

Page 1
The Movie what you really wanted to watch
The Music which is your favorite
The Photos which has your happy memories
TV Drama which you would never miss
Relax yourself wherever and whenever so far
Ultimate Digital Multimedia Player “Movie Clip”
Usseerr
U
Maannuuaall
M
MMooddeell QQSS--110000
Guuiiddee
G
Page 2

User Manual Guide Model: QS-
100
CONTENTS
1. Product Feature....................................................................................................................... 3
2. Safety Precautions .................................................................................................................. 4
3. Product Specification ............................................................................................................. 7
4. System Requirements (for PC) .............................................................................................. 8
5. Descriptions & Product Contents.......................................................................................... 9
5-1 QS-100 Description............................................................................................................ 9
5-2 Product Contents............................................................................................................. 10
6. Install HDD ............................................................................................................................. 11
7. Partitioning and Formatting Hard Disk ............................................................................... 12
7-1 Setting and Formatting on Windows 98/ME.................................................................. 12
7-2 Setting and Formatting on Windows 2000 / XP ............................................................ 16
7-3 Use on Linux (Available on Linux 2.4 or later).............................................................. 20
7-4 Use on Macintosh ............................................................................................................ 20
8. Connecting Video Cable....................................................................................................... 21
9. Connecting Audio Cable....................................................................................................... 23
10. Remote Controller ............................................................................................................... 24
11. Setting the SETUP Menu..................................................................................................... 27
12. Special Menu Setting .......................................................................................................... 30
13. Additional Functions........................................................................................................... 32
14. Main Screen Configuration................................................................................................. 33
15. Playing Movie ...................................................................................................................... 35
16. Playing Music ...................................................................................................................... 37
16. Playing Image ......................................................................................................................38
17. Using Virtual DVD................................................................................................................ 39
18. Firmware Upgrade............................................................................................................... 40
18. Firmware Recovery Mode................................................................................................... 42
19. Troubleshooting .................................................................................................................. 43
2
Page 3
User Manual Guide Model: QS-
100
11.. PPrroodduucctt FFeeaattuurree
QS-100 is a new type of entertainment device with 3.5’’ hard disk mounted inside. You can play various
multimedia data including video, music and image files saved in a PC by connection this device to PC
with USB cable.
● Used as a high resolution multimedia player by connecting to TV
(Optimization of firmware allows the highest operation speed in its class on the market)
● Used as a USB2.0 high-capacity portable storage device by being Connected to PC (NTFS/FAT32)
● Support digital TV-compliant component 480p, 720p, 1080i progressive Scan
● Optical output for digital 5.1 channel sound
● Virtual DVD function of playing high-resolution DVD file as clear as Original
● Persistent support for firmware upgrade at homepage.
3
Page 4
User Manual Guide Model: QS-
100
22.. SSaaffeettyy PPrreeccaauuttiioonnss
Please note the following precautions before use, Also, please pay special attention to additional
cautions marked [caution] in this User Guide
Proprietary Data
Proprietary contents such as software, sound sources and videos are protected under relevant laws
including the Copyright Act or Privacy Law using this product.
Codec support
This product does not support all the codec to play media files. Please confirm the kind of codec
supported. Also, even in case of supported codec, media files are not played as normal or are not in
normal operation depending on the characteristics of file or user environment.
Data Storage
Please keep data saved in this product in a separate safe place. We are not liable for any loss or damage
of stored data.
Use in Vehicle
Please use designated power adapter sold separately for use in a vehicle. As operation of this product may
distract your attention, do NOT use this product while driving. If this product is used when the engine is
stopped, it may not be operated as normal due to voltage difference and may lead to electric discharge of
the vehicle.
Impact
DO NOT impact or drop this product, which can lead to malfunction
Foreign Objects
Never push any metals such as coins and hair pins or flammable objects of any kind into this product,
which could result in circuitry malfunction or a fire,
Self-Service Prohibition
Do not break up, re-assemble or remodel this product by yourself, otherwise warranty would be in vain
4
Page 5

User Manual Guide Model: QS-
100
Loading
Do Not put heavy object on this product, this can result in damage to this product or person injury.
Water and Moisture
Do not let this product contact with water or liquids. If conductive liquids like water leaked into this products,
Immediately disconnect power and turn it off as that could result in a fire hazard or electric shock
Chemical Agents
Do Not use chemical agents or detergents, this could damage the surface of this product.
Heat
Do Not expose this device to heat or sunlight. Also, do not keep or leave it in high temperature for a long
time.
Magnets and Magnetic Force
Do not put this device near ant apparatus generating strong magnetic force this could lead to malfunction
or deletion of data inside.
Eye/Ear Protection
Watching TV for a long time or tuning the TV volume louder may cause vision or hearing damage
Fire
If abnormal phenomenon such as smoke or order is detected whie using this product, immediately turn the
power off, remove power adapter and ask for servicing.
Our Reach Of Children
Do not let infants or babies touch or suck this device and do not place it within the reach of babies or
children, there is a danger of personal injury
Power Supply Maintenance
Do not put a lot of power plugs at the same time and make certain that power is inserted tight.
Do not turn the power off while using and never forget to get rid of power adapter after use
5
Page 6
User Manual Guide Model: QS-
100
Any part of this user guide can not be copied in any form or by any means (including electrical copy,
mechanical copy, copy by copy machine, disk copy, ect.), reproduced or saved, introduced or
transmitted into search system without the written permission of Zioncom Technology Ltd.
Except rights expressly granted to the user by Zioncom Technology Ltd upon the use of this product,
supplying this document does not permit any license in relation to patent right, trademark right
copyright or other property rights
Microsoft Windows 98,window 98SE,Windows ME, Window 2000,Windows XP are registered
trademarks of Microsoft Corporation.
Zioncom Technology Ltd may modify the standard of hardware and software or other components in the
package to enhance the functionality of this product without prior agreement of individual users.
6
Page 7
User Manual Guide Model: QS-
100
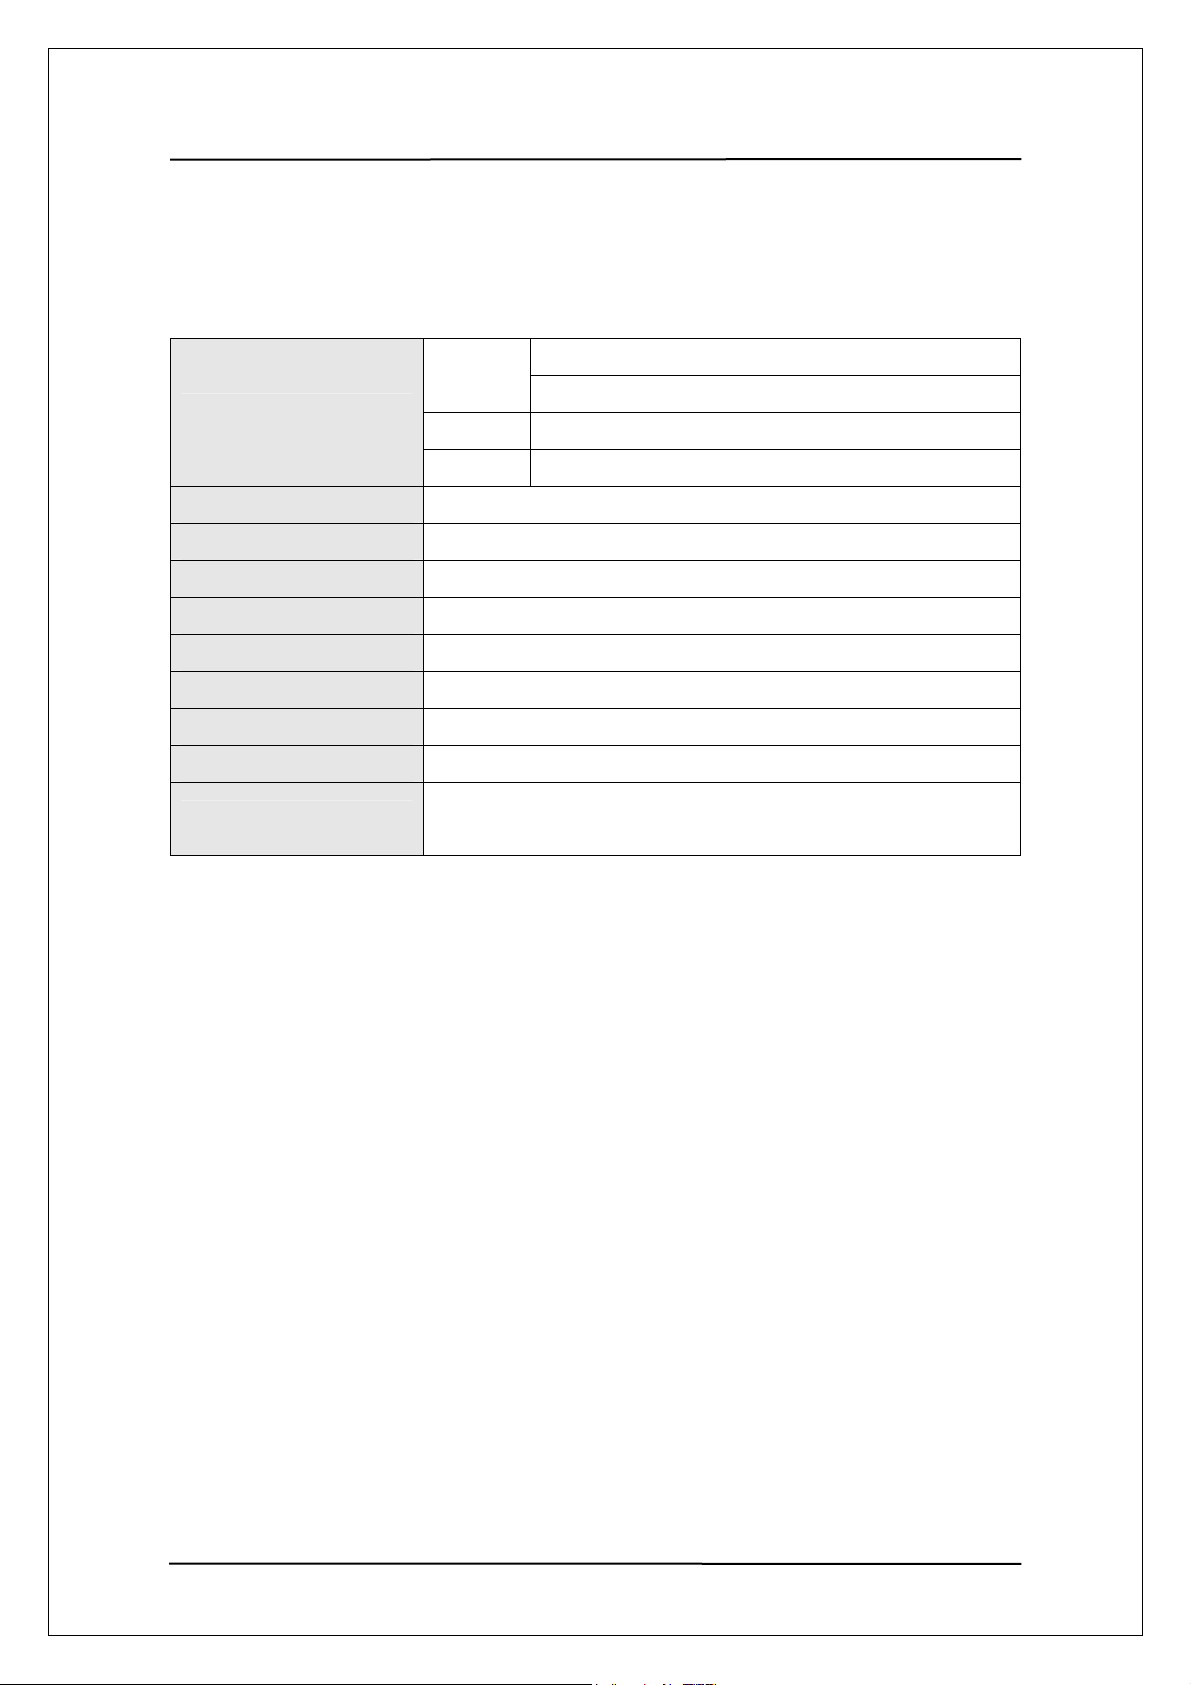
33.. PPrroodduucctt SSppeecciiffiiccaattiioonn
Specification
Movie
Supported File Formats
Video Output
Audio output
Interface
OS
File system
Dimensions
Weight
Temperature
Power Source
Music
Photo
S-video, Composite, HD Component (480p,720p,1080i)
2CH Analog, 5.1CH Optical (AC3, DTS).
USB2.0 (Device), USB1.1 Compatible
Windows 98 SE/Me/2000/XP or later, Linux, Macintosh
FAT32,NTFS
191x142.5x49(mm)
0.96kg
0~60
12V 3A AC/DC Adapter.(12V, 3A, or 12V, 2.5A )
Free Voltage(AC 100~240V,50~60Hz)
MPEG 1,2,4(MPG, MPEG, AVI, DAT, VOB, IFO, ISO)
Divx, Xvid (except GMC, Qpel optitions)
MP3, WMA, WAV, Ogg, Vorbis
JPEG
7
Page 8
User Manual Guide Model: QS-
100
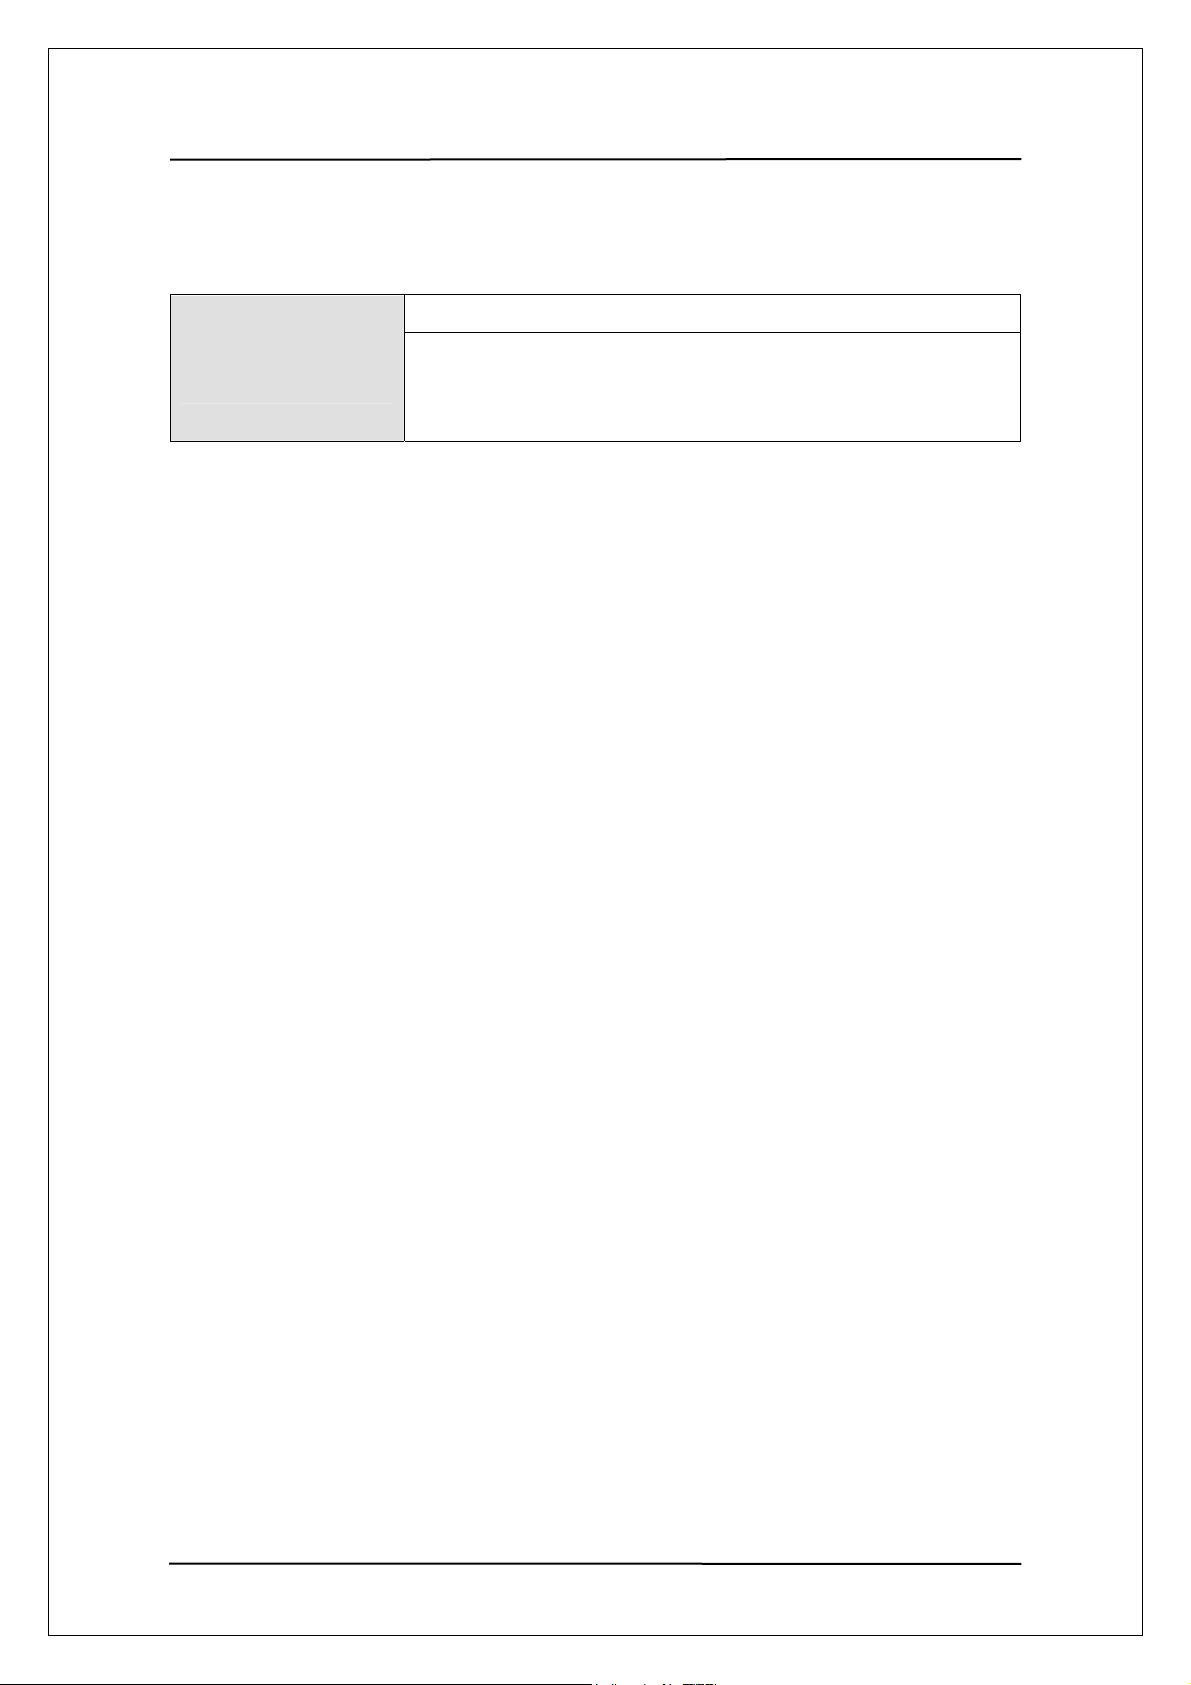
44.. SSyysstteemm RReeqquuiirreemmeennttss ((ffoorr PPCC))
-USB 2.0/USB1.1 Interface (USB 2.0 recommended)
PC Requirement for
USB Connection
-Operating System
Windows 98SE/ME/2000/XP,
Linux 2.4 or later, Mac OS 9.1 or later
8
Page 9
User Manual Guide Model: QS-
100
55.. DDeessccrriippttiioonnss && PPrroodduucctt CCoonntteennttss
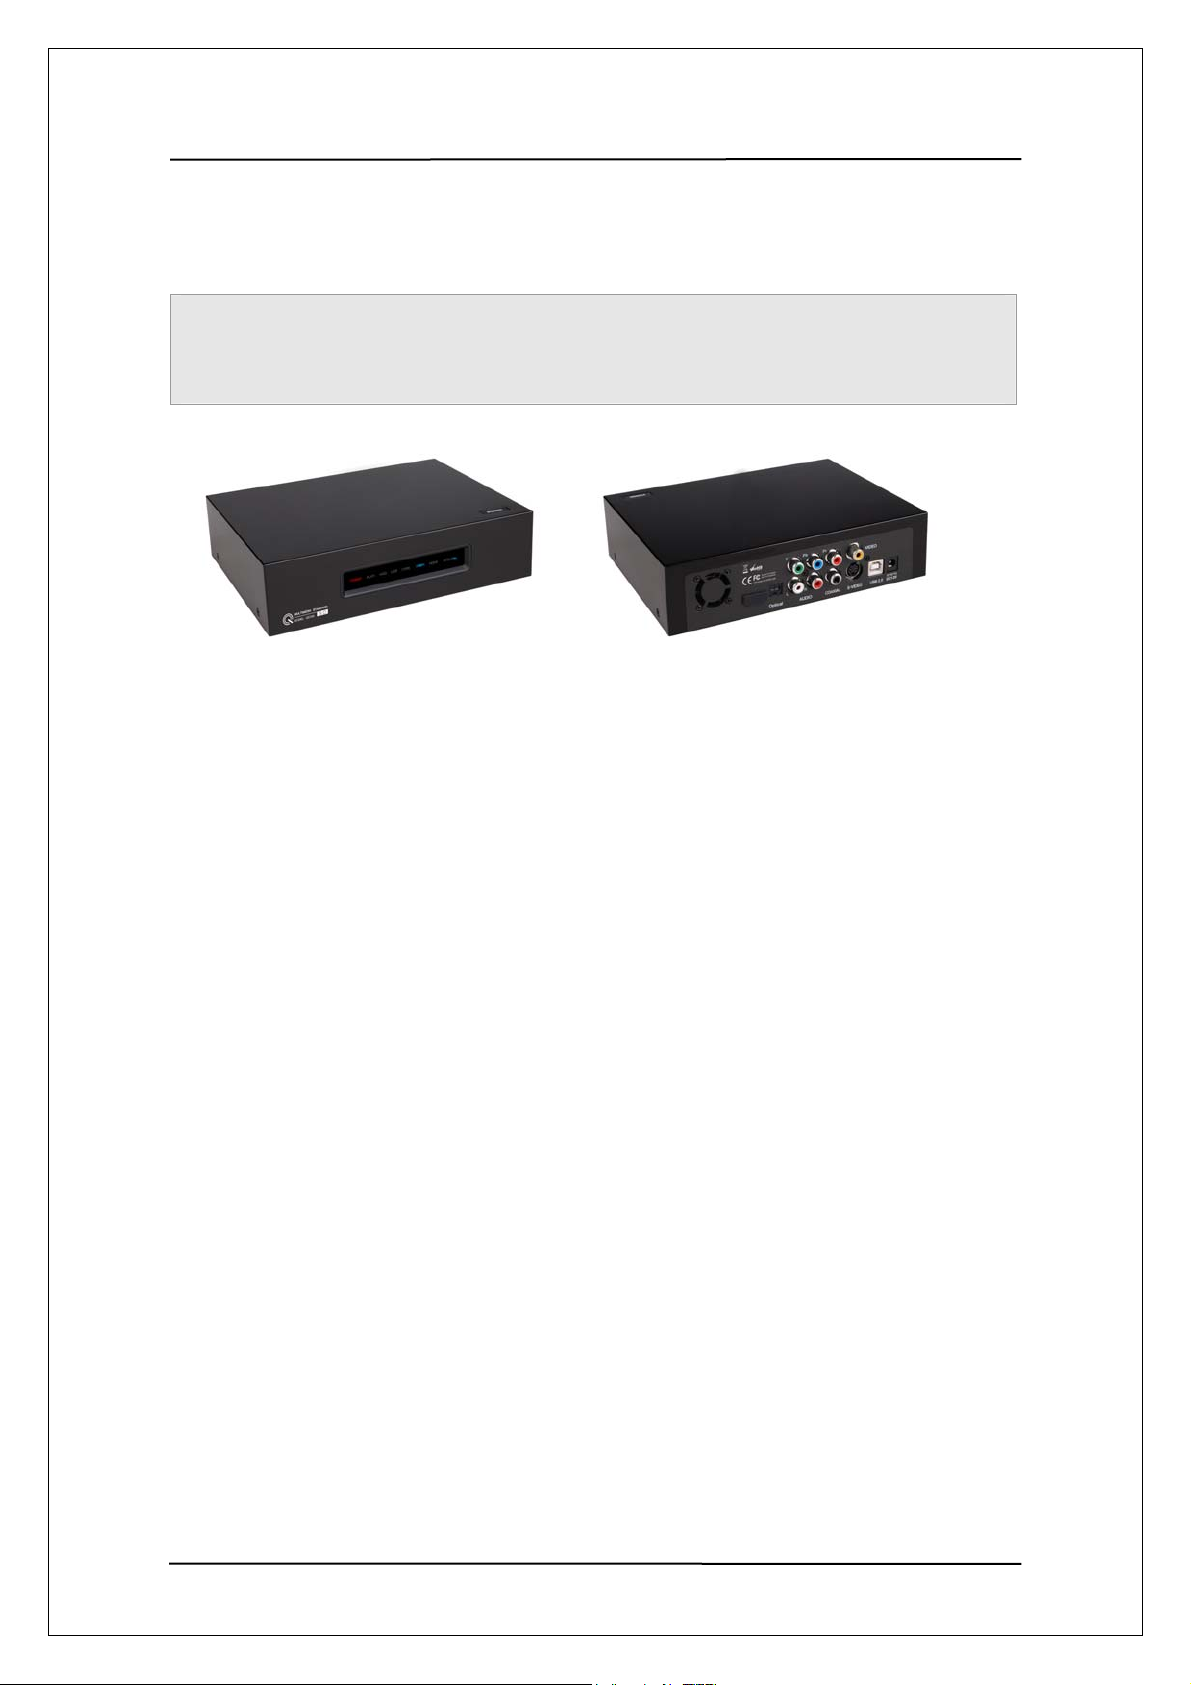
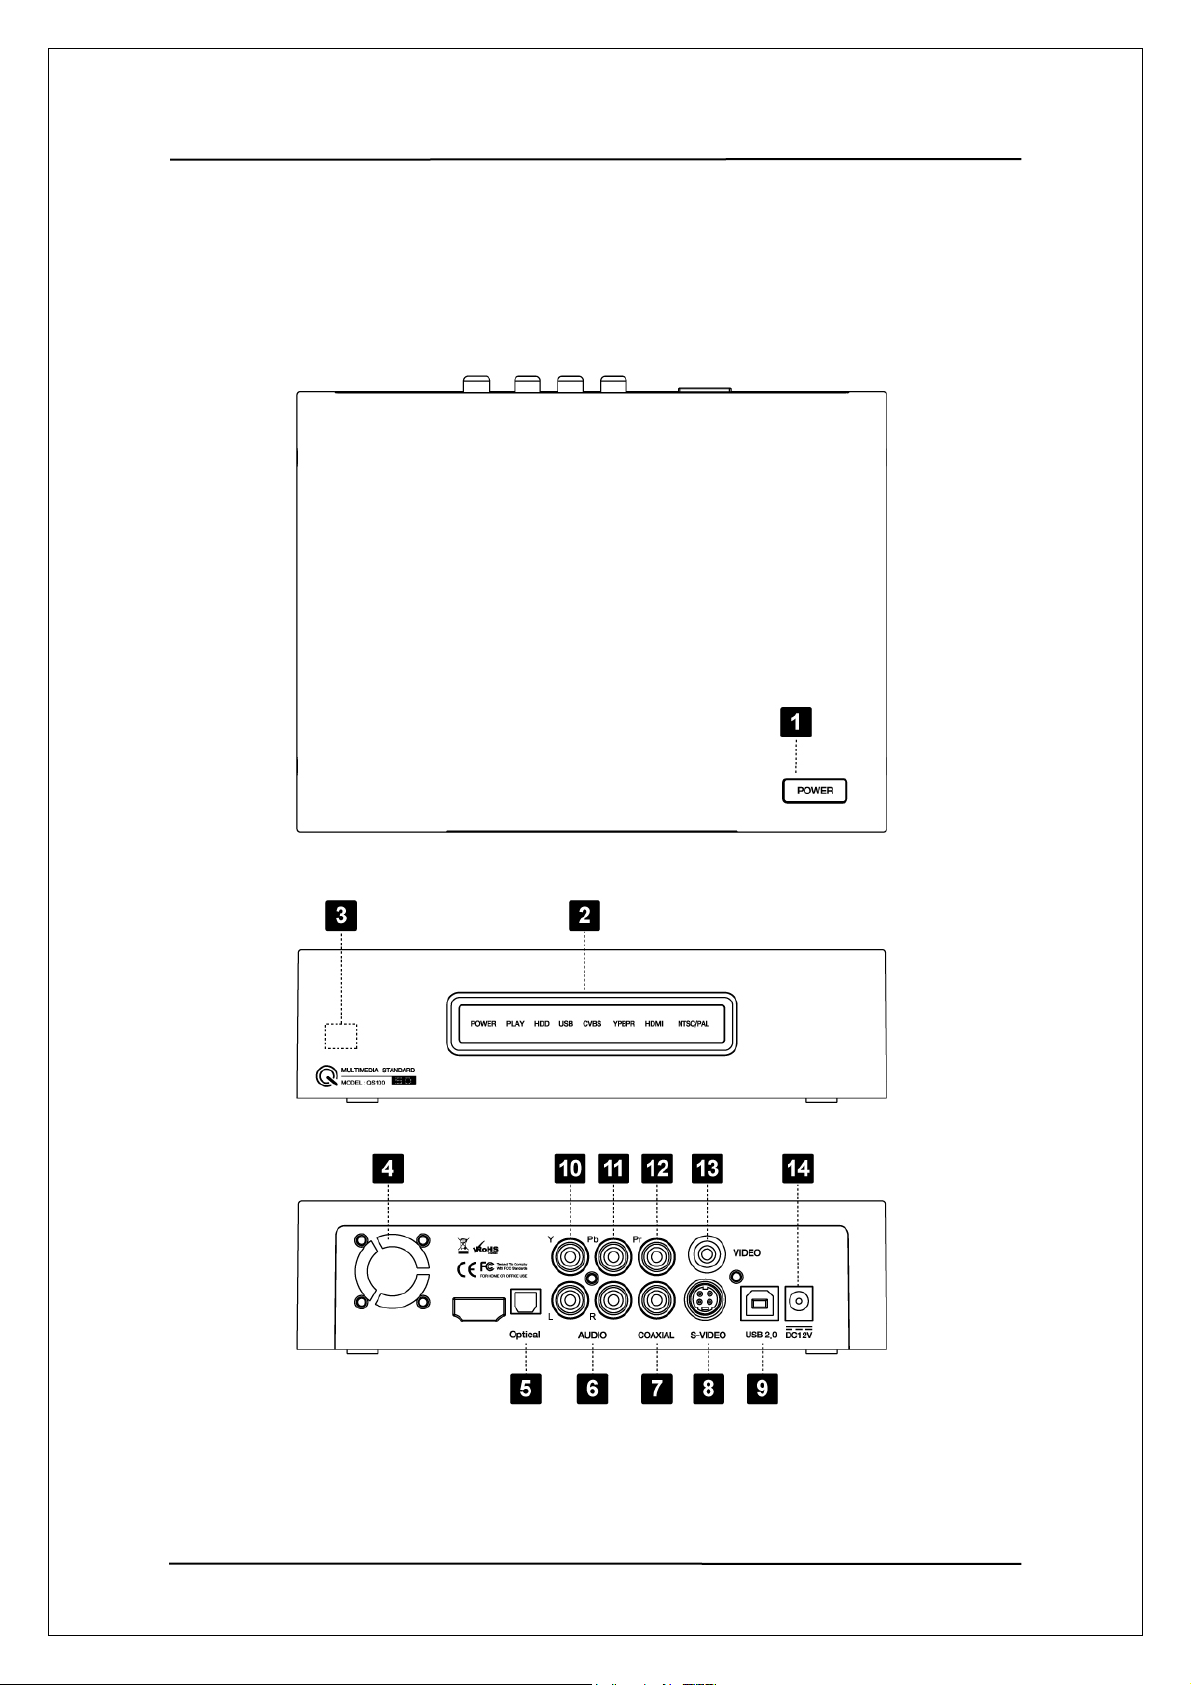
5-1 QS-100 Description
9
Page 10
User Manual Guide Model: QS-
100
1 Power
2 LED DISPLAY
3 Remote Control Sensor
4 Cooling Fan
5 Digital optical
6 Audio R / L
7 Coaxial
8 S-Video
9 USB port
10 Component Video Y
11 Component Video Pb /Cb
12 Component Video Pr/Cr
13 Composite Video
14 Power Connection jack
- Turns QS100 on and off
-Shows the player exactly working status
- Aim remote controller to this sensor
- Cools down HDD.
- Dusty cooling fan causes noises.
- Please clean this area often.
- Output for 5.1 channel sound for home theatre amps or
receiver which supports optical input.
- Connect digital optical cable to this output jack
- Right audio output of 2 channel audio
- Connect red audio cable to this output jack.
- Left audio output of 2 channel audio.
- Connect white audio cable to this output jack.
- Coaxial Cable Output of digital audio
- Connect S-Video cable to this output jack.
- USB 2.0 port is used to connect to a PC.
- Connect green component cable to this output jack.
- Connect blue component cable to this output jack.
- Connect red component cable to this output jack.
- Standard video output. Connect yellow video cable to
this output jack.
- Connect provided 12V adaptor or optional car cigar adaptor to
this jack.
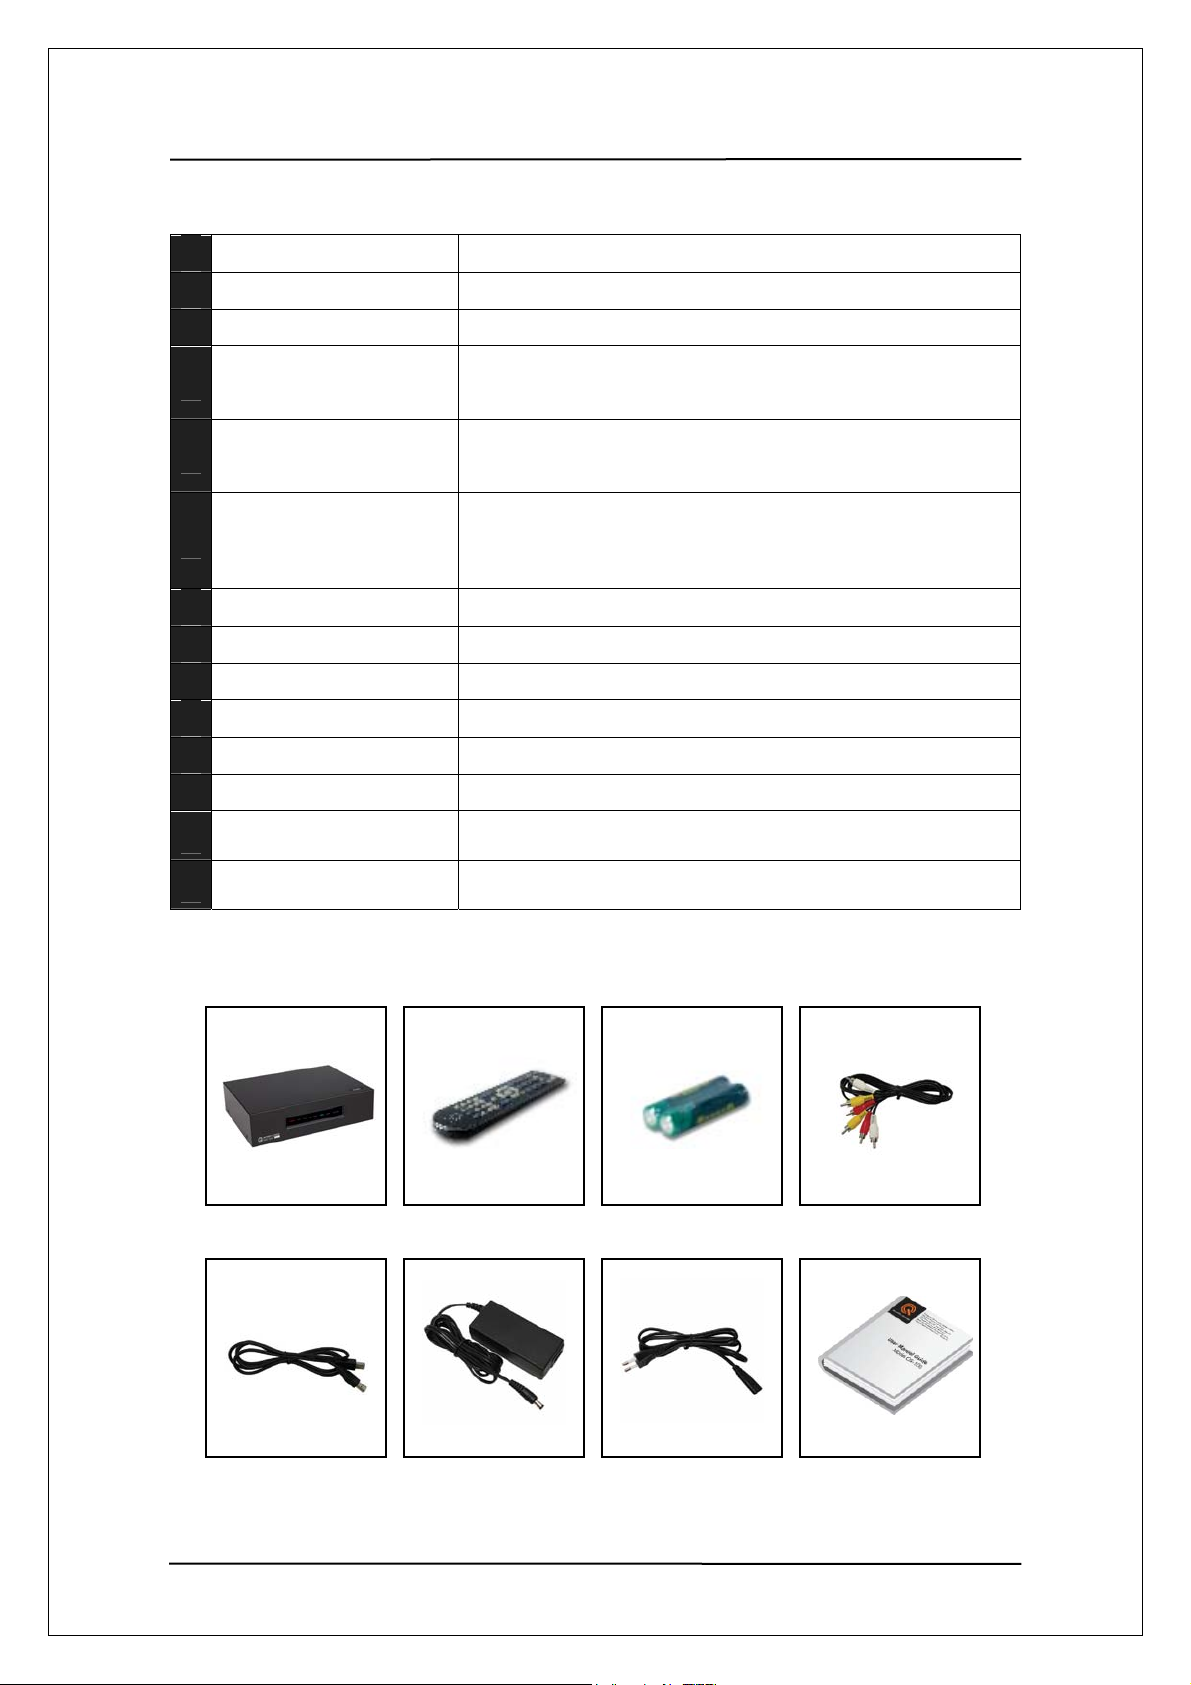
5-2 Product Contents
QS100 Remote Controller Battery(AAA*2) A/V Cable
USB Cable Power Adapter Power Cable User Guide
10
Page 11
User Manual Guide Model: QS-
100
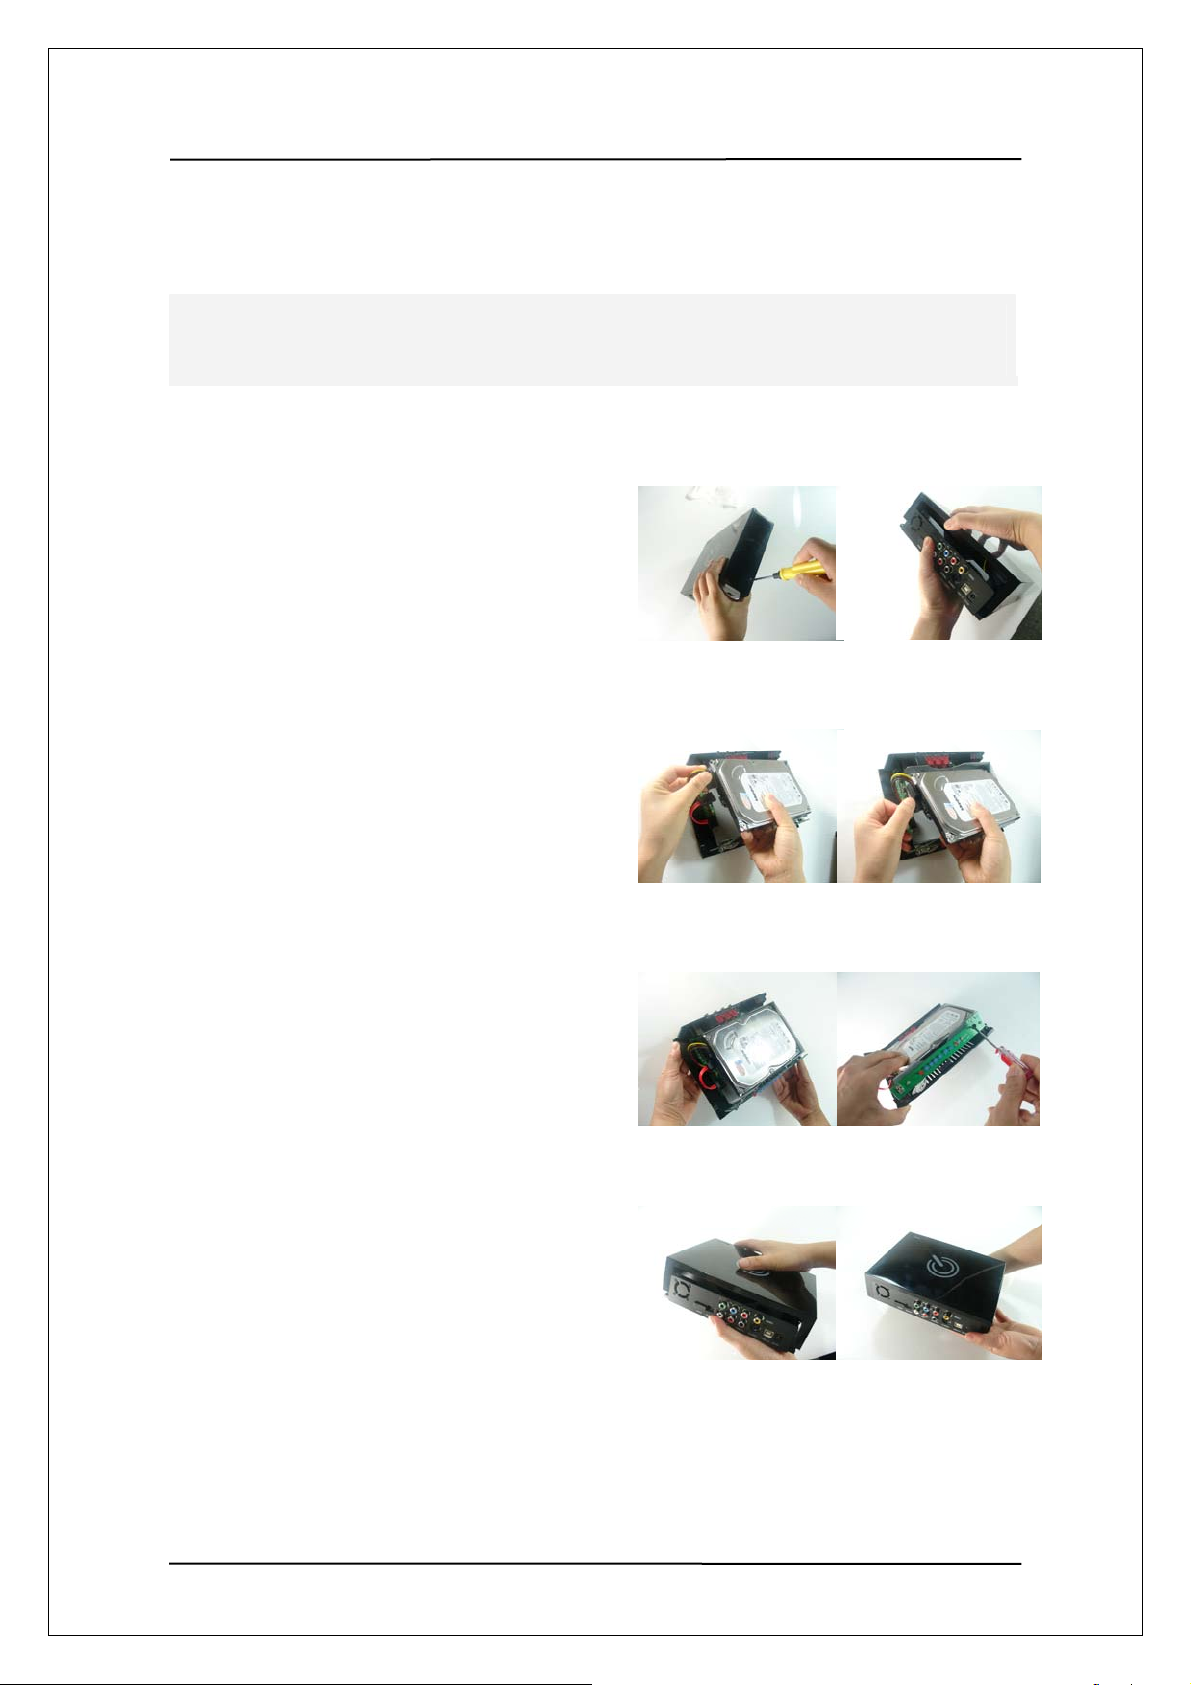
66.. IInnssttaallll HHDDDD
● Follow following step-by-step instruction to install a HDD, It is not as hard as you think, just follow
the steps slowly.
1. Unscrew the screws on both side of QS100
Use a screwdriver to unscrew the screw.
2. Open the topper cover
As showed in the picture, after doing step1,
you can open the topper cover of QS100 easily.
3. Inside picture after open
Picture shown is inside of QS100 after
open the topper cover.
4. Picture after HDD is connected
Gently place the HDD into the QS100 as shown
in the picture.
5. Screw the HDD holding screws
After HDD is placed in the QS100 properly,
screw the HDD holding screws as shown in the picture
6. Close the topper cover
When you close the topper cover, again, use a
screwdriver to screw the screws back in.
11
Page 12
User Manual Guide Model: QS-
100
77.. PPaarrttiittiioonniinngg aanndd FFoorrmmaattttiinngg HHaarrdd DDiisskk
Non-formatted hard disks are not detected by PC. If the hard disk is not formatted, please take the
following steps to format it. Newly purchased hard disks are not normally formatted
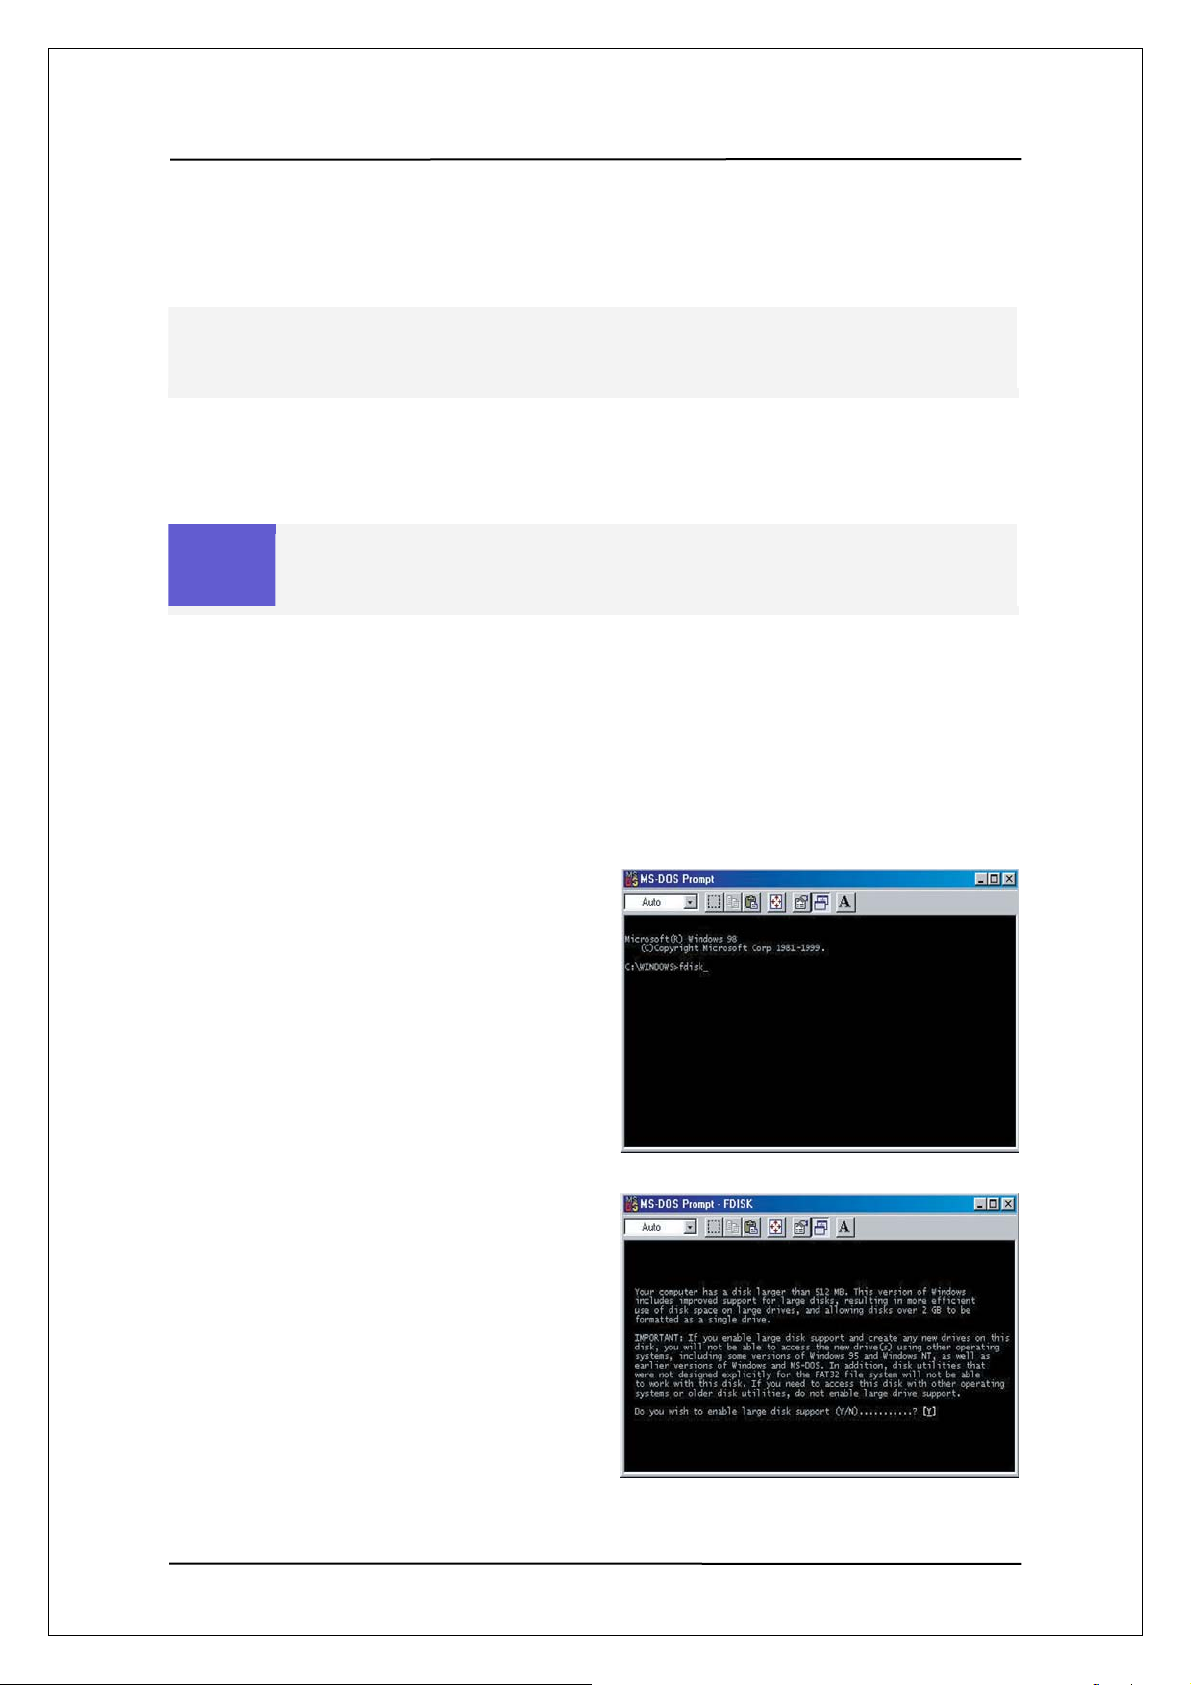
7-1 Setting and Formatting on Windows 98/ME
Caution
1. Install exclusive driver and then connect
QS100 to PC using USB cable
2. Select Window [Start>Program>MS-DOS]
to open and MS-DOS window.
In Windows 98SE, install and exclusive driver before proceeding to partition and
formatting. In windows ME/2000/XP, there is no need to install exclusive driver
3. Type fdisk command in MS-Dos window
and press the [Enter] key.
4. Say yes to enable large disk capacity by
typing “Y” and then press the [Enter] key.
12
Page 13
User Manual Guide Model: QS-
100
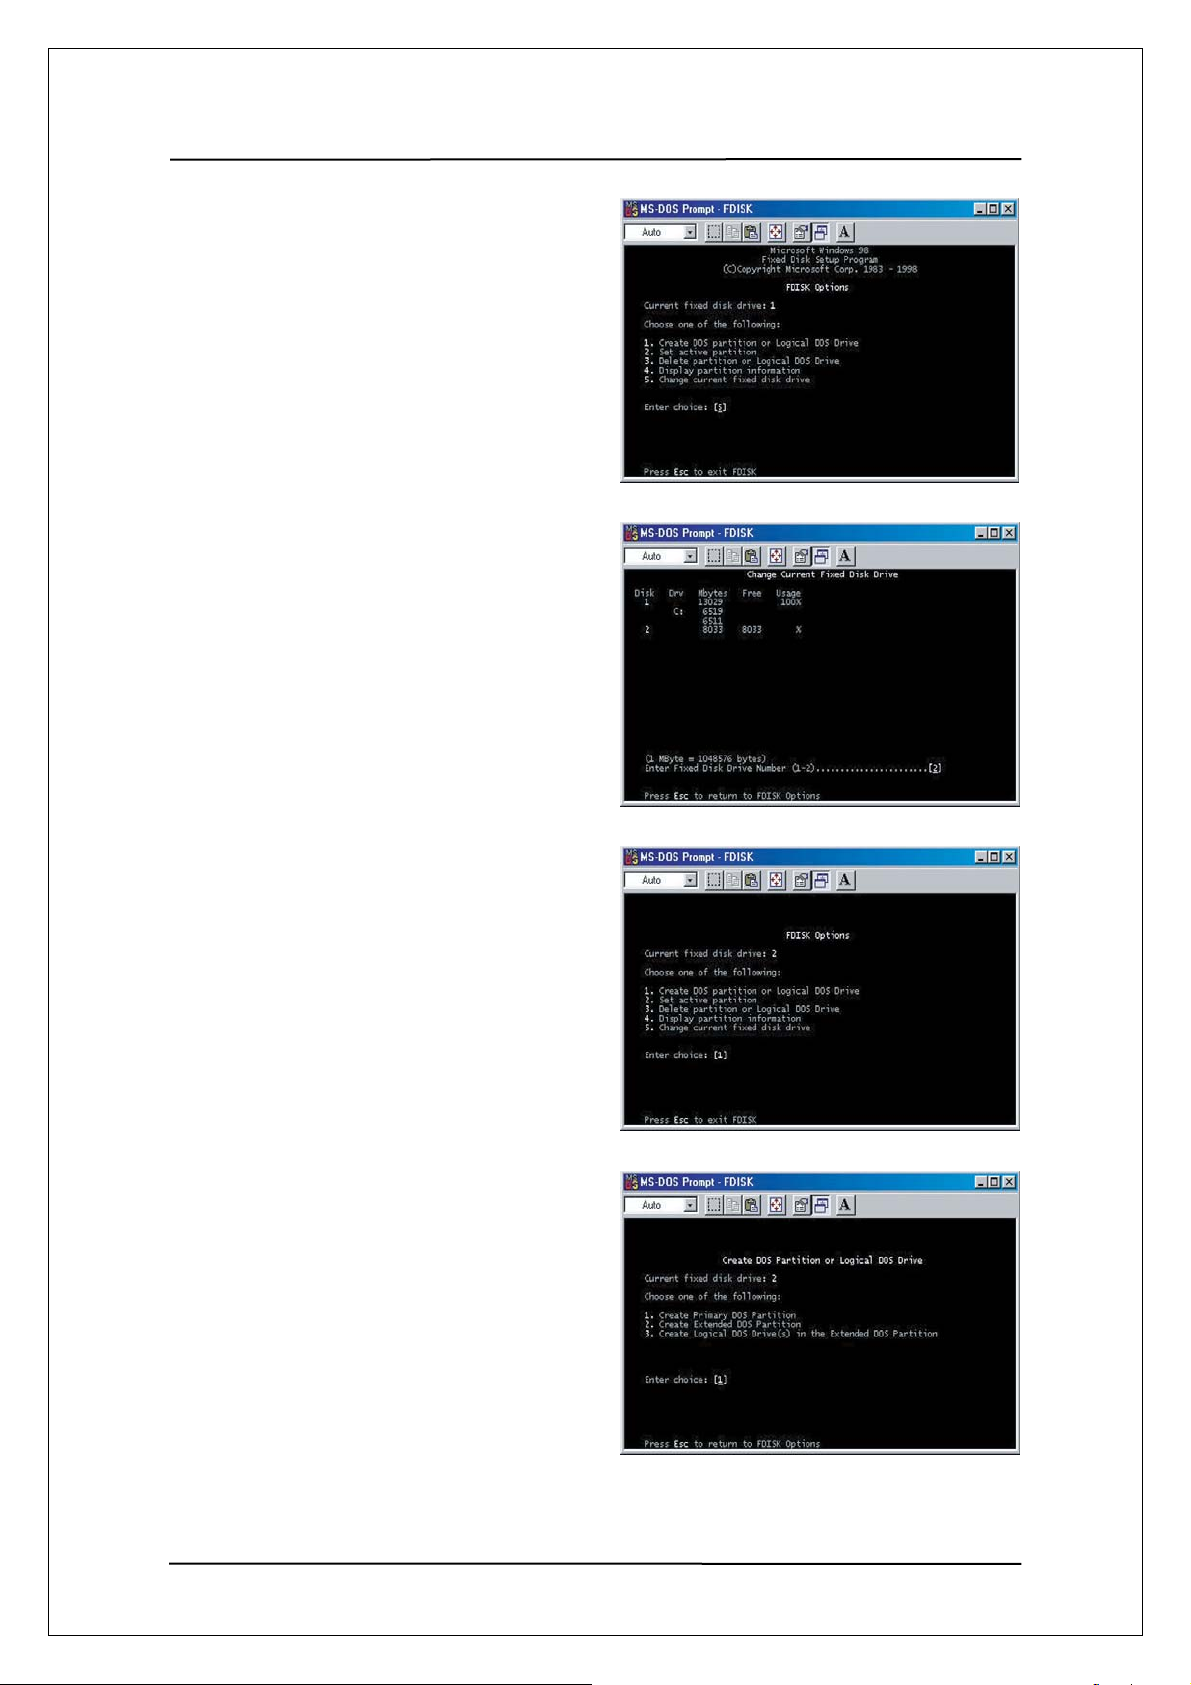
5. Among fdisk options, select options
5[change current fixed disk drive].
6. Type the hard disk number fro partitioning in
[Enter Fixed Disk Number] and press the
[Enter] key
7. Select [1.creat DOS partition or Logical DOS
Drive] in fdisk options by typing “1” and then
press the enter key
8. Select [1.Creat Primary DOS Partition] in
‘Create DOS Partition or Logical DOS Drive’
by typing “1” and then press the enter key.
13
Page 14
User Manual Guide Model: QS-
100
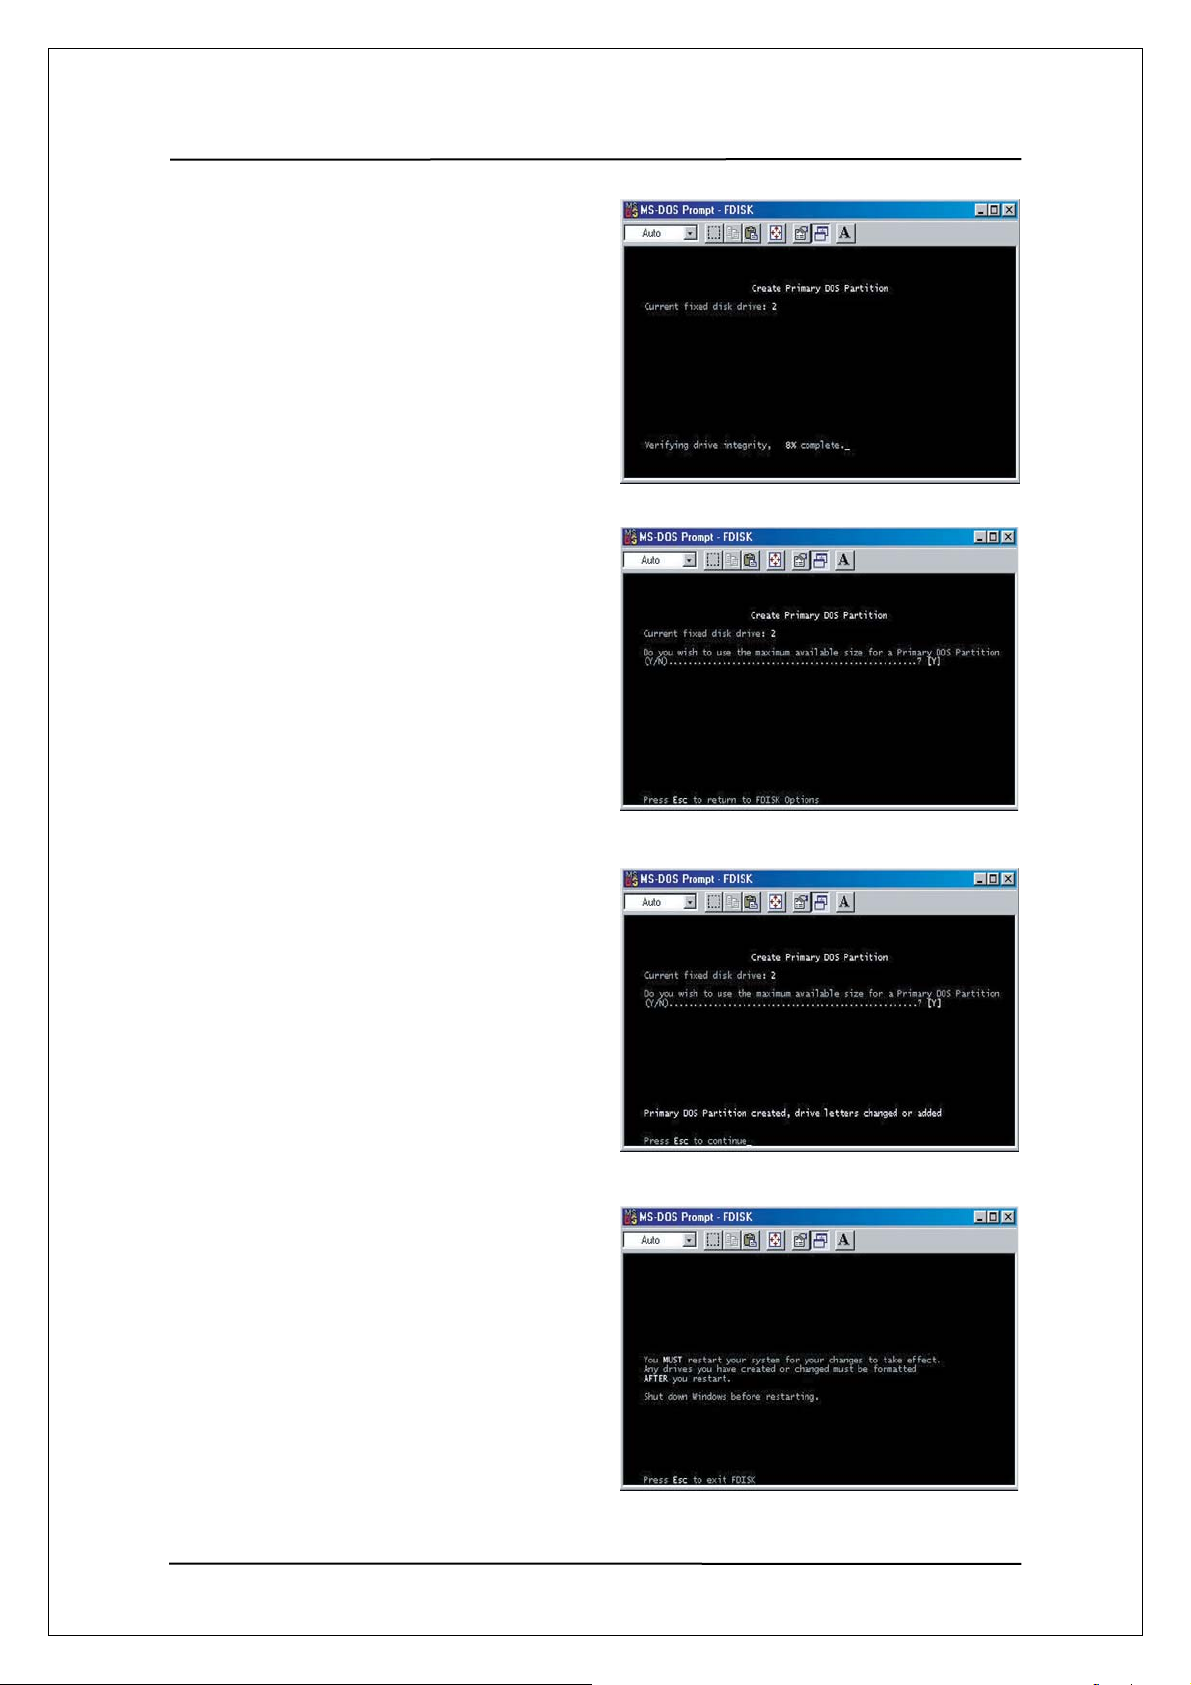
9. Wait for integrity check to be complete
as below
10. After integrity check, say yes to the message
‘Do you wish to use the maximum available
Size for a primary DOS partition and make the
Partition active( Y/N)?
By typing “Y” and press the enter key
11. Type in [capacity or % you want] and press the
enter key. If you want to use one disk
without partitioning. Type 100%.
12. Integrity check is started again. After it is
completed, A message saying Primary Dos
Partition was created, drive letter was modified
or added is displayed.
Then, press [ESC] to return to fdisk options
13. In fdisk option screen, press [ESC].
Then a message is displayed, saying that
your must restart your system.
Press [ESC] again.
14
Page 15

User Manual Guide Model: QS-
100
14. At hen C:\WINDOWS> prompt, type exit
and then press[ENER] to return to window
screen.
15. Disconnect QS100 from PC and then connect
it again to PC.
16. Drive letter s created in [My Computer] of
Windows Explorer.
Right-click the created drive letter and select
[Format].
17. When formatting is completed , you can use
QB100 as an external hard disk drive by connecting
it to Computer.(I change it based on my comprehension)
For some hard disks, power supply from USB port is not enough for operation, in this
case, connect a separate power supply using the adapter supplied in the package. Then,
no problem will be experienced in operating the device connected to a PC.
Caution
For recently released PCs, there is a USB port installed on the front side of the PC for
users’ convenience. However, this expanded USB port sometimes fail to recognize
devices sending and receiving data in high speed such as external hard disk. In this case,
use the USB port in the rear side of the PC
15
Page 16

User Manual Guide Model: QS-
100
7-2 Setting and Formatting on Windows 2000 / XP
Non-formatted hard disks are not detected by PC. If the hard disk is not formatted, please take the
following steps to format it. Newly purchased hard disks are not normally formatted
1. Connect QS100 to a PC using a USB cable
2. Select [Start> Control Panel>management
Tool>Computer Management] and then
[Disk Management] under Computer Management
menu.
3. Click [Next] to continue when write Signature
and Disk Upgrade Wizard appears
4. Select the disks you want to write a disk signature to
and Click [Next] to continue
5. When Write Signature and Disk Upgrade Wizard
is completed, Click [Finish]
6. Right-click an [Unallocated] drive in Drive Management
and select [New Partition] from the menu that appears.
7. When the New partition Wizard is shown,
Click [Next] to continue
16
Page 17

User Manual Guide Model: QS-
100
8. Select [Primary Partition(P)] and Click [Next]
to continue
9. Enter the desired partition size in [Partition size in MB]
and Click [Next] to continue.
10. When the [driver letter] is assigned, Click [Next]
11. In the format partition windows, select
[format this partition with the following settings] and
FAT32, and then check [Perform a quick format] box.
Click [Next] to continue.
12. When [Completing the New Partition Wizard]
appears, Click [Finish]
17
Page 18

User Manual Guide Model: QS-
100
13. A new NTFS partition was created.
14. Right-click an [Unallocated] drive in Drive
Management and select [New Partition] from
the menu that appears.
15. When the New partition wizard is shown
Click [Next] to continue.
16. Select [Primary Partition(p) and Click [Next]
to continue.
17. Leave the value for [Partition size in MB]
as if appears and Click [Next] to continue.
(The partition size shown is the remaining
hard disk size unallocated.)
18. When the [drive letter] is assigned,
Click [Next]
18
Page 19

User Manual Guide Model: QS-
100
19. In the format partition windows select
[Format this partition with the following settings]
and NTFS, and then check [Perform a quick format]
box, Click [Next] to continue.
20. When [Completing the New Partition Wizard]
appears, Click [Finish].
Caution
Drives formatted with NTFS file system are detected on windows 2000/XP,
but not detected on Windows 98/ME.
Do not select to use [Compressing Files and Folder] option.
If the specification file system is FAT32 on windows 2000/XP, it is not possible
to have one drive letter on large hard disk over 32GB. In order to have one partition,
please perform partitioning and formatting on windows 98/ME.
Also, select [Primary Partition] to have multiple partitions on large hard disk over 40GB.
If [Extended Partition] is selected, drives may not be detected.
19
Page 20

User Manual Guide Model: QS-
100
7-3 Use on Linux (Available on Linux 2.4 or later)
[Auto Mount]
After booting , log in as a root user. Connect this product and turn the power on .Confirm whether this
product's partition is detected using the partition tool, fdisk.
Make a mount pointer, for example, QS100, in folder mount ( / mnt)and edit / etc / fstab /
to add the following:
/ dev / sda1 / mnt / QS100 vfat nosuto, user 0 0 -> for HDD formatted with FAT32
/ dev / sda1 / mnt / QS100 ntfs nosuto, user 0 0 -> for HDD formatted with NTFS
You can use after log in again.
[Manual Mount]
Create mount pointer in the same way as above and then mount this product by typing as follows:
Mount -t vfat / dev / sda / mnt / QS100 -> for HDD formatted with FAT32
Mount -t ntfs / dev / sda / mnt / QS100 -> for HDD formatted with NTFS
A. it is assumed that QS-100 is detected as sda in the example above .Drive name
Note
[How to Stop Using QS-100]
You can unmount QS-100 in Device Manager.
may subject to change depending on user environment .Please type the name of
drive detected by USB Mass Storage.
7-4 Use on Macintosh
As this product is automatically detected on Macintosh O/S 9.X or later, there is no need extra drivers.
When stop using this product on Macintosh, discard the corresponding Desktop icon into Trash Bin and
disconnected this product from USB port..
20
Page 21

User Manual Guide Model: QS-
100
88.. CCoonnnneeccttiinngg VViiddeeoo CCaabbllee
1. Connect to TV using Composite cable
Connected a yellow (Video) cable, red and white(audio) cables to the same colored jacks located on
either rear or front of your TV. And the other end of the cables to the same colored jack of the QS-100.
Yellow (CVBS)
Connect to Yellow
port
Yellow (CVBS)
Connect to Yellow port of TV
Turn on the TV, and select the appropriate input.
Since QS-100 provides various connected methods, choose the right one for your TV.
Use of supplied cable is highly recommended.
2. Connect to TV using S-Video cable
Connect to
S-Video port of
QS-100
Connect to
S-Video port of TV
21
Page 22

User Manual Guide Model: QS-
100
Connect an S-video cable from S-Video output jack of QS-100 to S-Video input jack of your TV.
Audio signals should be connected separately using analog audio cable.
S-Video cable is not supplied with QS-100 package.
3. Connect to TV using Component Cables
Connect component video output (Y-Green,Pb-Blue,Pr-Red)to the colored component input jacks on
the back of your TV. Audio signals should be connected separately using analog audio cable.
Resolution of the screen can be selected among 1080i, 720p, and 480p depends on your
TV's capability.
Component cable is not supplied with QS-100 package.
Connect to Pr, Pb, Y
port of QS-100
Red (Pr)
Blue (Pb)
Green (Y)
Connect to Pr,Pb,Y
port of TV
Green (Y)
Blue (Pb)
Red (Pr)
22
Page 23

User Manual Guide Model: QS-
100
99.. CCoonnnneeccttiinngg AAuuddiioo CCaabbllee
1. Connect 2 Channel Audio
Connect to Red and
White port of QS-100
Connect red and white audio cables from QS-100 to same colored input jack of TV or audio device.
Connect to Red and
White port of TV
Red (Stereo-R)
White (Stereo-L)
Use of supplied audio cables is highly recommended
2. Connect Digital optical Cable
For those audio device which has digital optical input jack.QS-100 makes you to enjoy 5.1ch audio as
if you are in a theatre. As show in the picture. Connect optical cable from digital optical output jack of
QS-100 to the digital optical input jack of your audio device.
Connect to
Optical port of
QS-100
Connect to Optical port
of A/V Receiver
Optical cable is not supplied with QS-100 package.
23
Page 24

User Manual Guide Model: QS-
100
1100.. RReemmoottee CCoonnttrroolllleerr
24
Page 25

User Manual Guide Model: QS-
100
1 Power
2 VIDEO
3 MUSIC
4 PHOTO
5 SETUP
6 FUNCTION
7 MUTE
8 GOTO
9 Play/Pause
10 STOP/BACK
Switches on and off
Indicate the movie file in the frame
Indicate the audio file in the frame
Indicate the photo file in the frame
You can return to QS-100 environment setting menu by pushing this button
while DVD playback is stopped
Special Function Menu Button
Temporarily silence the audio
Skips to the point of time you want to view from current time during playback.
Type the point of time using arrow keys or numerical buttons and push the ok
button to proceed
Start or pause playback of video, music or images.
All files in a folder are played sequentially. If the folder has a sub-
Note
Stops playing video, music or image. If this is pushed on the main screen .you
will return to the upper level folder.
folder in it .files in the sun-folder are also played repeatedly without
limit before being stopped playing .For image, use the play button for
slide show
11 Ok
12 Arrow keys
13 VOL
14 SYNC
15 LIST JUMP
16 SEARCH
17 SKIP
Used the select menu option or to play video, music or images.
When the ok button is used, files in folder are played and then are
Note
Selects an option in the menu.
Also perform the following function when playing a video.
UP/Down Keys
Right / Left Keys
Controls volume
Used to adjust subtitle synchronization timing when while playing a video. You
can adjust the synchronization timing by 1second upon pushing this button
file list page move to forward
Searches the video file forward or backward with quick. Search speed is
increase or decreased 2,4,16,or 32 times upon pushing this button
Skip to next chapter or track during playback. When used on main screen, file
list is skipped by page.
stopped playing. Also, if there is a problem with images or
synchronization between image and audio during playback, just press
this button then the video refreshes and the problem is fixed.
move the position of subtitle
Video: Skip by 30seconds
Music: Skip by 5 seconds
image: Rotate images
25
Page 26

User Manual Guide Model: QS-
100
Modifies subtitle setting
18 SUBTITLE
19 AUDIO
20 MENU
21 TITLE
22 ZOOM
23 SCROLL
24 ANGLE
Push once to change
the size of subtitle
Push twice to elect
integrated subtitle.
Selects an audio language for video which includes two or more audio
language
Accesses menu on a DVD disk
Display title menu when playing a DVD
Enlarges or reduces DVD Video images
Push Once
Push Two
Push Three
Push Four
Moves the location of arrow keys. Please push the ok button after location
moving is completed
Modifies camera angle during playback of a DVD(only for multi-angle titles)
Push once to adjust zoom percentage and press OK.
Push twice to convert to full screen mode.
Push three times.
Push three times to perform pan-and-scan.
Push four times to turn off the zoom function.
Make changes using up and down arrow keys
If the subtitle provides two or more languages, push
this button twice or more to select to display subtitle
in other languages.
25 INFO
26 BOOKMARK
27 REPEAT
28 PICTURE
29 TV OUT
PASSWORD
0
“0”
Display information of the file being played on screen
Searches the end point of playback of a file that was stopped playing
Previously and then continues to play from that point.
Set the title, file, folder repeat
Adjust contrast, brightness and color or DVD images .you can display these
options sequentially by pushing the button repeatedly and make selection
using left /right arrow keys
Modifies TV out put supported by QS-100 sequentially.
If your TV screen fails to show images, please push this button slowly .
As there are seven TV output modes, you will get images by pressing the
button less than eight times.
Assigns a password to folder, you can cancel the password by typing 0000 in
the new password entry.
First, you need to open the folder you want to assign a password to.
Note
You can not assign a password to the selected folder using a selection
bar. If you enter disk and assign a password during initial drive
selection, it is assigned to disk drive.
26
Page 27

User Manual Guide Model: QS-
100
1111.. SSeettttiinngg tthhee SSEETTUUPP MMeennuu
See below for the SETUP screen of QS-100.Menu options indicated in white on the left are setup
options. Yellow item in the center are current settings. Items in white box on the right are values that can
be set in the current menu option. [Default language is English]
● Available options for each menu option are as follows .
1. Audio Output
Analog /DPCM
Outputs stereo audio signals through two analog channels.
For QS-100 model, DTS-encoded sounds are output through 2-channel stereo down –mix
Encode Digital
Outputs digital audio signals through optical output terminal.
Used to connect to receiver using optical output.(In this case, analog output is disabled.)
27
Page 28

User Manual Guide Model: QS-
100
2. Video Output
NTSC
Outputs NTSC composite video signals
PAL
Output PAL composite video signals
NTSC 480i
Output NTSC composition video signals and 480i component signals
PAL 576i
Output PAL composite video signals and 576i component signals
480P
Outputs component 480P progressive signals. Do not support composite output.
720P
Outputs component 720P progressive signals . Do not support composite output.
1080i
Output component 1080i interlace signals . Do not support composite output
3. TV Type
4:3 Letter box
Vertical radio is preferentially adjusted with the screen in the format. display theatrical images
with masking bars above and below the picture.
4:3 Panscan\
Horizontal ratio is preferentially adjusted with the screen in this format. Displays picture cropped
to fill your TV screen. Both side of the picture are cut out.
16:9
Outputs video images in the screen ratio of 16:9
4. Slide Show Duration
1, 2, 3, 4, 5, 10, 20, 30 Seconds
Set time interval for slide show in the playback of JPEG image file. Push the [Play/pause] button
to start side show in which image files are shown on screen for designated time period sequentially.
28
Page 29

User Manual Guide Model: QS-
100
5. Subtitle Font Size
Large Subtitle
When playing video with subtitle, subtitle are indicate in large letter.
Small Subtitle
When playing video with subtitle, subtitle are indicate in small letter.
Hide Subtitle
When playing video with subtitle, do not display subtitles on screen.
6. Subtitle Color
Letter Color/Border color
Choose from white –black / yellow –black / Blue green-black / white-blue / Yellow-blue
and Blue Green Blue.
7. Language
English
SETUP screen and various Uls are shown in English
Korean
SETUP screen and various Uls are shown in Korean
8. Setting LCD
Choose from standard/Rotate 90°ccw/Rotate 90°cw
9. Load Factory Defaults
Return all setting to factory default values
10. Firmware version
Indicate the version of Firmware.
29
Page 30

User Manual Guide Model: QS-
100
1122.. SSppeecciiaall MMeennuu SSeettttiinngg
Press the "f1"button on remote under the selection of partition or file list. With the button,
It will execution or end. You may use "ok" button for returning from Special Menu.
Setting is using by an arrow button of Up/Down and Left/Right.
● Special Function setting
1. User Background
1) Copy the file to the rot directory of the first partition and make the file name to "mybgfile.jpg".
2) Press the "FUNCTION" button and select the "User Background "with "User"
3) Press the "OK" or "FUNCTION" to finished
4) You may see the screen nominated.
Note
The image size is recommended "720×480" and no distinction a capital and a small letter.
30
Page 31

User Manual Guide Model: QS-
100
2. Auto Run
1) Make the folder named "Autoplay" of the first partition.
2) Save some music files into the folder.
3) Press the "FUNCTION" button and select the “Auto Run " with "Use"
4) Press the "OK" or "FUNCTION" button to finish.
5) You may automatically listen to all of music in the Autoplay folder whenever booting including
sub-folder
3. Music Photo Slide
1) Make the folder named "Bgslide" of the first partition.
2) Save some JPG files into the folder.
3) Press the "FUNCTION" button and select the "Music
Photo Slide" with "Setup Value" or "Each song"
4) Press the "OK" or "FUNCTION" button to finish.
5) Whenever you listen to music, you may
Using the Music Photo Slide function
Note
Press 1time to the Audio Button : Disappear the time
4. Slide Show Effect
1) Press the "FUNCTION" button and select the “Slide Show Effect” with “Use”
2) Press the “OK” or "FUNCTION" button to finish.
3) You may see the pictures applied
5. Music Photo Slide
1) Make the folder named “Bgmusic” of the first partition
2) Save some music file (mp3, wma, ogg, wav) into the folder
3) Press the "FUNCTION" button and select the “ Background Music” with “Use”
4) Press the “OK” or "FUNCTION" button to finish.
5) Whenever you listen the photos, you may automatically see the background music
6. Outline of File Lists
1) Press the "FUNCTION" button and select the “Outline of File Lists” with “Use”
2) Press the “OK” or "FUNCTION" button to finish
3) Effected outline for easy reading
31
Page 32

User Manual Guide Model: QS-
100
1133.. AAddddiittiioonnaall FFuunnccttiioonnss
● Additional Functions Setting.
1. Multi Subtitle
When you press the SUBTITLE button 2 times while playing some movie, it shows "SUBTITLE
FONT SIZE & SUBTITLE LANGUAGE".
You may change the SUBTITLE options with an arrow button of Up/Down.
2. Audio Multiplex
When you press the "FUNCTION" button while playing some movie, you may change the
Audio Multiplex Mode.
The mode are changed the following order Left/Right/Mixed/Stereo. If the two channel audio has
different audio of language, you may listed to by this function.
3. Password for folder
Assigns a password to folder. You can cancel the password by typing 0000 in the new password entry.
-First you need to open the folder you want to assign a password.
-You cannot assign a password to the selected folder using selection bar
- If you enter disk1 and assign a password during initial drive selection, it is assigned to disk 1 drive
Note
4. M3U Play List
Using Winamp, you can make M3U file. M3U file is play list that you'd like to listen and watch.
You can use "Random play" or "Normal play".
5. Move to the position that you want to, easily
When you press the "SYNC <, >" button anything, you can see the box "0000". By this time, you
input the figure that you'd like to move to and press the "OK" button. And then, it will be moved
directly.
Don't forget the password!
It can be working to the Music and M3U list.
32
Page 33

User Manual Guide Model: QS-
100
1144.. MMaaiinn SSccrreeeenn CCoonnffiigguurraattiioonn
QS-100 provides simple and intuitive user environment .All files that can be played are shown on
screen. You can play files simply by pressing arrow keys to choose a desired option and pushing the
[OK] button on the remote controller
● Icons and Options
1. Upper folder
Select to return the upper level folder .or push the [stop] button on the Remote Controller
2. Folder List
All folders saved. You can select to open a folder.
3. Video File
All video files that can be played are shown with this icon. (avi. mpg, MPEG, DAT, VOB, IFO, ISO)
33
Page 34

User Manual Guide Model: QS-
100
4. Audio File
All audio files that can be played are shown with this icon. (MP3,WMA, OGG, WAV)
5. Image File
ALL image file that can be played are shown with this icon (JPG, JPEG).
6. Firmware File
QS-100 's firmware file is shown with this icon.
7. Select Bar
Display selected option
8. Current Directory
Displays directory of the folder currently on screen.
9. File Information
Displays selected number of files and the size with selection bar. The number of files is shown in this
format (Currently elected File/All in the current Folder)
34
Page 35

User Manual Guide Model: QS-
100
1155.. PPllaayyiinngg MMoovviiee
Plays AVI, MPG, MPEG, DAT, and VOB files. When the video contains subtitle, subtitle should be saved
in the same folder as video.
If the [OK] button on the remote controller is selected to play video, playback is started from the
selected file to the last file sequentially and then stopped.
If [PLAY] button is selected, file in folder (subfolders included) are repeatedly played until [Stop] button
is pressed to stop playback.
●
Button and function for movie playback
Button Function Description
1-Click
SUBTITLE
2-Clicks
AUDIO
INFO
BOOKMARK
SCROLL
VOL
MUTE
ZOOM
SYNC
Select dual
Audio
View file
information
Resume Play
Move screen
Control
Volume
Remove
sound
1-Click
2-Click
3-Click
4-Clicks
Adjust subtitle
output timing
Changes subtitle size. Push SUBTITLE button and use(▲▼)keys
to changes subtitle size
Changes subtitle language for multi-language subtitle.
Push SUBTITLE button twice and use (▲▼) keys to select subtitle.
Select to play audio language for videos dubbed in two language.
Audio language changes upon pressing this button.
Displays the information of playback file.
Push this button again to display playback time only.
Push this button one more time to cancel file information display
Searches the end point of playback of file that was stopped playing
previously and then continue to play from that point
Move the location of screen using arrow keys and then push the [OK]
button
Controls the volume of sound
Temporarily silence the audio
Enlarges the screen using arrow keys and push the [ok] button
Pan & Scan
Full Screen mode to display video in full screen. Horizontal or vertical
ratio is not taken into consideration here.
Cancel the enlarged video setting
Adjust subtitle output when subtitles are not displayed synchronously
with the video. You can change the output timing by seconds based
on the picture.
35
Page 36

User Manual Guide Model: QS-
100
Button Function Description
GOTO
OK
Arrow Keys
PLAY
STOP
SKIP
SEARCH
Skip
Play selected file
Screen refresh
▲▼
◄►
Play/Pause
Stop playback
Upper Folder
Next/Previous File
Next/ Previous page
Quick search
Skips to the point of time you want to view from current time
during playback. Type the point of time using arrow keys or
numerical buttons and push the OK button to proceed
Play the selected file. Plays all files in a folder sequentially and
then stops playing.
Pushed when there is a problem with images or
synchronization between image and audio.
Adjusts the location of subtitle during playback
Skips forward or backward in 30 second interval during
playback
Play or pauses video. All files in a folder are played
sequentially. If the folder has a sub-folder in it, files in the sub-
folder are also played repeatedly without limit before being
stopped playing.
Stop playing video
Used to return to the upper level folder on the file list
Skips to next or previous file during playback
Skips to next or previous page on the file list
Searches the video forward or backward with quick..
Search speed is increased or decreased 2,4,16, or 32 times
upon pushing this button
36
Page 37

User Manual Guide Model: QS-
100
1166.. PPllaayyiinngg MMuussiicc
Plays MP3, WMA, OGG and WAV files. Search function does not work for OGG files. If the [OK] button
on the remote controller is selected to play audio, playback is started from the selected file to the last
file sequentially and then stopped. If [PLAY] button is selected, files in a folder(subfolders included) are
repeatedly played until [STOP] button is pressed to stop playback.
●
Button and function for music playback
Button Function Description
INFO
BOOKMARK
VOL
MUTE
View file information
Resume play
Control Volume Controls the volume of sound
Remove sound Temporarily silence the audio
Displays the information of a played file.
Push again to cancel file information display.
Searches the end point of playback of a file that was stopped
playing previously and then continues to play from that point.
OK
Play
Stop
SKIP
Arrow keys
Play selected file
Play/ Pause
Stop playback Stop paying audio
Upper Folder Used to return to the upper level folder on the file list.
Next/Previous File Skips to next or previous file during playback
Next/ Previous page Skips to next or previous page on the file list
▲▼
◄►
Play a selected file. Plays all files in a folder sequentially and
then stops playing
Play or pauses audio. All files in a folder are played
sequentially. If folder has a sub-folder in it, files in the sub-
folder are also played repeatedly without limit before bing
stopped playing
Plays audio and performs navigation
Skips forward or backward in 5 second interval during playback
37
Page 38

User Manual Guide Model: QS-
100
1166.. PPllaayyiinngg IImmaaggee
Plays JPEG files
If the [OK] button on the remote controller is selected to play images, only selected files are displayed
on screen. Push the [play] to start slide show. Push the [stop] to stop slide show
●
Button and function for image playback
Button Function Description
INFO
ANGEL
OK
PLAY
STOP
View file information
Remote image Rotates image 90 degrees clockwise
Play selected file
Play/Pause
Stop Playback Stops playing audio
Upper Folder Used to return to the upper level folder on the file list
Displays the information of a played file.
Push again to cancel file information display.
Play a selected file. Plays al files in a folder sequentially and
then stops playing.
Executes or pause images slide show. All files in a folder are
played sequentially. If the folder has a sub-folder in it, files in
the sub-folder are also played repeatedly without limit before
being stopped playing. Use SETUP menu to adjust slide show
interval.
SKIP
Arrow Keys
ZOOM
Next/Previous File Skip to next or previous file during playback
Next/Previous Page Skip to next or previous page on the file list
◄► Rotates image 90 degrees clockwise or counterclockwise
1-Click You can enlarge the screen
2-Click Pan & Scan
3-Click Full Screen
4-Click Default screen size
38
Page 39

User Manual Guide Model: QS-
100
1177.. UUssiinngg VViirrttuuaall DDVVDD
Virtual DVD function is used to play ripped DVD data saved in QS-100 as is played on DVD player.
Basically, QS-100’s remote controller is designed to support all function provided by DVD. Now, enjoy
DVDs to the full without damaging your valuable DVD collection.
●
Button and function with Virtual DVD
Remote Control
Button
AUDIO
INFO
BOOKMARK
VOL
MUTE
Function Description
Select audio Language
View file information Display the information of a playback file
Resume play
Control Volume Controls the volume of sound
Remove sound Temporarily silence the audio
Select to play audio language for videos dubbed in two
languages. Audio language changes upon pressing this
button
The end point of playback is lost when the power is
switched on and then off
GOTO
PLAY/ OK
STOP
SKIP
SEARCH
Skip to the point of time you want to view from current
Skip
Play/Pause Play or pauses video
Stop Stop playing video
Upper Folder Used return to the upper level folder on the file list.
Next/Previous Chapter Skips to next or previous Chapter during playback
Next/Previous Page Skips to next or previous page on the file list
Quick Search
time during playback. Type the point of time using arrow
keys or numerical buttons and push the OK button to
proceed
Search the video forward or backward with quick.
Search speed is increased or decreased 2, 4, 16 or 32
times upon pushing this button
39
Page 40

User Manual Guide Model: QS-
100
1188.. FFiirrmmwwaarree UUppggrraaddee
The upgrade version of firmware for QS-100 is released occasionally with function updates and bug
fixed depending on the development situation by customer demands. Check your firmware version at
the upper right corner of the screen
1. Download the latest firmware file from
“Download” at
2. Connect QS-100 to a PC using a USB cable
and copy a firmware file to desired location
3. Connect QS-100 to a TV and turn it on
4. Select firmware file with selection bar using
the remote controller and press the [OK] button
5. When firmware CAUTION is displayed,
select [Yes] to start upgrade
6. Wait for firmware upgrade to be completed.
www.mpmaneurope.com
40
Page 41

User Manual Guide Model: QS-
100
7. The following screen appears when the
Firmware upgrade is completed successfully.
8. The device reboots automatically.
Post-upgrade firmware version can be seen at the upper right corner of the SETUP menu
If power is turned off accidentally during firmware upgrade, QS-100 cannot operate as
Note
normal,. In this case, please restore firmware using firmware rescue mode
Caution
Never switch off or disconnect adapter during firmware upgrade
The latest firmware file is available at www.mpmaneurope.com
This may take up to 3 minutes depending on the user environment
41
Page 42

User Manual Guide Model: QS-
100
1188.. FFiirrmmwwaarree RReeccoovveerryy MMooddee
When the main body is turned off during firmware upgrade, QS-100 system get damaged and
the screen turns blank. In this situation, follow the steps below to restore firmware.
See the picture above for reference
1. Connect QS-100 to pc and copy firmware file to QS-100.
(Even though the main firmware experienced damage, QS-100 works as an external storage
device when connect to a pc )
2. Disconnect QS-100 form the pc and connect it to a TV.
(Connect video signal to TV’s composite terminal and connect power)
3. Press and hold the power button during 5 second on the Top side of this product.
4. Firmware rescue process starts. During the process, the TV screen remains blank
(During the process, USB LED and HDD LED on the front side of this product blink very
quickly)
5. After successful completion of firmware restoration, auto re-booting is performed and initial screen of
QS-100 is shown on TV
Note
During firmware upgrade, if there occurs a problem then reboot is not available,
please check the firmware upgrade, then try again.
42
Page 43

User Manual Guide Model: QS-
100
1199.. TTrroouubblleesshhoooottiinngg
For more details, visit our website at www.mpmaneurope.com
A. On Windows XP, a message is populated, saying HI-SPEED USB Device Plugged into non-
HISPEED USB Hub
- This message is displayed when connected to a USB port which does not support USB2.0.
In this case, transmission is made in the speed of USB 1.1.Please upgrade your main board to that
supporting usb2.0 or purchase USB 2.0 host card to speed the copying of files.
B. QS-100 is not detected in my computer or Windows Explorer after connecting the device to PC.
- If you are using Windows 98 SE ,you have to install drivers.
if you installed a new hard disk on your PC, please perform partitioning and formatting
C. After connecting to a TV, the screen remains blank or shows flicker.
- When video out setting is incorrect, the screen remains blank or shows black and white picture or
flicker. In this case, please push the [TV OUT] button on the remote controller slowly until
video output mode screen appears.
D. When connecting to a TV, QS-100 stands still with initial screen shown.
- Make sure that the hard disk connector of QS-100 is connected to the hard disk.
- Make sure that the hard disk was partitioned and formatted.
- For Windows XP, QS-100 is not detected when hard disk partition is in [Dynamic Volume].
Please remove and retry partitioning for use.
E. When playing a video, subtitles are not displayed
- Subtitles are not displayed when the name of video file is the same as subtitle file .
- If the voice codec is in DTS, extra receiver providing DTS decoding is required
F. When QS-100 is not detected by a PC
- Please make sure that QS-100 hard disk is formatted
- For a hard disk consuming a lot of power, connect an adapter to QS-100.
- Connection may fail when the USB port on the front side of a PC is used
43
Page 44

User Manual Guide Model: QS-
100
Warranty
z Warranty Regulations
Limited warranty period starts form the date of purchase. The purchase date must be stated
when the product is purchased. When the purchase date is not stated, the limited warranty
ends after one year and six months form the manufacturing date.
1. Product Warranty Period
QS-100 Accessories
3 months: adapter, USB cable
1 year form the data of purchase
2 months : user’s manual
Everything else for 3 months
2. Warranty Contents
Although the product is within warranty period, repair fees may be charged if the product is
Used in one or more of the following conditions.
- Damaged by accident, misuse, abuse, neglect and / or improper maintenance
- Damaged by any improper use of the product such as disassembly or modification
- Damaged by outside impact or shock
- Damaged by soaked in any liquid, or rusted by any foreign substances
- Damaged by using accessories or parts not supplied by the ZIONCOM Technologies.
- Damaged by any natural disaster such as fire, lightening ,flooding, etc
- Damaged by any other misuse of the product by the user
3. Recording Items
Product name : QS-100
Date of Purchase:
Place of Purchase:
Serial Number:
(Printed barcode on the bottom of the product)
44
 Loading...