

Page 1
Model-No.:
PH 540
EN
USER MANUAL
Page 2

TA B L E OF CO N TE N TS
1. UNDE RSTANDING YOUR DE VICE
1.1 GENERALINFO
2. GETT ING STA RTED
2.1 INSTALLING SIM CARD
2.2 POWERING ON/OFF THE DEVICE
3 T EXT ENTR Y
3.1 INPUT METHOD
4. HOME SCREE N
4.1 APPLICATION TAB
4.2 CUSTOMIZING SCREEN
5 ME NU FU NCTIO NS
5.1 CALLING
5.2 MESSAGING
5.3 CONTACTS
5.4 EMAIL
5.5 CAMERA
5.6 VIDEOS
5.7 GALLERY
5.8 SOUND RECORDER
5.9 DOWNLOADS
5.10 FILE EXPLORER
5.11 BROWSER
6 SE TTIN GS
...................................................................................................
..............................................................................................
.............................................................................................................
.................................................................................................
........................................................................................................
...............................................................................................
............................................................................................................
......................................................................................................
........................................................................................................
................................................................................................................
............................................................................................................
..............................................................................................................
...........................................................................................................
...................................................................................................
.............................................................................................
.......................................................................................................
................................................................................................................
....................................................................
.....................................................................................
...................................................................
.............................................................................................
.....................................................................................
.........................................................................................
1
1
2
2
4
5
5
7
8
9
10
10
11
14
16
17
19
20
20
21
21
22
23
Page 3
1
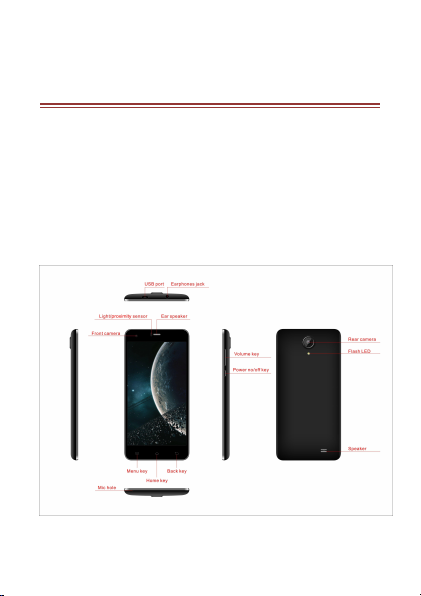
1. U N D E R S T A N D I N G YO U R DE V I C E
1.1 GENERAL INFO
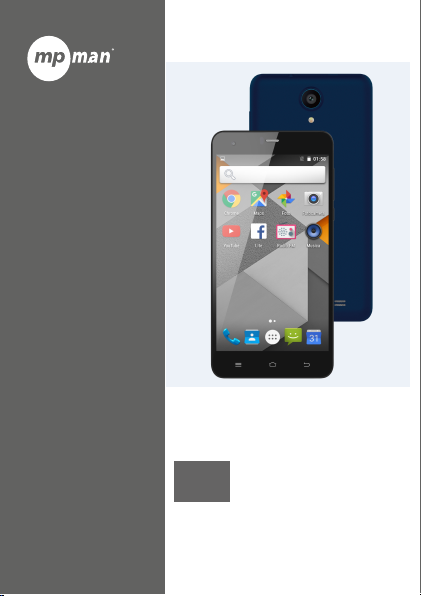
M550 is a dual SIM phone that encloses features, such as Android
version 5.1, Wi-Fi, 8.0 MP Auto focus bac k Camera & 2.0 MP front
camera, etc. This p hone is provided with two SIM slots for two
different SIM cards. You can select to op erate SIM cards as per your
personal and professional needs.
Page 4
2
2. G E T T I N G ST A R T E D
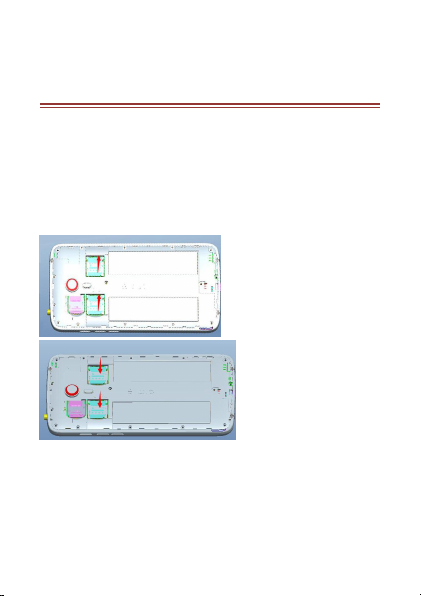
Remove th e back cov er of the d evice.
Hold the device with the front facing dow nwards.
Insert the SIM card in the device.
2.1 Installing SIM Card
Your device is provided with two SIM slots for two different SIM card s.
In order to install SIM card in the device, p lease follow the steps
mentioned below:
Installing Memory Card
Your device supports T -Flash card, which is a multimedia memory card
used t o mu ltiply the memory of the device. The T-flash card is small and
should be pulled out and installed carefully and prudently in order to
Page 5

3
avoid any kind of damage. Please follow the steps mentioned below to
Switch off your d evice.
Slide the T-Flash card into the s lot.
Plug the connector of th e charger into th e jack of the device.
Plug the charger into a standard AC wall outlet.
install the memory car d in the device:
Charging the Battery
The device p rompts a warning tone and message stating insuff icient
battery when the b attery power is low.
Please follow the instr uctions mentioned below to charge your device:
Charging……. Fully Charged…….
You must fully charge the battery before using the dev ice for the first
time. It is recommended to charge the battery for th ree hours before
using the device for the first time.
Page 6
4
2.2 POWERING ON/OFF THE DEVICE
Long press and hold the Power Key to turn on the device.
T he first scr een that appears is known as the home/idle
Dr ag the lock icon toward s to unlock the screen.
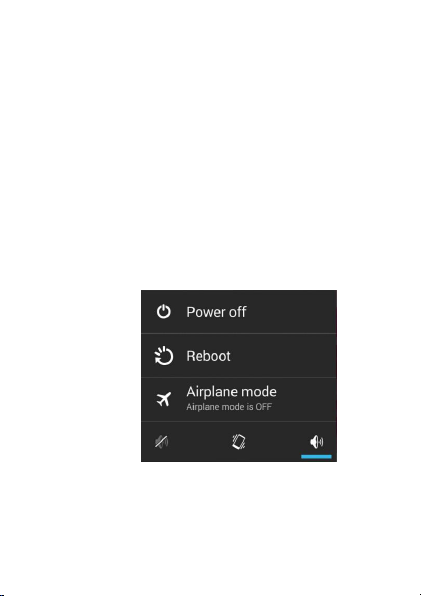
If the scr een turns off, then p ress th e Power Key to turn on the
Pr ess and hold t he Power Key for 3 seconds.
A pop-up window appears, select Power off.
Select OK to confirm.
Turning On the Device
After installing the SIM cards and charging the b attery, you are now
ready to turn on your device.
Screen.
display.
Turning Off the Device
Page 7
5
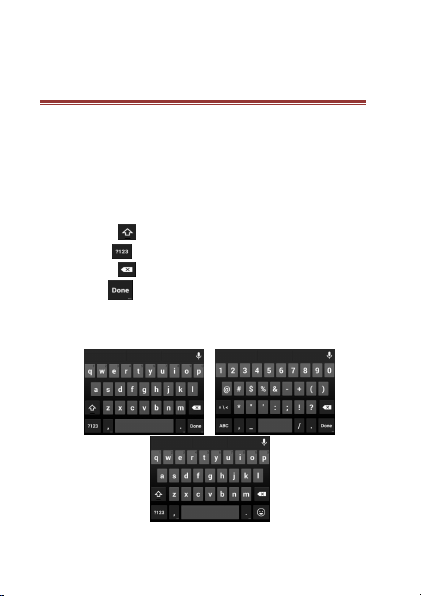
3 TE X T E N T R Y
Click the input field, then t he bottom of the scr een w ill appear
Click the letters on the virtual keyboard, text will be output on
Select to transform the letter case.
S elect to switch to the Nu mbers and Punctuation interface.
Select to delete the latest input character.
Icon in different input field will change to different
3.1 Input Method
To entry text, please follow the methods ment ioned below:
the v irtual keyboard.
the scr een.
character, it used to end the current input, and enter n ext
movement.
Page 8
6
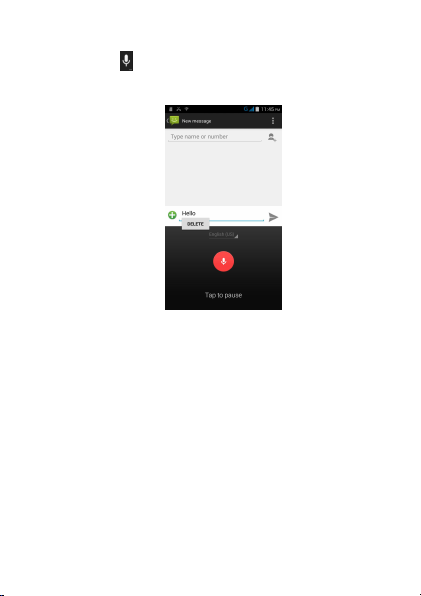
Select to open the voice input interface, then speak to
input.
Page 9
7
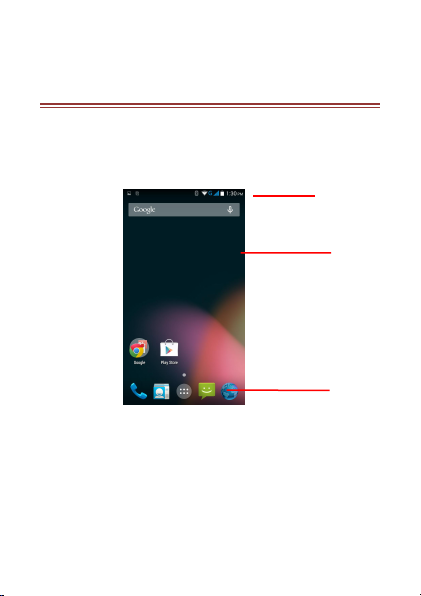
4. H O M E SC R E E N
Home Screen
Status Bar
Application
From Home screen, you can quickly access common features, view
notifications of missed calls, received messages and check
connection status.
Page 10

8
Network intensity of SIM card
Battery level of t he device
New short message
Missed call notification
Wifi connected
USB connected
Headset is plugged in
Bluetooth is activated
4.1 APPLICATION TAB
Application
Tap Applic ation Dr awer to acce ss appli cations and settings of the device.
The App lication tab enab les y ou to access the M ain M enu and choose
among the various u tilities/ featur es available in the device.
Page 11

9
4.2 CUSTOMIZING SCREEN
Long press on the desir ed application to add on the scr een.
In the idle mode, tap Menu Key > Wallpapers.
Select your desired wallpaper from t he various options.
The device features a touch screen with idle displays and access to
utilities at just one-tou ch. The screen can be customized by adding
various widgets, shortcuts and folder s.
Shortcuts
In order to add a shortcut on the screen:
Widgets
Save t ime with live u pdates r ight on Home screen and get all of your
personalized updat es at one place.
Setting the wallpaper
You can customize the wallpaper of your Home screen with default
wallpaper or with pictures taken from y our device.
Page 12

10
5 ME N U F U N C T I O N S
Enter the Main M enu, select Phone.
Enter the phone number using the on-screen keyboar d.
After entering phone n umber, tap .
T o end the call, tap to end the call.
5.1 Calling
If the icon appears on the screen, then y ou can make or receive
calls.
To make a call, please follow the steps mentioned below:
Tap to erase a wrong number. Tap and hold it to
erase the entire number.
Page 13

11
Answer/Reject an Incoming Call
T ap to compose a new message.
In Type name or number field enter t he recipient’s phone
T ype message in t he Type text message to compose field.
T ap to Send.
When y ou receive an incoming call, a notification mess age appears on
the screen. In order to accept the call, drag towards right. If you
wish to reject t he call, drag towar ds left.
5.2 MESSAGING
Your d evice featu res, send ing and receiving of SMS (Short Message
Service) and M MS (Multimedia Message Service). Go to Main Menu and
then select Messaging.
Creating a Message
number.
Page 14

12
Receiving and Managing Messages
Enter the Main M enu, select Messaging.
Select a message thread to open it.
Select Type text message to enter your message.
Click to Send.
Enter the Main M enu, select Messaging.
T ap to view a message thread.
Pr ess and hold a message to view th e message options.
Select Forward.
When you send and r eceive messages to/from a contact, t hese messages
are grouped as a message thread. A message thread looks like an
exchanged conversation.
Toreply to a text message
Toforward a text message
Page 15

13
In the Type n ame or number field, enter the recipient’s ph one
number.
Click to Send.
Enter the Main M enu, select Messaging.
T ap Menu > Delete all threads.
All the messages will be deleted.
Enter the Main M enu, select Messaging.
Select a message thread to open it.
Pr ess and hold t he message to v iew the submenu options.
Select ‘Copy ’.
Go to Compose new message.
Pr ess and hold T ype message.
Select ‘PASTE’ to paste the copied text to your new mess age.
Enter the Main M enu, select Messaging.
Select .
T ap Menu > Add subject.
In the Type n ame or number field, enter the recipient’s ph one
T o insert a picture or video file, tap Attach.
Todelete all text messages
Tocopy message text
You can use th is function to copy th e text from a message to a new
message you are composing.
MULTIMEDIA MESSAGE
A M ultimedia message or MM S can contain letter s, an image, an audio or
video file. To create and s end a MMS, please follow the steps mentioned
below:
number or email address and enter the Subject.
Page 16

14
To insert text, tap Type text message, and then enter your
message.
Enter the Main M enu select Phone.
Enter number, tap create new contact.
Select the storage.
You can enter contact information such as name, phone
T ap Done to s ave the contact.
5.3 CONTACTS
Toadd a Contact
number, email address etc, if you select storage as “Phone”.
Tip: Enter the Main Menu and select People, then tap also
can create New contact.
Page 17

15
Toimport contacts
Enter the Main M enu select People.
T ap Menu > Import/Export.
Select to import contacts fr om Phone contact/ Phone s torage/
Select a particular source to import the contacts from.
Select Next.
Select the destination, such as Phone storage t o copy contacts
Select Next.
Select “ ” to import all contacts or mark th e r equired
Select “OK”.
SIM Car d/ SD Card.
to SD Card.
contacts.
Page 18

16
5.4 EMAIL
Enter the Main M enu, tap Email.
Enter you r Email address and Password.
T ap Next. The dev ice will automatically retrieve email settings.
Enter Name and Account display name.
T ap Next.
Setting up an Email Account
Page 19

17
5.5 CAMERA
Select Camera. The screen will automatically switch to
Aim the phone at the subject. Tap to take the shot.
Capturing an Image
landscape view.
Page 20

18
Capturing a Video
Select Camera. Click switch to video mode.
Aim the phone at the subject. To start recording, select .
T o stop recording, select .
Tap to capture an
image
Tap to access to
galley
Tap to change
another mode
Tap to perform
settings
Page 21

19
5.6 VI DEOS
You can view/play your v ideos stored on your SD Card through th e
Video Player.
Tap select Application t ab > Videos to play videos on the memory
card.
Page 22

20
5.7 GALLERY
In the Gallery you can view the capt ured images, recorded video clips,
and downloaded images, etc. T he picture folder and video folder will be
displayed. Select to view the camera pictures or camera videos. Th e
images or videos w ill be displayed in thumbnails.
5.8 SOUND RECORDER
You can use the sound recorder to record sounds and also select to save
the recordings in your phon e. Tap select Application tab > Sound
Recorder. In t he sound recorder interface, you can press menu key to
select recording mode.
Page 23

21
5.9 D OWNLOADS
In t his application, you can view y our downloads, such as: audios/
Videos/pictures/ applications, you can re-download, delete or cover
these files.
5.10 file EXPLORER
This application allows you to view various files on your device
both in phone storage and SD card. You can view the d etails and select
these files to copy, delete, or share as you need.
Page 24

22
5.11 BROWSER
From the Main Menu, select Browser.
T ap the address b ar.
T ype the URL and select “Go”.
T ap Menu to access more functions, such as bookmarks,
Us e finger gestures to scr oll up or down .
T o scr oll left or r ight, tap and swipe your finger towards
Browser is a t ool which enables you to access the Internet .
Toopen a web page
history and other browser related settings.
Toscroll the page
right/left.
Page 25

23
6 SE T T I N G S
Enter Main Menu and tap Settings.
T ap ‘ON’ to activate Wi-Fi.
T ap Wi-Fi > Network notification to start detecting networks.
T ap to add a connection.
Power off, insert USIM or SIM card.
Power on.
Open setting, select Wireless & Networks, tap ‘More’.
Select mobile network, enter ‘Access Point Names’ interface.
T ouch menu button, select New APN;
Set as below:
N ame: (any name like airtel).
APN: airtelgprs.com.
T ouch menu button, select save.
Select Settings to view and adjust the settings of y our d evice. The
Settings menu is categorized into: Wireless & netw orks, Device,
Personal, Account and System.
WI-FI
Connect to a wireless network to browse Inter net.
The av ailable networks will th en be listed.
3G
The d evice su pports WCDMA pr otocol. Please make s ure th at you d evice
is turned off, th en insert or remove t he SIM card.
Settings > Wireless & Netw roks > M ore > Mobile netwroks > 3G Service
Page 26

24
Go back to access point names inter face, confirm the new APN
selected.
Access Settings by en tering the main menu.
Click Bluetooth to t urn on Bluetooth.
T o make you r device discover able, select Bluetooth settings
Go to Application Drawer > Settings > Security.
On the SIM car d lock tab, select Set up SIM card lock.
Us e PIN to Lock SIM card. Click to enable/disable.
Enter the current PIN code.
T o change the PIN code, select Change PIN.
Enter the old PIN code.
Enter the new PIN code and confirm.
BLUETOOTH
You can transfer data, such as music to other dev ice using Bluetooth.
Search the device and accept/transfer data. The received data is
automatically stored in the director y.
and check discoverable.
Enable or Disable SIM card PIN
When PIN code is enabled, you are required to enter the PIN code before
making a call.
BACKUP & RESET
You can use th e Privacy s ettings to manage you r personal information,
such as backup of the data, automatic rest ore and factory date reset.
Page 27

 Loading...