

Page 1
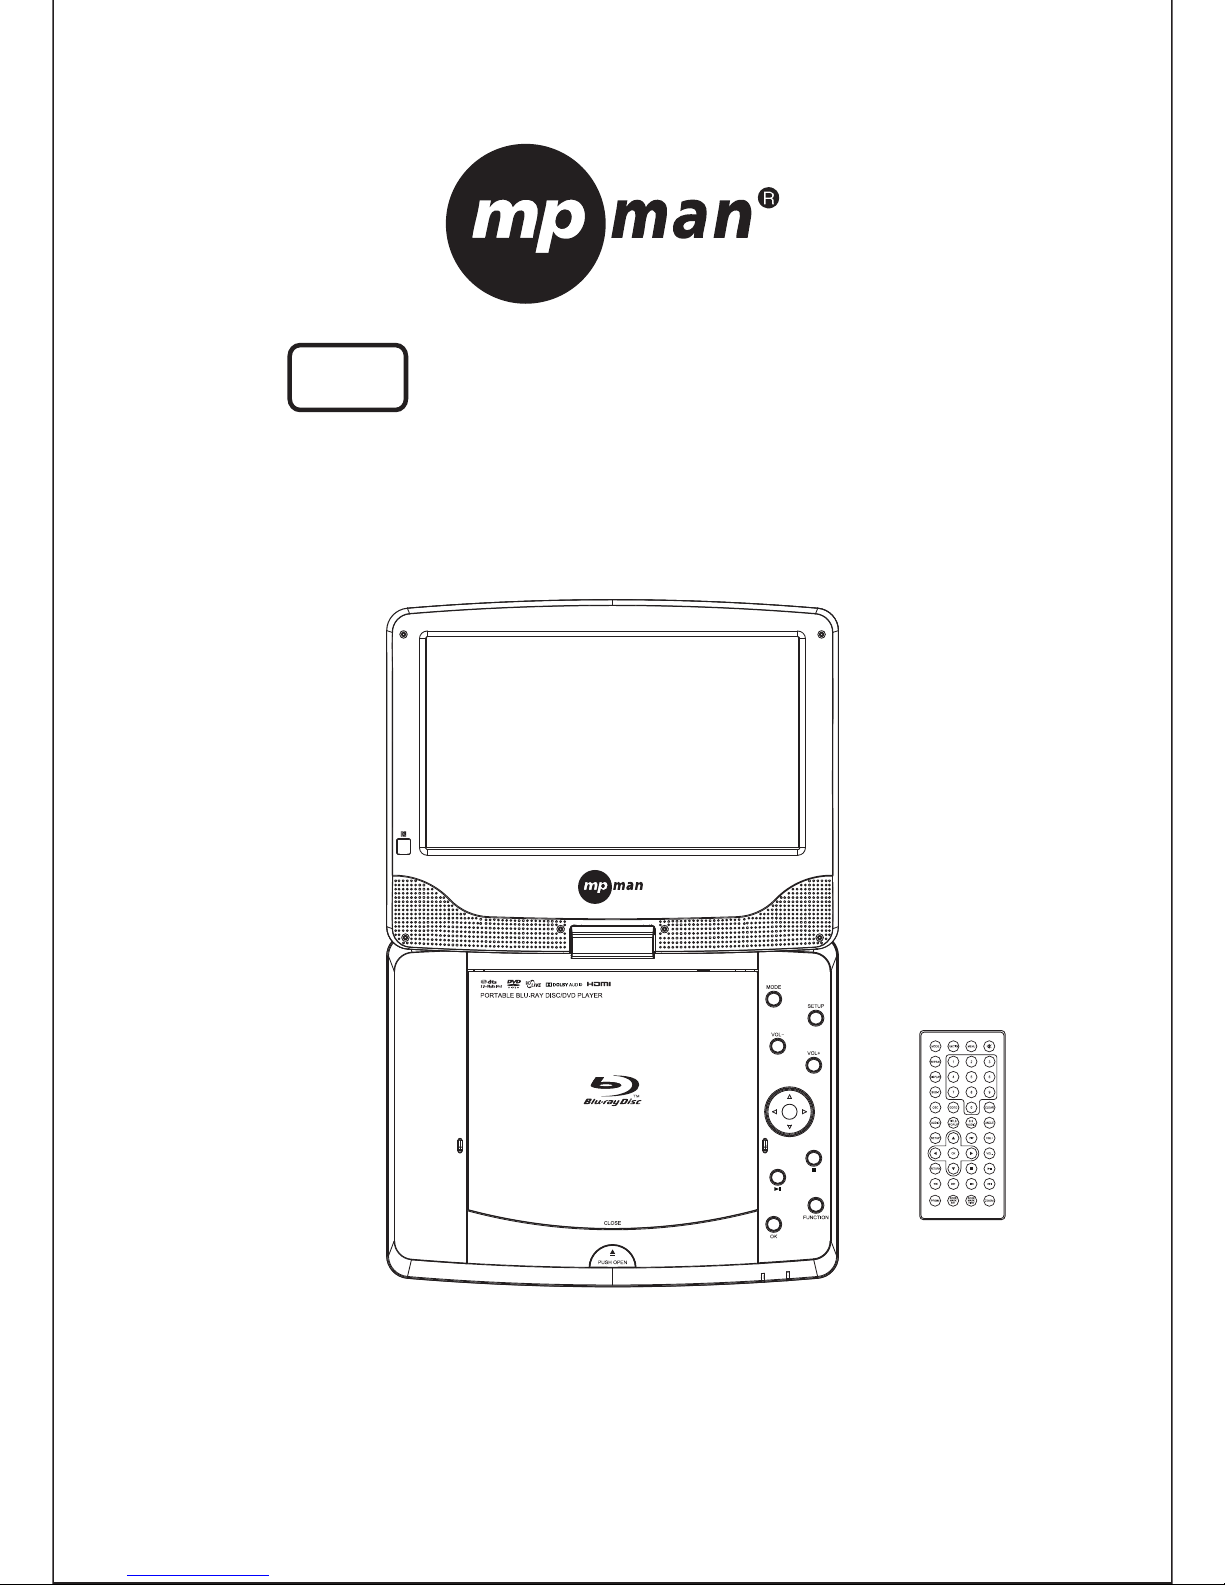
Bluray Portable DVD Player
Model: PDVBR2
Operating Manual
EN
Page 2

Page 3

1
Safety and Maintenance
This symbol indicates “dangerous voltage” inside the product that presents a risk of
electric shock or personal injury.
This symbol indicates important instructions accompanying product.
WARNING: To reduce the risk of fire or electric shock, do not expose this product to rain or
moisture. Appliance shall not be exposed to dripping or splashing and no objects filled with
liquids, such as vases, shall be placed on the appliance.
Security Instructions
Read all of the instruction before using this Blu-ray player and keep this manual in a safe
place for future reference.
1. Read and keep these instructions.
2. Heed all warnings and follow all instructions.
3. Do not use this player near water.
4. Clean only with dry cloth.
5. Do not block any ventilation openings and install in accordance with the manufacturer’s
instructions.
6. Do not install near any heat sources such as radiators, heat registers, or the player
(including amplifiers) that produce heat.
7. Protect the power cord from being walked on or pinched particularly near the
convenience receptacles, and the point where they exit from the player.
8. Use only with the cart, stand, tripod, bracket, table specified by the manufacturer or sold
with the player. When a cart is used, use caution when moving the cart/player combination
to avoid injury from tip-over.
9. Unplug this player during lightning storms or when unused for long periods of time.
10. Refer all servicing to qualified service personnel.
Servicing is required when the player has been damaged in any way, such as the
power-supply cord or plug being damaged, liquid has been spilled or objects have fallen into
the player, the player has been exposed to rain or moisture, does not operate normally, or
has been dropped.
11. Please keep the unit in an environment with good ventilation.
12. WARNING: To reduce the risk of the fire or electric shock, do not expose this apparatus
to rain or moisture. The apparatus shall not be exposed to dripping or splashing and no
objects filled with liquids, such as vases, shall be placed on the player.
13. WARNING: Where the mains plug or an appliance coupler is used as the disconnect
device, the disconnect device shall remain readily operable.
14. Do not expose the batteries to excessive heat such as fire direct sunshine or similar
sources.
CAUTION: To reduce the risk of electric shock, do not remove cover (or back). No user
serviceable parts inside. Refer servicing to qualified service personnel.
Page 4

2
CLASS 1 LASER PRODUCT
Use of controls, adjustments or performance of procedures other than those specified here
in may result in hazardous radiation exposure.
Trademark Notice
DVD Video is a trademark of DVD Format / Logo Licensing Corporation.
Blu-ray Disc and Blu-ray Disc logo are trademarks of the Blu-ray Disc Association.
Manufactured under license from Dolby Laboratories. Dolby, Dolby Audio and the double-D
symbol are trademarks of Dolby Laboratories.
For DTS patents, see http://patents.dts.com
. Manufactured under license from DTS
Licensing Limited. DTS, the Symbol, & DTS and the Symbol together are registered
trademarks, and DTS 2.0+Digital Out is a trademark of DTS, Inc. © DTS, Inc. All Rights
Reserved.
Java and all other Java trademarks and logo are registered trademarks of Sun
Microsystems, Inc.
Cinavia Notice
This product uses Cinavia technology to limit the use of unauthorized copies of some
commercially-produced film and videos and their soundtracks. When a prohibited use of an
unauthorized copy is detected, a message will be displayed and playback or copying will be
interrupted.
If playback or copying is interrupted and one of the messages shown below is displayed, the
content is an unauthorized copy protected by Cinavia technology.
Message
Cinavia Message Code
[Message(s) 1] 1
[Message(s) 2] 2
[Message(s) 3] 3
[Message(s) 4] 4
More information about Cinavia technology is provided at the Cinavia Online Consumer
Information Center at http://www.cinavia.com
. To request additional information about
Cinavia by mail, send a postcard with your mailing address to: Cinavia Consumer
information Center, P.O. Box 86851, San Diego, CA, 92138, USA.
IPR Message
Copyright 2004-2013 Verance Corporation. Cinavia
TM
is a Verance Corporation trademark.
Protected by U.S. Patent 7,369,677 and worldwide patents issued and pending under
license from Verance Corporation. All right reserved.
BD LIVE and BONUSVIEW are trademarks of the Blu-ray Disc Association.
Page 5
3
CAUTION: This product utilizes a laser.
Do not open cover and do not repair yourself. Refer servicing to qualified personnel.
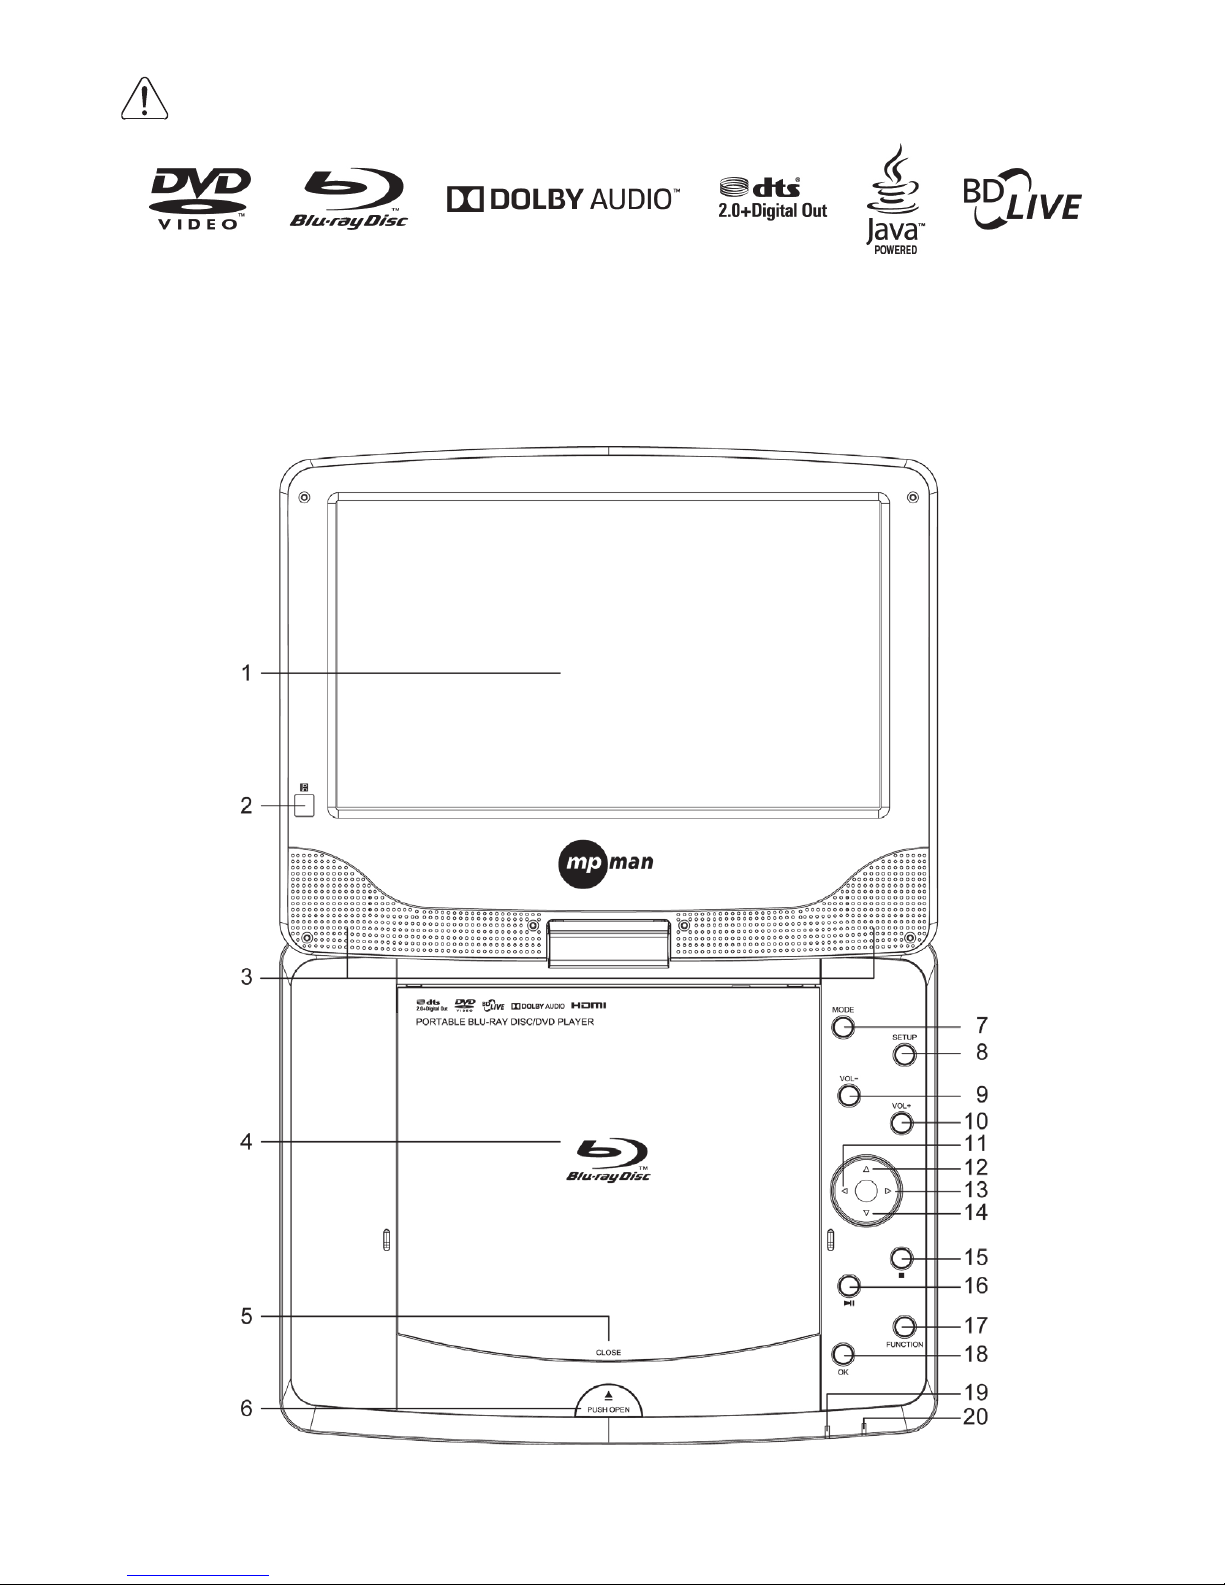
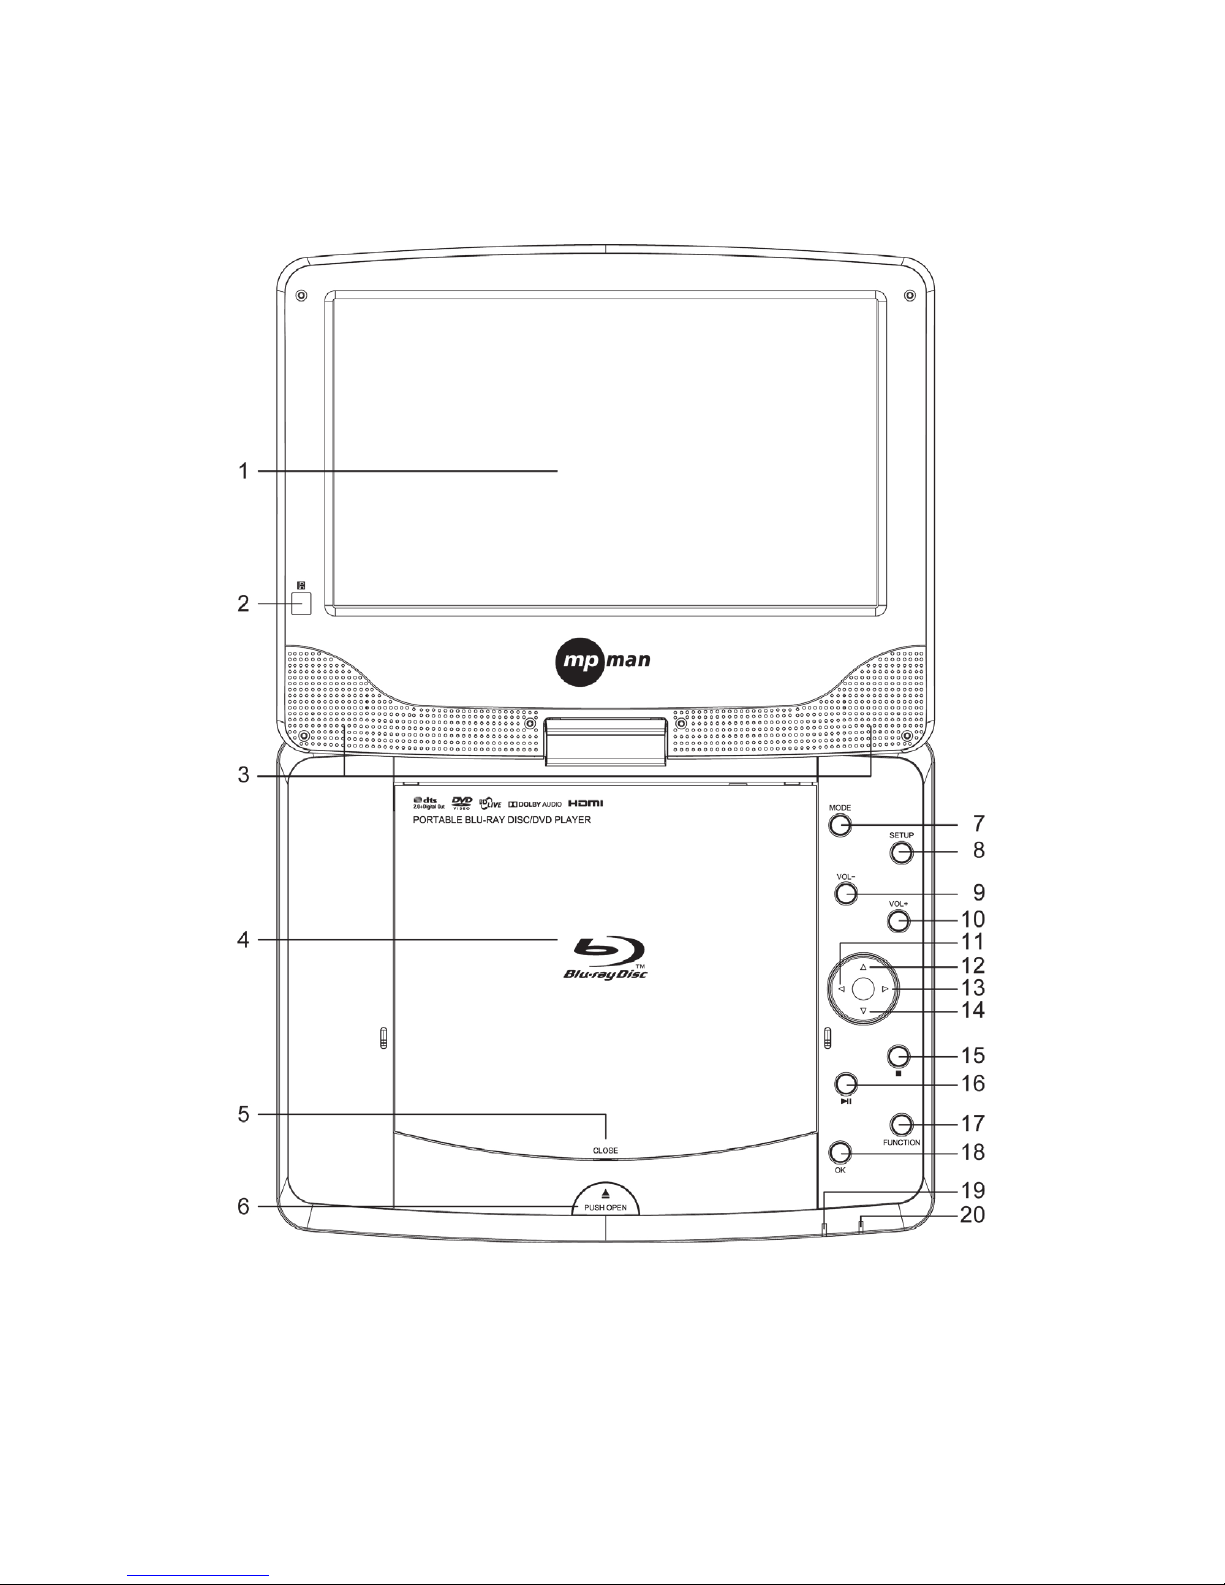
Location of Controls
The main screen
Front face
Page 6
4
1. LCD panel 2. Remote sensor 3. Speaker 4. Disc lid
5. CLOSE 6. PUSH OPEN 7. MODE 8. SETUP
9. VOLUME - 10. VOLUME + 11. LEFT 12. UP
13. RIGHT 14. DOWN 15. STOP 16. PALY/PAUSE
17. FUNCTION 18. OK 19. CHANGE indicator 20. POWER indicator
Note:
Power Indicator:
power on: Blue light on, power off: Blue light off.
Charging indicator:
charging: the red light on, full: red light off.
low battery: red light flash (remark, there is no low battery indicate when power off status)
Right side Left side
Back
1. PHONE 2. AV IN 3. HDMI OUT 4. SD/MMC
5. USB 6. DC IN 12V 7. ON/OFF 8. LAN
Remote Control
The remote control
1. Function 2. Mode
3. Repeat 4. Display
5. Subtitle 6. Goto
7. OSC 8. Title/Popup
9. Audio 10. Setup
11. OK 12. Direction key
13. Return 14. Fast forward
15. Fast Reverse 16. Green / Book mark set
17. Red / Program 18. Menu
19. Mute 20. Number buttons (0-9)
21. Clear 22. 2nd Audio
23. Angle 24. PIP
25. Volume+ 26. Volume-
27. Stop 28. Play/Pause
29. Previous 30. Next
31. Yellow / Book mark view 32. Blue / Zoom
Page 7
5
Operating with the remote control
1. The remote control must point at the remote sensor, in order
for the DVD player to function correctly.
2. The remote works best at a distance less than 3 meters and at
an angle of up to +/-30° toward the front of the unit.
3. Obstacles should not remain in between the remote control
and the remote sensor on the main unit.
Quick Starting Guide
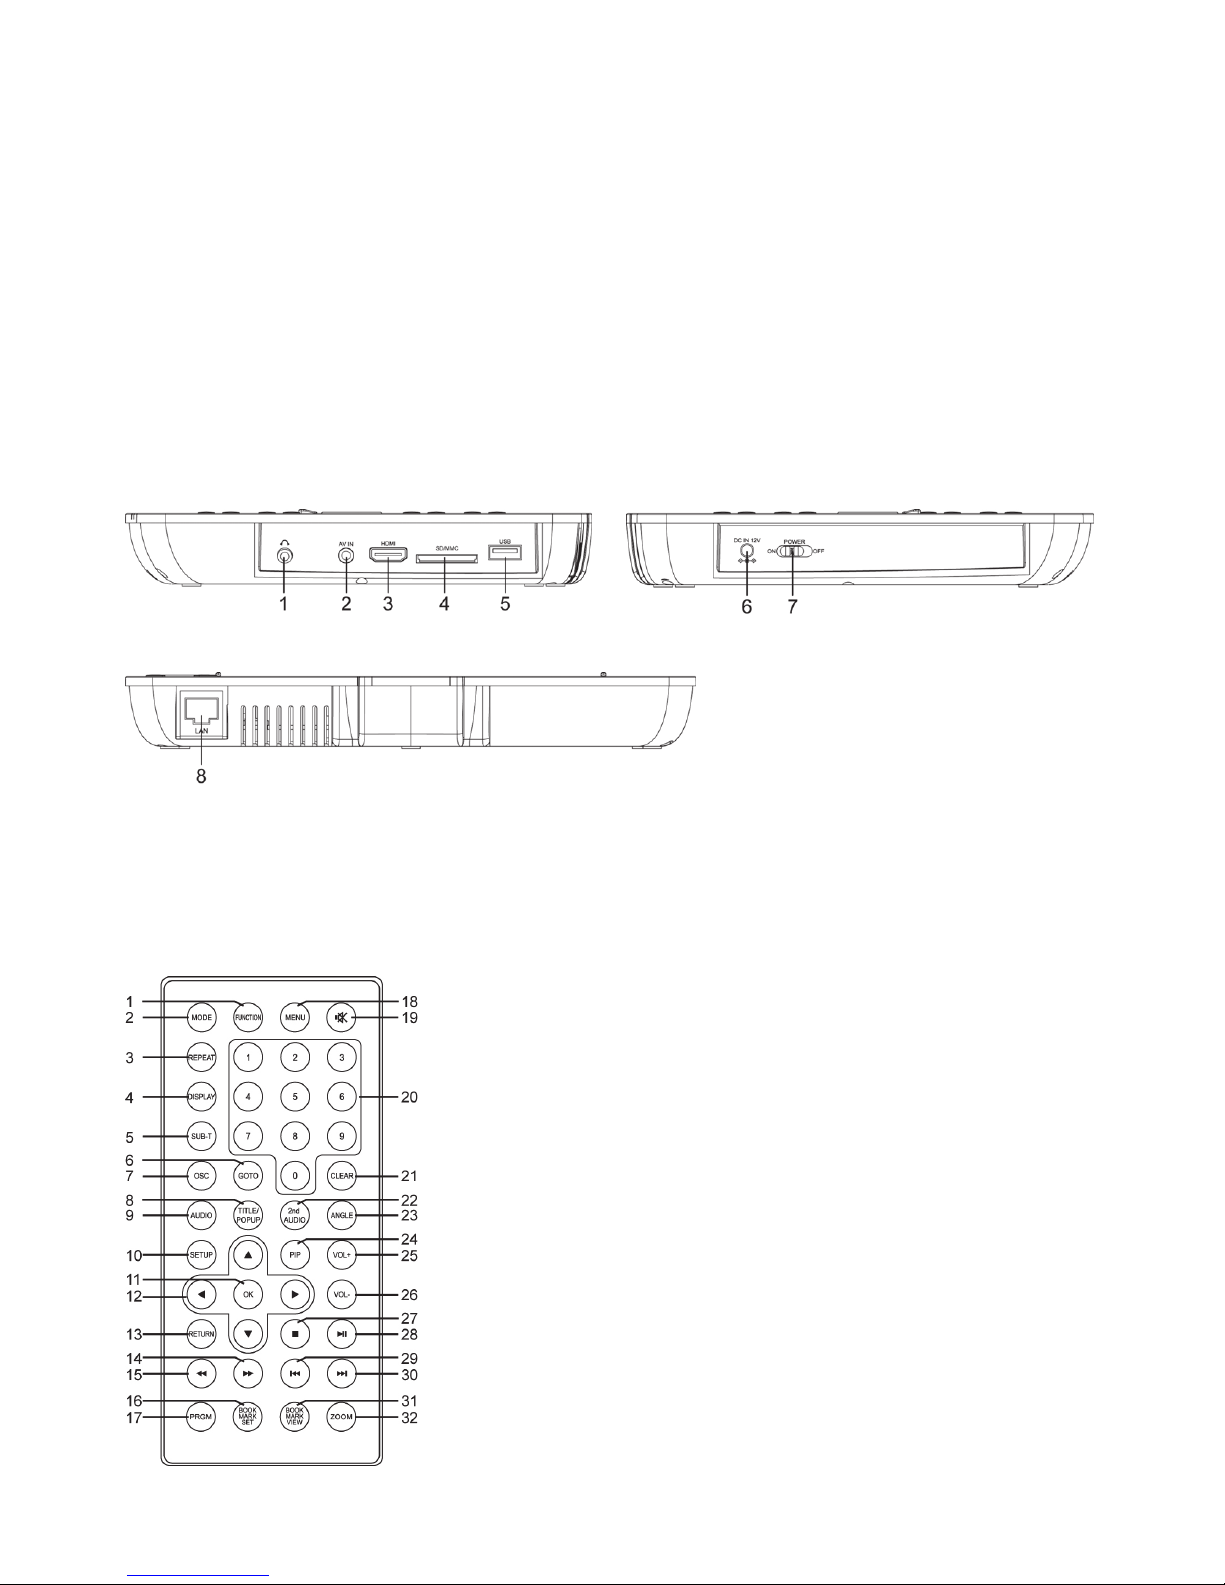
1. Connecting to an External Power Source
Connect the power adapter (supplied with the player) to the side input plug and to a wall
outlet. Do not use any other device otherwise specified by your dealer.
2. Open the screen panel.
The screen panel of the portable DVD opens to a maximum 180°. And it can rotate 270°.
3. Press the PUSH OPEN button to open the disc cover.
4. Insert a DVD disc with label side facing upward.
Align the center of the DVD disc with the center of the disc guide. Press gently down on the
DVD to snap the disc into place, and then close the disc cover.
5. Slide the power switch on the left side of the unit to power it on.
6. Press the OK or PLAY/PAUSE button on the unit to start playback.
In most cases, when you leave by the PLAY/PAUSE button, continue to be used by
PLAY/PAUSE button.
The DVD player will immediately start rendering the DVD program.
When you want to stop, press the STOP button, it will return to the power-on logo.
The player can be recharged while playback.
Connections
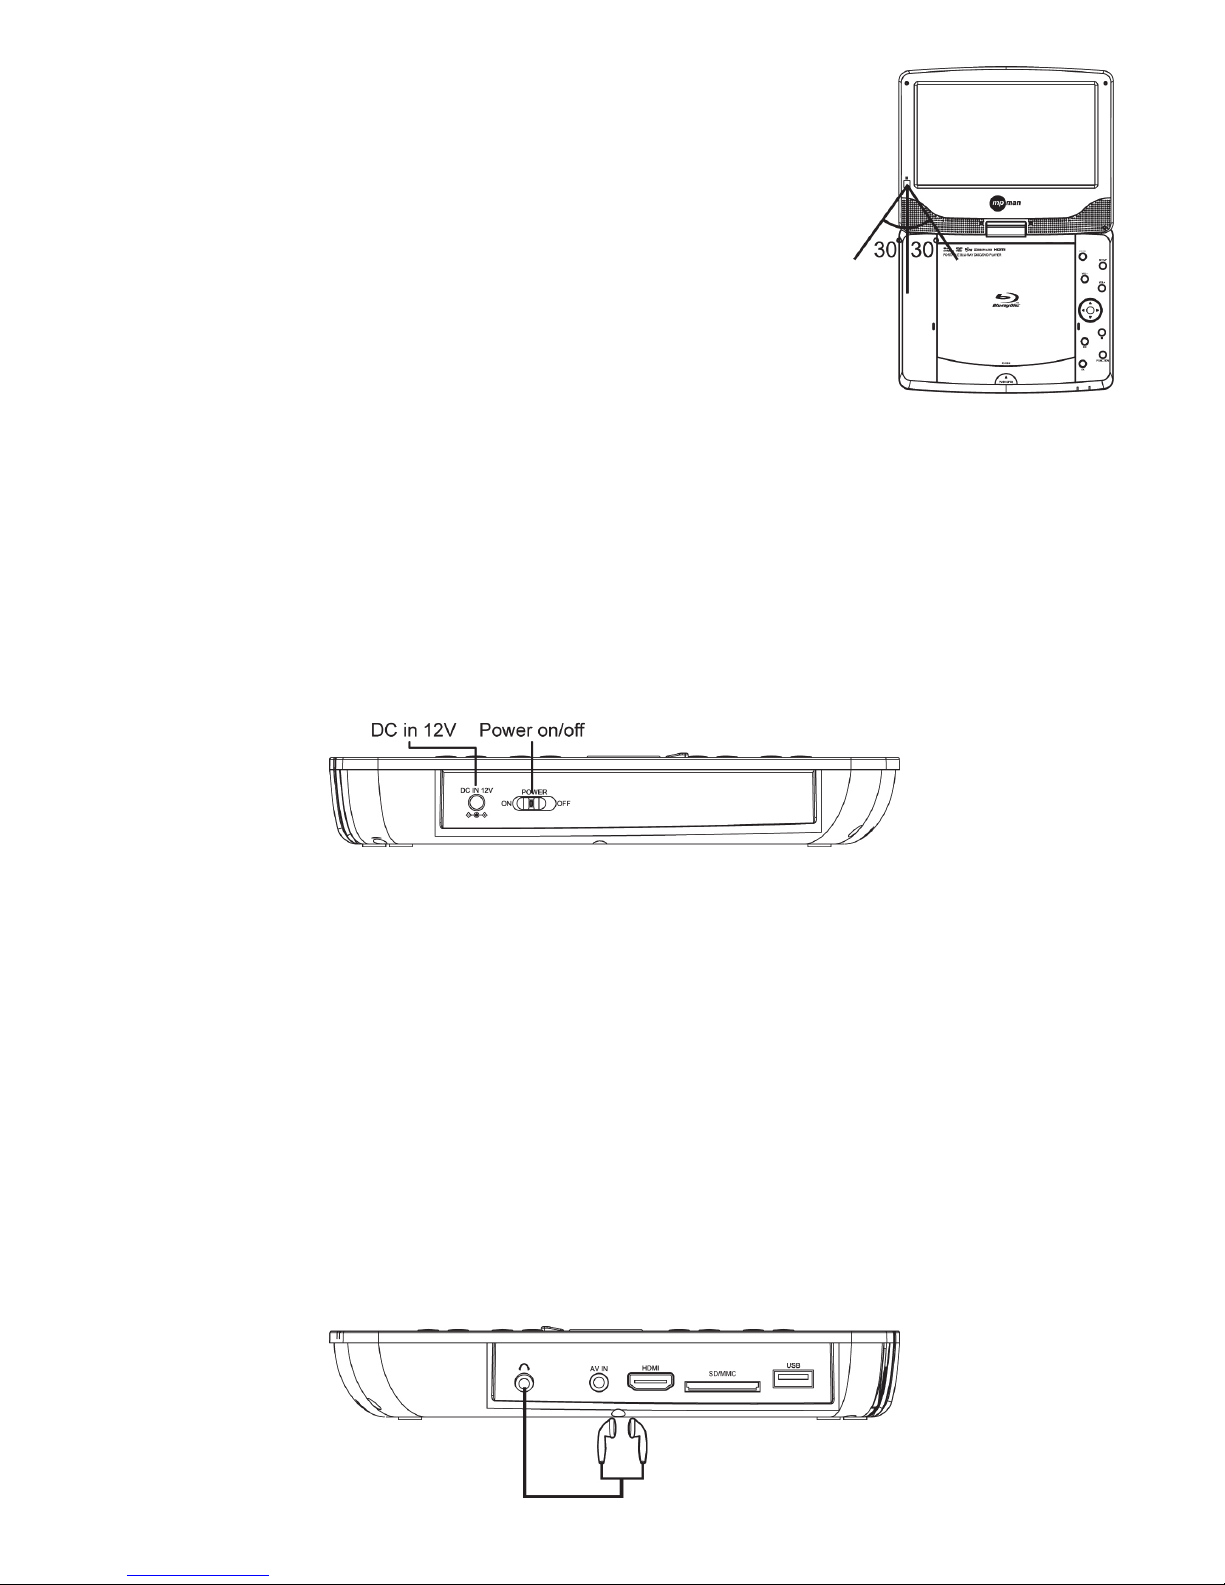
1. Connect to Earphones
1. Connect the earphones. earphones with a 3.5 mm stereo plug can be connected.
2. Adjust the volume by pressing the VOL+/VOL- buttons on the remote control.
The right side of the portable
Page 8
6
Avoid listening to sound at levels which may be harmful to your ears.
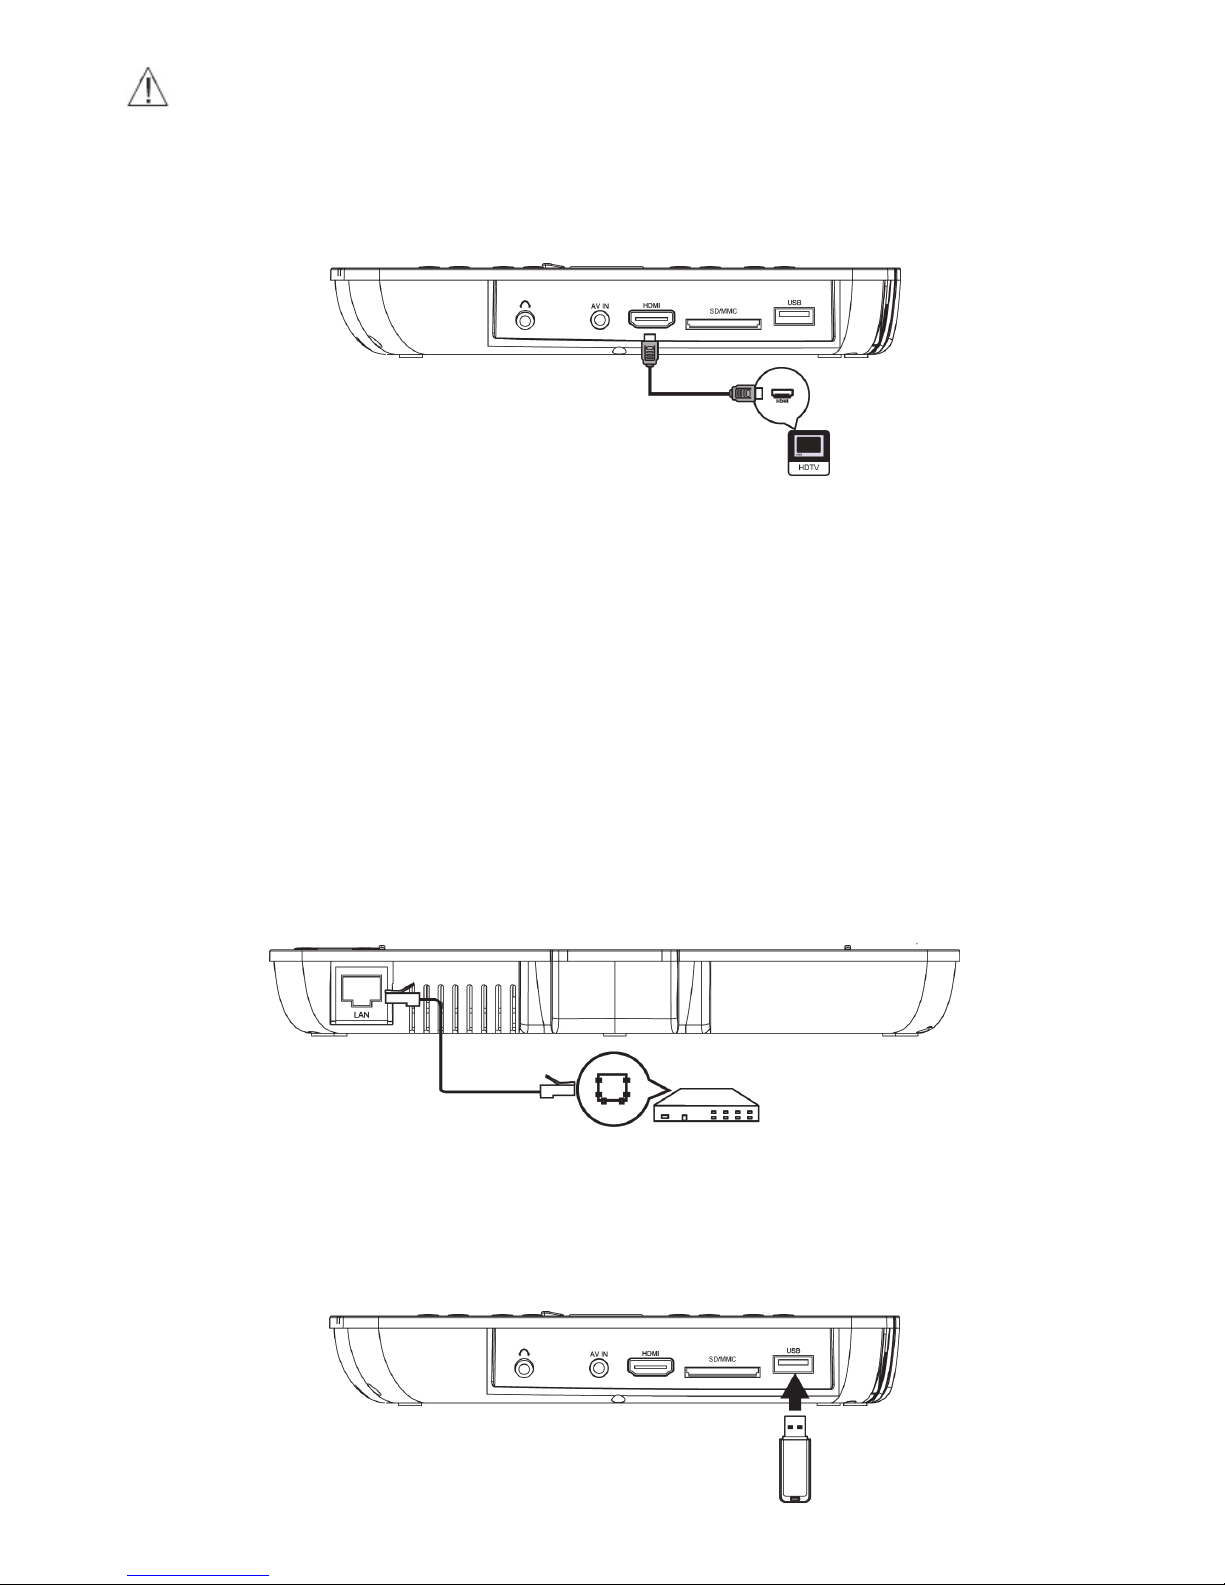
2. Connect to the HDMI
Connect the HDMI cable (not supplied) to the HDMI jack on this product and to the HDMI
input jack on the TV.
Please change the resolution to 1080P for the best image effect.
Please set the resolution to 720P for the best image effect of the screen after you finished
using the HDMI jack.
Tip
• You can optimize the video output by pressing the Resolution button repeatedly to select
the best resolution the TV can support.
• To play the digital video images of a BD-video or DVD video via an HDMI connection, it is
necessary that both this product and the display device (or an AV receiver/ amplifier)
support a copyright protection system called HDCP (high-bandwidth digital content
protection system)
• This type of connection provides best picture quality.
3. Connect Network
Connect this product to the network to enjoy software updates and BD-Live bonus content.
Connect the network cable (not supplied) to the LAN jack on this product and then connect
the network cable to the LAN jack on the broadband modem or router.
4. Connect USB Device
A USB device card to play multi-media file.
Page 9
7
Connect the USB device to the USB jack on this product.
Note:
We do not guarantee 100% compatibility with all USB devices.
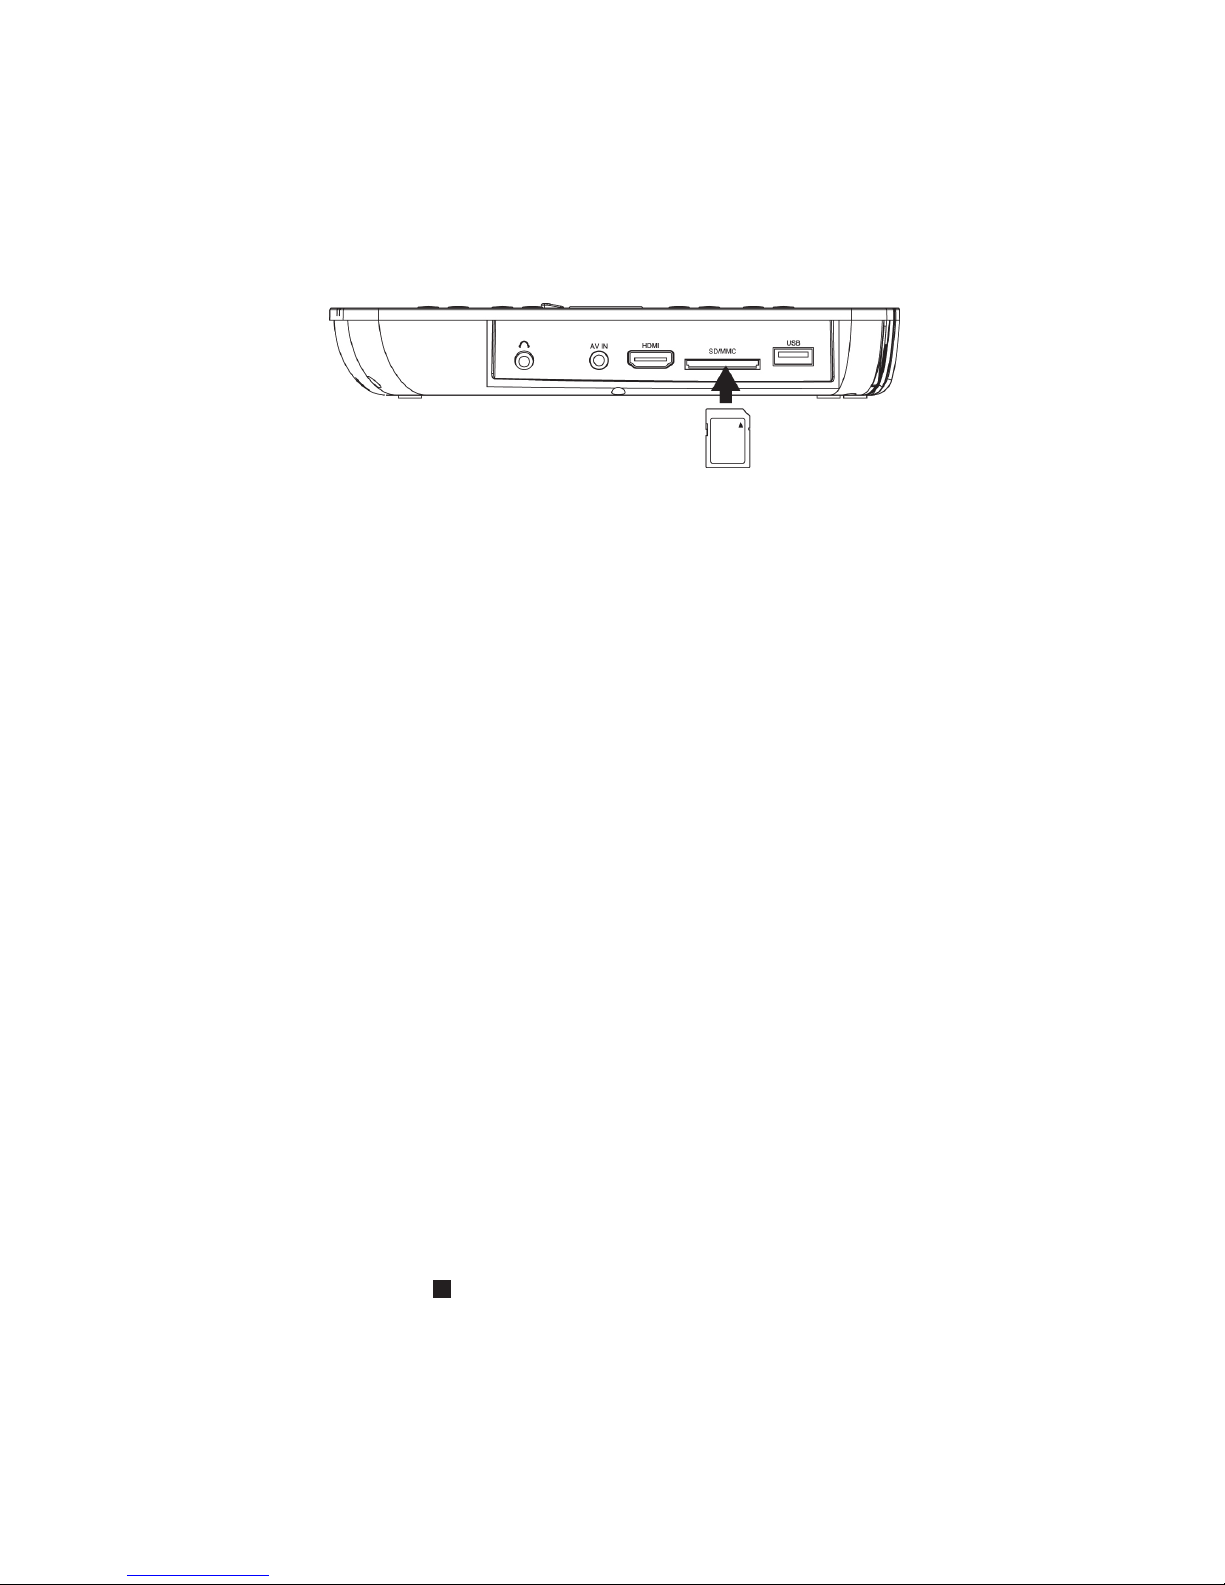
5. Connect SD/MMC Card
A SD/MMC card to play multi-media file.
Connect the SD/MMC card to the SD/MMC socket on this product.
Note:
We do not guarantee 100% compatibility with all SD/MMC card.
To play the multi-media file on USB device or SD/MMC card. Press the STOP during
playback, then press FUNCTION on the unit or on the remote.
Basic Operations
Turn On
Slide the power switch on the left side of the unit to power it on.
Setup Menu
Press SETUP to display the setup menu on the LCD screen.
Navigate the Menu
When a menu is displayed, press the Navigation Keys on the remote control to navigate
through it.
Select Menu Display Language
1. Select General Settings in SETUP Menu.
2. Press Up/Down buttons to select Language.
3. Press Right button to select OSD and press Right button again to enter the select menu,
then you can select the language you want.
4. Press OK to confirm.
Play a Disc
1. Press PUSH OPEN button to open the disc compartment.
2. Insert a disc with the label facing up.
3. Press CLOSE to close the disc compartment and start disc play.
4. To stop a disc play, press
PLAY VIDEO
Control Video Play
1. Play a title
2. Use the remote to control the play back
Page 10
8
Note:
For BD disc with Java application, the resume function is not available.
Display Menu
BD-video Disc:
MENU: Stops the video playing and returns to the disc menu. This feature is
disc-dependent.
POPUP: will access the BD-video disc menu without interrupting disc play.
DVD-video disc:
MENU will display the root menu of a disc.
DISPLAY will display disc information and guide you through the available functions on the
disc.
Change Video Play
Playing a Blu-ray Video Disc
Blu-ray video discs have larger capacity and support features such as high-definition video,
multichannel surround sound, Interactive menus and so on.
1. Insert a BD-video disc.
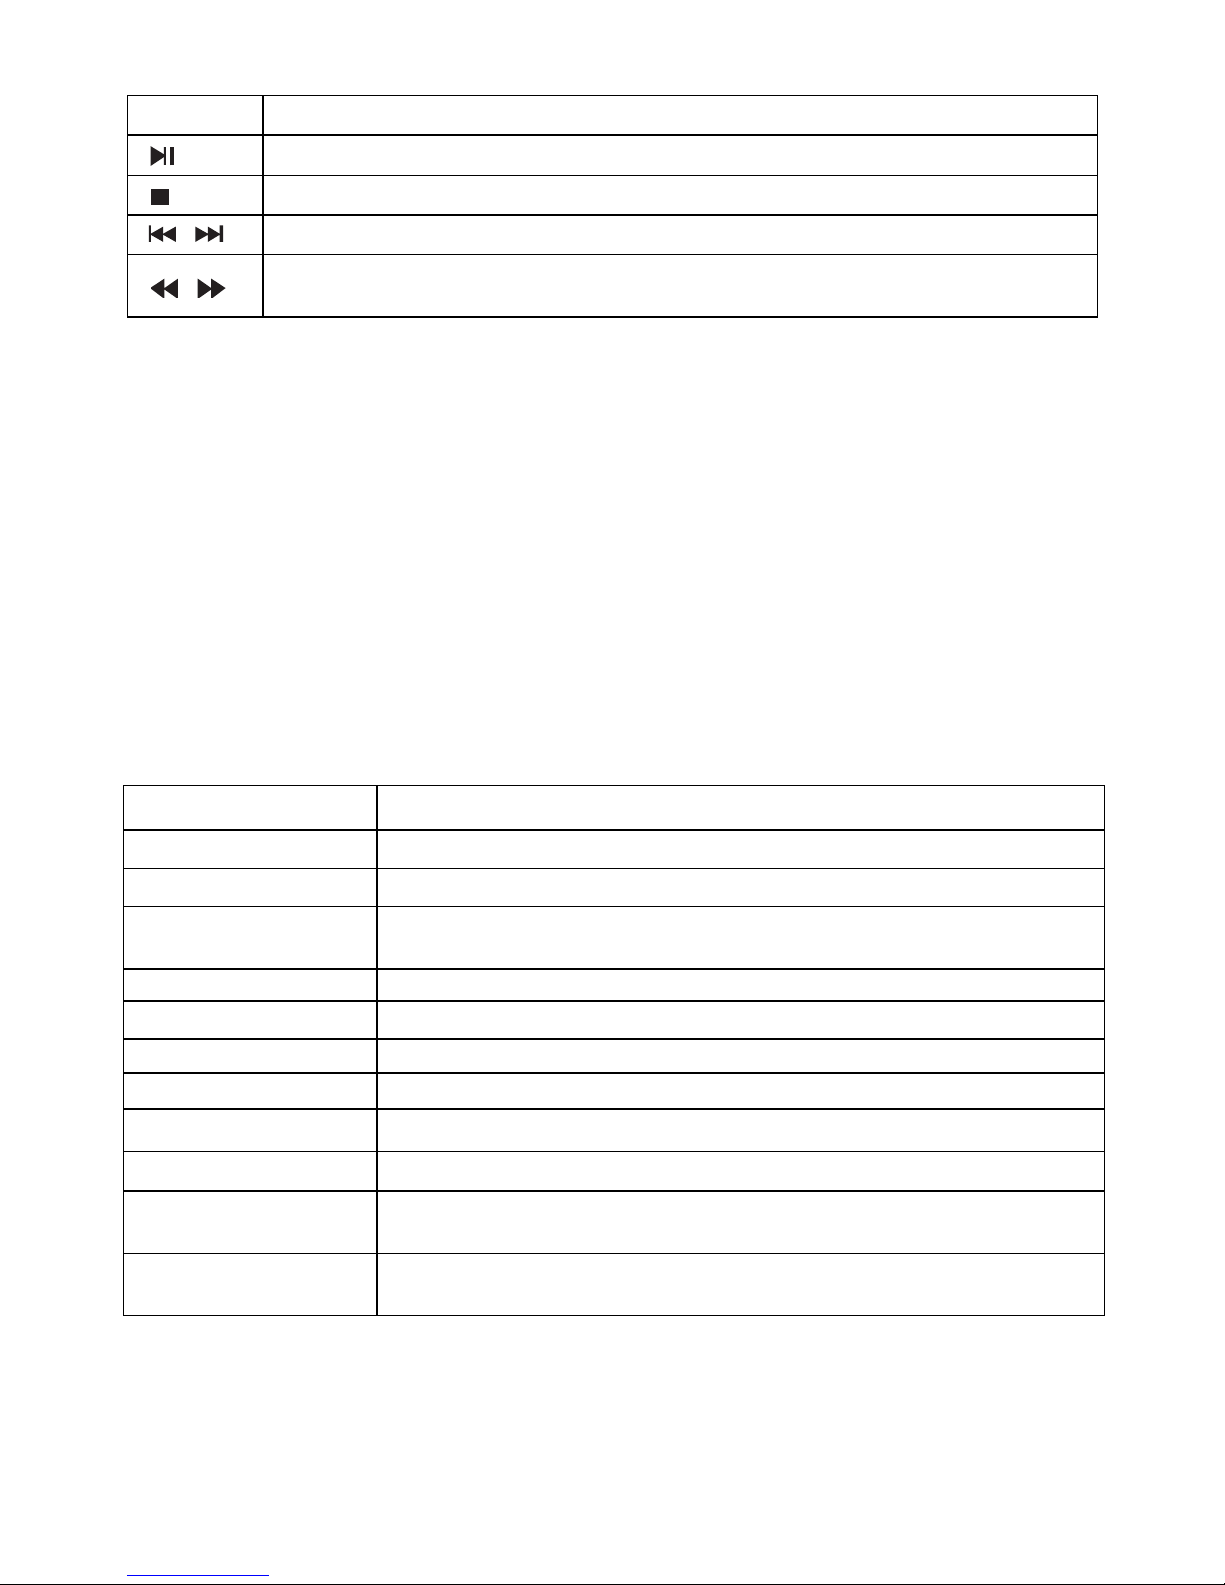
Buttons Action
Start or resume play / Pause play.
Stop play.
Skip to a previous/next title or chapter.
Search fast-backward or fast-forward.
Press repeatedly to change the search speed.
Button Action
Audio Selects an audio language
SUBTITLE Selects a subtitle language on a disc
REPEAT
Select or turn off repeat mode.
Repeat options may vary from the disc type
DISPLAY Display the current status or disc information
ZOOM Zoom in/out of the video image
BOOK MARK SET Set bookmarks of the currently playing disc
BOOK MARK VIEW View bookmarks of the currently playing disc
PROGRAM Edit the program and play
GOTO Jump to a user specified time during playback
2nd AUDIO
Switch over the audio displaying between the main window PIP
window.
OSC
Access options relating to the current activity or selection, and
control the video playback
Page 11
2. Playback will a
u
3. During playba
c
content store on t
h
4. During playbac
k
play.
Enjoying BONU
S
(Applicable only t
o
You can instantly
v
1.Press PIP to tur
n
2.Press 2nd AU
D
window.
Enjoy BD-LIV
E
You can enjoy th
e
disc when the unit
Example of BD-Li
v
1. Additional co
n
downloaded to a
c
2. Special video d
a
3. When a disc su
content provider v
Note
-The unit must be
-Depending on th
e
-When BD-Live fu
Internet service p
r
-Follow the instru
c
-It is recommend
e
free space is reco
m
tomatically start, or sele
c
k, you can press MEN
e disc.
, you can press POPUP
VIEW content
a disc compatible with
iew additional content (
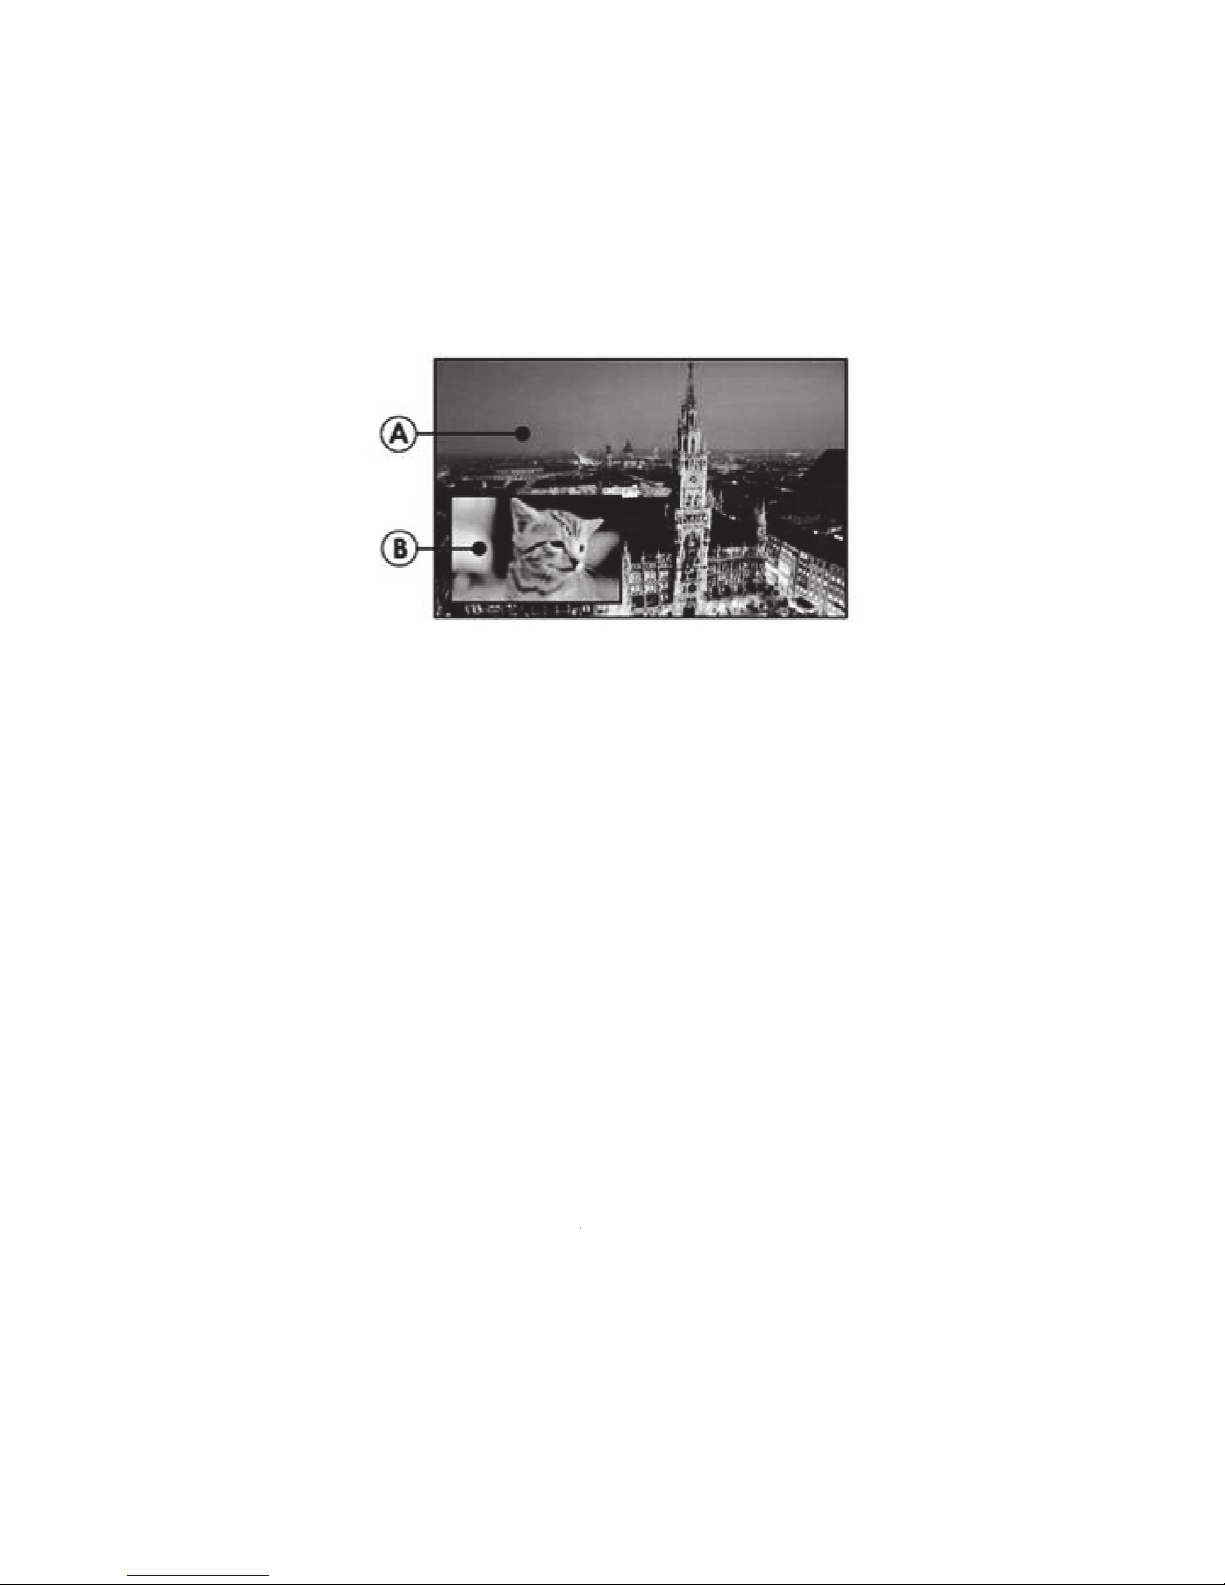
s
(A) Primary vid
e
on the secondary vide
o
IO to switch over the
a
BD-Live functions whic
is connected to the Inte
r
e Interactive functions:
tent (such as movie
t
onnected USB storage
d
ta may be played while
pporting BD-Live is play
e
a the Internet. Service a
n
connected and set up to
connection environmen
t
nctions are used and th
e
ovider charges will appl
y
tion given by the disc w
h
d to use a USB storag
e
mended).
9
t a play option in the m
e
U to display additional
to display the disc menu
the BONUSVIEW or Pi
uch as commentaries) i
n
o (B) Secondary vide
window.
udio between main Pla
h enable you to use Int
e
net.
t
railers, subtitles and
B
evice.
being downloaded.
d, the product or the dis
c
d functions will differ de
access Internet.
t
, it may take time to con
unit is connected to th
e
.
en using the BD-Live fu
n
device for download th
nu and press OK.
information, features or
without interrupting disc
cture-In-Picture feature)
a small screen window.
o
yback window and PIP
ractive functions on the
D-Java, etc.) can be
’s ID can be sent to the
pending on the disc.
nect to the Internet.
Internet, your standard
ction.
e content (at least 1GB
Page 12
10
PLAYING MUSIC
Controlling music playback
Use the remote control to control the playback for audio file.
Button Action
Start or Resume play / Pause Play
Stop Play
Skip to a previous or next title or chapter
Search fast-backward or fast-forward. Press repeatedly to change the
search speed.
Select an item to play
REPEAT Select or turn off repeat mode
PLAYING A PHOTO SLIDESHOW
You can play JPEG on the player as a slideshow.
1. Insert a disc or USB device that contains JPEG files
2. Select a Photo folder, then press OK to open.
-To select a Photo, use the Navigation buttons.
-To enlarge the selected Photo and start slideshow, press OK.
Note:
-It may require more time to display the disc content on your TV if there is a large number
of songs/ photos compiled onto one disc.
-This product can only display digital camera Pictures in the JPEG-EXIF format, typically
used by almost all digital cameras. It cannot display Motion JPEG, or Pictures in formats
other than JPEG, or sound clips associated with Pictures.
-Folders/files that exceed the supported limit of this product cannot be displayed or played.
Controlling Photo slideshow
1. Begin a Photo slideshow.
2. Use the remote control to control the play as follows:
Buttons Action
Rotate a photo
Flip a photo
Stop play
Page 13

11
Set slideshow interval and animation
1. During slideshow playback, press OSC. The options menu will be displayed.
2. Navigate the options with the Navigation button.
3. Select an option in the menu, then press OK.
4. Press OK.
Playing music during a Photo slideshow
Create a musical slideshow to play both CD music files and JPEG Photo files
simultaneously.
Note:
Create a musical slideshow, you must store the CD and JPEG files on the same disc as the
photos.
1. Select your CD music to play and start play-back.
2. Press Media Center to return to the main menu.
3. Navigate to enter a photo folder, then press OK to start slideshow play.
-Slideshow begins and continues till the end of the photo folder.
-Audio continues to play until the end of the disc.
-To stop the slideshow play, Press
-To stop the music play, press again.
Page 14
12
General Settings
BASIC OPERATION FOR THE MENU
1. Press STOP twice during playback
2. Press SETUP, the SETUP MENU display on the screen.
3. Select a main menu by LEFT/RIGHT.
4. Select the menu you want by UP/DOWN buttons and press RIGHT to enter.
You can press UP to return to the main menu.
5. Select the option by UP/DOWN and press RIGHT.
You can press LEFT to return to the previous menu.
6. Select by UP/DOWN buttons and press OK to confirm.
You can press LEFT to return to the previous menu.
7. To return to the main menu from any submenu, press RETURN.
8. To exit the menu, press SETUP.
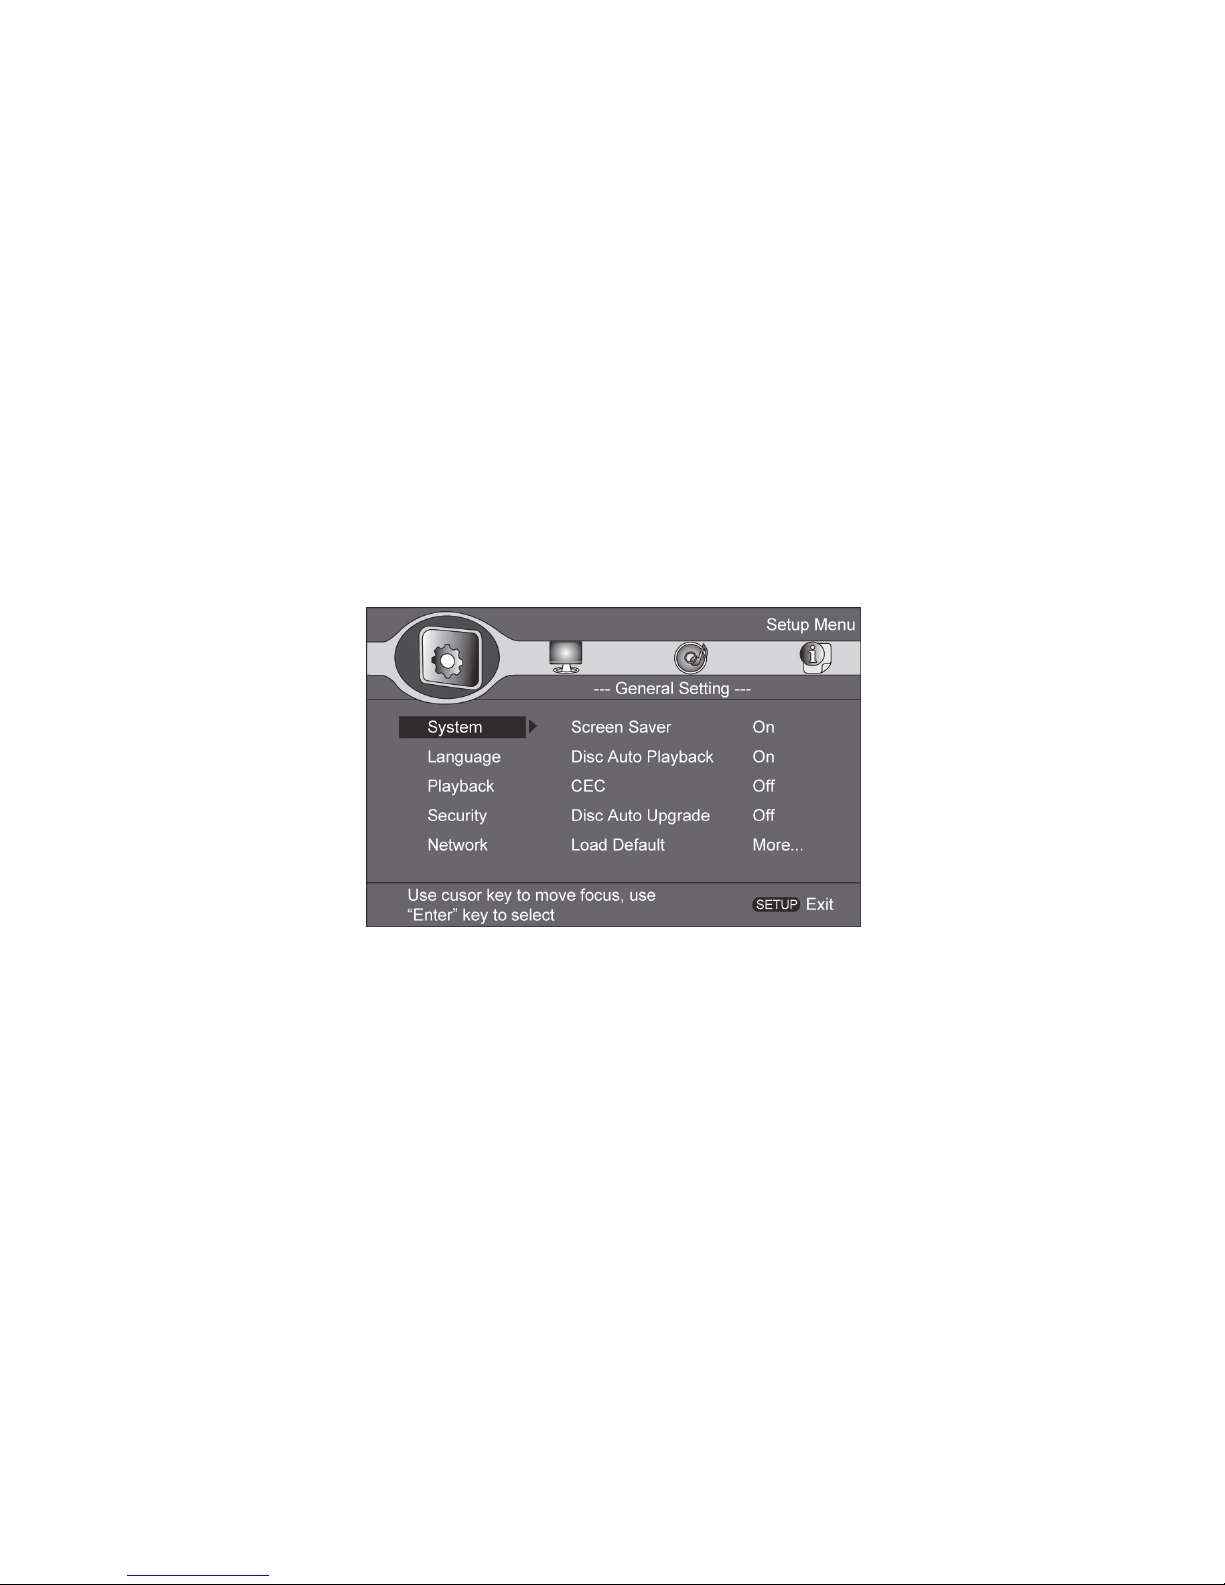
GENERAL PLAYER SETTINGS
SYSTEM
1. Screen Saver: Turns the screen saver on/off. The screen saver will display in 3 mins if
there is no operation when the unit is turned on.
2. Disc Auto Playback: Turns the disc auto playback function on/off.
3. CEC: Turns the CEC function on/off.
4. Disc Auto Upgrade: Turns the Disc Auto Upgrade function on/off.
5. Load Default: Return the player to its default settings.
6. Upgrade: select this when you want to upgrade your player software to the latest version.
7. Easy setup: Make default settings Fast.
8. BUDA: Define memory for BD-J.
* Notice : BUDA Setup has three-submenu of "External" & "On board" & " Card ". If you
choose "External" or "Card", you must connect USB or Card first.
Page 15
13
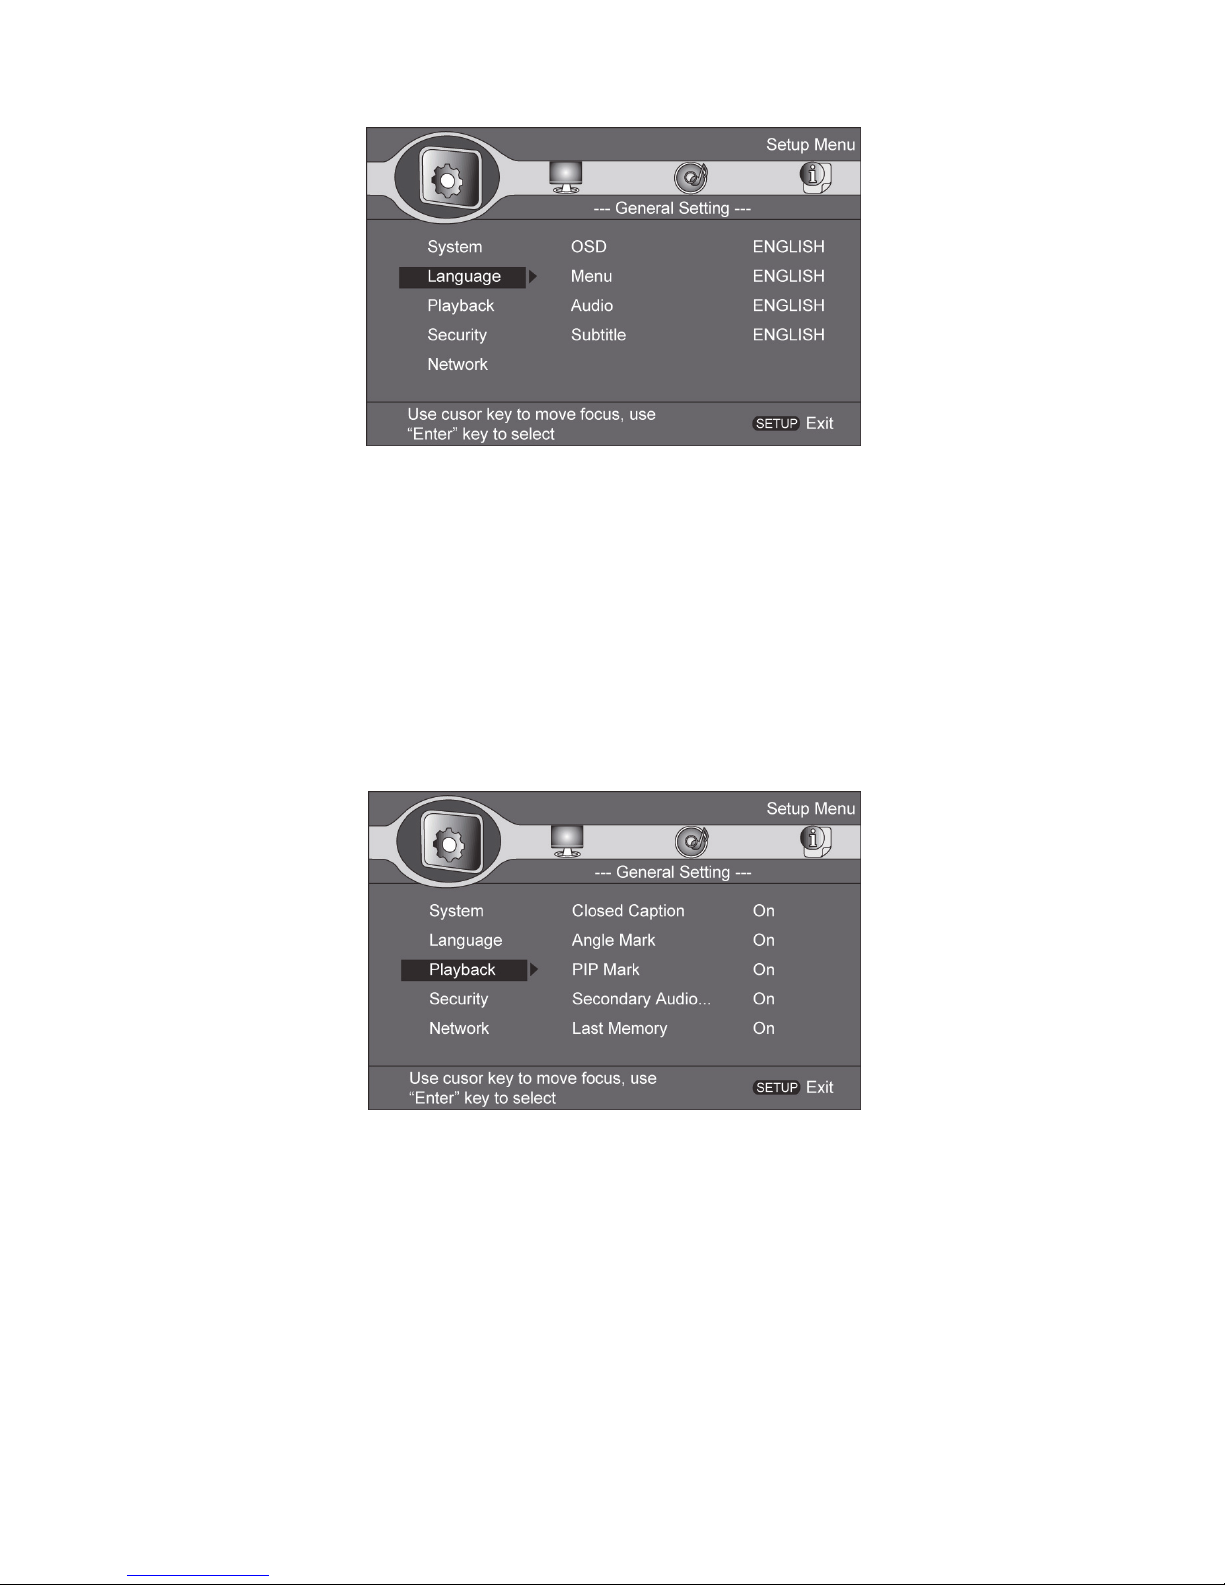
LANGUAGE
1. OSD: Selects the OSD language.
2. Menu: Selects the menu language of the disc.
3. Audio: Selects the audio language for the program.
4. Subtitle: Selects the subtitle language for the program
.
Note:
You have to select the audio and subtitle language according to the requirements on the
disc.
PLAYBACK
1. Closed Caption: Turn on/off the CC function.
2. Angle Mark: Turn on/off the Angle mark function.
3. PIP Mark: Turn on/off the PIP mark function
4. Secondary Audio Mark: Turn on/off Secondary Audio mark function.
5. Last Memory: Turn on/off the last memory function
6. PBC: Turn the PBC function on/off.
Page 16
14
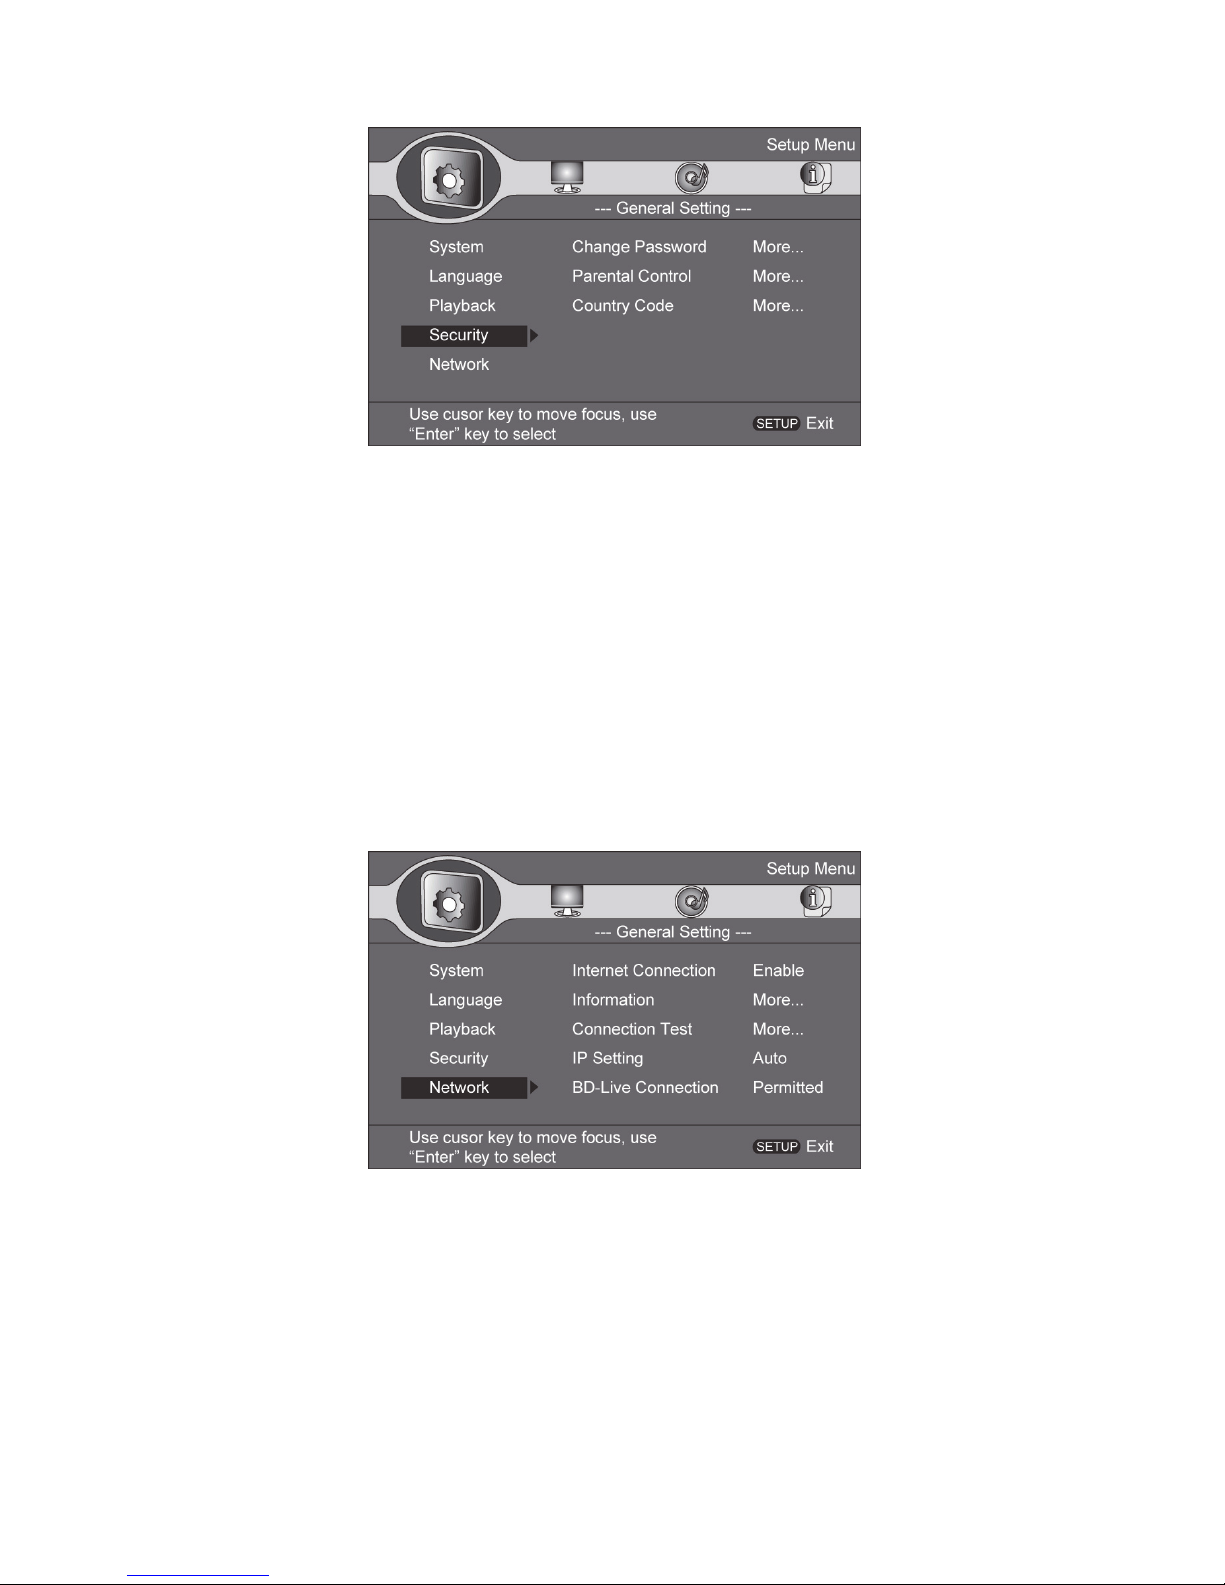
SECURITY
1. Change Password: Changes the password for parental control menu.
2. Parental Control: to set the parental control.
3. Country Code: Select the Country code.
Note:
The original code is 0000. The code can be changed by user.
NETWORK
• Connect this product to a broadband MODEM or router.
• This player will start to detect if there is a connection to the network.
• If the connection test fails, select (Retry) and press OK to try and re-connect to the network
again.
1. Internet Connection: Displays the Internet connection state.
2. Information:Displays information of the current Network.
3. Connection Test: Tests the Internet connection state.
4. IP Setting: Sets the IP for the player.
5. BD-Live Connection: Connection situation of BD-Live.
6. Proxy Setting: Setup Proxy Server.
Page 17
15
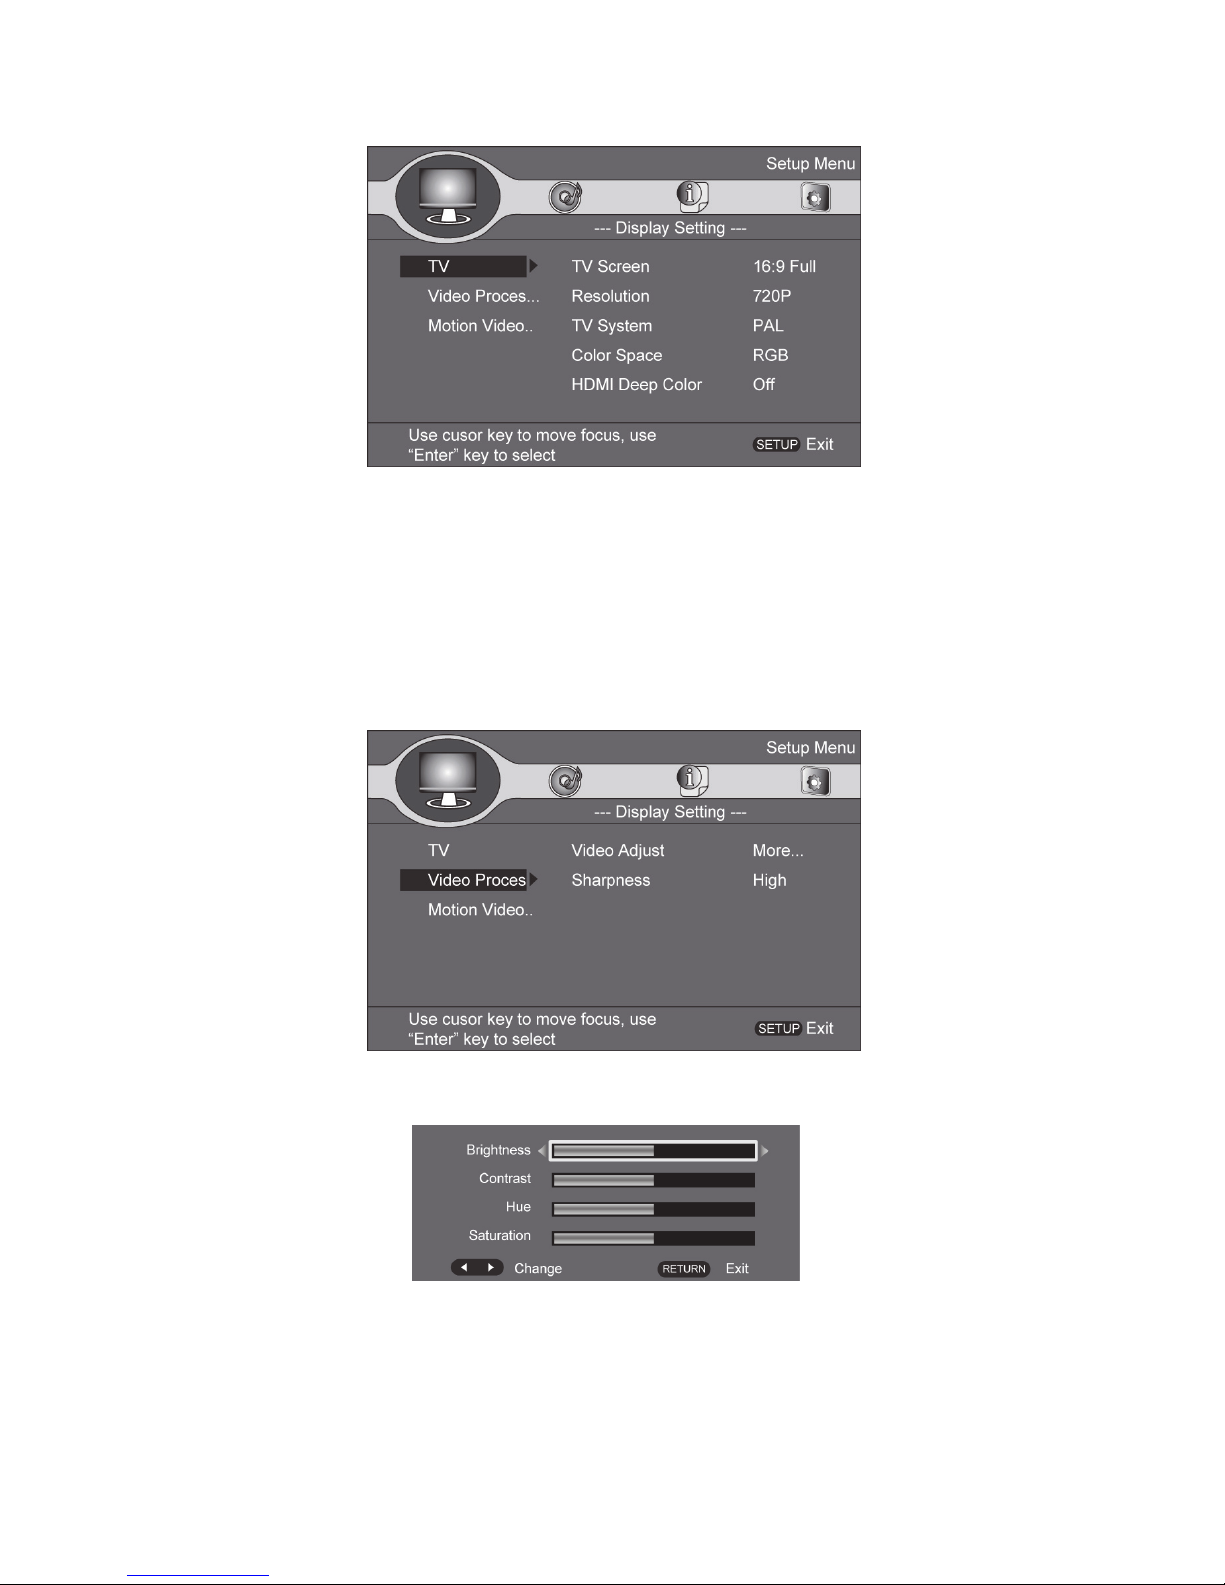
DISPLAY SETTINGS
TV
1. TV Screen: Selects the display mode for the TV.
2. Resolution: Selects the resolution for the TV.
3. TV System: Selects the TV system type.
4. Color Space: Selects the color space.
5. HDMI Deep Color: Selects the color for HDMI.
6. HDMI 1080 24Hz: Enable/disable this settings.
VIDEO PROCESSING
1. Video Adjust: Enter the submenu to adjust the video display.
2. Sharpness: Select the playback sharpness mode.
Adjust the Brightness, Contrast, Hue, Saturation of the screen to suit.
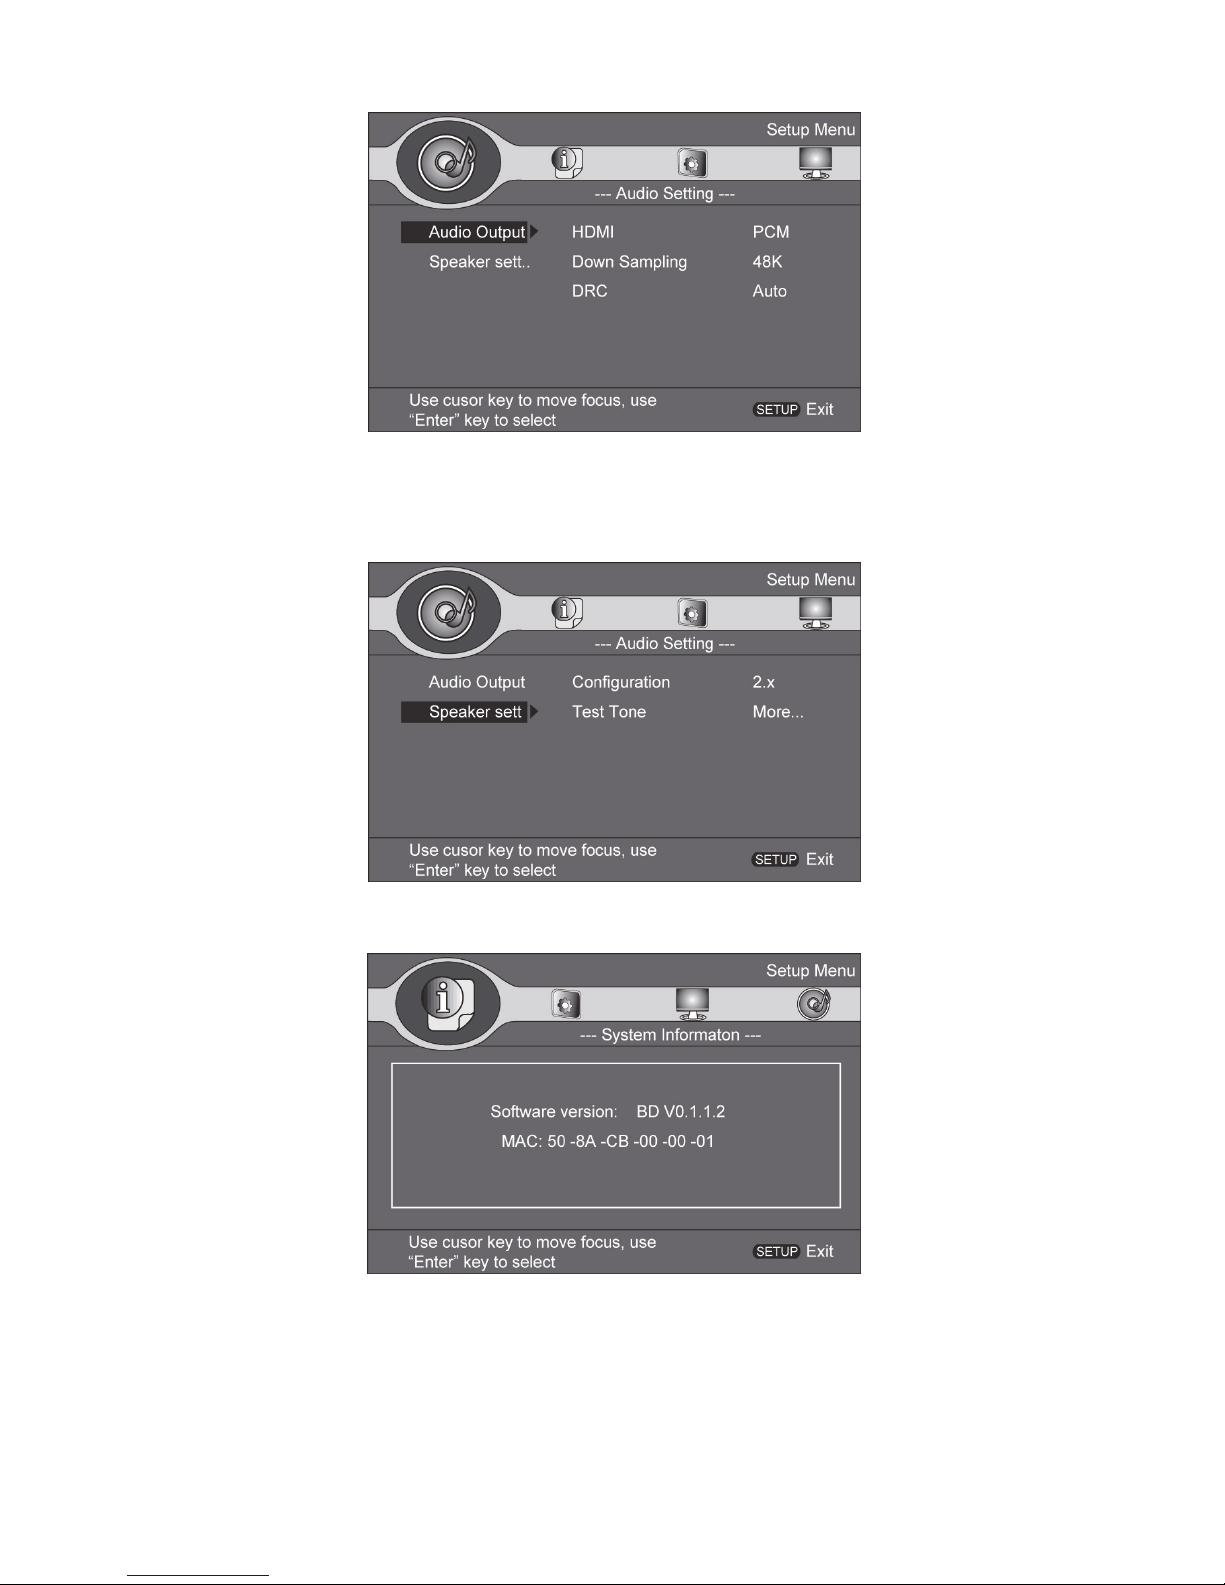
AUDIO SETTING
1. HDMI: Selects the HDMI mode.
2. Down samping: Selects down samping.
(Select this when the Amplifier connected to the placer is not 96KHz compatible)
Page 18
16
3. DRC: Dynamic range compression
Speaker Setting: Selects speaker output
1. configuration: channels 2x
2. Test Tone:
SYSTEM INFORMATION
Displays the system information (Information in the picture above is for reference only)
CLEAN DISCS
Wipe the disc with a Micro fiber Cleaning Cloth from the centre to the edge in a straight line
movement.
Page 19

17
Note
To prevent possible damage of this product do not turn off the power or remove the USB
flash drive while the software update is in progress.
Caution
Never use solvents such as benzene, thinner, cleaners available commercially, or anti-static
sprays intended for discs to clean the player.
Specifications
Playback disc formats
BD, BD-R, BD-RE, DVD-R/RW, DVD+R/RW, DVD-Video, VCD, CD, CD-R/RW
Video formats
H.264/VC1/MPEG-1/MPEG-2/MPEG-4/WMV
Audio formats
Dolby Digital, Dolby Digital Plus, Dolby TrueHD, DTS, WMA
Photos
JPEG, PNG, GIF,
Video
• Signal system: PAL / NTSC
• Composite video output: 1 Vp-p (75 ohm)
• HDMI video output: Auto, 480i/576i, 480p/576p, 720p, 1080i, 1080p, 1080p@24Hz.
Audio
• 2 Channel analog output.
-Audio Front L&R: 2 Vrms (> 1 kohm)
• Digital output: 0.5-Vp-p (75 ohm)
• HDMI output
USB
• As additional USB memory for software updates are storing BD-Live bonus contents.
Main unit
• Dimensions (w x h x d): 240x192x42(mm)
• Net Weight: 1.1kg
• Wave length:
-BD: 405 + 5nm/-5nm
-DVD:650 + 13NM/-10NM
-CD:790+15NM/-15NM
Page 20

18
Troubleshooting
WARNING: Before requesting after service please check this possible resolution. Risk of
electric shock. Never remove the casing of the product. To keep the warranty valid, never
try to repair the product yourself.
No reaction to the remote
control
• Make sure the player is connected to a power
outlet.
• Insert the batteries correctly.
• Point the remote control at the IR sensor located on
the front panel of this product.
• If the remote still does not function, try putting new
batteries into the remote control.
No picture/sound
• Make sure the connection is in good condition;
volume is not too low; audio receiver or TV work
normally; audio setting is proper.
No picture on HDMI connection
• If this player is connected to an unauthorized
display device with an HDMI cable, the audio/video
signal may not be displayed
• Check if the HDMI cable is faulty. If faulty or
damaged, replace the HDMI cable.
• If this happens when you change the [resolution]
setting, press Resolution on the remote control
repeatedly until the picture appears.
High-definition video signal
not playing on the TV
• Ensure that the audio cables are connected to the
audio input of the TV
• Assign the audio input of the TV to the
corresponding video input. See the TV user manual
for details.
No sound on HDMI connection
• You may not hear any sound from the HDMI output
if the connected device is non-HDCP compliant or
only DIVI compatible.
Disc cannot be played
• Ensure that the disc is loaded properly
• Ensure that this player supports the disc. See
Specifications.
• Ensure that this player supports the region code of
the DVD or BD.
• For DVD+RW, ensure that the disc is finalized.
• Clean the disc.
Data Files cannot be played or
read
• Ensure that the data file was recorded in the
standard UDF, ISO9660 or JOLIET format.
• Ensure that the JPEG file extension .jpg, JPG, jpeg
or JPEG.
Page 21
19
Not entry sign appears on the
TV
• The requested operation is not possible.
Unable to access BD-Live
feature
•Check the network internet connection or ensure
that the network Internet connection has been set up
•Clear USB storage.
•Ensure that the BD disc supports BD Live Feature.
This is to certify that the PORTABLE DVD PLAYER is in conformity with Council directive
2014/30/EU (EMC Directive)
Applicable standards:
EN 55013: 2013,
EN 55020: 2007+A11: 2011
EN 61000-3-2: 2014
EN 61000-3-3: 2013
LVD:
EN 60065: 2014
For more information please visit our website
www.mpmaneurope.com
Page 22
Lecteur DVD Blu-ray portable
Modèle : PDVBR2
Manuel d'utilisation
FR
20
Page 23

21
Sécurité et entretien
Ce symbole indique une « tension dangereuse » dans le produit qui présente un
risque de choc électrique ou de blessure.
Ce symbole indique des instructions importantes accompagnant le produit.
AVERTISSEMENT: Pour réduire le risque d'incendie ou de choc électrique, n’exposez pas
ce produit à la pluie ou à l'humidité. Cet appareil ne doit pas être exposé à des gouttes ou à
des éclaboussures et à aucun objet rempli de liquides, comme des vases, ne doivent être
placé sur l'appareil.
Instructions de sécurité
Lisez toutes les instructions avant d'utiliser ce lecteur Blu-ray et conservez ce manuel dans
un endroit sûr pour référence future.
1. Lisez et gardez ces instructions.
2. Respectez tous les avertissements et suivez toutes les instructions.
3. N’utilisez pas ce lecteur près de l'eau.
4. Nettoyez uniquement avec un chiffon sec.
5. N’obstruez pas les ouvertures de ventilation et installez conformément aux instructions
du fabricant.
6. Ne l’installez pas près de sources de chaleur telles que des radiateurs, chauffage
électrique, ou le lecteur (y compris les amplificateurs) qui produisent de la chaleur.
7. Protégez le cordon d'alimentation d'être piétiné ou pincé, en particulier à proximité des
prises de courant, et le point où ils sortent depuis le lecteur.
8. Utilisez uniquement avec le chariot, le socle, le trépied, le tableau spécifié par le fabricant
ou vendu avec le lecteur. Lorsque vous utilisez un chariot, faites attention lorsque vous
déplacez l'ensemble chariot / lecteur pour éviter les blessures en cas de chute.
9. Débranchez ce lecteur en cas d'orage ou lorsqu'il est inutilisé pendant de longues
périodes de temps.
10. Les travaux de réparation doivent se faire par un personnel qualifié.
Une réparation est nécessaire lorsque le lecteur a été endommagé de quelque façon, tel
que le cordon d'alimentation ou la prise est endommagé, du liquide a été renversé ou des
objets sont tombés dans le lecteur, le lecteur a été exposé à la pluie ou à l'humidité, ne
fonctionne pas normalement, ou a été laissé tombé.
11. Veuillez garder l'appareil dans un environnement avec une bonne ventilation.
12. AVERTISSEMENT: Pour réduire le risque d'incendie ou d'électrocution, ne pas exposer
cet appareil à la pluie ou à l'humidité. L'appareil ne doit pas être exposé à des gouttes ou
des éclaboussures et à aucun objet rempli de liquides, comme des vases, doit être placé
sur le lecteur.
13. AVERTISSEMENT: Si une prise secteur ou un coupleur d'appareil est utilisé comme
dispositif de déconnexion, le dispositif de déconnexion doit rester facilement accessible.
14. Ne pas exposer les piles à une chaleur excessive, comme le feu, rayon du soleil direct
ou de sources similaires.
Page 24

22
ATTENTION: Pour réduire le risque de choc électrique, ne pas retirer le couvercle (ou
l'arrière). Aucune pièce réparable par l'utilisateur ne se trouve dans l’emballage.
Reportez-vous à un personnel qualifié.
PRODUIT LASER DE CLASSE 1
L'utilisation de commandes, de réglages ou de procédures autres que ceux spécifiés ici
peut entraîner une exposition à des rayonnements dangereux.
Avis de marque déposée
DVD vidéo est une marque de commerce de DVD Format / Logo Licensing Corporation.
Blu-ray Disc et le logo Blu-ray Disc sont des marques déposées de Blu-ray Disc
Association.
Fabriqué sous licence de Dolby Laboratories. Dolby, Dolby Audio et le symbole double-D
sont des marques déposées de Dolby Laboratories.
Pour les brevets DTS, voir http://patents.dts.com. Fabriqué sous licence DTS Licensing
Limited. le DTS, le symbole, et DTS et le symbole tous ensemble sont des marques
déposées, et DTS 2.0 + Digital Out est une marque déposée de DTS, Inc. © DTS, Inc. Tous
droits réservés.
Java et toutes les autres marques de commerce Java et le logo sont des marques
déposées de Sun Microsystems, Inc.
Avis sur Cinavia
Ce produit utilise la technologie Cinavia pour limiter l'utilisation de copies non autorisées de
certains films et vidéos commercialement produits et leurs bandes sonores. Quand une
utilisation interdite d'une copie non autorisée est détectée, un message sera affiché et la
lecture ou la copie sera interrompue.
Si la lecture ou la copie est interrompue et l'un des messages ci-dessous est affiché, le
contenu est une copie non autorisée protégé par la technologie Cinavia.
Message
Code de Message Cinavia
[Message(s) 1] 1
[Message(s) 2] 2
[Message(s) 3] 3
[Message(s) 4] 4
Plus d'informations sur la technologie Cinavia est disponible au Centre d'information des
consommateurs en ligne de Cinavia à http://www.cinavia.com. Pour demander des
informations supplémentaires sur Cinavia par courrier, envoyez une carte postale avec
votre adresse postale à : Cinavia informations Consumer Center, P.O. Box 86851, San
Diego, CA, 92138, USA.
Page 25
23
Message IPR
Verance Corporation Droit d'auteur 2004-2013. Cinavia est une marque déposée de
Verance Corporation.
Protégé par le brevet US 7.369.677 et brevets mondiaux émis et en attente sous licence de
Verance Corporation. Tous droits réservés.
BD LIVE et BONUSVIEW sont des marques de Blu-ray Disc Association.
ATTENTION: Ce produit utilise un laser.
N’ouvrez pas le couvercle et ne le réparez pas vous-même. Référez-vous à un
personnel qualifié.
Page 26
24
Emplacement des commandes
L'écran principal
Face avant
1. Écran LCD 2. Capteur de la télécommande 3. Haut-parleur
4. Couvercle du disque 5. FERMER 6. APPUYER POUR OUVRIR
7. MODE 8. PARAMÈTRES 9. VOLUME –
10. VOLUME + 11. GAUCHE 12. HAUT
13. DROITE 14. BAS 15. ARRÊT
16. LECTURE/PAUSE 17. FONCTION 18. OK
19. Indicateur de CHARGE 20. Indicateur de puissance
Page 27

25
Remarque :
Indicateur de puissance :
Mise sous tension : lumière bleue allumée, mise hors tension : lumière bleu éteinte.
Indicateur de charge :
En charge : lumière rouge allumée, pleine : lumière rouge éteinte.
Batterie faible : lumière rouge clignote (remarque, il n'y a pas d’indicateur de batterie faible
lors de l’état hors tension)
Côté droite Côté gauche
L’arrière
1. CASQUE 2. Entrée AV 3. Sortie HDMI 4. SD/MMC
5. USB 6. Entrée DC de 12V 7. ON/OFF (Allumé /Eteindre) 8. LAN
Télécommande
La télécommande
1. Fonction 2. Mode
3. Répéter4. Affichage
5. Sous-titre 6. Aller à
7. OSC 8. Titre/Afficher
9. Audio 10. Paramètre
11. OK 12. Flèche directionnelle
13. Retour 14. Avance rapide
15. Retour rapide 16. Vert/Paramètre Marque page
17. Rouge/Programme 18. Menu
19. Muet 20. Boutons chiffre (0-9)
21. Effacer 22. Audio secondaire
23. Angle 24. PIP
25. Volume+ 26. Volume-
27. Arrêt 28. Lecture/Pause
29. Précédent 30. Suivant
31. Jaune/Voir marque page 32. Bleu/ Zoom
Page 28

26
Utilisation de la télécommande
1. La télécommande doit pointer vers le capteur, pour que le
lecteur de DVD fonctionne correctement.
2. La télécommande fonctionne mieux à une distance inférieure à
3 mètres et à un angle de +/- 30 ° vers l'avant de l'appareil.
3. Des obstacles ne doivent pas rester entre la télécommande et
le capteur de la télécommande de l'unité principale.
Guide de démarrage rapide
1. Connexion à une source d'alimentation externe
Branchez l'adaptateur secteur (fourni avec le lecteur) à la prise d'entrée sur le côté et à une
prise murale. Ne pas utiliser un autre appareil spécifié autrement par votre revendeur.
2. Ouvrez le panneau d'écran.
Le panneau d'écran du DVD portable s’ouvre à un angle maximum de 180 °. Et il peut
pivoter sur 270 °.
3. Appuyez sur la touche PUSH OPEN pour ouvrir le couvercle du disque.
4. Insérez un disque DVD avec l'étiquette vers le haut.
Alignez le centre du disque DVD avec le centre du guide de disque. Appuyez doucement
sur le DVD pour enclencher le disque en place, puis fermez le couvercle du disque.
5. Faites glisser l’interrupteur d'alimentation sur le côté gauche de l'appareil pour le mettre
sous tension.
Entrée DC de 12V Sous/Hors tension
6. Appuyez sur le bouton OK ou LECTURE / PAUSE sur l'appareil pour démarrer la lecture.
Dans la plupart des cas, lorsque vous quittez par le bouton LECTURE / PAUSE, la lecture
continue à être utilisés par LECTURE / PAUSE.
Le lecteur de DVD commencera immédiatement le rendu du programme DVD.
Lorsque vous voulez arrêter, appuyez sur la touche STOP, il retournera au logo de
démarrage.
Le lecteur peut être rechargé pendant la lecture.
Page 29

27
Les connexions
1. Connecter des écouteurs
1. Branchez les écouteurs. Les écouteurs avec une fiche stéréo de 3,5 mm peuvent être
connectés.
2. Réglez le volume en appuyant sur les touches VOL + / VOL- sur la télécommande.
Le côté droit du portable
Évitez l'écoute du son à des niveaux qui peuvent être nocifs pour vos oreilles.
2. Connexion HDMI
Branchez le câble HDMI (non fourni) à la prise HDMI sur ce produit et à la prise d'entrée
HDMI du téléviseur.
Changez la résolution sur 1080P pour un meilleur effet d'image.
Définissez la résolution sur 720P pour un meilleur effet d'image de l'écran après avoir fini
d'utiliser la prise HDMI.
Astuce
• Vous pouvez optimiser la sortie vidéo en appuyant sur le bouton de résolution pour
sélectionner la meilleure résolution que le téléviseur peut supporter.
• Pour lire les images vidéo numériques d'une vidéo BD ou d’une vidéo DVD via une
connexion HDMI, il est nécessaire que ces deux produits et le dispositif d'affichage (ou un
récepteur / amplificateur AV) prennent en charge un système de protection des droits
d'auteur appelé HDCP (high-bandwidth digital content protection system)
• Ce type de connexion fournit la meilleure qualité d'image.
3. Se connecter au réseau
Connectez ce produit au réseau pour profiter des mises à jour de logiciels et de contenu
bonus BD-Live.
Page 30

28
Branchez le câble réseau (non fourni) à la prise LAN sur ce produit, puis connectez le câble
réseau à la prise LAN sur le modem haut débit ou le routeur.
4. Brancher un périphérique USB
Une carte de périphérique USB pour lire le fichier multimédia.
Connectez le périphérique USB à la prise USB sur ce produit.
Remarque:
Nous ne garantissons pas une compatibilité à 100% avec tous les périphériques USB.
5. Connecter une carte SD / MMC
Une carte SD / MMC pour lire un fichier multimédia.
Connectez la carte SD / MMC à la l’emplacement SD / MMC sur ce produit.
Remarque:
Nous ne garantissons pas une compatibilité à 100% avec toutes les cartes SD / MMC.
Pour lire le fichier multimédia sur le périphérique USB ou une carte SD / MMC, appuyez sur
la touche STOP pendant la lecture, puis appuyez sur FONCTION sur l'appareil ou sur la
télécommande.
Opérations de base
Mise en marche
Faites glisser le commutateur d'alimentation sur le côté gauche de l'appareil pour le mettre
sous tension.
Page 31

29
Menu des paramètres
Appuyez sur Paramètres pour afficher le menu de configuration sur l'écran LCD.
Naviguer dans le menu
Quand un menu est affiché, appuyez sur les touches de navigation de la télécommande
pour naviguer à travers elle.
Sélectionner Menu Langue d'affichage
1. Sélectionnez Paramètres généraux dans le menu Paramètres.
2. Appuyez sur Up / Down pour sélectionner la langue.
3. Appuyez sur la touche Right (droite) pour sélectionner OSD et appuyez à nouveau sur le
bouton Right pour entrer dans le menu de sélection, vous pouvez sélectionner la langue
souhaitée.
4. Appuyez sur OK pour confirmer.
Lecture d'un disque
1. Appuyez sur le bouton le PUSH (OPEN) pour ouvrir le compartiment du disque.
2. Insérez un disque avec l'étiquette vers le haut.
3. Appuyez sur CLOSE pour fermer le compartiment à disque et lancez la lecture du disque.
4. Pour arrêter une lecture du disque, appuyez sur
LECTURE D’UNE VIDEO
Contrôle de la lecture vidéo
1. Lire un titre
2. Utilisez la télécommande pour contrôler la lecture
Boutons Action
Commencer ou continuer la lecture/pause
Arrêter la lecture
Sauter au titre/chapitre précédente/suivante
Rechercher retour rapide ou avance rapide
Appuyer par répétition pour changer la rapidité de la recherche
Remarque:
Pour les disques BD avec application Java, la fonction de reprise n’est pas disponible.
Menu d'affichage
Disque BD :
MENU: Arrêt de la lecture vidéo et retour au menu du disque. Cette fonction dépend du
disque.
POPUP: accède au menu du disque BD-vidéo sans interrompre la lecture du disque.
Disque DVD :
MENU affiche le menu racine d'un disque.
AFFICHAGE affiche les informations du disque et vous guide à travers les fonctions
disponibles sur le disque.
Page 32

30
Changer la lecture vidéo
Bouton Action
Audio Sélectionne la langue audio
SOUS TITRE Sélectionne une langue de sous-titres sur un disque
REPETER
Sélectionne ou désactive le mode de répétition.
Les options de répétition peuvent varier du type de disque
AFFICHAGE
Display the current status or disc information
Affichage de l'état ou les informations actuelles du disque
ZOOM Zoom avant / arrière de l'image vidéo
CONFIGURATION
SIGNETS
Définir des signets du disque en cours de lecture
VOIR SIGNETS Voir les signets du disque en cours de lecture
PROGRAMME Modifier le programme et lire
ALLER A Aller à un temps spécifié par l'utilisateur lors de la lecture
AUDIO secondaire
Commuter l’affichage audio entre la fenêtre principale et la
fenêtre PIP.
OSC
Options d'accès relatives à l'activité ou à la sélection en
cours, et contrôle la lecture vidéo
Lecture d'un disque Blu-ray
Les disques Blu-ray ont de plus grandes caractéristiques de capacité et de support tels que
la vidéo haute définition, le son surround multicanaux, les menus interactifs et ainsi de suite.
1. Insérez un disque BD.
2. La lecture démarre automatiquement, ou sélectionnez une option de lecture dans le
menu et appuyez sur OK.
3. Pendant la lecture, vous pouvez appuyer sur MENU pour afficher des informations
supplémentaires, des fonctionnalités ou stocker le contenu sur le disque.
4. Pendant la lecture, vous pouvez appuyer sur POPUP pour afficher le menu du disque
sans interrompre la lecture du disque.
Bénéficiant d'un contenu BONUSVIEW
(Applicable uniquement sur un disque compatible avec le BONUSVIEW ou la fonctionnalité
Picture-In-Picture) Vous pouvez visualiser instantanément du contenu supplémentaire
(comme les commentaires) dans une petite fenêtre.
Page 33

31
(A) Vidéo primaire (B) Vidéo secondaire
1.Appuyez sur PIP pour activer la fenêtre de vidéo secondaire.
2.Appuyez sur AUDIO secondaire pour basculer sur l'audio entre la fenêtre principale de
lecture et la fenêtre PIP.
Profitez de BD-LIVE
Vous pouvez profiter des fonctions BD-Live qui vous permettent d'utiliser des fonctions
interactives sur le disque lorsque l'appareil est connecté à Internet.
Exemple de fonctions interactives BD-Live :
1. Le contenu supplémentaire (tels que les bandes annonces de films, les sous-titres et
BD-Java, etc.) peut être téléchargé sur un périphérique de stockage USB connecté.
2. Des données vidéo spéciales peuvent être lues pendant le téléchargement.
3. Quand un disque supportant BD-Live est lu, le produit ou l'ID du disque peut être envoyé
au fournisseur de contenu via Internet. Le service et les fonctions diffèrent en fonction du
disque.
Remarque
-L’appareil doit être connecté et configuré pour accéder à Internet.
-Selon l'environnement de connexion, il peut prendre le temps de se connecter à Internet.
-Lorsque les fonctions BD-Live sont utilisées et l'appareil est connecté à l'Internet, vos frais
de fournisseur de services Internet standard seront applicables.
-Suivez l'instruction donnée par le disque lors de l'utilisation de la fonction BD-Live.
-Il est recommandé d'utiliser un périphérique de stockage USB pour télécharger le contenu
(au moins 1 Go d'espace libre est recommandé).
Page 34

32
LIRE DE LA MUSIQUE
Contrôle de la lecture de musique
Utilisez la télécommande pour contrôler la lecture de fichiers audio.
Bouton Action
Démarrer ou Reprendre la lecture / Pause
Arrêter la lecture
Passer au titre ou chapitre précédent ou suivant
Recherche retour rapide ou avance rapide. Appuyez plusieurs fois
pour c hanger la vitesse de recherche.
Sélectionnez un élément à lire
REPETER Sélectionner ou désactiver le mode de répétition
LECTURE D'UN DIAPORAMA DE PHOTO
Vous pouvez afficher le JPEG sur le lecteur comme un diaporama.
1. Insérez un disque ou périphérique USB qui contient des fichiers JPEG
2. Sélectionnez un dossier de photos, puis appuyez sur OK pour ouvrir.
-Pour Sélectionner une photo, utilisez les boutons de navigation.
-Pour agrandir la photo sélectionnée et lancer un diaporama, appuyez sur OK.
Remarque :
-Il peut nécessiter plus de temps pour afficher le contenu du disque sur votre téléviseur s'il y
a un grand nombre de chansons / photos compilées sur un seul disque.
-Ce produit peut afficher uniquement les photos d’appareil photo numérique au format
JPEG-EXIF, utilisé par presque tous les appareils photo numériques. Il ne peut pas afficher
de Motion JPEG ou d'images dans des formats autres que JPEG ou des clips sonores
associés à des images.
-Les dossiers / fichiers qui dépassent la limite prise en charge de ce produit ne peut être
affichés ou joués.
Contrôle du diaporama photo
1. Commencer un diaporama photo.
2. Utilisez la télécommande pour contrôler la lecture comme suit :
Boutons Action
Faire pivoter une photo
Retournez une photo
Arrêt de la lecture
Page 35

33
Régler l'intervalle et l'animation du diaporama
1. Pendant la lecture du diaporama, appuyez sur OSC. Le menu d'options sera affiché.
2. Parcourez les options avec le bouton de navigation.
3. Sélectionnez une option dans le menu, puis appuyez sur OK.
4. Appuyez sur OK.
Lire de la musique pendant un diaporama photo
Créer un diaporama musical pour lire à la fois des fichiers de musique de CD et des fichiers
Photo JPEG simultanément.
Remarque :
Créer un diaporama musical, vous devez stocker les fichiers CD et JPEG sur le même
disque que les photos.
1. Sélectionnez votre CD de musique à jouer et commencer la lecture
2. Appuyez sur Media Center pour revenir au menu principal.
3. Naviguez pour entrer dans un dossier de photos, puis appuyez sur OK pour lancer le
diaporama.
-Le diaporama commence et se poursuit jusqu'à la fin du dossier de photos.
-L’audio continue à jouer jusqu'à la fin du disque.
-Pour arrêter la lecture du diaporama, Appuyez sur
-Pour arrêter la lecture de la musique, appuyez à nouveau sur
Page 36

34
Paramètres généraux
FONCTIONNEMENT DE BASE POUR LE MENU
1. Appuyez deux fois sur STOP pendant la lecture
2. Appuyez sur SETUP (Configuration), l'écran affiche SETUP MENU (Configuartion du
menu).
3. Sélectionnez un menu principal par GAUCHE / DROITE.
4. Sélectionnez le menu souhaité par les boutons HAUT / BAS et appuyez sur DROITE
pour entrer.
Vous pouvez appuyer sur HAUT pour revenir au menu principal.
5. Sélectionnez l'option par HAUT / BAS et appuyez sur DROITE.
Vous pouvez appuyer sur GAUCHE pour revenir au menu précédent.
6. Sélectionnez par les touches HAUT / BAS et appuyez sur OK pour confirmer.
Vous pouvez appuyer sur GAUCHE pour revenir au menu précédent.
7. Pour revenir au menu principal de tout sous-menu, appuyez sur RETURN.
8. Pour quitter le menu, appuyez sur SETUP.
SYSTEME DE PARAMETRES
DE LECTURE GENERALE
1. Économiseur d'écran : Activez/désactivez l'économiseur d'écran. L'économiseur d'écran
affichera en 3 minutes s'il n'y a pas de fonctionnement lorsque l'appareil est sous tension.
2. Lecture auto de disque : Activez/désactivez la fonction de lecture automatique du disque.
3. CEC : Activez/désactivez la fonction CEC.
4. Mise à niveau automatique du disque : Activez/désactivez la fonction de mise à niveau
automatique du disque.
5. Chargement par défaut : Remettez le lecteur à ses réglages par défaut.
6. Mise à jour : sélectionnez cette option lorsque vous souhaitez mettre à jour votre logiciel
de lecture à la dernière version.
7. Installation facile : Effectuez les réglages par défaut rapide.
8. BUDA : Définissez la mémoire pour BD-J.
* Avertissement : Les réglages de BUDA a trois sous-menu « Externe » et « On board» et
« Carte ». Si vous choisissez « Externe » ou « Carte », vous devez vous connecter à l’USB
Page 37

35
ou à la carte en premier.
LANGUE
1. OSD : Sélectionne la langue de l'OSD.
2. Menu : Sélectionne la langue du menu du disque.
3. Audio : Sélectionne la langue audio pour le programme.
4. Sous-titre : Sélectionne la langue des sous-titres pour le programme.
Remarque :
Vous devez sélectionner l'audio et la langue des sous-titres en fonction des besoins sur le
disque
LECTURE
1. Sous-titrage : Activez / désactivez la fonction CC.
2. Marquage d’angle : Activez / désactivez la fonction de marquage d’angle.
3. Marquage PIP : Activez / désactivez la fonction marquage PIP
4.Marquage audio secondaire : Activez / désactivez la fonction marquage audio secondaire.
5. Dernière mémoire : Activez / désactivez la fonction dernière mémoire
6. PBC : Activez / désactivez la fonction PBC.
Page 38

36
SECURITE
1. Changer le mot de passe : Changez le mot de passe pour le menu du contrôle parental.
2. Contrôle parental : pour définir le contrôle parental.
3. Code du pays : Sélectionnez le code du pays.
Remarque :
Le code original est 0000. Le code peut être modifié par l'utilisateur.
RESEAUX.
• Connectez ce produit à un modem haut débit ou un routeur.
• Ce lecteur va commencer à détecter s'il y a une connexion au réseau.
• Si le test de connexion échoue, sélectionnez Réessayer (Retry) et appuyez sur OK pour
essayer de se re-connecter à nouveau au réseau.
1. Connexion Internet : Affiche l'état de la connexion Internet.
2. Information : Affiche des informations du réseau actuel.
3. Test de connexion : Teste l'état de la connexion Internet.
4. Réglage IP : Définit l'IP pour le lecteur.
5. Connexion au BD-Live : la situation de connexion de BD-Live.
6. Réglage du Proxy : Configuration du serveur proxy.
Page 39

37
REGLAGES DE L’ECRAN TV
1. Écran TV : Sélectionne le mode d'affichage du téléviseur.
2. Résolution : Sélectionne la résolution du téléviseur.
3. Système TV : Sélectionne le type de système de téléviseur.
4. Espace colorimétrique : Sélectionne l'espace couleur.
5. Couleur foncée HDMI : Sélectionne la couleur pour HDMI.
6. HDMI de 1080 24Hz : Activer / désactiver ce paramètre.
TRAITEMENT VIDÉO
1. Réglage vidéo : Entrez le sous-menu pour régler l'affichage vidéo.
2. Netteté : Sélectionnez le mode de lecture de la netteté.
Règle la luminosité, le contraste, la teinte, la saturation de l'écran.
CONFIGURATION AUDIO
1. HDMI : Sélectionne le mode HDMI.
2. sous-échantillonnage : Sélectionne le sous-échantillonnage.
(Sélectionnez cette option lorsque l'amplificateur connecté n’est pas compatible au 96kHz)
Page 40

38
3. RDC : Compression de plage dynamique
Réglage de l’haut-parleur : Sélectionne la sortie du haut-parleur
1. Configuration : canaux 2x
2. Tonalité d’essai:
SYSTÈME D'INFORMATION
Affiche les informations du système (Informations sur l'image ci-dessus est pour référence
seulement)
Nettoyage des disques
Essuyez le disque avec un chiffon en microfibre de nettoyage du centre vers le bord dans
un mouvement en ligne droite.
Page 41

39
Remarque
Pour éviter d'endommager ce produit ne mettez pas hors tension ou ne retirez pas le lecteur
flash USB pendant la mise à jour du logiciel est en cours.
Prudence
Ne jamais utiliser de solvants tels que le benzène, les diluants, les nettoyants disponibles
dans le commerce, ou des sprays anti-statiques destinés aux disques pour nettoyer le
lecteur.
Spécifications
Formats de disque de lecture
BD, BD-R, BD-RE, DVD-R/RW, DVD+R/RW, DVD-Video, VCD, CD, CD-R/RW
Formats vidéo
H.264/VC1/MPEG-1/MPEG-2/MPEG-4/WMV
Formats audio
Dolby Digital, Dolby Digital Plus, Dolby True HD, DTS, WMA
Photos
JPEG, PNG, GIF,
Vidéo
• Système du signal : PAL / NTSC
• Sortie vidéo composite : 1 Vp-p (75 ohms)
• Sortie HDMI vidéo : Auto, 480i / 576i, 480p / 576p, 720p, 1080i, 1080p, 1080p @ 24Hz.
Audio
• 2 sortie analogique de canal.
- Audio frontale Gauche et Droite : 2 Vrms (> 1 kohm)
• Sortie numérique : 0,5 Vp-p (75 ohms)
• Sortie HDMI
USB
• La mémoire USB supplémentaire pour les mises à jour logicielles sont stocké dans le
contenu bonus de BD-Live.
Unité principale
• Dimensions (L x H x P): 240x192x42 (mm)
• Poids net : 1,1 kg
• Longueur d'onde :
-BD : 405 + 5 nm / -5 nm
-DVD : 650 + 13 NM / -10 NM
-CD : 790 + 15 NM / -15 NM
Page 42

40
Dépannage
AVERTISSEMENT : Avant de demander le service dépannage veuillez vérifier que cette
résolution est possible. Risque de choc électrique. Ne retirez jamais le boîtier du produit.
Pour garder la garantie valide, n’essayez jamais de réparer le produit vous-même.
Aucune réaction de la
télécommande
• Assurez-vous que le lecteur est connecté à une prise de
courant.
• Insérez les piles correctement
• Pointez la télécommande vers le capteur infrarouge situé
sur la face avant de ce produit.
• Si la télécommande ne fonctionne toujours pas, essayez
de mettre de nouvelles piles dans la télécommande.
Pas d'image / son
• Assurez-vous que la connexion est en bon état ; le
volume n’est pas trop faible; Le récepteur audio ou TV
fonctionne normalement ; Le réglage audio est correcte.
Pas d'image sur la
connexion HDMI
• Si ce lecteur est connecté à un dispositif d'affichage non
autorisé avec un câble HDMI, le signal audio / vidéo ne
peut pas être affichée
• Vérifiez que le câble HDMI est défectueux. Si il est
défectueux ou endommagé, remplacez le câble HDMI.
• Si cela se produit lorsque vous modifiez le réglage
[résolution], appuyez sur Résolution sur la télécommande
jusqu'à ce que l'image apparaisse.
Le signal vidéo haute
définition ne fonctionne
pas sur le téléviseur
• Assurez-vous que les câbles audio sont connectés à
l'entrée audio du téléviseur
• Affectez l'entrée audio du téléviseur à l'entrée vidéo
correspondante. Voir le manuel de l'utilisateur du
téléviseur pour les détails.
Pas de son sur la
connexion HDMI
• Vous ne pouvez pas entendre le moindre son de la sortie
HDMI si l'appareil connecté est non compatible au HDCP
ou seulement compatible au DIVI.
Le disque ne peut pas
être lu
• Assurez-vous que le disque est correctement chargé
• Assurez-vous que ce lecteur prend en charge le disque.
Voir les caractéristiques.
• Assurez-vous que ce lecteur prend en charge le code de
région du DVD ou du BD.
• Pour les DVD + RW, assurez-vous que le disque est
finalisé.
• Nettoyez le disque.
Page 43

41
Les fichiers de données
ne peuvent pas être joués
ou lus
• Assurez-vous que le fichier de données a été enregistré
dans le format UDF, ISO9660 ou le format JOLIET.
• Assurez-vous que l’extension JPEG du fichier est .jpg,
JPG, JPEG ou JPEG.
Aucun signal d’entrée
n’apparaît sur le téléviseur
• L'opération demandée est impossible
Impossible d'accéder à la
fonctionnalité BD- Live
• Vérifiez la connexion Internet du réseau ou veillez à ce
que la connexion Internet du réseau a été mise en place
• Effacer le stockage USB
• Assurez-vous que le disque BD prend en charge la
fonctionnalité BD-Live
Il est certifié que ce LECTEUR DVD PORTABLE est conforme aux standards applicables
de la directive du conseil 2014/30/EU (EMC Directive) :
Normes applicables :
EN 55013: 2013,
EN 55020: 2007+A11: 2011
EN 61000-3-2: 2014
EN 61000-3-3: 2013
LVD:
EN 60065: 2014
Pour plus d'informations, visitez notre site web www.mpmaneurope.com
Page 44

42
La société MPMAN déclare que cet appareil est conforme à la directive européenne
1999/5/CE dite "R&TTE" (Radio And Terminal Telecommunication Equipement)
Pour toute information, veuillez contacter :
JME SA
Service Technique
M. Michel
77 rue dodonée
1180 Bruxelles
Belgique
Pour toutes questions :
MPMAN / JME SAService consommateur
M. Cavell
77 rue dodonée
1180 Bruxelles
Belgique
12 décembre, 2014
Page 45

Mobile Blu-ray-/DVD-Player
Modell: PDVBR2
Bedienungsanleitung
DE
43
Page 46

44
Sicherheit und Pflege
Dieses Symbol weist auf „gefährliche Spannung“ im Inneren dieses Produkts hin
und warnt vor Stromschlag und Verletzungen.
Dieses Symbol weist auf wichtige Bedienungshinweise zu diesem Produkt hin.
Warnung: Zur Vermeidung von Feuer und Stromschlag setzen Sie dieses Produkt weder
Regen noch Feuchtigkeit aus. Das Gerät darf nicht Tropf- oder Spritzwasser ausgesetzt
werden und muss in ausreichender Entfernung von Flüssigkeit enthaltenden Gegenständen
(wie Vasen) aufgestellt werden.
Sicherheitshinweise
Lesen Sie vor der Benutzung dieses Blu-ray-Players alle Anleitungen und bewahren Sie die
Anleitungen für künftiges Nachschlagen auf.
1. Lesen Sie diese Bedienungshinweise und bewahren Sie sie auf.
2. Beachten Sie alle Warnhinweise und folgen Sie den Anleitungen.
3. Benutzen Sie diesen Player nicht in unmittelbarer Nähe von Wasser.
4. Reinigen Sie den Player nur mit einem trockenen Tuch.
5. Blockieren Sie keine Öffnungen des Geräts und stellen Sie es gemäß Herstellerangaben
auf.
6. Stellen Sie den Player nicht in der Nähe von Wärmequellen wie Heizkörpern,
Heizstrahlern oder anderen Geräten auf die Wärme erzeugen (auch Verstärker) auf.
7. Schützen Sie das Stromkabel vor Knicken und Belastung.
8. Verwenden Sie das Gerät nur freistehend auf geeignetem Untergrund wie einem
Fernsehtisch, freistehendem Hocker oder Stuhl, einer Konsole oder anderen Möbeln die
den Herstelleranforderungen genügen oder Ihnen mit dem Gerät verkauft wurden. Achten
Sie bei Verwendung eines Rollwagens darauf, dass er nicht umkippen kann.
9. Ziehen Sie während eines Gewitters und bei längerer Nichtbenutzung den Netzstecker.
10. Lassen Sie alle Wartungsarbeiten vom Kundendienst durchführen. Eine Wartung wird
nach Schäden jeder Art, beispielsweise Schäden am Stromkabel oder dessen Anschlüssen,
jeglicher Berührung des Geräts mit Wasser oder Feuchtigkeit, dem Eindringen von
Objekten in den Player, wenn das Gerät nicht normal funktioniert oder es fallen gelassen
wurde, fällig.
11. Stellen Sie das Gerät nur in gut belüfteter Umgebung auf.
12. WARNUNG: Zur Vermeidung von Feuer und Stromschlag setzen Sie das Gerät weder
Regen noch Feuchtigkeit aus. Es sollte weder Spritz- noch Tropfwasser ausgesetzt werden.
Stellen Sie keine mit Wasser gefüllten Objekte (wie Vasen) auf das Gerät.
13. WARNUNG: Der Netzstecker muss während des Betriebs frei zugänglich sein.
14. Setzen Sie Batterien nicht übermäßiger Hitze oder direkter Sonneneinstrahlung aus.
VORSICHT
STROMSCHALGGEFAHR
NICHT ÖFFNEN
Page 47

45
Vorsicht: Zur Vermeidung von Stromschlag entfernen Sie weder die Verkleidung noch die
Rückseite des Gerätes. Es enthält keine wartungsfähigen Teile. Zur Wartung wenden Sie
sich an einen autorisierten Kundendienst.
Laser-PRODUKT der KLASSE 1
Verwendung der Bedienelemente und Einstellungen nur wie hier beschrieben;
weitergehende Eingriffe können Sie gefährlicher Strahlung aussetzen.
Marken
DVD-Video ist eine Marke von DVD Format / Logo Licensing Corporation.
Blu-ray Disc und das Blu-ray Disc Logo sind Marken der Blu-ray Disc Association.
Hergestellt unter Lizenz der Dolby Laboratories. Dolby, Dolby Audio und das
Doppel-D-Symbol sind Marken der Dolby Laboratories.
Für DTS-Patente siehe http://patents.dts.com. Hergestellt unter Lizenz von DTS Licensing
Limited. DTS, das Symbol und DTS und das Symbol zusammen sind eingetragene Marken
und DTS 2.0+Digital Out ist eine Marke von DTS, Inc. © DTS, Inc. Alle Rechte vorbehalten.
Java und alle anderen Java-Marken und Logos sind eingetragene Marken von Sun
Microsystems, Inc.
Hinweise zu Cinavia
Dieses Produkt verwendet Cinavia-Technologie zur Einschränkung der Nutzung nicht
autorisierter Kopien einiger kommerziell produzierter Filme und Videos sowie deren
Soundtracks. Wird eine unzulässige Nutzung einer nicht autorisierten Kopie erkannt, so
erscheint eine Meldung und die Wiedergabe oder die Kopie wird unterbrochen.
Bei Unterbrechung der Wiedergabe oder der Kopie und dem Erscheinen einer der
folgenden Meldungen ist der Inhalt durch Cinavia-Technologie geschützt.
Hinweis Cinavia Hinweis-Code
[Hinweis(e) 1] 1
[Hinweis(e) 2] 2
[Hinweis(e) 3] 3
[Hinweis(e) 4] 4
Weitere Informationen über die Cinavia-Technologie erhalten Sie vom
Cinavia-Online-Verbraucherzentrum bei http://www.cinavia.com
. Für weitergehende
Anfragen und zusätzliche Informationen erreichen Sie diesen Service per Mail oder unter
der Postanschrift Cinavia Consumer Information Center, P.O. Box 86851, San Diego, CA,
92138, USA.
Page 48

46
Hinweise zu gewerblichen Schutzrechten
Copyright 2004-2013 Verance Corporation. Cinavia
TM
ist eine Marke der Verance
Corporation.
Geschützt durch U.S. Patent 7,369,677 und weltweite Patente und Patentanträge unter
Lizenz der Verance Corporation. Alle Rechte vorbehalten.
BD LIVE und BONUSVIEW sind Marken der Blu-ray Disc Association.
Vorsicht: Dieses Produkt verwendet einen Laser.
Öffnen Sie nicht das Gehäuse und versuchen Sie nicht selbstständig, Reparaturen
durchzuführen. Wenden Sie sich stets an einen autorisierten Kundendienst.
Page 49

47
Bedienelemente und Funktionen
Bildschirm
Frontansicht
1. LCD-Display 2. Sensor Fernbedienung 3. Lautsprecher
4. CD-Laufwerk 5. Laufwerk schließen 6. Laufwerk öffnen
7. MENÜ 8. EINSTELLUNG 9. LAUTSTÄRKE +
10. LAUTSTÄRKE - 11. NAVIGATION LINKS 12. NAVIGATION AUFWÄRTS
13. NAVIGATION RECHTS 14. NAVIGATION ABWÄRTS 15. STOPP
16. WIEDERGABE/PAUSE 17. FUNKTIONSUMSCHALTER
18. OK 19. Lade-LED 20. Betriebs-LED
Page 50

48
Hinweis:
Betriebs-LED:
LED leuchtet blau: Betrieb; LED erloschen: Gerät ausgeschaltet.
Lade-LED:
LADEN: Rote LED leuchtet; Ladezyklus beendet: rote LED erloschen.
Akku schwach: Rote LED blinkt (keine Akkuanzeige bei ausgeschaltetem Gerät)
Seitenansicht rechts Seitenansicht links
Rückansicht
1. Kopfhörerbuchse 2. AV-Eingang 3. HDMI-Ausgang 4. SD/MMC-Karte
5. USB-Port 6. 12 V DC Eingang 7. Ein/Aus 8. LAN-Port
Fernbedienung
Tastenbelegung
1. Funktion 2. Menü
3. Wiederholen 4. Anzeige
5. Untertitel 6. Goto
7. OSC 8. Titel/Popup
9. Audio 10. Einstellungen
11. OK 12. Navigantionstasten
13. Zurück 14. Schneller Vorlauf
15. Schneller Rücklauf 16. Grün/Lesezeichen setzen
17. Rot/Programm 18. Menü
19. Stumm 20. Zifferntasten (0-9)
21. Löschen 22. Sekundäres Audio
23. Blickwinkel 24. PIP
25. Lautstärke+ 26. Lautstärke-
27. Stopp 28. Wiedergabe/Pause
29. Vorheriger Titel 30. Nächster Titel
31. Gelb/Lesezeichen anzeigen 32. Blau/Zoom
Page 51

49
Verwendung der Fernbedienung
1. Die Fernbedienung muss auf den Sensor ausgerichtet werden,
damit der Player ordnungsgemäß funktioniert.
2. Die Fernbedienung hat eine Reichweite von bis zu 3 m in
einem Winkel von +/-30°.
3. Zwischen der Fernbedienung und dem Sensor dürfen sich
keine Hindernisse befinden.
Kurzanleitung
1. Stromanschluss
Schließen Sie das Netzteil (mitgeliefert) an der Seite des Geräts und an einer Steckdose an.
Verwenden Sie kein fremdes Netzteil.
2. Bildschirm öffnen
Der Bildschirm des mobilen DVD-Players lässt sich bis zu 180° öffnen. Er kann um 270°
gedreht werden.
3. Drücken Sie PUSH OPEN, um das DVD-Laufwerk zu öffnen.
4. Legen Sie eine DVD mit dem Aufdruck nach oben ein.
Legen Sie die DVD mittig ein. Drücken Sie die DVD vorsichtig an, bis sie einrastet, dann
schließen Sie das DVD-Laufwerk wieder.
5. Stellen Sie den Ein-/Ausschalter auf der linken Seite des Geräts auf ON.
12 V DC Eingang Ein-/Ausschalter
6. Drücken Sie OK oder WIEDERGABE/PAUSE, um die Wiedergabe zu starten.
Die Wiedergabe startet unverzüglich.
Zum Beenden der Wiedergabe drücken Sie STOPP, damit wird das Einschalt-Logo
angezeigt.
Der Player kann während der Wiedergabe geladen werden.
Anschlüsse
1. Ohrhörerbuchse
1. Schließen Sie hier Ohrhörer mit einem 3,5 mm Stereo-Klinkenstecker an.
2. Stellen Sie die Lautstärke mit VOL+/VOL- auf der Fernbedienung ein.
Seitenansicht rechts
Page 52

50
Langes, lautes Hören über Kopfhörer oder Ohrhörer kann zu Hörverlust führen.
2. HDMI-Port
Schließen Sie ein HDMI-Kabel (nicht mitgeliefert) am HDMI-Port des Players und am
HDMI-Eingang des Fernsehers an.
Ändern Sie die Auflösung zu 1080p für beste Bildeffekte.
Ändern Sie die Auflösung zu 720p für beste Bildeffekte, wenn Sie den HDMI-Port nicht
verwenden.
Tipp
• Optimieren Sie den Videoausgang mit mehrfachem Tastendruck auf RESOLUTION und
wählen Sie die beste vom Fernseher unterstützte Auflösung.
• Zur Wiedergabe digitaler Videobilder eines BD-Videos oder DVD-Videos über HDMI
müssen beide Geräte den Kopierschutz HDCP unterstützen.
• Dieser Anschluss liefert die beste Bildqualität.
3. Netzwerk
Verbinden Sie den Player mit Ihrem Netzwerk, um Software-Updates und BD-Live
Bonus-Inhalte zu erhalten.
Schließen Sie ein Netzwerkkabel (nicht mitgeliefert) am LAN-Port des Players und an Ihrem
Modem oder Router an.
Page 53

51
4. USB-Speichermedium
Ein USB-Speichermedium kann zur Wiedergabe von Multimedia-Dateien angeschlossen
werden.
Schließen Sie das USB-Speichermedium am USB-Port des Players an.
Hinweis:
Wir können nicht garantieren, dass alle USB-Speichermedien kompatibel sind.
5. SD/MMC-Karte
Eine SD/MMC-Karte kann zur Wiedergabe von Multimedia-Dateien angeschlossen werden.
Stecken Sie die SD/MMC-Karte im SD/MMC-Steckplatz des Players ein.
Hinweis:
Wir können nicht garantieren, dass alle SD/MMC-Karten kompatibel sind.
Zur Wiedergabe einer Multimedia-Datei auf einem USB-Speichermedium oder einer
SD/MMC-Karte drücken Sie zunächst STOPP und dann FUNCTION auf dem Gerät oder
auf der Fernbedienung.
Allgemeine Bedienungshinweise
Einschalten
Schieben Sie den Ein-/Ausschalter auf der linken Seite des Geräts auf ON.
Einstellungsmenü
Drücken Sie SETUP zur Anzeige des Einstellungsmenüs.
Menünavigation
Mit den Navigationstasten auf der Fernbedienung navigieren Sie die Menüs.
Menüsprache wählen
1. Wählen Sie im Einstellungsmenü Allgemeine Einstellungen.
2. Mit den Navigationstasten aufwärts/abwärts wählen Sie die Sprache.
3. Mit der Navigationstaste rechts wählen Sie OSD, dann drücken Sie erneut die
Navigationstaste rechts, um das Auswahlmenü für die Sprache anzuzeigen.
Page 54

52
4. Drücken Sie OK zur Bestätigung.
Play a Disc
1. Drücken Sie PUSH OPEN, um das Laufwerk zu öffnen.
2. Legen Sie eine Disc mit dem Aufdruck nach oben ein.
3. Drücken Sie CLOSE, um das Laufwerk zu schließen und die Wiedergabe der Disc zu
starten.
4. Zum Beenden der Wiedergabe drücken Sie .
VIDEOWIEDERGABE
Steuerung der Videowiedergabe
1. Spielen Sie ein Video ab.
2. Mit der Fernbedienung steuern Sie die Wiedergabe.
Taste Funktion
Wiedergabe starten oder fortsetzen/Wiedergabe unterbrechen (Pause).
Wiedergabe beenden.
Sprung zum vorherigen/nächsten Titel oder Kapitel.
Suche im schnellen Rücklauf oder Vorlauf.
Drücken Sie die Taste mehrfach, um die Suchgeschwindigkeit zu ändern.
Hinweis:
Für BD-Discs mit Java-Anwendung steht die Funktion Fortsetzen nicht zur Verfügung.
Menü anzeigen
BD-Video:
MENU: Beendigung die Videowiedergabe und Rückkehr in das Discmenü. Die Funktion ist
von der Disc abhängig.
POPUP: Aufrufen des BD-Videomenüs ohne Unterbrechung der Wiedergabe.
DVD-Video:
MENU: Anzeige des Stammmenüs der Disc.
DISPLAY: Anzeige von Informationen zur Disc und Führung durch die verschiedenen
Funktionen.
Videowiedergabe umschalten
Taste Funktion
Audio Auswahl der Audiosprache.
SUBTITLE Auswahl der Untertitelsprache.
REPEAT
Aktivierung oder Deaktivierung des Wiederholungsmodus.
Wiederholungsoptionen sind von Disc zu Disc unterschiedlich.
DISPLAY Anzeige des aktuellen Status oder von Informationen zur Disc.
ZOOM Videobild vergrößern/verkleinern.
BOOK MARK SET Lesezeichen in der aktuellen Disc setzen.
Page 55

53
Taste Funktion
BOOK MARK VIEW Lesezeichen in der aktuellen Disc aufrufen.
PROGRAM Programm bearbeiten und abspielen.
GOTO Sprung zu einem selbst definierten Zeitpunkt in der Wiedergabe.
2nd AUDIO Audiowiedergabe im Haupt- und PIP-Fenster umschalten.
OSC
Optionen bezüglich aktueller Auswahl aufrufen und
Videowiedergabe steuern.
Blu-ray-Disc abspielen
Blu-ray-Discs haben eine größere Kapazität und unterstützen Funktionen wie HD-Video,
Mehrkanal-Surround-Sound, interaktive Menüs usw.
1. Legen Sie eine BD-Disc ein.
2. Die Wiedergabe startet automatisch; alternative wählen Sie eine Wiedergabeoption im
Menü und drücken Sie OK.
3. Während der Wiedergabe drücken Sie MENU, um zusätzliche Informationen, Funktionen
oder Inhalte der Disc anzuzeigen.
4. Während der Wiedergabe drücken Sie POPUP, um das Discmenü ohne Unterbrechung
der Wiedergabe anzuzeigen.
Bonusview
(Nur für Discs, die mit BONUSVIEW oder PIP-Funktion kompatibel sind.) Sie können
zusätzliche Inhalte (wie Kommentare) in einem kleinen Fenster anzeigen.
(A) Primäres Video (B) Sekundäres Video
1. Drücken Sie PIP, um das sekundäre Videofenster aufzurufen.
2. Drücken Sie 2nd AUDIO, um zwischen dem Haupt- und PIP-Fenster umzuschalten.
BD LIVE
Mit den BD-Live-Funktionen haben Sie interaktive Funktionen der Disc, wenn Sie mit dem
Internet verbunden sind.
Interaktive BD-Live-Funktionen:
1. Zusätzliche Inhalte (wie Trailer, Untertitel und BD-Java) können auf ein angeschlossenes
USB-Speichermedium heruntergeladen werden
Page 56

54
2. Spezielle Videodaten können während des Downloads wiedergegeben werden.
3. Während der Wiedergabe einer Disc, die BD-Live unterstützt, kann die Geräte- oder
Disc-ID über das Internet an den Anbieter übertragen werden. Dienste und Funktionen sind
von der Disc abhängig.
Hinweis
- Das Gerät muss mit dem Internet verbunden sein.
- Abhängig von der Umgebung kann der Aufbau der Verbindung mit dem Internet einen
Moment dauern.
- Bei Verwendung von BD-Live-Funktionen und Verbindung mit dem Internet kann Ihr
Internet-Dienstanbieter Kosten berechnen.
- Folgen Sie den Anleitungen auf der Disc, wenn Sie die BD-Live-Funktion nutzen.
- Verwenden Sie ein USB-Speichermedium zum Herunterladen der Inhalte (mindestens 1
GB freie Kapazität erforderlich).
MUSIKWIEDERGABE
Musikwiedergabe steuern
Mit der Fernbedienung steuern Sie die Wiedergabe der Audiodatei.
Taste Funktion
Wiedergabe starten oder fortsetzen/Wiedergabe unterbrechen (Pause).
Wiedergabe beenden.
Sprung zum vorherigen/nächsten Titel oder Kapitel.
Suche im schnellen Rücklauf oder Vorlauf.
Drücken Sie die Taste mehrfach, um die Suchgeschwindigkeit zu
ändern.
Titel zur Wiedergabe wählen.
REPEAT Wiederholungsmodus aktivieren oder deaktivieren.
DIASHOW
Sie können auf dem Player eine JPEG-Diashow anzeigen.
1. Legen Sie eine Disc ein oder schließen Sie ein USB-Speichermedium mit JPEG-Dateien
an.
2. Wählen Sie einen Fotoordner, dann drücken Sie OK, um ihn zu öffnen.
- Wählen Sie ein Foto mit den Navigationstasten.
- Zum Vergrößern des gewählten Fotos und Starten der Diashow drücken Sie OK.
Hinweis:
- Discs mit großen Inhalten benötigen länger, um angezeigt zu werden.
- Das Gerät kann nur Bilder von Digitalkameras im Format JPEG-EXIF anzeigen. Motion
JPEG oder Bilder in anderen Formaten oder Sound-Clips für Bilder können nicht gespielt
Page 57

55
werden.
- Ordner/Dateien, die größer als das unterstützte Limit sind, können nicht wiedergegeben
werden.
Diashow steuern
1. Starten Sie eine Diashow.
2. Mit der Fernbedienung steuern Sie die Wiedergabe wie folgt:
Taste Funktion
Bild drehen.
Bild kippen.
Wiedergabe beenden.
Intervall und Übergänge der Diashow einstellen
1. Während der Diashow drücken Sie OSC, um das Optionsmenü anzuzeigen.
2. Navigieren Sie die Optionen mit den Navigationstasten.
3. Wählen Sie eine Option im Menü, dann drücken Sie OK.
4. Drücken Sie OK zur Bestätigung.
Musikwiedergabe während der Diashow
Sie können Hintergrundmusik abspielen, während eine Diashow läuft.
Hinweis:
Für eine musikalische Diashow müssen Musik und Fotos auf der gleichen Disc gespeichert
sein.
1. Wählen Sie Ihre Musik und starten Sie die Wiedergabe.
2. Drücken Sie MEDIA CENTER, um in das Hauptmenü zurückzukehren.
3. Öffnen Sie den Fotoordner und drücken Sie OK, um die Diashow zu starten.
- Die Diashow beginnt und endet mit dem letzten Bild im Fotoordner.
- Das Audio beginnt und endet mit dem letzten Titel im Musikordner.
- Zum Beenden der Diashow drücken Sie .
- Zum Beenden der Musikwiedergabe drücken Sie erneut .
Page 58

56
Allgemeine Einstellungen
DIE MENÜS
1. Drücken Sie während der Wiedergabe zweimal STOPP.
2. Drücken Sie SETUP, um das Einstellungsmenü anzuzeigen.
3. Wählen Sie mit den Navigationstasten links/rechts ein Menü.
4. Wählen Sie den gewünschten Menüpunkt mit den Navigationstasten aufwärts/abwärts
und drücken Sie die Navigationstaste rechts zum Aufrufen.
Mit der Navigationstaste aufwärts kehren Sie in das Hauptmenü zurück.
5. Wählen Sie die Option mit den Navigationstasten aufwärts/abwärts und drücken Sie die
Navigationstaste rechts.
Mit der Navigationstaste links kehren Sie in das vorherige Menü zurück.
6. Wählen Sie den gewünschten Menüpunkt mit den Navigationstasten aufwärts/abwärts
und drücken Sie OK zur Bestätigung.
Mit der Navigationstaste links kehren Sie in das vorherige Menü zurück.
7. Zur Rückkehr aus einem beliebigen Untermenü in das Hauptmenü drücken Sie
RETURN.
8. Zum Verlassen des Menüs drücken Sie SETUP.
ALLGEMEINE EINSTELLUNGEN DES PLAYERS
SYSTEM
1. Bildschirmschoner: Hier schalten Sie den Bildschirmschoner ein und aus. Der
Bildschirmschoner schaltet sich nach 3 Minuten ein.
2. Disc autom. Wiedergabe: Hier schalten Sie die automatische Wiedergabe der Disc ein
und aus.
3. CEC: Hier schalten Sie die CEC-Funktion ein und aus.
4. Disc autom. Upgrade: Hier schalten Sie die automatische Aktualisierungsfunktion der
Disc ein und aus.
5. Standard: Hier stellen Sie den Player zu den Standardeinstellungen zurück.
6. Upgrade: Wählen Sie diesen Menüpunkt, wenn Sie die Software des Players zur
neuesten Version aktualisieren möchten.
7. Schnelleinstellung: Hier kehren Sie schnell zu den Standardeinstellungen zurück.
8. BUDA: Hier definieren Sie den Speicher für BD-J.
Page 59

57
* Hinweis: Die BUDA-Einstellung hat drei Untermenüs: „Extern“, „Gerät“ und „Karte“. Bei
Auswahl von „Extern“ oder „Karte“ muss zunächst ein USB-Speichermedium oder eine
Speicherkarte angeschlossen werden.
SPRACHE
1. OSD: Hier wählen Sie die OSD-Sprache.
2. Menü: Hier wählen Sie die Menüsprache der Disc.
3. Audio: Hier wählen Sie die Audiosprache der Disc.
4. Untertitel: Hier wählen Sie die Untertitelsprache der Disc.
Hinweis:
Audio- und Untertitelsprache müssen von der Disc unterstützt werden.
WIEDERGABE
1. Untertitel für Hörgeschädigte: Hier aktivieren und deaktivieren Sie die Untertitel für
Hörgeschädigte.
2. Blickwinkelmarkierung: Hier schalten Sie die Markierung der verschiedenen Blickwinkel
ein und aus.
3. PIP-Markierung: Hier schalten Sie die Markierung der PIP-Funktion ein und aus.
4. Sekundäre Audio-Markierung: Hier schalten Sie die Markierung des sekundären Audios
ein und aus.
5. Letztes Lesezeichen: Hier schalten Sie das Setzen des letzten Lesezeichens ein und
aus.
Page 60

58
6. PBC: Hier schalten Sie die PBC-Funktion ein und aus.
SICHERHEIT
1. Passwort ändern: Hier ändern Sie das Passwort für das Jugendschutzmenü.
2. Jugendschutz: Hier stellen Sie die elterliche Kontrolle ein.
3. Regionalcode: Hier wählen Sie den Regionalcode.
Hinweis:
Der Original-Code lautet 0000 und kann von Ihnen geändert werden.
NETZWERK
• Schließen Sie den Player an einem Breitband-Modem oder Router an.
• Der Player erkennt die Netzwerkverbindung.
• Schlägt der Verbindungstest fehl, so wählen Sie „Retry“ und drücken Sie OK, um die
Verbindung mit dem Netzwerk erneut aufzubauen.
1. Internetverbindung: Hier wird der Status der Internetverbindung angezeigt.
2. Informationen: Hier werden Informationen zum verbundenen Netzwerk angezeigt.
3. Verbindungstest: Hier wird der Status der Internetverbindung überprüft.
4. IP-Einstellung: Hier wird die IP-Adresse für den Player eingestellt.
5. BD-Live-Verbindung: Hier wird der Verbindungsstatus für BD-Live angezeigt.
6. Proxy-Einstellung: Hier wird der Proxy-Server eingestellt.
Page 61

59
BILDSCHIRMEINSTELLUNGEN
TV
1. TV-Bildschirm: Hier wählen Sie den Anzeigemodus für den Fernseher.
2. Auflösung: Hier wählen Sie die Auflösung für den Fernseher.
3. TV-System: Hier wählen Sie das TV-System.
4. Farbraum: Hier wählen Sie den Farbraum.
5. HDMI Deep Color: Hier wählen Sie die Farbe für HDMI.
6. HDMI 1080 24Hz: Hier aktivieren und deaktivieren Sie diese Einstellung.
VIDEOVERARBEITUNG
1. Videoeinstellung: Hier rufen Sie das Untermenü zum Einstellen der Videoanzeige auf.
2. Schärfe: Hier wählen Sie die Bildschärfe für die Wiedergabe.
Stellen Sie Helligkeit, Kontrast, Farbe und Sättigung des Bildschirms ein.
Page 62

60
AUDIOEINSTELLUNGEN
1. HDMI: Hier wählen Sie den HDMI-Modus.
2. Downsamping: Hier wählen Sie die Downsamping-Funktion.
(Auswahl, wenn der angeschlossene Verstärker nicht 96-kHz-kompatibel ist.)
3. DRC: Hier stellen Sie die Kompression des Dynamikbereichs ein.
Lautsprechereinstellung: Hier wählen sie den Lautsprecherausgang.
1. Konfiguration: 2x-Kanal.
2. Testton:
SYSTEMINFORMATIONEN
Hier werden Systeminformationen angezeigt (Abbildung oben nur als Referenz).
Page 63

61
DISCS REINIGEN
Wischen Sie Discs mit einem Mikrofasertuch von der Mitte nach außen ab.
Hinweis
Schalten Sie das Gerät nicht aus und entfernen Sie nicht den USB-Stick oder die
Speicherkarte, während die Softwareaktualisierung läuft.
Vorsicht
Verwenden Sie keine Lösungsmittel oder Anti-Statiksprays zum Reinigen der Discs oder
des Players.
Spezifikationen
Abspielbare Discformate
BD, BD-R, BD-RE, DVD-R/RW, DVD+R/RW, DVD-Video, VCD, CD, CD-R/RW
Videoformate
H.264/VC1/MPEG-1/MPEG-2/MPEG-4/WMV
Audioformate
Dolby Digital, Dolby Digital Plus, Dolby TrueHD, DTS, WMA
Foto
JPEG, PNG, GIF,
Video
• Signalsystem: PAL / NTSC
• Composite-Videoausgang: 1 Vp-p (75 Ohm)
• HDMI-Videoausgang: Auto, 480i/576i, 480p/576p, 720p, 1080i, 1080p, 1080p bei 24 Hz.
Audio
• 2-Kanal Analogausgang
- Audio Front L&R: 2 Vrms (> 1 kOhm)
• Digitalausgang: 0,5 Vp-p (75 Ohm)
• HDMI-Ausgang
USB
• Als zusätzliches USB-Speichermedium für Software-Updates und für BD-Live
Bonusinhalte.
Player
• Abmessungen (B x H x T): 240 x 192 x 42 mm
• Gewicht netto: 1,1 kg
• Wellenlänge:
- BD: 405 +5nm/-5nm
- DVD: 650 +13nm/-10nm
- CD: 790 +15nm/-15nm
Page 64

62
Störungsbehebung
WARNUNG: Bevor Sie sich an einen autorisierten Kundendienst wenden, versuchen Sie,
mit der nachstehenden Liste eine Lösung Ihres Problems zu finden. Öffnen Sie keinesfalls
das Gerät, Stromschlaggefahr. Außerdem verlieren Sie alle Garantieansprüche, wenn Sie
Reparaturen selbst vornehmen.
Fernbedienung
funktioniert nicht.
• Vergewissern Sie sich, dass der Player am Stromnetz
angeschlossen ist.
• Vergewissern Sie sich, dass die Batterien korrekt
eingesetzt sind.
• Richten Sie die Fernbedienung auf den IR-Sensor vorn auf
dem Gerät aus.
• Tauschen Sie die Batterien der Fernbedienung aus.
Kein Bild/Ton.
• Vergewissern Sie sich, dass alle Anschlüsse fest sind, ob
die Lautstärke zu niedrigeingestellt ist, ob der
Audio-Receiver oder Fernseher normal arbeiten und ob die
Audioeinstellungen korrekt sind.
Kein Bild bei
HDMI-Anschluss.
• Ist der Player an einem nicht autorisierten Anzeigegerät
über HDMI-Kabel angeschlossen, dann kann das
Audio/Videosignal möglicherweise nicht angezeigt werden.
• Überprüfen Sie das HDMI-Kabel auf Schäden und
tauschen Sie es ggf. aus.
• Drücken Sie mehrmals RESOLUTION auf der
Fernbedienung, bis das Bild angezeigt wird.
HD-Videosignal wird
nicht auf dem Fernseher
wiedergegeben.
• Vergewissern Sie sich, dass die Audiokabel korrekt am
Audioeingang des Fernsehers angeschlossen sind.
• Ordnen Sie den Audioeingang des Fernsehers dem
entsprechenden Videoeingang zu. Einzelheiten finden Sie
in der Bedienungsanleitung des Fernsehers.
Kein Ton bei
HDMI-Anschluss.
• Sie haben keinen Ton auf dem HDMI-Ausgang, wenn das
angeschlossene Gerät nicht HDCP-kompatibel oder nur
DIVI-kompatibel ist.
Disc wird nicht
wiedergegeben.
• Vergewissern Sie sich, dass die Disc korrekt eingelegt ist.
• Vergewissern Sie sich, dass der Player die Disc
unterstützt, siehe Spezifikationen.
• Vergewissern Sie sich, dass der Player den Regionalcode
der DVD oder BD unterstützt.
• Für DVD+RW vergewissern Sie sich, dass die Disc
finalisiert ist.
• Reinigen Sie die Disc.
Page 65

63
Daten werden nicht
wiedergegeben oder
gelesen.
• Vergewissern Sie sich, dass die Datei in Standard UDF,
ISO9660 oder JOLIET Format aufgenommen wurde.
• Vergewissern Sie sich, dass die JPEG-Dateiendung .jpg,
JPG, jpeg oder JPEG ist.
Auf dem Fernseher wird
keine Eingabe angezeigt.
• Die Taste ist ungültig, Betrieb nicht möglich.
BD- Live-Funktion kann
nicht aufgerufen werden.
• Überprüfen Sie die Internetverbindung oder vergewissern
Sie sich, dass die Internetverbindung besteht.
• Löschen Sie das USB-Speichermedium.
• Vergewissern Sie sich, dass die BD-Disc die
BD-Live-Funktion unterstützt.
Hiermit wird zertifiziert, dass der TRAGBARE DVD-PLAYER der Richtlinie des Rates
2014/30/EU (EMV-Richtlinie) entspricht.
Geltende Normen:
EN 55013: 2013,
EN 55020: 2007+A11: 2011
EN 61000-3-2: 2014
EN 61000-3-3: 2013
LVD:
EN 60065: 2014
Weitere Informationen finden Sieauf unserer Webseite www.mpmaneurope.com
Page 66

Lettore DVD Bluray Portatile
Modello: PDVBR2
64
Manuale operativo
ITA
Page 67

65
Sicurezza e manutenzione
Questo simbolo indica “tensione pericolosa” nel prodotto. Puó esserci il rischio di
scosse elettriche o danni personali.
Questo simbolo indica che ci sono particolari istruzioni per questo prodotto.
ATTENZIONE: per ridurre il rischio di incendi o scosse elettriche, non esporre questo
prodotto alla pioggia o umidità. L´apparecchiatura non deve essere esposta a gocce o
schizzi d´acqua e nessun oggetto contente liquidi, come un vaso, può essere appoggiato
sull´apparecchio.
Istruzioni di sicurezza
Si prega di leggere tutte le istruzioni prima di utilizzare questo lettore Blu-ray e conservare il
presente manuale in un luogo sicuro per poterlo consultare in futuro in caso di necessità.
1. Leggere e conservare le presenti istruzioni
2. Prestare attenzione alle avvertenze e seguire tutte le istruzioni
3. Non utilizzare questo lettore vicino all´acqua.
4. Pulire solo con un panno asciutto.
5. Non ostruire nessuna delle aperture per la ventilazione e installare seguendo le istruzioni
del costruttore.
6. Non collocare l´unità vicino a sorgenti di calore, come radiatori, stufe, caloriferi o alter
apparecchiature che producono calore (compresi gli amplificatori).
7. Proteggere il cavo di alimentazione, non calpestarlo o comprimerlo, specialmente in
corrispondenza degli attacchi e nel punto dove il cavo esce dal dispositivo.
8. Usare con carrello, supporto, treppiedi, staffa o tavolino solo se specificati dal fabbricante
o allegati al prodotto. Quando si usa un carrello, prestare attenzione a non ferirsi durante gli
spostamenti del dispositivo.
9. Scollegare l´apparecchiatura dalla rete elettrica durante temporali o se viene lasciato
inutilizzato per lunghi periodi di tempo.
10. Affidarsi a personale qualificato per tutti gli interventi di assistenza.
Gli interventi di assistenza si rendono necessari quando l´apparato ha subito danni, ad
esempio se il cavo di alimentazione o la spina sono danneggiati, se è stato versato del
liquido o sono caduti oggetti sull´apparecchio, se l´apparato è stato esposto a pioggia o
umidità, se non funziona normalmente o è caduto.
11. Si prega di collocare l´unità in un luogo con buona ventilazione.
12. ATTENZIONE: Al fine di evitare rischi di incendi o scosse elettriche, non esporre questo
apparato alla pioggia o all´umidità. L´apparato non deve essere esposto a gocce o schizzi,
nessun oggetto contenente liquidi, come un vaso, può essere collocato sull´apparato.
13. ATTENZIONE: La spina dell´alimentazione o dell´accoppiatore deve essere
raggiungibile facilmente e rapidamente se è utilizzata come dispositivo di spegnimento.
14. Non esporre le batterie a calore eccessivo, come fuoco, raggi diretti del sole, ecc.
Page 68

66
ATTENZIONE: Per ridurre i rischi di scosse elettriche non rimuovere il pannello di copertura
(o la parte posteriore). All´interno dell´apparecchio non vi sono parti riparabili dall´utente;
per le riparazioni si raccomanda pertanto di rivolgersi a tecnici qualificati.
PRODOTTO LASER DI CLASSE 1
L´utilizzo di comandi, adattamenti o procedure diversi da quelli indicate nel presente
manuale possono comportare il rischio di esposizione a radiazioni.
Note sul marchio
DVD Video è un marchio di fabbrica di DVD Format / Logo Licensing Corporation.
Blu-ray Disc e il logo di Blu-ray Disc sono marchi di fabbrica di Blu-ray Disc Association.
Prodotto sotto licenza da Dolby Laboratories. Dolby, Dolby Audio e il simbolo con la
doppia-D sono marchi di Dolby Laboratories.
Per informazioni sui brevetti DTS, vedere http://patents.dts.com. Prodotto sotto licenza di
DTS Licensing Limited. DTS, il simbolo e DTS e il simbolo assieme sono marchi registrati e
DTS 2.0+Digital Out è un marchio di DTS, Inc. © DTS, Inc. Tutti i diritti riservati.
Java e tutti gli altri marchi e loghi Java sono marchi registrati di Sun Microsystems, Inc.
Note su Cinavia
Il presente prodotto si avvale della tecnologia Cinavia per limitare l´uso di copie non
autorizzate di alcuni film, video e relative colonne sonore. Quando viene riscontrato un uso
improprio di una copia non autorizzata verrà visualizzato un messaggio e la riproduzione o
la copia saranno interrotte.
Se la riproduzione o la copia vengono interrotte e viene visualizzato uno dei seguenti
messaggi, il contenuto è una copia non autorizzata, protetta dalla tecnologia Cinavia.
Messaggio
Messaggio in codice Cinavia
[Messaggio(i) 1] 1
[Messaggio(i) 2] 2
[Messaggio(i) 3] 3
[Messaggio(i) 4] 4
Maggiori informazioni sulla tecnologia Cinavia sono disponibili al Cinavia Online Consumer
Information Center sul sito http://www.cinavia.com. Per richiedere ulteriori informazioni
riguardo Cinavia, inviare una cartolina postale con il proprio indirizzo di posta a: Cinavia
Consumer information Center, P.O. Box 86851, San Diego, CA, 92138, USA.
Messaggio IPR
Copyright 2004-2013 Verance Corporation. Cinavia
TM
è un marchio di Verance Corporation.
Protetto dal brevetto USA 7,369,677 e da brevetti in tutto il mondo ottenuti e richiesti sotto
licenza della Verance Corporation. Tutti i diritti riservati.
Page 69

67
BD LIVE e BONUSVIEW sono marchi di Blu-ray Disc Association.
ATTENZIONE: Questo prodotto utilizza un laser.
Non aprire il coperchio e non eseguire riparazioni da sé. Rivolgersi all´assistenza di
personale qualificato.
Posizione dei comandi
La schermata principale
Parte anteriore
Page 70

68
1. Panello LCD 2. Sensore remoto 3. Altoparlante
4. coperchio vano disco 5. CLOSE 6. Meccanismo PUSH OPEN
7. MODE 8. SETUP 9. VOLUME –
10. VOLUME + 11. SINISTRA 12. SU
13. DESTRA 14. GIU 15. STOP
16. PLAY/PAUSE 17. FUNCTION 18. OK
19. Indicatore di ricarica 20. Indicatore di potenza
Osservazioni:
Indicatore di alimentazione
Acceso: luce blu accesa. Spento: luce blu spenta.
Indicatore di ricarica
In ricarica: luce rossa accesa. Carico: luce rossa spenta.
Batteria scarica: luce rossa lampeggiante (osservazione: non viene segnalata se la batteria
è scarica quando il dispositivo è spento)
Lato destro Lato sinistro
Posteriore
1. Telefono 2. Ingresso AV 3. Uscita HDMI 4. SD/MMC
5. USB 6. DC IN 12V 7. ON/OFF 8. LAN
Page 71

69
Telecomando
Il telecomando
1. Function 2. Mode
3. Repeat 4. Display
5. Subtitle 6. Goto
7. OSC 8. Title/Popup
9. Audio 10. Setup
11. OK 12. Tasti direzionali
13. Return 14. Avanzamento veloce
15. Riavvolgimento veloce 16. Green / Book mark set
17. Rosso / Program 18. Menu
19. Mute 20. Tasti numerici (0-9)
21. Clear 22. 2nd Audio
23. Angle 24. PIP
25. Volume+ 26. Volume-
27. Stop 28. Play/Pause
29. Precedente 30. Successivo
31. Giallo / Book mark view 32. Blu / Zoom
Come utilizzare il telecomando
1. Il telecomando deve puntare al sensore remoto presente
nell´apparecchio perché il lettore DVD funzioni correttamente.
2. Il telecomando funziona meglio ad una distanza inferiore ai 3
metri e ad un angolo fino a +/-30° verso la parte anteriore del
dispositivo.
3. Non ci devono essere ostacoli tra il telecomando e il sensore
remoto presente nell´apparecchio.
Guida rapida
1. Connettere ad una fonte di alimentazione esterna.
Connettere l´adattatore di potenza (fornito assieme all´apparecchio) all´ingresso presente
sul lato e alla presa di corrente generale. Non utilizzare altri mezzi non specificati dal
rivenditore.
2. Aprire lo schermo.
Lo schermo del DVD portatile si apre fino ad un Massimo di 180°. E può ruotare fino a 270°.
3. Premere il tasto PUSH OPEN per aprire il coperchio del vano CD/DVD.
4. Inserire un disco DVD con il lato etichettato che punta verso l´alto.
Allineare il centro del disco DVD con il perno al centro del vano DVD. Premere con
gentilezza verso il basso in modo da bloccare il disco sul perno e infine chiudere il
coperchio.
5. Far scorrere l´interruttore sul lato sinistro del dispositivo per accenderlo.
Page 72

70
DC in 12V Power on/off
6. Premere il tasto OK o il tasto PLAY/PAUSE sul dispositivo per iniziare la riproduzione.
In molti casi, quando viene rilasciato il tasto PLAY/PAUSE, continua ad essere utilizzato il
tasto PLAY/PAUSE.
Il lettore DVD inizia immediatamente l´esecuzione del DVD.
Quando diviene necessario fermare la riproduzione, premere il tasto STOP e si tornerà alla
schermata iniziale.
Il lettore può essere ricaricato anche durante la riproduzione.
Connessioni
1. Connettere gli auricolari
1. Connettere gli auricolari. Possono essere connessi auricolari con cavo stereo da 3.5 mm.
2. Adattare il volume premendo i tasti VOL+/VOL- sul telecomando.
Il lato destro del portatile
Evitare l´ascolto con volume a livelli troppo elevati che potrebbero danneggiare l´udito.
2. Connettere all´HDMI
Connettere il cavo HDMI (non fornito) al jack HDMI presente in questo prodotto e al jack
presente sulla TV.
Si prega di cambiare la risoluzione a 1080P per ottenere una migliore qualità dell´immagine.
Si prega di impostare la risoluzione a 720P per un miglior effetto dello schermo una volta
terminato di utilizzare il jack HDMI.
Page 73

71
Consigli
• É possibile ottimizzare l´output video premendo più volte il tasto Resolution fino ad
individuare la migliore risoluzione supportata dalla TV.
• Per riprodurre le immagini di un disco BD-video o di un video DVD tramite connessione
HDMI, è necessario che sia questo prodotto che la TV (o il ricevitore AV) supportino il
sistema di protezione del copiright chiamato HDCP (high-bandwidth digital content
protection)
• Questo tipo di connessione permette una migliore qualità delle immagini.
3. Connettere in rete
Connettere in rete il presente prodotto per godere degli aggiornamenti software e del
contenuto bonus BD-Live.
Connettere il cavo di rete (non fornito) all´ingresso LAN presente in questo prodotto e quindi
connetterlo all´ingresso jack del modem o router.
4. Connettere il dispositivo USB
Un dispositivo USB per riprodurre file multimediali.
Connettere il dispositivo USB alla porta USB presente su questo prodotto.
Osservazioni:
Non garantiamo al 100% la compatibilità con ogni dispositivo USB.
5. Connettere una scheda SD/MMC
Una scheda SD/MMC per riprodurre file multimediali.
Page 74

72
Connettere la scheda SD/MMC all´ingresso per SD/MMC presente in questo prodotto.
Note:
Non garantiamo al 100% la compatibilità con ogni scheda SD/MMC.
Per riprodurre file multimediali su dispositivo USB o scheda SD/MMC, premere STOP
durante la riproduzione, quindi premere FUNCTION sul lettore o sul telecomando.
Operazioni basilari
Accensione
Far scorrere l´interruttore sul lato sinistro del dispositivo per accenderlo.
Menu Setup
Premere SETUP per visualizzare il menu impostazioni sullo schermo LCD.
Scorrere il menu
Quando viene visualizzato un menu premere i tasti di navigazione del telecomando per
navigare all´interno del menu.
Selezionare la lingua del menu
1. Selezionare Impostazioni Generali nel Menu SETUP.
2. Premere i tasti Su/Giù per selezionare la lingua.
3. Premere il tasto Destra per selezionare OSD e premere nuovamente il tasto Destra per
entrare nel menu di selezione; a questo punto è possibile selezionare la lingua desiderata.
4. Premere OK per confermare.
Riprodurre un disco
1. Premere il tasto PUSH OPEN per aprire il vano disco.
2. Inserire un disco con il lato etichetta rivolto verso l´alto.
3. Premere CLOSE per chiudere il vano e iniziare a riprodurre il disco.
4. Per interrompere la riproduzione, premere
RIPRODUZIONE VIDEO
Controllo riproduzione Video
1. Riprodurre una traccia
2. Usare il telecomando per controllare la riproduzione
Tasto Azione
Inizia o ricomincia una riproduzione / Mette in pausa la riproduzione.
Interrompe la riproduzione.
Salta ad una precedente/successiva traccia o capitolo.
Avanzamento o riavvolgimento rapido.
Premere ripetutamente per cambiare la velocità.
Osservazioni:
In caso di dischi BD, con applicazione Java, la funzione Riprendi non è disponibile.
Page 75

73
Menu Display
Dischi BD-video:
MENU: Interrompe la riproduzione video e ritorna al menu disco. Questa caratteristica
dipende dal disco.
POPUP: passa al menu del disco BD-video senza interrompere la riproduzione.
Disco DVD-video:
MENU viene visualizzato il menu principale del disco.
DISPLAY vengono visualizzate informazioni sul disco e verranno indicate le varie funzioni
presenti nel disco.
Cambiare modalità di riproduzione Video
Tasto Azione
Audio Per selezionare la lingua audio
SUBTITLE Per selezionare la lingua dei sottotitoli in un disco
REPEAT
Per selezionare o togliere la modalità repeat.
L´opzione repeat può variare in base al tipo di disco
DISPLAY Per visualizzare lo stato corrente o le informazioni sul disco
ZOOM Zoom in/out dell´immagine video
BOOK MARK SET Per impostare i segnalibri del disco riprodotto
BOOK MARK VIEW Per visualizzare i segnalibri del disco riprodotto
PROGRAM Per modificare la programmazione e riprodurre
GOTO
Durante la riproduzione, per saltare a uno specifico tempo
impostato dall´utente.
2nd AUDIO
Cambia la riproduzione audio tra la finestra principale e la
finestra PIP.
OSC
Accede alle opzioni relative all´attività o alla selezione
corrente e controlla la riproduzione video.
Riprodurre un disco Blu-ray
I dischi Blu-ray hanno maggiore capacità e funzioni di supporto come video ad alta
definizione, suono surround multicanale, menu interattivi ed altro.
1. Inserire un disco BD-video.
2. La riproduzione parte automaticamente, in caso contrario selezionare un´opzione di
riproduzione dal menu e premere OK.
3. Durante la riproduzione, premendo MENU, è possibile visualizzare informazioni
addizionali, funzioni o la memorizzazione di contenuti riguardanti il disco.
4. Durante la riproduzione, premendo POPUP, è possibile visualizzare il menu senza
interrompere la riproduzione.
Page 76

74
Utilizzare i contenuti di BONUSVIEW
(Applicabile solo con dischi compatibili con la funzione BONUSVIEW o la funzione
Picture-In-Picture). È possibile visualizzare ulteriori informazioni (come i commenti) in una
piccola finestra.
(A) Video primario (B) Video secondario
1.Premere PIP per aprire la finestra di video secondario.
2.Premere 2nd AUDIO per passare dall´audio della finestra principale alla finestra PIP.
Utilizzare BD-LIVE
É possibile utilizzare le funzioni BD-Live, le quali permettono l´utilizzo delle funzioni
interattive del disco (quando l´unità è connessa a Internet).
Esempio di funzioni interattive BD-Live:
1. Si può scaricare il contenuto addizionale (come trailers, sottotitoli, BD-Java, etc.) e
salvato in un dispositivo USB connesso.
2. I dati video speciali possono essere riprodotti durante lo scaricamento dei dati.
3. Quando viene riprodotto un video che supporta BD-Live, l´ID del prodotto o del disco può
essere inviata al fornitore di contenuti tramite internet. Servizi e funzioni possono differire in
base al disco.
Osservazioni
-L´unità deve essere connessa ad Internet.
-A seconda delle modalità di connessione, la connessione ad Internet può richiedere molto
tempo.
-Quando le funzioni BD-Live vengono utilizzate e l´unità è connessa ad internet verrà
applicata la tariffa internet del vostro fornitore di servizi internet.
-Seguire le istruzioni fornite dal disco quando vengono utilizzate le funzioni BD-Live.
-É raccomandato l´utilizzo di un dispositivo USB per il download di contenuti (almeno 1GB
di spazio libero a disposizione).
RIPRODUZIONE MUSICA
Controllo riproduzione musica
Utilizzare il telecomando per controllare la riproduzione di file audio.
Page 77

75
Tasto Azione
Per iniziare o ricominciare una riproduzione / mettere in pausa la
riproduzione.
Per interrompere la riproduzione
Per saltare ad una precedente/successiva traccia o capitolo.
Avanzamento o riavvolgimento rapido.
Premere ripetutamente per cambiare la velocità.
Selezionare un tasto per riprodurre
REPEAT Per inserire o togliere la modalità repeat
RIPRODURRE UNA PRESENTAZIONE DI FOTO (SLIDESHOW)
É possibile riprodurre una presentazione di immagini JPEG sul dispositivo.
1. Inserire un disco o dispositivo USB che contenga file JPEG
2. Selezionare una cartella di foto, quindi premere OK per aprire.
-Per selezionare una foto, utilizzare i tasti di navigazione.
-Per ingrandire la foto selezionata e iniziare lo slideshow premere OK.
Osservazioni:
-La visualizzazione del contenuto del disco su TV può richiedere un tempo maggiore se
sono presenti molte canzoni/foto nel disco.
-Questo prodotto permette la visualizzazione di foto effettuate con videocamera digitale in
formato JPEG-EXIF, tipicamente utilizzate da quasi tutte le videocamere digitali. Non può
visualizzare il format Motion JPEG o immagini in formato diverso da JPEG o clip audio
associate alle immagini.
-Cartelle/File oltre il limite Massimo consentito dal supporto non possono essere
visualizzate o riprodotte.
Controllare la presentazione delle foto
1. Iniziare uno slideshow di foto.
2. Utilizzare il telecomando per controllare la riproduzione nel modo seguente:
Tasto Azione
Per ruotare una foto
Per ribaltare una foto
Per interrompere la riproduzione
Impostare gli intervalli della presentazione e l´animazione
1. Durante la riproduzione della presentazione, premere OSC. Verrà visualizzato il menu
opzioni.
2. Muoversi tra le opzioni tramite i tasti di navigazione.
Page 78

76
3. Selezionare un´opzione del menu, quindi premere OK.
4. Premere OK.
Riprodurre musica durante una presentazione foto
Creare una presentazione musicale che riproduca assieme file di musica e file di immagini
JPEG.
Osservazioni:
Per creare uno slideshow è necessario mettere i file foto e i file immagini in formato JPEG
nello stesso disco.
1. Selezionare il CD che si vuole riprodurre e iniziare la riproduzione.
2. Premere Media Center per tornare al menu principale.
3. Individuare la cartella di immagini, quindi premere OK per avviare la riproduzione della
presentazione.
-La presentazione ha inizio e si conclude una volta riprodotte tutte le foto della cartella.
-L´audio continua fino alla fine del CD.
-Per interrompere lo slideshow premere
-Per interrompere la musica, premere nuovamente.
Impostazioni generali
OPERAZIONI BASILARI PER IL MENU
1. Premere STOP due volte durante la presentazione
2. Premere SETUP per visualizzare il MENU SETUP sullo schermo.
3. Selezionare uno dei menu principali utilizzando i tasti SINISTRA/DESTRA.
4. Selezionare il menu desiderato utilizzando i tasti SU/GIU e premere DESTRA per entrare
nel menu.
Per tornare nel menu principale, premere SU.
5. Selezionare l´opzione con i tasti SU/GIU e premere DESTRA.
Per tornare nel menu precedente, premere SINISTRA.
6. Selezionare con i tasti SU/GIU e premere OK per confermare.
Per tornare nel menu precedente, premere SINISTRA.
7. Per tornare al menu principale da qualunque sottomenu è sufficiente premere RETURN.
8. Per uscire dal menu, premere SETUP.
Page 79

77
IMPOSTAZIONI GENERALI DEL LETTORE
SISTEMA
1. Screen Saver: per attivare/disattivare lo screen saver. Lo screen saver verrà avviato
dopo 3 minuti di inattività quando l´unità è accesa.
2. Riproduzione automatica disco: per attivare/disattivare la funzione di riproduzione
automatica.
3. CEC: per attivare/disattivare la funzione CEC.
4. Aggiornamento automatico disco: per attivare/disattivare la funzione di aggiornamento
automatico del disco.
5. Impostazioni di default: Ripristina le impostazioni predefinite del lettore.
6. Upgrade: selezionare questa opzione quando si vuole aggiornare il software del lettore
alla versione più recente.
7. Easy setup: per effettuare le impostazioni di default in modo veloce.
8. BUDA: Definisce la memoria per BD-J.
* Nota: Il Setup BUDA ha tre sottomenu: "External", "On board" e " Card ". Se si vuole
selezionare "External" o "Card", è necessario prima aver connesso l´USB o la scheda.
LINGUA
1. OSD: per selezionare la lingua OSD.
2. Menu: per selezionare la lingua del menu del CD.
3. Audio: per selezionare la lingua dell´audio del programma.
Page 80

78
4. Sottotitoli: per selezionare la lingua dei sottotitoli del programma.
Osservazioni:
É necessario selezionare la lingua dell´audio e dei sottotitoli in base alle impostazioni del
CD.
RIPRODUZIONE
1. Closed Caption: per attivare/disattivare la funzione CC.
2. Angle Mark: per attivare/disattivare la funzione Angle mark.
3. PIP Mark: Per attivare/disattivare la funzione PIP mark.
4. Secondary Audio Mark: per attivare/disattivare la funzione Secondary Audio mark.
5. Ultima memoria: per attivare/disattivare la funzione ultima memoria
6. PBC: per attivare/disattivare la funzione PBC.
SICUREZZA
1. Cambia Password: per cambiare la password del menu di controllo dei genitori.
2. Controllo dei genitori: per impostare il controllo dei genitori.
3. Codice del paese: per impostare il codice del paese.
Osservazioni:
Il codice originale e 0000. Il codice può essere modificato dall´utente.
Page 81

79
NETWORK
• Connettere il prodotto a un MODEM o router.
• Questo lettore inizia a controllare se c´è una connessione alla rete.
• Se il test di connessione ha esito negativo, selezionare Retry e premere OK per provare a
riconnettersi di nuovo alla rete.
1. Connessione Internet: per visualizzare lo stato di connessione Internet.
2. Informazioni: per visualizzare le informazioni sulla rete corrente.
3. Test di Connessione: per testare lo stato della connessione Internet.
4. Impostazioni IP: per impostare l´indirizzo IP del lettore.
5. Connessione BD-Live: per visualizzare lo stato della connessione BD-Live.
6. Impostazioni Proxy: per visualizzare le impostazioni del Proxy Server.
IMPOSTAZIONI DI VISUALIZZAZIONE
TV
1. Schermo TV: per selezionare la modalità di visualizzazione della TV.
2. Risoluzione: per selezionare la risoluzione della TV.
3. Impianto TV: per selezionare il tipo di TV.
4. Spazio dei colori: per selezionare lo spazio dei colori.
5. Profondità cromatica HDMI: per selezionare i colori con l´HDMI.
6. HDMI 1080 24Hz: per attivare/disattivare queste impostazioni.
Page 82

80
ELABORAZIONE VIDEO
1. Regolazioni Video: per entrare nel sottomenu di regolazione della visualizzazione video.
2. Nitidezza: per impostare la nitidezza della riproduzione.
È possibile regolare a proprio piacimento Luminosità, Contrasto, Tonalità e Saturazione
dello schermo.
IMPOSTAZIONI AUDIO
1. HDMI: per selezionare la modalità HDMI.
2. Down samping: per selezionare il down samping.
(Selezionare questa opzione quando l´amplificatore connesso al lettore non è compatibile
con 96KHz)
3. DRC: Compressione del livello audio
Impostazione Speaker: per selezionare l´output degli speaker
1. Configurazione: 2 canali
2. Test Tone:
Page 83

81
INFORMAZIONI DI SISTEMA
È possibile visualizzare le informazioni sul sistema (le informazioni mostrate nell´immagine
sono solo un esempio)
Pulizia del disco
Pulire il disco con un panno morbido in microfibra con un movimento diretto dal centro verso
il bordo.
Osservazioni
Per evitare eventuali danni al prodotto non spegnere o rimuovere la chiave USB mentre è in
corso l´aggiornamento del software.
Attenzione
Non utilizzare solventi tipo benzene, diluente, pulitori di tipo commercial o spray antistatico
per pulire il lettore.
Page 84

82
Specifiche
Formati di riproduzione disco
BD, BD-R, BD-RE, DVD-R/RW, DVD+R/RW, DVD-Video, VCD, CD, CD-R/RW
Formati Video
H.264/VC1/MPEG-1/MPEG-2/MPEG-4/WMV
Formati Audio
Dolby Digital, Dolby Digital Plus, Dolby TrueHD, DTS, WMA
Foto
JPEG, PNG, GIF,
Video
• Segnale di sistema: PAL / NTSC
• Uscita video composito: 1 Vp-p (75 ohm)
• Uscita video HDMI: Auto, 480i/576i, 480p/576p, 720p, 1080i, 1080p, 1080p@24Hz.
Audio
• Uscita analogica a 2 canali.
• Fonte audio L&R: 2 Vrms (> 1 kohm)
• Uscita digitale: 0.5-Vp-p (75 ohm)
• Uscita HDMI
USB
• Una memoria addizionale per aggiornamento software e per memorizzare i contenuti
bonus BD-Live.
Unità principale
• Dimensioni (l x h x p): 240x192x42(mm)
• Peso netto: 1.1kg
• Lunghezza d´onda:
-BD: 405 + 5nm/-5nm
-DVD:650 + 13NM/-10NM
-CD:790+15NM/-15NM
Page 85

83
Risoluzione dei problemi
ATTENZIONE: Prima di richiedere l´intervento del centro assistenza si prega di provare
queste possibili soluzioni. Rischio di scosse elettriche. Non rimuovere l´involucro del
prodotto per nessun motivo. Per non invalidare la garanzia, non riparare mai il prodotto da
sé.
Nessuna reazione ai
comandi del telecomando
• Assicurarsi che il lettore sia collegato alla rete elettrica.
• Inserire le batterie del telecomando in maniera corretta.
• Puntare il telecomando verso il sensore posizionato nella
parte frontale di questo prodotto.
• Se il telecomando continua a non funzionare, provare con
nuove batterie.
Nessuna immagine/suono
• Assicurarsi che la connessione sia buona, che il volume
non sia troppo basso, che il ricevitore audio o il televisore
funzionino correttamente e che le impostazioni audio siano
corrette.
Nessuna immagine con
connessione HDMI
• Se questo lettore viene collegato con un cavo HDMI ad
un dispositivo di visualizzazione non autorizzato, il segnale
audio/video potrebbe non essere visualizzato
• Controllare se il cavo HDMI è guasto. Se guasto o
danneggiato, rimpiazzarlo.
• Se ciò accade quando viene cambiate le impostazioni
sulla risoluzione, premere ripetutamente Resolution sul
telecomando fino a che l´immagine appare sullo schermo.
Il segnale video ad alta
definizione non viene
riprodotto nella TV
• Assicurarsi che i cavi audio siano connessi all´ingresso
audio della TV
• Assegnare l´input audio della TV al corrispondente input
video. Vedere le istruzioni della TV per dettagli.
Nessun suono con
collegamento HDMI
• Può capitare se il dispositivo connesso non è compatibile
con HDCP o compatibile solo con DIVI.
Il disco non può essere
riprodotto
• Assicurarsi che il disco sia posizionato correttamente
• Assicurarsi che questo lettore supporti il disco. Vedere le
specifiche del prodotto.
• Assicurarsi che questo lettore supporti il codice regionale
del DVD o BD.
• In caso di DVD+RW, assicurarsi che il disco sia
finalizzato.
• Pulire il disco.
I file di dati non possono
essere riprodotti o letti
• Assicurarsi che i dati siano stati registrati secondo gli
standard UDF, ISO9660 o in formato JOLIET.
• Assicurarsi che l´estensione dei file JPEG sia .jpg o jpeg.
Page 86

84
Nessun segnale di
ingresso appare sullo
schermo TV
• L´operazione richiesta non è possibile
Impossibile accedere alla
funzione BD- Live
• Controllare la connessione internet o assicurarsi che la
connessione internet sia stata impostata
• Pulire la memoria USB
• Assicurarsi che il disco BD supporti la funzione BD Live
Questo serve a certificare che il LETTORE DVD PORTATILE è conforme alla direttiva
2014/30/EU del Consiglio Europeo (Direttiva EMC).
Standard applicabili:
EN 55013: 2013,
EN 55020: 2007+A11: 2011
EN 61000-3-2: 2014
EN 61000-3-3: 2013
LVD:
EN 60065: 2014
Per maggiori informazioni vi invitiamo a visitare il nostro sito internet
www.mpmaneurope.com
Page 87

Page 88

 Loading...