

Page 1

PC39HD
Page 2

1.PARTS OF THE CAMCORDER 5
2.PREPARING FOR USING 5
I
NSTALLING THE BATTERY 5
C
HARGING THE BATTERY 7
I
NSERTING THE MEMORY CARD 6
S
ETTING THE LANGUAGE 8
S
ETTING THE DATE AND TIME 10
M
ONITOR SCREEN DISPLAY 11
3.USING THIS CAMCORDER 14
URNING THE CAMCORDER ON AND OFF 14
T
C
HANGE THE MODE 15
R
ECORDING A VIDEO CLIP 15
T
AKING STILL IMAGES 16
U
SING THE SELF-TIMER 17
U
SING THE FLASH 18
R
ECORDING AUDIO 19
4.USING THE MENU IN RECORD MODE 19
M
ENU IN CAPTURE MODE 19
M
ENU IN VIDEO MODE 22
Page of 41 2
Page 3

SETUP MENU 23
5.PLAYBACK 25
P
LAYING BACK MOVIE CLIPS 25
P
LAYBACK STILL IMAGE 26
P
LAYING BACK AUDIO FILES 26
O
THER FUNCTION IN PLAYBACK MODE 27
6. MAKING CONNECTIONS 29
ONNECTING THE CAMCORDER TO A TV 29
C
C
ONNECTING THE CAMCORDER TO A HDTV 30
C
ONNECTING THE CAMCORDER TO A PC 32
7. SOFTWARE INSTALLATION 33
NSTALLING THE SOFTWARE 33
I
8. TROUBLESHOOTING 38
9. TECHNICAL SPECIFICATIONS 39
Page of 41 3
Page 4

Thank you for purchasing this product. Please read these operating
instructions carefully in order to use the digital video camera correctly.
Keep the instructions in a safe place after reading so that you can refer to
them later.
Precautions
Before using the camcorder, please ensure that you read and understand
the safety precautions described below.
• Do not try to open the case of the camcorder or attempt to modify this
camcorder in any way. Maintenance and repairs should be carried out
only by authorized service providers.
• Keep the camcorder away from water and other liquids. Do not use the
camcorder with wet hands. Never use the camcorder in the rain or snow.
Moisture creates the danger of electric shock.
• Use only the recommended power accessories. Use of power sources not
expressly recommended for this equipment may lead to overheating,
distortion of the equipment, fire, electrical shock or other hazards.
Page of 41 4
Page 5
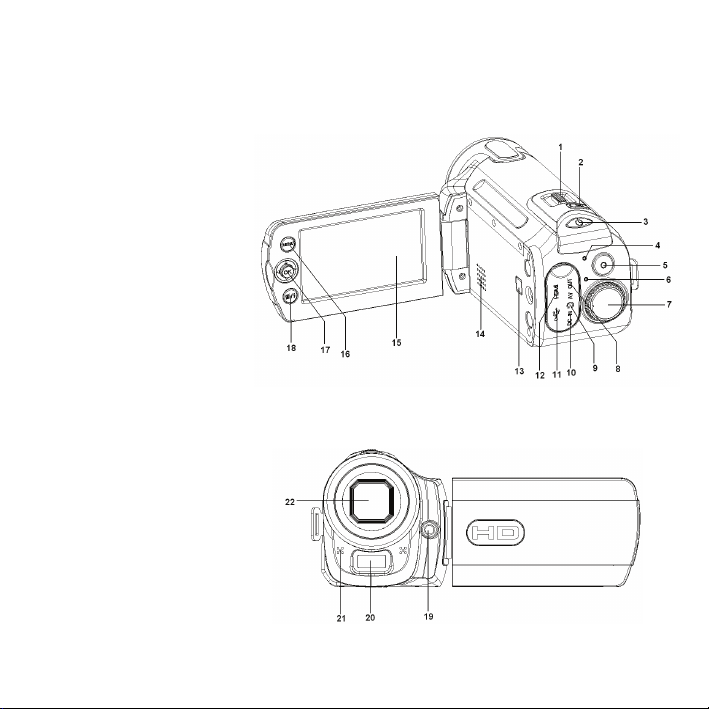
1. Parts of the camcorder
1: Zoom switch
2: Capture /voice
record button
3: Power button
4: Power LED
5: Video record mode
6: Charging LED
7: Mode dial
8: AV out jack
9: Earphone jack
10: DC in jack
11: USB Jack
12: HDMI jack
13 : Display button
14: Speaker
15: LCD screen
16: Menu button
Page of 41 5
Page 6
17:Joystick/ OK button
18: Delete/ Flash button
19: Compensating LED
20: Flash strobe
21: Microphone
22: Lens
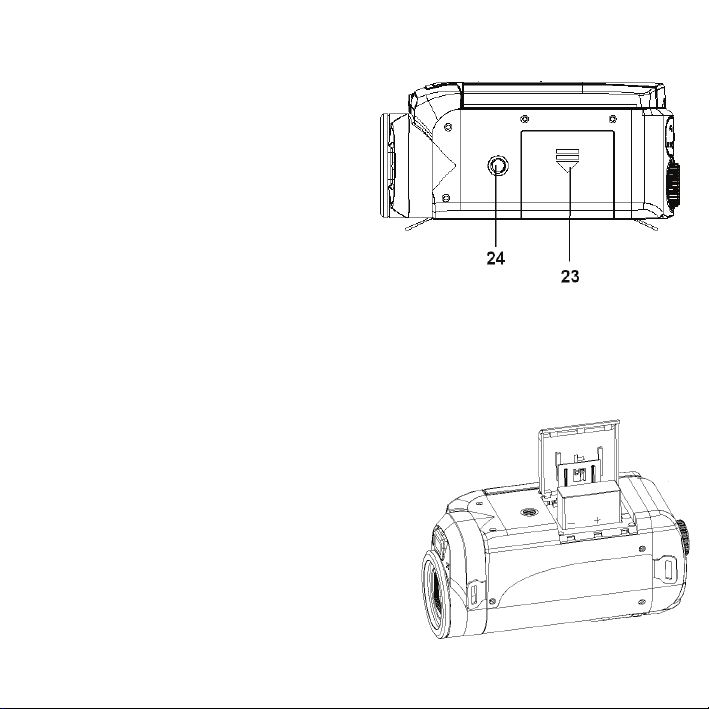
23: Battery cover
24: Tripod socket
2. Preparing for using
Installing the Battery
1. Slide the battery cover.
2. Place the accessory lithium-ion
battery into the compartment. Note
that the metallic contacts must be
Page of 41 6
Page 7
aligned with the contacts in the compartment.
3. After the battery is properly installed, replace the battery cover.
Charging the battery
Please charge the battery at least 8 hours for first time use.
a) Power OFF; connect the AC-adaptor to the camcorder DC in jack.
b) Plug the AC-adaptor to the electrical outlet.
c) Charging starts when charging LED turns BLUE. The charge indicator
light turns OFF when charging is
completed.
d) Disconnect the camcorder.
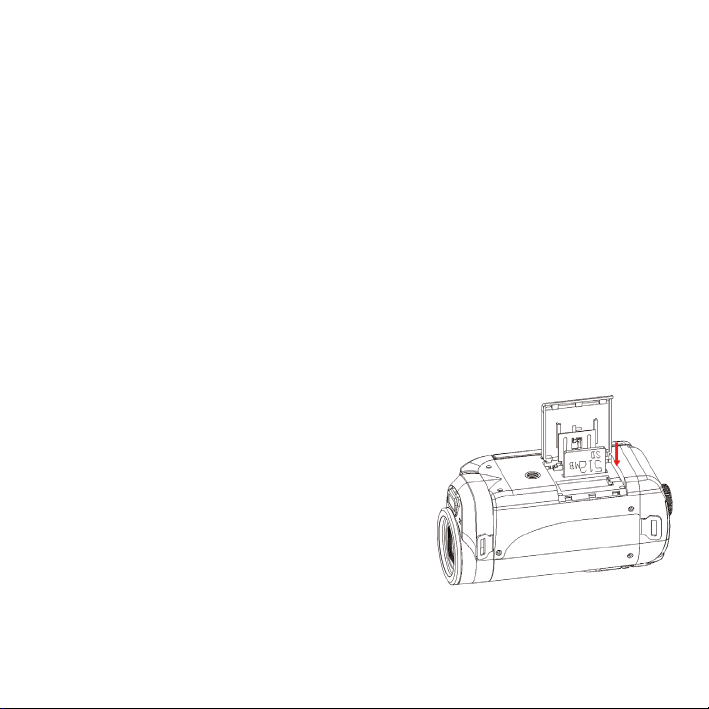
Inserting the Memory Card
This camcorder has an internal memory of
32MB, it can only record a few pictures or
movie clips. If you want record more you have to use a SD or MMC card
Page of 41 7
Page 8

(The MAX.SD/MMC card that this camcorder could support is up to
16GB ).Turn off the camcorder before inserting or removing the memory
card. Be sure to orient the card correctly when inserting it. Never try to
force the memory card into the slot when you feel resistance. The memory
card has a write protect switch, which used to protect data from accidental
deletion. Therefore, whenever you want to record, format or delete files in
the SD card, disable the write protection beforehand.
1. Turn off the camcorder.
2. Slide the battery cover and then you will see the SD card slot.
3. Insert the memory card as illustrated.
4. Close the battery cover.
• To release the memory card press the edge of the card gently.
Format the memory card
It is important to format the memory card when it is the first time you use
this camcorder. All data will be deleted including protected files. Be sure to
download important files to your computer before formatting.
1: Turn the power on, and set the camcorder to the Setup Menu.(See the
details on page 22 )
Page of 41 8
Page 9

2: Push the joystick upward or downward to select [Format] then push the
joystick rightward to launch the submenu.
3: Push the joystick upward or downward to select the item [YES] and then
press the OK button to erase all data.
Setting the Language
When using the camcorder for the first time after purchasing it, be sure to
choose a language and set the date & time before using the camcorder.
1: Turn the power on, and set the camcorder to the Setup Menu.(See the
details on page 22 )
2: Push the joystick upward or downward to select [Language] then move
the joystick rightward to launch the submenu.
3: Push the joystick upward or downward to select the desired language
and then press the OK button to confirm the setting.
4: Press the MENU button to close the menu.
Page of 41 9
Page 10
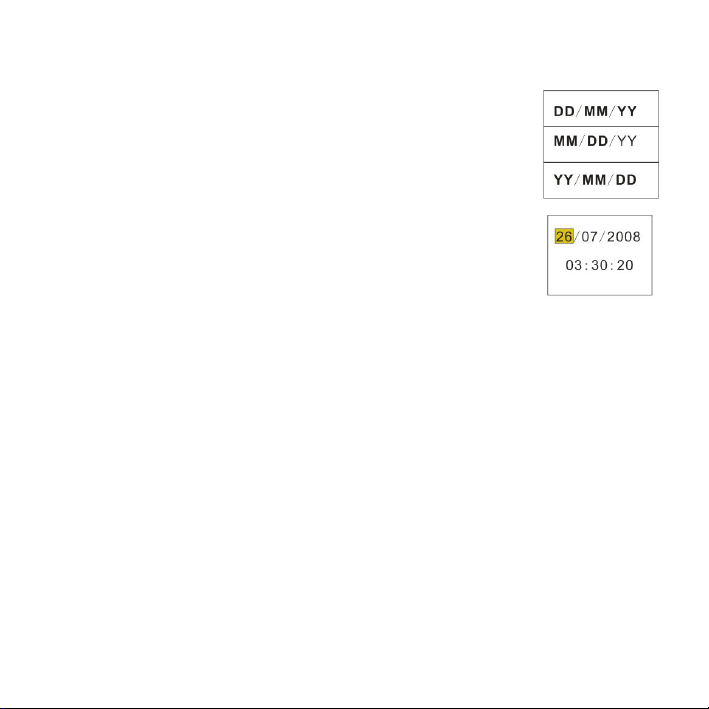
Setting the date and time
1: Turn the power on, and set the camcorder to the Setup
Menu. (See the details on page 22)
2: Push the joystick upward or downward to select
[Date/Time] then push the joystick rightward to launch
the submenu: Date Format, Date Setup.
3: Select a date format by using the joystick. And then
select [Date Setup].
4: Push the joystick upward or downward to change the highlighted value.
Push the joystick leftward or rightward to move the cursor between
settings.
5: Press the OK button to confirm the setting.
6: Press the MENU button to close the menu.
• The date and time can be only added to still images by setting the
function [Date Stamp] in capture menu.
Page of 41 10
Page 11
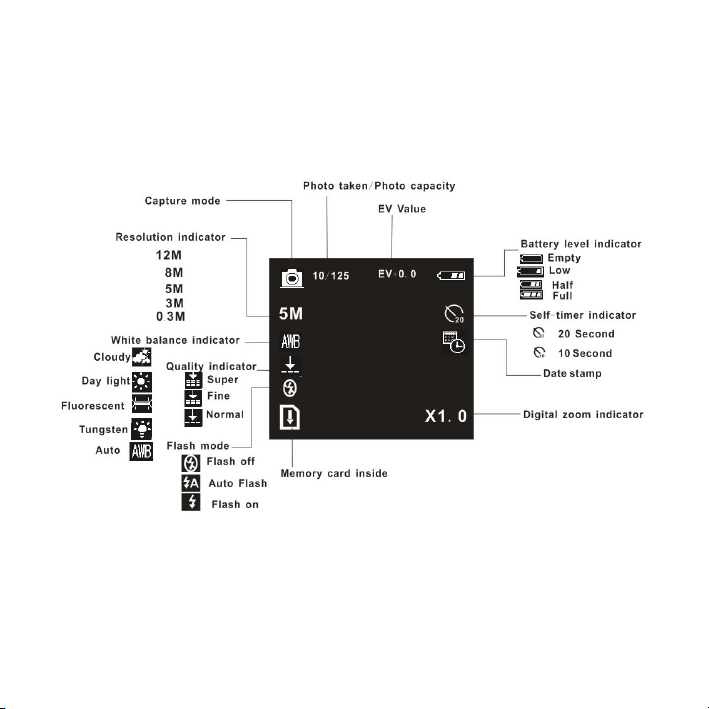
Monitor screen display
Capture
Page of 41 11
Page 12
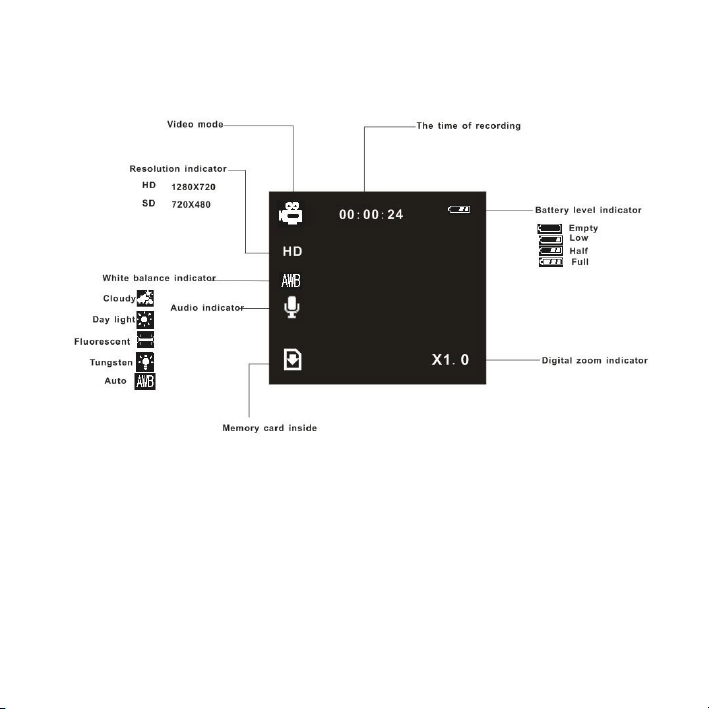
Video record mode
Page of 41 12
Page 13
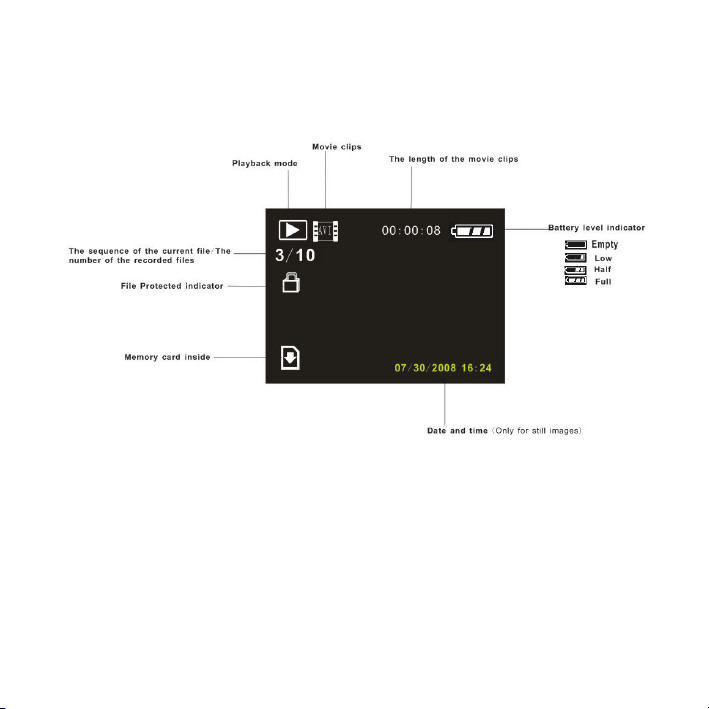
Playback mode
Page of 41 13
Page 14

3. Using this camcorder
Turning the Camcorder On and Off
1. Open the LCD panel to power on the camcorder and close the L CD
panel to turn off the camcorder.
2. You can also press the POWER button to turn on the camcorder and
press it again to turn the camcorder off.
To save battery power, the LCD monitor automatically turns off 30 seconds
after the last control accessed (factory-preset setting). Press any button
other than the power button to turn on the LCD monitor. After the power
saving function has been active for the set time, the power will turn off
completely. Press the Power button to power the camera back on. You can
change the power-off time by setting the function [Auto off] in the Setup
menu.
Page of 41 14
Page 15
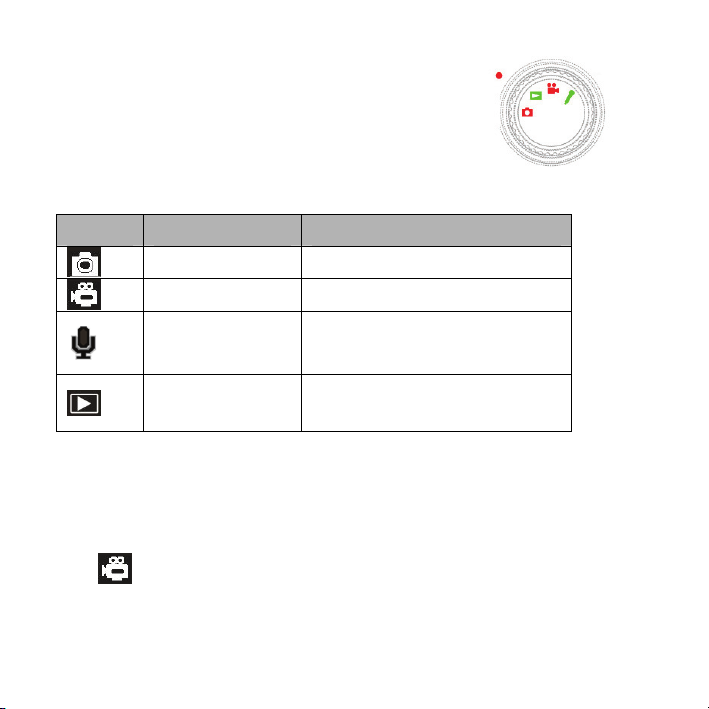
Change the record mode
There are four record modes in this camcorder.
Rotate the mode dial to set the camcorder to
different mode.
Display Title Description
Capture mode For taking still photos.
Video mode For recording movie clips.
Audio mode For recording audio files.
Playback mode For playback record files.
Recording a video clip
1: Turn on the camcorder and set the camcorder to video record mode
).
(
2: Zooming:
Page of 41 15
Page 16

Moving the Zoom switch rightward or leftward to zoom in or zoom out the
screen.
The value of magnification level appears on the LCD monitor.
3: Press the VIDEO RECORD button to start recording.
4: Press the VIDEO RECORD again to end the recording. If the memory is
full the video camera will stop recording automatically.
• On the upper of the LCD monitor displays the recorded time.
• When the light is insufficient press the FLASH/DELETE button to
turn on the compensating LED and when the light is enough press the
FLASH/DELETE button to turn off the compensating LED.
Taking still images
1. Set the camcorder to capture mode, the icon appears on the LCD
screen.
2. Zooming:
Moving the Zoom switch rightward or leftward to zoom in or zoom out
the screen.
monitor.
3. Hold the camcorder steady and then press the CAPTURE/VIOCE
The value of magnification level appears on the LCD
Page of 41 16
Page 17

RECORD button down to take a picture.
Using the Self-timer
Use the self-timer to set a delay from the time the shutter button is pressed
to the time the image is shot.
1: Turn the power on, and set the camcorder to the Capture mode.
2: Press the MENU button to display the capture menu.
3: Using the joystick to select the item [Self Timer]. And move the joystick
rightward to launch the submenu:
Disable: Don’t use self-timer.
10 Seconds: The shutter release will delay for 10 seconds.
20 Seconds: The shutter release will delay for 20 seconds.
4: Move the joystick upward or downward to select the self timer.
5: Press the OK button to confirm the setting, and then press the MENU
button to close the menu.
6: Press the CAPTURE/ VIOCE REICORD button to take picture.
Page of 41 17
Page 18
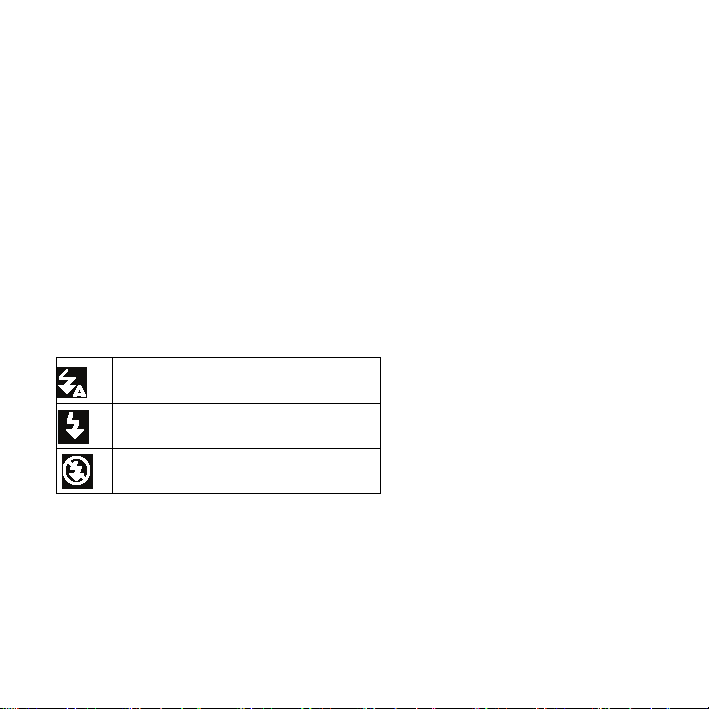
Using the Flash
The flash is not only for taking pictures when there is insufficient light, but
also for when the subject is in shade or with backlight conditions. Pressing
the Delete/flash button cycles your camera through the various flash
modes. The flash will not activate during continuous shooting or movie
recording.
1: Set the camcorder to the Capture mode.
2: Press the FLASH/DELETE button to change the flash mode.
Each time the flash button is pressed, the flash icon changes.
Auto: Automatically turn on/of
Flash on: Force on the flash
Flash off: Force off the flash
3: Press the SHUTTER button to take a picture.
• When the battery level is low the flash strobe will not work.
• The LCD screen is black when the flash is charging. The next image
can be shot only when charging is completed.
Page of 41 18
Page 19
Recording audio
1: Turn the camcorder on and set it to audio record mode.
2: Press the CAPTURE/VIOCE RECORD button to start recording.
3: Press the CAPTURE/VIOCE RECORD again to end the recording. If the
memory is full the video camera will stop recording automatically.
• On the center of the LCD monitor displays the recorded time.
• There is no menu in audio record mode.
4.Using the menu in record mode
When a menu is displayed, the joystick is used to make the desired setting.
The audio record mode doesn’t have a menu.
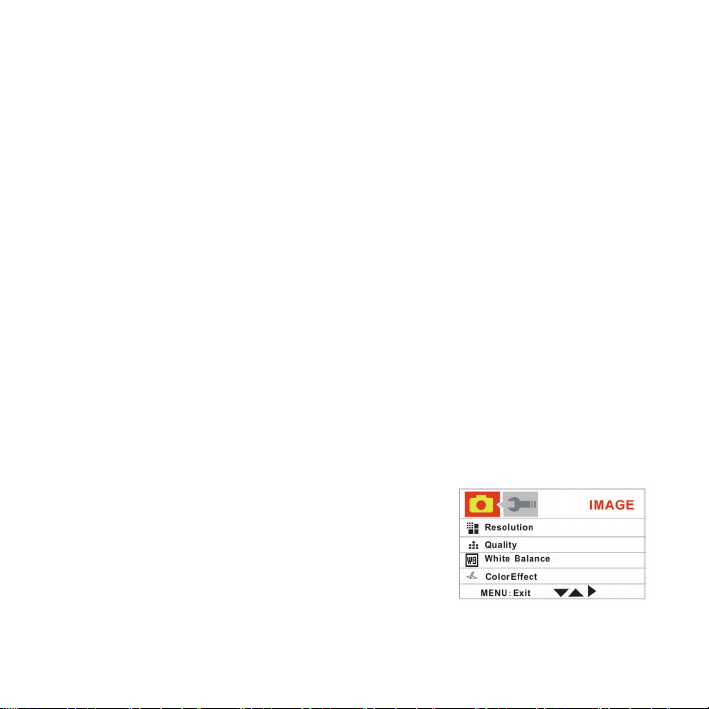
Menu in capture mode
1: Turn on the camcorder and set it to capture
mode.
2: Press the MENU button to display the menu.
3: Move the joystick upward or downward to select an item.
Page of 41 19
Page 20

4: Push the joystick rightward to enter the submenu.
5: Use the joystick to select the desired item.
6: Press the OK button to confirm the setting.
7: Press the MENU button to close the menu.
Capture menu list
Menu item Function
Resolution There are five options for choice:
[12M]/[8M] /[5M]/[3M]/[0.3M].
Quality Select a lower image quality to decrease the image size in
order to capture more images. There are three options for
choice:[Super] /[Fine] /[Normal].
White
Balance
Color
Effect
Adjust the white balance to suit different light sources.
There five items for option: [Auto]/[Daylight]/ [Cloudy] /
[Fluorescent] / [Tungsten].
Set the color effect to add a color tone to the picture.
[color]: Reflects the true color of the object.
[Sepia]: Adds a sepia color tone to the picture.
Page of 41 20
Page 21

[Monochrome]: The pictures only have two colors: white
and black.
Exposure Set the exposure value manually to compensate for unusual
lighting conditions such as indirect indoor lighting, dark
backgrounds, and strong backlighting. The exposure value
range is –2.0 to 2.0.
Date
Stamp
Self Timer Use the self-timer to set a delay from the time the shutter
Burst
Snapshot
This function can be used to add a date to your pictures as
you take them. There are two items for option:
[On]: Add the recording date & time to printed images.
[Off]: Do not add the recording date & time to printed
images.
button is pressed to the time the image is shot. [Disable]/[10
SEC]/[20SEC].
Use this function to take 3 pictures continuously.
[Single]: Press the shutter button once to take one picture.
[Burst]: Press the shutter button once to take three pictures
continuously.
Page of 41 21
Page 22
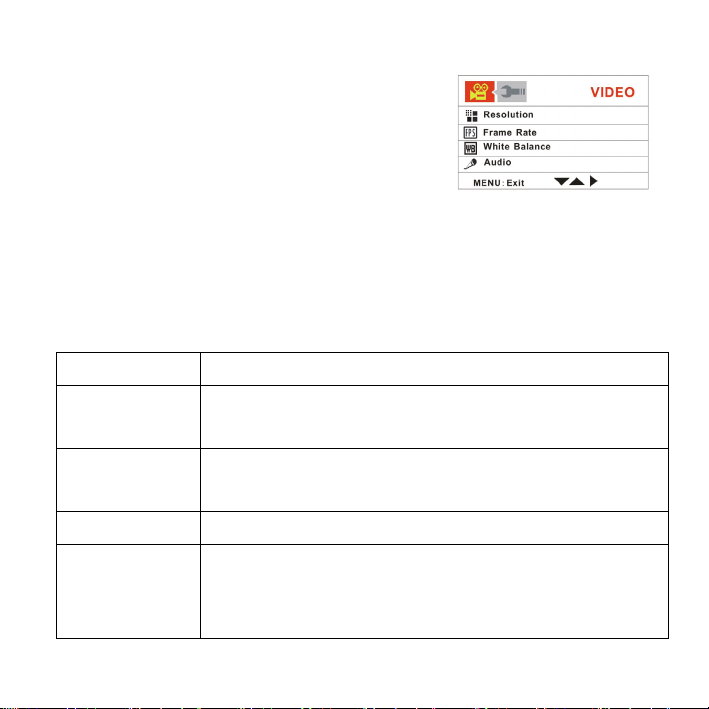
Menu in video mode
1: In video record mode press the MENU
button to display the menu.
2: Move the joystick upward or downward to
select an item.
3: Push the joystick rightward to enter the submenu.
4: Use the joystick upward or downward to select the desired item.
5: Press the OK button to confirm the setting.
6: Press the MENU button to close the menu.
Menu item Function
Resolution Select small movie size to record longer time. There are
two items for option:[1280x720]/ [720x480].
Frame Rate Select low frame rate to record longer time. There are
two items for option: [30FPS]/[15FPS].
White Balance See the details on page 20.
Audio [Enable]: Voice is recorded when recording movie clip..
[Disable]: No voice is recorded when recording movie
clips.
Page of 41 22
Page 23
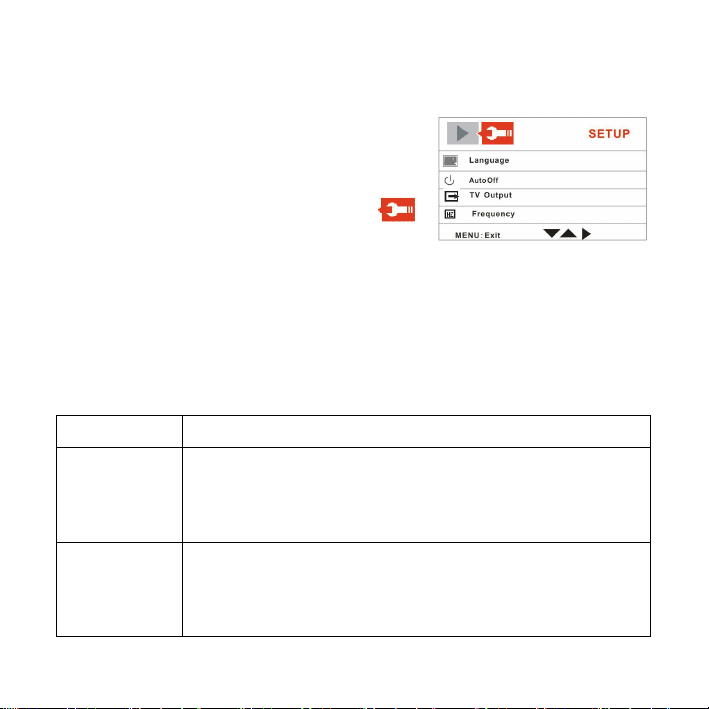
Setup menu
You can set the system items in setup menu.
1: Turn the power on and press the MENU
button to display the menu.
2: Push the joystick rightward to select
[Setup].
3: Move the joystick upward or downward to select an item.
4: Push the joystick rightward to enter the submenu.
5: Push the joystick upward or downward to select the desired item.
6: Press the OK button to confirm the setting.
7: Press the MENU button to close the menu.
Menu item Function
Language Select a language for the Display menu and other
information from the following languages: English,
French,German,Italian,Spanish, Portuguese.
Auto off To save power, the camcorder is turned off
automatically after a period of time. There are four
options: [Disable] / [1Min] / [3Min]/[5 Min].
Page of 41 23
Page 24

TV output You can review images on a television with the supplied
AV cable. TV Out should be set to either NTSC or PAL
depending on your region.
[NTSC]: America, Japan and others; [PAL]: Europe,
Oceania and others.
Frequency Light Frequency should be set to either 60Hz or 50Hz
depending on your region. [50HZ] / [60HZ].
Date/Time Refer to page 9.
Buzzer Sets the operation sound on and off. [Enable] / [Disable]
Format To erase all data stored on the memory card if you are
using a memory card, or all data stored in the internal
memory if there is no card inserted. All data will be
deleted including protected files. Be sure to download
important files to your computer before formatting. [Yes]
/ [No].
Default
Settings
To reset the entire menu and button operation settings
to initial default.
Page of 41 24
Page 25

USB Mode You can use this camera as a PC camera or removable
disk. [PC Camera]:Use as a PC camera; [Mass storage]:
Use as a removable disk.
Firmware
version
This function will show the software version.
5.Playback
Playing back movie clips
1: Set the camcorder to playback mode.
2: Push the joystick leftward or rightward to select the movie clips you want
to playback.
3: Press the VIDEO RECORD button to start playing. Press the OK button
to pause it and press it again to continue. Push the joystick rightward to
fast forward and push the joystick leftward to back forward.
4: Push the joystick upward or downward to adjust the volume.
Page of 41 25
Page 26

Playback still image
1: Set the camcorder to playback mode.
The latest recorded file appears on the LCD screen. If there are no
images stored, a message [No Image] appears.
2: Push the joystick leftward or rightward to preview the previous or next
image.
3: Zooming:
Moving the ZOOM switch leftward or rightward to zoom in or zoom out
the image. When the picture is enlarged you can push the joystick
upward/downward/Leftward/Rightward to browse the details of the
image.
Playing back audio files
1: Set the camcorder to playback mode.
2: Push the joystick leftward or rightward to select the audio file you want to
playback.
3: Press the CAPTURE/VIOCE RECORD button to start playing and press
Page of 41 26
Page 27

it again to end the playing. Press the OK button to pause it and press it
again to continue.
Other function in playback mode
Viewing Thumbnails
Push the ZOOM switch leftward to view the file in thumbnails mode. Move
the joystick upward/downward/leftward/rightward to select a file. Press the
OK button to view the file in full screen.
Delete files
If you want to delete a single file you have to select the file first and
then press the Delete/Flash button. Select “ Erase This” and then
press the OK button to enter the submenu. Move the joystick
leftward to select “Yes” and then press the OK button to delete the
file.
Delete a single
Page of 41 27
Page 28
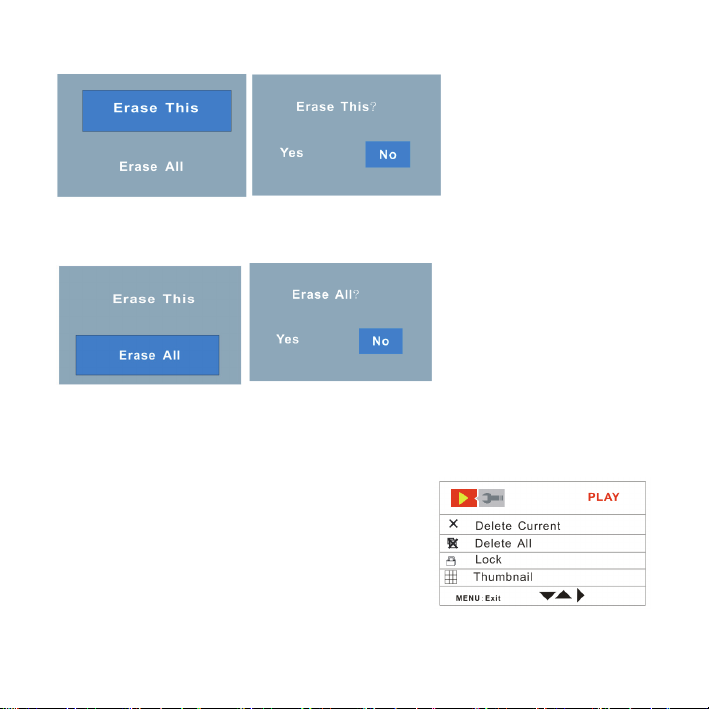
Delete All files
Menu in playback mode
1: In playback mode press the MENU
button to display the menu.
2: Move the joystick upward or downward to
select an item.
3: Push the joystick rightward to enter the
submenu.
Page of 41 28
Page 29

4: Move the joystick upward or downward to select the desired item.
5: Press the OK button to confirm the setting.
6: Press the MENU button to close the menu.
Menu item Function
Delete Current Use this function to delete a single file. [Yes]/[No].
Delete All Use this function to delete all files. [Yes]/[No].
Lock Use this function to protect the files from being deleted
by accident.
[Lock Current]: Lock the current file.
[Unlock Current]: Unlock the current file.
[Lock all]: Lock all files.
[Unlock All]: Unlock all files.
Thumbnail View all files in thumbnail mode.
[2x2]: The LCD screen display 4 files a page.
[3x3]: The LCD screen display 9 files a page.
Rotate Use this function to rotate the images.
[90]:Rotate the image 90 degrees in clockwise.
Page of 41 29
Page 30

[180]: Rotate the image 180 degrees in clockwise.
[270]: Rotate the image 270 degrees in clockwise.
Slide show Play the files automatically.
[On]: Select this item to start playing.
[Setup]: Set the direction and Interval time of the slide
show .
[Direction]: [Backward] / [Forward].
[Interval]: [I Sec] / [10 Sec].
6. Making connections
Connecting the Camcorder to a TV
When plug in the TV-out cable (supplied) to the camcorder AV out jack the
LCD screen turns black, Connect the camcorder to a TV and the TV screen
now performs as the camcorder LCD screen.
1. Connect the camcorder to a TV via the TV-out cable (supplied) 。
2. Turn on the TV and the camcorder, and then set the TV to “AV” mode.
3. When the camcorder is set to record mode, you can preview the
Page of 41 30
Page 31

subjects you want to record on the TV screen.
4. When the camcorder is set to Playback mode, you can review all the
pictures, video and audio clips stored in the camera on the TV.
Connecting the Camcorder to a HDTV
HD-TV hereby means the HDTV built-in component input ports, thus
can perform HD (720P) high resolution quality while connected.
Please note that only mini type HDMI cable could be used to this
camcorder. this mini HDMI cable is not included in the accessories .
You need to buy the mini HDMI cable contact the nearest service
centre
.
1. Connect the camcorder to HDTV by the HDMI-cable.
2. Power on HDTV and switch to HDMI-mode.
3. Power ON the camcorder. Set the camcorder in playback mode.
Push the joystick leftward or rightward to select the file demanded.
4. Press VIDEO RECORD button to “Play” the selected video file on
HDTV, press it again to “Stop” the playing.
5. Press the OK button to “Pause”, press it again to “Continue” the
playing.
Page of 41 31
Page 32

6. Push the joystick leftward to reward, push the joystick rightward to
forward.
7. Push the joystick upward or downward to adjust the volume.
Connecting the Camcorder to a PC
There are two ways to download files from the camcorder's internal
memory or memory card to a computer:
• By inserting the memory card into a card reader
• By connecting the camera to a computer using the supplied USB
cable.
Using a Card Reader
1: Eject the memory card from the camcorder and
insert it into a card reader that is connected to a
computer.
2: Open [My Computer] or [Windows Explorer] and
double-click the removable disk icon that represents the memory card.
3: Copy images from the card into a directory of your choice on the
computer’s hard disk.
Page of 41 32
Page 33

Connecting the Camcorder to a PC with the USB Cable
1: Connect the supplied USB cable to the computer's USB port and turn on
the camcorder. A message “Mass storage” or “PC Camera” appears on the
screen when connection to the computer has been successfully completed.
Press the OK button to set the camcorder to “Mass storage” mode.
2: Open [My Computer] or [Windows Explorer]. A "Removable Disk"
appears in the drive list. Double-click the "Removable Disk" icon to view its
contents. Files stored on the camera are located in the folder named
"DCIM".
3: Copy the photos or files to your computer.
7. Software Installation
Installing the Software
The bundled software CD has the drivers and software that come with
video camera.
Insert the CD into your CD-ROM drive. The autorun menu appears:
Page of 41 33
Page 34

The following software is listed:
• Install Driver: Installs software for PC camera
• Arcsoft MediaImpression: Installs software for editing movie clips and
photos.
If the autorun menu does not appear automatically, open the CD-ROM in
[My Computer] or [Windows Explorer] and double-click the file named
[autorun.exe] to start the program. You can also click [Run] in the Windows
Startup menu, enter "D:\autorun.exe" (where D is your CD-ROM drive letter)
in the text box, and click [OK].
Page of 41 34
Page 35

Install Driver
(1 )Insert the CD to your PC; (2) Click “Install Driver” to install the driver;
(2)Click “Next” and then click “Install” to install the driver;
(3) Click “Finish” to complete the installation
(4) Connect the camcorder to PC by the USB-cable; (6) Power on;
Page of 41 35
Page 36

(5) Use the OK button to set the camcorder to [PC Camera] mode.
(6) An interface “Found new Hardware Wizard” appears;
(7) Select “Install the software automatically (Recommended)”;
(8) Click “next”;
(9) If “hardware installation” interface appears click “Continue Anyway”;
Page of 41 36
Page 37

NOW START FROM NO. (8) ON TO NO. (11)
WHEN THE INTERFACE “Found new
hardware Wizard” APPEARS. IF THE
“Welcome to the scanner and camera
wizard” interface appears click “Cancel”.
Page of 41 37
Page 38

The installation is finished and now
you can use the PC-Camera function.
How to use the PC Camera function
1. Power ON; connect the camcorder with the PC by USB-cable.
2. Press the OK button to set the camcorder to PC Camera mode.
3. Double click the icon “My Computer” (on the PC-desktop).
4. Double click the icon
Then you can start to use the PC-Camera function.
8. Troubleshooting
Power does not turn on.
1.Battery is insufficient to power
on.
The camcorder does not take pictures.
★Recharge the battery.
Page of 41 38
Page 39

1.Memory is full.
2.Memory card is not formatted
correctly.
Image is blurry or out of focus.
1.The camcorder was moving
when the image was captured.
Image is not displayed on the LCD monitor.
1.A memory card with non-JPG
images (recorded with other
camera) is loaded.
Recorded files are not saved in memory.
1.The camcorder was turned off
before the files are saved in
memory.
★Insert a new memory card.
★Format the memory card again
★ Hold the camcorder steady
★This camcorder cannot display
★ If the battery low indicator
or use a new card.
when shooting picture.
non-JPG images.
appears on the LCD monitor,
recharge the battery
immediately.
Page of 41 39
Page 40

9. Technical Specifications
Sensor 5MegaPixels CMOS,
Display 2.7 " TFT Color LCD
Focus range Standard:200cm ~ infinity
Aperture F3.2, f=7.36mm
Shutter
Resolution StillImage:12M;8M;5M;3M; 0.3M;
Sensitivity Auto
White balance
Exposure control -2EV to +2EV in 0.5 step
Burst Included
Photo effect Color/Sepia/Monochrome
Self-timer 10/ 20 sec.
Storage 32 MB internal memory
Electronic Shutter:
Video:1280x720, 720x480.
Auto / Daylight / Tungsten / Fluoresce / Cloudy
External memory: SD / MMC
Page of 41 40
Page 41

For your information, please visit
TV system NTSC / PAL
Power Supply Lithium-ion battery
Ambient
temperature
Operating: 0° C to 40° C
Storage: -20 to 60° C
Microphone Built-in
Speaker Built-in
Dimension 128X62X59 (mm)
Weight Camera Body w/o battery: Approx. 205g
www.mpmaneurope.com
Page of 41 41
Page 42

PC39HD
Page 43

1. ÉLEMENTS DU CAMESCOPE 5
2. AVANT L’UTILISATION 7
M
ISE EN PLACE DE LA BATTERIE 7
M
ISE EN CHARGE DE LA BATTERIE 7
I
NSERTION D’UNE CARTE MEMOIRE 8
C
HOIX DE LA LANGUE 10
R
EGLAGE DE LA DATE ET L’HEURE 10
A
FFICHAGE DE L’ECRAN DE CONTROLE 12
3. UTILISATION DU CAMESCOPE 15
ISE SOUS ET HORS TENSION DU CAMESCOPE 15
M
C
HANGER LE MODE D’ENREGISTREMENT 16
E
NREGISTREMENT DE VIDEO-CLIP 17
P
RISE D’IMAGES FIXES 18
U
TILISATION DU DÉCLENCHEUR À RETARDEMENT 18
U
TILISATION DU FLASH 19
E
NREGISTREMENT AUDIO 20
4. UTILISATION DU MENU EN MODE D’ENREGISTREMENT 21
M
ENU EN MODE DE CAPTURE 21
M
ENU EN MODE VIDEO 23
Page of 42 2
Page 44

ENU DE CONFIGURATION 25
M
5. LECTURE 27
L
ECTURE VIDEO 27
L
ECTURE D’IMAGE 27
L
ECTURE DES FICHIERS AUDIO 28
A
UTRES FONCTIONS EN MODE DE LECTURE 29
6. BRANCHEMENTS 32
RANCHER LE CAMESCOPE A UN TELEVISEUR 32
B
B
RANCHER LE CAMESCOPE A UN TELEVISEUR HAUTE DEFINITION 32
B
RANCHER LE CAMESCOPE AU PC 33
7. INSTALLATION DE LOGICIEL 35
NSTALLATION DE LOGICIEL 35
I
8. PANNES 40
9. FICHE TECHNIQUE 41
Page of 42 3
Page 45

Merci d’avoir fait l’acquisition de cet appareil. Veuillez lire attentivement ces
instructions d'utilisation afin de faire bon usage de votre caméscope
numérique. Conservez ces instructions en lieu sûr après lecture pour toute
consultation ultérieure.
Précautions
Avant d’utiliser le caméscope, veillez à lire et à comprendre les consignes
de sécurité énumérées ci-dessous.
Ne tentez pas d’ouvrir le boîtier du caméscope ni de modifier l’appareil
d’une quelconque manière. L’entretien et la réparation doivent être
effectués par des prestataires agréés uniquement.
Tenez le caméscope éloigné de l’eau ou de tout autre liquide. N’utilisez pas
le caméscope les mains mouillées. N’utilisez jamais le caméscope sous
la pluie ou la neige. L’humidité représente un risque d’électrocution.
N’utilisez que les accessoires d’alimentation recommandés. L’utilisation de
sources d’alimentation non conçues spécifiquement pour cet équipement
peut entraîner une surchauffe, la déformation de l’équipement,
l’électrocution ou d’autres accidents.
Page of 42 4
Page 46

1. Éléments du caméscope
1: Commutateur Zoom
2: Touche
d’enregistrement de voix /
capture
3: Touche de mise sous
tension
4: Voyant LED de mise en
marche
5: Mode d’enregistrement
vidéo
6: LED de charge
7: Molette de sélection de
mode
8: Sortie jack AV
9: Prise pour écouteurs
10: Prise DC-in
11: Prise USB
Page of 42 5
Page 47

12: Prise HDMI
13 : Touche d’affichage
14: Haut-parleur
15: Écran LCD
16: Touche de Menu
17: Manche à balai / Touche OK
18: Touche Flash / suppression
19: LED de compensation
20: Flash-éclair
21: Microphone
22: Objectif
23: Couvercle du compartiment de la batterie
24: Cavité pour trépied
Page of 42 6
Page 48

2. Avant l’utilisation
Mise en place de la batterie
1. Retirez le couvercle du
compartiment en le faisant
coulisser.
2. Insérez la batterie lithium-ion fournie
dans le compartiment. Veillez à faire
correspondre les polarités à celles indiquées dans le compartiment.
3. Après avoir installé la batterie correctement, remettez le couvercle en
place.
Mise en charge de la batterie
Mettez la batterie en charge 8 heures au moins avant la première utilisation.
a) L’alimentation en OFF, branchez l’adaptateur CA à la prise DC-in du
caméscope.
Page of 42 7
Page 49

b) Branchez l’adaptateur CA à une prise du secteur.
c) La recharge débute lorsque la LED vire au bleu. Le voyant indicateur
de charge s’éteint à l’issue de la charge.
d) Débranchez le caméscope
Insertion d’une carte mémoire
Votre caméscope dispose d’une mémoire interne de 32 MB qui lui permet
de mémoriser seulement quelques photos et vidéo-clips. Pour avoir une
plus grande capacité, vous devez utiliser une carte mémoire SD ou MMC
(votre caméscope peut accueillir des cartes
SD/MMC jusqu’à 16 GB). Éteignez le
caméscope avant d’insérer ou de retirer une
carte mémoire. Veillez à orienter correctement la
carte pendant l’insertion. Si vous rencontrez une
résistance, n’essayez pas de forcer la carte
mémoire à rentrer dans la fente. La carte
mémoire dispose d’une protection en écriture contre les effacements
accidentels de données. Par conséquent, au moment d’enregistrer, de
Page of 42 8
Page 50

formater ou d’effacer des fichiers de la carte mémoire SD vous devez retirer
la protection d'écriture au préalable.
1. Mettez hors tension le caméscope.
2. Faites glisser le couvercle du compartiment de batterie pour découvrir
la fente de la carte SD.
3. Insérez la carte mémoire comme indiqué à l'image.
4. Refermez le couvercle du compartiment.
Pour retirer la carte mémoire, appuyez doucement sur le bord de la
carte.
Formatage d’une carte mémoire
Il est important de formater la carte mémoire lors de la première utilisation
de votre caméscope. Le formatage effacera toutes les données
enregistrées y compris les fichiers verrouillés. Veillez à transférer sur votre
ordinateur tous les fichiers importants avant de formater.
1: Allumez le caméscope et accédez au menu de configuration (voir les
détails à la page 22).
2: Poussez le manche à balai vers le haut ou le bas pour sélectionner
(Format) puis poussez le levier à droite pour lancer le sous-menu.
Page of 42 9
Page 51

3: Levez ou baissez le manche à balai pour sélectionner l’option (YES) puis
pressez la touche OK pour effacer toutes les données.
Choix de la langue
Lors de la première utilisation après l’achat du caméscope, veillez à
sélectionner une langue et à régler la date et l’heure avant toute utilisation.
1: Allumez le caméscope et accédez au menu de configuration (voir les
détails à la page 22).
2: Poussez le manche à balai vers le haut ou le bas pour sélectionner
(Language) puis à droite pour lancer le sous-menu.
3: Levez ou baissez le manche à balai pour sélectionner
la langue voulue puis pressez la touche OK pour
valider l’option.
4: Appuyez sur la touche MENU pour quitter le menu.
Réglage de la date et l’heure
1: Allumez le caméscope et accédez au menu de
Page of 42 10
Page 52

configuration. (voir les détails à la page 22)
2: Poussez le manche à balai vers le haut ou le bas pour sélectionner
(date/Time) puis à droite pour lancer le sous-menu. Format et réglage de
la date.
3: Sélectionnez un format de date à l’aide du manche à balai. Puis
choisissez (Date Setup).
4: Soulevez ou baissez le manche à balai pour changer la valeur en
surbrillance. Poussez le manche à gauche ou à droite pour déplacer le
curseur entre les réglages.
5: Appuyez sur la touche OK pour confirmer le réglage.
6: Appuyez sur la touche MENU pour quitter le menu.
La date et l’heure peuvent être ajoutées aux images fixes en réglant
l’option (Date Stamp) du menu de capture.
Page of 42 11
Page 53

Affichage de l’écran de contrôle
Capture
Page of 42 12
Page 54

Mode d’enregistrement vidéo
Page of 42 13
Page 55

Mode de lecture
Page of 42 14
Page 56

3. Utilisation du caméscope
Mise sous et hors tension du caméscope
1. Ouvrez ou fermez le panneau LCD pour allumer ou éteindre votre
caméscope.
2. Il est également possible d’allumer votre caméscope en appuyant sur la
touche POWER et de l’éteindre en la pressant de nouveau.
À des fins d’économie d’énergie, l’écran LCD s’éteint automatiquement
après 30 secondes d’inactivité de contrôle (préréglage en usine). L’écran
LCD s’allume en appuyant sur toute touche autre que la touche
d’alimentation. L’appareil s’éteint complètement au terme de la durée
préréglée de mise en veille. Pour remettre le caméscope sous tension,
appuyez sur la touche POWER. Vous pouvez changer la configuration de la
mise en arrêt grâce à l’option (Auto off) du menu de configuration.
Page of 42 15
Page 57

Changer le mode d’enregistrement
Ce caméscope dispose de quatre modes
d’enregistrement. Tournez la molette de sélection de
mode pour régler le caméscope sur différents
modes.
Affichag
e
Dénominat
ion
Mode de capture Prise d’images fixes.
Mode vidéo
Mode audio
Mode de lecture
Description
Enregistrement de séquences
filmées.
Enregistrement de fichiers
audio.
Lecture des fichiers
enregistrés.
Page of 42 16
Page 58

Enregistrement de vidéo-clip
1: Allumez le caméscope et réglez-le sur le mode d’enregistrement vidéo
(
).
2: Zoom :
Déplacez le curseur de Zoom à droite ou à gauche pour rapprocher ou pour
éloigner l’objectif. La valeur du niveau de grossissement apparaît sur
l'écran LCD.
3: Appuyez sur la touche VIDEO RECORD pour commencer à enregistrer.
4: Appuyez de nouveau sur la touche VIDEO RECORD pour mettre fin à
l’enregistrement. Le caméscope arrête automatiquement l’enregistrement
si la mémoire est saturée.
La durée de l'enregistrement est affichée sur la partie supérieure de
l'écran.
Si l'éclairage est insuffisant, appuyez sur la touche FLASH/DELETE
pour activer la LED de compensation et de nouveau sur cette touche
pour la désactiver si le niveau d’éclairage est suffisant.
Page of 42 17
Page 59

Prise d’images fixes
1. Mettez le caméscope en mode de capture, l’icône apparaît alors à
l’écran.
3. Zoom :
Déplacez le curseur de Zoom à droite ou à gauche pour rapprocher ou
pour éloigner l’objectif. La valeur du niveau de grossissement apparaît
sur l’écran LCD.
5. Tenez fermement le caméscope puis pressez la touche
CAPTURE/VOICE RECORD pour prendre la photo.
Utilisation du déclencheur à retardement
Utilisez le déclencheur à retardement pour différer la prise de la photo par
rapport au moment oů le bouton d’obturateur est pressé.
1: Allumez le caméscope puis accédez au mode de capture.
2: Affichez le menu de capture en appuyant sur la touche MENU.
3: Sélectionnez l’option (Self Timer) à l’aide du manche à balai. Déplacez le
manche sur la droite ou la gauche pour lancer le sous-menu.
Désactiver : Ne pas utiliser le déclencheur à retardement.
Page of 42 18
Page 60

10 secondes : Le déclenchement de l’obturateur à lieu au bout de 10
secondes.
20 secondes : Le déclenchement de l’obturateur à lieu au bout de 20
secondes.
4: Relevez ou baissez le manche à balai pour sélectionner le déclencheur à
retardement.
5: Validez votre choix en appuyant sur OK puis sur la touche MENU pour
clore le menu.
6: Appuyez sur la touche CAPTURE/VOICE RECORD pour prendre la
photo.
Utilisation du flash
Le flash ne sert pas uniquement aux prises de photo avec un faible
éclairage mais aussi lorsque l'objectif est à l'ombre ou à contre-jour.
Appuyez sur la touche Delete/flash pour faire défiler les différents modes
de flash de votre caméscope. Le flash ne fonctionne pas lors de prise de
photos en continu ou d’un enregistrement vidéo.
Page of 42 19
Page 61

1: Réglez le caméscope en mode Capture.
2: Changez de mode de flash en appuyant sur la touche FLASH/DELETE.
L'icône de flash change à chaque pression de la touche de flash.
Auto : Activé /désactivé
automatiquement
Flash activé : flash forcé à se
déclencher
Flash désactivé : Flash non
imposé
3: Appuyez sur le SHUTTER (déclencheur) pour prendre une photo.
Lorsque la batterie est faible, le flash-éclair ne fonctionne pas.
L’écran n’est pas éclairé pendant la charge du flash. La photo ne peut
être prise que si la charge est terminée.
Enregistrement audio
1: Allumez le caméscope et réglez-le sur le mode d’enregistrement vidéo.
2: Appuyez sur la touche CAPTURE/VOICE RECORD pour
Page of 42 20
Page 62

commencer l’enregistrement.
3: Appuyez de nouveau sur la touche
pour mettre fin à l’enregistrement. If the memory is full the video camera
will stop recording automatically.
La durée de l'enregistrement s’affiche au centre de l’écran LCD.
Il n’y a pas de menu en mode d'enregistrement audio.
CAPTURE/VOICE RECORD
4. Utilisation du menu en mode
d’enregistrement
Lorsqu’un menu est affiché, il faut utiliser le manche à balai pour faire les
réglages désirés. Le mode d’enregistrement audio n’a pas de menu.
Menu en mode de capture
1: Allumez le caméscope et réglez-le sur le
mode de capture.
2: Appuyez sur la touche MENU pour afficher le
menu.
Page of 42 21
Page 63

3: Relevez ou baissez le manche à balai pour sélectionner une option.
4: Poussez le manche à droite ou à gauche pour accéder au sous-menu.
5: Sélectionnez l’option désirée à l’aide du manche à balai.
6: Appuyez sur la touche OK pour confirmer le réglage.
7: Appuyez sur la touche MENU pour clore le menu.
Liste du menu de capture
Élément
du menu
Résolution Il existe cinq options au choix :
[12M]/[8M] /[5M]/[3M]/[0.3M].
Qualité Une qualité faible d’image se traduit par une petite taille de
fichier et, par conséquent, par la capture d’un plus grand
nombre de photos Il existe trois options au choix : [Super]
/[Fine] /[Normal].
Équilibre
des blancs
Effet de
couleur
Ajustez l’équilibre des blancs aux conditions des différentes
sources lumineuses. Il existe cinq options au choix :
Automatique, lumière du jour, nuageux, Fluorescent,
Incandescent.
Ce réglage permet d’ajouter une couleur supplémentaire.
[color] : Enregistrement en couleurs naturelles.
[Sepia] : ajoute une couleur de tonalité sépia.
[Monochrome] : Les photos sont simplement bicolores :
Fonction
blanc
Page of 42 22
Page 64

et noir.
Exposition Réglez la valeur d’exposition manuellement pour
compenser des éclairages inhabituels tels que la lumière
intérieure indirecte, des fonds sombres ou un rétro-éclairage
fort. La gamme des valeurs d’exposition est de 2,0 à 2,0.
Timbre à
date
Retardate
ur
Prises en
rafale
Cette fonction permet d’ajouter une date à vos photos au fur
et à mesure que vous les prenez. Il existe deux options :
[On] : Ajout de la date et l’heure enregistrées aux photos
imprimées.
[Off] : pas de données de date/heure ajoutées aux photos
imprimées.
Utilisez le déclencheur à retardement pour différer la prise
de la photo par rapport au moment oů le bouton d’obturateur
est pressé. [Disable]/[10 SEC]/[20SEC].
Utilisez cette fonction pour prendre 3 photos successives.
[Single] : Appuyez une fois sur le déclencheur pour prendre
une photo.
[Burst] : Appuyez une fois sur le déclencheur pour prendre
trois photos à la suite.
Menu en mode vidéo
1: Appuyez sur la touche MENU en mode
d’enregistrement vidéo.
2: Relevez ou baissez le manche à balai pour
Page of 42 23
Page 65

sélectionner une option.
3: Poussez le manche à droite ou à gauche pour accéder au sous-menu.
4: Relevez ou baissez le manche à balai pour sélectionner l’option désirée.
5: Appuyez sur la touche OK pour confirmer le réglage.
6: Appuyez sur la touche MENU pour clore le menu.
Élément du
menu
Résolution Choisissez une petite taille de film pour enregistrer plus
Cadence de
prise de vue
Équilibre des
blancs
Audio [Enable] : Le son est enregistré pendant la séquence de
Fonctions
longtemps. Il existe deux options au choix : [1280x720]/
[720x480].
Choisissez une cadence de prise de vue basse pour
enregistrer plus longtemps. Il existe deux options :
[30FPS]/[15FPS].
Voir les détails à la page 20.
film enregistrée.
[Disable] : Le son n’est pas enregistré pendant la
séquence de film enregistrée.
Page of 42 24
Page 66

Menu de configuration
Vous pouvez configurer les éléments du
système dans le menu de configuration.
1: Mettez sous tension puis appuyez sur la
touche MENU pour afficher le menu.
2: Poussez le manche à droite pour
sélectionner
3: Relevez ou baissez le manche à balai pour sélectionner une option.
4: Poussez le manche à droite ou à gauche pour accéder au sous-menu.
5: Relevez ou baissez le manche à balai pour sélectionner l’option désirée.
6: Appuyez sur la touche OK pour confirmer le réglage.
7: Appuyez sur la touche MENU pour clore le menu.
Élément du
menu
Langue Sélectionnez une langue de menu d’affichage et
Arrêt
automatique
(configuration).
Fonctions
d’autres informations parmi les langues suivantes :
anglais, français, allemand, italien, espagnol,
portugais.
À des fins d’économie d’énergie, le caméscope
s’éteint automatiquement après une période de
temps. Il existe quatre options : [Disable] / [1Min] /
Page of 42 25
Page 67

[3Min]/[5 Min].
Sortie TV Vous pouvez visionner des photos sur le téléviseur à
l’aide du câble AV fourni. Réglez cette option soit sur
NTSC, soit sur PAL, en fonction de votre région.
[NTSC] : Amérique, Japon et autres ; [PAL] : Europe,
Océanie et autres.
Fréquence Réglez la fréquence à 50 ou 60 Hz, en fonction de
votre région. [50HZ] / [60HZ].
Date / heure Reportez-vous à la page 9.
Avertisseur
sonore
Format Pour effacer toutes les données stockées dans la
Réglages par
défaut
Mode USB Pour utiliser votre caméscope comme caméra PC ou
Version du
firmware
Active ou désactive le son d’utilisation. [Enable] /
[Disable]
carte mémoire si disponible ou toutes les données
enregistrées dans la mémoire interne si aucune carte
n’est insérée. Le formattage effacera toutes les
données enregistrées y compris les fichiers
verrouillés. Veillez à transférer sur votre ordinateur
tous les fichiers importants avant de formater. [Yes] /
[No].
Pour remettre toutes les fonctions de menu et de
touches à leurs valeurs par défaut.
disque amovible. [PC Camera] : utilisez comme
camera PC.
[Mass storage] : utilisez comme disque amovible.
Donnela version du firmeware.
Page of 42 26
Page 68

5. Lecture
Lecture vidéo
1: Réglez le caméscope en mode de lecture.
2: Poussez le manche vers la gauche ou la droite pour faire défiler les
vidéos disponibles.
3: Appuyez sur la touche VIDEO RECORD pour commencer la lecture.
Pour interrompre la lecture, appuyez sur la touche OK. Appuyez de
nouveau pour reprendre la lecture. Pour avancer rapidement à travers le
fichier vidéo, poussez le manche à balai vers la droite et pour reculer
rapidement poussez-le vers la gauche.
4: Relevez ou baissez le manche pour augmenter ou diminuer le son.
Lecture d’image
1: Réglez le caméscope en mode de lecture.
Le fichier enregistré le plus récemment s’affiche alors à l’écran. Si aucune
image n’est enregistrée, le message [No Image] apparaît.
Page of 42 27
Page 69

2: Poussez le manche vers la gauche ou la droite pour afficher l’image
précédente ou suivante.
3: Zoom :
Déplacez le curseur de Zoom vers la droite ou la gauche pour rapprocher
ou éloigner l’objectif. Une fois l’image agrandie, poussez le manche vers
le haut/le bas/la gauche/la droite pour naviguer vers les détails de
l'image.
Lecture des fichiers audio
1: Réglez le caméscope en mode de lecture.
2: Poussez le manche vers la gauche ou la droite pour sélectionner le fichier
audio voulu.
3: Appuyez sur la touche CAPTURE/VOICE RECORD pour lancer la
lecture et appuyez de nouveau pour y mettre fin. Pour interrompre la
lecture, appuyez sur la touche OK. Appuyez de nouveau pour reprendre
la lecture.
Page of 42 28
Page 70

Autres fonctions en mode de lecture
Vue vignette
Appuyez sur le commutateur ZOOM vers la gauche pour voir les fichiers en
mode vignette. Déplacez le manche à balai vers le haut/le bas/la gauche/la
droite pour sélectionner un fichier. Appuyez sur la touche OK pour voir le
fichier en plein écran.
Suppression de fichiers
Si vous voulez supprimer un seul fichier, sélectionnez-le puis appuyez sur la
touche Delete/Flash. Sélectionnez «Erase This» puis appuyez sur la
touche OK pour accéder au sous-menu. Déplacez le manche à balai vers la
gauche pour sélectionner «Yes» puis appuyez sur OK pour supprimer le
fichier.
Suppression d’un seul fichier
Page of 42 29
Page 71

Suppression de tous les fichiers
Menu en mode de lecture
1: Appuyez sur la touche MENU en mode de
lecture pour afficher le menu.
2: Relevez ou baissez le manche à balai pour
sélectionner une option.
3: Poussez le manche à droite ou à gauche
pour accéder au sous-menu.
4: Relevez ou baissez le manche à balai pour sélectionner l’option désirée.
5: Appuyez sur la touche OK pour confirmer le réglage.
6: Appuyez sur la touche MENU pour clore le menu.
Page of 42 30
Page 72

Élément du
menu
Suppression du
fichier actuel
Suppression de
tout
Verrouillage Verrouillez des fichiers pour les protéger contre une
Vignette Voir tous les fichiers en mode de vignette.
Rotation Permet de faire tourner un fichier image.
Diaporama Lecture automatique des fichiers
Fonctions
Permet de supprimer un seul fichier. [Yes]/[No].
Permet de supprimer tous les fichiers. [Yes]/[No].
suppression accidentelle.
[Lock Current] : Verrouillez le fichier actuel.
[Unlock Current] : Déverrouillez le fichier actuel.
[Lock all] : Verrouillez tous les fichiers.
[Unlock All] : Déverrouillez tous les fichiers.
[2x2] : L’écran LCD affiche 4 fichiers dans une page.
[3x3] : L’écran LCD affiche 9 fichiers dans une page.
[90]: Rotation de l’image de 90° dans le sens horaire
[180]: Rotation de l’image de 180° dans le sens horaire
[270]: Rotation de l’image de 270° dans le sens horaire
[On] : Choisissez cette option pour démarrer la lecture.
[Setup] : Réglage de la direction et de l’intervalle de
temps de la diaporama.
[Direction] : [Backward] / [Forward].
[Interval] : [I Sec] / [10 Sec].
Page of 42 31
Page 73

6. Branchements
Brancher le caméscope à un téléviseur
Branchez le câble TV-out (fourni) à la prise AV-out du caméscope, l’écran
LCD s’assombrit. Branchez le caméscope au téléviseur, l’écran de ce
dernier va maintenant agir comme un écran pour votre caméscope.
1. Branchez le caméscope au téléviseur via le câble TV-out fourni.
2. Allumez le téléviseur et le caméscope puis réglez le mode source de
votre téléviseur à «AV».
3. Lorsque le caméscope est en mode d’enregistrement, vous pouvez
avoir un aperçu de vos enregistrements en cours sur votre téléviseur.
4. Lorsque le caméscope est en mode de lecture, vous pouvez avoir un
aperçu des fichiers images, vidéo et audio stockés dans la caméra sur
votre téléviseur.
Brancher le caméscope à un téléviseur haute définition
HD fait référence aux ports d’entrée du composant TV intégré et peut
donc obtenir une qualité haute résolution HD (720P) une fois connecté.
Notez que seul un câble HDMI type mini peut être branché à ce
Page of 42 32
Page 74

caméscope. Ce câble ne fait pas parties des accessoires fournis.
Vous devez acheter le câble HDMI mini auprès du service agréé le
plus proche.
1. Raccordez le caméscope au téléviseur HD à l’aide du câble HDMI.
2. Allumez votre téléviseur HD et réglez-le en mode HDMI.
3. Allumez le caméscope. Réglez le caméscope en mode de lecture.
Poussez le manche à balai vers la gauche ou la droite pour
sélectionner le fichier requis.
4. Appuyez sur la touche VIDEO RECORD pour «lire» le fichier vidéo choisi
sur le téléviseur HD, appuyez à nouveau pour stopper la lecture.
5. Pour interrompre la lecture, appuyez sur la touche OK. Appuyez de
nouveau pour reprendre la lecture.
6. Pour avancer à travers le fichier, poussez le manche à balai vers la
droite et pour reculer vers la gauche.
7. Relevez ou baissez le manche pour augmenter ou diminuer le son.
Brancher le caméscope au PC
Il existe deux manières de télécharger des fichiers de la mémoire interne du
Page of 42 33
Page 75

caméscope ou de la carte mémoire au PC.
• En insérant la carte mémoire dans le lecteur de carte.
• En raccordant la caméra au PC à l’aide du câble USB fourni.
Utilisation d’un lecteur de carte
1: Retirez la carte mémoire du caméscope et
insérez-la dans le lecteur de carte connecté au PC.
2: Accédez à (My Computer) ou (Windows Explorer)
et double-cliquez sur l'icône du disque amovible qui
représente la carte mémoire.
3: Copiez des fichiers image de la carte dans le répertoire de votre choix du
disque dur du PC.
Brancher le caméscope au PC à l’aide d’un câble USB
1: Branchez le câble USB fourni au port USB de l’ordinateur puis allumez le
caméscope. Le message «Mass storage» ou «PC camera» apparaît à
l’écran si la connexion au PC est réussie. Appuyez sur la touche OK pour
mettre le caméscope en mode «Mass storage».
Page of 42 34
Page 76

2: Ouvrez la fenêtre [My Computer] ou [Windows Explorer]. "Removable
Disk" apparaît dans la liste des pilotes. Double-cliquez sur l’icône
«Removable Disk» pour voir son contenu. Les fichiers sauvegardés dans le
caméscope sont dans le dossier intitulé «DCIM».
3: Copiez les photos ou fichiers dans votre PC.
7. Installation de logiciel
Installation de logiciel
Votre caméscope est livré avec un CD d'installation qui comprend un
logiciel et des pilotes.
Insérez le CD dans le lecteur CD-ROM. Un menu de lancement
automatique apparaît :
Page of 42 35
Page 77

Le logiciel suivant est listé :
Installer le pilote. Installer le logiciel de webcaméra.
Installer Arcsoft MedialImpression : installe le logiciel de retouche vidéo et
photos.
Si le menu de lancement automatique n'apparaît pas automatiquement,
ouvrez le CD-ROM dans la fenêtre [My Computer] ou [Windows Explorer] et
double-cliquez sur le fichier intitulé [autorun.exe] pour lancer le programme.
Il est également possible de cliquer sur [Run] dans le menu Startup de
Windows, entrez "D:\autorun.exe" (oů D est la lettre de votre lecteur de CD)
dans la boîte de dialogue et cliquez sur [OK].
Page of 42 36
Page 78

Installer le pilote
(1) Insérez le CD dans votre PC ; (2) Cliquez sur «Install Driver» pour
installer le pilote.
(2) Cliquez sur «Next» puis sur «Install» pour lancer l’installation du pilote.
(3) Cliquez sur “Finish” pour mettre fin à l’installation.
(4) Raccordez le caméscope au PC via le câble USB ; (6) Mettez sous
Page of 42 37
Page 79

tension ;
(5) Appuyez sur la touche OK pour mettre le caméscope en mode [PC
Camera].
(6) L’interface «Found new hardware Wizard» apparaît :
(7) Cliquez sur “Install the software automatically (Recommended)”
(installer le programme automatiquement (recommandé)) ;
(8) Cliquez sur “Next” ;
(9) Si l’interface «Hardware installation» apparaît, cliquez sur «Continue
anyway» ;
Page of 42 38
Page 80

COMMENCEZ MAINTENANT DE (8) A (11)
LORSQUE L'INTERFACE "Found new
hardware Wizard" (nouveau périphérique
détecté) apparaît. Si l’interface «Welcome to
the scanner and camera wizard» (guide
d’installation de scanner et caméra) apparaît,
cliquez sur «cancel».
Page of 42 39
Page 81

L’installation est maintenant
terminée vous pouvez utiliser la
fonction PC-caméscope.
Comment utiliser la fonction PC-caméscope
1. Mettez sous tension, connectez le caméscope au PC via le câble
USB.
2. Appuyez sur la touche OK pour mettre le caméscope en mode
PC-Camera.
3. Double-cliquez sur l’icône «My Computer» (du bureau du PC).
4. Double-cliquez sur l’icône
Vous pouvez, dès lors, utiliser la fonction PC-Camera.
8. Pannes
L’appareil ne s’allume pas.
1. La batterie est faible pour
l’allumer.
Le caméscope ne prend pas de photos.
1. Mémoire insuffisante. Insérez une nouvelle carte
Rechargez la batterie.
mémoire
Page of 42 40
Page 82

2. La carte mémoire n’est pas
formatée correctement.
L’image est floue.
1. Le caméscope n’est pas resté
stable pendant la prise de vue.
Les images ne sont pas affichées sur l’écran LCD.
1. Une carte mémoire avec des
images non JPG (prises avec
une autre caméra) est insérée.
Les images prises ne sont pas sauvegardées.
1. Le caméscope est éteint avant
que les fichiers ne soient
sauvegardés.
9. Fiche technique
Capteur 5MegaPixels CMOS,
Affichage 2,7 " TFT Couleur LCD
Plage de mise au
point
Diaphragme F3.2, f=7.36mm
Obturateur
Résolution Image : 12M;8M;5M;3M; 0.3M;
Sensibilité Auto
Équilibre des
Standard : 200 cm ~ infini
Obturateur électronique
Vidéo : 1280x720, 720x480.
Automatique ; Lumière du jour ; Fluorescent ;
Page of 42 41
Formatez à nouveau la carte ou
utilisez une nouvelle.
Tenez bien l’appareil pendant la
prise de photo.
Le caméscope n’affiche que les
images JPG.
Si le voyant de batterie faible
apparaît sur l’écran LCD,
rechargez immédiatement la
batterie.
Page 83

blancs
Commande
d’exposition
Rafale Incluse
Effet
photographique
Déclencheur à
retardement
Capacité Mémoire interne : 32 MB
Système TV NTSC / PAL
Alimentation
électrique
Température
ambiante
Microphone incorporé
Haut-parleur incorporé
Dimensions 128 X 62 X 59 (mm)
Poids Corps du caméscope sans batterie : Environ 205
Pour plus d’informations, connectez-vous sur notre site Internet
Incandescent ; Nuageux
-2EV à +2EV en étape 0,5
Couleur/Sépia/monochrome
10/ 20 sec.
Mémoire externe : SD / MMC
Batterie Lithium-ion
Service : 0° C à 40° C
Rangement : -20 à 60° C
g
www.mpmaneurope.com
Page of 42 42
Page 84

PC39HD
Page 85

1. KOMPONENTEN DES CAMCORDERS 5
2. VORBEREITUNG ZUR INBETRIEBNAHME 5
E
INLEGEN DES AKKUS 5
A
UFLADEN DES AKKUS 7
E
INSETZEN DER SPEICHERKARTE 6
E
INSTELLEN DER SPRACHE 8
E
INSTELLEN VON DATUM UND UHRZEIT 11
A
NZEIGE DES MONITORS 13
3. VERWENDUNG DES CAMCORDERS 15
IN- / AUSSCHALTEN DES CAMCORDERS 15
E
Ä
NDERN DES AUFNAHMEMODUS 16
A
UFZEICHNEN EINER FILMSEQUENZ 17
A
UFNEHMEN VON EINZELBILDERN 18
V
ERWENDEN DES SELBSTAUSLÖSERS 19
V
ERWENDEN DER BLITZFUNKTION 20
A
UFZEICHEN VON AUDIODATEIEN 21
4. VERWENDUNG DES MENÜS IM AUFNAHMEMODUS 22
M
ENÜ IM AUFNAHMEMODUS 22
M
ENÜ IM VIDEOMODUS 25
Seite 2 von 47
Page 86

SETUP-MENÜ 26
5. WIEDERGABE 29
W
IEDERGEBEN VON FILMSEQUENZEN 29
W
IEDERGEBEN VON EINZELBILDERN 30
W
IEDERGEBEN VON AUDIODATEIEN 30
W
EITERE FUNKTIONEN IM WIEDERGABEMODUS 31
6. HERSTELLUNG VON VERBINDUNGEN 29
NSCHLIESSEN DES CAMCORDERS AN EIN TV-GERÄT 29
A
A
NSCHLIESSEN DES CAMCORDERS AN EIN HDTV-GERÄT 30
A
NSCHLIESSEN DES CAMCORDERS AN DEN COMPUTER 37
7. SOFTWARE-INSTALLATION 39
NSTALLIEREN DER SOFTWARE 39
I
8. FEHLERSUCHE UND ABHILFE 44
9. TECHNISCHE DATEN 39
Seite 3 von 47
Page 87

Wir danken Ihnen, dass Sie dieses Produkt erworben haben. Lesen Sie
bitte diese Bedienungsanleitung sorgfältig durch, um die digitale
Videokamera richtig zu bedienen. Bewahren Sie die Anleitung
anschließend an einem sicheren Ort auf, um später darin nachschlagen zu
können.
Vorsichtsmaßnahmen
Stellen Sie bitte vor Inbetriebnahme des Camcorders sicher, dass Sie die
nachstehend erläuterten Sicherheitsvorkehrungen gelesen und verstanden
haben.
• Versuchen Sie nicht, das Gehäuse des Camcorders zu öffnen oder das
Gerät auf irgendeine Art und Weise zu verändern. Wartungs- und
Reparaturarbeiten dürfen ausschließlich von zugelassenen
Servicestellen vorgenommen werden.
• Halten Sie den Camcorder von Wasser und anderen Flüssigkeiten
entfernt. Bedienen Sie den Camcorder nicht mit feuchten Händen.
Nehmen Sie den Camcorder niemals bei Regen oder Schnee in Betrieb.
Die Feuchtigkeit kann einen elektrischen Schlag verursachen.
• Verwenden Sie ausschließlich das empfohlene Netzzubehör. Die
Seite 4 von 47
Page 88

Benutzung von Stromquellen, die nicht ausdrücklich für dieses Gerät
empfohlen wurden, kann zu Überhitzung, Störungen des Geräts,
Bränden, elektrischen Schlägen oder anderen Gefahren führen.
1. Komponenten des Camcorders
1: Zoom-Schalter
2: Aufnahme-/Sprachaufzeichnungs-Taste
3: EIN-/AUS-Taste
4: LED-Betriebsanzeige
5: VideoaufzeichnungsTa st e
6: LED-Ladeanzeige
7: Modus-Einstellrad
8: AV-Ausgang
9: Kopfhörerbuchse
10: Netzeingang
11: USB-Anschluss
Seite 5 von 47
Page 89

12: HDMI-Anschluss
13: Anzeigetaste
14: Lautsprecher
15: LCD-Monitor
16: MENÜ-Taste
17:Joystick/OK-Taste
18: Löschen-/Blitz-Taste
19: Ausgleichs-LED
20: Blitzreflektor
21: Mikrofon
22: Objektiv
23: Akkufachabdeckung
24: Stativgewinde
Seite 6 von 47
Page 90

2. Vorbereitung zur Inbetriebnahme
Einlegen des Akkus
1. Öffnen Sie die Akkufachabdeckung.
2. Legen Sie den im Zubehör
befindlichen Lithium-Ionen-Akku in
das Fach ein. Beachten Sie bitte,
dass die metallischen Kontakte an
den Kontakten im Akkufach ausgerichtet werden müssen.
3. Nachdem Sie den Akku ordnungsgemäß eingelegt haben, bringen Sie
die Abdeckung wieder an.
Aufladen des Akkus
Laden Sie den Akku bei erstmaliger Inbetriebnahme mindestens 8 Stunden
lang auf.
Seite 7 von 47
Page 91

a) Schalten Sie das Gerät aus; verbinden Sie das Netzteil mit dem
Netzeingang des Camcorders.
b) Schließen Sie das Netzteil an eine Steckdose an.
c) Der Ladevorgang beginnt, wenn die LED-Ladeanzeige BLAU leuchtet.
Die Ladeanzeige erlischt, wenn der Ladevorgang abgeschlossen ist.
d) Trennen Sie den Camcorder vom Netzteil.
Einsetzen der Speicherkarte
Dieser Camcorder verfügt über einen internen Speicher von 32 MB, mit
dem Sie nur einige Bilder oder Videoclips aufnehmen können. Wenn Sie
mehr aufnehmen möchten, müssen Sie eine SD- oder MMC-Karte
verwenden (dieser Camcorder unterstützt
SD-/MMC-Karten mit einer maximalen Kapazität
von bis zu 16 GB). Schalten Sie den Camcorder
aus, bevor Sie die Speicherkarte einsetzen oder
entnehmen. Achten Sie darauf, dass Sie die
Karte beim Einsetzen korrekt ausrichten.
Versuchen Sie niemals, die Karte mit Gewalt in
Seite 8 von 47
Page 92

den Einschub zu stecken, wenn Sie einen Widerstand spüren. Die
Speicherkarte verfügt über einen Schreibschutzschalter, der die Daten
davor schützt, versehentlich gelöscht zu werden. Sie müssen diesen
Schreibschutz daher deaktivieren, bevor Sie Dateien auf der Speicherkarte
speichern, formatieren oder löschen.
1. Schalten Sie den Camcorder aus.
2. Wenn Sie die Akkufachabdeckung öffnen, sehen Sie den
SD-Karteneinschub.
3. Setzen Sie die Speicherkarte ein, wie in der Abbildung dargestellt.
4. Schließen Sie die Akkufachabdeckung.
• Um die Speicherkarte aus der Verankerung zu lösen, drücken Sie
vorsichtig auf die Kante der Karte.
Formatieren der Speicherkarte
Es ist wichtig, dass Sie die Speicherkarte bei der erstmaligen
Inbetriebnahme dieses Camcorders formatieren. Dabei werden alle Daten,
einschließlich geschützte Dateien, gelöscht. Stellen Sie sicher, dass Sie
wichtige Dateien vor der Formatierung auf Ihren Computer übertragen.
1: Schalten Sie den Camcorder ein und stellen Sie ihn auf das Setup-Menü
Seite 9 von 47
Page 93

(siehe nähere Hinweise auf Seite 22).
2: Drücken Sie den Joystick nach oben oder unten, um [Formatieren]
auszuwählen, und drücken Sie den Joystick anschließend nach rechts,
um das Untermenü aufzurufen.
3: Drücken Sie den Joystick nach oben oder unten, um den Menüpunkt [Ja]
auszuwählen, und drücken Sie anschließend die OK-Taste, um alle
Daten zu löschen.
Einstellen der Sprache
Wenn Sie den Camcorder nach dem Kauf zum ersten Mal in Betrieb
nehmen, stellen Sie bitte sicher, dass Sie eine Sprache auswählen, sowie
Datum und Uhrzeit einstellen, bevor Sie den Camcorder benutzen.
1: Schalten Sie den Camcorder ein und stellen Sie ihn auf das Setup-Menü
(siehe nähere Hinweise auf Seite 22).
2: Drücken Sie den Joystick nach oben oder unten, um [Sprache]
auszuwählen, anschließend bewegen Sie den Joystick nach rechts, um
das Untermenü aufzurufen.
3: Drücken Sie den Joystick nach oben oder unten, um die gewünschte
Seite 10 von 47
Page 94

Sprache auszuwählen; drücken Sie anschließend die OK-Taste, um die
Einstellung zu bestätigen.
4: Drücken Sie die MENÜ-Taste, um das Menü zu schließen.
Einstellen von Datum und Uhrzeit
1: Schalten Sie den Camcorder ein und stellen Sie ihn auf
das Setup-Menü (siehe nähere Hinweise auf Seite 22).
2: Drücken Sie den Joystick nach oben oder unten, um
[Datum/Uhrzeit] auszuwählen; drücken Sie
anschließend den Joystick nach rechts, um das
Untermenü aufzurufen: Datumsformat,
Datumseinstellung.
3: Wählen Sie ein Datumsformat mit dem Joystick aus. Wählen Sie
anschließend [Datumseinstellung].
4: Drücken Sie den Joystick nach oben oder unten, um den markierten
Wert zu ändern. Drücken Sie den Joystick nach links oder rechts, um
den Cursor zwischen den Einstellungen hin- und herzubewegen.
5: Drücken Sie die OK-Taste, um die Einstellung zu bestätigen.
Seite 11 von 47
Page 95

6: Drücken Sie die MENÜ-Taste, um das Menü zu schließen.
• Einzelbilder können nur dann mit Datum und Uhrzeit versehen
werden, wenn die entsprechende Funktion [Datumsstempel] im
Aufnahmemenü eingestellt wurde.
Seite 12 von 47
Page 96

Anzeige des Monitors
Aufnahme
Seite 13 von 47
Page 97

Videoaufzeichnungsmodus
Seite 14 von 47
Page 98

Wiedergabemodus
3. Verwendung des Camcorders
Ein- und Ausschalten des Camcorders
1. Klappen Sie den LCD-Monitor aus, um den Camcorder einzuschalten;
um den Camcorder wieder auszuschalten, klappen Sie den
LCD-Monitor ein.
Seite 15 von 47
Page 99

2. Sie können auch die EIN-/AUS-Taste drücken, um den Camcorder
einzuschalten, bzw. sie erneut drücken, um ihn auszuschalten.
Um die Leistung des Akkus zu schonen, schaltet sich der LCD-Monitor
nach 30 Sekunden (ab der letzten Bedienung) automatisch ab
(Werkseinstellung). Drücken Sie eine beliebige Taste (außer der
EIN-/AUS-Taste), um den LCD-Monitor zu aktivieren. Nachdem die
Energiesparfunktion für die eingestellte Zeit aktiviert war, schaltet sich das
Gerät vollständig ab. Drücken Sie die EIN-/AUS-Taste, um die Kamera
wieder einzuschalten. Sie können die Zeit für die automatische
Abschaltung im Setup-Menü mit der Funktion [Autom. AUS] einstellen.
Ändern des Aufnahmemodus
Dieser Camcorder verfügt über 4 Aufnahmemodi.
Drehen Sie das Modus-Einstellrad, um den
Camcorder auf unterschiedliche Modi einzustellen.
Seite 16 von 47
Page 100

Anzeige Titel Beschreibung
Aufnahmemodus Zur Aufnahme von Bildern.
Videomodus
Audiomodus
Wiedergabemodus
Zur Aufzeichnung von
Filmsequenzen.
Zur Aufzeichnung von
Audiodateien.
Zur Wiedergabe von
Aufnahmedateien.
Aufzeichnen einer Filmsequenz
1: Schalten Sie den Camcorder ein und stellen Sie ihn auf den
Videoaufzeichnungsmodus (
2: Zoomen:
Bewegen Sie den Zoom-Schalter nach rechts oder links, um die
Bildschirmanzeige zu vergrößern oder zu verkleinern. Der Wert der
Vergrößerungsstufe erscheint auf dem LCD-Monitor.
).
Seite 17 von 47
 Loading...