

Page 1
MPUB330
USB-Stick MP3 Player with LCD Display
INSTRUCTION MANUAL
Please read this manual carefully before operation.
Page 2

TABLE OF CONTENTS
TABLE OF CO NTENTS ........................................................................... 2
PACKAGE CONT ENT S .......................................................................... 3
FEATU RES .............................................................................................. 4
GET TING STARTE D ................................................................................ 5
Controls at a Gla nce ........................................................................................5
Connecting H eadpho nes ................................................................................7
Connecting Power ...........................................................................................7
Loading a B atter y..................................................................................7
USB Power ............................................................................................ 7
Using th e Player Co ntrols................................................................................8
Power On /Off ........................................................................................8
Hold Sw itch ...........................................................................................8
Reset Func tion ...................................................................................... 8
Navigat ing the M enu Inte rfac e ............................................................. 8
Main Menu .......................................................................................................9
PLAY MUSI C ....................................................................................... 10
Play Musi c Contr ols .......................................................................................10
Repeat A -B Mo de ...............................................................................11
SET TING .............................................................................................. 12
FOLDER ............................................................................................... 13
Folder C ontrol s .............................................................................................. 13
USB CON NEC TIONS .......................................................................... 14
Minimu m PC Requirements ..........................................................................14
USB Dri ver Inst allati on (Wi ndows 9 8SE Only) .............................................14
Connecting to a C omputer ............................................................................14
Transferr ing File s ...........................................................................................15
Disco nnect ing fro m a Computer ...................................................................15
Micro soft W indows .............................................................................15
Macint osh OS .....................................................................................16
MPMANAGER ......................................................................................17
TROUB LESHOOTI NG .......................................................................... 18
SPECI FIC ATION S ................................................................................ 20
Page 2
Page 3
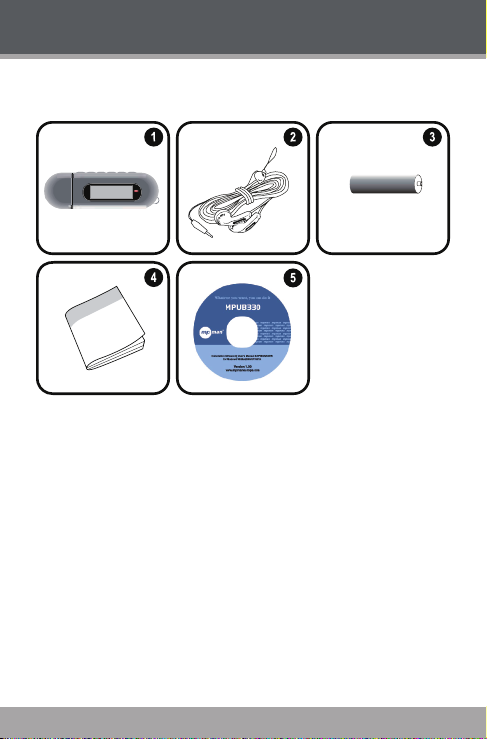
PACKAGE CONTENTS
Please make sure that the items listed below are incl uded in the package.
Should an ite m be mi ssing, pleas e cont act t he loc al ret ailer from which you
purcha sed this produc t.
1. MPUB3 30
2. Stereo E arpho nes
3. 1 x “AA A” Batter y
4. Instruction Bookl et
5. Instal lation C D
Page 3
Page 4

FEATURES
Integrat ed Flash M emor y
H igh- Contrast LCD Di splay wi th Back light
Plays MP3 and WMA Digital M usic Files
I D3 and LRC support for song and sync hronized lyric info rmation display
M obile D ata Stor age Funct ion
U SB 2.0 for Ultra -Fast File Transfers (up to 40x faster than USB 1.0)
Page 4
Page 5
GETTING STARTED
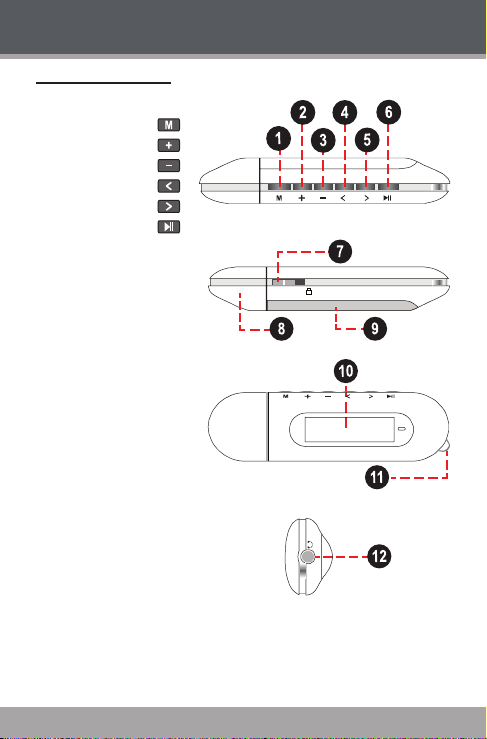
Cont rols a t a Glance
Top View
MENU button
1.
2. Volume +
3. Volume -
4. Previou s/Reverse
5. Next /For ward
6. Play/Pau se/Sto p
Bottom View
7. HOLD Sw itch
8. USB Cap
9. Batter y Com part ment Cove r
Front View
10. LCD Disp lay
11. Necks trap Ho ok
Right View
12. Headp hone Ou t Jack
Page 5
Page 6
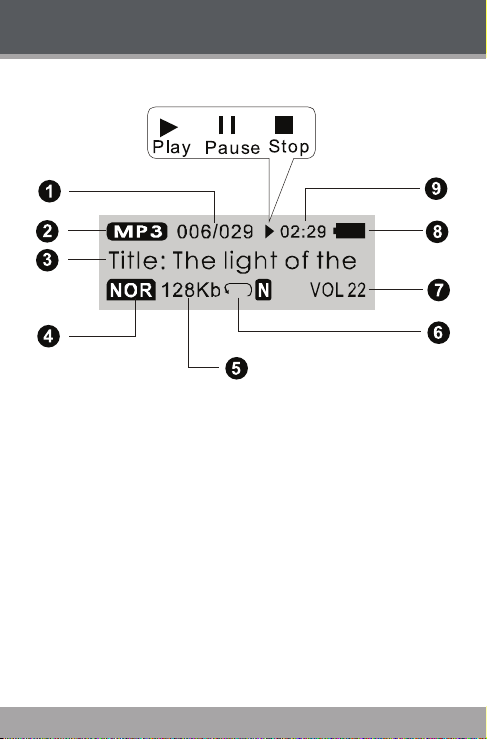
Play Mode Di spl ay
Current track / Total t racks
1.
File Type
2.
Song Tit le / File name
3.
Equalize r Indic ator
4.
Bitrat e
5.
Play Mode Indica tor
6.
Volume Level
7.
Batter y Level Indicat or
8.
Elapsed Time
9.
GETTING STARTED
Page 6
Page 7
GETTING STARTED
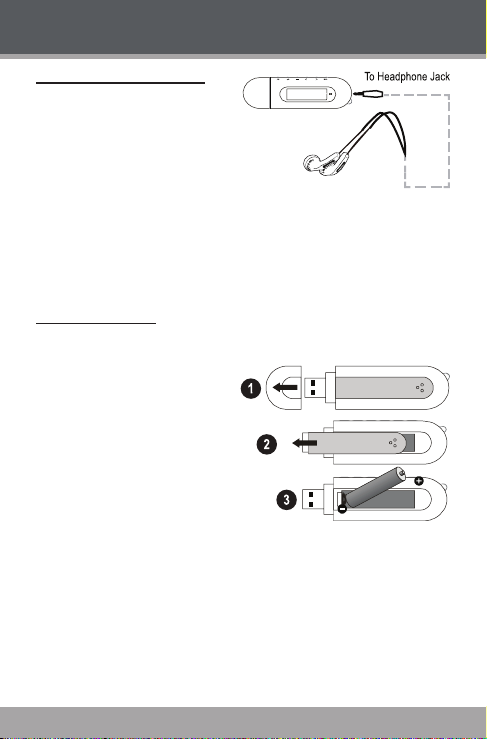
Conne cti ng Hea dpho nes
Connect headp hones /earph ones to
the Headphone O ut jack for private
listeni ng.
Lower the volume level before
connecting headphones, then
gradually increase the volume for
comfortable listening.
Hearing experts advise against the constant use of personal stereos played
at high volume.
C onstant high -volum e use can lead to hearing loss. If you experienc e
ringin g in you r ears or hearing loss, discontinue use immediately and
seek med ical ad vice.
Conne cti ng Power
The Player operates on 1 x “AA A” batte ry for m usic play back.
Loading a Ba tte ry
1. Remove the USB Cap.
2. Remove the Batter y Cover.
3. Inser t 1 x “AAA” bat tery, taking
care to match the “+” and “–”
polar ities of the batte ry with the
markings inside the battery compartment.
4. Replac e the Bat tery C over.
USB Power
When the Player is con nected to a computer’s power ed USB port , it will draw
power over t he USB c onnection.
Page 7
Page 8

GETTING STARTED
Usin g the Pl ayer Controls
Power On/O ff
To turn your playe r on, pres s . The LCD will light.
To turn y our player off, hold for at least 3 seconds. The LCD will
darken.
Hold Sw itch
The Hold feature locks (disab les) your player ’s controls to preve nt accide ntal
key presses when it i s in your po cket or bag .
To lock the player ’s controls, slide the HOLD switch to th e right in t he
direct ion of th e arrow. A Lock icon w ill be displayed on the scre en.
HOLD
To unlo ck the pl ayer’s co ntrols , slide the HOLD switch to t he left .
Reset Fu nction
You may reset your player if it should freeze or otherwise behave abnormally.
1. Disco nnect your player i f it is con necte d to a computer.
2. Remove the ba tter y from the player. Wait 10 seco nds, a nd th en replace
the battery.
3. Power on your player. Your player h as now bee n reset.
Navigating the Menu Inte rface
It is easy to use t he Playe r controls to select m enu options, items , and les
on your player.
To move the sele ction cursor (h ighlig ht), pre ss th e arrow keys . To move
quickl y in any dire ction, press a nd hold the arrow keys.
To high light th e previo us item to the left (or u p), press .
To high light th e next ite m to the ri ght (or down), pr ess .
To con rm and e nter the c urrent selection, pr ess .
To retur n to the pr evious s creen, press .
Page 8
Page 9

GETTING STARTED
Main Menu
The Main M enu gives you acc ess to the diff erent function modes of your
player.
To enter t he Main M enu, press and hold . To exit t he Main M enu,
press an d hold .
To select a function mode in the Main Menu, press or to highlight
the mode, and then p ress to c onrm.
Play Mus ic
Play your di gital M P3 or WM A music les.
Sett ing
Set your pl ayer’s internal options.
Folder
Play, view, or del ete les f rom your player.
Page 9
Page 10
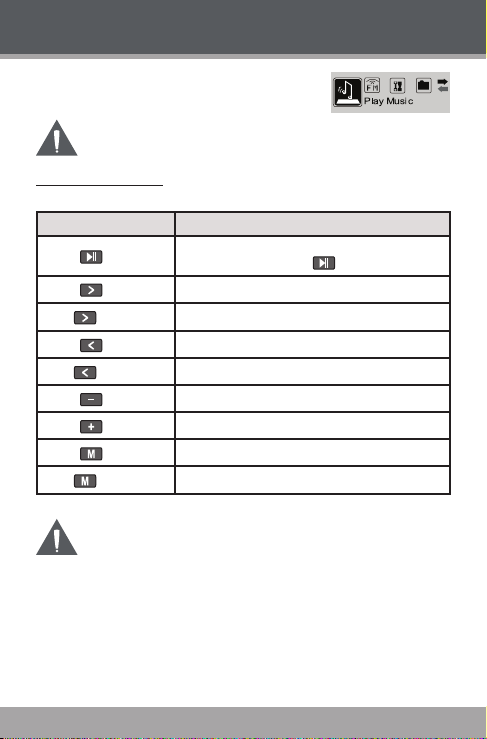
PLAY MUSIC
Enter PLAY MUSI C mode from the Main Menu to
play digi tal MP3 or WMA mu sic le s.
PLAY MUS IC mo de wil l play all compatible audio les on your
player, regardless of director y.
Play Music Controls
Use the fo llowin g contr ols dur ing musi c playback.
Key Functio n
Press
Press
Hold
Press
Hold
Press
Press
Press
Hold
For more information about how to get music onto your player,
please refer to the section “ Getting Started > C onnecting to a
Computer > Transferring Music to Your Player”.
For more information ab out digital MP3 and WMA music les,
please refer to the section “About MP 3/W MA Music Files”.
Star t/Resume tr ack play back.
Durin g playbac k, pres s to pause pl ayback .
Play the nex t trac k.
Fast-fo rward throug h the cur rent tr ack.
Play the pr evious t rack.
Reverse through t he curr ent trac k.
Decre ase the vo lume level.
Increa se the vol ume level.
Star t Repeat A -B Mo de.
Return to M ain Men u.
Page 10
Page 11

PLAY MUSIC
Repea t A-B Mode
Set a s egment of a music track to rep eat in a con tinuou s loo p. Dur ing pl ayback:
To set th e star ting point “A” of the loop, press .
To set the end point “B” of t he lo op, pr ess again. The loop will now
play from point “A” to poin t “B”.
To resu me norm al playback, pre ss again.
Page 11
Page 12

SETTING
Enter SETTI NG mode from the Main Menu to
change y our player’s inter nal opti on sett ings.
The Set ting Me nu cont ains 9 opt ions.
To sele ct an opt ion, pre ss
To exit th e Setting Menu , press .
Item Descr iptio n
Equalize r
Repeat M ode
Contrast Set the contrast level of the display.
Backli ght
Backli ght Col or
Power Set
Langau ge Set the La nguage that the m enus app ear in.
Version View your player’s rmware i nform ation.
Info View your player’s memor y infor mation .
Set a digital equa lizer preset. Th e options are Nor mal,
Pop, Rock , Classi cal, Ja zz, and B ass.
Set a Repea t Mode op tion. Th e optio ns are Normal,
Repeat O ne, Repea t All, Shu fe Re peat, D ir Normal,
Dir All Repeat, D ir Shuf e Repeat.
Set the backlight option to chang e the dura tion of time
(in seconds) that th e backl ight wil l remain o n after a
key press. A s ettin g of “Always O ff ” will disable th e
backli ght com pletely. A setting of “Always On” w ill
keep the ba cklig ht on cont inuously.
Set the color of th e backl ight. A setting of “Colo r 8”
will cha nge the b acklight colo r with ea ch key pres s.
Set the Power Set option to cha nge the duratio n of
time (in m inutes) that the playe r will rem ain on when
it is idle. A settin g of “Di sable” w ill turn this power
saving fe ature of f.
or . To conrm and enter, press .
Page 12
Page 13

FOLDER
Enter FOLDER mode t o view, play, or de lete le s on
your playe r.
You can also connect your player to a comput er to
easily manage your le lib rary.
Fold er Con trols
A di rectory tree will be displayed on- screen up on enteri ng FOLDER mode
from the Main Menu.
Use the fo llowin g contr ols in FOLDER mod e.
Key Functio n
Press
Press
Press
Press
Selec t the next le or fol der (down).
Selec t the previous le o r folde r (up).
If a fold er is sel ected, the folder’s c ontent s wi ll
be displ ayed.
If a le is sele cted, an optio n box wi ll be displayed:
S elect “ Play Now ” to play the selec ted le.
S elect “Delete?” to delete the selected le,
and then select “Yes” to conrm the deletion.
If the
icon is selected, the previous folder’s
contents will be displayed.
Return to M ain Men u.
Page 13
Page 14

USB CONNECTIONS
Minimum PC Requirem ents
You can connect the Player to a computer with a US B po rt to t ransfe r les
to you r player or to manage the les on yo ur pl ayer. The minimum req uirements listed below will allow you to perform basi c le managemen t functions;
advanced features will r equire a f aster PC and Windo ws con guration.
M S Windows 98SE (S ervi ce Pack 1) or ME [USB -MSC];
MS Wind ows 200 0 (Ser vice Pac k 3 or above) wit h Windo ws Media
Player 9 [USB- MSC];
MS Wind ows XP (Ser vic e Pack 1 or ab ove) with Win dows Media Player
10 or newer [U SB- MTP]
Pe ntium 166 MMX pro cess or (or equivalent)
9 6MB R AM
5 0MB of availabl e hard drive space
Internet connection
V ideo Di splay ca rd
S ound ca rd
U SB 1.0 por t (a USB 2. 0 Hi- Speed port w ill ena ble le transf ers up to 40
times fa ster).
New versions of Windows Medi a Player m ay be dow nloade d from the
Micro soft we bsite at w ww.mi crosoft.com.
Conne cti ng to a Computer
1. Make sure t he player i s turne d off.
2. Remove the USB Cap and plug the playe r dir ectly into your comp uter’s
USB por t.
Your player will be det ected as a “Removabl e Di sk” when you
open “My Computer”.
You may choo se to use a USB extension cable t o connect to
a computer.
Trans fer rin g Fil es
The USB 2.0 High- Spee d connection makes it easy to transfe r music les (or
any other da ta les) qui ckly between t he player an d your com puter. S imply
use the player as you wo uld a oppy disk us ing basic op eratin g system com -
mands.
Page 14
Page 15

USB CONNECTIONS
If you need fur ther as sistance
with tran sferr ing les , pl ease
refer to your o perating sy stem’s
instruction manual or on -scr een
help.
1. Connect the player to a
computer.
2. Double -c lick th e “My Co m-
puter ” i con on your desk top and then dou ble- clic k t he player icon (Re movable D isk).
3. Drag the les t o tra nsfers and dray-and- drop then onto t he “ Removable
Disk” icon th at repre sents your player.
You may al so transfer le s from your player to a c omputer.
Don’t dis conne ct the player or other wise interrup t the le trans fer process. Doi ng so may corrupt your les and/o r the player ’s
rmwar e.
Please refer to the d ocumentation that came with your c omputer or o pening system for more information and suppor t regardin g mus ic t ransfe r and le management over a US B co nnectio n.
Disco nnec tin g from a Computer
Disco nnect your p layer as instr ucted below to pr event data los s or le/ rmware cor ruption.
Microsof t WIndows
Disco nnect your p layer as instr ucted below to pr event data los s or le/ rmware cor ruption.
1. Double -c lick the green ar row in th e
taskba r located on the l ower-right side
of the co mputer screen (Sa fely Remove
Hardwa re).
Page 15
Page 16

USB CONNECTIONS
2. Safel y Remove H ardw are:
Selec t “USB M ass Storage
Device” from the list that
appear s and the n click o n
“Stop”.
Stop a Ha rdware Devic e:
Selec t “USB M ass Storage
Device” from the list that appears and then click on “O K”.
Selec t “USB M ass Storage
Device” from the list that appears and then click on “O K”.
3. When t he “Sa fe to Remove
Hardwa re” window app ears,
click t he OK but ton and disconne ct the USB cable fro m
the playe r and your c ompute r.
Macintosh OS
On the lef t side o f the Find er windo w,
1.
identi fy the a ppropriate Rem ovable D isk
icon.
Click on t he “Eject” a rrow on t he right of
2.
the Removable Dis k icon.
3. Disco nnect t he USB cable fro m the co mputer and your player.
Page 16
Page 17

MPMANAGER
For mus ic sync hroni sation and conversion, please use M PMAN AGER s oftware supp lied in t he CD ROM .
This sof tware can be us ed also for UPDATE of your player
MPMA NAGER ma nual is in clude d in your CD ROM
Page 17
Page 18

TROUBLESHOOTING
If you have a problem with this devi ce, please rea d the trouble shooti ng guide
below.
The playe r does n ot turn o n.
Ensure that the battery retains a charg e. Try replacing the bat tery with a
new one.
Try resett ing your player (remove a nd replace the ba tter y).
En sure tha t the Hol d switch i s diseng aged.
The but tons do not work .
Ensure that the battery retains a charg e. Try replacing the bat tery with a
new one.
En sure tha t the Hol d switch i s diseng aged.
I cannot t ransf er le s to the p layer.
En sure tha t your com puter is r unning a suppor ted op eratin g system.
I f you are runni ng Mic rosof t Wind ows 98 SE, ens ure that the US B driver
has been p roper ly installed.
I f usi ng t he su pplied USB extension cable, ens ure t hat it is securely a t-
tache d to the player and the P C, or tr y using an other US B cabl e.
I f you have con nected the p layer through a USB hub, tr y co nnect ing th e
player dir ectly t o your computer.
En sure tha t the playe r’s memo ry capacit y is not ful l.
En sure tha t the Hol d switch i s diseng aged.
There i s no sound d uring playba ck.
Check the volume level.
En sure tha t the head phone s are att ached s ecurely to the player.
The soun d quality of the music is p oor.
Try playing the le on yo ur com puter. If t he sou nd qual ity is still poor, tr y
downlo ading th e le again or re- encoding th e le your self.
Page 18
Page 19

TROUBLESHOOTING
En sure that the bit rate of the le is not too low. The highe r t he b it r ate
of the le, t he bet ter it will sound. The minimum recom mende d bitr ate is
128kbps fo r MP3s a nd 96k bps for W MAs.
Try l owerin g the volume of the pl ayer.
En sure tha t the head phone s are att ached s ecurely to the player.
The playe r will no t play my mus ic le.
En sure tha t the le is in a compatible f ormat.
T he l e may be co py-protected and you no long er have autho rizat ion t o
play this le. If you feel this is in erro r, ple ase contact the ser vice from
which yo u downlo aded th e le.
The LCD cha racters are corrupted o r somet hing is w rong wit h the
displ ay.
En sure tha t the cor rect m enu lang uage has b een set.
Try resett ing your player (remove a nd replace the ba tter y).
The playe r has mal funct ioned .
Try resett ing your player (remove a nd replace the ba tter y).
Page 19
Page 20

SPECIFICATIONS
Display Type 128 x 32 Dot-Mat rix LCD w ith Backlight
Memor y Integrated Flash Memor y
Audio For mat Support MP3, WMA
DRM Sup port --
Song Inf o Support ID3, LRC
PC Inter face USB 2.0 Hi-Sp eed
Plug and Pl ay Suppo rt Window s 98SE /20 00/M E/ XP or newe r
Audio Ou tput 3.5mm S tereo (H eadpho ne)
Menu Language S uppor t English , French, G erman , Hebrew, It alian,
Power Supply 1 x “AAA” Battery
Unit Dim ensions 3.58 ” x 1.10” x 0.82” (W HD)
Speci cati ons and manual are subject t o change w ithout p rior no tice.
Mac OS X
Portu guese, S panish , Chines e (Trad),
Chines e (Simp)
Page 20
Page 21

NOTES
Page 21
Page 22

For more information please check our
website
www.mpmaneurope.com
 Loading...