

Page 1

DIGITAL MUSIC PLAYER
MP3&WMA
USER MANUAL
MP-FUB269
www.mpmaneurope.com
__________________________________________________________________
Before connecting, operating or adjusting this product please read
these instructions completely.
Page 2

UP TILL 99 SONGS IN ONE DIRECTORY
YOUR MP-FUB269 ACCEPTS
UPTILL 99 SONGS IN ONE DIRECTORY
IF YOU WANT MORE THEN 99 SONGS,
STORE THEM IN A NEW DIRECTORY
IN PLAY MODE, YOU CAN CHANGE THE DIRECTORY
IN THE MENU.
DON’T FORGET: MAXIMUM 99 SONGS IN EACH DIRECTORY
2
Page 3

The player characteristics
♠ Supports MP3 and WMA music format.
♠ Supports USB function
♠ Supports two lines of lyrics display synchronization
♠ Big display (128*32) LCD display
♠ Supports Firmware upgrade function
♠ Voice equalizer
♠ GUI (graphical user interfaces).
The box:
(1) MP3 player 1Pc
(2) Stereo earphone 1Pc
(3) CD ROM 1Pc
(4) Manual 1Pc
(5) USB cable 1Pc
(6) Battery 1.5V/”AAA” 1Pc
PC needs
(1) Pentium 100 MHz or faster
(2) Windows 98/2000/ ME/XP
(3) USB port
(4) CD- ROM driver
(5) 15MB of free space on harddisk
(6) 32 MB RA M
2
Page 4
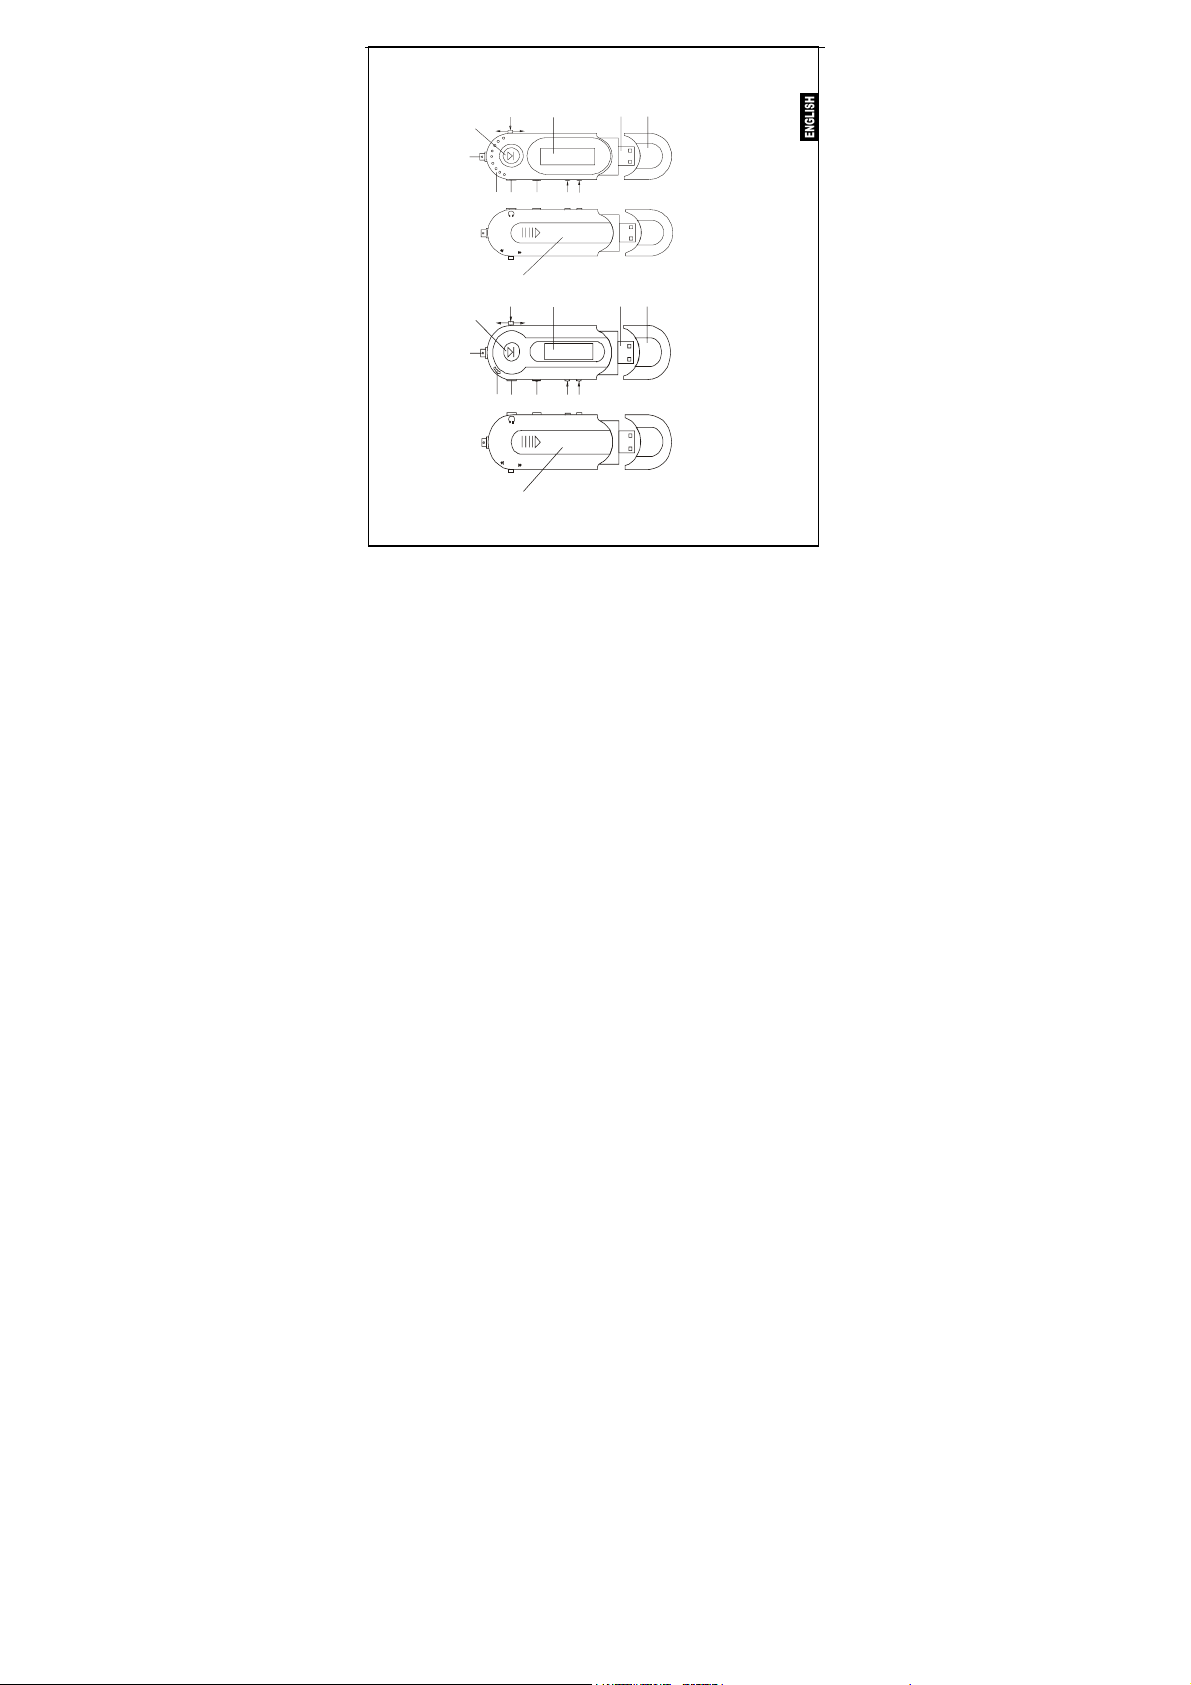
1.1 The player appearance interface
(2)
(1)
(4)
(13)
(10)
(3)
(11)
(12)
(9)
E
M
D
O
(2)
(1)
(4)
(13)
C
I
M
(9)
(8)
E
M
O
D
(5)
(6)
(7)(8)
A-B
REC
HOLD
(14)
(12)
(10)
(3)
(7)
HOLD
(14)
(11)
(6)
(5)
VOL
3
Page 5

1.2 The buttons
/P
(1) “” ⇒ OPEN
(2) “MODE” ⇒ Switch modes, menu selection by pressin
(3) “” ⇒ NEXT/FWD
(4) “” ⇒ PREV/REV
(5) “VOL+”⇒Volume inc
(6) “VOL-”⇒Volume decrease/fast decrease
(7) “HOLD” ⇒ Keyboard lock switch
(8) “” ⇒ Earphone i
(9) MIC ⇒ Built-in microphone
(10) LCD⇒ Liquid crystal display
(11) ⇒ USB interface
(12) ⇒ USB cover
(13) ⇒ Ribbon keyhole
(14) ⇒ Battery door
1.3 Push-button definition
Push-button includes four operation methods as short push,
long push, push and hold, single push.
LAY/PAUSE/STOP/POWER OFF
rease/fast increase
nput jack
4
g on button
Page 6
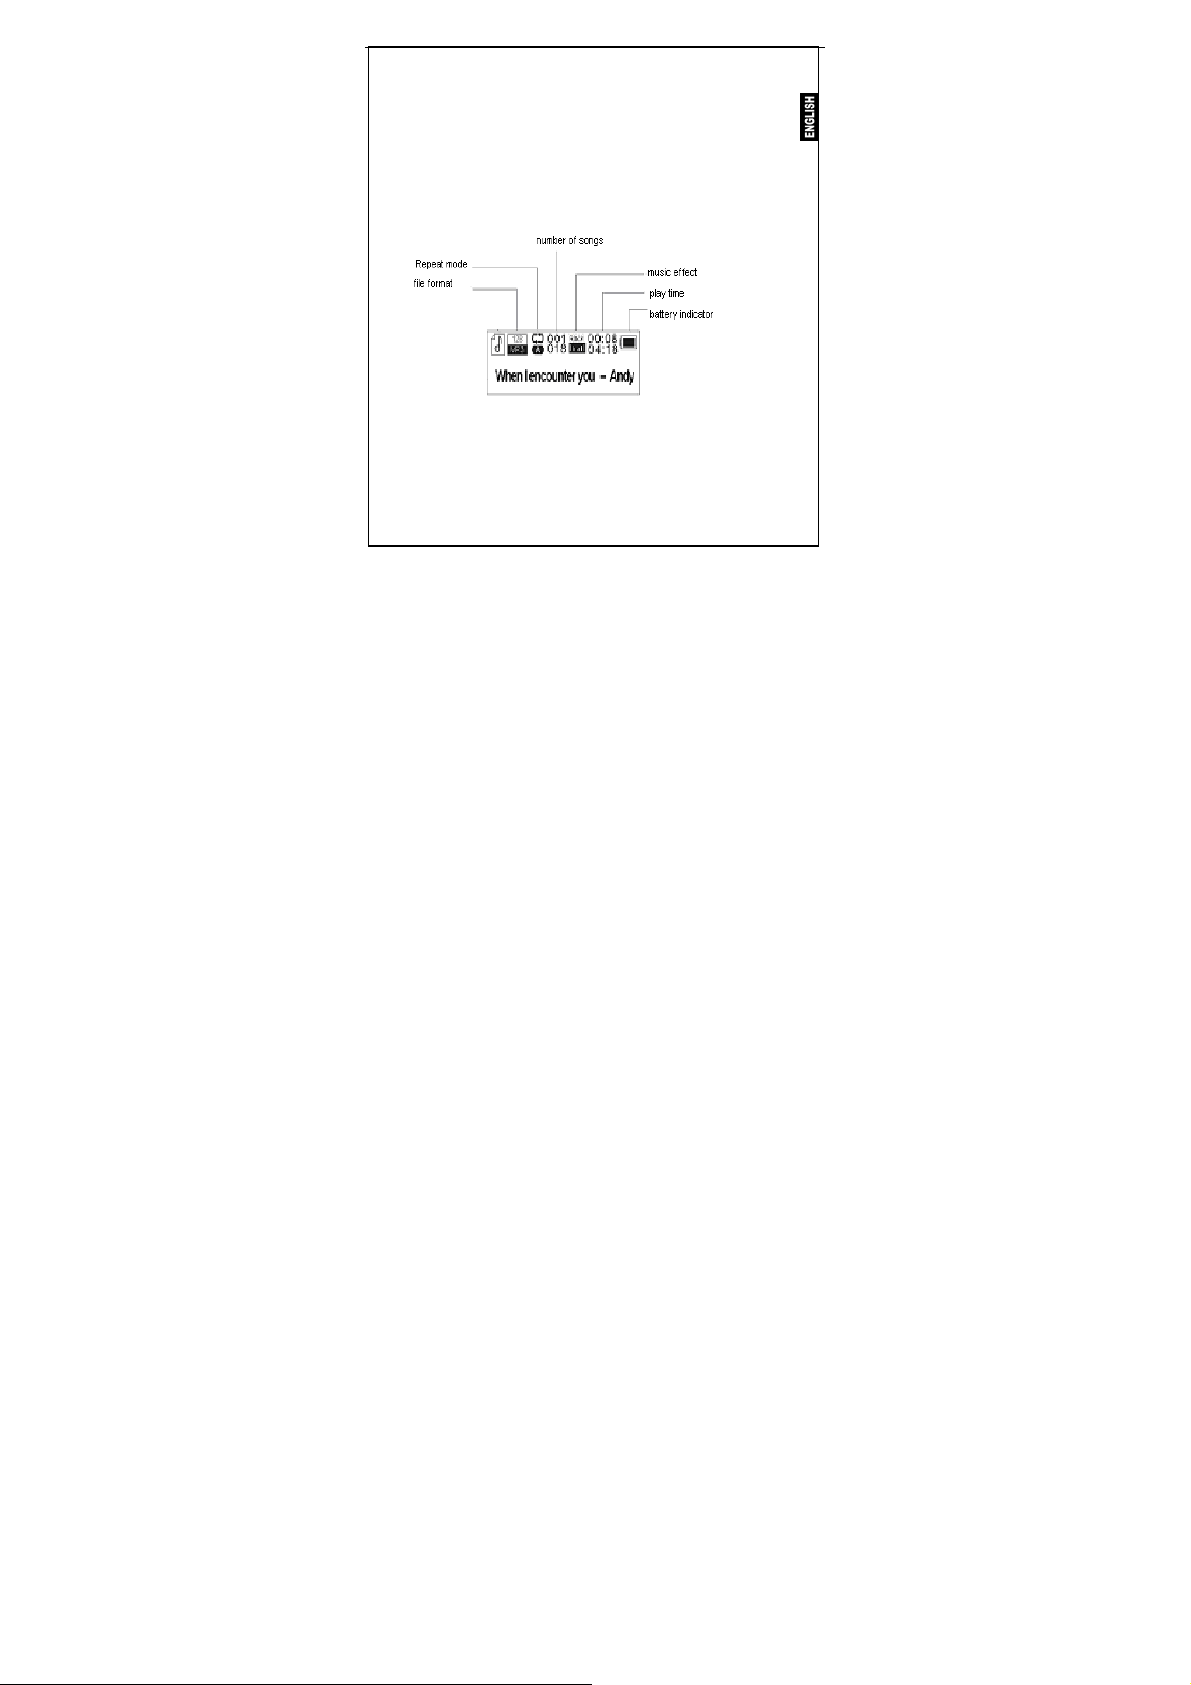
1.4 Display
This player adopts big LCD of 128*32 lattice
5
Page 7

2 Operating instruction
2.1 Turning on the MP3 player
Push the “PLAY” button for several seconds.
The LCD display will light up.
2.2 Main menu
ess the “MODE” button for several seconds,
Pr
om any point in the menu,
fr
and the player returns automatically back to the main menu.
Music
Five options:
1) MUSIC
2) RECORD
3) VOICE
4) SYSTEM
5) EXIT
6
Page 8

You can switch between options by sliding the “MODE” button
right “” or left “”. Then push shortly on the
“MODE” button to enter the submenu or confirm a function.
2.3 “Music” mode
Select “Music” mode in the main menu.
2.3.1 Stop submenu
Press "Mode" button once to enter the stop submenu.
Four options:
- Local Folder
- Delete file
- Delete all
- Exit
7
Page 9

r
2.3.1.1 Local folder
X
X
Local folde
Cr e new folder
主盘目
.
Files can be stored in different folders.
Create new folders in Windows explorer when MP3 is co ect
Open
“external drive”
eat
Pre utton to open Local folder
- ss "M
ode" b
- Mov ode button left or right to select the catalog
e m
- Press “Mode” button to confirm
2.3.1.2 Delete file
2.3.1.3 Delete all
Deletes all files of the current catalog
2.3.2 Play submenu
8
录
nn ed.
Page 10

During playback, press "MODE "button to enter "Play subm
Six options:
- Repeat
- Equalizer
-
Tempo Rate
- Replay
-
Replay times
- eplay gap
R
-
Exit
2.3.2.1 Repeat
Normal
Repeat One
Folder
Repeat Folder
Repeat All
Random
Intro
2.3.2.2 Equalizer
All songs are played once
Repeats the current song
Plays all the music of a specific
folder
Repeats the music of a spe
folder
Repeats all the music.
Plays music at random.
First 10 seconds of each song is
played.
9
enu “:
cific
Page 11

Sev
- Natural
- Roc
- Pop
- Cla
- Soft
- Jaz
- DB
2.3. e
en options:
k
ssic
z
B
2.3 Tempo Rat
The music can be played faster or slower (only with MP3 files)
Change the rate by pushing
2.3.2.4 Replay m
- A-B replay
When replay
Select
Select
The A-
Press “Mode” button to return to normal playback
-During replay, the play-rate can be changed with VOL+ or VOL-".
mode is selected, the A-B icon is visible
the start point A (flashing) by sliding “Mode” button right.
the end point B(flashing) by sliding “Mode” button right.
B section will be repeated continuously
the “Mode” Button left or right.
ode
10
.
Page 12

- Adding your voice to the A-B section
Dur the A-B section, slide “Mode” button to the right.
ing playback of
T
he microphone icon
Slide “Mode” button right again to stop the recording.
The A-B section + the voice recording will be repeated
3.2.5 Replay times
2.
Here you are able to choose how many times (1-10)
the A-B section
2.3.2.6 Replay gap
Choose the time (1-10 sec) between each A-B section.
2.4.3 Lyrics
This MP3 player supports "*. lrc "Lyric files
Lyrics can be downloaded from the internet.
Make sure that lrc-file has the same name as the corresponding son
For example:If the song name is “Yesterday.mp3 “,
the lyric file should be named “Yest erday.lrc”
MP3 and LRC file must stored in the same folder!
Attention: A lyric can not be larger
2.4 Record mode
will be repeated.
No Lyric
Lyric included
appears and your voice is recor
be
then 500 words.
11
ded.
g.
Page 13

-Select "Record mode " in the main menu.
The unit can store 99 recordings in each folder.
- Press “PLAY” button to start recording.
- Press “PLAY” button again to pause the recording (T
- Press “PLAY” again to continue recording.
- Press and hold the “PLAY” button to stop recording.
2.4.1 Record submenu
In t press mode button once
he Record mode,
ions:
3 opt
- Local folder
REC type
-
- Exit
2.4.1.1 Local folder
cfr 2.3.1.1
4.1.2 REC type
2.
12
ime flashes).
Page 14

ns:
Four optio
Fine y recording, wav format, good quality.
- “ REC”: high qualit
Long r quality recording, act format, uses less space
- “ REC”: lowe
Fine : wav format
- “ VOR”
Long VOR”: act format
- “
ng “VOR recording”, the player enters into the state
When usi
ecording” if no sound is detected by the microphone.
of “pause r
ng starts again when sound is detected.
Recordi
2.5 Voice mode
In this mode you can listen to the recordings created in “Record mode”
Select in the main menu "Voice mode ".
2.5.1 Voice stop submenu
When playback is stopped,
2.5.1.1 Local folder (Stop submenu)
cfr 2.3.1.1
2.5.1.2 Delete file (Stop submenu)
2.5.1.3 Delete all (Stop su
eletes all files of the currentD
press “Mode” button to enter the Voice submenu.
bmenu)
catalog
13
Page 15

2.
5.2 Voice play submenu
ayback, press “Mode” button to enter the Voice play submenu.
During pl
4
options: -Repeat
- Tempo rate
- Replay
- Exit
Those options are similar to the music play submenu
2.
6 Systems set up
Select “System” in the main menu
- Record Time
- Backlight
- Language
- Power off
- Replay mode
- Contrast
- Online Mode
- Memory in
- Animation
- Logo
- Firmwa
- Firmware upgrade
- Exit
fo
re version
14
Page 16

2.6.1 Record Time
Enter here the correct
ess he year- number will start flashing.
Pr VOL+ button and t
Change the year num
ess button and the months will start flashing flashing….
Pr again VOL+
hen correct, press mode button to confirm.
W date and time are
2.6.2 Language
Change the language by moving Mode button left or right.
Press Mode button to confirm.
2.6.3 Power off
- Off time
With this function the device will automatically shut down after a preset
time.(0-60sec), when no button is touc
If time is set at 0 seconds, the function is cancelled.
- Sleeping mode
With this function the device will always shut down after a preset time (0-120 min).
If time is set at 0, the function is cancelled.
When the device is powered off, sleeping mode is set at 0.
date and time.
ber by pushing Mode button left or right
hed and music is not playing.
15
Page 17

2.6.4 Replay
Manual replay or auto replay
6.5 Contrast
2.
Change contrast by moving mod
Press Mode button to confirm.
6.6 Online mode
2.
- Multi drive
- Normal (1 drive)
- Encrypted drive
2.6.7 Memory inf
Gives a percentage of the used memory com
.
2.6.8Animation
Choose between several “start up” animations.
2.6.9 Logo
Choose between different logo’s
2.7 Firmware version
Info about software ve
o
rsion
e button left or right.
pared to the total memory size
16
Page 18

2.8 USB disk use
The unit functions as
Windows98 (driver needed)
-
- above Windows 2000 ( no need to install driver)
hen connected with PC (battery not needed),
W
the device can be in 3 different modes
- “wait” mod
- “download data” mode
- “ send data” mode
Attention: Removing the device from the PC during
data transfer can cause severe damage to the
a standard USB disk with most operating systems.
e
17
device!
Page 19

2.9 upgrade
New upgrades are (will be) a
2.10 Hold switch
When "HOLD " switch is moved left, the other buttons are inactive
and “Hold icon” will light up.
2.11 Specification
(1) FLASH Memory 256M B
(2) Music format MP3, WMA
(3) Liquid crystal display monitor 128× 32 lattices
) Languages English, French, Italian,
(4
) Power supply 1.5V/ AAA
(5
(6) USB2.0
(7) Recording WAV (32K bps), ACT (8K bps)
(8) Frequency response 20Hz~20KHz
(9) Distortion < 0.1%
(10 ) Baud rate > 4Mbps
(11) Weight 30g (Without battery)
96mm x 30mm x 21mm (L x W x D)
(12) Size
vailable on WWW.MPMANEUROPE.COM.
German, Spanish, Swedish,
Portuguese, Denmark, Dutch.
Read 1033K Byte/S
Write 955K Byte/S
18
Page 20

RESET FUNCTION
FO LAY ED YOU CAN
IF R ANY REASON YOUR P ER IS BLOCK
RESE
T IT BY TAKING OUT AND TH EN IN THE BATTERY
R ITE
FO MORE INFORMATION PLEASE VISIT OUR WEBS
www.mpmaneurope.com
19
 Loading...