

Page 1

MPF90
USER’S MANUAL
Page 1 of 10
Page 2

Cautions
z Do not subject the device to severe impact or drop it from high position.
z Do not use the player in extreme hot or cold, dusty or damp field. Do not expose it to
direct sunshine.
z Back up the data frequently in case of accident data loss.
z Avoid using the player in strong magnetic field.
z Keep the device away from water or other liquids. In the event that water or other liquids
enter the device, power off the product immediately, take out the battery and clean the
device.
z Do not use chemical solution to clean the device in order to avoid corrosion. Clean it with
a dry cloth.
z We are not responsible for the damages or lost data caused by malfunction, misusing,
repairing the device or battery replacement.
z Do not attempt to disassemble, repair or modify the product, or it will be out of
guarantee.
z Appearance or actual display of the player may be different from what is described in
this manual. Please refer to the actual device.
Technical Notice
z Plug & Play is only available for WIN2000/XP. It is not supported by WIN98 and
WIN98SE in which a driver needs to be installed.
z Please charge the battery immediately when the display indicates low battery, or the
device will be powered off automatically.
z Please unplug the player properly to avoid data losing.
z The transfer rate displayed on the PC may be different depending on the operating
system. Exact transfer rate should be subject to the player's indication.
Page 2 of 10
Page 3
Key Features
z Play MP3, WMA and ASF file
z Folder Navigation
z Voice Recording
z FM Radio (optional)
z SRS WOW sound effect
z Built-in Rechargeable Lithium batteries
Package Content
z Main Unit
z Stereo earphone with neck strap
z USB Cable
z User Manual
z Warranty Card
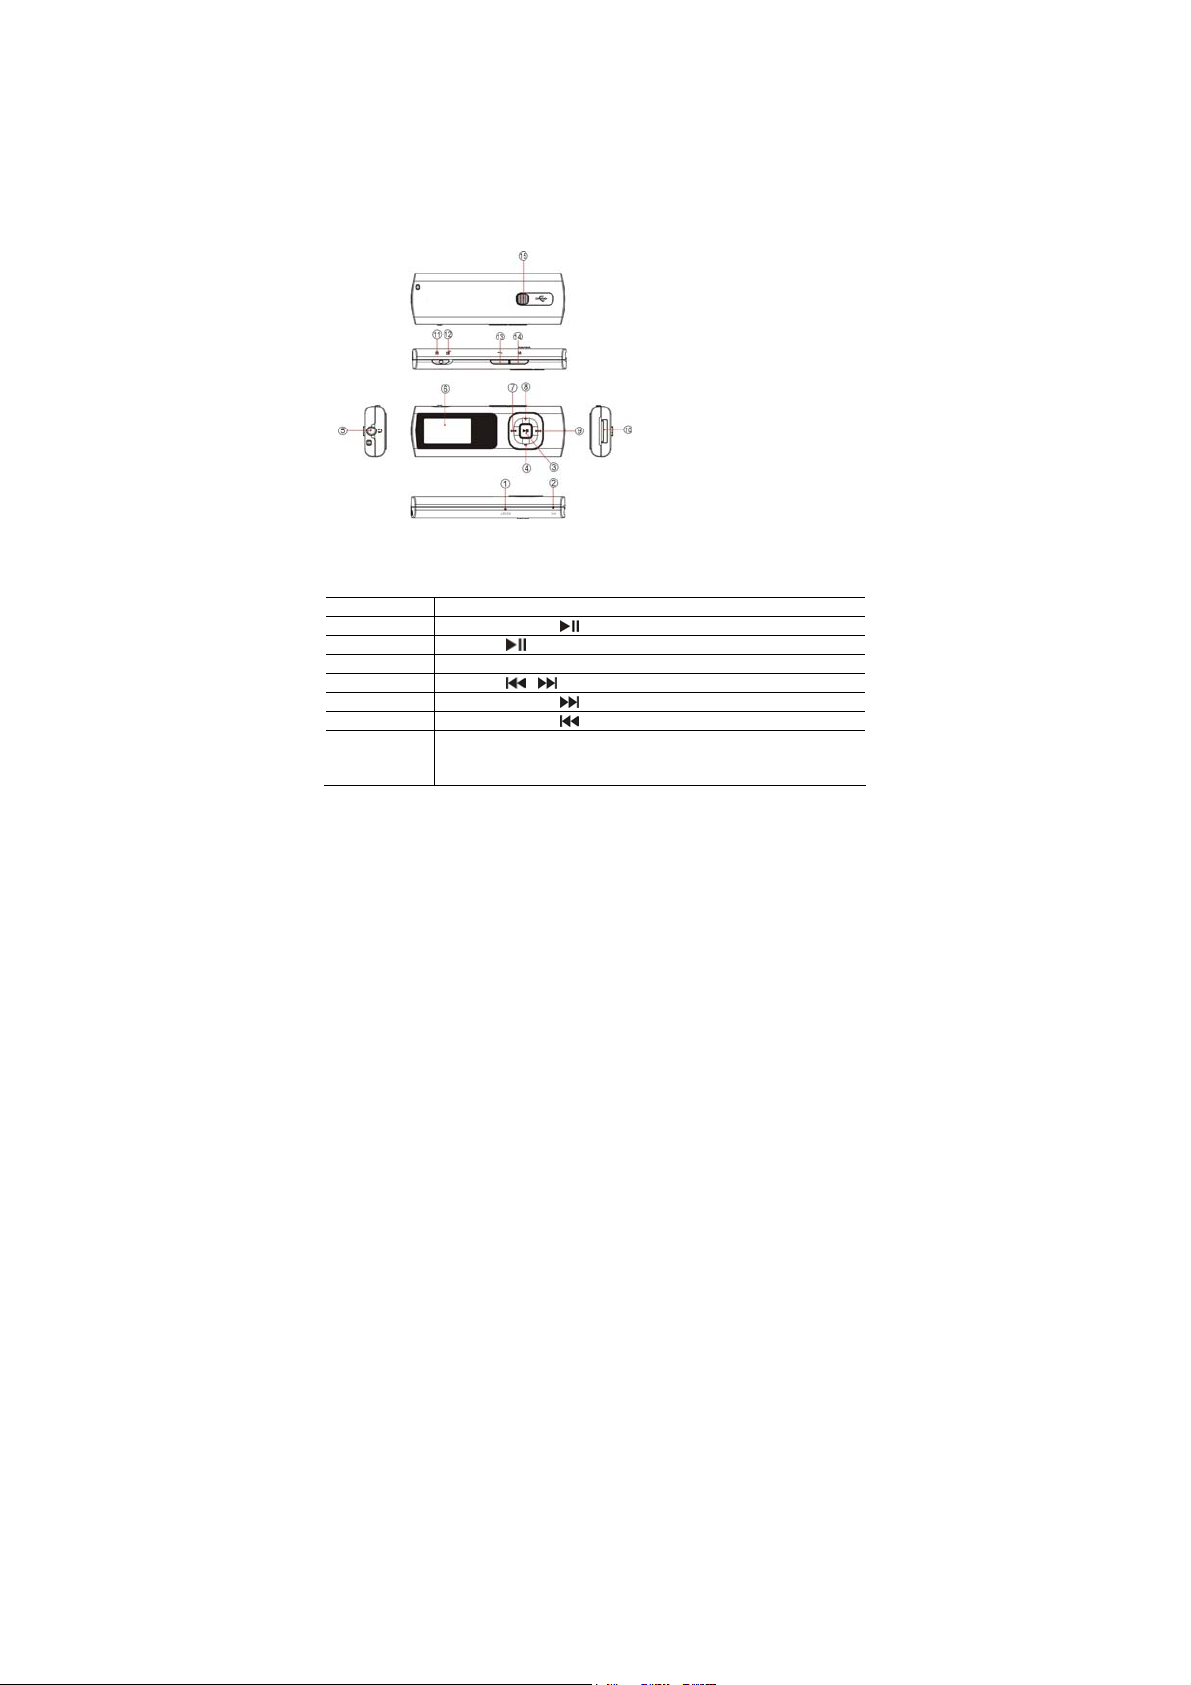
Keys Description
① Reset button
② Built-in Microphone
③ Play/Pause
④ VOL-
⑤ Earphone Jack
⑥ LCD display
⑦ Previous
⑧ VOL+
⑨ Next
⑩ USB Connector
⑪ Hold Switch (enabled)
⑫ Hold Switch (disabled)
⑬ ESC button
⑭ MENU button
⑮ USB push button
Basic Operations
Function Operation
Power On/Off Press and hold the key until you see prompt on the display.
Play/Pause Press the key to play or pause.
Adjust Volume Press the VOL+ or VOL- button to increase or decrease volume.
Previous/Next Press the / button to play the previous or next track.
Fast Forward Press and hold the button to fast forward the playback.
Rewind Press and hold the button to rewind the playback.
Lock/Unlock
buttons
To lock buttons against being pressed accidentally, slide the Hold
Switch to the left.
To unlock all buttons, slide the Hold Switch to the right.
Page 3 of 10
Page 4

Enter various work modes
When you power on the device, you should see the main menu providing various work mode
options – Music Mode, Record Mode, Voice Mode, Radio Mode and Setting Mode.
/ button to select a mode, and press the MENU button to enter it.
Press
Music mode
On the main menu, select “Music Mode” to enter the music mode. You should see the playing
screen when you enter it. Refer to the “Basic Operations” section for playing music.
z Enter folder navigation mode
(1) When the music is being played, shortly press the
(2) Shortly press the MENU button to display submenu.
(3) Select “Local folder” and then press the MENU button to confirm.
(4) In the folder mode, press
/ button to select a folder and then press the
MENU button to open it.
(5) In the opened folder, press
/ button to browse tracks.
To play the selected track, press the MENU button to enter music playing mode.
To close the current folder and return, press the ESC button.
z Delete Single Track
You can delete one single track following these steps:
(1) Pause the music playing first and then shortly press the MENU button to display
submenu.
(2) Select "Delete file" and then press the MENU button to continue.
(3) Press
/ button to select “Yes” or “No”, and then press the MENU button to
confirm or press the ESC button to cancel.
z Delete all tracks
You can delete all tracks following these steps:
(1) Pause the music playing first and then shortly press the MENU button to display
submenu
(2) Select "Delete all" and then press the MENU button to continue.
(3) Press
/ button to select “Yes” or “No”, and then press the MENU button to
confirm or press the ESC button to cancel.
z A-B Repeat
To repeat the specified section of the current track,
(1) When the music is being played, shortly press the MENU button to display
submenus.
(2) Press
/ button to select “Replay” and then press the MENU button to enter
the A-B repeat mode.
(3) At your desired start point, press the MENU button to confirm the start point of the
repeat.
(4) At your desired end point, press the MENU button to confirm the end point of the
repeat.
(5) The section between the start point and the end point begins to be played
Page 4 of 10
key to pause.
Page 5

repeatedly.
(6) To stop the A-B repeat, press the MENU button again.
z Select Play Mode
You can switch between the following play modes:
Normal -Play all tracks in order and stop after playing all
Repeat One - Keep repeating the current track
Folder – Play all tracks in current folder
Repeat Folder – Repeat all tracks in current folder.
Repeat All - Play all tracks in order and repeat
Random - Play all tracks randomly
Intro- Play the first 10 seconds of each track
To select play mode:
(1) When the music is being played, shortly press the MENU button to display
submenu.
(2) Press
/ button to select "Repeat" and then press the MENU button to show
the provided options.
(3) Press
/ button to select the desired repeat mode, and press the MENU
button to confirm or press the ESC button to cancel and return.
z Select the preset EQ mode
You can play the tracks in different sound effect. The device provides 8 EQ modes:
Normal, Rock, Pop, Classic, Soft, Jazz, DBB and UserEQ.
To set the preset EQ mode,
(1) When the music is being played, shortly press the MENU button to display
submenu.
(2) Press
/ button to select "Equalizer" and then press the MENU button to
show the provided options.
(3) Press
/ button to select the desired mode, and press the MENU button to
confirm or press the RETURN key to cancel and return.
To set the user-defined EQ,
(1) When the music is being played, shortly press the MENU button to display
submenu.
(2) Press
/ button to select "Equalizer" and then press the MENU button to
show the provided options.
(3) Press
/ button to select “UserEQ”, and press the MENU button to confirm
or press the RETURN key to cancel and return.
(4) Press
/ button to select the equalizer setting column, and press the
VOL+/VOL- button to adjust the equalizer level.
(5) Press the MENU button to confirm setting.
z Set SRS and WOW sound effect
The device provides vivid sound effect SRS and WOW to enhance your music
enjoyment. These steps can guide you to enable SRS and WOW setting:
(1) When the music is being played, shortly press the MENU button to display
submenu.
Page 5 of 10
Page 6

(2) Press / button to select "SRS WOW mode" and then press the MENU key
to show the provided options.
(3) Press
/ button to select “SRS WOW”, and press the MENU key to confirm or
press the RETURN key to cancel and return.
To adjust the WOW setting,
a. Select “Adjust WOW” and then press the MENU key to continue.
b. Select “SRS 3D”, “TruBass” or “FOCUS” and then press the
/ button to
adjust the level.
c. Press the MENU key to confirm setting.
WOW, SRS and symbol are trademarks of SRS Labs, Inc. WOW technology
Note:
is incorporated under license from SRS labs, Inc.
z Display lyric
To display the lyric during playback, you need to download a lyric file with the same
name as the current track title to the player, and then press and hold the MENU button to
enter the lyric display mode.
To hide the lyric, press and hold the MENU button again.
Note: The lyric file and the track should be in the same directory.
z Exit from the Music Mode
Press the ESC button to exit.
Voice recording
z Record
(1) On the main menu, select “Record Mode” and then press the MENU button to enter
voice recording mode.
(2) Press the
(4) During recording, you can press the
button to start recording.
button to pause or resume recording.
(5) Press the MENU button to stop and save the recording.
CAUTION: DO NOT POWER OFF THE DEVICE DURING RECORDING. THAT WILL
CAUSE CURRENT RECORDING UNSAVED AND LOST.
z Play the Recording
(1) On the main menu, select the “Voice Mode” to enter the voice playing mode.
(2) Press
/ button to select the file that you want to play and press the key
to play it.
For detail information about playing, refer to the “Basic operations” and “Music Mode”
section.
z Exit from the Record Mode
Press the ESC button to exit.
FM Radio (optional)
On the main menu, select “Radio Mode” and press the MENU button to turn on the FM radio.
z Auto Search for Broadcasting Stations
(1) Shortly press the MENU button to show the submenus.
(2) Press
/ button to select “Auto Search” and then press the MENU button to
Page 6 of 10
Page 7

continue.
(3) The radio automatically searches for stations within the frequency band. It will stop
searching when a station is found. You can press the MENU button to continue
searching. Found stations will be saved as preset stations.
z Search for Broadcasting Stations manually
/ button to decrease or increase frequency manually.
Press
z Save the found Station
You can save the found station following these steps:
(1) Press the MENU button shortly to show the submenu.
(2) Select “Save” and press the MENU button to continue.
(3) Press
/ button to select “Yes” or “No”, and then press the MENU button to
confirm.
z Listen to Station
Press the
key to select a preset station for listening.
z Delete broadcasting station
(1) Tune to the preset station that you want to delete.
(2) Press the MENU button shortly to show the submenu.
(3) Select “Delete” (or select “Delete All” to delete all preset stations) and press the
MENU button to continue.
(4) Press
/ button to select “Yes” or “No” and then press the MENU button to
confirm deletion.
z Set the frequency band
This device provides two frequency bands for your choice: Normal Band (87.5~108MHz)
and Japan Band (76~90MHz). You can select the band which is applicable for your local
region.
Shortly press the MENU button to display the submenu. Select “Normal Band” or “Japan
Band”, and then press the MENU button to confirm.
z Record the FM program
You can record the FM programs broadcasted by the station.
(1) When you are listening to the program, shortly press the MENU key to display the
submenu.
(2) Select “Record” and then press the MENU button to enter the voice recording mode.
(3) Press the
key to start, pause or resume recording.
(4) Press the MENU button to stop and save the recording
z Exit from the Radio Mode
Press the ESC button to exit.
System Settings
To customize the player settings:
(1) On the main menu, select “Setting Mode” and press the MENU button to enter the
system setting mode.
(2) Press
/ button to select a setting item and press the MENU button to confirm or
press the ESC button to return.
Page 7 of 10
Page 8

Item Description
Brightness – Adjust the brightness of the screen. LCD Set
DarkMode – Darken the screen after the set time for
saving power.
Language Select the language in which the on-screen text is
displayed.
Power off Off time –Set the length of time after which the player is
turned off automatically when it is idle.
Sleep time – Set the continuous playback time before
the player is turned off automatically.
Memory info. Display percentage of the used memory space.
Firmware version Display software version number.
Firmware Upgrade Upgrade the firmware.
Connect to the PC and download audio files
(1) Slide the USB Push button on the back of the device to protrude the USB connector.
(2) Attach the USB connector to the USB port of the PC.
(3) A new added removable disk will appear in “My Computer”. Just copying audio files from
or to the removable disk.
(4) Remove the player from the PC in a safe way to avoid data loss.
a. Left click the
b. Click the pop-up mini-window with message of “Stop the USB Mass Storage
Device – Drive (X)”.
c. When you are prompted to remove the device, pull out the MP3 player.
For Win98 system. Driver installation is required before connection.
Note:
icon at the right hand corner of the taskbar.
Charge the Battery
The device has built-in lithium rechargeable batteries. It is charged by USB connection.
To charge the battery, just attach the USB connector of the player to the USB port of the PC.
The device is connected to PC and being charged. To know the charge progress, see the
battery icon on the screen for reference. It takes about 3 hours to fully charge the battery.
Note:
a. Please charge the battery immediately when the display indicates low battery, or the
device will be powered off automatically.
b. For maximum performance, lithium-ion batteries need to be used often. If you don’t use
the device often, be sure to recharge the battery at least once per month.
Troubleshooting
Problem Possible Cause Solution
Page 8 of 10
Page 9

Cannot power on the
device.
No sound when playing
music or voice file.
The player cannot be
connected to the PC.
The displayed time is
changing constantly.
The PC has error when
you plug and unplug the
player.
Total memory displayed
on the player is not in
accordance with the
marked amount.
Some of MP3 files
cannot be played
properly.
Specification
LCD Display 96 x 64 Matrix Graphic Screen
Battery Type Rechargeable Li-polymer Battery
Battery Life 6-8 hours
Recording Format ACT
Recording Length (Max.) About 280 hours with 1GB
Music format MP3, WMA, ASF
Bit rate MP3/WMA: 8kbps ~ 320kbps
Frequency range 20Hz ~ 20kHz
Signal/noise ratio >= 90 dB
Channel separation >=40dB
Frequency response <=3dB (20Hz ~ 20kHz)
Output power to earphones L 4mW, R 4mW
USB Interface USB 2.0 (high speed)
1. No battery or battery is
too low.
2. The keys are locked.
1. The volume is too low.
2. There are problems with
the audio file.
1. The driver is not installed
or destroyed.
2. The USB interface is not
supported by PC’s
motherboard.
The bit rate of the MP3 file
is changing during
playback.
The player is disconnected
from the PC abruptly while
transferring files.
Part of memory is used to
store programs and display
characters.
The MP3 file is
compressed by a standard,
such as MPEG I Layer 1 or
Layer 2 that the player
does not support.
Item Parameter
ASF: 8kbps-448kbps
Page 9 of 10
1. Install or replace the
battery.
2. Disable the Hold Switch
1. Adjust the volume.
2. Skip the file.
1. Install or reinstall the
driver shipped with the
player.
2. Update or replace the
PC’s motherboard.
Try to use fixed bit rate to
compress the MP3 file.
Do not disconnect the
player from the PC when
transferring files.
Delete the unsupported
MP3 files.
Use MPEG I Layer 3
standard to compress the
unsupported MP3 files.
Page 10

Memory media FLASH
Memory capacity 256MB ~ 8GB
FOR MORE INFORMATION PLEASE VISIT OUR WEBSITE
www.mpmaneurope.com
Page 10 of 10
 Loading...