

Page 1

DIGITAL VIDEO / MUSIC PLAYER
MP3/WMA/AMV / JPEG / REC
USER MANUAL
MP-CS120
www.mpmaneurope.com
___________________________________________________________________
Before connecting, operating or adjusting this product please read these
instructions completely.
Page 2

UP TILL 99 SONGS IN ONE DIRECTORY
YOUR MP-CS155 ACCEPTS
UPTILL 99 SONGS IN ONE DIRECTORY
IF YOU WANT MORE THEN 99 SONGS,
STORE THEM IN A NEW DIRECTORY
IN PLAY MODE, YOU CAN CHANGE THE DIRECTORY
IN THE MENU.
DON’T FORGET: MAXIMUM 99 SONGS IN EACH DIRECTORY
1
Page 3

1.1The player characteristics
♠ MP3 / WMA music format.
♠ AMV movie format
♠ JPEG picture format
♠ 65K full color display
♠ Voice recorder
♠ GUI (graphical user interfaces).
The box:
(1) MP3 player 1Pcs
(2) Stereo earphone 1Pcs
(3) CD ROM 1Pcs
(4) Quick guide 1Pcs
(5) USB cable 1Pcs
PC needs
(1) Pentium 100 MHz or faster
(2) Windows 98/2000/ ME/XP
(3) USB port
(4) CD- ROM driver
(5) 15MB of free space on harddisk
(6) 32 MB RA M
2
Page 4
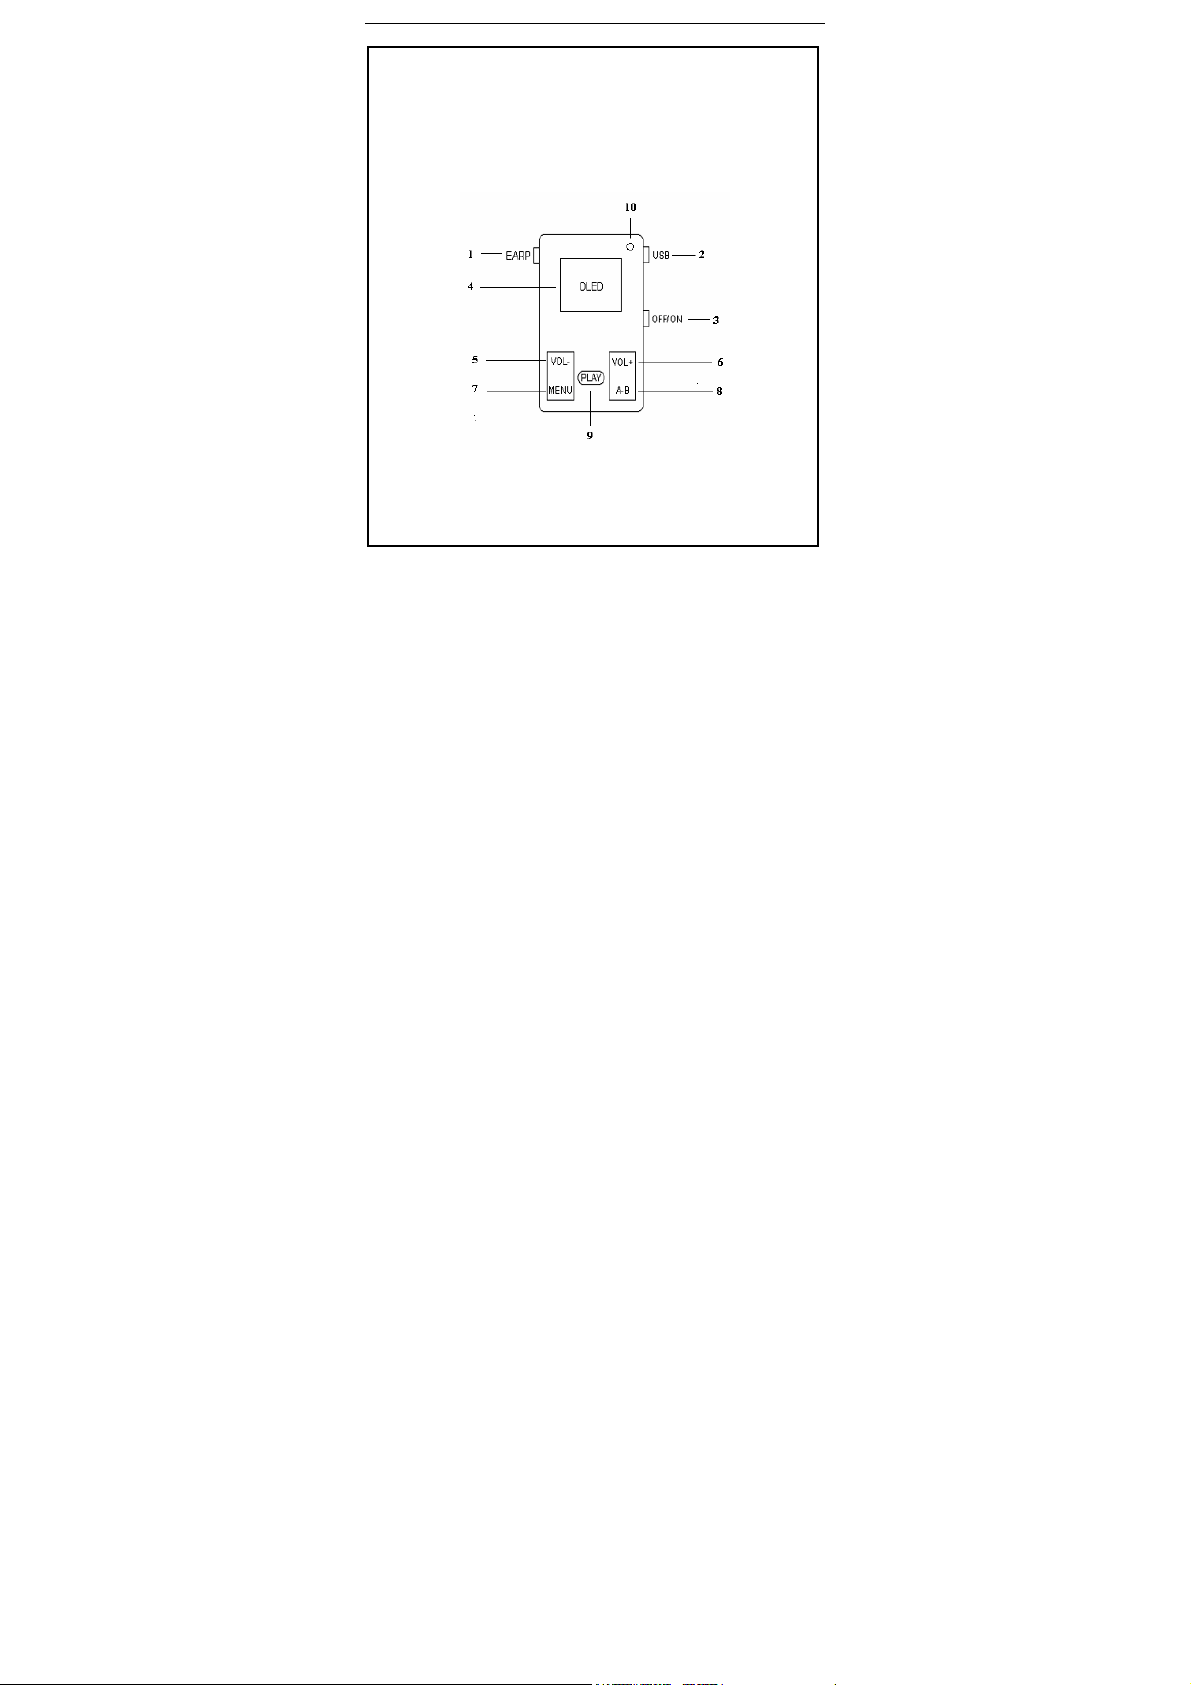
1.2 The player appearance interface
3
Page 5

1.3 Figure & Keys
1) Earphone jack,
2) USB Port
3) Power ON/OFF,
4) 65 K color display
5) Previous, Vol-
6) Next, Vol+
7) Menu
8) A-B recording
9) Play/pause
10) Microphone
1.4
Display
65000 colors OLED display
1.5 Battery
The screen shows a battery indicator with nine levels.
The battery indicator will be empty when the battery is used up. At that time,
the player should be charged with an external charger(optional) or with
the USB connection on your PC
4
Page 6

2 Operating instruction
2.1 Turning on/off the MP3 player
Slide ON/OFF switch to the right. The OLED display will light up.
Slide ON/OFF switch to the left. The MP3 player will shut off.
2.2 Changing volume (available only in play mode)
Press and hold “A-B” button for several seconds until the volume indicator appears
on the screen.
Now adapt the volume with the Vol-/Vol+ buttons.
2.3 Main menu
Press the “Menu” button for several seconds, from any point in the menu,
and the player returns automatically back to the main menu
Six options:
- 1) MUSIC
- 2) MOVIE
- 3) RECORD
- 4) VOICE
- 5) JPG VIEW
- 6) SETTING
You can switch between options by pushing “Next/Vol+” or “Prev/Vol-”
button. Then press shortly on the “Menu” button to
enter the submenu or to confirm a function.
.
5
Page 7

2.4 MUSIC
Select “Music” mode in the main menu, by pressing once the “menu” button.
To enter any music submenu options press once the “menu button”
There are 2 different types of submenu
A/ In stop mode (not available in playback)
B/ In play mode (during playback)
2.4.1 In stop mode (not available during playback)
Press "Menu" button once to enter the music submenu.
Three options are available:
Select and confirm your choice by pushing menu button.
2.4.1.1 Local folder (not available during playback)
Here you will be able to find the files stored in different folders.
On the root folder or in any other folder you have created in Windows.
To create new folders in Windows explorer when MP3 is connected.
Open “external drive”.
Create new folder
- Press "Menu" button to open Local folder
- Press “Next” or “Prev” button to select the catalog
- Press “Menu” button to confirm
- Local Folder
- Delete
- Repeat
- Exit
6
Page 8

2.4.1.2 Delete (not available during playback)
Select a song and push menu button.
Select “Delete”/”Delete all” and confirm with menu button once more
2.4.1.3 Repeat (available in both modes)
Normal
Repeat One
Folder
Repeat Folder
Repeat All
Random
Intro
2.4.2 In play mode (during playback)
During playback, press "Menu "button to enter music submenu:
Six options are available:
- Repeat
- Equalizer
- Tempo Rate
- Replay
- Replay times
- Replay gap
- Exit
Select and confirm your choice by pushing menu button.
All songs are played once
Repeats the current song
Plays all the music of a specific folder
Repeats the music of a specific folder
Repeats all the music.
Plays music at random.
First 10 seconds of each song is played.
7
Page 9

2.4.2.1 Repeat
Normal
Repeat One
Folder
Repeat Folder
Repeat All
Random
Intro
2.4.2.2 Equalizer
Seven options:
- Natural
- Rock
- Pop
- Classic
- Soft
- Jazz
- DBB
Select and confirm your choice by pushing menu button.
All songs are played once
Repeats the current song
Plays all the music of a specific folder
Repeats the music of a specific folder
Repeats all the music.
Plays music at random.
First 10 seconds of each song is played.
8
Page 10

2.4.2.3 Tempo Rate
The music can be played faster or slower from -8 to +8 (only with MP3 files)
Change the rate by Pressing “Next/Vol+” or “Prev/Vol-” button .
Confirm your choice by pushing menu button.
2.4.2.4 Replay
A-B replay
When replay mode is selected, the A-B icon is visible
Select the start point A (flashing) by pressing “Next/vol+” button.
Select the end point B(flashing) by press “Next/vol+” button .
The A-B section will be repeated continuously
Press “Menu” button to return to normal playback
- Adding your voice to the A-B section
During playback of the A-B section, by press “F.FWD” button
The microphone icon
Press “Menu” button again to stop the recording.
The A-B section + the voice recording will be repeated
2.4.2.5 Replay times
Here you are able to choose how many times (0-10) the A-B section
will be repeated.
2.4.2.6 Replay gap
Choose the time( 1-10 sec) between each A-B section.
appears and your voice is recorded.
9
.
Page 11

2.5 MOVIE
In this mode you can view your AMV movies.
Don’t forget to convert your movie files into AMV format so your MP-CS120
can play it!
A converter is available on the CDROM
Simply copy the movie files to the unit (cfr music files).
Select in the main menu "Movie ".
Select a file.
Press Play button for movie playback
Press forward button to display the next movie
On the movie menu there is only one submenu available in “stop mode” (not
during playback)
2.5.1 Movie submenu (not available during playback)
Press menu button to enter submenu
- Local folder
- Delete
- Repeat:
- Exit
cfr 2.4.1
2.6
-Select "Record mode " in the main menu.
The unit can store up to 99 recordings in each folder.
- Press “PLAY” button to start recording.
- Press “PLAY” button again to pause the recording (Time flashes).
- Press “PLAY” again to continue recording.
- Press and hold the “PLAY” button to stop recording.
RECORD
10
Page 12

2.6.1 Record submenu
In the Record mode, press Menu button once
to see the following 3 options:
- Local folder (root folder or any other folder)
- REC type
- Exit
2.6.1.1 Local folder
cfr 2.4.1.1
2.6.1.2 REC type
Four options:
- “Fine REC”: high quality recording, wav format, good quality.
- “Long REC”: lower quality recording, act format, uses less space
- “Fine VOR”: wav format
- “Long VOR”: act format
When using “VOR recording”, the player enters into the
state of “pause recording” if no sound is detected
by the microphone. Recording starts again when sound is detected.
2.7 VOICE
In this mode you can listen to the recordings created in “Record mode”
Select in the main menu "Voice mode ".
2.7.1 Voice stop submenu
When playback is stopped, press “Menu” button to enter the Voice submenu.
3 options:
- Local folder
- Delete
- Exit
11
Page 13

2.7.1.1 Local folder (Stop submenu)
cfr 2.4.1.1
2.7.1.2 Delete (Stop submenu)
Select a file and push menu button.
Select Delete/Delete all and confirm with menu button once more, or select Exit
to cancel
2.7.2 Voice play submenu
During playback, press “Menu” button to enter the Voice play submenu.
4 options: - Repeat
- Tempo rate
- Replay
- Exit
Those options are similar to the music play submenu
JPG View
2.8
In this mode you can view your JPEG pictures. Simply copy the pictures
to the unit (cfr music files)
Select in the main menu "JPG view ".
Press Play button for picture playback
Press forward button to show the next picture
2.8.1 JPG VIEW submenu
Press menu button to enter submenu
- Local folder: : cfr 2.4.1.1
- Play set: select manual or auto play
- Delete picture: cfr 2.6.1.2
- Exit
12
Page 14

2.9 SETTINGS
Select “System” in the main menu
- Clock
- LCD set
- Language
- Power off
- Replay mode
- Memory info
- Firmware version
- Exit
Press menu button to select.
2.9.1 Clock
Enter here the correct date and time.
Change the year number by using “Next/Vol+” or “Prev/Vol-” button.
Press the Menu button and the month-number will be indicated.
Change the number by using “Next/Vol+” or “Prev/Vol-”
Press again “Menu” button and the days will be indicated….
2.9.2 LCD set
Adjust the brightness (1-10), darkle(0-30), black (0-30),
by pressing “Next/Vol+” or “Prev/Vol-” button
Press Menu Button to confirm or choose exit to quit
2.9.3 Language
Change the language by pressing “Next/Vol+” or “Prev/Vol-” button
Press Menu button to confirm.
2.9.4 Power off
- Off time
With this function the device will automatically shut down after a preset
time.(0-60sec), when no button is touched and music is not playing.
If time is set at 0 seconds, the function is cancelled.
13
button
Page 15

- Sleeping mode
With this function the device will always shut down after a preset time (0-120 min).
If time is set at 0, the function is cancelled.
When the device is powered off, sleeping mode is set at 0.
2.9.5 Replay mode
Manual replay or auto replay
2.9.6 Memory info
Gives a percentage of the memory used compared to the total memory size
2.9.7 Firmware version
2.9.8 Exit
14
Page 16

3.1 SPECIFICATIONS
(1) FLASH Memory 256MB, 512MB, 1GB, 2GB
(2) Formats supported MP3, WMA, JPEG, AMV
(3) Languages English, French, German, Italian,
(6) Power supply 3.8v Rechargeable Lithium battery
(7) USB2.0 Read 1033K Byte/S
(8) recording WAV(32K bps), ACT (8K bps)
(9) frequency response 20Hz~20KHz
(10) distortion < 0.1%
(11) baud rate > 4Mbps
(12) weight 38g
(13) size 81mm x 42mm x 11mm (L x W x D)
3.2 Troubleshooting
If for any reason your player is blocked, you can reset the firmware
You just have to switch it off and back on. Reset is automatic at startup.
Spanish, Dutch, Portuguese.
Write 955K Byte/S
FOR MORE INFORMATION DO NOT HESITATE TO VISIT
OUR WEBSITE
www.mpmaneurope.com
15
 Loading...