

Page 1

Instruction Manual for
Instruction Manual for MP-CL2 digital player
Instruction Manual for Instruction Manual for
MPMAN MP3 Digital Player
Model: MP-CL2
Instruction Manual
Introduction
Thank you for purchasing this “MPMAN” MP3 player. Please take the time to read through
this instruction manual to learn about the various functions it has, so you can make the most
out of its features.
Safety information:
1. This player is a sophisticated electronic device. Do not disassemble it.
2. Do not expose the player to strong shocks or shaking.
3. Do not expose the player to very hot, cold, humid, or dusty environments. Also keep it
away from strong magnetic environments and exposure to long periods of sunlight.
4. Only clean the case of the player with a dry towel. Never clean it with any chemical
solvents.
5. The player should be kept away from water and water splashes. Never leave your player
anywhere that it might fall into water.
6. Always listen to music at an appropriate volume or it may damage your hearing.
7. Do not try to modify any part of the player.
8. Only use the battery, charger and other accessories specified by the manufacturer. Using
other products will invalidate the warranty and may damage your player.
9. If you wish to dispose of this player, please do so according to local environmental
protection rules.
10. Contact your local dealer or service center if you have any problems with the player.
Declaration
1. To prevent loss of data, it is recommended that the customer saves an extra copy of
important files. The company is not responsible for any loss caused by loss of data
2. These instructions are written to refer to the initial model of this product. Any change /
addition / deletion of functions and operations will be listed on the installation CD packed
with this product or on our company website. Should there be any discrepancy between
these written instructions and the instructions on the CD / website, the version on the CD /
website should prevail.
3. All changes / additions / deletions can be found on our company website:
www.mpmaneurope.com
4. The pictures used in the manual are for reference only and may differ from the actual
product.
5. Specifications are subject to change without notice. We apologize for any inconvenience
this may cause.
I. Introduction
A brief introduction to the product
1. Accessories packed with the product
2. Configuration requirements
3. Computer connection
4. Technical specifications
Contents
1
Page 2

Instruction Manual for
Instruction Manual for MP-CL2 digital player
Instruction Manual for Instruction Manual for
II. Buttons
1. Functions of the buttons / sockets
2. LCD screen
3. Power
III. Operation
i. Playing music
1. How to change EQ mode, set up the equalizer, play mode and synchronize the lyrics.
2. How to use A-B repeat or timed repeat modes
3. How to delete files and check file attributes
ii. How to record
1. Starting to record
2. Selecting a voice source
3. Selecting voice quality
4. Volume adjustment
5. Direct recording
iii. FM Frequency
1. Using the FM radio
2. Selecting frequency
3. Navigating and saving frequencies
4. FM line-in recording
5. Deleting a pre-set frequency
iv. E-book
1. Listening to music while reading an E-book
2. Setting up, using and deleting a bookmark
3. Page skipping, auto page turning and the setup of a timer for page turning.
v. Image viewing
vi. System settings
ⅣⅣⅣⅣ. Portable hard disk
ⅤⅤⅤⅤ. Safe removal of the USB cable
ⅥⅥⅥⅥ. Installation, operation and deletion of MPMAN MP-CL2 software
i. Installation
ii. Operating MP-CL2 driver-update software
iii. Deleting MPMAN MP-CL2 software
ⅦⅦⅦⅦ. Appendix
Trouble-shooting
ⅠⅠⅠⅠ. Introduction
A brief introduction to the product
This is a stylish and easy-to-use player with a color screen. It provides a range of
functions such as music playback, FM tuning, image viewing and E-book reading, etc. It
supports all the main music formats, e.g. MP3/WMA/WAV, and with a built-in EQ, you can
personalize the sound of your player. It also gives you sound and lyrics synchronization, a
timer, bookmarks and a file checker. It is comes with a driver-free hard disk (except for
Windows 98), a set-time repeat function, A-B section repeat, FM line-in recording, external
recording (with a built-in mic), line in audio frequency recording (LINE IN), USB 2.0, along
with six in-built backgrounds. It also gives you the option to listen to music while using the
E-book function. It’s an MP3 player and MUCH more!
2
Page 3

Instruction Manual for
Instruction Manual for MP-CL2 digital player
Instruction Manual for Instruction Manual for
1. Accessories packed with the product
MP-CL2 comes with the following accessories. If any item is missing, please contact your
local dealer.
●Earphones (1)
●Charger (1)
●USB cable (1)
●LINE IN cable (1)
●Installation CD (1)
●Warranty card (1)
●Quick guide (1)
2. Configuration requirements
● Microsoft Windows 98/2000/XP/ ME
● Pentium 200MHz CPU or above
● USB driver
● CD-ROM driver
● 40 MB hard drive
● 32 MB memory
3. Computer connection
Use the USB cable that comes with the player to connect the product to a computer. Insert the
square end of the USB cable into the player and the rectangular end to the USB port of the
computer.
4. Technical specifications
● Model: MP-CL2
● Storage media:built-in 64/128/256 flash disk (selectable)
● Port: USB 2.0
● Transmission speed: over 900KBps when reading; over 600 KBps when writing
● Recording format: WAV and MP3
● Bit ratio: 8Kbps~320 Kbps
● Recording time: approx. 180 minutes (128 M)
● Display: OLED (model); 65536 color (color); 96 x 64 (pixels)
● Power: Lithium-ion battery
● Battery charging time: approx. 3 hours
● Maximum output: earphone 4.0mw x 2
● FM frequency range: 87.5MHz-108MHz
● Size: 30mm (length) x 20mm (width) x 56mm (height)
ⅡⅡⅡⅡ. Buttons
1. Functions of the buttons/sockets
3
Page 4
Instruction Manual for
Instruction Manual for MP-CL2 digital player
Instruction Manual for Instruction Manual for
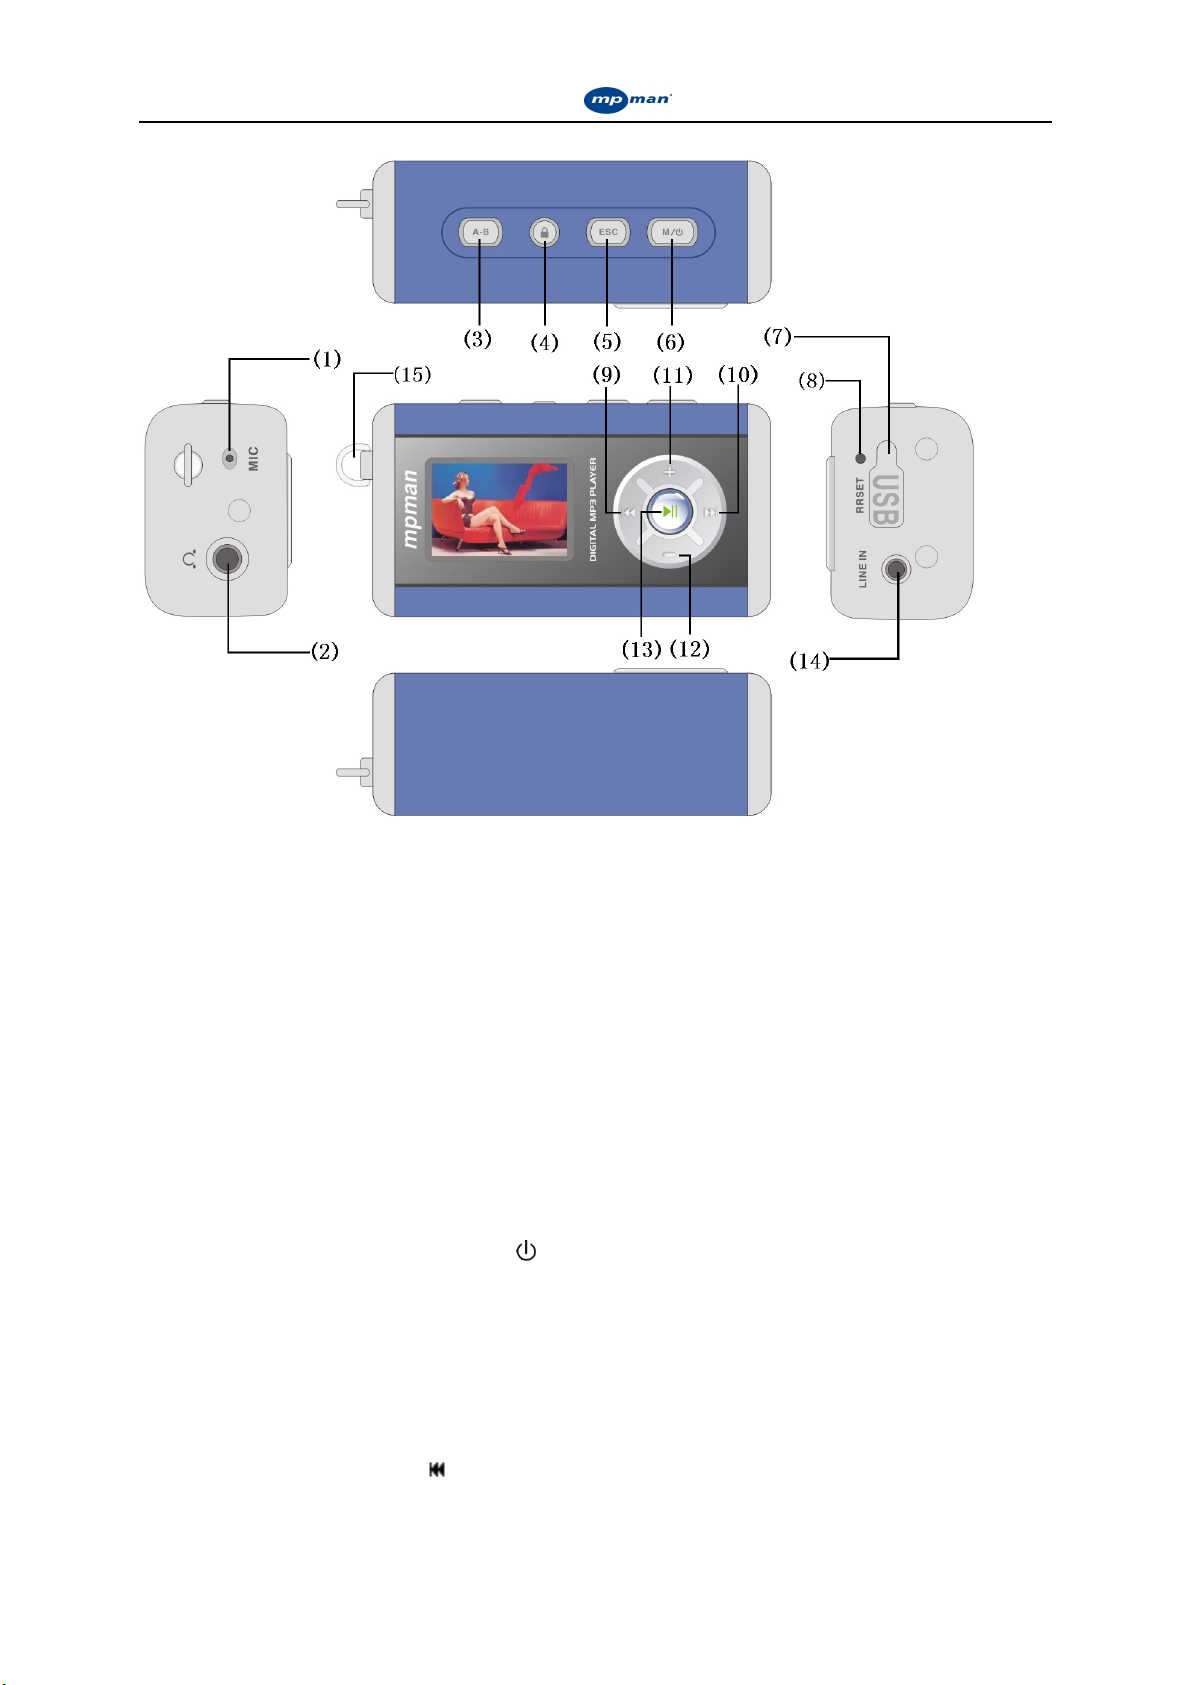
(1)Microphone
For recording
(2)Earphone socket
To connect to the earphones
(3) A-B (section repeating/timed repeating)
Use this button to repeat between points A and B in play mode. Hold the button down to use
the timed repeat function.
(4) Lock button
Use the lock button to disable all other buttons while you are using the player. Turn off the
lock button by pressing it and holding it down.
(5) Stop (ESC) /ESC
This will stop or exit your current action
(6)Menu button((((MENU))))/ Power ( )
This button will bring up the online menu or the power on/ power off option.
(7) USB port/ charging port
This port allows you to charge the MP3 player when it is connected to the charger, and allows
you to transfer data from your PC when it is connected to your PC’s USB port.
(8) RESET (Reset button)
This button will reset your player to its default state in the unlikely event that it crashes.
(9)Previous/fast rewinding ( )
In sleep or play mode, click this button and the current track will rewind to the start of the
4
Page 5
Instruction Manual for
Instruction Manual for MP-CL2 digital player
Instruction Manual for Instruction Manual for
previous track. If the track you are listening to is the first track, it will rewind to the final track.
In play mode, if you hold this button down it will fast rewind the current track.
In sound effect mode, pressing this button allows you to switch between different sounds.
During manual frequency search, clicking this button will reduce the frequency.
If you are reading text, this button returns you to the previous page.
While using a menu, this button lets you scroll upwards.
(10) Next/fast-forward ( )
In sleep or play mode, clicking this button will make the current track move to the next. If the
track you are listening to is the final one, it will play the first track.
In play mode, if you press this button and hold it in you will fast forward through the track
you are listening to.
While selecting sound effects, pressing this button allows you to alter your sound levels.
In manual frequency searching mode, press this button to increase the frequency.
While reading text, pressing this button moves you to the next page.
While using a menu, this button will move the cursor downwards.
((((11))))/((((12))))Increasing (++++) and reducing (----) the volume
While playing music or using the radio function, these buttons will adjust the volume.
When setting sound effects, you may alter the sound levels with these buttons.
In repeat mode you can increase/decrease the repeat times.
(13) Play ( ) / pause ( )
Play, pause, confirm.
(14) LINE IN socket
Record by connecting to an external source.
(15) Earphone Socket.
To connect to a set of earphones.
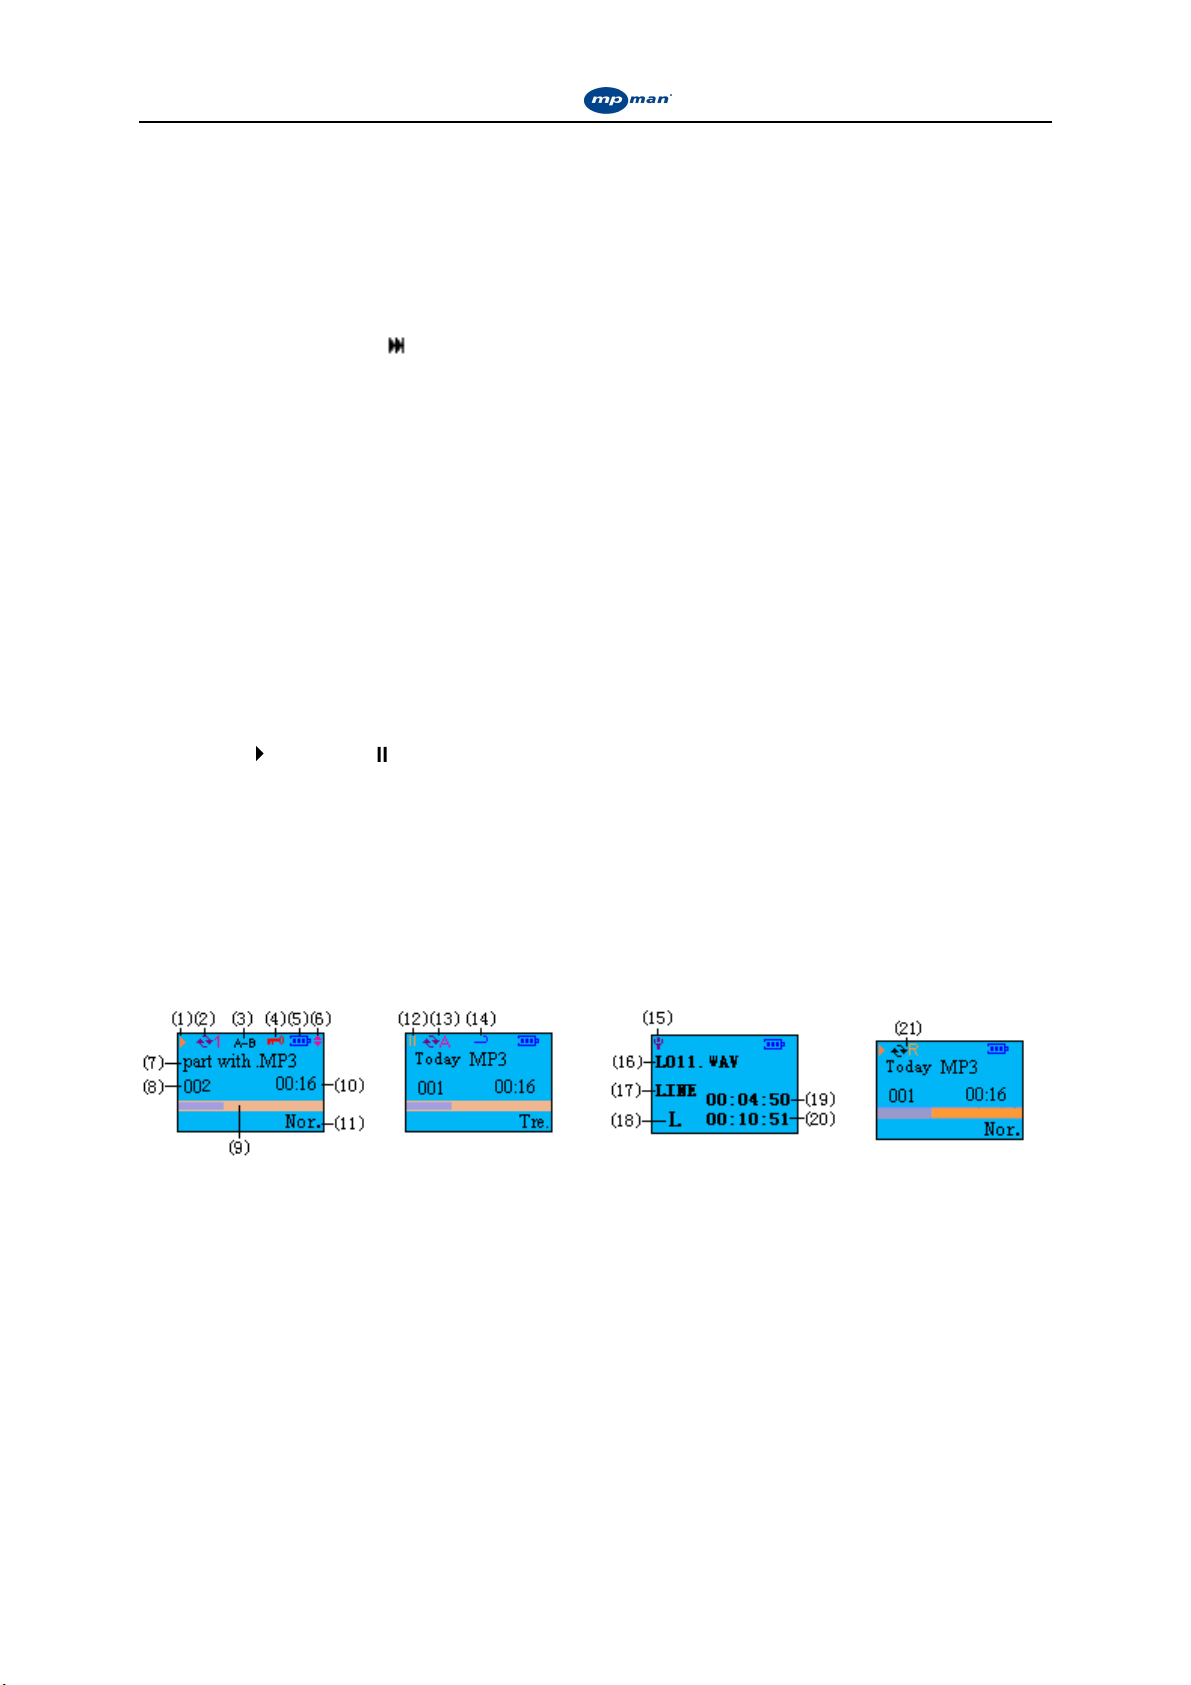
2. LCD screen
(1) Play mode
(2) Repeat single song
(3) A-B repeat
(4) Locked
(5) Battery status
(6) Previous/next page
(7) File name and format
(8) Number of current song
(9) Song progress bar
(10) Length of current song
(11) Sound effects/equalizer
5
Page 6
Instruction Manual for
Instruction Manual for MP-CL2 digital player
Instruction Manual for Instruction Manual for
(12) Pause
(13) Repeat all
(14) Length of time for repeating
(15) Recording
(16) Name and format of voice file
(17) LINE In recording
(18) Low quality indicator
(19) Length of recording time used
(20) Length of recording time available
(21) Repeat all in order
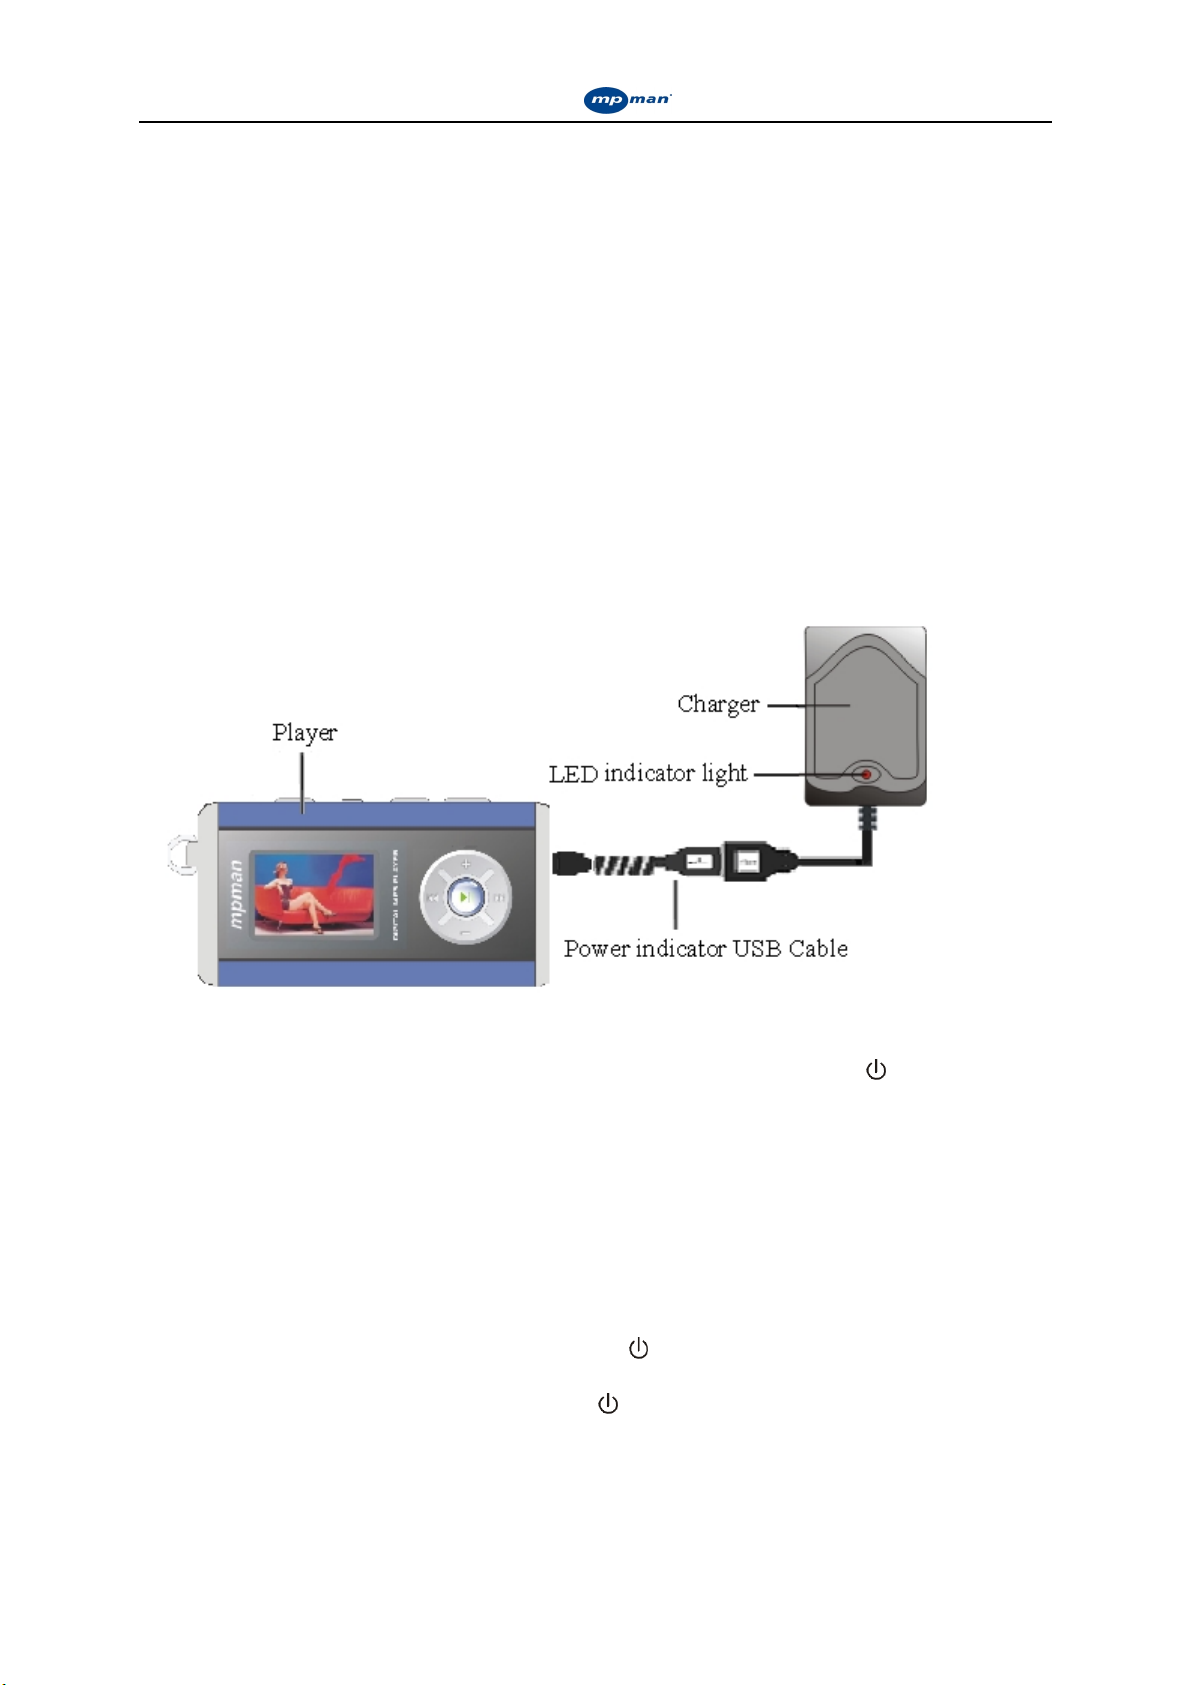
3. Power
How to charge your player:
(1)Using the charger
Connect your MPMAN MP-CL2 via a USB Cable to the charger and charging will start
automatically, as is illustrated below:
(2) Charging via a USB connection to a Computer
Connect the player to a computer via the USB cable, and then press the M/
it down until the battery indicator appears. It takes approximately 4 hours charge, and an extra
hour will ensure it is fully charged.
Note: 1. While charging is underway the bar of the battery indicator on the screen will cycle
showing that it is still not fully charged. When charging is complete the battery indicator will
stop flashing and will show 3 full bars on the display.
2. The first time the battery runs down fully it is recommended that you
allow 2 extra hours to recharge the battery.
ⅢⅢⅢⅢ. Operation
Power on: When the power is off, press the M/ button and hold it down to switch the
player on.
Power off: When the power is on, press the M/ button and hold it down until the bar on the
screen is full and it will switch off.
Note: The MP-CL2 has an automatic power saving function, which switches off the player if
it is left idle for 3 minutes. (This function will not work if the player is connected to a
computer with a USB cable, or while it is playing a file or a radio signal.)
button and hold
6
Page 7

Instruction Manual for
Instruction Manual for MP-CL2 digital player
Instruction Manual for Instruction Manual for
i. Music playing
Press the M/ button and hold it down to switch the player on. Press the and buttons
to choose the “music playing” icon, as shown in figure 2.Next press the button to
confirm and enter the menu or a list of songs, as shown in figure 3. Press the and
buttons scroll through the menu or songs and then press the button to select a menu item
or play a song. The play mode screen is illustrated in figure 4.
Fig. 1 Fig. 2 Fig. 3
Fig. 4 Fig. 5 Fig. 6
1. How to change EQ mode, set up the Equalizer levels, play mode and synchronize the lyrics.
In play mode, click the M/ button to open the online play menu, as shown in figure 5. Press
the and buttons to select the mode you want and press the button to confirm your
choice and enter the menu. The online play menu consists of 6 options: sound effects, play
mode, set timer length, playing interface, volume control, and equalizer settings.
Fig.7 Fig.8 Fig.9 Fig.10
Fig.11 Fig.12 Fig.13 Fig.14
Sound effects: The player has eight different sounds: standard, rock, jazz, classic, pop, bass,
alt and personalized. Click the M/ button to enter the online menu, and use the
and buttons to select “sound effects” and press the button to confirm.
Next select the sound you prefer. Press the
Setting sound levels: The built-in equalizer is shown in figure 6. Click the
buttons to switch between different audio frequencies. Press the + or - buttons to
set the level of the selected audio frequency. Then press the button to confirm
and return to the main online menu.
Play mode: This player has 5 different play modes - normal, repeat current song, repeat all,
random and random repeat.
Normal: This plays the files on the player, or within a selected directory, from first to last. As
shown in figure 7 no repeat indicator is shown on the screen.
Repeat current song: This repeats the current file only. In this mode, there is a indicator
displayed on the screen, as shown in figure 8.
Repeat all: This mode repeats all the files stored in the player, or in a directory. In this mode,
indicator is displayed on the screen, as shown in figure 9.
a
button to confirm.
and
7
Page 8

Instruction Manual for
Instruction Manual for MP-CL2 digital player
Instruction Manual for Instruction Manual for
Random: This mode plays all the files on the player or in a directory at random. In this mode
a indicator is displayed,as shown in figure 10.
Random repeat: This repeats all the files stored on the player or in a directory at random. In
this mode a indicator is displayed, as shown in figure 11.
Lyrics synchronization: Use the and buttons to select the“playing interface” option
and press the button to confirm. There are “normal”and“lyric synchronization” options
for you to choose from. If you select“normal” the system stays in the normal playing mode,
without displaying lyrics, as shown in figure 11. If you choose the “lyrics synchronization”
option the system will go into lyric synchronization mode. This synchronizes the MP3/WMA
and LRC files, which share the same name in a selected directory, as shown in figure 12.
2. How to use A-B repeat or timed repeat mode.
A-B repeat: In play mode, click this button once to set a start point – A. A- will then be
displayed on the screen. Click this button again to set the end point – B. A-B will now be
displayed, and the player will repeat between these two points. Pressing the button a third
time will cancel your selection and return you to normal play mode.
Timed repeat: Select the “length of time setting” from the online menu and press the
button. Use the + or – buttons to set the length of time you wish to repeat. The maximum
length of time you can set is 99 seconds, and the shortest is 3 seconds. After setting the repeat
time click the button to confirm,then click the ESC button to exit the online menu. If you
press the A-B button and hold it down,the system will use the current point as the start of
your repeat time and return to that point once it has played the set amount of time. The screen
will display a indicator. When you wish to return to normal play mode and stop the timed
repeat, just click the A-B button again.
3. How to delete files and check the attributes of files.
Delete files: In the song directory, as shown in figure 3, press the or buttons to select
the files you wish to delete. Click the M/ button and an interface will pop up, as shown in
figure 13. Press the or buttons to select “delete”. Click the button and a dialogue
box “are you sure you want to delete this file?” will pop up. Click the
The song will then be deleted and the player will return to the screen shown in figure 3. To
cancel the deletion you can use the ESC button.
Note: Read-only files cannot be deleted. The system will display a “Read-only files. Cannot
be deleted.” message if you try to do this.
Checking the attributes of files: In the screen shown in figure 13, press the
to select attribute and press the
This shows the size of the file.
ii. Setting up recording
This player allows you to make high quality recordings, such as FM line-in recordings,
external recording via a MIC (with its built-in microphone), Line in (via Line in) etc. The
length of time available for your recordings depends upon the quality and the capacity of the
NAND FLASH.
1. Starting to record
Use the
button to select and the screen shown in figure 16 will appear. Here there are four
and buttons to select the “record” option,as shown in figure 15. Press the
button. The screen shown in figure 14 will now appear.
button to confirm.
or buttons
8
Page 9

Instruction Manual for
Instruction Manual for MP-CL2 digital player
Instruction Manual for Instruction Manual for
options: start recording, select voice source, select voice quality, adjust volume. Select“start
recording” and press the button to enter recording mode, as shown in figure 17. Should
the voice source be “MIC”, “MIC” will be displayed on the screen. Should the voice
source be “ LINE IN”, “LINE IN” will be displayed on the screen. Press the ESC button to
stop recording and save the file.
Fig.15 Fig.16 Fig.17 Fig.18
Note: When “Mic” is chosen as the voice source, the system will create a directory named
“VOICE”, as shown in figure 18. Your recorded files will be saved in this directory in the
order that you create them. When “ LINE-IN” is chosen as the voice source, the system will
create a directory named “ LINE-IN”, as shown in figure 18. The recorded files will be saved
in this directory in the order you create them. When FM recording is chosen, the system will
create a directory named “FM”, as shown in figure 18, and the recorded files will be saved in
the order you create them.
2. Voice source selection
MIC: A recording MIC is built into the player
LINE IN: Record a LINE IN audio frequency signal directly via LINE IN
3. Voice quality selection
The player has 3 quality options: refined, medium and low. Choosing a better voice quality
will give you a finer sound.
4. Volume adjustment
Press the – or + buttons to adjust the volume
5. Direct recording
Connect to the LINE IN socket of the MP-CL2 via a LINE IN cable. This cable allows you
record directly to another output with no outside sound interference.
After entering “record mode”, press the
the voice source and select your recording settings, then choose “start recording” and press
the
button to confirm. Press the ESC button to stop recording and the system will create
and save the recorded file, which will automatically be saved in chronological order with any
existing files.
Note: The voice source should be set as “LINE IN” in the recording settings.
iii. FM Frequency
Note: The earphones need to be plugged into the socket during frequency navigation or
you will not be able to tune in to any radio stations as the earphones also serve as the
antennae in radio mode.
1. Entering and exiting the FM radio
Use the and buttons to select “FM radio”, as shown in figure 19. Press the button
to confirm and begin channel selection, as shown in figure 20. If there are no channels saved
in the player, the message “no channel” will be displayed. Click the M/ button to enter the
online menu, as shown in figure 22. There are two setting options: frequency navigation and
channel delete. Press the ESC button to exit FM radio mode.
button to enter the recording menu. First choose
9
Page 10

Instruction Manual for
Instruction Manual for MP-CL2 digital player
Instruction Manual for Instruction Manual for
Fig.19 Fig.20 Fig.21
2. Frequency selection
The channel selection interface is set to default upon entering “FM radio”, as shown in figure
20. Select the appropriate channel with the and buttons and press the button to start
playing, the screen will display as shown in figure 21. Switch to the previous or next channel
with the
3. Navigating and saving frequencies
Click the M/
navigation” and press the button to enter navigation mode, as shown in figure 23.
Navigate using the and buttons. Click the and buttons to manually control
navigation or press and hold down the
This function will search for channels and automatically stop when it finds one. Press the A-B
button to save a channel. The player can save up to 30 channels.
and buttons.
button to enter the on-line menu, as shown in figure 22. Select “frequency
and buttons to use the auto navigation function.
Fig.22 Fig.23
4. FM line-in recording
While receiving a radio signal, press the A-B button and hold it down. A recording online
menu will pop up, as shown in figure 16. Select “start recording” and press the button to
start FM recording. Click the ESC button to stop recording, and the system will save your file
automatically.
5. Deleting a frequency
Click the M/ button to enter the online menu, as shown in figure 22. Use the or
buttons to select “channel delete”. Press the
confirm the deletion by pressing the button.
iv. E-book
Use the and buttons to choose the “E- book” option,as shown in figure 24. Press the
button to enter the file list, as shown in figure 25. Press the or buttons to select a file
and press the
Use the
and buttons to speed up page scrolling. In text reading mode, press and hold down the A-B
button to check your current page number.
button to confirm and enter the text reading interface, as shown in figure 26.
and buttons to go to the previous or next pages. Press and hold down the
button again to display the frequency list, and
Fig.24 Fig.25 Fig.26
1. Listening to the music while reading an E-book
In text reading mode, click the M/
music”, as shown in figure 27. Press the
button to enter the online menu, and select “start playing
button to enter the music list interface, as shown
10
Page 11

Instruction Manual for
Instruction Manual for MP-CL2 digital player
Instruction Manual for Instruction Manual for
in figure 3. Choose the song you would like to play and press the button to confirm, as
shown in figure 7. Next click the ESC button to exit the online menu and return to text
reading mode. Now you can listen to music while reading text. Adjust the volume using the
+/- buttons, and to switch off the music click the M/ button to enter the online menu, and
select “Switch off music” and press the button to confirm.
Fig.27 Fig.28 Fig.29
2. Setting up, using and deleting a bookmark
((((1))))bookmark setting
In text reading mode, click the M/ button to enter the online menu. Press the or
buttons to select“add bookmark”,as shown in figure 28. Click the button to set a
bookmark, and for each file up to 5 bookmarks can be set. If more than 2 bookmarks are set
within the same file, the system will show a dialogue box asking “is this bookmark to replace
an existing bookmark in this file?” Replace the existing bookmark by clicking the button,
or add a new bookmark by clicking the ESC button.
((((2))))Using a bookmark
In text reading mode, click the M/ button to enter the online menu. Press the or
buttons to select “bookmark list” and click the button to confirm. Select the bookmark
you want, and then click the button to go directly to the bookmarked page.
((((3))))Deleting a bookmark
Select “bookmark delete” from the text reading online menu by using the or buttons,
and confirm by pressing the button. Next press the or buttons to select the
bookmark you want to delete and click the button to confirm.
3. Page skipping, auto page turning and setting up a page turning timer.
((((1))))age skipping
From the text online menu, press the
click the button, as shown in figure 30. The screen will display the page number being
read. Choose the number of pages you want to skip using the +/- buttons. You can use the
or buttons to scroll between units, hundreds, thousands etc. Once you have selected the
correct number, press the
have selected exceeds the total number of pages in the file, you will be sent to the last page.
((((2))))Automatic page turning
From the text online menu, use the
and click the button to confirm. Go back to the text reading mode by clicking the ESC
button and the automatic page turning function is now enabled. If wish to disable this function,
enter the online menu and select “disable automatic page turning” and press the button to
confirm.
((((3))))Setting a page turning timer
Select the “page turning speed” option from the text reading online menu by using the or
buttons. Use the +/- buttons to adjust the speed. The time between each page turn can be
set anywhere from 1-99 seconds. Confirm by pressing the button after the selecting the
time you want.
button to skip to the selected page number. If the number you
or buttons to select the “fast locate” option and
or buttons to select “start automatic page turning”
11
Page 12

Instruction Manual for
Instruction Manual for MP-CL2 digital player
Instruction Manual for Instruction Manual for
Fig.30 Fig.31 Fig.32
v. Image viewing
Use the or buttons to choose the “image viewing” option,as shown in figure 31. Click the
button to confirm and enter the file list, as shown in figure 32. Press the
and click the
using the
button to confirm and enter image viewing mode. Switch to the previous or next file by
or buttons.
or buttons to select a file
How to set the image size, play an image automatically and set the display time.
In image viewing mode, there are 3 functions: image size, automatic playing and set display
time will be shown. Press and hold down the M/ button to enter the online menu when
viewing an image, as shown in figure 33.
(1) Setting the image size
When browsing images using the online menu, use the or buttons to choose the “image
size” function and press the button to confirm. There are two options, “fit to screen” and
“actual size”. When “actual size”, is selected press and hold down the or buttons and
the + or – buttons to move up or down / left or right while viewing images.
(2)Automatic image playing
Click the or buttons to select “switch on automatic playing” from the image viewing
online menu, and press the button to shift between switch on and switch off automatic
playing.
(3) Display time
From the image viewing online menu, press the or buttons to select “playing speed”
and press the button to confirm. Use the +/- buttons to adjust the figures. The interval that
each image can be displayed is between 3-99 seconds. Click the button to confirm your
choice.
Note: Only ““““*.BMP”””” image format will be supported in image viewing.
Fig 33 Fig 34 Fig 35
vi. System setting
Enter the main interface,and use the
or buttons to select “system setting”, as shown in
figure 35. In the “system setting” directory you can select from the following options: set
language, menu scrolling, LCD background setting, timer on/off, memory management,
theme setting, restore to defaults, and edition information.
1. Set language
Enter “system setting” and click the
or buttons to select “language selection”. Click
the button to enter the language selection interface,where there are three options:
English、 Simplified Chinese and Traditional Chinese. Use the or buttons to select the
language you prefer, and then click the button to confirm your selection.
2. Menu scrolling
Enter “system setting”, and click the
or buttons to select “activate menu scrolling”. Click
12
Page 13

Instruction Manual for
Instruction Manual for MP-CL2 digital player
Instruction Manual for Instruction Manual for
the button to shift between activating and de-activating menu scrolling. When menu
scrolling is activated, if the menu exceeds the size of the display area, a scrolling display will
be used.
3. Background light time setting
Enter “system setting” and click the or button to select “background light time
setting”. Use the +/- button to adjust the figure.
4.Timed on/off
Enter “system setting” and then use the or buttons to select “timed on/off” and
press the
figure 37. The figure highlighted is the current setting. Use the +/- button to adjust this
figure. Click
between 3 minutes and 24 hours. Click button to confirm your selection.
Select “activate timed shutting off” and click the button to confirm. If this function
is active the player will automatically shut down if it has been idle for the period of time
selected. Select “disable the timed shutting off” and press button to disable this function.
5. Memory management
Enter “system setting” and click the or buttons to select “memory management”
and press button to confirm, as shown in figure 38. Use the or buttons to select
“memory data” or “file management” and press the button to confirm.
Use the or buttons to select “memory data” and then press the button. The
interface will show the amount of memory used, and the amount of memory still available.
Use the or buttons to select “file management” and press the button to enter the
directory or file list. Use the or buttons to select files, and click the MENU button to
use file delete or attribute checking. This operation is similar to step 3 in part 1: “playing
music”.
6. Theme setting
Enter “system setting” and use the or buttons to select“theme setting”. Press
the
press the button to confirm.
7. Restore default settings
The system will ask “Are you sure you want to restore default settings?” Click the
button to confirm and you player will return to all of its default settings. Click the ESC
button to exit and cancel.
8. Check edition information
Enter “system setting” and use the
Click the button and the screen will display the model and version of the player.
button to confirm, as shown in figure 36. Select “timed shutting off”, as shown in
or button to modify( Hour, Minute and Second),The time selected will be
button to confirm. Use the or buttons to select from the different themes and
Enter “system setting” and use the
or buttons to select“restore default settings”.
or buttons to select “edition information”.
Fig 36 Fig 37 Fig 38
ⅣⅣⅣⅣ. Portable hard disk
This product can be used as a driver-free USB flash disk with the WINDOWS ME/2000/XP
operating system; while with Windows 98 and MAC operating systems a driver program
13
Page 14

Instruction Manual for
Instruction Manual for MP-CL2 digital player
Instruction Manual for Instruction Manual for
(included in the product package - MP-CL2 driving & upgrading tools) must first be installed.
The player may upload and download files of any format. If these files are not MP3/WMA
format or recording files, they will not be displayed or have any influence on the operation of
the player.
V. Safe removal of USB
On your computer, click the “ ” icon in the bottom right corner of the desktop in order to
safely remove the USB cable, as instructed by the operating system. This helps avoid loss of
data, which can occur if the USB cable is disconnected improperly.
ⅥⅥⅥⅥ. The installation, operation and deletion of MPMAN MP-CL2 software
Caution: The operation below is for the Windows 2000 operating system. The following
pictures, which are for reference only, may differ from screen shots for other operating
systems.
i. Installation
1. Insert the installation CD included with the player into your computer’s CD ROM
drive. The screen will display a menu, as shown in figure 39.
Fig 39
(1) Operation of LRC lyric editor
For details, consult help for the LRC lyric editor.
(2) Click “Install MP-CL2 driver-upgrade tools” and install the program according to the
cues that appear on screen.
(3) If you cannot open PDF files on your PC, click “Install Adobe Acrobat Reader” as
shown in figure 39 and install the program.
ii. USB flash disk tester
If you cannot find the portable hard disk while running “Tmusic” after you have connected
the MP3 player, open “USB flash disk tester” to help you locate the USB flash disk.
iii. Operation of MP-CL2 driver-update software
Note: Once you have installed MP-CL2 update tools and driver programs for the Windows 98
or MAC operating system, it is not necessary to install the USB driver program.
14
Page 15

Instruction Manual for
Instruction Manual for MP-CL2 digital player
Instruction Manual for Instruction Manual for
Connect the player to the PC via the communicative cable line, and the screen of the player
will display “Ready”. Double click “My computer” on your PC, and a portable disk (e.g. disk
K) will appear.
1. Downloading (from PC to the player)
Copy the files that you wish to transfer from the PC and paste them directly into disk K.
2. Uploading (from the player to PC)
Copy the files in disk K that you wish to transfer and paste them directly into a selected folder
in your PC.
3. Deleting
Select the files you wish to delete, right click the mouse and select delete. You can also use
the “Delete” key on the keyboard of your PC.
(1)Formatting
Connect the player to the USB port of a PC; a portable disk will be displayed in “My
Computer”. Select that disk, right click the mouse, and then select “format”. The screen will
display as shown below in figure 40. Select “FAT” or “FAT32” in the “file system”, and
click “Start” to start formatting. Click “Close” after formatting is complete.
Fig40
(2) Updating the program
Normal mode: Connect the player to a PC via a USB communicative cable and then select
“Start/Program/MPMAN MP-CL2 Multimedia player/MP3 Update” from your desktop. The
screen will then appear as shown in figure 42. Select “Format data section”, and then click
“Start” to update the program. Click “Close” after the updating is complete.
15
Page 16

Instruction Manual for
Instruction Manual for MP-CL2 digital player
Instruction Manual for Instruction Manual for
Fig42
Recover mode: First press the reset key and keep the player in “power off” mode. Next
press the “ ” button and hold it down for 10 to 15 seconds. Meanwhile plug in the USB
communicative cable to connect the player to a PC). You will see an indicator flashing on the
screen a few times (although this may happen very quickly, so ensure you continue to hold
down the button for 10 to 15 seconds). On your computer desktop click
“Start/Program/MPMAN MP-CL2 Multimedia player/MP3 Update”, and the screen will
display as shown in figure 41 (If this does not happen, repeat the recover mode procedure).
When the indicator bar as is shown in figure 41 and is full, the screen will display as shown in
figure 42 automatically. Click “Start” to update the program. Click “Close” after the updating
is complete. Use the format program within the Windows system to format the player.
Note:
1. When you run “update” for the first time, and the indicating bar in picture 41 is full,
during the updating procedure, the system may find another new hardware device. Please
click “next step” and finish the installation of new hardware. After this the updating will
automatically switch to the next updating screen, as shown in figure 42.
2. When you update the program for the first time, you need to first select “format data
section” as shown in figure 42, and then click “Start” to begin the update.
3. Some problems may occur during the procedures outlined above: there may be problems
switching automatically to the next update screen or no indicator bars will appear. If these
problems repeatedly occur the device is not working normally. Please check the hardware
list in the System Device Manager and re-install the driver program (the device name is
STMP3500 or USB Device), and select “CDROM:\\Player\Windows\Drivers”. After
successful re-installation, it should update properly. You should now be able to follow the
updating procedures outlined above.
16
Page 17

Instruction Manual for
Instruction Manual for MP-CL2 digital player
Instruction Manual for Instruction Manual for
Fig41
iv. Deleting the MPMAN MP-CL2 software
Double click the “Add/Delete program” icon in the control panel of your PC, and the screen
will display as shown in figure 43. Select MPMAN MP-CL2 Multimedia Player, and then
click the “Change/Delete” button, and proceed by following the cues displayed on screen.
Alternatively, from your desktop select “Start/Program/MPMAN MP-CL2 Multimedia
player/uninstall”.
Fig43
VII. Appendix
Trouble shooting
//// Why can some WMA format songs on the digital player not be played?
---- There are many different music formats for songs on the Internet and many of them are in
WMA format. Some of these WMA format songs are subject to DRM (license) copyright
17
Page 18

Instruction Manual for
Instruction Manual for MP-CL2 digital player
Instruction Manual for Instruction Manual for
protection, which may cause unauthorized copies of some songs to become unplayable. This
system protects the original owner of the songs. Some websites offer songs without license
protection, and you may copy and play them as you wish - just like songs in mp3 format.
However, some websites only offer songs in WMA format with license protection (for
example: www.9sky.com). To play these songs you can only use your PC with a Windows
Media Player which has obtained the correct license protection. (Windows Media Player is a
free Microsoft product that allows you to play WMA streaming media files. You can
download it from many websites.) You cannot copy and play these songs on another PC
without license protection. This prevents the spreading of unauthorized and illegal copies of
songs and protects the song’s copyright owner.
If you have WMA format songs with the corresponding license protection, you still cannot
just copy the songs from your PC to the digital player. You need to open Windows Media
Player first. From its menu select “document”, “open” and open all the WMA songs you want
to copy (if all of them can be played, you can transfer them to your player). Connect the
digital player to your PC via a USB cable, and the screen of the player will display
“Communicating”. Next a portable disk (e.g. K:\) will be displayed. Now click the “portable
device” option on the left hand side of the Windows Media Player. A list of the music to copy
will appear. Select all the songs you want to copy and then click the “copy music” button in
the top left hand corner of the screen. The selected songs can now be transferred to your
player with the required license protection authorization.
//// How many minutes of MP3/WMA songs can be stored on the player?
---- This depends upon the player’s memory capacity, and how much is available for storage.
One minute’s MP3/WMA music occupies approximately 1Mb of space, so if the capacity of
the memory is 128Mb then it can store around 128 minutes of music.
//// Having problems transferring files?
---- (1) Please make sure that the USB cable is properly connected to the player and the PC.
(2) Please check that there is enough memory available to accommodate the files that you
wish to transfer.
//// Lost data?
---- Some data loss can be caused by an unstable power supply during the transfer process. Our
company does take responsibility for any files that are lost or damaged. We strongly
recommend that our customers keep back-up copies of all important files.
//// Why do different songs play at different volumes?
---- Depending on how a song is recorded, and how the volume levels were set at that time,
songs can have different volumes levels and some can sound much louder than others.
//// Why can some files, which are smaller in size than the available space on the player,
18
Page 19

Instruction Manual for
Instruction Manual for MP-CL2 digital player
Instruction Manual for Instruction Manual for
still not be transferred?
---- The CMOS chip inside the player allocates 16KB or 32KB to one memory track. A one
Byte file will take one track. Therefore some files are smaller than the available memory but still cannot be
transferred to the player.
//// My player won’t start, what has happened?
----Could the following have occurred:
(1) During an upgrade of the player’s hardware, an accidental error might have occurred or
the USB cable was unplugged.
(2)The Flash disk has been physically damaged.
(3)An unreliable power supply has resulted in an automatic power off after start up.
19
 Loading...