

Page 1
User’s Guide
MP710
Powered by Android
• This guide shall only be used for providing information and operating instruction
• MPMAN reserves the right to modify the specifications and other
information without prior notice
• Software, music, or film, etc with copyrights shall be protected by relative laws
• Shape and color of actual product may vary slightly from the pictures shown in this guide
• Display screens in default setting may vary from the screen contents used in this guide
Page 2

+ SAFETY PRECAUTIONS
• Do not use MP710 in extremely hot, cold, dusty or damp environments
• Do not leave MP710 inside a car with all windows closed in summer weather
• Do not drop MP710 when using it. It might seriously damage the components inside and
crack the screen
• Do not pull out the adapter cord or touch the power plug with wet hands
• Do not use a damaged power cord, a damaged plug or a loose power outlet
• Do not disassemble, repair, or modify MP710 arbitrarily. These actions will void the
manufacturer’s standard warranty
• Ensure that the battery is charged only with the original adapter included in the package
• When formatting MP710 or uploading/downloading files, do not disconnect MP710
from the PC. This may damage files or MP710 itself
• Do not visit unreliable websites
• Delete suspicious messages and e-mails sent by unidentified senders
• Install an anti-virus application and execute a virus check regularly
2
Page 3

CONTENTS
5 About MP710
6 Main Specifications
7 Exterior of MP710
8 Accessories
9 Basic Operations
10 Charging
11 Turning On/Off
12 Unlocking The Screen
13 Buttons
14 Using Touch Screen
15 Moving Files from PC to MP710
17 Downloading Applications
19 USB On-The-Go (OTG)
20 Home Screens
21 Adding Widgets, Shorcuts and Folders
22 Changing your Wallpaper
22 Moving Icons
22 Removing Icons
23 Application Screens
25 Status Bar
27 System Settings
29 Wireless and Network
30 Language and Keyboard
31 Applications
33 Changing Input Method
34 Factory Reset
3
Page 4

CONTENTS
35 Main Features
36 Music
36 Video and Picture
37 Web Browsing
37 File Explorer
38 Program manager in Security Guard
39 Email
4
Page 5

ABOUT MP710
Main Specifications
Exterior of MP710
Accessories
5
Page 6

+ MAIN SPECIFICATIONS
• O/S: Android 2.2
• Screen: 7.0” TFT LCD Resistive Screen (800 X 480, 16million colors)
• CPU: ARM 600MHz + DSP 600MHz
• RAM: DDR2 256 MB
• Connectivity: Wi-Fi (IEEE802.11 b/g)
• Video: 720P HD Video support
MPEG-2, MPEG-4, H.264, WMV, MP4, RMVB, FLV, MKV
• Audio: MP3, WMA, OGG, FLAC
• Photo: JPEG, BMP, PNG, GIF
• Memory Expansion: External Micro SD card slot (Up to 16GB)
• Applications: Access to android application marketplaces
• Others
• G-Sensor
• Built-in speaker and MIC
• USB On-The-Go (OTG) function
• Internet browsing, emails, eBook, documents, games, VOIP, etc
6
Page 7
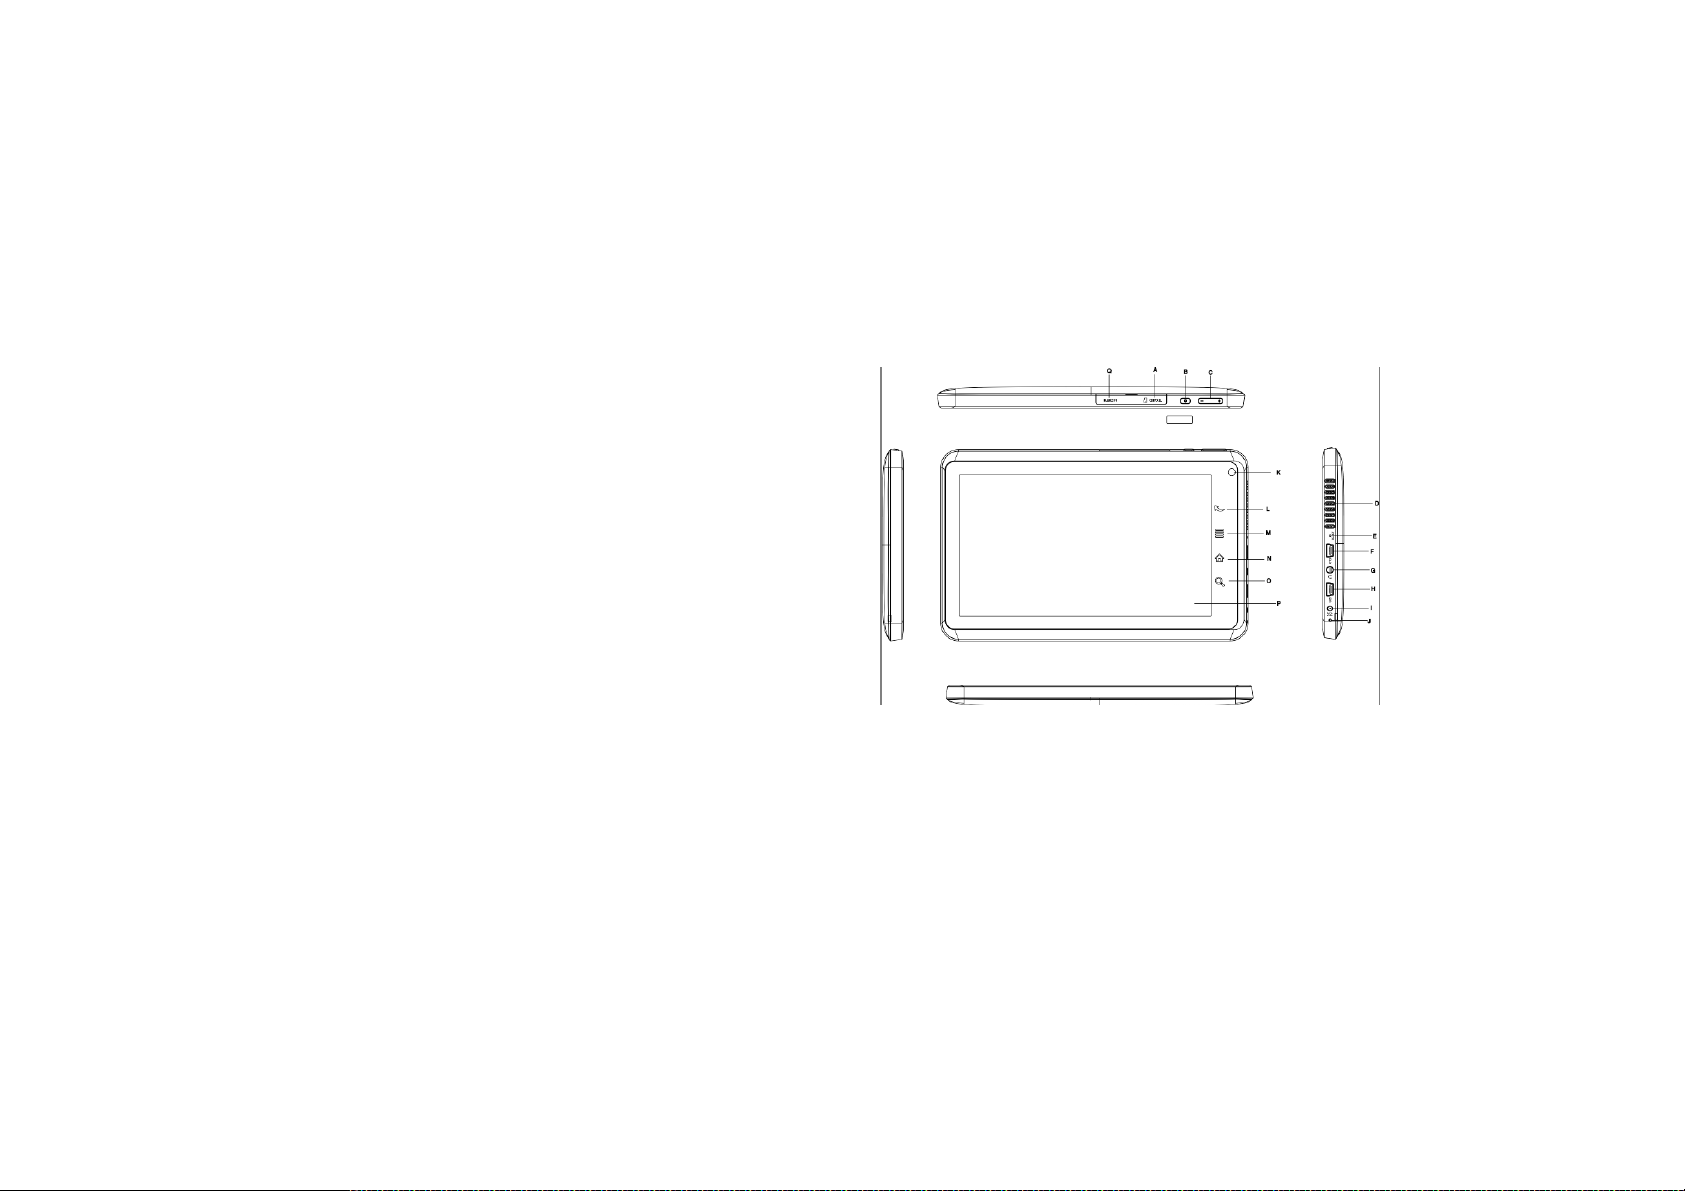
+ EXTERIOR OF MP710
A MicroSD slot,
B Power button
C Volume down/up
D Speaker
E Reset
F OTG port
G Earphone jack
H USB port
I Charger
J Mic
K Camera
L Previous menu M menu N Home O Search P LCD screen Q HDMI
7
Page 8

+ ACCESSORIES
Mp710, USB, CD, Charger, Lens cleaner, Introduction guide paper
Note: The images of the accessories may differ from the actual products. Some accessories are subject
to change without prior notice
8
Page 9

BASIC OPERATIONS
Charging
Turning on/off MP710
Unlocking the screen
Buttons
Using touch screen
Moving files from PC to MP710
Downloading applications
USB On-The-Go (OTG) function
Home Screens
Application Screens
Status Bar
System Settings
Factory Reset
9
Page 10

+ CHARGING
Please connect the power adapter to the left side of MP710. It takes about 3-4 hours to be fully charged.
Please charge MP710 in the following instances
• The battery icon is showing a low power level
• The player turns off automatically or turns off soon after restart
• The buttons and screen do not respond properly
Notes:
• Only use the original power adapter included in the package. Using a power adapter
with wrong specifications will damage MP710 and will void the standard warranty
• MP710 will not be charged with the USB cable by connecting to PC
• The battery is a consumable part and the lifespan of the battery will decrease slowly as
you use MP710 over time
• Charging time will be longer if you use MP710 while you are charging
10
Page 11

+ TURNING ON/OFF
• Turn on: Press and hold the power button until you see the Logo. It will take 1-2 minutes to boot.
• Turn off: Press and hold the power button
Note:
• Turning on MP710 after factory reset : When you turn on MP710 after factory reset, it will show the
Calibration screen. This is to calibrate the touch screen to have accurate touch. Carefully press and hold
on the center of the target (+). Repeat as the target moves around the screen. If calibration is not
working properly, press the Previous or Home button to cancel and go to the Home screen. You can
always calibrate the screen later
• Booting time depends on the size of the memory being used
11
Page 12

+ UNLOCKING THE SCREEN
MP710 goes into a sleep mode after a set time of no operation. When you are in the sleep mode, you
will need to unlock the screen to restart.
• Press the power button shortly
• When you see the standby screen, slide the unlock icon upward to unlock the screen
12
Page 13

+ BUTTONS
There are 4 main buttons located at the bottom of MP710: Previous Menu, Menu, Home and Search.
• Previous Menu: On any screen, if you press this button, it will go back to the previous screen
• Menu: On any screen, if you press this button, it will pop-up a window with all available options for that
screen. If a pop-up window doesn’t show up, there are no available options for that screen
• Home: On any screen, if you press this button, it will go to the Home screen
• Search: On any screen, if you press this button, it will show you a quick search box
13
Page 14

+ USING TOUCH SCREEN
Precautions before use
- MP710 has a resistive touch screen that is operated by detecting a small pressure from your finger or
stylus
Do not press the screen with a sharp object.
-
- The sensors may be damaged when they are pressed too hard or excessive pressure is applied.
• Tapping: You can select or execute a function by tapping a desired menu or item.
• Tapping and holding down: You can check available options by tapping and holding down a desired
menu/item/text or screen.
• Dragging: You can move the item you want to a desired location on the screen by tapping and
holding down the item.
Notes: Try to use the tip of your fingers when you use the screen with a reasonable pressure.
14
Page 15

+ MOVING FILES FROM PC TO MP710
You can move files from/to MP710 and PC easily via the USB Cable.
1. Make sure MP710 is on
2. Connect MP710 to your PC with the USB cable.
3. When successfully connected, the status bar will show you icon on the top left side of the
screen
4. Pull down the Status bar by dragging it downward to open the screen
15
Page 16

5. Tap “USB connected” and tap again “Turn on USB Storage”
6. Now, MP710 will be recognized as a removable disk by your PC
7. Simply copy and paste files you want from PC to MP710
8. After you finish, Press “Turn off USB storage” to disconnect the USB cable from the player
Note:
If HOST MODE selected in setting menu, MP710 does not recognize as a removable disk. You can use
removable disk by deselect HOST MODE.
16
Page 17

+ DOWNLOAD APPLICATIONS
You can download and install various applications
Download from Application Marketplaces
1. Tab the Google Market icon
2. You will need to create an account if you do not have one already
3. Search or browse through categories for applications you want
4. Select and download the application
Download from Internet
1 Android applications have .APK file extension. You can search for any specific APK files in
the internet
2 Download the files (.APK) into your computer.
3 Connect MP710 to your computer.
4 Copy and paste .APK file into MP710
5 Run “ApkInstaller” and find .APK file copied into MP710.
6 Tap the file to install and follow the instructions on the screen.
17
Page 18

Note:
There are more than 100,000+ applications and the number keeps growing. There are free applications
as well as paid applications. Not all Android devices in the market are 100% compatible with all of
applications available. Please make sure to test a
can run on MP710 before you purchase paid applications.
free version of the paid applications to ensure they
18
Page 19

+ USB ON-THE-GO (OTG)
USB On-The-Go, often called USB OTG is a specification that allows USB devices, which would
normally act as slaves (e. g. digital audio players, USB flash drive), to switch roles and become the host
themselves.
This function enables you to connect MP710 directly to USB flash drive or other storage devices and
move files freely without PCs via USB OTG Cable.
• USB Storage Device: connect MP710 to other USB storage devices such as USB flash drive,
Portable hard drive via USB OTG cable (sold separately)
1. USB Mode select in setting menu, select HOST MODE.
2. Connect a USB storage device to MP710 using a USB OTG cable
3. Open explorer and tap the USB folder
4. You can view and manage files in the connected USB device
• USB peripherals: You can connect other devices such as external Wireless keyboard, mouse or
other compatible USB peripherals. Once connected, you are ready to go!!
19
Page 20

+ HOME SCREENS
When you press the home button, the home screen appears. MP710 has five home screens. Swipe the
screen left or right or tap the white dots on the left or right side of the screen to view all the screens.
20
Page 21

- Adding Widget, Shortcuts, and Folders
1. Navigate to the home screen where you want to add the item
2. Tap and hold an empty spot on your Home screen. It will show you a pop-up window with
available options
3. Tap Android Widgets, Shortcuts, or Folders
4. Tap the item to add
Notes: Explore various options to make MP710 personalized for your style
21
Page 22

- Changing Your Wallpapers
1. Tap and hold an empty spot on your Home screen
2. Tap Wallpapers from the pop-up window
3. Tap Pictures or Wallpapers
4. Select the picture you want and tap Set wallpaper
- Moving Icons
1. Tap and hold an icon
2. Drag it to the place where you want to have it
- Removing Icons from the Home Screens
1. From the Home screen, tap and hold the item you want to delete
2. Drag it to the trash icon and release your finger
22
Page 23

+ APPLICATIONS SCREENS
This is the area where all your applications will appear. As you download new
applications, they will appear on the Application screens.
23
Page 24

- Accessing the Application Screen
1. From any Home screen, tap the Application button on the right side of the screen and it
will show the Application screen.
2. Swipe up or down to view all applications in your device.
- Creating a Shortcut to the Home Screen
1. From the application screen, tap and hold an application icon you want to move
2. The shortcut of the application will appear on the Home screen
24
Page 25

+ STATUS BAR
To view your notifications, tap and drag the Status bar down to open the screen. New updates or status
information will appear in the notification bar when available
25
Page 26

Icons on the Status bar
26
Page 27

+ SYSTEM SETTINGS
To access the System settings, please press the Menu button from the Home screen and the Home
screen will show the available menus. Please tab the Settings icon. Or you can go to the Application
screen and press the Settings icon.
27
Page 28

When you tap the Settings icon, the screen will show you all the available options for system settings.
Swipe the screen up or down to see the desired option
28
Page 29

- Wireless and Network
You can change the Wireless network setting.
1. Select Wi-Fi
2. Tap the Wi-Fi setting
3. The device will start searching for available
Wi-Fi networks
4. Select the Wi-Fi network available to you
Note:
• When an open Wi-Fi network is available, appears on the Status bar
• When the Wi-Fi network is connected, appears on the Status bar
29
Page 30

- Language and Keyboard
• Select Language: Choose your preferred language.
• Android keyboard: Tap Android keyboard and change the settings for the onscreen keyboard
Note: Search for other language keyboards from application market places and install. Once installed,
come back to this setting option and choose the keyboard you want.
30
Page 31

- Applications
You can manage all of your applications here.
• Unknown sources: please check this option
to have non-market applications on your device.
Please keep this option always marked.
• Manage applications: All of your installed
applications are listed here
31
Page 32

1. Tap the application you want to manage
2. You can uninstall the application by pressing the Uninstall button
3. You can move the application from the system memory to the user memory by pressing The
Move to device button
Note: One of the many advantages of Android 2.2 is that you can move applications between the
system memory and the user memory and can free up the system memory.
32
Page 33

- Changing Input Method
In any data input field, tap and hold down the
field, and you will see an Edit Text field pop-up
window
Tap the Input method and you will see all
keyboards available if you have installed more
than one keyboard for other languages. Select
the keyboard, then the keyboard will appear
with the desired language you installed.
33
Page 34

+ FACTORY RESET
You can erase all data on device.
1. Select Privacy
2. Tap the Factory data reset
3. The device will restart
Note:
• Turning on MP710 after factory reset : When you turn on MP710 after factory reset, it will show the
Calibration screen. This is to calibrate the touch screen to have accurate touch. Carefully press and hold
on the center of the target (+). Repeat as the target moves around the screen. If calibration is not
working properly, press the Previous or Home button to cancel and go to the Home screen. You can
always calibrate the screen later
• All data stored in the system memory will be erased. So please back up all the data before you
perform Factory reset.
34
Page 35

MAIN FEATURES
Music
Video and Picture
Web Browsing
Explorer
Program manager in Security Guard
Alarm
Email
35
Page 36

There are many preinstalled applications in MP710 for you to enjoy many features from the start.
However, MP710 is a customizable “Smart Media Player” and we encourage you to explore better and
advanced applications and options to make your own MP710.
- Music
Tap the Audio player icon
music files
Note: DRM protected files are not supported by MP710
from the application screen and you can view and manage all of your
- Video
Tap the Video player icon
Note: DRM protected video files are not supported by MP710
from the applications screen. You can view and manage videos.
- Picture
Tap the photo icon
You can view the pictures in a slideshow or edit them
from the applications screen. You can view and manage pictures.
36
Page 37

- Web Browsing
Tap the Browser icon
press the menu button on any web screen to see all available options or settings.
Note: Adobe Flash (.SWF) is not supported by MP710. You can not view flash contents on the web. You
can still enjoy Flash movies (FLV)
on the right side of the screen. Once the web browser is running, you can
- File Explorer
Tap the ES file explorer icon
in your MP710.
from the applications screen. You can view and manage all of your files
37
Page 38

- Program manager in Security Guard
Tap the Security Guard icon from the applications screen or drag down the Status bar and select
this application. This application by default is always running in the system unless you close this. This
application is to close unnecessarily running applications from system memory
Android OS supports multi-tasking features and there are many applications running in the back-end
system even though you do not see them running on the screen. If you have many applications running,
they take up much of system memory and you will experience a serious slowdown in the system.
We recommend you run this application from time to time to ensure unnecessary applications are closed
when you are experiencing a slow
down
- Alarm
Tap the Clock icon from the applications screen. You can set the Alarm
38
Page 39

- Email
Tap the Email icon from the applications screen. If you use the Email feature for the first time, you
will need to set up your email account.
1. Enter your email address by tapping the email
address box
2. Enter the password in the password box and then
tap next
3. When the automatic registration is complete, you
can set the name for your email account and start
using the email service.
39
Page 40

You can add or delete email accounts
• Add: Inbox > Menu button> Account> Menu button> Add an account
• Delete: Inbox > Menu button > Account > Touch and hold the name of the account to delete > Delete
the account
Note: Most public email services are compatible with Android OS, such as hotmail, Gmail, AOL.
However, Yahoo email service is not supported. For Yahoo email users, please download Yahoo
Android App from the market place.
Note: if you fail to connect to the server through automatic registration, go back to the email setup
screen and tap Manual setup
1. When the screen for selecting an account type appears, select POP3 or IMAP
2. Enter the receiving and sending server setting information, and then tap Next
3. Set the name for your account and tap complete
40
 Loading...