

Page 1
Page 2

1. Introduction
Congratulation for the purchasing of the Player. The high integration reduces the device weight and the
dimensions and the use is comfortable. The big display with TFT technology offers clear and sharp
information and the USB 2.0 interface make easier the data transfer operation from/to the computer. The
MP4 Player has built-in a Li-Polymer battery rechargeable by computer USB port. By the microphone inside
it is possible to record voice messages and play them directly with the device or by computer.
Before using this product, please read this manual and retain the instruction for future reference.
- 1 -
Page 3
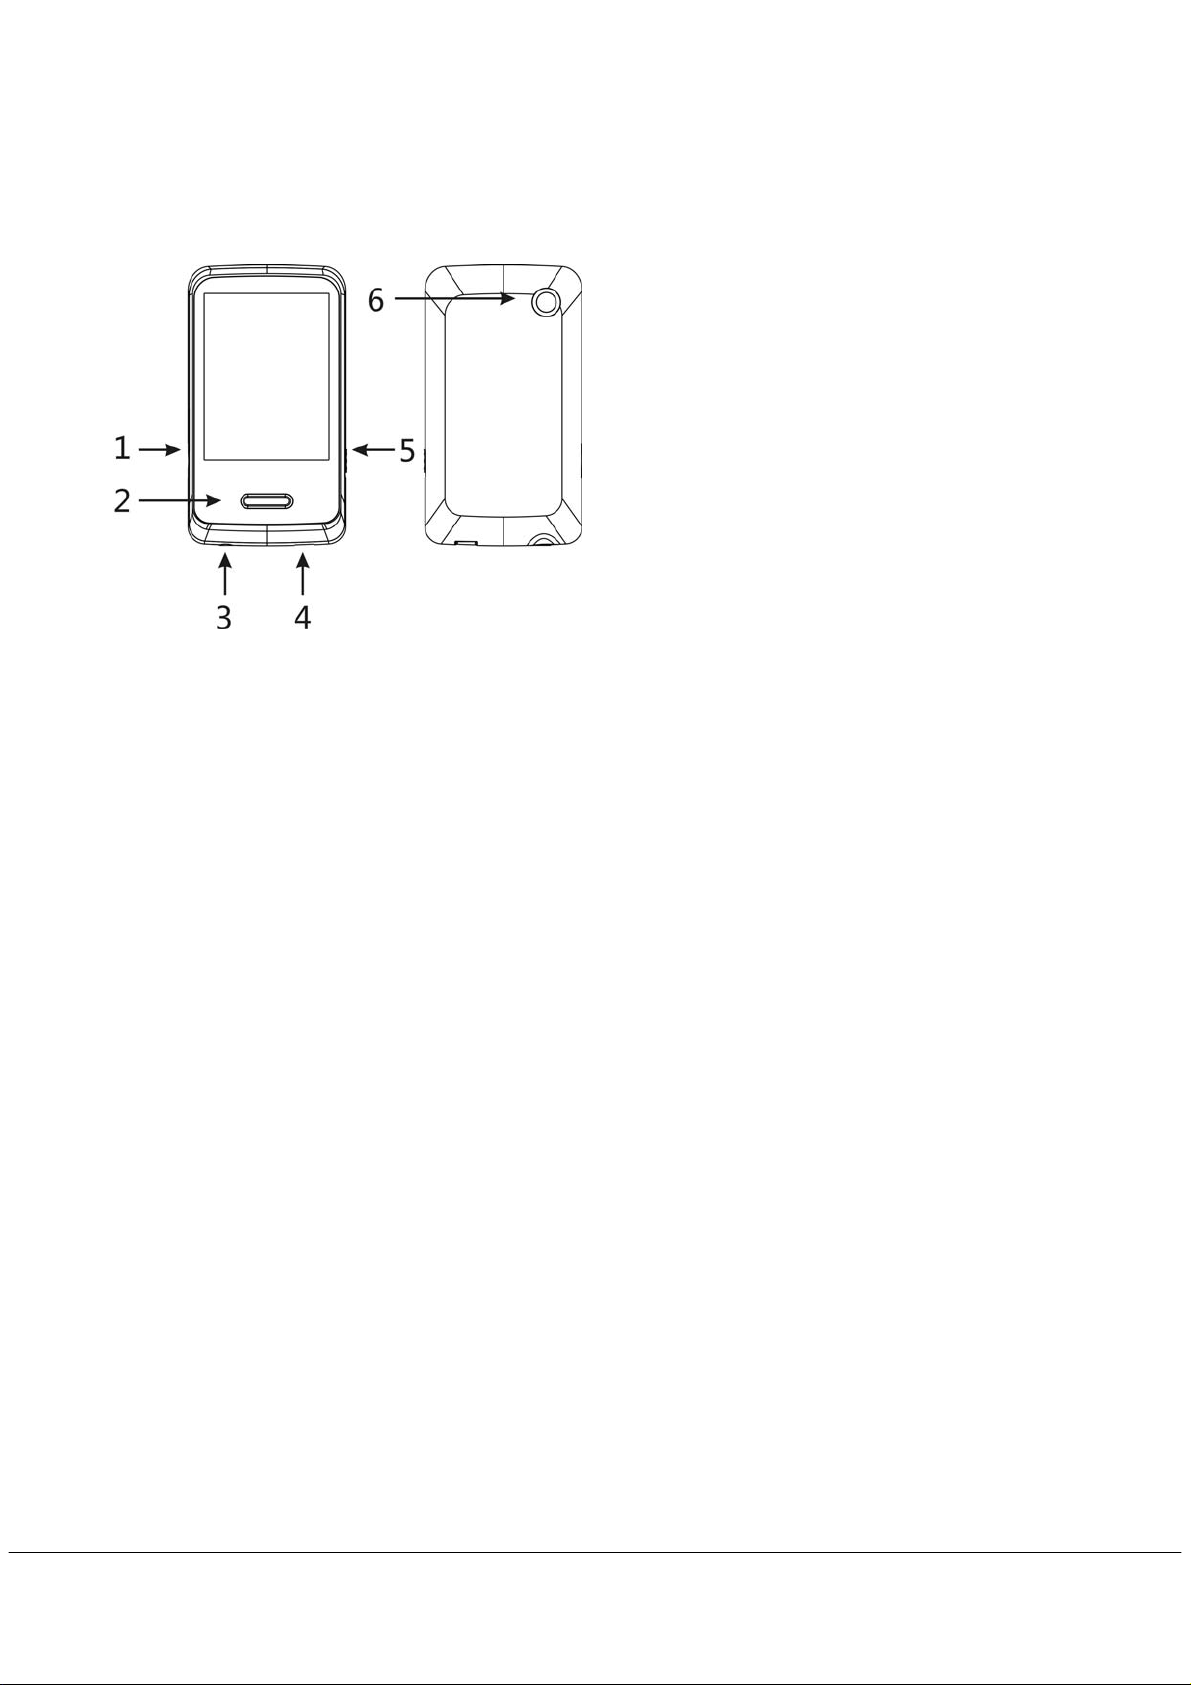
2. Description
Here below you will find a product description
1. MICRO SD Card slot
2. Return
3. Earphone connector
4. USB connector
5. Power ON /OFF
6. Camera
3. Use
a) Power ON/OFF
Powering On:.
1. Turn on On/Off button to On positio n and power on screen
Powering Off:
1. Hold the Return key for 4 seconds to switch to standb y mode.
2. Then, turn the On/Off button to Off position.
3. Under the state of stop, the player may power off automatically if a sleep time is predefined in
System Menu.
b) Recharge the Player
MP4 player is supplied of a rechargeable battery. It is advised to long charge the player at first use!
During charging, You should first turn on your PC and your player, and then connect the player to the PC
throught the USB cable. The player should be fully charged in 3 to 4 hours.
4. Main Menu
After powering on the MP4 player, you can see the main menu with 9 submenus, which allow you to select
different functions and options. You can select the desire option,and then press menu icon to confirm the
selection.
- 2 -
Page 4
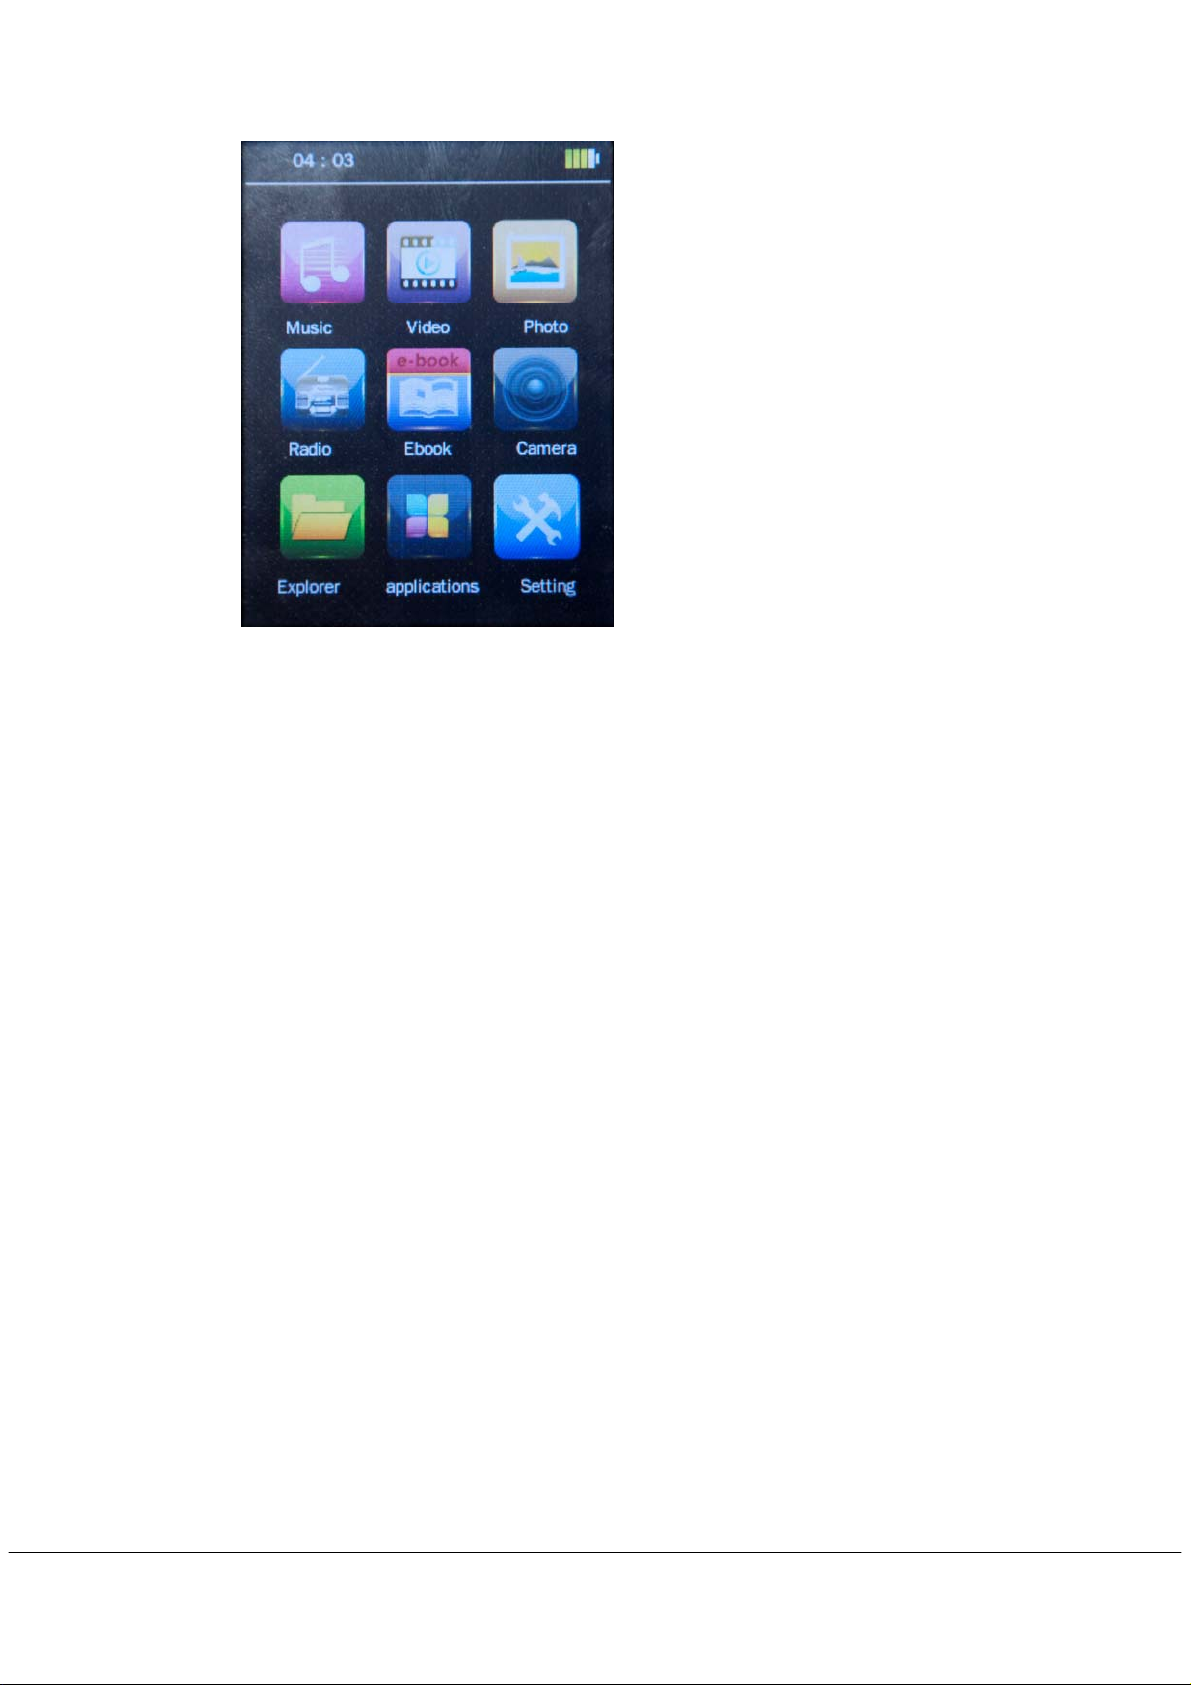
The available options are:
Music:
Video:
Radio:
Photo:
Ebook:
Explorer:
Camera:
Applications:
Setting:
Select this option to play song.
Select this option to play video.
Select this option to use the FM radio.
Select this option to browse and see photos.
Select this option to read text.
Select this option to explore the Folder on the memory
Select this option to take pictures
Select this option to use Recorder /calendar /stopwatch /calaulator
Select this option to access at system setup.
Touch screen key function
Under the main menu, you can touch to select the function, and enter the submenu.
Note:
Don’t touch too heavy, otherwise will cause the touch function is not sensitive or display broken.
When find touch is not sensitive, you can adjust the screen under Setting menu
When the unit is dead due operate is not correctly, push the power key to Off position to po wer off.
- 3 -
Page 5
a) Music Mode
The music player option allows playing songs which are saved on memory . To activate this option please
follow here below instruction:
1. Power ON the MP4 Player , Then press the[Return button, The screen will displa y the main menu
2. Press
Click
to start to play the first song available
.
to show all direct
Click
to add list and add tag
Click to show information of now playing music
Click : to return to main menu.
Click
playing the song,Slide the
Play mode: Under playing status, Click
Repeat One, Repeat All, shuffle and Intro.
EQ Setting: Under playing status, Click
to select the previous file, click to select the next file. Click to play /pause, When
to adjust the Volume, Fast forward or Fast backward: Slide
to adjust the playing point.
to choose play mode, Including Sequence,
to choose EQ mode, Including Normal, Rock, Pop,
Classic, Soft, Jazz and DBB .
- 4 -
Page 6

B) Picture Mode
Under main interface,Click to enter.
Click
Click to choose Main Dir and Card Dir..
Click
Click
Click
Click
to start browsing the all pictures.
to choose automatic browse time, including 1/2/3/4/5 .
to show the previous file.
to show the next file.
to return to main menu.
C) Video Mode
Under main interface,Click to enter file list, Click the file name to play the video.
- 5 -
Page 7

Click to show all Dir。
Click : to add marked
Click to play /pause
Click
Click to return to main menu.
Click to select the previous file, click to select the next file. Click to play /pause,
Fast forward or Fast backward: Slide
to adjust the Volume
to adjust the playing point.
D) Camera Mode
Under main interface,Click to enter.
Click to return to main menu.
Click to return to the previous interface
Click “capture”To take picture.
- 6 -
Page 8

Click
Click
Click
Click to show the taked pictures
Click to enter setting menu. Including special ,save path,shutter ,data stamp.
Click
Click to take pictures
to enter video recorder
to choose the self-timer between 5/15/20 seconds
to return to main menu.
to choose the resolution , Including 320X240/1280X960/1024X768/640X480
E) FM Radio
Under main interface,Click to enter FM radio .
- 7 -
Page 9

Click : to show channel list
Click
channels..
Click
Click
Click to record FM
Click To choose the tuner region including CHN,USA,JAPAN and EUROPE
Click to return to main menu.
Click to select the previous channel, click to select the next channel. Click to play /pause,
Slide the
: The system will start auto search. When search finishes, the system will automatically save the
to save channel
to delete station
to adjust the Volume
F) EBOOK MODE
Under main interface,Click to enter Ebook mode.
Click
10/15/20/25/30S.
Click :To Add tag .
Click : to skip to the file you want
Click to show all Dir
Click
Click :To see next page .
Click : to return to main menu..
to switch manual play and auto play mode. Auto play to press to choose playing time
: To see previous page
- 8 -
Page 10

G) Explorer
Under main interface,Click to enter explorer.
1. by this mode it is possible to manage all the files supported by the player, by playing or deleting them.
2. browse the folders and select the supported files to start playback.
3. through the menu in the bottom side of the screen, it is possible to select and delete the files inside the
memory card.
to delete the file.
Click
Click to return to main menu.
H) Applications
Under main interface,Click to enter Applications.
- 9 -
Page 11

1:by this mode it is possible to use all tools including recorder/calendar/stopwatch/calculator
I) Setting
Under main interface,Click to enter Setting Mode.
Display:
1.Auto lock
Press click” ∧∨”to adjust the LCD auto lock time . If the Backlight Time is 0, then no black screen. If not 0,
the screen will turn black if no operation during the set duration.
Backlight off will be shield for some functions like lyric display, text reading, video playing etc.
2. Backlight Brightness: Slide process bar to adjust LCD backlight brightness 1-5 levels.
Calibrate: Click twice in the center of “+” to proceed touch screen calibration and exit only calibrate ok.
- 10 -
Page 12

Date& Time:
Press set date to date setting i nterface, slide the number to setting until the correct time and data,
press
Language:
Support English, Simplified Chinese (default), Traditional Chinese, Japanese, Korean, French, German,
Italian, Dutch, Portuguese, Spanish, Swe dish, Czech, Danish, Polish, Russian, Turkish,ect
Player Info:
Show the player’s basic information: Firmware Version, Card Capacity and Card Free Space.All Music ,All
Photos,All Videos,All Ebooks ,
default setting:
to return.
Select it and the system will prompt: “ Restore default settings?” Select Ok, then the settings of all applications
will restore to the factory setting.
- 11 -
Page 13

MPMANAGER
For movie and music synchronisation and conversion, please use MPMANAGER software supplied in the
CD ROM.
This software can be used also for UPDATE of your player.
MPMANAGER manual is included in your CDROM.
- 12 -
Page 14

Page 15

For more information please check our website
www.mpmaneurope.com
- 14 -
 Loading...