

Page 1
FOR MODEL NO
MP244
EN
MP3 & Video Player
Instruction Manual
Please read this instruction carefully before the operation
Page 2

Content
1 GETTING READING TO USE............................................................................................................................................................................................................................... 3
1. Precautions....................................................................................................................................................................................................................................................3
2. Safety warnings.............................................................................................................................................................................................................................................3
3. Features overview.........................................................................................................................................................................................................................................3
4 Precautions .....................................................................................................................................................................................................................................................4
2 PLAYER OVERVIEW ..........................................................................................................................................................................................................................................6
2.1 LOCATING BUTTONS ........................................................................................................................................................................................................................................... 6
2.2 MAIN INTERFACE ................................................................................................................................................................................................................................................ 7
2.3 BATTERY INDICATOR........................................................................................................................................................................................................................................... 7
2.4 BUTTONS INTRODUCTION................................................................................................................................................................................................................................... 7
2. 5 OPERATING BUTTONS........................................................................................................................................................................................................................................ 8
2.5 POWER ON / OFF ................................................................................................................................................................................................................................................8
3 MAIN MENU ...................................................................................................................................................................................................................................................... 8
4 PLAY MUSIC ..................................................................................................................................................................................................................................................... 8
5 FUNCTION OF BUTTONS ................................................................................................................................................................................................................................. 10
FUNCTION DESCRIPTION ........................................................................................................................................................................................................................................ 11
6 PHOTO............................................................................................................................................................................................................................................................ 12
FUNCTION OF BUTTONS.......................................................................................................................................................................................................................................... 13
7 VIDEO .............................................................................................................................................................................................................................................................15
FUNCTION OF BUTTONS.......................................................................................................................................................................................................................................... 15
FUNCTION DESCRIPTIONS ...................................................................................................................................................................................................................................... 16
8 RECORD .........................................................................................................................................................................................................................................................17
FUNCTION OF BUTTONS.......................................................................................................................................................................................................................................... 18
9 FM.................................................................................................................................................................................................................................................................. 18
OPERATION METHOD .............................................................................................................................................................................................................................................. 19
10 E-BOOK ......................................................................................................................................................................................................................................................21
FUNCTION OF BUTTONS.......................................................................................................................................................................................................................................... 21
11 TOOLS ............................................................................................................................................................................................................................................................ 22
11.1 STOPWATCH ...................................................................................................................................................................................................................................................23
1
Page 3

11.2 CALCULATOR .................................................................................................................................................................................................................................................. 24
11.3 CALENDAR ...................................................................................................................................................................................................................................................... 25
11.4 PC CAMERA ................................................................................................................................................................................................................................................26
12 NAVIGAT ION .................................................................................................................................................................................................................................................... 27
13 LOCAL FOLDER........................................................................................................................................................................................................................................... 27
14 SETTINGS ................................................................................................................................................................................................................................................... 27
DETAIL INFO ............................................................................................................................................................................................................................................................ 28
15 SPECIAL EFFECTS SETTING........................................................................................................................................................................................................................ 28
16 DATE AND TIME........................................................................................................................................................................................................................................... 28
DISPLAY SETTING.................................................................................................................................................................................................................................................... 29
LANGUAGE.............................................................................................................................................................................................................................................................. 30
SET RESTORING......................................................................................................................................................................................................................................................30
17 CAMERA .....................................................................................................................................................................................................................................................30
18.1 MAIN MENU INTRODUCTION ...........................................................................................................................................................................................................................30
18.2 SUBMENU INTRODUCTIONS............................................................................................................................................................................................................................ 30
18 RECORD VIDEO .......................................................................................................................................................................................................................................... 31
19.1 MAIN MENU INTRODUCTION ...........................................................................................................................................................................................................................31
19.2 SUBMENU INTRODUCTIONS............................................................................................................................................................................................................................ 32
MAKING VIDEO FILES ..............................................................................................................................................................................................................................................32
TOOLS APPLICATION PLATFORM ............................................................................................................................................................................................................................. 33
OPERATION STEPS..................................................................................................................................................................................................................................................33
FIRMWARE UPGRADING .......................................................................................................................................................................................................................................... 35
CONNECTING TO PC ..............................................................................................................................................................................................................................................35
FIRMWARE UPGRADING .......................................................................................................................................................................................................................................... 36
TROUBLE-SHOOTING ..............................................................................................................................................................................................................................................38
SPECIFICATIONS ..................................................................................................................................................................................................................................................... 39
2
Page 4

1 Getting reading to use
1. Precautions
Please read the following instructions carefully for your safety and prevention of property damage;
¾ Do not expose the device to liquid, moisture or humidity place;
¾ Do not leave the device under strong light or nearby any heating appliances for a long time;
¾ Do not dismantle, assemble or alter the device arbitrarily;
¾ Do not use the product in locations where it is forbidden to use electronic devices, such as on the plane;
¾ Do not drop, or give a strong shock or vibration to the unit, or it may cause a malfunction;
¾ Don’t expose the device to chemicals such as benzene or diluents.
2. Safety warnings
¾ If the LCD panel breaks due to a strike, the liquid crystal may spilled out.
¾ The company shall not be liable for the compensation for the third party damages or damages not caused by the product itself.
¾ The company can not accept any liability for data loss caused by repair or improper operation, so please backup important data on your PC or
other storage media devices.
¾ For your personal safety, please note:
a) If you are driving a vehicle or doing something which requires your full attention, please do not use this MP3 player, since it may be distracting
in general because your attention is divided between two separate tasks. And use of player while driving is illegal in some areas.
b) Do not listen to music at very loud volumes, long time listening at high volume may cause permanent hearing impairment. Please adjust the
volume to the appropriate level for listening.
c) Please lower the volume level or stop using the MP3 player if you suffered from tinnitus.
3. Features overview
z 320 X 240 dot matrix full color high speed TFT screen;
z Supporting music formats of WMA, WAV, OGG, APE, FLAC;
z Supporting video formats of WMV, RMVB, FLV, AVI (XVID);
z FM radio, able to save 20 broadcasting stations at each band;
3
Page 5

z Supporting picture browse in JPEG, BMP, GIF format;
z With built-in microphone, and ultra-long time record;
z With energy saving settings, freely adjustable brightness and automatic shutdown;
z Various equalizers and repeat modes for option;
z Multi-language display;
z USB2.0 high speed transmission;
z Support e-Book reading;
z Support mobile hard disk;
z Firmware upgradeable;
z Support functions of calendar, stopwatch and calculator;
z Support PC Camera;
z Navigation function
4 Precautions
1. Keep the player away from dusty, dry and humidity places, or temperature extremes (either too cold or hot);
2. Make sure not drop the item on the ground while using it.
3. The battery life may be different in consideration of actual use condition, manufacturing company or producing time.
4. Please charge the battery in below conditions:
5. When the battery indicator shows no power remaining;
6. The player turns off automatically, and it turns off again after reboot;
7. No response on button press;
8. Never disconnect the player from a PC abruptly during downloading, uploading, so as to avoid program error;
4
Page 6

9. When the player is used as a mobile hard disk, please follow the correct operation method for storing or transferring documents. The company shall
not bare any responsibilities for data loss caused by illegal operations;
10. Your battery will be recharged while the player is connected to a PC, no matter the player is on or off;
11. Do not dismantle, assemble or alter the product arbitrarily, please contact the distributor for any questions.
12. The product specifications and functions are subject to change for improvement without any prior notice.
Disclaimer
○Thank you for your purchase of this digital player!
Please read carefully of this user manual before your real operation.
○To provide better service, the content of this user manual and the specifications are
subject to change for improvement without any prior notice.
If the actual setting or operation method varied from what we descript in the manual,
please visit our company website for reference of our new products information.
5
Page 7
2 Player Overview
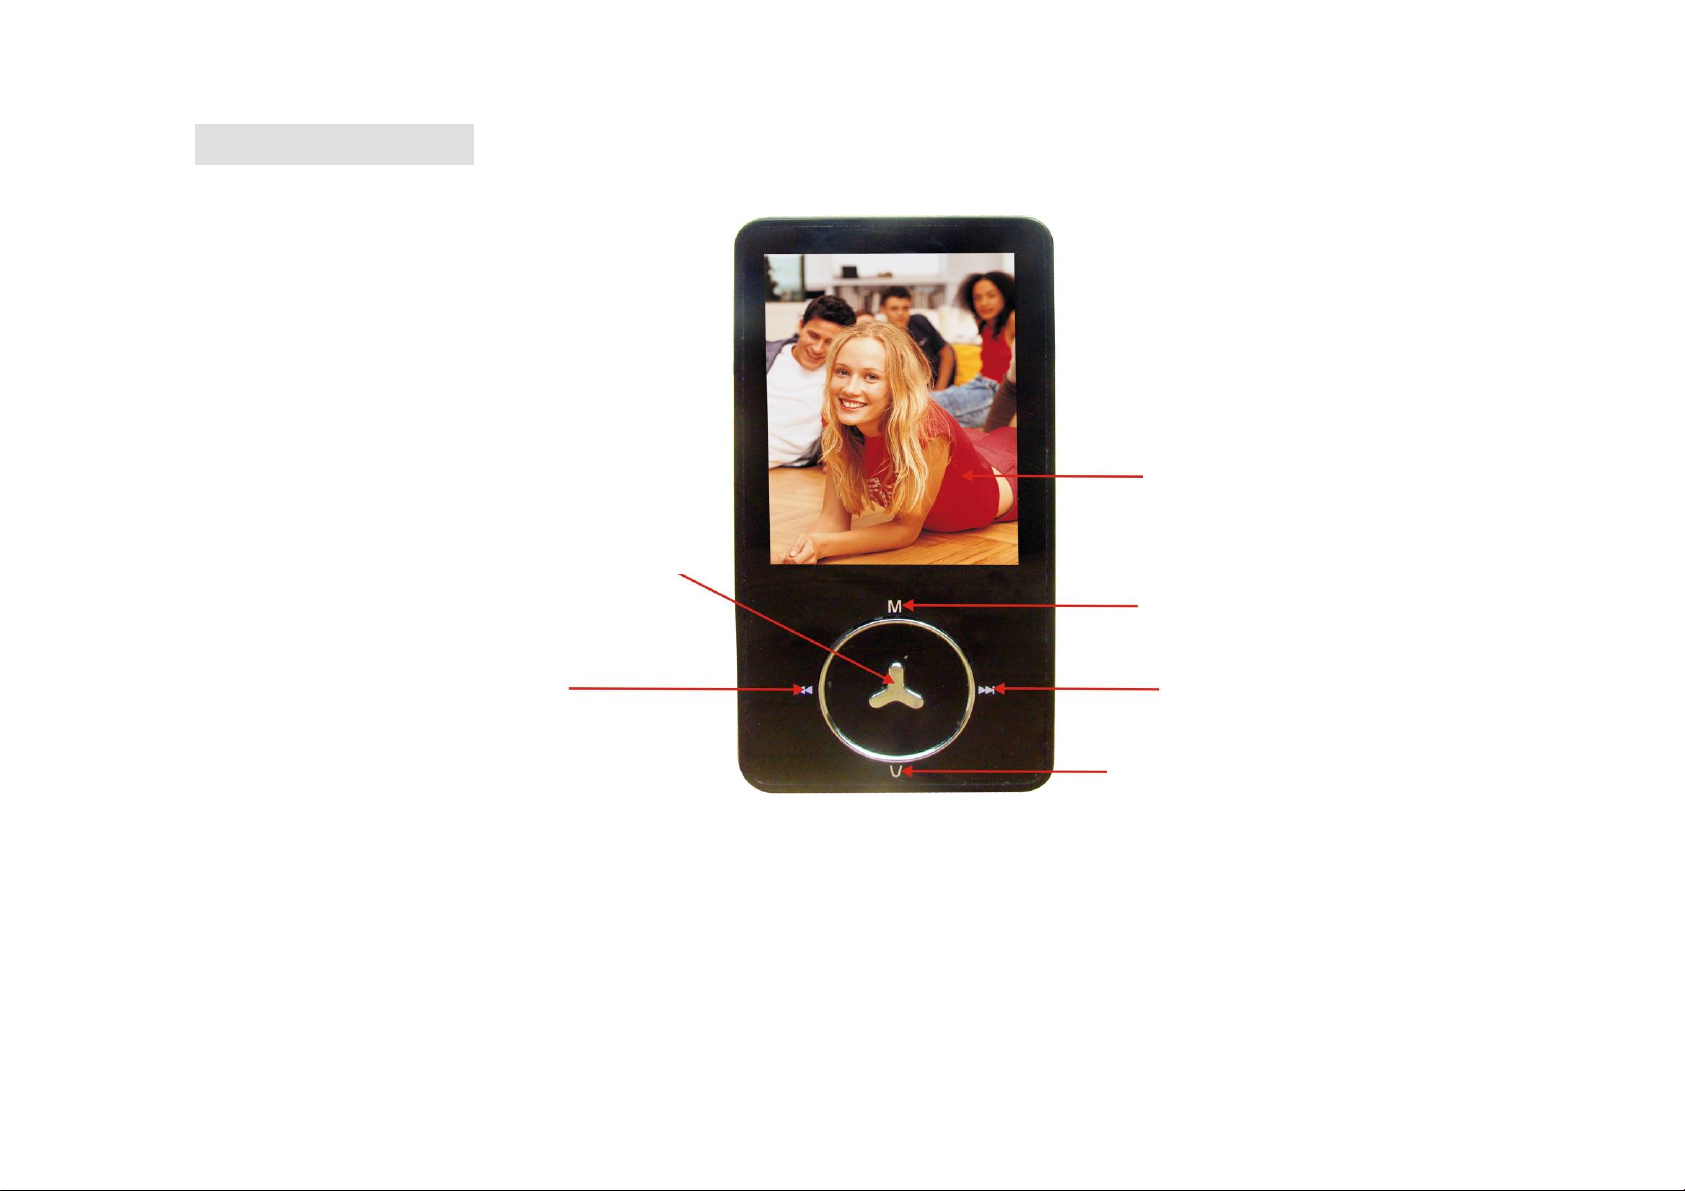
2.1 Locating buttons
Display Screen
Play/Pause
Mode
Previous
Next
Vo l u m e
6
Page 8

2.2 Main interface
2.3 Battery indicator
When the device is fully charged, the battery indicator blocks are full, and then it gradually becomes blank as the using time
increases.
When the battery runs out, the battery capacity indicator blocks become blank, now you need to charge the player in time.
You can charge the player by linking it with PC, or using accessory charger for battery charging.
(Note: switch on the player before charging.)
2.4 Buttons introduction
︱◄◄: Option button; long time press for fast-rewind, previous options;
►►︱: Option button; long time press for fast-forward, next options;
VOL button: press the button momentarily goes back to the previous menu, long time press the button to enter volume adjusting
interface.
Note: if any item is selected, the background color of this item turns grey.
7
Page 9

PLAY button (►‖): press the button momentarily to pause or continue playing; when the player is turned on/off, long time press this
button to turn it off/on; in some working mode, press this button for confirmation.
2. 5 Operating buttons
Action Method of pressing buttons
Short press Press the button for less than 1.2 seconds, and
release.
Long press Press the button for more than 1.2 seconds
Press and hold Press the button and hold until the desired
function is in effect
2.5 Power on / off
z When the player is off, push the power switch to “ON” position to turn the player on.
When the player is on, push the power switch to “OFF” position to turn the player off.
The player will be turned off automatically after reached the set period of inactivity time.
Note: when the player connected to a computer, this function will not work.
3 Main Menu
From the main menu, press “︱◄◄/►►︱” button to choose different function mode, and press “PLAY” button to access the
corresponding function mode.
In music mode, e-Book mode, FM mode or Video mode, press “V” button momentarily will return to the upward menu.
4 Play Music
Choose “Music” option from the main menu, short press “PLAY” button to enter “Music” mode. Now the screen displays the Audio file
list.
8
Page 10
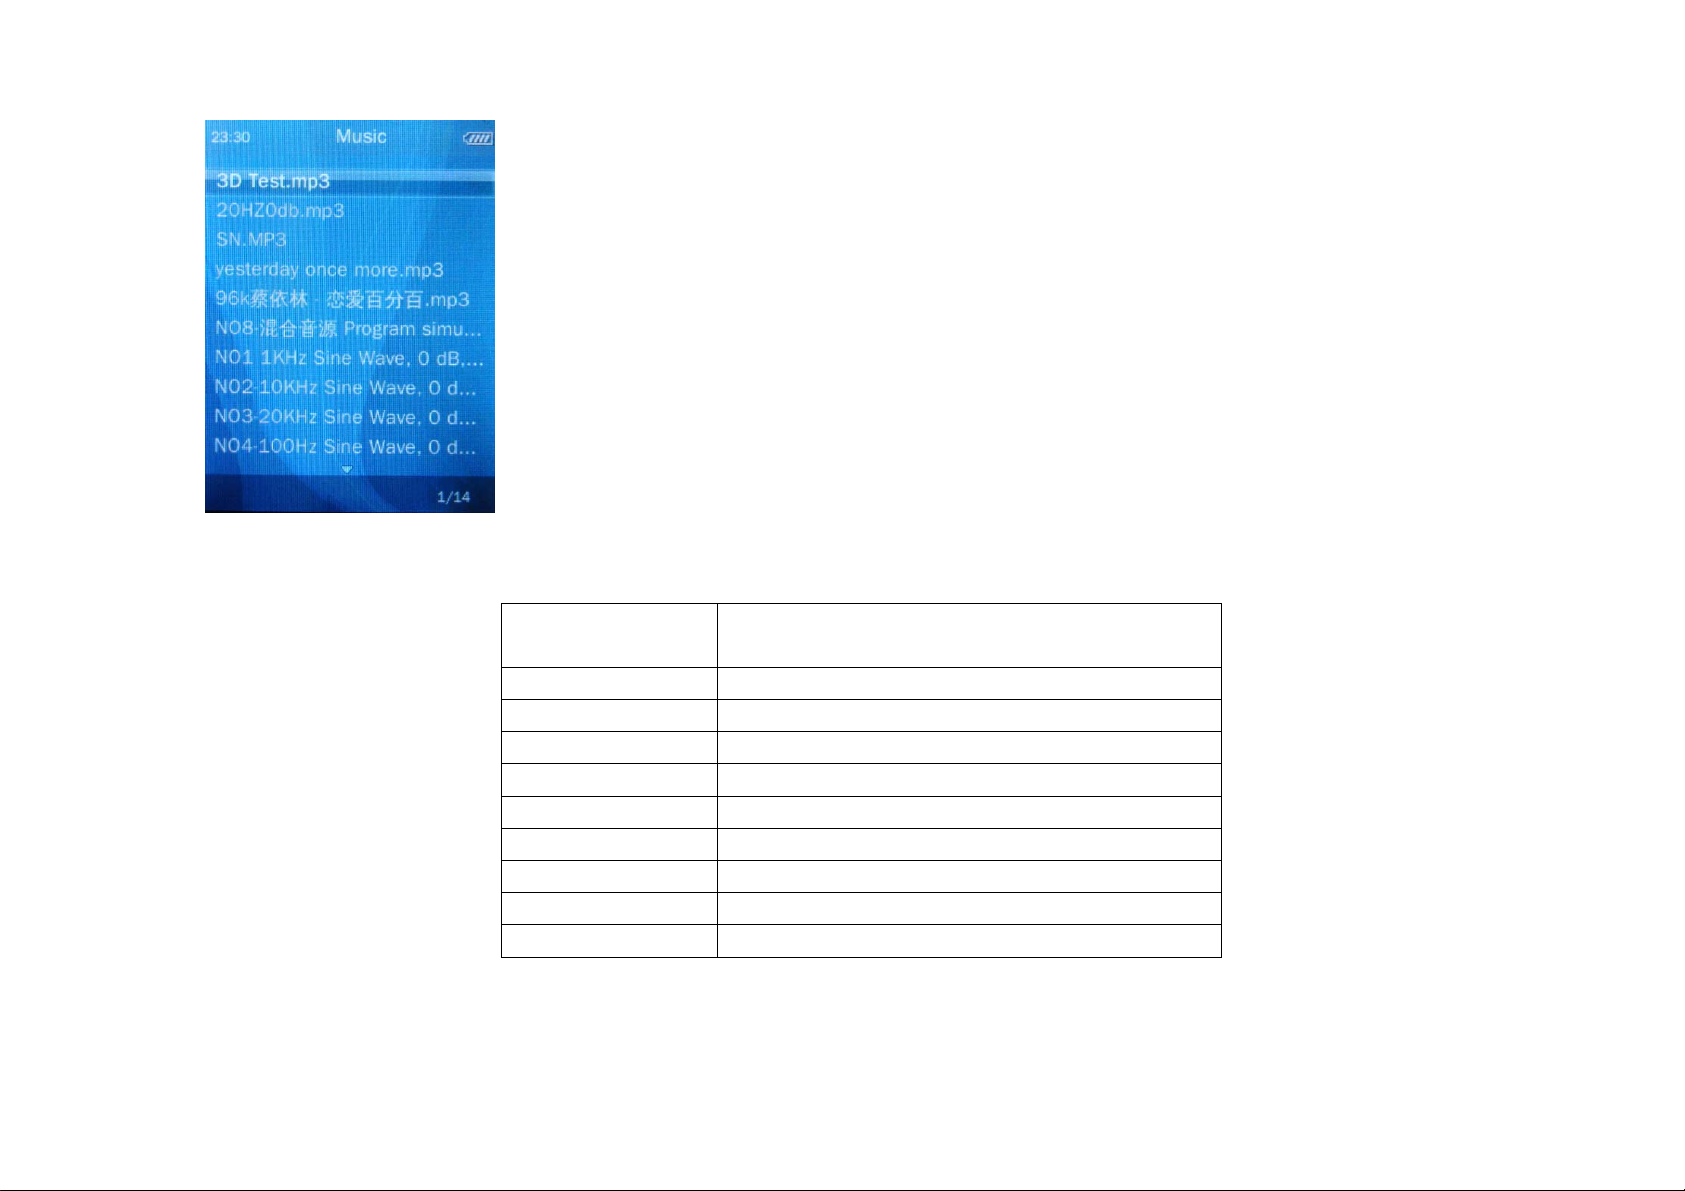
Music playing interface
Now playing The playing song list, it is empty when there
is no music exist;
All tracks All tracks list;
Artist Playlist arranged by artist;
Album Playlist arranged by album;
Genre Playlist arranged by genre;
Play list Customized playlist;
Directory list Choose local folder, or card menu;
Recorded files Recording files list
Level Playlist for starred songs (with five star level)
Tag playlist Playlist for tag songs;
9
Page 11

5 Function of buttons
z When music in play, short press “V” button returns to the upward menu, and step by step returns to the main menu.
z After a song is selected, short press “PLAY” button enters into the playing interface and starts music playing.
z When music in play, short press “M” button to enter the playing submenu, short press the button to switch among: playing interface,
star level setting interface, and lyric display interface.
z When music in play, short press “V” button returns to the upward menu and music continues playing, press the “V” button step by
step, returns to the main menu.
z Short press “︱◄◄/►►︱” button to choose your favorite file or menu; long press the button for fast-rewind / fast-forward during
music playing.
z Short press “PLAY” button to pause the music playing.
z In submenu, long press “︱◄◄/►►︱” button to change the parameter value or conduct other selects.
10
Page 12

Function description
1. Play music
Choose the desired playlist and short press “►‖” button to enter; choose your favorite song, press “PLAY” button to confirm your
selection and play the selected song.
2. Volume control
Long press “VOL” button to enter the volume adjusting interface: , and press ”︱◄◄/►►︱” button to turn
the volume up and down.
3. Playing submenu
In music playing interface, short press “M” button to enter the playing submenu, short press “PLAY” button for confirmation.
A-B repeat
Choose “A-B repeat” from the playing submenu, short press “►‖” button to confirm starting point, the screen displays icon ‘A-’;
press the button again to set the ending point, the screen displays ‘-B’, after A-B segment setting, the screen displays ‘A-B’ icon and
begins repeat A-B segment. Press “►‖” button once again to exit the A-B segment repeat.
Repeat mode Set the play mode: normal/ repeat one/ repeat all/ shuffle/ shuffle + repeat;
EQ setting Set sound effects: Natural/ Rock/ Pop/ Classic/ Soft/ Jazz/ DBB/ Customize EQ/ SRS
WOW/ SRS WOW HD/ SRS user mode.
Sound effect Choose among: EQ, SRS user mode, fade-in & fade-out effect.
Repeat times
Repeat
Set how many times to repeat the song before quite, long press “︱◄◄/►►︱” button
to change the number of times.
Set the interval between each repeats, long press “︱◄◄/►►︱” button to change the
11
Page 13

interval length of interval.
Repeat mode Enter the repeat mode.
Speed control
Lyric display When music in play, if there is a lyric file matched to the playing song, press “M” button
Star level
setting
Add tag
Add to playlist Add to defined playlist.
Delete Delete the current playing song.
Detail info Display the detail info of current music.
Change the play speed of the now playing song, long press “︱◄◄/►►︱” button to
change the value.
can switch to the lyric display interface. You can choose to set this function on or off.
When music in play, short press “M” button enters into the star level setting interface.
There are five star levels, which can be set according to your preference level, short
press “︱◄◄/►►︱” button to select the number, and the color of that number of stars
selected changed.
Add the now playing song to tag list.
4. Multi-duty mode
When music in play, short press “V” button returns to the main menu step by step, and you can access to below modes: Photo,
e-Book, Setting. Now the music continues playing and user realizes the multi-duty operation function.
6 Photo
Choose “Photo” from the main menu, and short press “►‖” button to access the “Photo” mode, now the screen displays the photo file
list.
12
Page 14

Now playing Current playing photo list;
Photo list
Content Choose local folder or card menu;
Browsing
pattern
List mode List all photos from the disk;
Thumbnail view Display all pictures as thumbnails from the disk
Manual playing Manual play, short press “︱◄◄/►►︱” button.
Play method
Slide show Photo slide one by one by pressing “►‖” button
Function of buttons
Short press “︱◄◄/►►︱” button to choose your desired photo file;
When a photo is selected, press “PLAY” button to browse the selected photo;
Short press “M” button to enter the playing submenu;
13
Page 15

In photo view interface, short press “V” button returns to the upward menu, long press “V” button enters into the volume adjusting
interface to adjust the volume up ad down; when in other function mode, short press “V” button to exit and returns to the upward menu.
Short press “︱◄◄/►►︱” button to play the previous / next photo.
Playing submenu:
Rotate Rotate the current image by 90°, 180°or 270° degrees clockwise, press
“►‖” to confirm.
Zoom To zoom in/ out the playing image, press “PLAY” button to confirm, press
“︱◄◄/►►︱” button to move up or down, press “► ”‖ button to exit
Zoom (You can not choose the previous/ next image while zoom in/ out
the present image)
Slide
interval
Set the time interval between each slides, long press “︱◄◄/►►︱”
button to change the value.
Slide effect To choose corresponding slide effects.
Remove To delete the selected file, press “PLAY” button for confirmation.
Detail info Detail info related to the present image, press “►‖” button for
confirmation.
Useful tips: the picture zoom in/ out function can be only activated when the image pixels bigger than the screen display
pixels (320*240). And GIF format picture can not support rotating or zoom out function.
14
Page 16

7 Video
Choose “Video” from the main menu, and short press “►‖” button to enter the video file play list.
Now playing Press “PLAY” button to enter the playlist.
Content Choose the local folder or card menu.
Tag playlist Enters into the tag playlist.
Function of buttons
Short press “PLAY” button for playing or pause playing, press “M” button to enter the playing submenu;
When a video file is selected, short press “PLAY” to start the playing;
Short press “︱◄◄/►►︱” button to choose the video file or menu;
Short press “V” button returns to the upward menu, and step by step goes to the main menu.
15
Page 17

Function descriptions
1. Fast-forward/ fast-rewind
When playing video files, long press “︱◄◄/►►︱” button for fast-forward/ fast-rewind.
2. Submenus
When playing video files, short press “M” button enters into the playing submenu.
Play mode: choose the play mode of video files (normal, repeat one, repeat all, shuffle);
Add tag: short press “PLAY” button confirms to add to tag list.
Delete: delete the current playing video file.
Detail info: display detail info of current playing video file.
3. Volume
Same menu functions under both “Video” and “Music” mode.
16
Page 18

Long press “VOL” button to enter the relative volume adjusting interface: , press “︱◄◄/►►︱” button to
turn the volume up and down.
8 Record
Choose “Record” from the main menu, and short press “►‖” button to access the “Record” mode.
Start recording: short press “►‖” button to start voice recording.
Recording format: short press “M” button into the submenu and choose the record format. The WAV format has different bit rate ranges
from 32/64/192/384kbps, and MP3 format has bit rate of 64/128/256 Kbps.
17
Page 19

Function of buttons
Record:
In Record mode, short press “►‖” button to enter the recording interface, now press “►‖” button to start recording;
Short press “PLAY” button to pause the recording, press “M” button to save the recorded segment;
In Record mode, short press “M” button to enter the recording submenu to set relative parameters.
Record format: can choose WAV or MP3 format, press “PLAY” button for confirmation.
Record Quality: choose among: low, medium and high, press “PLAY” button for confirmation.
MIC boost: choose number range from 1~5, press “PLAY” button for confirmation.
Playing recorded files: to play recorded files under Music mode, the operation method just same as playing music files.
9 FM
Choose “FM” from the main menu, and short press “►‖” button to enter:
18
Page 20

On reception: short press “PLAY” button to enter the FM mode;
Station list: enter the saved station list and short press “︱◄◄/►►︱” button to choose your desired station, press “PLAY” button to
confirm and starts listening to radio;
Band: you can choose either “Euro band” or “Japanese band”.
Operation method
Current radio frequency
1. Choose “FM” from the main menu, short press “►‖” button to enter the FM mode.
Saved station S/N
2. FM internal recording
Minimum frequency
Frequency band
Maximum frequency
19
Page 21

In FM reception mode, short press “M” button to enter the FM submenu, and short press “︱◄◄/►►︱” button to choose “FM
record”, press “PLAY” button to start recording, short press “M” button to save and exit. If press “V” button to exit, the screen will
give a prompt for continue recording, short press “►‖” button to select “Cancel”, press it again to save and then exit the current
interface.
3. Record sound quality
When listening to radio, short press “M” button to enter the FM submenu, and short press “︱◄◄/►►︱” button to
choose ”Record quality”, choose from “High, Medium, and Low”, then press “►‖” button to confirm.
4. MIC boost: short press “M” button to enter the FM submenu, press “︱◄◄/►►︱” button to choose “MIC boost”, then press “► ” ‖
button to set the boost value ranges from 1~7.
5. Save stations
When listening to radio, short press “M” button to enter the FM submenu, short press “︱◄◄/►►︱” button to choose “Save”,
then press “►‖” button to confirm saving.
6. Search broadcasting stations
Manual scan: short press “︱◄◄/►►︱” button to search channels upward/ downwards;
Auto scan: in FM reception interface, press “M” button to enter the FM submenu, press “︱◄◄/►►︱” button to choose “Auto
scan”, then short press “►‖” button starts searching channels backwards automatically, and save the stations searched.
7. Station list: saved station list.
8. Frequency band: you can choose either “Euro-band” or “Japanese band”.
9. Mute: mute the playing sound;
10. Switch to preset stations
In FM reception mode, short press “M” button to enter the saved station list. Short press “︱◄◄/►►︱” button to choose the
20
Page 22

desired station, now press “►‖” button to confirm your selection and starts listening to radio.
11. Delete
When listening to preset stations, short press “M” button to enter the FM submenu, short press “︱◄◄/►►︱” button to choose
“Delete”, and press “►‖” button confirms to delete the current station.
12. Multi-duty operation, same as operations under Music mode.
10 e-Book
Choose “e-Book” from the main menu, and short press “►‖” button to enter the e-Book mode.
File list
Now reading Current reading page, when not start
reading, this item is not available.
Playlist Choose local folder or card menu
Bookmark list Bookmarked files
Function of buttons
Short press “︱◄◄/►►︱” button to choose your desired file;
When a file is selected, short press “PLAY” button to enter the relative text reading interface;
In text reading interface, long press “V” button enters the volume adjusting interface, short press “V” button returns to the upward
e-Book file list. When in other functions mode, short press “V” button returns to the upward menu, and step by step returns to the main
menu.
Functions description
21
Page 23

Short press “PLAY” button to enter the e-Book reading interface, press “►‖” button to choose “Manual play” or “Auto play”.
Short press “︱◄◄/►►︱” button to scroll up and down the text pages.
Short press “M” button to enter the e-Book submenu.
1. Page break: long press “︱◄◄/►►︱” button skips to the place where you want to start reading with, press “PLAY” button to
confirm.
2. Set the time interval of auto page-turn during e-Book browsing, press “M” button to enter the e-Book submenu and select the
relative setting item, long press “︱◄◄/►►︱” button to change the time interval length.
3. Font size: set the font size of e-Book browse interface small, medium or large.
4. Add bookmark: press “► ” button confirms to add bookmark for the current reading page. ‖
5. Delete: press “► ” button to confirm deleting the current file. ‖
11 Tools
Choose “Tools” from the main menu, and short press “►‖” button to enter.
22
Page 24

11.1 Stopwatch
Entering into the stopwatch interface, short press “► ”‖ button to pause the clock, press “►►︱” button to save the first clock pause,
and start another record, until the fifth record, press “►►︱” button to save the fifth clock pause, then the previous five records will
automatically move upwards by one item. Short press “► ”‖ button will pause the clock pause recording.
23
Page 25

11.2 Calculator
Enter the calculator interface, button operations as below:
24
Page 26

1. Short press “︱◄◄/►►︱” button to move left or right.
2. Short press “ ► ” button to confirm your selection, short press “V” button to exit and returns to the upward menu. ‖
11.3 Calendar
Entering into the calendar interface, button operations as below:
25
Page 27

1. Short press “► ” button to display the calendar confirmation interface, press “‖ ︱◄◄/►►︱” button to select the
parameter to adjust: date/month/year, short press “► ” button to confirm, press “‖ ︱◄◄/►►︱” button to revise the value, short
press “V” button returns to the calendar interface.
2. Press “︱◄◄/►►︱” button to revise the date (long press for quick confirmation), press “VOL” button returns to the calendar main
interface.
11.4 PC CAMERA
Before using this function, please connect the player with PC via USB cable, now short press “► ”‖ button to enter this function mode. If you
are not connecting the player with PC, the screen will give a prompt with following message “please plug in the USB cable”, short press “V” button to exit.
26
Page 28

12 Navigation
From the main menu, choose “Navigation” and press “► ”‖ button to enter; now you can choose to enter the local folder.
13 Local folder
Choose the local folder, short press “►‖” button to enter; the screen now displays all folders under the local folder.
Choose the folder that needs navigation, short press “►‖” button to enter; the screen will display all files under this folder. Choose the
file you need navigation, short press “►‖” button to confirm the selected file.
14 Settings
Press “► ” butto‖ n entering into the “Settings” mode, short press “︱◄◄/►►︱” button to choose different option, and press “► ” ‖
button to enter:
27
Page 29

Detail info
Displays the player’s detail information.
15 Special effects setting
Here you can set the display manner of the main interface:
Short press “►‖” button to enter, press “︱◄◄/►►︱” button to choose the display manner: Normal, Zoom, and Push; then press
“►‖” button to confirm your selection.
16 Date and time
Adjust date: short press “M” button to choose the item need to be adjusted, long press “︱◄◄/►►︱” button to change the
value, press “►‖” button to confirm. Short press “V” button returns to the upward menu, and step by step returns to the main menu.
28
Page 30

Time format: short: press “M” button to choose 24 hour clock type.
To display in the title: choose on, then you see the real-time displayed in the title of the screen. Short press “︱◄◄/►►︱” button to
select and press “►‖” button to confirm.
Display setting
Under this mode, you can set the backlight delay time (from 5 seconds to 5 minutes, choose “Off” to keep the backlight normal on).
Short press “︱◄◄/►►︱” button to choose, long press the button to change the length of delay period.
Power saving mode
1. Power saving mode:
When in stop condition, you can set the delay time before the player automatically turned off when there is no operation of the
player for a certain period of time (ranges from 10 seconds to 10 minutes), press ”︱◄◄/►►︱” button to adjust the value, press
“► ”‖ button to save the setting and exit.
2. Sleep mode: set the delay time of inactivity before the player automatically turned off (ranges from 10 minutes to 5 hours). The
operation method will be same as power saving mode setting.
Flash format: able to format the player’s built-in flash. Please remember to backup your data before formatting; the operation method
will be same as memory card formatting.
( Note: after flash format, slide the power switch to turn the player on again.)
29
Page 31

Language
Under this menu, multi-languages are available for your selection.
SelfCheck systems: short press “►‖” button to confirm, the player starts self-check systems.
Set restoring
Able to restore all application settings to default set.
17 Camera
18.1 Main menu introduction
Choose “Camera” from the main menu, short press “►‖” button to enter the Camera mode, or press “SHOT” button directly enters into the
capture preview mode.
Under capture mode, the player doesn’t support multi-duty function.
Short press “︱◄◄/►►︱” button to adjust focus, the player supports 1.0~2.0 totally 11 levels digital zoom.
Short press “► ” button to take photo, or press “SHOT” button directly to take photo, press “V” button returns to the upward menu. ‖
The captured picture will be saved under the PICTURE folder.
18.2 Submenu introductions
1. Preview: capture preview;
2. Parameters preview: preview current parameter settings;
3. Switch to video recording: short press “︱◄◄/►►︱” button to select, short press “► ” button directly enter‖ s into the video
recording interface;
4. White balance
Available selections are: Auto, Outdoor, Indoor, the default set is Auto;
30
Page 32

5. Brightness
Able to set the brightness within the scope: -3 to +3, the default value is 0;
6. Exposure mode
Available selections are: Auto, Indoor, Outdoor, the default set is Auto;
7. Special effect
Available selections are: No, Black and white, Old, Negative, the default set is No.
8. Save path
Available selections are: local folder, external card;
9. Pixels
Available selections are: 2048x1536, 1600x1200, 1280x960, 640x480, 320x240.
The default set is: 640x480;
10. Self-timer shooting
Set the delay time before the shutter is released: Off, 5 seconds, 10 seconds, 15 seconds, and 20 seconds. The default set is “Off”.
11. Shutter sound
Available selections are: Off, EQ1, EQ2, EQ3. The default set is EQ1.
12. Date and time
Available selections are: Off, Date, Date and time. The default set is Off.
18 Record video
19.1 Main menu introduction
Choose “Record video” from the main menu, and enter into the relative interface.
Under “Record video” mode, the player doesn’t support multi-duty function.
Press “SHOT” button or “► ” button to record video, press the button again to stop the video recording. Short press “M” button or “V” ‖
button to save the recorded video file, the screen gives a prompt with message: “The file is saved”.
The recorded video will be saved under the VIDEO folder.
31
Page 33

19.2 Submenu introductions
1. Preview: video recording preview;
2. Parameters preview: preview current parameter settings;
3. Switch to Capture mode: short press “︱◄◄/►►︱” button to select, short press “► ” button directly enters into the photo taking ‖
interface;
4. White balance
Available selections are: Auto, Outdoor, Indoor, the default set is Auto;
5. Brightness
Able to set the brightness within the scope: -3 to +3, the default value is 0;
6. Exposure mode
Available selections are: Auto, Indoor, Outdoor, the default set is Auto;
7. Special effect
Available selections are: No, Black and white, Old, Negative, the default set is No.
8. Save path
Available selections are: local folder, external card;
9. Pixels
Available selections are: 320x240, 224x176, 176x144. The default set is: 320x240;
10. Remaining capacity
Displays the remaining storage capacity of the player;
11. Video record quality
Available selections: High, Medium, Low, Adaptive. The default set is High.
Making video files
The tool supports converting audio/video files into advanced AVI format file, which can be played by our MP4 Player. Video files that
able to be played by Windows Media Player, normally can be converted into AVI files by this tool.
32
Page 34

Tools application platform
Please use version 9.0 or above for operating system: Windows2000, Windows XP, Vista, or DirectX. You’d better not to use this tool
under operating system of Windows98, and Windows Me.
Operation steps
1. Run the installation tools from the accessory CD, and finish installation as guided by Navigation.
2. After installation, open the installation folder, and find the tool file: double click it to open, then choose the tool
file: and double click it to run;
3. Display interface:
33
Page 35

Choose source video file, click the button ① , which is on the right of “Source File”, and choose the right file you are to convert;
34
Page 36

To save the converted file, click the button on the right of the “Target file path”, and choose the saving path. ②
③ After selected, click “ ” button to start format conversion.
When the conversion progress reaches 100%, it gives a prompt that the conversion is finished, indicating the successful video
conversion. Transfer the converted file to the portable media player through USB cable, now you can start viewing.
Note: for detail operations methods, please refer to file.
Firmware upgrading
Connecting to PC
Choose U disk: connect the player to PC as an USB disk, the PC provides power supply and support data transfer.
Choose MTP device: PC will reorganize the player as a MTP device, provide power supply and support playback.
35
Page 37

Choose USB charging: charging the battery through USB port.
Firmware upgrading
Choose the U disk and connect the player to PC, now you can start firmware upgrading.
The player is able to upgrade or maintain the system firmware by using the media player upgrade tool.
Operation steps:
1. Turn on the player, and connect the player to PC through USB port;
2. When making video files, find “ ” from the “Installation” folder;
3. Find the tool , and double click it to run.
4. Click “New firmware version”, and choose the firmware file.
36
Page 38

5. Select the file and click to open it.
6. Firmware upgrading: after finish above operation, click “Start to upgrade” to run, now, do not unplug the player from PC. After successful upgrading, the
screen displays as below:
Click "Yes",
Click "Download",
37
Page 39

Program completed.
Firmware upgrading is finished successfully; exit the player safely from PC.
Trouble-shooting
1. The player can not be started
38
Page 40

· Check if the battery runs out;
· Connect with charger to see if the electricity of battery is enough.
· If the player is unable to be switched on after battery charging, then please contact with our customer service center.
2. No sound from the earphone
· Please make sure the volume is not at 0 and earphone connection is secure.
3. Big noise
· Please make sure the earphone plug is clean, sometimes contaminations on the earphone plug may cause noise.
· Check if the music file is corrupted or not, play other music files for testing, since corrupted music files will cause noise or sound
skip.
4. FM Reception is not good
. Move the earphone or the player to different place as the earphone can be used as an antenna
. Turn off the electronic devices nearby
5. Unrecognizable codes on the display screen
· Make sure you choose the right language, or you can check language setting by: <Settings>--<System >--<Language setting>.
6. Can not download file
· Make sure of correct connection between the player and PC.
· Check whether there is still vacant memory of the MP3 player.
· Check whether USB cable is damaged.
Specifications
Display screen Dot matrix(320*240)256K color
USB specifications HS USB2.0 (HIGH SPEED)
Memory Flash memory: 512M-8GB
Power
MP3, WMA Headphone maximum output (L)5mW+(R)5mW(32Ohm)
Lithium battery
Up to 12 hours playback time
Sampling rate 8KHz/16KHz
Record format
39
WAV(32/64/192/384Kbps) Record
MP3(64/128/256 Kbps)
Page 41

MP3 bit rate 8K bps – 320K bps
WMA bit rate 32K bps – 384K bps
Frequency response 20Hz~20KHz
SNR 85dB
Distortion 0.06%
Reception frequency range 76MHz–90MHz/87.5MHz–
108MHz
FM radio
Saved stations 20+20
Headphone maximum output (L)5mW+(R)5mW(32Ohm)
SNR 45dB
Music format MP3, WMA, WAV, OGG, APE, FLAC
Video format WMV, RMVB, FLV, AVI (XVID) video format (below 320*240)
Operating temperature -5 ~ 40℃℃
Support language English, simplified Chinese, traditional Chinese, Japanese, Korea,
French, German, Italian, Dutch, Portuguese, Spanish, Swedish,
Czech, Denish, Polish, Russia, Turkish, Hebrew;
Compatible operating system Windows98/ME/2K/XP/Vista/Linux6.2/Mac os 10
40
Page 42

 MPMANAGER
For movie and music synchronisation and conversion, please use MPMANAGER software supplied in the PLAYER.
This software can be used also for UPDATE of your player.
MPMANAGER manual is included in your PLAYER.
English
Page 43

For more information please check our website
www.mpmaneurope.com
 Loading...