

Page 1
MINI100
CD/MP3 Mini Hi-Fi System
INSTRUCTION MANUAL
Before using please read this manual carefully
Page 2
WARNING
TO PREVENT FIREORSHOCK HAZARD, DO NOT EXPOSE THIS APPLIANCE TO RAIN OR MOISTURE.
TO AVOID ELECTRICAL SHOCK, DO NOT OPEN THE CABINET, REFERSERVICING TO QUALIFIED
PERSONNEL ONLY.
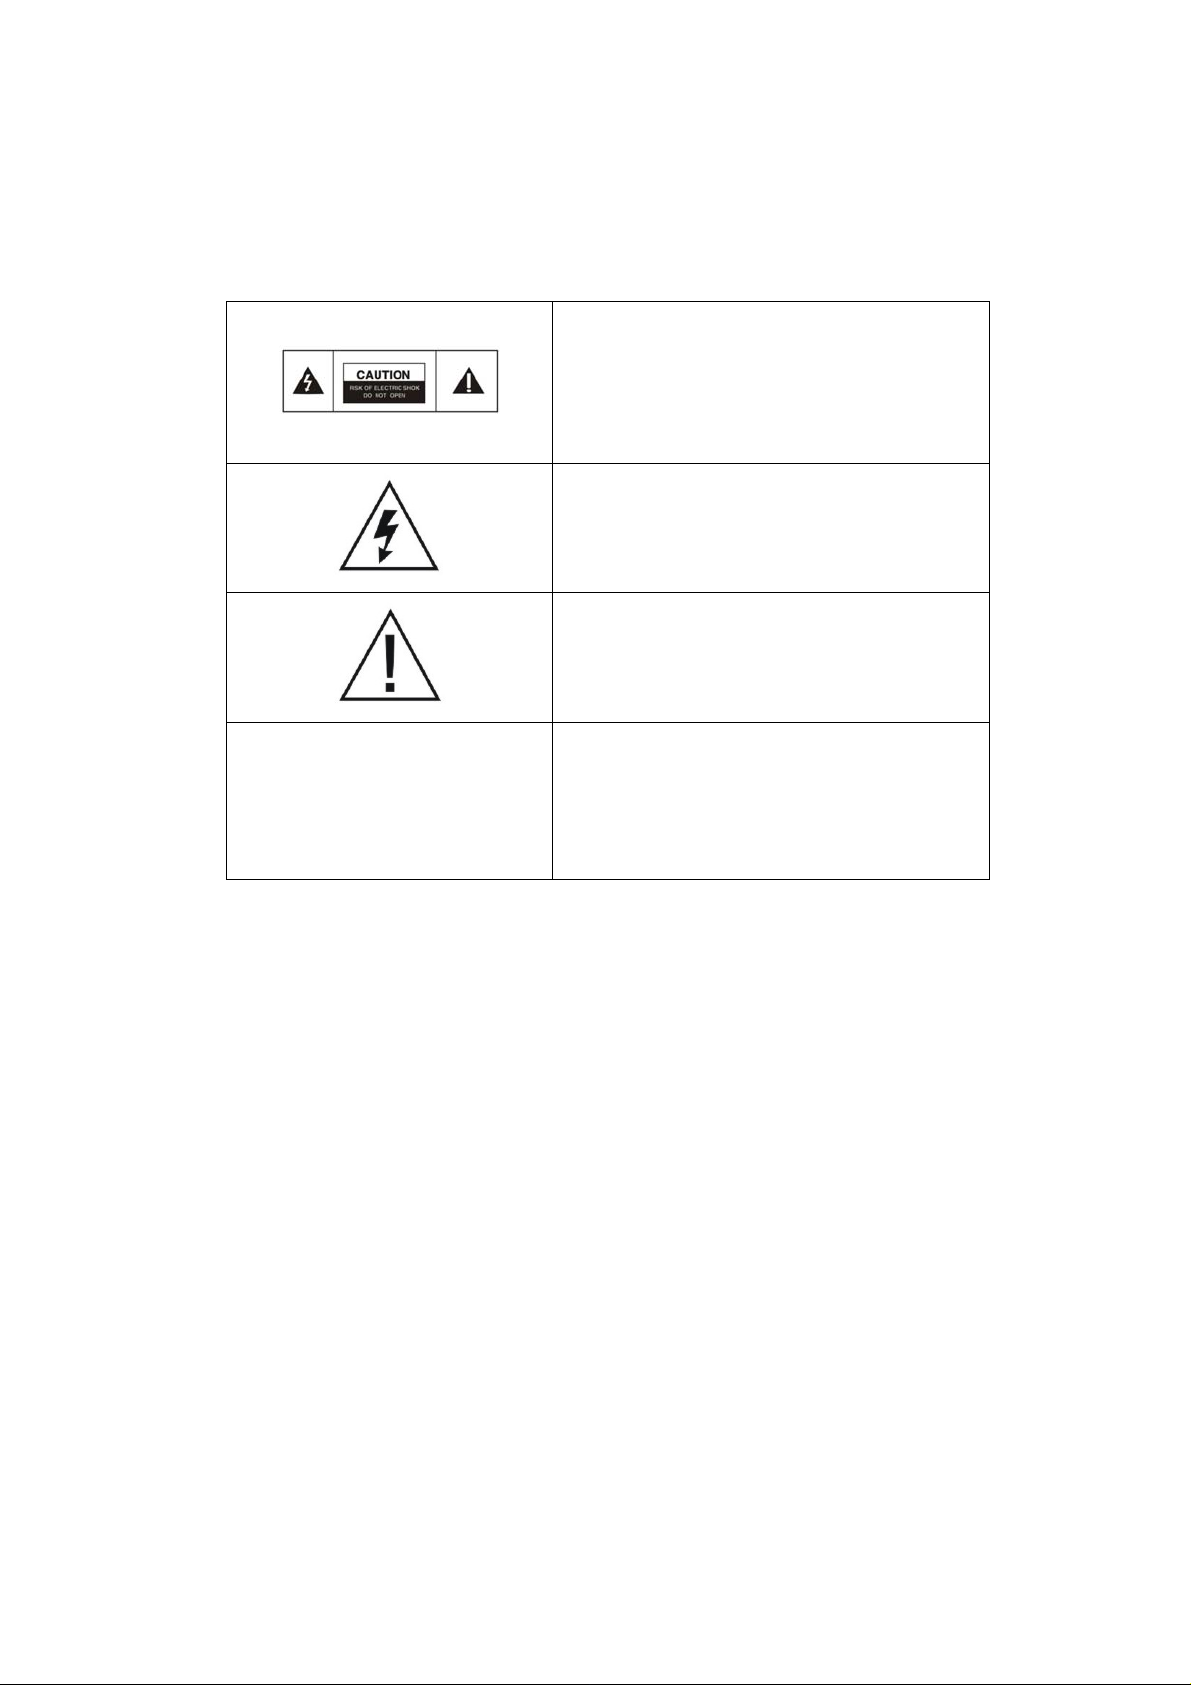
CAUTION: TO REDUCE THE RISK OF ELECTRIC
SHOCK, DO NOT REMOVE COVER (OR BACK). NO
USER-SERVICEABLE PARTS INSIDE, REFER
SERVICING TO QUALIFIED SERVICE PERSONNEL.
The lightning flash with arrowhead symbol, within an
equilateral triangle, is intended to alert the user to the
presence of uninsulated dangerous voltage within the
products enclosure that may be of sufficient magnitude
The exclamation point within an equilateral triangle is
intended to alert the user to the presence of important
operating and maintenance (servicing) instructions in the
literature accompanying the appliance.
CLASS 1 LASER PRODUCT
LUOKAN 1 LASERLAITE
KLASS 1 LASERAPPARAT
This Compact Disc player is classified as a CLASS 1
LASER product.
The CLASS 1 LASER PRODUCT label is located on the
rear exterior.
FOR SAFE AND EFFICIENT OPERATION
Do not damage the power cord.
When not in use, disconnect the power cord from the outlet. Grasp the plug, not the cord when disconnecting
the unit.
If water should enter the unit, electrical shock or a malfunction may result.
Use in an area where there is low humidity and little dust.
Do not disassemble or alter the unit any way.
Do not use the unit in area where extremes in temperature occurs or where it may be exposed to direct
sunlight.
IMPORTANT:
SET THE VOLTAGE SELECTOR TO CORRECT VOLTAGE BEFORE USE.
1
Page 3
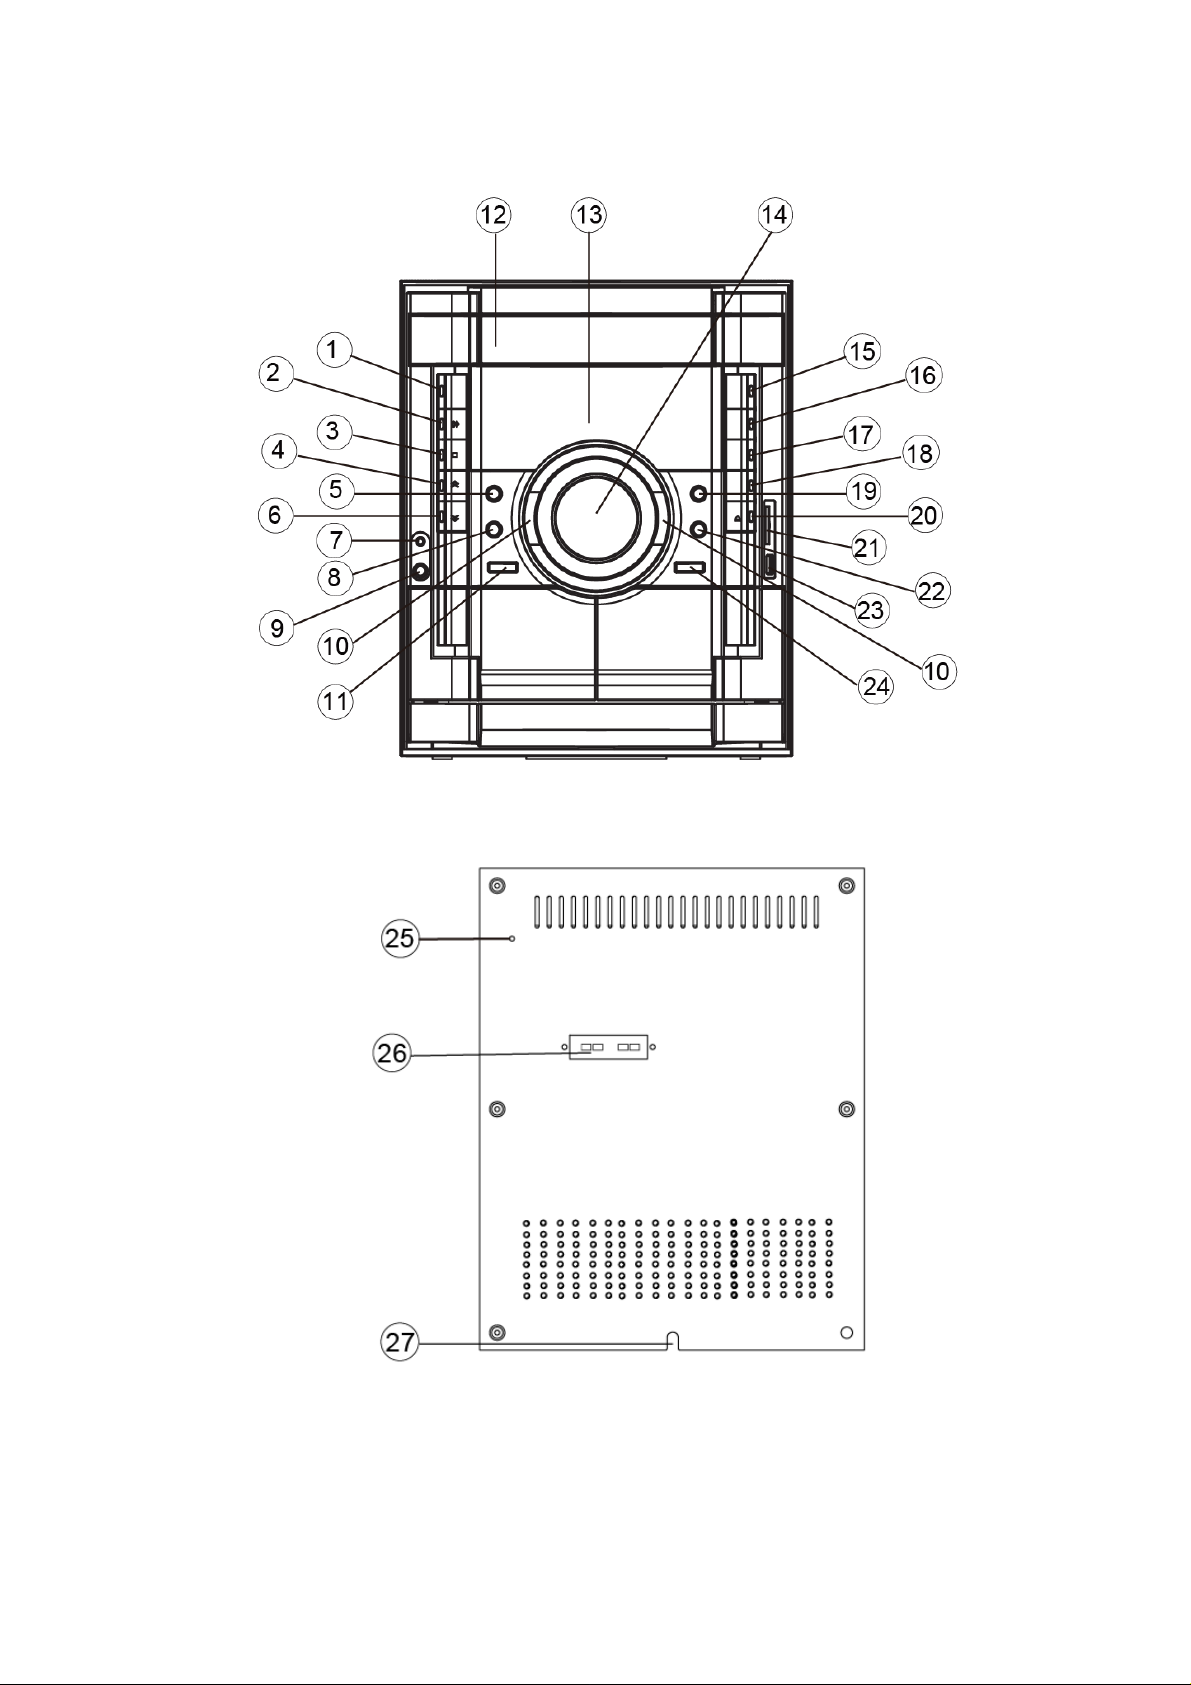
MAIN UNIT
FEATURES
2
Page 4

FEATURES
(1) POWER SWITCH (15) PROG/MEM
(2) PLAY/PAUSE (16) SLEEP
(3) STOP (17) FUNCTION
(4) M.UP/NEXT (18) USB/SD
(5) RANDOM (19) CLOCK
(6) M.DN/PREV (20) OPEN/CLOSE
(7) AUX/MP3-IN (21) SD CARD
(8) REP. (22) EQ
(9) MIC JACK (23) USB SOLT
(10) TU.UP/TU.DN (24) FM ST/MONO
(11) MUTE
(12) DISC TRAY (26) SPEAKER TERMINAL
(13) LCD DISPLAY (27) AC CORD INPUT
(14) VOLUME +/-
(25) FM ANTENNA
3
Page 5

POWER SWITCH
Press to turn on the unit, press again to power off the unit, The LCD display and power indicator will light on
that indicate the unit is power on.
CLOCK SETTING
Use button on the remote
1. Press and hold “CLOCK” button, 12 or 24 hour will show on display.
Use “
2. Press and hold “CLOCK” button, the hour of the clock is blinking.
3. Press “
4. Press “ CLOCK” again to set minute, the minute of the clock is blinking
5. Press“
6. Wait for a few second, the clock is ready.
TIMER ON/OFF FUNCTION
TIME ON SETTING
1. Press “TIMER” button , “TR-ON” will shown on screen and hour of the clock is blinking
2. Press “
3. Press “TIMER’ again to set minute, the minute of the clock is blinking
4. Press “
TIME OFF SETTING
5. Press “ TIMER” button again until “ TR-OFF” shown on screen and hour of the clock is blinking
6. Press “
7. Press “TIMER” again to set minute, the minute of the clock is blinking
8. Press “
9. Press “TIMER” again “
desired
SNOOZE
Press “SNOOZE” on remote control when timer on awake, the unit will turn off 9 minutes and turn on
afterwards
“CLOCK”,”TIMER ON/OFF” and “SNOOZE” button only locate on remote control.
SLEEP FUNCTION
1. You can use “SLEEP” button to playing unit from 90 minute to 10 minute.
2. Press “SLEEP” button, and remain minutes shown on screen.
3. Press “SLEEP” to set desired minute to turn off the unit (count from 90 minutes and step down 10
minutes each press)
4. “SLEEP” shows on screen to start count down the function
5. Press “SLEEP” button again to cancel
VOLUME CONTROL
Adjust the sound level ,Press “+” to increase the sound level , Press “-“ to decrease the sound level on
remote control or rotate the “VOLUME” knob on main unit
PRESET EQUALIZER
ROCK: Bass sound are emphasized with some stress on the treble range
JAZZ: Bass and middle range (voice) sounds are emphasized
CLASSIC: Voice(middle range)are emphasized with some emphasis on bass sounds
FLAT: The bass, middle, and treble levels have equal emphasis
4
” button to select either one. Press “CLOCK” again to comfirm.
” to set desired hour
” to set desired minute
” to set desired hour for timer on
” to set desired minute for timer on
” to set desired hour for timer off.
” to set desired minute for timer off
” shown on screen and the unit is ready switch on and off automatically as your
Page 6

AUX-IN JACK
Connect a external device (e.g.mp3 player) with a 3.5mm jack to main unit. Press” FUNCTION” to aux-in,
and play the device. Sound comes out from the speakers of the unit
MUTE FUNCTION-(ON REMOTE CONTROL)
Press this key to mute the sound, press again or volume knob to restore the sound level previously set.
TO LISTEN TO A RADIO STATION
1. Set FUNCTION selector to “TUNER’ position.
2. Adjust VOLUME CONTROL and PRESET EQUALIZER to suit your personal listening preference.
PRESETTING RADIO STATIONS
You can preset up to 30 FM stations
1. Press ”FUNCTION” to ”TUNER”
2. PRESS “ band” ON REMOTR CONTROLTO SELECT am OR fm
3. Press “T-UP” or “T-DN” to desire station
4. Press “PROG” to save the station. This station is saved
5. Repeat step 2 and 4 unit all desire radio stations are saved
Listening to a non-preset station
1. Press FUNCTION to “TUNER” , mode
2. Press T-UP or T-DN to select desired radio frequency
ADJUSTING AN ANTENNA
FM: Unravel the antenna wire and extend it to its full length for best reception
5
Page 7

USING CD PLAYER KEYS
The following CD/MP3 control keys are used to control the CD/MP3 player
PLAY/PAUSE
: Press this key to start playing CD, Pressing this key during play will stop playing a
moment. To restart, press this key once again
STOP
SKIP/SEARCH
: Press this key to stop playing CD
: Press this key to moment to next track
: Press to quickly advance the playing location
: Press this key a moment to skip to beginning of the track currently played.
: Press to quickly rewind
REPEAT : Press this key to select or cancel repeat play mode
PROGRAM : Store track number to be played into the memory. Maximum capacity is 20.
STANDARD PLAY
1. Set FUNCTION selector to “DISC” position
2. Open the CD tray by pressing OPEN/CLOSE key, place a CD on the tray and close the CD door. Press
PLAY/PAUSE button to start playing
3. Adjust VOLUME CONTROL and PRESET EQ to suit your personal listening preference
4. High speed forward scan play
Press the forward scan button
on the remote control, 3 times quickly fomwards scan will play .Press
again for normal
5. High speed reverse scan play
Press the reverse scan button
on the remote control, 3 times quickly reverse scan will play
Press again for normal
6. Skip Function
a) Press skip forward button
b) Press skip back button
on the remote control to skip the beginning of next track
on the remote control to backward to the beginning of the current track
and then press again to move to the previous track
7. To stop playing, press “STOP” button
TO PLAY A DISC WITH PROGRAM PLAY MODE
Your unit has a program memory to store the playing tracks up to 20 steps:
1. Place a disc in the CD tray then close the CD tray
2. Press “PROG” button on the remote control to start the program memory in STOP mode.The “PROG”
indicator will be light up.
3. Input your desired track number by pressing numeric keys and “PROG” one by one continuously.
4. Press “PLAY/PAUSE” key to start the program play.
5. To erase your program, press “STOP” key during playing the program and the “PROGRAM” indicator will
be distinguished. Otherwise, press“PROG” button to cancel the program.
SETING FOR REPEAT PLAYING MODES
You can set the repeat play mode by pressing “REPEAT” button. When you first press “REPEAT”, the
“Repeat” indicator will keep blinking, so the current tracks will be played over and over until cancelled. Press
“REPEAT” key once again, the “Repeat” indicator will keep blinking, so the current tracks will be played over
and over until cancelled. Press “REPEAT” key once again, the “Repeat” indicator will be steady on, all the
track on the disc will be played over and over until cancelled. Press “Repeat” again to repeat play, “REP”
indicator goes off. Unit play normally.
NOTES ON HANDLING COMPACT DISC
z To keep the disc clean, handle the disc by its edge. Do not touch the disc surface.
z Do not stick paper nor write anything on the surface.
z After playing, store the disc in its case.
6
Page 8

USB PLAY OPERATION
In the front panel of the unit, there is USB input (23), you can connect USB driver through this
interface, Switch to CD mode. If no any discs are inserted in the unit, the unit will search the MP3 files or
WMA files in the USB drier and start to play MP3 files or WMA files automatically if in CD/MP3 mode. you
can also press USB/SD button to select USB mode .When playing the MP3 files or WMA files in the
device the operation is the same with the MP3 operation described above.
INSTALL SD CARD:
When you insert a SD card in the SD slot, the unit will search the MP3 files and WMA files automatically.
The operation is the same with the MP3 operation described above.
To remove the SD card pull out the from the card slot.
CAUTION:
When there are important files in the USB device, do not connect it to the main unit to play, and do not play a
CDR/RW disc that has important files in it because any wrong operation may cause files loss. Our company
assumes no responsibility for this.
7
Page 9

SPECIFICATIONS
GENERAL
Power Requirement………………………………..AC 100V-240V~50/60Hz
Remote Control…………………………………….DC 3V UM -4*2 pcs
Power Consumption……………………………….AC 240Watts
Weight……………………………………………... Approx.1 1.5kg
Dimensions…………………………………………Approx. 855 (L) x 315 (W) x 433 (H) mm
Operation Temperature……………………………..
+5˚C - +40˚C
RECEIVER SECTION
Receiving Bands…………………………………. FM
Tuning range………………………………………FM 87.5 - 108 MHZ
CD/MP3 PLAYER SECTION
Playback System………………………………… Compact Disc Digital Audio
DAC…………………………………………………1 bit D/A converter
Frequency Response……………………………...20-20, 000Hz
AUDIO SECTION
Power Output………………………………………..Maximum 60 Watts per channel
Speaker Impedance…………………………………4 ohms
Preset Equalizer…………………………………….ROCK-JAZZ-CLASSIC-FLAT
ACCESSORIES
Instruction Booklet………………………………… .1
Remote Handset…………………………………….1
CAUTION
* To avoid electric shock, this unit must not be exposed to dripping water or water splash.
8
Page 10

This is to certify that MINI100 is in conformity with:
Council directive 2004/108/EC
Applicable standards:
EN 55013:2001+A1: 2003+A2:2006
EN 61000-3-2: 2006+A1: 2009+A2: 2009
EN 61000-3-3:2008
EN 55020: 2007+A11: 2011
For more information please visit our website
www.mpmaneurope.com
 Loading...