

Page 1
ICR-350
User Manual
Page 2

IMPORTANTSAFETY INSTRUCTIONS
PRECAUTIONS
To maintain optimum performance:
Do not use unit in places which are extremely hot,cold,dusty or humid.
Do not use or keep the unit in following places.
In a high humidity.
In an area exposed to direct sunlight.
Near sources of strong magnetism,such as televisions,speakers or magnets.
Where there is a lot of movement or vibration, such as on a car .
For safety
Do not attempt to disassemble this unit.
make sure that pins or other foreign objects to not get inside the Unit.
Take care not to drop the unit or subject it to strong shocks.
Note when listening with the earphones
listen at moderate volumes to avoid hearing damage.
Do not wear the earphones while driving or cycling
you should use extreme caution or temporarily discontinue use in potentially hazarous
situations such as walking,Jogging,etc.
1
Page 3

If you hear no sound, DO NOT turn the volume up high because the music could suddenly
begin at high volume. To avoid hurting your ears or damaging the headphones turn the volume
control to the lowest level before starting playback and slowly turn it up to the desired level.
Designs and Specifications are subject to change without notice.
2
Page 4

Location of Controls:
1. Line-in socket
2. Earphone socket
3. Built-in microphone
4. Status indicator
5. LCD display
6. HOLD button
7. USB jack
8. Record
9. Stop/Pause
10. Power on/off/playback/pause
11. Menu/ Previous/REW /Next/FF
12. Volume +/ Volume -
13. Louder speaker
14. Lock button
15. Battery case
3
Page 5
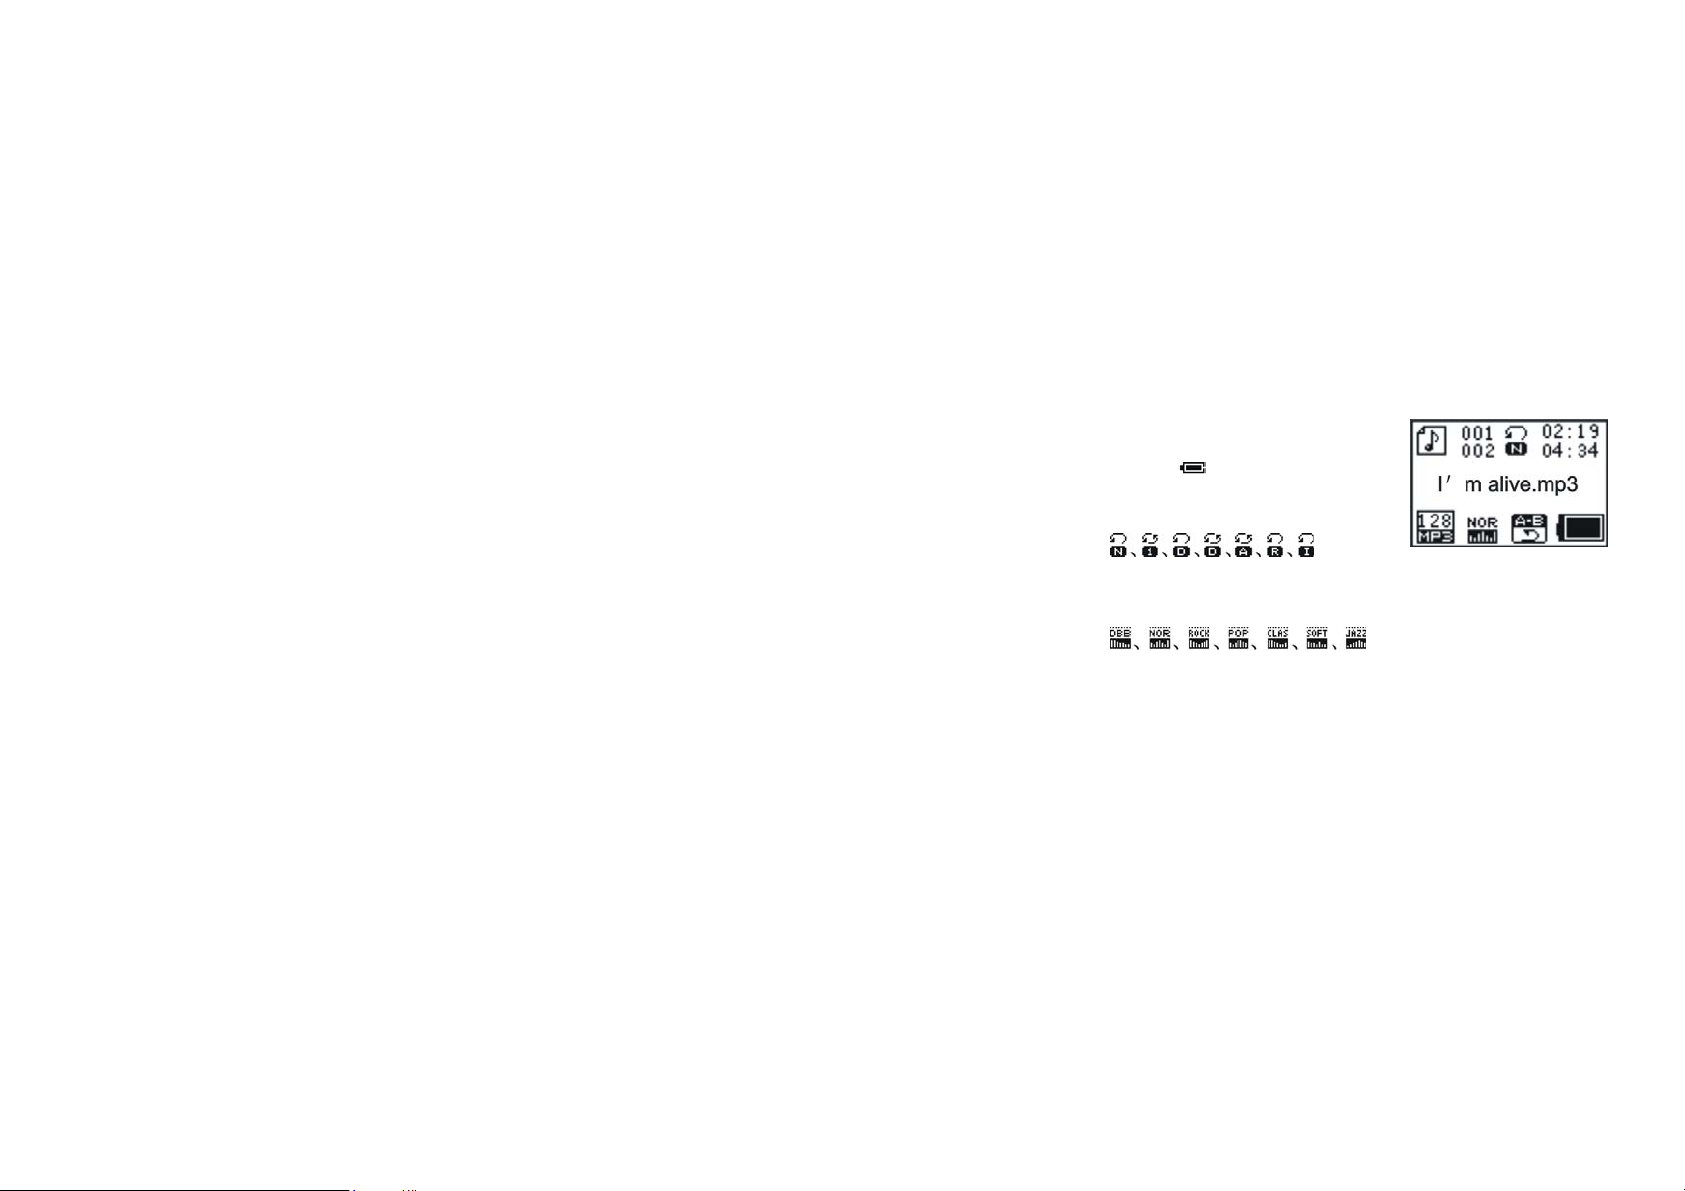
Display
· Battery Level
· The name of playing songs, number and time
· Repeat Mode
7 modes: Normal, Repeat One, Folder, Repeat Folder, Repeat All, Random, Intro
· EQ mode
7 modes: Natural, Rock, Pop, Classical, Soft, Jazz, DBB
4
Page 6

Basic operation
1. Power supply
It is powered by AAA battery or USB. When the remaining capacity of battery
indication shows
2. Power on/off
A. Press and hold
B. Under the playback or stop (pause) status, press and hold
Note: If the unit is locked by the HOLD key, it
displays the locked icon and then power off
automatically while power on.
3. Mode
After powering on the unit, press and hold the M
button to enter the main menu. There are four modes: Music mode MSC,
Recording mode REC, Voice mode VOI and System
setting SYS. As the following picture shows:
Press
Press the M button to enter.
II. Recording Mode REC
or to select the corresponding mode.
, please change the battery in time.
button to power on. The LCD displays the startup logo.
to power off.
5
Page 7

1. Enter from the menu
1). Turn on the unit and enter the main menu.
2). Select the Recording mode REC by
button to confirm and enter.
3). Press
4). Press and hold ■ button or the M button to stop recording and save at the
same time.
Note: (1). If the LCD displays “Disk Full”, it means that there is no enough
the disk, please delete some files to release the space.
displays “Directory Full”, it means that there are already 99 files in the
directory. Please change to another directory.
2. Shortcut
1) Under the stop status, press ●button to start to record. Press ■ to pause.
2) Press and hold the ■ button or M button to stop recording and save at the
button to begin to record.
space in
(2). The unit supports 99 files under every directory. If the LCD
same time.
/ button, and then press the M
6
Page 8

3. Select Record type
1) Under the recoding stops interface, press M button to enter the record
menu.
2) Select “record type” and then press the M button to enter. Then select “record
type” option by
REC Type: SP record, WAV format, good timbre
LP record, ACT format, general timbre
SP VOR, WAV format, voice-control REC
LP VOR, ACT format, voice-control REC
Voice-control indicates that the record is controlled by voice. It will stop when
there is no voice and record the datum when there is voice, so as to save the
memory space.
3). Playback of recorded files
A. Enter the main menu, select the Voice Mode VOI.
B. Press the M button to enter the interface, and then press
C. Select the recorded files by
or button and then press M to confirm.
to playback.
or button.
7
Page 9
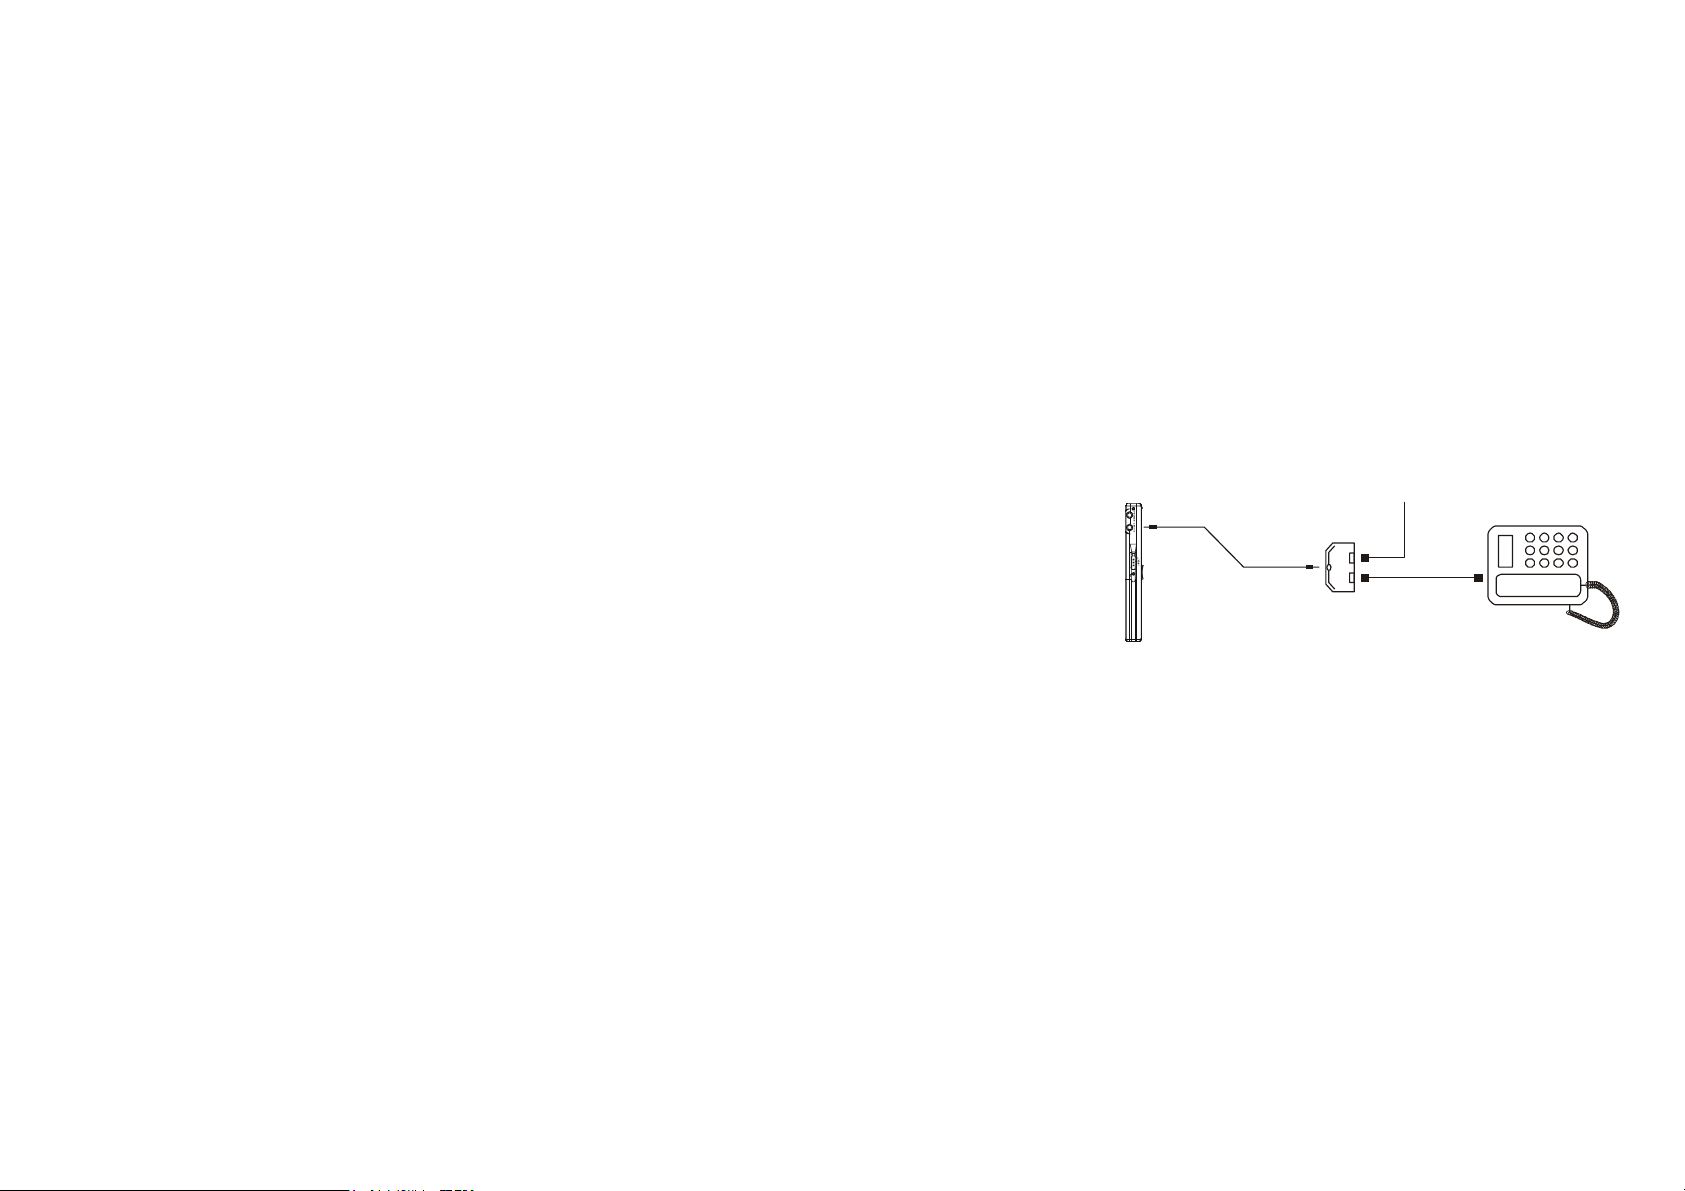
4. Telephone conversation recording
Connect the external telephone line and telephone cable to the telephone
adaptor; link the audio line to the adaptor and LINE IN jack. Continuously press ●
button to start recording.
LI NE I N
Telephone line
LINE IN cable
Telephone adapter
Telephone line
5. Transfer recorded files to the external equipment
Link the audio cable to the PHONES (earphone) and external equipments’ in-put
jack, then press PLAY/M button of the recorder and the external equipment’s
REC button at the same time. (Please test the external equipment’s REC function
8
Page 10
before your recording in order to avoid failed recording)
Note: during the recording, if the unit was shut off by knock or other
actions, all recording files will lost. So please operate carefully.
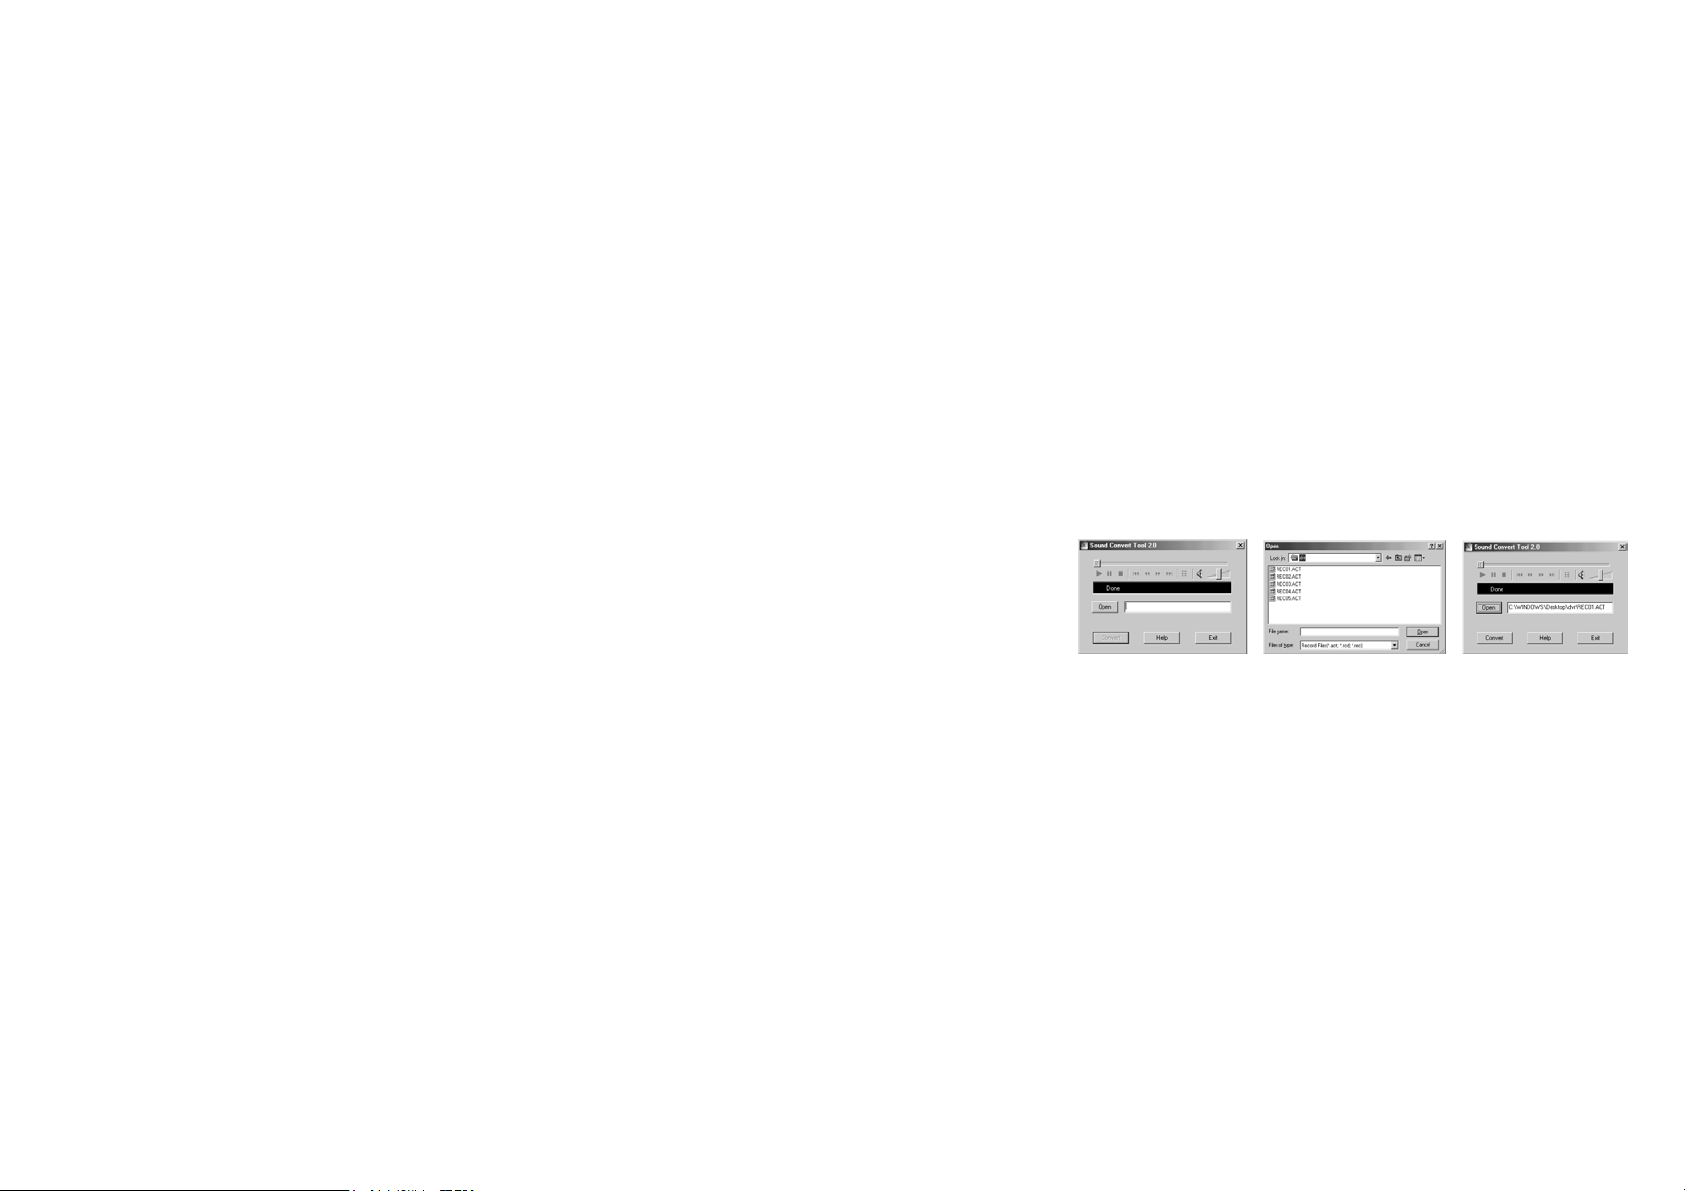
6. Convert ACT format files into WAV format
1). After install the software, open and run “sound converter”, click “open”
2). Select the ACT files you want to convert
3). Clock “convert” and start the converting
9
Page 11

III. Music Mode MSC and Voice Mode VOI
1. Description of Keys Function
Key Action Stop State Play State Play submenu Stop Submenu Main Menu
long press Power off Power off Power off Power off
short press Play Stop Exit the menu
long press Enter main menu
M
+
short press
short press
long press
short press
long press
short press
long press
Enter the main
directory
Next Next and play Move submenu Next mode
Continue scanning
forward
Previous
Continue scanning
backward
Increase volume
step by step
Increase volume
continually
Enter main
menu
Enter mode
selection
FF
Previous and
play
REW
Increase volume
step by step
Increase volume
continually
Enter main
menu
Confirm the
option or enter
more further
Move forward
continuously
Move submenu Previous mode
Move backward
continuously
Same as in left
Same as in left
Same as in left
Same as in left
× × ×
× × ×
×
Enter main
menu
×
Move forward
continuously
Move backward
continuously
10
Page 12

decrease
volume step by
step
decrease
volume
continually
Enter the A-B
repeat status
Enter the A-B
repeat status
Enter the playing
submenu
× × ×
× × ×
Enter the record
×
interface and
start to record
Enter the record
×
interface and
start to record
× × ×
start to record
start to record
﹣
●
■
short press
long press
short press
long press
short press
long press
decrease volume
step by step
decrease volume
continually
Enter the record
interface and start
to record
Enter the record
interface and start
to record
To pause recording × × × ×
To save recording
! Operation skills: You can exit from the menu or the select interface
Quickly by short pressing “
” key.
Do not shift too quickly when pressing the keys, please operate one by one.
2. Stop menu
Under the stop status, press M button to enter the stop menu. There are four
11
Page 13

options: Main directory, Delete one, Delete All, and exit. Select the corresponding
option by
1). The unit support 99 top-level subdirectories. You can save different files in
different directories (the directory should be pre-built in the PC), so that you can
play and manage them by classifying.
Note: I. You can set the “Main disk directory” for music mod, record mode and
voice mode respectively, i.e., the “main disk directory” of these three mode do not
correspond the same directory.
II. There must be files which can be identified by the mode in the directory, so
that the directory can be displayed while setting the “main disk directory”.
2). Delete files
● Select “delete one” or “delete all” to delete the current file or all of the files in the
current folder.
● Under pause status, press MODE/REP button to enter the stop menu, press
or button.
or button to select “delete one”, and then press the M button to enter
the delete interface. Press
select “YES” and press the M button to delete the current file; select “NO” to give
up the deletion; select “delete all” to delete all of then files in the current directory.
or button to shift between “YES” and “NO”;
12
Page 14

Note: “delete all” can only delete the files in the current directory under the
current mode. For example, under the music mode, if you select “delete all”,
you can only delete the music files. The recorded files will not be deleted.)
3). Select “exit”, press the M button to exit the stop menu.
3. Play Menu
In Play state, short press MODE/REP key to enter Play menu including options of
Repeat, Equalizer (only for Music mode), tempo rate, replay, replay times (only
for music mode), replay gap(only for Music mode), and Exit. Select the
corresponding option by press
pressing M key.
1) Repeat Mode:
When playing music and REC files, you can select different cycling modes (e.g.,
Repeat one, repeat all, etc.)
When confirming your selection, the player will play the set rules. The play modes
available include: Normal, Repeat One, Folder, Repeat Folder, Repeat All,
or button. Enter options by short
13
Page 15

Random and Intro.
Normal: After the music in the current directory have been played fully, the
player will play the music in the next directory till all files are played and then it will
stop.
Repeat One: Repeat playing a single piece of music.
Folder: Play all the music in the folder.
Repeat Folder: Repeatedly play all the music in the folder.
Repeat All: Repeatedly play all the music.
Random: Play randomly the music in the current folder.
Intro: Play all the music of the first ten seconds in the current folder.
2). Equalizer (Only available in Music mode)
14
Page 16

(Natural)
(Rock)
(Pop)
(Classical)
(Soft)
(Jazz)
(DBB)
3). Tempo Rate
When playing the music files (only applicable for MP3 files) and recorded files,
the user can select different tempo rate (slower or faster), but the sound will not
be changed.
4). Repeat Mode
15
Page 17

(1) While playing, press ●button to set the point “A”, the letter “B” in the repeat
icon
will flash. Press the ● button again to confirm the starting point B. Then
the player will repeat playing between A and B. When reaching the set times or
short press the M key to exit Repeat mode.
(2) Follow function (the voice mode doesn't have this function)
In A-B repeat, press ● button to enter the follow mode, the repeat icon “
changed into the follow icon “
of the user. The time length is the same as the A-B repeat. When the set time
comes, the player will play the original voice and the icon will be changed into
“
”. Then the user can press the ● botton to enter the contrast function.
Note: In this state, press ● button to return to the state of “A-B repeat”.
(3) Contrast function (the voice mode doesn't have this function)
After entering the contrast function, the repeat icon will be changed to “
the time, the player starts to play the following voice. After the following voice has
been fully played, the icon will be changed to “
original voice. After the original voice has been fully played, it starts to play the
record repeatedly without stop (no limits of the “Repeat Times” setting) till you
”. Then the player will begin to record the voice
”, at the time, it plays the
” is
”. At
16
Page 18

press M button to exit.
(4)Replay Times (only music mode has this function)
Press M button to adjust the repeat times, the repeat times will determine it will
exit after how many times of A-B repeat it plays.
(5) Replay gap (only music mode has this function)
Press M button to adjust the replay gap, the replay gap will determine the time
length to be paused between this playing and the last playing (unit: second)
(6)Exit
Press the M key shortly to exit the play menu.
4. Lyrics
This player supports the lyrics function with MP3 playback.
Note :
1) Lyrics file format should be *.LRC
2) File name should be the same as the song’s name.
3) Lyrics file should be placed in the same folder of the song.
During playback mode, press and hold M button to display Lyrics, Press M
button to exit.
For example: The song file name is: A-DoNight.mp3
17
The lyric file name is: A-DoNight. Lrc
Page 19

V. Lock
Under the playback or stop mode, status, push HOLD
key per arrowhead direction to lock the player. On the
hold mode, non of the functions can be used.
VI. System setup SYS
1. Clock
1). The current time (Electronic watch function. The time can only be showed
after entering this interface):
Press the M button to enter the current time interface:
18
Page 20

Press + (- to the reverse direction) to start to set form year (the year option start to
blink), then increase or decrease the numeral by
shortly press + to select Month, Day, Hour, Minute and Second and also increase
or decrease the numeral by
and exit after adjustment.
2). Pre-record
Set a time, and the unit will start to record automatically at the pre-set time.
Press the M button to enter the Pre-record interface.
or button. Press M or key to confirm
or button. Then
19
Page 21

The way to adjust the pre-set time is same as the above: set the Year, Month,
Day, Hour, Minute and Second one by one, and then press M or
confirm and exit after adjustment.
Note: press ● button to turn on/shut down the function of pre-REC. if you
shut down this function, there is no bell icon on the display.
key to
3). Length of record
Press the M button to enter the record length interface:
The way to adjust the time is same as the above: set the Year, Month, Day, Hour,
20
Page 22

Minute and Second one by one, and then press M or key to confirm and exit
after adjustment.
2. Backlight time
Press the M key to enter the backlight time interface.
Press
Press the M or
3. Language Selection
Press the M key to enter the language selection interface:
/ button to adjust the backlight. The unit of time is second.
key to confirm and exit after setting.
21
Page 23

Press the / button to select the corresponding language and the
shortly press M button to confirm and exit.
4 Power off setting
Press the M button to enter the power off setting interface. There are two modes:
1). Power-saving mode
Set the time of Power off (unit: minute), in Stop state, the time is calculated when
no key is pressed and the player would power off automatically. If it is set as 0
second, the function will be inactivated.
2). Sleep Mode
Set a time(unit: minute), the time is calculated when no key is pressed and the
player would power off automatically, the time will cleaned to zero before it is
22
Page 24

powered off. (i.e. set for one time) it is mainly used for listening to songs before
your sleep. The setting will be canceled automatically after power off. You have to
reset it if you want to use it again.
5. Repeat Setting
Press the M button to enter the repeat setting interface. There are two modes:
1). Manual Mode means it can not pause automatically when A-B repeat, but to
set the point manually.
2). Auto Mode means it can pause automatically. (Pertaining to recitations
without music.)
6. Contrast adjustment
Adjust the contrast of the screen.
7. On-line Mode
This setting is for the setting of modes of portable disks displaying in PC. Three
modes available include: Multi Drive, Normal Only, and Encrypted Only.
23
Page 25

8. Memory info:
Check the remaining capacity of the flash memory. The former numerals
represent the total capacity of the disk, and the percentage represents the
percentage of the used space.
9. Firmware version:
Display the version of firmware.
10. Firmware upgrading
VI. Connection with PC
Install the driver for Windows Operating Systems 98 SE. For windows Operating
System ME/2000/XP or greater, you don’t need to install the driver.
Turn on the player and insert USB into the USB ports of your PC. Once the
connection is properly made, the following screen will display
24
Page 26

Create a File Folder:
This player can recognize 99 files of level one created in portable disk by user.
2. Upgrade Player
The player may be upgraded or maintained its system firmware using the tools
and software installed on the computer.
1. Enter the main menu, press “
/ ” key to select “System Setting”. Short
25
Page 27

press “M” key to enter and press “ / ” key to select "Firmware Upgrade”,
press M key again to confirm and enter.
2. Connect the player to PC.
3. Run the upgrading tool “MP3PlayerUpgrade” of PC, and then click “Select the
Firmware file of new version” knob. Select the new firmware program (it can be
found in the disk enclosed with the player or downloaded from the producer's
website).
4. Click the “Start upgrading” button and the system will start the work of
upgrading.
5. After successful upgrading, the following will be displayed on the player:
26
Page 28

Note:
1. Firmware upgrading is used for enhancing and optimizing the
performance of the player. But if the firmware is not upgraded, the normal
work of the player will not be affected.
2. The errors caused from the firmware upgrading may result in the failure
of the player! So please read the operation manual carefully before the
operation. It is recommended that this operation shall be done by the
persons with sufficient computer knowledge.
3. The software for the firmware upgrading of this player is not available to
other series of players, vice versa.
27
Page 29

3. Function of Special Space
The user can arbitrarily divide the USB disk into two parts through the tools
enclosed with the player, (the use can see two disk letters. For system of
Windows 2K, the computer should be installed with the SP4. Otherwise, the user
can only see one disk letter. If the user wants to see the other disk letter, he has
to select the “Single common disk” or “Single encryption disk” under “System
setting/ On-line mode”. One part shall be encrypted (it may not be encrypted, thus
the disk can be used as two) so as to hide the contents. Such data cannot be
seen without the passwords.
1. Connect the player with the computer.
2. Run the tool kit MP3 Player Disk Tool Of installation program enclosed with the
player.
3. The user will first see the format tool. Then select the “Divide/encrypt” and
select a proper capacity for the encryption disk.
28
Page 30

Then click the related block to set the user' name and the passwords. Enter the
name in the block of “New user's name” and enter the password in the block of
“New password”. Then enter the new password again in the block of “Confirm the
new password”. Click the button “Start” to start dividing the disk.
4. After dividing, the user will see the Left Indications:
5. Press “Enter”, and the computer will indicating for restart the system. Confirm it
so as to restart the computer system.
29
Page 31

6. After starting, the user will see two disks (for the operation system lower than
Windows 2K SP4, the user can only see one disk letter). Click the encrypted disk
(listed at the second place), which has three files. Two are hidden files and one is
the execution file. The disk only has the space of 300K.
7. Run the execution file “RdiskDecrypt.exe” and enter the user's name and
password into the Dialogue box. If the password is correct the Copy file in the
disk will be opened.
30
Page 32

8.Each time when connecting with the computer, user must enter the user's name
and password so that he can open the encrypted disk.
Note: these files in the encrypted disk can't be identified by the player.
Note: Either when the disk is divided into two parts or when two disks are
combined into one, the data in the disk will be Deleted, please backup the
data in advance.
Warning: Please don't lose your User's name and password; otherwise the
encrypted disk cannot be used. The encrypted disk can only be cancelled
by combining the disks, and this loses the files in the encrypted disk.
Trouble Shooting
31
Page 33

1.Why can’t some MP3 be played?
Standard MP3 only includes: the songs in layer 3 of MPEG 1, layer 3 of MPEG 2
and layer 3 of MPEG 2.5. Otherwise, it won’t be played in the player except
transformed by the corresponding software.
2.Why doesn’t the memory size displayed under the operational system
match the figure on the tab?
The software in the MP3 player takes up a small portion of the memory, which
coincides with the corresponding standards.
3.About WAV format
This solution supports WAV files of IMA ADPCM format only. If you want to store
WAV files of other format in this player, please set up a new folder and store the
WAV files in it. Don’t put the WAV files of other format into the root directory of the
mobile disk and the folder of VOICE, otherwise, the player may shut down when
play such WAV files.
32
Page 34

4.What causes the MP3 player running slowly?
Using or deleting files frequently in a long time will generate fragments in the flash
memory, like fragment in the hard disk, which will cause the player running slowly.
5.What if the driving program of the MP3 player be damaged?
This is caused by improper operation. For details, please refer to the
Upgrade/Renew Software part.
6.What if the MP3 play works abnormally, i.e, shutting down?
When abnormal causes occur due to improper operation, turn off the unit and
then turn it on again.
33
Page 35

Specification
Flash memory: 1GB.
Max recording time: HQ: 64Hr/LQ:16,000min
PC Supports ; Windows 98/ME/2000/XP, Mac OS 10.X & Linux kerne 1.2.4.2 &
above
Dimension: 100mmx34mmx14mm
Weight: 24g (35g included battery)
Power source: AAA battery
Microphone: built-in capacitor microphone
Input: Built-in MIC
Output: Double-channel earphone, above 8 ohm.
Condition to use: 0-40C
Accessories:
Headphone, Neckstrap, USB Extension cable, Battery (1xAAA), Telephone
Adaptor, Telephone cable, Audio Cable, Install CD, User Manual
34
 Loading...