

Page 1
A
B
C
D
DIGITAL VOICE
RECORDER
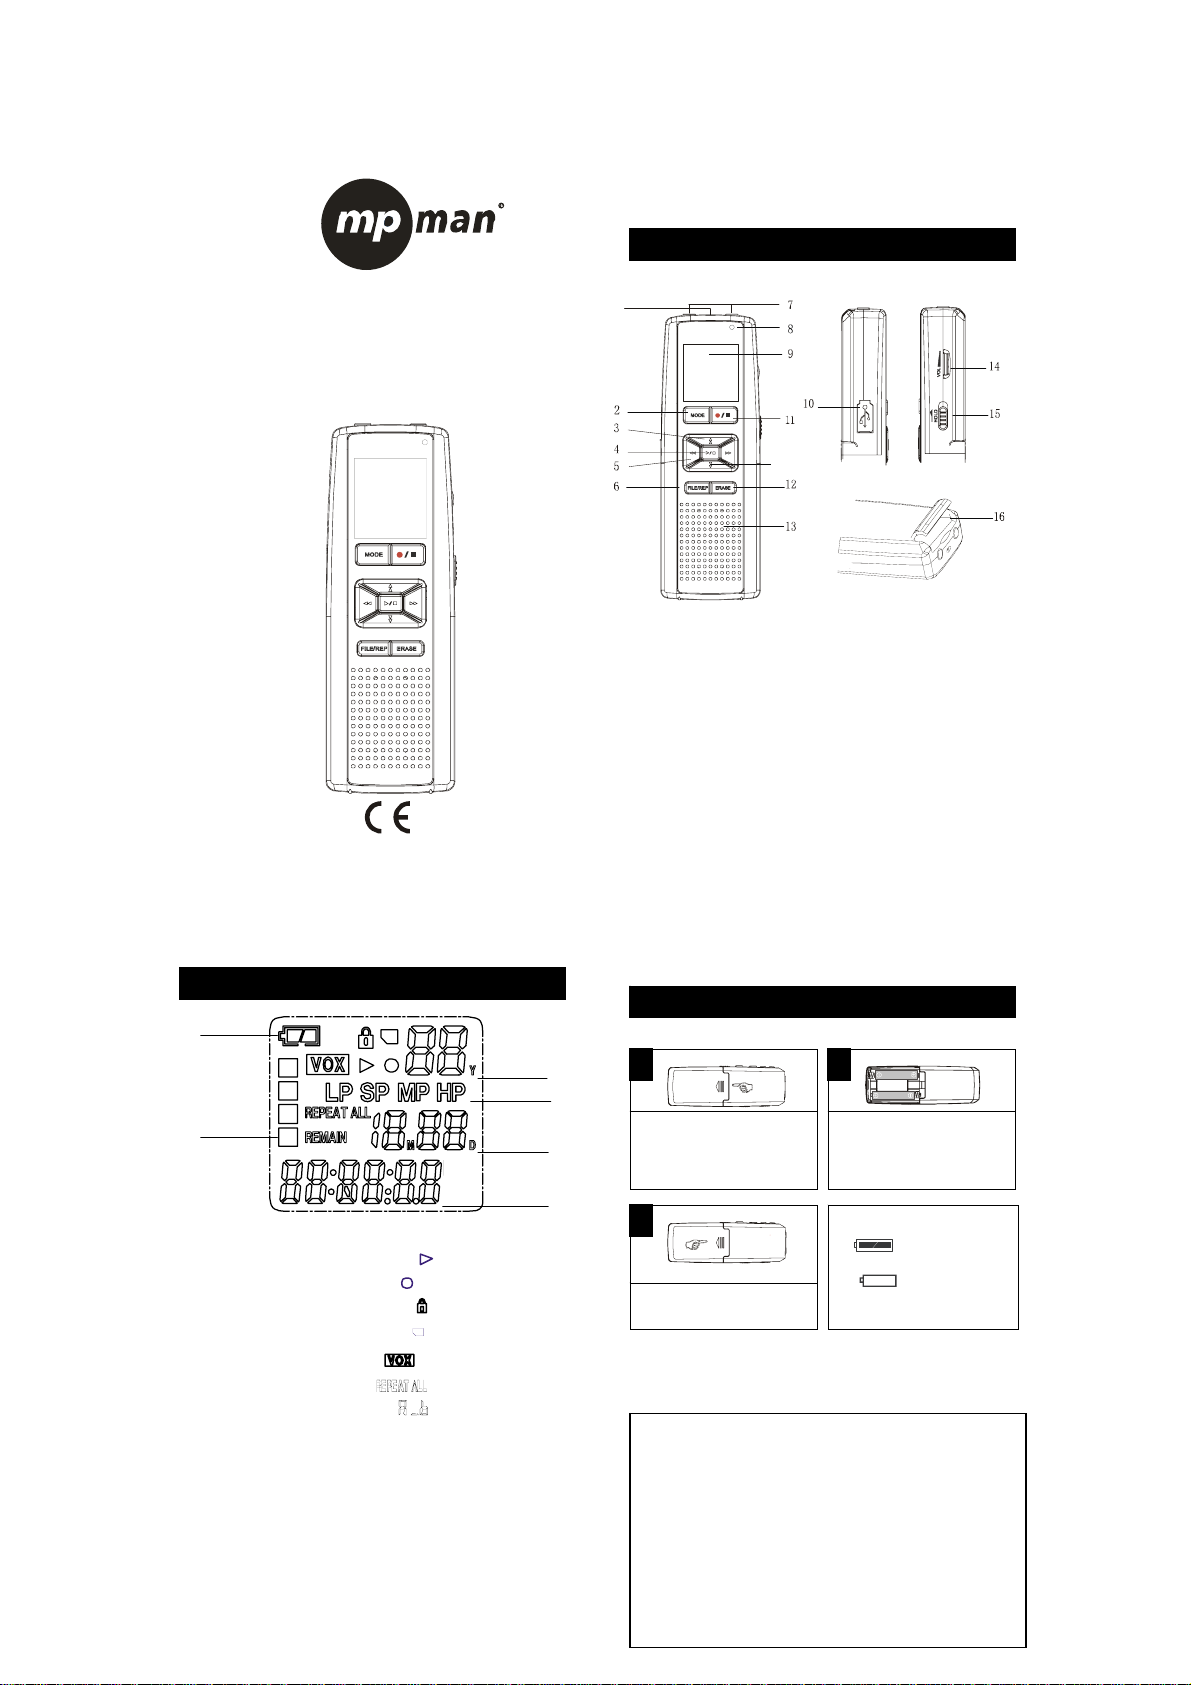
LOCATION OF INDICATORS
F
E
A. Year/Message
B. Recording quality
C. Month/Date
D. Elapsing of message
E. File folder
F. Battery indicator
MODEL:ICR-300
MODE
FILE/REP ERASE
INSTRUCTION MANUAL
A
B
C
D
Play logo
Record logo
Hold logo
SD card logo
Voice activate
Repeat 1/repeat all
Repeat A-B
LOCATION OF INDICATORS
1
Built-in Microphone 1 Record/Stop key 11
MODE/Power on 2 Pause/Delete key
12
UP/Down(↑/↓)key 3 Speaker 13
Play/Stop 4 Volume 14
Right/left(←/→)key 5 Hold key 15
File/Repeat 6 SD card socket 16
Ext. Microphone Jack 7
Recording indicator 8
LCD display 9
USB Jack 10
BATTERY INSTALLATION
NOTE: Replace batteries don’t affect messages or files stored on unit.
MODE
FILE/REP ERASE
OPERATION
Push to open battery cover..
Close the battery cover
But t he time and date may need reset if the unit out off power more than 1
minute.
BATTERY PRECAUTIONS
Please follow below advices while handle batteries:
1.Use only the size and type of batteries specified.
2.Be sure correctly install batteries as logos carved on battery compartment.
Batteries reversed may lead the unit defect.
3.Do not mix different types of batteries together(e.g. Alkaline and Carbon-zinc),Or
old battery with fresh.
4.If the device is not to be used for a long period of time, remove the batteries to
prevent damage or injury from possible battery leakage.
5.Do not try to recharge batteries not intended to be rec harged; they can overheat
and rupture.(Follow battery manufacturer’s directions.)
6.Never try to remove the batteries while recording.
2
3
3
Insert 2pcs of“AAA”size
batteries with correct polarity.
Y BATTERY INDICATORS:
replace.
The batteries are fresh.
The batteries are weak or dead to
VOL
HOLD
Page 2
)
)
)
)
)
P
OPERATION(CONTINUED
OPERATION(CONTINUED
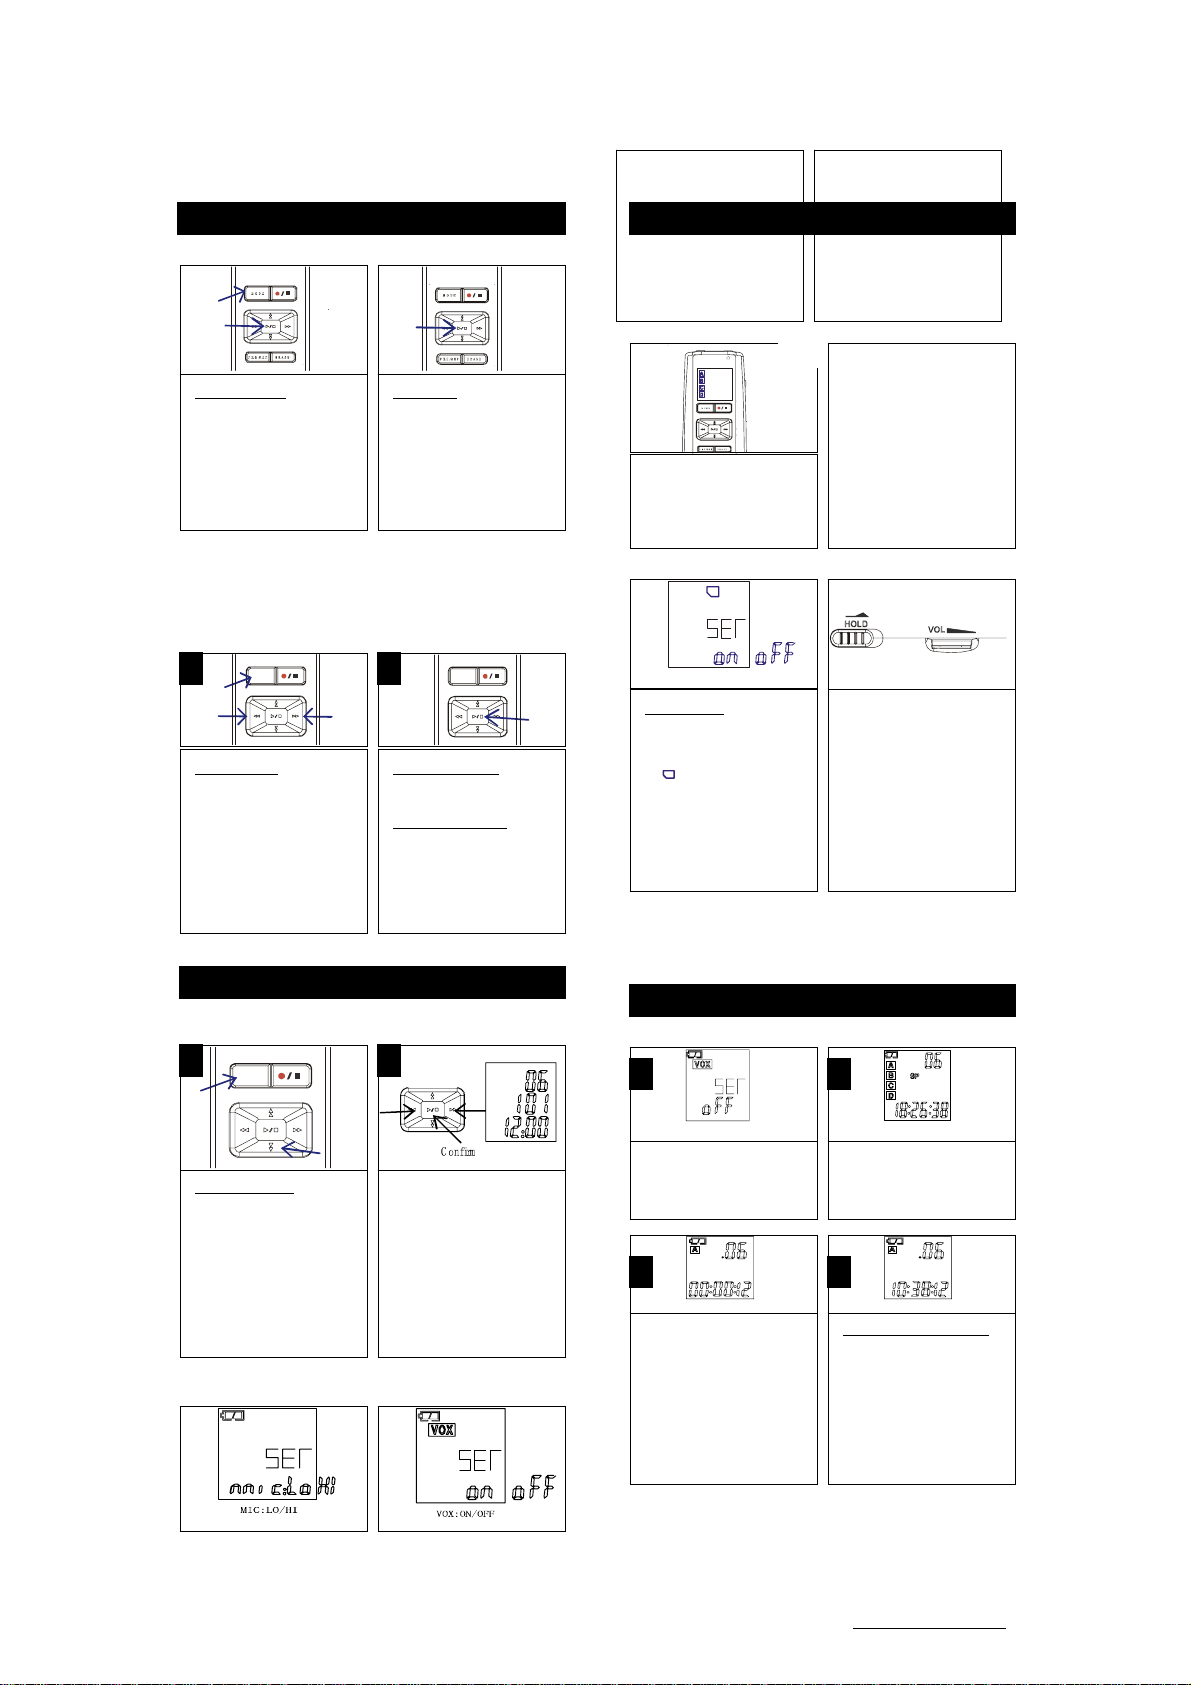
TO TURN UNIT ON TO TURN UNIT OFF
4
*To turn LCD on, press PLAY
key once.(Time & Date on LCD/
Date mode.)
*Then, To power unit on, press
MODE key once.(ICR mode is
n LCD). o
To turn unit off, At ICR mode, press
and hold PLAY key more than
2seconds. LCD will be Displayed
time & date. (Date mode.)
* Unit will be off LCD after 60
seconds without any action.(Auto
ower off.) p
SET SOUND QUALITY *Factory setting is “HP”
There are 4 recording quality for your choice,
For best sound quality, select HP(High Play); 5.5 hours recording.
For good sound quality, select MP(Medium Play); 8 hours recording.
For normal sound quality, select SP(Standard Play); 16 hours recording.
For longer recording time, select LP(long Play); 50 hours recording.
SET is displayed on LCD. Use (←)or
(→) key to select 1 recording quality.
MODE
To enter Set Mode. When ICR
mode,. press and hold MODE key
more than 3 seconds.
To confirm, press Play key then
press Mode key to back.
To confirm the setting, press
PLAY key and then Press
MODE key to back.
To choose setting item,
First, enter Set Mode.
Then, use (↑)or(↓)key first to
select mode, then use (←)
or(→)key further setting.
MODE
5
OPERATION(CONTINUED
SET TIME AND DATE
When batteries are insert, 06y 1M 01D 12:00:00 will be on LCD.(Date mode.)
MODE
To enter SET mode, press and
hold MODE key, t hen press
down key (↓)till time and dat e
on LCD.
①Select Year(Y) and set with
(←) or(→).Then press PLAY key
to confirm. ② Select month(M)
and set with ( ← ) or( →).Then
press PLAY key to confirm.
M
③Select Date(D) and set with
(←) or(→).Then press PLAY key
to confirm. ④Select Hour
and set with (←) or(→).Then
press PLAY key to confirm.
⑤Select Minute and set with (←)
or(→).Then press PLAY key to
confirm.
*Press MODE key to back.
Y
D
SET MIC SENSITIVITY SET VOICE
ACTIVATE(VOX)
In set mode, press down Key(↓)
till MIC setting. Then p ress
(←)or(→)key to LOW or HI. Press
PLAY key to confirm then press
key to back.
MODE
OPERATION(CONTINUED
*LOW for sounds near by unit;
*Hi for sounds far from unit.
*Factory setting is “HI”
SELECT A FILE FOLDER. (A,B,C,D)
There are 4 file folders(A,B,C,D)for your recording.
Each file folder can store 99 messages, and you can save 396 messages total
on the unit.
A
Use SD card. HOLD and Volume
B
C
D
Power on unit, press FILE/REP
key to select 1 to record
message.
*Factory setting is “A”
SD car d: ON/ OFF
To use SD card,
insert SD card first. Long press
MODE key to enter Set Mode.
Then use (↑)or (↓)key
till
logo appeared on LCD.
Select ON with (←)or(→)key.
Press PLAY key to confirm and
press MODE key to back. SD
card
is recording storage media.
In set mode, press down key(↓)
till VOX appeared on LCD. Set
VOX on or off with (←)or(→)key.
Press PLAY key to confirm the
setting then press MODE
back.
*Factory setting is “Off”
7
NOTE:
Each time you record a
message, the unit will assign
number automatically
The file number will be
shown on LCD.
*If the units is full, FULL will be
appeared on LCD. Delete
same messages and you can
ecord again. r
HOLD
HOLD key and VOL key on right
side on unit.
*If unit doesn’t work, check
HOLD key off.
*If there is no sound even unit is
working, volume up slowly.
key to
VOL
Note: When you use SD card for playing/Recording, you must set SD card “On” each time
after inset SD card, (SD car d i-con is on LCD.) *If there is no SD card in un it, it ca nnot be
“On” for SD card.
OPERATION(CONTINUED
NORMAL RECORDING
Make sure VOX set OFF. Turn
unit on, and select sound quality
(HP,MP,SP,LP)
*Factory setting is “Off”.
A
SP
ower on unit(ICR mode), and
press REC/STOP key once. LED
light on and start recording. New file
# & recording time are on LCD.
To stop recording, press
REC/STOP
Key again. *When you use external
microphone, put it into mic. Jack on
unit.
NOTE:
* Recording level is automatically sets by unit..
* To record another message, simply press REC/STOP key, Message(file) number
will increase one by one.
* For normal voice recording, distance of 5-9 inches is appropriate.
Do not remove the batteries while recording or otherwise interrupt the recording
process. Doing so may result in lost or damaged recording files. Unit will take a
few minutes to resume normal operations.(the display will read “LOAD” until normal
function resumes.).In order to protect your voice recordings, it is good practice to
regularly save backup copies or your recordings(
of this manual for more information).
8
A
B
C
D
Select a File Folder to record
with FILE/REP key
*Factory setting is “A”
A
SP
REMAIN
To see remain recording time.
Press PLAY/STOP button while
Recording. ’REMAIN’ appeared
and remain recording time on
LCD for 3sec.
*While recording, press II/DEL
key for pause, and press the key
again to start recording.
see the PC Connection & Software section
Page 3

)
4
)
D
)
p
OPERATION (CONTINUED)
VOICE ACTIVATED (VOX) RECORDING
Set the VOX “On” to record just only when sound is detected.
The unit will pause recording when no sound is heard, and start recording again
automatically when sound is detected.
Make sure VOX is s et ‘ ON’.
VOX i-con is on LCD. Select
sound quality (HP,MP,SP,LP)
.
A
SP
At ICR mode, press REC/STOP
key once to start recording.
To stop recording, press
REC/STOP key again.
*On VOX mode, recording is
automatically start when sound
is detected. When there is no
sound, stop recording
automatically and LED blinks
until sound is detected.
OPERATION(CONTINUED
9
Select a Folder with FILE/TIME
key.(A,B,C,D).
NOTES:
.The first per iod of sounds
activate the unit and may not
be recorded.
. A variation in v oice level
during recording will not stop
the unit, two seconds of
silence is required to stop the
recording.
.For constant recording, see
previous page.
.To pause, press the ERASE
button.
.The built-in audio level
automatically sets the
recording level.
. For normal voice level,
distance of 5-9 inches is
appropriate.
10
B
A
B
C
D
PLAYBACK MESSAGES
A
B
C
D
Turn unit on (ICR mode) and
select a File Folder with
FILE/REP button.
FILE/REP
Press PLAY/STOP key once to
playback a message.
*While playing, press
REC/STOP key to show
recording time and date on LCD
of the message.
*While playing press ll/DEL key
for pause, and press the key
again to play.
*While recording, press ll/ DEL
key for pause, and press the key
again to record.
Check record
date&ti me
PAUSE
Select file number to play with
(↑)or(↓)key and press PLAY
key once.
REV
.For Cue and Review during
playback, press FWD or REV
key. The speed of playback at
10second/s, press and hold
FWD or REV key more than 3
second, the speed up to
30second/s.
.Press FWD or REV or
Play/Stop keys resume normal
play .
EARPHONE JACK
REPEATEDLY PLAYBACK MESSAGES
For private listening, connect an earphone to EAR jack.
The unit can repeat 1 or all messages, or a section from A to B.
The speaker will automatically disconnected when an earphone plug
in rted into EAR jack.
se
REPEAT MESSAGE A-B:
While playing a message,
press the FILE/REP key once,
‘A’ appeared on LCD. Press
FILE/REP again and ‘b’ is on
LCD. Then unit will repeat play
from A-B. To back normal, press
FILE/REP key again.
DELETE SINGLE MESSAGE DELETE ALL
OPERATION(CONTINUED
B
11
REPEAT 1/ ALL MESSAGES:
While playing a message, long
press FILE/REP key until
“REPEAT” on LCD. Long press
FILE/REP again, “REPEAT
ALL” on LCD, To cancel repeat,
press long FILE/REP key again.
MESSAGES
At ICR mode, select a file to
delete, and press DEL key once.
“DEL 1” on LCD and play the
file automatically. Press DEL
key again while playing, and the
message will be deleted.
* Without DEL key again while
playing or press another key,
delete will be canceled.
IMPORTANT NOTES:
Once message(s) is deleted or unit is formatted, they can not be
recovered.
OPERATION(CONTINUED
At ICR mode, long press DEL
key, and‘DEL ALL’is on LCD
Press DEL key again, and all
messages in a selected folder
will be deleted.(Without DEL key
again, or press another key,
delete will be canceled.)
12
EDIT MESSAGE (SEPARATE)
With Edit function, cut a long message to a certain sect of your wanted is possible. The
most effective way to edit a message is to cut it into two sects.
MODE
4t h
3nd
FILE/REP
2nd
1st
ERASE
* Select a file to separate.
①Long press (↓) key. “Edt”
(edit) is on LCD.
②Press Play key to find point to
separate.
③Press FILE/REP key to
arate the message into two.
se
FW
. * After a message is cut into two sects, the original message number is kept
for first sect, and the last message number is created for second sect
automatically.
④Press Play key again to
confirm it.
* Press MODE key to back
* If you want to cancel EDIT,
press MODE key anytime.
EDIT MASSAGE (CUT)
①Select a file to cut A-B. and long press (↓) key same as above.
②"Edt" is on LCD. ③Press PLAY key to find start point(A) to cut, then press
DEL key. ④ “A St” is on LCD. ⑤After find end point(B) to cut, press DEL
key again. ⑥”bEd” is on LCD. ⑦Press PLAY key to confirm to cut A-B from
the massage. ⑧OK is on LCD, and delete A-B from the message. ⑨ Press
MODE key to back.(ICR mode.)
* If you want to cancel Edit, press MODE key anytime. Unit will be back to
ICR mode.
Page 4

y
)
Memory is Full.
When memory (inside unit or SD card.)is full, ‘FULL’ appeared on
LCD. Delete or move some massage to other devises such as PC,
and you can record again.
FORMAT THE UNIT
OPERATION(CONTINUED
13
11
Enter SET mode to press and
hold MODE key, press (↑) or
(↓)key till FoR(format) is on
LCD.
IMPORTANT NOTES:
.Once message(s) is DELETE or the unit be FORMAT, they can not be
recovered.
.Format process will be taken about 20 seconds, during that period all keys a re
no functions.
Use (←) or (→)key select
‘YES’,then long hold DEL key,
All files and messages in the
unit will be formatted.
Recording telephone conversation.
①, Connect ICR-300 to telephone with Tel. cord & Audio cord
(including accessory) as below.
②, Press ‘Record/Stop’ button after pick up telephone call. (Make
sure‘Record indicator’ is light on.)
③, Press ‘Record/Stop’ button again after telephone conversation
is over. (Make sure ‘Record indicator’ is light off.)
14
Installing the Driver(for Win 98 or Win 98SE only)
The USB mass storage function will not be activated without dri ver
installation to activate the USB mass storage function, please use
the installation CD-Rom to install the driver.
1. Insert the Installation CD
2. The Main Menu Window will pop up automatically.
3. Click on “Voice Manager and Driver Setup” to proceed the set up
Wizard, click on NEXT the instruction to proceed the installation.
4. Once the installation is done, click on Finish.
Remarks:
Although the driver is just required for Windows 98, we still
recommend you install the “Voice Manager” for playing records
on your PC.
Voice recorder require USB1.1 or 2.0 from the PC
Downloading and uploading Files
1. Link the unit to a computer by provided USB cable.
2. Drag and drop files/records to removable disk or your computer.
Note: When you are finished transferring files, use the Safely
3.
Remove Hardware procedure before disconnecting your player.
As the voice recorder files are special format(LP, SP, MP, HP), so you
may not play this files well on your PC. Please install voice manager
software, and that could help. a shortcut of ‘Voice Manager ’ will appeared on
the desktop after installed software.
Pla
voice recorder files on PC
15
Files on Recorder Files on Computer
TRANSFERRING FILES
The "Voice Manager "convert voice record files to WAV format files
that allow you to save the recorder files or burn them on a CD or transmit
them to other PC.
16
CARE AND MAINTENANCE
RESETTING THE UNIT
If the unit is exposed to a strong static electrical charge, the unit
may lock up, or the display may dim. This is very rare, but if it does
happen, remove the batteries and then reinstall. All settings w ill
return to their preset values, but the previous messages are
saved.
TRAFFIC SAFETY
•. Do not use while operating a motorized vehicle. It may create
a traffic hazard and is illegal in many areas.
•.Even if your earphone is an open air type designed to let you
hear outside sounds, do not turn the volume up so high that
you cannot hear what is around you.
•.Use extreme caution or temporarily discontinue use in
potentially hazardous situations.
CARE
• .Keep the unit dry. If it gets wet, wipe it immediately. Liquids
may contain minerals that can corrode the circuits.
•.Use and store the unit only in normal temperature
environments. Extreme temperatures can shorten the life of
electronic devices, damage batteries and/or melt plastic parts.
•.Keep the unit away from dirt and dust.
•.Handle the unit gently and carefully. Dropping it can cause
damage and may cause the unit to work improperly.
•.To clean, wipe the unit with a damp cloth occasionally to keep
it looking new. Do not use harsh chemicals, cleaning solvents
or strong detergents.
Page 5

)
SPECIFICATIONS
Message number
Max.396 (4 files total)
LP SP MP HP
Recording Time(128MB memory)
Memory (SD or FLASH) SD:64MB~1GB;FLASH:128MB
MICROPHONE Ext..Mic (D3.5mm, Mono w/switch)
Jacks EARPHONE Ear Phone (D3.5mm, Mono w/switch)
Loud Speaker 8 ohms dynamic speaker
Output power
Earphone 5 mW
R/P frequency response 300 Hz to 3,000 Hz
Power Source DC 3V with "AAA" Alkaline battery x 2 pcs sleep<60uA
Battery Life Time
About 6.5 hours at speaker play at volume 1/2..
Other record date Memorize recording date of message
function remain time Display remaining time for recording
Accessories Earphone /CD Soft / USB Cable/Telephone Kit/Microphone
Size(mm) 115×40 ×20 mm
Specifications are subject to change without notice.
Max. 99 (sigal file)
17
50hours 16hours 8hour 5hours30min
USB USB V1.1 Socket
USB JACK MINI 5PIN
Speaker 100 mW
About 10 hours at recording mode (HP Recording)
18
IMPORTANTSAFETY INSTRUCTIONS
Read this manual before use and keep it for future reference
PRECAUTIONS
To maintain optimum perfo rmance:
Do not use unit in places which are extremely hot, c old, dusty or
High humidity place.
Do not use or keep the unit in following places.
In a high humidity area such as a bathroom or near a hearer.
In an area exposed to direct sunlight(e.g., inside car
where it become extremely hot).
Near sources of strong magnetism, such as television, speakers
or magnets.
Where there is a lot of movement or vibration, such as in a car
dashboard or an unstable shelf.
For safety
Do not attempt to disassemble thi s unit.
make sure that pins or other foreign objects to not get inside
the Unit.
Take care not to drop the unit or subject it to strong shocks .
N ote no listening with the earphones
listen at moderate volumes to avoid hearing damage.
Do not wear the earphones while d riving or cycling. It may create
a traffic hazard.
You should use extreme caution or temporarily discontinue use
in potentially hazardous situations such as walking, Jogging, etc.
If you hear no sound, DO NOT turn the volume up high because
the music could suddenly begin at high volume. To avoid hurting
your ears or damaging the headphones turn the volume control to
the lowest level before starting playback and slowly turn it up
to the desired level.
1
OPERATION(CONTINUED
Mode setting. (How to use MODE key?)
* MODE key can setting following 10 items.
1, Recording quality mode. (HP, LP, SP, MP) 6, Date. (1 – 31)
2, Microphone sensitivity. (Hi, Lo.) 7, Time/hour. (00 – 23)
3, VOX. (On, Off) 8, Time/minute. (00 – 59)
4, Year. (06 – 50 / last 2 digit of the year) 9, SD card. (On, Off)
5, Month. (1 – 12) 10, Format. (No, Yes)
1, Make unit Power-on ( I CR mode)
1-1, Nothing displayed on LCD
* Press P LAY key once.
↓
1-2, Calendar & time displayed on LCD. (Date mode.)
(The display will be disappeared after 60 sec. without any action./ Auto power off.)
* Press MO DE key once.
↓
1-3, IC recorder Power-on. (ICR mode.)
(The display will be disappeared after 60 sec. without any action./ Auto power off.)
2, Make unit SET Mode
Page 6

2-1, At ICR Mode, press MODE key and hold more than 3 sec., the display shows SET Mode.
(The display will be back to “Date mode” after 60sec. with out any action.)
2-2, Use (↑) or (↓) key to select one mode to be set.
2-3, After select mode, use (←) or (→) key to change setting.
2-4, To confirm to change the sett ing, press PLAY key each time.
(No press PLA Y key each time, No change the setting.)
2-5, Press MODE key once to be back “ICR mode” after finish setting.
6
 Loading...