

Page 1
FRA105
FM Alarm Clock Radio
Instruction Manual
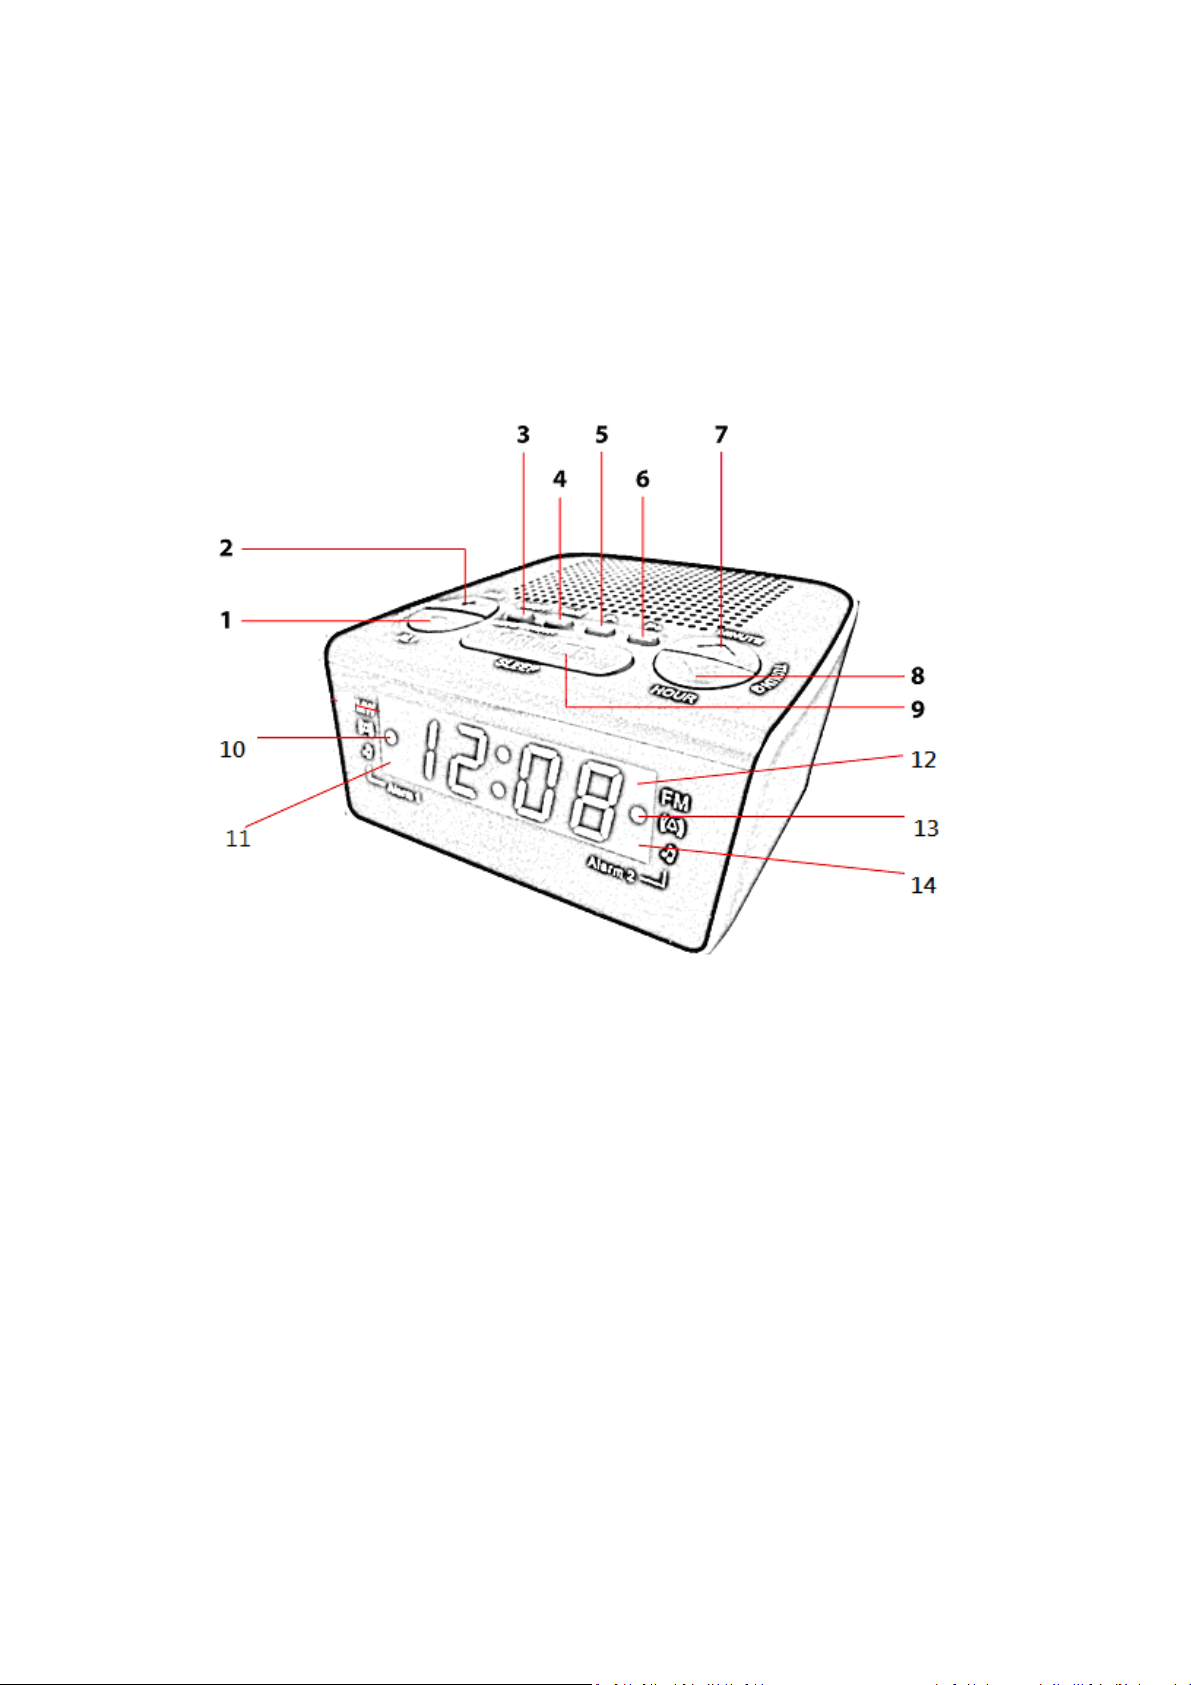
LOCATION OF CONTROLS
1. ALARM 1 / VOLUME-
2. ALARM 2 / VOLUME+
3. ON/OFF / BAND SELECT
4. TIME SET / MEMORY SET
5. MEMORY -
6. MEMORY +
7. MINUTE / TUNING+
8. HOUR / TUNING-
9. SLEEP/SNOOZE
10. ALARM 1 Buzzer Indicator
ALARM 1 Radio Indicator
11.
Page 2

12. FM Indicator
13. ALARM 2 Buzzer Indicator
14. ALARM 2 Radio Indicator
POWER SOURCE
TO USE AC HOUSE CURRENT
Plug the AC cord into the standard household electrical socket.
BATTERY BACKUP
This unit has a battery backup facility to provide power in case of the power cut.
1. Remove battery cover.
2. Insert 2 new AAA size batteries (not included ) properly.
3. Remount the battery cover.
OPERATING THE RADIO
1. Press ON/OFF button to turn on the radio. FM indicator turns on and the LED
shows the frequency. After 5 seconds, LED will show the time.
2. Pressing VOL+ button to increase the volume and press VOL- to decrease.
Note: Volume range: 00 (mute) to 16 (maximum)
3. Press TUN- or TUN+ to tune into the desired station:
Manual Tuning : Press TU- button or TU+ repeatedly until the desired station is
reached.
Auto Scanning: Press and hold TU- button or TU+ for more than 1 second to
perform auto scan.
Press any button to stop auto scanning.
Note : Please use Manual Tuning when the radio signal is not strong enough.
4. Press and hold ON/OFF button to turn off the radio.
PRESETTING YOUR FAVOURITE STATION
10 stations can be preset in 10 memories which are indicated as preset numbers P01,
P02, P03, P04, P05, P06, P07, P08, P09 and P10.
1. Press and hold SET button for over 1 second until the last memorized preset
number appears and flashes.
2. Choose the preset number to memorize this station by pressing MEMORY- or
MEMORY+.
Page 3

3. Once the preset number is chosen, it will keep flashing for 5 seconds. Press SET
button once within these 5 seconds, then the tuned station will be memorized in
this chosen preset number and the LED will stop flashing and change to show the
frequency. If the SET button is not pressed within these 5 seconds, then the LED
will jump back to show the frequency, and the memory storing does not succeed.
TUNING INTO A PRESET STATION
1. Press MEMORY+ or MEMORY – once to tune the radio to the station stored in the
preset number next to the last loaded one.
2. After the preset number is chosen, the LED shows the radio frequency after 2
seconds.
Important Note: Please do NOT hold (press continuously) the SET button in this
stage, or the unit will enter the mode of presetting the station. In this case, do not
press any button until the LED stops flashing, or the preset memory may easily be
disturbed by your wrong operation.
TIME SETTING
1. Plug the unit into the AC mains, “0:00” will appear and flash.
2. Press HOUR (8) for hour setting.
3. Press MINUTE (7) for minute setting.
4. Press SET button once or wait for 5 seconds, the clock will start running from the
set time.
5. Switch off the radio, press and hold SET button for 1 second until the display
flashes, then follow step 2, 3 & 4 above to set the new time.
DUAL ALARM FUNCTION
Each alarm function can be set independently. When any alarm is set to wake by
radio, please select the desired band, station and volume level before turning off the
radio.
ALARM SETTING
Page 4

1. Turn off the radio.
2. Press ALARM 1 once, the alarm time and either Alarm 1 Buzzer indicator or Alarm
1 Radio indicator flashes.
3. Press HOUR button for selecting hour. Press MINUTE button for selecting
minutes.
4. Press ALARM 1 button again or wait for 5 seconds to confirm the set alarm time.
5. Press ALARM 1 button repeatedly to choose the alarm function status.
A) Wake by buzzer is set when Alarm 1 Buzzer indicator and Alarm time flash;
B) Wake by radio is set when Alarm 1 Radio indicator and Alarm time flash.
C) Off is set when no indicator is on and current time shows on LED;
6. To set Alarm 2 , follow the above step 2 to 5, wake by buzzer status is indicated by
Alarm 2 Buzzer indicator while wake by radio status is indicated by Alarm 2 Radio
indicator.
7. When the Alarm is turned on :
A) Press ON/OFF or Alarm 1/2 button once to switch off alarm 1/2.
B) Press SNOOZE button to stop the alarm temporarily for 9 minutes. [See
SNOOZE SETTING below]
C) It will keep making sound for 1 hour if not being stopped.
D) Press ALARM 1 or ALARM 2 until the indicators (radio or buzzer) disappear to
disable the alarm setting.
Notes
The ALARM 1 (or 2) indicator flashes in the display when the alarm sounds.
The ALARM 2 takes priority if both alarms are set the same time.
SNOOZE SETTING
1) Press SNOOZE button to stop the alarm and it will sound again after 9 minutes.
The SNOOZE function is valid for 1 hour.
2) The alarm indicator flashes when SNOOZE function is turned on.
3) Press ON/OFF button to switch off SNOOZE function.
SETTING THE SLEEP TIMER
1) Turn on the radio.
2) Press SLEEP button, then the LED shows 90 (for 90 minutes ).
3) Press SLEEP button repeatedly until the desired SLEEP time shows, which is
shown in sequence as 90 > 80 > 70 > 60 > 50 > 40 > 30 > 20 > 10 > OFF.
Press SLEEP button in the SLEEP mode, the LED will show the remaining time of
4)
Page 5

the SLEEP period, and the SLEEP time can be set again.
5) Switch off the SLEEP function by step 3 .
SETTING THE SLEEP TIMER AND ALARM TOGETHER
1) To set the SLEEP TIMER function and Alarm function together, set the alarm first.
2) Turn on the radio, and follow step 2 & 3 of SETTING THE SLEEP TIMER.
Specifications
Power Source : 230V ~ 50 Hz
Radio Frequency : FM: 87.5 ~ 108 MHz
Speaker : 57 mm, 8 Ω, 0.5W
Power consumption : 5 W
DC Battery for back up : 3V, 2 x AAA size batteries ( not included )
 Loading...