

Page 1
INSTRUCTION MANUAL
CD/MP3 PLAYER WITH FM RADIO
AND USB READER
MODEL: CSU602PLL
Please read and follow these instructions before using your unit.
Page 2
OVERVIEW OF THE PLAYER
12
19
13
18
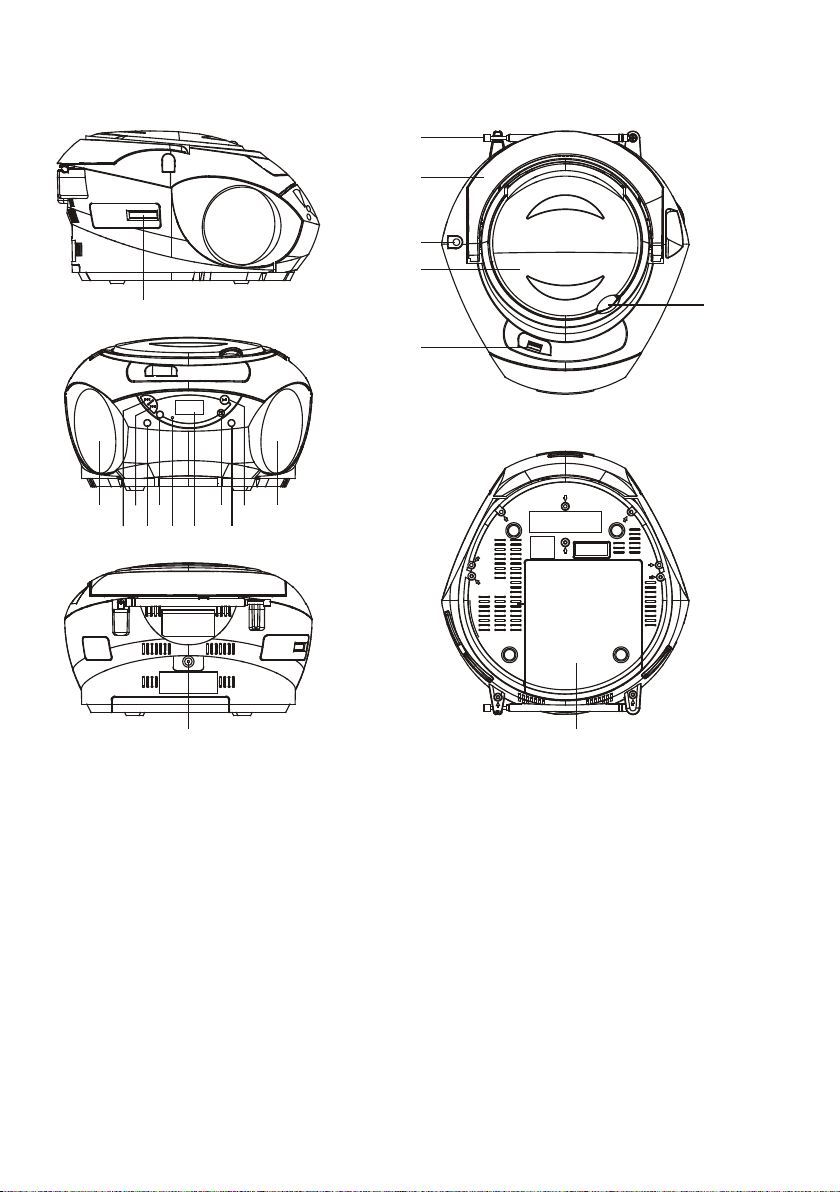
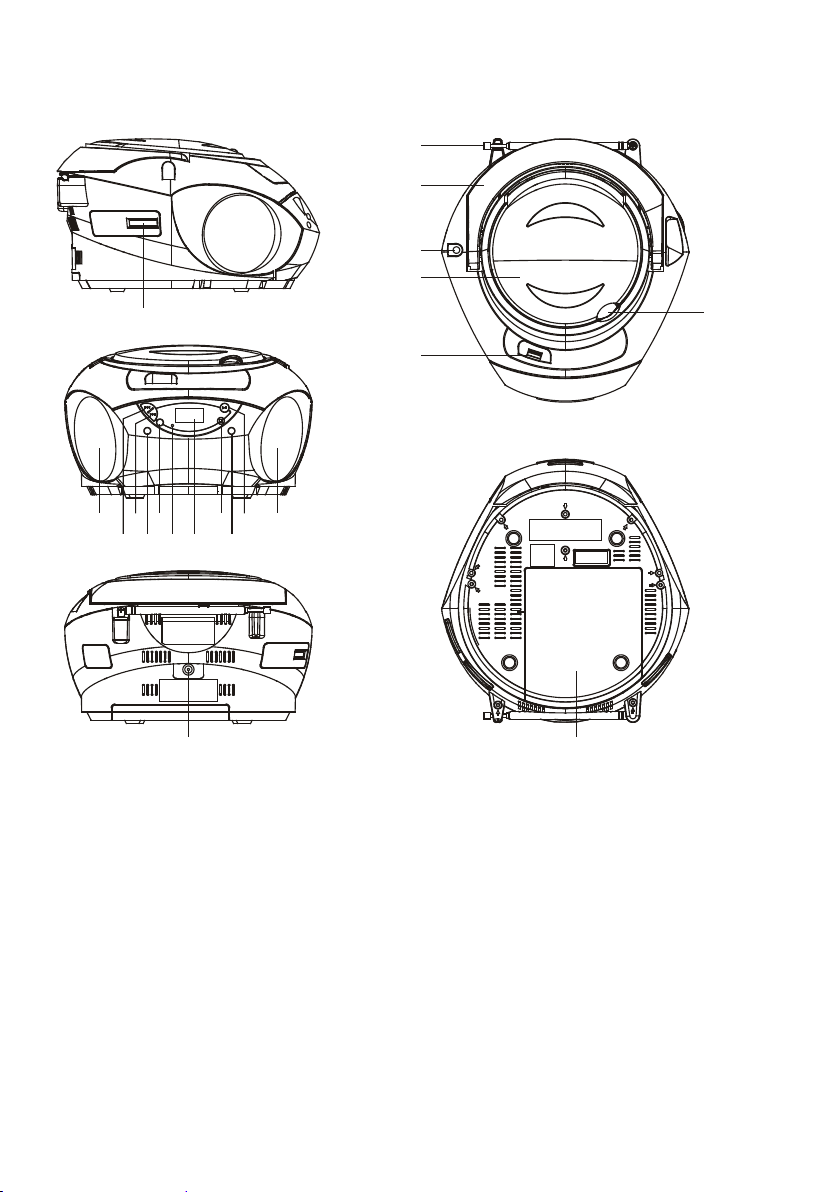
19. BATTERY COMPARTMENT
1
6
4
2
5
3
7 8910
11
2
14
15
16
17
LOCATION OF CONTROLS
1. VOLUME CONTROL
2. SPEAKER
3. SKIP DN/TUN- BUTTON
4. SKIP UP/TUN+ BUTTON
5. SOURCE BUTTON
6. MODE/PROG/MEM BUTTON
7. STANDBY INDICATOR
8. LCD DISPLAY
9. STOP/CH- BUTTON
10. POWER BUTTON
11. PLAY/PAUSE/CH+ BUTTON
12. DC IN JACK
13. FM TELESCOPIC ANTENNA
14. FOLDING HANDLE
15. AUX IN JACK
16. CD DOOR
17. USB PORT
18. CD DOOR OPEN AREA
GB-1
Page 3

POWER SUPPLY
BATTERY OPERATION
1. Remove the battery compartment cover gently.
2. Install 8 x 'C' size batteries (UM-2 or equivalent) while observing the correct polarities.
3. Replace the battery compartment cover.
NOTE:
The AC/DC adapter must be detached from the DC IN jack of the player for battery
operation.
Leaking batteries may damage the battery cabinet and the player as a whole, so they
should be removed from the cabinet when becoming flat or when the player is not to be
played on batteries for some time.
DC INPUT OPERATION
Plug the supplied adapter to the DC IN jack on the unit and to the main power.
NOTE: If not any audio signal inputs to the unit in about one hour, the unit will enter to standby
mode automatically (except at FM radio mode).
FM RADIO
TUNING THE FM RADIO
1. The standby indicator will light once connect the main unit to the main power. Press the
POWER button to turn the unit on (the standby indicator will be off).
2. Press the SOURCE button repeatedly to switch the unit to the FM radio mode.
3. To launch the auto-searching, press and hold the SKIP DN/TUN- button or SKIP UP/TUN+
button several seconds and then release it.
4. Press the SKIP DN/TUN- button or SKIP UP/TUN+ button to tune the radio stations manually.
5. Adjust the volume level to a comfortable listening level.
6. Press the POWER button to turn off the unit.
NOTE:
When FM (stereo) station is received, the FM stereo icon will be displayed on the screen.
The FM TELESCOPIC ANTENNA is directional. When you are receiving an FM broadcast,
fully extend the TELESCOPIC ANTENNA and rotate it for the best reception.
STORING YOUR FAVORITE RADIO STATION
1. Tune to your favorite station first; press the MODE/PROG/MEM button for storing the current
station until memory cell number flashes on the screen.
2. Use the STOP/CH- button or the PLAY/PAUSE/CH+ button to select the corresponding
memory cell among P01-P20 for storing the station.
3. Confirm your selection by pressing the MODE/PROG/MEM button.
4. During radio playback, press the STOP/CH- button or the PLAY/PAUSE/CH+ button
repeatedly to recall the preset stations.
GB-2
Page 4

HANDLING AND MAINTENANCE OF A DISC
CLEAN FROM CENTER TO EDGE
Follow the instructions below to handle and maintain your disc in order
that long time and trouble free performance can possibly be obtained:
Ensure not to caress the rain bow side of the disc; handle the disc by
the edge.
Long time exposure to sunshine, high temperatures and humidity will
HANDLE DISC ONLY AS SHOWN
damage the disc. And keep storage area clean.
Avoid sticking labels on both sides of a disc. Writing with pointed
articles on the disc should be strictly avoided.
Clean the disc wiping the centre and then working out to the edge
with a dry & soft cloth or a disc brush. Avoid any cleansing lotion or
chemical eradicator.
Store them in their cases when they are not to be used.
DO NOT STORE NEAR HEAT
LOAD A DISC
1. Open the CD door by the Door open area.
2. Load a disc on the disc tray with the label side facing up.
3. Close the CD door.
PLAY A DISC (CD/MP3)
1. Press the POWER button to turn the unit on (the standby indicator will be off).
2. Press the SOURCE button repeatedly to switch to CD mode.
3. Follow the steps above to load a disc.
4. The player begins reading disc immediately.
5. When the disc is successfully read, the total number of the tracks shows in the LCD and
playback follows with the first track.
6. Press the PLAY/PAUSE/CH+ button once to halt music playback, the elapsed time flashes to
indicate the player in Pause mode; press the STOP/CH- button to cease music playback, the
LCD shows the total number of the tracks again.
EXTERNAL MEMORY MEDIA OPERATION (USB)
1. Press the POWER button to turn the unit on (the standby indicator will be off).
2. Insert an USB to the USB port.
3. Press the SOURCE button repeatedly to switch to USB mode.
4. When the inserted USB is detected and read, the first track will be played automatically.
5. Press the PLAY/PAUSE/CH+ button to pause or resume the playback.
6. Press the STOP/CH- button to cease the playback.
SKIP TRACKS AND SEARCH FOR A SPECIFIC POINT TO PLAY (CD/MP3/USB)
1. Press once the SKIP UP/TUN+ button in music play to skip to the next track; press once the
SKIP DN/TUN- button in music play to go back to beginning of the current track, press the
button twice continuously to skip to the previous track.
2. Press and hold the SKIP UP/TUN+ button or the SKIP DN/TUN- button in music play to search
at quick rate for a specific point to play.
REPEAT PLAYBACK (CD/MP3/USB)
During playback, press the MODE/PROG/MEM button to repeat play a single track; press the
button twice to repeat play all tracks; press the button three times to enter the introduction play
mode; press the button four times to enter the random play mode; press the button five times to
exit.
GB-3
Page 5

PROGRAMMED PLAY (CD/MP3 DISC/USB)
1. At stop mode, press the MODE/PROG/MEM button once, the program’s icon shows with a
program sequence indication "P01" first, then a track number flickers on the LCD with the
program’s icon;
2. Select the first track to be programmed using the SKP UP/TUN+ button or the SKIP DN/TUNbutton, and then press the MODE/PROG/MEM button again to store and advance to the next
programming step (If there are several folders on the MP3 disc or USB, it is necessary to
program folders first and then the tracks. The method of the folders programming is the same
as the tracks programming.).
3. Repeat the above steps to program more tracks. A maximum of 20 tracks for CD and 99 tracks
for MP3/USB can be programmed in memory in a preferred order. If the memory is full, the
screen will show “FUL” for indicating.
4. Press the PLAY/PAUSE/CH+ button to begin programmed play in the preferred order after you
are done with programming. The player stops automatically after all programmed tracks are
played.
5. You may press the STOP/CH- button to terminate programmed playback. In program stop
mode, press the PLAY/PAUSE/CH+ button to begin the programmed playback with the
programming order identical with the previous one done; press the STOP/CH- button again to
clear the programming.
AUX IN
1. Connect the Aux in jack on the unit to an audio source, for example, MP3 player with an audio
cable.
2. Power on the unit following the corresponding instructions.
3. Press the SOURCE button repeatedly to switch to AUX mode.
4. Use the native controls on the connected audio device to begin playing music through the
connected unit.
IMPORTANT SAFETY INSTRUCTIONS
The apparatus shall not be exposed to dripping or splashing and that no objects filled with
liquids, such as vases, shall be placed on the apparatus.
When the AC/DC adapter is used as the disconnect device, the disconnect device shall remain
readily operable. To be completely disconnected the power input, the AC/DC adapter shall be
disconnected from the mains completely.
No naked flame sources, such as lighted candles, should be placed on the apparatus.
Minimum distances 2.0cm around the apparatus for sufficient ventilation. The ventilation should
not be impeded by covering the ventilation openings with items, such as newspapers,
table-cloths, curtains, etc.
The use of apparatus is in tropical and/or moderate climates.
Attention should be drawn to the environmental aspects of battery disposal.
CAUTION: Danger of explosion if battery is incorrectly replaced. Replace only with the same or
equivalent type.
Battery shall not be exposed to excessive heat such as sunshine, fire or the like.
The marking plate is located at the back of the apparatus.
GB-4
Page 6

SPECIFICATION
GENERAL
Power .................................................... DC 9V 1A (from the external adapter)
12V UM-2/"C" x 8pcs (batteries)
Power consumption ................................. 9W
Dimensions ............................................. Approx. 235mm (L) x 250mm (W) x 142mm (H)
Operation temperature ............................ +5°C ~ + 35°C
RECEIVER SECTION
Receiving bands...................................... FM ST.
Tuning range/sensitivity ........................... FM 87.5 - 108 MHz
CD PLAYER SECTION
Playback system ..................................... Compact Disc Digital Audio System
AUDIO SECTION
Output power .......................................... 1.2W x 2 (RMS)
Speaker impedance ................................ 8 ohms
Specifications are subject to change without notice.
This is to certify that the CD/MP3 PLAYER is in conformity with
Council directive 2004/108/EC (EMC Directive)
Applicable standards:
EN55013:2001+A1:2003+A2:2006
EN61000-3-2:2006+A1:2009+A2:2009
EN61000-3-2:2008
EN55020:2007
For more information please visit our website
www.mpmaneurope.com
GB-5
Page 7

MODE D'EMPLOI
LECTEUR CD/MP3 AVEC RADIO FM
ET LECTEUR USB
MODÈLE: CSU602PLL
Veuillez lire et suivre ces consignes avant d'utiliser votre appareil.
Page 8
APERÇU DU LECTEUR
12
19
13
18
1
6
4
2
5
3
7 8910
11
2
14
15
16
17
EMPLACEMENT DES COMMANDES
1. REGLAGE DU VOLUME
2. HAUT-PARLEUR
3. BOUTON PRECEDENT / FREQ -
4. BOUTON SUIVANT / FREQ +
5. SOURCE
6. BOUTON MODE/PROG/MEM
7. INDICATEUR DE VEILLE
8. ECRAN LCD
9. BOUTON STOP / STATION-
10. BOUTON MARCHE / ARRET
11. BOUTON LECTURE / PAUSE / STATION +
12. PRISE ENTREE CC
13. ANTENNE FM TELESCOPIQUE
14. POIGNEE PLIANTE
15. JACK ENTREE AUX
16. PORTE DU CD
17. PORT USB
18. ZONE D'OUVERTURE DE LA PORTE DU CD
19. COMPARTIMENT A PILES
FR-1
Page 9

ALIMENTATION
UTILISATION SUR PILES
1. Retirer délicatement le couvercle du compartiment à piles.
2. Insérer 8 piles 'C' (LR14 ou équivalentes) en respectant les polarités.
3. Remettre en place le couvercle du compartiment à piles.
REMARQUE :
Pour un fonctionnement sur piles, l'adaptateur CA / CC doit être débranché de la prise
entrée CC.
Les piles coulées peuvent endommager le compartiment à piles voire le lecteur en
lui-même. Les piles doivent donc être retirées lorsqu'elles sont usagées ou que le lecteur
ne va pas être utilisé sur piles pendant une période prolongée.
FONCTIONNEMENT AVEC L'ENTREE CC
Branchez l'adaptateur fourni à la prise entrée CC de l'appareil et à une prise secteur
N.B. : Si l'appareil ne reçoit aucun signal audio pendant une heure, il se mettra automatiquement
en veille (sauf dans le cas du mode radio FM).
RADIO FM
REGLAGE DE LA RADIO FM
1. L'indicateur de veille s'allumera une fois l'appareil branché sur le secteur. Appuyez sur le
bouton MARCHE pour allumer l'appareil (l'indicateur de veille s'éteint).
2. Appuyez plusieurs fois sur le bouton SOURCE pour basculer en mode radio FM.
3. Pour lancer la recherche automatique, appuyez pendant quelques secondes sur le bouton
PRECEDENT / FREQ- ou sur le bouton SUIVANT / FREQ+ puis relâchez.
4. Appuyez sur le bouton PRECEDENT / FREQ- ou sur le bouton SUIVANT / FREQ+ pour régler
manuellement les stations de radio.
5. Réglez le volume à un niveau d'écoute confortable.
6. Appuyez sur le bouton ARRET pour éteindre l'appareil.
REMARQUE:
Lorsqu'une station FM (stéréo) est captée, l'icône FM stéréo s'affiche sur l'écran.
L'ANTENNE FM TELESCOPIQUE est directionnelle. Lorsque vous captez une radio FM,
déployez entièrement l'ANTENNE TELESCOPIQUE et orientez la pour une meilleure
réception.
MEMORISER VOS STATIONS DE RADIO PREFEREES
1. Réglez d'abord votre station préférée ; appuyez sur le bouton MODE/PROG/MEM pour
mémoriser la station écoutée jusqu'à ce que le numéro de présélection clignote sur l'écran.
2. Utilisez le bouton STOP/STATION– ou LECTURE/PAUSE/STATION+ pour sélectionner le
numéro de présélection correspondant parmi P01-P20 afin de mémoriser la station.
3. Confirmez votre sélection en appuyant sur le bouton MODE/PROG/MEM.
4. Pendant l'écoute de la radio, appuyez plusieurs fois sur le bouton STOP/STATION– ou sur le
bouton LECTURE/PAUSE/STATION+ pour rappeler les stations présélectionnées.
FR-2
Page 10

MANIPULATION ET ENTRETIEN D'UN DISQUE
Suivez les instructions ci-dessous pour manipuler votre disque afin de
le conserver en bon état de marche et de préserver sa durée de vie.
Assurez-vous de ne pas toucher la surface enregistrée du disque ;
ne tenez le disque que par ses bords.
L'exposition prolongée à la lumière directe du soleil, les
températures élevées ou l'humidité endommageront le disque.
Maintenez la surface enregistrée propre.
Ne pas coller d'étiquettes sur les faces d'un disque. Évitez
absolument d'écrire sur le disque avec des objets pouvant le rayer.
Essuyez le disque du centre vers ses bords en utilisant un chiffon
sec et doux ou une brosse à disque. Ne pas utiliser de lotions
nettoyantes ou de produits chimiques.
Conservez les dans leur boîtier lorsqu'ils ne sont pas utilisés.
SAISIR LE DISQUE COMME ILLUSTRÉ
NETTOYER DU CENTRE VERS LES
NE PAS ENTREPOSER A PROXIMITE
D'UNE SOURCE DE CHALEUR
BORDS
CHARGER UN DISQUE
1. Ouvrez la porte du CD par sa zone d'ouverture.
2. Posez un disque sur le plateau avec la face imprimée tournée vers le haut.
3. Fermez la porte du CD.
LIRE UN DISQUE (CD/MP3)
1. Appuyez sur le bouton MARCHE pour allumer l'appareil (l'indicateur de veille est éteint).
2. Appuyez plusieurs fois sur le bouton SOURCE pour basculer en mode CD.
3. Suivez les étapes décrites ci dessus pour charger un disque.
4. Le lecteur commence à lire le disque immédiatement.
5. Quand le disque a été correctement lu, le nombre total de pistes s'affiche sur l'écran LCD et
l'écoute de la première piste démarre.
6. Appuyez une fois sur le bouton LECTURE/PAUSE/STATION+ pour mettre la lecture de la
musique en pause, le temps écoulé clignote pour indiquer que le lecteur est mode Pause;
appuyer sur le bouton STOP/STATION- pour arrêter la lecture de la musique, l'écran LCD
affiche de nouveau le nombre total de pistes.
FONCTIONNEMENT AVEC UN STOCKAGE EXTERNE (USB)
1. Appuyez sur le bouton MARCHE pour allumer l'appareil (l'indicateur de veille s'éteint).
2. Branchez le périphérique USB dans le port USB.
3. Appuyez plusieurs fois sur le bouton SOURCE pour basculer en mode USB.
4. Quand le périphérique USB est détecté et lu, la première piste est jouée automatiquement.
5. Appuyez sur le bouton LECTURE/PAUSE/STATION+ pour mettre en pause ou relancer la
lecture.
6. Appuyez sur le bouton STOP/STATION- pour arrêter la lecture.
SAUT DE PISTES ET RECHERCHE D'UN POINT DE LECTURE SPECIFIQUE (CD/MP3/USB)
1. Appuyez une fois sur le bouton SUIVANT/FREQ+ pendant la lecture pour passer à la piste
suivante; appuyez une fois sur le bouton PRECEDENT/FREQ- pendant la lecture pour revenir
au début de la piste écoutée, appuyez deux fois pour retourner à la piste précédente.
2. Appuyez longuement sur le bouton SUIVANT/FREQ+ ou PRECEDENT/FREQ- pendant la
lecture pour rechercher en accéléré un point de lecture spécifique.
FR-3
Page 11

LECTURE REPETEE (CD/MP3/USB)
Pendant la lecture, appuyez sur le bouton MODE/PROG/MEM pour répéter la piste seule;
appuyez deux fois sur le bouton pour répéter toutes les pistes; appuyez trois fois pour passer
dans le mode de lecture d'introductions ; appuyez quatre fois pour lire aléatoirement; appuyez
cinq fois pour sortir.
LECTURE PROGRAMMEE (CD/MP3 DISC/USB)
1. Lecture arrêtée, appuyez sur le bouton MODE/PROG/MEM une fois, l’icône programme
s'affiche avec d’abord l'indication de séquence de programme "P01", puis un numéro de piste
clignotant sur l'écran LCD avec l'icône programme;
2. Sélectionnez la première piste à programmer en utilisant les boutons SUIVANT/FREQ+ et
PRECEDENT/FREQ-, puis appuyez à nouveau sur le bouton MODE/PROG/MEM pour
enregistrer et avancer à l'étape de programmation suivante (Si il y a plusieurs répertoires sur
le disque MP3 ou sur le périphérique USB, il est nécessaire de programmer d'abord les
répertoires puis les pistes. La méthode de programmation des répertoires est la même que
celle de la programmation des pistes.).
3. Répétez les étapes ci-dessus pour programmer plus de pistes. Un maximum de 20 pistes pour
les CD et de 99 pistes pour les MP3 / USB peut être programmé en mémoire dans un ordre
préféré. Si la mémoire est pleine, l'écran affichera “FUL” pour l'indiquer.
4. Une fois la programmation terminée, appuyez sur le bouton LECTURE/PAUSE/STATION+
pour démarrer la lecture programmée dans l'ordre défini. Le lecteur s’arrête automatiquement
quand toutes les pistes programmées ont été lues.
5. Vous pouvez appuyez sur le bouton STOP/STATION- pour arrêter la lecture programmée. En
mode programme arrêté, appuyez sur le bouton LECTURE/PAUSE/STATION+ pour lancer la
lecture programmée dans un ordre identique à celui précédemment fait; appuyez de nouveau
sur le bouton STOP/STATION- pour effacer la programmation.
ENTREE AUX
1. Connectez l'entrée jack Aux de l'appareil à une source audio, par exemple un lecteur MP3
avec un câble audio.
2. Allumez l'appareil selon les consignes adéquates.
3. Appuyez plusieurs fois sur le bouton SOURCE pour basculer en mode AUXiliaire.
4. Utilisez les commandes d'origine de votre périphérique audio connecté pour commencer à
jouer de la musique avec l'appareil.
CONSIGNES IMPORTANTES DE SECURITE
L'appareil ne doit pas être exposé à des écoulements ou des éclaboussures et aucun objet
rempli de liquide, tel qu'un vase, ne devrait être posé dessus.
Quand l'adaptateur CA/CC est déconnecté, il doit rester facilement accessible. Pour être
totalement déconnecté de l'alimentation, l'adaptateur CA/CC doit être totalement débranché de
la prise secteur.
Aucune source directe de flamme, telle que des bougies allumées ne doit être posée sur
l'appareil.
Une distance minimale de 2.0cm autour de l'appareil doit être respectée pour assurer une
aération suffisante. L'aération ne doit être gênée en obstruant les ouvertures de la ventilation
avec des objets, tels que des journaux, nappes, rideaux, etc.
L'utilisation prévue de l'appareil concerne les climats modérés et/ou tropicaux.
Une attention particulière doit être portée à l'environnement en jetant les piles.
ATTENTION : Risque d'explosion si la pile n'est pas remplacée correctement. Remplacer
uniquement avec un type de pile similaire ou équivalent.
FR-4
Page 12

Les piles ne doivent pas être exposées à une chaleur excessive telle que le soleil, le feu, etc.
La plaque signalétique se situe au dos de l'appareil.
CARACTERISTIQUES
GENERAL
Alimentation ........................................... CC 9V 1A (adaptateur externe)
12V LR14/"C" x 8 (piles)
Consommation ........................................ 9W
Dimensions ............................................. Approx. 235mm (L) x 250mm (l) x 142mm (H)
Température de fonctionnement .............. +5°C ~ + 35°C
RECEPTEUR
Bande de réception ................................. FM ST.
Plage de fréquence / sensitivité............... FM 87.5 - 108 MHz
LECTEUR CD
Système de lecture ................................. Système Audio Numérique à Disque Compact
AUDIO
Puissance de sortie ................................. 1.2W x 2 (RMS)
Impédance .............................................. 8 ohms
Les caractéristiques sont sujettes à changement sans préavis.
Ce logo certifie que le LECTEUR CD/MP3 respecte la
directive du conseil 2004/108/CE (directive CEM)
Normes Applicables:
EN55013:2001+A1:2003+A2:2006
EN61000-3-2:2006+A1:2009+A2:2009
EN61000-3-2:2008
EN55020:2007
Pour plus d'informations, veuillez visiter notre site web
www.mpmaneurope.com
FR-5
Page 13

BEDIENUNGSANLEITUNG
CD/MP3-SPIELER MIT FM-RADIO
UND USB-LESEGERÄT
MODELL: CSU602PLL
Vor der Verwendung Ihres Geräts diese Anleitung bitte lesen und befolgen.
Page 14

ÜBERSICHT ÜBER DEN SPIELER
12
19
13
18
14
15
16
1
17
6
4
2
5
3
7 8910
11
2
ANORDNUNG DER STEUERELEMENTE
1. LAUTSTÄRKEREGLER
2. LAUTSPRECHER
3. ÜBERSPRINGEN-/TUNER-
4. ÜBERSPRINGEN +/TUNER+
5. QUELLENTASTE
6. MODUS-/PROG-/SPEICHER-TASTE
7. STAND-BY-ANZEIGE
8. LCD-BILDSCHIRM
9. STOPP-/KANAL-
10. NETZTASTE
11. WIEDERGABE/PAUSE/KANAL+
12. DC-EINGANGSBUCHSE
13. FM-TELESKOPANTENNE
14. KLAPPGRIFF
15. AUX-IN-BUCHSE
16. CD-KLAPPE
17. USB-PORT
18. CD-KLAPPENEINGRIFF
19. BATTERIEFACH
DE-1
Page 15

STROMVERSORGUNG
BATTERIEBETRIEB
1. Die Batteriefachabdeckung vorsichtig öffnen.
2. Acht Batterien der Größe 'C' einsetzen (UM-2 oder gleichwertig) und auf die korrekte
Polarität achten.
3. Die Batteriefachabdeckung wieder anbringen.
HINWEIS:
Für den Batteriebetrieb muss das AC-/DC-Netzteil von der DC-Eingangsbuchse getrennt
sein.
Auslaufende Batterien können das Batteriefach und den Spieler als Ganzes beschädigen,
daher sollten Sie aus dem Fach herausgenommen werden, wenn sie schwach sind oder
der Spieler für einige Zeit nicht mithilfe der Batterien betrieben wird.
BETRIEB ÜBER DEN DC-EINGANG
Schließen Sie das Netzteil an die DC-Eingangsbuchse des Geräts sowie an den Netzstrom
an.
HINWEIS: Wenn das Gerät innerhalb von etwa einer Stunde keinerlei Audiosignal empfängt,
schaltet das Gerät automatisch in den Stand-by-Modus (außer im FM-Radio-Modus).
FM-RADIO
DAS FM-RADIO EINSTELLEN
1. Die Stand-by-Anzeige leuchtet auf, sobald das Hauptgerät an den Netzstrom angeschlossen
ist. Zum Einschalten des Geräts auf die NETZ-Taste drücken (die Stand-by-Anzeige erlischt).
2. Wiederholt auf die QUELLEN-Taste drücken, um das Gerät auf den FM-Modus einzustellen.
3. Zum Starten der automatischen Suche, die Tasten ÜBERSPRINGEN-/TUNER- oder
ÜBERSPRINGEN+/TUNER+ für mehrere Sekunden gedrückt halten und anschließend
loslassen.
4. Die Tasten ÜBERSPRINGEN-/TUNER- oder ÜBERSPRINGEN+/TUNER+ drücken, um
Radiosender manuell einzustellen.
5. Die Lautstärke auf ein angenehmes Hörniveau regeln.
6. Zum Ausschalten des Geräts auf die NETZ-Taste drücken.
HINWEIS:
Wenn ein FM-Sender (Stereo) empfangen wird, erscheint das FM-Stereo-Symbol auf dem
Bildschirm.
Die FM-TELESKOPANTENNE ist direktional. Wenn Sie eine FM-Sendung empfangen, die
TELESKOPANTENNE vollständig ausziehen und drehen, bis der Empfang optimal ist.
IHRE LIEBLINGSSENDER SPEICHERN
1. Stellen Sie zuerst Ihren Lieblingssender ein; drücken Sie zum Speichern des aktuellen
Senders auf die MODUS-/PROG-/SPEICHER-Taste, bis die Speicherplatznummer auf dem
Bildschirm erscheint.
2. Wählen Sie den entsprechenden Speicherplatz zum Speichern des Senders unter den Plätzen
P01-P20 aus, indem Sie die Tasten STOPP-/KANAL- oder WIEDERGABE/PAUSE/KANAL+
verwenden.
3. Drücken Sie auf die MODUS-/PROG-/SPEICHER-Taste, um Ihre Wahl zu bestätigen.
4. Drücken Sie während der Radio-Wiedergabe wiederholt die Tasten STOPP-/KANAL- oder
WIEDERGABE/PAUSE/KANAL+, um gespeicherte Sender aufzurufen.
DE-2
Page 16

HANDHABUNG UND PFLEGE VON DISCS
E VON HITZE
Halten Sie sich an die nachfolgende Anleitung zu Handhabung und
Pflege Ihrer Disc, damit eine möglichst lange und problemlose Leistung
erreicht wird:
Sicherstellen, dass Sie nicht über die Regenbogen-Seite der Disc
streichen; halten Sie die Disc am Rand.
Die Disc nimmt Schaden, wenn sie über längere Zeit Sonne, hohen
Temperaturen oder Feuchtigkeit ausgesetzt wird. Halten Sie den
Aufbewahrungsort sauber.
Auf beide Seiten der Disc dürfen keine Aufkleber aufgebracht
werden. Das Beschreiben der Disc mit spitzen Gegenständen muss
strikt vermieden werden.
Reinigen Sie die Disc, indem Sie mit einem trockenen, weichen Tuch
oder einer Disc-Bürste von der Mitte in Richtung des Randes
DISC NUR WIE DARGESTELLT
HANDHABEN
VON DER MITTE RICHTUNG
NICHT IN DER NÄH
RAND REINIGEN
LAGERN
wischen. Jegliche Reinigungslösung oder chemische Tintenlöscher
vermeiden.
Bei Nichtverwendung in der Hülle aufbewahren.
EINE DISC EINLEGEN
1. Öffnen Sie die CD-Klappe am CD-Klappeneingriff.
2. Legen Sie eine Disc so in das Disc-Fach ein, dass das Label nach oben zeigt.
3. Schließen Sie die CD-Klappe.
EINE DISC (CD/MP3) ABSPIELEN
1. Zum Einschalten des Geräts auf die NETZ-Taste drücken (die Stand-by-Anzeige erlischt).
2. Wiederholt auf die QUELLEN-Taste drücken, um den CD-Modus aufzurufen.
3. Die oben genannten Schritte befolgen, um eine Disc einzulegen.
4. Der Spieler beginnt sofort damit, die Disc zu lesen.
5. Wenn die Disc erfolgreich gelesen ist, erscheint die Gesamtzahl der Stücke auf dem LCD und
die Wiedergabe erfolgt mit dem ersten Stück.
6. Drücken Sie einmal auf die Taste WIEDERGABE-/PAUSE-/KANAL+, um die Musikwiedergabe
zu unterbrechen; die abgelaufene Zeit blinkt, was anzeigt, dass sich der Spieler im
Pausenmodus befindet; drücken Sie auf die Taste STOPP/KANAL-, um die Musikwiedergabe
zu beenden, das LCD zeigt erneut die Gesamtzahl der Stücke an.
BETRIEB ÜBER EIN EXTERNES SPEICHERMEDIUM (USB)
1. Zum Einschalten des Geräts auf die NETZ-Taste drücken (die Stand-by-Anzeige erlischt).
2. Schließen Sie ein USB an den USB-Port an.
3. Wiederholt auf die QUELLEN-Taste drücken, um den USB-Modus aufzurufen.
4. Wenn das angeschlossene USB erkennt und gelesen wurde, wird das erste Stück automatisch
wiedergegeben.
5. Drücken Sie auf die Taste WIEDERGABE/PAUSE/KANAL+, um die Wiedergabe zu pausieren
oder fortzusetzen.
6. Drücken Sie auf die Taste STOPP/KANAL-, um die Wiedergabe zu beenden.
STÜCKE ÜBERSPRINGEN UND EINEN BESTIMMTEN WIEDERGABEPUNKT SUCHEN
(CD/MP3/USB)
1. Während der Musikwiedergabe einmal auf die Taste ÜBERSPRINGEN+/TUNER+ drücken,
um zum nächsten Stück zu springen; einmal auf die Taste ÜBERSPRINGEN-/TUNERdrücken, um zum Anfang des aktuellen Stücks zu springen, die Taste zwei Mal hintereinander
drücken, um zum vorherigen Stück zu springen.
DE-3
Page 17

2. Die Tasten ÜBERSPRINGEN+/TUNER+ oder ÜBERSPRINGEN-/TUNER- während der
Musikwiedergabe gedrückt halten, um im Schnelllauf nach einem bestimmten
Wiedergabepunkt zu suchen.
WIEDERHOLEN DER WIEDERGABE (CD/MP3/USB)
Drücken Sie während der Wiedergabe auf die Taste MODUS/PROG/SPEICHER, um ein
einzelnes Stück wiederholt wiederzugeben; zweimal auf die Taste drücken, um alle Stücke
wiederholt wiederzugeben; die Taste dreimal drücken, um den Einstiegs-Wiedergabemodus
aufzurufen; zum Verlassen, viermal auf die Taste drücken.
PROGRAMMIERTE WIEDERGABE (CD/MP3/DISC/USB)
1. Im Stopp-Modus einmal auf die Taste MODUS/PROG/SPEICHER drücken und das
Programmsymbol wird zuerst zusammen mit einer Programmsequenzanzeige "P01"
angezeigt, anschließend blinkt zusammen mit dem Programmsymbol eine Stücknummer auf
dem LCD.
2. Wählen Sie das erste Stück, dass einprogrammiert werden soll mithilfe der Tasten
ÜBERSPRINGEN+/TUNER+ oder ÜBERSPRINGEN-/TUNER- aus und drücken Sie
anschließend erneut auf die Taste MODUS/PROG/SPEICHER, um abzuspeichern und zum
nächsten Programmierschritt zu gehen (wenn sich auf der MP3-Disc oder dem USB-Stick
mehrere Ordner befinden, müssen zuerst Ordner und anschließend Stücke programmiert
werden Ordner werden genauso programmiert wie Stücke.).
3. Wiederholen Sie die obigen Schritte, um weitere Stücke zu programmieren. Für CD können
maximal 20 und für MP3/USB maximal 99 Stücke in bevorzugter Reihenfolge in den Speicher
programmiert werden. Ist der Speicher belegt, wird dies durch “FUL” auf dem Bildschirm
angezeigt.
4. Nachdem Sie das Programmieren abgeschlossen haben, zum Starten der programmierten
Wiedergabe in gewünschter Reihenfolge auf die Taste WIEDERGABE/PAUSE/KANAL+
drücken. Der Spieler stoppt automatisch, nachdem alle programmierten Stücke
wiedergegeben wurden.
5. Sie können die Taste STOPP/KANAL- drücken, um die programmierte Wiedergabe zu
beenden. Im Programm-Stopp-Modus können Sie auf die Taste
WIEDERGABE/PAUSE/KANAL+ drücken, um die programmierte Wiedergabe in gleicher
Programmreihenfolge zu beginnen, wie die vorherige; erneut auf die Taste STOPP/KANALdrücken, um die Programmierung zu löschen.
AUX-IN
1. Schließen Sie die Aux-Eingangsbuchse des Geräts an eine Audioquelle an, beispielsweise an
einen MP3-Spieler mit Audiokabel.
2. Schalten Sie das Gerät unter Beachtung der entsprechenden Anleitungsschritte ein.
3. Wiederholt auf die QUELLEN-Taste drücken, um den AUX-Modus aufzurufen.
4. Verwenden Sie die nativen Steuerelemente auf dem angeschlossenen Audiogeräts, um Musik
über das angeschlossene Gerät wiederzugeben.
WICHTIGE SICHERHEITSHINWEISE
Das Gerät sollte keinen Tropfern oder Spritzern ausgesetzt werden und mit Flüssigkeit gefüllte
Gegenstände, wie z. B. Vasen, dürfen nicht auf das Gerät gestellt werden.
Wenn das AC-/DC-Netzteil als Trennvorrichtung verwendet wird, muss die Trennvorrichtung
leicht zugänglich sein. Um den Netzstrom vollständig abzutrennen, muss das AC-/DC-Netzteil
vollständig aus der Netzsteckdose gezogen werden.
Auf das Gerät dürfen keine offenen Flammen, wie z. B. brennende Kerzen, gestellt werden.
Ein Mindestfreiraum von 2,0 cm um das Gerät dient der ausreichenden Belüftung. Die
DE-4
Page 18

Belüftung darf nicht durch Bedeckung der Lüftungsöffnungen behindert werden, z. B. durch
Zeitungen, Tischdecken, Vorhänge etc.
Das Gerät ist für die Verwendung in tropischen und/oder mäßigem Klima bestimmt.
Beachten Sie die Umweltaspekte der Batterieentsorgung.
VORSICHT: Explosionsgefahr, wenn die Batterie nicht korrekt ausgetauscht wird. Nur mit
demselben oder einem gleichwertigen Typ ersetzen.
Die Batterie darf keinen Wärmequellen, wie z. B. Sonnenlicht, Feuer oder Ähnlichem,
ausgesetzt werden.
Das Kennzeichnungsetikett befindet sich auf der Geräterückseite.
TECHNISCHE DATEN
ALLGEMEINES
Strom ..................................................... DC 9 V 1 A (vom externen Netzteil)
12 V UM-2/"C" x 8 Stk. (Batterien)
Stromverbrauch ....................................... 9 W
Abmessungen ......................................... Ca. 235 mm (L) x 250 mm (B) x 142 mm (H)
Betriebstemperatur .................................. +5 °C ~ +35 °C
EMPFÄNGER
Empfangene Frequenzen ........................ FM-ST.
Tunerbereich/Sensibilität ......................... FM 87,5 - 108 MHz
CD-SPIELER
Wiedergabesystem ................................. digitales Kompakt-Disc-Audiosystem
AUDIO
Ausgabeleistung...................................... 1,2 W x 2 (RMS)
Lautsprecherimpedanz ............................ 8 Ohm
Die technischen Daten können ohne Ankündigung geändert werden.
Hiermit wird bestätigt, dass der CD/MP3-SPIELER übereinstimmt, mit der
Direktive 2004/108/EC (EMC-Direktive)
Geltende Standards:
EN55013:2001+A1:2003+A2:2006
EN61000-3-2:2006+A1:2009+A2:2009
EN61000-3-2:2008
EN55020:2007
Besuchen Sie für weitere Informationen unsere Website
www.mpmaneurope.com
DE-5
Page 19

MANUALE D’ISTRUZIONI
LETTORE CD/MP3 CON RADIO FM
E LETTORE USB
MODELLO: CSU602PLL
Si prega di leggere e seguire queste istruzioni prima dell’uso dell’unità.
Page 20

DESCRIZIONE DEL LETTORE
12
19
13
18
19. COMPARTMENTO BATTERIA
1
6
4
2
5
3
7 8910
11
2
14
15
16
17
POSIZIONE DEI CONTROLLI
1. CONTROLLO VOLUME
2. ALTOPARLANTE
3. PULSANTE SALTA GIÙ/SINTONIA-
4. PULSANTE SALTA SU/SINTONIA+
5. PULSANTE SORGENTE
6. PULSANTE MODALITÀ/PROG/MEM
7. INDICATORE STANDBY
8. DISPLAY LCD
9. PULSANTE STOP/CAN-
10. PULSANTE ALIMENTAZIONE
11. PULSANTE ESEGUI/PAUS A/CAN+
12. PRESA INGRESSO CC
13. ANTENNA TELESCOPICA FM
14. MANICO PIEGHEVOLE
15. PRESA INGRESSO AUX
16. SPORTELLO CD
17. PORTA USB
18. AREA APERTURA SPORTELLO CD
IT-1
Page 21

ALIMENTAZIONE
FUNZIONAMENTO A BATTERIA
1. Togliere delicatamente il coperchio del vano batteria .
2. Inserire 8 batterie di dimensione 'C' (UM-2 o equivalenti), rispettando la polarità corretta.
3. Riposizionare il coperchio del vano batterie.
NOTA:
Per il funzionamento a batteria l'adattatore di rete deve essere staccato dalla presa DC IN
(ingresso corrente continua) del lettore.
Perdite dalle batterie esaurite possono danneggiare l'involucro del vano batteria e il lettore
nel suo complesso, quindi devono essere rimosse dall’unità appena si scaricano o quando
non si usa per un certo tempo il lettore alimentato da batterie.
FUNZIONAMENTO CON INGRESSO CC (DC IN - Corrente continua)
Collegare l'adattatore in dotazione alla presa d’ingresso della continua (DC IN) sull'unità e
all'alimentazione principale.
NOTA: Se non ci fossero segnali audio in ingresso all'unità per circa un'ora, essa entrerà
automaticamente in modalità standby (salvo in modalità radio FM).
RADIO FM
SINTONIZZAZIONE RADIO FM
1. L'indicatore di standby si accende dopo aver collegato l'unità principale all'alimentazione
principale. Premere il pulsante di ALIMENTAZIONE per accendere l'unità (l'indicatore di
standby si spegnerà)
2. Premere ripetutamente il pulsante SORGENTE per commutare l'unità alla modalità radio FM.
3. Per avviare la funzione di ricerca automatica, premere e tenere premuto il pulsante SALTA
GIÙ/SINTONIA- o SALTA SU/SINTONIA+ per alcuni secondi e quindi rilasciarlo.
4. Premere il pulsante SALTA GIÙ/SINTONIA- o il pulsante SALTA SU/SINTONIA+ per
sintonizzare le stazioni radio manualmente.
5. Regolare il livello di volume ad un livello di ascolto confortevole.
6. Premere il pulsante di ALIMENTAZIONE per spegnere l'unità.
NOTA:
Quando una stazione FM (stereo) viene trovata, l'icona FM stereo viene visualizzata sullo
schermo.
L'ANTENNA TELESCOPICA FM è direzionale. Quando si riceve una trasmissione FM,
allungare completamente l'ANTENNA TELESCOPICA e ruotarla per una ricezione ottimale
MEMORIZZAZIONE DELLE STAZIONI RADIO PREFERITE
1. Per memorizzare come preferita la stazione corrente su cui si è sintonizzati, premere il
pulsante MODALITÀ/PROG/MEM fino a quando sullo schermo lampeggia il numero della cella
di memoria.
2. Per la memorizzare la stazione utilizzare il pulsante STOP/CAN- o il pulsante
ESEGUI/PAU SA/CAN+ per selezionare la cella di memoria corrispondente tra P01-P20.
3. Confermare la selezione premendo il pulsante MODALITÀ/PROG/MEM.
4. Durante la riproduzione della radio, premere ripetutamente il pulsante STOP/CAN- o il
pulsante ESEGUI/ PAUSA/CAN+ per richiamare le stazioni preselezionate.
IT-2
Page 22

GESTIONE E MANUTENZIONE DI UN DISCO
NON CONSERVARE VICINO A FONTI
Attenersi alle istruzioni riportate qui di seguito per maneggiare e
mantenere il disco in modo che possa durare a lungo e senza problemi.
Assicurarsi di non la superficie di lettura del disco, ma maneggiare il
disco dal bordo.
Un’esposizione prolungata al sole, a temperature elevate e umidità
possono danneggiare il disco. Tenere l 'area di lettura pulita.
Evitare di attaccare etichette su entrambi i lati di un disco. Si deve
evitare rigorosamente di scrivere con oggetti appuntiti sul disco.
Pulire il disco dal centro e verso il bordo con un panno asciutto e
morbido o una spazzola per disco. Evitare qualsiasi lozione o
detergente chimico.
Riporre i dischi nell'apposito contenitore se non sono utilizzati.
MANEGGIARE IL DISCO SOLO
COME INDICATO
PULIRE DAL CENTRO VERSO
L'ESTERNO
DI CALORE
CARICAMENTO DI UN DISCO
1. Aprire lo sportello del CD dalla zona di apertura della Porta.
2. Inserire il disco nel cassetto con il lato dell'etichetta rivolto verso l'alto.
3. Chiudere lo sportello del CD.
RIPRODUZIONE DI UN DISCO (CD/MP3)
1. Premere il pulsante di ALIMENTAZIONE per accendere l'apparecchio (l'indicatore di standby si
spegnerà).
2. Premere ripetutamente il pulsante SORGENTE per passare alla modalità CD.
3. Seguire la procedura qui sopra per inserire un disco.
4. Il lettore inizierà immediatamente la lettura del disco.
5. Quando il disco viene letto correttamente, il numero totale delle tracce comparirà sul display
LCD e la riproduzione inizierà dal primo brano.
6. Premere il pulsante ESEGUI/PAUSA/CAN+ una volta per arrestare la riproduzione della
musica, il tempo trascorso dell’esecuzione del brano lampeggerà per indicare che il lettore è in
modalità Pausa. Premere il pulsante STOP/CAN- per terminare la riproduzione della musica, il
display visualizzerà nuovamente il numero totale delle tracce.
FUNZIONAMENTO CON SUPPORTO DI MEMORIA ESTERNA (USB)
1. Premere il pulsante di ALIMENTAZIONE per accendere l'apparecchio (l'indicatore di standby si
spegnerà).
2. Inserire un dispositivo USB alla porta USB.
3. Premere ripetutamente il pulsante SORGENTE per passare alla modalità USB.
4. Quando l'USB inserito viene rilevato e letto, il primo brano verrà riprodotto automaticamente.
5. Premere il pulsante ESEGUI/PAUSA/CAN+ per mettere in pausa o riprendere la riproduzione.
6. Premere il pulsante STOP/CAN- per terminare la riproduzione.
SALTARE UNA TRACCIA E CERCARE UN PUNTO SPECIFICO DA ASCOLTARE
(CD/MP3/USB)
1. Premere una volta il pulsante SALTA SU/SINTONIA+ durante la riproduzione per saltare al
brano successivo, premere una volta il pulsante SALTA GIÙ/SINTONIA- durante la
riproduzione per tornare all'inizio del brano corrente, premere il pulsante due volte di seguito
per saltare alla traccia precedente.
2. Tenere premuto il pulsante SALTA SU/SINTONIA+ o il pulsante SALTA GIÙ/SINTONIA-
durante la riproduzione per la ricerca veloce di un punto specifico da ascoltare.
IT-3
Page 23

RIPETIZIONE DELLA RIPRODUZIONE (CD/MP3/USB)
Durante la riproduzione, premere il pulsante MODALITÀ/PROG/MEM per ripetere la riproduzione
di un singolo brano, premere il pulsante due volte per ripetere la riproduzione di tutti i brani,
premere tre volte il pulsante per accedere alla modalità di riproduzione introduzione, premere il
pulsante quattro volte per accedere alla modalità di riproduzione casuale e premere il pulsante
cinque volte per uscire.
RIPRODUZIONE PROGRAMMATA (CD/MP3 DISC / USB)
1. In modalità di arresto, premere il pulsante MODALITÀ/PROG/MEM una volta, il programma
presenterà una sequenza con prima di tutto l'indicazione "P01", poi il numero del brano
lampeggerà sul display con l'icona del programma;
2. Selezionare il primo brano da programmare utilizzando il pulsante SALTA SU/SINTONIA+ o il
pulsante SALTA GIÙ/SINTONIA-, e quindi premere il tasto MODALITÀ/PROG/MEM per
memorizzare e passare al passo successivo di programmazione (se ci fossero diverse cartelle
sul disco MP3 o USB, è necessario programmare prima le cartelle e poi le tracce. Il metodo di
programmazione delle cartelle è lo stesso della programmazione dei brani.).
3. Ripetere i passaggi precedenti per programmare altri brani. Un massimo di 20 tracce per CD e
99 tracce per MP3/USB possono essere programmati nella memoria in un ordine preferito. Se
la memoria è piena, lo schermo mostrerà "FUL" (PIENO) per segnalarlo.
4. Premere il pulsante ESEGUI/PAUSA/CAN+ per iniziare la riproduzione programmata
seguendo l'ordine quando si termina la programmazione. Il lettore si interrompe
automaticamente dopo che sono stati riprodotti tutti i brani programmati.
5. È possibile premere il pulsante STOP/CAN- per terminare la riproduzione programmata. In
modalità di arresto della programmazione, premere il pulsante ESEGUI/PAUSA/CAN+ per
iniziare di nuovo la riproduzione programmata, con l'ordine di programmazione identico a
quello fatto precedentemente oppure premere il tasto STOP/CAN- di nuovo per cancellare
completamente la programmazione.
INGRESSO AUX
1. Collegare la presa d’ingresso AUX dell'unità a una sorgente audio, ad esempio un lettore MP3
con un cavo audio.
2. Accendere l'unità seguendo le istruzioni corrispondenti.
3. Premere ripetutamente il pulsante SORGENTE per passare alla modalità AUX.
4. Utilizzare i controlli nativi del dispositivo audio collegato per iniziare la riproduzione della
musica attraverso l'unità collegata.
ISTRUZIONI DI SICUREZZA IMPORTANTI
L'apparecchio non deve essere esposto a sgocciolii o spruzzi e nessun oggetto pieno di liquidi,
come vasi, deve essere posizionato sull'apparecchio.
Quando l'adattatore di rete non è utilizzato deve comunque restare sempre facilmente
accessibile. Perché esso sia completamente scollegato dalla rete è necessario che il cavo non
sia connesso a nessuna presa di corrente.
Nessuna sorgente di fiamma, come candele accese, deve essere collocata sopra
all'apparecchio.
Per una ventilazione sufficiente lasciare liberi almeno 2,0 centimetri intorno al dispositivo. La
ventilazione non deve essere impedita coprendo i fori di ventilazione con oggetti come giornali,
tovaglie, tende, ecc
L'uso degli apparecchi è possibile in climi tropicali e/o moderati.
Si richiama l'attenzione agli aspetti ambientali nello smaltimento delle batterie.
ATTENZIONE: Pericolo di esplosione se le batterie vengono inserite in modo errato. Sostituirle
solo con batterie dello stesso tipo o equivalente.
IT-4
Page 24

La batteria non deve essere esposta a calore eccessivo come luce solare, fuoco o simili.
La piastra dei contrassegni si trova sul retro dell'apparecchio.
CARATTERISTICHE GENERALI
Alimentazione ........................................ 9V CC 1A (dall’adattatore esterno)
12V UM-2/"C" x 8 unità (batterie)
Consumo ................................................. 9W
Dimensioni .............................................. Cicrca 235mm (Lu) x 250mm (La) x 142mm (Al)
Temperatura di funzionamento ................ +5°C ~ + 35°C
SEZIONE DEL RICEVITORE
Bande di ricezione ................................... FM ST.
Sensitività/intervallo di sintonizzazione ... FM 87.5 - 108 MHz
SEZIONE LETTORE CD
Sistema di riproduzione ........................... Sistema Audio Digitale a Compact Disc
SEZIONE AUDIO
Potenza di uscita.....................................1.2W x 2 (RMS)
Impedenza altoparlanti ............................ 8 ohm
Le specifiche sono soggette a modifiche senza preavviso.
Si certifica che il LETTORE CD/MP3 è in conformità con la
direttiva del Consiglio 2004/108/EC (Direttiva per la
Compatibilità Elettromagnetica)
Standard applicabili:
EN55013:2001+A1:2003+A2:2006
EN61000-3-2:2006+A1:2009+A2:2009
EN61000-3-2:2008
EN55020:2007
Per maggiori informazioni si prega di visitare la nostra pagina web:
www.mpmaneurope.com
IT-5
Page 25

INSTRUCTIE HANDLEIDING
CD/MP3 SPELER MET FM RADIO
EN USB LEZER
MODEL: CSU602PLL
Lees alstublieft en volg deze instructies op voordat u het apparaat gebruikt.
Page 26

OVERZICHT VAN DE SPELER
12
19
13
18
1
6
4
2
5
3
7 8910
11
2
14
15
16
17
LOCATIE VAN DE CONTROLES
1. VOLUME CONTROLE
2. LUIDSPREKER
3. SLA OVER DN/TUN- KNOP
4. SLA OVER OMHOOG/TUN+ KNOP
5. BRON KNOP
6. MODE/PROG/MEM KNOP
7. STANDBY INDICATOR
8. LCD SCHERM
9. STOP/CH- KNOP
10. VERMOGEN KNOP
11. SPEEL/PAUZEER/CH+ KNOP
12. DC IN CONTACTBUS
13. FM TELESCOPISCHE ANTENNE
14. OPVOUWBAAR HANDVAT
15. AUX IN CONTACTBUS
16. CD DEUR
17. USB POORT
18. CD DEUR OPEN GEBIED
19. BATTERIJ COMPARTIMENT
NL-1
Page 27

VERMOGEN VOORZIENING
BATTERIJ BEDIENING
1. Verwijder het batterij compartiment deksel voorzichtig
2. Installeer 8 x 'C' grootte batterijen (UM-2 of gelijkwaardig) terwijl u de correcte polariteit in
de gaten houdt.
3. Herplaats het batterij compartiment deksel
OPMERKING:
De AC/DC adapter moet losgemaakt worden van de DC IN contactbus van de speler voor
bediening met batterij.
Lekkende batterijen kunnen de batterij ruimte beschadigen en de speler in het geheel, dus
moeten zij verwijderd worden van de ruimte wanneer ze leeg raken of wanneer de speler
voor geruime tijd niet wordt gebruikt met batterijen.
DC INVOER BEDIENING
Doe de geleverde adapter in de DC IN contactbus op het apparaat en in de
stroomvoorziening.
OPMERKING: Naar het apparaat is in ongeveer een uur, zal het apparaat automatisch naar
stand-by mode gaan (behalve bij FM radio mode).
FM RADIO
AFSTEMMEN DE FM RADIO
1. De stand-by indicator zal oplichten wanneer het hoofdapparaat met de
hoofdstroomvoorziening is verbonden. Druk op de VERMOGEN knop om het apparaat aan te
zetten (de stand-by indicator gaat uit).
2. Druk op de BRON knop herhaaldelijk om het apparaat naar de FM radio mode te schakelen
3. Om het auto-zoeken te starten, druk op en hou de SLA OVER DN/TUN- knop of SLA OVER
OMHOOG/TUN+ knop verscheidene seconden en laat het dan los.
4. Druk op de sla over DN/TUN- knop of SLA OVER OMHOOG/TUN+ knop om de radio stations
handmatig af te stemmen.
5. Stel het volume niveau bij naar een comfortabel luister niveau.
6. Druk op de VERMOGEN knop om het apparaat uit te zetten.
OPMERKING:
Wanneer een FM (stereo) station wordt ontvangen, wordt het FM stereo-icoon getoond op het
scherm.
De FM TELESCOPISCHE ANTENNE is directioneel. Wanneer u een FM uitzending ontvangt,
trek de TELESCOPISCHE ANTENNE geheel uit en draai het voor de beste ontvangst.
UW FAVORIETE RADIO STATION OPSLAAN
1. Stem eerst af op uw favoriete station; druk op de MODE/PROG/MEM knop om het huidige
station op te slaan totdat het geheugen nummer flikkert op het scherm.
2. Gebruik de STOP/CH- knop of de SPEEL/PAUZEER/CH+ knop om het corresponderende
geheugen nummer te kiezen tussen P01-P20 om het station op te slaan.
3. Bevestig uw keuze door te drukken op de MODE/PROG/MEM knop.
4. Tijdens afspelen radio, druk op de STOP/CH- knop of de SPEEL/PAUZEER/CH+ knop
herhaaldelijk om de voor ingestelde stations op te roepen.
NL-2
Page 28

HANTEREN EN ONDERHOUDEN VAN EEN DISK
Volg de instructies hieronder om uw disk te hanteren en te
onderhouden zodat een lange tijd zonder moeilijkheden van vrij
afspelen mogelijk kan worden gehaald:
Overtuig u ervan dat u de regenboogzijde van de disk niet
beschadigd; hanteer de disk bij de rand.
Lange tijd blootstellen aan zonlicht, hoge temperaturen en
vochtigheid zal de disk beschadigen. En hou het opslaggebied
schoon.
Voorkom het plakken van etiketten op beide zijden van een disk.
Schrijven met gepunte artikelen op de disk moet strikt vermeden
worden.
Reinig de disk door vegen van het centrum en werk dan naar buiten
HANTEER DE DISK ALLEEN
ZOALS GETOOND
REINIG VAN MIDDEN NAAR
SLA NIET OP NABIJ HITTE
BUITEN
met een droge & zachte doek of een disk borstel. Voorkom elke
reiniging lotion of chemische verwijderaar.
Sla ze op in hun omhulsel wanneer ze niet worden gebruikt.
LADEN VAN EEN DISK
1. Open de CD deur via het deur open gebied.
2. Laat en disk op de disk tray met de etiket zijde naar boven.
3. Sluit de CD deur.
SPELEN VAN EEN DISK (CD/MP3)
1. Druk op de VERMOGEN knop om het apparaat aan te zetten (de stand-by indicator gaat uit).
2. Druk op de BRON knop herhaaldelijk om naar cd mode te schakelen
3. Volg de stappen hierboven om een disk te laden.
4. De speler begint de disk direct te lezen.
5. Wanneer de disk succesvol is gelezen, zal het totale aantal van de tracks getoond worden in
de LCD en het afspelen begint met de eerste track.
6. Druk op de SPELEN/PAUZEER/CH+ knop eenmaal om het afspelen van muziek te stoppen,
de vergane tijd flikkert om aan te geven dat de speler zich in pauzeer mode bevindt; druk op
de STOP/CH- knop om het afspelen van muziek te stoppen, de LCD zal weer het totale aantal
van de tracks tonen.
EXTERNE GEHEUGEN MEDIA BEDIENING (USB)
1. Druk op de VERMOGEN knop om het apparaat aan te zetten (de stand-by indicator gaat uit).
2. Steek een USB in de USB-poort.
3. Druk op de BRON knop herhaaldelijk om naar USB mode te schakelen
4. Wanneer de ingestoken USB ontdekt wordt en gelezen, zal de eerste track automatisch
afgespeeld worden.
5. Druk op de SPELEN/PAUZEER/CH+ knop om het afspelen te pauzeren of te hervatten.
6. Druk op de STOP/CH- knop om het afspelen te stoppen.
SLA OVER TRACKS EN ZOEK NAAR EEN SPECIFIEK PUNT OM TE SPELEN
(CD/MP3/USB)
1. Druk eenmaal op de SLA OVER OMHOOG/TUN+ knop in afspelen muziek om door te gaan
naar de volgende track; druk eenmaal op de SLA OVER, DN/TUN- knop in afspelen muziek
om terug te gaan naar het begin van de huidige trek, druk de knop tweemaal continu om over
te slaan naar de vorige track.
2. Druk en hou de SLA OVER, OMHOOG/TUN+ knop of de SLA OVER, DN/TUN- knop in
afspelen muziek om in een snelle mode te zoeken naar een specifiek punt om te spelen.
NL-3
Page 29

HERHAAL AFSPELEN (CD/MPS/USB)
Tijdens afspelen, druk op de MODE/PROG/MEM knop om een enkele track herhaald af te spelen;
druk tweemaal op de knop om alle tracks herhaaldelijk af te spelen; druk driemaal op de knop om
de introductie speel mode binnen te gaan; druk de knop vier keer om de willekeurige speel mode
binnen te gaan; druk de knop vijf keer om te verlaten.
GEPROGRAMMEERD SPELEN (CD/MP3 DISK/USB)
1. In stop mode, druk op de MODE/PROG/MEM knop eenmaal, het programma icoon toont met
een programma sequentie indicatie "P01" eerst, dan flikkert een tracknummer op de LCD met
het programma icoon;
2. Kies de eerste track om te worden geprogrammeerd gebruikende de SLA OVER,
OMHOOG/TUN+ knop of de SLA OVER, DN/TUN- knop, en druk weer op de
MODE/PROG/MEM knop om op te slaan en door te gaan naar de volgende programmeer stap
(als er meerdere mappen op de MP3 disk of USB zijn, is het eerst nodig om de mappen te
programmeren en dan de tracks. De methode van het programmeren van de mappen is het
zelfde als het programmeren van de tracks.).
3. Herhaal de bovenstaande stappen om meer tracks te programmeren. Een maximum van 20
tracks voor CD en 99 tracks voor MP3/USB kan in het geheugen geprogrammeerd worden in
een willekeurige volgorde. Als het geheugen vol is, zal het scherm "FUL" tonen om dit aan te
geven.
4. Druk op de SPELEN/PAUZEER/CH+ knop om het geprogrammeerde spelen in de willekeurige
volgorde te beginnen nadat u klaar bent met programmeren. De speler stopt automatisch
nadat alle geprogrammeerde tracks zijn afgespeeld.
5. U mag drukken op de STOP/CH- knop om het geprogrammeerde afspelen te beëindigen. In
het programma stop mode, druk op de SPELEN/PAUZEER/CH+ knop om het
geprogrammeerde afspelen te beginnen met de geprogrammeerde volgorde identiek met de
vorige gedaan; druk op de STOP/CH- nogmaals om het programmeren te verwijderen.
AUX IN
1. Verbindt de Aux in contact bus op het apparaat met een geluidsbron, bijvoorbeeld, MP3-speler
met een audiokabel.
2. Zet het apparaat aan opvolgend de corresponderende instructies
3. Druk op de BRON knop herhaaldelijk om naar AUX mode te schakelen
4. Gebruik de controllers van het verbonden audio apparaat om het afspelen van muziek via het
verbonden apparaat te beginnen.
BELANGRIJKE VEILIHEID INSTRUCTIES
Het apparaat moet niet blootgesteld worden aan druppelen of spetteren en dat er geen
objecten gevuld met vloeistoffen, zoals vazen, worden geplaatst op het apparaat.
Wanneer de AC/DC adapter wordt gebruikt als het afgesloten apparaat, zal het afgesloten
apparaat redelijk bedienbaar blijven. Om helemaal afgesloten te worden van de
vermogeninvoer, moet de AC/DC adapter compleet van de stroom afgesloten worden.
Geen open vlam bronnen, zoals brandende kaarsen, moeten op het apparaat geplaatst
worden.
Minimum afstanden 2.0 cm rond het apparaat voor voldoende ventilatie. De ventilatie moet niet
worden gehinderd door het afdekken van de ventilatie-openingen met objecten, zoals kranten,
tafelkleden, gordijnen, enz.
Het gebruik van het apparaat is in tropische en/of gemiddelde klimaten.
Aandacht moet besteed worden aan de omgeving aspecten van batterij verwijdering.
VOORZICHTIG: Gevaar van explosie wanneer batterij niet correct wordt vervangen. Vervang
alleen met dezelfde of gelijkwaardige type.
NL-4
Page 30

Batterij moet niet worden blootgesteld aan extreme hitte zoals zonneschijn, vuur of
gelijkwaardig.
De markeren de plaat is gelokaliseerd aan de achterkant van het apparaat.
SPECIFICATIE
ALGEMEEN
Vermogen .............................................. DC 9V 1A (van de externe adapter)
12V UM-2/"C" x 8pcs (batterijen)
Vermogen consumptie ............................ 9W
Afmetingen .............................................. Ong. 235mm (L) x 250mm (B) x 142mm (H)
Werk temperatuur ................................... +5°C ~ + 35°C
ONTVANG GEDEELTE
Ontvangen banden .................................. FM ST.
Afstemming bereik/gevoeligheid.............. FM 87.5 - 108 MHz
CD SPELER GEDEELTE
Afspeel systeem ...................................... Compact Disk Digitaal Audio Systeem
AUDIO GEDEELTE
Uitvoer vermogen .................................... 1.2W x 2 (RMS)
Luidspreker impedantie ........................... 8 ohms
Specificaties zijn onderdeel van verandering zonder opgave.
Dit is om te bevestigen dat de CD/MP3 SPELER is conform met
Raad richtlijn 2004/108/EC (EMC Richtlijn)
Applicatieve standaarden
EN55013:2001+A1:2003+A2:2006
EN61000-3-2:2006+A1:2009+A2:2009
EN61000-3-2:2008
EN55020:2007
Voor meer informatie bezoek alstublieft onze website
www.mpmaneurope.com
NL-5
Page 31

MANUAL DE INSTRUÇÕES
LEITOR DE CD/MP3 COM RÁDIO FM
E LEITOR DE USB
MODELO: CSU602PLL
Leia e siga estas instruções antes de utilizar a unidade.
Page 32

VISÃO GLOBAL DO LEITOR
12
19
13
18
19. COMPARTIMENTO DE BATERIA
1
6
4
2
5
3
7 8910
11
2
14
15
16
17
LOCALIZAÇÃO DOS CONTROLOS
1. CONTORLO DE VOLUME
2. COLUNA
3. BOTÃO SKIP DN/TUN-
4. BOTÃO SKIP UP/TUN+
5. BOTÃO DE FONTE
6. BOTÃO MODO/PROG/MEM
7. INDICADOR DE SUSPENSÃO
8. ECRÃ LCD
9. BOTÃO PARAR/CH-
10. BOTÃO DE ALIMENTAÇÃO
11. BOTÃO REPRODUZIR/PAUSAR/CH+
12. ENTRADA DC IN
13. ANTENA TELESCÓPICA FM
14. ASA DOBRÁVEL
15. ENTRADA AUX IN
16. PO RTA CD
17. PORTA USB
18. ÁREA DE ABERTURA DE PORTA CD
PT-1
Page 33

FORNECIMENTO DE ALIMENTAÇÃO
OPERAÇÃO DE BATERIA
1. Retire a tampa do compartimento da bateria gentilmente.
2. Instale baterias de tamanho 8 x 'C' (UM-2 ou equivalente) enquanto observa as
polaridades correctas.
3. Volte a colocar a tampa o compartimento da bateria.
NOTA:
O adaptador AC/DC tem de ser desligado da entrada DC IN do leitor para a operação da
bateria.
Vazamento de baterias poderá danififcar o compartimento das mesmas, e até o leitor, por
isso devem ser retiradas do compartimento quando ficarem planas ou quando o leitor não
for utilizado durante algum tempo.
OPERAÇÃO ENTRADA DC
Introduza o adaptador fornecido na entrada DC IN da unidade e à tomada de parede.
NOTA: Se não existir nenhuma entrada de sinal de áudio na unidade durante uma hora, a
unidade entrará em modo de suspensão automaticamente (excepto no modo FM).
RÁDIO FM
SINTONIZAÇÃO DO RÁDIO FM
1. O indicador de suspensão irá piscar uma vez assim que ligar a unidade principal à fonte de
alimentação. Pressione o botão de ALIMENTAÇÃO para ligar a unidade (o indicador de
suspoensão desligar-se-á).
2. Pressione o botão FONTE repetidamente para alterar a unidade para o modo de rádio FM.
3. Para iniciar a procura automática, pressione e mantenha os botões SKIP DN/TUN- ou SKIP
UP/TUN+ durante vários segundos e liberte-o.
4. Pressione os botões SKIP DN/TUN- ou SKIP UP/TUN+ para sintonizar para as estações de
rádio manualmente.
5. Ajuste o volume para um nível de audição confortável.
6. Pressione o botão de ALIIMENTAÇÃO para desligar a unidade.
NOTA:
Quando a estação FM (estérea) for recebida, o ícone de FM sera exibido no ecrã..
A ANTENA TELESCÓPICA FM é direccional. Quando estiver a receber uma transmissão FM,
extenda ao máximo a ANTENA e rode-a para uma recepção melhor.
ARMAZENAR A SUA ESTAÇÃO DE RÁDIO PREFERIDA
1. Sintonize na sua estação preferida; pressione o botão MODO/PROG/MEM para armazenar a
estação actual até o número de memória piscar no ecrã.
2. Utilize o botão PARAR/CH- ou o botão REPRODUZIR/PAUSAR para seleccionar a célula de
memória correspondente entre P01-P20 para armazenamento da estação.
3. Confirme a sua selecção pressionando o botão MODO/PROG/MEM.
4. Durante a reprodução de rádio, pressione o botão PARAR/CH- ou o botão
REPRODUZIR/PAUSAR para relembrar as estações pré-definidas.
PT-2
Page 34

MANUSEAMENTO E MANUTENÇÃO DE UM DISCO
Siga as instruções abaixo para manusear e manter o seu disco, de
modo a obter uma utilização duradoura e sem problemas:
Assegure-se de não tocar no lado arco íris do disco; manuseie o
disco pela borda.
Tempo tempo de exposição ao sol, altas temperaturas e humidade
danificam o disco. Mantenha a área de armazenamento limpa.
Evite etiquetas em ambos os lados do disco. Escrever com pontas
afiadas no disco deve ser evitado.
Limpe o disco a partir do centro para fora com um pano seco e suave
ou uma escova de discos. Evite qualquer loção de limpeza ou agents
químicos.
Armazene-os nas suas caixas quando não forem utilizados.
MANUSEIE O DISCO SÓ COMO
MOSTRADO
LIMPE DO CENT RO PARA A
NÃO ARMAZ ENE PERTO DE
BORDA
CALOR
CARREGAR UM DISCO
1. Abra a porta de CD a partir da área de abertura.
2. Coloque um disco no tabuleiro de disco com o lado da etiqueta para cima.
3. Feche a porta de CD.
REPRODUZIR UM DISCO (CD/MP3)
1. Pressione o botão de ALIMENTAÇÃO para ligar a unidade (o indicador de suspensão
desliga-se).
2. Pressione o botão FONTE repetidamente para alterar para o modo CD.
3. Siga os passos acima para carregar um disco.
4. O leitor começa a ler o disco de imediato.
5. Quando o disco for lido, o número total de faixas aparecerá no LCD e a reprodução começará
na primeira faixa.
6. Pressione o botão REPRODUZIR/PAUSAR/CH+ uma vez para pausar a reprodução de
música. O tempo decorrido irá piscar para indicar que está em modo de Pausa; pressione o
botão PARAR/CH- para parar a a reprodução de música; o LCD irá mostrar o número total de
faixas novamente.
OPERAÇÃO DE MÉDIA EM MEMÓRIA EXTERNA (USB)
1. Pressione o botão de ALIMENTAÇÃO para ligar a unidade (o indicador de suspensão irá
desligar-se).
2. Insira um USB na porta de USB.
3. Pressione o botão FONTE repetidamente para alterar para o modo USB.
4. Quando o USB inserido é detectado e lido, a primeira faixa sera reproduzida
automaticamente.
5. Pressione o botão REPRODUZIR/PAUSAR/CH+ para pausar ou continuar a reprodução.
6. Pressione o botão PARAR/CH- para parar a reprodução.
PASSAR FAIXAS E PROCURAR POR UM PONTO ESPECÍFICO PARA REPRODUZIR
(CD/MP3/USB)
1. Pressione uma vez o botão SKIP UP/TUN+ durante a reprodução para passer para a faixa
seguinte; pressione uma vez o botão SKIP DN/TUN- durante a reprodução de música para
recomeçar a faixa actual, e pressione duas vezes seguidas para passer para a faixa anterior.
2. Pressione e mantenha o botão SKIP UP/TUN+ ou o botão SKIP DN/TUN- durante a
reprodução de música para procurar por um ponto específico para reproduzir.
PT-3
Page 35

REPETIR REPRODUÇÃO (CD/MP3/USB)
Durante a reprodução, pressione o botão MODO/PROG/MEM para repetir uma única faixa;
pressione o botão duas vezes para repetir todas as faixas; pressione o botão três vezes para
introduzir o modo de reprodução; pressione o botão quatro vezes para entrar no modo de
reprodução aleatória; pressione o botão cinco vezes para sair.
REPRODUÇÃO PROGRAMADA (CD/DISCO MP3/USB)
1. No modo parado, pressione o botão MODO/PROG/MEM uma vez, e o ícone de programa irá
aparecer com a indicação de sequência de programa "P01" primeiro; de seguida o númeor de
uma faixa piscará no LCD com o ícone de programa;
2. Seleccione a primeira faixa a ser programada utilizando o botão SKP UP/TUN+ ou o botão
SKIP DN/TUN-, e pressione o botão MODO/PROG/MEM novamente para armazenar e
avançar para o seguinte passo de programação (Se existirem várias pastas no disco de MP3
ou USB, é necessário programar primeiro as pastas e de seguida as faixas. O método de
programação de pastas é o mesmo que a programação de faixas).
3. Repita os passos acima para programar mais faixas. Um máximo de 20 faixas para CD e 99
faixas para MP3/USB pode ser programado na memória numa ordem personalizada. Se a
memória estiver cheia, o ecrã irá mostrar “CHEIO”.
4. Pressione o botão REPRODUZIR/ PAUSAR/CH+ para começar a reprodução programada na
ordem personalizada após terminar a programação. O leitor pára automaticamente após todas
as faixas programadas serem reproduzidas.
5. Pode pressione o botão PARAR/CH- para parar com a reprodução programada. No modo de
programação parade, pressione o botão REPRODUZIR/PAUS AR/CH+ para iniciar a
reproduçã programada com a ordem personalizada indêntica à ordem anterior. Pressione o
botão PARARP/CH- novamente para limpar a programação.
AUX IN
1. Ligue a entrada de Aux in da unidade a uma fonte de áudio, como por exemplo, leitor MP3
com cabo de áudio.
2. Ligue a unidade seguindo as instruções correspondentes.
3. Pressione o botão FONTE repetidamente para alterar para o modo AUX.
4. Utilize os controlos natives no dispositivo de áudio ligado para iniciar a reprodução através da
unidade ligada.
INSTRUÇÕES DE SEGURANÇA IMPORTANTES
O aparelho não deve ser exposto a gotejamento ou salpicado e nenhum objecto com líquidos,
como vasos, devem ser colocados em cima do aparelho.
Quando o adaptador AC/DC é utilizado como dispositivo de desconexão, o dispositivo de
desconexão deve manter-se completamente operável. Para ser completamente desconectado
da entrada de alimentação, o adaptador AC/DC deve ser completamente desconectado da
tomada.
Nenhuma fonte de fogo, como velas acesas, devem ser colocadas no aparelho.
Mantenha uma distância minima de 2.0cm à volta do aparelho para ventilação suficiente. A
ventilação não deve ser impedida cobrindo as aberturas de ventilação com itens, como jornais,
panos de mesa, cortinas, etc.
A utilização do aparelho deve ser realizada em climas tropicais e/ou moderados.
Tenha atenção aos aspectos ambientais quando deitar fora a bateria.
CUIDADO: Perigo de explosão se a bateria for incorrectamente substituída. Substitua com o
mesmo tipo ou equivalente.
A bateria não não deve ser exposta a calor excessive como luz do sol, fogo ou fonts
semelhantes.
A placa de marcação está localizada na parte traseira do aparelho.
PT-4
Page 36

ESPECIFICAÇÕES
GERAL
Potência ................................................ DC 9V 1A (do adaptador externo)
12V UM-2/"C" x 8pçs (baterias)
Consumo de energia ............................... 9W
Dimensões .............................................. Approx. 235mm (C) x 250mm (L) x 142mm (A)
Temperatura de operação ....................... +5°C ~ + 35°C
SECÇÃO DE RECEPÇÃO
Bandas de recepção ............................... FM ST.
Alcance/sensibilidade de sintonização .... FM 87.5 - 108 MHz
SECÇÃO DE LEITOR CD
Sistema de reprodução ........................... Sistema de Áudio Digital de Disco Compacto
SECÇÃO DE ÁUDIO
Potência de saída ................................... 1.2W x 2 (RMS)
Impedância da coluna ............................. 8 ohms
Especificações estão sujeitas a alterações sem aviso prévio.
Isto serve para certificar que o LEITOR DE CD/MP3 está em conformidade com
Directiva do Conselho 2004/108/EC (Directiva EMC)
Padrões aplicáveis:
EN55013:2001+A1:2003+A2:2006
EN61000-3-2:2006+A1:2009+A2:2009
EN61000-3-2:2008
EN55020:2007
Para mais informações, visite o nosso website
www.mpmaneurope.com
PT-5
 Loading...