

Page 1
USB/MP3/CD/PLL FM Bazooka Boombox
CSU557RC
Instruction Manual
Page 2
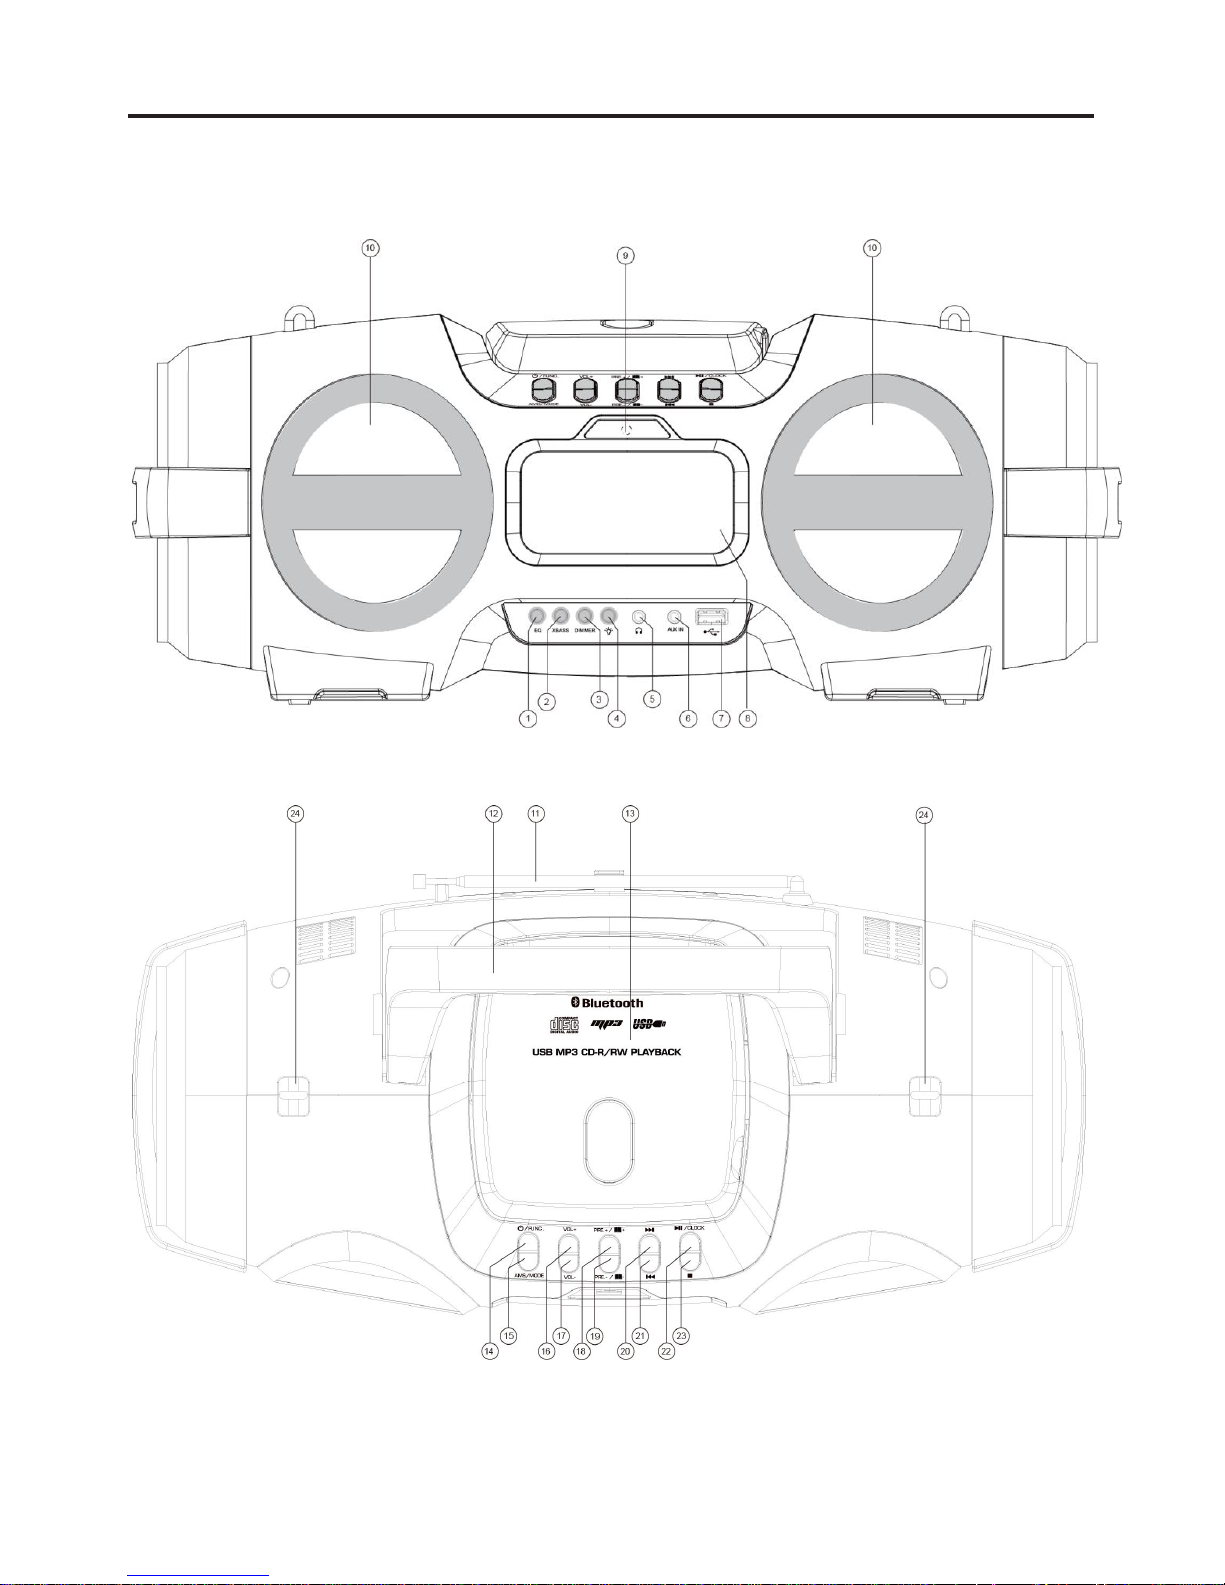
Overview of the Components
EN-1
Page 3
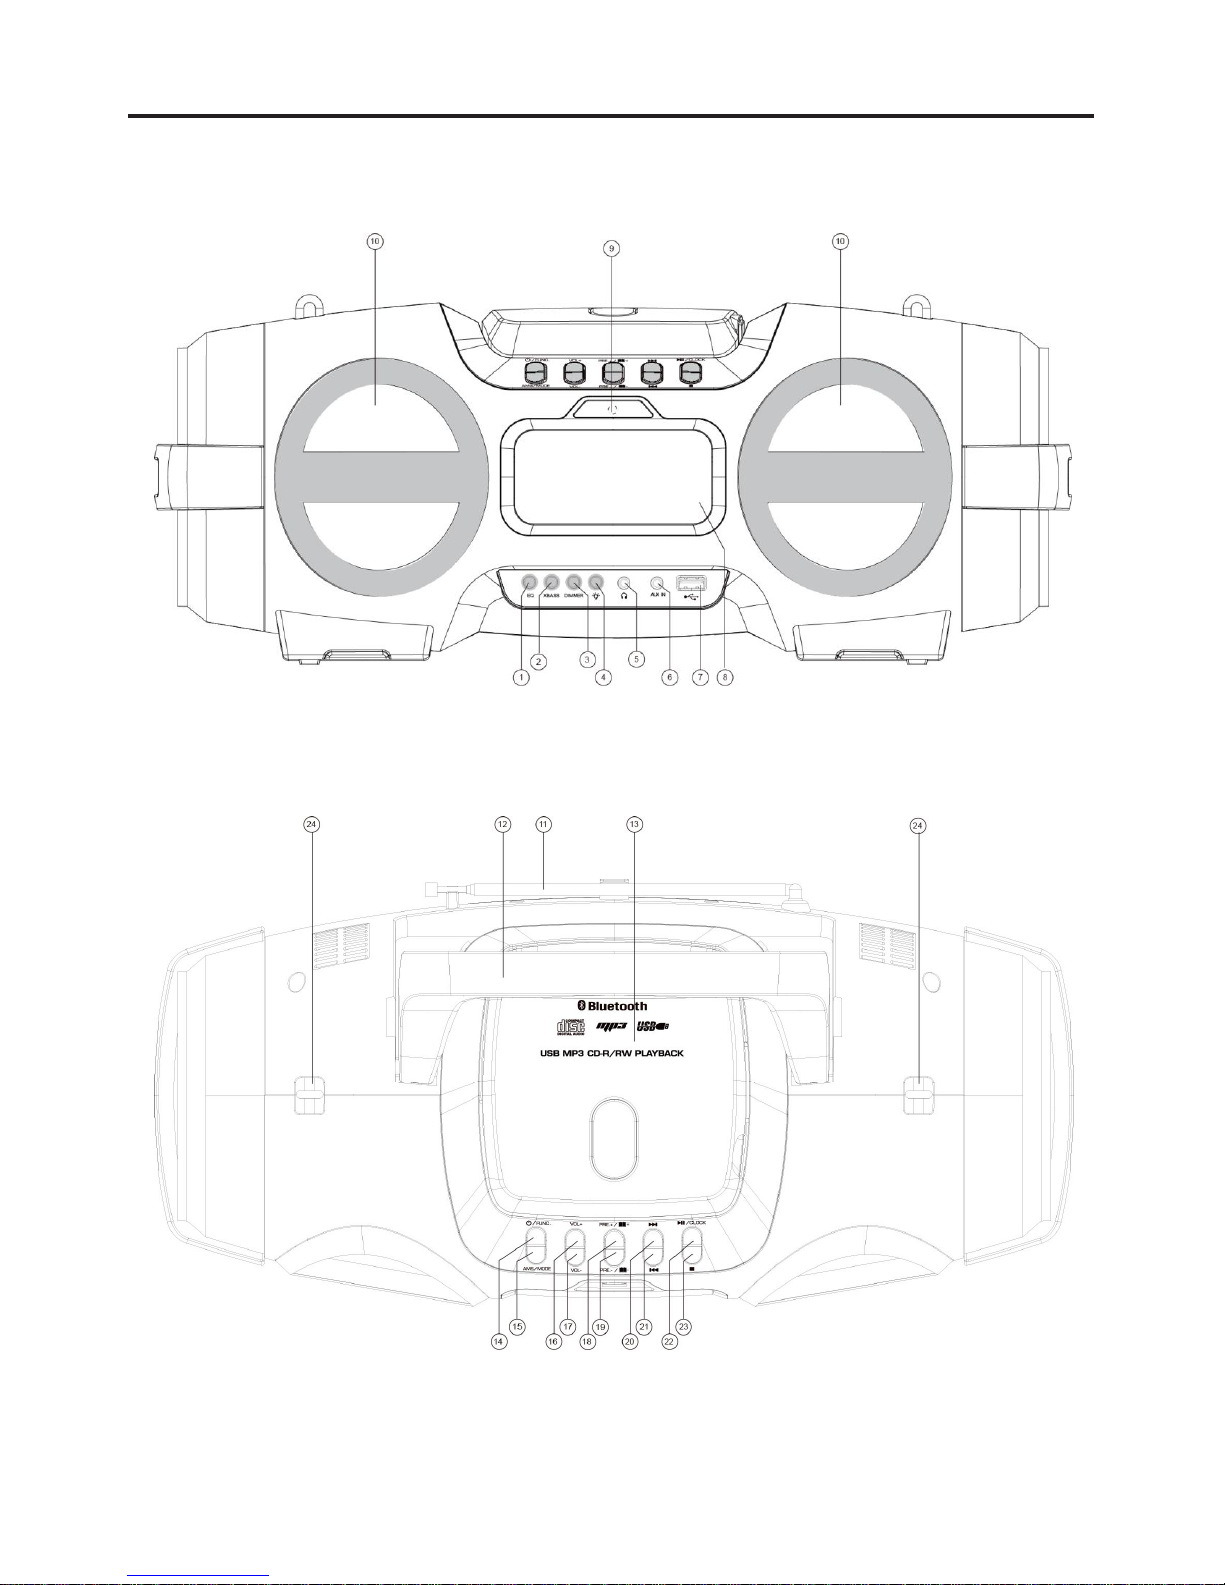
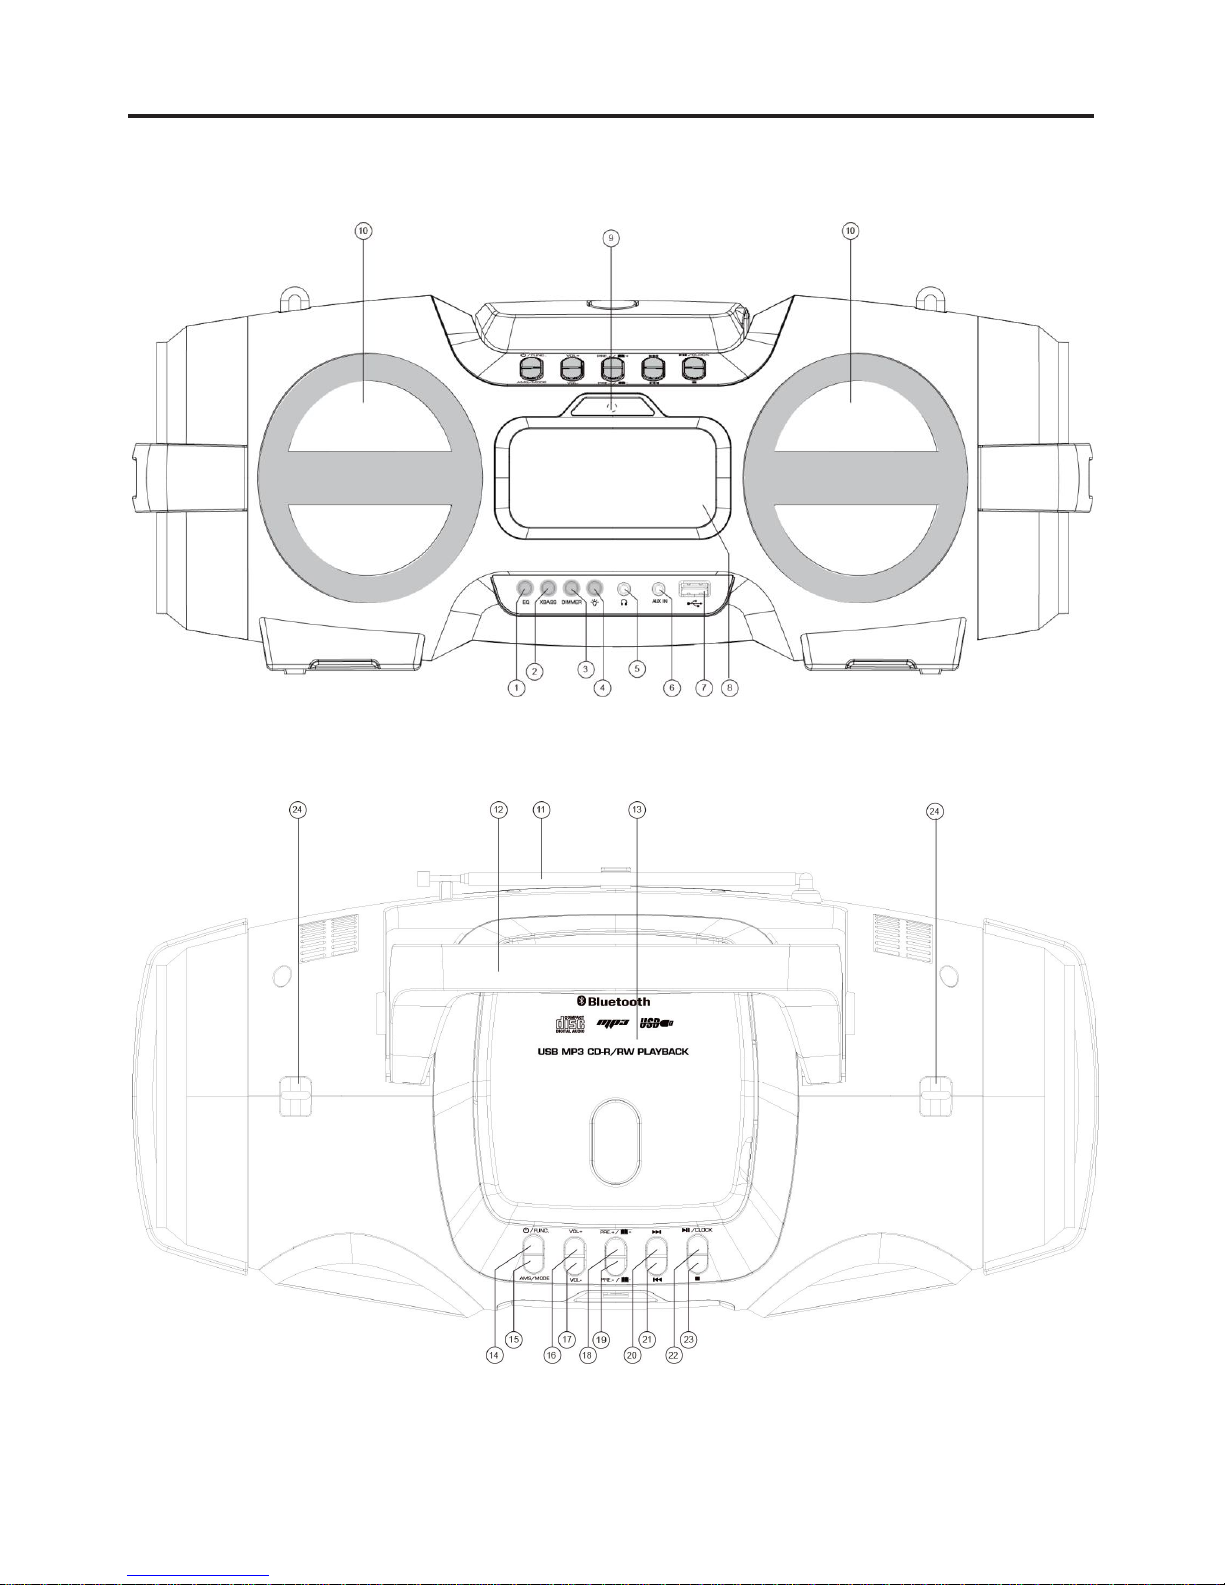
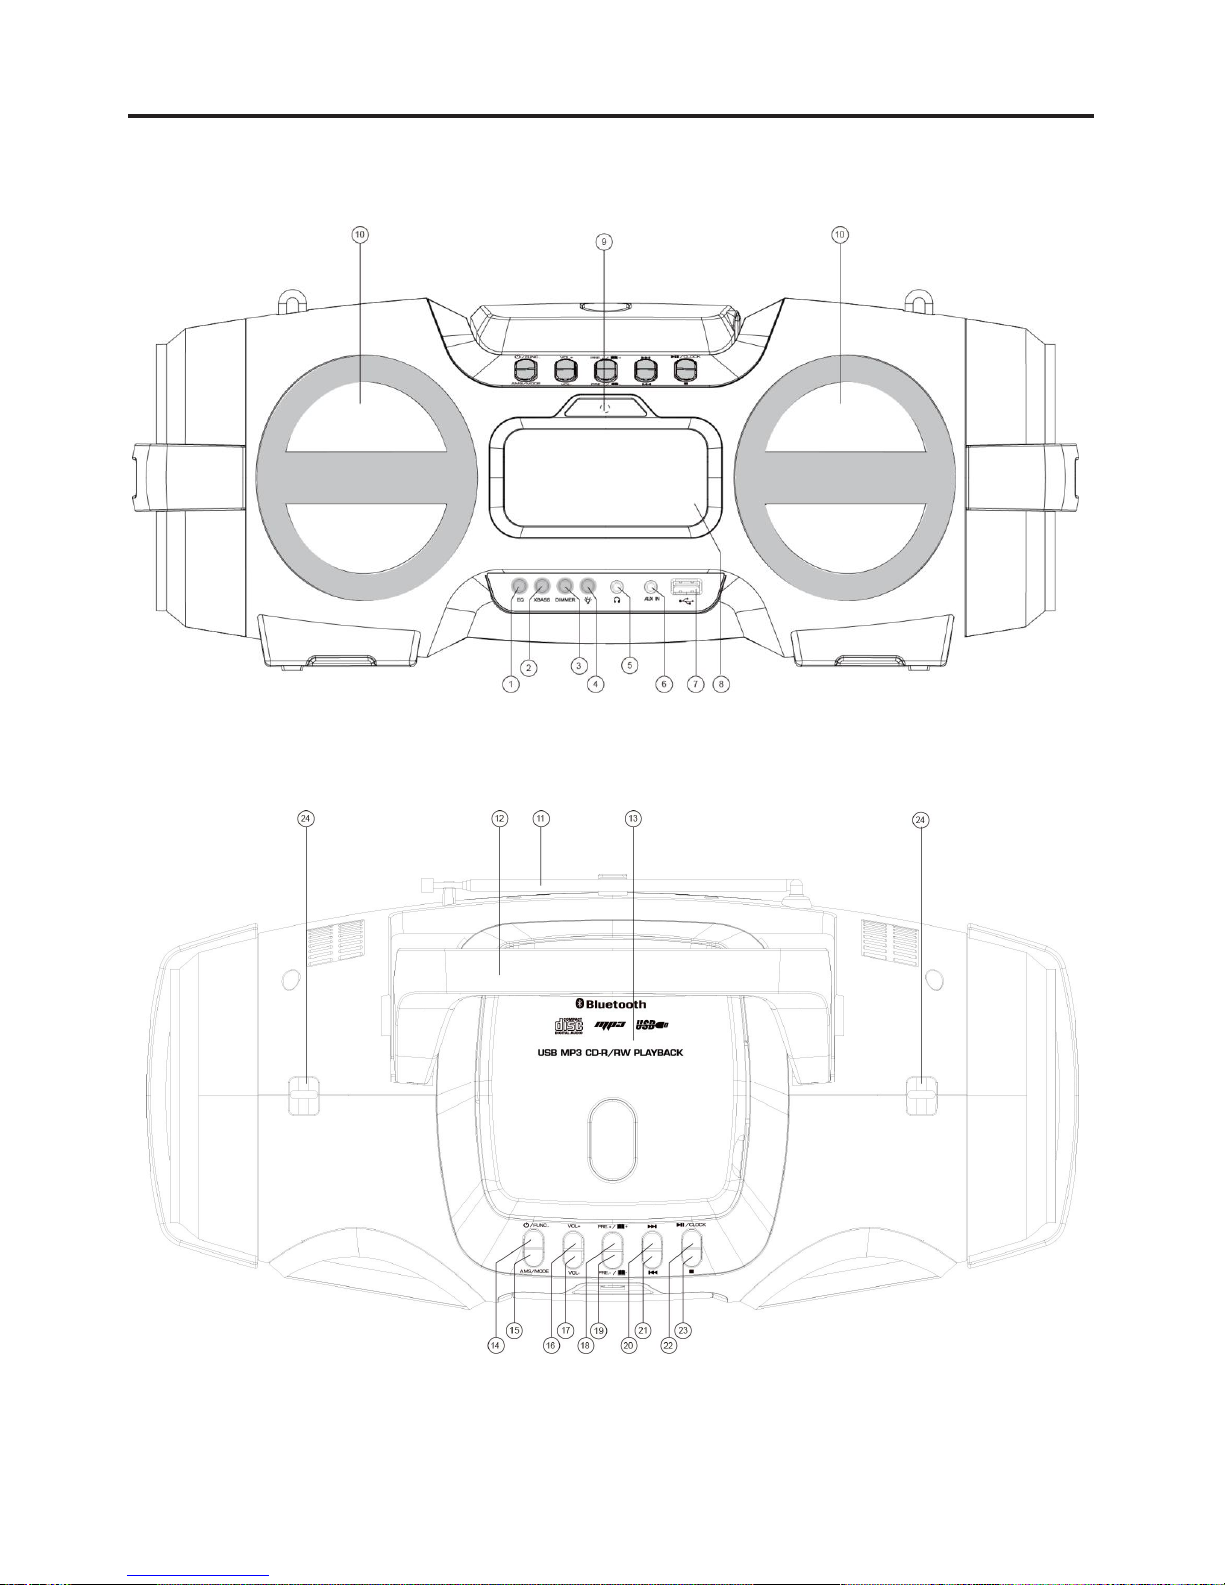
1 EQ button
2 BASS button
3 DIMMER button
4 LIGHT button
5 Headphone jack
6 AUX-IN jack
7 USB port
8 LCD display
9 Remote sensor
10 Speaker
11 Telescopic antenna
12 Handle
13 CD compartment
14 STANDBY / FUNC. button
15 AMS / MODE button
16 VOL+ button
17 VOL- button
18 PRE.+ / FOLDER + button
19 PRE - / FOLDER – button
20 SKIP + button
21 SKIP – button
22 PLAY / PASUE / CLOCK button
23 STOP button
24 HOOK FOR BELT
Insert a CR2025 battery into the battery compartment. Be sure that the battery inserts correctly to avoid
damage to the remote control. Always remove the batteries when the remote control will not be used for
a long period of time, as this will cause leakage to the battery and subsequently damage to your set.
CAUTION: Danger of explosion if battery is incorrectly replaced. Replace only with the same or
equivalent type.
Start-
up of the device/introduction
• Select a suitable location for the device, such as a dry, flat, non-slip surface on which it is easy to
operate the machine.
• Ensure that the device is sufficiently ventilated.
• Remove the protective film from the display if it is still present.
EN-2
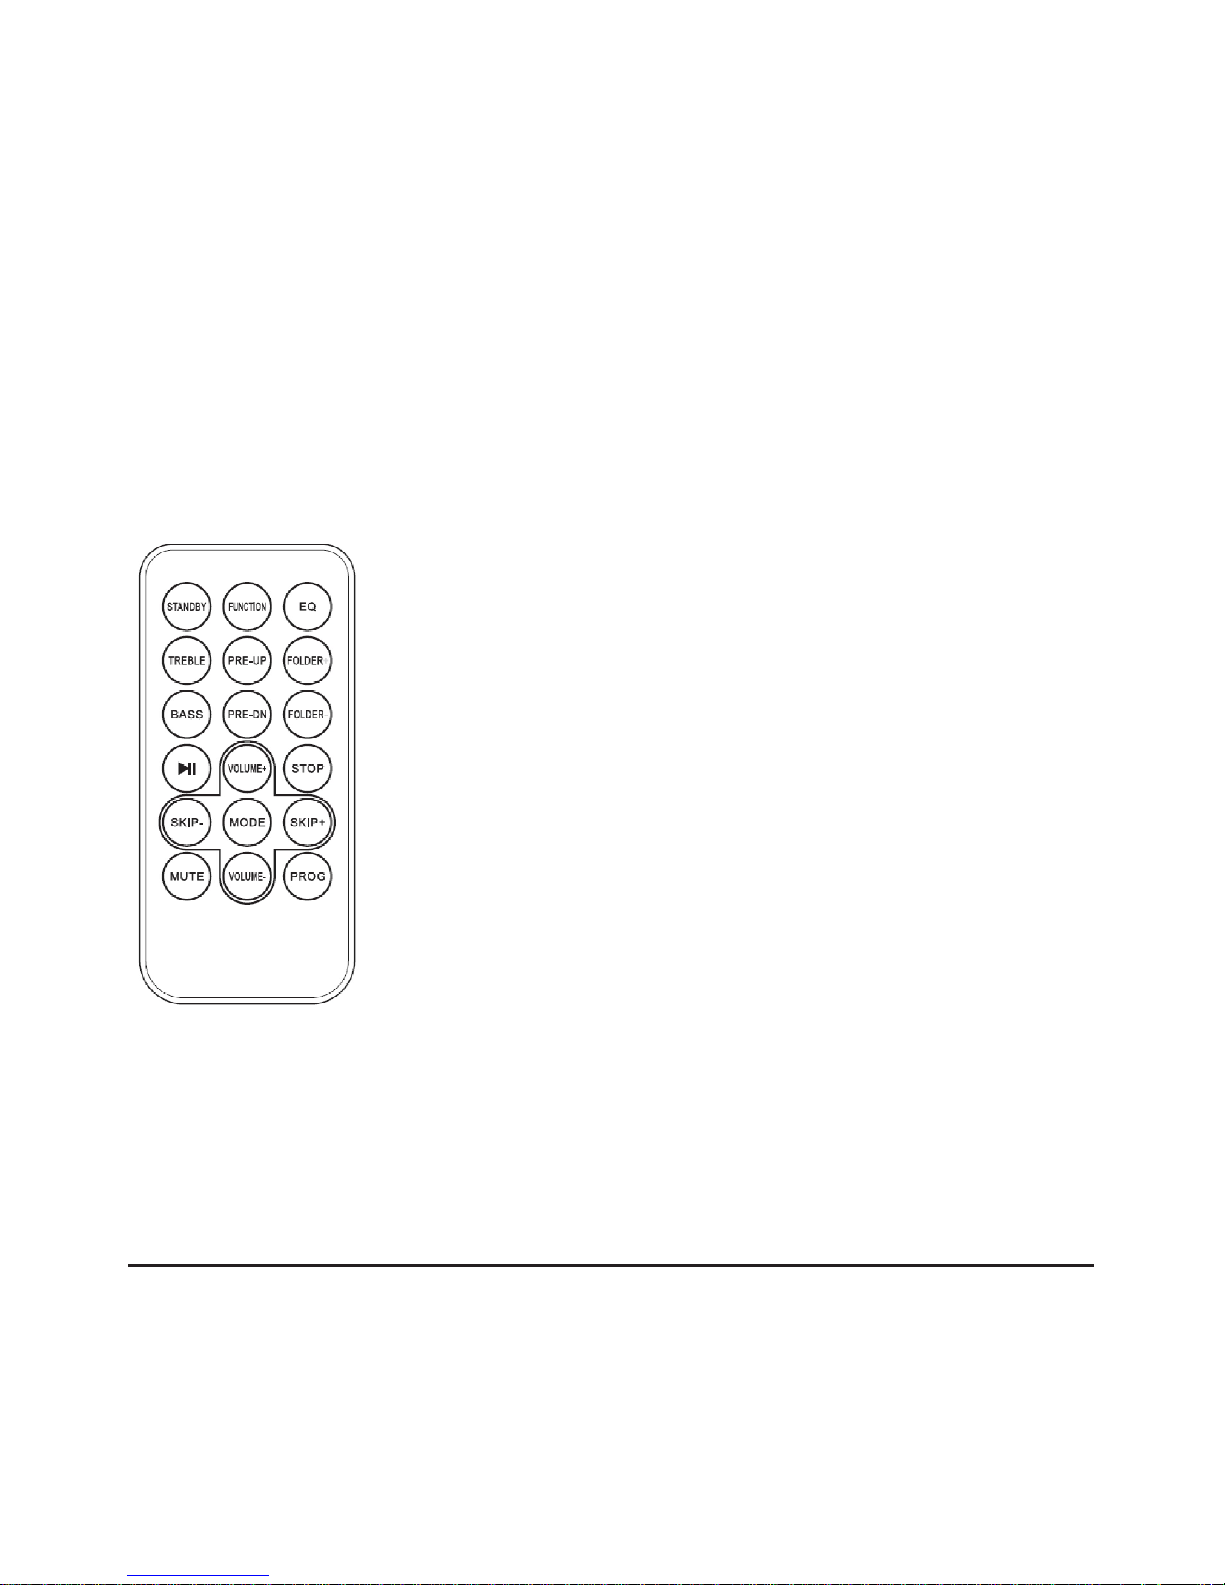
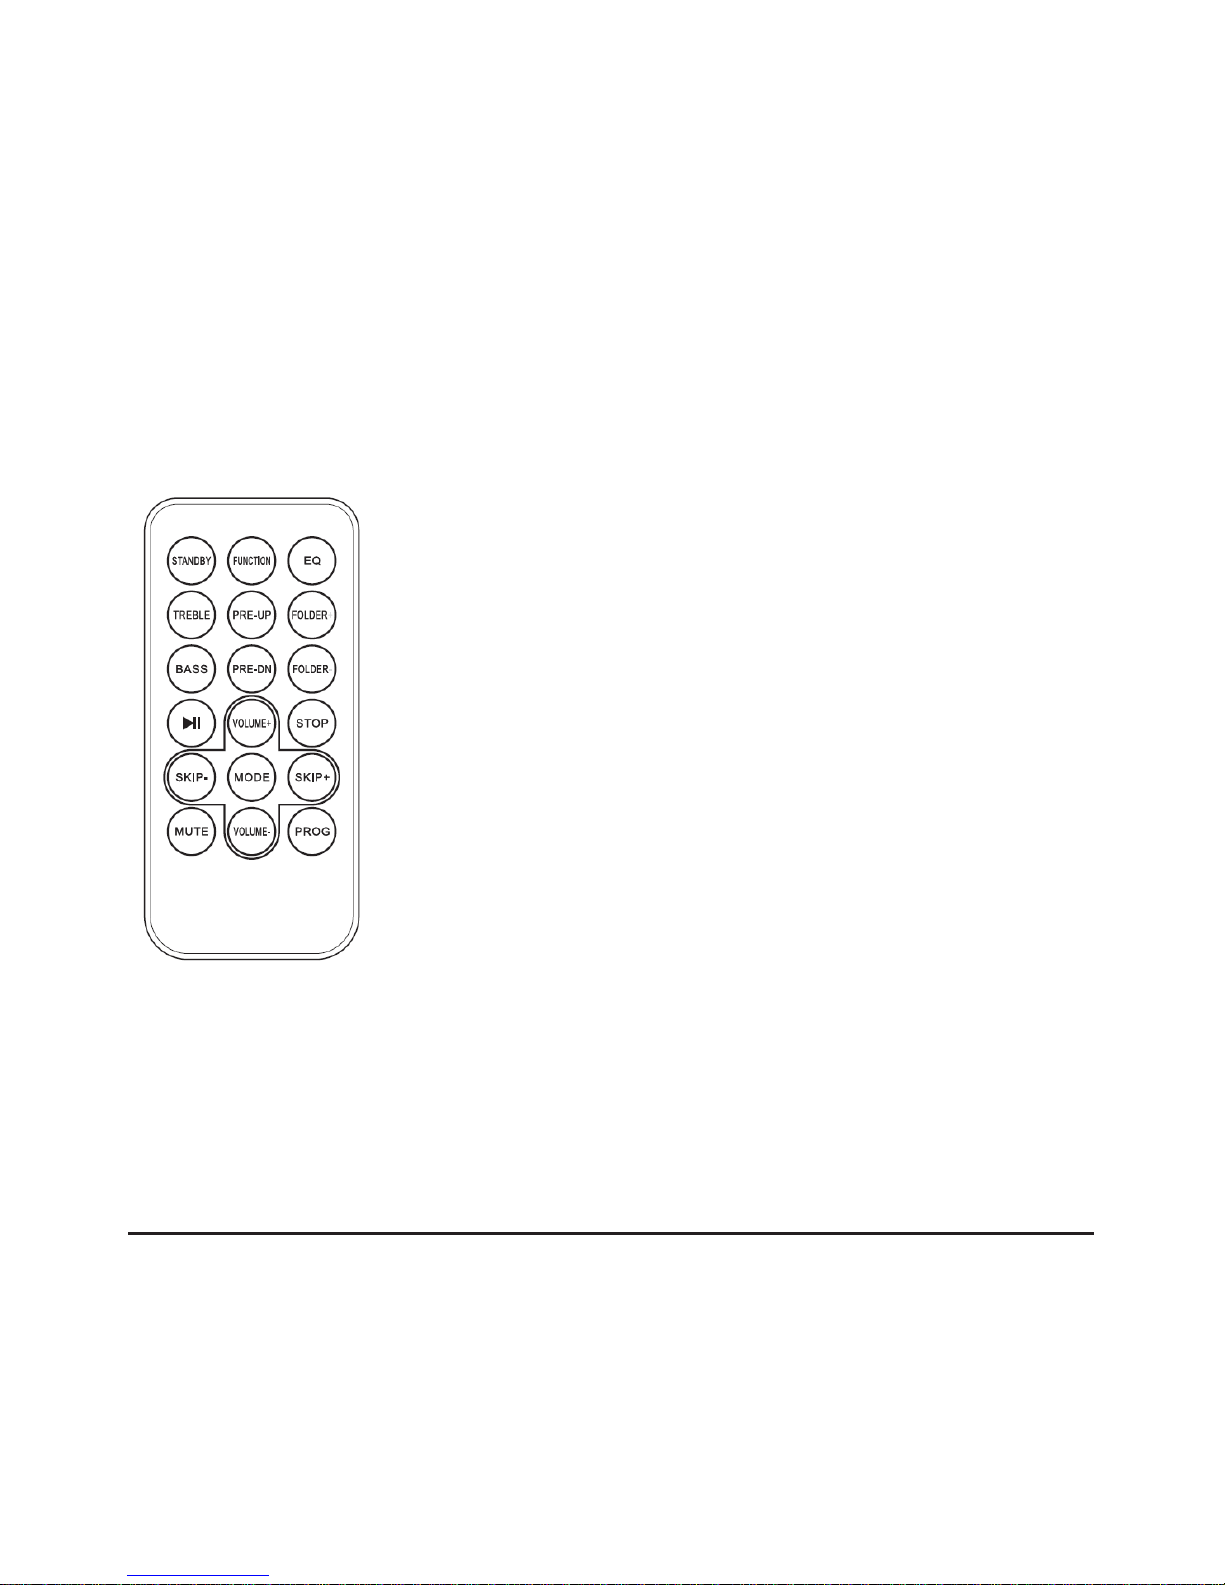
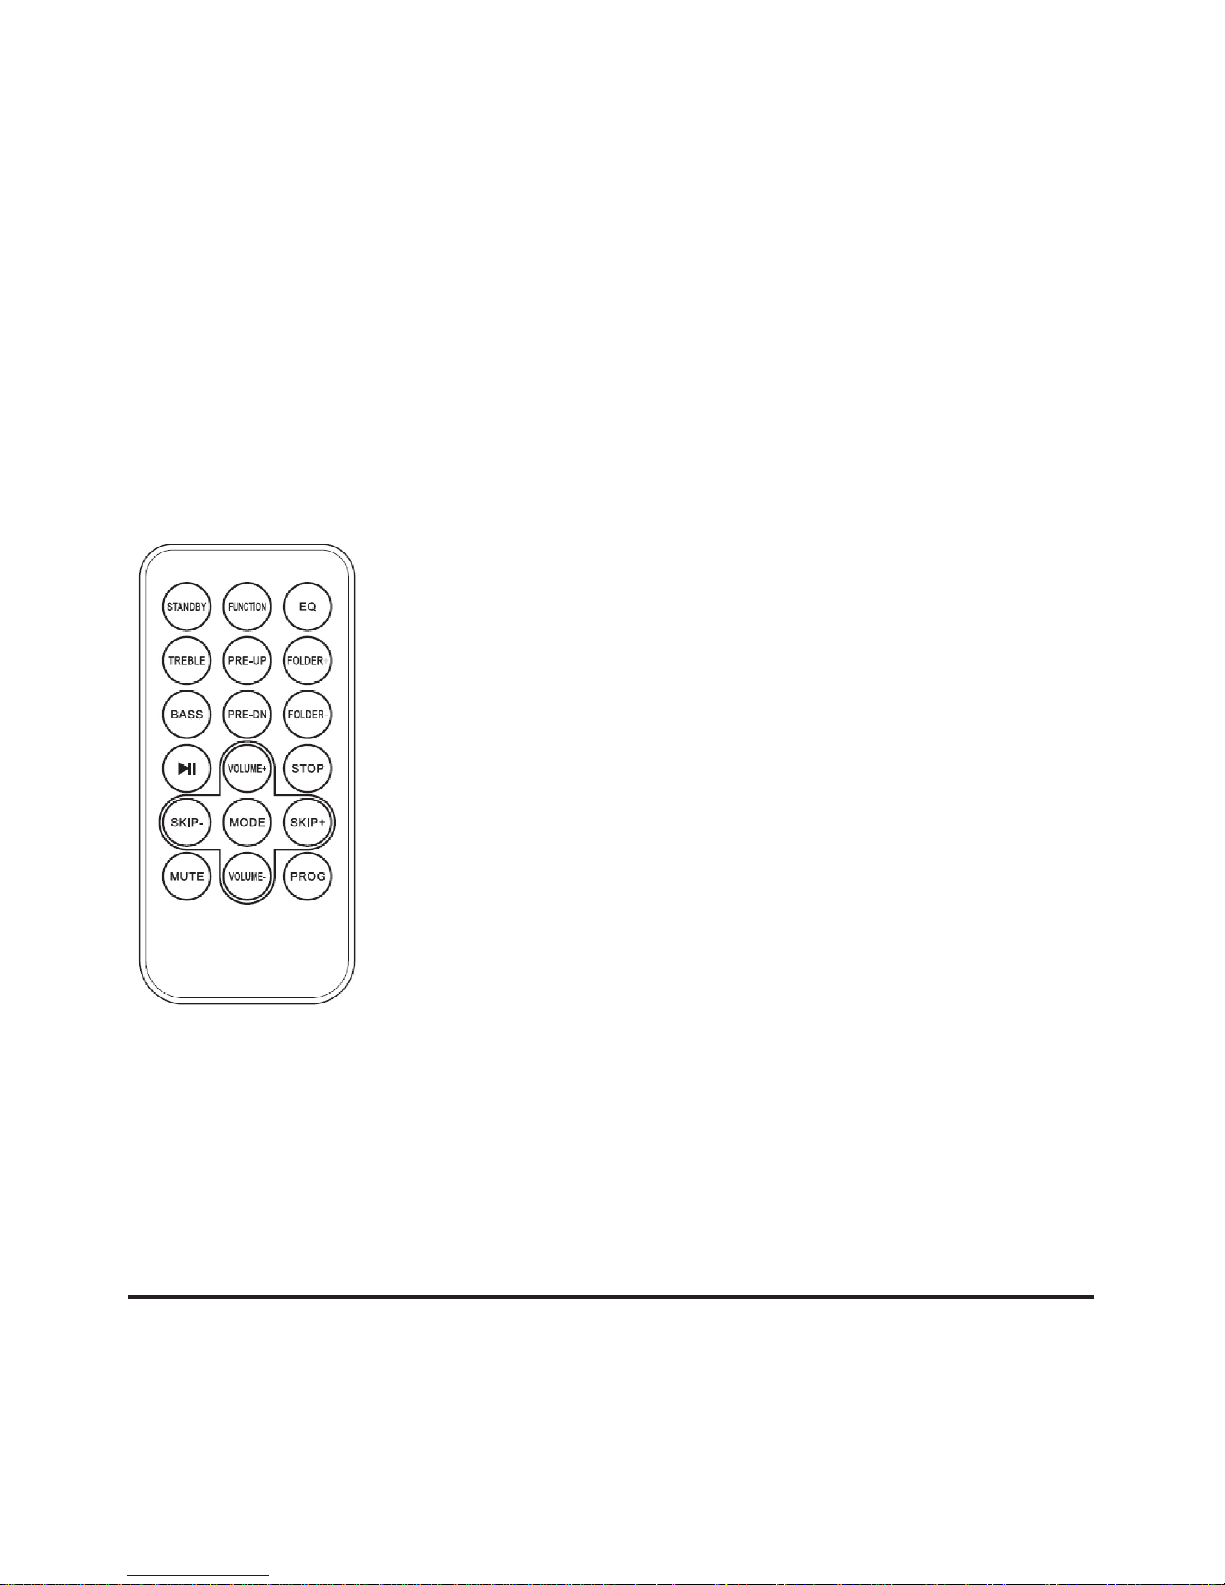
1 STANDBY
2 FUNCTION
3 EQ
4 TREBLE
5 PRE-UP
6 FOLDER
7 BASS
8 PRE-DN
9 FOLDER
10 PLAY / PAUSE
11 VOLUME +
12 STOP
13 SKIP –
14 MODE
15 SKIP +
16 MUTE
17 VOLUME -
18 PROG
Page 4

Power Supply
• Ensure that the voltage is the same as that indicated on the model identification plate.
• Connect the power cable supplied (see battery compartment if necessary) to a properly installed
safety power socket and the mains connector AC on the back of the machine.
Inserting the Batteries (not supplied)
1. Open the lid of the battery compartment on the bottom.
2. Insert 8 batteries of type UM 1/R20 1.5 V. Please ensure that the polarity is correct (see the floor of
the battery compartment)!
3. Then close the battery lid.
NOTE:
When a mains cable is connected the batteries are automatically switched off.
CAUTION:
• Batteries can leak and lose battery acid. When not using the system for a long period of time, remove
the batteries.
• Different battery types or new and used batteries must not be used together.
• Do not dispose of batteries with household waste. Return old batteries to the respective collection
facilities or your dealer.
WARNING:
The batteries shall not be exposed to excessive heat such as sunshine, fire or the like. Danger of
explosion!
Setting the clock
The system must be in standby mode in order to set the clock.
1. Press and hold the PLAY / PASUE / CLOCK button for approx.2 seconds.
2. Use the SKIP + & SKIP - buttons to set the time format “12 / 24hr”.
3. Press the PLAY / PASUE / CLOCK button to confirm time format.
4. Use the SKIP + & SKIP - buttons to set the hours accordingly.
3. Press PLAY / PASUE / CLOCK again. The minute digits start flashing.
4. Use the SKIP + & SKIP - buttons to set the minute accordingly.
5. Press PLAY / PASUE / CLOCK button again.
NOTE:
• The clock time settings will be erased in the event of power interruptions.
• Press and hold the /CLOCK button during operation in order to briefly display the current time.
Transport Safety Device, CD Compartment
1. Open the CD compartment by pulling the lid upwards by the tab.
2. Before operating the machine for the first time, remove the transport safety device from the CD
player if it is still in place.
Turning device on/ off
• Press the STANDBY / FUNC. button to turn the device on.
• To turn off the device, keep the STANDBY / FUNC. button pressed for approx. 3 seconds.
NOTE:
After about 10 minute without a signal, the device will automatically switch to standby.
EN-3
Page 5

Volume
You can set the desired volume with the VOL- / VOL + buttons
Headphone jack (PHONES)
To listen to music privately, use headphones with a 3.5 stereo jack plug and connect to the
headphones socket on the front of the system. The speakers will then be muted.
Listening to the Radio
1. Use the STANDBY / FUNC. button to select the desired frequency band.
2. For FM reception: Completely extend the telescopic antenna. Change its position to improve the
reception.
3. There are two options to search for and preset radio stations.
• Automatic scan:
Important! Any preset radio stations will be overridden.
Press and hold the MODE/AMS button for approx.3 seconds. The system scans the entire frequency
band for radio stations. Any stations found will be preset from lowest to highest frequency.
• Manual scan for audio stations:
Briefly press the SKIP + & SKIP - buttons, until you have found the radio station which you are looking
for. If you keep one of the buttons pressed down, the device will search to the previous, respectively
Preset station:
1. Press and hold the "AMS / MODE" button on unit for about 2-3 seconds to start the automatic preset
process.
2. Display will show the memory sequence number and radio stations will be automatically preset into
the sequence number (Note: Each sequence number means 1 preset station while during automatic
preset process.)
3. Once all the stations were automatic preset, press the “Pre + / FOLDER +” or “Pre - /
FOLDER –“ buttons to choose preset stations.
Playing CDs/MP3
1. Select the CD mode with the STANDBY / FUNC. button.
2. Open the CD compartment by pulling the lid upwards by the tab.
3. Insert an audio CD with the printed side facing upwards on to the central cone so that the CD clicks
into place and then close the lid of the CD compartment.
4. After a few seconds the total number of songs/tracks is shown in the display.
NOTE:
In the case of CDs in MP3 format the number of folders is briefly displayed at first.
5. The CD will play from the first title.
6. In order to remove a CD, please press the STOP button, open the CD compartment and lift the CD
out carefully.
EN-4
Page 6

Always keep the CD deck closed.
NOTE:
• if a disc is inserted the wrong way around, respectively if no disc is inserted, then the message “- - - -”
will blink and “NO Cd “ appears on the display.
• Playback of CDs produced by the user cannot be guaranteed due to the large variety of software and
CD media available.
Playing music via USB
This device has been developed in line with the latest technical advances in the USB field. The wide
range of different
USB storage devices of all types which are currently on the market, unfortunately do not allow us to
guarantee full compatibility with all USB storage devices. For this reason, in rare cases there may be
problems in playing back files from USB storage devices. This is not a malfunction of the device.
1. Select the USB mode with the STANDBY / FUNC. button.
2. Connect a USB storage device directly into the port. The display briefly shows the number of folders
and then the total number of tracks. Playback will automatically start after a few seconds.
For operation, please refer to the section “Description of the control buttons”.
NOTE:
• Always directly connect a USB storage medium to the USB port to prevent any malfunctions.
• The USB port is not designed for charging external devices.
CAUTION:
Switch the device to a different operating mode before you remove the USB storage device
Description of the control buttons
NOTE:
Not all the functions may be supported depending on the playback device.
PLAY / PASUE / CLOCK
• You can briefly interrupt and resume playback using this button. The display shows the elapsed
playback time flashing. Pressing again continues playback.
• Press and hold this button during operation to briefly display the current time.
SKIP + & SKIP -
With SKIP + you can jump to the next or previous track etc.
• If the button is kept pressed down, the machine starts to search through the tracks.
The SKIP - button can be used as follows:
Press once = This starts the current track again from the beginning.
Press twice = This jumps back to the previous track.
STOP
The playback is stopped.
EN-5
Page 7

MODE
• In stop mode for programming any order of tracks (see the section on “Programmed Play”).
During the playback of an audio CD:
Press once = the current track is repeated continuously. The symbol “REP” will flash in the display.
Press twice = the whole CD is played continuously. The symbol “REP ALL” will flash in the display.
Press three times = RAND appears on the display. All tracks will be played in random order.
Press four times = all functions are cancelled. The normal play mode is resumed.
During playback of MP3 music:
Press once = the current track is repeated continuously. The symbol “REP” will flash in the display.
Press twice = the selected folder is repeated continuously(REP FOLDER appears in the display).
Press three times = all music titles are repeated continuously(the symbol “REP ALL” will flash in the
display).
Press four times = RAND appears on the display. All tracks will be played in random order.
Press five times = all the functions are deactivated. Playback is continued normally.
PRE - / FOLDER- / PRE + / FOLDER +
Use the PRE - / FOLDER- and PRE + / FOLDER + buttons to select another folder. The music in the
selected folder is played back.
Programmed Play
This can be used to program any desired sequence of tracks.
1. Press the STOP button.
2. Press the MODE / AMS button. “P01” (Storage space) and the notification “PROG” will appear in the
display. Use the SKIP + & SKIP - buttons to select the desired track and then press the MODE / AMS
button again. The display changes to memory slot P02.
3. Select the next track with the SKIP + & SKIP - buttons and press the MODE / AMS button again.
Repeat the procedure until all the desired tracks are selected.
NOTE:
Once the storage capacity of the tracks to be programmed has been reached “FUL” flashes in the
display.
4. Press the PLAY / PASUE / CLOCK button. The playback starts.
The notification “PROG” will appear additionally in the display.
5. Press once the button to stop the playback while retaining the program.
6. To play the programmed back again, press the PLAY / PASUE / CLOCK button.
7. To delete the program, press the STOP button twice. The notification “PROG” will disappear.
EN-6
Page 8

Playing back Music in MP3 Format
With this device it is possible to play back pieces of music in MP3 format. The device also supports all
standard CD types: CD, CD-RW, CD-R.
This machine of is able to play MP3 CDs. Up to 99 tracks can be compressed and stored on these CDs.
Your machine detects an MP3 CD automatically (the total number of tracks and MP3s appears in the
display). If you would like to play one of these CDs, proceed as described under “Playing CDs/MP3”.
Tracks can be programmed as described under “Playing Back Programmed Tracks”.
AUX IN socket
Via this socket you can also hear the sound of other playback devices such as MP3 players, CD
players etc. through the loudspeakers.
1. Please connect the external device with a 3.5 mm stereo jack plug to the AUX-IN socket.
2. Repeatedly press the STANDBY / FUNC. button, until “AUX” is shown in the display.
3. You will hear the sound playback from the external device through the loudspeakers. You may adjust
the volume with VOL + / VOL -. The CD buttons are not functional.
4. For the remaining procedure please see the operating instructions of the external sound source.
NOTE:
Adjust the volume of the external device to a comfortable level.
Playing music via
Bluetooth
Before you can use a Bluetooth device with this system, you must first pair them.
1. Select the Bluetooth mode with the STANDBY / FUNC. button.
2. The “Bluetooth” logo on LCD Display will flash.
3. Set other available Bluetooth devices to search for this system until it recognizes “CSU557RC”.
4. Select “CSU557RC” on Bluetooth devices to start pairing.
PLAYBACK
1. When connected to Bluetooth device, unit will follow the playback on Bluetooth device automatically.
2. Select desired level by using the “VOL +” or “VOL -” button.
3. Corresponding command is sent to this system when connected Bluetooth device.
4. You can select available features in your Bluetooth device (such as play/pause, skip track, fast
forward / backward, menu selection) during playback.
CAUTION:
Switch the device to a different operating mode to exit the Bluetooth mode
EN-7
Page 9
Cleaning and Maintenance
WARNING:
Do not immerse the device in water.
• Always remove the mains plug before cleaning the machine.
• Any marks on the surface can be wiped off with a slightly damp cloth without any additives.
This is to certify that CSU557RC is in conformity with:
Council directive 89/336/EEC (EMC directive):
Applicable standards:
EN55013:2001+A1:2003+A2:2006
EN61000-3-2:2006+A1:2009+A2:2009
EN61000-3-3:2008
EN55020:2007
Made in PRC
For more information please visit our website
www.mpmaneurope.com
EN-8
Page 10
Vue d'ensemble des composants
FR-1
Page 11
1 Bouton EQ ( équalizer)
2 Bouton des basses
3 Bouton du variateur
4 Bouton de la lumière
5 Prise de casque
6 Prise AUX-IN
7 Port USB
8 Ecran LCD
9 Capteur de la télécommande
10 Haut-parleur
11 Antenne télescopique
12 Poignée
13 Compartiment CD
14 Bouton Veille / Fonction
15 Bouton AMS / MODE
16 Bouton VOL+
17 Bouton VOL-
18 Bouton PRE.+ / Dossier +
19 Bouton PRE - / Dossier –
20 Bouton Passer +
21 Bouton Passer -
22 Bouton LECTURE / PAUSE / Horloge
23 Bouton STOP
24 CROCHET POUR CEINTURE
Insérez une pile CR2025 dans le compartiment de la batterie. Assurez-vous que la batterie s’insère
correctement pour éviter d'endommager la télécommande. Retirez toujours les piles lorsque la
télécommande ne sera pas utilisée pendant une longue période de temps, car cela provoquerait une
fuite de la batterie et ensuite endommager votre appareil.
ATTENTION : Danger d'explosion si la pile est remplacée de façon incorrecte. Remplacez uniquement
avec le même type de pile ou équivalent.
Mise en service de l'appareil / introduction
• Sélectionnez un emplacement approprié pour l’appareil, comme une surface plane et sèche,
antidérapante sur laquelle il est facile de faire fonctionner l’appareil.
• Assurez-vous que l'appareil est suffisamment ventilé.
• Retirez le film protecteur de l'écran si il est encore présent.
Source d’alimentation
• Assurez-vous que la tension est la même que celle indiquée sur la plaque d'identification du modèle.
FR-2
1 VEILLE
2 FONCTION
3 EQ
4 AIGUS
5 PRE-HAUT
6 DOSSIER +
7 BASSE
8 PRE-BAS
9 DOSSIER -
10 LECTURE / PAUSE
11 VOLUME +
12 STOP
13 PASSER –
14 MODE
15 PASSER +
16 MUET
17 VOLUME -
18 PROG
Page 12

• Branchez le câble d'alimentation fourni (voir le compartiment de la batterie si nécessaire) à une prise
de courant sécurisée bien installée et au connecteur d'alimentation AC à l'arrière de la machine.
Insertion des piles (non fournies)
1. Ouvrez le couvercle du compartiment de la batterie sur le fond.
2. Insérez 8 piles de type UM 1 / R20 1,5 V. Veuillez-vous assurez que la polarité est correcte (voir le
fond du compartiment de la batterie) !
3. Fermez ensuite le couvercle de la batterie.
REMARQUE :
Quand un câble d'alimentation est connecté, les piles sont automatiquement mis hors tension.
PRUDENCE :
• Les piles peuvent fuir et perdre de l'acide. Quand vous n’utilisez pas le système pendant une longue
période de temps, retirez les piles.
• Les différents types de pile ou les piles neuves et les usagées ne doivent pas être utilisés tous
ensembles.
• Ne jetez pas les piles dans les ordures ménagères. Retournez les piles usagées aux installations de
collecte responsable ou à votre revendeur.
ATTENTION :
Les piles ne doivent pas être exposées à une chaleur excessive comme le soleil, le feu ou similaire. Il y
a danger d'explosion !
Réglage de l'horloge
Le système doit être en mode veille afin de régler l'horloge.
1. Appuyez et maintenez le bouton LECTURE/ PAUSE / HORLOGE pendant environ 2 secondes.
2. Utilisez les boutons PASSER + et PASSER - pour régler le format de l'heure de « 12 / 24hr ».
3. Appuyez sur le bouton LECTURE / PAUSE/HORLOGE pour confirmer le format de l’heure.
4. Utilisez les boutons PASSER + et PASSER - pour régler les heures en conséquence.
5. Appuyez sur le bouton LECTURE / PAUSE/HORLOGE à nouveau. Les chiffres des minutes
commencent à clignoter.
6. Utilisez les boutons PASSER + et PASSER - pour régler les minutes en conséquence.
7. Appuyez sur le bouton LECTURE / PAUSE/HORLOGE à nouveau.
REMARQUE :
• Les réglages de l'horloge seront effacés en cas de coupures de courant.
• Appuyez et maintenez enfoncé le bouton LECTURE / PAUSE/HORLOGE pendant le fonctionnement
afin d'afficher brièvement l'heure actuelle.
Dispositif de sécurité de transport, Compartiment CD
1. Ouvrez le compartiment CD en tirant le couvercle vers le haut par la languette.
2. Avant d'utiliser la machine pour la première fois, retirez le dispositif de sécurité de transport à partir
du lecteur de CD s’il est toujours en place.
Mise en route/ Arrêter l’appareil
• Appuyez sur le bouton VEILLE / FONC. pour allumer l'appareil.
• Pour éteindre l'appareil, maintenez le bouton VEILLE / FONC. enfoncé pendant environ 3 secondes.
FR-3
Page 13

REMARQUE:
Après environ 10 minutes sans signal, l'appareil passe automatiquement en veille.
Le volume
Vous pouvez régler le volume souhaité avec les boutons VOL- / VOL +
Prise casque (TELEPHONES)
Pour écouter de la musique en privé, utilisez un casque avec une prise jack 3,5 stéréo et
connectez-vous à la prise casque sur le devant de l’appareil. Les haut-parleurs seront alors mis en
sourdine.
Écouter la radio
1. Utilisez le bouton VEILLE / FONC. pour sélectionner la bande de fréquence désirée.
2. Pour la réception FM, étendez complètement l'antenne télescopique. Changez sa position pour
améliorer la réception.
3. Il y a deux options pour rechercher et prérégler des stations de radio.
• Scan automatique :
Important ! Toutes les stations de radio préréglées seront remplacées.
Appuyez et maintenez le bouton MODE / AMS pendant environ 3 secondes. Le système scan toute la
bande de fréquences pour rechercher des stations de radio. Toutes les stations trouvées seront
préréglées de la plus basse à la plus haute fréquence.
• Le scan manuel pour rechercher des stations radio :
Appuyez brièvement sur les boutons PASSER + et PASSER - , jusqu'à ce que vous avez trouvé la
station de radio que vous recherchez. Si vous gardez un des boutons enfoncés, l'appareil recherchera
respectivement la précédente
Station préréglée :
1. Appuyez et maintenez le bouton « AMS / MODE» sur l'unité pendant environ 2-3 secondes pour
démarrer le processus de préréglage automatique.
2. L'écran affichera le numéro de séquence de la mémoire et les stations de radio seront
automatiquement préréglées par le numéro de séquence (Remarque : Chaque numéro de séquence
signifie 1 station préréglée au cours du processus de préréglage automatique)
3. Une fois que toutes les stations sont préréglées automatiquement, appuyez sur le bouton « PRE +
/ DOSSIER +» ou « PRE - / DOSSIER -» pour choisir des stations préréglées.
Lecture de CD / MP3
1. Sélectionnez le mode CD avec le bouton VEILLE / FONC.
2. Ouvrez le compartiment CD en tirant le couvercle vers le haut par la languette.
3. Insérez un CD audio avec la face imprimée tournée vers le haut sur le cône central de sorte que le
CD se mette en place, puis fermez le couvercle du compartiment de CD.
4. Après quelques secondes, le nombre total de chansons / pistes est affiché à l'écran.
REMARQUE :
Dans le cas des CD au format MP3 le nombre de dossiers est brièvement affiché tout au début.
5. Le CD va jouer à partir du premier titre.
FR-4
Page 14

6. Pour retirer un CD, veuillez appuyer sur le bouton STOP, ouvrez le compartiment CD et soulevez le
CD avec soin.
Toujours garder la platine CD fermée.
REMARQUE :
• si un disque est inséré dans le mauvais sens, respectivement si aucun disque est inséré, le message
« - - - - » clignote et « NO Cd» (Aucun CD) apparaît sur l'écran.
• La lecture des CD produits par l'utilisateur ne peut pas être garantie en raison de la grande variété de
logiciels et de CD disponibles.
Lecture de musique via l’USB
Cet appareil a été mis au point en conformité avec les dernières avancées techniques dans le domaine
USB. La large gamme de périphériques de stockage USB de tous les types qui sont actuellement sur le
marché, malheureusement ne nous permettent pas de garantir une compatibilité totale avec tous les
périphériques de stockage USB. Pour cette raison, dans de rares cas, il peut y avoir des problèmes
dans la lecture de fichiers à partir de périphériques de stockage USB. Cela n’est pas un défaut de
fonctionnement de l’appareil.
1. Sélectionnez le mode USB avec le bouton VEILLE / FONC.
2. Connectez un périphérique de stockage USB directement dans le port. L'écran affiche brièvement le
nombre de dossiers et le nombre total de pistes. La lecture démarre automatiquement après quelques
secondes.
Pour le fonctionnement, veuillez-vous référer à la section «Description des boutons de commande ».
REMARQUE :
• Connectez toujours directement un support de stockage de mémoire USB au port USB afin d'éviter
tout dysfonctionnement.
• Le port USB n’est pas conçu pour charger des périphériques externes.
PRUDENCE :
Mettez l'appareil dans un autre mode de fonctionnement avant de retirer le périphérique de stockage
USB
Description des boutons de commande
REMARQUE :
Toutes les fonctions peuvent être prises en charge en fonction de l'appareil de lecture.
LECTURE / PAUSE / HORLOGE
• Vous pouvez interrompre brièvement et reprendre la lecture en utilisant ce bouton. L'écran affiche un
temps de lecture écoulé clignotant. En appuyant de nouveau la lecture se poursuit.
• Appuyez et maintenez enfoncé ce bouton pendant le fonctionnement pour afficher brièvement l'heure
actuelle.
PASSER + et PASSER -
Avec PASSER + (SKIP +) vous pouvez passer à la piste suivante ou la précédente, etc.
• Si le bouton est maintenu enfoncé, l’appareil commence à chercher à travers les pistes.
FR-5
Page 15

Le bouton PASSER – (SKIP -) peut être utilisé comme suit :
Appuyez une fois = La piste en cours recommencera depuis le début.
Appuyer deux fois = La lecture revient à la piste précédente.
STOP
La lecture est arrêtée.
MODE
• En mode stop pour la programmation de tout ordre de pistes (voir la section sur « Lecture
programmée »).
Pendant la lecture d'un CD audio :
Appuyez une fois = la piste en cours est répétée en continu. Le symbole «REP» clignotera à l'écran.
Appuyer deux fois = l'ensemble du CD est joué de façon continue. Le symbole « REP ALL » (Tout
répéter) clignotera à l'écran.
Appuyez trois fois = RAND (Aléatoire) apparaît sur l'écran. Toutes les pistes seront lues dans un ordre
aléatoire.
Appuyez quatre fois = toutes les fonctions sont annulées. Le mode de lecture normale est relancé.
Pendant la lecture de musique MP3 :
Appuyez une fois = la piste en cours est répétée en continu. Le symbole «REP» clignotera à l'écran.
Appuyer deux fois = le dossier sélectionné est répété en continu (REP FOLDER apparaît sur l'écran).
Appuyez trois fois = tous les titres de musique sont répétées en continu (le symbole « REP ALL »
clignotera à l'écran).
Appuyez quatre fois = RAND apparaît sur l'écran. Toutes les pistes seront lues dans un ordre aléatoire.
Appuyez cinq fois = toutes les fonctions sont désactivées. La lecture se poursuit normalement.
PRE - / DOSSIER- / PRE + / DOSSIER +
Utilisez les boutons PRE - / DOSSIER- et PRE + / DOSSIER + pour sélectionner un autre dossier. La
musique dans le dossier sélectionné est lue.
Lecture programmée
Ceci peut être utilisé pour programmer une séquence quelconque de pistes désirées.
1. Appuyez sur le bouton STOP.
2. Appuyez sur la touche AMS/MODE. « P01 » (espace de stockage) et la notification « PROG »
apparaîtront à l'écran.
Utilisez les boutons PASSER + et PASSER - pour sélectionner la piste désirée, puis appuyez à
nouveau sur la touche MODE / AMS.
L'écran change et affiche l'emplacement de mémoire P02.
3. Sélectionnez la piste suivante avec les boutons PASSER + et PASSER - et appuyez de nouveau sur
la touche MODE / AMS. Répétez la procédure jusqu'à ce que toutes les pistes souhaitées soient
sélectionnées.
REMARQUE :
Une fois la capacité de stockage des pistes à programmer a été atteint «FUL» (Plein) clignote à l'écran.
FR-6
Page 16

4. Appuyez sur le bouton LECTURE / PAUSE / HORLOGE. La lecture commence.
La notification « PROG » apparaîtra aussi sur l’écran.
5. Appuyez une fois sur le bouton pour arrêter la lecture tout en conservant le programme.
6. Pour lire de nouveau les pistes programmées, appuyez sur le bouton LECTURE / PAUSE /
HORLOGE.
7. Pour supprimer le programme, appuyez deux fois sur le bouton STOP. La notification « PROG »
disparaîtra.
Lecture de musique en format MP3
Avec cet appareil, il est possible de lire des morceaux de musique au format MP3. L’appareil prend
également en charge tous les types de CD standard :
CD, CD-RW, CD-R.
Cet appareil est capable de lire les CD MP3. Jusqu'à 99 pistes peuvent être compressés et stockés sur
ces CD. Votre appareil détecte un CD MP3 automatiquement (le nombre total de pistes et de MP3
apparaît à l'écran). Si vous souhaitez jouer un de ces CD, procédez comme décrit à la rubrique
« Lecture de CD / MP3». Les pistes peuvent être programmées comme décrit dans la rubrique
«Lecture de pistes programmées ».
Prise AUX IN
Via cette prise, vous pouvez également écouter le son d'autres appareils de lecture tels que les
lecteurs MP3, les lecteurs de CD, etc. à travers les haut-parleurs.
1. Veuillez connecter le périphérique externe avec une prise jack stéréo de 3,5 mm à la prise AUX-IN.
2. Appuyez plusieurs fois sur le bouton VEILLE / FONC. , jusqu'à ce que « AUX » est affiché à l'écran.
3. Vous entendrez le son de la lecture de l'appareil externe à travers les haut-parleurs. Vous pouvez
régler le volume avec VOL + / VOL -. Les boutons de la fonction CD ne sont pas fonctionnels.
4. Pour la procédure restante veuillez voir le mode d'emploi de la source audio externe.
REMARQUE :
Réglez le volume de l'appareil externe à un niveau confortable.
Lecture de musique via le Bluetooth
Avant de pouvoir utiliser un périphérique Bluetooth avec ce système, vous devez d'abord les coupler.
1. Sélectionnez le mode Bluetooth avec le bouton VEILLE / FONC.
2. Le logo «Bluetooth» de l'écran LCD clignotera.
3. Réglez les autres périphériques Bluetooth disponibles pour rechercher cet appareil jusqu'à ce qu'il
reconnaisse « CSU557RC ».
4. Sélectionnez « CSU557RC » sur les appareils Bluetooth pour commencer le couplage.
LECTURE
1. Lorsqu'il est connecté à un appareil Bluetooth, l’appareil suivra la lecture du périphérique Bluetooth
automatiquement.
2. Sélectionnez le niveau de volume souhaité à l'aide des boutons « VOL –» « VOL + ».
3. La commande correspondante est envoyée à cet appareil lorsqu'il est connecté au périphérique
Bluetooth.
FR-7
Page 17
4. Vous pouvez sélectionner les fonctions disponibles dans votre périphérique Bluetooth (tels
quelalecture / pause, passer piste, avance / retour rapide, sélection de menu) pendant la
lecture.
PRUDENCE :
Mettre l'appareil dans un autre mode de fonctionnement pour quitter le mode Bluetooth
Nettoyage et entretien
PRUDENCE :
Ne pas plonger l'appareil dans l'eau.
• Retirez toujours la prise d’alimentation secteur avant de nettoyer la machine.
• Toutes les marques sur la surface peuvent être nettoyées avec un chiffon légèrement humide sans
aucun additif
Nous certifions par la présente que le CSU557RC est conforme à :
Directive du conseil 89/336/EEC (directive CEM):
Normes applicables :
EN55013:2001+A1:2003+A2:2006
EN61000-3-2:2006+A1:2009+A2:2009
EN61000-3-3:2008
EN55020:2007
Fabriqué en RPC
Pour de plus amples informations, veuillez consulter notre site Internet
www.mpmaneurope.com
FR-8
Page 18

La société MPMAN déclare que cet appareil est conforme à la
directive européenne 1999/5/CE dite "R&TTE" (Radio And Terminal
Telecommunication Equipement)
Pour toute information, veuillez contacter :
JME SA
Service Technique
M. Michel
77 rue dodonée
1180 Bruxelles
Belgique
Pour toutes questions :
MPMAN / JME SAService consommateur
M. Cavell
77 rue dodonée
1180 Bruxelles
Belgique
12 décembre, 2014
Page 19
Overzicht van de onderdelen
NL-1
Page 20
1 Knop EQ
2 Knop BASS
3 Knop DIMMER
4 Knop LIGHT
5 Hoofdtelefoonuitgang
6 AUX-INGANG
7 USB-poort
8 LCD-display
9 Afstandsbedieningssensor
10 Luidspreker
11 Telescopische antenne
12 Handvat
13 CD-compartiment
14 Knop STANDBY / FUNC.
15 Knop AMS / MODE
16 Knop VOL+
17 Knop VOL18 Knop PRE.+ / FOLDER +
19 Knop PRE - / FOLDER –
20 Knop SKIP +
21 Knop SKIP –
22 Knop PLAY / PASUE / CLOCK
23 Knop STOP
24 HAAK VOOR RIEM
Plaats een CR2025-batterij in het batterijvak. Zorg ervoor dat de batterij juist wordt geplaatst om
schade aan de afstandsbediening te voorkomen. Verwijder batterijen altijd uit de afstandsbediening als
deze gedurende een lange periode niet wordt gebruikt, omdat dit tot batterijlekkage kan leiden en
vervolgens uw toestel kan beschadigen.
LET OP: Explosiegevaar indien batterij onjuist wordt vervangen. Alleen vervangen door batterij van
hetzelfde of vergelijkbaar type.
Het apparaat opstarten/inleiding
• Selecteer een geschikte locatie voor het apparaat, zoals een droog, vlak en niet-glad oppervlak
waarop het apparaat eenvoudig kan worden gebruikt.
• Zorg ervoor dat het apparaat voldoende wordt geventileerd.
• Verwijder het beschermende folie van het display indien dit nog aanwezig is.
NL-2
1 STANDBY
2 FUNCTION
3 EQ
4 TREBLE
5 PRE-UP
6 FOLDER
7 BASS
8 PRE-DN
9 FOLDER
10 PLAY / PAUSE
11 VOLUME +
12 STOP
13 SKIP –
14 MODE
15 SKIP +
16 MUTE
17 VOLUME
18 PROG
Page 21

Voeding
• Zorg ervoor dat de netspanning overeenkomt met de spanning die is aangegeven op het typeplaatje
van het apparaat.
• Sluit het meegeleverde netsnoer aan (zie batterijvak indien nodig) op een juist geïnstalleerd
stopcontact en de stroomingang op de achterkant van het apparaat.
De batterijen plaatsen (niet meegeleverd)
1. Open het deksel van het batterijvak op de onderkant.
2. Plaats 8 batterijen van het type UM 1/R20 1.5 V. Zorg ervoor dat de batterijen in de juiste richting
(polariteit) worden geplaatst (zie op bodem van het batterijvak)!
3. Sluit daarna het deksel van het batterijvak.
OPMERKING:
Als het netsnoer wordt aangesloten, worden de batterijen automatisch uitgeschakeld.
LET OP:
• Batterijen kunnen lekken en batterijzuur verliezen. Als het apparaat voor een lange periode niet wordt
gebruikt, verwijder dan de batterijen.
• Verschillende soorten batterijen of nieuwe en oude batterijen mogen niet samen worden gebruikt.
• Gooi batterijen niet weg bij het normale huisvuil. Breng gebruikte batterijen terug naar een van de
speciale inzamelpunten of naar uw dealer.
WAARSCHUWING:
De batterijen mogen niet worden blootgesteld aan extreme warmte, zoals zonlicht, vuur en dergelijke.
Explosiegevaar!
De klok instellen
Het apparaat moet in de standbymodus staan om de klok in te stellen.
1. Houd de knop PLAY / PAUSE / CLOCK voor ca. 2 seconden ingedrukt.
2. Gebruik de knoppen SKIP + & SKIP – om de tijdnotatie in te stellen op “12 / 24hr”.
3. Druk ter bevestiging van de tijdnotatie op PLAY / PAUSE / CLOCK.
4. Gebruik de knoppen SKIP + & SKIP – om de uren juist in te stellen.
3. Druk nogmaals op PLAY / PAUSE / CLOCK. De minuutcijfers beginnen te knipperen.
4. Gebruik de knoppen SKIP + & SKIP – om de minuten juist in te stellen.
5. Druk nogmaals op PLAY / PAUSE / CLOCK.
OPMERKING:
• De instelling van de klok wordt gewist in het geval van stroomonderbrekingen.
• Houd de knop PLAY / PAUSE / CLOCK tijdens gebruik ingedrukt om kort de huidige tijd weer te
geven.
Transportbeveiliging, CD-compartiment
1. Open het CD-compartiment door het deksel omhoog te trekken bij het lipje.
2. Voordat u het apparaat voor het eerst gebruikt, moet u de transportbeveiliging uit de CD-speler
verwijderen indien deze nog op zijn plaats zit.
Het apparaat in-/uitschakelen
• Druk op STANDBY / FUNC. om het apparaat in te schakelen.
NL-3
Page 22

• Houd STANDBY / FUNC. voor ca. 3 seconden ingedrukt om het apparaat uit te schakelen.
OPMERKING:
Het apparaat zal na ongeveer 10 minuten zonder signaal automatisch naar de standbymodus
schakelen.
Volume
U kunt het volume naar wens instellen met behulp van de knoppen VOL- / VOL +.
Hoofdtelefoonuitgang (PHONES)
U kunt een hoofdtelefoon met 3,5mm stereostekker gebruiken om privé naar muziek te luisteren. Steek
de stekker van de hoofdtelefoon in de hoofdtelefoonuitgang op de voorkant van het systeem. De
luidsprekers worden nu automatisch uitgeschakeld.
Naar de radio luisteren
1. Gebruik de knop STANDBY / FUNC. om de gewenste frequentieband te selecteren.
2. Voor FM-ontvangst: Strek de telescopische antenne volledig uit. Verander de richting om de
ontvangst te verbeteren.
3. Er zijn twee opties om te zoeken naar zenders en voorkeurzenders in te stellen.
• Automatische scan:
Belangrijk! Voorkeurzenders worden bij het uitvoeren van een automatisch scan overschreven.
Houd de knop MODE/AMS voor ca.3 seconden ingedrukt. Het systeem scant op de gehele
frequentieband naar radiozenders. Elke zender die wordt gevonden wordt opgeslagen als
voorkeurzender in volgorde van frequentie (van de laagste naar de hoogste frequentie).
• Handmatige scan voor radiozenders:
Druk kort op de knoppen SKIP + & SKIP – tot u de radiozender die u zoekt gevonden heeft. Als u één
van beide knoppen ingedrukt houdt, zal het apparaat automatisch zoeken naar de volgende of vorige
zender.
Voorkeurzender:
1. Houd de knop "AMS / MODE" op het apparaat voor ongeveer 2-3 seconden ingedrukt om het
automatisch instellen van voorkeurzenders te starten.
2. Het display toont het voorkeurzendernummer en er worden automatisch radiozenders opgeslagen
onder deze nummers (Opmerking: elk voorkeurnummer staat voor 1 voorkeurzender tijdens het
automatisch instellen van voorkeurzenders.)
3. Zodra alle zenders zijn opgeslagen als voorkeurzender, kunt u op de knoppen “Pre + / FOLDER +”
en “Pre - / FOLDER –“ drukken om de gewenste voorkeurzender te selecteren.
Afspelen van CD’s /MP3’s
1. Selecteer de CD-modus met behulp van de knop STANDBY / FUNC.
2. Open het CD-compartiment door het deksel omhoog te trekken bij het lipje.
3. Plaats een audio-CD met de bedrukte zijde naar boven gericht op de as in het midden, zodat de CD
op zijn plaats klikt en sluit daarna het deksel van het CD-compartiment.
4. Na een paar seconden wordt het totaal aantal nummers/tracks getoond op het display.
NL-4
Page 23

OPMERKING:
In het geval van CD’s met MP3-bestanden, wordt eerst kort het aantal mappen getoond.
5. De CD wordt vanaf het eerste nummer afgespeeld.
6. Als u een CD uit het CD-compartiment wilt halen, druk dan eerst op STOP, open het
CD-compartiment en til de CD daarna voorzichtig uit het apparaat.
Houd het CD-compartiment altijd gesloten.
OPMERKING:
• als een disc verkeerd om wordt geplaatst of als er geen disc wordt geplaatst, dan zal het bericht “NO
Cd “ op het display verschijnen, terwijl “- - - -” knippert.
• Het afspelen van CD’s die door de gebruiker zelf zijn geproduceerd kan niet worden gegarandeerd
door de grote verscheidenheid aan beschikbare software en beschrijfbare cd’s.
Afspelen van muziek via USB
Het apparaat is ontwikkeld in lijn met de laatste technologische ontwikkelingen op het gebied van USB.
Door het brede scala aan USB-opslagapparaten dat vandaag de dag beschikbaar is op de markt,
kunnen we echter niet garanderen dat alle USB-opslagapparaten compatibel zijn met dit apparaat. Om
deze reden kunnen er in zeldzame gevallen problemen ontstaan bij het afspelen van bestanden vanaf
USB-opslagapparaten. Dit is geen defect van het apparaat.
1. Selecteer de USB-modus met behulp van de knop STANDBY / FUNC.
2. Steek een USB-opslagapparaat in de USB-poort. Het display toont kort het aantal mappen en
daarna het totaal aantal tracks. Het afspelen start automatisch na een aantal seconden.
Voor bediening, kijk in de paragraaf “Beschrijving van de bedieningselementen”.
OPMERKING:
• Sluit USB-opslagapparaten altijd rechtstreeks op de USB-poort aan om eventuele storingen te
voorkomen.
• De USB-poort is niet ontworpen voor het opladen van externe apparaten.
LET OP:
Schakel het apparaat naar een andere gebruiksmodus voordat u het USB-opslagapparaat uit de
USB-poort trekt.
Beschrijving van de bedieningselementen
OPMERKING:
Het is mogelijk dat niet alle functies worden ondersteund, afhankelijk van het afspeelapparaat.
PLAY / PAUSE / CLOCK
• U kunt het afspelen tijdelijk onderbreken en hervatten met behulp van deze knop. Het display toont
knipperend de verstreken afspeeltijd. Druk nogmaals op de knop om het afspelen te hervatten.
• Houd de knop tijdens gebruik ingedrukt om kort de huidige tijd weer te geven.
SKIP + & SKIP -
Met SKIP + & SKIP -kunt u naar de volgende of vorige track gaan, etc.
• Houd de knop ingedrukt om vooruit of terug te spoelen binnen tracks.
NL-5
Page 24

De SKIP – kan als volgt worden gebruikt:
Druk één keer = Dit start de huidige track vanaf het begin.
Druk twee keer = Het apparaat gaat naar de vorige track.
STOP
Het afspelen wordt gestopt.
MODE
• Gebruik de knop als het afspelen is gestopt om een programma samen te stellen om de volgorde
waarin tracks worden afgespeeld naar wens in te stellen (zie paragraaf “Een programma afspelen”).
Tijdens het afspelen van een audio-CD:
Druk één keer = de huidige track wordt continu herhaald. Het symbool “REP” knippert op het display.
Druk twee keer = de gehele CD wordt continu afgespeeld. Het symbool “REP ALL” knippert op het
display.
Druk drie keer = RAND verschijnt op het display. Alle tracks worden in willekeurige volgorde
afgespeeld.
Druk vier keer = alle functies worden geannuleerd. Het normale afspelen wordt hervat.
Tijdens het afspelen van MP3-muziek:
Druk één keer = de huidige track wordt continu herhaald. Het symbool “REP” knippert op het display.
Druk twee keer = de geselecteerde map wordt continu herhaald (REP FOLDER verschijnt op het
display).
Druk drie keer = alle muziekbestanden worden continu herhaald (het symbool “REP ALL” knippert op
het display).
Druk vier keer = RAND verschijnt op het display. Alle tracks worden in willekeurige volgorde
afgespeeld.
Druk vijf keer = alle functies worden uitgeschakeld. Het normale afspelen wordt hervat.
PRE - / FOLDER- / PRE + / FOLDER +
Gebruik de knoppen PRE - / FOLDER- en PRE + / FOLDER + om een andere map te selecteren. De
muziek in de geselecteerde map wordt afgespeeld.
Een programma afspelen
U kunt een programma samenstellen om tracks in de gewenste volgorde af te spelen.
1. Druk op STOP.
2. Druk op MODE / AMS. De tekst “P01” (geheugenpositie) en de notificatie “PROG” verschijnen op het
display.
Gebruik de knoppen SKIP + & SKIP – om de gewenste track te selecteren en druk daarna nogmaals op
MODE / AMS.
Het display schakelt naar geheugenpositie P02.
3. Selecteer de volgende track met behulp van de knoppen SKIP + & SKIP – en druk daarna nogmaals
op MODE / AMS. Herhaal deze procedure tot alle gewenste tracks zijn geselecteerd.
OPMERKING:
Zodra het programmageheugen vol is, zal het bericht “FUL” knipperen op het display.
NL-6
Page 25

4. Druk op PLAY / PAUSE / CLOCK. Het afspelen start.
De notificatie “PROG” zal nu bovendien op het display verschijnen.
5. Druk één keer op STOP om het afspelen te stoppen, maar het programma te behouden.
6. Als u het programma opnieuw wilt afspelen, druk dan op PLAY / PAUSE / CLOCK.
7. Als u het programma wilt verwijderen, druk dan twee keer op STOP. De notificatie “PROG” wordt niet
langer getoond op het display.
Afspelen van muziek in MP3-
formaat
Het is met dit apparaat mogelijk om muziekbestanden van het MP3-formaat af te spelen. Het apparaat
ondersteunt ook alle standaard soorten CD’s:
CD, CD-RW, CD-R.
Dit apparaat kan MP3-CD’s afspelen. Er kunnen tot 99 tracks worden gecomprimeerd en opgeslagen
op deze CD’s. Uw apparaat detecteert MP3-CD’s automatisch (het totaal aantal tracks en MP3’s
verschijnt op het display). Als u een van deze CD’s wilt afspelen, volg dan de instructies in de paragraaf
“Afspelen van CD’s/MP3’s”. U kunt ook een programma samenstellen en afspelen door de stappen in
de paragraaf “Een programma afspelen” te volgen.
AUX INGANG
Het is ook mogelijk om gebruik te maken van de aux-ingang om het geluid van andere
afspeelapparaten, zoals MP3- en CD-spelers, af te spelen door de luidsprekers van dit apparaat.
1. Sluit het extern apparaat met een 3,5mm stereostekker aan op de AUX-INGANG.
2. Druk herhaaldelijk op STANDBY / FUNC. tot “AUX” wordt getoond op het display.
3. Het geluid van het extern apparaat wordt nu afgespeeld via de luidsprekers van de boombox. U kunt
het volume instellen met VOL + / VOL -. De knoppen voor het bedienen van de CD-speler werken in
deze modus niet.
4. Voor de resterende gebruiksprocedures, raadpleeg de handleiding van de externe geluidsbron.
OPMERKING:
Stel het volume van het extern apparaat in op een comfortabel niveau.
Afspelen van muziek via Bluetooth
Voordat u een Bluetooth-apparaat kunt gebruiken om muziek af te spelen via de boombox, moet u de
beide apparaten eerst koppelen.
1. Selecteer de Bluetooth-modus met behulp van de knop STANDBY / FUNC.
2. Het “Bluetooth” logo knippert op het LCD-display.
3. Zoek met het Bluetooth-apparaat naar andere Bluetooth-apparaten en selecteer de boombox (het
apparaat met de naam “CSU557RC”).
4. Selecteer “CSU557RC” op het Bluetooth-apparaat om het koppelen te starten.
AFSPELEN
1. Als er verbinding is gemaakt met een Bluetooth-apparaat, dan zal de boombox automatisch het
afspelen van het Bluetooth-apparaat volgen.
2. Stel het volume naar wens in met behulp van “VOL +” en “VOL -”.
NL-7
Page 26

3. Als er verbinding is gemaakt met een Bluetooth-apparaat en er op dat apparaat een commando
wordt uitgevoerd, zal het bijbehorende commando ook naar de boombox worden verstuurd.
4. U kunt tijdens het afspelen de beschikbare functies selecteren op uw Bluetooth-apparaat (zoals
afspelen/pauzeren, volgende/vorige track, vooruit-/terugspoelen, menuselectie).
LET OP:
Schakel naar een andere gebruiksmodus om de Bluetooth-modus te verlaten
Reiniging en onderhoud
WAARSCHUWING:
Dompel het apparaat niet onder in water.
• Haal de stekker altijd uit het stopcontact voordat u begint met het reinigen van het apparaat.
• Eventuele vlekken op het oppervlak kunnen worden opgeveegd met een licht bevochtigde doek
zonder reinigingsmiddelen.
Dit is om te certificeren dat CSU557RC in overeenstemming is met:
Richtlijn van de Raad 89/336/EEC(EMC richtlijn):
Toepasselijke normen:
EN55013:2001 + A1:2003 + A2:2006
EN61000-3-2:2006 + A1:2009 + A2:2009
EN61000-3-3:2008
EN55020:2007
Gemaakt in de Volksrepubliek China
Voor meer informatie bezoek onze website
www.mpmaneurope.com
NL-8
Page 27

Vista d´insieme dei componenti
IT-1
Page 28

1 tasto EQ
2 tasto BASS
3 tasto DIMMER
4 tasto LIGHT
5 jack cuffie
6 jack AUX-IN
7 Porta USB
8 Display LCD
9 Sensore del telecomando
10 Altoparlanti
11 Antenna Telescopica
12 Maniglia
13 Vano CD
14 Tasto STANDBY / FUNC
15 Tasto AMS / MODE
16 Tasto VOL+
17 Tasto VOL18 Tasto PRE.+ / FOLDER +
19 asto PRE - / FOLDER –
20 Tasto SKIP +
21 Tasto SKIP –
22 Tasto PLAY / PAUSE / CLOCK
23 Tasto STOP
24 Gancio per la cinghia
Inserire una batteria di tipo CR2025 nel vano batteria. Assicurarsi che la batteria sia inserita
correttamente per evitare danneggiamenti al telecomando. Rimuovere sempre le batterie quando il
telecomando non viene utilizzato per un lungo periodo di tempo, in quanto il non uso potrebbe causare
danni alla batteria e di conseguenza anche al telecomando.
ATTENZIONE: Pericolo di esplosione se la batteria non è sostituita correttamente. Sostituire solo con
lo stesso tipo o equivalente.
Avviamento del dispositivo/introduzione
• Trovare un luogo adatto al dispositivo, ad esempio asciutto, in piano, su una superficie non scivolosa
dove sia possibile operare con facilità sul dispositivo.
• Assicurarsi che il dispositivo abbia sufficiente ventilazione.
• Rimuovere la pellicola protettiva sul display, se risulta ancora presente.
IT-2
1 STAND-BY
2 FUNZIONE
3 EQUALIZZATORE
4 SUONI ALTI
5 PRE-SU
6 CARTELLA
7 SUONI BASSI
8 PRE-GIÙ
9 CARTELLA
10 AVVIO / PAUSA
11 VOLUME +
12 STOP
13 SALTA –
14 MODALITÀ
15 SALTA +
16 ESCLUDI AUDIO
17 VOLUME –
18 PROGRAMMA
Page 29

Alimentazione
• Assicurarsi che la tensione corrisponda a quella indicata sulla targhetta di identificazione del modello.
• Connettere il cavo di alimentazione fornito (vedere il vano batteria se necessario) ad una presa di
corrente adatta e quindi inserirlo nel retro del dispositivo.
Inserimento delle batterie (non fornite)
1. Aprire il coperchio del vano batteria sul fondo.
2. Inserire 8 batterie di tipo UM 1/R20 1.5 V. Si prega di inserirle secondo la polarità corretta (vedere il
fondo del vano batteria)!
3. Infine chiudere il coperchio del vano batteria.
OSSERVAZIONI:
Quando viene connesso il cavo della corrente, le batterie vengono automaticamente disattivate.
ATTENZIONE:
• Dalle batterie possono fuoriuscire sostanze acide. Quando il dispositivo non viene usato per un lungo
periodo di tempo, rimuovere le batterie.
• Tipi di batterie differenti o batterie nuove e vecchie non possono essere usate assieme.
• Non gettare le batterie tra i normali rifiuti domestici. Riconsegnare le vecchie batterie ai centri di
recupero oppure ai rivenditori.
AVVERTENZA:
Le batterie non devono essere esposte a calore eccessivo come la luce del sole, fuoco ecc. Pericolo di
esplosione!
Impostazione dell´orario
Il dispositivo deve essere in modalità standby per poter impostare l´ora.
1. Premere e tenere premuto il tasto PLAY / PAUSE / CLOCK per circa 2 secondi.
2. Usare i tasti SKIP + & SKIP – per impostare il formato ora in “12 / 24 ore”.
3. Premere il tasto PLAY / PAUSE / CLOCK per confermare il formato ora.
4. Usare i tasti SKIP + & SKIP – per impostare correttamente l´ora.
3. Premere PLAY / PAUSE / CLOCK nuovamente. I numeri corrispondenti ai minuti inizieranno a
lampeggiare.
4. Usare i tasti SKIP + & SKIP – per impostare correttamente i minuti.
5. Premere il tasto PLAY / PAUSE / CLOCK nuovamente.
OSSERVAZIONI:
• Le impostazioni dell'orario verranno perse in caso di interruzione di corrente.
• Premere e tenere premuto il tasto /CLOCK per vedere l´ora corrente.
Sicurezza per il trasporto, Comparto CD
1. Aprire il vano CD alzando il coperchio tramite la linguetta.
2. Prima di utilizzare il dispositivo per la prima volta, rimuovere le protezioni per il trasporto se sono
ancora presenti.
Accendere/Spegnere il dispositivo
• Premere il tasto STANDBY / FUNC per accendere il dispositivo.
• Per spegnere il dispositivo, mantenere premuto il tasto STANDBY / FUNC per circa 3 secondi.
IT-3
Page 30

OSSERVAZIONI:
Dopo circa 10 minuti senza attività, il dispositivo andrà automaticamente in standby.
Volume
É possibile impostare il volume desiderato con i tasti VOL- / VOL +
Jack per cuffie (TELEFONI)
Per ascoltare musica in privato, utilizzare cuffie stereo da 3.5 mm e connetterle all'attacco adatto alle
cuffie presente nella parte anteriore del dispositivo. Gli altoparlanti resteranno muti.
Ascoltare la Radio
1. Usare il tasto STANDBY / FUNC per selezionare la banda di frequenza desiderata.
2. Per la ricezione della banda FM: estendere completamente l´antenna telescopica. Cambiare la sua
posizione per migliorare la ricezione.
3. Esistono due opzioni, ricercare una stazione o memorizzarla.
• Scansione automatica:
Importante! Tutte le stazioni memorizzate precedentemente verranno cancellate.
Premere e tenere premuto il tasto MODE/AMS per circa 3 secondi. Il dispositivo effettuerà la scansione
dell´intera banda di frequenza per trovare le stazioni radio. Ogni stazione trovata verrà memorizzata in
ordine di frequenza, dalla più bassa alla più alta.
• Scansione manuale di stazioni audio:
Cliccare i tasti SKIP + & SKIP – fino a trovare la stazione desiderata. Se si mantengono premuti i tasti, il
dispositivo andrà a ricercare la stazione precedente.
Memorizzazione di una stazione:
1. Premere e tenere premuto il tasto "AMS / MODE" sul dispositivo per circa 2-3 secondi per iniziare il
processo di memorizzazione automatica.
2. Il Display mostrerà il numero di sequenza di memoria e le stazioni radio verranno automaticamente
memorizzate nel numero di sequenza indicato (Nota: ogni numero di sequenza indica 1 stazione
memorizzata durante il processo di memorizzazione automatico).
3. Una volta che tutte le stazioni sono state automaticamente memorizzate, è sufficiente premere il
tasto “Pre + / FOLDER +” o il tasto “Pre - / FOLDER –“ per selezionate una stazione già memorizzata.
Riproduzione CD/MP3
1. Selezionare la modalità CD con il tasto STANDBY / FUNC.
2. Aprire il vano CD premendo sulla linguetta per aprire il coperchio.
3. Inserire un CD audio con il lato stampato rivolto verso l´alto e metterlo sul perno centrale, premendo
in modo che il CD rimanga agganciato, quindi chiudere il coperchio del vano CD.
4. Dopo qualche secondo, sul display apparirà il numero totale di canzoni/tracce presenti nel CD.
OSSERVAZIONI:
Nel caso di CD con file MP3 verrà prima mostrato per un breve momento il numero di cartelle presenti
nel CD.
5. Il CD verrà riprodotto a partire dalla prima traccia.
IT-4
Page 31

6. Per rimuovere un CD, premere il tasto STOP, aprire il vano CD e togliere con delicatezza il CD.
Tenere sempre il coperchio del vano CD chiuso.
OSSERVAZIONI:
• Se un disco viene inserito con il lato sbagliato (o se nessun disco viene inserito), allora lampeggerà il
messaggio “- - - -” (oppure apparirà la scritta “NO Cd “).
• Non può essere garantita la riproduzione di CD prodotti dall´utente stesso, a causa della larga varietà
di software disponibili.
Riproduzione di musica tramite USB
Il dispositivo è stato sviluppato in linea con gli ultimi progressi tecnologici nel campo USB. L´ampia
gamma di dispositivi di memoria USB presenti attualmente sul mercato sfortunatamente non ci
permette di garantire una completa compatibilità del dispositivo con tutti i tipi di dispositivi USB. Per
questa ragione, in qualche caso potrebbero esserci problemi nella riproduzione di file provenienti dal
dispositivo USB. Questo non va considerato come un malfunzionamento del dispositivo.
1. Selezionare la modalità USB con il tasto STANDBY / FUNC.
2. Connettere un dispositivo USB direttamente all'ingresso. Il display mostrerà brevemente il numero di
cartelle presenti e successivamente il numero totale di tracce. Dopo un paio di secondi,
automaticamente avrà inizio la riproduzione.
Per le operazioni, si prega di fare riferimento alla sezione “Descrizione dei tasti di controllo”.
OSSERVAZIONI:
• Per evitare malfunzionamenti, connettere sempre in maniera diretta il dispositivo USB con la porta
USB.
• La porta USB non è ideata per la ricarica di dispositivi esterni.
ATTENZIONE:
Passare ad una diversa modalità prima di rimuovere il dispositivo USB.
Descrizione dei tasti di controllo
OSSERVAZIONI:
Non tutte le funzioni possono essere supportate, dipende dal dispositivo di riproduzione.
PLAY / PASUE / CLOCK
• É possibile interrompere brevemente e riprendere la riproduzione usando questo tasto. Sul display
lampeggerà il tempo di riproduzione trascorso. Premendo nuovamente, continuerà la riproduzione.
• Premere e tenere premuto questo tasto quando il dispositivo è in funzione per vedere brevemente
l´ora corrente.
SKIP + & SKIP -
Con SKIP + è possibile saltare alla traccia successive o alla precedente.
• Se il tasto viene mantenuto premuto, il dispositivo inizia la ricerca fra le tracce.
Il tasto SKIP – può essere usato nei modi seguenti:
Premuto una volta = Ricomincia il brano corrente dall´inizio.
Premuto due volte = Salta al brano precedente.
IT-5
Page 32

STOP
La riproduzione si ferma.
MODALITÁ
• In modalità stop per programmare l´ordine delle tracce (vedere la sezione “Riproduzione
programmata”).
Durante la riproduzione di un CD audio:
Premere una volta = il brano corrente verrà riprodotto continuamente. Sul display lampeggerà il
simbolo “REP”.
Premere due volte = tutto il CD verrà riprodotto continuamente. Sul display lampeggerà il simbolo “REP
ALL”.
Premere tre volte = Sul display apparirà la scritta RAND. Tutti i brani verranno riprodotti in ordine
casuale.
Premere quattro volte = Tutte le impostazioni verranno cancellate. Verrà ristabilita la modalità normale
di riproduzione.
Durante la riproduzione di musica MP3:
Premere una volta = il brano corrente verrà riprodotto continuamente. Sul display lampeggerà il
simbolo “REP”.
Premere due volte = la cartella selezionata verrà riprodotta continuamente (REP FOLDER lampeggerà
sul display).
Premere tre volte = tutti i brani musicali verranno riprodotti continuamente (il simbolo “REP ALL”
lampeggerà sul display).
Premere quattro volte = RAND apparirà sul display. Tutte le tracce verranno riprodotte in ordine
casuale.
Premere cinque volte = tutte le impostazioni verranno cancellate. La riproduzione continua
normalmente.
PRE - / FOLDER- / PRE + / FOLDER +
Usare i tasti PRE - / FOLDER- and PRE + / FOLDER + per selezionare un´altra cartella. Verrà
riprodotta la musica presente in un´altra cartella.
Riproduzione programmata
Questa funzione può essere utilizzata per programmare una sequenza di tracce desiderata.
1. Premere il tasto STOP.
2. Premere il tasto MODE / AMS. “P01” (Spazio di memorizzazione) e “PROG” appariranno sul display.
Usare i tasti SKIP + & SKIP – per selezionare la traccia desiderata e quindi premere il tasto MODE /
AMS di nuovo.
Il display passerà allo spazio di memoria P02.
3. Selezionare la traccia successive con i tasti SKIP + & SKIP – e premere il tasto MODE / AMS di
nuovo. Ripetere la procedura finché tutte le tracce desiderate sono state memorizzate.
OSSERVAZIONI:
Una volta raggiunto il limite massimo di memoria, “FUL” lampeggerà sul display.
IT-6
Page 33

4. Premere il tasto PLAY / PAUSE / CLOCK. La riproduzione avrà inizio.
Il simbolo “PROG” apparirà sul display.
5. Premere una volta il tasto per fermare la riproduzione, mantenendo comunque la programmazione.
6. Per riprodurre nuovamente, premere il tasto PLAY / PAUSE / CLOCK.
7. Per eliminare la programmazione, premere due volte il tasto STOP. Il simbolo “PROG” sparirà.
Riproduzione di musica in formato MP3
Con questo dispositivo è possibile riprodurre brani di musica in formato MP3. Il dispositivo inoltre
supporta tutti i tipi di CD:
CD, CD-RW, CD-R.
Questo dispositivo è in grado di riprodurre CD con file MP3. In questi CD possono essere compresse e
salvate fino a 99 tracce musicali in formato MP3. Il dispositivo riconosce automaticamente un CD con
MP3 (il numero totale di tracce apparirà sul display). Se si è interessati a riprodurre uno di questi CD,
procedere come descritto nella sezione “Riproduzione CD/MP3”. Le tracce possono essere
programmate come descritto nella sezione “Riproduzione programmata tracce”.
Presa AUX IN
Tramite questa presa è possibile ascoltare la musica proveniente da altri dispositivi di riproduzione,
come lettori MP3, lettori CD, etc. tramite gli altoparlanti.
1. Si prega di connettere il dispositivo esterno con un cavo stereo di 3.5 mm alla presa AUX-IN.
2. Premere ripetutamente il tasto STANDBY / FUNC., finché “AUX” apparirà sul display.
3. Si potrà sentire la musica del dispositivo esterno tramite gli altoparlanti. È possibile adattare il
volume con i tasti VOL + / VOL -. I tasti del vano CD non sono funzionanti.
4. Per altre procedure, si prega di consultare le istruzioni operative del dispositivo esterno.
OSSERVAZIONI:
Adattare il volume del dispositivo esterno ad un livello confortabile.
Riproduzione di musica tramite Bluetooth
Prima di poter utilizzare un dispositivo Bluetooth con questo prodotto, è necessario prima effettuare il
collegamento tra loro.
1. Selezionare la modalità Bluetooth con il tasto STANDBY / FUNC.
2. Il logo “Bluetooth” lampeggerà sul Display.
3. Impostare su Altri Bluetooth disponibili per cercare “CSU557RC”.
4. Selezionare “CSU557RC” tra i dispositivi Bluetooth per iniziare il collegamento.
RIPRODUZIONE
1. Una volta connesso al dispositivo Bluetooth, il prodotto seguirà la riproduzione del dispositivo
Bluetooth automaticamente.
2. Selezionare il volume desiderato utilizzando i tasti “VOL +” or “VOL -”.
3. Il comando corrispondente è inviato a questo dispositivo quando è connesso con il Bluetooth.
4. É possibile selezionare le funzioni disponibili nel Bluetooth (come play/pause, salta traccia,
avanzamento/riavvolgimento veloce, selezione menu) durante la riproduzione.
IT-7
Page 34
ATTENZIONE:
Passare ad una diversa modalità per uscire dalla modalità Bluetooth.
Pulizia e manutenzione
ATTENZIONE:
Non immergere il dispositivo nell´acqua.
• Staccare sempre la spina prima di pulire il dispositivo.
• Eventuali segni sulla superficie possono essere tolti utilizzando un panno leggermente bagnato e
senza l´uso di particolari additivi.
Questo marchio CSU557RC certifica la conformità con:
Direttiva Comunitaria 89/336/EEC (EMC directive):
Standard applicabili:
EN55013:2001+A1:2003+A2:2006
EN61000-3-2:2006+A1:2009+A2:2009
EN61000-3-3:2008
EN55020:2007
Costruito nella RPC
Per ulteriori informazioni, siere pregati di far visita al nostro sito:
www.mpmaneurope.com
IT-8
Page 35
Geräteübersicht
DE-1
Page 36

1 EQ-Taste
2 BASS
3 DIMMER
4 BELEUCHTUNG
5 Kopfhörerbuchse
6 AUX-EINGANG
7 USB-Port
8 LCD
9 Fernsensor
10 Lautsprecher
11 Teleskopantenne
12 Griff
13 CD-Laufwerk
14 STANDBY / FUNKTION
15 AMS / MODUS
16 LAUTSTÄRKE+
17 LAUTSTÄRKE18 SPEICHER.+ / ORDNER +
19 SPEICHER - / ORDNER –
20 ÜBERSPRINGEN +
21 ÜBERSPRINGEN –
22 WIEDERGABE / PAUSE / UHRZEIT
23 STOPP
24 GÜRTELCLIP
Legen Sie eine CR2025 Batterie in das Batteriefach ein. Installieren Sie die Batterie ordnungsgemäß,
um Schäden an der Fernbedienung zu vermeiden. Entfernen Sie die Batterien, wenn Sie die
Fernbedienung über längere Zeit nicht verwenden werden, um ein Auslaufen der Batterie und daraus
resultierend Schäden am Gerät zu vermeiden.
VORSICHT: Es besteht Explosionsgefahr, falls Batterien unsachgemäß ersetzt werden. Ersetzen Sie
die Batterien nur durch solche des gleichen oder gleichwertigen Typs.
Gerät einschalten/Einleitung
• Wählen Sie einen geeigneten Standort für das Gerät, z.B. einen trockenen, flachen, rutschfesten
Untergrund, auf dem sich das Gerät einfach bedienen lässt.
• Sorgen Sie für eine ausreichende Ventilation des Geräts.
• Entfernen Sie den Schutzfilm vom Display, sofern dieser noch vorhanden ist.
DE-2
1 STANDBY
2 FUNKTION
3 EQ
4 HOCHTON
5 SPEICHER+
6 ORNDER
7 BASS
8 SPEICHER-
9 ORDNER
10 WIEDERGABE / PAUSE
11 LAUTSTÄRKE+
12 STOPP
13 ÜBERSPRINGEN-
14 MODUS
15 ÜBERSPRINGEN+
16 STUMM
17 LAUTSTÄRKE
18 PROGRAMMIEREN
Page 37

Stromversorgung
• Die Spannung in Ihrem Haushalt muss mit den Angaben auf dem Typenschild übereinstimmen.
• Schließen Sie das mitgelieferte Netzkabel (ggf. im Batteriefach nachsehen) an eine ordnungsgemäß
installierte Sicherheitssteckdose und an den AC-Netzeingang an der Rückseite des Geräts an.
Batterien einlegen (nicht mitgeliefert)
1. Öffnen Sie das Batteriefach an der Unterseite des Geräts.
2. Legen Sie 8 Batterien des Typs UM 1/R20 1,5 V ein. Achten Sie auf die richtige Polarität (siehe
Markierungen am Boden des Batteriefachs)!
3. Schließen Sie dann wieder die Batteriefachabdeckung.
HINWEIS:
Sofern das Netzkabel verbunden ist, wird der Batteriebetrieb automatisch getrennt.
VORSICHT:
• Batterien können auslaufen und Batteriesäure verlieren. Falls Sie das Gerät längere Zeit nicht
verwenden werden, entnehmen Sie die Batterien.
• Mischen Sie nicht unterschiedliche Batterietypen sowie alte und neue Batterien.
• Entsorgen Sie Batterien nicht über den Hausmüll. Geben Sie diese an entsprechenden
Sammelstellen oder bei Ihrem Händler ab.
WARNUNG:
Schützen Sie die Batterien vor extremer Wärme wie Sonneneinstrahlung, Feuer oder ähnlichem.
Explosionsgefahr!
Uhrzeit einstellen
Die Uhrzeit kann nur während des Standby-Modus eingestellt werden.
1. Halten Sie die Taste WIEDERGABE / PAUSE / UHRZEIT ca. 2 Sekunden lang gedrückt.
2. Verwenden Sie die Taste ÜBERSPRINGEN + & ÜBERSPRINGEN – zur Auswahl des
Stundenformats: „12 / 24“.
3. Drücken Sie die Taste WIEDERGABE / PAUSE / UHRZEIT erneut, um das Stundenformat zu
bestätigen.
4. Stellen Sie die Stunden mit den Tasten ÜBERSPRINGEN + & ÜBERSPRINGEN – entsprechend
ein.
3. Drücken Sie die Taste WIEDERGABE / PAUSE / UHRZEIT erneut. Die Minutenziffern beginnen zu
blinken.
4. Stellen Sie die Minuten mit den Tasten ÜBERSPRINGEN + & ÜBERSPRINGEN – entsprechend ein.
5. Drücken Sie die Taste WIEDERGABE / PAUSE / UHRZEIT erneut.
HINWEIS:
• Die Uhrzeiteinstellungen werden bei einem Stromausfall gelöscht.
• Halten Sie die Taste /UHRZEIT während des Betriebs gedrückt, um kurz die Uhrzeit anzuzeigen.
Transportsicherung, CD-Laufwerk
1. Öffnen Sie das CD-Laufwerk, indem Sie den Deckel an der Klappe anheben.
2. Entfernen Sie vor dem erstmaligen Gebrauch des Geräts die Transportsicherung des CD-Players
(sofern noch vorhanden).
Gerät ein-/ausschalten
DE-3
Page 38

• Drücken Sie die Taste STANDBY / FUNKTION, um das Gerät einzuschalten.
• Halten Sie die Taste STANDBY / FUNKTION 3 Sekunden lang gedrückt, um das Gerät
auszuschalten.
NOTE:
Nach ungefähr 10 Minuten ohne Signal schaltet das Gerät automatisch in den Standby-Modus.
Lautstärke
Stellen Sie die Lautstärke mit den Tasten LAUTSTÄRKE- / LAUTSTÄRKE+ ein.
Kopfhörerbuchse (PHONES)
Um ungestört Musik hören zu können, schließen Sie den 3,5 mm Stereostecker von einem Paar
Kopfhörer an die Kopfhörerbuchse an der Vorderseite des Geräts an. Die Lautsprecher werden dann
stumm geschaltet.
Radio hören
1. Drücken Sie die Taste STANDBY / FUNKTION, um das gewünschte Frequenzband auszuwählen.
2. UKW-Empfang: Ziehen Sie die Teleskopantenne vollständig aus. Richten Sie die Antenne dann für
einen optimalen Empfang entsprechend aus.
3. Es gibt zwei Möglichkeiten, Sender zu suchen und zu speichern.
• Automatische Suche:
Wichtig! Bereits gespeicherte Sender werden überschrieben.
Halten Sie die Taste MODUS/AMS ca. 3 Sekunden lang gedrückt. Das System sucht dann das
gesamte Frequenzband nach Radiosendern ab. Gefundene Sender werden von der niedrigsten zur
höchsten Frequenz gespeichert.
• Manuelle Suche nach Audiosendern:
Drücken Sie kurz die Taste ÜBERSPRINGEN + oder ÜBERSPRINGEN -, bis Sie den gewünschten
Radiosender gefunden haben. Halten Sie eine der beiden Tasten gedrückt, um zum jeweils vorherigen
Sender zu gelangen.
Sender speichern:
1. Halten Sie die Taste „AMS/MODUS“ ca. 2-3 Sekunden lang gedrückt, um den automatischen
Speichervorgang zu starten.
2. Im Display wird die Speicherplatznummer angezeigt und die Radiosender werden automatisch auf
dem Speicherplatz gespeichert (Hinweis: Während des automatischen Speichervorgangs repräsentiert
jede Nummer 1 Speicherplatz.)
3. Nachdem alle Sender gespeichert wurden, drücken Sie die Taste „Speicher + / ORDNER +“ bzw.
„Speicher - / ORDNER -“, um einen gespeicherten Sender auszuwählen.
CD-/MP3-
Wiedergabe
1. Drücken Sie die Taste STANDBY / FUNKTION, um den CD-Modus einzuschalten.
2. Öffnen Sie das CD-Laufwerk, indem Sie den Deckel an der Klappe anheben.
DE-4
Page 39

3. Legen Sie eine Audio-CD mit der bedruckten Seite nach oben auf die zentrale Spindel; die CD muss
einrasten. Schließen Sie dann wieder das CD-Laufwerk.
4. Nach ein paar Sekunden wird im Display die Gesamtzahl an Titeln/Songs angezeigt.
HINWEIS:
Bei CDs mit MP3-Dateien wird zunächst kurz die Anzahl von Ordnern angezeigt.
5. Die Wiedergabe startet mit dem ersten Titel auf der CD.
6. Um eine CD zu entnehmen, drücken Sie die STOPP-Taste, öffnen Sie das CD-Laufwerk und heben
Sie die CD vorsichtig an.
Lassen Sie den Deckel des CD-Laufwerks immer geschlossen.
HINWEIS:
• Falls eine CD falsch herum bzw. keine CD eingelegt wurde, blinkt im Display die Anzeige „- - - -“ bzw.
„NO Cd“.
• Aufgrund der Vielzahl an Software und CD-Medien auf dem Markt können wir nicht garantieren, dass
alle selbst erstellten CDs in diesem Gerät abgespielt werden können.
Musikwiedergabe via USB
Dieses Gerät wurde gemäß aktuellsten technischen Fortschritten im Bereich der USB-Technologie
hergestellt. Aufgrund der Vielzahl an unterschiedlichen USB-Gerätetypen auf dem Markt können wir
leider nicht garantieren, dass alle USB-Speichergeräte mit diesem Produkt kompatibel sind. Es kann
daher in einigen wenigen Fällen vorkommen, dass sich einige Dateien auf USB-Geräten nicht
abspielen lassen. Dies ist keine Fehlfunktion des Produkts.
1. Drücken Sie die Taste STANDBY / FUNKTION, um den USB-Modus einzuschalten.
2. Schließen Sie ein USB-Gerät direkt an den Port an. Im Display erscheint kurz die Anzahl der Ordner,
gefolgt von der Gesamtzahl an Titeln. Die Wiedergabe startet nach einigen Sekunden automatisch.
Details zu den Funktionen finden Sie im Abschnitt „Erläuterung der Funktionstasten“.
HINWEIS:
• Schließen Sie USB-Geräte immer direkt an den USB-Port an, um Fehlfunktionen zu vermeiden.
• Der USB-Port ist nicht zum Aufladen externer Geräte geeignet.
VORSICHT:
Schalten Sie einen anderen Betriebsmodus ein, bevor Sie das USB-Gerät vom Produkt trennen.
Erläuterung der Funktionstasten
HINWEIS:
Je nach Wiedergabegerät werden möglicherweise nicht alle Funktionen unterstützt.
WIEDERGABE / PAUSE / UHRZEIT
• Mit dieser Taste können Sie die Wiedergabe unterbrechen. Im Display blinkt die verstrichene
Wiedergabezeit. Drücken Sie die Taste erneut, um die Wiedergabe fortzusetzen.
• Halten Sie diese Taste während des Betriebs gedrückt, um kurz die Uhrzeit anzuzeigen.
ÜBERSPRINGEN + & ÜBERSPRINGEN -
Mit der Taste ÜBERSPRINGEN + können Sie zum nächsten Titel springen.
• Halten Sie die Taste gedrückt, um einzelne Titel vorzuspulen.
DE-5
Page 40

Verwenden Sie die Taste ÜBERSPRINGEN - wie folgt:
Einmal drücken = Der aktuelle Titel wird erneut von Anfang an abgespielt.
Zweimal drücken = Das Gerät springt zum vorherigen Titel.
STOPP
Die Wiedergabe wird beendet.
MODUS
• Im Stopp-Modus können Sie mit dieser Taste Titel in beliebiger Reihenfolge programmieren (siehe
Abschnitt „Programmierte Wiedergabe“).
Während der Wiedergabe einer Audio-CD:
Einmal drücken = Der aktuelle Titel wird kontinuierlich wiederholt. Im Display blinkt „REP“.
Zweimal drücken = Die gesamte CD wird wiederholt abgespielt. Im Display blinkt „REP ALL“.
Dreimal drücken = RAND erscheint im Display. Alle Titel werden in willkürlicher Reihenfolge abgespielt.
Viermal drücken = Alle Funktionen werden abgebrochen und der normale Wiedergabemodus wird
fortgesetzt.
Während der Wiedergabe von MP3-Dateien:
Einmal drücken = Der aktuelle Titel wird kontinuierlich wiederholt. Im Display blinkt „REP“.
Zweimal drücken = Der ausgewählte Ordner wird wiederholt abgespielt (REP FOLDER erscheint im
Display).
Dreimal drücken = Alle Titel wiederholt abgespielt. Im Display blinkt „REP ALL“.
Viermal drücken = RAND erscheint im Display. Alle Titel werden in willkürlicher Reihenfolge abgespielt.
Fünfmal drücken = Alle Funktionen werden abgebrochen und der normale Wiedergabemodus wird
fortgesetzt.
SPEICHER - / ORDNER- / SPEICHER + / ORDNER +
Verwenden Sie die Tasten SPEICHER - / ORDNER- / SPEICHER + / ORDNER +, um einen anderen
Ordner auszuwählen. Die Musik in dem ausgewählten Ordner wird dann wiedergegeben.
Programmierte Wiedergabe
Sie können Titel für die Wiedergabe in einer beliebigen Reihenfolge programmieren.
1. Drücken Sie die STOPP-Taste.
2. Drücken Sie die Taste MODUS / AMS. Die Anzeigen „P01“ (Speicherplatznummer) und
„PROG“ erscheinen im Display.
Wählen Sie mit den Tasten ÜBERSPRINGEN + & ÜBERSPRINGEN - den gewünschten Titel aus;
drücken Sie dann die Taste MODUS / AMS erneut.
Im Display erscheint dann die Anzeige P02.
3. Wählen Sie mit der Taste ÜBERSPRINGEN + & ÜBERSPRINGEN - den nächsten Titel aus und
drücken Sie dann MODUS / AMS erneut. Wiederholen Sie diese Vorgehensweise für die Auswahl aller
gewünschten Titel.
HINWEIS:
Sobald Sie die maximale Anzahl an Titeln gespeichert haben, blinkt im Display die Anzeige „FUL“.
4. Drücken Sie die Taste WIEDERGABE / PAUSE / UHRZEIT; die Wiedergabe startet.
Im Display erscheint die Anzeige „PROG“.
DE-6
Page 41

5. Drücken Sie die Taste einmal, um die Wiedergabe zu unterbrechen; der Modus bleibt aktiviert.
6. Um die Wiedergabe fortzusetzen, drücken Sie WIEDERGABE / PAUSE / UHRZEIT erneut.
7. Um die programmierte Sequenz zu löschen, drücken Sie die Taste STOPP zweimal.
„PROG“ erlischt.
MP3-Wiedergabe
Sie können mit diesem Gerät MP3-Musik abspielen. Das Gerät unterstützt folgende CD-Typen:
CD, CD-RW, CD-R.
Dieses Gerät kann MP3-CDs abspielen. Es unterstützt CDs mit bis zu 99 Titeln. Ihr Gerät erkennt die
MP3-CD automatisch (Gesamtzahl an MP3-Titeln wird angezeigt). Folgen Sie der Vorgehensweise in
Abschnitt „CD-/MP3-Wiedergabe“, um solche Discs abzuspielen. Sie können Titel für die
programmierte Wiedergabe gemäß Abschnitt „Programmierte Wiedergabe“ speichern.
AUX-EINGANG
Über diesen Anschluss können Sie externe Audiogeräte wie z.B. MP3-Player, CD-Player, usw.
wiedergeben.
1. Schließen Sie das externe Gerät unter Verwendung eines Kabels mit 3,5 mm Stecker an den
AUX-EINGANG an.
2. Drücken Sie wiederholt die Taste STANDBY / FUNKTION, bis im Display die Anzeige
„AUX“ erscheint.
3. Die Musik des externen Geräts wird dann über die Lautsprecher des Produkts abgespielt. Stellen Sie
die Lautstärke mit den Tasten LAUTSTÄRKE+ / LAUTSTÄRKE- entsprechend ein. Die CD-Tasten sind
funktionslos.
4. Für andere Funktionen informieren Sie sich bitte in der Bedienungsanleitung des externen Geräts.
HINWEIS:
Stellen Sie die Lautstärke an dem externen Gerät entsprechend ein.
Musikwiedergabe via Bluetooth
Bevor Sie ein Bluetooth-Gerät verwenden können, müssen Sie es mit diesem Produkt koppeln.
1. Drücken Sie die Taste STANDBY / FUNKTION, um den Bluetooth-Modus einzuschalten.
2. Im LCD blinkt das „Bluetooth“-Logo.
3. Aktivieren Sie an dem externen Gerät die Bluetooth-Gerätesuche und suchen Sie nach
„CSU557RC“.
4. Wählen Sie “CSU557RC” am Bluetooth-Gerät und starten Sie die Kopplung.
WIEDERGABE
1. Sobald ein Bluetooth-Gerät verbunden wurde, folgt das Produkt der Wiedergabe am
Bluetooth-Gerät.
2. Stellen Sie die Lautstärke mit den Tasten LAUTSTÄRKE+ / LAUTSTÄRKE- entsprechend ein.
3. Während der Bluetooth-Verbindung wird ein entsprechender Befehl an dieses System gesendet.
4. Während der Wiedergabe können Sie unterschiedliche Funktionen an Ihrem Bluetooth-Gerät
auswählen (Wiedergabe/Pause, Titel überspringen, Zurück-/Vorspulen, Menü auswählen.
DE-7
Page 42

VORSICHT:
Schalten Sie einen anderen Betriebsmodus ein, um Bluetooth zu deaktivieren.
Reinigung und Pflege
WARNUNG:
Tauchen Sie das Gerät nicht in Wasser.
• Trennen Sie den Netzstecker vor der Reinigung des Geräts.
• Verschmutzungen auf der Oberfläche können Sie mit einem leicht angefeuchteten Lappen (ohne
Reinigungsmittel) beseitigen.
Hiermit wird bescheinigt, dass CSU557RC konform ist mit:
Richtlinie des Rates 89/336/EWG (EMV-Vorschrift)
Geltenden Standards:
EN55013:2001+ A1:2003+A2:2006
EN61000-3-2: 2006+ A1:2009+ A2:2009
EN61000-3-3:2008
EN55020:2007
Made in China
Für weitere Informationen besuchen Sie bitte unsere Website unter:
www.mpmaneurope.com
DE-8
Page 43

Aspeto geral dos componentes
PT-1
Page 44

1 Botão EQ
2 Botão BASS
3 Botão DIMMER
4 Botão LUZ
5 Entrada dos auscultadores
6 Entrada AUX-IN
7 Porta USB
8 Visor LCD
9 Sensor remoto
10 Altifalante
11 Antena telescópica
12 Pega
13 Compartimento do CD
14 Botão STANDBY / FUNC
15 Botão AMS / MODE
16 Botão VOL+
17 Botão VOL18 Botão PRE.+ / FOLDER +
19 Botão PRE - / FOLDER 20 Botão SKIP +
21 Botão SKIP –
22 Botão PLAY / PAUSE / CLOCK
23 Botão STOP
24 GANCHO PARA O CINTO
Introduza uma pilha CR2025 no compartimento das pilhas. Certifique-se que a pilha está inserida
corretamente para evitar danos no telecomando. Retire sempre as pilhas quando o telecomando não
for ser usado por um período longo, porque isto pode causa o derrame da pilha e subsequentemente
danos no seu aparelho.
ATENÇÃO: Perigo de explosão se a pilha for substituída incorretamente. Substitua por uma idêntica ou
de tipo equivalente.
PT-2
1. (STANDBY) ESPERA
2. FUNÇÃO
3. EQ
4. AGUDOS
5. ANT-CIMA
6. PASTA
7. BAIXO
8. ANT- BAIXO
9. (FOLDER) PASTA
10. REPRODUZIR / PAUSA
11. VOLUME +
12. PARAR
13. (SKIP) SALTAR –
14. MODO
15. (SKIP) SALTAR +
16. MUDO
17. VOLUME
18. PROG
Page 45

Arranque do dispositivo/introdução
• Selecione uma localização adequada para o dispositivo, como uma superfície seca, plana, não
escorregadia em que seja fácil operar o aparelho.
• Assegure-se que o dispositivo está suficientemente ventilado.
• Retire a película protetora do visor se a mesma ainda existir.
Fonte de alimentação
• Assegure-se que a voltagem é a mesma que a indicada na placa de identificação do modelo.
• Ligue o cabo de alimentação fornecido (ver o compartimento da pilha se necessário) a uma tomada
de segurança devidamente instalada e os cabos de ligação AC na parte de trás do aparelho.
Inserir as pilhas (não fornecidas)
1. Abra a tampa do compartimento das pilhas no fundo.
2. Insira 8 pilhas tipo UM 1/R20 1, 5 V. Assegure-se que a polaridade está correta (veja na base do
compartimento das pilhas).
3. Depois feche a tampa da bateria
NOTA:
Quando o cabo de alimentação está ligado as pilhas são automaticamente desligadas.
ATENÇÃO:
• As pilhas podem derramar e perder ácido. Quando não usar o sistema por um período longo, retire as
pilhas.
• Não podem ser usadas em conjunto diferentes tipos de pilhas nem misturar novas com usadas.
• Não elimine as pilhas com o lixo doméstico. Entregue as pilhas usadas em instalações de recolha ou
no revendedor.
AVISO:
17. As pilhas não podem ser expostas a calor excessivo como sol, incêndio ou fonte de calor similar.
Perigo de explosão!
Acertar o relógio
O sistema tem de ficar em modo espera para poder acertar o relógio.
1. Prima e mantenha o botão PLAY / PAUSE / CLOCK durante apróx. 2 segundos.
2. Use os botões SKIP + e SKIP – para acertar o formato da hora “12h / 24h”.
3. Prima PLAY / PAUSE / CLOCK para confirmar o formato da hora.
4. Use os botões SKIP + e SKIP – para acertar a hora em conformidade.
3. Prima PLAY / PAUSE / CLOCK novamente. Os dígitos dos minutos começam a piscar.
4. Use os botões SKIP + e SKIP – para acertar os minutos em conformidade.
5. Prima o botão PLAY / PAUSE / CLOCK novamente.
NOTA:
• As configurações do relógio serão apagadas caso haja uma interrupção no abastecimento de
energia.
• Prima e mantenha premido o botão /CLOCK durante o funcionamento de modo a exibir brevemente a
hora atual.
Dispositivo de Segurança de Transporte, Compartimento do CD
1. Abra o compartimento do CD puxando a tampa para cima pela lingueta.
PT-3
Page 46

2. Antes de utilizar o aparelho pela primeira vez, retire o dispositivo de segurança de transporte do
reprodutor de CD se ainda o tiver.
Ligar/Desligar o dispositivo
• Prima o botão STANDBY / FUNC. para ligar o dispositivo.
• Para desligar o dispositivo, mantenha o botão STANDBY / FUNC. premido durante apróx. 3
segundos.
NOTA:
Decorridos cerca de 10 minutos sem sinal, o dispositivo mudo automaticamente para standby.
Volume
Pode selecionar o volume desejado com os botões VOL- / VOL +
Ficha dos auscultadores (FONES)
Para ouvir música em privado, use auscultadores com uma ficha 3.5 estéreo e ligue à tomada dos
auscultadores na parte da frente do sistema. Os auscultadores ficarão então mudos.
Ouvir Rádio
1. Use o botão STANDBY / FUNC. para selecionar a banda de frequência desejada.
2. Para receção FM: Estenda completamente antena telescópica. Altere a posição para melhorar a
receção.
3. Há duas opções para procurar e predefinir estações de rádio.
c Procura automática
Importante! Quaisquer estações de rádio predefinidas serão apagadas.
Prima e mantenha o botão MODE/AMS durante apróx. 3 segundos. O sistema procura as estações de
rádio na banda de frequência. Quaisquer estações encontradas serão predefinidas da frequência mais
baixa para a mais alta.
• Procura manual de estações áudio:
Prima brevemente os botões SKIP + & SKIP -, até encontrar a estação de rádio que procura. Se
mantiver um dos botões premidos, o dispositivo procurará a anterior
Estação predefinida:
1. Prima e mantenha premido o botão “AMS / MODE” na unidade durante cerca de 2 a 3 segundos
para iniciar o processo de predefinição automática.
2. O visor mostra o número de sequência da memória e as estações de rádio serão automaticamente
predefinidas no número de sequência (Nota: Cada número de sequência significa uma estação
predefinida durante o processo automático de predefinição.)
3. Depois de todas as estações estarem serem automaticamente predefinidas, prima os botões “Pre +
/ FOLDER +” ou “Pre - / FOLDER –“ para escolher as estações predefinidas.
PT-4
Page 47

Reproduzir CDs/MP3
Selecione o modo CD com o botão STANDBY / FUNC.
2. Abra o compartimento do CD puxando a tampa para cima pela lingueta.
3. Insira um CD áudio com o lado impresso virado para cima no cone central de modo a que o se
ajuste no lugar fazendo clique, depois feche a tampa do compartimento do CD.
4. Decorridos uns segundos o número total de músicas/faixas é apresentado no visor.
NOTA:
No caso dos CDs no formato MP3 o número de pastas é apresentada primeiro brevemente.
5. O CD reproduz o primeiro título.
6. Para retirar o CD, prima o botão STOP, abra o compartimento do CD e retire o CD cuidadosamente.
Mantenha o compartimento do CD sempre.
NOTA:
• se um disco for introduzido ao contrário, ou se o disco não for introduzido, então a mensagem “- - - -”
pisca e aparece “SEM CD “ aparece no visor.
• A reprodução de CDs produzidos pelo utilizador não pode ser garantida devido à grande variedade
de software e suportes de CD disponíveis.
Reprodução de música através de um dispositivo USB
Este dispositivo foi desenvolvido de acordo com os avanços técnicos mais recentes no campo dos
dispositivos USB. A grande variedade de diferentes dispositivos de armazenamento USB, de todos os
tipos, que há atualmente no mercado, não nos permite infelizmente garantir total compatibilidade com
todos os dispositivos de armazenamento USB. Por esta razão, em casos raros, pode haver problemas
na reprodução de ficheiros a partir de dispositivos de armazenamento USB. Isto não é uma avaria do
aparelho.
1. Selecione o modo USB com o botão STANDBY / FUNC.
2. Ligue um dispositivo de armazenamento USB diretamente à porta. O visor mostra brevemente o
número de pastas e depois o número total de faixas. A reprodução inicia-se automaticamente
decorridos alguns segundos.
Para funcionar, consulte a secção “Descrição dos botões de controlo”.
NOTA:
• Ligue sempre o suporte de armazenamento USB diretamente à porta USB para evitar avarias.
• A porta USB não foi concebida para o carregamento de dispositivos externos.
ATENÇÃO:
Mude o dispositivo para um modo de funcionamento diferente antes de retirar o dispositivo de
armazenamento USB
PT-5
Page 48

Descrição dos botões de controlo
NOTA:
Nem todas as funções podem ser suportadas isso depende do dispositivo de reprodução.
PLAY / PAUSE / CLOCK
• Pode interromper brevemente e retomar a reprodução usando este botão. O visor mostra o tempo de
reprodução decorrido a piscar. Premindo de novo a reprodução continua.
• Prima e mantenha premido este botão durante o funcionamento para mostrar brevemente a hora
atual.
SKIP + & SKIP -
Com o botão SKIP + pode saltar para a faixa seguinte ou anterior, etc.
• Se mantiver o botão premido, o aparelho começa a procurar nas faixas.
O botão SKIP – pode ser usado da seguinte forma:
Prima uma vez = Isto faz voltar a faixa atual novamente ao início.
Prima duas vezes = Isto faz saltar para a faixa anterior.
STOP
A reprodução para.
MODE
• No modo stop para programar qualquer ordem de faixas (ver a secção “Reprodução Programada”).
Durante a reprodução de um CD áudio:
Prima uma vez = a faixa atual é repetida continuamente. O símbolo “REP” pisca no visor.
Prima duas vezes = o CD completo é reproduzido continuamente. O símbolo “REP ALL” pisca no visor.
Prima três vezes = RAND aparece no visor. Todas as faixas serão reproduzidas por ordem aleatória.
Prima quatro vezes = todas as funções são canceladas. É retomado o modo reprodução normal.
Durante a reprodução do MP3:
Prima uma vez = a faixa atual é repetida continuamente. O símbolo “REP” pisca no visor.
Prima duas vezes = a pasta selecionada é repetida continuamente (REP FOLDER aparece no visor).
Prima três vezes = todos as músicas são repetidas continuamente (o símbolo “REP ALL” pisca no
visor).
Prima quatro vezes = RAND aparece no visor. Todas as faixas serão reproduzidas por ordem
aleatória.
Prima cinco vezes = todas as funções são desativadas. A reprodução continua normalmente.
PRE - / FOLDER- / PRE + / FOLDER +
Use os botões PRE - / FOLDER- e PRE + / FOLDER + para selecionar outra pasta. A música da pasta
selecionada é reproduzida.
PT-6
Page 49

Reprodução Programada
Isto pode ser usado para programar qualquer sequência de faixas desejada.
1. Prima o botão STOP.
2. Prima o botão MODE / AMS. “P01” (Espaço de armazenamento) e o aviso “PROG” aparece no visor.
Use os botões SKIP + & SKIP – para selecionar a faixa desejada e depois prima novamente o botão
MODE / AMS. O visor muda para o espaço de memória P02.
3. Selecione a faixa seguinte com os botões SKIP + & SKIP – e prima novamente o botão MODE /
AMS. Repita o procedimento até todas as faixas desejadas se encontrarem selecionadas.
NOTA:
Uma vez atingida a capacidade de armazenamento das faixas a programar “FULL” pisca no visor.
4. Prima o botão PLAY / PAUSE / CLOCK. A reprodução é iniciada.
O aviso “PROG” aparece adicionalmente no visor.
5. Prima uma vez o botão para parar a reprodução enquanto mantém o programa.
6. Para voltar a reproduzir o programado, prima o botão PLAY / PAUSE / CLOCK.
7. Para apagar o programa, prima o botão STOP duas vezes. O aviso “PROG” desaparece.
Reproduzir Música em Formato MP3
Com este dispositivo é possível reproduzir músicas em formato MP3. O dispositivo também suporta
todos os tipos normais de CD: CD, CD-RW, CD-R.
Este aparelho pode reproduzir CDs MP3. Nestes CDs podem ser comprimidas e guardadas até 99
faixas. O seu aparelho deteta automaticamente um CD MP3 (aparece no visor o número total de faixas
e MP3s). Se pretender um desses CDs, proceda da forma descrita em “Reproduzir CDs/MP3”. As
faixas podem ser programadas da forma descrita em “Reproduzir Faixas Programadas”.
Entrada AUX IN
Através desta entrada pode ouvir o som de outros dispositivos de reprodução como reprodutores de
MP3, CD, etc. através dos altifalantes.
1. Ligue o dispositivo externo com a ficha estéreo de 3.5 mm à tomada AUX-IN.
2. Prima repetidamente o botão STANDBY / FUNC., até “AUX” aparecer no visor.
3. Ouvirá o som reproduzido pelo dispositivo externo através dos altifalantes. Pode ajustar o volume
com VOL + / VOL -. Os botões do CD não funcionam.
4. Para o restante procedimento consulte as instruções de funcionamento da fonte externa de som.
NOTA:
Ajuste o volume do dispositivo externo para um nível confortável.
Reproduzir música através do Bluetooth
Antes de poder usar um dispositivo Bluetooth com este sistema, tem de proceder primeiro ao
emparelhamento.
1. Selecione o modo Bluetooth com o botão STANDBY / FUNC.
2. O logotipo do “Bluetooth” pisca no Visor LCD.
3. Configure outros dispositivos Bluetooth disponíveis para procurar este sistema até reconhecer o
“CSU557RC”.
PT-7
Page 50
4. Selecione “CSU557RC” nos dispositivos Bluetooth para começar a emparelhar.
REPRODUÇÃO
1. Quando ligado ao dispositivo Bluetooth, a unidade faz automaticamente a reprodução no dispositivo
Bluetooth.
2. Selecione o nível de volume desejado usando o botão “VOL +” ou “VOL -”.
3. O comando correspondente é enviado para este sistema quando ligado ao dispositivo Bluetooth.
4. Pode selecionar as funcionalidades disponíveis no seu dispositivo Bluetooth (como
reproduzir/pausa, saltar faixa, avanço rápido / para trás, menu de seleção) durante a reprodução.
ATENÇÃO:
Mude o dispositivo para um modo de funcionamento diferente para sair do modo Bluetooth
Limpeza e Manutenção
ADVERTÊNCIA:
Não mergulhe o dispositivo em água.
• Retire sempre da tomada antes de limpar o aparelho.
• Quaisquer marcas na superfície podem ser limpas com um pano ligeiramente húmido sem quaisquer
aditivos.
Isto é para certificar que CSU557RC está em conformidade com:
Directiva de concelho 89/336/EEC (direcção EMC):
Padrões aplicáveis:
EN55013:2001+A1:2003+A2:2006
EN61000-3-2:2006+A1:2009+A2:2009
EN61000-3-3:2008
EN55020:2007
Fabricado na RPC
Para mais informações, visite o nosso website:
www.mpmaneurope.com
PT-8
 Loading...