

INSTRUKCJA OBSŁUGI
SZYBKOWAR
wielofunkcyjny garnek ciśnieniowy ztimerem
PRZED PIERWSZYM UŻYCIEM ZAPOZNAJ SIĘ ZINSTRUKCJĄ OBSŁUGI
model MGS-05

SPIS TREŚCI
PL
WAŻNE WSKAZÓWKI DOTYCZĄCE ŚRODKÓW BEZPIECZEŃSTWA ....................... 4
OPIS URZĄDZENIA ............................................................................................. 6
ŹRÓDŁA CIEPŁA ..................................................................................................7
ZASADY BEZPIECZEŃSTWA .................................................................................7
FUNKCJE ............................................................................................................. 8
INSTRUKCJA OBSŁUGI ........................................................................................ 9
WYKRYWANIE IUSUWANIE USTEREK ............................................................... 12
KONSERWACJA ..................................................................................................12
CZASY GOTOWANIA .......................................................................................... 14
INNE .................................................................................................................15
GŁÓWNE PARAMETRY TECHNICZNE .................................................................. 16
OZNAKOWANIA PRAWNE ................................................................................. 17
DANE TECHNICZNE ............................................................................................ 17
2

Szanowni Państwo,
Bardzo dziękujemy za zaufanie, które pokładacie Państwo w rmie MPM nabywając jedno
znaszych naczyń kuchennych.
Poprzez ten zakup pokazujecie nam Państwo, że nasze wysiłki aby uprościć proces przygotowania
igotowania potraw zostały docenione.
Państwa szybkowar zosta ł dostosowany do kuchenek elektr ycznych, ceramicznych, halogenow ych,
gazowych iindukcyjnych co zostało uwidocznione na stopce garnka.
Prosimy zatem ogruntowne przeczytanie niniejszej instrukcji.
W instrukcji tej znajdziecie Państwo wskazówki dotyczące gotowania, konserwacji, jak również
dane techniczne iinformacje ogwarancji.
Korzystanie z instrukcji spowoduje, że docenicie Państwo swoje nowo nabyte naczynie
dogotowania, co przez długie lata przyniesie Państwu dużo zadowolenia.
Przed pierwsz ym użyciem należy szybkowar oraz akcesoria dokładnie umyć ciepłą wodą zużyciem
łagodnego środka do mycia naczyń. Do produktów wykonanych ze stali nierdzewnej prosimy nie
używać środków myjących na bazie cytrusów, gdyż może to spowodować uszkodzenia, czego
skutkiem mogą być plamy podobne do korozji. Plamy te można wprosty sposób usunąć stosując
środek czyszczący do stali nierdzewnej.
Zachęcamy do korzystania z naszego szybkowaru ze stali nierdzewnej. Postaramy się udzielić
Państwu najlepszego możliwego wsparcia. Gwarancją bezpieczeństwa, wytrzymałości idobrego
wyglądu są nie tylko dobra konstrukcja izastosowane materiały. Do uzyskania wysokiej jakości
produktu przyczyniają się również testy procesu działania.
Szybkowar będzie dłużej sprawny, jeżeli będzie wykorzystywany wodpowiedni sposób. Instrukcja
obsługi zawiera zasady odnoszące się do odpowiedniego użytkowania izasad gotowania. Należy
dokładnie zapoznać się zniniejszymi instrukcjami.
Szybkowar jest wykonany ze stali nierdzewnej, co zapewnia bezpieczeństwo oraz higienę. Posiada
dobre właściwości wytrzymałości cieplnej ijest łatwy wczyszczeniu.
Trójwarstwowe kapsułowe dno zawiera wewnętrzny wkład z czystego aluminium. Wykorzystany
materiał jest wy trzymały iposiada dobre właściwości przewodzenia, dzięki czemu jest odpowiedni
do podgrzewania napłycie indukcyjnej ipełnego wykorzystania źródła cieplnego.
Pokrywa szybkowaru jest wyposażona w zegar (timer – minutnik) oraz potrójny system
zabezpieczeń w celu zapewnienia wygody użytkownika i bezpieczeństwa użytkowania produktu.
Szybkowary wykonane są zgodnie ze wsz ystkimi obowiązującymi normami.
PL
3

PL
WAŻNE WSKAZÓWKI DOTYCZĄCE ŚRODKÓW BEZPIECZEŃSTWA
Przeczytać uważnie wszystkie informacje zawarte winstrukcji.
Przechowywać urządzenie w miejscu niedostępnym dla dzieci poniżej 8 lat.
Niniejszy sprzęt może być użytkowany przez dzieci w wieku co najmniej 8 lat
i przez osoby o obniżonych możliwościach zycznych, umysłowych i osoby
o braku doświadczenia i znajomości sprzętu, jeżeli zapewniony zostanie
nadzór lub instruktaż odnośnie do użytkowania sprzętu w bezpieczny
sposób, tak aby związane z tym zagrożenia były zrozumiałe. Dzieci bez
nadzoru nie powinny wykonywać czyszczenia i konserwacji sprzętu.
Nie pozwalać dzieciom na zbliżanie się do pracującego szybkowaru.
Niniejsze urządzenie gotuje pod ciśnieniem. Nieprawidłowe stosowanie
może powodować oparzenia. Przed rozpoczęciem gotowania, upewnić
się, że garnek jest poprawnie zamknięty. Patrz „Instrukcja użytkowania”.
Nie używać szybkowaru do innych celów niż te, do których został prze-
znaczony.
Stosować odpowiednie źródła ciepła, zgodnie zinstrukcją użytkowania.
Przenosić szybkowar pod ciśnieniem zzachowaniem szczególnej ostrożności.
Szybkowar należy przenosić, przestawiać, przesuwać delikatnie wpłaszczyź-
nie poziomej zawsze chwytając za dwa uchwyty jednocześnie. Nie dotykać
gorących powierzchni. Wrazie potrzeby korzystać zochronnych rękawic.
Nigdy nie wkładać szybkowaru do gorącego piekarnika.
Nigdy nie używać szybkowaru bez wody, może to spowodować poważne
uszkodzenia.
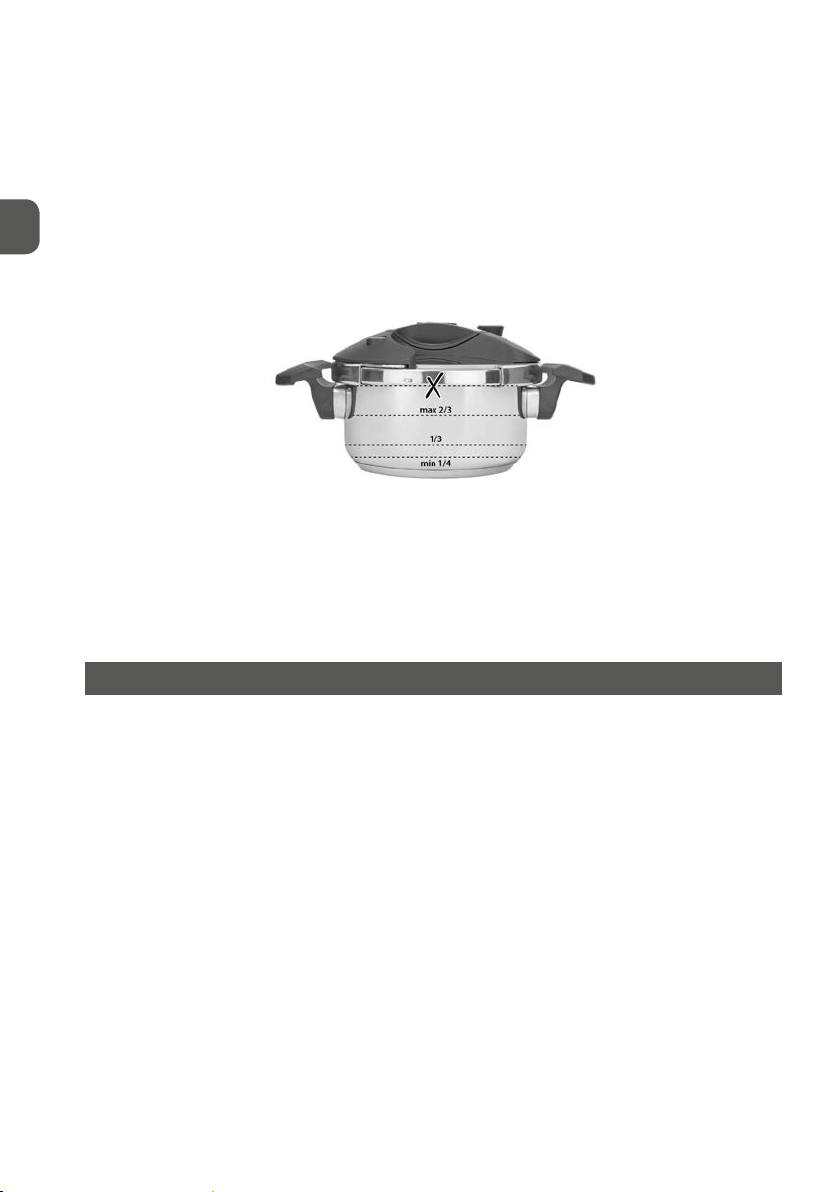
Nie napełniać garnka powyżej 2/3 jego pojemności. Podczas gotowania
potraw zwiększających swoją objętość podczas gotowania, takich jak ryż lub
suszone warzywa, nie napełniać szybkowaru powyżej 1/2 jego pojemności.
Niektóre warzywa, takie jak groch, fasola oraz warzywa iowoce suszone
należy przed gotowaniem namoczyć wczystej wodzie. Potrawy, które
podczas gotowania wytwarzają pianę powinny być najpierw gotowane
bez pokrywki, następnie odcedzone idopiero wówczas można je gotować
wszybkowarze.
Przed każdym użyciem sprawdzić, czy zawory nie są zablokowane izanie-
czyszczone. Patrz„Instrukcje użytkowania”.
Nigdy nie używać szybkowaru wtrybie ciśnieniowym do smażenia wpłyt-
kim lub głębokim oleju.
4

Po gotowaniu mięsa ze skórą, która może pęcznieć pod wpływem ciśnienia,
nie przekłuwać mięsa, dopóki skóra jest napęczniała; może to spowodować
oparzenia.
Podczas gotowania ziarnistej żywności, po opadnięciu zaworu bezpieczeństwa iprzed otwarciem pokrywy, należy delikatnie potrząsnąć szybkowarem
aby uniknąć wyrzucenia potrawy.
Nigdy nie otwierać szybkowaru, zanim nie upewnimy się, że wewnętrzne
ciśnienie całkowicie spadło. Nigdy nie używać siły do otwarcia pokrywy.
Patrz „Instrukcja użytkowania”.
Nigdy nie myć pokrywy iuszczelki wzmywarce do naczyń.
Używać tylko oryginalnych części zapasowych, odpowiednich do danego
modelu szybkowaru. W szczególności używać korpusu i pokrywy po-
chodzących od tego samego producenta, wskazanych jako wzajemnie
kompatybilne.
Nie manipulować żadnymi urządzeniami zabezpieczającymi poza wyko-
nywaniem czynności obsługowychwymienionych w instrukcji obsługi.
Zachować niniejszą instrukcję.
Dla bezpieczeństwa dzieci proszę nie zostawiać swobodnie dostępnych
części opakowania (torby plastikowe, kartony, styropian itp.).
OSTRZEŻENIE!
Nie pozwalać dzieciom bawić się folią. Niebezpieczeństwo uduszenia!
PL
5
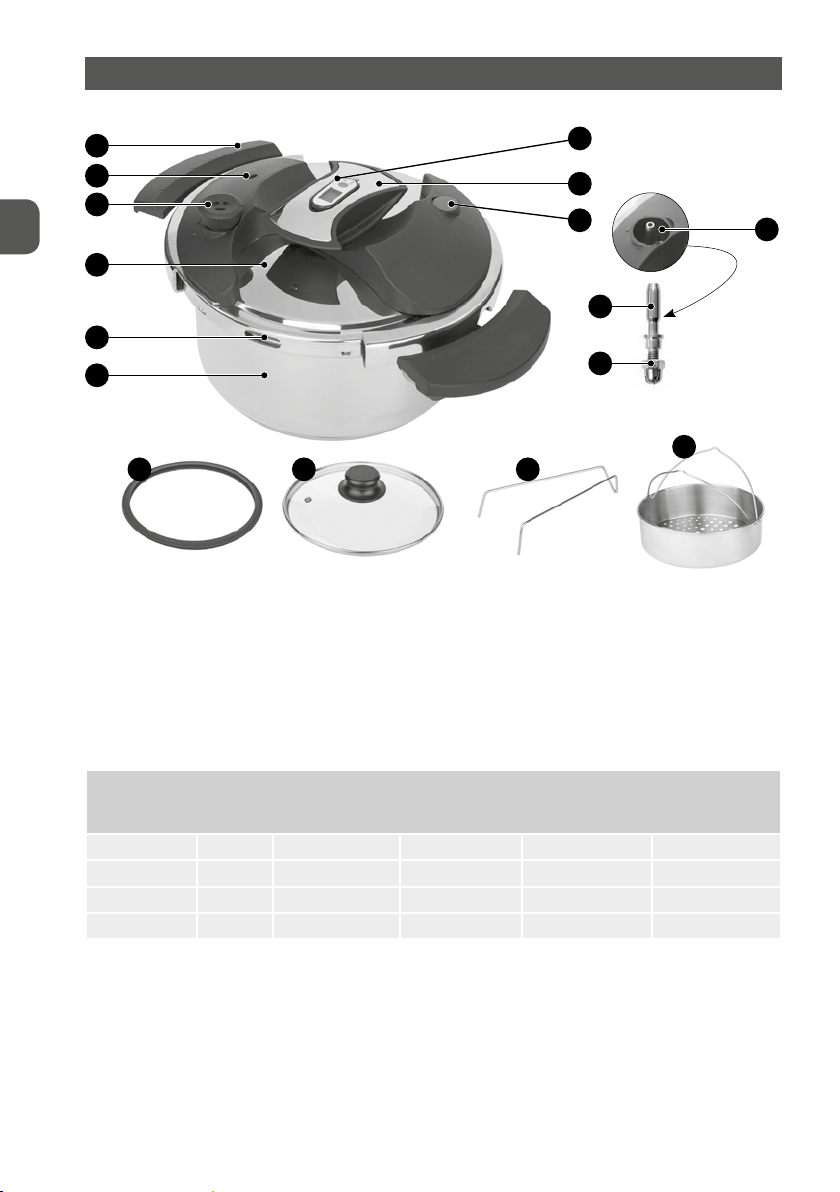
OPIS URZĄDZENIA
PL
1
2
3
4
8
9
12 15 14
1. Uchwyt garnka
2. Zawór bezpieczeństwa
3. Regulator ciśnienia
4. Pokrywa
5. Pokrętło pokrywy
6. Timer
7. Wskaźnik poziomu ciśnienia
8. Okienko bezpieczeństwa
Nr elementu Średnica Pojemność
MGS- 01 22 CM 5,0 L 100 kPa 130 -160 kPa 180-3 00 kPa
MGS-02 22 CM 4,0 L i 6,0 L 100 k Pa 130 -160 kPa 180-3 00 kPa
MGS-05 22 CM 5,0 L 100 kPa 130 -160 kPa 180-3 00 kPa
MGS-07 22 CM 7, 0 L 100 kPa 130 -160 kPa 180-3 00 kPa
9. Korpus szybkowaru/garnek
10. Otwór wentylacyjny
11. Śruba blokująca
12. Uszczelka
13. Wkład do gotowania na parze
14. Podstawka pod wkład do gotowania
na parze
15. Szklana pokrywa
Ciśnienie
robocze
6
5
7
10
11
Pierwsze
ciśnienie
bezpieczeństwa
3
13
Drugie ciśnienie
bezpieczeństwa
6
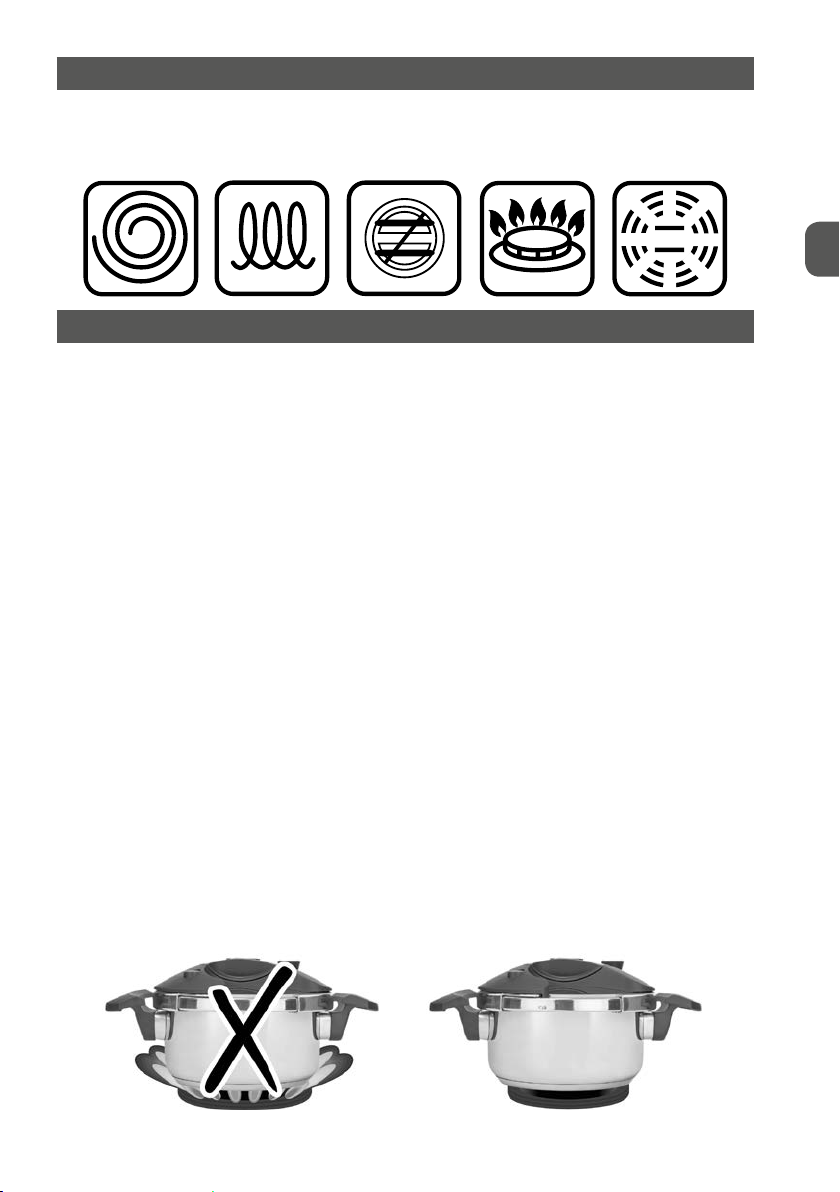
ŹRÓDŁA CIEPŁA
GA ZOWA
KUCHNIA
KUCHNIA
ELEKTRYCZNA
HALOGEN
CERAMICZNA
PŁYTA
INDUKCYJNA
KUCHNIA
Szybkowar przystosowany jest do wszystkich rodzajów kuchni, wtym indukcyjnych.
ZASADY BEZPIECZEŃSTWA
Przeczytać ze zrozumieniem wszystkie instrukcje ibezwględnie zachować instrukcję obsługi do wglądu.
Użytkownik ponosi wszelką odpowiedzialność za ewentualne wypadki, do których może dojść w wyniku
nieprzestrzegania niniejszej instrukcji.
1. Szybkowar jest przeznaczony wyłącznie do użytku domowego a inne zastosowania są
niedozwolone. Nie korzystać zurządzenia jeśli wpobliżu znajdują się dzieci. Wżadnym
wypadku dzieci nie powinny znajdować się w pobliżu szybkowaru w czasie gotowania
ipo jego zakończeniu, gdy szybkowar jest jeszcze gorący. Nie korzystać zurządzenia, gdy
wpobliżu znajdują się osoby niepełnosprawne, lub osoby, które nie zapoznały się ze zrozu-
mieniem zinstrukcją obsługi atakże gdy w pobliżu znajduję się zwierzęta domowe.
2. Nie dotykać bezpośrednio rozgrzanych powierzchni metalowych. W razie potrzeby uży-
wać rękawic ochronnych.
3. Punkt wrzenia w szybkowarze wynosi ok. 120 stopni Celsjusza imoże generować duże
ilości pary.
4. Nie używać szybkowaru do gotowania soku idżemu, artykułów ziarnistych itp., ponieważ
może to spowodować powstanie dużej ilości bąbelków, rozprysków, które mogą zabloko-
wać zawór bezpieczeństwa . Zabrania się gotowania tego typu pożywienia.
5. Nigdy nie gotować wszybkowarze dań na bazie mleka.
6. Nie używać gruboziarnistej soli. Potrawy należy posolić drobną solą pod koniec gotowa-
nia, gdy szybkowar nie znajduje się wtrybie ciśnieniowym.
7. Utrzymywać czysty isuchy regulator ciśnienia, zawór bezpieczeństwa, uszczelkę atakże
korpus ipokrywę.
8. Nie umieszczać sody bezpośrednio wgarnku, nie podgrzewać oleju iwina.
9. Umieścić garnek stabilnie na kuchence. W przypadku kuchenek gazowych, płomień
niemoże dotykać ścianek garnka. Wprzypadku kuchenek elektrycznych średnica kuchen-
ki musi być mniejsza niż spód garnka.
PL
7
PL
10. Nie używać szybkowaru do gotowania na głębokim oleju i do suchego gotowania
(bezwody), gdyż może to spowodować uszkodzenia iskrócić żywotność produktu.
11. Jeżeli z zaworu bezpieczeństwa lub okienka bezpieczeństwa wydobywa się para,
bezzwłocznie zdjąć garnek ze źródła grzania. Nie używać do momentu rozwiązania
problemu.
12. Podczas używania szybkowaru nie dotykać okienka bezpieczeństwa.
13. Nigdy nie przykrywać podczas gotowania żadnych elementów pokrywy (okienka bezpie-
czeństwa, zaworu bezpieczeństwa, regulatora ciśnienia, wskaźnika poziomu ciśnienia).
14. Gotując pożywienie lub wodę nigdy nie przekraczać 2/3 pojemności. Gotując potrawy,
produkty zwiększające pod wpływem temperatury iwody swoją objętość np. ryż, warzywa iinne, nie przekraczać 1/2 pojemności garnka.
15. Nigdy nie otwierać pokrywy przy ciśnieniu wytworzonym wewnątrz. Nigdy nie podgrze-
wać, gdy pokrywa znajduje się wnieprawidłowej pozycji.
16. Nie dopuścić do zbyt długiego pozostawania soli, octu, cukru lub wody po gotowaniu
wszybkowarze. Może to spowodować powstanie plam wewnątrz garnka. Po użyciu wyczyścić iwysuszyć.
17. Sprawdzić każdy element szybkowaru przed użyciem, aby zapewnić bezpieczeństwo
użytkowania iuniknąć ewentualnych wypadków.
FUNKCJE
1. Szybkowar jest przeznaczony wyłącznie do użytku domowego. Pokrywka ikorpus są wyko-
nane zwytrzymałej iestetycznej stali nierdzewnej. Szybkowar posiada trzywarstwowe dno
wypełnione aluminium. Produkt jest przeznaczony do gotowania na kuchenkach elektrycznych ze stałą płytą, szklano-ceramicznych, halogenowych, gazowych iindukcyjnych.
2. Elementy zapewniające bezpieczeństwo:
*
REGULATOR CIŚNIENIA: dostępne są dwa ustawienia zaworu: wyrównywanie ciśnień oraz
praca pod ciśnieniem roboczym.
*
ZAWÓR BEZPIECZEŃSTWA: Zawór bezpieczeństwa automatycznie sprawdza ciśnienie we-
wnątrz szybkowaru. Jeżeli zawór wykryje ciśnienie robocze to uniesie się czerwony trzpień
zaworu blokując jednocześnie możliwość otworzenia garnka. Jeżeli ciśnienie wzrośnie
ponad bezpieczny poziom z zaworu zacznie wydobywać się para zapobiegając dalszemu
wzrostowi ciśnienia i temperatury. Jeżeli z zaworu wydobywa się para na początku procesu
gotowania należy sprawdzić czy uszczelka pokrywy szybkowaru i sama pokrywa są prawidłowo zainstalowane i zablokowane.
*
OKIENKO BEZPIECZEŃSTWA: Zboku pokrywki znajduje się okienko bezpieczeństwa.
Jego zadaniem jest wypuszczanie pary, jeżeli regulator ciśnienia izawór bezpieczeństwa
nie mogą działać poprawnie lub gdy wewnątrz znajduje się za dużo pary. Należy zwrócić
8

uwagę, by okienko bezpieczeństwa nigdy nie było skierowane wstronę użytkownika
lub osób trzecich.
regulator
ciśnienia
okienko
bezpieczeństwa
zawór
bezpieczeństwa
praca pod
ciśnieniem
roboczym
wyrównywanie
ciśnień (spust
pary przed
otwarciem
pokrywy)
ZASADA DZIAŁANIA
Szybkowar to garnek ogrubych ściankach ze szczelnie przylegającą pokrywą, dzięki czemu
temperatura wzrasta nawet do 120ºC, wytwarzając ciśnienie, które 2-3 krotnie skraca czas
gotowania.
ZALET Y GOTOWANIA WSZYBKOWARZE
* znacznie przyśpiesza proces gotowania
* oszczędność czasu do 70% ienergii do 50%
* potrawy zachowują wartości odżywcze ismakowe
* ogranicza rozchodzenie się zapachów wtrakcie gotowania
* idealny do sporządzania jednogarnkowych potraw (np. gulaszu)
INSTRUKCJA OBSŁUGI
PRZED ROZPOCZĘCIEM KORZYSTANIA ZSZYBKOWARU PO R AZ PIERWSZY
1. Przeczytać dokładnie instrukcję obsługi przed pierwszym użyciem. Szczególnie dokładnie
zapoznać się zczęścią „zasady bezpieczeństwa”.
2. Przed pierwszym użyciem należy garnek, pokrywkę iuszczelkę oraz dodatkowe wyposa-
żenie (szklaną pokrywkę i wkład do gotowania na parze) umyć łagodnym detergentem,
następnie opłukać iwytrzeć do sucha.
3. Regulator ciśnienia ustawić w pozycji wyrównywania ciśnień.
4. Napełnić szybkowar w 1/2 zimną wodą, zamknąć pokrywkę, postawić na źródle grzania
iodczekać, aż para zacznie wydobywać się zregulatora ciśnienie. Zdjąć szybkowar zku-
chenki izostawić zamknięty na około 10-30 minut wcelu pozbycia się zapachu poproduk-
cyjnego garnka.
5. Po ochłodzeniu otworzyć pokrywkę. Wylać wodę, umyć iwysuszyć ponownie szybkowar.
PL
9
PL
PRZED GOTOWANIEM
1. Upewnić się, że otwór wentylacyjny, zawór bezpieczeństwa iregulator ciśnienia nie są za-
blokowane. Jeżeli występuje blokada, użyć cienkiego patyczka (wykałaczki) do wyczyszczenia przewodu iusunięcia blokady. Upewnić się, że zawór bezpieczeństwa jest czysty
idziała prawidłowo, auszczelka jest poprawnie umieszczona.
2. Szybkowar musi być wypełniony co najmniej 1/4 l wody lub innego płynu, żeby umożliwić
prawidłowe gromadzenie się pary. Żywność lub woda nigdy nie mogą przekraczać 2/3
objętości garnka. Jeżeli żywność wytwarza pianę, pęcznieje podczas gotowania, nie
może przekraczać 1/2 objętości.
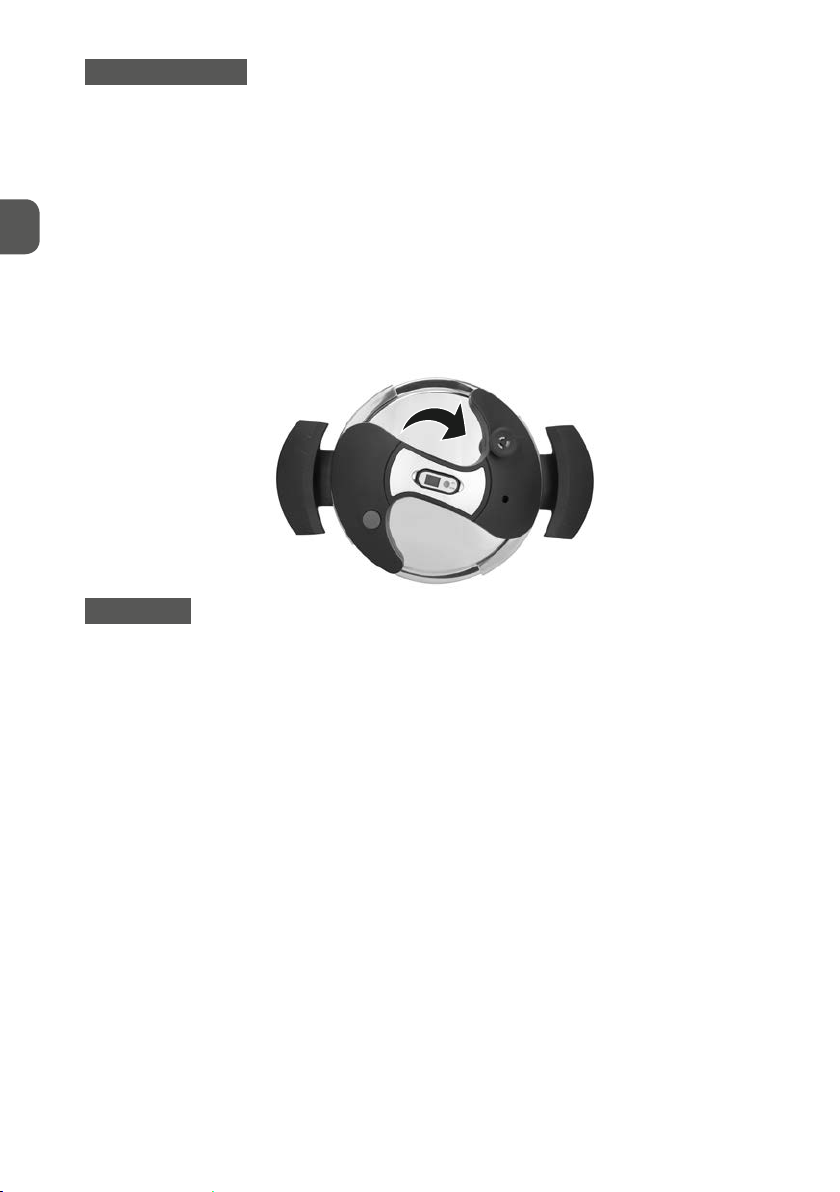
3. Zamykanie pokrywki: przekręcić pokrętło zgodnie zruchem wskazówek zegara wtym mo -
mencie słyszalne będzie kliknięcie, co znaczy, że pokrywka jest całkowicie i prawidłowo
zamknięta. Jeżeli jest to konieczne, docisnąć ręką, by zamknąć lub otworzyć pokrywkę.
GOTOWANIE
1. Ustawić szybkowar na płaskiej i stabilnej powierzchni palnika. Podczas podgrzewania
średnica palnika kuchenki nie może być większa niż średnica garnka. Podczas
podgrzewania na kuchence gazowej upewnić się, że płomienie nie dotykają bocznych
ścianek garnka. Aby umożliwić jak najszybsz y wzrost temperatury użyć dużej mocy grzania.
UWAGA: Zawsze podczas przenoszenia, przesuwania trzymać za obydwa uchwyty garnka.
2. Regulator ciśnienia ustawić w pozycji ciśnienia roboczego. W początkowej fazie
podgrzewania możliwe jest delikatne wydzielanie się pary z zaworu bezpieczeństwa. Po
wzroście temperatury proces ten zaniknie.
3. Gdy na wskaźniku ciśnienia zauważone zostanie białe oznaczenie oznacza to, że szybkowar
osiągnął roboczą temperaturę i ciśnienie. Z regulatora ciśnienia zacznie wydobywać się
para i od tego momentu należy odliczać czas gotowania.
4. Ustawić źródło grzania na najniższy poziom aby zapobiec dalszemu wzrostowi
temperatury i ciśnienia.
5. Jeżeli zostanie zauważone, że wskaźnik ciśnienia wrócił do początkowej pozycji,
należy zwiększyć nieco poziom mocy podgrzewania szybkowaru.
6. Jeżeli wskaźnik ciśnienia pokazuje czerwoną kreskę – zmniejszyć natychmiast poziom
mocy podgrzewania.
7. Gdy upłynie czas gotowania wyłączyć źródło ciepła.
10
SZYBKIE CHŁODZENIE SZYBKOWARU
Wcelu szybkiego zmniejszenia temperatury iciśnienia należy:
* używając rękawic ochronnych ostrożnie ustawić (za pomocą widelca lub innego przyboru
kuchennego) regulator ciśnienia w pozycji wyrównywania cisnień, co spowoduje zwolnienie
pary izmniejszenie ciśnienia wewnątrz szybkowaru
lub
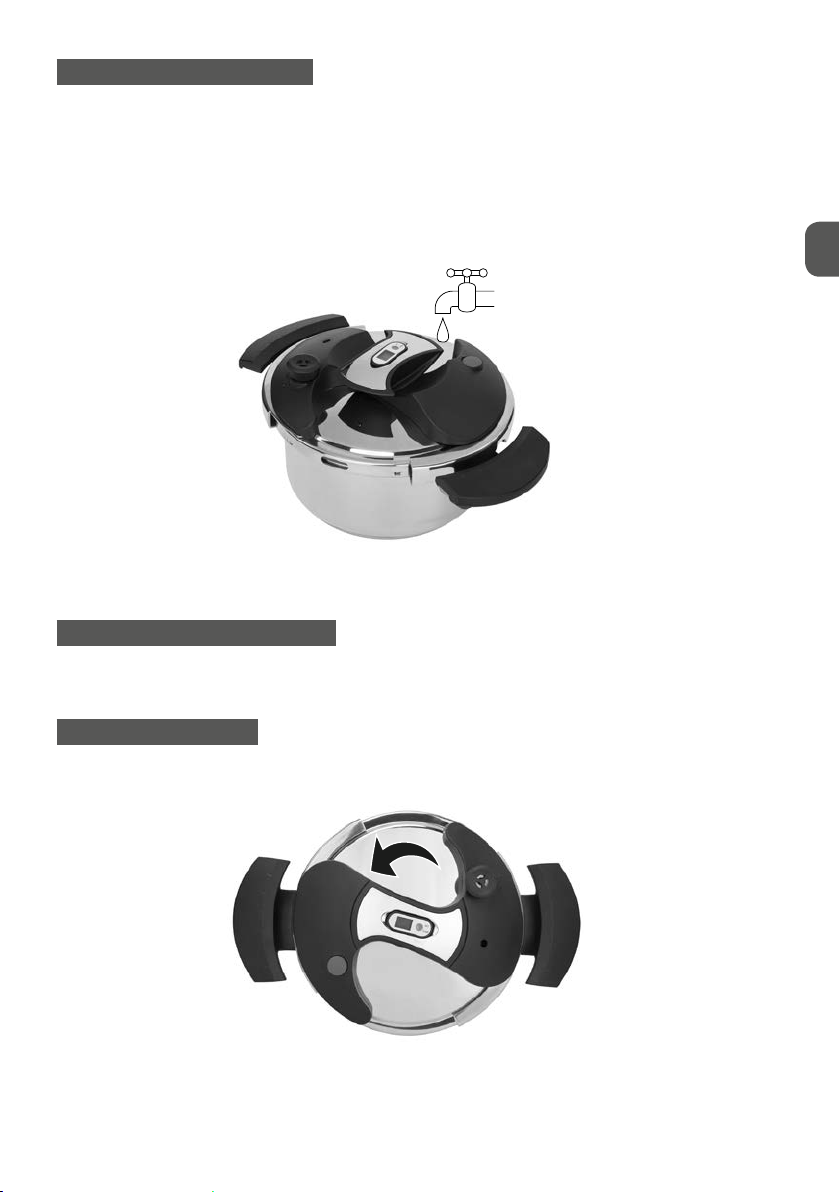
* umieścić szybkowar pod delikatnym strumieniem zimnej wody, uważając by nie zalać za-
woru bezpieczeństwa. Po opadnięciu zaworu bezpieczeństwa można otworzyć pokrywkę.
Gotowanie zakończone. Uwaga: Nie wlewać wody do środka zaworu bezpieczeństwa.
NATURALNE CHŁODZENIE SZYBKOWARU
Po gotowaniu pozwolić na naturalne schłodzenie się garnka inie otwierać pokrywki, aż zawór
bezpieczeństwa iwskaźnik ciśnienia nie opadną.
PL
OTWIERANIE SZYBKOWARU
Przekręcić pokrętło zgodnie ze wskazaniem strzałki (kierunek przeciwny do ruchu wskazówek
zegara).
11

PL
WYKRYWANIE IUSUWANIE USTEREK
Faza Przyczyna Metoda zaradcza
Nagrze wanie szyb kowaru – przez
regulat or ciśnienia n ie wydobyw a
się para
Para wyd obywa się zzaw oru
bezpieczeństwa
Zawór bezpieczeństwa nie podnosi się
Para wyd obywa się zróż nych miejsc
Utrudnione zamykanie/otwieranie
1. Regulator jest zablokowany.
2. Pożywienie zalega wobszarze wentylacji.
3. Podgrzewanie na sucho.
4. Szy bkowar znaj duje się na poc hyłej powie rzchni.
1. Otwór wentylac yjny jest zablokowany.
2. Za dużo po żywienia wś rodku.
3. Za duż y płomień (źr ódło grzan ia).
1. Pokr ywka nie je st poprawni e zablokowan a.
2. Źródł o ciepła jes t zbyt słab e do zagotowan ia
wod y.
3. Uszcze lka jest bru dna lub zdefor mowana.
4. Zbyt ma ła ilość pł ynu.
1. Regu lator izawór bez pieczeńs twa nie dzia łają
popraw nie.
2. Źle ułożona uszczelka .
3. Uszcze lka jest znis zczona.
4. Brudna uszczelka.
5. Pokrywka niedokładnie zamknięta.
1. Niepoprawn ie założona uszczelka.
2. Uniesiony zawór bezpieczeństwa.
3. Zdeformowana uszczelka.
1. Usunąć materiał z regulatora.
2. Usunąć pr zyczyn ę zalegania z a pomocą igł y z obszaru
wentylacji.
3. Wyłąc zyć, umieś cić szybko war na płaski ej powierzc hni
iumożliw ić regulator owi spuszcz enie ciśnieni a,
następ nie otworz yć pokry wkę isprawdzić .
4. Umieścić szybkowar na pł askiej powierzchni.
1. Usunąć m ateriał z ot woru wentyl acyjnego.
2. Umieśc ić w garnku praw idłową iloś ć pożywie nia.
3. Zmniejs zyć płomi eń (źródło gr zania), wyre gulować
regulator iwybrać odpowiednie ciśnienie.
1. Zablokować poprawnie pokrywkę.
2. Zwiększyć źródło grzania.
3. Wyczyścić lub wymienić uszczelkę.
4. Sprawdz ić, czy w sz ybkowarze je st wysta rczająco du żo
pły nu. Wrazie potr zeby uzupe łnić.
1. Usunąć z r egulatora i z aworu ewentua lne
zanieczyszczenia za pomocą igły.
2. Poprawnie zamontować uszczelkę.
3. Wymien ić uszczelkę n a nową.
4. Wyczyścić uszczelkę.
5. Zamknąć poprawnie pokrywkę.
1. Upew nić się, że uszc zelka pasuje do p okrywk i.
Używać tylko oryg inalnej uszczelki.
2. Odczekać, aż zawór bezpieczeństwa opadnie całkowicie.
3. Wymie nić uszcze lkę na orygina lną, dostępn ą jedynie
uproduce nta/dostaw cy bądź wauto ryzowany m serwisi e.
Wszelkich napraw dokonywać może tylko autoryzowany serwis agd (wykaz adresów
dostępny na stronie internetowej www.mpm.pl).
KONSERWACJA
SZYBKOWAR
* Do oczyszczenia zabrudzonych miejsc stosować łagodne detergenty.
* Po każdym użyciu umyć iwysuszyć garnek, wkład do gotowania na parze, oraz pokrywki.
*
Nie stosować szczotek metalowych do czyszczenia, żeby nie uszkodzić metalowej powierzchni.
* Nie dotykać korpusu garnka bezpośrednio metalowymi narzędziami.
Uwaga! Wprzypadku dużej zawar tości wapnia wwodzie, na dnie garnka mogą pojaw ić się odbarwienia, osad.
Nie ma to wpływu na jakość potr aw ani właściwośc i szybkowaru . Wcelu u sunięcia ewentualnych plam, można
przetrzeć garnek wodą zoctem anastępnie dokładnie umyć iwysuszyć . Nie pozostawiać wgarnku kwaśnych
isłonych produktów, sosu pomidorowego itp., ponieważ może to dopr owadzić do powstania plamek rdzy.
Jeśli szybkowar nie jest używany przez dłuższy czas, należy garnek ipokrywę przechowywać
osobno wsuchym miejscu.
12

USZCZELK A
* Usunąć zuszczelki wszelkie nieczystości, delikatnie umyć wciepłej wodzie.
* Dokładnie osuszyć uszczelkę.
* Zamontować uszczelkę wpoprawnej pozycji.
* Wymienić uszczelkę na nową raz wroku, po długim czasie stosowania, wprzypadku zde-
formowania lub uszkodzenia. Wcelu wydłużenia okresu użytkowania oraz poprawy jej
funkcjonalności, nanieść na suchą uszczelkę odrobinę oleju jadalnego. Jeśli nie używamy
szybkowaru przez dłuższy czas, uszczelkę należy przechowywać osobno.Re
REGULATOR, PRZEWÓD WENTYLACYJNY IZAWÓR BEZPIECZEŃSTWA
*
Po każdym użyciu szybkowaru należy zdemontować regulator ciśnienia poprzez energiczne
wyjęcie go z kanału wentylacyjnego, wykałaczką usunąć resztki po gotowaniu a następnie
umyć go w zimnej wodzie. Podobnie postępować z kanałem wentylacyjnym. Po wyczyszczeniu go sprawdzić jego drożność wizualnie.
*
Po każdym użyciu szybkowaru wyczyścić zawór bezpieczeństwa i sprawdzić czy prawidłowo
się porusza.
*
Otwór wentylacyjny oraz zawór bezpieczeństwa należy okresowo zdemontować za pomocą
klucza i poddać czyszczeniu przy pomocy wykałaczki. Po czyszczeniu zamontować na miejscu.
Przed użyciem obrócić pokrywę i sprawdzić czy czerwony korek swobodnie opada.
PL
Nieprawidłowe zamontowanie zaworu może stanowić niebezpieczeństwo
dlaużytkownika.
USUWANIE PRZYPALONEGO POŻYWIENIA
*
Do usuwania przypalonego pożywienia stosować produkty zdrewna lub inne specjalnie
przystosowane dowyrobów ze stali nierdzewnej
*
Jeżeli przypalona masa jest lepka, zalać ciepłą wodą zdodatkiem oleju. Następnie delikatnie
usunąć. Nie usuwać ostrym narzędziem.
13

PL
UWAGI SPECJALNE, PRAKT YCZNE WSK AZÓWKI
*
Nigdy nie stosować do mycia ostrych zmywaków, metalowych szczotek. Używać łagodnego
środka do mycia naczyń.
*
Nigdy nie myć pokrywki iuszczelki wzmywarce; uszczelka nie może być czyszczona
żadnymi płynami iśrodkami do mycia naczyń.
* Smarować uszczelkę olejem jadalnym, aby wydłużyć jej żywotność.
* Nigdy nie zamykać garnka po użyciu. Pozwala to wydłużyć żywotność uszczelki.
* Rozmrażać produkty przed gotowaniem, namoczyć fasolę isuszoną żywność.
*
Otworzyć pokrywkę igotować przez chwilę żywność wydzielającą bąbelki, pianę. Zamknąć
pokrywkę po zakończeniu formowania się bąbli, piany.
* Zaletą szybkowaru jest to, że nie ubywa wnim wody mimo dłuższego gotowania.
*
Zmniejszyć płomień, jeżeli poziom pożywienia zacznie się nadmiernie podnosić.iana uszczelki
WYMIANA USZCZELKI
Zaleca się wymianę uszczelki na nową co rok. Wymienić natychmiast, jeżeli jest uszkodzona,
popękana lub zdeformowana.
Nigdy nie stosować zamienników. Skontaktować się zproducentem lub dostawcą.
CZASY GOTOWANIA
* Czas gotowania liczony jest od wypuszczenia pary przez regulator.
*
Poniższa lista służy wyłącznie jako referencja, proszę dostosować czasy gotowania do
własnego smaku.
Nazwa produktu
Zupy
fasolowa 10-2 0
gulaszowa 15-20
jarzynowa 4-8
kapuśniak 15
pomidorowa 4-8
rosół drobiowy 15-20
rybna 6-8
ziemniaczana 6-8
Czas gotowania
wmin.
W przypadku warzyw wytwarzających podczas gotowania pianę, należy je najpierw zagotować
wnormalnym trybie gotowania (bez wytworzonego ciśnienia), następnie zdjąć pianę.
14
Uwagi
Fasola pod w pływe m wody pęczn ieje, dlatego pr zed gotowani em wskazane
jest nam oczenie jej wc zystej wo dzie. Do gotowa nia wtrybie c iśnieniowy m nie
napełniać powyżej ½ pojemności garnka.

Warzywa
brukselka 4
buraki 20 -25
groszek zielony 3-5
kalaor 3-5
kalarepa 4-5
kapust a 8-10
marchew 3-7
ziemniaki 10
Mięso
golonka 30- 40
gulasz 15-25
kotlet wieprzowy 1 0-12
kurczak cały 20 -25
ozorki cielęce 10 -15
pieczeń cielęca 20-2 5
pieczeń jagnięca 25-30
pieczeń wieprzowa 20-30
pieczeń wołowa 40-50
udko zindy ka 25-35
wołowina gotowana 35-45
żeberka 10 -12
Ryby
Ryba wcałości 4
Ryba duszona 4-8
Filet rybny 3
Im drob niej pokr ojone ty m króts zy czas g otowania. J eśli chce my, by warzy wa były b ardzie j kruche na leży
skrócić czas gotowania. Polecamy gotować warzywa na parze (poziom wody – minimum na wewnętrznej
miarce garnka).
Mięso podsmażać wgarnku bez pokrywy. Następnie zalać wodą (wy warem). Duże porcje można
pokroić na mniejsze kawałki.
Należy pamiętać, że wywar z ryb ma lepką konsystencję. W związku z t ym należy natyc hmiast
pocałkowitym opadnięciu ciśnienia zdjąć pokry wę szybkowaru.
PL
INNE
GOTOWANIE ZUŻYCIEM WKŁADU NA PARĘ
Szybkowar wyposażony jest we wkład do gotowania na parze. Dodatkową funkcją wkładu
jest opcja tarki do warzyw iowoców. Spód wkładu posiada różnej wielkości ostrza dotarcia
warzyw oraz krojenia wplastry.
Aby gotować zwykorzystaniem wkładu na parę, należy na dno garnka położyć podstawę pod
wkład (na wyposażeniu), umieścić na niej wkład, wlać odpowiednią ilość wody doszybkowaru
(do poziomu minimum na wewnętrznej miarce garnka) oraz ułożyć produkty nadnie wkładu
dogotowania na parze. UWAGA: produkty ni gdy nie mogą doty kać pokry wy szybkowa ru.
15

PL
OBSŁUGA TIMERA – MINUTNIK A
Podczas gotowania wszybkowarze zaleca się wyjąć timer zpokrywy.
1. Wcisnąć iprzytrzymać niebieski przycisk aby uruchomić timer – na ekranie wyświetlone
zostanie „00”.
2. Ustawianie czasu: przyciskając niebieski przycisk zaprogramować czas trwania gotowania
wzakresie 0 – 99 min. Sygnał dźwiękowy zasygnalizuje zakończony czas gotowania.
3. Jeżeli ustawienie czasu jest niepoprawne, wcisnąć i przytrzymać niebieski przycisk, po-
nownie wyświetlone zostanie „00” – ustawienie początkowe.
DODATKOWE WYPOSAŻENIE
* wkład do gotowania na parze zfunkcją tarki do warzyw, owoców
* szklana pokrywa
GŁÓWNE PARAMETRY TECHNICZNE
* Specykacje: ciśnienie robocze 100 kPa (+/-10%).
*
Niezawodność uszczelnienia: poniżej 20 kPa ciśnienia roboczego, brak wycieku wody lub pary.
* Ciśnienie działania zabezpieczeń: (I): od 130 kPa do 160 kPa (II): 180-300 kPa.
*
Bezpieczne otwarcie pokrywki: jeżeli ciśnienie wewnętrzne przekracza 4 kPa, pokrywki nie
można otworzyć.
*
Bezpieczne zamknięcie pokrywki: jeżeli pokrywka nie jest poprawnie zamknięta to ciśnienie
wewnętrzne jest na poziomie poniżej 4 kPa.
16

OZNAKOWANIA PRAWNE
OZNAKOWANIE LOKALIZACJA
Identykacja producenta / marki handlowej Dno zbior nika / garnka
Rok prod ukcji inr part ii
Ciśnienie robocze (PF)
Maksymalne ciśnienie bezpieczeńst wa (PS)
Wewnętrzna strona pokrywy
DANE TECHNICZNE
DANE TECHNICZNE
Pojemność: 5 L
Średnica garnka: 22 cm
Średnica dna garnka: 18 ,5 cm
Wysokość garnka: 14 ,5 cm
Waga netto garnka: 3 ,37 kg
Ciśnienie robocze: 10 0 k Pa
UWAGA! Firma MPM agd S.A. zastrzega sobie możliwość zmian technicznych!
PL
17

TABLE OF CONTENTS
IMPORTANT SAFETY GUIDELINES .................................................................... 20
DESCRIPTION OF THE APPLIANCE .....................................................................22
HEAT SOURCE....................................................................................................23
GB
SAFETY RULES ...................................................................................................23
FEATURES .........................................................................................................24
INSTRUCTIONS FOR USE ...................................................................................25
TROUBLESHOOTING ......................................................................................... 28
MAINTENANCE ................................................................................................ 28
COOKING TIMES ............................................................................................... 30
OTHER ............................................................................................................... 31
KEY TECHNICAL SPECIFICATIONS ......................................................................32
REGULATORY LABELLING ..................................................................................33
TECHNICAL SPECIFICATIONS .............................................................................33
18

Dear Customer,
Thank you very much for the trust you have placed in MPM by purchasing one of our cookware
products.
By choosing our products you show us that our eorts to make the cooking process easier for you
have been recognised.
Your pressure cooker is suitable for use with electric, ceramic, halogen, gas and induction cook tops,
as indicated on the underside of each pot.
Please read all of this user manual carefully.
It contains useful cooking tips as well as technical data, maintenance and warranty information.
This user manual will help you fully appreciate your new cookware and enjoy many years of
satisfactory use.
Before rst use, wash your pressure cooker and accessories thoroughly with warm soapy water. Do
not use citrus fruit-based cleaning agents on stainless steel as this might damage kitchenware by
making rust-like stains. Discolorations can be removed with a stainless steel cleaner.
We hope our stainless-steel pressure cooker will serve you well. We will spare no eort to provide
you with the best support possible. The safety, durability and sleek appearance of the product
is guaranteed not only by excellent design and materials but its high quality is also additionally
ensured by means of operational testing.
The pressure cooker will have a longer life if properly used. This User Manual will guide you through
the use and cooking principles regarding your pressure cooker. Please read the instruction below
carefully.
This pressure cooker is made of stainless steel for better safety and hygiene. It has good heat
resistance properties and is easy to clean.
Its three-ply sandwich base includes a pure aluminium insert. The material we used is durable
and has good conductivity properties, which makes it suitable for heating on induction hobs and
enables eective use of the heat source.
The lid of the pressure cooker comes with an integrated timer and three-way protection system to
ensure user comfort and operational safety.
The pressure cooker has ben manufactured in line with all applicable standards.
GB
19

GB
IMPORTANT SAFETY GUIDELINES
Please read this user manual thoroughly before use.
Kepp the appliance out of reach of children aged under 8 years old.
This product may only be operated by children aged 8 or more, by mentally
or physically decient persons, and by persons without knowledge of or
experience in operating this appliance provided that they are supervised
or have been instructed in its safe operation, and as a result have clear
understanding of all related risks. Children without supervision must never
clean or care for this appliance.
Do not allow children to come near the pressure cooker when it is in op-
eration.
This appliance cooks food under pressure. Inappropriate use may cause
burns. Please make sure that the pot is correctly closed before you begin
cooking. See the Instruction for Use below.
Do not use the pressure cooker for other purposes then the ones it is in-
tended for.
Use appropriate heat sources in compliance with the Instructions for Use.
Exercise particular caution when handling a pressure cooker. The pressure
cooker must always be carried, shifted or moved gently on a horizontal
plane by gripping both handles at the same time. Do not touch its hot
surfaces. Use protective gloves if required.
Never put the pressure cooker inside a hot oven.
Never use the pressure cooker without water as it may cause serious damage.
Do not ll the pot more than to 2/3 of its volume. When preparing dishes
that expand while cooking, including rice and dried vegetables, do not ll
the pressure cooker above 1/2 of its volume. Some vegetables, including
peas, beans and dried vegetables and fruits, must be soaked in clean
water prior to cooking. Dishes that generate foam or froth while cooked
should be rst boiled with the lid o, next strained, and only then cooked
in pressure cooker.
Prior to every use check that the valves are not blocked or dirty. See the
Instruction for Use below.
Never use your pressure cooker in pressurised condiction for shallow or
deep frying.
20

After cooking meat with an outer layer of skin, which tends to swell in
pressure conditions, do not pierce the meat when the skin is swollen as
this could scald you.
When cooking grain products, once safety valve is down and before you
open the lid, shake your pressure cooker gently to prevent the dish from
spurting.
Never open the pressure cooker before you are sure that the pressure inside
has dropped. Never apply force to open the lid of your pressure cooker. See
the Instruction for Use below.
Never wash the lid and the gasket in a dishwasher.
Use only genuine spare parts suitable for your pressure cooker model.
In particular, use the body and the lid from the same manufacturer and
specied as fully compatible.
Do not manipulate with the safety devices expect within the scope of
maintenance activities specied in this User Manual.
Keep this User Manual for future refernce.
To keep your children safe, do not leave any parts of the packaging readily
accessible (e.g. plastic bags, cardboard boxes, polystyrene inserts, etc.).
WARNING!
Never let children play with plastic lm or bags. Choking hazard!
GB
21

DESCRIPTION OF THE APPLIANCE
GB
1
2
3
4
8
9
12 15 14
1. Pot handle
2. Safety valve
3. Pressure regulator
4. Lid
5. Lid knob
6. Timer
7. Pressure level indicator
9. Pressure cooker body / pot
10. Venting duct
11. Locking screw
12. Gasket
13. Steaming basket
14. Steaming basket support
15. Glass lid
6
5
7
10
11
8. Safety window
Item number Diameter Volume
MGS- 01 22 C M 5,0 L 100 kPa 130 -160 kPa 180-3 00 kPa
MGS-02 22 CM 4,0 L i 6,0 L 100 kPa 13 0-16 0 kP a 180-3 00 kPa
MGS-05 22 CM 5,0 L 100 kPa 130 -160 kPa 180-3 00 kPa
MGS-07 22 CM 7,0 L 100 k Pa 130 -160 kPa 180 -300 kPa
Operating
pressure
First safety
pressure
3
13
Second safety
pressure
22

HEAT SOURCE
COOKER
GAS
ELECTRIC
COOKER
HALOGEN
HOB
CERAMIC
COOKER
INDUCTIVE
This pressure cooker is intended for all types of hobs, including induction hobs.
SAFETY RULES
Please read and under stand all instructions contained in this User Manual, and make sure to keep it for future
reference.
The User is f ully responsib le for any potential acc idents resulti ng from failure to c omply with this Us er Manual.
1. Your pressure cooker is intended for household use only – any other applications are
strictly forbidden. Do not use the appliance with children close by. Children must never be
near your pressure cooker when it is in operation and when the cooking has nished but
the appliance has not cooled down yet. Do not use the appliance when disabled people
or people who have not read and understood this User Manual are in close proximity, or
with pets nearby.
2. Do not touch hot metal surfaces. Use protective gloves if required.
3. The boiling point of the pressure cooker is around 120 degrees Celsius, and it may generate large amounts of steam.
4. Do not use your pressure cooker to prepare juice or jam and grain products, etc. as this
could result in the formation of large amounts of bubbles and create splashes that could
block the safety valve. Cooking this type of food in the pressure cooker is strictly forbidden.
5. Never use your pressure cooker to prepare milk-based dishes.
6. Do not use coarse salt. Dishes must be salted with ne-grained salt at the end of cooking
when your cooker is not pressurised.
7. Keep the pressure regulator, safety valve and gasket, as well as the body and lid, clean and
dry.
8. Do not put soda directly in your pressure cooker, and do not use it to heat up oil or wine.
9. Put the pot securely on the hob. With gas hobs, the ame must not lick the walls of the
pot. On electric hobs, the diameter of the cooking zone must be smaller than the diameter
of the pot base.
GB
23

GB
10. Do not use your pressure cooker for deep frying or dry cooking (without water) as this can
damage the product and reduce its life.
11. If there is steam coming out of the safety valve or the safety window, remove the
pot from the heat source immediately. Do not use it until the problem has been
solved.
12. Do not touch the safety window when the pressure cooker is in operation.
13. Never cover any parts of the lid (safety window, safety valve, pressure regulator or pres-
sure level indicator) when cooking.
14. When cooking food or when boiling water, never use more than ²/₃ of the volume of your
pressure cooker. When cooking products that expand in water and high temperature, e.g.
rice or vegetables, do not use more than ½ of the pot’s volume.
15. Never open the lid when the cooker is under pressure. Never heat up your dish when the
lid is not placed securely in its correct place..
16. Prevent salt, vinegar, sugar or water from staying for too long in your pressure cooker after
you nish cooking. This can leave stains inside the pot. Clean and dry your pressure cooker
after use.
17. Check each part of the pressure cooker before use to ensure safe operation and to prevent
any potential accidents.
FEATURES
1. This pressure cooker is for household use only. The lid and the body are made from strong
and sleek stainless steel. Your pressure cooker has three-ply base lled with aluminium. The
product is intended for cooking on xed-plate electrical hobs, glass and ceramic hobs, halogen hobs, gas hobs and induction hobs.
2. Safety devices:
* PRESSURE REGULATOR: There are two possible settings of this valve: pressure equalisa-
tion and operating pressure.
*
SAFETY VALVE: The safety valve automatically checks the pressure inside your pressure
cooker. If the valve detects the operating pressure, a red valve stem will go up and block
the ability to open the pot. Should the pressure go above a safe level, the valve will begin
releasing steam to prevent a further increase of pressure and temperature. If steam is released
through the valve at the beginning of the cooking process, you must check whether the
pressure cooker lid gasket and the lid itself are properly tted and interlocked.
*
SAFETY WINDOW: The safety window is located on the side of the lid. Its purpose is to
release steam if the pressure regulator and the safety valve cannot work properly or when
24

there is too much steam in the pressure cooker. Ensure that the safety window is never
directed towards the user or any third parties.
Pressure
regulator
Safety
window
Safety
valve
Operating
pressure
Pressure
equalisation
PRINCIPLE OF OPERATION
A pressure cooker is a thick-walled pan with a tightly secured lid that enables a temperature
increase of up to 120ºC, generating pressure that shortens the cooking time by 2 to 3 times.
ADVANTAGES OF A PRESSURE COOKER
* Signicantly speeds up the cooking process
* Saves up to 70% of time and 50% of energy
* Dishes keep their nutritional and taste values
* Reduces the spread of smells during cooking
* Perfect for preparing one-pot dishes (e.g. a goulash)
INSTRUCTIONS FOR USE
BEFORE YOU BEGIN USING YOUR PRESSURE COOKER
1. Read this User Manual thoroughly before rst use. Pay special attention to the Safety Rules
section.
2. Before rst use, wash the pot, lid, gasket and accessories (glass lid and steaming basket)
with a mild detergent, then rinse them and wipe them dry. Set the pressure regulator to
the pressure equalisation position. Fill your pressure cooker to ½ with cold water, close the
lid, put the pot on the heat source, and wait for the steam to begin coming out through the
pressure regulator. Remove the pressure cooker from the hob and leave it closed for 10 to
30 minutes to get rid of the smell from manufacturing.
3. Once the pot has cooled, open the lid. Pour the water out of the pressure cooker, wash it,
and dry it again.
GB
25

GB
BEFORE COOKING
1. Ensure that the venting ducts, safety valve and pressure regulator are not blocked. If there
is any blockage, use a thin stick (a toothpick) to clean the duct and remove the blockage.
Make sure that the safety valve is clean and works properly, and that the gasket is tted
correctly in its place.
2. The pressure cooker must be lled with at least ¼litre of water or other liquid to enable
proper accumulation of steam. Food and water must never exceed ²/₃ of the pot’s volume.
If the food generates foam or froth, or if it expands when cooked, it may not take up
more than ½ of the volume.
3. To close the lid, turn the knob clockwise until you hear a click indicating that the lid has
been fully and properly closed. If required, apply pressure with your hand to close or open
the lid.
COOKING
1. Put your pressure cooker on a rm and at surface of the hob. When cooking, the cooking
zone diameter must not be greater than the pot diameter. If you use a gas hob for cooking,
ensure that the ames do not lick the side walls o f the pot. To enable the highe st temperature
increase possible, use high heating power.
NOTE: Whenever you move or shift you pressure cooker, hold it by its both handles.
2. Set the pressure regulator to the operating pressure position. At the initial heating stage,
minor amounts of steam may come out through the safety valve. This will stop when the
temperature increases.
3. When the marking on the pressure indicator turns white, your pressure cooker has reached
the operating temperature and pressure. Steam will start getting out through the pressure
regulator – this is when counting down of the cooking time should begin.
4. Set the heat source to the lowest level possible to prevent a further temperature increase.
5. When you see that the pressure indicator has come back to the initial positio increase a little
the heating power below your pressure cooker.
6. When the pressure indicator shows a red line, reduce the heating power immediately.
7. When the cooking time has elapsed, turn o the heat source.
26

QUICK COOLING OF THE PRESSURE COOKER
To quickly decrease the temperature and pressure:
* Use protective gloves and proceed with caution to set the pressure regulator (with a fork
or other kitchen implement) to the pressure equalisation position to release the steam and
reduce the pressure inside the pressure cooker.
or
*
Put the pressure cooker under a thin stream of cold running water while being cautious
not to pour water on the safety valve. Once the safety valve has dropped down, you can
open the lid.
The cooking is complete. Note: Do not pour water into the safety valve.
NATURAL COOLING OF THE PRESSURE COOKER
Leave the pot to cool naturally after cooking, and do not open the lid until the safety valve and
the pressure indicator have dropped down.
GB
OPENING THE PRESSURE COOKER
Turn the knob in the direction indicated by the arrow (anticlockwise).
27

GB
TROUBLESHOOTING
Stage Cause Remedy
The pres sure cooker is ov erheating
– the pres sure regulat or does not
release steam.
There is s team coming ou t of the
safet y valve.
The safe ty valve doe s not go up.
There is s team coming ou t from
dierent areas.
Restrained closing/opening.
1. The re gulator is blo cked.
2. There is some food clogging the venting area.
3. Dry heating.
4. The p ressure coo ker stands o n an inclined s urface.
1. The ven t is blocked.
2. Too much food inside.
3. Excessive ame (heat source).
1. The li d is not secure d correctl y in place.
2. Insuc ient heat sour ce to make the water b oil.
3. The gaske t is dirty or d eformed.
4. Insucient amount of liquid.
1. The pr essure regu lator and the sa fety valve
do not work c orrectl y.
The gaske t has not been t ted corre ctly in place .
2. The gasket is damaged.
3. Dirty gasket.
4. The lid has n ot been close d properly.
1. The se al has not been t ted corre ctly in place.
2. The saf ety valve is up.
3. Deformed gasket.
1. Remov e the blockin g material fro m the pressur e
regulator.
2. Use a need le to remove the c ause of cloggi ng from the
venting area.
3. Turn o the he at source, put th e pressure co oker on a
at sur face, and leave it f or the pressu re regulator to
reduce p ressure, then o pen the lid to se e inside.
4. Put the pr essure cooke r on a at surfa ce.
1. Remov e the blockin g material fro m the vent.
2. Put the right amount of food inside the pot.
3. Reduce t he ame (heat sou rce), adjust the pr essure
regulator, and select the appropriate pressure.
1. Sec ure the lid corr ectly.
2. Increase the heat source.
3. Clean or r eplace the gaske t.
4. Check if the pressure cooker contains enough liquid.
Rell if required.
1. Use a ne edle to remove any c logging mate rial from the
pressure regulator and the safety valve.
2. Fit the ga sket correc tly in place.
3. Replace t he gasket with a n ew one.
4. Clean the gasket.
5. Close the lid properly.
1. Ensur e that the gaske t ts the lid. Use a g enuine gasket
onl y.
2. Wait unt il the safet y valve has dro pped down com pletely.
3. Replace the gasket with a genuine one available from the
manufa cturer/sup plier or fro m an authori sed serv ice centre.
Any repairs may be carried out only by authorised home appliance service centres (for
the address list, please go to our website at www.mpm.pl.
MAINTENANCE
PRESSURE COOKER
* Use mild detergents to clean any dirty areas.
* Wash and dry the pot, the steaming basket and the lids after each use.
* Do not use metal brushes for cleaning to avoid damaging the metal surface of your pres-
sure cooker.
* Do not apply any metal tools directly to the body of the pot.
Note: If there is a high concentration of calcium in water, discolouration and sediment may appear on the pot
base. This will not aect the quality of your dishes or the performance of your pressure cooker. To remove any
such stains, you can wipe the pot using water with vinegar, then wash it thoroughly, and wipe it dry. Do not
store any ac idic or salty p roducts, e.g. tom ato sauce, in your pre ssure cooker as th is may create corr osion stains.
If your pressure cooker will not be used for a longer time, store the pot and the lid separately
in a dry place.
28

GASKET
* Remove any impurities from the gasket and wash it gently with warm water.
* Wipe the gasket completely dry.
* Fit the gasket correctly in place.
* Replace the gasket with a new one once a year, after prolonged use or when it is deformed
or damaged. Apply a hint of edible oil on the gasket to increase its lifetime and to improve
its performance. If you will not be using your pressure cooker for an extended period of
time, store the gasket separately.Re
PRESSURE REGULATOR, VENTING DUCT AND SAFETY VALVE
*
After each use of the pressure cooker, dismantle the pressure regulator by removing it
briskly from the venting duct, use a toothpick to take out any cooking residues, then rinse
the regulator with cold water. Follow a similar procedure for the venting duct. Once it is
clean, inspect it visually for any obstructions.
*
After each use of the pressure cooker, clean the safety valve and check whether it moves
correctly.
*
The venting duct and the safety valves must be periodically dismantled using a key in order
to be cleaned. Remember to mount them back in place after cleaning. Turn the lid upside
down before use to check if the red plug falls down freely.
GB
Incorrect mounting of the valve may put the User at risk.
REMOVAL OF BURNT FOOD
*
Use wooden implements or other products dedicated for stainless steel to remove any
burnt food.
*
If the burnt mass is sticky, pour warm water with some oil over it. Next, remove the mass
gently. Do not remove it with a sharp tool.
29

GB
SPECIAL REMARKS AND PRACTICAL TIPS
*
Never use abrasive scouring pads or metal brushes for washing. Use mild washing-up liquid.
*
Never wash the lid and the gasket in a dishwasher; the gasket must not be cleaned with
any washing-up liquids or agents.
* Spread some edible oil on the gasket to extend its life.
* Never close the pot after use. This will extend the life of the gasket.
* Defrost products, and soak beans and dried food prior to cooking.
* For food that forms bubbles and foam/froth, remove the lid and cook it for a while. When
the bubbling and foaming/frothing stops, close the lid.
* One advantage of a pressure cooker is that the amount of water inside does not decrease
even with prolonged cooking.
* If the top surface of your dish begins to go too high up, reduce the ame.miana uszczelki
REPLACING THE GASKET
Replace the gasket with a new one every one year. If it is damaged, cracked or deformed,
replace it immediately.
Never use any substitute products. Please contact the manufacturer or the supplier.
COOKING TIMES
*
The cooking time begins to be measured once the pressure regulator starts releasing steam.
* The list below is only for reference purposes. Please adopt the cooking times to your indi-
vidual taste.
Product
Soups
Bean sou p 1 0-20
Goulash soup 15-20
Vegetable soup 4-8
Cabbag e soup 15
Tomato soup 4 -8
Chicken broth 15-20
Fish soup 6-8
Potato so up 6-8
Cooking time
in minutes
For vegetables that produce foam or froth while cooked, begin by cooking them in a traditional way
(without generated pressure), and then remove the foam/froth.
Beans sw ell in water, so it is re commended to s oak them in cle an water befor e
cookin g. Fill the pot to ½ of i ts volume whe n cooking und er pressure
Comments
30

Vegetables
Brussels sprouts 4
Beetroot 20 -25
Green pe as 3-5
Cauliower 3-5
Kohlrabi 4-5
Cabbag e 8 -10
Carrot s 3-7
Potatoe s 10
Meat
Pork knuckle 30-40
Goulash 15-25
Pork cut let 10-12
Whole chicken 20-2 5
Veal tongues 1 0-15
Roast veal 20-2 5
Roast la mb 25-30
Roast p ork 20-30
Roast b eef 40 -50
Turkey thigh 25-35
Boiled beef 35 -45
Ribs 10 -12
Fish
Whole sh 4
Fish stew 4 -8
Fish llet 3
The smal ler the piece s, the shorte r the cooking ti me. If you want you r vegetable s to be crispie r, shorten
the cooking time. We recommend steaming vegetables (water level – the minimum amount is indicated
on the internal measuring scale)
Meat needs to be rst stir-fried in the pot with the lid o. Next, pour water (stoc k) into it. L arge
port ions may be cut i nto smaller p ieces.
Note that sh stock is stick y. With that in mind, remove the pressure cooker lid immediately after the
pressure has dropped down completely.
GB
OTHER
COOKING WITH A STEAMING BASKET
Your pressure cooker comes with a steaming basket. The basket has an additional function of
a vegetable and fruit grater. The bottom part of the basket features variously sized edges for
grating and slicing vegetables and fruits.
To cook with your steaming basket, place the steaming basket support (included) on the pot
base, put the basket on the support, ll the pressure cooker with an appropriate amount of
water (up to the minimum level indicated on the pot’s interior measuring scale), and lay the
products on the bottom of the steaming basket.
NOTE: The products must never touch the lid of your pressure cooker.
31

USING THE TIMER
It is recommended to remove the timer from the cover when cooking in the pressure
cooker.
1. Press and hold the blue button to turn the timer on – “00” will display on the screen.
GB
2. Setting the time: Press the blue button to set the cooking time within the range from 0 to
99 minutes. A sound alarm will indicate that the cooking time has nished.
3. If the time setting is incorrect, press and hold the blue button to display the initial setting
of “00” and proceed as above.
ACCESSORIES
* Steaming basket with an integrated vegetable and fruit grater
* Glass lid
KEY TECHNICAL SPECIFICATIONS
* Specications – Operating pressure: 100 kPa (+/-10%).
* Sealing reliability: below 20 kPa of the operating pressure, no water or steam leakage.
* Limit pressure for safety devices: (I): from 130 kPa to 160 kPa (Ii): from 180 kPa to 300 kPa.
* Safe lid opening: if the internal pressure is above 4 kPa, the lid cannot be opened.
*
Safe lid closing: If the lid is not secured correctly , the internal pressure is at the level of 4 kPa.
32

REGULATORY LABELLING
labelling location
Manufa cturer / bra nd details Base of th e container / po t
Year of manufacture and batch number
Operating pressure (PF)
Maximu m safety pr essure (PS)
Inside the lid
DANE TECHNICZNE
TECHNICAL SPECIFICATIONS
Volume: 5 L
Pot diameter: 22 cm
Pot bottom diameter: 18 ,5 cm
Pot height: 14 ,5 cm
Pot gross weight: 3,37 k g
Operating pressure: 10 0 k Pa
NOTE: MPM agd S.A. may change the technical features of the product without notice.
GB
33

NOTATKI
34

35
NOTATKI

GB
Życzymy zadowolenia zużytkowania naszego wyrobu izapraszamy
do skorzystania zszerokiej oferty handlowej firmy
We wish you satisfaction from using the product and invite you to check awide
range of other
appliances
MPM agd S.A.
ul. Brzozowa 3, 05-822 Milanówek, Poland
tel.: (22) 380 52 34, fax: (22) 380 52 72
www.mpm.pl
 Loading...