

Page 1

IPDS DIMM for HP LaserJet 2100
Installation & Operator’s Guide
D60413-01
November 2003
MPI Tech A/S
Vadstrupvej 35
2880 Bagsvaerd
Denmark
Tel: +45 44 36 60 00
Fax: +45 44 36 61 11
www.mpitech.com
Page 2

Table of contents
1
Introduction .......................................................................................3
2 Installation ......................................................................................... 4
2.1.1 Actual installation ......................................................................4
3 Configuration...................................................................................... 5
3.1 Using the Web Browser....................................................................5
3.1.1 Requirements ...........................................................................5
3.1.2 Getting Started .........................................................................5
3.1.3 IPDS Configuration ....................................................................6
3.1.4 Configuration of Input Trays........................................................6
3.1.5 Advanced Functions ...................................................................6
3.1.6 IPDS Configuration Settings ........................................................6
3.1.7 IPDS Input Trays .......................................................................8
3.2 Hints and Guidelines for Configuration................................................9
3.2.1 HP JetDirect PrintServers ............................................................9
4 PSF/400 AFP Printing Using TCP/IP.................................................10
4.1 AS/400 Settings for Version 3.1 ...................................................... 11
4.1.1 Configuring PSF with CRTDEVPRT on V3R1 .................................. 11
4.1.2 Configuring AFP with WRKAFP2 on V3R1 ..................................... 12
4.2 AS/400 Settings for Version 3.2 ...................................................... 13
4.2.1 Configuring PSF with CRTDEVPRT on V3R2 .................................. 13
4.2.2 Configuring AFP with CRTPSFCFG on V3R2. ................................. 14
4.3 AS/400 Settings for Version 3.6 ...................................................... 15
4.3.1 Configuring PSF with CRTDEVPRT on V3R6 .................................. 15
4.3.2 Configuring PSF with WRKAFP2 on V3R6 ..................................... 16
4.4 AS/400 Settings for Version 3.7 ...................................................... 17
4.4.1 Configuring PSF with CRTDEVPRT on V3R7 .................................. 17
4.4.2 Configuring AS/400 for IPDS printing on V3R7 ............................. 18
4.5 AS/400 Settings for Version 4.1 ...................................................... 19
4.5.1 Configuring PSF with CRTDEVPRT on V4R1 .................................. 19
4.5.2 Configuring AS/400 for IPDS printing on V4R1 ............................. 20
4.6 AS/400 Settings for Version 4.2 ...................................................... 21
4.6.1 Configuring PSF with CRTDEVPRT on V4R2 .................................. 21
4.6.2 Configuring AS/400 for IPDS printing on V4R2 ............................. 22
4.7 AS/400 settings for Version 4.3....................................................... 23
4.7.1 Configuring PSF with CRTDEVPRT on V4R3 .................................. 23
4.7.2 Configuring AS/400 for IPDS printing on V4R3 ............................. 24
5 PSF/MVS AFP Printing Using TCP/IP ................................................26
5.1 PSF/MVS direct attachment ............................................................ 26
5.2 PSF/MVS startup procedure ............................................................ 26
6 AIX (version 4.2) for PPD .................................................................29
6.1 Device Parameter Setup................................................................. 29
7 Error Messages .................................................................................30
7.1 Supported IPDS NACK's: ................................................................ 30
7.2 IPDS messages on printout............................................................. 35
Appendix A. Abbreviations...................................................................36
2
Page 3

1 Introduction
The IPDS DIMM provides more features that any other competitive product in the
world.
The IPDS DIMM is an internal module for AFP print using the IPDS printing
capabilities. As one of the very few companies MPI Tech offers total connectivity
flexibility as the solution operates with both HP JetDirect and MPI Tech LAN
connectivity solutions for TCP/IP attachment to S/390, AS/400 and AIX systems
for AFP printing. Direct connection to IBM mainframe or AS/400 using coax or
twinax attachments is also possible.
MPI Tech's IPDS printing solution is one of the most widely used within the
industry and offers a wide range of features and added value enhancements. The
IPDS DIMM™ provides plug-in IPDS support as an additional Printer Driver
Language.
Installation can be performed by simply inserting the IPDS DIMM in the HP
printer. Once the IPDS DIMM is installed, configuration of the IPDS setup options
can be performed via your web browser. The IPDS DIMM uses the TCP/IP PPD
protocol, which is sent by your IBM host system from supported IBM PSF
products using TCP/IP host attachment.
Note: IRQ-reporting is not supported when the IPDS DIMM is used with an
interface other than MPI Tech's own.
3
Page 4

2 Installation
The installation of the IPDS DIMM is described in detail below.
Requirements: Minimum 8MB RAM installed in the printer.
Note: Before you start installing the IPDS DIMM, make sure that the printer is
powered off and that the power cord has been disconnected.
CAUTION
Static electricity can damage your IPDS Dual Inline Memory Module (DIMM).
When handling the IPDS DIMM, you should either wear an antistatic wrist strap,
or frequently touch the metal surface of the printer.
2.1.1 Actual installation
1. Open the interface cable door on the right side of the printer by pressing
on the release tabs. Disconnect all interface cables.
2. Facing the printer front, lift up the top cover.
3. Press the release button on the right side below the top cover. Slide the
right side panel forward until the alignment arrows line up.
4. Take the cover off, pulling it away from the printer. You will now have
access to the available DIMM slots.
5. Remove the IPDS DIMM from the antistatic bag. Hold by the edges,
component side facing towards the back of the printer. Make certain that
the locks on each side of the slot are open, and that the notches on the
IPDS DIMM are aligned with the DIMM slot. For best results, use the DIMM
slots in 1-2-3 order.
6. Press the DIMM straight into the slot (press firmly) Make certain that the
locks above and below the DIMM snap inward into place (to remove a
DIMM, the locks must be released).
Repeat steps 5 and 6 for each DIMM that is being installed
7. To replace the side panel, line up the alignment arrows and slide the panel
backwards until the release button latches into place. Close the top cover.
8. Reinstall the interface cable(s) and power cord. Turn on the printer.
4
Page 5
3 Configuration
3.1 Using the Web Browser
Through a web browser it is possible to configure the IPDS DIMM and to perform
various advanced test functions.
3.1.1 Requirements
A web browser, for example Microsoft Internet Explorer 4.0 or Netscape
Navigator 4.0 or higher.
A TCP/IP enabled EIO Interface Card with an IP address.
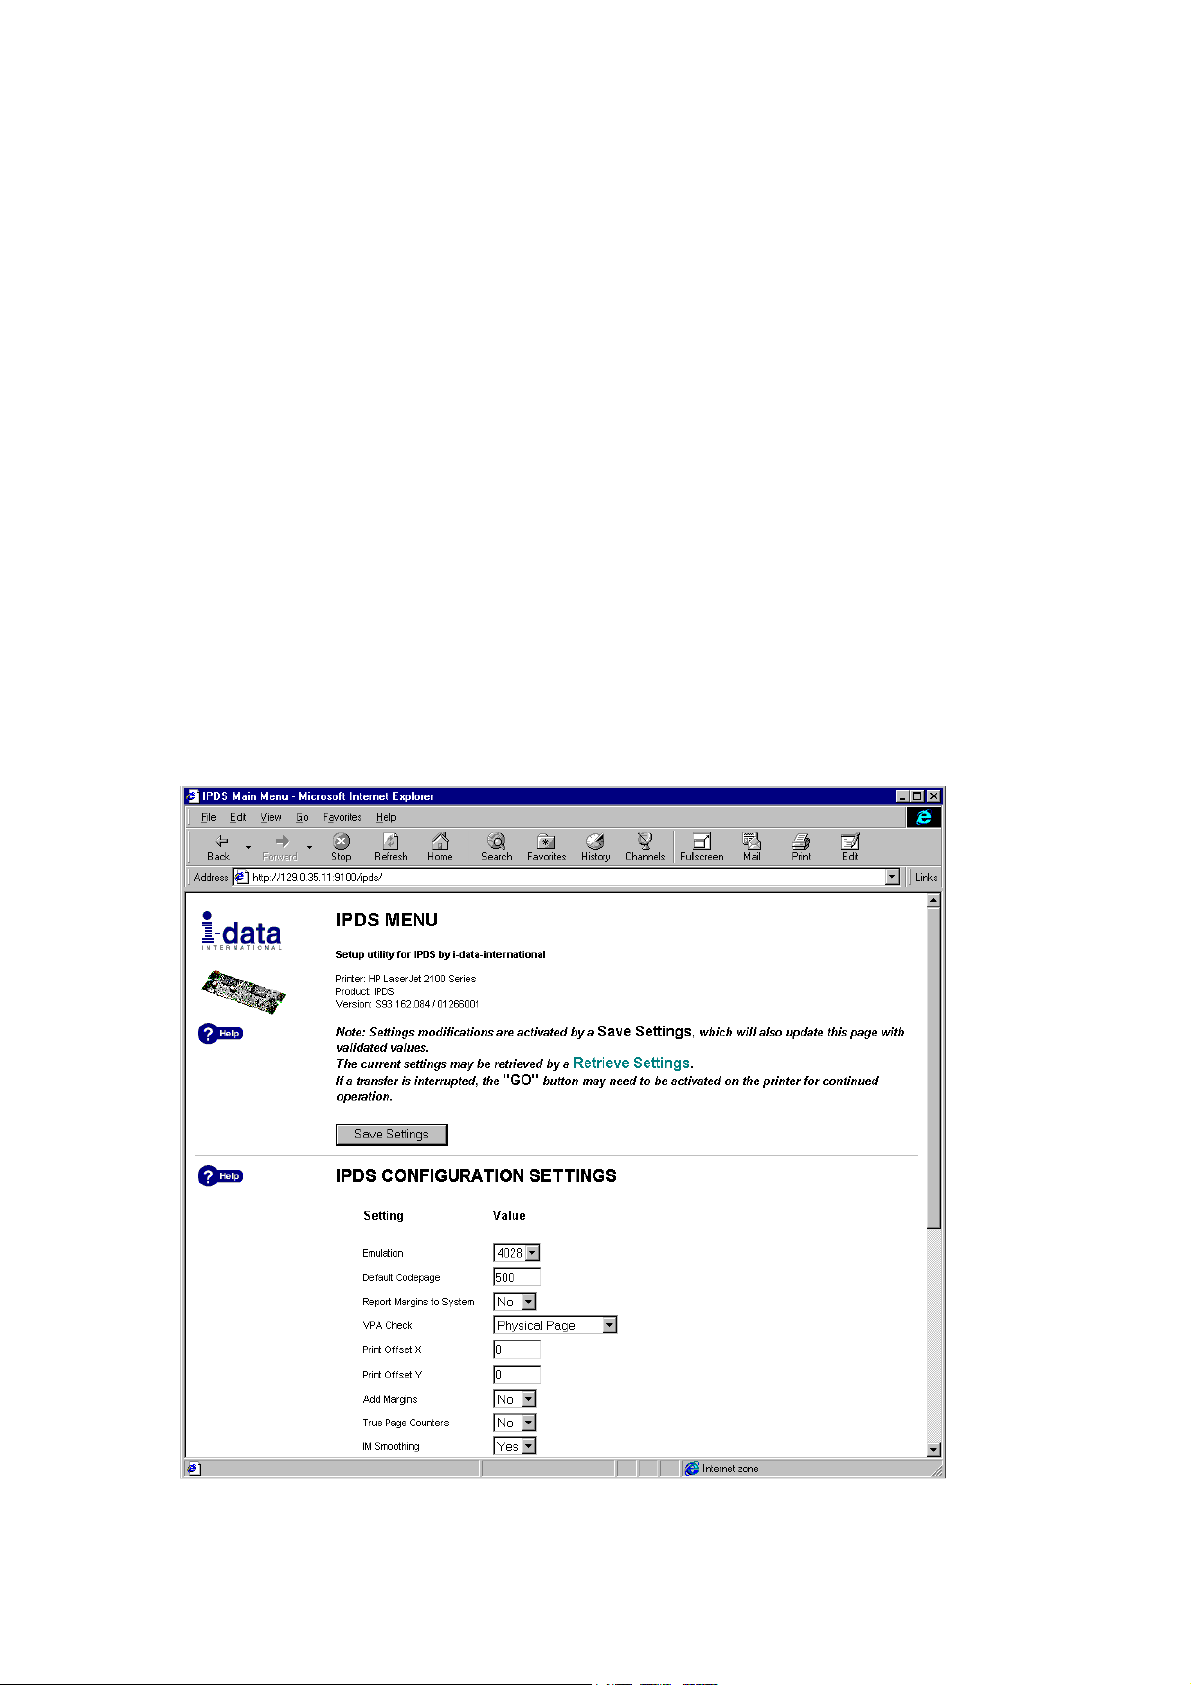
3.1.2 Getting Started
1. Start the web browser.
2. After http://, type the IP address of the PrintServer followed by
:9100/ipds/ in the web browser’s Address or Location box. The web
browser will load the IPDS Menu from the IPDS DIMM.
Note: The loading of the page may take more than a minute.
Figure 1, IPDS Menu
5
Page 6
3.1.3 IPDS Configuration
1. Go to IPDS CONFIGURATION SETTINGS to configure the IPDS DIMM. The
settings are shown in Figure 1.
2. Customize the settings with your preferred values. If you click , you
will see a list of the different settings, the range of the values and the default
values. These are also listed in section 3.1.6, IPDS Configuration Settings below.
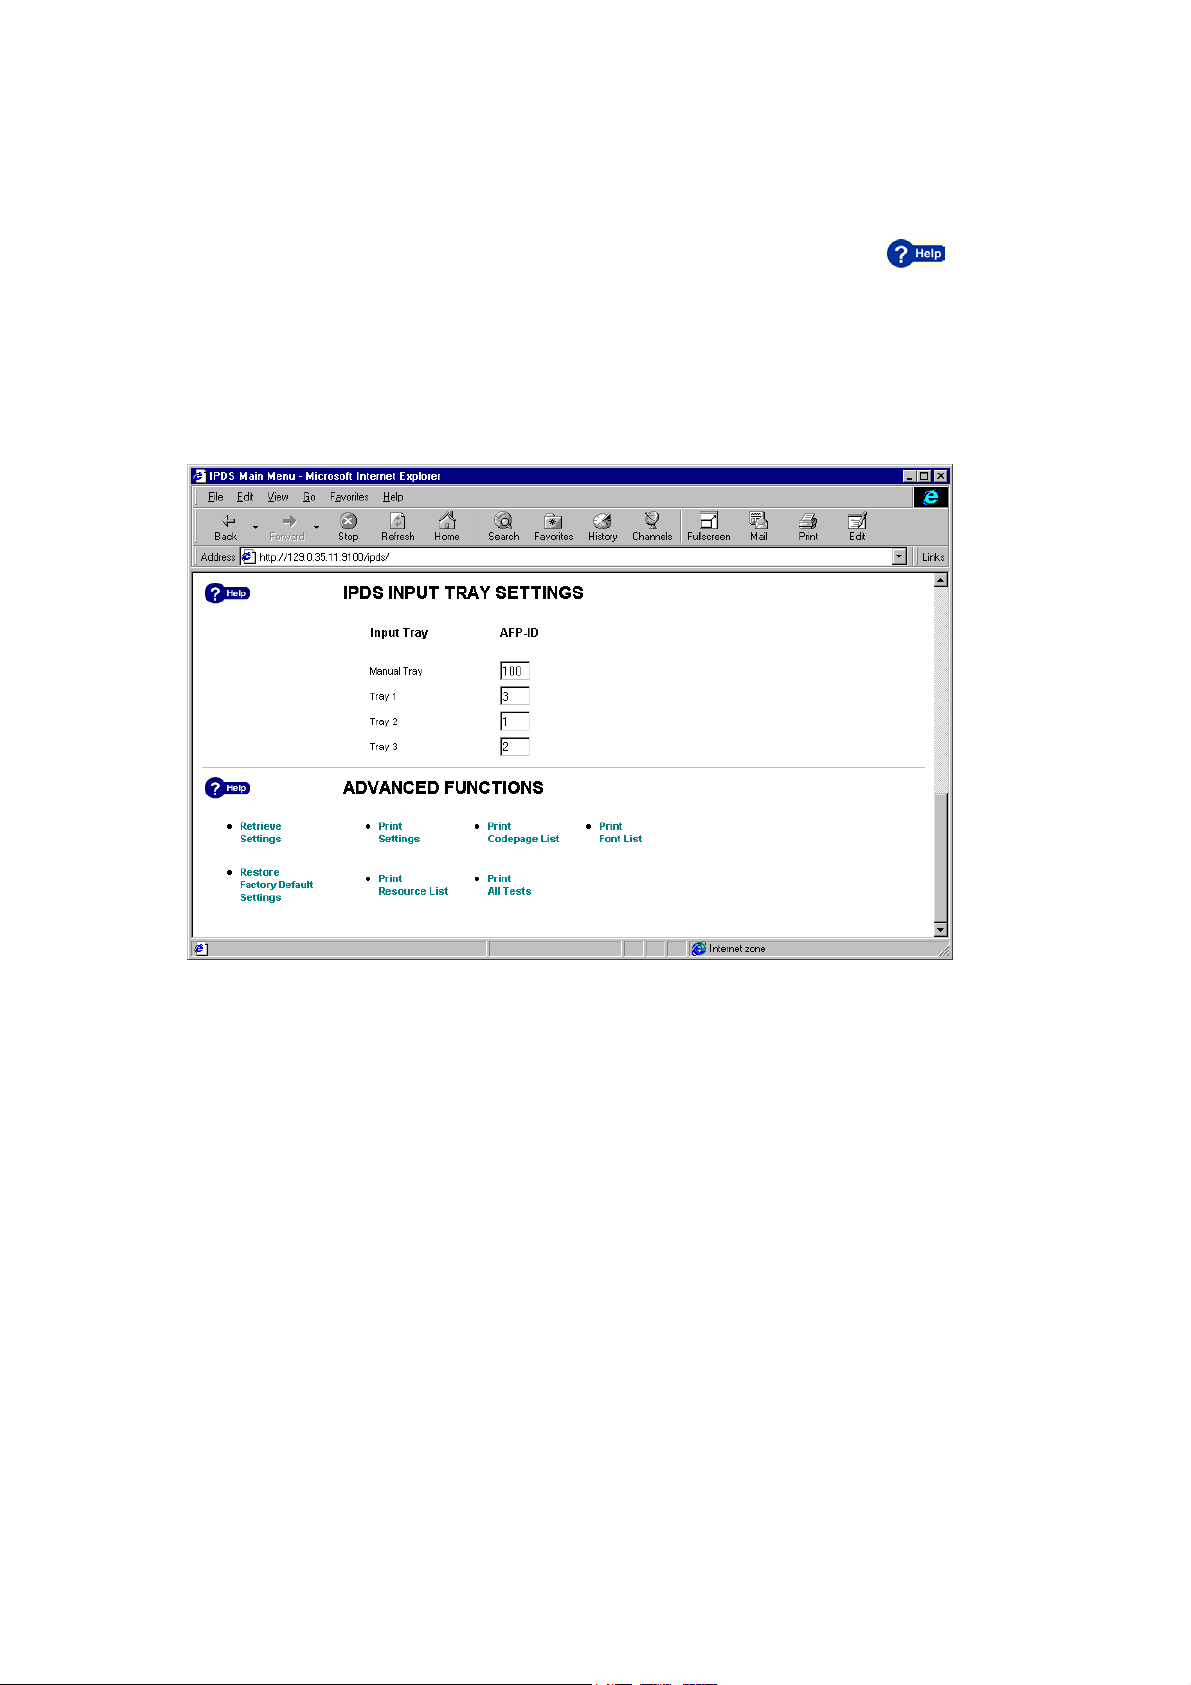
In order to configure the printer’s input trays, scroll down to the heading IPDS
INPUT TRAY SETTINGS.
3.1.4 Configuration of Input Trays
Figure 2, Input tray settings and advanced functions
Here, you can set the AFP IDs of the different input trays. There is a description
of the ranges and defaults of the AFP IDs in section 3.1.7, IPDS Input Trays
below.
Note: If you stop the loading of the pages at any point during the configuration,
you may need to press the Go button on the printer again in order to continue.
3.1.5 Advanced Functions
Clicking these functions, you can retrieve settings, restore factory default settings
or print out different test prints.
Note: If you stop the loading of the pages at any point during the configuration,
you may need to press the Go button on the printer again in order to continue.
3.1.6 IPDS Configuration Settings
Below is a short description of the configurable items:
6
Page 7

EMULATION
Defines the type of IPDS printer to emulate.
Range:
3812
3816
4028
Default:
4028
DEFAULT CODEPAGE
Defines which codepage to use as printer default.
Range:
1..65534 (0xFFFE). Validated when the ppd line opens.
Default:
500
REPORT MARGINS TO SYSTEM
Defines whether the margins should be reported in the OPC reply or not. If not,
the entire page is reported as the printable area.
Range:
YES, NO.
Default:
NO
VPA CHECK
Defines which margins should be used to determine the existence of a VPA
exception condition, which must be reported to the system.
Range:
MARGINS
PHYSICAL PAGE
IPDS LOGICAL PAGE
NONE.
Default:
PHYSICAL PAGE
Note: VPA CHECK=MARGINS will be changed to PHYSICAL PAGE if the margins
are not reported to the system.
PRINT OFFSET X
Defines X-offset to move the output print position. The value is defined in 300 dpi
dots.
Range:
-999..999
Default:
0
PRINT OFFSET Y
Defines Y-offset to move the output print position. The value is defined in 300 dpi
dots.
Range:
-999..999
Default:
0
ADD MARGINS
Defines whether the printable area margins should be added to the IPDS LPP
(Logical Page Position) or not.
7
Page 8

Range:
NO
YES
Default:
NO
TRUE PAGE COUNTER
Defines whether to query for printed pages.
Range:
NO
YES
Default:
NO
IM SMOOTHING
Defines whether the 240 to 300 dpi scaling in IM 3812 mode should be smoothed
in the same way as characters or not at all.
Range:
NO
YES
Default:
YES
3.1.7 IPDS Input Trays
Below is a short description of the configurable items:
MANUALTRAY
Defines AFP ID for Manual tray.
Range:
AFP ID 0..255
Default:
AFP ID 100
TRAY 1
Defines AFP ID for Tray 1.
Range:
AFP ID 0..255
Default:
AFP ID 2
TRAY 2
Defines AFP ID for Tray 2.
Range:
AFP ID 0..255
Default:
AFP ID 1
TRAY 3
Defines AFP ID for Tray 3.
Range:
AFP ID 0..255
Default:
AFP ID 3
8
Page 9

Note: The default value is actually '0', indicating that the AFP ID will be
automatically assigned. By default Tray 1 (the fold down tray) will actually be
assigned the highest (normal tray) AFP ID
3.2 Hints and Guidelines for Configuration
This section describes where settings are stored. There is also a description of the
configuration of timers in combination with HP JetDirect cards or compatible
PrintServers.
3.2.1 HP JetDirect PrintServers
On these PrintServers, the settings are stored in the printer's non-volatile RAM
(NVRAM). Only those settings accessible from the IPDS web pages can be
changed. In order to browse the IPDS web pages, the host print queue will need
to be stopped and restarted after settings have been modified (on some systems,
e.g. PSF/6000 under AIX, the PPD connection is not established until a print job is
submitted to the queue).
If you cannot access the IPDS web pages, you may try to reach the web pages of
the PrintServer by browsing the base IP address in order to see its status.
In order to close down the TCP/IP connection properly, the timeout period of the
PrintServer must be longer than the inactive timeout period of the host. However,
the timeout period of the PrintServer, as well as the host's active timeout period
(the time the host will wait for a printer to reply) must be sufficiently large to
allow the printer to flush the paper pipeline.
300 seconds is recommended as a reasonable choice for the PrintServer timeout.
A somewhat lower value should be used for the host's inactive timeout.
Note: As all data go through port 9100, you cannot browse the web pages as the
printer is printing and vice versa.
9
Page 10

4 PSF/400 AFP Printing Using TCP/IP
This chapter provides configuration guidelines for OS/400 using TCP/IP. The
versions differ somewhat in the setup.
For the different OS/400 versions, use the cross-references below:
4.1, AS/400 Settings for Version 3.1
4.2, AS/400 Settings for Version 3.2
4.3, AS/400 Settings for Version 3.6
4.4, AS/400 Settings for Version 3.7
4.5, AS/400 Settings for Version 4.1
4.6, AS/400 Settings for Version 4.2
4.7, AS/400 settings for Version 4.3
Requirements:
Before IPDS printing using TCP/IP can be accomplished, the following points need
to be checked:
• TCP/IP is installed and enabled
• The relevant PTFs are applied
• The WRKAFP2 command is compiled
(for AS/400 3.1 and 3.6 only)
Details on how to verify these items can be found on the internet.
Consult the following IBM web address for details:
http://as400service.rochester.ibm.com/
In the Technical Information database, you find the following links:
• AS/400 Knowledge Base
This link directs you to the area of the Knowledge Base, which is
specifically about Print. IBM Doc. No. 8414724, PTF Listing for AFP Printing
is a good entry.
• Preventive Service Planning (PSP)
This link directs you to the area of the Knowledge Base about Cumulative
PTF Package for all OS/400 versions. IBM Doc. No. 8203740, PTF Listing
for TCP/LAN Printing is a good entry.
10
Page 11

Printer Requirements:
The recommended memory configuration is as follows:
Requirement Minimum
installed
memory
A4/Letter simplex 8 MB 8 MB 12 MB
Printer Minimum Printer
firmware date code
HP2100 19990105 S93 162.084
HP JetDirect EIO (600 N J3111A/Ethernet)
HP JetDirect EIO (600 N J3112A/Tokenring)
HP JetDirect EIO (600 N J3113A/10/100Tx Eth)
HP settings:
1. Set the IP, Subnet Mask, and Gateway address on the JetDirect card.
2. The printer's PS wait time-out shall be set to 300 sec.
3. The JetDirect card's IDLE TIMEOUT shall be set to 3600 sec or 0 (zero).
4. Remember to power cycle printer to enable new settings.
Recommended
minimum memory
(simple text)
Recommended
minimum memory
(pages with overlays
or graphics)
IPDS DIMM
firmware(or later
versions)
4.1 AS/400 Settings for Version 3.1
To configure IPDS printing on AS/400 V3R1, you must use two commands:
- CRTDEVPRT
- WRKAFP2
4.1.1 Configuring PSF with CRTDEVPRT on V3R1
On V3R1, at the AS/400 command line, enter a command in the form:
CRTDEVPRT DEVD(HP_IPDS) DEVCLS(*RMT) TYPE(*IPDS)
MODEL(0) AFP(*YES) AFPATTACH(*APPC)
FONT(11)RMTLOCNAME(TCPIP) FORMFEED(*AUTOCUT)
TEXT('IDATA IPDS DIMM')
11
Page 12

A completed screen looks like the following example:
Display Device Description Page 1
5763SS1 V3R1M0 940909 BLDSYS1 09/11/96 11:15:40
Device description . . . . . . . : DEVD HP_IPDS
Option . . . . . . . . . . . . . : OPTION *ALL
Category of device . . . . . . . : *PRT
Automatically created . . . . . .: NO
Device class . . . . . . . . . . : DEVCLS *RMT
Device type . . . . . . . . . . .: TYPE *IPDS
Device model . . . . . . . . . . : MODEL 0
Advanced function printing . . . : AFP *YES
AFP attachment . . . . . . . . . : AFPATTACH *APPC
Online at IPL . . . . . . . . . .: ONLINE *YES
Font . . . . . . . . . . . . . . : FONT
Identifier . . . . . . . . . . . : 011
Point size . . . . . . . . . . . : *NONE
Form feed . . . . . . . . . . . .: FORMFEED *AUTOCUT
Separator drawer . . . . . . . . : SEPDRAWER *FILE
Separator program . . . . . . . .: SEPPGM *NONE
Library . . . . . . . . . . . . :
Printer error message . . . . . : PRTERRMSG *INQ
Message queue (V3R1) . . . . . . : MSGQ QSYSOPR
Shadowing message queue (V3R6) . : MSGQ QSYSOPR
Library . . . . . . . . . . . . : *LIBL
Maximum pending requests . . . . : MAXPNDRQS 6
Print while converting . . . . . : PRTCVT *YES
Print request timer . . . . . . .: PRTRQSTMR *NOMAX
Form definition . . . . . . . . .: FORMDF F1C10110
Library . . . . . . . . . . . . : *LIBL
Character identifier . . . . . . : CHRID *SYSVAL
Remote location . . . . . . . . .: RMTLOCNAME TCPIP
Local location . . . . . . . . . : LCLLOCNAME *NETATR
Remote network identifier . . . .: RMTNETID *NETATR
Mode . . . . . . . . . . . . . . : MODE QSPWTR
Text . . . . . . . . . . . . . . : TEXT IDATA IPDS DIMM
4.1.2 Configuring AFP with WRKAFP2 on V3R1
On V3R1, at the AS/400 command line, enter a command in the form:
WRKAFP2 DEVD(HP_IPDS) IPDSPASTHR(*YES) TCPIP(*YES)
RMTSYS('128.9.12.134') PORT(9100) INACTTMR(*SEC15)
12
Page 13

A printout should look like the following:
QPQXWAFP
-------DEVD HP_IPDS
IPDSPASTHR *YES
TCPIP *YES
RMTSYS 192.194.134.90
PORT 9100
ACTTMR *NOMAX
INACTTMR *SEC15
SBP *NO
PSC *YES
DRF *NO
DRR *NO
EDGSNSTV *NO
Then do the following:
Ping the IP address to verify communication with the printer:
PING ’192.194.134.90’
Vary the printer on:
VRYCFG HP_IPDS CFGTYPE(*DEV) STATUS(*ON)
Start the print writer:
STRPRTWTR HP_IPDS
4.2 AS/400 Settings for Version 3.2
To configure IPDS on AS/400 V3R2, use the following commands:
- CRTDEVPRT
- CRTPSFCFG
4.2.1 Configuring PSF with CRTDEVPRT on V3R2
On the AS/400 command line, enter a command in the form:
CRTDEVPRT DEVD(HP_IPDS) DEVCLS(*RMT) TYPE(*IPDS)
MODEL(0) AFP(*YES) AFPATTACH(*APPC)
FONT(11)RMTLOCNAME(TCPIP) FORMFEED(*AUTOCUT)
TEXT('IDATA IPDS DIMM')
13
Page 14

A completed screen looks like this:
Display Device Description Page 1
Device description . . . . . . . . . . .: DEVD HP_IPDS
Option . . . . . . . . . . . . . . . . .: OPTION *ALL
Category of device . . . . . . . . . . .: *PRT
Automatically created. . . . . . . . . .: NO
Device class . . . . . . . . . . . . . .: DEVCLS *RMT
Device type. . . . . . . . . . . . . . .: TYPE *IPDS
Device model . . . . . . . . . . . . . .: MODEL 0
Advanced function printing . . . . . . .: AFP *YES
AFP attachment . . . . . . . . . . . . .: AFPATTACH *APPC
Online at IPL . . . . . . . . . . . . . : ONLINE *YES
Font . . . . . . . . . . . . . . . . . .: FONT
Identifier . . . . . . . . . . . . . . .: 011
Point size . . . . . . . . . . . . . . .: *NONE
Form feed . . . . . . . . . . .. . . . .: FORMFEED *AUTOCUT
Separator drawer . . . . . . . . . . . .: SEPDRAWER *FILE
Separator program. . . . . . . . . . . .: SEPPGM *NONE
Library. . . . . . . . . . . . . . . . .:
Printer error message . . . . . . . . . : PRTERRMSG *INQ
Message queue . . . . . . . . . . . . . : MSGQ QSYSOPR
Library . . . . . . . . . . . . . . . . : *LIBL
Maximum pending requests . . . . . . . .: MAXPNDRQS 6
Print while converting . . . . . . . . .: PRTCVT *YES
Print request timer . . . . . . . . . . : PRTRQSTMR *NOMAX
Form definition . . . . . . . . . . . . : FORMDF F1C10110
Library . . . . . . . . . . . . . . . . : *LIBL
Character identifier . . . .. . . . . . : CHRID *SYSVAL
Remote location . . . . . . . . . . . . : RMTLOCNAME TCPIP
Local location . . . . . . .. . . . . . : LCLLOCNAME *NETATR
Remote network identifier . . . . . . . : RMTNETID NETATR
Mode. . . . . . . . . . . . . . . . . . : MODE QSPWTR
Dependent location name . . . . . . . . : DEPLOCNAME *NONE
Text . . . . . . . . . . . .. . . . . . : TEXT IDATA IPDS DIMM
4.2.2 Configuring AFP with CRTPSFCFG on V3R2.
On the AS/400 command line, enter a command in the form:
CRTPSFCFG PSFCFG(HP_IPDS) IPDSPASTHR(*YES)
RLSTMR(*SEC15) TEXT(IDATA IPDS
DIMM)RMTLOCNAME('194.192.134.90) PORT(9100)
14
Page 15

A completed screen looks like this:
PSF configuration: HP_IPDS Library: QGPL
User resource library . . . . . . . . . . . . . : *JOBLIBL
IPDS pass through . . . . . . . . . . . . . . . : *YES
Activate release timer . . . . .. . . . . . . . : *NORDYF
Release timer . . . . . . . . . . . . . . . . . : *SEC15
Restart timer . . . . . . . . . . . . . . . . . : *IMMED
SNA retry count . . . . . . . . . . . . . . . . : 2
Delay time between retries . . .. . . . . . . . : 0
Blank page . . . . . . . . . . .. . . . . . . . : *YES
Page size control . . . . . . . . . . . . . . . : *YES
Resident fonts . . . . . . . . .. . . . . . . . : *YES
Resource retention . . . . . . .. . . . . . . . : *YES
Edge orient . . . . . . . . . . . . . . . . . . : *NO
Remote location:
Name or address . . . . . . . . . . . . . . . . : 194.192.134.90
TCP/IP port . . . . . . . . . . . . . . . . . . : 9100
TCP/IP activation timer . . . . . . . . . . . . : 170
PSF defined options: *NONE
Text description . . . . . . . . . . .. . . . . : IDATA IPDS DIMM
Device resource library list: *DFT
Then do the following:
Ping the IP address to verify communication with the printer:
PING ’192.194.134.90’
Vary the printer on:
VRYCFG HP_IPDS CFGTYPE(*DEV) STATUS(*ON)
Start the print writer:
STRPRTWTR HP_IPDS
4.3 AS/400 Settings for Version 3.6
To configure IPDS on AS/400 V3R6, you use the following commands:
- CRTDEVPRT
- WRKAFP2
4.3.1 Configuring PSF with CRTDEVPRT on V3R6
At the AS/400 command line, enter a command in the form:
CRTDEVPRT DEVD(HP_IPDS) DEVCLS(*RMT) TYPE(*IPDS)
MODEL(0) AFP(*YES) AFPATTACH(*APPC) FONT(11)
RMTLOCNAME(TCPIP) FORMFEED(*AUTOCUT) TEXT('IDATA IPDS
DIMM')
15
Page 16

A completed screen looks like this:
Display Device Description Page 1
Device description. . . . . . . .: DEVD HP_IPDS
Option. . . . . . . . . . . . . .: OPTION *ALL
Category of device . . . . . . . : *PRT
Automatically created . . . . . .: NO
Device class . . . . . . . . . . : DEVCLS *RMT
Device type. . . . . . . . . . .: TYPE *IPDS
Device model . . . . . . . . . . : MODEL 0
Advanced function printing . . . : AFP *YES
AFP attachment. . . . . . . . . .: AFPATTACH *APPC
Online at IPL . . . . . . . . . .: ONLINE *YES
Font. . . . . . . . . . . . . . .: FONT
Identifier. . . . . . . . . . . .: 011
Point size. . . . . . . . . . . .: *NONE
Form feed . . . . . . . . . . . : FORMFEED *AUTOCUT
Separator drawer . . . . . . . . : SEPDRAWER *FILE
Separator program. . . . . . . . : SEPPGM *NONE
Library. . . . . . . . . . . . . :
Printer error message . . . . . .: PRTERRMSG *INQ
Message queue . . . . . . . . . .: MSGQ QSYSOPR
Library. . . . . . . . . . . . . : *LIBL
Maximum pending requests . . . . : MAXPNDRQS 6
Print while converting . . . . . : PRTCVT *YES
Print request timer. . . . . . . : PRTRQSTMR *NOMAX
Form definition. . . . . . . . . : FORMDF F1C10110
Library . . . . . . . . . . . . .: *LIBL
Character identifier . . . . . . : CHRID *SYSVAL
Remote location. . . . . . . . . : RMTLOCNAME TCPIP
Local location. . . . . . . . . .: LCLLOCNAME *NETATR
Remote network identifier . . . .: RMTNETID *NETATR
Mode. . . . . . . . . . . . . . .: MODE QSPWTR
Dependent location name. . . . . : DEPLOCNAME *NONE
Text. . . . . . . . . . . . . . .: TEXT IDATA IPDS DIMM
4.3.2 Configuring PSF with WRKAFP2 on V3R6
On V3R6, at the AS/400 command line, enter a command in the form:
WRKAFP2 DEVD(HP_IPDS) IPDSPASTHR(*YES) TCPIP(*YES)
RMTSYS('128.9.12.134') PORT(9100) RLSTMR(*SEC15)
16
Page 17

A printout should look like the following:
QPQXWAFP
-------DEVD HP_IPDS
IPDSPASTHR *YES
TCPIP *YES
RMTSYS 192.194.134.90
PORT 9100
ACTTMR *NOMAX
RLSTMR *SEC15
SBP *NO
PSC *YES
DRF *NO
DRR *NO
EDGSNSTV *NO
Then do the following:
Ping the IP address to verify communication with the printer:
PING ’192.194.134.90’
Vary the printer on:
VRYCFG HP_IPDS CFGTYPE(*DEV) STATUS(*ON)
Start the print writer:
STRPRTWTR HP_IPDS
4.4 AS/400 Settings for Version 3.7
To configure IPDS on AS/400 V3R7, you use the following commands:
- CRTDEVPRT
- CRTPSFCFG
4.4.1 Configuring PSF with CRTDEVPRT on V3R7
At the AS/400 command line, enter a command in the form:
CRTDEVPRT DEVD(HP_IPDS) DEVCLS(*LAN) TYPE(*IPDS)
MODEL(0) LANATTACH(*IP) AFP(*YES) PORT(9100)FONT(11)
FORMFEED(*AUTOCUT) RMTLOCNAME('192.194.134.90)
USRDFNOBJ(AFP/NETWRKPRT *PSFCFG) TEXT('IDATA IPDS
DIMM')
17
Page 18

A completed screen looks like this:
Display Device Description Page 1
5716SS1 V3R7M0 961108 BLDRB1 09/11/96 12:02:59
Device description . . . . . . .: DEVD HP_IPDS
Option . . . . . . . . . . . . .: OPTION *ALL
Category of device . . . . . . .: *PRT
Device class . . . . . . . . . .: DEVCLS *LAN
Device type . . . . . . . . . . : TYPE *IPDS
Device model . . . . . . . . . .: MODEL 0
LAN attachment . . . . . . . . .: LANATTACH *IP
User-defined object . . . . . . : USRDFNOBJ NETWRKPRT
Library . . . . . . . . . . . . : AFP
Object type . . . . . . . . . . : *PSFCFG
Data transform program . . . . .: USRDTATFM *NONE
User-defined driver program . . : USRDRVPGM *NONE
Advanced function printing . . .: AFP *YES
Port number . . . .. . . . . . .: PORT 9100
Online at IPL . . . . . . . . . : ONLINE *YES
Font . . . . . . . . . . . . . .: FONT
Identifier . . . . . . . . . . .: 011
Point size . . . . . . . . . . .: *NONE
Form feed . . . . . . . . . . . : FORMFEED *AUTOCUT
Separator drawer . . . . . . . .: SEPDRAWER *FILE
Separator program . . . . . . . : SEPPGM *NONE
Library . . . . . . . . . . . .:
Printer error message . . . . . : PRTERRMSG *INQ
Message queue . . . . . . . . .: MSGQ QSYSOPR
Library . . . . . .. . . . . . .: *LIBL
Activation timer . . . . . . . .: ACTTMR 170
Maximum pending requests . . . .: MAXPNDRQS 6
Print while converting . . . . .: PRTCVT *YES
Print request timer . . . . . . : PRTRQSTMR *NOMAX
Form definition . . . . . . . . : FORMDF F1C10110
Library . . . . . . . . . . . . : *LIBL
Remote location . . . . . . . . : RMTLOCNAME
Name or address . . . . . . . . : '194.192.134.90'
Dependent location name . . . . : DEPLOCNAME *NONE
Text . . . . . . . . . . . . . .: TEXT IDATA IPDS DIMM
User-defined options . . . . . . . . . : USRDFNOPT
-----------------User-defined options------------------
4.4.2 Configuring AS/400 for IPDS printing on V3R7
On the AS/400 command line, enter a command in the form:
CRTPSFCFG PSFCFG(AFP/NETWRKPRT) IPDSPASTHR(*YES)
RLSTMR(*SEC15) TEXT('IDATA IPDS DIMM')
18
Page 19

A completed screen looks like this:
PSF Configuration Information Page 1
PSF configuration: NETWRKPRT Library: AFP
User resource library . . . . . . . . . . . . . : *JOBLIBL
IPDS pass through . . . . . . . . . . . . . . . : *YES
Activate release timer. . . . . . . . . . . . . : *NORDYF
Release timer . . . . . . . . . . . . . . . . . : *SEC15
Restart timer . . . . . . . . . . . . . . . . . : *IMMED
SNA retry count . . . . . . . . . . . . . . . . : 2
Delay time between retries. . . . . . . . . . . : 0
Blank page. . . . . . . . . . . . . . . . . . . : *YES
Page size control . . . . . . . . . . . . . . . : *YES
Resident fonts. . . . . . . . . . . . . . . . . : *YES
Resource retention. . . . . . . . . . . . . . . : *YES
Edge orient . . . . . . . . . . . . . . . . . . : *NO
Remote location:
Name or address . . . . . . . . . . . . . . . . : *NONE
TCP/IP port . . . . . . . . . . . . . . . . . . : *NONE
TCP/IP activation timer . . . . . . . . . . . . : 170
PSF defined options: *NONE
Text description . . . . . . . . . . . . . . . : IDATA IPDS DIMM
Device resource library list: *DFT
Note: The lines in bold in the above screen are not used by PSF/400.
Instead, PSF/400 uses the information entered in the device description screen.
Then do the following:
Ping the IP address to verify communication with the printer:
PING ’192.194.134.90’
Vary the printer on:
VRYCFG HP_IPDS CFGTYPE(*DEV) STATUS(*ON)
Start the print writer:
STRPRTWTR HP_IPDS
4.5 AS/400 Settings for Version 4.1
To configure IPDS on AS/400 V4R1, you use the following commands:
- CRTDEVPRT
- CRTPSFCFG
4.5.1 Configuring PSF with CRTDEVPRT on V4R1
At the AS/400 command line, enter a command in the form:
CRTDEVPRT DEVD(HP_IPDS) DEVCLS(*LAN) TYPE(*IPDS)
MODEL(0) LANATTACH(*IP) AFP(*YES) PORT(9100)FONT(11)
FORMFEED(*AUTOCUT) RMTLOCNAME('192.194.134.90)
USRDFNOBJ(AFP/NETWRKPRT *PSFCFG)TEXT('IDATA IPDS
DIMM')
19
Page 20

A completed screen looks like this:
Display Device Description Page 1
5716SS1 V4R1M0 961108 BLDRB1 09/11/96 12:02:59
Device description . . . . . . . . : DEVD HP_IPDS
Option . . . . . . . . . . . . . . : OPTION *ALL
Category of device . . . . . . . . : *PRT
Device class . . . . . . . . . . . : DEVCLS *LAN
Device type. . . . . . . . . . . . : TYPE *IPDS
Device model . . . . . . . . . . . : MODEL 0
LAN attachment . . . . . . . . . . : LANATTACH *IP
User-defined object. . . . . . . . : USRDFNOBJ NETWRKPRT
Library. . . . . . . . . . . . . . : AFP
Object type. . . . . . . . . . . . : *PSFCFG
Data transform program . . . . . . : USRDTATFM *NONE
User-defined driver program. . . .: USRDRVPGM *NONE
Advanced function printing . . . . : AFP *YES
Port number. . . . . . . . . . . . : PORT 9100
Online at IPL. . . . . . . . . . . : ONLINE *YES
Font . . . . . . . . . . . . . . . : FONT
Identifier . . . . . . . . . . . . : 011
Point size . . . . . . . . . . . . : *NONE
Form feed. . . . . . . . . . . . . : FORMFEED *AUTOCUT
Separator drawer . . . . . . . . . : SEPDRAWER *FILE
Separator program. . . . . . . . . : SEPPGM *NONE
Library. . . . . . . . . . . . . . :
Printer error message. . . . . . . : PRTERRMSG *INQ
Message queue. . . . . . . . . . . : MSGQ QSYSOPR
Library. . . . . . . . . . . . . . : *LIBL
Activation timer . . . . . . . . . : ACTTMR 170
Maximum pending requests . . . . . : MAXPNDRQS 6
Print while converting . . . . . . : PRTCVT *YES
Print request timer. . . . . . . . : PRTRQSTMR *NOMAX
Form definition. . . . . . . . . . : FORMDF F1C10110
Library. . . . . . . . . . . . . . : *LIBL
Remote location. . . . . . . . . . : RMTLOCNAME
Name or address. . . . . . . . . . : '194.192.134.90'
Dependent location name. . . . . . : DEPLOCNAME *NONE
Text . . . . . . . . . . . . . . . : TEXT IDATA IPDS DIMM
User-defined options . . . . . . . : USRDFNOPT
-----------------User-defined options------------------
4.5.2 Configuring AS/400 for IPDS printing on V4R1
On the AS/400 command line, enter a command in the form:
CRTPSFCFG PSFCFG(AFP/NETWRKPRT) IPDSPASTHR(*YES)
RLSTMR(*SEC15) TEXT('IDATA IPDS DIMM')
20
Page 21

A completed screen looks like this:
PSF Configuration Information Page 1
PSF configuration: NETWRKPRT Library: AFP
User resource library . . . . . . . . . . . . . : *JOBLIBL
IPDS pass through . . . . . . . . . . . . . . . : *YES
Activate release timer. . . . . . . . . . . . . : *NORDYF
Release timer . . . . . . . . . . . . . . . . . : *SEC15
Restart timer . . . . . . . . . . . . . . . . . : *IMMED
SNA retry count . . . . . . . . . . . . . . . . : 2
Delay time between retries. . . . . . . . . . . : 0
Blank page . . . . . . . . . . . . . . . . . . .: *YES
Page size control . . . . . . . . . . . . . . . : *YES
Resident fonts . . . . . . . . . . . . . . . . : *YES
Resource retention. . . . . . . . . . . . . . . : *YES
Edge orient . . . . . . . . . . . . . . . . . . : *NO
Remote location:
Name or address . . . . . . . . . . . . . . . . : *NONE
TCP/IP port . . . . . . . . . . . . . . . . . . : *NONE
TCP/IP activation timer . . . . . . . . . . . . : 170
PSF defined options: *NONE
Text description. . . . . . . . . . . . . . . . : IDATA IPDS DIMM
Device resource library list: *DFT
Note: The lines in bold in the above screen are not used by PSF/400.
Instead, PSF/400 uses the information entered in the device description screen.
Then do the following:
Ping the IP address to verify communication with the printer:
PING ’192.194.134.90’
Vary the printer on:
VRYCFG HP_IPDS CFGTYPE(*DEV) STATUS(*ON)
Start the print writer:
STRPRTWTR HP_IPDS
4.6 AS/400 Settings for Version 4.2
To configure IPDS on AS/400 V4R2, you use the following commands:
- CRTDEVPRT
- CRTPSFCFG
4.6.1 Configuring PSF with CRTDEVPRT on V4R2
At the AS/400 command line, enter a command in the form:
CRTDEVPRT DEVD(HP_IPDS) DEVCLS(*LAN) TYPE(*IPDS)
MODEL(0) LANATTACH(*IP) AFP(*YES) PORT(9100)FONT(11)
FORMFEED(*AUTOCUT) RMTLOCNAME('192.194.134.90)
USRDFNOBJ(AFP/NETWRKPRT *PSFCFG) TEXT('IDATA IPDS
DIMM')
21
Page 22

A completed screen looks like this:
Display Device Description Page 1
5716SS1 V4R2M0 971108 BLDRB1 09/11/97 12:02:59
Device description . . . . . . . . : DEVD HP_IPDS
Option . . . . . . . . . . . . . . : OPTION *ALL
Category of device . . . . . . . . : *PRT
Device class . . . . . . . . . . . : DEVCLS *LAN
Device type. . . . . . . . . . . . : TYPE *IPDS
Device model . . . . . . . . . . . : MODEL 0
LAN attachment . . . . . . . . . . : LANATTACH *IP
User-defined object. . . . . . . . : USRDFNOBJ NETWRKPRT
Library. . . . . . . . . . . . . . : AFP
Object type. . . . . . . . . . . . : *PSFCFG
Data transform program . . . . . . : USRDTATFM *NONE
User-defined driver program . . . .: USRDRVPGM *NONE
Advanced function printing . . . . : AFP *YES
Port number. . . . . . . . . . . . : PORT 9100
Online at IPL. . . . . . . . . . . : ONLINE *YES
Font . . . . . . . . . . . . . . . : FONT
Identifier . . . . . . . . . . . . : 011
Point size . . . . . . . . . . . . : *NONE
Form feed. . . . . . . . . . . . . : FORMFEED *AUTOCUT
Separator drawer . . . . . . . . . : SEPDRAWER *FILE
Separator program. . . . . . . . . : SEPPGM *NONE
Library. . . . . . . . . . . . . . :
Printer error message. . . . . . . : PRTERRMSG *INQ
Message queue. . . . . . . . . . . : MSGQ QSYSOPR
Library. . . . . . . . . . . . . . : *LIBL
Activation timer . . . . . . . . . : ACTTMR 170
Maximum pending requests . . . . . : MAXPNDRQS 6
Print while converting . . . . . . : PRTCVT *YES
Print request timer. . . . . . . . : PRTRQSTMR *NOMAX
Form definition. . . . . . . . . . : FORMDF F1C10110
Library. . . . . . . . . . . . . . : *LIBL
Remote location. . . . . . . . . . : RMTLOCNAME
Name or address. . . . . . . . . . : '194.192.134.90'
Dependent location name. . . . . . : DEPLOCNAME *NONE
Text . . . . . . . . . . . . . . . : TEXT IDATA IPDS DIMM
User-defined options . . . . . . . : USRDFNOPT
-----------------User-defined options------------------
4.6.2 Configuring AS/400 for IPDS printing on V4R2
On the AS/400 command line, enter a command in the form:
CRTPSFCFG PSFCFG(AFP/NETWRKPRT) IPDSPASTHR(*YES)
RLSTMR(*SEC15) TEXT('IDATA IPDS DIMM')
22
Page 23

A completed screen looks like this:
PSF Configuration Information Page 1
PSF configuration: NETWRKPRT Library: AFP
User resource library . . . . . . . . . . . . . : *JOBLIBL
IPDS pass through . . . . . . . . . . . . . . . : *YES
Activate release timer. . . . . . . . . . . . . : *NORDYF
Release timer . . . . . . . . . . . . . . . . . : *SEC15
Restart timer . . . . . . . . . . . . . . . . . : *IMMED
SNA retry count . . . . . . . . . . . . . . . . : 2
Delay time between retries. . . . . . . . . . . : 0
Blank page. . . . . . . . . . . . . . . . . . . : *YES
Page size control . . . . . . . . . . . . . . . : *YES
Resident fonts. . . . . . . . . . . . . . . . . : *YES
Resource retention. . . . . . . . . . . . . . . : *YES
Edge orient . . . . . . . . . . . . . . . . . . : *NO
Remote location:
Name or address . . . . . . . . . . . . . . . . : *NONE
TCP/IP port . . . . . . . . . . . . . . . . . . : *NONE
TCP/IP activation timer . . . . . . . . . . . . : 170
PSF defined options: *NONE
Text description. . . . . . . . . . . . . . . . : IDATA IPDS DIMM
Device resource library list: *DFT
Note: The lines in bold in the above screen are not used by PSF/400. Instead,
PSF/400 uses the information entered in the device description screen.
Then do the following:
Ping the IP address to verify communication with the printer:
PING ’192.194.134.90’
Vary the printer on:
VRYCFG HP_IPDS CFGTYPE(*DEV) STATUS(*ON)
Start the print writer:
STRPRTWTR HP_IPDS
4.7 AS/400 settings for Version 4.3
To configure IPDS on AS/400 V4R2, you use the following commands:
- CRTDEVPRT
- CRTPSFCFG
4.7.1 Configuring PSF with CRTDEVPRT on V4R3
At the AS/400 command line, enter a command in the form:
CRTDEVPRT DEVD(HP_IPDS) DEVCLS(*LAN) TYPE(*IPDS)
MODEL(0) LANATTACH(*IP) AFP(*YES) PORT(9100)FONT(11)
FORMFEED(*AUTOCUT) RMTLOCNAME('192.194.134.90)
USRDFNOBJ(AFP/NETWRKPRT *PSFCFG)TEXT('IDATA IPDS
DIMM')
23
Page 24

A completed screen looks like this:
Display Device Description Page 1
5716SS1 V4R3M0 981108 BLDRB1 09/11/98 12:02:59
Device description . . . . . . . . : DEVD HP_IPDS
Option . . . . . . . . . . . . . . : OPTION *ALL
Category of device . . . . . . . . : *PRT
Device class . . . . . . . . . . . : DEVCLS *LAN
Device type. . . . . . . . . . . . : TYPE *IPDS
Device model . . . . . . . . . . . : MODEL 0
LAN attachment . . . . . . . . . . : LANATTACH *IP
User-defined object. . . . . . . . : USRDFNOBJ NETWRKPRT
Library. . . . . . . . . . . . . . : AFP
Object type. . . . . . . . . . . . : *PSFCFG
Data transform program . . . . . . : USRDTATFM *NONE
User-defined driver program . . . : USRDRVPGM *NONE
Advanced function printing . . . . : AFP *YES
Port number. . . . . . . . . . . . : PORT 9100
Online at IPL. . . . . . . . . . . : ONLINE *YES
Font . . . . . . . . . . . . . . . : FONT
Identifier . . . . . . . . . . . . : 011
Point size . . . . . . . . . . . . : *NONE
Form feed. . . . . . . . . . . . . : FORMFEED *AUTOCUT
Separator drawer . . . . . . . . . : SEPDRAWER *FILE
Separator program . . . . . . . . : SEPPGM *NONE
Library. . . . . . . . . . . . . . :
Printer error message . . . . . . : PRTERRMSG *INQ
Message queue. . . . . . . . . . . : MSGQ QSYSOPR
Library. . . . . . . . . . . . . . : *LIBL
Activation timer . . . . . . . . . : ACTTMR 170
Maximum pending requests . . . . . : MAXPNDRQS 6
Print while converting . . . . . . : PRTCVT *YES
Print request timer . . . . . . . : PRTRQSTMR *NOMAX
Form definition . . . . . . . . . : FORMDF F1C10110
Library. . . . . . . . . . . . . . : *LIBL
Remote location. . . . . . . . . . : RMTLOCNAME
Name or address. . . . . . . . . . : '194.192.134.90'
Dependent location name . . . . . : DEPLOCNAME *NONE
Text . . . . . . . . . . . . . . . : TEXT IDATA IPDS DIMM
User-defined options . . . . . . . : USRDFNOPT
-----------------User-defined options------------------
4.7.2 Configuring AS/400 for IPDS printing on V4R3
On the AS/400 command line, enter a command in the form:
CRTPSFCFG PSFCFG(AFP/NETWRKPRT) IPDSPASTHR(*YES)
RLSTMR(*SEC15) TEXT('IDATA IPDS DIMM')
24
Page 25

A completed screen looks like this:
PSF Configuration Information Page 1
PSF configuration: NETWRKPRT Library: AFP
User resource library . . . . . . . . . . . . . : *JOBLIBL
IPDS pass through . . . . . . . . . . . . . . . : *YES
Activate release timer. . . . . . . . . . . . . : *NORDYF
Release timer . . . . . . . . . . . . . . . . . : *SEC15
Restart timer . . . . . . . . . . . . . . . . . : *IMMED
SNA retry count . . . . . . . . . . . . . . . . : 2
Delay time between retries. . . . . . . . . . . : 0
Blank page. . . . . . . . . . . . . . . . . . . : *YES
Page size control . . . . . . . . . . . . . . . : *YES
Resident fonts. . . . . . . . . . . . . . . . . : *YES
Resource retention. . . . . . . . . . . . . . . : *YES
Edge orient . . . . . . . . . . . . . . . . . . : *NO
Remote location:
Name or address . . . . . . . . . . . . . . . . : *NONE
TCP/IP port . . . . . . . . . . . . . . . . . . : *NONE
TCP/IP activation timer . . . . . . . . . . . . : 170
PSF defined options: *NONE
Text description . . . . . . . . . . . . . . . . : IDATA IPDS DIMM
Device resource library list: *DFT
Note: The lines in bold in the above screen are not used by PSF/400. Instead,
PSF/400 uses the information entered in the device description screen.
Then do the following:
Ping the IP address to verify communication with the printer:
PING ’192.194.134.90’
Vary the printer on:
VRYCFG HP_IPDS CFGTYPE(*DEV) STATUS(*ON)
Start the print writer:
STRPRTWTR HP_IPDS
25
Page 26

5 PSF/MVS AFP Printing Using TCP/IP
This chapter provides information on how to create MVS definitions for printing
from PSF/MVS via TCP/IP. The following topics are addressed:
JES printer statements
PSF Startup procedure
Once these parameters have been configured, and the basic TCP/IP installation of
the PrintServer (equipped with an IPDS DIMM) has been completed, direct AFP /
IPDS from PSF / MVS will be possible.
Requirements:
• PSF/MVS version 2 Release 2.0 with APAR OW15599.
• MVS Scheduler APAR OW12236 which supports the PRINTDEV IPADDR and
PORTNO keywords.
• IBM TCP/IP Version 3 Release 1, or higher, installed and configured on
MVS.
Co-requisite supported TCP/IP controller is also required (e.g. IBM 3172).
MTU size:
• The Maximum Transmission Unit (MTU) of the IP packet for the MVS
system is recommended to be set up to 2000.
Note: The MTU size should not exceed the maximum size sent through the
control unit. Failure may lead to transmission problems.
5.1 PSF/MVS direct attachment
Sample PSF/MVS JES2 initialisation statements
FSSDEF(FSS1)PROC=PSF4,HASPFSSM=HASPFSSM
PRT420 FSS=FSS1,MODE=FSS,PRMODE=(LINE,PAGE),
CLASS=A,UCS=0,SEP,NOSEPDS,CKPTPAGE=100,DRAIN,WS=(R,Q/FCB)
Example of PSF/MVS JES2 printer definition
5.2 PSF/MVS startup procedure
//PSF4 PROC
//STEP01 EXEC PGM=APSPPIEP,REGION=1750K
//JOBHDR OUTPUT PAGEDEF=V06483, /* JOB SEPARATOR PAGEDEF
*/
// FORMDEF=A10110,CHARS=GT15 /* JOB SEPARATOR FORMDEF
*/
//JOBTLR OUTPUT PAGEDEF=V06483, /* JOB SEPARATOR PAGEDEF
26
Page 27

*/
// FORMDEF=A10110,CHARS=GT15 /* JOB SEPARATOR FORMDEF
*/
//DSHDR OUTPUT PAGEDEF=V06483, /* DS SEPARATOR PAGEDEF
*/
// FORMDEF=A10120,CHARS=GT15 /* DS SEPARATOR FORMDEF
*/
//MSGDS OUTPUT PAGEDEF=A06462, /* MESSAGE DATASET PAGEDEF
*/
// FORMDEF=A10110 /* MESSAGE DATASET FORMDEF
*/
//********************************************************************
//*
//* THIS PROC. IS TO BE USED FOR 300 DPI DEVICES
//* -----------
//********************************************************************
//FONT01 DD DSN=SYS1.FONTLIBBB,DISP=SHR /* FONTS - 300 DPI */
// DD DSN=SYS1.FONT300,DISP=SHR /* SYSTEM FONTS - 300 DPI */
//*------------------------------------------------------------------//PSEG01 DD DSN=SYS1.PSEGLIB,DISP=SHR /* SYSTEM PAGE SEGMENTS */
//*------------------------------------------------------------------//OLAY01 DD DSN=SYS1.OVERLIB,DISP=SHR /* SYSTEM MEDIUM OVERLAYS */
//*------------------------------------------------------------------//PDEF01 DD DSN=SYS2.PDEFLIB,DISP=SHR /* SYSTEM PAGEDEFS */
// DD DSN=SYS1.PDEFLIB,DISP=SHR /* SYSTEM PAGEDEFS */
//*------------------------------------------------------------------//FDEF01 DD DSN=SYS2.FDEFLIB,DISP=SHR /* SYSTEM FORMDEFS */
// DD DSN=SYS1.FDEFLIB,DISP=SHR /* SYSTEM FORMDEFS */
//********************************************************************
//* STANDARD PRINTDEV */
//********************************************************************
//PRT420 CNTL
//PRT420 PRINTDEV FONTDD=*.FONT01, /* FONT LIBRARY DD */
// OVLYDD=*.OLAY01, /* OVERLAY LIBRARY DD */
// PSEGDD=*.PSEG01, /* SEGMENT LIBRARY DD */
// PDEFDD=*.PDEF01, /* PAGEDEF LIBRARY DD */
// FDEFDD=*.FDEF01, /* FORMDEF LIBRARY DD */
// JOBHDR=*.JOBHDR, /* JOB HEADER SEPARATOR OUTPUT */
// JOBTRLR=*.JOBTLR, /* JOB TRAILER SEPARATOR OUTPUT*/
// DSHDR=*.DSHDR, /* DATA SET HEADER SEPERATOR */
// MESSAGE=*.MSGDS, /* MESSAGE DATA SET OUTPUT */
// PAGEDEF=A06462, /* DEVICE PAGEDEF DEFAULT */
// FORMDEF=A10110, /* DEVICE FORMDEF DEFAULT */
// CHARS=(GT10, /* DEVICE */
// GT12,GT15,GT10), /* DEFAULT FONT SET */
// PIMSG=YES, /* ACCUMULATE DATA SET MESSAGES*/
// DATACK=BLOCK, /* REPORT ALL DATA-CHECK ERRORS*/
// TRACE=NO, /* CREATE INTERNAL TRACE */
// FAILURE=WCONNECT, /* ACTION ON PRINTER FAILURE */
// TIMEOUT=REDRIVE, /* PSF ACTION ON TIMEOUT */
// DISCINTV=0, /* DISCONNECT INTERVAL IN SECS.*/
// MGMTMODE=IMMED, /* ACTIVATE PRINTER AT STARTUP */
// IPADDR=‘192.0.110.21’ /* IP ADDRESS */
// PORTNO=5001 (9100) /* IP ADDRESS
*/
//PRT420 ENDCNTL
Using IP address 192.0.110.21 and port number 5001
The IP address of the PrintServer (IPDS) should be programmed in the IPADDR
statement. The PORTNO 5001 is the default port number of the first IPDS port on
27
Page 28

the PrintServerfor the MPI Tech EIO interface (IPDS). Use a value of 91005002
to address the second IPDS port if required.for any other interface.
28
Page 29

6 AIX (version 4.2) for PPD
For a description of PSF for AIX, please see the IBM manual, IBM Print Services
Facility for AIX: Print Administration version 2.1, Doc. no. S544-3817-02.
6.1 Device Parameter Setup
1. From smit, enter the main menu and select PSF for AIX - Printing and
Configuration
2. Here, you continue through the following screens by selecting Administer
PSF for AIX, Manage a PSF for AIX Printer and Show/Change
Characteristics of a Printer
3. Now select Device Options and select your device.
4. On the screen TCP/IP-Attached Printer Device Options, type
Internet ADDRESS, PORT number (5001 if you use LinkCom or
HostCom, otherwise 9100) and the value you want for Connection
TIMEOUT in seconds.
5. After changing the values, you must go back to the main screen, select
PSF for AIX - Printing and Configuration and then Bring Queues Up
and Down to stop and start the queue for the changes to take effect.
29
Page 30

7 Error Messages
Overview of IPDS NACK’s that can be returned to the system.
7.1 Supported IPDS NACK's:
Command Reject Exceptions
0x800100: Invalid IPDS Command Code
0x800200: Invalid IPDS Command Sequence
0x800400: Data received after ARQ
0x80E000: Invalid IPDS Command Length
Equipment check with intervention-Required Exception
(MPI Tech LinkCom/HostCom only)
0x501000: Printer hardware exception
0x50F200: Print overrun
0x50F500: Image generator exception
0x50F600: Offset stacker exception
0x50F700: Duplex media source exception
0x50F800: Input media source exception
Intervention-Required Exceptions
0x400000: Printer Not Ready
0x400100: Printer Out of Paper
0x400200: Printer exit tray full
0x400400: Printer out of toner
0x400500: Empty fuser oil supply
0x400600: Invalid media
0x403100: Paper length check
0x403300: Paper width check
0x40E000: Paper jam not cleared
0x40E100: Out of paper (secondary input)
0x40E200: Transport requires corrective action
0x40E300: Fuser requires corrective action
0x40E500: Paper jam recovery needed
0x40E600: Door open
0x40E700: Paper specification check
Equipment check exception
0x10F100: Permanent hardware exception
0x10F200: Print overrun
0x10F300: Magnet settings changed
0x10F400: Serializer parity exception
0x10F500: Image generator exception
0x10FA00: Media size sensor error
Data-Check Exceptions
0x082100: Undefined Character
0x082900: Double-byte coded font section is not activated or is invalid
30
Page 31

0x086000: Numeric representation precision check
0x08C100: Position check
Specification Check - IO Image Exceptions
0x050001: Invalid IO-Image self-def. field code
0x050003: Invalid IO-Image self-def. field len.
0x050004: Invalid IO-Image self-def. field val.
0x05700F: IO - Begin Segment out of sequence.
0x05710F: IO - End segment out of sequence
0x05910F: IO - Begin Image Content out of seq.
0x05920F: Image Data self-def. field out of seq
0x05930F: End Image Content out of sequence
0x059401: Inconsistent Image Size Parameter value and Image Data
0x05940F: Image Size Parameter missing
0x059410: Image Size Parameter value unsupp.
0x059411: Image Size cannot be determined
0x05950F: Image Encoding Parameter out of seq.
0x059510: Image Encoding Parameter value unsupp.
0x059511: IO-image decompression error.
0x05960F: Image Data Elem. Size Par. our of seq
0x059610: Image Data Elem. Size Par. val. unsup.
0x05970F: Image Look Up Table ID out of seq.
0x059710: Image Look Up Table ID Par. unsupp.
0x05A902: IO data outside the Image Pres. Space
Specification Check - Bar Code Exceptions
0x040300: Invalid bar code type
0x040400: Unsupported font - local ID or font not available
0x040500: Invalid or unsupported bar code colour
0x040600: Invalid module width
0x040700: Invalid element height
0x040800: Invalid height multiplier
0x040900: Invalid wide-to-narrow ratio
0x040A00: Invalid symbol reference point
0x040B00: Invalid bar code modifier
0x040C00: Invalid bar code data length
0x040E00: Check-digit calculation exception
0x041000: Invalid HRI location
0x041100: Attempt to print outside block
Specification Check - Graphics Exceptions
0x030001: Unsupported graphics command code
0x030002: Reserved byte or invalid attr. set
0x030003: Incorrect drawing order length
0x03000C: Segment prolog exception
0x03000E: Unsupported attribute value
0x030021: Invalid or unsupported default
0x033400: Character angle value not supported
0x033E00: Invalid End Prolog
31
Page 32

0x036000: Area bracket exception
0x036800: Begin Area received incorrectly
0x036801: Area truncated exception
0x036802: Supported order invalid in area
0x037001: Unsupported BSI segment flag
0x037082: Invalid BSI segment flag
0x0370C1: Invalid BSI length
0x0370C5: Insufficient segment data
0x039200: Graphic image order sequence error
0x039300: Graphics image bracket exception
0x039301: Incorrect number of Image Data orders
0x03C300: Font not available
0x03C301: Undefined graphics character code
0x03D100: Truncated graphics image exception
0x03D101: Invalid order in graphics image
0x03D102: Graphics Image format not supported
0x03D103: Image width greater than max. supp.
0x03E100: Relative line outside coord. space
Specification Check - General Exceptions
0x020001: Embedded control-sequence code except
0x020201: End Suppression ctrl-seq. exception
0x020202: Invalid IPDS Command Length
0x020205: Invalid data self-def. field length
0x020302: IPDS command header length too small
0x020305: Invalid or unsupp. block orientation
0x020401: END PAGE encountered during suppres.
0x020402: Invalid use of ARQ-Continuation Bit
0x020405: Area pos. Ref. System not supported
0x020501: Invalid Spanning Sequence
0x020505: Invalid self-def. field unit base
0x020601: Invalid Begin Suppression (BSU)
0x020605: Invalid self-def. field L-units
0x020705: Invalid self-def. field extents
0x020805: Invalid or unsupported mapping option
0x020A05: Data in a block might be outside VPA
0x020B05: Invalid self-def. field identifier
0x020C01: Invalid or unsupported font local ID
0x020F01: Invalid Set Text Orientation (STO)
0x021001: Invalid Set Inline Margin (SIM)
0x021101: Invalid Set Baseline Increment (SBI)
0x021201: Invalid intercharacter adjustment
0x021202: Font storage is full
0x021301: Invalid Absolute Move Baseline (AMB)
0x021401: Invalid Absolute Move Inline (AMI)
0x021402: The font resource to be deactivated was not found
0x021501: Invalid Relative Move Inline (RMI)
0x021502: Invalid DF command font or font ID
0x021601: Invalid Relative Move Baseline (RMB)
0x021701: Invalid Set Variable-Space Inc (SVI)
32
Page 33

0x021702: Invalid deletion type in DF command
0x021802: Invalid font ID
0x021901: Invalid repeat length for RPS
0x021902: Multiple occurrences of the same LFE
0x021A01: Repeat String (RPS) or Transparent Data (TRN) exception
0x021B01: Repeat String (RPS) target-string length exception
0x021B02: Invalid Load Font Control unit base
0x021C01: Invalid escape sequence
0x021D02: Invalid or unsupported value for the Load Font Equivalence
(LFE) GRID
0x021E01: Invalid WT control-sequence length
0x021F01: Repeat String (RPS) length exception
0x022002: Invalid LFC font stageability byte
0x022202: Invalid LFC data pattern format
0x022302: Invalid value for LFC font type bits
0x022602: Invalid LSS or LFC X-box size
0x022702: Invalid LSS or LFC Y-box size
0x022A02: Invalid value for LFC X-density
0x022B02: Invalid value for LFC Y-density
0x022D02: Invalid or unsupported value for LFC pattern-data alignment
0x022E02: Insufficient font data received
0x023001: Insufficient storage for LCC record
0x023101: Invalid LCC number of copies
0x023201: Invalid LCC Keyword in copy-group ent
0x023202: Excess font data received
0x023401: Invalid LCC entry-byte count
0x023601: Invalid LCC simplex/duplex parameter
0x023703: Invalid or unsupported LCC media-destination parameter
0x023705: Mixture of media-source IDs or media-destination IDs in a
duplex copy-subgroup pair
0x023902: LFC font HAID already assigned
0x023C02: Invalid value within a LFI command
0x023E02: Invalid LFC character-pattern address
0x023F02: STO-SCFL-LFE mismatch
0x024002: Invalid value for font inline seq.
0x024201: WIC pel count is less than min. req.
0x024301: WIC pel cnt is greater than max. supp
0x024302: Invalid double-byte coded font section identifier
0x024401: WIC scan count is less than min. req.
0x024501: WIC scan cnt is greater than max. sup
0x024601: Invalid WIC source image format
0x024602: Invalid parameter in an LFI command
0x024701: Invalid WIC magnification factor
0x024702: Invalid LFE font-inline sequence
0x024801: Invalid WIC scan-line direction
0x024901: Invalid scan-line-sequence direction in a WIC command
0x024A01: Invalid WIC image block location
0x024D02: Insufficient storage for LFC and LFI
0x025301: Invalid or unsupported value for WIC image colour
0x025803: Invalid or unsupported value for text colour
0x026002: Invalid LPD L-units/unit base (Xp +I)
0x026102: Invalid LPD L-units/unit base (Yp +B)
33
Page 34

0x026202: Invalid LPD Xp-extent
0x026301: Insufficient pattern storage
0x026302: Invalid LPD Yp-extent
0x026402: Invalid LPD unit base
0x026802: Invalid LPD inline-sequence direction
0x026902: Invalid LPD baseline-seq. direction
0x026A01: Insufficient source image data
0x026A02: Invalid LPD initial I print coord.
0x026B01: Excess source image data received
0x026B02: Invalid LPD initial B print coord.
0x026F02: Invalid Media Origin par. in XOH-SMO
0x027002: Invalid or unsupported value for XOH-SMS units per unit base
0x027202: Invalid XOH-SMS XmExtent
0x027302: Invalid XOH-SMS YmExtent
0x027402: Invalid or unsupported value for XOH SMS unit base
0x027701: Group termination exception
0x027801: Invalid order type
0x028501: Invalid DO-command overlay ID
0x028702: Invalid LFC unit base for Pel-units
0x028802: Invalid LFC X-Pel-units per unit base
0x028902: Invalid LFC Y-Pel-units per unit base
0x028A01: Invalid or unsupported value for DPS segment command
page segment HAID
0x028A02: Invalid LFC RMMF-value
0x029001: Invalid or unsupported overlay ID
0x029101: BO overlay ID already loaded
0x029102: Invalid XOA-RRL entry
0x029201: Overlay ID not loaded
0x029301: Recursive overlay invocation
0x029401: Invalid page segment HAID
0x029501: Page segment HAID already loaded
0x029502: Invalid XOH-PCC page-counter update
0x029601: Page segment HAID not loaded
0x029801: Invalid or unsupported suppression number
0x029803: Invalid TBM control sequence
0x02A401: Page boundary in X-dir. can't be rep.
0x02A501: Page boundary in Y-dir. can't be rep.
0x02AD01: Invalid LPP command
0x02AE01: Invalid IO command parameter
0x02AF01: Insufficient storage to prt the sheet
0x02C001: Mix. of Xm- and Ym-axis duplex Copy G
0x02C101: Max. simplex/duplex keyword in LCC
0x02C201: Odd num. of duplex copy group in LCC
0x02C202: More than one media-source or media-destination keyword
specified in a copy subgroup
0x02C301: Mix. of simplex/duplex par. in LCC
0x02C401: Unequal copy counts in LCC
0x02C602: Invalid mapping type in an LE command
0x02FF02: Exceptions detected but not queued
34
Page 35

Conditions Requiring Host Notification:
0x010000: Normal Printer Restart
0x010100: Physical Media Size or Input Media Source ID Changed
0x011000: Print Position adjustment (used for resource timeout)
0x01E400: Cancel Key pressed
7.2 IPDS messages on printout
• IPDS DIMM ERROR
Explanation:
A hardware error is detected on the IPDS DIMM.
The IPDS DIMM initialization will now be stopped.
You will not be able to print IPDS from this DIMM.
Contact your supplier for further information.
• The IPDS personality was unable to allocate sufficient memory.
• The IPDS personality may not work properly until more RAM is
installed.
• The IPDS personality requires at least 8 MB RAM installed in total.
Explanation:
More RAM has to be installed in the printer.
The recommended memory configuration is as follows:
Requirement Minimum
installed
memory
A4/Letter simplex 8 MB 8 MB 12 MB
Generally spoken: The more installed memory, the better performance. Beyond
24 MB of installed memory you should not be able to increase performance
noticeably by adding more memory.
• A checksum error is detected in the IPDS DIMM
Explanation:
The IPDS initialization will now be stopped.
You will not be able to print IPDS from this DIMM.
Contact your supplier for further information.
Recommended
minimum memory
(simple text)
Recommended
minimum memory
(pages with
overlays or
graphics)
35
Page 36

Appendix A. Abbreviations
Abbreviation Full name Explanation
AFP Advanced Function
Presentation
APL A Programming Language
ASCII American Standard Code
for Information
Interchange
CPI Characters Per Inch
DCA Document Content
Architecture
DIMM Dual Inline Memory
Module
DIP Dual Inline Packet
DSC Data-Stream
Compatibility
IBM concept for print
data formatting that
defines how print control
files should be structured.
This is the current
standard.
Print data stream
generated by IBM
mainframes. Contains
almost exclusively text,
i.e. text that could be
produced by a typewriter.
FLASH (Usually memory) Memory chip able to
store information
permanently without
power. Depending on the
type, flash memory can
be ‘written’ between
1.000 and 100.000 times.
FSL Function Selection via the
Line
GFID Global Font ID
HEX Hexadecimal
36
Used to configure default
values in MPI Tech
interfaces for line data
printing. Also used for
print job specific
formatting like bold and
font change.
Page 37

Abbreviation Full name Explanation
ICDS Compressed Data Stream MPI Tech equivalent for
the IPDS data stream.
ICDS will for instance be
generated and sent by
PSS and translated to
PCL or PostScript by the
MPI Tech
PrintServer/Protocol
converter. ICDS supports
the complete print data
stream and
communication between
ICDS capable devices
(including software
devices).
IPDS Intelligent Printer Data
Stream
IPDS is generated and
sent by e.g. PSF and
translated to PCL by e.g.
the MPI Tech
PrintServer/Protocol
converter. IPDS supports
the complete print data
stream and
communication between
IPDS capable devices
(including software
devices).
ITDS Transparent Data stream Used to configure and
upgrade MPI Tech IPDS
capable devices. Only
IPDS related functions
are affected. ITDS can be
used locally via
Centronics or printed
using PSF.
LAN Local Area Network Usually TokenRing or
Ethernet. Coax and
Twinax are usually
regarded as WANs.
LED Light-Emitting Diode
37
Page 38

Abbreviation Full name Explanation
LPD Line Printer Demon Part of the standard
TCP/IP stack (programs).
Two major (incompatible)
variations of LPR/LPD are
generally usedWorks only
in conjunction with LPR.
The sender of a print job
via TCP/IP will be LPR
and the receiver will be
LPD.
LPR Line Printer Requester Part of the standard
TCP/IP stack (programs).
Two major (incompatible)
variations of LPR/LPD are
generally usedWorks only
in conjunction with LPD.
The sender of a print job
via TCP/IP will be LPR
and the receiver will be
LPD.
MVS Multiple Virtual Machine IBM operating system for
mainframes. This is the
most commonly used
operating system for
large corporations.
OS/390 New name for MVS IBM operating system for
mainframes. This is the
most commonly used
operating system for
large corporations. The
only operating system
that supports IBM CMOS
and SYSPLEX technology.
PPD Page Printer Demon Enhanced version of
LPR/LPD. The
enhancement enables bidirectional
communication when
printing. Not part of the
standard TCP/IP stack
(programs). Used by ida
Psxx, ida RPPC, IBM
Network printers,
PSF/AIX and others.
Works only in conjunction
with PPR. The sender of a
print job via TCP/IP will
be PPR and the receiver
will be PPD.
38
Page 39

Abbreviation Full name Explanation
PPR Page Printer Requester Enhanced version of
LPR/LPD. The
enhancement enables bidirectional
communication when
printing. Not part of the
standard TCP/IP stack
(programs). Used by ida
PSS, ida HPR and PSF.
Works only in conjunction
with PPR. The sender of a
print job via TCP/IP will
be PPR and the receiver
will be PPD.
PSF Print Service Facility IBM printer driver for AFP
printing. Converts line
data and AFP data to
IPDS only. PSF/AIX and
PSF/2 is capable of
converting the data to
PCL as well.
PSS (ida PSS) Print
Subsystem Print
system for OS/390 (MVS)
and VM systems. Prints
AFP and line data files on
all remote printers, NOT
channel attached
printers.
RAM Random Access Memory Memory chip that is able
to store information while
powered on. RAM can be
‘written’ an indefinite
number of times.
SCS SNA Character String Control information for
simple print formatting
like e.g. set CPI, LPI and
Form Feed.
SIMM Single Inline Memory
Module
SNA Systems Network
Architecture
IBM networking concept
usually for Mainframe and
AS/400. On mainframes
the actual program that
implements SNA is called
VTAM.
39
Page 40

Abbreviation Full name Explanation
TCP/IP Transmission Control
Program/Internet
Protocol
Suite of programs for
network communication.
TCP/IP can be installed
on almost every existing
operating system, but the
supported functions vary
between operating
systems. TCP/IP consist
of a base TCP program
and various other
programs providing
support for e.g. LPD,
Telnet or BootP.
VTAM Virtual TeleAccess
Method
IBM network
communcation program.
VTAM is used to connect
printers and terminals to
OS/390 (MVS) and VM
systems.
VM Virtual Machine IBM operating system for
mainframes. OS/390
(MVS) and other
operating systems can
run under control of VM.
WAN Wide Area Network Usually Coax and Twinax
networks. Today it is also
used for larger Token
Ring and Ethernet
networks and/or Router
base networks.
40
 Loading...