

Page 1

Head Office
Address: MPIO Co., Ltd.
10F Polaris2 B/D, 15-1 Jeongja-dong, Bundang-gu, Seongnam-si, Gyeonggi-do,
463-010 Korea
Tel: +82-31-785-9260
Website: www.mpio.co.kr
In Europe
Address: MPIO BV
Planetenweg 11-41, unit 23A, 2132 HN Hoofddorp, The Netherlands
Tel: +31-23-557-7889
Website: www.mpio.com
In USA
Address: MPIO USA
6440 Lusk Blvd., Suite D105, San Diego, CA92121, USA
Tel: +1-858-455-6775
Website: www.mpioamerica.com
In China
Address: MPIO Shanghai
E-23F Hudu Mansion, NO.838 Zhangyang Road Pudong, Shanghai, 200-122 China
Tel: +86-21-5058-6018
Website: www.mpio.cn
Portable Multimedia Player
MPIO Co., Ltd.
www.mpio.com
Thank you for purchasing this product.
Please read the manual carefully before use.
Page 2

Visual Express HX100
1
Customer RegistrationThank you notes
Thank you for your HX100 purchase.
We will do our best to compensate to customer’s support with the
top-on-top product. This guide will ensure that you get the most functions
of HX100 with conveniences. Please do read through this guide before
using and contact our customer support center for any problem in use.
Please read carefully safety instruction before use.
Thank you note
Customer can receive continuous services through online register of
MPIO(www.mpio.com) or customer registration card to local distributor.
This site provides you diverse information and news of product.
By online registration, you can receive diverse event or product
information provided by MPIO.
Using Firmware Update from website, you can receive continuous
service for product improvement.
Diverse of customer questions are answered and online support is
available.
Customer Registration
Visual Express HX100
www.mpio.com
Page 3

Table of ContentsCopyright Notice / Trademark / Limited Liability
Copyright Notice / Trademark / Limited Liability Table of Contents
Using this manual if you make play, copy, distribution of the software,
audio and video which have an intellectual property are protected by
copyright & international laws. Users are responsible for infringement of
copyright or intellectual property.
Copyright Notice
HX100 is the registered trademark of MPIO Co., Ltd.
Microsoft Windows 98, Windows ME, Windows 2000, Windows XP is
registered trademarks of Microsoft Corporation.
Trademark
Limited Liability on improper use
Manufacturer, Importer, Distributor, Agencies shall not be liable for
product damages caused by misuse, abuse, improper handling,
infringement of literary property by photographing & portrait using this
product. The manufacturer shall not be responsible for injury and damages
caused by improper uses in out of standard or conditions.
Limited Liability on loss of data
Users should keep separately data stored on disk media, video file, photo
file to avoid operating error, failure of unknown cause, loss under repair.
Manufacturer, Importer, Distributor, Agencies shall not be liable for
damages caused by loss of data stored on the product.
Limited Liability on alteration of functions
The manufacturer, MPIO Co., Ltd may change the specifications or S/W
without individual’s consent or prior information.
Limited Liability
1-1 Accessories & Components
1-2 Minimum System Requirements
1-3 HDD Management
3-1 Music Player Screen
3-2
Detailed Description
2-1 Name of Parts
2-2 Connecting & Installation
2-3 Basic Function
4-1 Video Box Screen
4-2 Detailed Function
5-1 Photo Viewer Screen
5-2 Detailed Function
2-3-1 Power On/Off
2-3-2 Main Screen
2-3-3 Name & Functions of Buttons
2-3-4 Navigation Button
3-2-1 Play Audio File
3-2-2 Button Usage
3-2-3 Setting Play Mode
3-2-4 Play List
3-2-5 Multitasking Function
4-2-1 Play Video File
4-2-2 Button Usage
4-2-3 Setting Play Mode
5-2-1 Play Photo File
5-2-2 Button Usage
5-2-3 Setting Play Mode
Thank you Note
Customer Registration
Copyright Notice / Trademark / Limited Liability
Safety Instruction
Table of Contents
1. Before Using
2. Getting Started
3. Music Box
4. Video Box
5. Photo Box
1
2
3
5
11
12
13
14
17
25
26
27
28
29
30
31
32
32
33
34
35
36
37
38
39
40
41
Visual Express HX100
2
Visual Express HX100
3
Page 4

Safety Instructions
Table of Contents
42
43
44
45
46
47
47
47
48
48
49
49
50
51
52
53
54
55
56
56
57
58
60
62
63
66
68
70
72
7-1 Recorder Screen
7-2 Detailed Function
7-2-1 Select Recorder Function
7-2-2 Button Usage
7-2-3 Setting Recording Mode
8-1 File Manager Screen
8-2 Detailed Function
9-1 Setting Menu
9-2 Detailed Function
8-2-1
Select file Manager Function
8-2-2 Button Usage
8-2-3 Setting File Manager Mode
8-2-4 Notice
Display
System
Music
Video
Image
Recorder
12-1 Before Start
12-2 How to Install
12-3 How to Convert Media Files?
7. Recorder
9. Setting
8. File Manager
6-1 Text Viewer Screen
6-2 Detailed Function
6-2-1 Play Photo File
6-2-2 Button Usage
6-2-3 Setting Play Mode
6. Text Box
Safety Instructions
* Precautions - Read through below points to use
the player safely.
When it is connected to PC for transferring files from PC to
HX100, the ‘Music’ is recognized as Music_Box, ‘Video’ as
Video_Box, ‘Photo’ as Photo_Box and ‘Text’ as Text_Box.
Do not alter or delete the name of folders(Music_Box, Video_Box,
Photo_Box, Text_Box) which are recognized with connection
to PC.
It is only recognized in the HX100, when the music file is stored
in the Music_Box, video file in the Video_Box, Image file in the
Photo_Box and text file in the Text_Box.
(Ex: When the music file is stored in the Video_Box or
Photo_Box, it is not recognized in the HX100.)
The equipped TFT-Color LCD is a kind of cutting-edge product
and it may be sensitive to either strong impact or change of
condition(Temperature and humidity). So we would like to ask
you for your precaution on handling HX100 and it may cause
paid repair in case of inferior through customer’s carelessness.
15. Regulatory Information
16. Warranty Notice
14. Product Specifications
12. MPIO
Media Converter
User Manual
13. FAQ
11. System Recovery
10. Firmware Update
Visual Express HX100
4
Visual Express HX100
5
Page 5

Safety Instructions Safety Instructions
Safety in public transportation
It may cause accidental damage using in bus, subway,
railway such as public transportation by caught
earphones between the doors. Listening with loud
volume while using public transportation may cause
inconveniences to other people. To protect other’s
privacy, please use with low volume while using
public transportation.
Prohibition of place objects inside
It is prohibited to put metal or inflammable objects
inside the player for safe usage. It may cause inferior
of player.
Prohibition of reassembling, remodeling
Do not disassemble or modify. It may cause breakage,
inferior or accidental damage.
Precaution against drop or impact
Do not drop or put strong impact through stepping on
the product. It may cause breakage or inferior.
Prohibition of chemicals
Do not peel the surface using chemicals or detergent.
Safety Instructions
Hearing Safety
Do not use headphones or earphones at high volume.
Auditory injury can be caused. Reduce volume or stop
using the player if you experience a ringing in your ears.
Hearing for a long time can cause auditory injury.
Safety while walking
Reduce volume of headphone or earphone while
walking or at street side, pedestrian’s crosswalk
because it can cause damages.
Safety during driving
Do not use headphones or earphones while cycling,
driving such as motorized vehicle & roller skating. It
can be against the law in some regions to use
headphones or earphones during driving. Do not
leave this product in a car. It may cause damages to
the product and user according to the ascending or
descending of in car temperature.
Visual Safety
Watching video files with narrow screen can cause a
visual damage. Do not use for a long time continuously.
Visual Express HX100
6
Visual Express HX100
7
Page 6

Safety Instructions Safety Instructions
Power management
Do not overload a single power circuit. It may cause
fire or heat.
Precaution against fire
Power off immediately and detach the adapter if
smoke, smell or noise such unusual thing happens.
Using of approved battery
Use the battery belonged to this product or manufacturer providing one for safe usage.
Precaution of thunder and lightning
Unplug the power use when it thunders or lightning
flashes. Electric shock or breakage may cause.
Using of approved adapter
Use the AC power adapter belonged to this product
for safe usage.
Use only proper accessories
IIt may cause accidental damage if you use another
accessories not provided with this player.
Precaution against fire
Keep out of direct ray of light or such places where
there are heating equipment. Such places may cause
player inferior or breakage.
Proper data backups
IKeep your data separately which is stored in this player
unless it may cause data deletion during inferior or
repair. Manufacturer, Importer, Distributor, Agencies
shall not be liable for data damages caused by user.
Precaution against heavy lading
Precaution against heavy lading. Do not place heavy
objects on the device to avoid breakage. Using of
approved adapter. Use the AC power adapter
belonged to this product for safe usage.
Prohibition of expose to water, humidity, rain,
beverage, medicine and cosmetic
This player, as a electronic product, is easily damaged
by water. Do not power on if the player gets wet , then
mop up the player immediately and go get repair. Do
not use water or other chemicals to clean the player.
Use dry mope or towel.
Visual Express HX100
8
Visual Express HX100
9
Page 7

1. Before Using Safety Instructions
1. Before Using
1-1 Accessories & Components
HX100
User Manual
Carrying Case
Power Adapter
Battery
A/V Cable
Line-in Cable
Earphones
Plastic Cover
Application CD
USB Device Cable
Precaution against using of infants & children
Keep battery & adapter away from touching or
sucking of infants & children. It may cause accidental
damage to infants and children.
Precaution against using battery, adapter, main
body
• Keep the player away from water and excessively
humid areas.
• Do not handle with wet hands, it may cause
accidental damage and receiving of electric shock.
• Keep away from harsh environments including
impacting, heating, sauna or disassembling with
sharp thing unless it may cause explosion.
• Do not handle the charging terminal of adapter or
battery with metals unless it may cause product
inferior or damage.
Precaution against humidity or dust
Do not leave the player where there are much
humidity and dust.
Precaution against magnetic
Magnetic may bring in damage in your player.
Visual Express HX100
10
Visual Express HX100
11
Page 8

1. Before Using 1. Before Using
1-2 Minimum System Requirements
For General Purpose
Pentium III or above
256MB or above
USB 1.1 or above(2.0 Preferred)
Specification
CPU
Memory
USB
Category
Operating System
1-3. HDD Management
For General Purpose
Specification
Category
For using Media Converter Program
Pentium IV or above
512MB or above
Windows ME, 2000, XP
Specification
CPU
Memory
Operating System
Category
Media Converter Program does not support in Windows 98/SE.
Please refer to the ‘Help’ menu after installation of media converter
program for using it.
• When it is connected to PC for transferring files from
PC to HX100, the ‘Music’ is recognized as music_Box,
‘Video’ as video_box, ‘Photo’ as photo_box.
• Do not alter or delete the name of folders which are
recognized in PC explorer.
• It can be recognized in the HX100, when the music file
is stored in the music_box, video file in the video_box,
Image file in the photo_box.
(Ex: When the music file is stored in the video_box or
photo_box, it is not recognized in the HX100.)
Precaution against drop or impact: It may cause
breakage by external impact or drop. Avoid accidental
impact or drop against the product.
While data transmission: It may cause HDD error if the
USB cable is left out while data transmission/reception
from PC.
Back-up of the stored data before formatting, if you want
to format HDD at your pleasure.
It is necessary to format this product with FAT32 file
system. It is not recognized in this product to format as
NTFS file system under Window base PC.
Check through disk error test provided by Window
program if it is a HDD error.
In case of disk breakage, it is not recognized as external
storage device or files are not visible in each menu of
system. In this case you should ask repair.
Windows 98, ME, 2000, XP
* Under Windows 98 system,
you should install additional driver
for use of USB.
Precaution against
HDD handling
Precaution against
HDD format
HDD error
Disk breakage
Data Transfer
MS Direct X 9.0b or above (64MB Video Memory),
MS Windows Media Player 9, Divx 5.1.1 or above,
Internet Explore 6.0 or above
Multimedia
(Must have Utility
for Media Converter)
Visual Express HX100
12
Visual Express HX100
13
Page 9

Internal Mic
Internal Stereo Speaker
Power On / Off
Menu button
LED indicator: Power,HDD,Battery
Stop / Escape
Play / Pause
Cradle Port
Navigation Key:
Vol up / down, FF & REW
Select: press Upright
Earphone Jack
A/V Jack(connected to TV)
USB 2.0(Device) Slot
Audio Line-in Jack
Battery Lock
DC in 5.0V Jack
Rechargeable / Detachable Lithium Polymer Battery
2. Getting Started 2. Getting Started
2. Getting Started
2-1 Name of Parts
Top
Left Right Back
Front
Bottom
Visual Express HX100
14
Visual Express HX100
15
Page 10

2. Getting Started 2. Getting Started
2-2 Connecting & Installation
Attaching / Removing battery
Attaching the rechargeable battery
Detaching the rechargeable battery
Cover 4/3 of battery onto the
back side of main body And
fix it.
1.
Slide the battery to the arrow
direction till it locks into the
place precisely.
2.
Slide 4/3 of the battery out
of the player and lift it up
then it will release.
2.
Press the lock to release the
battery and slide 4/3 of it out
of the player.
1.
Visual Express HX100
16
Visual Express HX100
17
Connecting Adapter and Charging
Connect the adapter to the player’s DC Jack which is on the lower end
of the right side from the front of player.
If the LED which is on the lower end of the front illuminates with red
color, charging is in processing.
The LED light will change into green color when charging is complete.
The LED light will turn-off when the adapter is detached.
1.
2.
3.
4.
Power Adapter
Page 11
2. Getting Started 2. Getting Started
TV Connecting & Display
Connect A/V cable to the image input terminal of TV. Yellow is Video,
White is Audio left channel, Red is Audio right channel.
Connect A/V cable to the end of A/V Jack which is on the lower end of
the left side from the front.
Set the TV setting as Line-in .
Set the TV Out as NTSC or PAL according to your TV set available mode
for further information please look up on 9. Setting section in manual.
When you power on the player, menu icons will be displayed on TV
screen and you can enjoy video file by setting TV screen.
If you pull out the A/V cable from the player, then you can enjoy video
file on the LCD screen again.
If you connect A/V cable to the player while screen playing on built-in
LCD, then there is no output on LCD.
1.
2.
3.
4.
5.
6.
7.
Yellow(Video)
White(Audio-L)
Red(Audio-R)
Visual Express HX100
18
Visual Express HX100
19
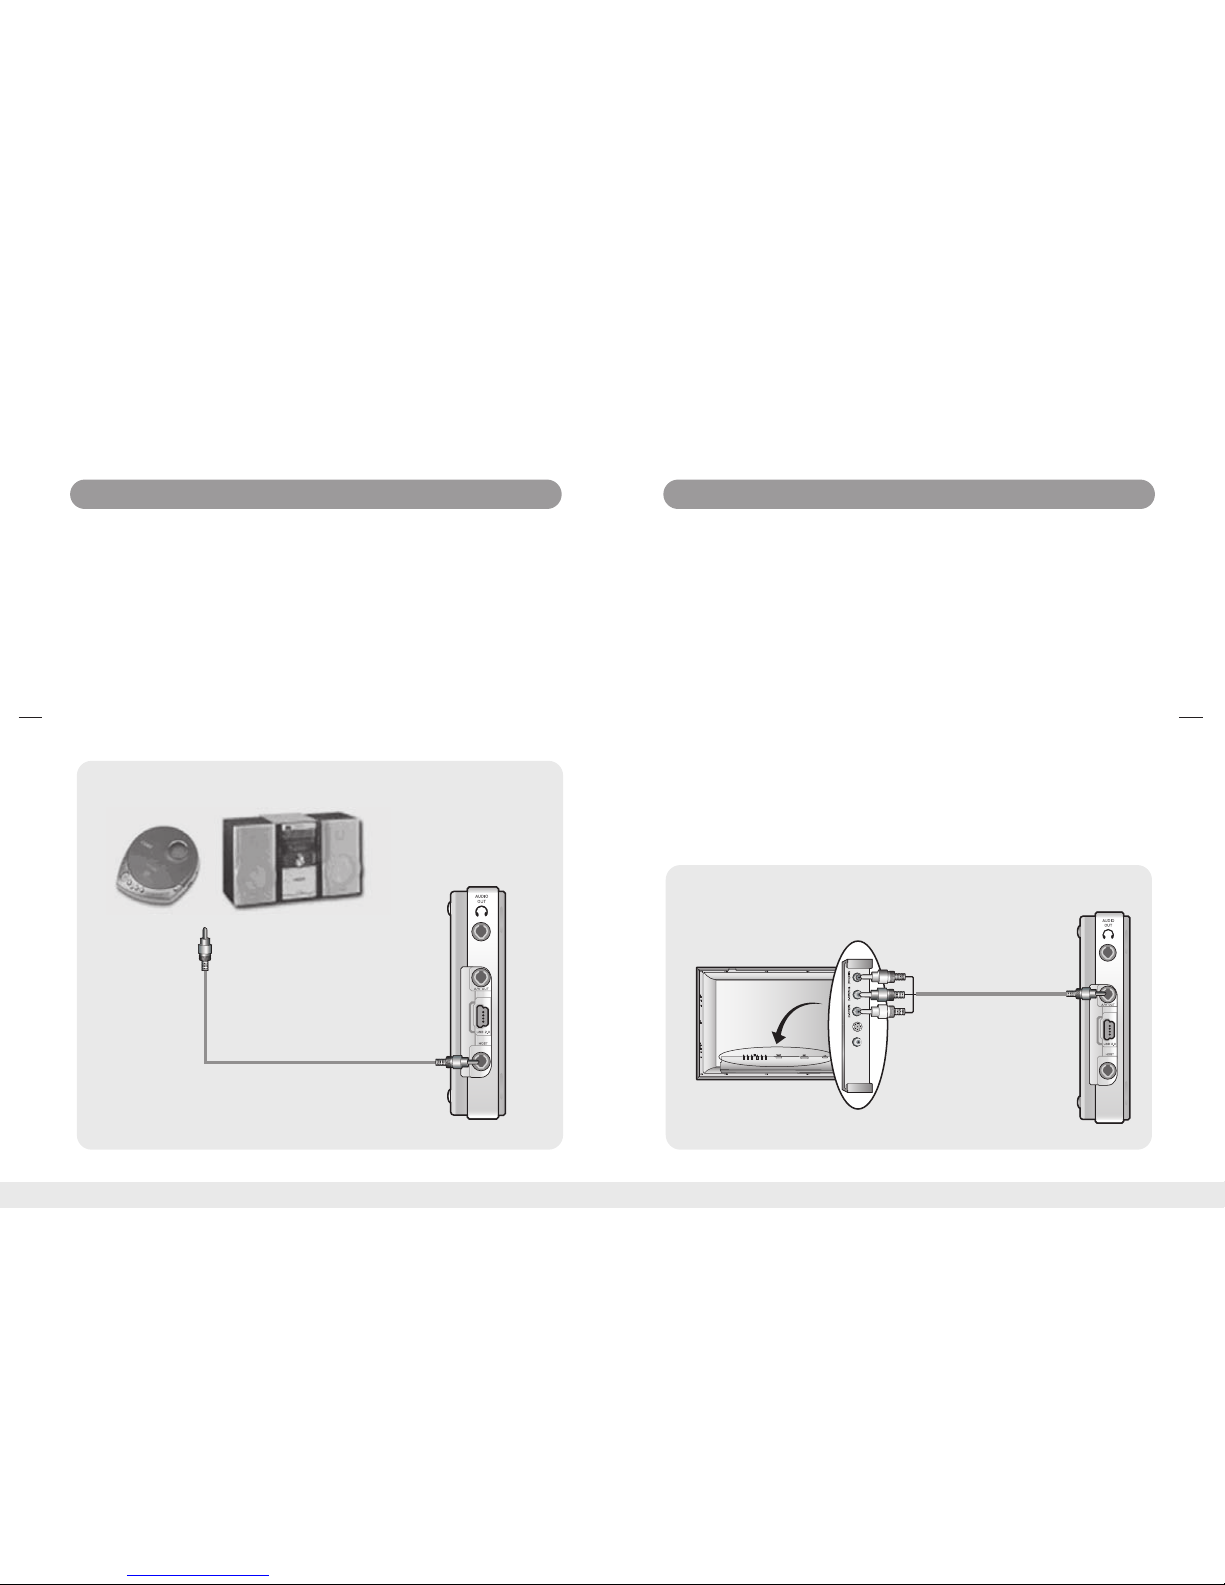
Line-in Connection & Recording
Connect the Line-in jack to the Line-out(or earphone) jack of external
audio device like stereo system or CD player and etc with Line-in cable.
Open port cover on the left side and connect Line-in jack to audio in
port at the lowest side.
When you finish the connection, you can record line-in audio at
[recorder] function.
When you finish the recording, please remove the Line-in cable.
1.
2.
3.
4.
External audio device
Page 12

Big Jack
Small Jack
2. Getting Started
2. Getting Started
Connecting to PC with USB 2.0
You should connect to PC with USB 2.0 port.
In Windows 98 system, you should install additional
USB driver for recognition of USB.
* Precaution
Power on the player. Wait until the main screen is displayed.
Connect to a PC with USB 2.0 cable(Mini USB B, long cable). When it is
connected to PC, ‘USB Device Connected’ message will pop-up on the
screen of the player.
Open USB port which is on the left side and connect USB 2.0 cable
(Mini USB B, long cable) with USB 2.0 Jack which is on the lower end
of player.
When it is connected to the main body, it is recognized as a mass
storage on PC. If no power source is input, the USB is not recognized.
Power on when it is connected to PC.
When it is connected to PC, it is recognized as a mass storage, HX100.
You can transfer movie, music, image file from PC to audio box, video
box, photo box folder in the player.
1.
2.
3.
4.
5.
6.
Connecting external speaker
Connect the external speaker to the Audio jack.(Speaker connection
cable is not provided by manufacturer.)
Enjoy listening HX100 with adjust the volume.
1.
2.
Connecting Earphone
Connect the earphone jack to the player.
USB Device
Connected
Visual Express HX100
20
Visual Express HX100
21
Page 13

2. Getting Started 2. Getting Started
Uninstall Windows 98/SE USB Driver
Press Yes and then the uninstallation is finished.
3.
To uninstall USB driver, move to Start-> Setting -> System Control ->
Program add/delete.
Select Disk Removal Utility.
1.
2.
Install USB Driver for Windows 98/SE( Windows 98 SE Only)
If User’s PC is Windows 98/SE, user has to install USB driver. You can
install USB driver in application CD.
If the installation of win 98 usb driver is finished, you can use.
3.
Please insert application cd and browse Win98 USB Driver.exe in Win98
USB Driver folder.
If you run Win98 USB Driver.exe, you can find flowing screen and click next.
1.
2.
Visual Express HX100
22
Visual Express HX100
23
Page 14

Function
Step
Function
Step
2. Getting Started 2. Getting Started
2-3. Basic Function
2-3-1 Power On / Off
Power On
Power Off
Press power button about 3 seconds to make
power on.
1.
Press power button about 3 seconds to make
power off. Stop all functions before you shut
off the player.
1.
Ending Image is displayed and then the player
is off. Make sure of the battery remaining since
it might be turned off automatically in case of
out of battery.
2.
Hard disk LED(middle LED) is on and then
Power LED(top LED) is on.
2.
Opening Image is displayed and then the main
menu is displayed.
3.
Separating product from PC
Select ‘Toshiba MK2004GAL USB Device’ and OK button.
2.
Click the message pop up and press ok.
3.
You can disconnect USB cable from product and PC.
4.
Click the ‘Safely removing device’ icon in the PC tray, If the tray icon is
not displayed, click the ‘Display hidden icon’ to view the hidden icon.
1.
Visual Express HX100
24
Visual Express HX100
25
Page 15

Description
Category
2. Getting Started 2. Getting Started
Main Screen
2-3-2 Main Screen
Playing music files
Playing video files
Playing image files
Playing .txt files
Recording voice
Managing files
Setting the functions
Music Box
Video Box
Photo Box
Text
Recorder
File Manager
Setting
2-3-3 Name & Functions of Buttons
Menu
Use the [MENU] button to set play mode in
Video Box, Photo Box, Text.
Power
Press when power on/off.
Press about 3 seconds to make power on/off.
Play / Pause
Use [ ] button to play/pause music/video file
and press again to pause play of music/video.
You can execute the functions of each menu by using navigation button.
Stop / ESC
Use [ /ESC] key to pause playing(music, video,
image) and move to upper screen.
Use [ /ESC] key to move to upper menu.
Function Description
Button
Visual Express HX100
26
Visual Express HX100
27
Page 16

3. Music Box
2. Getting Started
2-3-4. Navigation Button
3. Music Box
3-1 Music Player Screen
Function Description
Button
File playing: Playback of previous song for
music, previous frame for video, previous
image for photo.
File Manager: Use REW button to shift Device type.
File playing: Playback of next song for music,
next frame for video, next image for photo.
File Manager: Use FF button to shift Device type.
During file navigation: Moves to upper direction.
Audio/Video File playing: Turn up the volume.
Text Viewer: Moves line of text file.
During file navigation: Moves to upper direction.
Audio/Video File playing: Turn down the
volume.
Text Viewer: Moves line of text file.
(Press Navigation Key Upright)
Play selected file.
Moves to selected folder.
Select
Below functions are realized by pressing Navigation button to desired
direction.
You can listen stored music files(MP3,WMA,OGG etc) through music player.
Please refer to 14. Product specification of this manual for the
information of playable music file.
Visual Express HX100
28
Visual Express HX100
29
Status Display
Title
Artist name
Album
Relative location in the music
Present playing time
Equalizer
Volume Level
Lyric
Show Music Box Options
Page 17

3. Music Box 3. Music Box
3-2. Detailed Description
3-2-1 Play Audio File 3-2-2 Button Usage
Select Music Box icon and press Select button
to listen audio file in Music Box folder.
Play All
If you want to play all files in selected folder,
please click [Play All] icon in top.
Play recent
If you want to play again recent audio file you
listened, please click [Play recent] icon in top.
View Music Player
You can view music player. You can set volume
and other functions.
If you want to delete file in folder, move select
bar on targeted file and press ‘Menu’ button and
choose ‘Delete’ or ‘Delete All’. If you choose
[Yes], the file is deleted.
If selected file is unplayable or a damaged one,
then ‘Can’t Play’ message will be shown on the
screen and it returns to the folder again.
Put cursor on the file you would like to play
back from the folder under ‘Music Box’ and
click select or play button.
FF / REW
If you press [ ] while listening music, you
can move to previous file. If you press [ ],
you can move to next file.
MENU
If you press [MENU] button while listening
music, you can set play mode. You can find
more information on play mode, look at next.
ESC
You can move to file list screen by pressing
[ /ESC]. You can search files or select [Text] or
[Photo] function listening music.
Play / Pause
Use [ ] button to play/pause music/video file
and you press again to pause play of music/
video.
VOL(+/-)
You can turn up or down music volume by
pressing [+/-] button.
Music Box
Icon Selection
Select and play file
Unplayable file
Delete file(s)
Visual Express HX100
30
Visual Express HX100
31
Page 18

3. Music Box 3. Music Box
Equalizer
You can set Equalizer preset setting. You can set
equalizer as ‘Standard / Rock / Pop / Jazz / Classic
/ Dance / Heavy / Disco / Soft / 3D Stereo / Hall’.
Balance
You can set the Balance of Right/Left audio output.
Resume play
Move to recently played portion of the file.
Play Single
You can play selected file play repeatedly.
Repeat
You can set repeat function as ‘single or all
files’.
3-2-4 Play List
Select music file and click ‘Menu’ button briefly.
You will be asked whether you want to add to
Play list. Use direction key to select [Yes] button
then the file will be added to the list.
File selection
& Add to Play list
Select desired
music file
ESC Button
Enjoy text or
photo album
If you want to select file in Music Box folder,
press ‘Menu’ button and choose ‘Delete’ or
‘Delete All’, and then the files are deleted.
If you want to stop or pause a audio file, press
play/pause key.
Play desired music file.
In case you press [ /ESC] button, it will be
escaped from the music box menu while
music file playing.
You can enjoy e-book(.txt file) or photo album
while listening music.
Pause / Stop
Delete play list file(s)
3-2-5 Multitasking Function
You can view photo album or text while listening music at the same
time. The playback condition is displayed at the upper end of screen and
it is adjustable with play/pause button.
3-2-3 Setting Play Mode
Shuffle
You can play files in present folder randomly.
You can set paly mode by pressing [menu] key.
How to use multitasking function.
Playing
Pause
Visual Express HX100
32
Visual Express HX100
33
Select file under the play list and the files in
Play list are played consecutively.
Play [Play list]
Interval Repeat
Press the select button once from the point where
you want to make the section replay, then you will
see the indicator beneath the progress bar that
is informing the section replay start point.
Page 19

4. Video Box 4. Video Box
4. Video Box
4-1 Video Box Screen
File name
Relative location in the video
Present playing time
Show Video Options
Total Play time
You can watch video file stored in Video Box folder.
You can watch WMV or ASF file which is not played in this player
through conversion of Media Converter Program.
Please refer to [Product Specification] of this manual for the information
of playable video file format.
4-2 Detailed Function
4-2-1 Play Video File
If selected file is unplayable or a damaged one,
then ‘Can’t Play’ message will be shown on the
screen and it returns to the folder again.
Play recent
If you want to play again recent video file you
played, please click [Play recent] icon in top.
Play All
If you want to play all files in selected folder,
please click [Play All] icon in top.
If you want to delete file in folder, move select
bar on targeted file and press ‘Menu’ button
and choose ‘Delete’ or ‘Delete All’. If you
choose [Yes], the file is deleted.
Put cursor on the file you would like to
playback from the folder under ‘Video Box’ and
click select or play button.
Select Video Box icon and press Select button
to play video file in Video Box folder.
Video Box
Icon Selection
Select and play file
Unplayable file
Delete file(s)
Visual Express HX100
34
Visual Express HX100
35
Page 20

4. Video Box 4. Video Box
4-2-2 Button Usage
FF / REW
If you press [ ] while playing video file, you can
move to previous(about 30 seconds) scene. If you
press [ ], you can move to next scene of the file.
You can set move time at setting.
ESC
You can stop playing file and move to file list
screen by pressing [ /ESC]
Play / Pause
Use [ ] button to play/pause video file and
you press again to pause play of music/video.
Select
If you press [Select] button while playing video file, you
can view play information display(Look at Video Box
screen). The display will disappear within 3 seconds.
VOL(+/-)
You can turn up or down music volume by
pressing [+/-] button.
Screen size
You can choose screen size as original
or full screen.
MENU
If you press [MENU] button while playing video
file, you can set play mode. You can find more
information on play mode, look at next.
4-2-3 Setting Play Mode
You set play mode by pressing [Menu] key.
Resume Play
move to recently played portion of
the file.
Subtitle On / Off
You can switch subtitle on and off. To
play subtitle there should be same file
name as video file name in same folder,
which has extension name as smi.
Subtitle On
Subtitle Off
Full screen
Original
Interval
Repeat
Visual Express HX100
36
Visual Express HX100
37
Press the select button once from
the point where you want to make
the section replay, then you will see
the indicator beneath the progress
bar that is informing the section
replay start point.
Page 21

5. Photo Box 5. Photo Box
5. Photo Box
5-1 Photo Viewer Screen
5-2 Detailed Function
5-2-1 Play Photo File
You can see saved image file(JPG) through photo viewer.
Please refer to the 14. Product Specification of this manual for the
information of playable image file.
File name
Original size
Current mode
Show Photo Options
Select ‘Photo Box’ icon using navigation
button.(By selecting the icon will be indicated.)
It will be switched over as snapshot mode
automatically.
Play All
If you want to play all files in selected folder,
please click [Play All] icon in top.
If you want to delete file in folder, move select
bar on targeted file and press ‘Menu’ button
and choose ‘Delete’ or ‘Delete All’. If you
choose [Yes], the file is deleted.
If selected file is unplayable or a damaged one,
then ‘Can’t Play’ message will be shown on the
screen and it returns to the folder again.
Put cursor on the file you would like to
playback from the folder under ‘Photo-Box’
and click select or play button.
Play recent
If you want to play recent video file you played
again, please click [Play recent] icon on top.
Delete file(s)
Unplayable file
Select and view file
Select Text icon
Visual Express HX100
38
Visual Express HX100
39
Page 22

5. Photo Box 5. Photo Box
5-2-3 Setting Play Mode5-2-2 Button Usage
Zoom Mode
You can choose zoom mode by pressing [Menu]
button. And then you can Increase image file up to
5 times of original size by pressing [+/-] button. If
you press[ /ESC]button, you can stop zoom mode.
Wall paper
You can select present photo file as wall paper.
Wall paper will be displayed in opening, ending,
main and music play screen.
Delete
If you want to delete present photo file, you can
select ‘Delete’ function.
You set play mode by pressing [Menu] key.
Rotation Mode
You can rotate image file in rotation mode. You
can rotate photo screen by pressing [ / ]
button. If you press [Select] button, Rotation
status will be displayed. If you press [ /ESC]
button, you can stop rotation mode.
Move mode
You can watch all screen of enlarged image file by
selecting Move mode. You can move photo screen
by pressing navigation button. If you press
[Select] button, Move status will be displayed. If
you press[ /ESC]button, you can stop move mode.
Select
If you press [Select] button while playing photo
file, you can view play information display. The
display will disappear within 3 seconds.
MENU
If you press [MENU] button while watching
photo file, you can set play mode. You can find
more information on play mode, look at next.
ESC
You can stop playing file and move to file list
screen by pressing [ /ESC].
VOL(+/-)
If you listen music playing photo file, you can
turn up or down music volume by pressing
[+/-] button.
FF / REW
If you press [ ] while playing photo file, you
can move to previous file. If you press [ ]
you can move to next file.
Visual Express HX100
40
Visual Express HX100
41
Play / Pause
Use [ ] button to play/pause photo file and
you press again to pause play of photo.
Page 23

6. Text 6. Text
6.Text Box
6-1 Text Viewer Screen 6-2 Detailed Function
6-2-1 Play Text File
Text Box is a function to view a stored Text file(.txt) in text_box folder.
If you want to view text file while listening music, please look up on
3. Music_box section.
File name
Relative location in the text
Page
Show Text Options
If selected file is unplayable or a damaged one,
then ‘Can’t Play’ message will be shown on the
screen and it returns to the folder again.
Play recent
If you want to play again recent video file you
played, please click [Play recent] icon in top.
Play All
If you want to play all files in selected folder,
please click [Play All] icon in top.
If you want to delete file in folder, move select
bar on targeted file and press ‘Menu’ button
and choose ‘Delete’ or ‘Delete All’. If you
choose [Yes], the file is deleted.
Put cursor on the file you would like to
playback from the folder under ‘Text’ and click
select or play button.
Select ‘Text’ icon using navigation button.(By
selecting the icon will be indicated.) it will be
switched over as snapshot mode automatically.
Select Text icon
Select and view file
Unplayable file
Delete file(s)
Visual Express HX100
42
Visual Express HX100
43
Page 24

6. Text 6. Text
Resume play
Move to recently played portion of the
file.
You can change present font size as
normal or small.
You can set text file play mode as normal
and blank fix. You can set play mode as
blank fix mode to shorten or remove
blank in text file.
6-2-3 Setting Play Mode6-2-2 Button Usage
Auto Scroll
You can set the time of the auto page/line
viewer at you conrenience.
Normal
Blank Fix
Normal Font
Small Font
Select
If you press [Select] button while playing text
file, you can view play information display. The
display will disappear within 3 seconds.
MENU
If you press [MENU] button while watching
photo file, you can set play mode. You can find
more information on play mode, look at next.
ESC
You can stop playing file and move to file list
screen by pressing [ /ESC].
Play / Pause
When you listen music playing text file, you can
use [ ] button to play/pause audio file and you
press again to pause play of audio file.
VOL(+/-)
When you listen music playing text file, you
can turn up or down music volume by pressing
[+/-] button.
FF / REW
If you press [ ] while viewing text file, you
can move to previous page. If you press [ ],
you can move to next page.
Visual Express HX100
44
Visual Express HX100
45
Page 25

7. Recorder 7. Recorder
Select Recorder icon and press Select button to
record audio file.
Play / Pause
You can use [ ] button to play/pause recording
function.
7. Recorder
7-1 Recorder Screen
7-2 Detailed Function
7-2-1 Select Recorder Function
7-2-2 Button Usage
Audio Input type displayed: Mic or line-in
Bit Rate and Sampling Rate of recorded file
Status display
Recording or playing progress time
Recording or playing file name
Recordable volume(Used/Total)
Progress bar
Recording Icon
Ready – recording ready
Waiting
Recording –
Play – playing recorded file
Pause – pause recording
Stop
Recorder
Icon Selection
MENU
If you press [MENU] button while recording,
you can set play mode. You can find more
information on play mode, look at next.
ESC
You can stop recording file and move to main
screen by pressing [ /ESC].
You can record conversation or lectures using built-in microphone or
make direct recording of music from audio device using line-in cable
attached.
Microphone is built-in on the top of player, so you should use it with
considering the recording direction.
recording is
in progress
You can set record/pause function
by pressing [Select] button.
You can set play/pause function by
pressing [Select] button.
You can stop playing or recording
function.
You can set recording input type as
Mic or Line-in.
Record
Pause
Play
Pause
Stop
Input
selection
Mic
Line-in
7-2-3 Setting Recording Mode
Visual Express HX100
46
Visual Express HX100
47
Page 26

8. File Manager
8. File Manager
8. File Manager
8-1 File Manager Screen
8-2 Detailed Function
8-2-1 Select File Manager Function
8-2-3 Setting File Manager Mode
Select ‘File Manager’ icon using navigation
button.(By selecting the icon will be indicated.)
It will be switched over as file manager mode
automatically.
VOL(+/-)
You can move up/down and select file by
pressing [+/-].
ESC
You can stop playing file and move to main
screen by pressing [ /ESC].
MENU
If you press [MENU] button, you can set file
manager mode. You can find more information
on play mode, look at next.
Move to HDD
Move file to other
folder displayed right
or left section.
FF / REW
You can select folder displayed above by
pressing [ / ].
8-2-2 Button Usage
Select
File Manager
icon
Visual Express HX100
48
Visual Express HX100
49
Page 27

File copy
If there is a same file
name in designated
folder, message below
will be displayed.
9. Setting
8. File Manager
9. Setting
9-1 Setting Menu
8-2-4 Notice
Delete All Delete all files in present folder.
Copy to HDD
Copying file to other
folder displayed right or
left section.
Delete
Delete selected file.
Disk volume check
If the Disk volume is
less than selected file
size, message below
will be displayed.
Display
System
Menu Function
Brightness
Contrast
TV Out
Language
Product
OS Version
HDD
LCD Off(sec)
Power Off(min)
Firmware Update
Music
Video
Image
Recorder
Menu Function
Speaker
Equalizer
Balance
Bass Boost
Replay
Shuffle
Screen Size
Subtitle
Language
Seek
Interval(sec)
Slide
Slide show time
Bit Rate
Mic Gain
Visual Express HX100
50
Visual Express HX100
51
Page 28

9. Setting 9. Setting
Display
Brightness
Contrast
TV Out
Language
Default Setting
Function Description
Default Value
15
15
System
Product
OS Version
LCD Off(sec)
Firmware
Update
Default Setting
30
10
Function Description
HDD Usage
Power Off(min)
9-2 Detailed Function
Visual Express HX100
52
Visual Express HX100
53
Default Value
To select the LCD brightness.
To select the screen contrast.
TV Out is to set the output of video
signal form when Video Out is set
as TV. NTSC is for USA, Canada,
Korea, Japan etc. PAL is for Europe,
Australia etc.
You can set the display language.
Language pack is supplied to display
in desired language.
To set as factory mode.
Shows product name.
Shows version of firmware.
Shows Hard Disk Drive usage. Free means empty
volume and Used means used volume.
LCD Off menu is to set the automatic LCD off time when
there is no key input.
Range: Always on, 5~60 seconds, increases per 5
seconds.
Power off menu is to set the automatic power off time
when there is no key input.
Range: Always on, 10~120 minutes, increases per 10
minutes.
To update the firmware. There should be supplied file in
the ‘system’ folder. Firmware update processing will be
displayed at the lower end of the screen.
*notice: Please make sure not to power off while firmware
updating. It is recommended to be sourced with adapter
whill updating. You should be careful of the power
since it will be not recovered when it is powered off
while updating.
The setting value of LCD off and power off are converted
to default mode.
Page 29

9. Setting 9. Setting
Music Video
Function Description
Default Value
Function Description
Default Value
Visual Express HX100
54
Visual Express HX100
55
on
Standard
0
Linear
All
Off
You can convert the setting value of the
built-in speaker.
Audio effect will be set when there is no
setting value in the ID Tag while playing.
To adjust the left/right value upon the
Audio output of speaker or earphones.
Range: -5 - 0- +5
To adjust the Boost mode.
Range: Linear, Adaptive
To set the replay mode.
Range: All, Single, Off
To set the random or successive playback
of title.
Range: On/Off
To set as factory mode.
Screen Size
Default Setting
Seek Interval
(sec)
Original
On
30
To set the screen size while playing.
Range: Original/Full Screen
To set the On/Off of subtitle.
Range: On/Off
To select the subtitle language.
Range: English/Korean
To set the seek interval time by
pressing FF/REW button while
playing.
Range: 5~600
To set as factory mode.
Speaker
Balance
Equalizer
Bass Boost
Replay
Shuffle
Default Setting
Subtitle
Subtitle Language
Page 30

10. Firmware Update
9. Setting
On
8
Image
Slide Show
Slide Show
Interval
(sec)
Function Description
To select the slide show. When it is on, it will be
automatically played after the minutes
(seconds) designated below.
Range: Off/On
To set the interval between the slide show.
When it is Always on, it does not work.
Range: Always on, 1~20 seconds
To set the Bit Rate which is used for recording.
Range: 96Kbps, 128Kbps
To adjust the volume upon the Mic input.
(It is fixed as 10.)
Range: 10
10. Firmware Update
128
10
Recorder
Bit rate
(kbps)
Mic Gain
Function Description
New Firmware
File download
File Upload
Update
completion
USB cable
separation
Update start
Description
Process
When new firmware update file is released, save it
downloaded from web site(www.mpio.com). Check
the firmware version before saving.
Connect this player to PC with USB Cable. You
should connect this player to USB 2.0 jack of PC.
When this product is recognized as external storage
device on PC, please delete previous firmware in
System folder and save the downloaded firmware
updated files to the System folder of player.
After saving new firmware files in ‘System’ folder,
separate USB cable after executing ‘Safely removing
device’.
Put cursor on Setting>System>Firmware Update
and press Select key then it will start to search
Update file and start updating. Do not turn off or key
operating while updating. It will be turned off
automatically when update is completed.
When update is completed, it is turned off
automatically. If you reboot the player, then it will be
operated as a Firmware updated status. To check
that there is no failure in update, go to ‘System’
folder under the ‘Setting’ folder and check the
version of Firmware in order to confirm whether
update is completed.
Default Value
Default Value
Visual Express HX100
56
Visual Express HX100
57
Page 31

11. System Recovery
11. System recovery11. System recovery
Notice: System recovery function is advisable only if the error message is
displayed repeatedly. When you format the HX100, or if it doesn’t work
properly, the following message will appear.
Recovery
While the power is turned on, connect the HX100 to the PC with a USB
cable.
Make a ‘system’ folder on the HX100 using the PC. You have to set the
folder name to ‘system’ so that it can be recognized by the HX100.
Insert the CD-ROM that is supplied with the product into the CD-ROM
drive of the PC, and copy all the ‘system recovery’ folder files in the
CD-ROM into the ‘system’ folder.
After running ‘Safely remove hardware’, remove the USB cable from the
HX100 and then reboot the HX100 to complete the recovery procedure.
1.
2.
3.
4.
Management of the HX100 HDD
In case of format or chkdsk the HX100 HDD
Turn the HX100 on and press the ‘Pause( )’ and ‘ESC( )’ buttons
simultaneously before the main screen appears. Then an error message
appears on the HX100.
When the error message appears on the screen, connect the HX100 to
the PC, then format the disk and run chkdsk.
* Note: To run chkdsk at the PC’s DOS window, enter chkdsk
<current Drive name of HX100>/f command and click ‘Enter’.
Ex) In case the HX100 is recognized as an ‘E’ drive on
the PC, enter chkdsk e:/f and click ‘Enter’.
-
-
Error Message
Visual Express HX100
58
Visual Express HX100
59
Page 32

12. HX100 Media Converter User Manual12. HX100 Media Converter User Manual
OS: Windows Me / 2000 / XP
Microsoft DirectX 9.0b or higher(requirement)
Microsoft Windows Media Player 9 or higher(requirement)
Microsoft Internet Explorer 6 or higher(requirement)
DivX 5.2.1(requirement)
You can get those components from the installation disc or various web
sites if they have not been installed on your system.
-
-
-
-
-
12. HX100 Media Converter User Manual
12-1 Before start
HX100 Media Converter may not properly work unless the following
components are installed:
HX100 Media Converter is optimized for DivX 5.2.1. Thus, it is possible
to introduce errors in conversion on the system with unified codec packs
or older versions of DivX.
HX100 Media Converter may not work if your system has unified codec
packs not properly installed. If HX100 Media Converter converts movies
incorrectly or crashes, you need to try uninstalling the unified codec
packs and then reinstall DivX codec and Windows Media Player.
HX100 Media Converter may not convert some non-standard or
abnormal media files, of which video and audio codec information will
not properly shown on the source media file window.
The new automatic recovery system can handle movie clips that are
damaged or contain invalid samples. However, it does not give a
guarantee of successively converting all invalid movie clips; the severely
damaged clips may be failed to be converted or their converted video and
audio may be out of sync.
Converting process usually requires more system resources than most
3D games. Thus, during converting movie clips, we recommend not to
use other programs, which may be slowed down or stalled. Especially, it
is highly recommended not to run any applications using audio/video
resources such as games, audio/video players, and audio/video editing.
Some screen-savers using lots of audio/video resources possibly
obstruct the converting process. In that case, the screen-savers need to
be deactivated for proper conversion.
In some systems, they may enter power-saving states due to their
automatic power managers although the converting processes are
ongoing. Such case may be avoided by deactivate or modify the power
managers in accordance with their instruction guides.
You can contact to HX100 support center for any technical supports.
* Note : In principal, you can never get any technical support for troubles
in handling illegal media files.
Intel Celeron CPU(Pentium-4 is recommended)
256MB RAM(512MB is recommended)
DirectX 9 supported Graphic Adapter
(64MB video memory is recommended)
-
-
-
HX100 Media Converter will properly work on most multimedia PCs.
However, we recommend it to be used on up-to-date PCs for satisfactory
performance.
Our suggested system is as follows:
We recommend users to maintain their operating system at the
up-to-date state by activating the automatic update service of MS
Windows. HX100 Media Converter may not be installed or work properly
under outdated systems.
Software Requirements
Hardware Requirements
Notices for Use
Visual Express HX100
60
Visual Express HX100
61
Page 33

12. HX100 Media Converter User Manual12. HX100 Media Converter User Manual
Click setup file in HX100 Media Converter folder.
HX100 Media Converter is a tool for converting movies of various formats
to those of DivX-AVI for HX100. It can handle all movie files playable with
Windows Media Player. HX100 Media Converter has a simple, compact
user interface as shown in the following figure.
Due to the new automatic recovery system, the converting process
may be stalled for 1~3 minutes. This is a portion of automatic
recovery for damaged movie clips, and hence you need not to
terminate or cancel the converting process by compulsion.
1.
Installation starts.
2.
Fill in the user name and company and serial number. Serial number is
attached in application cd cover and manual.
* Note :
3.
You can add the source media files to convert by pushing the
button and then selecting one or more files. You can remove files from
the source-file list by selecting them and push the button.
Then, specify a target folder to which the converted files are saved by
pushing the button. You can use an existing folder as the
target or create a new one. You can not proceed to the next step unless
you specify the target folder.
When you are ready to convert, push the button. Then the
remaining work you need to do is just waiting; everything will be done
automatically.
1.
2.
3.
If the Divx 5.2.1. bundle is not installed in PC, Divx 5.2.1 is automatically
installed and the installation is finished.
4.
12-2 How to Install 12-3 How to Convert Media Files?
Visual Express HX100
62
Visual Express HX100
63
Page 34

12. HX100 Media Converter User Manual12. HX100 Media Converter User Manual
The Media Converter suggests profiles optimized for HX100, which can
be selected from , as follows:
1.
320x240(Preserving Aspect-ratio): (Default) A profile for the LCD of
PMPs. The source clips will be resized so that their widths are
320-pixels while preserving their aspect-ratios. It can be suitable for 4:3
or wider video clips such as movies.
640x480(Preserving Aspect-ratio): A profile for televisions(using TV-out of
PMPs). It is the same as (a) except that widths of the converted movie
clips will be 640-pixels.
320x240(4:3): A profile for the LCD of PMPs. The source clips will be
stretched to 320 by 240 pixels. It is useful for converting video clips that
originally have 4:3 aspect-ratios.
640x480(4:3): A profile for televisions(using TV-out of PMPs). It is the
same as (c) except that widths of the converted movie clips will be
stretched to 640 by 480 pixels
Video Recompression: A profile for preserving resolutions of the source
clips. It is useful for fixing movie clips not playable on PMPs although
they are in the standard format for PMPs(See specification for PMPs).
Converting video clips of low-resolution or low-quality to the
profile of the high-quality(640x480) will not improve their visual
quality(although their file sizes will be larger). Even though the
user wants to watch video clips on televisions, (a) is suitable for
the source clips of low-resolutions.
* Note1 :
The 2-pass converting can be used for source clips failed to be
converted with the 1-pass mode, for example, audios of the resulting
clips are not noticeably synchronized with videos; the length of the
resulting ones are very shorter than that of the sources; or audios are
missed out.
2.
* Converting Options (Advanced)
Video clips of 640x480 resolutions will not be played with higher
visual quality than those of 320x240 resolutions on the LCD of
PMPs. For watching on PMPs only, (a) is the most suitable.
* Note 2 :
The 2-pass converting is not superior to the 1-pass mode but an
alternative method. For some video clips, the 2-pass mode is
more likely to cause errors than the 1-pass mode. Thus, it is
recommended to be used for only converting failed clips with
the 1-pass mode.
The converting process may be failed although the source clips
are playable on PCs. This is probably caused by audio/video
codecs due to damaged or invalid samples of the source clips
rather than errors of the Media Converter. In general, illegally
copied video clips are likely to be damaged or invalid by
improper creation or distribution, which prohibits successful
converting.
For video clips failed to be converted, the user can converting a
clip at a time. This approach can reduce lots of errors. If this
approach is not useful, the user can use the 2-pass mode finally.
Video clips introducing repetitive errors can be regarded as
damaged or invalid ones. Such clips may not be converted
although the user uses the 2-pass mode. In this case, these
clips can be considered as unconvertible ones.
* Note 1 :
* Note 2 :
* Note 3 :
* Note 4 :
Visual Express HX100
64
Visual Express HX100
65
Page 35

13. FAQ13. FAQ
13. FAQ
Can’t hear
anything
from earphones.
Nothing is
displayed
on the LCD screen.
Video file does
not play properly.
No Sound
of Music
or Video files.
Solutions
Troubles
Check whether volume is set as 0 or low volume.
Check whether earphones or wire remote controller is
plugged firmly.
To save the battery if there is no key input while
playing audio file the LCD display is automatically
turned off. If you press any key then LCD will be
turned on again.
No image will be displayed if HX100 is connected to
TV with A/V cable. (TV Out) At this moment, if you
disconnect the A/V cable, you can watch on the
HX100 screen. (Refer to P19).
Music file playback is not possible if the file is not
supported format in this player or compressed out of
specification.
Check supported audio/video file specification in advance.
Not supported video file or compressed out of
specification, damaged files will not be played. Check
supported video file specification in advance.
WMV file is playable with conversion at Media
Converter program included in Application CD.
Even it is AVI file, if the video file has Microsoft WMV
format, then it can not be played.
When you select video file playback, the initial loading
time will be varied according to the format of video file.
Some image file may not be playable according to
the Photo file specification. Check the supported
image file specification of this player.
HX100 is committed to providing its customers with the best possible
support.
This page is for troubleshooting against possible problems that may
occur when you are using the HX100. Please take note and follow the
procedures below.
Video caption
does not display.
Recording is
not operated.
Where can I find
the serial number?
How can I download
new firmware?
How can I make
the customer
Register?
Remote
controller does
not operate.
Solutions
Troubles
LCD off function is designated for extending the
playing time. If there is no key input while music
playing, recording, viewing photo or USB
connecting, the LCD is automatically turned off.
(Refer to P53)
Power off function is designated for extending the
playing time. If there is no key input while playing,
the power is automatically off. Press power button
to play again. (Refer to P53)
This product supports only SMI file playback. The
subtitle file which has the extension name as .smi
should have the same file name as video file and be
in the same folder.
Check whether Caption is ‘On’ in Play Mode. When
Caption is ‘OFF’ caption display is not available.
Check whether remote controller Hold key is ‘On’.
When Hold key is ‘On’ remote controller does not
operate.
There is no source of power or filled with stored
data. Check before recording the remaining room
for store data and organize files.
Please visit www.mpio.com and look up on
download section in customer support pages.
After purchasing HX100, visit www.mpio.com site
of each country to subscribe & register under
Support section.
Serial number is pasted on the battery attach part or
the side of box.
If power is off, the player is not recognized. If power
is weak, the player is not recognized as an external
storage device. You should install separate driver
under Windows 98 version of PC. Install USB 98
Driver in the supplied Application CD. Check whether
USB Cable is connected to USB 2.0 port.
LCD is repeatedly
turned off.
Player is not
recognized as an
external storage
device when it is
connected to PC
as an USB device.
Power is
off repeatedly.
Photo file does
not play properly.
Visual Express HX100
66
Visual Express HX100
67
Page 36

14. Product Specifications14. Product Specifications
14. Product Specifications
Specifications
Category
20GB 1.8” HDD
3.5” TFT LCD, QVGA(320X240)
NTSC / PAL, D1(720X480)
Built-in Stereo Speaker
Built-In Mic
JPEG Support
.txt file support
USB 2.0(Device)
Windows 98 SE / ME / 2000 / XP, Mac 9.2 above
FAT32 File System
4&1/2 Hours(320X240, 25Frame), Speaker off
10Hours(LCD Off / Speaker Off), Speaker off
DC 5.0V, 3A
3000mAh Lithium Polymer
(detachable & rechargeable)
130(W)X78(H)X24.5(T)
Approx. 285g(including Battery)
0 C ~40 C
Earphones, AV Cable, USB Device cable,
Line-in Cable, AC Adapter, Carrying Case,
User Manual, Application CD, Plastic Cover
Microsoft Windows 98SE / ME / 2000 / XP
(MS Windows ME / 2000 / XP)
Pentium III(Pentium IV recommended)
256MB(512MB recommended)
32MB(64MB recommended)
Storage
Speaker
Voice Recorder
Image Viewer
Text Viewer
PC Interface
Accessories & Components
LCD
TV Out
Video
Operating
System
Play Time
General
System
Requirements
(Recommendation
for Media Converter)
Power
Supply
Operating
System
Built-In battery
CPU
System Memory
Video Memory
Operational
Temperature
General Specifications
Specifications
Category
MPEG1, MPEG2 MP@ML, MPEG4 SP & ASP
Video file with QPEL(Quarter Pixel motion) /
GMC(Global Motion Compensation) /
DTS Sound encoded files,
Damaged video files,
video files over playable resolution
WMV, ASF
MP3, AAC, AC3
MAX. 720X480
Up to 30fps
Video: MAX. 4Mbps
Audio: MAX. 640Kbps
SMI Format Supportable
MPEG 1/2/2.5 Layer 3, WMA, OGG, AC3
MAX. 320kbps
32KHz, 44.1KHz, 48KHz
ID3 V1, ID3 V2 2.0, ID3 V2 3.0
Unplayable
Video Format
Bit Rate
Video
Playable
File Format
Audio
Playable
File Format*
Playable Resolution
Frame Rate
Caption
Playable File Format
Bit Rate
Sampling rate
Tag
Direct Play
Video Format
Transcoder
Video Format*
Playable
Audio Format
Playable A/V Format
WMV video format can be playable through media converter program.
Damaged audio and video file may not be able to play.
*
*
OS
File System
Video*
Audio
AC Adapter
Dimension
Weight
Visual Express HX100
68
Visual Express HX100
69
Page 37

15. Regulatory Information15. Regulatory Information
This product has manufactured and tested to comply with limits for
a Class B Computing device according to the specification in FCC
rules Park 15.
Operation is subject to the following 2 conditions.
This product may not cause harmful interference.
This Product must accept any interference received, including
interference that may cause undesired operation
If you want this product repaired, you must make manufacturer or
authorized agent fix if to keep FCC registration valid. If you think this
product causes any interference with your radio or television
reception, try following instructions.
Adjust or relocate the radio or TV Antenna.
Move away the device from the radio or TV.
15. Regulatory Information
This product manufactured and tested or certified in Korea against
European requirements for CE as in EMC Directive 89/336/EEC
(Amended by directive 92/31/EEC, 93/68/EEC)
CE marking means that the manufacturer verifies that the product
meets the requirements of all new approach directives that apply to
the product. It also means that the manufacturer confirms that the
product has been assessed according to one of the prescribed
procedures to determine that it fulfils the mandatory requirements.
CE marking indicates that the product may legally be sold in all 18
Member States of the European Economic Area as follows. Each
Member State must accept CE-marked products without requiring
any further testing or approval in relation to requirements covered by
new approach directives.
Member States of the EU: Austria, Belgium, Denmark, Finland, France,
Germany, Greece, Ireland, Italy, Luxembourg, The Netherlands,
Portugal, Spain, Sweden, United Kingdom.
FCC(Federal Communications Commission) compliance statement CE(Community European) conformance statement
1.
2.
1.
2.
Visual Express HX100
70
Visual Express HX100
71
Page 38

16. Warranty Notice16. Warranty Notice
16. Warranty Notice
Visual Express HX100
72
Visual Express HX100
73
Corrosion caused by water or objects.
Defect caused by misuse or unsuitable operation.
Voluntarily disassembling or remodeling .
Defect caused by impact.
Defect caused by misuse of peripherals or accessory which are not
supplied by manufacturer or its relations worldwide.
Situation which is acknowledged as user’s fault.
Invisible to check the product info. owing to the damage of
product number.
Presents no purchasing receipt against replacements or refunds.
-
-
-
-
-
-
-
-
Manufacturer shall not be responsible for any special, incidental or
consequential damages caused by natural disasters, fire, static
discharges, misuse, abuse, improper handling, unauthorized repair
and following issues.
Limits of Warranty
This product is sold with a limited warranty and specific warranties not
included in limited liability are available to the purchaser as follows.
Warranty period
The LCD Screen on product has been manufactured to rigid
standards to provide high quality for best performance. But LCD of
product may have some imperfections not particular to the product
but to all devices with LCD regardless of the original manufacturers
of LCD. Each LCD vendor guarantees that its LCD will contain no
more than a certain number of defective pixels.
So, manufacturer guarantees that this LCD product will have no
more than 2 defective pixels. That means the during the period of
guarantee for product, manufacturer or its relations like local
distributors will repair or replace LCD product with 3 or more
defective pixels at their costs. In other words, LCD with one or two
defective pixel is not guaranteed for replacement or repair.
LCD Pixel Policy
Warranty period
Product
1 Year
Look following section.
6 Months
2 Months
Exception of Warranty
Main body &
Remote controller
LCD
Adapter, Battery
Earphones, Cables,
Carrying Case
Battery, User Manual,
Install CD,
Arm/Neck string, Gifts
Remarks
Keeping period of
Service components:
3 Years
after quit of sales
Page 39

16. Warranty Notice16. Warranty Notice
Visual Express HX100
74
Visual Express HX100
Please take a brief moment to fill out the product registration card
below and send to local distributor or you can register in MPIO
(www.mpio.com).
Serial Number is located back of product and side of gift box.
Customer registration card
Product Name*
Serial Number*
Purchase date*
Purchase place*
First Name*
Last Name*
Address*
State
Zip Code*
E-Mail*
Phone*
Cellular Phone
Customer
Information
* section must be filled
Please keep the purchasing receipt for the exchange & refund of
product as you need to present it in advance. Purchasing receipt is
needed to check the product delivery time.
Dead On Arrival or damaged In Transit.
Incorrectly shipped.
1 month passed after delivery of product
in full working condition
Voluntarily Disassembling or remodeling
by customer.
Damage or breakage through unsuitable
handling by customer.
Change of mind.
Refund and replacement policy
Range of
no replacements
& refunds
Range of
replacements
& refunds
 Loading...