

Page 1

<HS100> User's Guide
Date of Publication : Aug. 2003
Date of First edition : Aug. 2003
Publishing Company : Digitalway, Inc.
Address : 6440 Lusk Blvd. Suite D105 San Diego, CA 92121,
USA
Tel : 858-554-1300
Fax : 858-554-1370
Homepage : www.mpio.com
©2003 Digitalway, Inc.
User ’s Guide
HS100
designing your digital dream
The contents of user's guide could be changed without prior notice.
Please read all instructions in this user's guide before using the product.
English
Español
HS100-Eng_Bestbuy 8/12/97 8:23 PM Page 2
Page 2
English
3
Table of Contents
1. Introduction / 04
2. Specifications / 04
3. Safety Precautions / 05
4. Composition / 06
5. HS100 Overview / 07
6. In Case of Windows Computer / 08
1) HS100 Using / 08
A. Driver Installation / 08
B. How to confirm the Driver Installation / 08
C. Data Storage / 09
2) HS100 Management / 09
A. Assigning a Volume Label / 09
B. Formatting / 11
3) Removing HS100 From Your Computer / 12
7. In Case of Macintosh Computer / 13
8. X-Series Utility / 14
1) X-File Security / 14
A. Instructions for the X-File Security Program / 14
B. Program Definitions / 16
2) X-File Mailer / 18
A. Introduction / 18
B. Main Features / 18
C. Caution / 18
D. How to use? / 19
9. Troubleshooting / 25
10. Limited Warranty Statement / 26
English
2
The contents of this manual are subject to change without
prior notice, depending on updates and changes in specification, etc. Keep the manual to use at any time.
Any form of imitation, copying, reproduction or translation in
part or in whole of both the product and its accompanying
documents or shrinking the product in such a form as to be
read by electronic means without Digitalway's prior consent
is prohibited by the Copyrights Act.
• Microsoft, Windows, Windows Explorer, and Windows
Logo are trademarks or registered trademarks of Microsoft
Corporation.
• Intel & Pentium are registered trademarks of Intel
Corporation.
• Macintosh, Macintosh Logo is trademarks or registered
trademarks of Apple Computer, Inc.
• The system and products appearing in this manual are
covered by trademarks or registered trademarks of each
company or organization concerned; the mark
TM
or ® is
not always indicated.
Designing Your Digital Dream
HS100-Eng_Bestbuy 8/12/97 8:23 PM Page 2
Page 3
English
5
English
4
HS100 is a small, light storage device with a capacity of 1.5 GB
of its 1-inch hard disk. It commands the strength of both a
large capacity HDD and a small Flash Memory storage device.
It is also capable of fast data transmission by using the USB
2.0 Interface.
1. Introduction
Product Code HS100
Capacity 1.5GB
Interface USB 2.0(compatible with USB 1.1)
Transfer Rate 1. With USB 2.0: Maximum 38Mbps
2. With USB 1.1: Maximum 8Mbps
Operating Temperature -10°C ~ 50°C
Range
Dimensions (mm) 43.6(W) x 84.5(H) x 14.8(D)
Weight (g) 56.5g
Platform OS Windows 98/SE/ME/2000/XP
Macintosh OS Version 9.x later
2. Specifications
HS100 is initially formatted in FAT32. Actual usable capacity can be
changed via the logic file system regardless of the physical capacity
of HS100 (1.5GB).
* The warranty does not cover PC connections with the use of
extended cords like the USB hub, etc.
* Connection of HS100 to the USB 1.1 Host Adapter enables you
to operate at the speed of the USB 1.1.
* You need to mount a USB 2.0 Host Adapter on the computer to
achieve maximum transmission speed when using the device.
You should be fully aware of the notice below, before using
the product.
The company does not take the responsibility for the defect
of the product (accessory, connecting device etc.), damage,
data loss, accident & disorder etc., occurred from not fully
understanding the notice below, so please be sure to check
this notice.
• Do not use the product for the other purpose except for the matters described in the manual.
• Pay attention not to hurt your hand while you touch a product box,
manual, accessory etc.
• Hard disk is sensitive to impact. Pay attention not to have a
severe impact on the product, might cause a trouble or a damage.
• Pay attention not to use the device or leave it alone in places with
high/low temperature, high humidity, big thermal difference, and
by the strong magnetic field.
• Remember that liquid (water, beverage etc.) not leaked into the
device.
• The device that you discretionary disassembled or remodeled can
not be provided with a free service and can be excluded from the
service areas, so pay special attention to this.
• The company shall not be held liable for data lost and damaged
during data transmissions between HS100 and your computer.
• Be sure to backup your data during data storage. Device malfunction, operational errors, external shock, or power failure can cause
loss of stored data. The company does not assume any liability for
such occurrences. Please take proper precaution
• Customers must back up the data stored in the device before
requesting for the service. For the service-requested device, the
data are assumed to have been backed up by customers ; we do
not provide any data backup service separately. We assume no
liability for any data loss during the service.
• Please plug or unplug the cable by holding the plugs not by
pulling out the cable, to prevent internal line breaking.
• Do not give an impact to the connected part while the Computer is
connected to the device.
• When the device is covered with foreign particles, please wipe off
it with soft cloth or clean towel and be careful not to use chemicals
3. Safety Precautions
HS100-Eng_Bestbuy 8/12/97 8:23 PM Page 4
Page 4
English
7
5. HS100 Overview
English
6
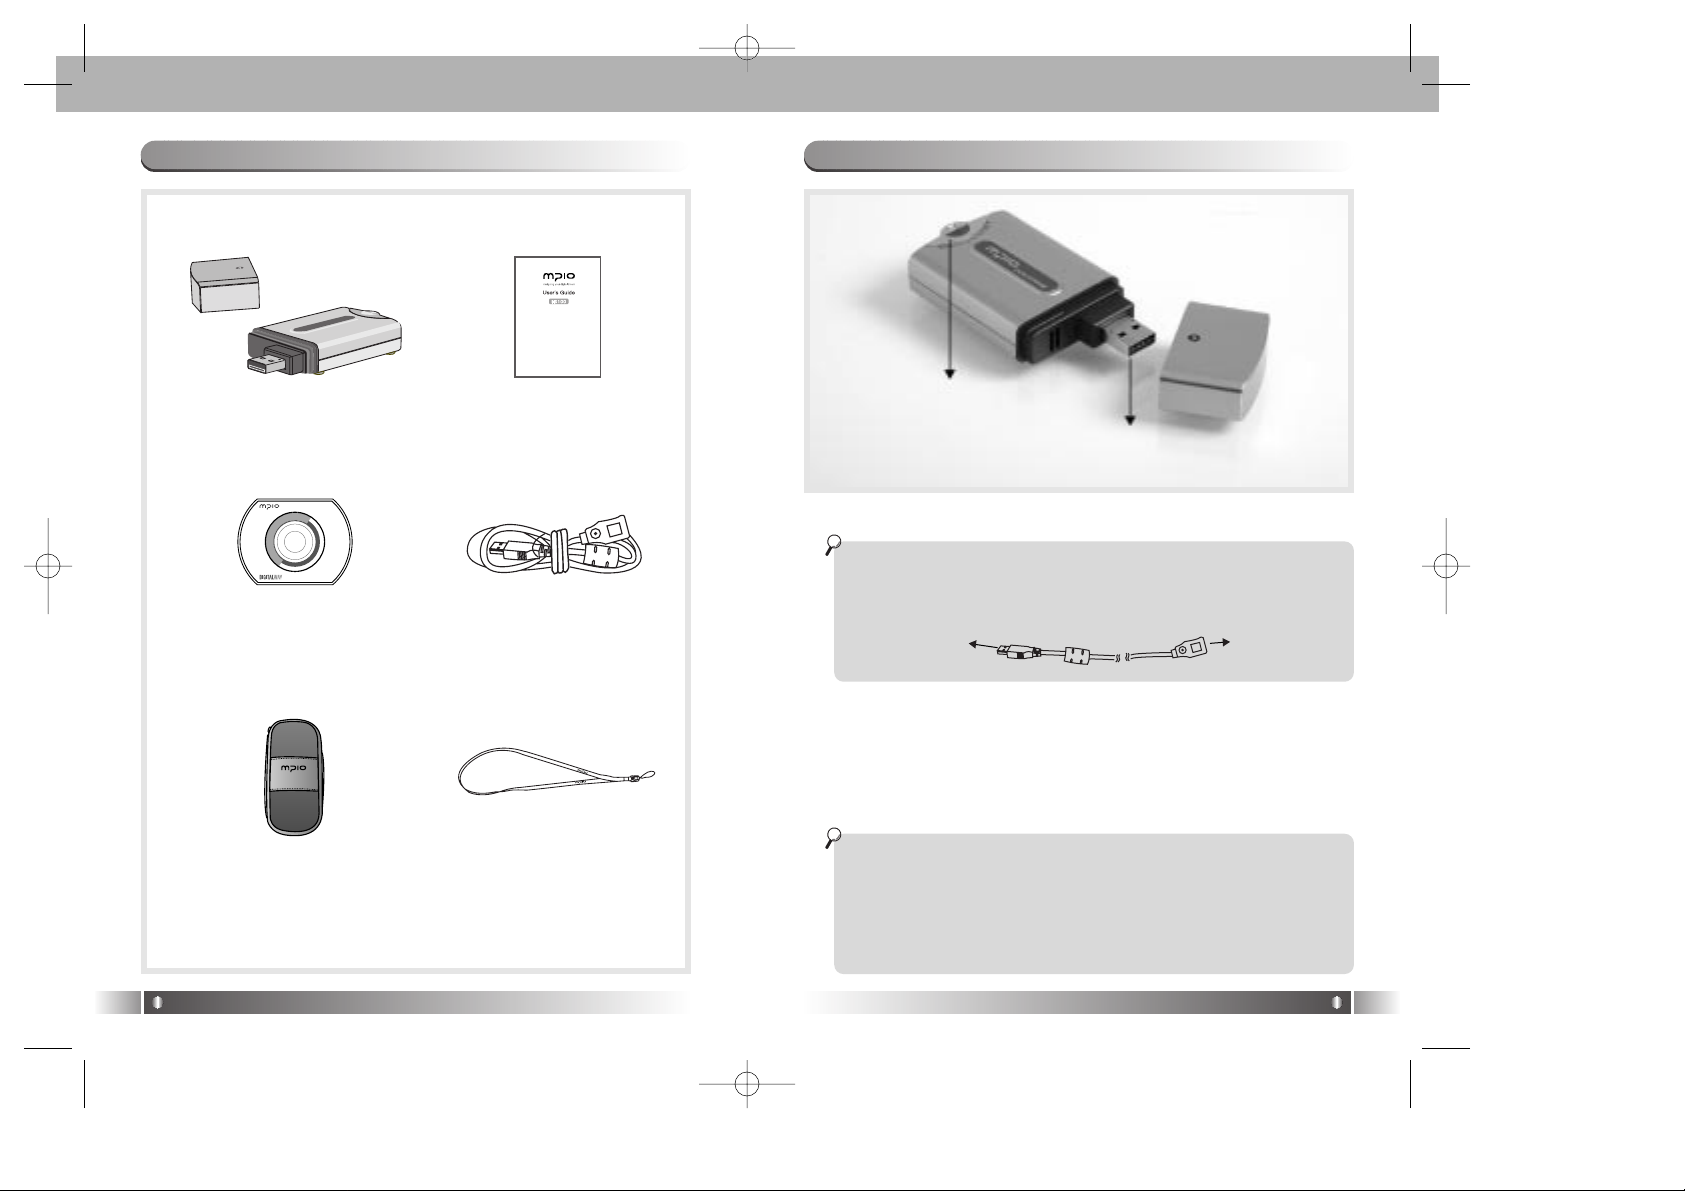
4. Composition
X
-
F
I
L
E
S
E
C
U
R
I
T
Y
D
R
I
V
E
R
(Ver 1.0)
HS100
X
-
M
A
I
L
E
R
HS100 User's Guide
Installation CD Extension USB Cable
Case Necklace Strap
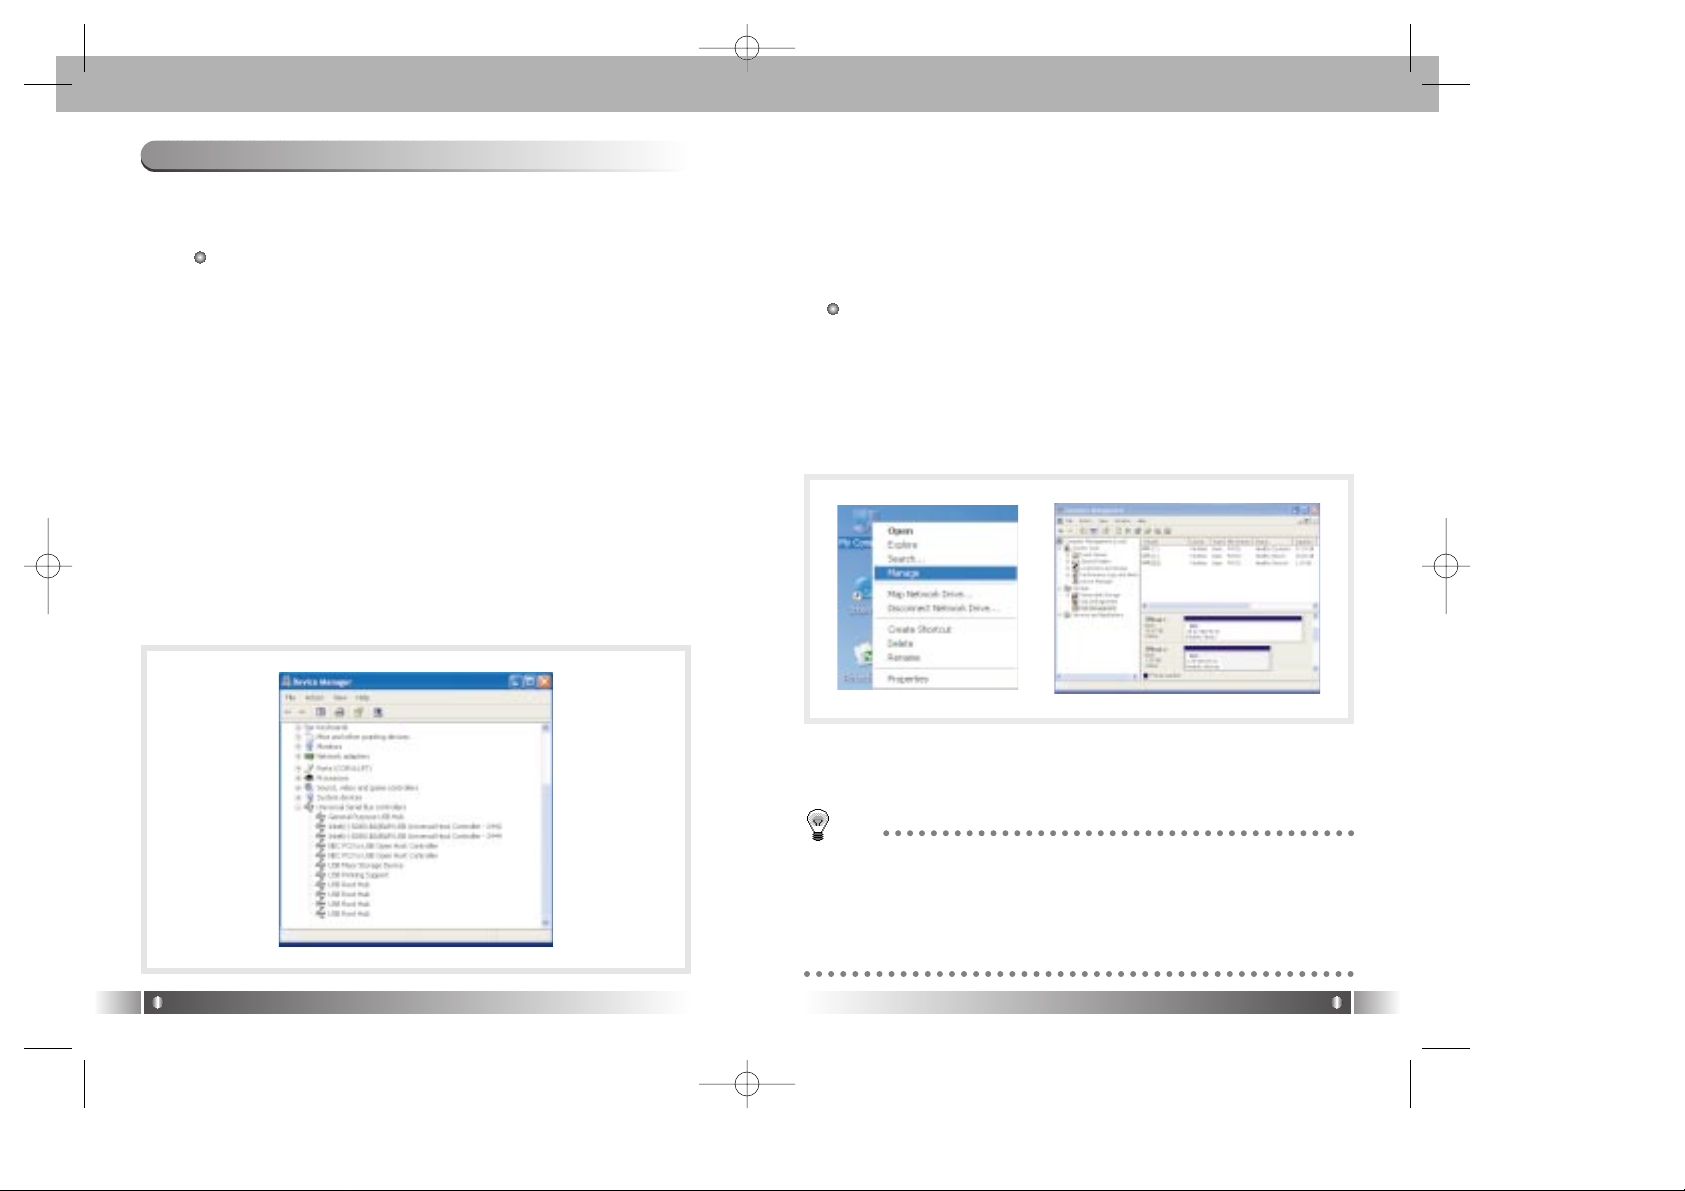
1. USB Terminal: insert this into the computer's USB terminal.
1. USB Terminal
2. LED display
When connecting the device to the computer with a USB extension
cable, connect terminal Aof this cable to the USB terminal of the
computer. Then insert the HS100 USB terminal into USB extension
cable B.
2. LED display: When the device is connected to the PC, the light
on the LED display is turned on when data is being
transmitted.
• Green light - this indicates the connection of the device to the
computer when power is turned on.
• Red light - indicates that the disk is transmitting the data.
Warning : When Transmitting Data
Removing the device from the computer right after data transmission increases the risk of data loss and damage to the device. Wait
until the device completes the recording of the data. Then check
whether the LED color has changed to green. Only then it is safe to
remove the device from the computer. Simply follow the instructions
in "Removing the device from the computer" on page 12.
Terminal A
Terminal B
HS100-Eng_Bestbuy 8/12/97 8:23 PM Page 6
Page 5
English
9
English
8
6. In Case of Windows Computer
1) HS100 Using
A. Driver Installation
You can use HS100 without installing the Driver in Windows
ME/2000/XP.
• How to Install the Driver in Windows 98/SE Computer :
If HS100 is connected to the Windows 98 computer, a new
hardware wizard is executed. If you find a location for the
new device driver in Windows while the wizard is executed,
insert the Installation CD in the CD ROM and designate
such location as the driver location.
B. How to confirm the Driver Installation :
• Use of Windows 98/SE/ME
If the Driver Installation is completed normally, you can confirm " USB Mass Storage Device" in the control panel/system/device manager/universal serial bus controllers.
• Use of Windows 2000/XP
If the Driver Installation is completed normally, you can confirm " USB Mass Storage Device" in the control panel/system/hardware/device manager/universal serial bus controllers.
C. Data Storage
• After connecting HS100 to your computer, open the "My
Computer" icon on your desktop to see whether the device
has been recongnized as a Local Disk. Use HS100 like
any ordinary hard disk.
2) HS100 Management
Do not perform "Close Checking" during disk defragmenter or
Error-Checking to prevent data loss.
A. Assigning a Volume Label
• Connect HS100 to the computer. Select the "Manage" item
by opening the "My Computer" icon, then select the "Disk
Management" from the tree tab of the computer management window.
• Confirm that the new hard disk has been indicated, in addition to the existing hard disk.
TIP
What is Volume?
Volume is a large capacity auxiliary storage device for the semipermanent storage of data in your computer. Each disk that
operates independently is equal to one volume. Alarge capacity
storage device is composed of several volumes.
HS100-Eng_Bestbuy 8/12/97 8:24 PM Page 8
Page 6

English
11
English
10
• Right click the "Properties" item that indicates this device.
• Assign a volume label to the nameless new volume.
• When HS100 is connected to the computer, the device
appears, bearing the volume label it has been assigned
with.
TIP
What is Label?
Information recorded in the disk indicates the data stored in the
auxiliary memory device.
B. Formatting
• Connect HS100 to the computer.
• Select the "Manage" item by opening the "My Computer"
icon, then select the "Disk Management" from the tree tab
of the computer management window.
• Select the [Format] item by right clicking the HS100 icon.
• Designate FAT32 for the File System(or you can choose the
FAT16/NTFS.) and select the default value for the Allocation
unit size. If you want quick formatting, select the Perform a
quick format
Warning :
Removing the device from the computer while formatting is going
on may cause Device damage. Please take extra precautions.
HS100-Eng_Bestbuy 8/12/97 8:24 PM Page 10
Page 7

English
13
English
12
3) Removing HS100 From Your computer
• To remove the device safely from your computer, just go
through the following steps. Be sure to double-check each step
so as to avoid the risk of data loss or damage to the device.
• Direct the mouse's pointer on the hot plug icon of the work tray
and then right click it.
• If you select "Safely Remove hardware" the following message
pops up.
• When the window for the "Safe Remove Hardware" appears,
select the "USB Mass Storage Device" in the window. This indicates the hardware device. Click the [Stop] button.
• When the "Stop a Hardware Device" window appears, confirm
the "USB Mass Storage Device" item and then press the [OK]
button.
• When the window for the "Safe Detachment of Hardware"
appears, press the [Close] button, then remove HS100 from the
computer.
7. In Case of Macintosh Computer
Driver Installation
You can use HS100 without installing the Driver in Macintosh OS
version 9.x ~ X.
Data transfer between Windows and Macintosh OS is not guaranteed.
HS100-Eng_Bestbuy 8/12/97 8:24 PM Page 12
Page 8

English
15
indicate the correct drive and path in the "Encryption file"
menu and choose the file(s) from the "Decoding" files window.
10. Select the "Decode" option and enter the password, which
was used to encode the file(s). This will place a copy of each
file selected in the location indicated from the "Original files"
window with no security.
11. The X-File Security Icon will appear on your desktop after the
installation is complete:
English
14
8. X-Series Utility
1) X-File Security
This Security Program is an application, which is compatible with
the HS100 and the Windows operating system. The program
allows for the user to add a level of security to their files. If you
are going to access the protected files from another computer,
then ensure that the X-File Security Program is installed on that
computer. Please refer to Program Definitions and Descriptions
for assistance.
A. Instructions for the X-File Security Program
1. Install the X-File Security Program on your computer system.
2. Connect the HS100, ensure that it shows on your desktop as
a "Local Disk" drive.
3. Start the X-File Security Program by selecting the shortcut on
your desktop.
4. Indicate the correct drive and path in the "Original files" menu
to show the file(s), which you would like to select for password
security.
5. Indicate the correct drive and path in the "Encryption files"
menu to show where you would like to save the encoded
file(s), such as the HS100.
6. Choose the file(s) from the "Original files" window, which you
would like to encode for security and select the "Encoding"
option.
7. Enter a password for the protected file(s), which can be from 1
to 8 characters (caution: ensure to remember the password(s),
as this is the only way to decode files).
8. To access encoded files, select the file to open and enter the
password which was used to encode the file.
9. To decode file(s) or remove passwords associated to file(s),
HS100-Eng_Bestbuy 8/12/97 8:24 PM Page 14
Page 9

English
17
5. Choose all - this option allows the user to select all files from
the window area when encoding, decoding or deleting files.
6. Delete - this option allows the user to remove any file(s) that
have been selected, ensure to be careful as this also includes
files from your computer.
7. Refresh - this option will show the most current file information
regarding your computer system.
English
16
1. Original files - this menu allows the user to indicate the drive
and the file location for files, which they would like to add
password protection or a location for files they would like to
decode.
2. Encryption files - this menu allows the user to indicate the
drive and the file location for where they would like to save the
password protected files or a location for files they would like
to decode.
3. Encoding - this option will prompt the user for a password,
when entered will create a password protected file for each file
selected and shows as a "XFF" file format.
4. Decoding - this option will prompt the user for a password,
when entered will place a copy of each file selected in the
location indicated without file security.
B. Program Definitions:
• When encoding a file, the program creates a copy of the original
file and saves that password-protected file into the location indicated in the "Encryption files" window. When decoding a file, the
program creates another copy of the original file and saves the
unsecured file into the location indicated in the "Original files" window.
• If you are going to access the encoded files from another computer, ensure that the X-File Security Program is installed on that
computer. We suggest for the user to save the X-File Security
Program on the HS100, which can then be easily installed.
• Passwords are case sensitive. Ensure to remember password(s)
as you are not able to access files that have been encoded without the original password(s).
• The "Delete" option in the "Original files" window will remove all of
the selected file(s) when this option is entered (caution: ensure to
be careful as this option removes any file(s) selected including
files from your computer).
• If you have mistakenly removed files from your computer using
the "Delete" option in the "Original files" window, you can locate
the deleted files from the Windows "Recycle Bin".
• The "Delete" option in the "Decoding files" window will remove all
of the "Encoded" file(s) which have been selected when this
option is entered.
• Files, which have been encoded, for security protection will
appear as a "XFF" file format.
HS100-Eng_Bestbuy 8/12/97 8:24 PM Page 16
Page 10

English
19
D. How to use?
a. Main Window
English
18
2) X-Mailer
A. Introduction
• X-mailer is a Mobile e-mailer program to receive/send/store
their e-mails just through their HS100 at any PC without using
Outlook (Express) of the PC.
• At any PC out of your home or office, you can manage your emails just by plugging your HS100 to the PC.
• X-mailer uses its own engine instead of Outlook (Express) from
Microsoft. It does not need to access to the Outlook of the PC
and accordingly does not leave any data of your e-mails in the
PC.
B. Main Features
• You can send e-mails without outgoing mail server (SMTP).
• Mobile e-mailer to be installed in your HS100.
• To manage your e-mails just by plugging the HS100 to any PC.
• Just one time set-up for user mail account.
• No need to access to the Outlook of the PC and no trace of
your e-mail at the PC.
• Easy to import the mail account and mail address from Outlook.
• To show the free space of the HS100.
• Very simple use as similar as Outlook (Express).
C. Caution
• Please choose HS100 to install this program.
• After using X-mailer work, please finish the program rightly and
then separate drive safely according to <User's Guide>.
1) Pull-down menu: List of all functions of X-Mailer.
- File, Edit, View, Message, Tools, Help.
2) Tool bar: List of function icons frequently used.
3) Mail box folders: This folder saves all mails of your accounts.
* Unread mails are indicated by number inbox.
- Inbox: This folder saves mails from your mail servers.
- Outbox: This folder saves sent mails.
- Drafts: This folder saves mails that you saved temporarily
before you send.
4) Mail list window: All mails are listed by date here.
Unread mails are indicated by thick font and show the capacity
by bytes so that you can erase unnecessary mails.
You can choose mails here and move 'Outlook Express' mail
list window with 'Drag & drop'.
5) Mail contents window: shows mail contents.
6) Status Bar: shows mail number and working process.
HS100-Eng_Bestbuy 8/12/97 8:24 PM Page 18
Page 11

English
21
2) SMTP Port number: Default port number of outgoing mail is
'25'. This program uses this basic port number '25' unless particular SMTP server.
3) From: Sender's mail address. If registered mail accounts are
plural, you can click and choose one from the Pull-down
menu.
4) To: Receivers mail addresses. If you want to add more than
one account, you must divide them with semicolon (;).
Ex) sample@mpio.com; abc@mpio.com; test@mpio.com
If you click address icon button and you can import regis-
tered mail addresses very easily.
If you bring mail accounts from mailing list, they are added
and listed automatically with semicolon (;).
5) Cc: This account receiver will refer the same mail contents.
The way to input mail address is the same as 'To' accounts.
6) Attachment: You can attach files to the mail by clicking 'File
search' button or choose file(s) and put in by 'drag & drop'.
7) Subject: The mail's main title.
8) Contents: The mail's contents.
9) Priority: You can set the priority of the mail.
10) 'Send' button: When you click this button, the mail will be
sent to the receiver and then the mail sending window will be
closed automatically.
11) 'Save' button: When you click this button, the unfinished mail
is saved to 'Drafts'. Later you can correct and send the mail
after you double click the mail in the 'Drafts'.
12) 'Reset' button: When you click this button, all written contents
will be erased and initialized to new mail sending window.
English
20
b. Send Mail
1) SMTP server: You use this server when you send an e-mail.
X-Mailer supports two ways to use SMTP server
and not to use SMTP server.
• Send Mail without SMTP server: It's faster and you can
send mails more easily wherever you are because X-mailer
doesn't need to use SMTP server. But it can take more time
to send mails to receivers when the receivers are many.
• Send Mail with SMTP server: It's more stable many
receivers because the mails will pass through SMTP server.
But you should input new SMTP server address whenever
internet-connected PC changes.
HS100-Eng_Bestbuy 8/12/97 8:24 PM Page 20
Page 12

English
23
English
22
c. Mail Accounts 6) Name: Input the representative name here. This name doesn't
need to be same as the name of the account. There is no specific rule to input the name.
Ex) 'James', 'Sara', 'Hello', etc.
7) E-mail address: The E-mail address of the account.
8) Reply address: If you omit this address, then the address will
be the same as upper mail address.
9) 'Include this account when receiving mail or synchronizing'
check option: If you check this option, then it will include this
account when it brings the mail.
10) Incoming Mail (POP3): Input incoming mail (POP3) server
address. Even if the PC Internet connects changes, this mail
server address remains the same.
11) Incoming Mail Port Number: sets and keeps the default num-
ber (110) unless it uses particular POP3 server.
12) Leave a copy of messages on server: Check and the mails
remain in server even when this program brings the mails
from server. If the mails remain in server, then you can
import and check them with other mailer programs (Outlook
Express). But it could make mail server full with mails and at
last, no more mail could be received. If you turn off this
option, then the mails in the mail server will be erased at the
same time importing mails from the server. And then you
cannot import them with other mail programs. So turn off this
option only when you are sure you don't need to import them
with other mailer programs later.
13) Outgoing mail (SMTP): If you use SMTP server, Input SMTP
server address of your Internet service provider.
14) Outgoing Mail Port Number: Use default number (25) unless
the mail server uses particular SMTP server.
15) 'Use SMTP Server' check option: Refer to the '4.2.1. SMTP
(Outgoing mail) server'.
16) Account name: The ID to log on to POP3 mail server.
17) Password: The password of 'Account name'.
18) 'Remember password' check option: Check and you can log
on automatically and if this option is unchecked, there will
show a Log on window when this program imports mails from
server.
1)Account list window: shows all registered accounts and when
you erase check mark, the accounts will be omitted for bringing mails.
2) 'New' button: Click and input to register new account.
3) 'Remove' button: Click and remove the account chosen in the
account list window.
4) 'Set as Default' button: Click to choose the account in the list
and set the Default account for using X-mailer. After you set
an account as a Default, this program keeps the setting when
you send or receive mails.
5) 'Import' button: Click to import registered accounts from
'Outlook Express'. At this time you should input the password
of account.
HS100-Eng_Bestbuy 8/12/97 8:24 PM Page 22
Page 13

English
25
English
24
d. Address Book
1) Pull-down menu
Edit - Choose All: You can choose whole addresses in the list.
Tools - Send Mail: You can send a mail to chosen addresses
in the list.
2) Address Book: It shows representative names and mail
accounts.
3) New: You can Input new addresses in the mail address list.
4) Modify: You can correct chosen addresses in the list window.
5) Remove: You can remove chosen addresses in the list win-
dow.
6) Import: You can import addresses form 'Outlook Express'
address book.
7) Close: You can close Address Book window. At this time all
changes are saved automatically.
Q1. What happens when I see a message saying, "Hi-Speed USB
device plugged into Non-Hi-Speed USB Hub"?
A1. This message is displayed when the USB2.0 product is
connected to the USB1.1 Host Adapter in Windows XP. In
such case, the USB 2.0 product operates at the standard
speed of a USB 1.1.
Q2. A tricking sound was produced while HS100 was not normally
connected to the computer.
A2. Product failure may be the cause. Contact the customer call
center for more information.
9. Troubleshooting
HS100-Eng_Bestbuy 8/12/97 8:24 PM Page 24
Page 14

English
27
1300 ) If warranty service is required, Digitalway, Inc. will issue a
Return Merchandise Authorization Number. Products must be
shipped in the original or comparable packaging with shipping
and insurance charges prepaid in U.S currency.
Digitalway, Inc. will use new or refurbished parts at its discretion,
and will own all parts removed from repaired products. Please
note that repair or replacement of a Digitalway, Inc. product during warranty will not extend the original warranty term.
4. Limitation of Warranty
Neither Digitalway, Inc. nor its third party suppliers make any
other warranty or condition of any kind whether expressed or
implied, with respect to the Digitalway, Inc. products, and specifically disclaim the implied warranties or conditions or merchantability, satisfactory quality, and fitness for a particular purpose.
5. Limitation of Liability
Except for the limited obligations specifically set forth in this warranty statement, in no event shall Digitalway, Inc. or its third party
suppliers be liable for indirect, incidental, consequential, or special damages or losses, including loss of data, use, or profits,
even if Digitalway, Inc. has been advised of the possibility of such
damages.
English
26
10. Limited Warranty Statement
Thank you for purchasing a Digitalway, Inc. product.
Digitalway, Inc. HS100 is provided 90-day limited warranty
against defects in materials and workmanship from the original date of purchase from an authorized agent.
1. Limited Warranty Conditions
The limited warranty is provided to the original owner only and is
not transferable to any third party. Proof of purchase will be
required for any limited warranty on Digitalway, Inc. products.
Digitalway, Inc.'s warranty covers only those defects which arise
as a result of normal use of the product, and do not apply to any
product:
(1) which has been repaired or altered unless done or approved
by Digitalway, Inc., (2) which has not been maintained in accordance with any operating or handling instructions provided by
Digitalway, Inc., (3) which has been altered or damaged by accident; (4) which has been subjected to unusual physical or electrical stress, misuse, abuse, power shortage, or negligence, (5)
which has been used other than in accordance with the product
operating and handling instructions or (6) damage resulting from
an Act of God.
2. Limited Warranty Coverage
Subject to the above conditions, within a period of 90-day of the
date of purchase, if Digitalway, Inc. receives notice of defect in
any Digitalway, Inc. product which is covered by Digitalway, Inc.'s
warranty, Digitalway, Inc. shall either repair of replace the defective product, at Digitalway, Inc.'s option. Digitalway, Inc. shall have
no obligation to repair or replace until the customer returns the
defective product to Digitalway, Inc. according to the Warranty
Procedure in below. Accessories and softwares are not warranted
by Digitalway, Inc.
3. Warranty Procedure
During the warranty period, DIGITALWAY will replace or repair
defective products returned to Digitalway, Inc., Address : 6440
Lusk Blvd. Suite D105 San Diego. CA 92128 or if you need an
inquiry 858-554-1300. Please contact Digitalway, Inc. for RMAformat. ( e-mail : customerservice@digitalwayinc.com or 858-554-
DIGITALWAY. INC.
Address: 6440 Lusk Blvd. Suite D105 San Diego. CA 92128,
USA
Tel: 858-554-1300.
HS100-Eng_Bestbuy 8/12/97 8:24 PM Page 26
Page 15

English
28
Memo
HS100-Eng_Bestbuy 8/12/97 8:24 PM Page 28
 Loading...