

Page 1

Preface
1) features
Support MP3, WMA, WAV format music
Thank you for choosing this mp3 player. For your proper and
skillful use, this manual will introduce all the functions of the
player in detail. Please read this manual carefully. It will be
helpful for you to enjoy high quality mp3 music. We think the
content of this manual is compiled seriously and correctly.
Please inform us in time if any mistake or careless omission
occurs.
Table of contents
1) features
2) introduct ion of operation interface
3) battery loading and unloading
4) software installation
5) file uploading and downloading
Recording function (about 500mins for 128MB flash)
Line-in function (WAV format)
FM stereo radio and inner recording
Portable flash memory
Repeat function
Six EQ models: Jazz, Classic, Rock, Bass, Popular and
Normal
Six play model: sequence, random, single repeat, totally
repeat, random repeat totally, 10 second preview
OLED color pictu r e display
TXT reading
Support edit play function
USB 2.0 port
6) operating fun c ti ons
7) operation precautions
8) specification
9) accessories
1
Support Windows95/98/2000/ME/XP, no drive for
Windows2000/ME/XP
Support simple and capital Chinese, English,
Korean, and European Languages
2
Page 2
Lyric synchro display
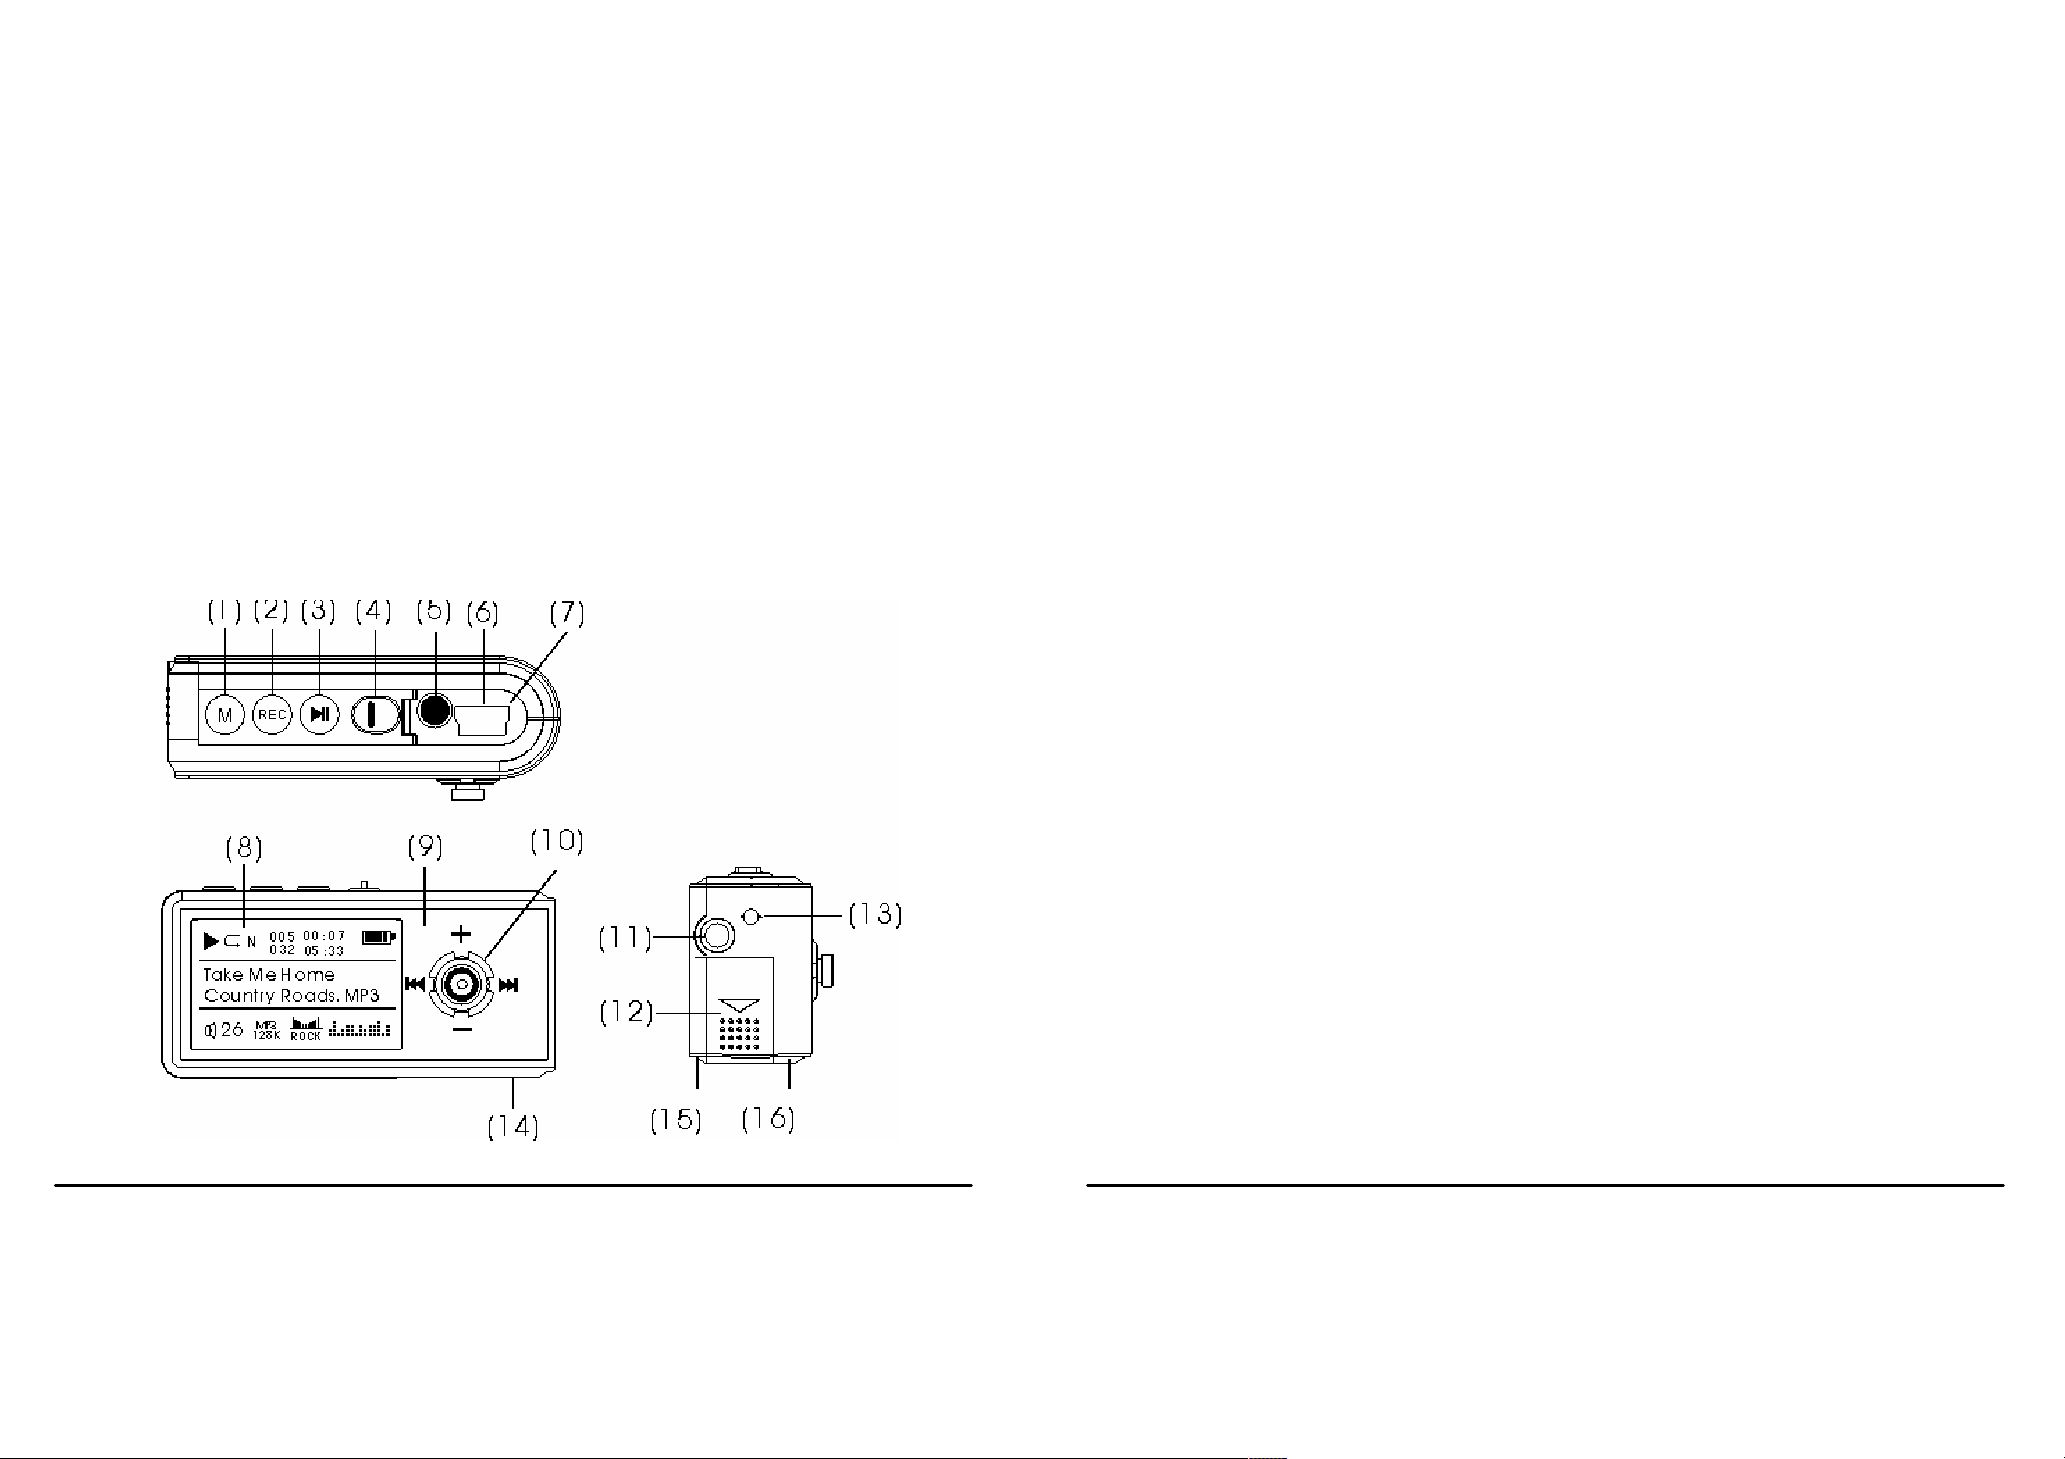
1. Functional button
Inner set fl ash memory: 128MB, 256MB, 512MB and 1G
Playing time: over 8 hours
32 class volume adjustment
Key button locking function
2) introduction of operation interface
Panel description
2. Recording button
3. Power on / off / play /pause
4. Hold lock / unlock
5. Line-in jack
6. USB socket
7. USB cap
8. LCD display
9. Aluminum de ck
10. Multi-functional button
There are four functions on the button. They are volume
3
up and down, search previous and next
11. Earphone jack
12. Battery door
13. Rope hook
14. MIC inner microphone
15. cover board (bottom)
16. cover board (face)
4
Page 3
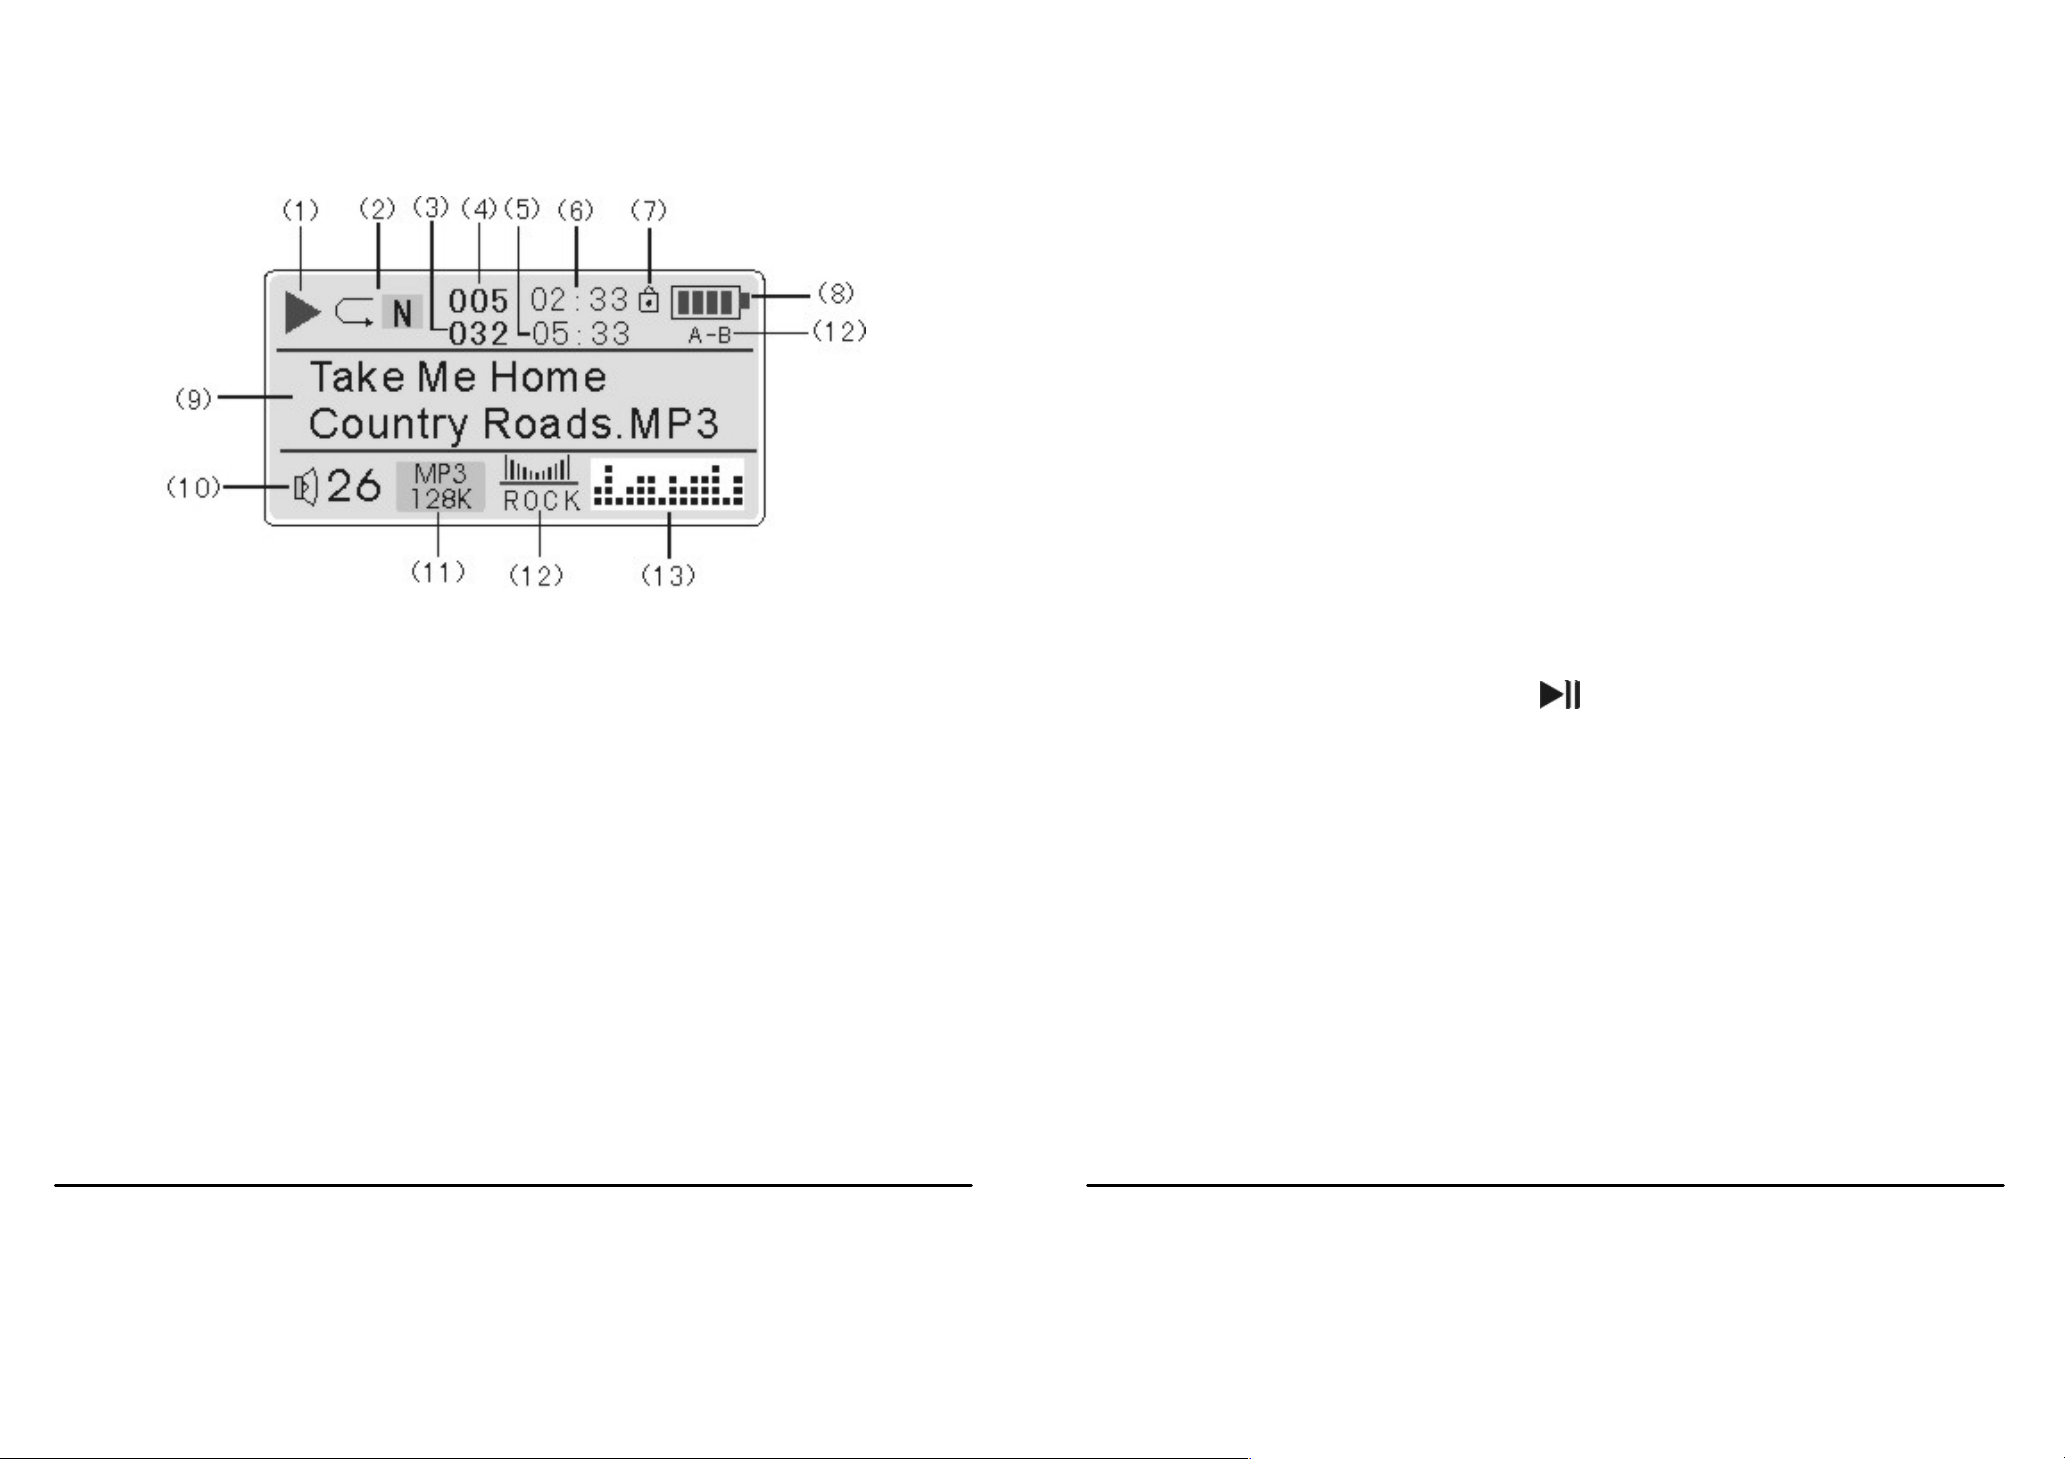
10. current volume indication
A. LCD display
1. play / stop / pause indication
2. play model indication
11. sort of the son g a nd bytes
12. sound effect
13. dynamic sound effect indication
3) Battery loading and unloading
1. To open the battery cabin, push the battery door in the
direction the arrow indicates
2. Load the AAA 1.5V battery into the battery cabin in the
indicated pole direction. Push to close the battery door.
3. Turn on the powe r. Pres s
to check the electric power
3. total song amount
4. sequence number of current song
5. total playing time of current song
6. elapsed time of current song
7. button lock indication
8. battery power indication
9. song and singer display
5
remained
4. Caution: If not using for a long time, please take out
the battery. When there is no power display after
battery loa ded a nd powe r on , plea se che ck t o s ee if it i s
properly loaded in right direction. Otherwise please
contact your local service for help.
6
Page 4

4) Software installation
A. Your PC must support: WIN98 ver2.0, WIN ME,
WIN2000, WINXP.
B. Your PC must be and have: IBM compatible, Pentium
166MHz processor or above, USB port, 32MB memory or
above, 20 MB idle hard disk space or above, optical drive
of 4 times speed or above, sound card (recommended),
able to surf internet (recommended)
C. For Windows98 operating system, you need to install the
D. If your computer has had the driving software, the system
may automatically unload when trying to install again.
Please do not connect the player. Otherwise it may lead to
possible ma lfunction for future installation and operation.
E. This mp3 software is an inter-dynamic interface between
the player and the computer. Files and data as MP3 /
WMA / voice and other data can all be downloaded and
uploaded between the player and your computer.
F. Installation Procedure
drive software to insure linkage and data transfer between
your PC and the mp3 player. For Windows2000 / ME / XP,
just insert the player into USB interface directly. The PC
can auto-recognize. When the computer keeps showing
“New Hardware Found”, please click “the next step” or
“confirm”. To recover and upgrade mp3 firmware, you
still need to in stall the driving software.
7
1. Turn on the computer
2. Load the driving software CD
3. Double click to run “SETUP” and follow the hint to click
“NEXT” or “YES”. The software will be loaded on your
PC.
4. When installation completed, “Sigmatel MSCN Audio
Player” will appear in the “START-PROGRAM” menu on
8
Page 5

the desktop which me ans a correct installation.
10
loading until “READY” appears on the LCD.
Note: For Windows98 sys tem, you ha ve t o restart yo ur
computer.
5) File uploading and downloading
A. After software installed on PC, to upload and download
MP3 / WMA or other fil e s, you nee d to c onn ec t th e play e r
with a USB line.
B. When connected, a link icon appears on the LCD of the
mp3 player. And your PC will
automatically find the portable memory disc.
B. Your computer will regard the mp3 player as a portable
2. If the player can not work properly accidentally, please
take out the batt ery, reload it after 3 seconds and re connect
to the computer.
3. The pl ay er s up po rts WAV files in IMA ADPCM format. If
you intend to save WAV files in other formats, please
create a new folder in the portable memory disc and save
WAV files to this folder. Please note: do not save WAV
files of other format to the root catalog and the VOICE
folder of the portable memory disc. It may cause the
player not effecting when playing the WAV files.
memory disc. By duplicating, it can upload and download
MP3 / WMA or other files as you need. During data
transmission, the icon on the LCD will flicker until
transmission done.
C. Cautions
1. When loading files, never disconnect or remove the USB
line to avoid damage of the mp3 player. Never start
9
4. Format the memory of the mp3 player
Before formatting, copy crucial files to your computer.
Turn on the player and be sure it is properly connected to
the computer.
Format the memory disc of the player as do the
hard disc
Warn: Formatting could dele all files in the memory.
Page 6
Don’t disconnect when formatting. Otherwise the
12
while th e icon s hown on the L CD fl icker s d uri ng up l oadi ng
player cannot startup because the system files could
be lost.
Cautions:
Don’t disconnect power supply and don’t unplug the player
while th e icon s hown on the L CD fl icker s d uri ng up l oadi ng
/ downloading under the system of Windows2000 /
Windows ME. Be sure follow safe instruction to unplug.
When insert the player to the USB port, you may find a
“
” icon on desktop as shown below. Double
/ downloading under the system of Windows98 / 95.
Otherwise data could be lost of files be damaged. Be sure
to remove the player from your co mpute r at least 5 seco nds
after the icon stops flickering.
6) Operating functions
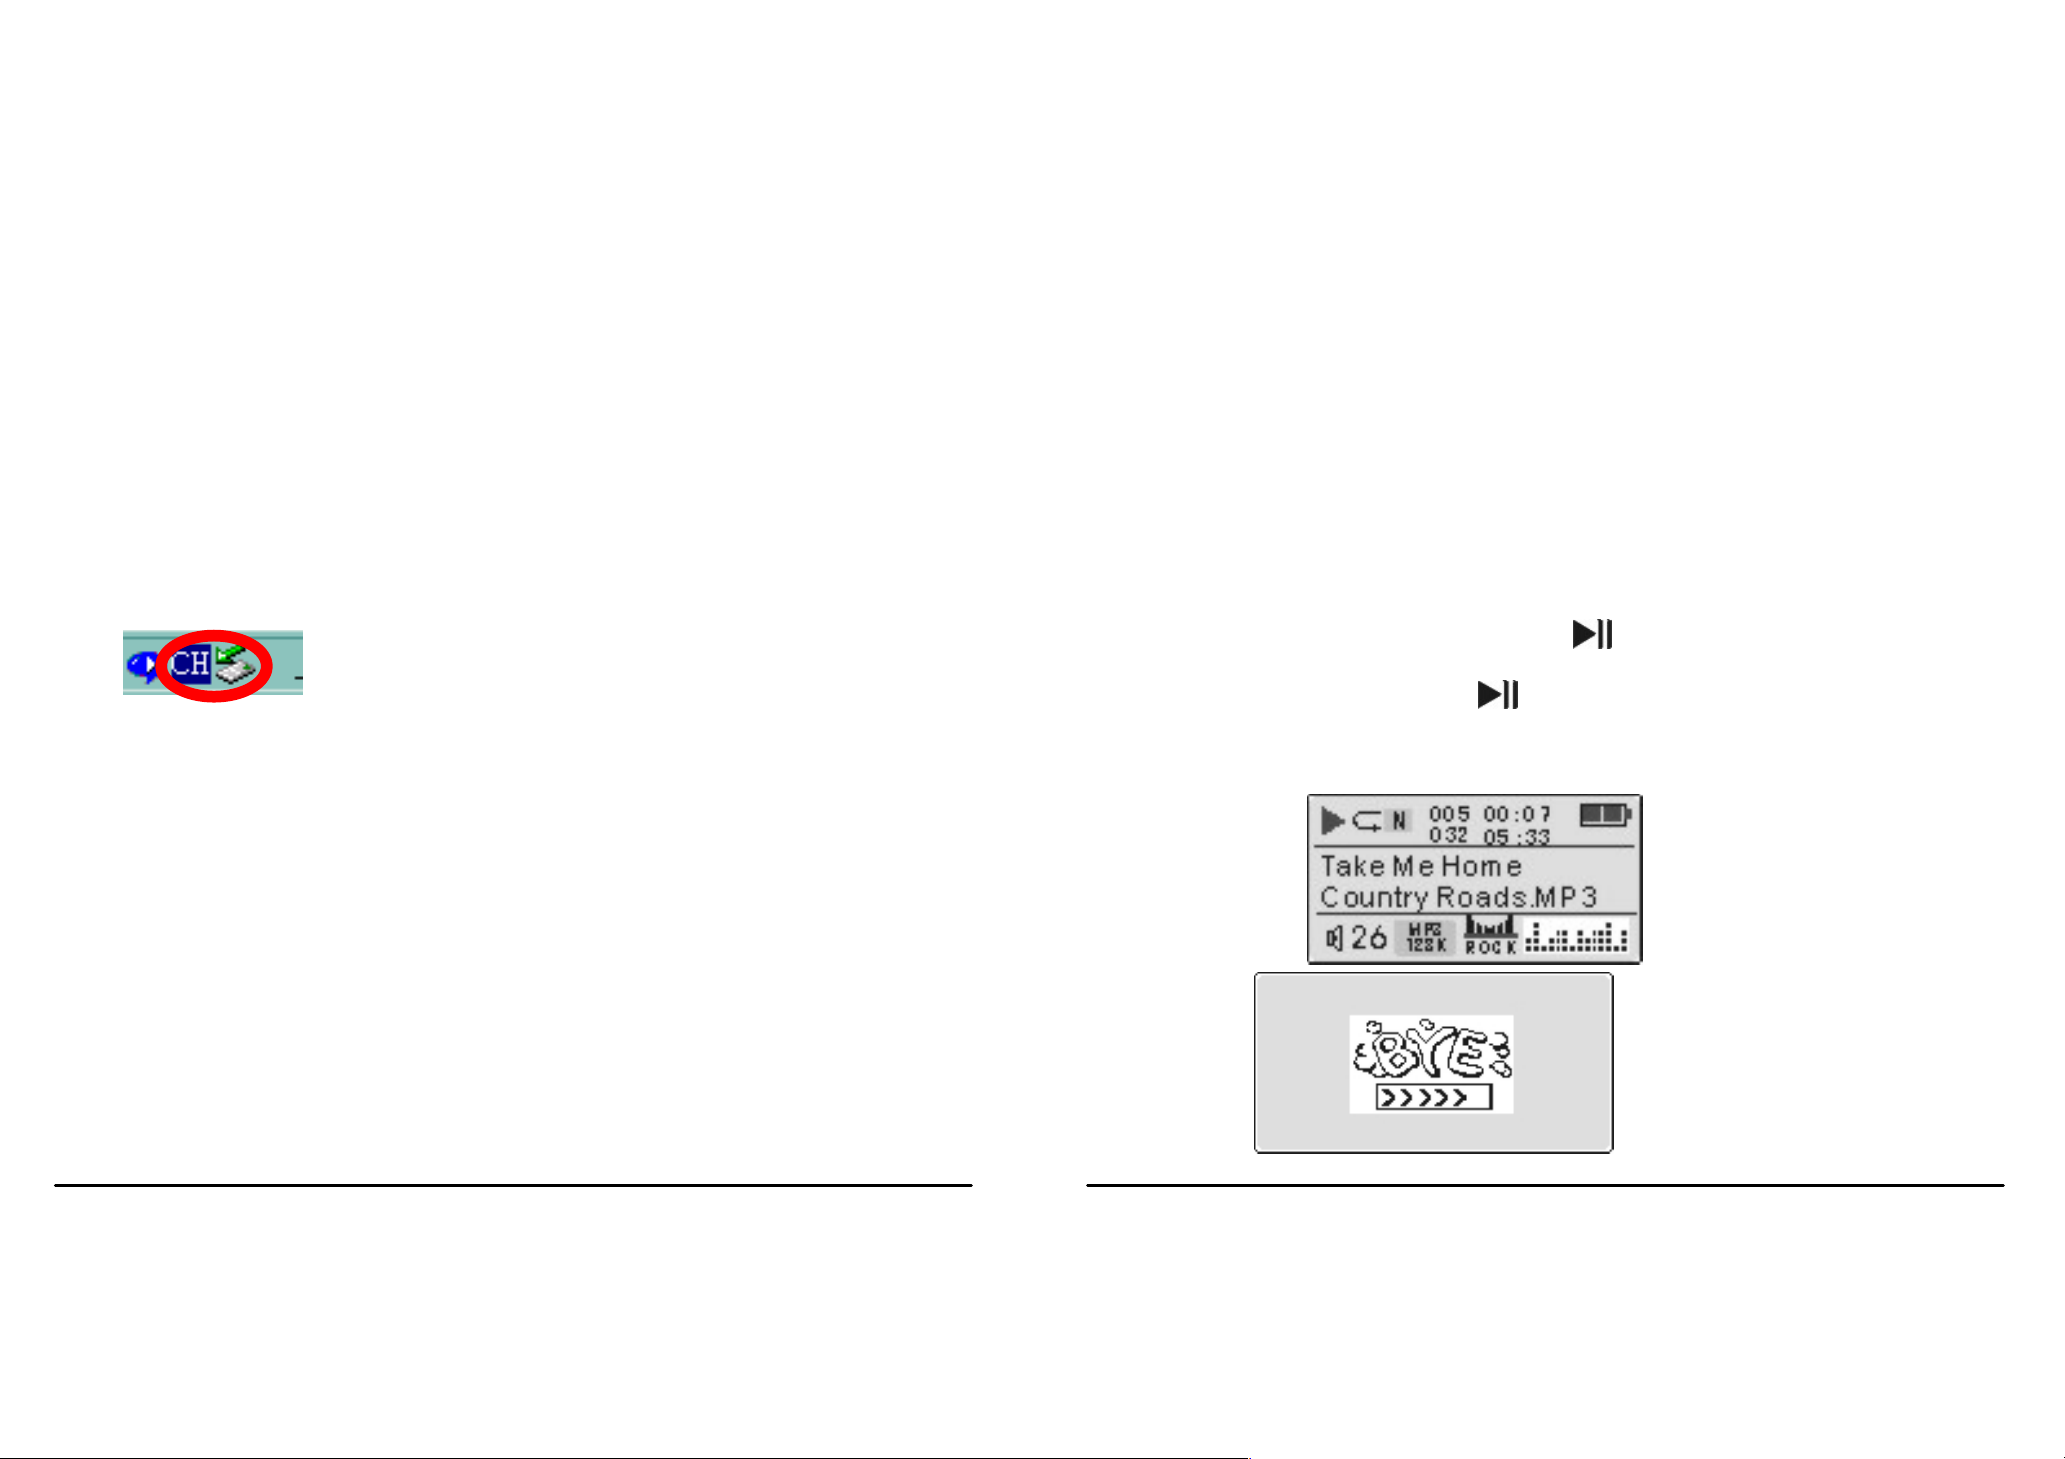
A. Turn on
Insert earphone into the earphone jack . Push Lock
button unlocked. Press
stand by. Press
again to play music. See left
to tu rn on the player and
click this icon, a new window of “unplug or exit” appears.
You may choose what you are going to remove. Then
choose “stop”. The system will again ask you confirm to
remove or not. Select “confirm”. The system will remind
you “you may be comfy to remove the hardware” and you
may remove the player from your computer with ease.
Don’t disconnect power supply and don’t unplug the player
11
below.
Page 7
13
B. Power off : When it is standing by, press and
14
D. Recording/playing function
hold on until the picture appears on the LCD. See
right below.
C. Play MP3 music files
1 After turn-on, press
Press the
become pause sign . Press the button
again to continue to play. Press
2 seconds to stop playi ng.
2 Press
Press
button again to pause. The play sign
or to select previous or next song. ,
or and hold on to fast forward or fast
to play, see up left figure.
and hold on for
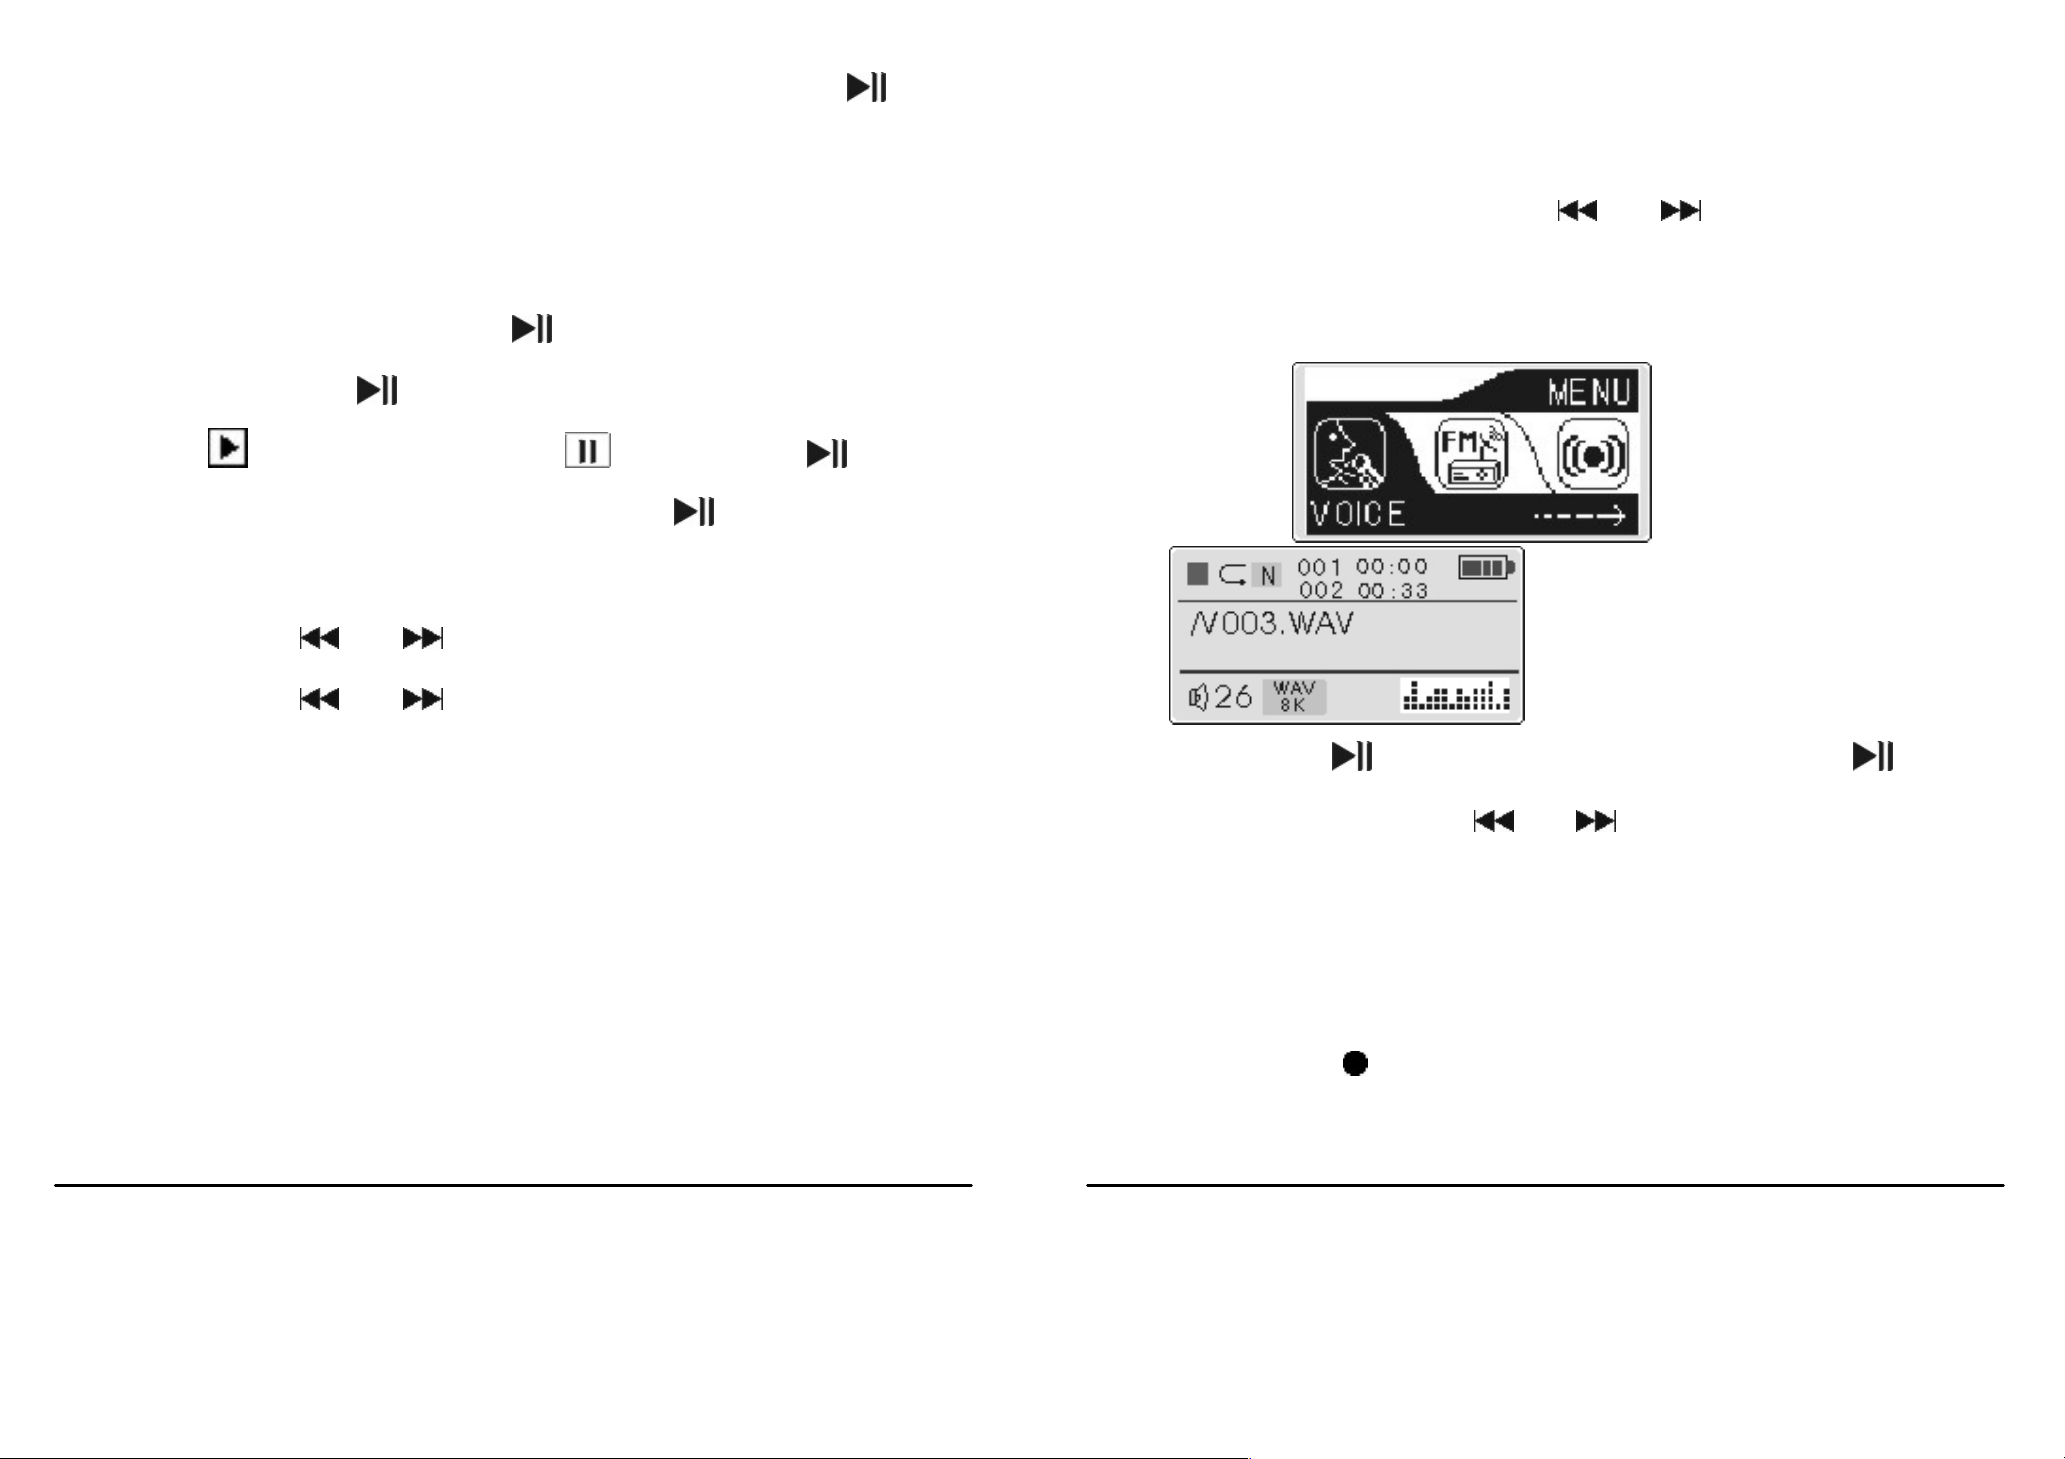
1 When playing, press the “M” button to enter
function menu. Press
menu. See left figure below. Press “M” again to
enter voice interface. See right figure below.
or to select “VOICE”
backward
3 When playing or standing by, press “+” or “-” to
increase or decrease volume.
4 Notice: When playing, the battery power may
jump, it i s not a malfunctio n. It is because of the
different power consumption.
2 Press
to pause. Press
next catalog. Press “+” or “-” to increase or decrease
volume. If there is no file recorded, “ No file
recorded ” will display on the LCD.
3 Press “
as left below. 00:00:33 is time spent to record.
to play the files recorded. Press again
or to select the previous or
” to start recording. Recording interface is
Page 8

15
09:12:56 is the remaining time to record.
16
5 When there is no more room for the memory disc to
record, It will show: “memory occupied”. Press
” to stop recording. It will auto-stop and back to
“
4 Press
Press
finishing, press “
recording interface. Press
last recorded files. Press
playing press “
to pause recording. See up right figure.
again to continue to record. When
” to stop recording and back to
or to select the
to play the file. When
” button to set start poin t of repeat,
play model
6 When standing by, press “
seconds to enter voice operation directly without
pressing “M” button.
” and hold on for 2
E. Line-in function
1 This function enables the player to transfer voices
brought by exterior audio devices into WAV format
and be saved. Please refer to recording setting in
H..5.
press “
the set part circularly. Press “
repeating and continue to play. Press “M” button
transitorily to exit recording function and b ack to the
up menu.
” again to set end point of repeat and play
” again to cancel
2 There is an audio cable in the accessories. Plug one
end into “Line-in” jack or audio out or earphone
jack. Open the USB cap and plug the smaller end in
the “LINE” jack. Press the “PLAY” button of the
exterior audio device to play in medium volume.
Page 9

17
3 Press “M” to enter function menu. Press or
18
below. Press the “M” button again to start recording.
See right figure below. 00:00:33 is the current
recording time while 09:12:56 is the time remained.
Recorded files are saved in the “LINE-IN” folder of
the mp3 player which will be automatically named
as Lxxx.MP3.
to select “LINE-IN” menu. See left figure
F. Radio operation
1 Enter radio menu: Press to turn on. Press “ M ”
to enter function menu. Press
“FM RADIO”. See left figure below. Press “M”
again to enter the interface to choose stations. See
right figure below.
or to select
4 Press
continue . Pres s “
playing interface. Press
recorded. Press
to pause recording. Press again to
” butto n to st op and back to voice
or to select the file
to play.
2 Listen to broadcasting: Press
local stations saved. (need to search and save in
advance) Press “+” or “-” to increase or decrease the
volume. This player will automatically search all
local broa dc ast pr ogram s at y our fir st tur nin g on an d
or to choose
Page 10

19
entering radio model. As shown in the left figure
20
below, the auto-searching take s about 45 seconds. It
will broadcast programs of the first station
automatically. If the stations are too less or not clear,
please follow step 3 and step 4 to search manually
and save.
3 Manual searching: As show in the figure above,
press “M” to enter searching. “Radio” turns into
“Scan” as shown in the left figure below. Press
or
0.1MHz. Press
to manually adjust the frequency in variety of
or and hold on to
auto-searching. Searching will stop and play the first
4 Save stations: After manual searching , press “M” to
enter “Store” as shown in the up right figure. Press
or to select a station to save. Then press
to save as shown in the left figure below. 30
stations could be saved. The player will
automatically re turn to radio model.
station when searched. If the stations are too less or
not clear, we suggest you press
or shortly.
, the
5 Auto searching: When enter to scan, press
player will search all local stations and save
automatically as shown in the up right figure. It will
Page 11

21
automatically turn i nto radio model and play the first
22
Press to pause. Press the again to continue.
broadcast station saved after auto searching.
6 Dele station: After auto searching, press
to select to listen radio programs one by one. If the
program is not clear, you may dele. Choose the
station you are intended to dele, press “M” to enter
dele model as shown in the left figure below. Press
to dele and it returns “radio” model
automatically as s hown in the right figure below.
or
Press “
radio programs recorded is operated as to play the
files, back to voice menu, press
saved file to play. The recorded radio program files
are auto named as “FXXX.WAV” and saved in the
FM folder of the player. The FM folder is
auto-created when recording.
” again to back to radio model. To play the
or to select
7 Radio recording: When listening to a radio program
and intend to record, press “
” button to record the
program you are listening. Se e the left figure below.
8 Exit: Press “M” and hold on until return menu
appears as shown in the up right figure. Press
to
return to MP3 model.
Note: Pressing
can only temporarily save the
Page 12
23
stations. Saving will be lost when take out the
24
press “M” again. Set the end point “B” as shown in
battery. To save permanently, pressing
button lo ng a nd or din ary power off are required.
One station may be selected directly to listen
without searching on next turn on.
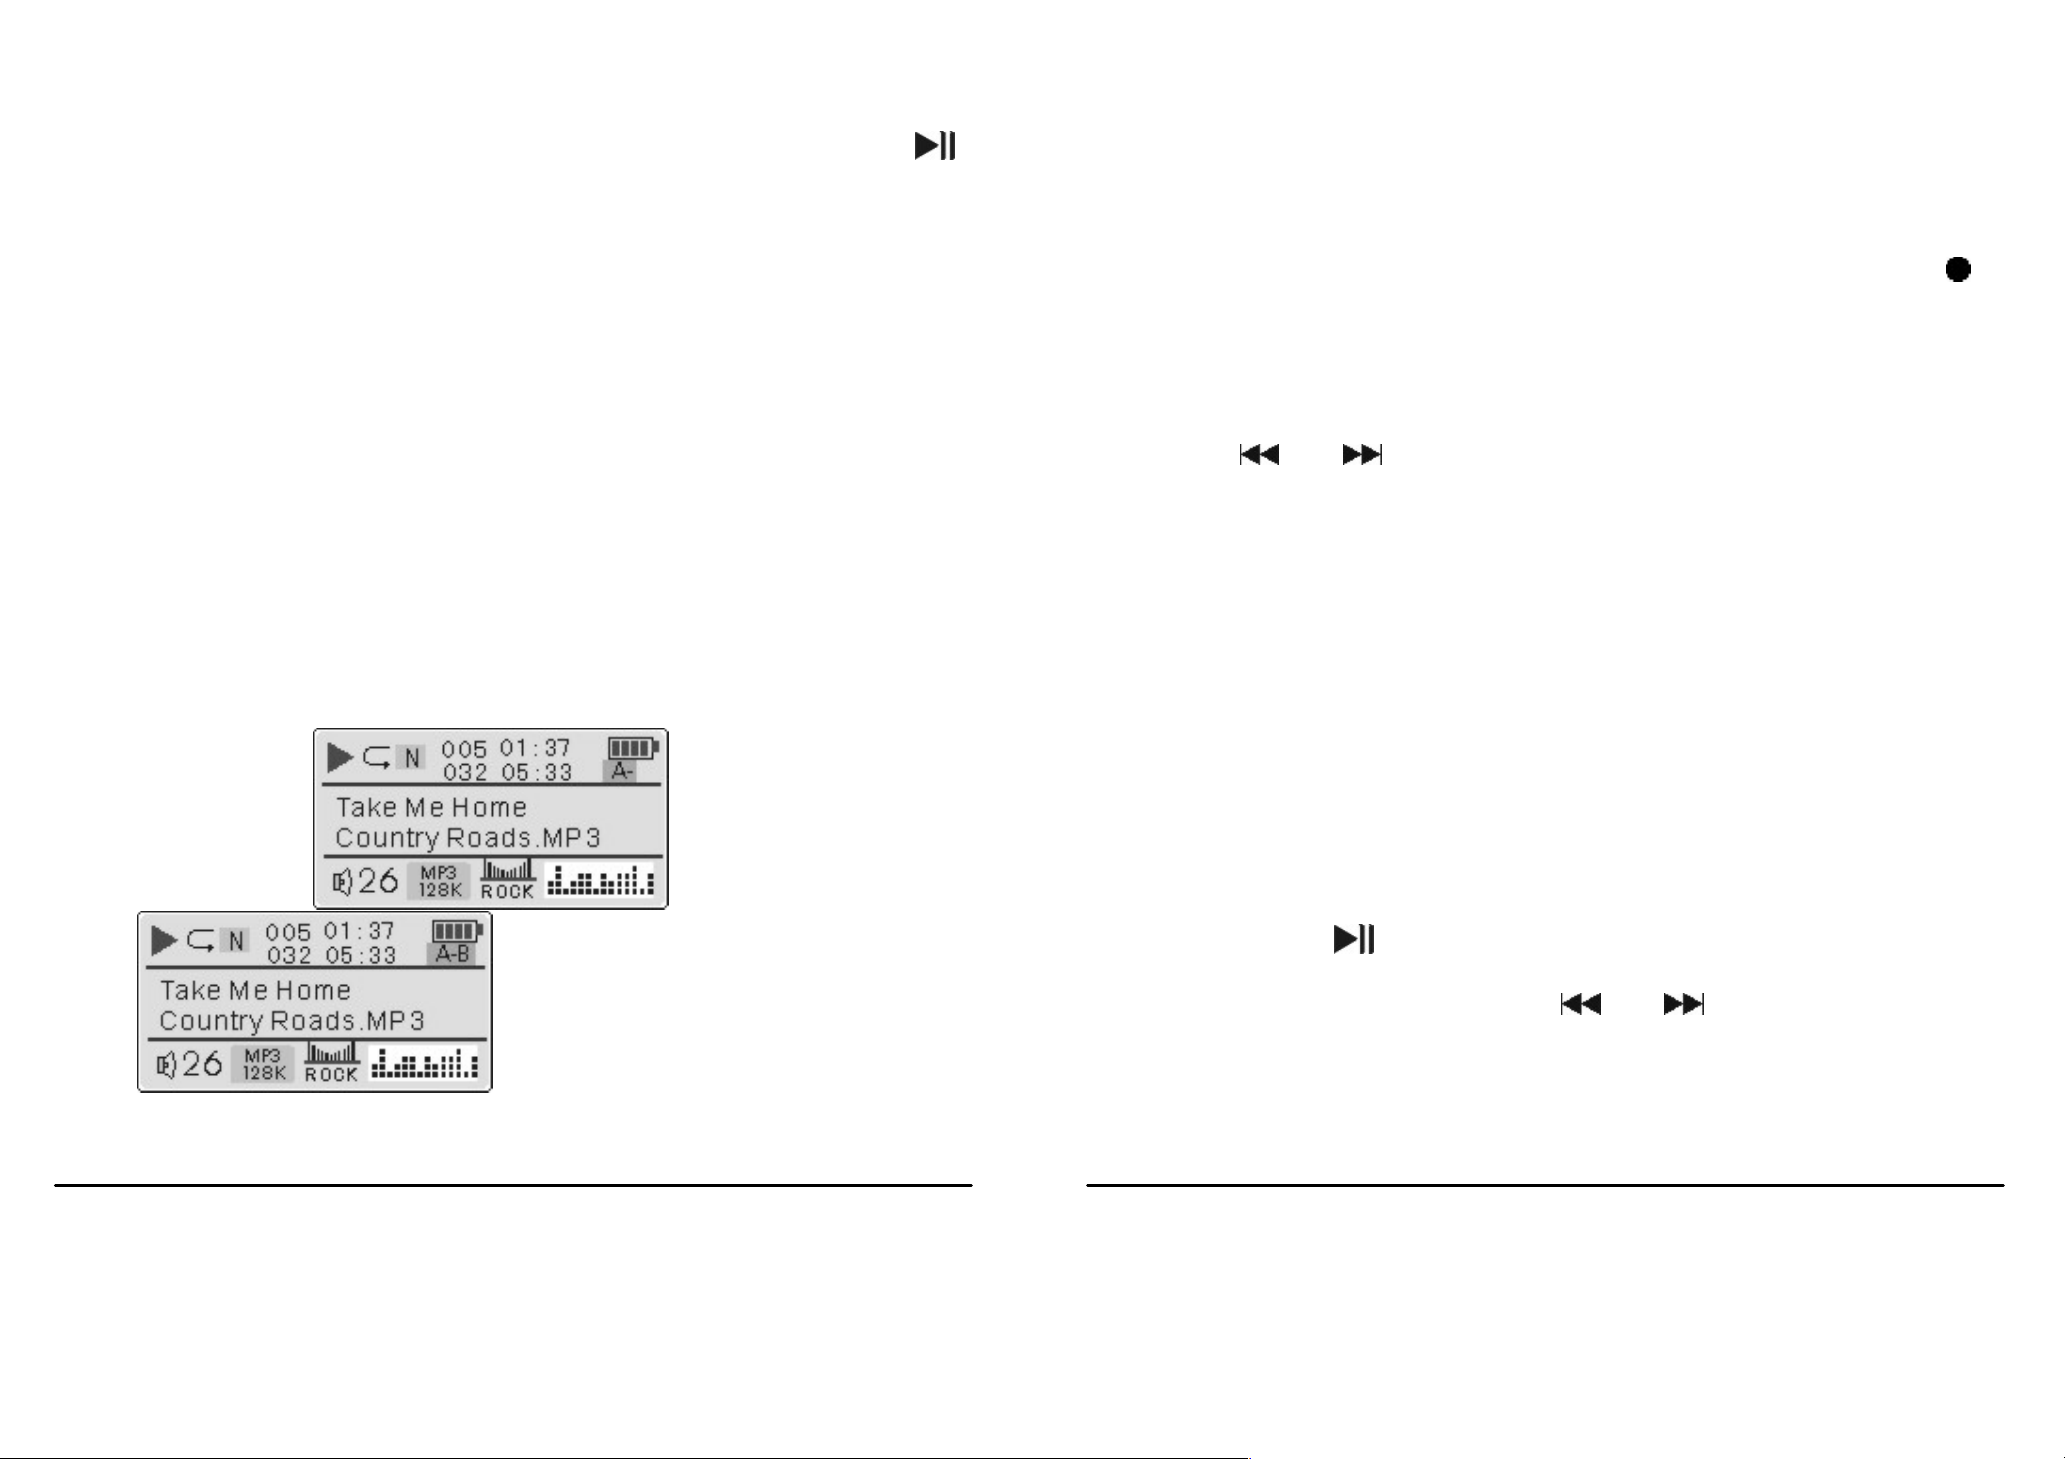
G. Repeat function
1 When playing mp3 or recorded files and at the start
point of a paragraph which you need to repeat, press
“M” shortly. Set the start point “A” as shown in the
left figure below.
3 When playing circularly between A and B, press “
the up right figure. The player will play circularly
between A and B.
”
button to cancel repeating. The player will play the
current music. You may cancel repeating by pressing
or and select a song as you li ke.
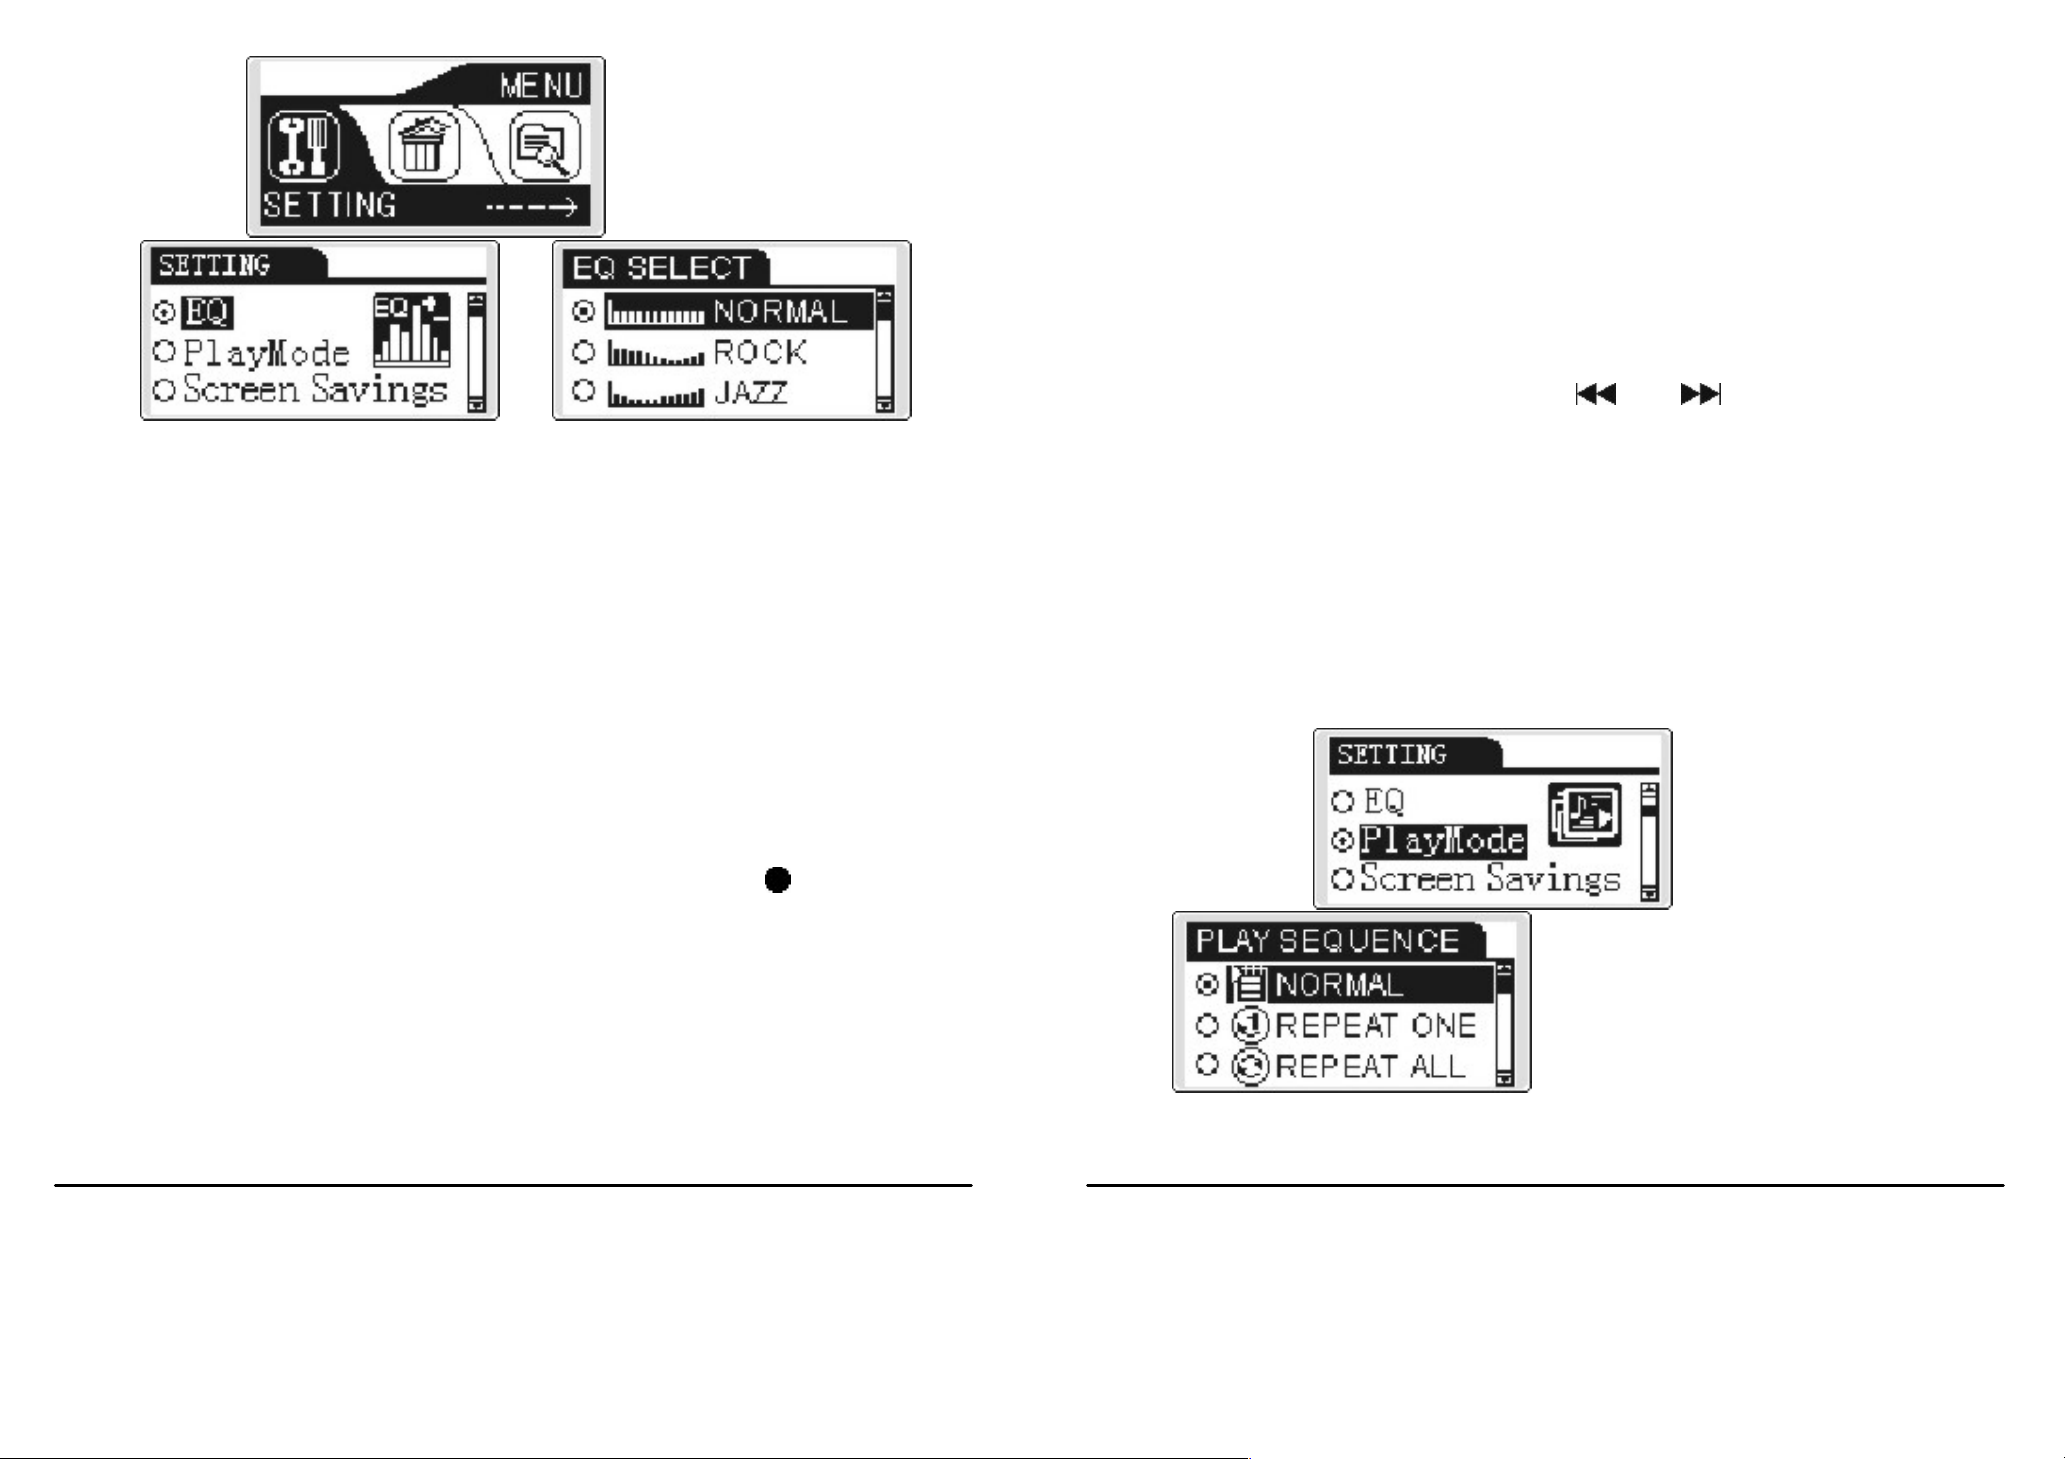
H. Menu setting operation
1 EQ setting
You may select different EQ model upon different
type of music you enjoy. There are 6 EQ models,
JAZZ, CLASSIC, ROCK, BASS, POP and
2 Continue to play. At the end point of the paragraph,
a) Press
NORMAL.
to turn on the player . Press “M” to enter
function menu. Press
shown in the left figure below.
or to select setting as
Page 13
25
26
2 Play model setting
When playing, you may prefer to enjoy one song or
b) Press “M” to enter setting interface. Press “+” or
“-“” to select EQ as shown in the up middle
figure. Press “M” again to enter the EQ interface as
shown in the up right fi gure.
c) Press “+” or “-“” to a djust different EQ. Pre ss “M”
to confirm and exit the current setting. Press “+” or
whole songs circularly. This function may
implement.
a) When turn on or playing, press “M” to enter
function menu. Press
or to select setting.
Press “M” again to enter setting interface. Press “+”
or “-“” to select play model interface as shown in
the left figure below. Press “M” again to select play
sequence interface as shown in the right figure
below.
“-“” again to select exit menu to exit.
d) When playing mp3 music, pressing “
” may also
change the EQ model. Release the button and press
it again, EQ model may be changed once more.
e) Note: There is no EQ selection for every recording
file.
b) Press “+” or “_” to set circular model.
Page 14

27
Circular models are in sequence: sequence, random,
28
single repeat, totally repeat, random repeat totally, 10
second preview.
Sequence: all songs play once in order and stop
Random: play random as per the player’ s inner setting
Single repeat: circular play current song
Totally repeat: play as per the player’s inner setting
and repeat all
Random repeat totally: play all the songs random and
repeatedly
10 second preview: play the first 10 seconds of each
song
b) Press “M” again to enter LCD protection time
setting interface as shown in the up right figure.
c) Press
or to increase or decrease the time.
When finished press “M” to return to the upper
menu.
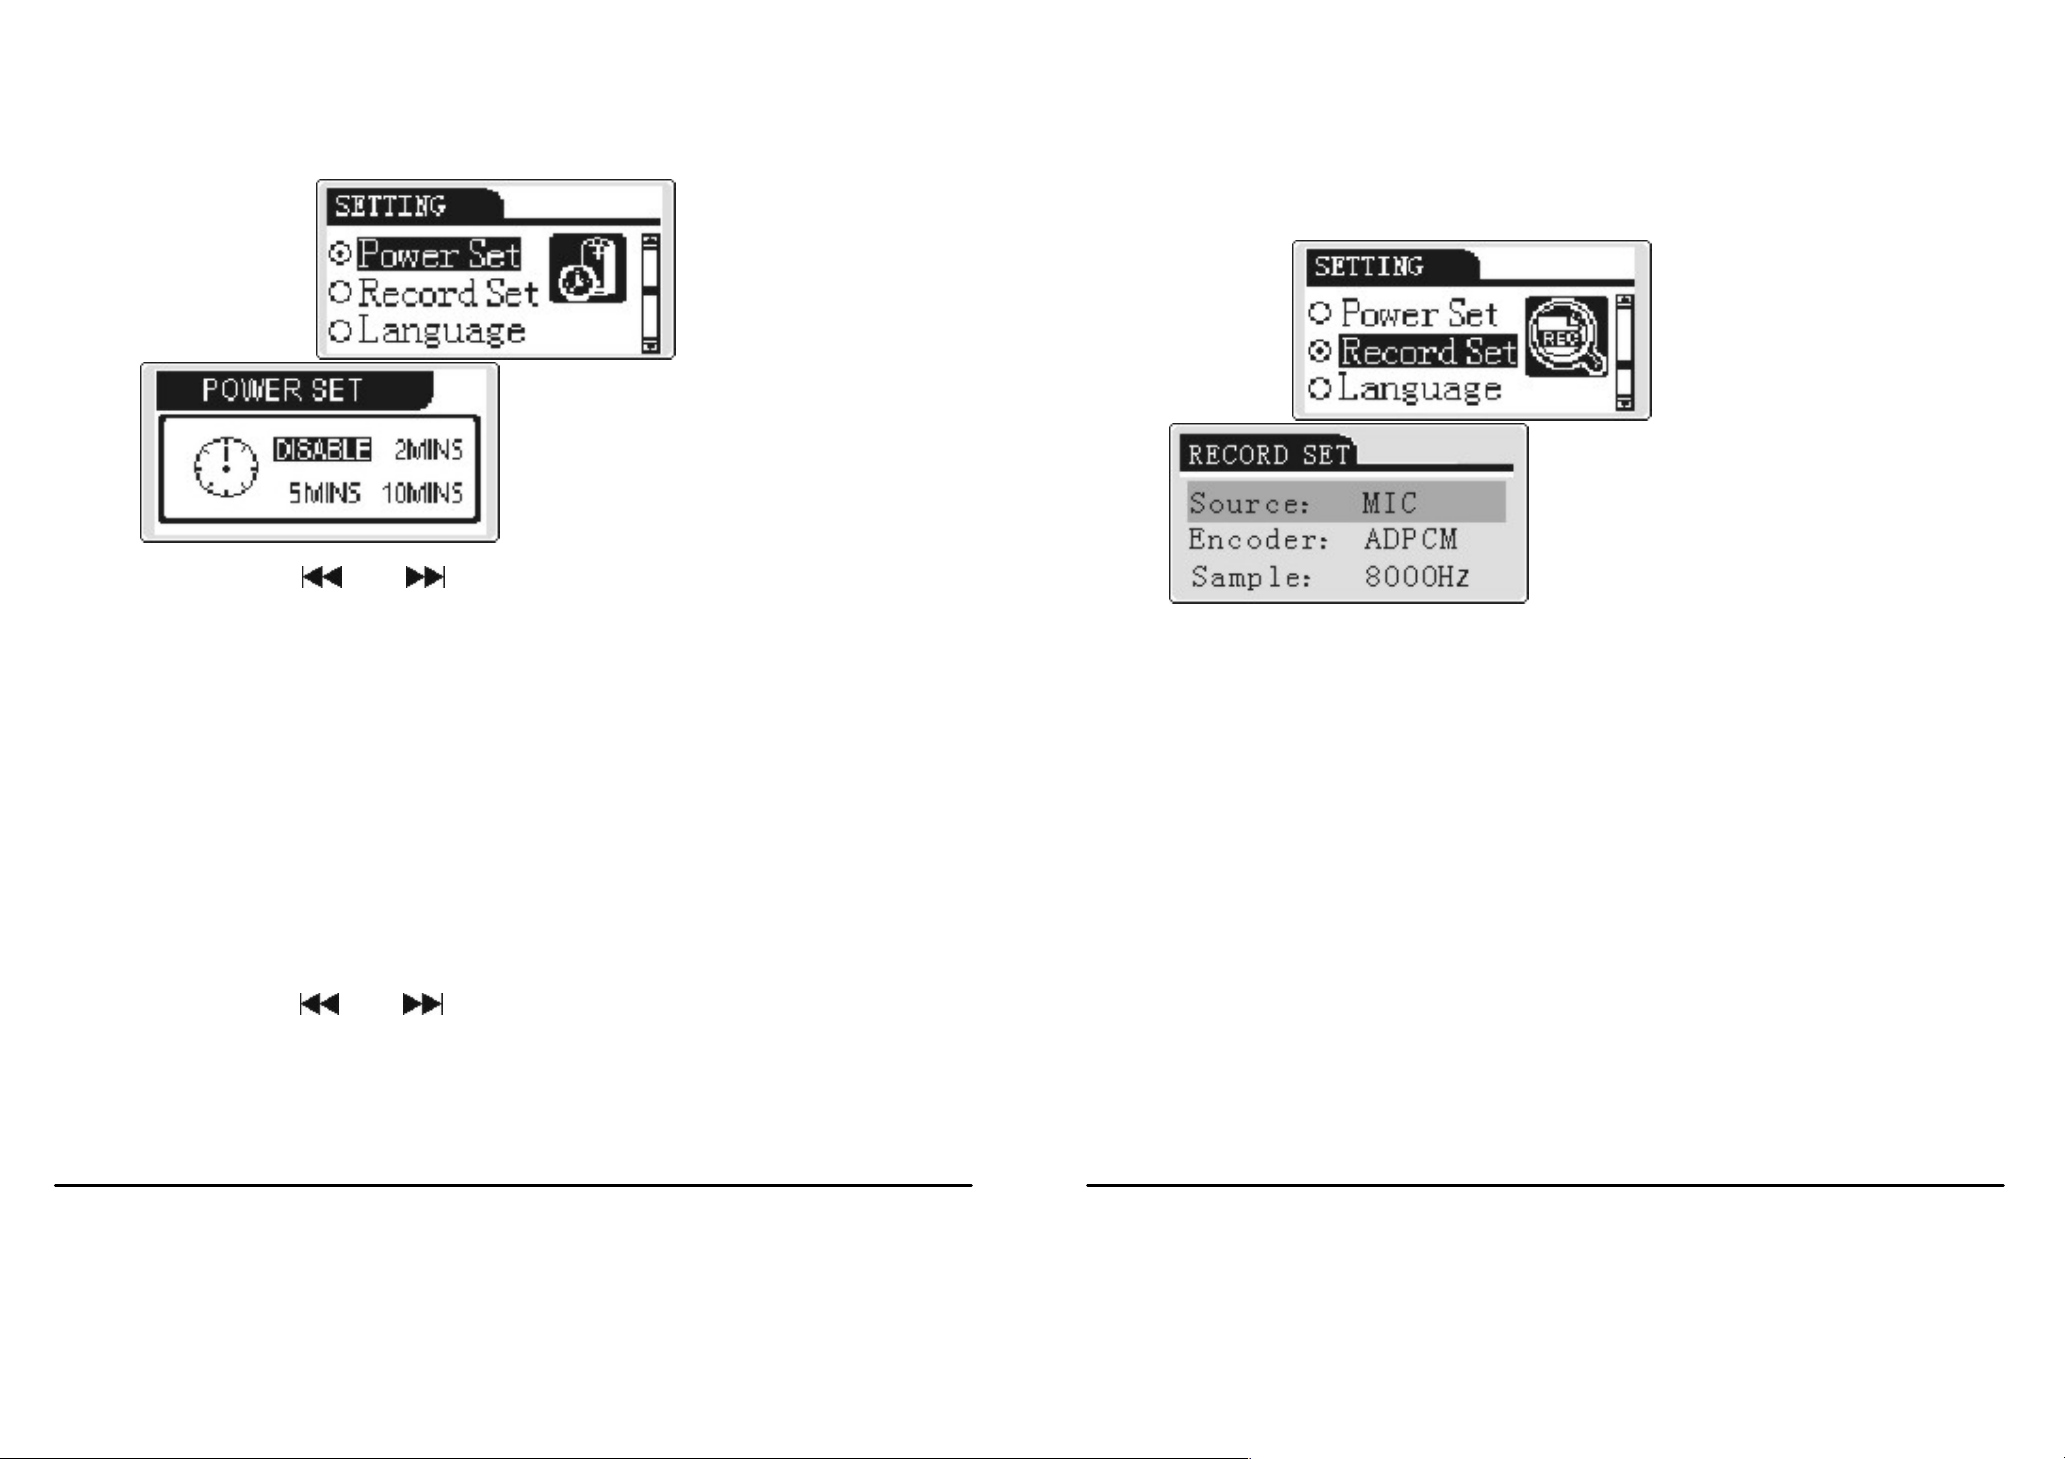
4 Turn off setting
3 LCD protection
a) When turn on press “M” to enter function menu.
Press
or to select setting. Press “M” again
a) When turn on press “M” to enter function menu.
to enter setting interface. Press “+” or “_’’ again to
select LCD protection setting as shown in the left
figure below.
This setting is to turn off the player in a period
when there is no operation after turn on.
Press “
or to select setting. Press “M” to
enter setting interface. Press “+” or “_” to select
turn off setting interface as shown in the left figure
Page 15
29
below. Shortly press “M” again to set as shown in
30
Press “M” again to select a setting term as shown in
the right figure below.
b) Press
the player is on but there is no operation. Time:
forbidding, 2 seconds, 5 se conds, 10 seconds
or to select the auto off time when
the right figure below. When a term selected, press
“M” to change the ter m.
b) There are three recording terms: source, encoding,
sampling
Note: If selecting 2 seconds and there is no operation,
the player will turn of f au to matically in two seconds.
5 Recording setting
a) When turn on press “M” to enter function menu.
Press
or to select setting. Press “M” again
to enter setting option. Press “+” or “_” to select
Source: To set recording source, the player
could choose either microphone or external
input. When recording by inner microphone,
set microphone. When recording from
external (LINE-IN), set external input as
shown in the left figure below.
recording setting as shown in the left figure below.
Page 16

31
32
Generally inner recording sampling frequency
is 8KHz while LINE-IN recording sampling
Encoding: This term is to set the sampling
encoding. Press “+” or “_” to select encoding
as shown in the up right figure. Press “M”
again to change once. When recording from
external (LINE-IN), set IMADPCM as shown
in the up right figure.
frequency is automatically set at 32 KHz that
might be rectified by users.
c) If not entering the recording setting to rectify the
above terms, when recording from inner
Sampling: To set for sampling frequency.
Press “+” or “_” to select sampling as shown
in the left figure below. Press “M” to change
as shown in the right figure below. Higher
d) After setting press “
sampling frequency brings better music
quality but takes more memory room.
MIC, it will be auto-set as “Microphone / PCM /
Mono-/8k”. When recording from external, it will be
auto-set as “LINE-IN/ IMADPCM/ Stereo/ 32k.
” to return the upper menu.
We suggest users not to rectify except special
occasions occur.
Page 17

33
6 Language selection
34
language to obtain c orrect display.
When turn on, press “M” to enter function menu. Press
or to select setting. Press “M” again to enter
setting option. Press “+” or “_” to se lect langua ge setting
interface as shown in the left figure below. Press “M”
again to enter language setting options. Press “+” or “_”
to select a language as shown in the right figure below.
When a language selected press “M” to return to the
upper menu.
Caution:
When finishing one setting, press
To save the battery power, the turn off setting is
I. Dele file
to turn off,
setting will be saved. If taking out the battery to
turn off, all settings will not be saved.
important. Generally be 2 seconds.
To dele files in the mp3 player, you may either
operate the key buttons of the player or apply a
If strange symbols occur to the loaded song name, set the
PC .When songs or voice files need to be dele,
follow the operation below:
Turn on the player, press “M” to enter
function menu. Press
“DELE” as left figure below. Press “M” again
to enter “dele file” menu. Press
again to select “dele music files” or “dele
or to select
or
Page 18
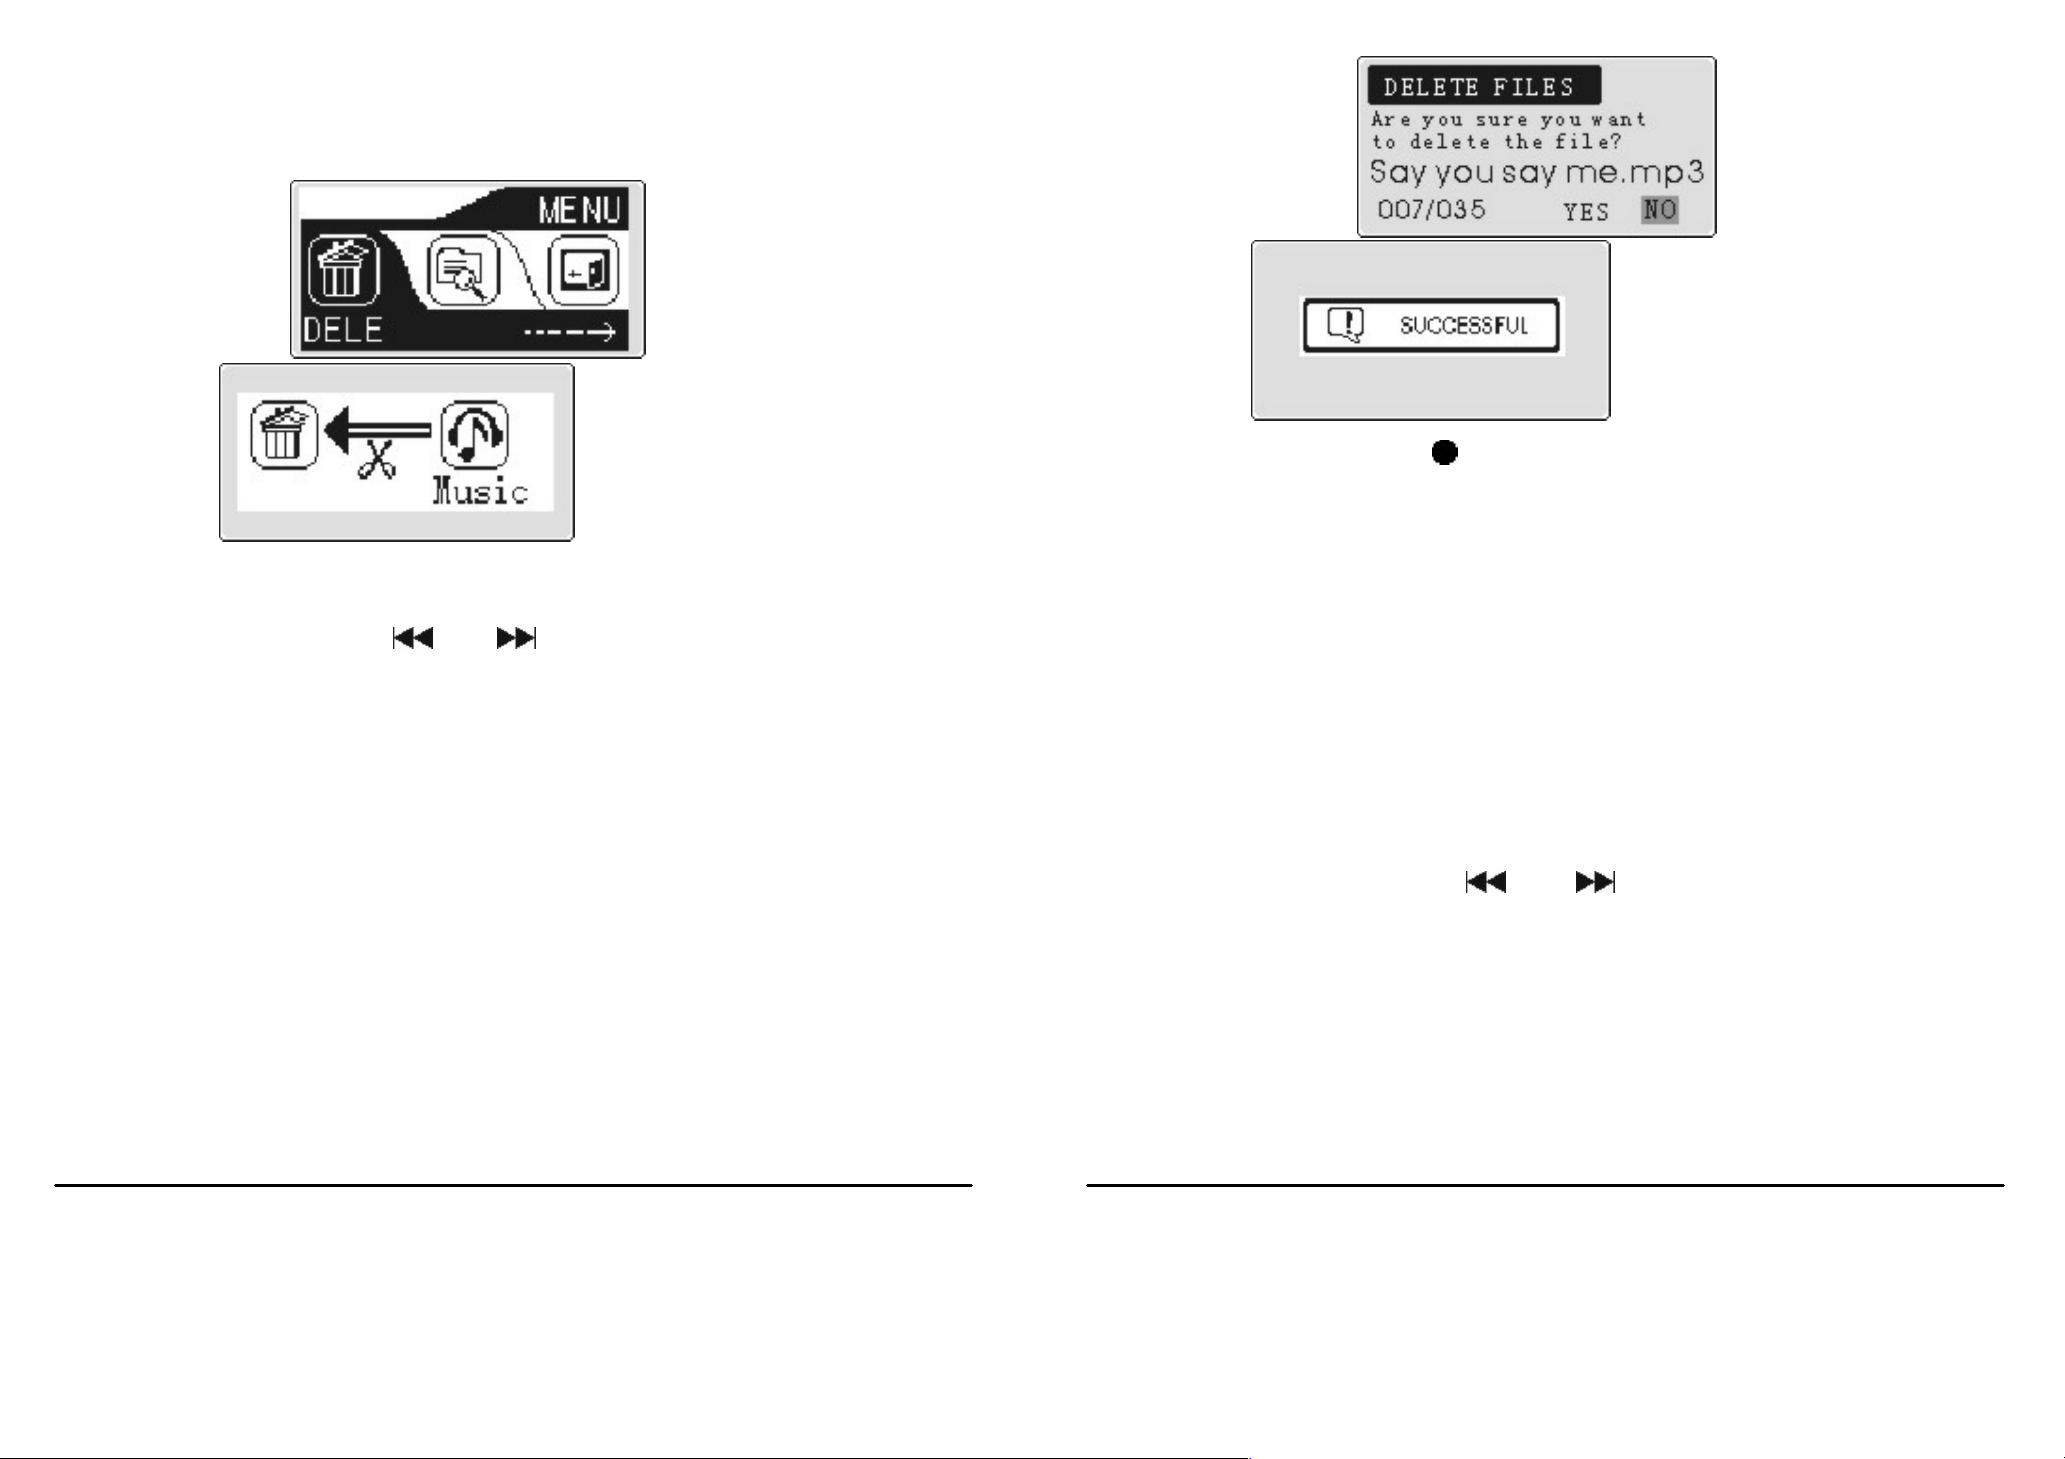
35
voice files” as shown in the right figure below.
36
Select “dele music files”.
Press “M” to enter dele music files interface.
Press
the left figure below. Press “+” or “_” to
confirm the file, select “yes”. Then press “M”
to dele the file. “successful” will appear on
the display as shown in the right figure below.
or to select the file as shown in
Press “
When there are various music folders in the play er,
a Turn on the player, press “M” to enter function
J compiling play function
edit play function could make the player to play a
sole song or file in a sing le folder indep endently.
menu. Press
” to return to the upper me nu.
or to select “navigate” as
If “dele failure” appears on the display, please
link the mp3 player to your PC and check the
attribute of the song, change “read only” into
“save”.
shown in the left figure below. Press “M” again to
enter the sub-menu of “navigate”. Press”+” or “-”
to select “P&S play” as shown in the right figure
below.
Page 19

37
38
to select “navigate” as shown in the left figure
below. Press “M” again to enter sub-menu of
b Press “M” again to enter the root directory. Press
“+” or “_” to select a folder or a song. Press
play the content of the folder or the selected song..
c Press the “M” again to return to the folder selection.
Press “
“.Press “M” to return and compiling play function
” to return to the upper menu, select “exit
to
“navigate”. Press “+” or” -_” to select “EBOOK”
as shown in the right figure below. Press “M”
again to enter file options. Select a file and again
press “M” to start reading. Press “+” or “-” to up
and down. Press “
” to return.
be canceled.
K TXT reading
Files in txt format may be saved in the player.
When txt files are downloaded, you may read on
the player. Press “M” to enter menu. Press
or
L Memory and Version inquiry
Turn on the player, press “M” to enter function
menu. Press
shown in the figure below , Press “MENU” to
or to select “INFO” menu , as
Page 20

39
enter. You are easy to find the memory room
40
professional lyric software. Both of them
remained and the version of the player. Press “M”
to the upper menu.
M Lyrics synchro display
There must be Lyric file which has the same
name of the song in the mp3 player. The
two files should have the same name under
are using time sequence to edit. They have
the form as “(mm:ss)” or “(mm:ss: ff)”.
7) Operation precautions
1 Precautions
a prevent from overheated, moist
environment
To assure the device, do not use it in
surroundings as overheated, extreme cool,
wet. Shower room with high temperature is
one catalog except the extensive name. The
extensive name of the Lyric files should be
LRC.
Make Lyrics file
Generally there are two methods to make
lyric files. One is to use notebook tool in
operation system. The other is to use
strictly prohibited. Do not expose to stove,
oven, or long time sunshine as in a parked
car.
b Prevent collide
Avoid dropping from high places, or collide
with hard objects. It may cause damage.
Page 21

41
42
c Pl ease do not dis assemble the devi ce. For
query regarding the device, please contact us,
or your local service center or distributor.
d Remove the battery when not use for long.
Battery linkage may damage.
2 Tr ouble shooting
a Press
, no display
There is no battery loaded, load one.
b Settings can not be saved
press
and hold on for a while and turn
off the device to keep long time saving.
c Shut–down again after turn on the
device for several seconds.
Check if the device has been locked up.
Push unlock the player by moving
HOLD
Check if battery be exhausted
The battery be exhausted or not be
loaded in the right direction.
LCD contrast ratio not properly set, set
contrast ratio again
Due to accident, the device does not
work. Removal the battery, install back
in about 5 seconds
d Shut –down again after turn on the
device for several minutes
It is a setting to save power. When no
instruction has been sent, it turns off
automatically. You may cancel this setting.
Page 22

43
e There is no sound when playing
44
Volume setting is t oo low. Adjusting
No music file in the player
f After connection, portable hard disc not
found.
Check if you have properly loaded the
drive software
Loading software be damaged
Your PC doesn’t support USB port. You
need to upgrade
g Can not play MP3 file
This device supports only standard
compressed format, make sure you have
the right compressed method. Do not
st
compress using 1
or2nd layer.
h Why there is no time showing when
playing some songs?
For MP3 files, adopting VBR format
Your computer driving software
Or your computer has loaded some
higher driving software. Dele all INF
and PNF files which contain
“ Sigmatel” info, in “OEMO-6.INF”
and “OEM-6.PNF” under Windows/
INF”
(namely compressed mp3 files with variable
speeds). It will display only “VBR”. To have
time display, you may re-compress the files
by adopting fixed speed.
Page 23

45
46
8. Specific at i ons
flash memory 128MB/256MB /5 12 MB/ 1G
battery 1 AAA alkaline 1.5V
display OLED color
dimension 57x27x18mm
file transfer speed 4Mbps max
SNR 90 dB
Maximum Output
5mW(L) + 5mW ®
Frequency
20KHz-20KHz
Response
9) Accessories:
1 MP3 player 1 set
2 USB cable 1 set
3 Line-in Audio line 1 set
4 Earphone 1 set
5 CD 1 set
6 Manual 1 set
7 AAA battery 1 set
8 Warrant card 1 set
9 QC pass card 1 piece
Recording
8KHz-32KHz
Sampling
FM Frequency 88MHz-108MHz
MP3, 8Kbps-320Kbps
Compress Speed
WMA, 5Kbps-192Kbp
 Loading...