

Page 1

2
Digital Sound MP3 Player
What is MP3?
MP3 stands for MPEG 1/2 layer 3.
MP3 files can be compressed up to 1/20 size of
the original wave files.
What is the MPIO?
The MPIO stands for Multi-Play Internet AudiO,
is a new generation digital audio player.
You can purchase MP3 files on the internet
and download them directly to your MPIO for
CD quality sound without the need of casette
tapes or CDs.
Up to 30 Hrs Play
with Remote
Control and USB
Connection!
Digital Sound
The MPIO maintains high
quality sound at all time.
Page 2

3
• This equipment has been tested and found to comply with the
limits for a Class B digital device.
Player Features and Controls..
Accessories
Inserting the battery
Display(LCD) panel
Listening to the sample music
Adjusting Vol(Volume) / Hold mode
REP(Repeat) mode
EQ(Equalizer) mode
AB(Repeat Segmentation) mode
Installing Software on PC
Installing The MPIO-DME Manager
Connecting the MPIO to PC
Formatting Internal Memory
Downloading Files to the MPIO
Erasing Files on PC
Arranging the Playback Order
Inserting the SMC(SmartMedia Card)
Safety Precautions
Troubleshooting
Technical Specifications
Warranty
4
6
7
8
9
10
11
13
14
15
16
17
18
19
21
22
24
25
26
27
28
CONTENTS
Page 3

4
PLAYER FEATURES AND CONTROLS
USB Connector
Power on/Play/Pause
LCD
Earphone Jack
Hold Switch
Volume Control
Rewind/ Fast Rewind
Forward/ Fast Forward
Stop/Power off
AB (Seek)
EQ(Equalizer)
(Rock/Flat/Classic/Bass/Pop)
Repeat (Intro/Normal/Repeat1/Repeat All/Shuffle)
Front Panel
Page 4

5
Battery Case
SMC Slot
Eject Button
(SmartMedia Card)
Power on/Play/Pause
Stop/Power off
Volume Control [+/-]
EQ(Equalizer)
(Rock/Flat/Classic/Bass/Pop)
Earphone Jack
Rewind
Forward
Hold
Hole for Wrist
String
Rear Panel Optional Remote Control
Page 5

6
ACCESSORIES
USB CableUser's Guide Installation CD
Remote Control
1.5V AA type Battery
(1EA)
Wrist String
Earphone
Page 6

7
INSERTING THE BATTERY
1. Slide the battery cover in the
direction of the arrow.
2. Insert "AA" type battery with the
correct polarity.
3. Close the cover and slide it as
indicated until the battery cover
latches.
• You need one 1.5V AA type battery for your MPIO.
Page 7

8
DISPLAY(LCD) PANEL
The indicator shows the amount of battery
remaining as belows:
If the battery icon shows empty and starts
blinking, it indicates the battery is almost gone.
(About 3 minutes left before the battery needs to
be replaced.)
EQ(Equalizer Mode) Icon:
By selecting Equalizer menu, you
can choose one mode from 5
different Equalizer
modes
(Rock/Flat/Classic/Bass/Pop)
as you like.
Playback Icon
Track Number
Battery Icon
Playing Time of music files
SMC(SmartMedia Card) Icon
Repeat Mode Icon
Hold Icon
Battery
Page 8

9
LISTENING TO THE SAMPLE MUSIC
If you do not press any buttons during in
the selection state, MPIO will
automatically turn off after 3 minutes.
Your MPIO comes with pre-installed MP3 files for your immediate use.
2. (REWIND button)
Press the button shortly to select the
previous files.
Press and hold the button to rewind fast.
(FORWARD button)
Press the button shortly to select the
next files.
Press and hold the button to go forward
fast.
3. To stop the MPIO temporarily, Press
(play button).
Press (play button) again to
continue playing.
1. Turn the MPIO on by
pressing and holding
(play button) for about
2 seconds.
Press (play button)
again to play the first
selection.
4. Press to stop
playing.
To turn your MPIO off,
press and hold
button for about 3
seconds.
Page 9

10
ADJUSTING VOL(VOLUME LEVEL)/ HOLD MODE
1. Turn the MPIO on and
select the file what you
desire.
2. Adjusting the volume
Adjust the volume by
pressing the volume
control ( ) to your
desired level.
• The level of volume is 00-40.
Hold Button
For the prevention of malfunction of player, locate the
Hold switch to the Hold position. When this button is kept
on, all buttons will not operate. And icon will be displayed
on the LCD. ( )
Page 10

11
REP(REPEAT) MODE
1. Press Repeat mode, and you can select 5 different functions mode as below.
Repeat mode
Intro : Plays first 10 seconds for each of the file
Normal : Plays all stored files one time in order
Repeat 1 : Repeats the current selected file
Repeat All : Repeats all stored files
Shuffle : Plays files in random order
ICON
Page 11

12
REP MODE
• Press and select REP Mode, and you can enjoy following modes Intro → Normal → Repeat One → Repeat
All → Shuffle.
Intro Normal Repeat One Repeat All Shuffle
Page 12
13
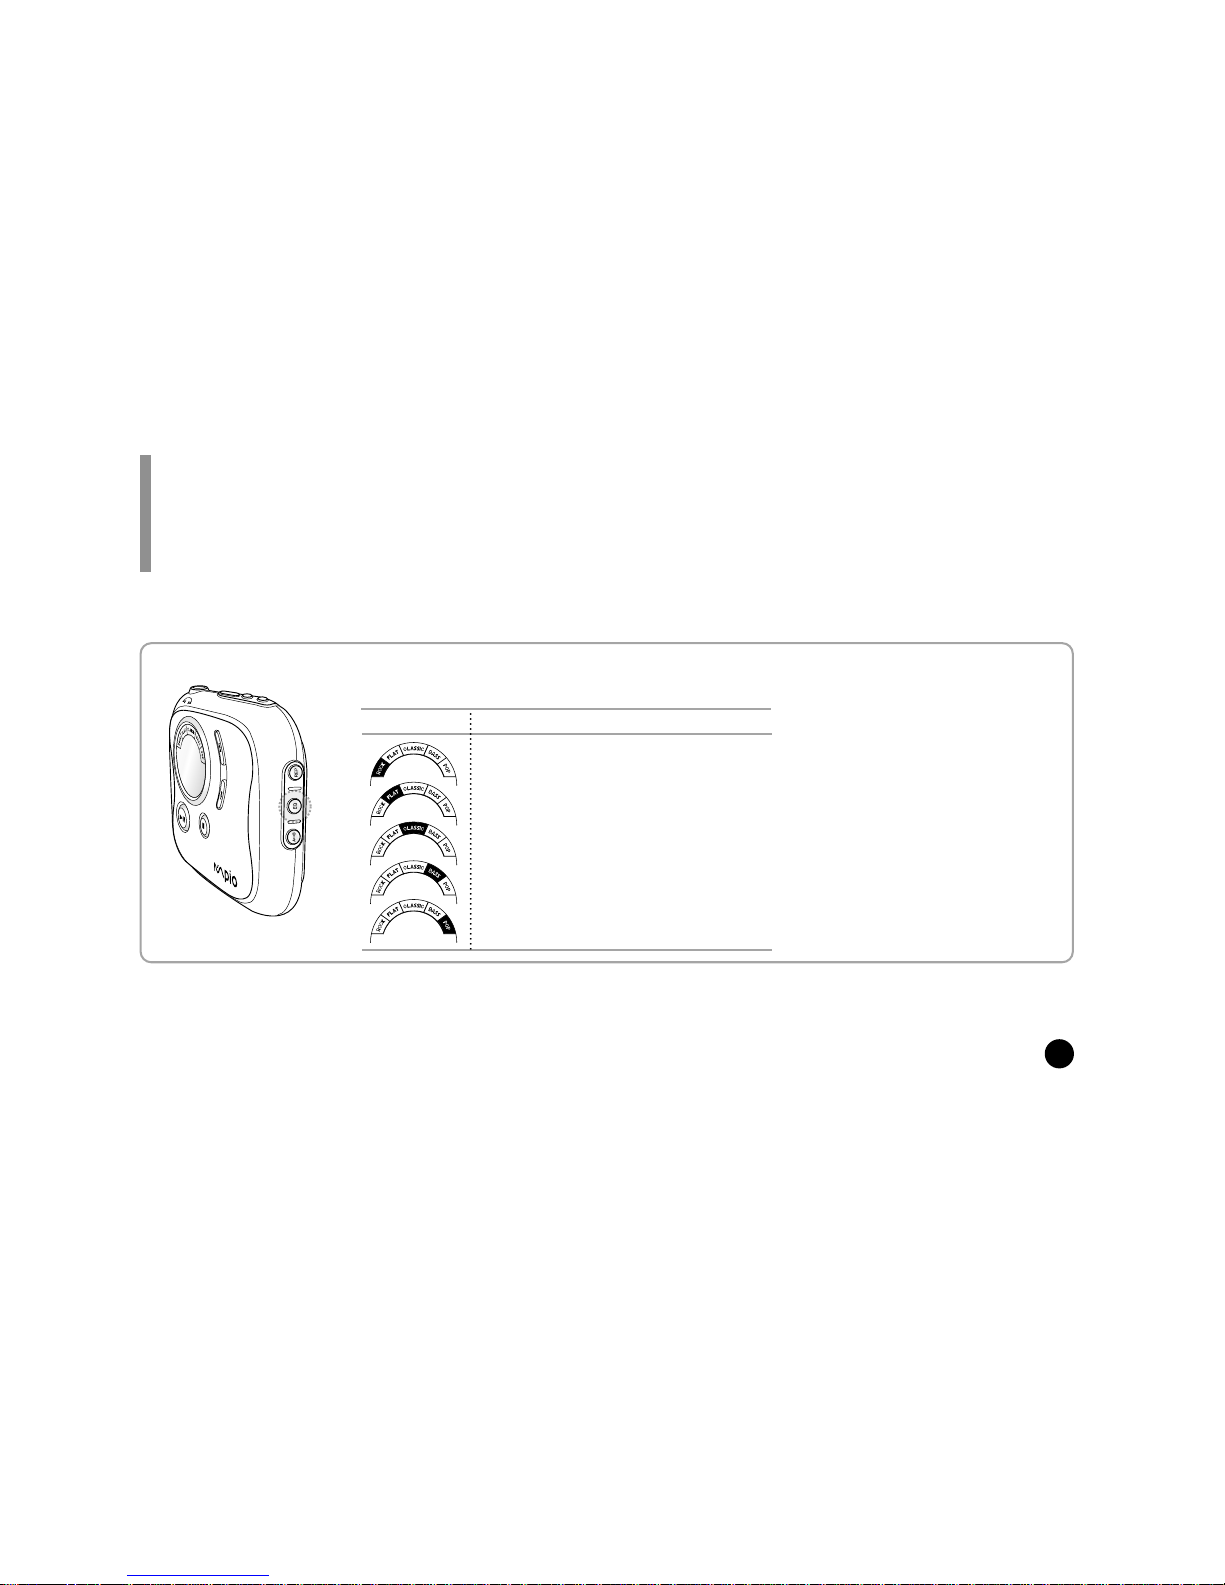
EQ(EQUALIZER) MODE
To adjust the desired equalizer mode, press EQ button. You can enjoy 5 different modes as
below:
Rock : Balance suitable for rock music
Flat : Normal balance
Classic : Balance suitable for classical music
Bass : Balance suitable for strengthen bass
Pop : Balance suitable for pop music
Your MPIO is equipped with a preset equalizer that enables you to choose the most appropriate balance between treble and bass
frequencies, according to the type of music you are listening to.
Equalizer modeICON
Page 13

14
AB(REPEAT SEGMENTATION) MODE
If you press the (Rewind & Forward button) during
playback time, you can move to the previous point or the next
in a current track.
If you press (Forward) button
1. Press button
during playback.
2. Press button once
again to complete the
Repeat Segmentation.
3. Press (Stop) button to cancel the
Repeat Segmentation mode.
① To cancle the Repeat Segmentation and
play the current file, press button.
② To go back to the initial state of the file,
press (Stop) button.
Then the icon will appear on
LCD. It indicates the mode is
starting.
The icon will appear on LCD.
It indicates the mode is selected .
Page 14

15
INSTALLING SOFTWARE ON PC
First, place the Installation CD into your CD-ROM drive. The
installation will start with the initial page as you can see on the right
side of this page.
• MPIO-DME Manager
MPIO-DME Manager is for transferring files between PC and the MPIO.
You can download MP3 files and others to your MPIO.
You can also upload any other files (except MP3 and WMA files) to your PC
using this software.
• Sample MP3 Songs
You can enjoy 5 sample songs in MP3.
• WWW
You can get updated information and MPIO-DME Manager from our
website.
System Requirements
•
Pentium 133MHz or faster • CD-ROM drive • USB port
•
20MB free hard disk space • Windows 98/SE/ME/2000(PRO)/MAC OS(ver8.61~9.1)
Insert the Installation CD into the CD-ROM drive. The picture below will appear.
Page 15

16
INSTALLING THE MPIO-DME MANAGER
By pressing the 'Next' button you can install the MPIO-DME Manager in order.
• The installation of MPIO -DME Manager was finished well.
'MPIO-DME Manager' icon will be created on your Windows desktop.
Click!
Click!
Click!
Page 16

17
CONNECTING THE MPIO TO PC
1. Connect the USB Cable to the
USB port of the computer.
Attention
Please connect the USB Cable to your MPIO only when your MPIO is in the stop mode.
If you connect the USB Cable to your MPIO in the playing mode of your MPIO, the set can become wrong.
‘Con PC’ will appear on the
LCD of the player.
Before you download MP3 files into the MPIO, you must connect the MPIO to
your PC using the supplied USB cable.
2. Only with your USB cable can upload or download the files,
even with no battery.
Page 17

18
FORMATTING INTERNAL MEMORY
1. Execute the MPIO-DME Manager. 2. Click [Memory] and select [Format
Internal Memory].
• Before formatting the SMC(SmartMedia Card),
connect your MPIO to PC. If the SMC is
installed in the MPIO, you can also format SMC
by selecting [Memory] and [Format Memory
Card].
• Double-click the icon of the MPIO-DME Manager on
the desktop.
Before formatting internal memory, turn the MPIO on and connect the MPIO to PC using the USB cable.
Double-Click!
Page 18

19
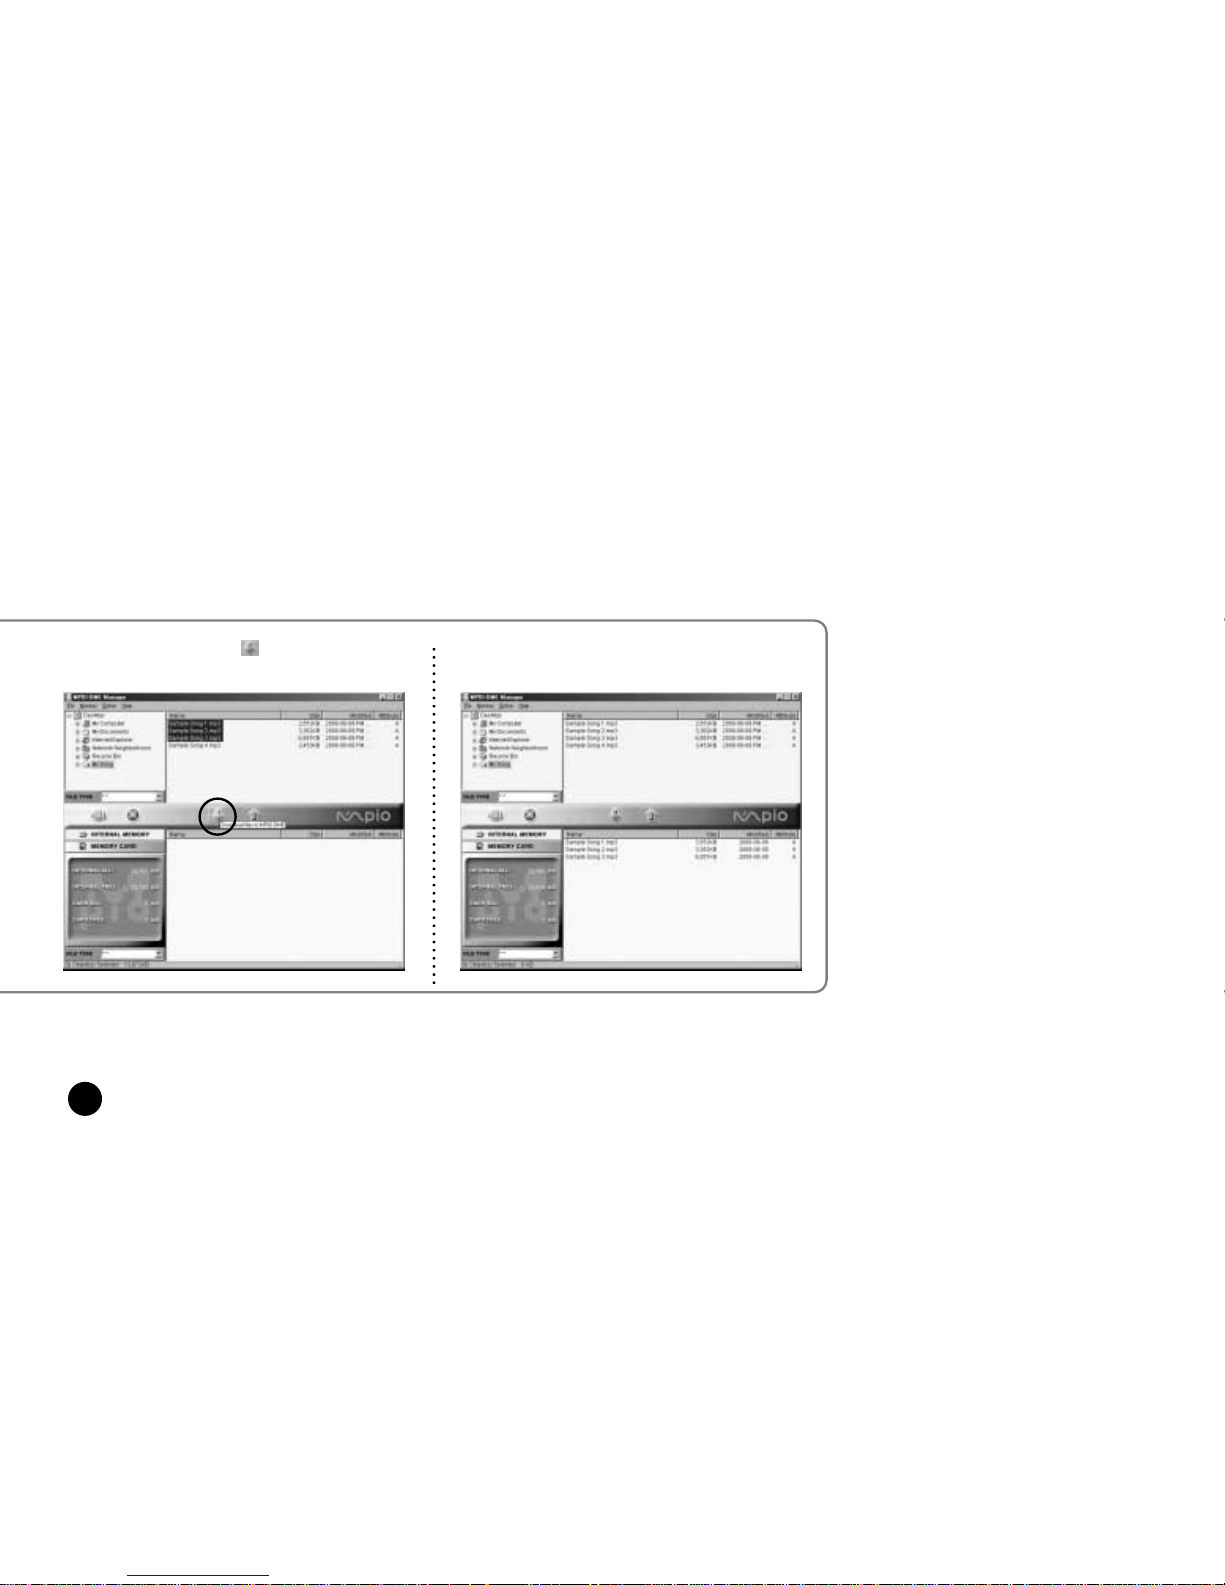
DOWNLOADING FILES TO THE MPIO
Before downloading files to your MPIO, turn the MPIO on and connect the MPIO to PC using the USB cable.
1. Execute the MPIO-DME Manager.
Double-click the icon of the MPIODME Manager on the desktop.
2. Click Connect icon on the
MPIO-DME Manager.
3. Select File(s) to download to the
MPIO.
Double-Click!
Page 19
20
• You can also select [File] and [Download Files to MPIO].
4. Click Download icon.
Note
■ Always check that 'Con PC' is
displayed on the LCD of the MPIO
before sending files.
The selected file has been downloaded.
Now you can listen to music with the MPIO
after removing the USB cable.
Page 20

21
ERASING FILES ON PC
Turn the MPIO on and connect your MPIO to PC and execute the MPIO-DME Manager before
erasing.
1. Click the file of the MPIO you would
like to delete.
2. Click [File] and select [Erase Files
in MPIO].
3. Click [OK].
You can also delete the file by pressing the right button on the mouse and selecting Erase.
Page 21

22
ARRANGING THE PLAYBACK ORDER
1. Execute the MPIO-DME Manager.
Double-click the icon of the MPIO-DME
Manager on the desktop.
2. Click [File] and [Change File order
in MPIO].
3. Arrange the files by dragging and
dropping.
Connect your MPIO to PC using the USB cable and execute the MPIO-DME Manager.
Double-Click!
Page 22

23
4. Click [OK] after moving files to the
desired position.
5. The MPIO-DME Manager displays
the file arrangement you made.
Page 23

24
INSERTING THE SMC(SmartMedia Card)
Inserting SMC
1. Insert the SMC into the SMC Slot.
2. Capacity of the SMC will appear
when the MPIO is turned on.
You can store more music by using the SMC
★★★ You have to turn the MPIO off before inserting or ejecting SMC from the MPIO.
During the playback of files stored in SMC, the SMC
icon will blink continuously.
Ejecting SMC
Turn the MPIO off first. Then push
the SMC eject switch( ) .
• To send file to the MPIO, you must format the
SMC before using it. (refer to page 18)
Internal
Memory
External
Memory
SmartMedia
Card
Page 24

25
SAFETY PRECAUTIONS
1. Do not drop your MPIO or leave it under heavy objects.
2. Do not allow any liquids to contact the MPIO.
■ If this happens, wipe the MPIO with dry cloth.
3. Avoid areas of high humidity, strong magnetic fields, or sources of heat.
4. Do not use thinner, alcohol, or benzene when cleaning the MPIO.
5. To avoid damage to the MPIO, battery always must be taken out when not in use for a long time.
You must read to use the MPIO for a long time.
Page 25

26
TROUBLESHOOTING
If you have problems with your MPIO, refer to this section first before calling for customer service.
1. The MPIO does not work or nothing is displayed on the LCD.
■ Check the capacity of the battery.
One 1.5V AA type battery is required.
■ Check the polarity( + and - ) of the battery.
2. The buttons are not working.
■ Check if the Hold Switch is locked.
While the Hold Switch is locked,the buttons do not work.
3. There is no sound when the ▶/■ button is pressed in MP3
mode.
■ Check that MP3 files are stored in the internal memory.
■ Check the volume level.
4. MP3 files can not be downloaded.
■ Check the connection between the USB port of your PC and the
USB cable.
5. MP3 files can not be downloaded.
■ Check and/or replace the new battery.
■ Check the connectin between the USB port of your PC and the
USB cable.
6. SMC cannot be inserted into theMPIO.
■ Make sure you are using the correct SMC.
Only 3.3V version cards will work on your
MPIO.
5V version cards will not function correctly.
7. The files on the SMC can not be recognized.
■ MP3 files downloaded hardware from a different may not work
on your MPIO.
■ Fomat the SMC and copy files again with the MPIO Manager.
Page 26

27
TECHNICAL SPECIFICATIONS
Model
Memory Capacity
Voltage
Battery
LCD
Dimensions
(W x H x D)/ Weight
Case
File Transmission Speed
Memory Socket
Signal to Noise Ratio(S/N)
Earphone Output Power
Output Frequency Range
Sampling Rate
Compressibility
DME
Internal Memory 32/64/128MB, External Memory SMC 128MB(MAX)
1.5V
AA type(1ea)
HTN-type 7Segment LCD
68 x 68 x 18.9mm / 59g (without battery)
Aluminum, Plastic
5.5 Mbps(Max.)
SmartMedia Card (3.3V)
85dB
10mW (R: 5mW, L: 5mW)
20Hz~20KHz
8KHz~48KHz
8kbps~256kbps
MPIO(DME)
Digitalway reserves the right to make improvements in this manual and the products it describes at any time, without notice.
Page 27

28
WARRANTY
This MPIO brand product, as configured and distributed by Digitalway
Co., Ltd. and delivered, in the original carton to the original consumer purchaser, is warranted by Digitalway against manufacturing
defects in materials and workmanship for following limited warranty
period: One(1) year
This limited warranty begins on the original date of purchase, and does
include transportation, installation, removal, and reinstallation.
Warranty repairs must be performed by Digitalway.
To receive warranty service, the original dated bill of sale must be pre- sented upon
request as proof of purchase to Digitalway. Transportation to Digitalway is the responsibility of the purchaser.
Digitalway will repair this product, at our option and at no charge, with
new or reconditioned parts or will exchange the product with a reconditioned unit if found to be detective during the limited warranty period
specified above. The product must be returned during the warranty period with
transportation charges prepaid to Digitalway.
Prior to returning any product for warranty service, the purchaser must
contact Digitalway for problem determination and service procedures.
It is the purchaser's responsibility to secure all programs and data contained in or affected by the product. Digitalway does not warrant uninterrupted or error-free operation of the product,and shall not be liable
for the loss or destruction of data or media resulting from the use or
for service of this product.
All replaced parts and products become the property of Digitalway and
must be returned to Digitalway.
Replacement parts and products assume the remaining original warranty, or ninety (90) days, whichever longer.
Digitalway's obligations respect to software products distributed by Digitalway under the Digitalway brand name are set forth in the applicable end user license agreement. Non-Digitalway hardware and software products are provided on an "AS IS" basis.
However, non-Digitalway manufacturers, suppliers, or publishers may
provide their own warranties. This limited warranty covers manufacturing defects in materials and workmanship encountered in normal,
noncommercial use of this product and shall not apply to the following,
including, but not limited to: damage which occurs in shipment; applications and uses for which this product was not intended; failures or
problems which are caused by products or equipment not supplied
by Digitalway; accidents, misuse, abuse, neglect, misapplication, fire,
water, lighting or other acts of nature; incorrect electrical line voltage,
fluctuations or surges; damage caused by improper or faulty installation; improper connection with any peripheral; product alteration or mo- dification;
improper or unauthorized repair; cosmetic damage or exterior finish; product will
Page 28

29
altered serial numbers; failure to follow operating instruction, costomer adjustment,
maintenance and environment environmental instructions that are covered and
prescribed in the instruction book;
Use of non-Digitalway or unauthorized parts, supplies, accessories or
equipment that damage this product or result in service problems; failures or problems due to incompatibility with other equipment.
The purchaser is cautioned that product performance is affected by
system configuration, software, applications, purchaser data and opera- tor control of
the system, among other factors.
The product is considered to be compatible with many system, howev-er it is the
purchaser's responsibility to determine the functional imple- mentation.Therefore,
suitabillty of the product for a specific purpose or application is not warranted by
Digitalway.
There are no express warranties other than those listed and described
above, and no warranties whether express or implied, including, but not
limited to, any implied warranties of merchantability or fitness for a par- ticular
purpose, shall apply after the express warranty periods stated
above, and no other express warranty of guaranty given by any person,
firm or corporation with respect to this product shall be binding on
Digitalway. Digitalway shall not be liable for loss of revenue of profits,
or any other special, incidental or consequental damages caused by
the use, misuse or inability to use this product, regardless of the legal
theory on such the claim is based. And even if Digitalway has been
advised of the possibility of such damages.
Without limiting the foregoing, purchaser assumes all risk and liability
for loss, damage or injury to purchaser and purchaser's property and
to others and their property arising out of the use, misuse or inability
to use this product sold by Digitalway not caused directly by the neg- ligence of
Digitalway.
This limited warranty shall not extend to anyone other than the original purchaser of this product, is nontransferable and states your exclusive remedy.
Some states do not allow limitations on how long an implide warranty
lasts, or the exclusion or limitation of incidental or consequential damages, so the above limitations or exclusions may not apply to you.
This warranty gives you specific legal rights, and you may also have
other rights which vary from state to state. This product is for personal use only, are is only for use in compliance with the limitations of copyright and other laws.
Page 29

Memo
 Loading...