


User Manual
Contents
MOZA AirCross 2 Overview
Installation and Balance Adjustment
Installing the Battery
Attaching the Tripod
Unlocking Motors
Mounting the Camera
Balancing
Buttons and OLED Display
Button Functions
LED Indicators
Main Interface
Menu Description
Features Description
Camera Control
Motor Output
PFV,Sport Gear Mode
Manual Positioning
Button Customization
Inception Mode
Balance Check
Sensor Calibration
Language Switch
User Conguration Management
ension
Ext
Manfrotto Quick Release System
Two Camera Mounting Directions
Smartphone and PC Connection
Phone Holder
Firmware Upgrade
SPECS
1
2
2
2
2
3
3
4
4
5
5
6
8
8
9
10
11
11
11
12
13
14
14
15
15
15
16
16
16
17

AirCross 2 Overview
10
21
19
20
23
11
12
13
14
15
26
27
28
22
24
25
29
30
32
Tilt Knob
Tilt Motor
Tilt Arm
Camera
Control Port
Baseplate Knob
Pan Arm
Crash Pad
Pan Motor
3/8”Screw
10
Trigger
11
Roll Motor Lock
12
Pan Knob
13
Smart Wheel
Indicator Light
14
Ring
15
Power Button
16
Power Supply
Electrode
16
17
USB Type-C
17
Charging Port
Battery Level
18
Indicator
19
Safety Lock
20
Roll Motor Lock
21
Multi-CAN Port
22
Roll Arm
23
Roll Knob
24
Roll Motor
1
31
18
Pan Motor Lock
25
26
OLED Screen
27
Joystick
28
Dial Wheel
29
USB Port
30
Multi-CAN Port
31
Battery
32
Battery Lock
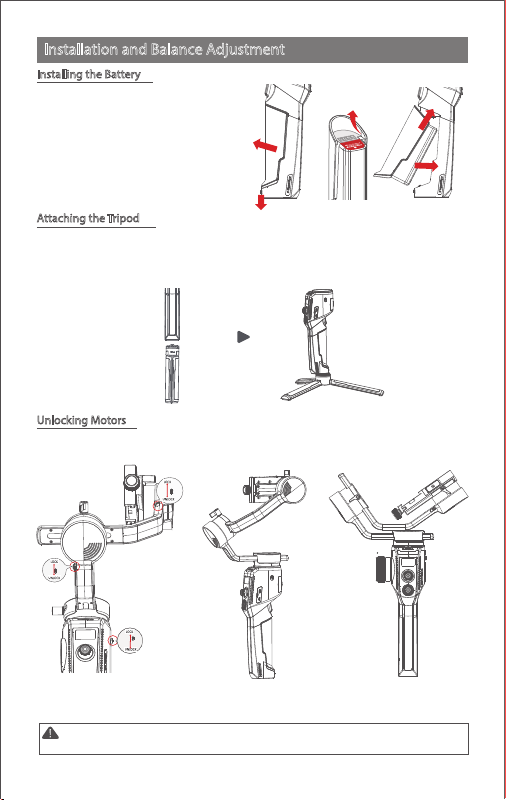
Installation and Balance Adjustment
Installing the Battery
a. Press the battery lock downwards;
b. Take out the battery;
c. Remove the insulating lm at the
electrode;
d. Attach the battery electrode to
the gimbal.
e. Press the battery into the hatch
Attaching the Tripod
Attach the tripod to stand the gimbal.
a. Screw the tripod tightly into the 1/4" hole at the bottom of the gimbal.
b. Expand three support feet, place the gimbal on a at surface
b
a
a b
Unlocking Motors
The AirCross 2 gimbal has 3 locks which are used to lock motors to prevent rotation.
c
d
e
3 Motor Locks Unfolding Storage
Notes: Please unlock all motor locks before starting on the gimbal, otherwise motors will get
overheated or enter the protection mode.
2
Mounting the Camera
Horizontal Mounting
a. Place the longer side of the L-Bracket under the
camera, and lock the camera with a 1/4”screw.
Vertical Mounting
a. Place the longer side of the L-Bracket under the
camera, and lock the camera with a 1/4”screw.
Use the Arka quick release plate for vertical shot:
a. Place the arka-swiss quick release plate
horizontally under the camera and use a 1/4"
screw to lock the camera;
Note: The camera can only be installed vertically using the Arka quick release plate. It does not
block the camera's battery port and memory card slot.
b. Loosen the quick release knob screw, Pull out the safety
lock at the end of the quick-release knob, insert the shorter
end of the L-Bracket into the quick release baseplate, and
then lock the knob.
b. Loosen the quick release knob screw, pull out
the safety lock, insert the longer end of the
L-Bracket into the quick release baseplate, and
then lock the knob.
b. Loosen the quick-release knob and pull out the safety
lock at the end of the quick-release knob. Install the Arka
quick-release plate into
the quick-release base. Then lock the knob.
Balancing
a. Loosen the knob of the tilt arm, adjust the tilt
arm back and forth until the lens moves
horizontally forward, and then lock the knob.
b. Rotate the camera to make its lens face
upward, loosen knob on the release plate, adjust
the release plate back and forth until the lens
faces straight upward, and then lock the knob.
3

c. Loosen the knob of the roll arm, adjust roll arm
leftwards and rightwards until it remains
horizontal, and then lock the knob.
Note: Please release the motor lock of the axes before balance adjustment, otherwise it can’t be
adjusted accurately. Please ensure that the MOZA AirCross 2 is balanced well before use.
d. Hold the gimbal horizontally to make the pan arm
level with the ground, then loosen the knob on the
pan arm, adjust the pan arm leftwards and rightwards
until it remains level, and then lock the knob.
Buttons and OLED Display
Button Functions
Button Operation Function Customizable Function Menu
Trigger
Power
Button
Smart
Wheel
Joystick
Top
Button
Down
Button
Left
Button
Right
Button
Center
Button
Dial
Wheel
Combo
1X click ——
2X click Re -center —— Re -center Sele —— —— —— The same
3X click Sele —— Re-center Sele —— —— —— The same
Hold
Click and hold
1X click
2X click
3X
click
Long press
Turn
Push up/down
Push left/right
1X click Tilt follow —— —— —
1X click Pan follow —— —— —— —— —— —— Option-down
1X click Roll follow
3X click FPV mode
1X click
3X click
1X click
2X click
Long press Ent
Turn
Power+center
button
——
Focus Photo —— —— —— The same
Pan -tilt follow
All lock —— —— —— —— —— —— The same
Switch wheel
modes
Sleep/wake
up
Switch Grouping
of Wheel Modes
ON/OFF —— —— —— —— —— —— The same
Focus motor 1Focus
Move the
tilt axis
Move the
pan axis
Sport gear
mode
Inception
mode
Video
recording
Take photo
er menu
Adjust the
follow speed
Firmware
upgrade
Pan -tilt
——
follow
—— —— —— —— —— —— The same
—— —— —— —— —— ——
—— —— —— —— —— —— ——
Focus
motor 1
motor 2
Tilt axis
Roll axis Pan axis —— —— —— The same
Roll axis Pan axis —— —— —— The same
Tilt axis
—— —— —— —— —— ——
—— —— —— —— —— ——
—— —— —— —— —— ——
—— —— —— —— —— ——
—— —— —— —— —— ——
—— —— —— —— —— —— Take photo
—— —— —— —— —— ——
—— —— —— —— —— ——
—— —— —— —— —— —— ——
Sport
All lock
gear
mode
E-focus Tilt axis
— —— —— —— Option-up
4
FPV —— The same
The same
Pan axis The same
Roll axis
Return
——
Conrm/Next
menu
——
Video recording
Exit menu
Adjust relevant
parameter
 Loading...