

Page 1

software version 4.1
media center user guide
Page 2

Page 3

The information contained in this document is provided solely for use in connection with Digeo products and services. Digeo, Inc. reserves all rights in and
to such information and the products and services discussed herein. This docu
ment should not be construed as transferring or granting a license to any intellectual property rights, whether express, implied, arising through estoppels or
otherwise. EXCEPT, AS MAY BE AGREED IN WRITING BY DIGEO, INC., THE
INFORMATION CONTAINED IN THIS DOCUMENT, AND ALL DIGEO PRODUCTS
AND SERVICES ARE PROVIDED “AS IS” AND WITHOUT A WARRANTY OF ANY
KIND. DIGEO, INC. HEREBY DISCLAIMS ALL WARRANTIES, EXPRESS OR
IMPLIED, RELATING TO THE INFORMATION IN THIS DOCUMENT AND DIGEO
PRODUCTS, INCLUDING, BUT NOT LIMITED TO, THE IMPLIED WARRANTIES OF
MERCHANTABILITY, FITNESS FOR A PARTICULAR PURPOSE, AND NONINFRINGEMENT OF THIRD PARTY INTELLECTUAL PROPERTY. The information in
this document may contain inaccurate information. Digeo, Inc. makes no rep
resentations or warranties with respect to the accuracy or completeness of the
information contained in this document, and Digeo, Inc. reserves the right to
change the information in this document, product or service descriptions, and
product or service specifications at any time, without notice.
This product incorporates copyright protection technology that is protected by
U.S. patents and other intellectual property rights. Use of this copyright protec
-
tion technology must be authorized by Macrovision Corporation, and is
intended for home and other limited consumer uses only, unless otherwise
authorized by Macrovision. Reverse engineering or disassembly is prohibited.
Contains Macromedia Flash™ Player technology by Macromedia, Inc. Copyright © 1995-2001 Macromedia, Inc. All rights reserved. Macromedia, Flash
and Macromedia Flash are trademarks or registered trademarks of Macrome
dia, Inc. in the United States and internationally.
Digeo, Inc. reserves the right to discontinue or change any product or service,
or the documentation for any product or service, at any time, without notice.
Trademarks: Digeo, the Digeo logo, Moxi, the Moxi logo, and combinations
-
thereof are trademarks of Digeo, Inc. in the USA and other countries. All other
product, service or brand names are the property of their respective owners.
Manufactured under license from Dolby Laboratories. Dolby and the double-D
symbol are trademarks of Dolby Laboratories.
© 2006 by Digeo, Inc. All rights reserved.
-
-
i
Media Center User Guide © 2006 by Digeo, Inc. All rights reserved.
Page 4

all DVRs were not created equal
Contents
2
List of figures............................................iv
List of tables............................................... v
Introduction ............................................... 1
Powerful browsing and search tools............2
Watch and record in high-definition............3
Take charge of your TV...............................3
Other great applications..............................3
Extend the media center to a second TV .....4
Using this guide..........................................4
Using Moxi.................................................7
Using the remote control ............................ 8
Navigating the Moxi Menu........................10
Using Change Time Slot.........................10
Learning about Moxi.................................11
Understanding the storage meter ..........11
Software version and other details.........11
Searching for shows..................................12
Searching by title or keyword.................12
© 2006 by Digeo, Inc. All rights reserved. Media Center User Guide
Searching by category ........................... 13
Remembering your favorite channels ........ 13
Using the Moxi Flip Bar............................. 13
Using the player bar.................................. 14
Recording shows ...................................... 15
Understanding the program card icons and
colors.................................................... 15
Finding a previously scheduled recording16
Recording options ................................. 16
Recording series .................................... 17
Using SuperTicker™ ................................. 19
Limiting headlines to one topic or item..19
Reading the whole story........................20
Using Photos ............................................ 20
Uploading photos..................................20
Viewing photos..................................... 21
Using Media Player ................................... 22
DVD video resolutions ...........................23
DVD copyrights .....................................23
Using Jukebox.......................................... 23
Loading music....................................... 24
Playing music ........................................ 24
Reading service messages......................... 25
Playing Moxi games.................................. 25
Changing settings ................................... 29
Channel List ............................................. 30
Sound Effects ........................................... 30
HDTV Setup.............................................. 30
Setting standard TV video resolution ..... 31
Setting HDTV video resolution............... 31
Widescreen .............................................. 32
Audio Output........................................... 33
Secondary Audio ...................................... 34
Closed Caption......................................... 34
Skip settings............................................. 34
PC Link Setup........................................... 35
CD Options .............................................. 35
Parental Controls...................................... 35
i
Page 5

Creating a PIN....................................... 35
Changing a PIN ..................................... 36
Locking channels or programs by rating. 36
Turning off parental controls................. 37
Controlling Pay Per View or On Demand
purchases..............................................38
If you forget your PIN ............................ 38
Using and programming the remote..... 41
Functions of the Moxi remote................... 42
Multi-function buttons .......................... 42
Programming the remote.......................... 44
Programming with codes....................... 44
Programming by search.........................45
Infrared emitter ........................................ 46
Adding additional recording space........47
Using an external hard drive ..................... 48
Connecting an external hard drive.........48
Disconnecting an external hard drive..... 49
Recovering corrupted programs............. 49
Archiving simplified .................................. 49
Choosing the connection ...................... 49
Archiving to a VCR or DVCR..................... 50
Using a digital VCR to archive programs 50
Enabling PC Link...................................... 53
System requirements ................................ 54
Connecting to the network....................... 54
Setting up your computer..........................54
Using Windows Media Player 11 ............55
Using Windows Media Connect .............56
Playing shared music or photos..................57
Getting connected....................................59
Before connecting.....................................60
Ventilation requirements ...........................60
Media center information..........................61
Media center illustrations...........................61
Moxi Mate information..............................62
Moxi Mate illustrations..............................62
Available ports...........................................62
Connecting to the TV and receiver.............65
Connecting to the home network..............66
Wired data connection...........................66
Wireless data connection........................67
Adding components...............................67
Troubleshooting.......................................71
Media center troubleshooting....................72
Audio and video problems .....................72
Remote or front panel control problems.73
Moxi Mate troubleshooting.......................73
Power problems.....................................73
Audio and video problems .....................74
Home network troubleshooting.................74
Moxi remote programming codes .........77
TV Codes ..................................................78
Audio device codes ...................................85
Specifications ...........................................91
Media center specifications .......................92
Moxi Mate specifications...........................92
Glossary....................................................93
Index.........................................................97
iii
Media Center User Guide © 2006 by Digeo, Inc. All rights reserved.
Page 6

all DVRs were not created equal
List of figures
3
Figure 1: Conceptual view of the Moxi Menu......................................... 2
Figure 2: The Moxi remote control......................................................... 9
Figure 3: Channels list in the Moxi Menu.............................................. 10
Figure 4: Channels list action menu...................................................... 10
Figure 5: Change Time Slot card........................................................... 10
Figure 6: Change Time Slot remote button functions............................ 11
Figure 7: The About Moxi card............................................................. 11
Figure 8: The Find & Record card.......................................................... 12
Figure 9: Entering letters with the remote buttons................................ 12
Figure 10: Searching for shows by title................................................. 12
Figure 11: Favorites card...................................................................... 13
Figure 12: The flip bar.......................................................................... 13
Figure 13: Playback controls................................................................. 14
Figure 14: Features of the player bar .................................................... 14
Figure 15: Program card with the scheduled to record icon.................. 15
Figure 16: Program card icons.............................................................. 15
Figure 17: Program card background colors and icons indicate status... 16
Figure 18: Recording options screen..................................................... 16
Figure 19: Summary of series recording options................................... 17
Figure 20: Changing the series priority ................................................. 18
Figure 21: Locking a SuperTicker topic ................................................. 19
Figure 22: Locking a SuperTicker item .................................................. 19
Figure 23: Reading a SuperTicker story................................................. 20
© 2006 by Digeo, Inc. All rights reserved. Media Center User Guide
Figure 24: Uploading photos to the media center ................................. 21
Figure 25: Browsing photo albums........................................................ 21
Figure 26: Selecting an album to play in Jukebox.................................. 23
Figure 27: Adjusting the sound effects volume...................................... 30
Figure 28: Letter box mode on standard (4:3) and widescreen (16:9).... 32
Figure 29: Cropped mode on standard (4: 3) an d w ide screen (16:9) ...... 32
Figure 30: Wide mode on standard (4:3) and widescreen (16:9)............ 32
Figure 31: Changing the audio output.................................................. 33
Figure 32: Enabling or disabling SAP..................................................... 34
Figure 33: Skip settings card................................................................. 34
Figure 34: Controlling movie ratings ..................................................... 36
Figure 35: The Favorites category with locked programs ....................... 37
Figure 36: Disabling parental controls ................................................... 37
Figure 37: Setting the relock timer........................................................ 38
Figure 38: Relock time.......................................................................... 38
Figure 39: The Moxi remote.................................................................. 43
Figure 40: Infrared receiver on the media center front panel................. 46
Figure 41: Signal flow from the media center........................................ 49
Figure 42: Example of connections between the media center
and DVCR...................................................................................... 51
Figure 43: IEEE 1394 connector types ................................................... 51
Figure 44: Using the Media Sharing screen ........................................... 55
Figure 45: Link icon.............................................................................. 57
i
Page 7

Figure 46: Ventilation requirements ...................................................... 60
Figure 47: Media center front panel (some models differ)...................... 61
Figure 48: Media center rear panel (some models differ)....................... 61
Figure 49: Moxi Mate front panel.......................................................... 62
Figure 50: Moxi Mate rear panel and connections................................. 62
Figure 51: Connecting an HDTV or EDTV and digital audio.................... 65
Figure 52: Connecting a standard TV (480i) and stereo audio................ 66
Figure 53: Wired home network connection to the media center.......... 66
Figure 54: Wireless home network connection to the media center....... 67
Figure 55: Installation of secondary compo ne n ts................................... 67
List of tables
Video connections and supported resolut i o ns .......................................31
Audio connections and selections ............................................ .... ... ......33
Video connections and supported resolut i o ns .......................................50
Video cables, starting with highest quality connection ...........................63
Audio cables starting with highest quality connection ...........................64
TV codes ...............................................................................................78
Audio device codes ...............................................................................85
Media center specifications ...................................................................92
Moxi Mate specifications .......................................................................92
v
Media Center User Guide © 2006 by Digeo, Inc. All rights reserved.
Page 8

Introduction
1
Powerful browsing and search tools..................................................................... 2
Watch and record in high-definition..................................................................... 3
Take charge of your TV........................................................................................ 3
Other great applications ...................................................................................... 3
Extend the media center to a second TV .............................................................. 4
Using this guide................................................................................................... 4
© 2006 by Digeo, Inc. All rights reserved. Media Center User Guide
1
Page 9

Introduction
The Moxi Menu is the easiest, most intuitive way to browse and command the expanding range of programming content and services.
The Emmy® Award-winning dual-axis navigation (see figure 1) puts
content choices right at the top of the menu instead of forcing you to
dig through several levels of menus.
Vertical band with
subcategories or
selections
Center focus is the
active card
Horizontal band
with category or
filter selections
Figure 1: Conceptual view of the Moxi Menu
Powerful browsing and search tools
Searching through hundreds of channels one by one is no way to find
shows. With the mini-TV window, you can browse the menu without
interrupting what you are watching.
• Total access — Integrated menu displays cable programming
and media applications, such as Jukebox, Photos, and Games.
• Intuitive action menus — Choices (such as watch, record, or
close) are presented in clear pop-up menus.
• Integrated On Demand and Pay Per View — Listings available
from multiple locations.
• Browse while viewing — The mini-TV window and Moxi Flip
Bar make it easy to browse program information and set pro
grams to record without leaving the current show.
• Powerful search — Search two full weeks of guide data, including On Demand and Pay Per View listings, by title, keyword, and
category.
• Category filters — Browse by category – HDTV, movies, sports,
kids, news, music, and more.
• Parental controls — Block shows by TV rating, movie rating, or
channel, and set On Demand and PPV purchase options.
-
2
Media Center User Guide © 2006 by Digeo, Inc. All rights reserved.
Page 10

all DVRs were not created equal
Introduction
Watch and record in high-definition
The Moxi service offers robust high definition TV (HDTV) so you can
watch and record crystal-clear high definition programming.
• Full DVR capabilities for HDTV, with Dolby Digital and surround
sound decoding.
• Support for multiple video resolutions including 480i, 480p,
720p, and 1080i.
• Down-convert HD resolutions to standard definition TV (SDTV).
• Output options in 16:9 (widescreen) and 4:3 (standard) with
DVI-D and component video outputs (in addition to RF, composite, and S-Video connectors).
• Automatic resolution switching passes through the native resolution of source programming for TVs that support multiple resolutions.
Take charge of your TV
Digital Video Recording (DVR) allows you to get more from your TV
service provider. With Moxi, y ou can watc h TV on your own sch edu le.
Never miss your favorite shows, even if two are on at the same time.
• Pause and use instant replay on live TV.
• Watch one show while recording another, or record two shows
while playing back a previously recorded show.
• Fast-forward and rewind shows, at a variety of speeds.
• Automatically record the entire season of a favorite series.
• Enjoy the clarity of high-definition video recordings.
Other great applications
On Demand and Pay Per View —The innovative Moxi Menu makes
it easy to browse, preview, and purchase On Demand programming.
Y ou can surf through On Demand titles in a menu category, or find On
Demand titles included within search and browse results alongside Pay
Per View, live TV, and recorded show listings, all without digging
through a deep menu.
Digital photos — Photos offers the easiest way to import, store,
browse, and view family photos on TV.
SuperTicker™ — SuperTicker runs at the bottom of the TV screen
and brings you one-touch access to weather, sports, news, and more,
without taking you away from your show. Use the remote to see the
details behind any headline.
1
© 2006 by Digeo, Inc. All rights reserved. Media Center User Guide
3
Page 11
Introduction
DVD player — The on-screen menu for DVDs makes it easy to switch
to alternate commentary, language tracks, and subtitles (some
models).
Games — Enjoy traditional arcade games such as Mahjong, Video
Poker, Slot Machine, and more.
Jukebox — Import music from CDs and then play them through the
Moxi Menu. Browse your collection by artist, album, genre, or song.
Shuffle the collection by genre, artist, or album.
PC Link — PC Link allows your media center to access photos and
music stored on your networked computers. Any shared media are
then available for display or play on the TV and home theater audio
system. Using Windows Media Connect 2.0 or later, photos and music
files appear in the Photos or Jukebox categories, just like photos and
music loaded directly on the media center.
PC Link can connect to your home network through Ethernet or with a
wireless Ethernet adapter.
Extend the media center to a second TV
The Moxi Mate makes all the features of the media center available to
a second TV in the home. Contact your service provider for the avail
ability of the Moxi Mate. Not all media centers are compatible.
-
Using this guide
Each chapter includes a short table of contents at the beginning and a
blue box at the end directing you to the next step in the process or fur
ther information on recently discussed subjects.
At the back of this book there is a glossary and index. Since the Moxi
user interface is so intuitive, readers often look to the index to find
answers to specific questions.
Notes appear throughout this book. The notes have icons to indicate
that the subject.
!
When a word is bolded it either refers to an element of the Moxi
Menu or a button on the remote or front panel that requires user
action. For example, press the skip button on the remote.
Notes with a red icon contain cautionary or warning information.
Failure to heed this information could lead to damaged or
malfunctioning equipment or loss of data.
Notes with the blue icon contain informative tips or answers to
common questions.
Notes with the orange icon contain something to try out.
-
4
Media Center User Guide © 2006 by Digeo, Inc. All rights reserved.
Page 12

all DVRs were not created equal
The next steps
• To jump right into using Moxi, go to Using Moxi on
page 7.
• To customize Moxi to suit your equipment and configuration, see Changing settings on page 29.
• See Using and programming the remote on page 41
to learn how to configure the remote for your TV.
• Do you have a specific question? Use the
Glossary on page 93 and Index on page 97 to find
the answer.
Introduction
1
© 2006 by Digeo, Inc. All rights reserved. Media Center User Guide
5
Page 13

Introduction
6
Media Center User Guide © 2006 by Digeo, Inc. All rights reserved.
Page 14

Using Moxi
2
Using the remote control..................................................................................... 8
Navigating the Moxi Menu ................................................................................ 10
Learning about Moxi.......................................................................................... 11
Searching for shows .......................................................................................... 12
Remembering your favorite channels ................................................................. 13
Using the Moxi Flip Bar...................................................................................... 13
Using the player bar........................................................................................... 14
Recording shows ............................................................................................... 15
Using SuperTicker™........................................................................................... 19
Using Photos ..................................................................................................... 20
Using Media Player ............................................................................................ 22
Using Jukebox ................................................................................................... 23
Reading service messages .................................................................................. 25
Playing Moxi games........................................................................................... 25
© 2006 by Digeo, Inc. All rights reserved. Media Center User Guide
7
Page 15

Using Moxi
This chapter tells you all you need to know to become an expert user
of the Moxi Menu.
Using the remote control
The Moxi remote allows full control of the media center and provides
volume controls for your TV or audio receiver. Buttons on the remote
are organized by function. Many buttons have multiple functions
depending on whether you are in the Moxi Menu, watchin g fu llscreen TV, or using an application such as Jukebox.
The primary function of the orange Moxi button is to op en an d clos e
the Moxi Menu but no matter where you end up in the Moxi Menu,
always remember that the Moxi button can get you back to full-screen
TV with a couple of presses.
See figure 2 on page 9 for a detail e d loo k a t a ll t he buttons and functions.
8
Media Center User Guide © 2006 by Digeo, Inc. All rights reserved.
Page 16

all DVRs were not created equal
Using Moxi
* locks and unlocks SuperTicker items
ticker displays and hides SuperTicker
power turns the TV and audio receiver on and off
on demand jumps to the On Demand category
live TV jumps to full-screen live TV
play starts a recorded program, song, or album
rew multi-speed rewind for playback (press multiple
times to select speed)
fwd multi-speed fast forward for playback (press
multiple times to select the speed)
rec starts a recording
stop stops a program, song, or album
pause pauses a live or recorded show, song, or album
(press pause, then fwd for slow motion)
replay jumps back seven seconds, moves the Moxi
Menu back one day
skip jumps ahead in stored or recorded video, moves
the Moxi Menu forward one day
number keys tune directly to channels, enter text in
menus, make choices in games
1 press twice to backspace during text entry
0 press twice to add a space during text entry
clear deletes all entered text, deletes shows from
Recorded TV, and dismisses the Moxi Menu and
Flip Bar
enter applies numeric or text entries
Figure 2: The Moxi rem o t e c o n t rol
info displays additional information about the selected
item
zoom toggles between an open Moxi Menu and
full-screen TV without losing menu position
arrow up, down, right use to navigate menus, play
games (hold for turbo speed)
arrow left exit most menus, navigate menus, play
games (hold for turbo speed)
OK selects or activates the selected item
back jumps back 15 minutes, shows last note page,
jumps 30 minutes in the Moxi Menu, or goes to the
previous photo
next jumps back 15 minutes, shows last note page,
jumps 30 minutes in the Moxi Menu, or goes to the
next photo
MOXI opens and closes the Moxi Menu from most
places (two presses might be required)
vol adjusts the audio volume on the TV or audio device
mute toggles sound on and off
jump goes to the last viewed channel
ch changes channels or pages through vertical menus
(hold for turbo speed)
2
© 2006 by Digeo, Inc. All rights reserved. Media Center User Guide
9
Page 17
Using Moxi
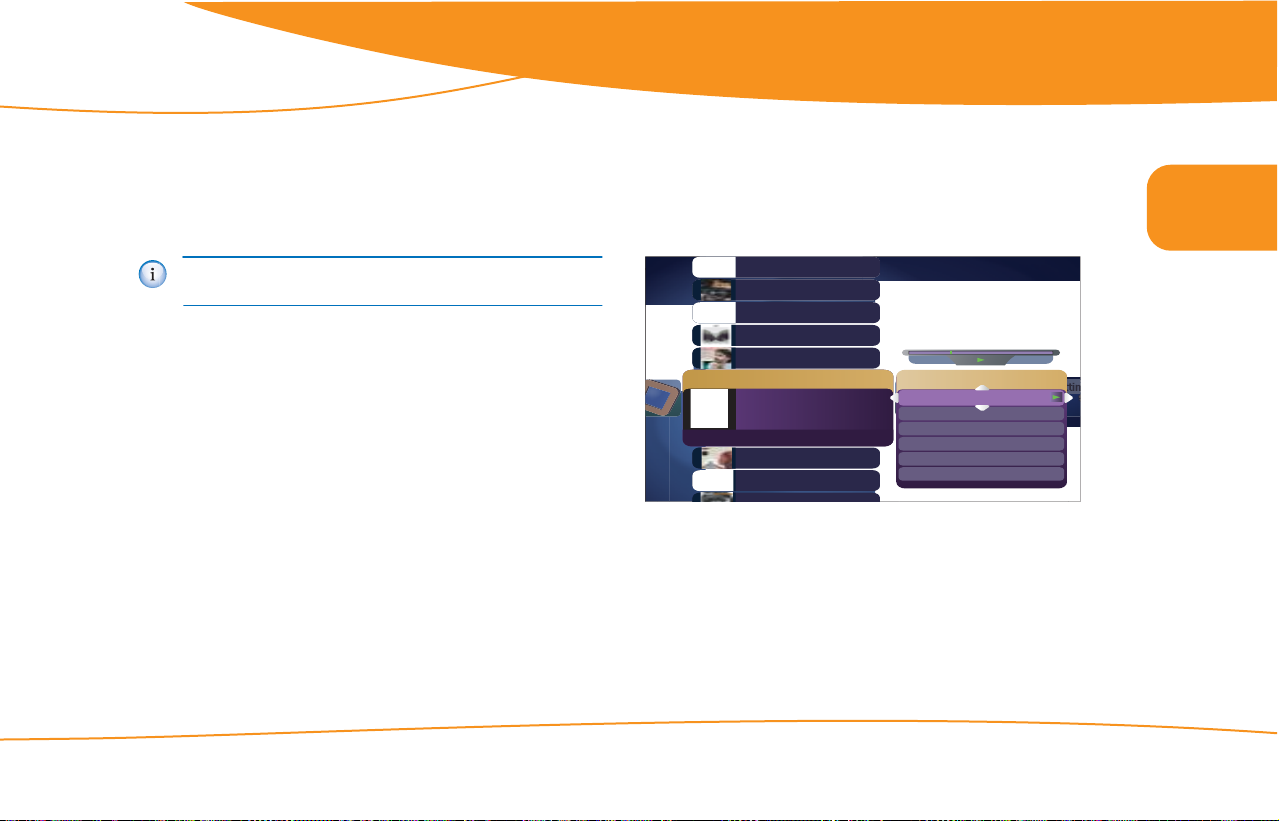
Navigating the Moxi Menu
The Moxi Menu works by filtering TV programs and features into categories such as Channels, Movies, Sports, Kids, and more. These category cards appear in the horizontal band. The vertical band contains
the list of choices for that category.
Mini TV
window
Coming Up
menu
Channels
5
The O.C.
Love, Inc.
Smallville
Survivor
I Shouldn’t Be Alive
Will & Grace
8:00 - 8:40 PM
Dog Whisperer, The
Change Time Slot
American Inventor
62
Coming Up
8:40
My name Is Earl
9:30
The Office
10:00
ER
TV-14, repeat
What happened to Baby Gin?
Vince’s plans to move into a
brownstone with Will.
6:33
Show synopsis and rating
Figure 3: Channels list in the Moxi Menu
1. Press the orange Moxi button on the remote to open the Moxi
Menu.
2. The Channels category card is in center focus (see figure 3). Use the
up and down arrow keys on the remote to scroll vertically.
3. Press the right arrow key once to move to the Coming Up menu, and
then scroll vertically to see what is showing later on that channel.
4. When you find a show to watch press OK and the action menu
appears (see figure 4).
5. Press OK again to watch the show.
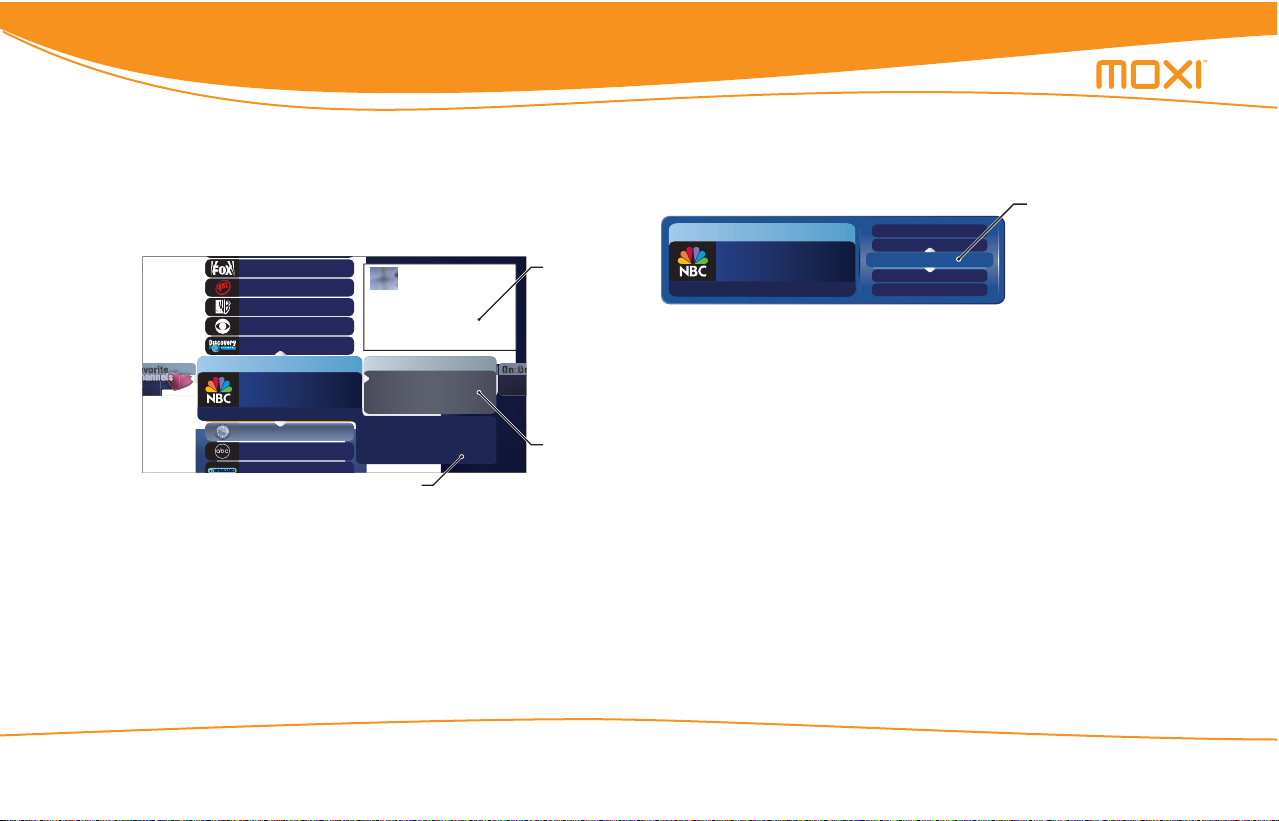
Action menu
Channels
The Office
9:30 - 10:00 PM
5
Figure 4: Channels list action menu
record series
record once
watch
close
see all times
choices change
depending on
your activity
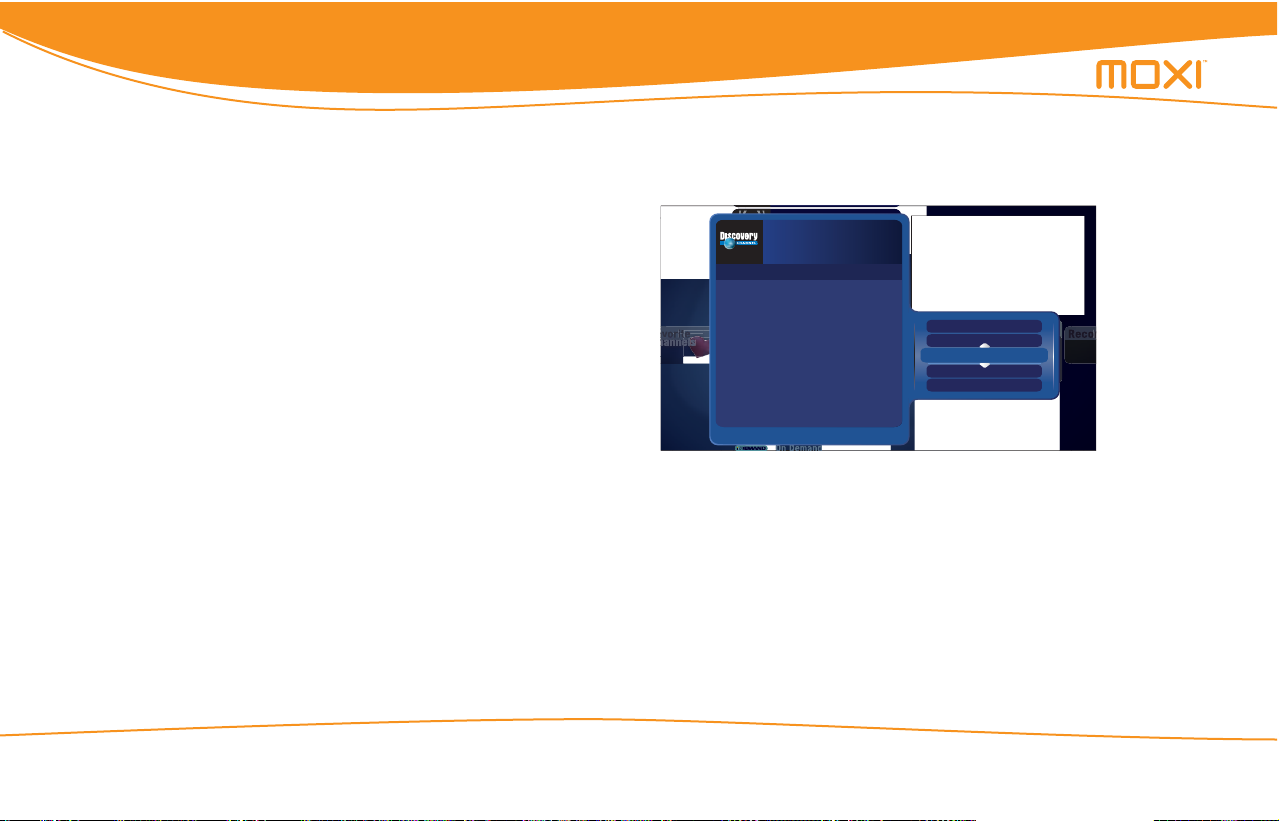
Using Change Time Slot
The Change Time Slot card appears in most categories and includes a
menu that allows you to scroll to a specific time (see
right arrow to highlight the menu, and then choose the time.
Figure 5: Change Time Slot card
figure 5). Use the
10
Media Center User Guide © 2006 by Digeo, Inc. All rights reserved.
Page 18
all DVRs were not created equal
Using Moxi
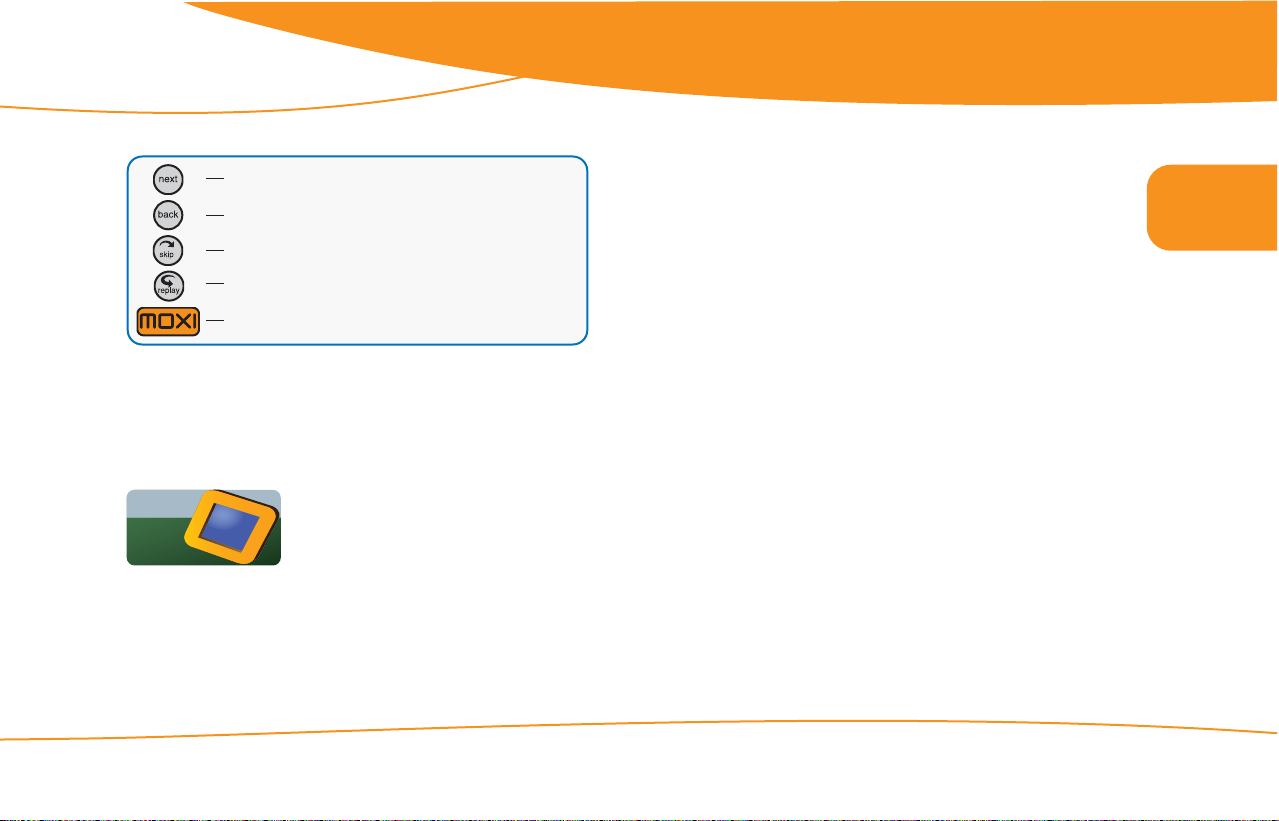
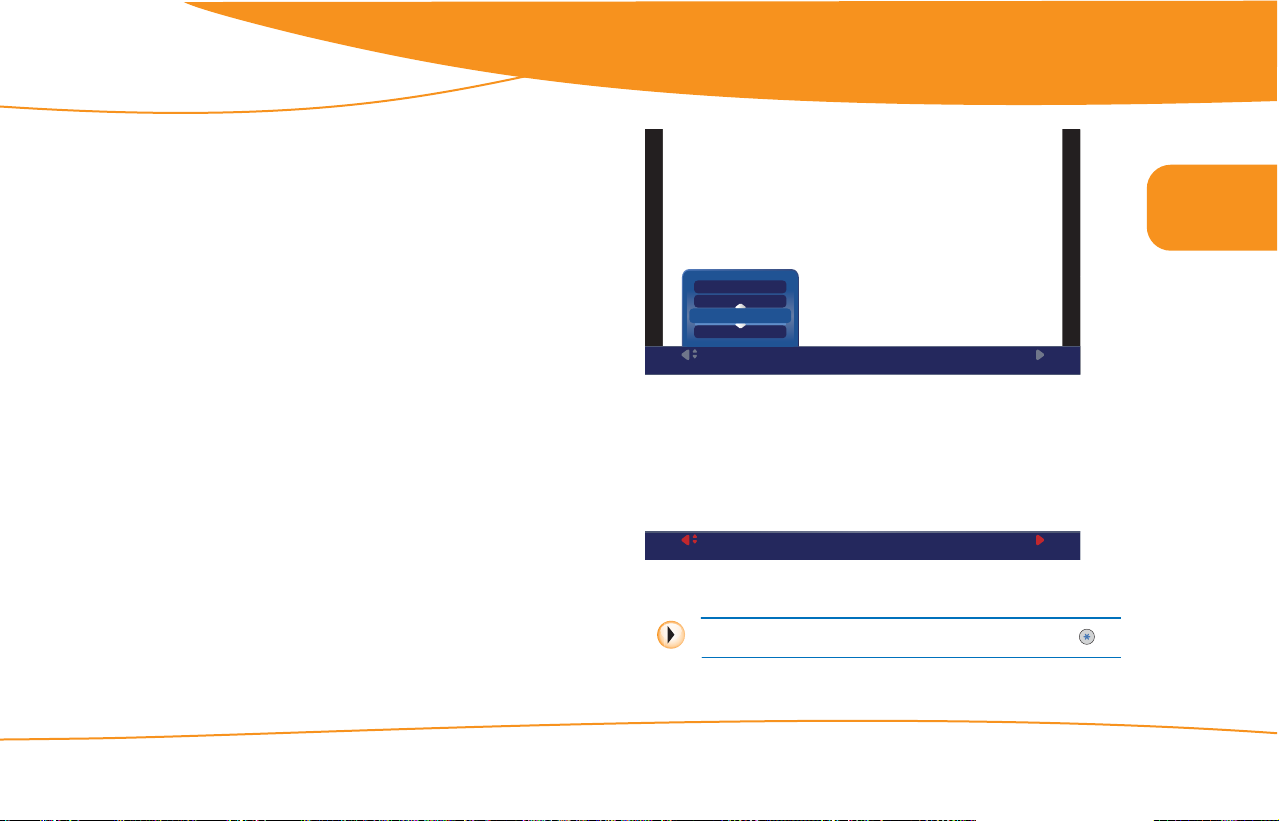
Alternatively, change the time slot by using the remote (see figure 6).
Advances the category schedule 30 minutes.
Goes back 30 minutes (if you are viewing future listings).
Advances the category schedule 24 hours.
Goes back 24 hours (if you are viewing future listings).
One press returns the schedule to the current time.
Figure 6: Change Time Slot remote button functions
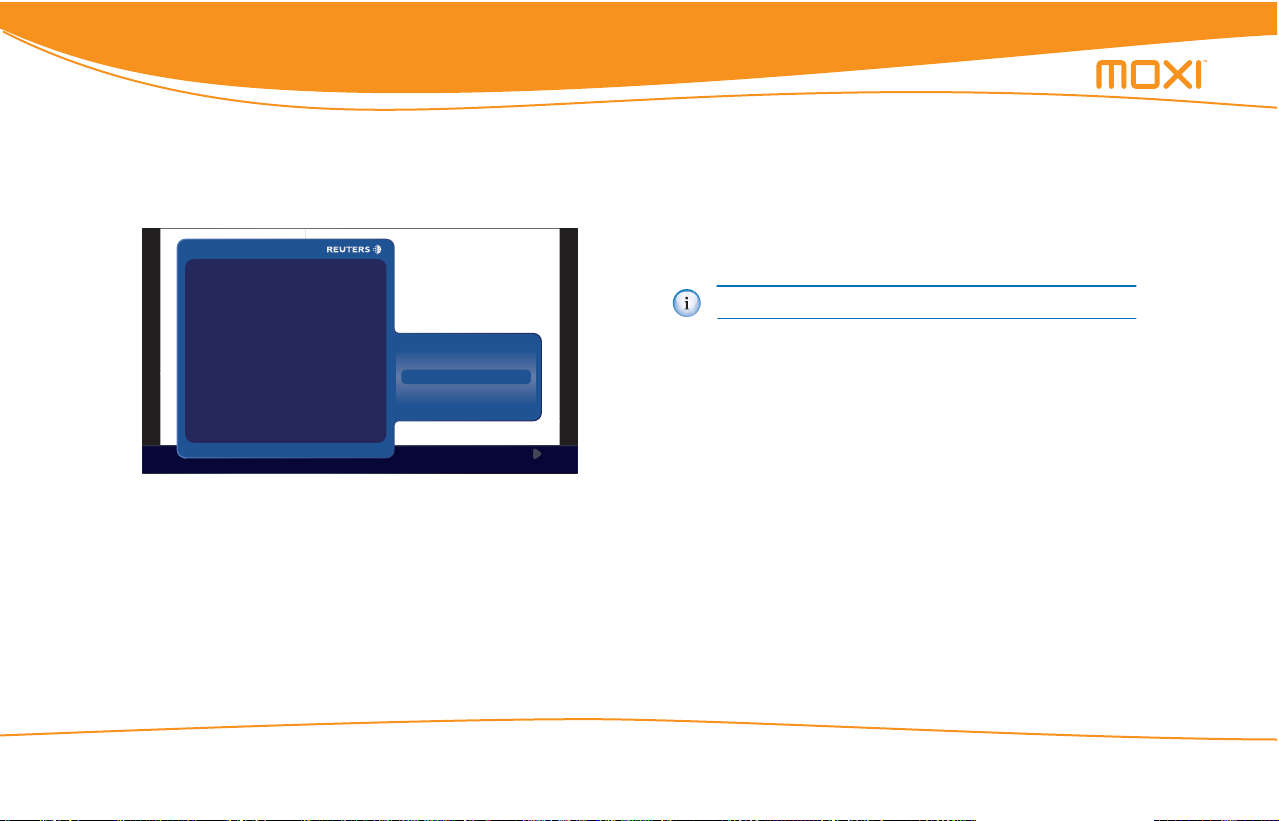
Learning about Moxi
The About Moxi category offers several helpful tips and a welcome
movie that provides an overview of the media center.
About
Moxi
Figure 7: The About Moxi card
Understanding the storage meter
The Storage & Stats card in the About Moxi category provides a
disk space meter that indicates how much hard drive space is in use. If
an external hard drive is connected, the media center adjusts the
meter to account for the extra spac e. This meter only provides a gen
eral idea of how much more you can record. The exact space for
future recordings depends upon the type of recording (HD or SD), the
broadcasting station, and whether or not any stored programs are eli
gible for deletion.
Software version and other details
The Storage & Stats card in the About Moxi category lists information
that may be helpful during a service call.
• Software version — the current version of the Moxi software
running on the media center
• Box ID — serial number or hardware device ID (HDID)
• IP address — a numerical address that identifies a specific loca-
tion or computer on the Internet
• MAC address — Media Access Control address is a unique number assigned to a media center
• The date of the most recent updates for account settings, entitlements, and EPG data
2
-
-
© 2006 by Digeo, Inc. All rights reserved. Media Center User Guide
11
Page 19

Using Moxi
RecordRecord
Find &
TV
Ticke
Searching for shows
There are many ways to find shows. Besides channel or menu surfing,
you can search by title, keyword, or by category.
Searching by title or keyword
1. In the Moxi Menu, scroll to the Find & Record category
(see figure 8).
Figure 8: The Find & Record card
2. Choose By Title or By Keyword, and then enter the search word.
Use the arrow keys to highlight a letter, and then press OK to enter
it. Alternatively, use the number keys as you would when entering
letters on a telephone or writing a mobile phone text message (see
figure 9 and figure 10).
3. Press the left arrow key on the remote to view the results.
4. Select a show, and then press OK to open the action menu.
When searching By Title, the results list sorts as you type. When
searching By Keyword, the results appear only after you use the
left arrow to view the results.
Use either the arrow
and OK buttons...
...or the number
buttons to enter
letters.
Press twice to add a space
Press twice to backspace
Press to clear the entire entry
Figure 9: Entering letters with the remote buttons
43
LET
A
K
E
E
I
Y
B
M
O
Q
A
R
U
D
Y
2
6
C
L
O
S
E
Find by Title
Free
Let It Ride
Lethal Weapon
Lethal Weapon 4
Let’s Cook
Let’s Talk
Scarlet Letter, The
...David Letterman
...David Letterman
17 Results
Scheduled to Record
Let It Be Me
Series Options
Canceled & Deleted
By Title
By Keyword
By Category
Figure 10: Searching for shows by title
BACKSPACE
B
F
J
N
R
V
Z
3
7
SPACE
C
G
K
O
Channels
S
W
0
4
8
9:05
D
H
L
P
T
X
1
5
9
12
Media Center User Guide © 2006 by Digeo, Inc. All rights reserved.
Page 20
all DVRs were not created equal
channelschannels
Favorite
Using Moxi
Searching by category
The search by category method organizes shows scheduled in the next
24 hours into category or genr e filters such as movies, drama, comedy,
and so on. Some categories include a card, such as more movies that
shows additional matches for the next two weeks or so. Shows may
appear in more than one genre.
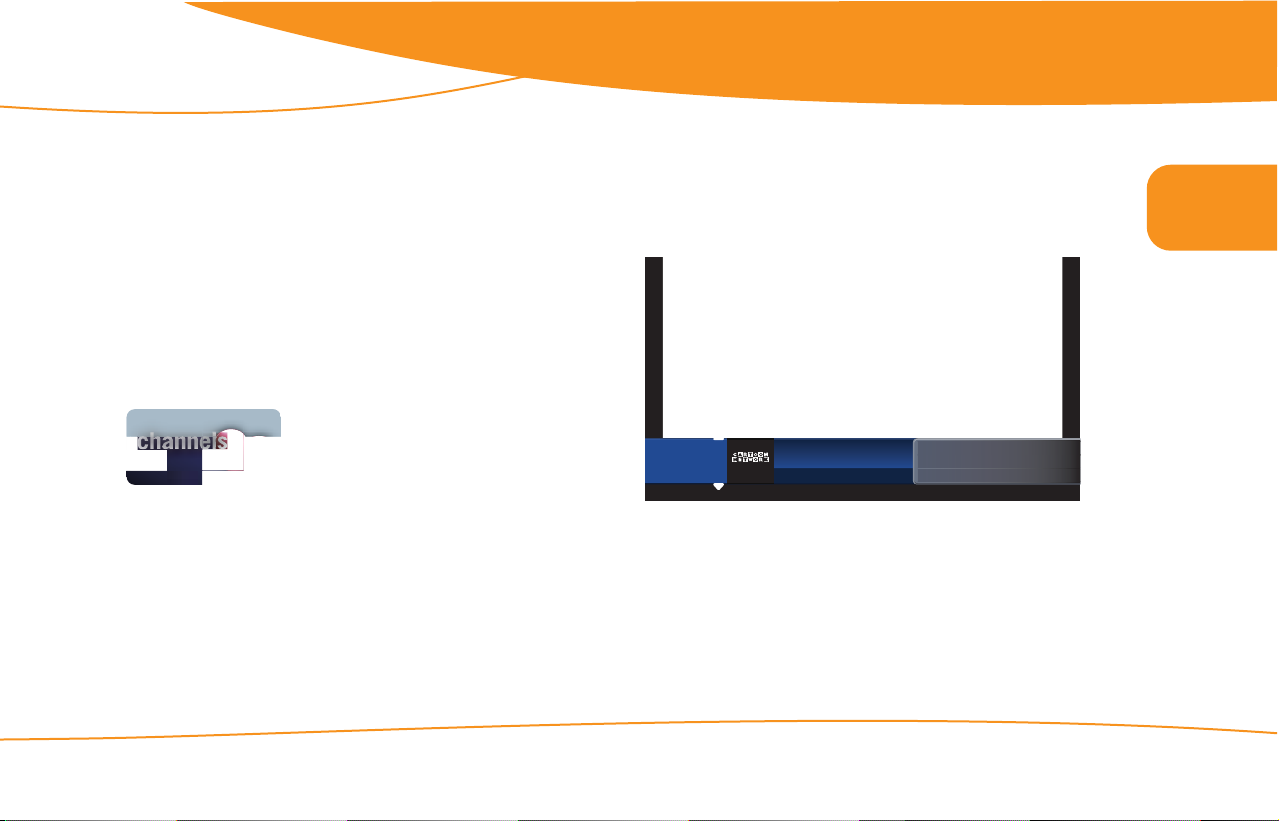
Remembering your favorite channels
The Moxi Menu automatically builds a list of the 15 channels you
watch most frequently and stores them in the Favorites category (see
figure 11). Favorites are compiled separately for the Moxi Mate and
media center.
Figure 11: Favorites card
The favorites list builds from channels that appear in the Channels
category and excludes any channels blocked by parental controls.
• Delete a single channel at a time by selecting the channel, and
then choosing remove channel, or by pressing the clear button
on the remote.
• Clear the entire favorites list by selecting the Options card (you
might need to scroll down to see it), and then choo sing c lear al l.
Using the Moxi Flip Bar
While watching full-screen TV, press any arrow, the OK button, or a
enter a channel number and the flip bar displays. The flip bar provides
many of the same functions as the Channels card in the Moxi Menu
figure 12).
(see
Codename: Kids Next ...
4242
3:08 PM T00NP 3:00 - 3:30 PM
Figure 12: The flip bar
The flip bar lets you access controls while scaling the video slightly.
Information is shown about the current show and upcoming pro
grams.
• Use the up and down arrows to see what is on other channels.
• Press the right arrow, and scroll down to see what is on later.
• Press OK to open the action menu for the selected show.
Fosters Home for Imagi...
TV - Y7
4:00
5:00
Zatch Bell
4:30
Pokémon
-
2
© 2006 by Digeo, Inc. All rights reserved. Media Center User Guide
13
Page 21
Using Moxi
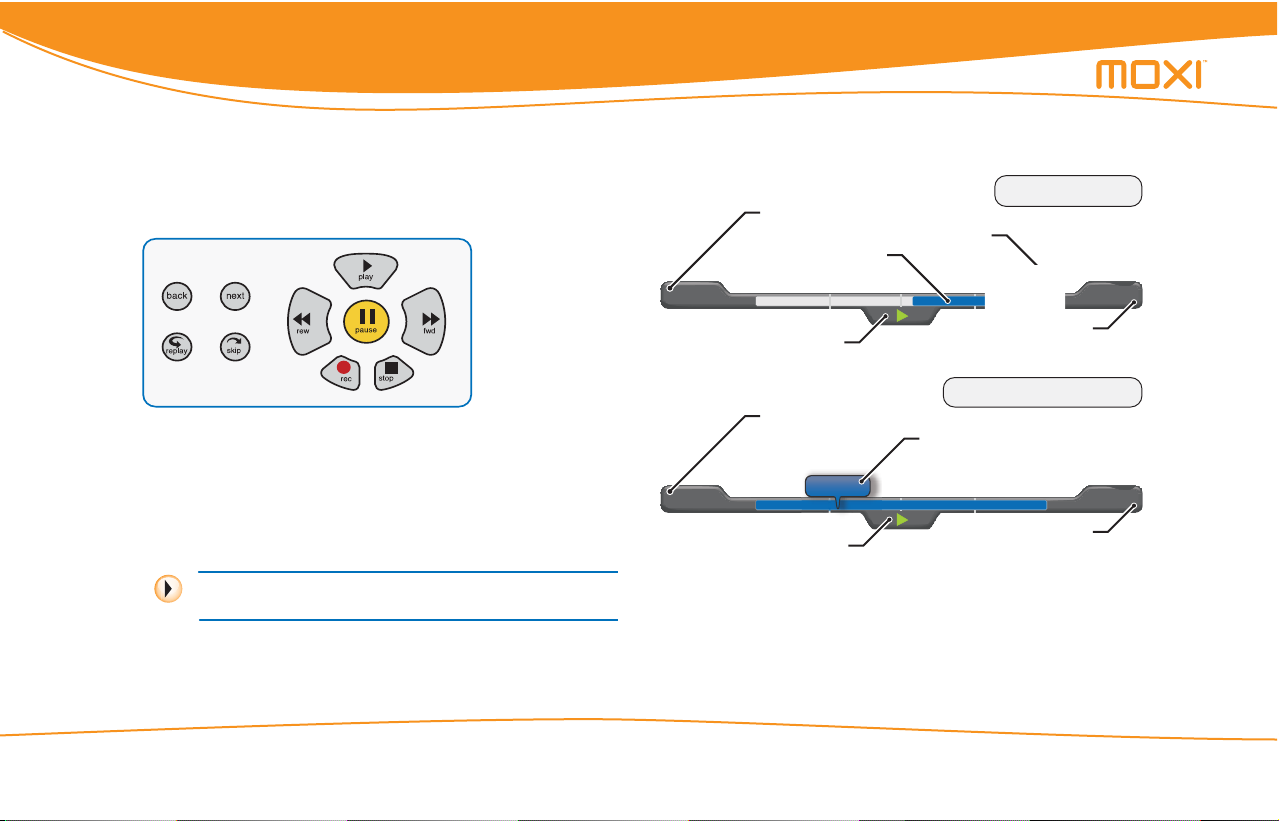
Using the player bar
The player bar appears whenever you press a playback control button
figure 13) and provides information about the duration of the
(see
program and your current playback state (see figure 14).
Figure 13: Playback controls
The player bar shows you the program begin and end time (or the
duration of a recorded program), the current time, and the amount of
the program stored in temporary memory. The playing state of the
program is shown (rewind, fast-forward, pause,
recording). The amount stored in memory is shown in blue.
To activate slow motion press pause, and then press the fastforward button once.
When you start watching a show, the media center begins storing it in
temporary memory. The amount of temporary memory varies, but is
slow-motion, play, or
never less than 30 minutes (10 minutes for HDTV). When you change
channels, temporary memory may be cleared.
Live program
Time the show began
Stored in temporary
memory
1:00 2:00
Player control state
Current time or location
1:57
Time the show ends
Recorded program
Start of the show
Current time or location
0:00 2:00
Player control state
Figure 14: Features of the player bar
If you are watching a live program, you can use the playback controls,
such as rewind or replay, on any portion of the sh ow stored in tempo
rary memory. To record it along with the remainder of the show, press
rec, and then press OK.
0:17
Duration of the show
-
14
Media Center User Guide © 2006 by Digeo, Inc. All rights reserved.
Page 22
all DVRs were not created equal
Using Moxi
Recording shows
To schedule a recording, highlight it in the Moxi Menu, and then press
the rec button (or simply press rec if you are already watching the
show). Alternatively, press OK, and then choose one of the following
recording options:
• Record once — To record only the current episode of the show.
• Record series — To record this show every time it airs on the
current channel.
• See all times — To see other times the show will air in the
future. This is helpful if you missed part of a program but want
to record the entire program. You can then schedule a recording
from the search results.
Once a recording is scheduled, a blue circle icon appears on the program card (see figure 15).
To Record
Formula One Racing
33
Figure 15: Program card with the scheduled to record icon
4:30 - 7:00 AM
Sun, 8/27
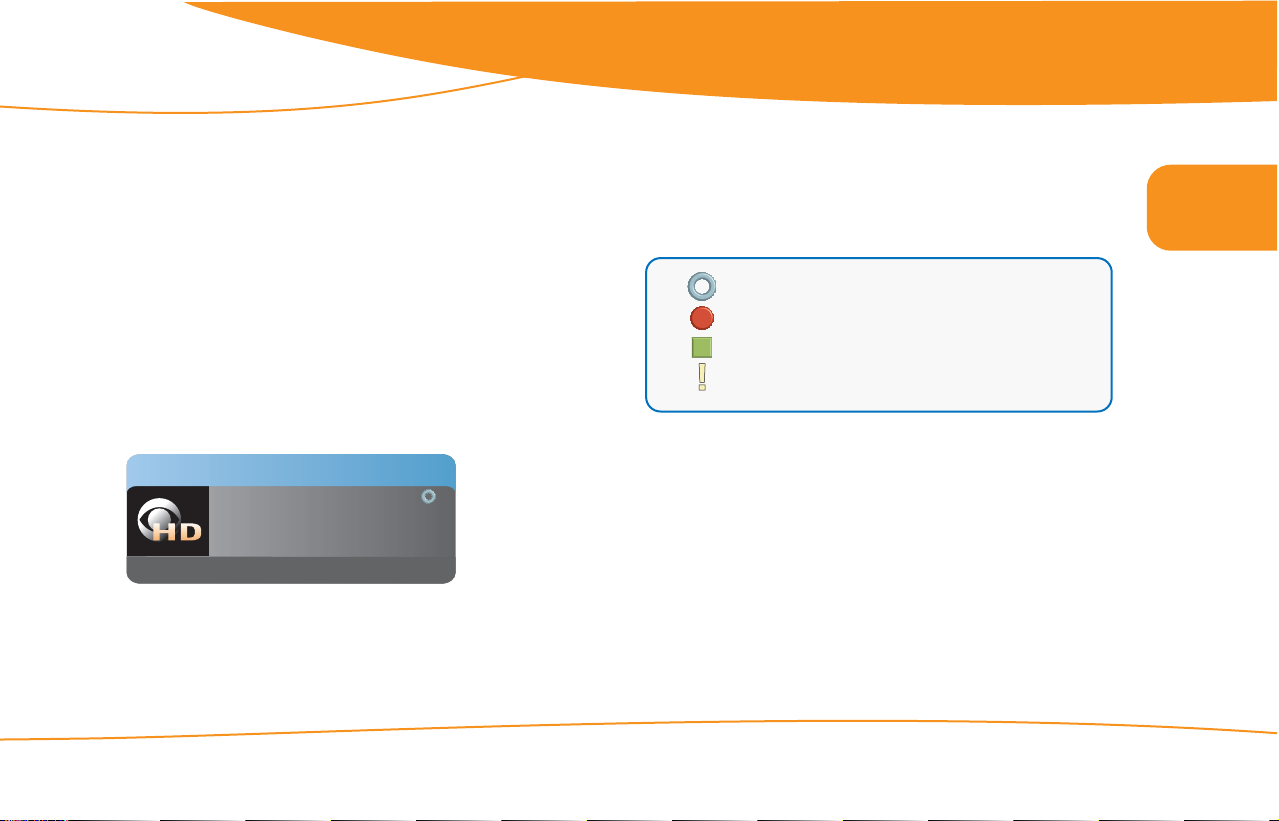
Understanding the program card icons and colors
Program card icons appear in the upper right of a show’s card in the
Moxi Menu and let you know the status of a recorded show or sched
uled recording (see figure 16).
The show is scheduled to be recorded.
The media center is recording the show right now.
The show is recorded and can only be deleted manually.
The show is recorded and may be deleted when space is
needed for newer shows.
Figure 16: Program card icons
-
2
© 2006 by Digeo, Inc. All rights reserved. Media Center User Guide
15
Page 23
Using Moxi
C.
L
.
e
r
e
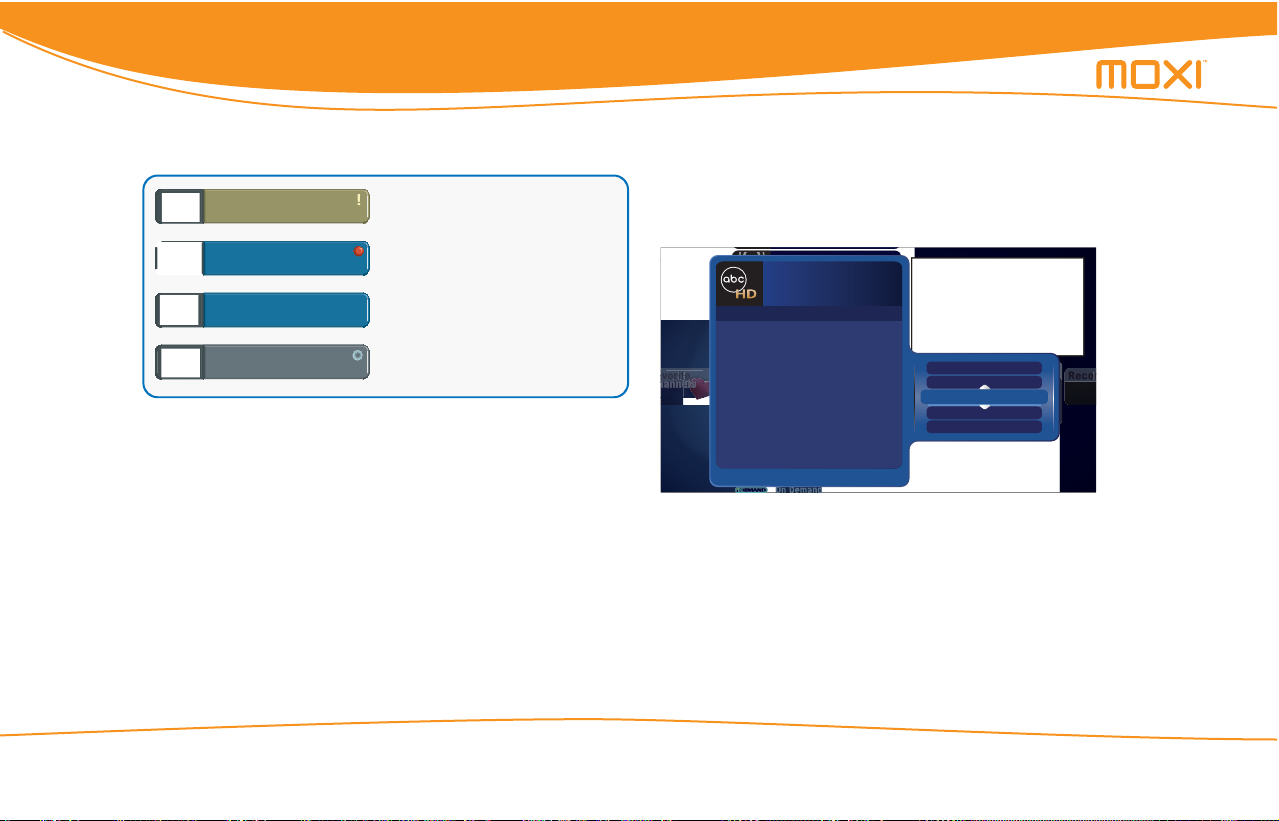
Grey’s Anatomy
The background color of a program card indicates whether the show is
on now, in the future, recorded, or being recorded (see
Fishing With Greg...
Premiership Soccer
Formula One Racing
Golf
Figure 17: Program card background colors and icons indicate status
Shows with the brown background
and exclamation point or square are
record ed.
Shows with the recording icon are
being recorded now.
Shows with a blue background are on
now.
Shows with a gray background are
future programs. If they are scheduled
to be recorded, the open circle icon
appears.
figure 17).
Finding a previously scheduled recording
To find a specific show you already scheduled to record, go to the
& Record category. You can use one of the search features or
Find
open the Scheduled to Record card. A listing of all scheduled record
ings in the next two weeks appears.
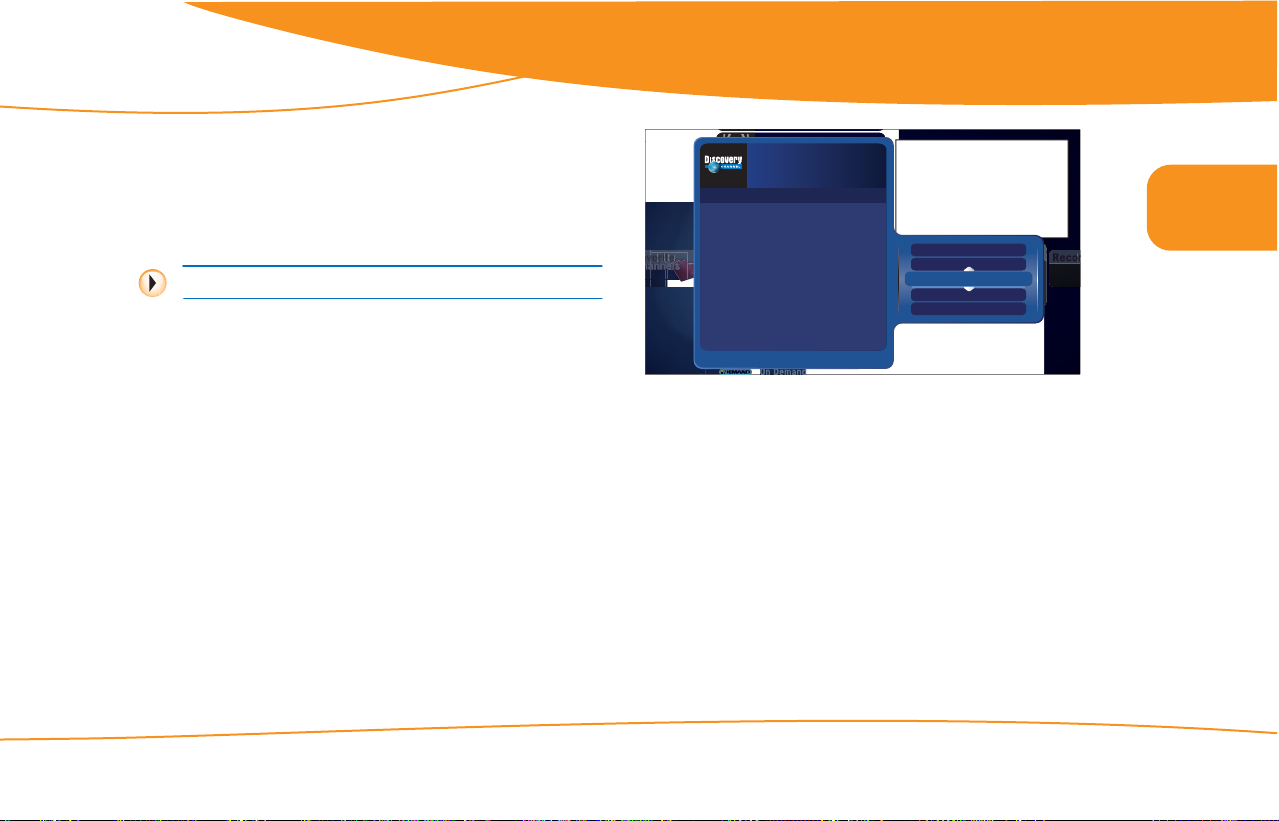
Recording options
To change recording options when the scheduled show is in c enter
focus, press OK, and then choose recording options from the
options list. The menu summarizes the current options, which you can
then modify (see
Figure 18: Recording options screen
You can change the start, stop, and keep settings or choose to record
the series.
• Stop: The default setting is on time. You can choose to stop the
recording up to five minutes early or up to 90 minutes late.
• Start: The default setting is on time. You can choose to start
the recording up to five minutes early or late.
figure 18).
The O.C.
The O.
Love, Inc.
ove, Inc
Smallville
Smallvill
104 8/31 8:00 - 9:00 PM
Survivor
Survivo
Options for this recording:
I Shouldn’t Be Alive
I Shouldn’t Be Aliv
Start: on time
Stop: on time
Channels
Keep: 2 days
Set Relock Timer
Select an option to change it.
Dog Whisperer, The
Change Time Slot
American Inventor
13
Coming Up
8:40
9:30
10:00
reeries
stop
record once
start
My name Is Earl
watch
keep
The Office
close
close
ER
see all times
get series
1:48
16
Media Center User Guide © 2006 by Digeo, Inc. All rights reserved.
Page 24
all DVRs were not created equal
C.
L
.
e
r
e
#4 Monster Garage
Using Moxi
•Keep: The default setting is two days, which means the pro-
•Close: This closes the menu and saves any changes you made.
• Get series or series options This selection opens the series
Recording series
The record se r i e s option is available from the action menu anytime
you select a series episode in the Moxi Menu. If you select record
series, the media center will record the series according to your set
tings, which are accessible from any episode, or go to the Find &
Record category.
1. Open the Series Options card.
2. Scroll to the series you want to update.
3. Press OK.
4. Select recording options from the menu. The current options for
gram is eligible for deletion after two days, but not deleted until
space is needed for new recordings. You can choose to keep the
program protected until space is needed, up to four days, or
until you delete it manually.
You can press the left arrow to close and exit most menus.
options menu. For more information on controlling series record
ings, see Recording series, below.
-
the series are summarized on the left in figure 19.
The O.C.
The O.
Love, Inc.
ove, Inc
Smallville
Smallvill
38 Series
Survivor
Survivo
Options for this series recording:
I Shouldn’t Be Alive
I Shouldn’t Be Aliv
Start: on time
Stop: on time
Channels
Keep: 2 days
Episode Limit: 2
Set Relock Timer
Accept: first-run only
Timeslots: All
Select an option to change it.
Dog Whisperer, The
Change Time Slot
-
American Inventor
Figure 19: Summary of series recording options
5. Select an option to change it.
• Stop: The default setting is on time. You can stop the
recording up to five minutes early or up to 90 minutes late.
•Start: The default setting is on time. You can start the
recording up to five minutes early or late.
• Keep: The default setting is two days, which means the
program is eligible for deletion after two days, but it is not
deleted until space is needed for new recordings. You can
choose to keep the program protected only until space is
needed, up to four days, or until you delete it manually.
13
Coming Up
8:40
9:30
10:00
reeries
start
record once
stop
My name Is Earl
watch
keep
The Office
close
episode limit
ER
see all times
timeslots
1:45
2
© 2006 by Digeo, Inc. All rights reserved. Media Center User Guide
17
Page 25
Using Moxi
C.
L
.
e
r
e
#17 Deadliest Catch
• Episode Limit: This sets the maximum number of episodes
of the series that the media center will record. If the maxi
mum is reached, new recordings of the series replace the
oldest recording of the series. The default setting is five but
this can be changed to any number between one and five.
You can also remove the limit by selecting unlimited.
• Accept: The default setting is accept repeats. If you do not
want repeat episodes recorded, choose first-run only.
• Timeslots: The default setting is all. With some shows, you
may want to record repeats but you do not want to record
all the repeats. For example, if a show airs several times a
day, or if a network runs a marathon, you might only want
the shows that air during a specific timeslot. The media cen
ter checks to see which timeslots are available and allows
you to select a single timeslot or set it to all to record every
episode that meets your other criteria.
•Priority: By default, new series recordings are added to the
bottom of the list of series recordings. Series priority only
matters when more than two series recordings are scheduled
for the same time slot. See
Setting the series priority for
more information.
Setting the series priority
When you schedule a new series recording, it is automatically added
to the bottom of the list of series recordings.
The O.C.
The O.
Love, Inc.
ove, Inc
Smallville
Smallvill
38 Series
Survivor
Survivo
9 World Rally Championship
10 UEFA Champions League Soccer
I Shouldn’t Be Alive
I Shouldn’t Be Aliv
11 Rides
12 Inside Grand Prix
Channels
13 Victory By Design
14 Bicycle Racing
Set Relock Timer
15 Survivorman
-
16 Dirty Jobs
17 Deadliest Catch
Dog Whisperer, The
Change Time Slot
American Inventor
23
Coming Up
8:40
9:30
10:00
record series
7
record once
6
My name Is Earl
watch
5
The Office
close
4
ER
see all times
3
Figure 20: Changing the series priority
If more than two series recordings are scheduled for the same time on
the same day, the media center checks the order in the priority list and
only records the two programs with the higher priority.
For example, if there are series recordings set for Thursday evening
with series priority ranks of 4, 9, and 23, all in the 9:00 PM tim e slot,
only the series with ranks of 4 and 9 are recorded.
2:55
18
Media Center User Guide © 2006 by Digeo, Inc. All rights reserved.
Page 26
all DVRs were not created equal
To change the series priority:
1. Select recording options, and then series options from the action
menu of any scheduled or recorded series recording car d or go to the
Series Options card within the Find & Record category.
2. Choose priority or change priority, depending on the menu.
3. The menu displays a numbered list of stored series. Select a series if
one is not already selected.
4. Use the up or down arrows to place the series (see figure 20 on
page 18).
Using SuperTicker™
close
lock item
lock topic
more info
Missing boy in Colorado found alive after 4 days
Using Moxi
2
When activated, SuperTicker displays up-to-date news headlines,
weather forecasts, sports scores, and stock market updates.
To open or close SuperTicker, press the ticker button near the top of
the remote. SuperTicker automatically cycles through all headlines in
one topic, and then goes to the next topic.
Sports scores are delayed approximately 15 minutes. Stock market
index numbers are delayed approximately 20 minutes.
Limiting headlines to one topic or item
1. Use the arrow keys to scroll to a topic or item.
2. Press OK.
3. Choose lock topic or lock item (see figure 21).
© 2006 by Digeo, Inc. All rights reserved. Media Center User Guide
Figure 21: Locking a SuperTicker topic
• When a topic is locked, the arrows at the sides of the screen
change to red and SuperTicker only scrolls through that topic.
• When an item is locked, the left and right arrows turn red along
with the up and down arrows and SuperTicker is locked on that
item (see
Figure 22: Locking a SuperTicker item
figure 22).
Missing boy in Colorado found alive after 4 days
To toggle between locking and unlocking SuperTicker, press .
19
Page 27
Using Moxi
loc
lock topic
close
m
Reading the whole story
All headlines have a story behind them. To read the story, press info
on the remote. Use the next and back buttons to page through the
story.
NEWS
Missing boy in Colorado found alive after
4 days
CANON CITY, Colo. -- Years from now,
8-year-old Evan Thompson will have quite
a story to tell.
On his first camping trip over the
weekend, he vanished for four days. Lost,
he wandered without food and water. He
lock item
k item
poked at ant hills, slept beneath trees and
lock topic
hid in caves while nearly 100 rescuers
more info
ore info
searched for him.
close
Missing boy in Colorado found alive after 4 days
Missing boy in Colorado found alive after 4 days
next1 of 2
Figure 23: Reading a SuperTicker story
close
Using Photos
You can load hundreds of digital photos on your media center and
then play them back as slideshows on your TV.
The media center can also connect to your networked computer running Windows Media Connect and stream photos o ver you r ho me
network. To learn more about connecting to your PC, see
Link on page 53.
Enabling PC
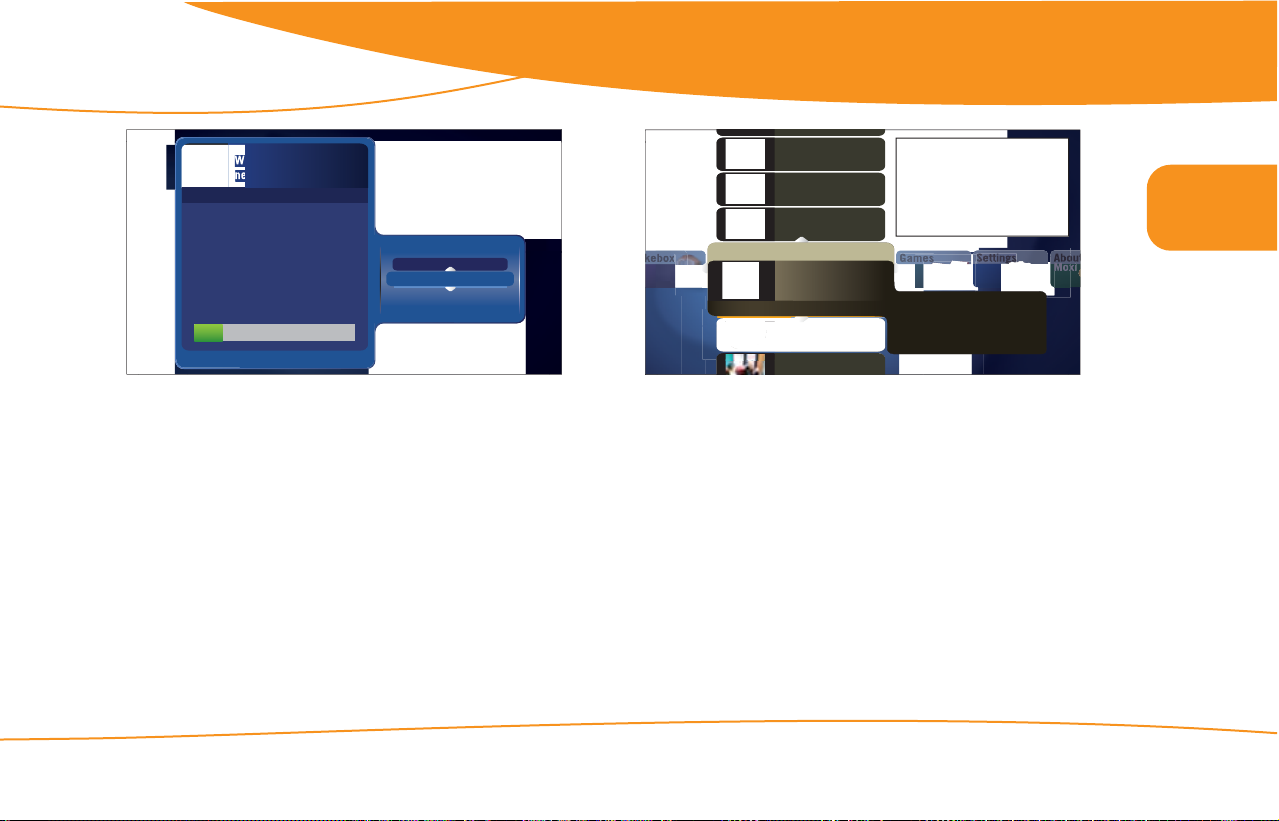
Uploading photos
1. Attach a memory card reader to a USB port on the media center. The
rear ports are USB 2.0 and significantly faster than the front USB
ports.
2. Insert the memory card containing the photos into the card reader.
3. In the Photos category, choose load album.
The media center skips any photos larger than 10 MB.
4. The media center uses a reserved partition of the hard drive for photos and music so uploading photos does not decrease the amount of
TV you can record. The media center shows you how much of the
dedicated space you are using with the Media Storage Capacity
graph (see figure 24).
a. If you have room for the new albu m, continue to Step 5.
b. Otherwise, choose no, close, and then delete an older album before
uploading a new one.
5. Choose yes, upload to confirm. The media center creates a new
album, labels it with the current date, and copies the photos stored
on the memory card.
20
Media Center User Guide © 2006 by Digeo, Inc. All rights reserved.
Page 28
all DVRs were not created equal
Would you like to add
new photos now?
Please connect your memory card reader
and insert your memory card.
All your new photos will be saved to a
Channels
new album labeled with today’s date.
Set Relock Timer
Media Storage Capacity
3%
Figure 24: Uploading photos to the media center
re
record once
no, close
watch
yes, upload
close
see all times
9/10/06
7/29/06
6/08/06
Photos
default music
01/01/06
7/20/06
Load Album
9/16/05
10/29/05
12 Photos
Figure 25: Browsing photo albums
Using Moxi
To delete or rotate this photo,
press OK.
2
Viewing photos
In the Photos category, scroll to the album you want to play, and then
choose an option.
© 2006 by Digeo, Inc. All rights reserved. Media Center User Guide
Photos are shown at the highest allowed resolution. (See HDTV
Setup on page 30 for more information on setting TV resolutions.)
Photos are sized to fit the screen without stretching them (the aspect
ratio remains correct).
• Play slideshow — Plays all photos in the selected album. During
the slideshow, each p hoto ap pears for ab out s e ven seco nds. You
may use the playback controls to manually control the slidesho w.
The slideshow plays continuously until you press stop.
• Open album — Views a single photo within an album. Scroll to
the photo, and then press OK.
• Delete album — Removes the photo album (there is no undo).
21
Page 29

Using Moxi
• Slideshow music — If you have Jukebox, you can select a saved
music playlist to accompany the slideshow. Select slideshow
music, and then choose a music playlist.
While viewing photos in an album or during a slideshow:
• Press fast-forward or rewind to speed up or slow down the slideshow.
• Press pause to halt the slideshow in the current picture.
• Press the right arrow, skip, or next to advance to the next
photo.
• Press the left arrow, replay, or back to return to the previous
photo.
• When the flip bar is open, press OK to see editing options for
the photo or the album. The info button also opens the editing
menu.
If you use PC Link, shared media have the link icon in
the upper right.
Creating a playlist for a photo album with PC Link
First you need to create a playlist. On your PC, you can create a playlist
using a media player that supports .m3u (used by various media play
ers) or .wpl (Windows Media Player) playlist file formats. The playlist
and its music files must be in folders that are shared through Windows
Media Connect to play on your media center . You can also create play
lists from music stored locally on your media center by adding the
music to a queue and saving that queue as a playlist.
To assign your playlist to a photo album, go to the albu m o n your
media center. Select slideshow music, then select the playlist you
would like to have assigned to it.
Using Media Player
Some models of the media center include a DVD player that allows
you to watch DVDs or play audio CDs on either the m edia c enter o r
the Moxi Mate, if available.
To play a movie:
1. Press the eject button on the media center or, in the Moxi Menu,
select the Media Player category, and then choose eject or open
tray.
2. Insert the DVD in the tray, and then press the eject button on the
media center or, in the Moxi Menu, select the Media Player category, and then choose close tray.
3. The DVD should begin automatically. If it does not, select the Media
Player in the Moxi Menu, press OK, and then select play.
Once the DVD is playing, press OK to open the flip bar , and t hen press
OK again to access the DVD controls without interrupting the mov ie.
If the DVD contains rating information, the media center enforces your
parental control settings. (To learn more about parental controls, see
Parental Controls on page 35.)
-
You can watch the DVD on either the media center or the Moxi
Mate, but you cannot watch it simultaneously on both.
22
Media Center User Guide © 2006 by Digeo, Inc. All rights reserved.
Page 30
all DVRs were not created equal
Using Moxi
DVD video resolutions
Since the native resolution of DVDs is 480i, the media center automatically plays DVDs in either 480p or 480i, depending on your selections
in the HDTV `Setup category. The media center automatically upcon
verts to 480p if 480i is not selected in the HDTV Setup category.
The DVD player in the media center cannot upconvert to 720 p or
1080i or play HD-DVD or Blu-Ray discs.
DVD copyrights
To protect the copyrights of movie creators, you cannot watch DVDs
on a TV connected to the media center with IEEE 1394 or record DVDs
to a VCR connected with IEEE 1394.
Using Jukebox
Jukebox allows you to play music using your media center, TV, and
home theater equipment. If PC Link is enabled (see
-
Link on page 53), you may play music stored on your personal computer.
Gnarls Barkley
8 mile
David Guetta vs. The Egg
U2 - The Best of 1980
Cieli Di Toscana
Jukebox/Albums
Long Gone Before Daylight
Home
MANDY
Figure 26: Selecting an album to play in Jukebox
Communication
Long Gone Before Daylight
Cardigans
00:00 10:05
Songs
Communication
Your’re The Storm
A Good Horse
61:35
And You Kissed Me
Could’nt Care Less
Please Sister
The Jukebox category contains a list of your music sorted by albu m,
genre, or artist. To change how the list is displayed:
1. Select the listing you want from the action menu that appears after
choosing Jukebox Options, change view.
2. Press OK.
Enabling PC
10:05
2
© 2006 by Digeo, Inc. All rights reserved. Media Center User Guide
23
Page 31

Using Moxi
You can also choose to shuffle play all your music, or play it all in
order. (There may be a delay when first playing a large catalog of
music via PC Link.)
Loading music
If you have a media center with a CD/DVD drive:
1. Press eject on the front panel of the media center or choose eject
from the Media Player category.
2. With the label side up, insert the audio CD into the CD/DVD drive.
3. The media center immediately begins playing and importing the
audio tracks.
Some fairly common albums or new releases may not be recognized
and will be shown as “Unknown Album,” rather than displaying
the album name and track names. This is caused by gaps in thirdparty data. The songs are still imported.
The media center uses a partition of the hard drive reserved for photos
and music so uploading music does not decrease the amount of TV
you can record. You can change the default behavior when you insert
a CD. See
To load music on your computer:
1. Load the unecrypted MP3 files on your computer. Make sure they are
2. Check the Jukebox category in the Moxi Menu for the songs.
CD Options on page 35 for more information.
stored in a folder shared by Windows Media Connect.
Playing music
To play music, scroll to the album, artist, or song, and then press OK.
Choose play from the action menu. After a few minutes, a full-scr een
animated jukebox appears to prevent TV screen burn-in.
Creating a queue
1. Navigate to the album, artist, or song, and then press OK.
2. Choose add to queue from the action menu.
3. Once you add all the songs you want, go to the Queue card, and
then press OK.
4. Choose one of the following actions:
• Save — creates a playlist (see Creating a playlist below).
• Shuffle play — plays all songs in the qu eu e in ran dom order
•Close — exits to the Jukebox category.
• Clear — deletes all songs in th e q ueue.
Songs shared to the media center via PC Link cannot be added to
the queue.
24
Media Center User Guide © 2006 by Digeo, Inc. All rights reserved.
Page 32

all DVRs were not created equal
Using Moxi
Creating a playlist
1. Open the queue card, and then select save.
2. A new action dialog opens and prompts you to enter a name for the
playlist.
3. Press the right arrow until save is highlighted, and then press OK.
The playlist now appears in the main Jukebox category.
If you use PC Link, shared songs have the link icon in the
upper right when viewed in the Moxi Menu.
Reading service messages
Occasionally, your service provider may send service messages directly
to your media center. These messages could cover topics such as
upcoming software updates, future programming, or anything else
related to your use of the media center. When you have a service mes
sage, the message light on the front panel of the media center is lit.
To read the message:
1. Press the Moxi button to open the Moxi Menu.
2. Scroll to the Service Message category.
3. Use the up or down arrows to select the message, and then press OK
to open it.
4. Use the next and back buttons to page through the message.
Once you have read the message, you can choose to exit the message,
mark it as unread, or delete it.
Playing Moxi games
There are several games available to you in the Games category. Each
game includes on-screen playing instructions. The current games
include:
Slot Machine
-
Solitaire
2
© 2006 by Digeo, Inc. All rights reserved. Media Center User Guide
25
Page 33

Using Moxi
Code Breaker
Mahjong
Bubble Blast
Blockbreaker
Invasion Wave
Blackjack
26
Media Center User Guide © 2006 by Digeo, Inc. All rights reserved.
Page 34

all DVRs were not created equal
Using Moxi
Video Poker
Bowling
Tomato
21 Frenzy
2
Ping
Blast it
© 2006 by Digeo, Inc. All rights reserved. Media Center User Guide
27
Page 35

Using Moxi
The next steps
• To customize Moxi to suit your equipment and con-
figuration, see Changing settings on page 29.
•See Using and programming the remote on page 41
to learn how to configure the remote for your TV.
• To set up PC Link, see Enabling PC Link on page 53.
• Do you have a specific question? Use the
Glossary on page 93 and Index on page 97 to find
the answer.
28
Media Center User Guide © 2006 by Digeo, Inc. All rights reserved.
Page 36

Changing settings
Channel List....................................................................................................... 30
Sound Effects .................................................................................................... 30
HDTV Setup....................................................................................................... 30
Widescreen........................................................................................................ 32
Audio Output .................................................................................................... 33
Secondary Audio ............................................................................................... 34
Closed Caption.................................................................................................. 34
Skip settings ...................................................................................................... 34
CD Options........................................................................................................ 35
Parental Controls............................................................................................... 35
3
© 2006 by Digeo, Inc. All rights reserved. Media Center User Guide
29
Page 37

Changing settings
The Settings category is where you customize the default media center
settings to suit your needs.
Channel List
The Channel List card displays all available channels. You can modify
the list if there are channels you never watch, or do not want to
appear in the main Channels category after you press the Moxi but
ton you can modify the list. To modify the list:
1. To remove (or restore) a channel, go to the Channel List card in the
Settings category, if you are not already there.
2. Scroll up or down to the channel you want to remove or restore.
3. Press OK.
That channel no longer appears in the main Channels category or, if
you restored it, appears once again.
-
Sound Effects
You can adjust the volume for those sounds you hear every time you
push OK, pause, or most any other button on the remote. You can
choose between three volume levels or mute them entirely.
1. To change the sound effects setting, go to the Sound Effects card in
the Settings category.
2. Choose the desired output setting, and then choose close.
Settings
Sound Effects
Figure 27: Adjusting the sound effects volume.
medium
low
mute
close
high
HDTV Setup
The media center automatically adjusts the video output to match the
broadcast format and the selections you make in the HDTV Setup
card.
The video resolution options are 480i, 480p, 720p, and 1080i. Always
use the best resolution allowed by your TV, the video cable between
the media center and TV, and the broadcast. See
which resolutions are supported by which cables.
table 1 to learn
30
Media Center User Guide © 2006 by Digeo, Inc. All rights reserved.
Page 38

all DVRs were not created equal
Table 1: Video connections and supported resolutions
Connection 480i (SD) 480p 720p 1080i
DVI-D digital video X X X X
Component video
(YPbPr)
S-Video X
Composite video (V) X
RF (some models) X
IEEE 1394 (does not
show user interface
graphics or DVDs)
For more information on video cables, see table 4 on page 63.
If you select a video resolution in error and the screen goes
blank, do not push any buttons, but wait about thirty
seconds for video to come back. If it does not, see
displayed on page 72 to fix it.
X X X X
X X X X
No video
Changing settings
Setting standard TV video resolution
If your TV is a standard definition (SD) TV, make sure 480i is the only
box checked. All other video resolutions will be output at 480i. You
can still watch HD channels and they may look considerably better
than their SD counterparts.
Setting HDTV video resolution
The media center outputs video in its native format or adjusts the
video to match your video resolution settings.
T o get the most out of your HDTV, check the manual that came with it.
The manual specifies which video resolutions the TV can display. Some
TVs only display one video resolution while others can show many.
1. Go to the HDTV Setup card in the Settings category.
2. Check a resolution your TV supports.
3. Once the video switches to the new resolution, choose yes.
4. Continue selecting each video resolution your TV supports.
5. Choose close.
3
© 2006 by Digeo, Inc. All rights reserved. Media Center User Guide
31
Page 39

Changing settings
Widescreen
The widescreen settings only take effect if the broadcast is presented
in 16:9, or widescreen, format.
Letter box — Shrinks a widescreen picture to fill the screen and puts
black or gray bars at the top and bottom of the screen. This is the best
choice if you have a standard TV.
Figure 28: Letter box mode on standard (4:3) and widescreen (16:9)
Cropped — Fills the entire screen with the pictur e by cr opping out the
left and right edges of the picture. This is an alternative setting for
standard TVs.
Figure 29: Cropped mode on standard (4:3) and widescreen (16:9)
Wide mode — Horizontally squeezes widescreen video (16:9) to fit a
standard TV (4:3). Choose this if you have a TV capable of sh owin g
widescreen programs correctly (in the original 16:9
Figure 30: Wide mode on standard (4:3) and widescreen (16:9)
Each setting affects the aspect ratio of the show on your TV dif ferent ly
and could even have a different effect on the commercials airing dur
ing a show. You may have to experiment to find the best setting for
your TV and viewing habits.
Some TVs have built-in widescreen settings. Check the user guide
that came with your TV for more information.
To use Moxi to change the widescreen settings
1. Go to the Widescreen card in the Settings category.
2. Choose the desired output setting, and then choose close.
aspect ratio).
-
32
Media Center User Guide © 2006 by Digeo, Inc. All rights reserved.
Page 40

all DVRs were not created equal
Audio Output
Changing settings
Audio Output
Change the audio output type to match your audio connection and
equipment (see
Table 2: Audio connections and selections
Audio connection Preferred selection
S/PDIF (coaxial or optical) Dolby Digital
RCA (red and white) Stereo
RF (some models) Mono
The media center can output sound in Dolby Digital, stereo, or mono.
1. To change the audio setting, go to the Audio Output card in the
Settings category.
2. Choose the desired output setting, and then choose close.
table 2).
10
If you use a S/PDIF output to a Dolby
Digital receiver or amplifier, choose dolby
digital (system or game soun effects won’t
play when tuned to Dolby Digital
Channels
programming).
Set Relock Timer
If you use audio L R outputs (red and
white connectors), choose stereo.
If you use the RF “To TV” output (coax
cable) to your TV, or if you use audio L or
next1 of 2
Figure 31: Changing the audio output
System and game sound effects do not play when audio output is
set to Dolby Digital.
record series
close
record once
dolby digital
watch
stereo
close
mono
see all times
3:55
3
© 2006 by Digeo, Inc. All rights reserved. Media Center User Guide
33
Page 41

Changing settings
Secondary Audio
Secondary Audio
When you watch a TV that includes a secondary audio program (SAP),
usually in a different language, the media center can pass that second
ary audio stream to your TV or audio receiver.
1. To enable or disable SAP, go to the SAP card in the Settings cate-
gory.
2. Choose enable (or disable), and then chose close.
3. Change to the channel carrying the secondary audio stream.
4. To hear secondary audio on digital channels, open the flip bar, press
OK, and then choose language from the action menu.
The O.C.
Love, Inc.
Smallville
Survivor
Enabling SAP will play Secondary Audio
Programs on analog channels after your
I Shouldn’t Be Alive
next channel change.
Channels
If the channel does not carry Secondary
Audio Programs you will hear the primary
Set Relock Timer
audio.
Dog Whisperer, The
Change Time Slot
American Inventor
Figure 32: Enabling or disabling SAP
11
Coming Up
8:40
9:30
10:00
reeries
record once
disable
My name Is Earl
watch
enable
The Office
close
close
ER
see all times
1:43
Closed Caption
Most viewers use these setting to toggle closed captions on or off.
-
There are additional settings that may be used on digital streams that
enable them.
Skip settings
Pressing the skip button on the remote moves you forward in
recorded or stored programs in set increments. Change the increment
by adjusting the skip options in the Settings category.
The skip option is not available in all markets.
Choose one of the following:
• 30 seconds
• 3 minutes
• 5 minutes
• 15 minutes
Settings
Skip: 30 seconds
Figure 33: Skip settings card
15 minutes
close
30 seconds
3 minutes
5 minutes
34
Media Center User Guide © 2006 by Digeo, Inc. All rights reserved.
Page 42

all DVRs were not created equal
Changing settings
PC Link Setup
PC Link connects your media center to home computers. When connected, shared photos and music stored on the computer are listed in
the Photos and Jukebox categories in the Moxi Menu, just like photos
and music loaded directly on the media center.
See Enabling PC Link on page 53 for more information.
CD Options
The CD Options allow you to customize how the media center
responds when you insert an audio CD in the disk drive.
• Auto play — automatically plays a CD when inserted.
• Auto import — automatically imports a CD to Jukebox when
inserted.
• Auto eject — automatically ejects a CD once it is imported or
played.
Parental Controls
The parental control functions provided by the media center are
robust. By setting a four-digit personal identification number (PIN), you
can lock programming by rating or channel.
The media center still records scheduled shows blocked by parental
controls but you must enter the PIN before you can watch them.
In households with the Moxi Mate, parental control settings and
PIN apply to both TVs but turning parental controls off at one TV
does not turn them off at the other.
Creating a PIN
The first time you use parental controls, the media center asks you to
create a PIN.
1. In the Settings category, scroll to the Parental Controls card.
2. Press OK.
3. Use the number keys on the remote to enter a four digit PIN, and
then enter the PIN again to confirm it.
4. Choose close.
3
© 2006 by Digeo, Inc. All rights reserved. Media Center User Guide
35
Page 43

Changing settings
Movie
Ratings
Lock By
Channel
VOD/
PPV
Changing a PIN
1. In the Settings category, scroll to the Parental Controls card.
2. Press OK.
3. Choose settings.
4. Scroll left to the Change PIN card, and then press OK.
5. Enter the old PIN.
6. Enter the new PIN, and then enter the new PIN again to confirm it.
Locking channels or programs by rating
1. In the Settings category, scroll to the Parental Controls card.
2. Press OK.
3. Choose settings.
4. Choose either TV Ratings, Movie Ratings or Lock By Channel.
Each card contains a list of the rating system or a list of channels.
Scroll to the format or channel you want to control.
FV
TV Ratings
TV-G
TV-Y7-FV
TV-Y7
TV-Y
Unlock All
Mature audiences
only
TV-14
TV-PG
Mature audiences only.
This program is specifically
designed to be viewed by adults
and therefore may be unsuitable for
children under 17.
To unlock programs with this rating,
press OK.
Figure 34: Controlling movie ratings
5. Lock the rating or channel by choosing it, and then pressing the OK
button on the remote. In figure 34, TVMA, TV14, and TVPG are
locked.
When you lock a rating, all ratings for more mature audiences are
also locked. For example, lock TVPG and TV14 and TVMA are also
locked. When unlocking, the reverse is also true.
6. Choose the Back button to exit parental controls and return to the
Moxi Menu.
36
Media Center User Guide © 2006 by Digeo, Inc. All rights reserved.
Page 44

all DVRs were not created equal
Changing settings
Locked
Amazing Stories
Proud Family, The
Locked
Locked
Favorites
Locked
2:00 - 3:00 PM
4
Dog Whisperer, The
Options
American Inventor
Change Time Slot
Figure 35: The Favorites category with locked programs
104
2:34
When parental controls are turned on, the names of all locked programs are replaced with “Locked” regardless of where they are listed
(Moxi Menu, flip bar, Find & Record, and so on).
If the V-Chip in your TV is enabled, you may see a black screen after
tuning to a channel with blocked content. No Moxi Menu, flip bar,
sound effects, or any other audio or video are shown or heard. To
correct this, change to an unblocked channel, or disable all V-Chip
functions and use the parental control features provided by Moxi to
regulate viewing.
Turning off parental controls
1. Press OK on any locked program.
2. Enter your PIN to unlock all programming temporarily or choose
more options to only unlock the current channel.
To unlock or change all parental control settings, go to the Settings
category, scroll to the Parental Controls card, and then press OK.
Settings
Parental Controls:
Currently On
Figure 36: Disabling parental controls
Setting the unlock timer
While configuring parental contr ols, you can specify how long to leave
parental controls unlocked.
1. In the Settings category, scroll to the Parental Controls card, and
then press OK.
2. Choose settings.
3. Scroll left to the Set Relock Timer card, and then press OK.
4. Enter your PIN, if prompted.
5. Choose the unlock duration of between one and six hours
(see figure 37). This option appears anytime you unlock parental controls.
settings
off
close
3
© 2006 by Digeo, Inc. All rights reserved. Media Center User Guide
37
Page 45

Changing settings
C.
L
.
e
r
e
Set Relock Timer
The O.C.
The O.
Love, Inc.
ove, Inc
Smallville
Smallvill
Survivor
Survivo
When you unlock a show, you open a
temporary viewing window. Parental
I Shouldn’t Be Alive
I Shouldn’t Be Aliv
Controls are temporarily suspended during
this time.
Channels
Choose the amount of time to suspend
Set Relock Timer
Parental Controls when unlocking a show.
After the chosen length of time, Parental
Controls will re-lock automatically.
Dog Whisperer, The
Change Time Slot
American Inventor
When you unlock a show, you
open a temporary viewing window.
Parental Controls will relock
automatically after this time.
record series
4 hours
Coming Up
record once
2 hours
8:40
My name Is Earl
watch
1 hour
9:30
The Office
close
close
10:00
ER
see all times
6 hours
Figure 37: Setting the relock timer
Once set, the Parental Controls card category displays the relock
time (see
figure 38).
Settings
Parental Controls:
Temporarily Off
Will relock at 8:33 PM
Figure 38: Relock time
Controlling Pay Per View or On Demand purchases
To restrict the purchase of Pay Per View or On Demand programs, use
the same PIN as with parental controls. See
for more information on creating a PIN.
1. In the Settings category, scroll to the Parental Controls card, and
then press OK.
2. Choose settings.
3. Scroll to the On Demand / Pay Per View Purchases card, and then
press OK.
4. Enter your PIN to require that the PIN be entered whenever a pur-
chase is made.
Creating a PIN on page 35
If you forget your PIN
If you forget your PIN:
1. Call your cable provider.
2. After the representative resets the PIN, create a new one right away
(see Changing a PIN on page 36).
38
Media Center User Guide © 2006 by Digeo, Inc. All rights reserved.
Page 46

all DVRs were not created equal
Changing settings
3
The next steps
• To learn how to use the Moxi Menu, see Using
Moxi on page 7.
•See Using and programming the remote on page 4 1
to learn how to configure the remote for your TV.
• To set up PC Link, see Enabling PC Link on page 53.
• For help, see Troubleshooting on page 71.
• Do you have a specific question ? Use the
Glossary on page 93 and Index on page 97 to find
the answer.
© 2006 by Digeo, Inc. All rights reserved. Media Center User Guide
39
Page 47

Changing settings
40
Media Center User Guide © 2006 by Digeo, Inc. All rights reserved.
Page 48

Using and programming the remote
Functions of the Moxi remote............................................................................ 42
Programming the remote................................................................................... 44
Infrared emitter ................................................................................................. 46
4
© 2006 by Digeo, Inc. All rights reserved. Media Center User Guide
41
Page 49

Using and programming the remote
This chapter provides information about remote functions and programming.
Functions of the Moxi remote
The Moxi remote operates the media center, and—once programmed—will simultaneously control the power, volume, and mute
functions of your TV or audio receiver.
Your cable operator may supply a different remote. If your remote
does not look like the one pictured in
the information provided with that remote for programming instructions.
When replacing batteries, use only high quality, non-corrosive
batteries designed for use in electronic equipment.
Multi-function buttons
Some buttons have different functions depending on what application
you are using, whether you are watching live TV, or navigating the
Moxi Menu. For example, the ch+ button pages through the channels
category in the Moxi Menu but opens the flip bar and switches to the
next channel while watching live TV. See
details on all the buttons and functions.
figure 39 on page 43, refer to
figure 39 on page 43 for
42
Media Center User Guide © 2006 by Digeo, Inc. All rights reserved.
Page 50

all DVRs were not created equal
Using and programming the remote
* locks and unlocks SuperTicker items
ticker displays and hides SuperTicker
power turns the TV and audio receiver on and off
on demand jumps to the On Demand category
live TV jumps to full-screen live TV
play starts a recorded program, song, or album
rew multi-speed rewind for playback (press multiple
times to select speed)
fwd multi-speed fast forward for playback (press
multiple times to select the speed)
rec starts a recording
stop stops a program, song, or album
pause pauses a live or recorded show, song, or album
(press pause, then fwd for slow motion)
replay jumps back seven seconds, moves the Moxi
Menu back one day
skip jumps ahead in stored or recorded video, moves
the Moxi Menu forward one day
number keys tune directly to channels, enter text in
menus, make choices in games
1 press twice to backspace during text entry
0 press twice to add a space during text entry
clear deletes all entered text, deletes shows from
Recorded TV, and dismisses the Moxi Menu and
Flip Bar
enter applies numeric or text entries
Figure 39: The Moxi remote
info displays additional information about the selected
item
zoom toggles between an open Moxi Menu and
full-screen TV without losing menu position
arrow up, down, right use to navigate menus, play
games (hold for turbo speed)
arrow left exit most menus, navigate menus, play
games (hold for turbo speed)
OK selects or activates the selected item
back jumps back 15 minutes, shows last note page,
jumps 30 minutes in the Moxi Menu, or goes to the
previous photo
next jumps back 15 minutes, shows last note page,
jumps 30 minutes in the Moxi Menu, or goes to the
next photo
MOXI opens and closes the Moxi Menu from most
places (two presses might be required)
vol adjusts the audio volume on the TV or audio device
mute toggles sound on and off
jump goes to the last viewed channel
ch changes channels or pages through vertical menus
(hold for turbo speed)
4
© 2006 by Digeo, Inc. All rights reserved. Media Center User Guide
43
Page 51

Using and programming the remote
Programming the remote
Before you begin, find the codes for your TV from the table starting on
78. Write it here:
page
____________________________________________________________
____________________________________________________________
____________________________________________________________
If you have an audio receiver, find the codes in the table starting on
85. Write it here:
page
____________________________________________________________
____________________________________________________________
____________________________________________________________
Use one of the following procedures:
• Programming with codes
• Programming by search on page 45 — use this if your brand is
not listed or if the given codes do not work.
Programming with codes
Follow these steps to program the remote to control TV power and
volume.
Some older devices may not be supported. If the device fails to
respond to any code, use its original remote to control it.
1. Turn on the TV or audio device you want to control.
2. On the Moxi remote, press and hold the Moxi and OK buttons simul-
taneously until the LED at the top of the remote blinks twice.
3. Using the number buttons on the remote, enter one of the codes for
the TV. When you enter the correct code, the LED blinks twice. If it
blinks once, the code was invalid—try another code.
4. Press the Power button on the remote.
5. If the TV does not respond, repeat steps 2 and 3 using another listed
code. Repeat until successful, or use Programming by search on
page 45.
6. To program the remote to control TV power plus power and volume
for an audio device, turn on the audio device you want to control.
7. Repeat Step 3 using the code for the audio device.
8. Press the Power button on the remote. If you programmed two
devices, both turn off.
9. If the TV or audio device does not respond, repeat steps 2 and 3
using another listed code. Repeat until successful, or use the Programming by Search procedure.
44
Media Center User Guide © 2006 by Digeo, Inc. All rights reserved.
Page 52

all DVRs were not created equal
Using and programming the remote
Programming by search
If the TV or audio device is not listed, or the codes listed do not work,
try programming by search. Programming by search allows the remote
to cycle through codes to find one that works with the TV or audio
device.
Once programmed with two device codes, the r emot e contr ols volume
and mute for the second device. Follow these steps to program the
remote to control audio device power and volume.
Some older devices may not be supported. If the device fails to
respond to any code, use its original remote to control it.
1. Turn on the TV or audio device you want the remote to control.
2. On the Moxi remote, press and hold the Moxi and OK buttons simul-
taneously until the LED at the top of the remote blinks twice.
3. Using the number buttons on the remote, press 9 9 1 0 for the TV, or
9 9 1 1 for the audio device. The LED light blinks twice.
To reset the remote to the original factory setting, enter code
9 9 9 9, and then press OK.
4. Press the Mute button.
• If this mutes the device, go to step 5.
• If this does not mute the device, press the up arrow to
advance to the next code, and then press Mute again.
Repeat until the device responds.
5. Press OK to set the current code and finish.
4
© 2006 by Digeo, Inc. All rights reserved. Media Center User Guide
45
Page 53

Using and programming the remote
Infrared emitter
When a button on the remote is pressed, the infrared signal is sent to
an IR receiver. The receiver then transmits the signal to the IR emitter
(IR blaster), which sends commands to electronic components.
For the IR emitter to send its signals to the media center, it must have
a clear view of the infrared receiver on the front panel of the media
center. To see the receiver, shine a flashlight at the media center front
panel, to the right of the clock (see
tation provided by the manufacturer of the IR emitter for proper i nstallation and orientation.
The infrared frequency used for IR signals between the remote and
media center is 38 KHz.
Figure 40: Infrared receiver on the media center front panel
figure 40). Refer to the documen-
IR receiver
MESSAGE
RECORDING
POWER
10:35
OK
CHANNELMENULIVE TV
POWER
The next steps
• Get the cod es. Se e Moxi remote programming
codes on page 77.
• Do you ha ve a specific question? U se the
Glossary on page 93 and Index on page 97 to find
the answer.
46
Media Center User Guide © 2006 by Digeo, Inc. All rights reserved.
Page 54

Adding additional recording space
Using an external hard drive .............................................................................. 48
Archiving simplified ........................................................................................... 49
Archiving to a VCR or DVCR .............................................................................. 50
5
© 2006 by Digeo, Inc. All rights reserved. Media Center User Guide
47
Page 55

Adding additional recording space
This chapter describes how to connect an external hard drive, VCR, or
other recording device, to add additional drive space or archive shows
recorded on the media center. If you have the External Hard Drive card
in the Settings category, continue to
below. Otherwise, skip to Archiving simplified on page 49.
Programs protected by Macrovision copy protection may not be
archived to a VCR.
Using an external hard drive
Using an external hard drive
To provide additional space for recorded programs, you may connect
one external hard drive at a time to the rear USB 2.0 port on the media
center to provide additional space for recorded programs. Once the
media center recognizes the external hard drive, programs stored on it
appear in the Recorded TV category and any other applicable catego
ries.
• There is no limit to the number of external hard drives you can
associate with the media center but only connect one at a time.
• External hard drives used with the media center must be dedicated for use with only that media center. Moving the external
hard drive between media centers or using it for storing other
data will cause the loss of all programs previously stored on the
external hard drive.
• The external hard drive is only used to store recordings, not photos or music. If you need more storage space for photos or
music, see
Enabling PC Link on page 53.
• The Moxi Menu does not provide any visual clues about which
hard drive (internal or external) contains a recording.
Connecting an external hard drive
1. Connect an external hard drive to a USB 2.0 port on the rear of the
media center. Connect the hard drive directly to the media center.
USB hubs are not supported.
2. Wait for media center to recognize the external hard drive. If the
media center fails to recognize the external hard drive, restart the
media center and try again.
3. If this is the first time this hard drive was plugged into this media
center, or if the hard drive is not properly formatted, the media center prompts you to format the hard drive.
If you choose to format the external hard drive, all data on the drive
!
-
will be deleted. You must do this to use the external hard drive with
the media center.
4. If you choose reformat, you are the prompted to confirm the choice.
5. Once the external hard drive is recognized as properly formatted and
ready for use, the media center adjusts the recording schedule to
account for the additional space. You can unplug and plug in the
external hard drive as needed.
48
Media Center User Guide © 2006 by Digeo, Inc. All rights reserved.
Page 56

all DVRs were not created equal
Adding additional recording space
Disconnecting an external hard drive
If an connected external hard drive is disconnected while it is in use (a
recording is playing or a program is being recorded) recordings stored
on it may become corrupted. To disconnect the external hard drive:
1. Manually stop all recordings by selecting the program card in the
Moxi Menu, and then choosing stop recording.
2. In the Settings category, select the External Hard Drive card.
3. Select disconnect and press OK.
4. A note appears letting you know that it is ok to disconnect the drive
or that the drive is in use and cannot be disconnected.
Recovering corrupted programs
In certain circumstances, such as after a power failure, a message asking you to reformat your external hard drive may appear even when
the external drive is already formatted for your Moxi. Your recordings
may be recoverable.
1. Select Close to dismiss the message.
2. Switch the external hard drive off.
3. Switch the external hard drive on.
4. Wait until all disk activity stops. This may take several minutes but it
indicates that Moxi is attempting to resolve the file corruption.
5. Check the Recorded TV category for recovered recordings. If they do
not appear, repeat this procedure once more. If they still do not
appear, the recordings are corrupt and the external hard drive must
be reformatted.
Archiving simplified
To archive a program, play back the record ed program while recording
with the connected recording device. When recording to a VCR from
any port all on-screen activities are recorded. This includes channel
changes, navigation of the Moxi Menu, system sounds, and transpo r t
actions (pause, stop, rewind, and fast-forward).
When installing any secondary device, such as a VCR, do not insert the
device in the primary signal path between the media center and the
TV, as this may affect the video and audio displayed on the TV. Instead,
use a secondary video input to the TV for the VCR (see
the content is protected by copy protection systems, the picture may
still appear distorted.
Signal flows from the
media center to the TV and
also to the VCR or other
secondary device. Never
install the secondary
device in the primary
connection between the
media center and the TV.
Figure 41: Signal flow from the media center
Media Center
TV
Secondary
device
Choosing the connection
Variations in VCR and TV technology present many connection
options. Determine which connection is used between the TV and the
media center and use an alternate connection to the VCR.
figure 41). If
5
© 2006 by Digeo, Inc. All rights reserved. Media Center User Guide
49
Page 57

Adding additional recording space
When selecting the connections, consider the video resolution.
• If you plan to record HD programming to the VCR, use a connection that supports 720p and 1080i.
• If you plan to record in standard definition (480i), use any video
connection except the one used by the TV. See
table 3 for the
resolutions supported by each connection.
Table 3 : Video connections and supported resolutions
Connection 480i 480p 720p 1080i
DVI-D X X X X
Component (YPbPr) X X X X
IEEE 1394 X X X X
S-Video X
Composite (V, L, R) X
RF (some models) X
Archiving to a VCR or DVCR
The installation instructions in this document are generic and may
need to be adjusted to suit the your equipment. Refer to the VCR
manufacturer’s documentation before installation.
Always maintain an uninterrupted primary video connection directly
from the media center to the TV.
Using a digital VCR to archive programs
1. Connect one video cable between the media center and the VCR.
a. Connect component cables if they are not already used for the TV.
b. Use composite cables if component is not available.
c. Use IEEE 1394 if your VCR and media center support it.
Use an IEEE 1394 connection to the TV as a secondary connection
only. No user interface graphics are transmitted via IEEE 1394.
Recordings made via IEEE 1394 include any channel changes and
use of the playback controls.
d. If IEEE 1394 is not an option, use component if it is not already used
for the TV.
e. Use composite if component is not avai lable.
2. Unless you used IEEE 1394 or HDMI, which carries audio and video,
connect an audio cable between the media center and your VCR. Use
S/PDIF or composite.
50
Media Center User Guide © 2006 by Digeo, Inc. All rights reserved.
Page 58

all DVRs were not created equal
3. Connect another set of audio and video cables between the VCR and
the TV.
4. Play the recorded program while recording with the VCR.
Main TV (rear view)
Adding additional recording space
There are three types of IEEE 1394 connectors:
6-pin powered
4-pin unpowered (used on media center)
4-pin (used on many digital media devices)
A cable with a 6-pin connector works in the larger 4-pin
port but does not supply power to the secondary device.
5
IEEE 1394 cable to
secondary TV video
Digital VCR
(rear view)
input for VCR playback
Composite
stereo audio
Moxi Media Center
(rear view)
Power
Figure 42: Example of connections between the media center and DVCR
cables
CABLE IN
VY
LP
B
RP
R
Component cables
IEEE 1394 cable
The TV now has at least two sets of video cables: one to watch live or
recorded programming from the media center, and another to watch
recorded programming from the VCR.
There are several IEEE 1394 connector options. Make sure you have a
cable with the large 4-pin or 6-pin connector at one end for the media
center and, at the other end, a connector that fits the digital VCR (see
Figure 43: IEEE 1394 connector types
The next steps
• If you have no t already, go schedule some recordings. See Using Moxi on page 7.
• For help, see Troubleshooting on page 71.
• Do you have a specific question ? Use the
Glossary on page 93 and Index on page 97 to find
the answer.
figure 43).
© 2006 by Digeo, Inc. All rights reserved. Media Center User Guide
51
Page 59

Adding additional recording space
52
Media Center User Guide © 2006 by Digeo, Inc. All rights reserved.
Page 60

Enabling PC Link
System requirements ......................................................................................... 54
Connecting to the network ................................................................................ 54
Setting up your computer .................................................................................. 54
Playing shared music or photos .......................................................................... 57
6
© 2006 by Digeo, Inc. All rights reserved. Media Center User Guide
53
Page 61

Enabling PC Link
This chapter details how to share photos and unencrypted MP3 files
from networked computers with your media center.
PC Link is an optional feature not available in all areas.
PC Link connects your media center to computers on your home network. When connected, shared photos and music stored on the computer are listed in the Photos and Jukebox categories in the Moxi
Menu, just like photos and music loaded directly on the media center.
You can play them on the TV but y ou can not delete or mod ify the
media stored on the computer from the media center.
System requirements
To share media with your Moxi Media Center, your computer must
meet the following requirements:
• Run Windows Vista or Windows XP® SP2
• Be connected to the same home network and subnet as the
Moxi Media Center
Connecting to the network
If the media center is not yet connected to the home network, see Connecting to the home network on page 66.
To enable PC Link:
1. In the Moxi Menu, go to the Settings category, and then choose the
PC Link Setup card.
2. Press OK, and then scroll to the Network Status card.
3. If the card says Connection: Good, and has a valid IP address,
proceed to Using Windows Media Connect on page 56.
4. If the card says Connection: Error and has no IP address, choose
Reconnect. After a few seconds the screen will refresh. If you still
cannot connect, troubleshoot your home network.
If you have problems getting the media center and computer to connect, see Home network troubleshooting on page 74.
Setting up your computer
Select one of the following file sharing applications. The applications
are listed starting with the most preferred.
• Windows Vista or XP with Windows Media Player 11 on page 55
• Windows XP with Windows Media Connect on page 56
54
Media Center User Guide © 2006 by Digeo, Inc. All rights reserved.
Page 62

all DVRs were not created equal
Using Windows Media Player 11
If you have Windows Vista then Windows Media Player 11 is already
installed on your PC. Skip to
you have Windows XP see Installing Windows Media Player 11 below.
Installing Windows Media Player 11
If you already have Windows Media Connect installed, and want to
share photos, it is recommended that you do not install Windows
Media Player 11 because Windows Media Player 11 places all photo
albums into a single album. Go to
page 56.
1. Download Windows Media Player 11 from Microsoft at
www.microsoft.com/windows/windowsmedia/player/11/
default.aspx.
2. Install Windows Media Player 11 according to the instructions
provided by Microsoft.
3. See Sharing with Windows Media Player 11 below to configure
Windows Media Player 11.
Sharing with Windows Media Player 11
1. After launching Windows Media Player 11 select Tools, then
Options, and then select the Library tab.
2. Click Configure Sharing. Check the Share my media to: checkbox.
3. Select the device with which you want to share your media, and then
click Allow. The Moxi Media Center appears as “Moxi Media
Renderer” with a unique alphanumeric code (see figure 44).
Sharing with Windows Media Player 11. If
Using Windows Media Connect on
Enabling PC Link
6
Figure 44: Using the Media Sharing screen
4. Click OK or Apply, and then click OK again to close the Options
window.
5. At the media center, in the Moxi Menu, go to the Settings category,
and then choose the PC Link Setup card.
6. Press OK, and then scroll to the Media Servers card.
7. If the computer running Windows Media Player 11 is listed, you are
finished and can play the shared media. If it is not listed, scroll left to
the to the Network Status card, press OK, and then select recon-
nect.
© 2006 by Digeo, Inc. All rights reserved. Media Center User Guide
55
Page 63

Enabling PC Link
Using Windows Media Connect
Windows Media Connect is not available for Microsoft Vista.
Checking and installing Windows Media Connect
If you already use Windows Media Connect, make sure the software is
up to date.
To distinguish Windows Media Connect 1.0 from 2.0, open
Windows Media Connect, and then click Help. The first paragraph
states the software version.
To install or upgrade Windows Media C onn ect:
1. At the computer with the photos or music you want to share, go to
www.microsoft.com/downloads and search for Windows Media Connect. Microsoft may choose to stop offering Windows Media Connect at any time.
2. Download and install Windows Media Connect according to the
instructions provided by Microsoft.
Connecting to the media center
At the computer:
1. Launch Windows Media Connect if it is not already running.
2. When Windows Media Connect launches, you are prompted to select
the device you want to allow to access your computer. Select the
Moxi Media Renderer, and then click Allow.
3. Click Next, and then choose which folders to share with the Moxi
Media Center.
4. Click Finish. Windows Media Connect minimizes itself to the taskbar
and begins indexing the shared folders. A balloon pops up from the
toolbar alerting you that the computer is now sharing available
media. If you are sharing a large number of files, it may take several
minutes for the balloon to appear.
At the media center:
1. In the Moxi Menu, go to the Settings category, and then choose the
PC Link Setup card.
2. Press OK, and then scroll to the Media Servers card. Your shared
computer should be listed. If it is not, check to make sure your home
network is configured correctly. If your shared computer is listed as
busy, the computer is probably still indexing files. Wait a few
minutes, and then check again.
3. Windows Media Connect is a Microsoft product and is supported by
Microsoft at www.microsoft.com.
56
Media Center User Guide © 2006 by Digeo, Inc. All rights reserved.
Page 64

all DVRs were not created equal
Playing shared music or photos
Enabling PC Link
To play shared music, go to the Jukebox category. For shared photos,
go to the Photos category. See
information on photos.
Scroll vertically to the photo, song, album, or playlist with the link icon
and select it to play the media. See
more information on Jukebox.
Using Photos on page 20 for more
Using Jukebox on page 23 for
Shared media have the
PC Link symbol
Jukebox/Albums
Long Gone Before Daylight
61:35
Figure 45: Link icon
Photo albums only share the first 75 images in any album. Windows
Media Player 11 on Windows XP places all shared photos into a
single album.
Jukebox albums or playlists only share the first 100 tracks.
© 2006 by Digeo, Inc. All rights reserved. Media Center User Guide
The next steps
•See Using Moxi on page 7 to learn how to play
music and photos.
• Home networ ks can be comp lex. For help, see
Troubleshooting on page 71.
• Do you have a specific question ? Use the
Glossary on page 93 and Index on page 97 to find
the answer.
6
57
Page 65

Enabling PC Link
58
Media Center User Guide © 2006 by Digeo, Inc. All rights reserved.
Page 66

Getting connected
Before connecting ............................................................................................. 60
Ventilation requirements.................................................................................... 60
Media center information .................................................................................. 61
Media center illustrations................................................................................... 61
Moxi Mate information...................................................................................... 62
Moxi Mate illustrations ...................................................................................... 62
Available ports................................................................................................... 62
Connecting to the TV and receiver..................................................................... 65
Connecting to the home network...................................................................... 66
7
© 2006 by Digeo, Inc. All rights reserved. Media Center User Guide
59
Page 67

Getting connected
This chapter details connecting the set-top box to yo ur TV an d other
home media equipment.
Before connecting
Before installing, the media center installation environment must meet
the following physical requirements:
If you have a multi-room media center and Moxi Mate, and are
!
moving either from their original installation room, a professional
cable installer must make a service call to configure your home’s
coaxial cable network.
low-pass filter reflector , do it now. See
filter reflector on page 15.
• Locate the media center within six feet of a power outlet (do not
use an extension cord).
• Use a surge protector to isolate the media center from power
surges.
• Make sure the infrared receiver on the media center and the
remote are free from obstructions, such as furniture and doors.
If you have not already installed the
Installing a low-pass
Ventilation requirements
T o pr event overheating, allow adequate ventilation and airflow ar ound
the media center. The media center requires at least a two-inch (5 cm)
clearance on top and all sides with airflow to the or rear.
2 inches
(5 cm)
Figure 46: Ventilation requirements
Any Digeo set-top box
2 inches (5 cm)
2 inches
(5 cm)
60
Media Center User Guide © 2006 by Digeo, Inc. All rights reserved.
Page 68

all DVRs were not created equal
Getting connected
Media center information
Moxi Media Center features:
• Dual analog and digital cable video tuners
• HDTV decoder
• Digital Video Reco rder (DVR)
• Video outputs to DVI-D, component, composite, S-Video, and on
some models, RF and IEEE 1394
• Digital audio (S/PDIF coaxial, optical) output
• Stereo audio outpu t
• Two USB 1.1 (front) and two USB 2.0 (rear) connectors
• Clock display
• Front panel control buttons
• CD/DVD optical disk drive (on some models)
• Support for a second TV (on models compatible with the Moxi
Mate)
Media center illustrations
The following illustrations of the media center show the front and rear
panels and connections. Your model may differ slightly.
Indicators
MESSAGE, RECORDING, POWER, TRAY BUSY
DVD/CD TRAY
MP-22DF ONLY
Figure 47: Media center front panel (some models differ)
Vent Vent
Power
CABLE IN
Composite
audio/video
S-video
VY
LP
B
RP
R
Component video
DVI-D
digital
video
Figure 48: Media center rear panel (some models differ)
MESSAGE
POWER
USB 1.1
RECORDING
S/PDIF
digital
audio
Time
10:35
CHANNELMENULIVE TV
Controls
LIVE TV, MENU, CHANNEL
IEEE
1394
OK
POWER
USB 2.0
Navigation
OK
Power
Ethernet
7
© 2006 by Digeo, Inc. All rights reserved. Media Center User Guide
61
Page 69

Getting connected
OK
Moxi Mate information
Standard features include:
• Shared dual cable tuners, DVR, and CD/DVD drive with the
media center
• Standard RF and Composite video with stereo audio outputs
• Front panel clock display and control buttons
Moxi Mate illustrations
Controls
CHANNELMENULIVE TVPOWER
10:35
Figure 49: Moxi Mate front panel
Composite VideoRF connections
OUT
CABLE IN TO TV
Figure 50: Moxi Mate rear panel and connections
RLV
Stereo Audio
OK
NavigationPower IndicatorTime
POWER
Available ports
Before connecting the media center, consider the equipment to which
it will be connected. Is your TV standard definition (
tion TV (HDTV)? Is there a receiver? If so, does it accept S/PDIF?
The characteristics of the connections offered on the medi a center are
table 4 (video cables) and table 5 on page 64 (audio cables).
listed in
SD) or high defini-
62
Media Center User Guide © 2006 by Digeo, Inc. All rights reserved.
Page 70

all DVRs were not created equal
Table 4: Video cables, starting with highest quality connection
Getting connected
Connector shapes Cable type Description
DVI-D A digital video connection capable of displaying 480i, 480p, 720p, and 1080i video resolutions from the
IEEE 1394 A high-bandwidth digital connection, sometimes called FireWire®. The media center provides an MPEG 2
Component A three-wire analog video connection capable of displaying 480i, 480p, 720p, and 1080i video resolu-
Y
P
B
P
R
S-Video An analog video connection with better quality than Composite. S-Video is capable of displaying 480i
V
© 2006 by Digeo, Inc. All rights reserved. Media Center User Guide
Composite or
RCA
RF out Basic analog connection supports 480i video output. (Available on some models only)
media center. If 480i is not selected in HDTV Setup, video in 480i is automatically converted to 480p. If
your TV has an HDMI port but no DVI-D port, you may use video output from the media center with a DVI
to HDMI conversion cable. A separate audio connection is required.
audio and video stream for recording or display on a digital device in the same resolution as the broadcast. No user interface graphics appear (Moxi Menu, flip bar, and so on).
tions from the media center. Component is the most user-friendly HD and standard video connection for
the media center.
video from the media center.
An analog video connection. Composite supports 480i video output.
7
63
Page 71

Getting connected
Table 5 : Audio cables starting with highest quality connection
Connector shapes Cable type Description
64
S/PDIF
(coaxial)
S/PDIF
(optical)
L
RCA An analog stereo audio connection.
A digital audio connection that carries high-quality Dolby Digital audio.
A digital audio connection that carries high-quality Dolby Digital audio.
R
Media Center User Guide © 2006 by Digeo, Inc. All rights reserved.
Page 72

all DVRs were not created equal
Getting connected
Connecting to the TV and receiver
The media center supports multiple types of audio and v ideo co nn ec tions. It is recommended that you use the highest-quality connection
supported by both the TV or audio receiver and the media center.
Do not plug the media center into power yet.
!
1. Place the media center in a well-ventilated open area near the TV and
audio receiver (if used). Connect the incoming coaxial cable to the
media center.
2. Install one of the following video connections and refer to figure 51
for HDTVs or figure 52 for standard TVs on page 66:
a. For HD and supported TVs, connect a DVI-D cable between the media
center and the HDTV.
If a DVI-D cable or an HDMI to DVI conversion cable is used along
with an intermediate device such as an audio/video receiver, video
might not be passed through the intermediate device to the TV. If
this happens, connect the media center directly to the TV.
b. If a DVI-D connection is unavailable, connect component (YPbPr)
cables for HDTV.
c. For televisions where DVI-D or component is not an option, connect
an S-Video cable, or go to option d.
d. When a, b, or c is unavailable, use a composite video cable connected
to the V port.
3. Install one of the following audio connections:
a. For digital audio, connect an S/PDIF cable to the media center and
receiver or TV.
b. For analog audio to the TV, connect composite stereo cables between
the TV and the L and R ports.
c. For analog audio with a receiver, connect composite stereo cables
between the receiver and the L and R ports.
DVI-D video
2a
HDTV
Component
V
L
R
2b
video
Y
P
P
B
R
1
Power
4
Figure 51: Connecting an HDTV or EDTV and digital audio
CABLE IN
Composite
audio
3b
S/PDIF
a
3
Receiver
7
© 2006 by Digeo, Inc. All rights reserved. Media Center User Guide
65
Page 73

Getting connected
e
Personal
comp
r
Composite
2
d
audio/video
TV
CABLE IN
S-Video
2
c
V
Y
B
L
P
R
R
P
1
Power
4
3
c
Stereo Audio
Receiver
Figure 52: Connecting a standard TV (480i) and stereo audio
4. Plug in the power to start the media center (allow five minutes for
system start-up).
5. Plug the TV and receiver (if used) into a power outlet. On some models, a two-prong outlet is available on the rear of the media center.
Do not connect the media center to a switched power source.
Doing so increases the chance that the media center is turned off
and is not able to record programs as scheduled.
Connecting to the home network
To enable PC Link, the media center needs a full-time connection to
your home network. The connection can be wired (see below) or wire
less (see Wireless data conne ctio n on page 67), although a wired connection is preferred.
Wired data connection
Connect a CAT-5 network cable with RJ-45 plugs between the Ethernet port on the rear of the media center and your home network. An
Internet connection is not required for PC
CAT-5 cabl
ute
Router
CABLE IN
Power
Media Center
Figure 53: Wired home network connection to the media center
WANPower Reset
132456
Link.
VY
LPB
RPR
CAT-5 cable
USB
-
66
Media Center User Guide © 2006 by Digeo, Inc. All rights reserved.
Page 74

all DVRs were not created equal
Getting connected
Wireless data connection
If a wired connection is not possible, connect the media center to a
wireless game adapter or wireless bridge manufactured by the same
company as your wireless router, see
is not required for PC Link.
You must use the Ethernet port on the rear of the media center. A
!
USB to Ethernet connection is not supported.
Wireless
communication
1324WANPowerReset
Wireless Router
Power
Wireless Bridge
(802.11 b or g)
Figure 54: Wireless home network connection to the media center
Power
Media Center
figure 54. An Internet connection
CABLE IN
VY
LP
RP
CAT-5 network cable
B
R
USB
Adding components
To add components to the TV connected to the media center, such as
a DVD player or VCR, refer to the manufacturer’s documentation for
each device. For digital VCRs, see
page 50.
For other additional components, use a secondary conn ection to th e
TV. Do not interrupt the primary signal from the media center to the
figure 55). If the content is protected by d igital c opyright p ro-
TV (see
tection systems, the picture on the additional component may appear
distorted or not at all.
Signal flows from the
media center to the TV and
also to the VCR or other
secondary device. Never
install the secondary
device in the primary
connection between the
media center and the TV.
Figure 55: Installation of secondary components
Secondary digital monitors can be connected via the IEEE 1394 ports
but do not display the Moxi Menu or any other user interface graphics
Archiving to a VCR or DVCR on
Media Center
Secondary
device
TV
7
© 2006 by Digeo, Inc. All rights reserved. Media Center User Guide
67
Page 75

Getting connected
68
Media Center User Guide © 2006 by Digeo, Inc. All rights reserved.
Page 76

all DVRs were not created equal
.
Getting connected
The next steps
• See Using Moxi on page 7 to learn more about the
Moxi Menu.
• To set up PC Link, see Enabling PC Link on page 53.
• For help, see Troubleshooting on page 71.
• Do you ha ve a specifi c question? Use the
Glossary on page 93 and Index on page 97 to find
the answer.
© 2006 by Digeo, Inc. All rights reserved. Media Center User Guide
7
69
Page 77

Getting connected
70
Media Center User Guide © 2006 by Digeo, Inc. All rights reserved.
Page 78

Troubleshooting
Media center troubleshooting............................................................................ 72
Moxi Mate troubleshooting ............................................................................... 73
8
© 2006 by Digeo, Inc. All rights reserved. Media Center User Guide
71
Page 79

Troubleshooting
This chapter contains troubleshooting information for basic issues
related to your media center or Moxi Mate. If these tips do not resolve
the issue, contact your service provider for fu rt h er a ssist a nc e.
Media center troubleshooting
This section addresses issues related to the media center.
Audio and video problems
The following procedures address connectivity and configuration
issues between the cable drop, TV, and the media center.
No video displayed
1. Check the cabling between the media center and the TV to make
sure it is connected correctly and securely.
2. Verify that the TV has the proper video settings (line 1, channel 3, SVideo, and so on).
3. Verify that the V-Chip in the TV is disabled. Instead, use the parental
controls on the media center to control viewing. See Parental
Controls on page 35 for more information.
Use the front panel controls to manually set the video resolution.
1. Simultaneously press the Live TV and OK buttons to display the current mode.
2. Use the channel up and down buttons to select the mode. The
modes available are SD (for 480i), 480p, 720p, and 1080 (for 1080i).
Static on screen or poor picture quality
1. Make sure the media center and the TV are turned on.
2. Check that all cables are connected to the proper ports and are
secure.
3. Verify that the TV is tuned to the correct video input.
TV audio and video out-of-sync
1. Make sure the audio outputs from the media center are connected
directly to the audio output device and are not passed through any
intermediate device.
2. Reset the media center by pressing and holding the reset button until
the LED display begins to change (starting with 0000). Allow about
five minutes for the system to start.
Cannot change TV channels
1. Check the cabling between the media center and the TV.
2. Begin recording and then try changing the channel.
3. Bypass the media center and verify that the TV displays video. If not,
there is a problem with the signal.
4. Make sure the remote has fresh batteries.
5. Make sure the remote is programmed properly and is set to the
proper device mode. (See Using and programming the remote on
page 41 for more information.)
72
Media Center User Guide © 2006 by Digeo, Inc. All rights reserved.
Page 80

all DVRs were not created equal
Troubleshooting
Remote or front panel control problems
If you cannot control the media center with the front
panel buttons:
• Try using the Moxi remote. If it works, call customer service for a
replacement media center.
If you cannot control the user interface from the Moxi
remote, but front panel buttons work:
• Make sure the remote has fresh batteries.
• Check the line of sight between the remote and the front of the
media center for obstructions.
• If the media center responds sluggishly or intermittently to
remote control key presses, the problem may be caused by the
TV. Some TVs, including those with backlight systems, emit a fre
quency that interferes with the frequency used by the remote
control (38 kHz). Try relocating the TV or media center so that
the media center is well behind the TV.
Moxi Mate troubleshooting
This section provides troubleshooting tips for basic issues related to
the Moxi Mate. If you cannot resolve the issue, contact your service
provider.
Power problems
If the Moxi Mate does not display the time on the front panel, it is
likely that it is not getting power.
• Ensure that the power cable is plugged into the Moxi Mate and
the wall outlet.
• Use only the power supply issued with the Moxi Mate. Most
Moxi Mates use a 7-Volt power supply.
• Make sure the wall outlet has power and is not controlled by a
-
wall switch. Voltage must be within the 95 VAC to 125 VAC
range at 57 Hz to 63 Hz.
• Try a different wall outlet.
8
© 2006 by Digeo, Inc. All rights reserved. Media Center User Guide
73
Page 81

Troubleshooting
Audio and video problems
The following items address connectivity and configuration issues
between the TV and the media center or Moxi Mate.
• Make sure the media center, Moxi Mate, and the TV to which the
Moxi Mate is connected are plugged in and turned on.
• Make sure the TV connected to the media center or Moxi Mate is
set to the correct channel (usually 3 or 4) or input setting, and
that the sound is not muted.
• Check that the coaxial and composite cable connections to make
sure they are secure.
• Check all splitters to ensure that they allow the 1 GHz signals
used for Moxi Mate communications to pass through. Splitters
may have “5 - 1000 Hz” written on them.
Home network troubleshooting
If you are having trouble connecting the media center to your home
network, check the following:
• Connect the media center to the home network through the
Ethernet (RJ-45) port on the rear of the media center. USB net
work connections are not supported.
• Make sure DHCP is enabled in your router. Static IP addresses ar e
not supported.
• When connecting the media center to your home IP network, a
wired connection is best. Wired connections are not subject to
the same interference as wireless connections.
• If you use a game adapter or ethernet brid ge to conn ect wirelessly, any 802.11b, g, or n product works but is susceptible to
radio interference.
• Make sure the media center and any computers sharing photos
or music with PC Link are on the same subnet. Their IP addresses
are the same except for the last number (192.168.2.2 and
192.168.2.3, for example).
If all network devices seem to be working but you have problems getting Windows Media Connect to share media with your media center
(your computer does not appear as an available server in the Moxi
Menu), follow these steps.
1. Right-click the network icon in the system tray.
2. Click repair, and then wait for Windows to fix the problem.
-
74
Media Center User Guide © 2006 by Digeo, Inc. All rights reserved.
Page 82

all DVRs were not created equal
If that does not correct the problem, do the following:
1. At the computer, click Start, and then Run.
2. Type cmd, and then press Enter.
3. In the command window, type ipconfig /release, and
then press Enter.
4. Type ipconfig /dnsflush, and then press Enter.
5. Type ipconfig /renew, and then press Enter.
6. In Windows Media Connect, click the Settings icon. If sharing is
enabled, click the stop button.
7. Click the start button to begin sharing.
8. After a few moments, your computer should begin sharing photos
and music with the media center.
Troubleshooting
8
The next steps
•See Using Moxi on page 7 to learn mo re about the
Moxi Menu.
• Do you have a specific question ? Use the
Glossary on page 93 and Index on page 97 to find
the answer.
© 2006 by Digeo, Inc. All rights reserved. Media Center User Guide
75
Page 83

Troubleshooting
76
Media Center User Guide © 2006 by Digeo, Inc. All rights reserved.
Page 84

Moxi remote programming codes
TV Codes........................................................................................................... 78
Audio device codes............................................................................................ 85
9
© 2006 by Digeo, Inc. All rights reserved. Media Center User Guide
77
Page 85

Moxi remote programming codes
This chapter provides a listing of all programmable TV and audio
device codes stored in the Moxi remote. See
Using and programming
the remote on page 41 for more information.
TV Codes
Use the codes in table 6 to program the remote for your TV.
Table 6 : TV codes
TV Code
Aiko 0092
Aiwa 0701, 1914
Akai 0030, 1903, 0098, 0672
Alaron 0179, 0183
Albatron 0003, 0843
Ambassador 0177
America Action 0180
Ampro 0751
Anam 0068, 0004, 0180, 0003
Anam National 0161, 0055
AOC 0003, 0030, 0137, 0185
Table 6: TV codes (Continued)
TV Code
Apex
Digital
Archer 0003
Audiovox 0092, 0180, 0802, 0875, 1951, 1937, 1952,
Aventura 1271
Axion 1937
Bell & Howell 0154
BenQ 1212, 1032
Bradford 0180
Brillian 1007
Broksonic 1935, 0003, 0236, 1463, 1905, 1911, 1929
Candle 0186, 0046, 0030, 0056
Carnivale 0030
Carver 0054, 0170
Casio 1205
CCE 0217, 0329
0148, 0879, 0748, 0890
0003,1661
78
Media Center User Guide © 2006 by Digeo, Inc. All rights reserved.
Page 86

all DVRs were not created equal
Moxi remote programming codes
Table 6: TV codes (Continued)
TV Code
Celebrity 0000
Celera 0148
Changhong 0148
Citizen 0186, 0046, 0056, 0030, 0032, 0060, 0092,
Clairtone 0185
Clarion 0180
Colt 1906
Commercial
Solutions
Concerto 0056
Contec 0158, 0036, 0180, 0185
Craig 0180, 0161
Crosley 0054
Crown 0032, 0180
Curtis Mathes 0060, 0030, 0032, 0047, 0054, 0056, 0093, 0145,
0280,1909
0047
0154, 0166, 1661, 0466, 1903, 1919
Table 6: TV codes (Continued)
TV Code
CXC 0180
Daewoo 0092, 1909, 1661, 0661, 0032, 0066, 0067, 0672
Dell 1080, 1178
Denon 0145, 0511
Dumont 0017
Durabrand 1271, 1463, 0003, 1178, 0180, 1034
Dwin 0093, 0774
Electroband 0000, 0185
Electrograph 1755
Electrohome 0032, 0036
Elektra 0017, 1661
Emerson 0236, 0180, 1178, 0179, 0177, 1463, 0282, 1911,
0270, 1944, 1909, 0280, 0183, 0181, 0158, 0032,
0185, 0036, 1905, 1271, 1909, 1929, 0154
Envision 0813, 0030
Epson 1122, 0833, 0840
ESA 1271, 1903
9
© 2006 by Digeo, Inc. All rights reserved. Media Center User Guide
79
Page 87

Moxi remote programming codes
Table 6 : TV codes (Continued)
TV Code
Fisher 0154
Fujitsu 0809, 0179, 0683, 0853
Funai 1271, 0180, 0179, 1271, 1904, 1944
Futuretech 0180
Gateway 1755, 1032
GE 0021, 0027, 0047, 0055, 1178, 0051, 0251, 1661,
0135, 0138, 0174, 0279, 0282, 1907, 1917, 1919,
1922
Gibralter 0017, 0030
GoVideo 0886
GoldStar 0001, 0030, 1178, 0032, 1926
Goodmans 0360
Gradiente 0392
Grunpy 0179, 0180
Haier 1034
Hallmark 1178
Harley Davidson 0043, 0179, 1904
Table 6: TV codes (Continued)
TV Code
Harman/Kardon 0078, 0054
Harvard 0068, 0180
Havermy 0093
Helios 0865
Hello Kitty 1661
Himitsu 0180
Hisense 0748
Hitachi 0145, 0032, 0056, 0413, 0095, 0173, 0227, 0279,
0797, 1904, 0145
Hyundai 0849, 1219
Infinity 0054
InFocus 1164
Insignia 1204
Inteq 0017
IX 0877
Janeil 0046
80
Media Center User Guide © 2006 by Digeo, Inc. All rights reserved.
Page 88

all DVRs were not created equal
Moxi remote programming codes
Table 6: TV codes (Continued)
TV Code
JBL 0054
JCB 0000
Jensen 0050, 0761, 1933, 0150
JVC 0053, 0731, 0036, 0160, 0036, 1923
Kawasho 0158, 0308
KEC 0180
Kenwood 0030
KLH 0148, 1962
Kloss 0024, 0046, 0078
Konka 0707, 0632, 1939, 0180, 0638, 1939
KTV 0180, 0185, 0280, 0217, 0030, 0032, 0183
LG 1178, 0442, 0003, 0856, 1934
Lloyd's 1904
Loewe 0136
Luce 1031
Luxman 0056
Table 6: TV codes (Continued)
TV Code
LXI 0154, 0047, 0054, 0148, 1178
Magnasonic 1913, 1909
Magnavox 0054, 0187, 1944, 0024, 0020, 1198, 1913, 0028,
0030, 0036, 0179, 0186, 0032, 0706, 1904, 1931
Magnin 1907
Marantz 0054, 1154, 0704, 0854, 0030, 0444
Matsushita 0250, 0650
Maxent 1755
Megapower 0003
Megatron 0003, 0145, 1178
MEI 0185
Memorex 0179, 1463, 1911, 1178, 1920, 0150, 0154, 1924,
1926, 1924
MGA 0150, 0030, 1178, 1907
Midland 0017, 0032, 0047, 0051, 0135
Minutz 0021
Mitsubishi 0150, 1178, 0014, 0093, 0358, 0868, 0098, 1917
9
© 2006 by Digeo, Inc. All rights reserved. Media Center User Guide
81
Page 89

Moxi remote programming codes
Table 6 : TV codes (Continued)
TV Code
Monivision 0003, 0843
Motorola 0055, 0093
MTC 0060, 0030, 0185, 0056
Multitech 0180, 0217
NAD 0148, 1178
NEC 0030, 0497, 1704, 0036, 0170, 0882, 0056, 0434
NetTV 1755
Nikko 1178, 0032, 0030, 0092
Noblex 0430
Norcent 0824, 0748
NTC 0092
Onwa 0180
Optimus 0250, 0166, 1924, 1913, 0154, 0650
Optoma 0887
Optonica 0093, 0165
Orion 1911, 0179, 0236, 1463, 1905, 1929
Table 6: TV codes (Continued)
TV Code
Panasonic 0051, 0250, 0650, 0055, 1924, 0226, 1941, 1410,
1947, 0162, 0375, 1919, 1946
Penney 0047, 0060, 0030, 0021, 0027, 0135, 1178, 0001,
0051, 0032, 0309, 1926, 1919, 1907, 0148, 0149,
0138, 0110, 0032, 0003
Philco 0020, 0028, 0030, 0054, 0302
Philips 0054, 1961, 0690, 1154
Pilot 0030, 0032
Pioneer 0166, 1260, 0679, 0172
Polaroid 1276
Portland 0032, 0092
Prima 0761, 1933, 0150
Princedom 0717, 0003
Prism 0051
Preston 0047, 1922
Proton 0466, 0003, 1178, 0031
Pulsar 0017
82
Media Center User Guide © 2006 by Digeo, Inc. All rights reserved.
Page 90

all DVRs were not created equal
Moxi remote programming codes
Table 6: TV codes (Continued)
TV Code
Quasar 0051, 0055, 0250, 0165, 0219, 0650, 1919, 1924
Radio-Shack 0165, 0180, 0030, 1178, 0032, 0154, 1904, 1920,
0047, 0056
RCA 0047, 0679, 1922, 0135, 1948, 1958, 0090, 0174,
1907, 1917, 1919
Realistic 0165, 0180, 0154, 0030, 0032, 1178, 0056
Rhapsody 0183, 0185
Runco 0497, 0603, 0017, 0251, 0030
Sampo 1755, 0030, 0032, 0100, 0110
Samsung 1903, 0060, 1178, 0766, 1959, 1903, 0030, 0032,
0056, 0329, 0302, 0427
Samsux 0032
Sansui 1911, 1935, 1463, 1904, 1929
Sanyo 0799, 0154, 0893, 0088, 0107, 0232, 1142, 1907
Scotch 1178
Scott 0236, 0309, 1178, 0179, 0180
Table 6: TV codes (Continued)
TV Code
Sears 0154, 0148, 1007, 0047, 0054, 0056, 0149, 0168,
Sharp 0093, 0165, 0491, 0153, 0851, 0032, 1917, 0036,
Sharper Image 1950
Sheng Chia 0093
Simpson 0186, 0187
Solarism 1220
Sony 0000, 0353, 0834, 1904, 1925
Soundesign 1178, 0179, 0180, 0186
Sova 1952
Spectricon 0003, 0137
Squareview 1271
SSS 0180
Starlite 0180
Studio Experi-
ence
1271, 1178, 0179, 0032, 1904, 1926
0220, 0032, 0398
0843
9
© 2006 by Digeo, Inc. All rights reserved. Media Center User Guide
83
Page 91

Moxi remote programming codes
Table 6 : TV codes (Continued)
TV Code
Superscan 0864
Supre-Macy 0046
Supreme 0000
SVA 0587, 0748, 0865, 0871, 0872
Sylvania 0020, 0054, 1271, 0028, 1944, 0030, 0065, 0036,
1931, 1944
Symphonic 1271, 1913, 0180, 1904
Syntax 1144, 1178
Tandy 0093
Tatung 0003, 0055, 0396, 1032
Technics 0051, 0250
Technol Ace 0179
Techview 0847
Techwood 0003, 0051, 0056
Teknika 0186, 0054, 0179, 0180, 0032, 0092, 0056, 0060,
0150, 0175
Telefunken 0056, 1903
Table 6: TV codes (Continued)
TV Code
Tera 0031
Thomas 1904
TMK 0056, 0177, 1178
TNCi 0017
Toshiba 0148, 0149, 0060, 1704, 1918, 0650, 0832, 1164,
1178, 1918, 1935, 0036, 0154, 1918
Tosonic 0185
Totevision 0032
Trical 0036
TVS 1463
Ultra 0391
Universal 0027
Vector Research 0030
VEOS 1007
Victor 0053
Vidikron 0242, 0054
84
Media Center User Guide © 2006 by Digeo, Inc. All rights reserved.
Page 92

all DVRs were not created equal
Moxi remote programming codes
Table 6: TV codes (Continued)
TV Code
Vidtech 0036, 1178
Viewsonic 0864, 0857, 0885, 1755
Viking 0046
Vizio 1032, 0864, 0885
Wards 0054, 0165, 1178, 0020, 0000, 0021, 0027, 0028,
Waycon 0148
Westinghouse 0889, 0890
White Westing-
house
Yamaha 0797, 0833, 0769, 0030, 0769
Zenith 0017, 1178, 1909, 1911, 0092, 1463, 1904, 1929
Zonda 0003
0030, 0056, 0174, 0179, 0202
1909, 1463
Audio device codes
Use the codes in table 7 to program the remote for your audio device.
Table 7: Audio device codes
Audio device Code
Acurus 3765
Adcom 3002, 3304, 3577, 3616, 4100, 4616, 4617
Admiral 3182
Aiwa 3121, 3125, 3158, 3189, 3405, 3406, 4089, 4243,
Akai 3076, 3224, 4255, 4512
Alco 4390
Amphion Media
Works
Amplifier
Technologies
AMW 4563, 4615
Anam 4074, 4609
Apex Digital 4257, 4430, 4774
4405, 4641
4563, 4615
4584
9
© 2006 by Digeo, Inc. All rights reserved. Media Center User Guide
85
Page 93

Moxi remote programming codes
Table 7 : Audio device codes (Continued)
Audio device Code
Arcam 4120
AudioSource 3011
Audiotronic 4189
Audiovox 4390, 4627
B & K 3840
Bel Canto
Design
Biamp 3582
Bose 3639, 3674, 4229, 4253
Brix 4602
Cambridge
Soundworks
Capetronic 3531
Carver 3008, 3042, 3189, 3269, 3360, 3412, 4089, 4189
Casio 3195, 3201
Clarinette 3195
Classe 3733, 4461, 4462
4583, 4584
4370
Table 7: Audio device codes (Continued)
Audio device Code
Classic 4352
Coby 4263, 4389
Criterion 4420
Curtis Mathes 3080, 3201, 3300
Daewoo 4250
Dell 4383
Delphi 4414
Denon 3004, 3160, 3273, 3771, 4104, 4142, 4360
Digital Audio
Control
Durabrand 4561
Elan 3647
Emerson 3255, 3424
Fisher 3042, 3219, 3360, 4801
Forte 3606
Fosgate 3111, 4487
3085
86
Media Center User Guide © 2006 by Digeo, Inc. All rights reserved.
Page 94

all DVRs were not created equal
Moxi remote programming codes
Table 7: Audio device codes (Continued)
Audio device Code
Garrard 3146, 3281, 3424, 3440, 3463, 3744
Gateway 4517, 4567
GE 3078, 3260
Glory Horse 4263
Go Video 4532
GoldStar 3031
GPX 3744
Hafler 3146
Harman/Kardon 3106, 3110, 3189, 3891, 3892, 4306
Hewlett Packard 4181
Hitachi 3228, 4273, 4801
Initial 4426
Inkel 3062, 3066
Integra 3135, 4298, 4320
JBL 3110, 3281, 4306
JVC 3331
Table 7: Audio device codes (Continued)
Audio device Code
JVC 3074, 3464, 4263, 4374, 4495, 4811
Kansai 3440
Kenwood 3027, 3042, 3077, 3186, 3239, 3297, 3313, 3314,
3356, 4027, 4051, 4313, 4569, 4570
KLH 4390, 4412, 4428, 4664
Koss 3255, 3424, 3744, 4366, 4497
Lasonic 4798
Left Coast 3892
Lenoxx 4437, 4561
Lexicon 4076, 4802
LG 4293
Linn 3189, 3269, 3282
Liquid Video 4497
Lloyd's 3195
Logitech 4408
Luxman 3149, 3165
9
© 2006 by Digeo, Inc. All rights reserved. Media Center User Guide
87
Page 95

all DVRs were not created equal
Moxi remote programming codes
Table 7: Audio device codes (Continued)
Audio device Code
LXI 3181, 3744
Magnavox 3128, 3189, 3195, 3204, 3222, 3364, 3269, 3391,
3531, 4089, 4189, 4269, 4514
Marantz 3006, 3039, 3128, 3189, 3269, 3321, 3412, 3892,
4089, 4189, 4269, 4289
Mark Levinson 4483
McIntosh 3251
MCS 3039, 3201, 3346
Mitsubishi 4393
Modulaire 3195
Musicmagic 4089
NAD 3320
Naim 3552
Nakamichi 3097, 3321, 3347, 4555
NEC 3131, 3264
Norcent 4389
NTDE Geniesom 3744
Table 7: Audio device codes (Continued)
Audio device Code
Onkyo 3119, 3135, 3380, 3842, 4298, 4320, 4531
Optimus 3042, 3080, 3177, 3181, 3186, 3219, 3300, 3395,
3440, 3531, 3622, 3670, 3738, 3744, 3801, 3823,
4023, 4074
Orient Power 3744
Oritron 4366, 4497
Outlaw 4487
Panasonic 3039, 3308, 3309, 3367, 3518, 3521, 4288, 4316,
4518, 4548, 4633, 4763, 4764
Parasound 3246
Penney 3195, 3201
Philco 4390
Philips 3189, 3269, 3391, 3412, 3642, 3892, 4089, 4120,
4189, 4266, 4269
Pioneer 3013, 3080, 3150, 3244, 3289, 3300, 3531, 3630,
3823, 4023, 4384
Polaroid 4508
Polk Audio 3189, 3269, 3892, 4289
9
© 2006 by Digeo, Inc. All rights reserved. Media Center User Guide
88
Page 96

all DVRs were not created equal
Moxi remote programming codes
Table 7: Audio device codes (Continued)
Audio device Code
Proscan 4254
Quasar 3039
Radio-Shack 3744, 4263
RCA 3054, 3080, 3300, 3346, 3360, 3530, 3531, 3823,
4023, 4074, 4154, 4254, 4390, 4511, 4609
Realistic 3163, 3181, 3182, 3195, 3395
Regent 4437
Rio 4383, 4869
Saba 4519
Samsung 4295, 4500
Sansui 3189, 3193, 3321, 3323, 3346, 3593, 3623, 3652,
4089
Sanyo 3219, 3801, 4251, 4469
Schneider 3364
Scott 3105, 3163, 3322, 3390
Sears 3201
Sharp 3186, 3226, 3262, 4286
Table 7: Audio device codes (Continued)
Audio device Code
Sharper Image 4263, 4556
Sherwood 3062, 3066, 3475, 3491, 3502, 3565, 4077, 4423,
4653
Shinsonic 4426
Shure 3264
Sonic 3281
Sonic Blue 4383, 4532, 4869
Sony 3158, 3168, 3220, 3415, 3689, 3815, 4058, 4126,
4158, 4258, 4349, 4406, 4441, 4442, 4558, 4658,
4758, 4759, 4822, 4858
Soundesign 3078, 3211, 3670
Soundstream 3141
Stereophonics 4023
Sunfire 3313, 3314, 4313
Sylvania 3222
Symphonic 3182
Tandberg 3204, 3206
9
© 2006 by Digeo, Inc. All rights reserved. Media Center User Guide
89
Page 97

all DVRs were not created equal
Table 7: Audio device codes (Continued)
Audio device Code
Moxi remote programming codes
Teac 3163, 3387, 3463, 4074, 4267, 4390, 4528
Technics 3039, 3208, 3308, 3309, 3372, 3374, 3518, 3521,
4308, 4309, 4518
Techwood 3281, 3344, 3364
Thorens 4189
Toshiba 3353
Venturer 4390
Victor 3074, 3331
Wards 3013, 3054, 3078, 3080, 3158, 3189, 3211
Welton 3344
Yamaha 3081, 3082, 3133, 3143, 3176, 3186, 3354, 3504,
4176, 4276, 4331, 4375
Yorx 3195
© 2006 by Digeo, Inc. All rights reserved. Media Center User Guide
9
90
Page 98

Specifications
Media center specifications................................................................................ 92
Moxi Mate specifications ................................................................................... 9 2
10
© 2006 by Digeo, Inc. All rights reserved. Media Center User Guide
91
Page 99

Specifications
Media center specifications Moxi Mate specifications
92
Table 8 : Media center specifications
Feature Quantifier
Power supply Line input voltage 95 V to 125 V AC; fre-
USB power (front) Two USB 1.1 connectors, 5 V, 500 mA maxi-
USB power (rear) Two USB 2.0 connectors, 5 V, 500 mA maxi-
DVI power 5 V, 100 mA maximum current
IEEE 1394 Two large 4-pin, unpowered (some models)
Operating
temperature
Dimensions (WxHxD) 17 x 3.3 x 12 inches
Weight Approximately fifteen pounds
Media Center User Guide © 2006 by Digeo, Inc. All rights reserved.
quency 57 Hz to 63 Hz
mum combined current
mum combined current
15°C to 65°C
Table 9: Moxi Mate specifications
Feature Quantifier
Power supply Line input voltage 95 VAC to
125 VAC; frequency 57 Hz to 63 Hz
Operating temperature 15°C to 65°C
Dimensions (WxHxD) 10.3 x 2 x 6 inches
Weight Approximately three pounds
Page 100

all DVRs were not created equal
Glossary
Glossary
11
Numerics
1080i 1080 alternating interlaced lines is the
most common HD standard with the
greatest line count, and available on almost all HD-ready and HDTV sets.
16:9 The aspect ratio of widescreen digital TV
formats for all HD and some standarddefinition video. Sixteen units of width
correspond proportionally to nine units of
height, regardless of actual screen size.
A
action menu: Provides provides different
action choices or commands. It appears in
the Moxi Menu when a user decision is required.
album: A collection of songs in Jukebox or a
collection of photographs in Photos.
aspect ratio: The aspect ratio of a screen is
its width divided by its height. Traditional
TVs are 4:3 and HDTVs are 16:9.
4:3 The aspect ratio of the standard NTSC TV
screen. Four units of width corresponding
proportionally to three units of height regardless of the actual size of the screen.
480i 480 interlaced lines is the setting for
most standard TVs. Not all HDTVs display
480i.
480p Many HD and EDTVs can display 480
progressive scan lines.
C
card: Cards appear in a vertical list within cat-
egories in the Moxi Menu.
category: Category cards appear in the hor-
izontal band of the Moxi Menu. They include Channels, Recorded TV, Favorites,
and more.
720p 720 progressive scan lines on a TV
screen.
© 2006 by Digeo, Inc. All rights reserved. Media Center User Guide
component: A c omposite video connection
uses three separate analog video signals
to supply video. The red, green, and blue
RCA connectors are standard.
composite: A composite connection sup-
plies an analog video signal. The yellow
RCA connector is standard.
D
DVCR: A digital video cassette recorder can
record higher video resolutions and with
better quality than a traditional VCR.
DVCRs may use magnetic tape or disk
drives.
DVI-D: Digital Video Interface - digital is a dig-
ital signal for digital monitors. It is a highspeed serial interface that supports digital
displays only.
DVR: Digital Video Recorder is a feature that
enables a subscriber to pause and replay
live TV and digitally record TV s hows.
93
 Loading...