

Page 1

MATE
Quick Start Guide
Page 2

Thanks for buying a Moxi Mate®. Whether you’ve purchased your Mate to watch
shows recorded on your Moxi HD DVR in the bedroom or to stream media from
your computer, we know you want to see it in action. Let’s get started.
What you need for setup:
• Moxi Mate
• Computer connected to the Internet
• Wired Ethernet connection to the Moxi Mate
• Optional – Moxi HD DVR
For additional information on using your Moxi Mate, other Moxi products, and for
additional support, see our website: http://www.moxi.com.
Page 3

Component Video Cable
Composite A/V Cable
Power cord
Ethernet Cable
1 Unpack Your Moxi Mate
Package Contents
clear0enter
7
pqrs8tuv9wxyz
4
ghi5jkl6mno
1
2
abc3def
jump
mute
chvol
stoprec
pause
play
replay skip
rew fwd
back next
info zoom
OK
live
TV
ticker
Important Advisory
Information*
Batteries Separate
Moxi Mate
Moxi Remote
AA AA
*Review the Important Advisory Document and these instructions in full.
HDMI Cable
Pr
VideoPbL
Y
R
Input:
12V DC
Ethernet
SATA
COAX
IR Out
Digital
Audio Out
Serial
USB 2.0
OK
RESET
MENU
Page 4
Digital
Audio Out
IR Out
Ethernet
USB 2.0
COAX
Video L R
Y Pb Pr
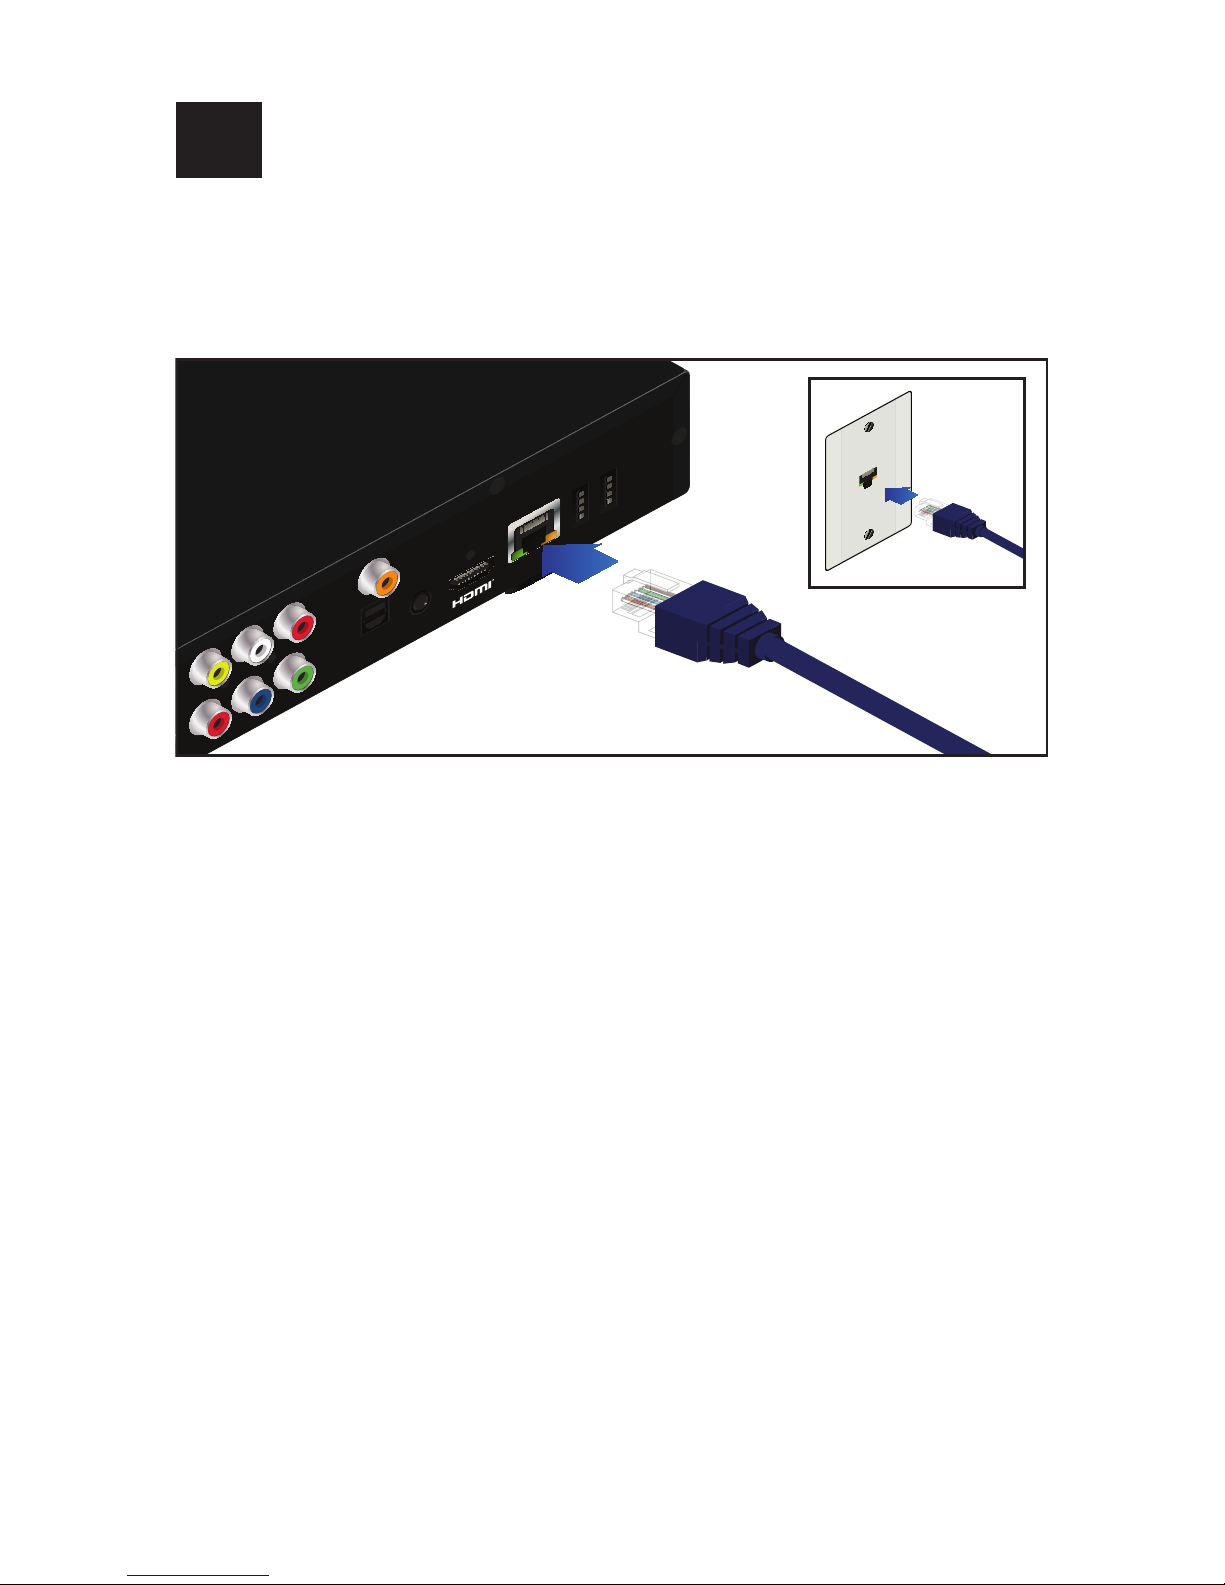
Ethernet
If you do not have an Ethernet port nearby, you can:
• User a Powerline adapter, which will use your electrical wiring as a transmission medium for broadband Internet access.
• Use a MoCA adapter, which uses your existing coaxial wiring as a transmission medium for broadband Internet access.
For more information, see the Moxi Mate User Guide at moxi.com.
Connect your Moxi Mate to your home network with the Ethernet cable.
A broadband Internet connection is required to access recorded TV shows from a
Moxi HD DVR, receive service updates, and access additional Moxi features.
2 Connect to the Moxi Service
Page 5

The Moxi logo on the front panel will light up as soon as you connect power to
your Moxi Mate.
You may want to use a surge protector. Do not use a standard extension cord.
4 Plug in the Power Cord
Digital
Audio Out
IR Out
Ethernet
USB 2.0
COAX
SATA
12V DC
Input
Y Pb
Pr
Video L R
Serial
Digital
Audio Out
IR Out
Ethernet
USB 2.0
COAX
L R
Pb Pr
HD
Component
HDMI Input
3 Connect to Your TV
Connect your Moxi Mate to your TV with the HDMI cable.
HDMI provides the best video and audio quality in one cable. If your TV doesn’t
have an HDMI input, use the component or composite cable. HDMI or component connections are required for HD video support.
Tip: You can connect additional devices such as stereo receivers to your Moxi
HD DVR. See the user guide at moxi.com for further information.
Page 6

5 Activate Your Moxi Mate
Note: During this part of the setup process, you will need to have access to a
computer with an Internet connection.
Start the Guided Setup on Your TV
Turn on your TV to start the registration of your Moxi Mate.
If a software update is available, the Moxi Mate will already be downloading that
update and restart. This may take up to 45 minutes depending on your Internet
connection speed; do not unplug your Moxi Mate during this time. When complete or if an update is not required, you will see the following registration screen
containing your Moxi ID.
Write down this ID, go to your computer, and direct an Internet browser to moxi.
com. If you have already set up a Moxi HD DVR, sign in to your account, and
select “Add a Device”. If you have purchased the Moxi Mate as a stand-alone
device, select “Activate a Moxi”. When prompted for your Moxi ID number, type in
the 12-digit Moxi ID that was displayed on your TV screen.
Once you have completed the registration process or the addition of this device,
you’ll see an 8-digit registration key on your computer screen. This registration
key will also be sent to the email address you provided during registration.
Page 7

Next, confirm your account information. Your Moxi Mate will complete any downloads. When the download is complete, you’ll be asked to restart your Moxi Mate.
6 Complete Your Registration
Go back to your Moxi Mate, and use your remote to enter the 8-digit registration
key when prompted.
Page 8

If you have connected your TV to your Moxi Mate with an HDMI cable, you can
skip this step.
We want to make sure that the Moxi Menu displays correctly on your TV screen
and is optimized for high-definition viewing.
7 Set Your TV resolution
1. Press the Moxi button and navigate horizontally to Settings
2. Scroll vertically to TV Setup
3. Choose the highest resolution you think your TV supports. Check your TV
manual for details.
4. After making your resolution selection, wait to make sure you see the Moxi
Menu. If you do not see anything appear on your screen, wait 30 seconds
and the Moxi Mate will revert to the previous settings for you to try again.
5. For best performance, unselect any other resolutions other than the highest
one your TV supports.
Page 9

8 Viewing your Moxi HD DVR Shows
on Moxi Mate
12:43
5.1
!
9 episodes
1 hr 28 mins
Boy Meets Grill
Days of our Lives
!
!
!
1/20
2/12
2/11
5 episodes
3/01
3/13
Wild About Animals
Samantha Brown: Passport...
Semi-Homemade Cooking...
The Situation Room
Terror Within, The
Wildcats
Series Options
!
!
!
Monk
Law & Order: Criminal Intent
Burn Notice
3/13
3/6
2/28
Episodes
Start on time, Stop on time, Keep 2 days, Episode
Limit: 5, Accept repeats, Timeslot: 11:00-11:30 AM
only, Priority: 2 of 13
5.1
!
Monk
Series
14 episodes
Recorded TV
If you have your Moxi HD DVR set up to share its media across your home network, the Moxi Mate will automatically detect the presence of your Moxi HD DVR
and the recorded TV shows that are available for viewing.
The Moxi Menu on your Moxi Mate will now contain an extra menu item called
Recorded TV that contains your recorded shows.
Page 10

9 Enjoy Your Moxi Mate
Congratulations! Have fun using your Moxi Mate.
To start navigating:
• Use the left and right arrow buttons to browse the main menu
• Use the up and down arrow buttons to scroll through items in each category
• When you see something you like, press OK to get a list of options.
Make sure to visit moxi.com, where you’ll find the Moxi Mate and Moxi HD DVR
User Guides, which will introduce you to great features, give you instructions on
how to set them up, and provide details on alternate setup configurations.
Page 11

© 2009 Arris, Inc. All rights reserved. Arris, Moxi and the Moxi logo are trademarks and
registered trademarks of Arris, Inc. HDMI, the HDMI logo, and High-Definition Multimedia Interface
are trademarks or registered trademarks of HDMI Licensing LLC. Use of the trademarks and
service marks of the National Television Academy (“NATAS/NTA”), requires the prior express written
permission of the National Television Academy. CableCARD™ is the trademark of Cable Television
Laboratories, Inc. www.moxi.com
Part # 030-0020-104 Rev. 4.0
Visit moxi.com to download the complete Moxi User Guide and discover all of the
capabilities your new Moxi Mate has to offer.
www.moxi.com
HD DVR
 Loading...