

Moxi BMC9012 BROADBAND MEDIA CENTER - MOXI VIEWER'S GUIDE, BMC9022 BROADBAND MEDIA CENTER - MOXI VIEWER'S GUIDE User Manual
Page 1

Viewer’s Guide
version 3.0
300.9000.vg.dgo.091504
Page 2

The information contained in this document is provided solely for use in connection with Digeo products and services. Digeo, Inc. reserves all rights in and to
such information and the products and services discussed herein. This document should not be construed as transferring or granting a license to any intellectual
property rights, whether express, implied, arising through estoppels or otherwise. EXCEPT, AS MAY BE AGREED IN WRITING BY DIGEO, INC., THE INFORMATION
CONTAINED IN THIS DOCUMENT, AND ALL DIGEO PRODUCTS AND SERVICES ARE PROVIDED “AS IS” AND WITHOUT A WARRANTY OF ANY KIND. DIGEO, INC.
HEREBY DISCLAIMS ALL WARRANTIES, EXPRESS OR IMPLIED, RELATING TO THE INFORMATION IN THIS DOCUMENT AND DIGEO PRODUCTS, INCLUDING, BUT
NOT LIMITED TO, THE IMPLIED WARRANTIES OF MERCHANTABILITY, FITNESS FOR A PARTICULAR PURPOSE, AND NON-INFRINGEMENT OF THIRD PARTY INTELLECTUAL PROPERTY. The information in this document may contain inaccurate information. Digeo, Inc. makes no representations or warranties with respect to the
accuracy or completeness of the information contained in this document, and Digeo, Inc. reserves the right to change the information in this document, product or
service descriptions, and product or service specifications at any time, without notice.
Manufactured under license from Dolby Laboratories. Dolby and the double-D symbol are trademarks of Dolby Laboratories.
Digeo, Inc. reserves the right to discontinue any product or service, or the documentation for any product or service, at any time, without notice, or to change any
feature or function of any Digeo, Inc. product or service at any time, without notice.
Trademarks: Digeo, the Digeo logo, Moxi, the Moxi logo, and combinations thereof are trademarks of Digeo, Inc. in the USA and other countries. All other product,
service or brand names are the property of their respective owners.
© 2004, Digeo, Inc. All Rights Reserved.
Page 3
Contents
Congratulations! 3
Moxi Menu 4
Introducing the Moxi Menu 4
Getting Around the Moxi Menu 5
Moxi Menu Icons 6
Moxi Remote 7
Using the Moxi Remote 7
Find and Watch a Show 8
Checking Channels 8
Finding Future Shows 9
Finding a Show by Type or Category 10
Finding a Show by Title or Keyword 11
Finding Upcoming Series Episodes 12
Saving and Watching Favorite Channels 13
Getting Information About the Current Show 14
Digital Video Recorder 15
Getting to Know the Digital Video
Recorder (DVR) 15
Pausing and Replaying Live TV 16
Recording a Show On Now 17
Scheduling a Recording 18
Setting Recording Options 19
Recording First Runs Only or
Repeated Episodes 19
Choosing a Recording Priority 20
Saving Recordings 21
Media Player 30
Playing DVDs 30
Watching the DVD 31
Games 32
Battleship 32
Blackjack 32
Checkers 33
Domino Dementia 33
Solitaire 34
Video Poker 34
Parental Control Settings 35
Turning Parental Controls On and Off 35
Creating or Changing Your Personal
Identification Number (PIN) 36
Locking Certain Channels 37
Locking Movie or TV Content by Ratings 38
Locking Access to Pay Per View
and Video On Demand Shows 39
Watching a Locked Show or Channel 40
Other Settings 41
Customizing the Channels Listings 41
Adjusting Sound Effects Volume 41
Setting the Video Aspect Ratio 42
Closed Captioning 42
Setting Video Output Resolution 43
Setting Audio Output 44
Setting Secondary Audio 44
On Demand 22
Finding an On Demand Show 22
Watching an On Demand Show 23
Pay per View 24
Finding and Watching a Pay Per View Show 24
Moxi Ticker 25
Reading Headlines 25
Getting More Than Headlines 26
Photos 27
Uploading Photos 27
Viewing Your Photos 28
Modifying Individual Photos 29
Moxi Connections 45
Connecting the Media Center 45
Supported Connections 46
Frequently Asked Questions 47
Moxi Remote Button Guide 52
[3]
Contents
Page 4

Congratulations!
Get ready to experience an entirely new level of entertainment. Moxi takes your television beyond
everyday TV programming and teaches it some entirely new tricks. The Moxi Service lets you watch
your favorite shows on your schedule. Plus, it offers many great opportunities to make your viewing
experience much more enjoyable.
With the 2-TV Media Center plus the Moxi Mate, you can enjoy full access to all the exciting features
described here, and to all recorded content, anywhere in your home!
If your version of Moxi does not include all the features described in this guide, call your cable
company to find out how to add them.
Digital Video Recording (DVR)
Moxi DVR lets you pause, rewind, and fast-forward through live shows—including high definition
programming—just as you do recorded shows. You can also find, record, and store your favorite
movies and shows digitally, and then watch them whenever you want. You no longer need piles of
tapes or complicated VCRs.
Moxi Menu
The Moxi Menu provides a fast and easy way to view all your entertainment options. You can find the
shows you want by title, category, actor, or channel. Use the menu to quickly see what’s on now, and
scroll through On Next to see what’s coming up. The Moxi Menu makes it easy to configure parental
controls, channel lists, and more.
Ticker
Moxi Ticker gives you one-click access to the latest weather, sports, news, and stocks without
changing the channel. The Moxi Ticker scrolls below the TV picture, so it doesn’t interfere with your
show. And with one click, you can see the story behind the headline.
Photos
Moxi lets you store your digital photos and display them on your TV. If you have the 2-TV Media Center
plus Moxi Mate, your family can enjoy your slideshows on both TVs.
Media Player
With Moxi’s Media Player, you can enjoy all DVD functions with the same Moxi remote control and
Moxi Menu you use for TV. Plus, you can cut down on living room clutter by having one less box to
stack and one less remote to lose.
Games
Try your hand at a selection of fun and challenging interactive games on your TV. Moxi tests your skill
and memory with a collection of strategy and casino games that are easy to learn and hard to walk
away from.
[4]
gratulations!
Con
Page 5
Moxi Menu
Introducing the Moxi Menu
The Moxi Menu puts all your entertainment options into horizontal and vertical bands that loop
around so you never get lost. The horizontal band contains the main categories of Channels (live TV)
and Recorded TV, plus exciting Moxi features such as Ticker, Games, and more. Use the left and right
arrow buttons on the Moxi remote to scroll through the categories. When a category rests in center
focus (the central, highlighted area), a vertical band appears containing all the choices for
that category.
If you have the 2-TV Media Center and Moxi Mate, you can use the Moxi Menu from either
TV or both simultaneously.
To display the Moxi Menu:
Press the MOXI button on the Moxi Remote.
[5]
To scroll through the Moxi Menu:
Press the arrow buttons.
Moxi Menu
Page 6
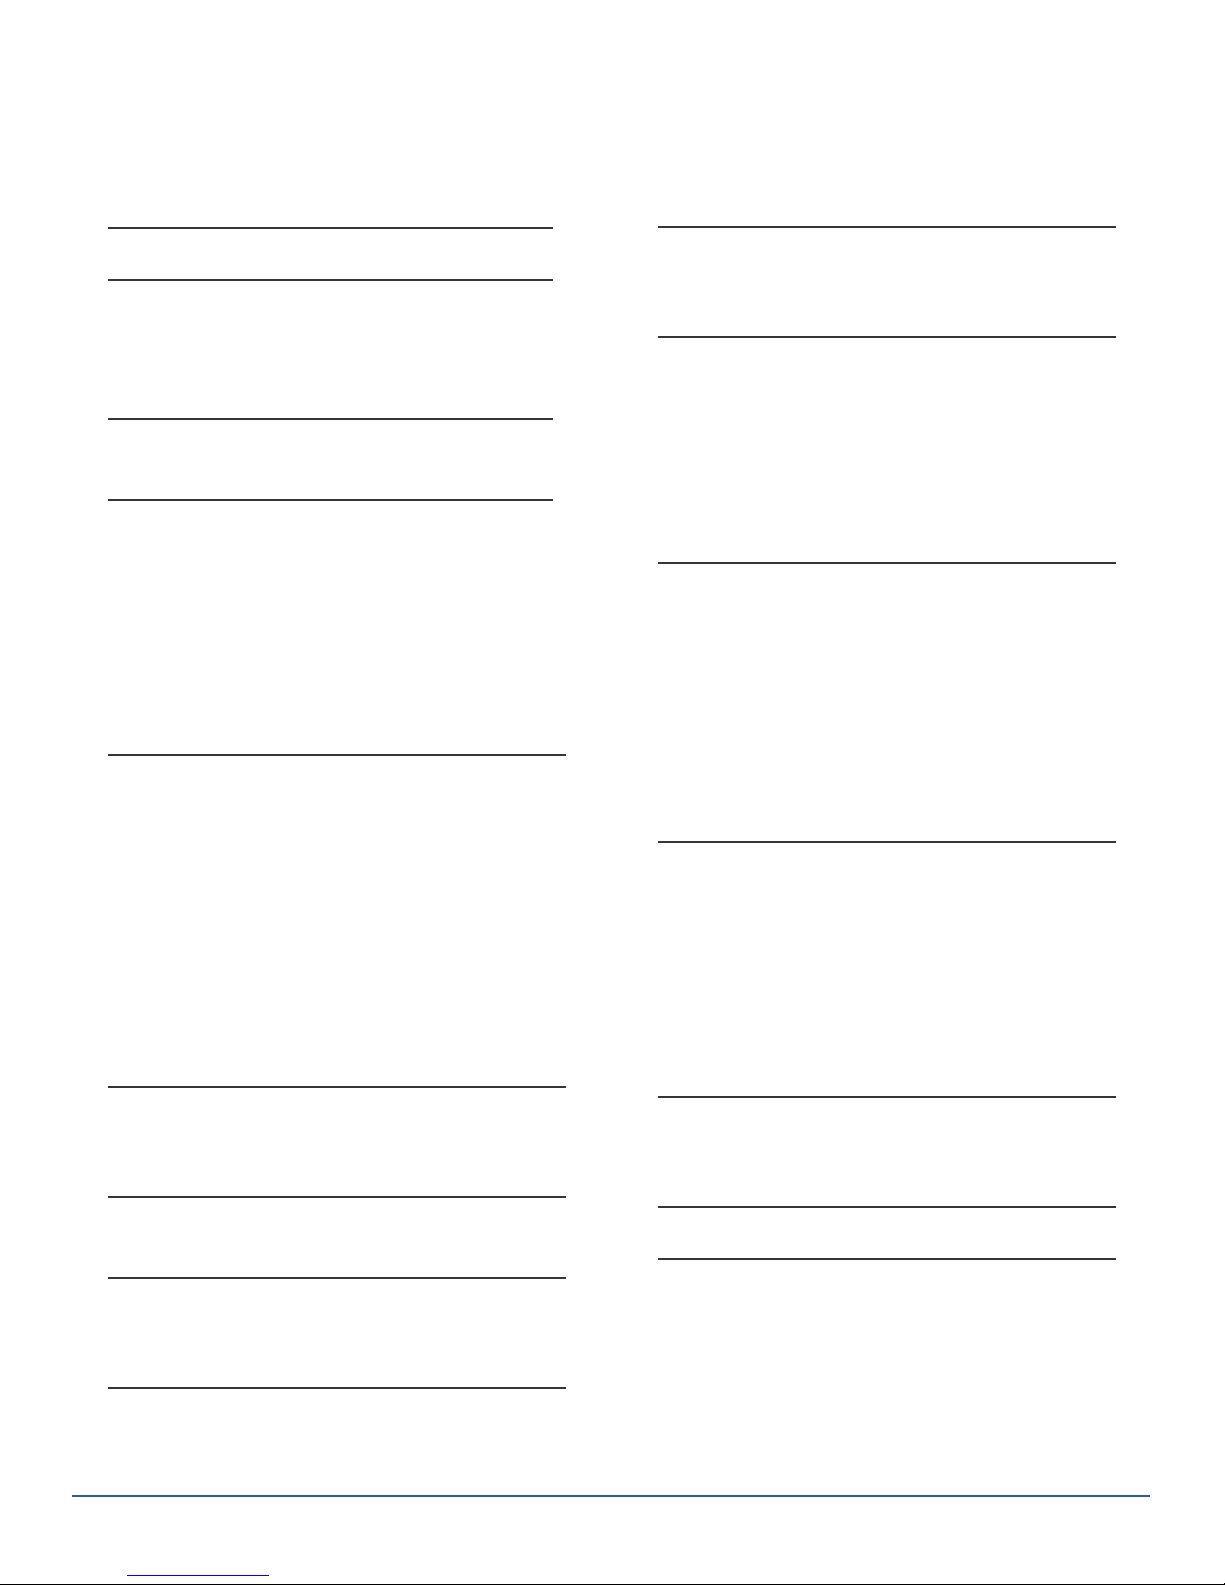
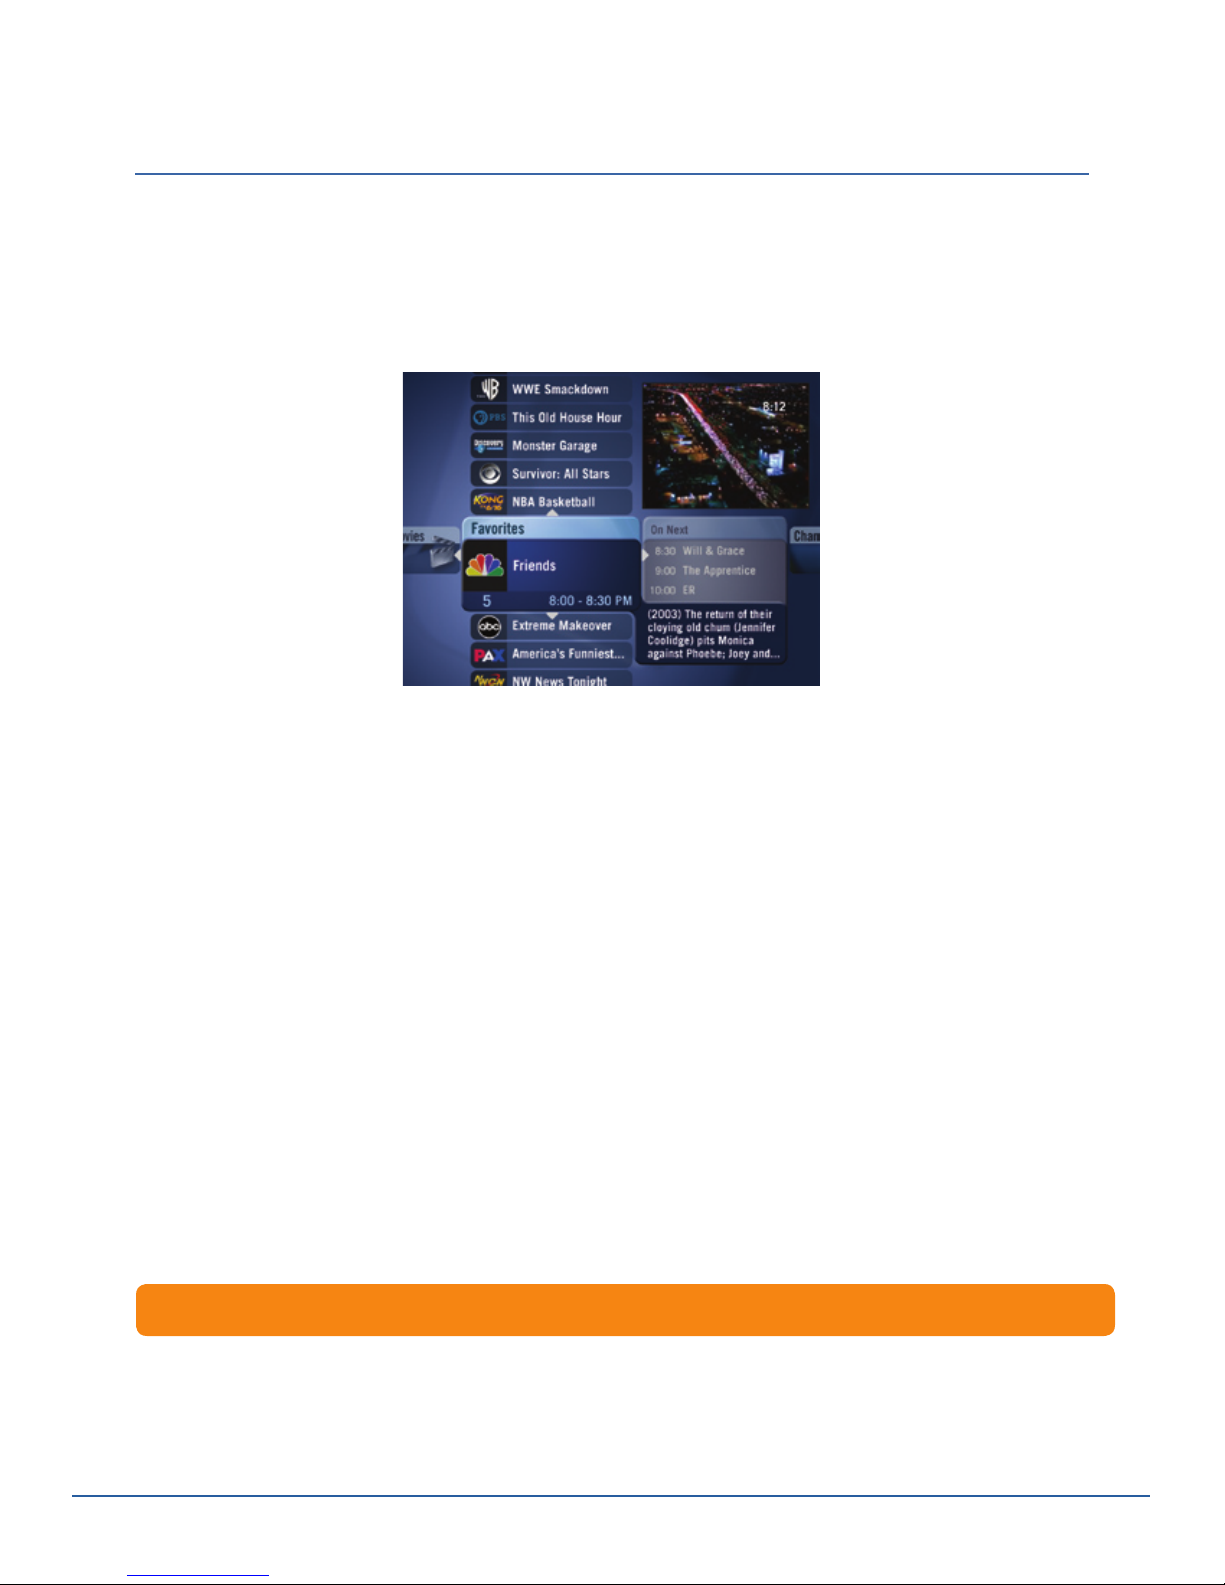
Getting Around the Moxi Menu
The Moxi Menu contains all the information you need to decide which show you want to watch.
Center focus refers to the central,
highlighted area. Move an item to
center focus to activate or learn
more about the item. If you move
a channel to center focus, you see
the show name, start and end
times, channel ID, and more.
The vertical list displays show
titles or subcategories of the
item in center focus. Move a
title into center focus to see
more information.
Live and recorded shows continue
in the video window while you use
the Moxi Menu. The video window
also displays the current channel
and time.
The On Next menu lists upcoming shows on the current
channel.
Arrows indicate which directions
you can scroll.
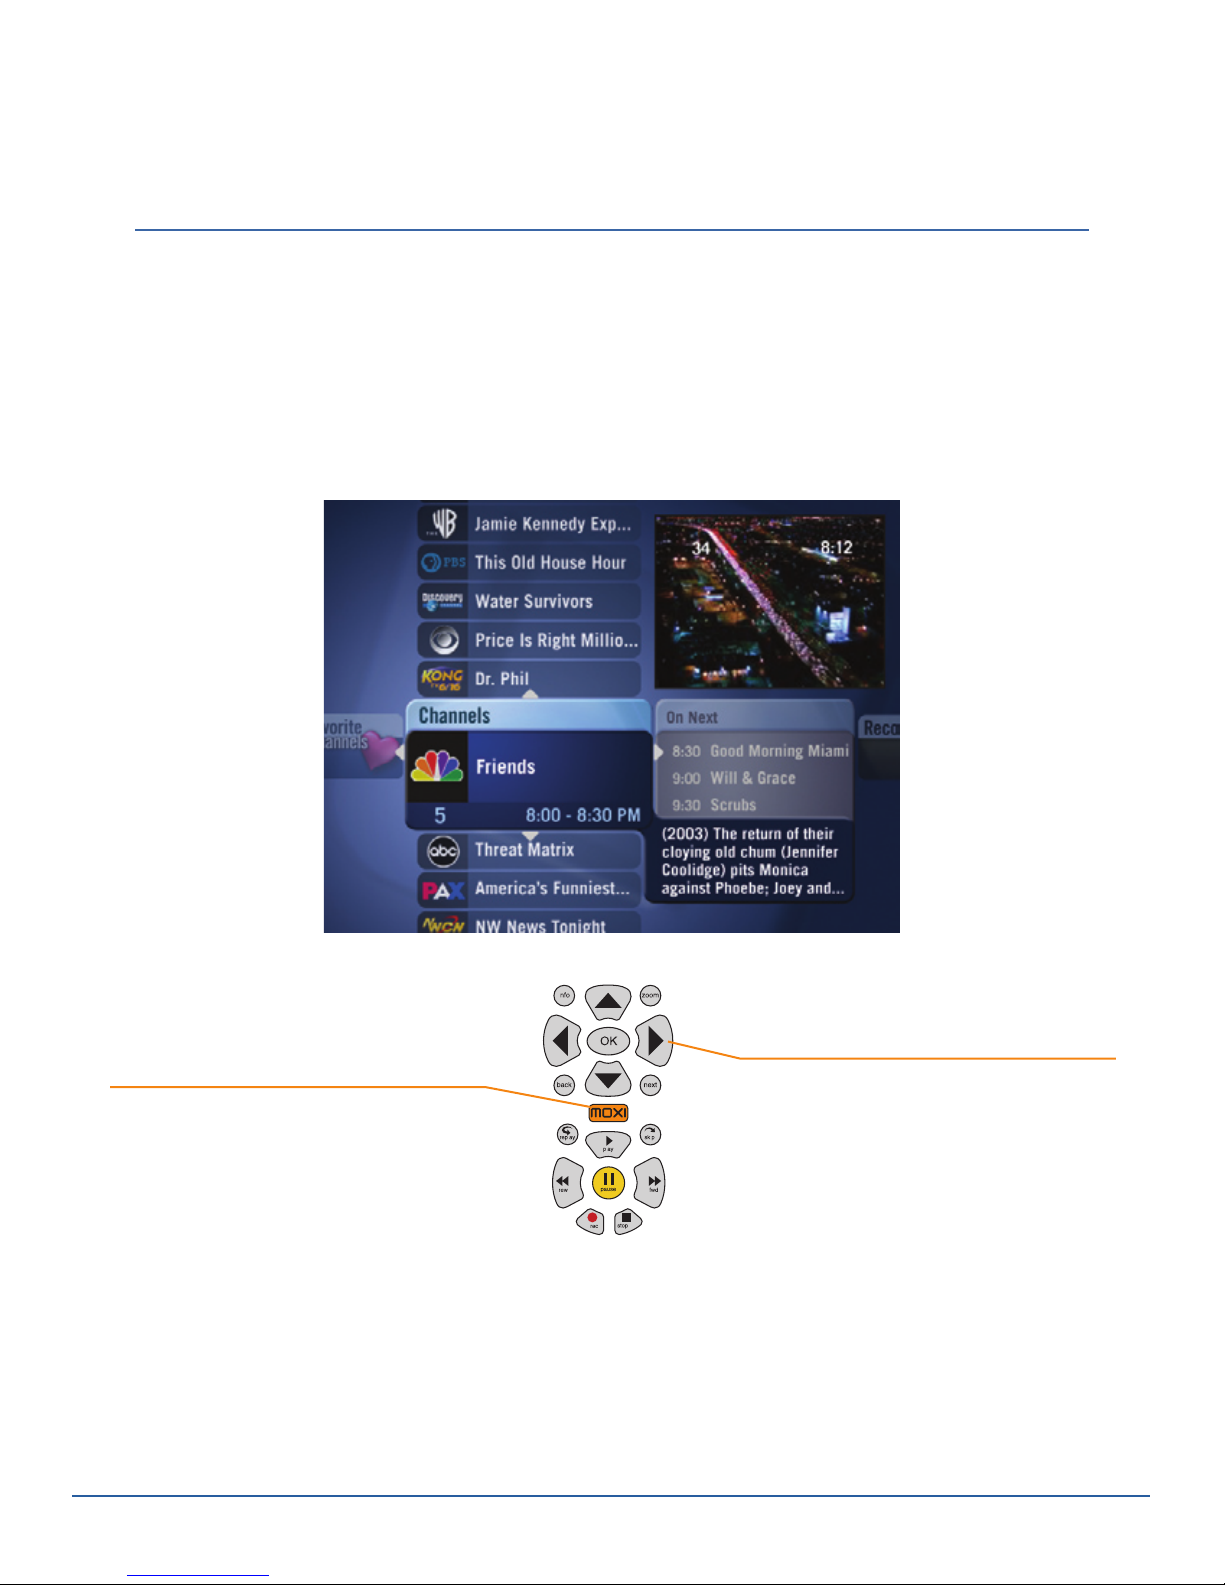
To see a demonstration of how to use the Moxi Menu, press the left or right arrow button until the
Intro to Moxi category is in center focus. Select Intro to Moxi Menu
The Info Panel provides additional
information about the item in center focus.
.
[6]
Moxi Menu
Page 7
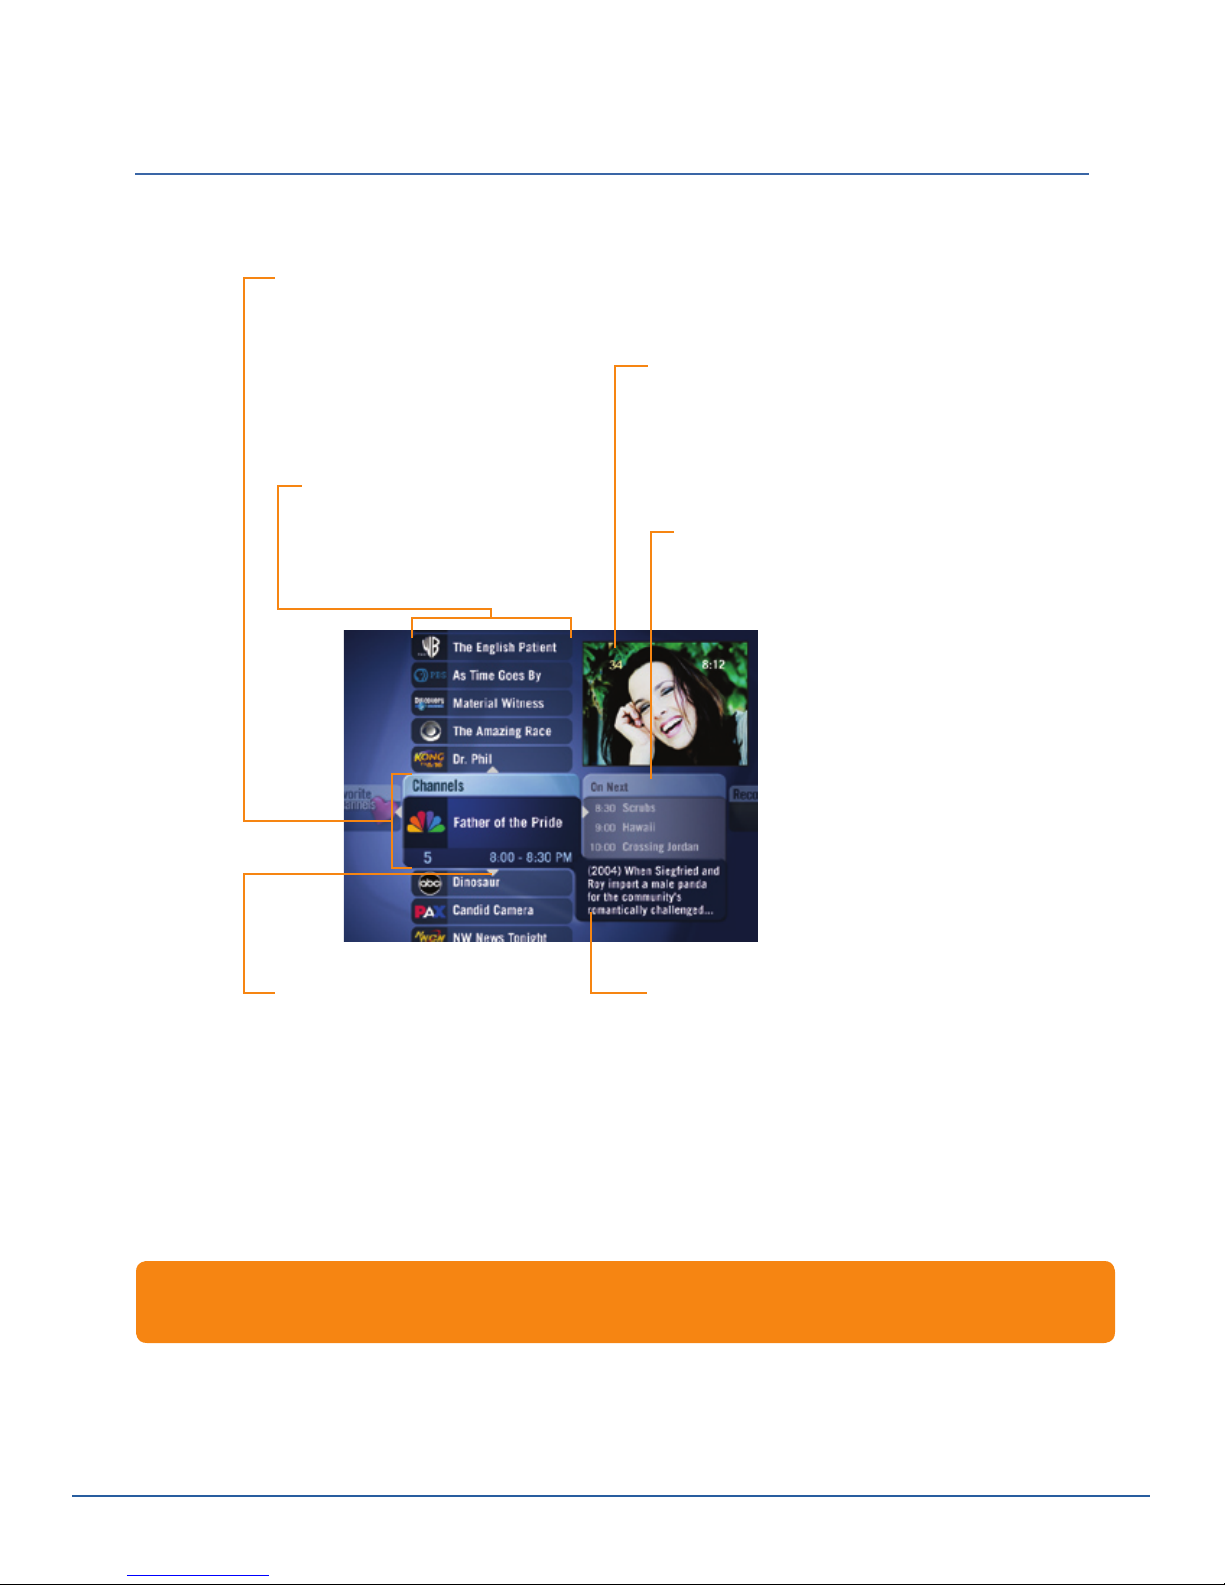
Moxi Menu Icons
The Moxi Menu uses icons to help you identify programs or navigation options at a glance.
This show is scheduled to record.
This show is currently recording.
If space is needed for a new recording,
this one may be deleted. To save this
recording, follow the instructions on
page 21.
This show will not be deleted.
Recorded TV Vertical List
with Recording Icons
The Back card lets you exit from some subcategories of
the Moxi Menu. To return to the main Moxi Menu, select
Back, and then press the OK button on the Moxi remote.
This show or channel is locked by
Parental Controls. You must enter the PIN
to access it.
This setting, channel, or other item
is selected.
[7]
Moxi Menu
Page 8
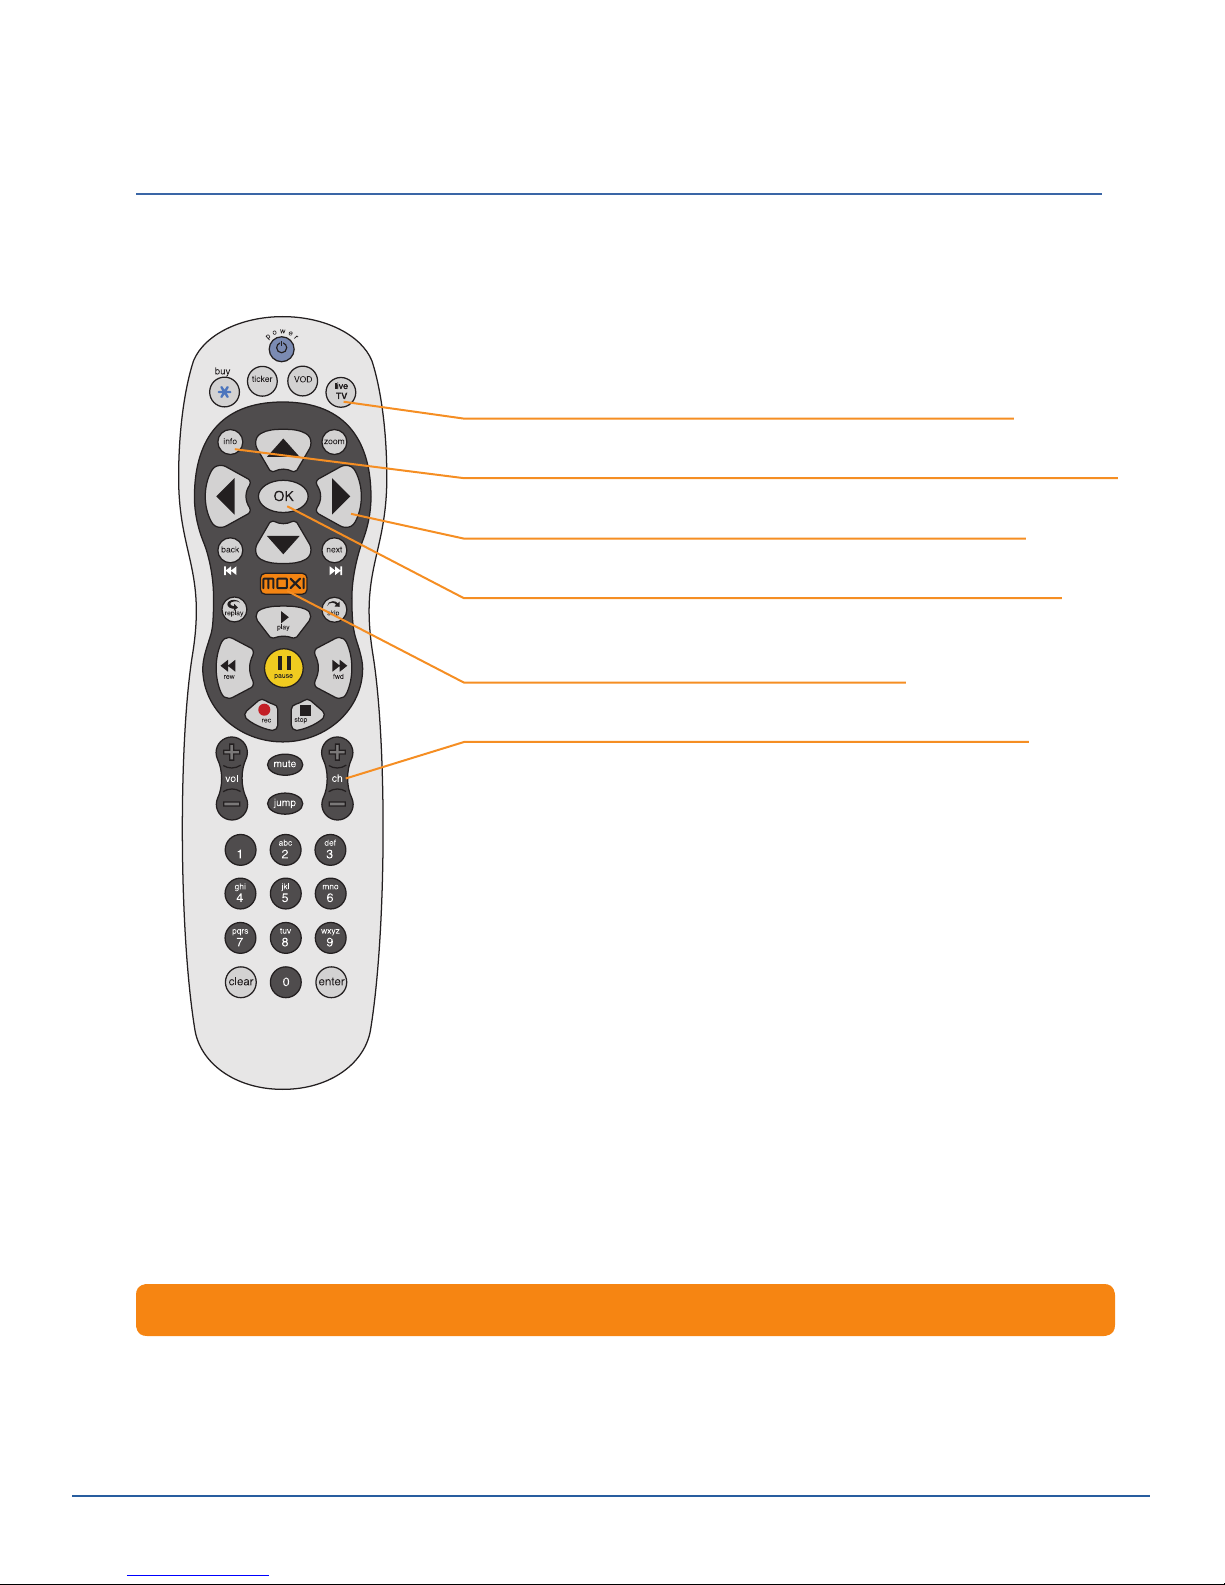
Moxi Remote
The Moxi remote brings everything Moxi has to offer right to your fingertips.
To return to watching TV at any time, press the live TV button.
To see information about a show you are watching, press the info button.
To loop through the menu categories, press the arrow buttons.
To select an item, press an arrow button to move the item to center
focus, and then press the OK button.
To display the Moxi Menu, press the MOXI button.
To change channels or scroll through a vertical menu one page
at a time, press the ch+ or ch- button.
To close the Moxi Menu, press the MOXI button or the live TV button.
For the best response, make sure there is nothing blocking the line of
sight from the Moxi remote to the Media Center.
See the last page for descriptions of all buttons on the Moxi remote.
[8] Moxi Remote
Page 9

Find and Watch a Show
Checking Channels
The Channels category provides the quickest way to see what’s on now and what’s on next. See
“Customizing the Channels Listings” on page 42 to learn about removing and adding channels to the
Channels category.
If you have the 2-TV Media Center, you can watch the same show on both TVs or a different show
on each.
• To view the Channels category: Press the MOXI button on the remote
to bring up the Moxi Menu.
• To see what’s on now: Press the up or down arrow buttons to scroll
through the vertical list. To scroll through individual items more
quickly, hold down the arrow button. To scroll through several items at
a time, press the ch+ and ch- buttons.
• To see what’s on later: Check the On Next menu or the Flip Bar. The
following page describes how to use the On Next menu and Flip Bar to
find upcoming shows (up to two weeks out).
Hint: If the Channels category is not in center focus, press the MOXI button again.
You can jump directly to a channel in the Moxi Menu by pressing the number buttons on your remote. In
Live TV (if Ticker is not on), press the number buttons to tune directly to a channel at any time.
[9]
Find and Watch a Show
Page 10
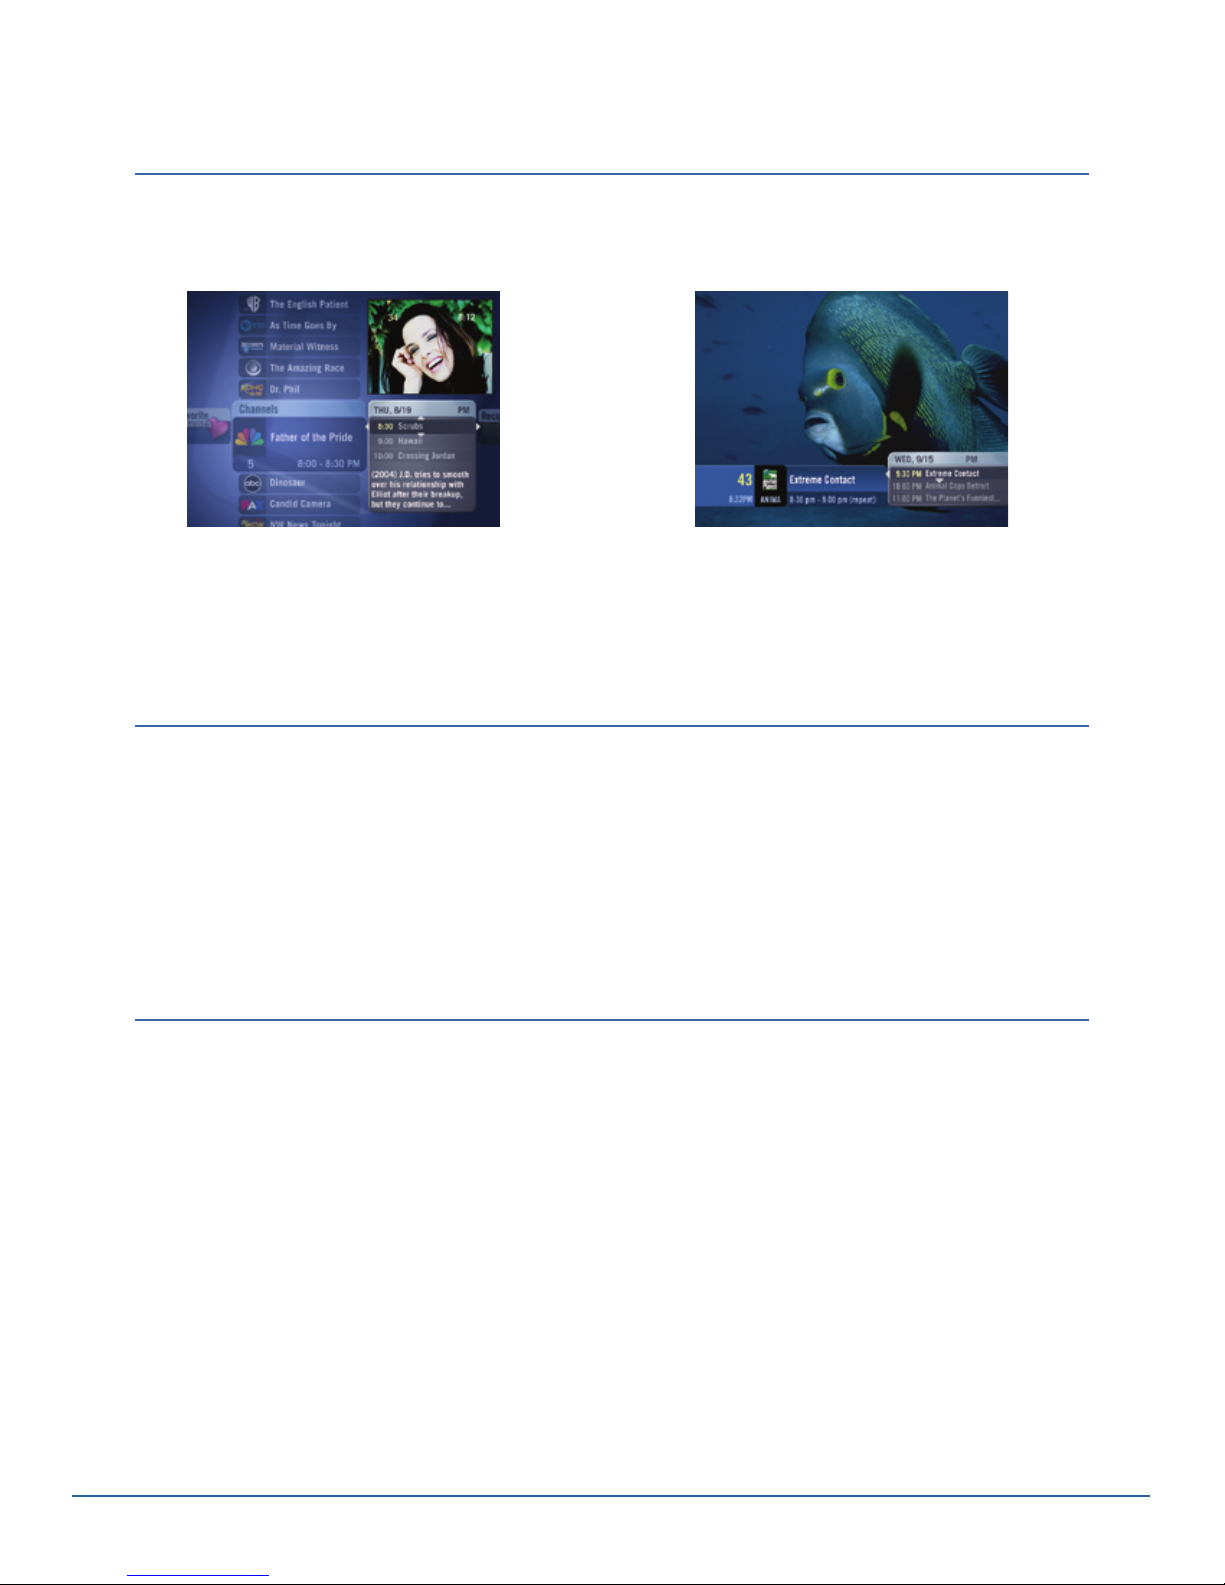
Finding Future Shows
Moxi provides two ways to plan your TV viewing—the On Next menu and the Flip Bar. You can use
either one to check upcoming shows on all channels. The Flip Bar does more than list upcoming
shows. See page 15 for more information.
When you scroll through the
HDTV, or Favorites category, the On Next
menu appears, listing the next three
shows on that channel.
To see the lineup for the current channel
Using the On Next menu
1. On a channel in the Channels, HDTV, or
Favorites category, press the right arrow
to highlight the On Next menu.
2. Press the down arrow to scroll through
upcoming shows on this channel.
To see the lineup for another channel
Using the On Next menu
1. Select a channel in the Channels or
Favorites list.
2. Press the right arrow button to highlight
the On Next menu.
3. Press the down arrow to scroll through
upcoming shows.
4. Press the left arrow to return to the
Channels or Favorites list, and repeat
as desired.
Channels,
When you tune to a channel, the Flip Bar
appears for a few seconds. You can display
it at any time by pressing the info button,
or an arrow button.
Using the Flip Bar
1. With the Flip Bar visible, press the right
arrow button to highlight the three
upcoming shows listed.
2. Press the down arrow button to scroll
through additional upcoming shows on
the current channel.
Using the Flip Bar
1. With the Flip Bar visible, press the up or
down arrow to display information about
another channel. (The channel you are
watching does not change.)
2. If you want to see what’s on further in the
future than the next three shows, press
the right arrow button to highlight the
upcoming shows.
3. Press the down arrow to scroll
through additional upcoming shows
on that channel.
[10]
Find and Watch a Show
Page 11
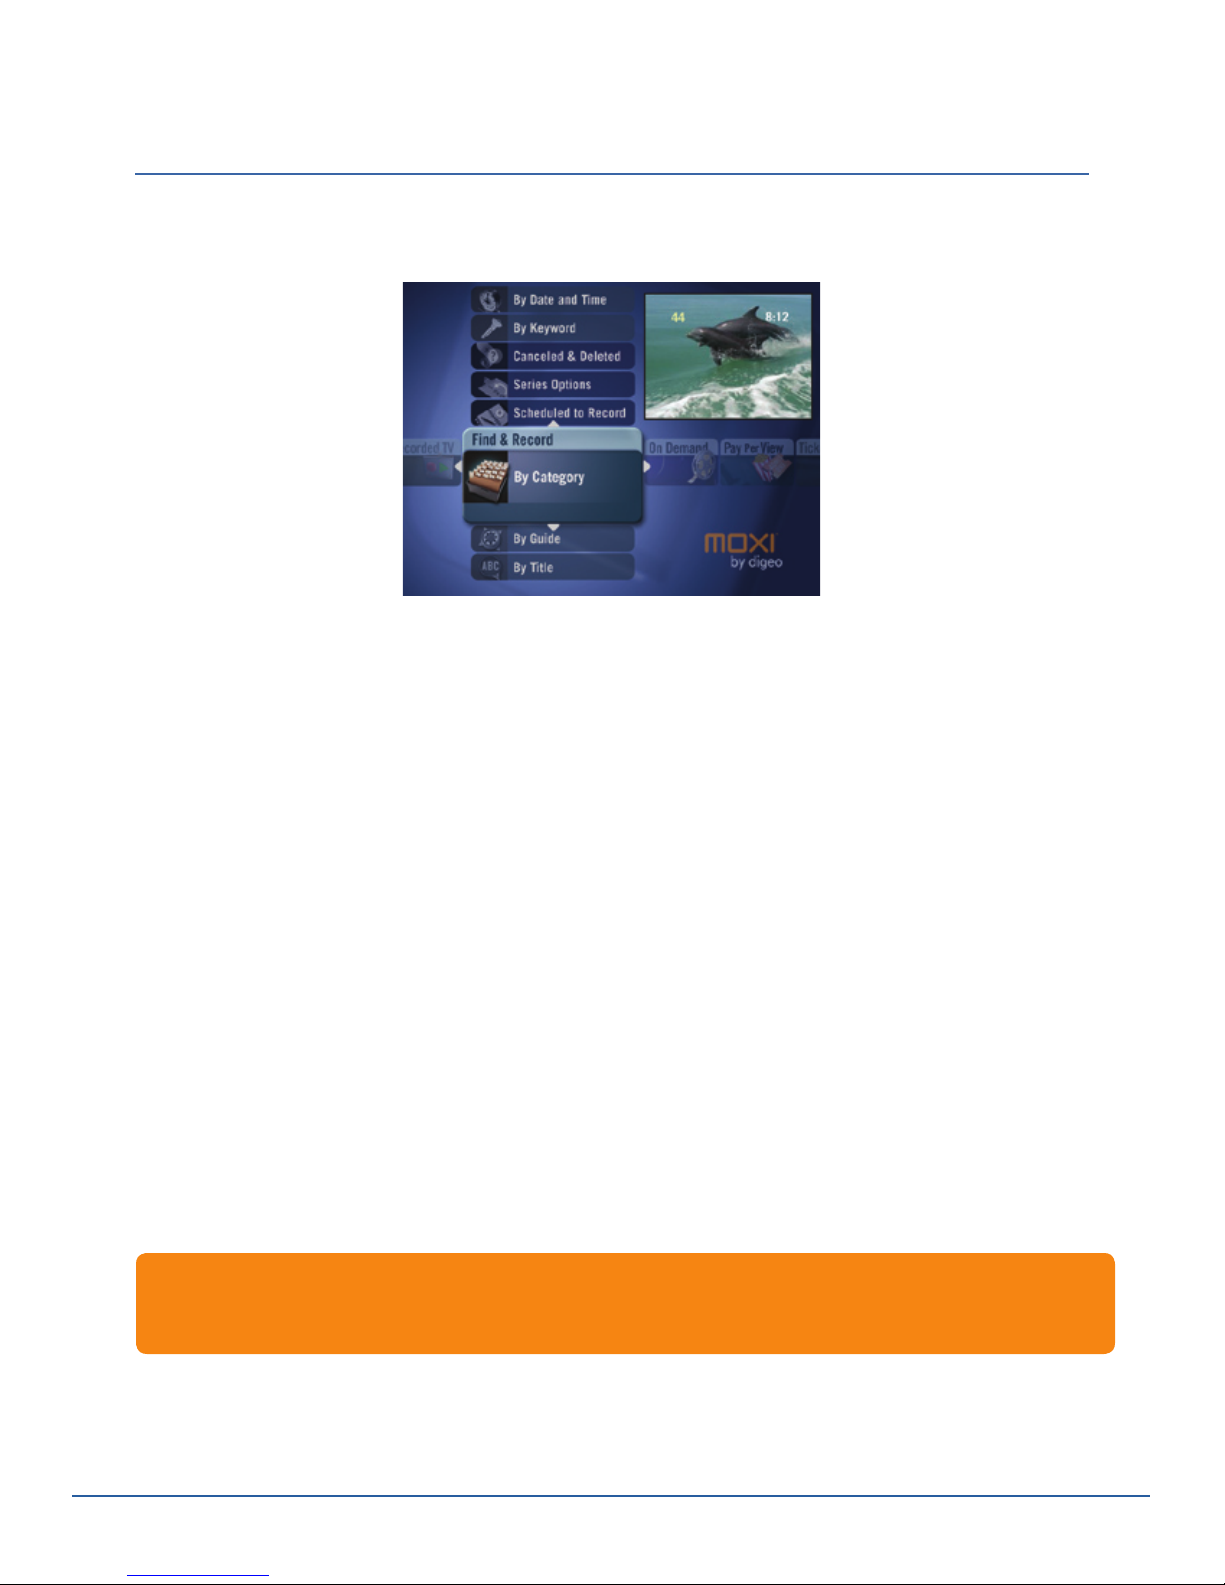
Finding a Show by Type or Category
Moxi Menu categories let you browse through specific types of programs you’re interested in. You
can choose Music, News, Kids, Sports and Movies. In the Find & Record category, you can browse
through even more categories.
1. In the Find & Record category, select By Category, and then press OK.
2. Press the left or right arrow button until the desired category is in
center focus, and then press OK. Shows in the selected category
appear in the vertical list.
3. Press the up or down arrow button to scroll through the list of shows,
or choose More to see subcategories with additional shows.
4. When the show you want is in center focus, press OK, and then select
watch or one of the recording choices in the action menu.
For another way to find a show by category, on the Moxi Menu press the left or right arrow button
until the desired category is in center focus. Press the up or down arrow to scroll through the list of
shows in that category.
[11]
Find and Watch a Show
Page 12
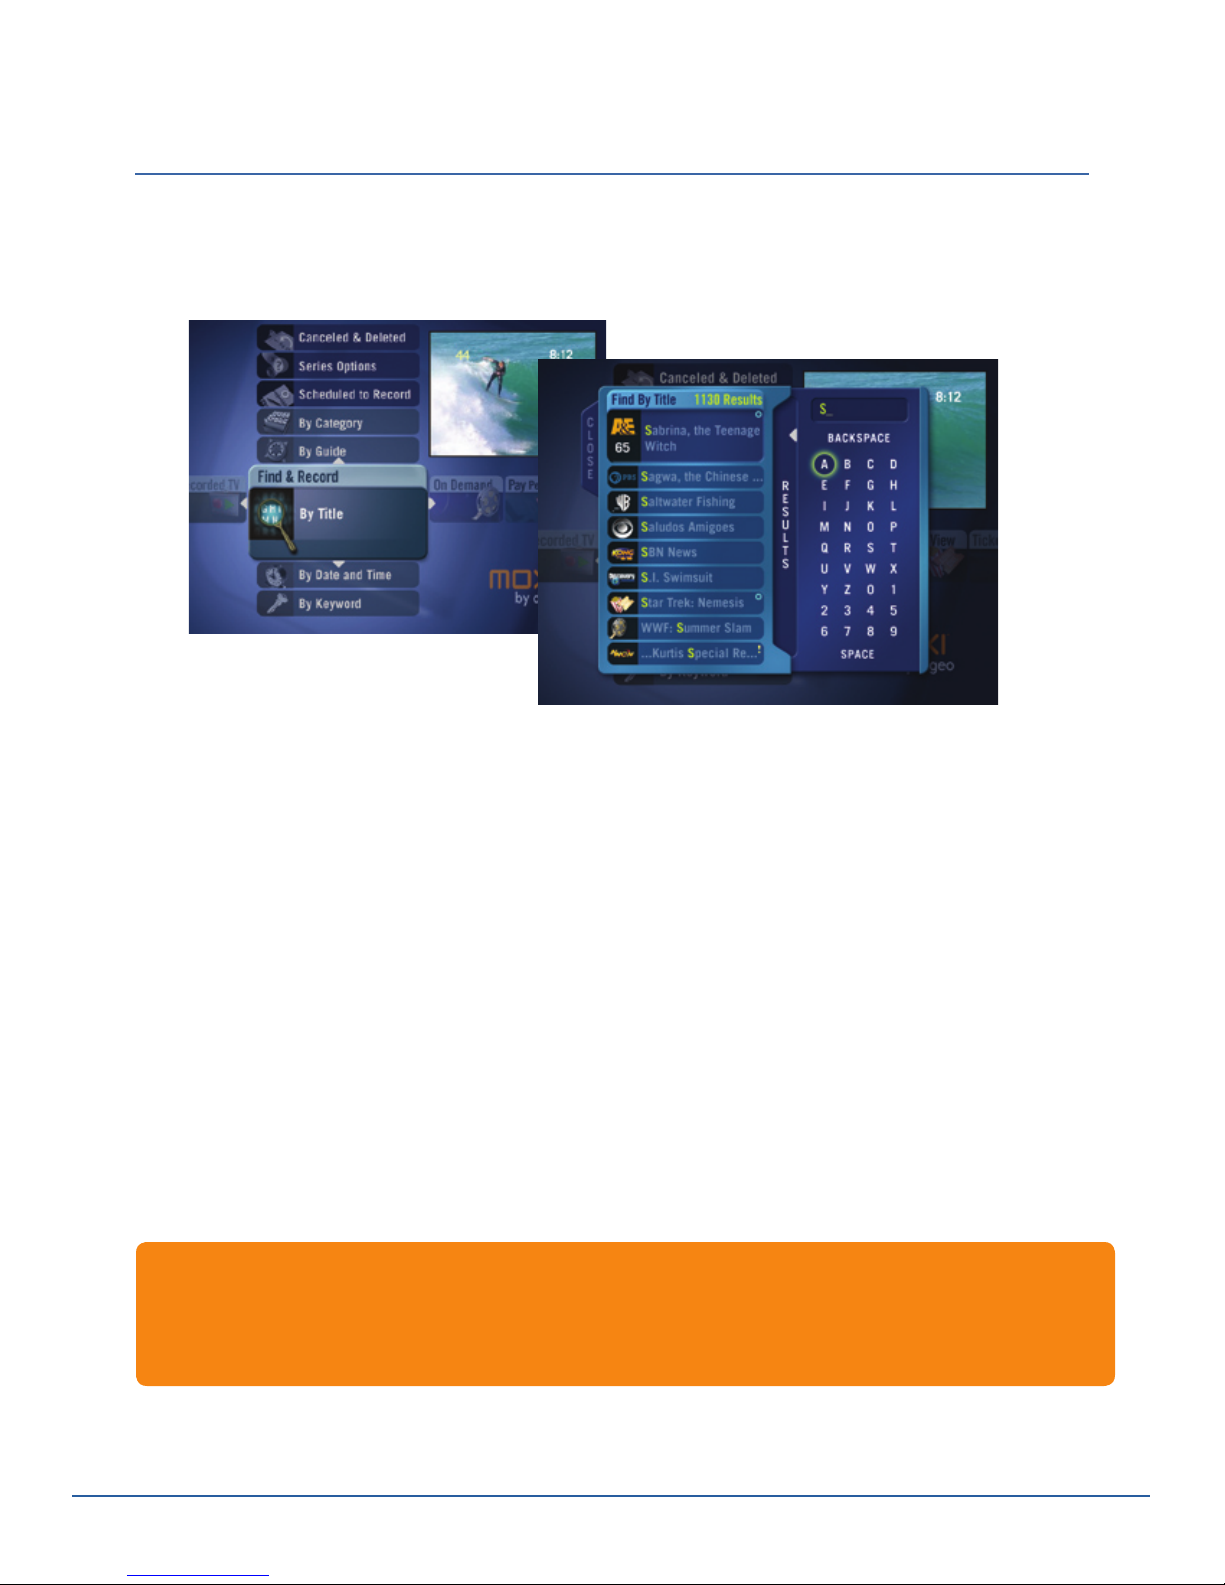
Finding a Show by Title or Keyword
You can search for a show by its title, the name of a cast member, or a word that describes the show.
When searching by title, you can search on any word contained in the title. Your search returns all
shows scheduled to air within the next two weeks that meet your criteria.
1. In the Find & Record category, use the up or down arrow to scroll to
By Title or By Keyword, and then press OK to select it.
• To search by the name of the show, choose By Title.
• To search for a cast member, team name, or topic, select By Keyword.
2. When the on-screen keyboard appears, use the arrow buttons to
highlight the first letter in the title, keyword, or cast member’s name,
and then press OK.
3. Repeat for subsequent letters.
4. After typing the title, keyword, or name (or the first several letters),
press the left arrow to close the keyboard and move the highlight to
the results list.
Shows that contain the title or keyword you typed appear in the vertical
results list.
You can also enter text using the number buttons on the remote
• To clear an entire entry, press the enter button.
• To add a space, press 0 twice.
• To backspace one letter, press 1 twice to highlight backspace, and then press OK.
[12]
Find and Watch a Show
Page 13

Finding Upcoming Series Episodes
If you have a favorite series, not only can you schedule it to record, you can also find out about
upcoming episodes. Moxi makes it easy for you to discover if an episode will be showing on a different
day or if it’s a new one you haven’t seen yet. (See page 19 for instructions on recording a series.)
1. In the Find & Record category, select Scheduled to Record, and then
press OK.
2. Select the desired series and press OK again.
3. In the action menu, select view upcoming and press OK.
4. Scroll through the list of series episodes that are scheduled to air
within the next two weeks (approximately).
You can select an episode in the list, press OK, and then perform any of the options in the action
menu. You can also press the info button to learn more about the selected episode.
[13]
Find and Watch a Show
Page 14
Saving and Watching Favorite Channels
Moxi automatically remembers your favorite channels and creates a list of the 15 channels you watch
most often. The Favorites category updates automatically, but you can also customize it.
With the 2-TV Media Center, Moxi saves favorite channels for each TV separately. The channels you
watch most frequently in one room appear in the Favorites list in that Moxi Menu only. They do not
appear in the Favorites list in the Moxi Menu in the second room.
• To add a channel to your Favorites: You don’t have to do a thing! Moxi
automatically adds the channels you watch most frequently.
• To tune to a favorite channel: Bring the Favorites category to center
focus and select the channel from the vertical list. Press the OK button
to select the show, and then select watch in the action menu.
• To clear your Favorites list: In the Favorites category, select Options
from the vertical list, and then select Clear in the action menu. Moxi
begins building a new list based on your viewing.
• To remove a single favorite: In the Favorites category, select the
desired channel, press OK, and then select remove channel in the
action menu.
A channel locked with Parental Controls (see page 38) does not appear in the Favorites list
[14]
Find and Watch a Show
Page 15

Getting Information About the Current Show
When you tune to a channel, the Flip Bar appears at the bottom of your screen. It displays the name
of the show, its duration, and the channel you are watching. The Flip Bar also shows you what’s on
later (described in more detail on page 10). Plus, it lets you browse through upcoming shows on other
channels without having to change the channel. The Flip Bar disappears automatically after a few
seconds of no activity.
• To see the Flip Bar: When watching live TV, if the Flip Bar is not
displayed, press the OK button, the info button, or an arrow button.
Unless Ticker is running, the Flip Bar appears.
• To see what’s coming up: Display the Flip Bar, and then press the right
arrow button. Press the down arrow to see additional upcoming shows.
• To see what’s on another channel: Display the Flip Bar, and then
press the up or down arrow button. The Flip Bar does not change the
channel. It shows information about the current show on the other
channel and the next three shows.
• To watch or record a listed show: When a show you want to watch or
record appears on the main Flip Bar or in its list of upcoming shows,
press the OK button. Select the desired action.
Another way to get more information is to press the info button. If you press info when the Ticker is
displayed, you see details about the current item. In live TV or on a show in the Moxi Menu, pressing
the info button displays details about the show.
[15]
Find and Watch a Show
Page 16
Digital Video Recorder
Getting to Know the Digital Video Recorder (DVR)
Moxi makes it more enjoyable to watch live or recorded TV. Using the Moxi remote, you can pause,
rewind, fast-forward, and replay the action. You can also record and store up to 50 hours of programs.
You can record two shows at the same time or record one show while you watch another.
With the 2-TV Media Center and Moxi Mate, you can do even more. You can record a show on one TV
and watch it on another. Or, you can watch and record two different shows at the same time—one on
each TV.
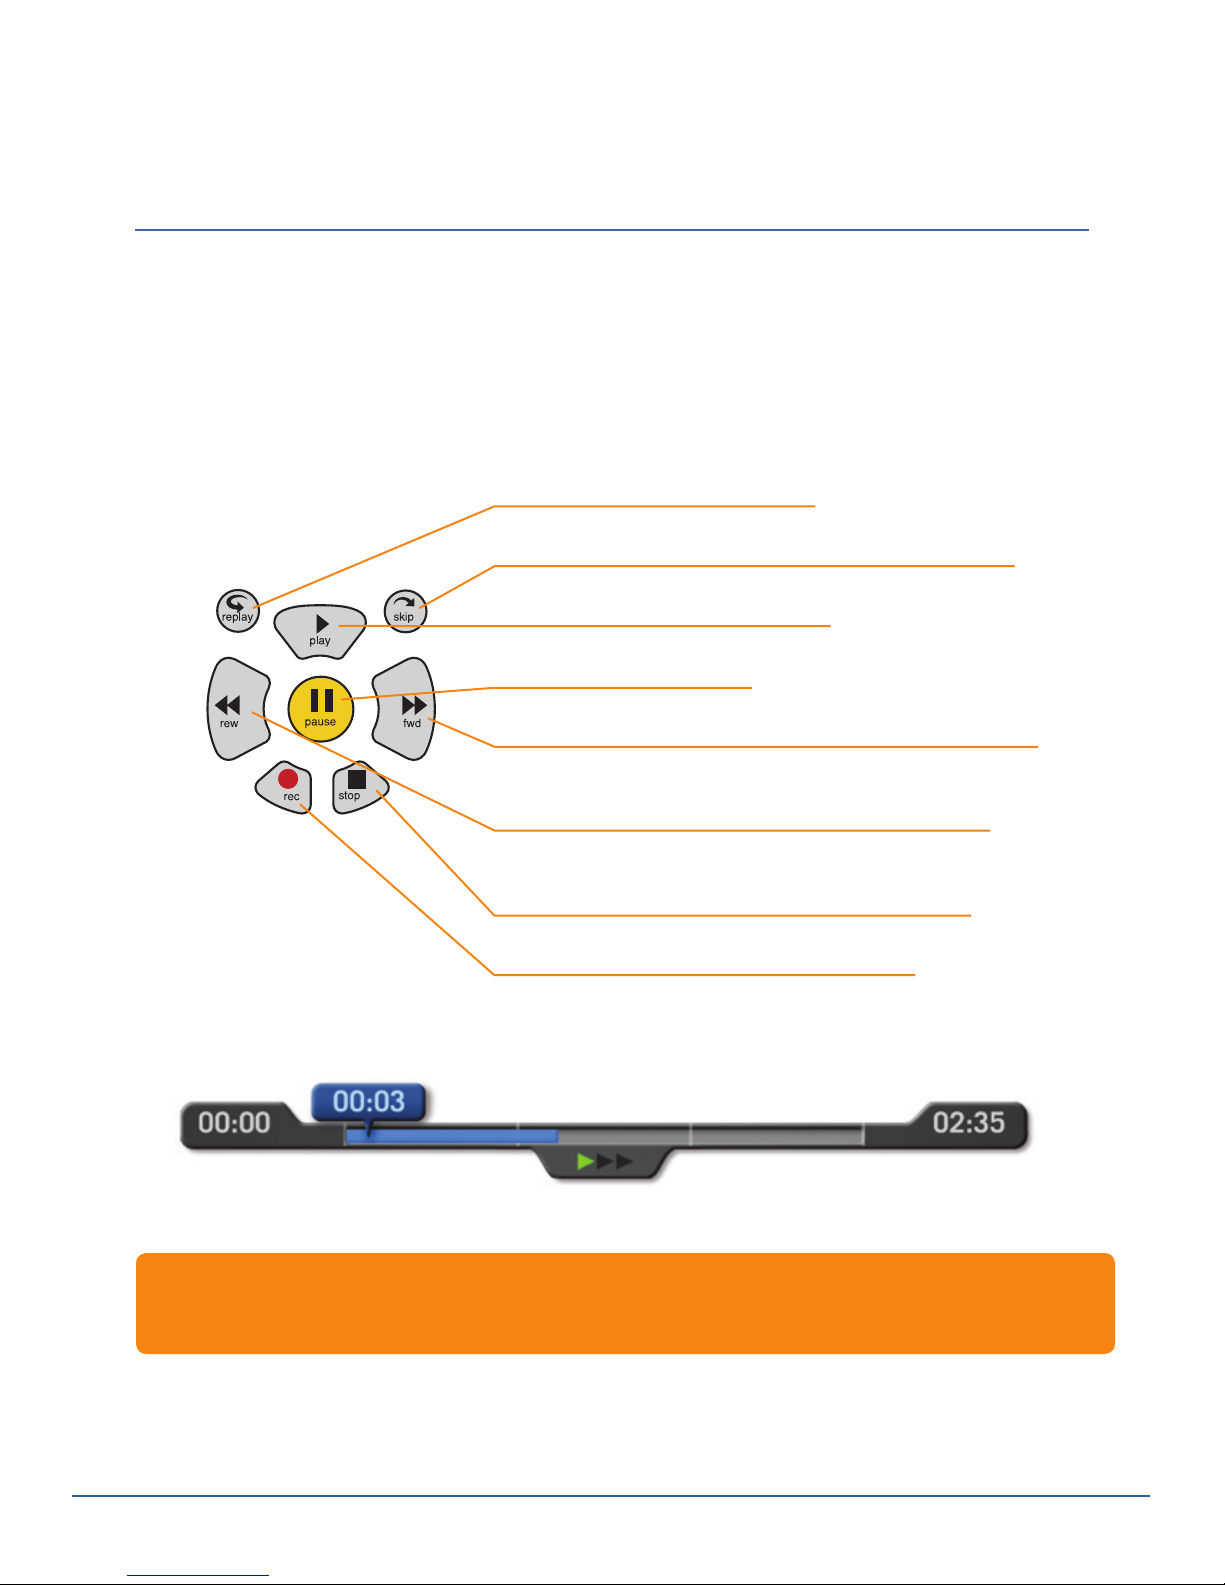
Use the buttons in the center section of the Moxi remote to control the DVR.
replay: Jumps back seven seconds.
skip: Jumps ahead approximately 30 seconds (if possible).
play: Begins playing or resumes play.
pause: Pauses the program.
fwd: Fast-forwards at variable speeds, faster with each press
(3x, 15x, 60x).
rew: Rewinds at variable speeds, faster with each press
(3x, 15x, 60x).
stop: Stops recording or playback of a recorded show.
rec: Gives you the option of recording the show.
A player bar keeps you informed of how much of a recorded show you have watched and the time
remaining.
If you pause or replay live TV, the player bar shows how much of the show has been recorded to
temporary memory. That is how much you can replay.
The amount of content you can store on Moxi varies, depending on whether you record standard
definition or high definition content. High definition content takes up approximately four times as
much space on your DVR.
[16]
Digital Video Recorder
Page 17

Pausing and Replaying Live TV
Now that you have Moxi, you don’t need to let interruptions make you miss exciting action or your
favorite part of a show. On either the Media Center or the 2-TV Media Center, you can easily pause a
live TV show to answer the phone, fix a snack, or let the cat in. You can watch an instant replay of a
scene you missed or one you just want to see again.
With the 2-TV Media Center and Moxi Mate, you can pause the show in one room, and then pick it
up from the same place in another room. You can pause, replay, rewind, and fast-forward shows on
either TV. You can even replay a scene on one TV at the same time someone else fast-forwards or
watches it at regular speed on the other.
• To rewind a show you are watching: Press the rew button.
• To replay the last seven seconds: Press the replay button.
• To fast-forward through a live or recorded show: Press the fwd or skip
button. If you are watching a live broadcast, you cannot skip ahead.
• To join the current live show in progress: Press the live TV button.
Moxi stores up to 30 minutes of the current show in temporary memory. When you change the
channel, the temporary memory is cleared. To see how many minutes of the current show are stored,
display the player bar by pressing the
how much of the show is stored.
If you will be away from the TV for more than 30 minutes, use the rec button on the Moxi remote to
record your show so you don’t miss anything.
play button. The highlighted part of the player bar indicates
[17]
Digital Video Recorder
Page 18

Recording a Show On Now
When you start watching a show, Moxi begins storing it in temporary memory. If you have been
watching the show for a few minutes before you press the rec button on the Moxi remote, Moxi
automatically includes the stored part of the show in the final recording.
1. While watching live TV, press the rec button on the Moxi remote to
display the recording options menu.
You can also find the show in the Moxi Menu, and then press the rec button.
2. To begin recording, select record once by pressing the
You can record two live TV shows at the same time or record one live show while you watch another.
You can even watch a show you already recorded while you record two others. However, if you try
to watch a third live show while two other shows are recording, a message pops up on your screen
asking if you want to stop one of the recordings.
OK button.
[18]
Digital Video Recorder
Page 19

Scheduling a Recording
Moxi makes recording your favorite shows and series easy. Just select the ones you want to record
and Moxi records them when they’re broadcast. If the network changes the show time, Moxi
automatically updates the recording schedule.
If you have the 2-TV Media Center and Moxi Mate, you can schedule recordings from both TVs.
1. Use the Moxi Menu to find the show or series you want to record.
2. Press the
3. When the action menu appears, select one of the following:
• record once to record only this episode
• record series to record all episodes of the show
• recording options to see additional recording options, including
the option to set a priority in case two shows are scheduled for
the same time
4. Press
Once your shows start recording, they appear in the Recorded TV category in the Moxi Menu.
OK button.
OK.
[19] Digital Video Recorder
Page 20

Setting Recording Options
Moxi recording options help you manage your recordings. For example, you can adjust the scheduled
start and stop times, indicate how long you want to keep recordings, and set whether you want to
record reruns or only new episodes. We’ve included some examples to get you started.
Recording First Runs Only or Repeated Episodes
1. In the Find & Record category, select
and then press OK.
2. Select the desired series, and then press
3. Select recording options, press
list until Accept is in the center. The choice appearing under Accept
may be the one you want. If it is, go to step 5.
4. Press the right arrow button, select one of the listed options,
and then press OK.
• To record only new episodes: select first-run only.
• To record all episodes: select repeats.
5. Press the left arrow button to save your change, and then press it again.
When the Back card appears, press OK to return to the previous menu.
Series Options,
OK again.
OK, and then scroll through the option
You can use these same basic steps, substituting the desired option, to change other settings.
[20]
Digital Video Recorder
Page 21

Choosing a Recording Priority
If you find that your shows are not recording because they conflict with another scheduled recording,
you can raise the priority of a particular show so it always gets recorded.
1. In the Find & Record category, select Series Options, and then press
OK.
2. Select the desired series, and then press
3. In the action menu, select
4. Adjust the priority of the series recordings by choosing move up
or move down, and then press OK. Select confirm priority, and then
press OK again.
5. Press the left arrow button. When the
return to the previous menu.
If you set a show to start early or end late and it creates a schedule conflict with another recording,
Moxi asks you to resolve the conflict by setting the priority.
change priority, and then press OK.
OK again.
Back card appears, press OK to
[21]
Digital Video Recorder
Page 22

Saving Recordings
With Moxi, you can specify how long to save a show you recorded. You can also erase a recording
whenever you want.
1. In the Recorded TV category, select the desired show, and then press
OK.
2. In the action menu, select keep until, and then press
3. Press the right arrow button to display the possible settings, select
the one you want, and then press the left arrow to accept it.
4. Press the left arrow again to save your setting.
To erase a recording, select it in the Recorded TV category, and then press the clear button.
OK.
[22]
Digital Video Recorder
Page 23

On Demand
Finding an On Demand Show
In addition to the On Demand category, On Demand, or Video On Demand (VOD), titles also appear in
other categories, such as Movies.
1. In the Moxi Menu, select the On Demand category, and then press OK.
2. Press the up or down arrow button to scroll through the vertical list,
which contains titles of available On Demand shows plus a More On
Demand card.
Note: The name of the category in your Moxi
Menu may be VOD, On Demand, or something
similar. However, the instructions in this section
are the same.
3. To see more On Demand categories and titles, choose More On
Demand, and then press OK. Select a category from the horizontal list
that appears to see titles in that category. (Some categories also have
More cards, which display subcategories.)
4. Select the title you want to watch, press
such as play or buy, in the action menu.
5. If necessary, use the number buttons on the Moxi remote to enter your
PIN. To confirm your purchase, choose yes, and then press
Some On Demand categories may require an upgrade to your subscriber package. Check with your
cable provider to find the package that meets your needs.
OK, and then select an option,
OK.
[23]
On Demand
Page 24

Watching an On Demand Show
You can choose any On Demand show from the listings and watch it instantly. On Demand shows are
listed for a limited time, typically 24 hours, but it can be different for each show.
You can replay an On Demand show as many times as you like, as long as it is listed.
Facts about On Demand shows
• The On Demand show starts playing as soon as you purchase it.
• If you pause an On Demand show for more than five minutes
(approximately), the show closes and the screen returns to live TV. You
can resume watching the show where you left off, as long as you are
within the rental period or the show is listed.
• Unlike recorded shows, which can be rewound or fast-forwarded at
multiple speeds, you can rewind and fast-forward On Demand shows at
one speed only.
• You cannot record On Demand shows.
To resume playing an On Demand show
• In the
• Rented titles have a gold bar at the top and appear in the
• As long as you are within the rental period, you do not have to
On Demand category, select the desired title, press OK, and then
choose resume in the action menu.
category and the My Rentals subcategory.
repurchase the show.
On Demand
[24]
On Demand
Page 25

Pay Per View
Finding and Watching a Pay Per View Show
In addition to the Pay Per View category, Pay Per View titles appear in other categories, such as
Channels, Movies, and Sports. You can purchase a Pay Per View title anytime during the purchase
window, and then watch it immediately or record it for later viewing.
1. In the Pay Per View or other category, select the Pay Per View show
you want to watch, and then press OK.
2. In the action menu, select one of the following:
• To purchase a show to watch now: Select watch/buy.
This option appears only if the show is on now.
• To purchase a show to watch later: Select record/buy.
Titles of all purchased Pay Per View shows have a gold band at the
top so they are easy to find in categories.
• To see a list of all scheduled show times: Select see all times. Scroll
to the show time you want, press OK, choose record/buy, and then
press OK again.
3. If necessary, use the number buttons on the Moxi remote to enter your
PIN. To confirm your purchase, choose yes, and then press
If you used Parental Controls to lock Pay Per View, you may need to enter your PIN twice: once to
view any show locked by its rating, and again to purchase a show.
OK.
[25]
Pay Per View
Page 26

Moxi Ticker
Reading Headlines
The Moxi Ticker lets you glance at the bottom of the screen and see the latest news headlines,
weather, sports, and stocks scroll by while you watch your favorite shows.
• To turn Ticker on or off: Press the ticker button on the Moxi remote.
• To see all headlines or scores: Just watch. Ticker automatically cycles
through all headlines in one topic, and then goes to the next topic.
• To find the weather in another city: Weather for your city appears by
default. To see weather for another city, scroll to the Weather tab (for
current weather information) or the Forecast tab (for the next few days’
forecast), and then press the up or down arrow button to scroll through
the other cities.
[26]
Moxi Ticker
Page 27

Getting More Than Headlines
With the Moxi Ticker, you can learn more about any headline you see scroll by, or you can stop on one
topic or story and see changes as they develop.
• To read the whole story: Press the right or left arrow button to bring
the desired headline or score to the center, and then press OK. Select
More info, and then press OK again. Use the next or back buttons as
necessary to read the story.
• To limit headlines to one category: Press the right or left arrow button
to bring the category to the center, and then press OK. Select Lock
category. To return to automatic scrolling, press the left or right arrow
button.
• To get updates on a headline or score: Press the right or left arrow
button to bring the desired headline or score to the center, press OK,
and then select Lock item. Updated scores or details appear as soon as
Moxi receives them.
You can quickly lock or unlock a topic on the Ticker by pressing the
* button on the Moxi remote.
[27] Moxi Ticker
Page 28

Photos
Uploading Photos
To upload digital photos, you must install the ScanDisk card reader. Follow the manufacturer’s
instructions for attaching the
on your Media Center.
Note: You can upload photos much faster if you attach the ScanDisk card reader to the USB2 port on
the back of the Media Center.
ScanDisk ImageMate® 8 in 1 USB 2.0 Card Reader/Writer
to a USB port
1. Insert your camera’s memory card with your photos into the ScanDisk
card reader installed on your Media Center.
2. In the Photos category of the Moxi Menu, select
and then press OK.
3. When the message appears asking if you would like to add new photos
now, choose yes, and then press
That’s all there is to it.
Important: Photos must be smaller than 10 MB. The upload process skips any photos that are
bigger than 10 MB.
OK.
Load Album,
[28]
Photos
Page 29

Viewing Your Photos
You can upload digital photos to Moxi, and then view them on your TV as slideshows. If you have the
2-TV Media Center, you can view your photos on either TV or on both of them simultaneously.
1. In the Photos category, select the album
you want to view, and then press OK.
2. In the action menu, select
slideshow, and then press OK.
Each photo in the album appears
for approximately seven seconds
accompanied by background music.
(Currently, you cannot change the
music selection.)
You can use the buttons on the Moxi remote to control the slideshow.
info: Displays the slideshow Flip
Bar, which shows the name of
the photo and its position in the
album.
play
play: Plays the slideshow or
resumes one you paused.
rew, replay, or left arrow:
Rewinds the slideshow one photo.
pause: Pauses the slideshow on
the current photo.
After the last photo in the album appears, the slideshow starts again from the beginning. The
slideshow continues until you press stop.
fwd, skip, or right arrow:
Advances the slideshow
one photo.
stop: Ends the slideshow.
Photos[29]
Page 30

Modifying Individual Photos
It’s easy to rotate or delete individual photos after you upload them.
1. In the Photos category, choose the album that contains the photo you
want to rotate or delete, and then press OK.
2. From the action menu, choose
to the desired photo.
3. Press
• If you choose delete, the photo is deleted from the album.
• If you choose rotate 90, the photo turns clockwise 90 degrees.
• To see the photo in full-screen mode, choose full screen. However,
OK to select the photo. Choose rotate 90 or delete photo, and
then press OK again.
Repeat this step as necessary.
you must press
or delete the photo.
OK to return to the album view before you can rotate
open album, press OK, and then scroll
You can delete an entire album by scrolling to it, pressing
press the clear button after scrolling to the album.
[30]
OK, and then choosing delete. You can also
Photos
Page 31

Media Player
Playing DVDs
If you have the 2-TV Media Center, Moxi’s Media Player lets you use the Moxi remote and Moxi Menu
while enjoying all the DVD functions you are familiar with. You can watch the DVD on either TV.
However, at this time, you cannot view the DVD on both TVs simultaneously.
To play the DVD on your main TV
*
1. Open the Moxi CD/DVD tray by pressing the
Center.
2. Place your DVD in the tray, and then close the tray. It takes a moment
for Moxi to recognize your DVD and display the introductory screen.
To play the DVD on your second TV
1. Insert the DVD in the main Media Center.
2. To allow time to get to the second TV, when the DVD starts playing,
press the Pause
3. On the second TV, select Media Player in the Moxi Menu, press
and then select play in the action menu.
or Stop button on the Moxi remote.
eject button on the Media
OK,
If the DVD contains rating information, Moxi enforces your Parental Control settings. If you locked the
DVD’s movie rating, you must enter your PIN before you can watch the DVD.
* This feature is currently available on the 2-TV Media Center only.
[31]
Media Player
Page 32

Watching the DVD
Using your Moxi remote, you can browse through the DVD menu and take advantage of any options
offered by the DVD. Once you insert the DVD and the introductory screen appears, you’re ready to
begin. Use your Moxi remote and the Flip Bar to control the DVD play.
1. If the Flip Bar is not visible, press the OK or info button, or an arrow
button to display it.
2. Press
3. Select the desired action and press
Several selections have multiple options. Each time you press
• Angle: Cycles through other available angles of display.
• Audio: Cycles through available languages for the audio.
• Close: Closes the action menu.
• DVD Menu, Title Menu, or Root Menu: Displays the DVD top menu.
• Go Up: Displays the next higher menu, if available.
• Subtitle: Cycles through available languages for subtitles, plus Off
• Title #: Cycles through the titles of movies or scenes on the DVD.
Unlike music CDs, Moxi does not import and save the contents of the DVD. You must have the DVD
in the tray to play it.
OK to see the DVD action menu.
OK. Only actions supported by the
DVD appear.
OK,
a description of the selected option appears on the bottom line of
the Flip Bar.
for no subtitles.
[32]
Media Player
Page 33

Games
Moxi’s Games category lets you try your hand at a selection of strategy and parlor games. All games
include playing instructions.
Battleship
Objective: Sink the five-ship enemy armada before
the enemy sinks yours.
• For each attack you launch, the enemy launches
a counterattack.
• Game is over when you destroy the enemy’s
armada, or when the enemy destroys yours.
How to play
1. Use the arrow buttons to target the spot
where you want to drop your depth charges
and torpedoes.
2. Press
:
OK to launch your attack.
Blackjack
Objective: Build a hand having more points than the
dealer’s hand, without “busting”—going over
21 points.
• Dealer must stand (not take any more cards) on
17 points and hit (take another card) on 16.
• Blackjack pays 2 to 1. If player and dealer both
have Blackjack, it’s a “draw.” No one wins.
• Ace = 1 or 11; Jack, Queen, King = 10; Number
cards = face value.
• Game uses 3 decks, shuffled when 26 cards
remain.
• Initial stake is $2,000, but Moxi carries any winnings or losses from the Video Poker game to
Blackjack, so you may start with more or less than $2,000. If you go broke, Moxi renews your stake.
How to play:
1. Select
If Last appears, select it to bet the same amount you bet on the last game.
2. Select
If your first 2 cards total 21, it’s Blackjack. You win! (If the dealer’s first 2 total 21, the dealer wins.)
3. After you see your cards, you can Double your bet. If you Double, you receive only 1 more card.
4. Select either
Add and press OK to bet $25. Repeat until your desired bet is placed.
Deal and press OK.
Hit (to receive a card) or Stand (when you don’t want any more cards).
[33]
Games
Page 34

Checkers
Objective: Eliminate your opponent’s pieces before
your opponent eliminates yours.
You can play against Moxi or you can share the Moxi
remote and play against another person.
• You eliminate your opponent’s checker by jumping
over it.
• A player’s turn ends when the player cannot move
one square or jump an opponent’s checker.
• The game ends when one player’s checkers are
eliminated or cannot move.
How to play:
1. Use the arrow buttons to move the highlight to the checker you want to move, and then press
2. Use the arrow buttons to highlight the square where you want your checker to land,
and then press OK.
• Checkers can move diagonally forward, one square at a time, or can jump over an opponent’s
checker to the next square on the diagonal.
• When a checker gets to the far end of the board, it gets crowned a King. A King can move
diagonally forward or backward.
Domino Dementia
Objective: Eliminate the colored domino blocks and
score points as you go.
• Stack the falling domino blocks so that one side of
one block lines up with the side of another block
that has the same number of spots.
• The sides that touch must have the same number
of spots, regardless of color.
• Aligned blocks disappear.
• You must line up at least three blocks to win
points; the more blocks you line up, the more
points you get.
OK.
How to play:
Use the arrow buttons and the
• Up arrow button rotates the block counter-clockwise.
• Down arrow button accelerates the rate of fall.
• Right and left arrow buttons maneuver the block from side to side.
• OK button drops the block right away.
OK button to control falling blocks.
[34]
Games
Page 35

Solitaire
Objective: Build stacks of each of the four suits.
• Stacks must be in ascending order, starting with
the Ace.
• Columns must be in descending order, alternating
black and red suits. Move cards to other columns
to see hidden cards.
• Only Kings can be placed in empty columns.
• Game ends when you complete four stacks or
cannot continue.
How to play
1. Use the arrow buttons to move the highlight to the deck, and then press
2. Use the arrow buttons to highlight the card you want to move, and then press
3. Use the arrow buttons to target where you want to place the card, and then press
:
Video Poker
Objective: Hold the winning hand. A pair of Jacks
or better wins.
• Game uses a 52-card deck, shuffled before each
hand.
• There are no wild cards.
• The values of all winning hands appear when you
choose Deal. You need Jacks or better to score.
• Initial stake is $2,000, but Moxi carries any
winnings or losses from the Blackjack game to
Video Poker, so you may start with more or less
than $2,000. If you go broke, Moxi renews your
stake.
OK to turn over a card.
OK.
OK.
• Moxi holds your winnings until the next game.
How to play:
1. Select
To automatically bet the maximum, select
2. Select
3. Select each card you want to hold and press
Bet One and press OK to ante up. Repeat as desired up to the maximum $50.
Deal and press OK. (If you selected Max Bet, Moxi deals automatically.)
Max Bet.
OK. Then select Deal again.
[35]
Games
Page 36

Parental Control Settings
Turning Parental Controls On and Off
When you first install Moxi, Parental Controls are turned off. They turn on automatically
as soon as you add or change a Parental Control setting. You can turn them off manually
either temporarily or indefinitely.
When you turn Parental Controls off, Moxi remembers your TV, movie, channel, and On Demand or
Pay Per View settings. You do not need to reset them when you turn the controls back on.
If you have the 2-TV Media Center, your Parental Control settings apply to both TVs. But turning
Parental Controls off on one TV does not affect the other TV.
1. In the Settings category, select Parental Controls, and then press OK. The
Parental Controls category tells you if controls are currently on or off.
2. To change the status, press OK. If prompted, enter your PIN using the
number buttons on the Moxi remote. You don’t need to press OK again.
(See page 37 for instructions on creating a new PIN.)
3. To activate any rating, channel, and On Demand or Pay Per View locks
you have set, select On in the action menu.
• To turn parental controls off for a limited time, select 4-Hour Off. To
turn them off in general, select Always Off.
• You can also turn Parental Controls off for four hours by unlocking a
show. See page 41 for details.
Note: Remember that any time you add or change a Parental Control setting, Parental Controls
turn on automatically.
[36]
Parental Control Settings
Page 37

Creating or Changing Your Personal Identification Number (PIN)
Your PIN enables you to specify Parental Control settings and override them when needed. The Moxi
service supports one PIN for the household. If you have the 2-TV Media Center, you use the same PIN
on both TVs.
To create your PIN
The first time you use Parental Controls, Moxi asks you to create a PIN.
Use the number buttons on the Moxi remote to enter a four-digit PIN you
can remember.
To change your PIN
1. In the
2. Using the number buttons on your Moxi remote, enter your current PIN.
3. When prompted, enter the new four-digit PIN, and then enter it again
To reset your PIN
1. Call Customer Service and ask them to reset your PIN.
2. In the
3. When prompted, create a new PIN.
Settings category, select Parental Controls, press OK, and then
select Change PIN.
to confirm.
Settings category, select Parental Controls and press OK.
Important: If Customer Service resets your PIN, you should create a new one immediately. Otherwise,
the first person attempting to access a locked show or channel is asked to create the new PIN. The
person does not need to enter the previous PIN.
[37]
Parental Control Settings
Page 38

Locking Certain Channels
When you lock a channel, a lock icon appears by that channel wherever that channel appears in the
Moxi Menu or Flip Bar. Instead of a program title, the word “Locked” appears.
If you have the 2-TV Media Center, channels you lock are locked on both TVs, but can be unlocked on
each TV separately.
1. In the
2. When a channel you want to lock or unlock is in center focus, press
3. If prompted, enter your PIN using the number buttons on the Moxi remote.
4. When finished, press the right or left arrow to bring the
Notice that the Parental Controls category card states that Parental
Controls are turned on.
Settings category, select Parental Controls, press OK, and then
select Lock by Channel.
OK. Repeat this step as often as necessary to choose other channels.
Back card to
center focus, and then press OK to exit Parental Controls. You must
exit Parental Controls for the new settings to take effect.
To unlock all locked channels quickly, select All Channels in the Lock by Channel vertical list.
[38]
Parental Control Settings
Page 39

Locking Movie or TV Content by Ratings
Parental Controls allow you to lock content based on movie ratings set by the Motion Picture
Association of America (MPAA) and TV ratings set by the TV Parental Guidelines Monitoring Board.
When you lock a rating, Moxi also locks all levels above the one you choose. For example, if you lock
R-rated movie content, Moxi also locks NC-17. If you lock TV-PG, Moxi also locks TV-14 and TV-MA.
If you have the 2-TV Media Center, the ratings you select are locked on both TVs.
1. In the
2. Select the rating you want to lock or unlock, and then press
3. Repeat steps 1 and 2 for Movie Ratings
4. When finished, press the right or left arrow to bring the
Notice that the Parental Controls category card states that Parental
Controls are turned on.
Important: You must specify movie ratings and TV ratings separately.
• To unlock all locked movie ratings quickly: In the Movie Ratings vertical list, select Unlock
all movies.
Settings category, select Parental Controls, press OK, and then
select TV Ratings.
OK. Moxi
locks higher ratings for you automatically.
.
Back card to
center focus, and then press OK to exit Parental Controls. You must
exit Parental Controls for the new settings to take effect.
• To unlock all locked TV ratings quickly: In the
TV Ratings vertical list, select Unlock all TV ratings.
[39]
Parental Control Settings
Page 40

Locking Access to Pay Per View and On Demand Shows
In the On Demand/Pay Per View category under Parental Controls, you can specify whether a PIN
must be entered before a Pay Per View or On Demand show can be ordered.
Important: Unless you specify that a PIN must be entered before ordering a Pay Per View or On
Demand show, Moxi will not require one.
1. In the
2. To change the setting, press
3. If Moxi asks for your PIN, use the number buttons on the Moxi remote to
4. When finished, press the right or left arrow to bring the
Settings category, select Parental Controls, press OK, and then
select On Demand/Pay Per View.
OK.
enter it, select PIN is Required
center focus, and then press OK to exit Parental Controls. You must
exit Parental Controls for the new settings to take effect.
(or PIN is Not Required), and then press OK.
Back card to
The On Demand/Pay Per View category card shows you whether you must enter a PIN to order an On
Demand or Pay Per View show.
[40]
Parental Control Settings
Page 41

Watching a Locked Show or Channel
In the Moxi Menu, locked shows and channels are listed as Locked. When you tune to a locked show
or channel, Moxi displays a black screen and the Flip Bar, and prompts you to enter your PIN to watch
the show.
If you have the 2-TV Media Center and unlock Parental Controls on one TV to watch a locked show,
you unlock it on that TV only.
1. Tune to the desired show or channel using the Moxi Menu or by tuning
directly.
2. When the Flip Bar appears, press
3. Use the number buttons on the Moxi remote to enter your PIN. This
turns Parental Controls off for a four-hour period.
Important: When you unlock a show, you turn off
for the four-hour period—not just for that show. To turn them back on
sooner, go to Parental Controls, press OK, enter your PIN, and then
select On.
To record a locked show, you must enter your PIN when you schedule the recording. If you schedule
a recording and later set Parental Controls so the show or channel is locked, the show still records.
However, you must enter your PIN to watch the recording.
OK.
all
parental controls
[41]
Parental Control Settings
Page 42

Other Settings
Customizing the Channels Listings
By default, Moxi lists all available channels in the Channels category. However, it is easy to hide the
ones you do not want displayed. You can still tune directly to those channels, but they do not appear in
the Channels category list.
1. In the
Channels with check marks appear in the Channels category list.
2. If a channel you want to see in the
Pressing
3. Repeat step 2 for other channels you want to add or remove.
To tune to a channel that does not appear in the
the number buttons on the Moxi remote to enter the channel number.
Settings category, select Channel List, and then press OK.
Channels category does not have a
check mark, press OK to add it.
OK also removes a check mark, which keeps a channel from
appearing in the list.
Channels category, use
Adjusting Sound Effects Volume
Moxi provides sound effects to let you know a button on the Moxi remote has been pressed, and an
action has been completed in the Moxi Menu. You can adjust the volume of these sounds or turn them
off entirely.
1. In the
2. In the action menu, select the desired setting, and then press
3. Scroll to close, and press
Adjusting the volume of these sound effects does not affect your TV volume.
Settings category, select Sound Effects, and then press OK.
OK.
A check mark appears next to your selection.
OK again to save your selection.
[42]
Other Settings
Page 43

Setting the Video Aspect Ratio
You can manage how widescreen content appears on your TV. The cable installer typically configures
this setting when installing the Media Center. However, if you upgrade or change your TV, you might
need to change this setting.
1. In the
2. Select one of the following settings.
• Wide Mode—On widescreen TVs, this setting fits widescreen
• Cropped—On standard TVs, this setting forces widescreen content
• Letterbox—On standard TVs, this setting fits widescreen content to
3. Scroll to close, and then press
Settings category, select Widescreen, and then press OK.
content to the height and width of the screen. On standard TVs, the
content appears squeezed horizontally.
to fit the height of the screen, clipping the left and right sides of the
scene. Standard content appears normally.
the width of the screen, displaying dark bars above and below the
content. Standard content appears normally.
OK again to save your change.
Closed Captioning
Moxi lets you turn on Closed Captioning, which displays the audio portion of a show as text
superimposed over the video.
If you connect your TV to the Media Center using a Component or DVI cable, follow the instructions
below to configure Closed Captioning. If your TV and the Media Center are connected in any other way,
you must use your TV menu instead. For details, refer to the documentation for your TV.
1. In the Settings category, select Closed Captioning, and then press OK.
2. Select Enabled
3. Select Basic Service
receive, and then scroll to the option compatible to your area.
4. Select Preferred Language, and then select
If you have digital service and the Media Center is connected using Component or DVI cables, you may
be able to customize the way captioning appears by scrolling to Display preferences
settings. You must select CC5 in step 3 to make the captioning visible.
or Disabled.
or Digital Service, according to the service you
Primary or Secondary.
and choosing
[43]
Other Settings
Page 44

Setting Video Output Resolution
The cable installer typically configures the video output resolution setting for you when installing the
Media Center. You should not need to change this setting unless you change to a different type of TV.
Warning: Changing the video output resolution to one your TV cannot support could damage the TV.
1. In the Settings category, select Video Output, and then press OK.
2. Select one of the settings that your TV supports:
• 480i—This is the default setting. Use this option if your TV does
not support high definition settings and is connected by an S-Video
cable, or a Composite video cable (yellow-tipped RCA cable).
• 1080i—This option is only for high definition TVs, connected by
Component cable (YPbPr). This setting cannot be used if the TV is
connected with Composite or S-Video connections.
• 480p or 720p—This option is for enhanced or high definition TVs
that do not support 1080i, but do support other high-definition
settings and are connected by Component (YPbPr). This setting
cannot be used if the TV is connected with Composite or S-Video
cable.
Tip: If you have HDTV, we suggest you set your video output for
HD (usually 1080i). However, if you want to view SD shows in their
original 4:3 ratio, we suggest you change your video output setting to
480i. After the show, change the setting back for HD.
3. Scroll to close, and then press
• If the setting is not compatible with your TV, you see a black screen.
After 20 seconds, Moxi reverts to the previous setting. Do not press
any buttons on the Moxi remote.
• If the setting works for your TV, you see a confirmation message.
Select yes, and then press
Hint: Before connecting your Media Center to a new TV, change the setting to 480i. After the move,
change to the appropriate setting.
OK to test your selection.
OK.
[44]
Other Settings
Page 45

Setting Audio Output
Moxi supports both analog and digital audio. If your sound system supports digital audio, such as
Dolby® Surround, and is connected using digital audio (S/PDIF) cable, you must configure Moxi’s
audio output to match.
1. In the
2. Select one of the settings that your TV supports:
• Dolby Digital—For digital systems connected by a compatible
• Left-Right Stereo—For standard systems connected by standard
• RF/TV—For standard systems connected by a single Coaxial cable
3. Scroll to close, and then press
Settings category, select Digital Audio, and then press OK.
digital audio (S/PDIF) cable.
RCA-type Composite audio cables, where L is the left channel and
R is the right channel.
running between the Media Center and the TV.
OK.
Setting Secondary Audio
Some shows offer a second audio track. For example, the primary language might be English, and the
secondary language Spanish. You can configure Moxi to use the primary or secondary track as your
audio preference for those shows.
If you set the secondary track as your preference, you hear shows with the secondary track whenever
it is available. Otherwise, you hear the primary track (typically English in the United States). For the
tracks available in your area contact Customer Service.
1. In the
2. Select Enable to hear the secondary audio track, when one is available.
3. Select close. Changes take effect the next time you change the channel.
Hint: On digital channels with alternate audio tracks, use the language option from the Flip Bar.
Settings category, select Secondary Audio, and then press OK.
Select Disable to hear only the primary track.
[45]
Other Settings
Page 46

Moxi Connections
S/PDIF
USB
S-video
Ethernet
B
V
L
R R
Power
Digital
Audio
Wall
CABLE IN
DVI-D
Y
P
P
2
a
2
b
3
2
c
Splitter
1
(optional PiP feed)
TV
4
Connecting the Media Center
At installation, the cable installer connected your Media Center to your TV. However, if you change to
a different TV or move the Media Center to another room, you will need to reconnect it. The following
steps briefly describe how to connect your Media Center to your TV. Refer to the Hardware manual for
detailed instructions.
1. With the TV and Media Center unplugged, connect the incoming cable
to the Media Center, as shown in (1).
2. For the best viewing experience—and to support high definition—
connect the Media Center video output to your TV using the Component
video connection (YPbPr). Use a certified Component video cable. (2a).
If your TV does not have Component video, the next best choice is to
use an S-Video connection (2b). Otherwise, use the optional yellow
composite connection (2c). Connect the appropriate cable as shown.
3. If your entertainment system supports digital audio, use the S/PDIF
connection supported by your system. (Wiring not shown.) Otherwise,
connect a Composite stereo audio cable (typically red = right, white =
left) as shown in (3).
4. Plug one end of the power cable into the Media Center (4) and the other
end into the power outlet. Allow three to five minutes for Moxi to start.
If you upgrade to a TV that supports high definition, you must configure the Moxi video output settings to
match what your TV supports. For more information, see the “Setting Video Output Resolution” chapter.
Note: The DVI port on your media center is not active at this time. Use the Component connections to
support HD output.
[46]
Moxi Connections
Page 47

Supported Connections
The following table shows the audio and video connections supported by the Media Center. Not all
televisions support digital audio and video. Refer to the documentation for your TV or receiver for the
types of connection it supports.
Supported Video Resolutions
Connection Supported resolution
Video 480i* 480p 720p 1080i
Component (YPbPr)
DVI-D‡ (digital)
S-Video
Composite (Y)
Supported Audio Formats
Audio Stereo Digital Surround
S/PDIF (optical)
S/PDIF (RCA)
Composite (L/R)
* Most standard TVs use the 480i setting.
‡ The DVI-D port is not enabled at this time. If you have a high definition television, use the
component connection. Please contact your cable company for availability of DVI support
in your market.
[47]
Moxi Connections
Page 48

Frequently Asked Questions
DVR
How do I record only the first-run episodes of a series?
When you schedule the series recording, select recording options in the action menu, and then select
first-run only. As long as the channel listing identifies the episode as new or a repeat, Moxi will
record exactly what you request.
How can I record an entire show if it has already started?
As soon as you start watching a show, Moxi begins storing it in temporary memory. If you have been
watching the show for a few minutes before you press the rec button on the Moxi remote, Moxi
automatically includes the stored part of the show in the final recording.
Note: If you change channels, temporary memory clears and Moxi starts storing the show on the new
channel. The amount of available temporary memory space varies, but is never less than 30 minutes.
Can I record a Pay Per View or On Demand show?
You can watch a Pay Per View show or record it for later viewing only at the time you purchase it.
You can watch an On Demand show as often as you like, while it is available. You cannot record an On
Demand show.
How do I know when the recorder is full?
Moxi never lets the recorder get full. Based on your requests and the priorities you set, Moxi manages
the amount of space you have left. If Moxi needs space to record a new program, it asks you to delete
some shows.
How do I delete a recorded show?
When the recording playback ends, you are prompted to save or delete the show. You can also select a
show in the list of recorded shows, and then press the clear button or select delete from the action menu.
How far forward and backward do the skip and replay buttons take me?
If you press the replay button while watching a live or recorded show, you go back 7 seconds. If you
press the
have paused or replayed a scene first.
skip button, you skip ahead 30 seconds. On a live show, the skip button works only if you
Media Player, Photos, and Jukebox
Can Moxi read my data CDs?
If your CD contains MP3 data, yes. Moxi can play MP3 data CDs.
Do Parental Control Settings work on DVD movies?
Yes, but Moxi can enforce Parental Control settings only if the DVD contains rating information.
[48]
Frequently Asked Questions
Page 49

Settings
When I turn off Parental Controls on one TV, does this turn off the Parental Controls
on the other TV also?
When you enter your PIN to unlock a show, you turn off all Parental Controls on the TV you are using
only. It does not turn them off on the second TV.
Once you turn Parental Controls off by unlocking a show, they remain off for four hours, and then turn
back on automatically. You can also turn them on sooner.
How can I listen to a show with secondary audio?
If the show is on an analog channel and is broadcast with an alternative audio track, select
the Settings category, and then check Enable.
If the show is on a digital channel, tune to it and display the Flip Bar. In the Flip Bar action menu,
Language. Repeat to hear all available audio tracks.
select
How can I stop unwanted channels from appearing in my channel list?
In the Settings category, select Channel List, and then select the channels you want to remove from
the list. Only channels with green check marks appear in the listings.
Can I only tune to channels that appear in my channel list?
The ch+/ch- button only tunes to channels listed in the channel list. However, you can tune to other
channels by using the number buttons on the Moxi remote.
How can I stop the clicking sound whenever I press a button on the remote?
In the Settings category, select Sound Effects, and then select Mute. This silences only the sound
effects. It does not affect the audio on your TV.
How do I get my Dolby® Surround to work with Moxi?
Make sure you are using an S/PDIF connection and that, in the
Digital under Audio Output.
Why does the picture look stretched on my widescreen TV?
Settings category, you select Dolby
SAP from
The settings on your TV and Moxi must be synchronized for widescreen. If your Moxi
setting is 1080i, HD shows will look great. Other channels may appear stretched.
Why don’t my high definition (HD) channels look any different from the other channels?
First, make sure you have an HD-compatible TV, and that it is attached to your Media Center using
component or DVI-D cables. Then, make sure your video output setting is the highest supported by
your TV—1080i, 720p, or 480p. (Refer to your Hardware Manual for details.)
[49]
Video Output
Frequently Asked Questions
Page 50

General
I don’t have a picture. What happened?
Make sure your cable is connected to the wall and the Media Center, and that the video input on your
TV is set to
If there is still no picture, your video output setting may be one your TV does not support. To fix it, on
the front of the Media Center, simultaneously press and hold the Live TV (second from left) and
buttons. When Sd, 480p, 720p, or 1080 appears on the Media Center LED display, a message appears
on the TV screen, showing the appropriate video setting and asking if you want to select it. Choose
yes.
Why is there no sound with my picture?
The mute button on the remote may be pressed or the volume lowered too far. If the volume indicator
appears on your screen with none of the bars selected, press the mute button again. Otherwise, press
the vol+ button.
I don’t have any sound or picture. What happened?
Make sure your TV and Media Center are plugged in and your surge protector is turned on. If you still
have no sound or picture, contact Customer Service.
Why don’t I see anything listed in the channels list?
INPUT.
OK
This is probably a connection error. To fix it, press and hold the
Media Center for five seconds. Then allow the Media Center to restart. This takes about three to five
minutes.
Why isn’t my remote working?
Make sure you are using the Moxi remote and have fresh batteries in it. Remove anything in front of
the Media Center that may be blocking the signal from the Moxi remote.
If you still have a question or problem, contact Customer Service at the phone number
shown on the cover.
Reset button on the front of the
[50]
Frequently Asked Questions
Page 51

Your Notes
[51]
Your Notes
Page 52

Your Notes
[52]
Your Notes
Page 53

Moxi Remote Button Guide
ticker displays and hides Moxi Ticker
*/buy locks and unlocks the Ticker
(buy reservedfor future use)
info displays additional information
ok selects or activates the
item in center focus
back goes to previous
page in notes
MOXI displays or
hides the Moxi Menu
replay jumps back
seven seconds
pause pauses live or recorded
shows and DVDs
rec displays
PLAYER CONTROLS
recording menu
vol changes TV or
receiver volume
jump goes to channel
last viewed
clear deletes all text
entered during text entry,
or removes recorded shows
power turns TV on and off
vod launches the VOD menu
live TV displays full-
screen live TV
zoom toggles between
full-screen media
and Moxi Menu
arrows move through
Moxi Menu
next goes to next
page in notes
skip jumps ahead in buffered or
recorded content
rew/fwd provides multi-speed
(3x, 15x, 60x) reverse or
forward video playback
mute toggles sound
on and off
ch/page changes channels or
pages through vertical menus
numbers provide direct channel
tuning or phone-like text entry
enter applies numeric
or text entries
[53]
Moxi Remote Button Guide
 Loading...