

Page 1

CABLE
HD DVR 3012
Page 2
Safety Instructions
The symbol is intended to alert the user to presence of un-insulated
“Hazardous Voltage” within the product’s enclosure that may be of
sufficient magnitude to constitute a risk of electric shock to persons.
The symbol is intended to alert the user that improper use of the
product may result in product malfunction. The user should pay
attention to avoid accidents or unnecessary problems.
Important Safety Instructions
1) Read these instructions.
2) Keep these instructions.
3) Heed all warnings.
4) Follow all instructions.
5) Do not use this apparatus near water.
6) Clean only with dry cloth.
7) Do not block any ventilation openings. Install in accordance with the
manufacturer’s instructions.
8) Do not install near any heat sources such as radiators, heat registers, stoves,
or other apparatus (including amplifiers) that produce heat.
9) Do not defeat the safety purpose of the polarized or grounding-type plug. A
polarized plug has two blades with one wider than the other. A grounding type
plug has two blades and a third grounding prong. The wide blade or the third
prong are provided for your safety. If the provided plug does not fit into your
outlet, consult an electrician for replacement of the obsolete outlet.
10) Protect the power cord from being walked on or pinched particularly at plugs,
convenience receptacles, and the point where they exit from the apparatus.
11) Only use attachments/accessories supplied by the manufacturer.
12) See the Regulatory Information and Product Safety Information and Warnings document for further important safety and regulatory information and notices.
The information contained in this document is provided solely for use in connection with
Digeo products and services. Digeo, Inc. reserves all rights in and to such information and
the products and services discussed herein. This document should not be construed as
transferring or granting a license to any intellectual property rights, whether express,
implied, arising through estoppels or otherwise. EXCEPT, AS MAY BE AGREED IN WRITING
BY DIGEO, INC., THE INFORMATION CONTAINED IN THIS DOCUMENT, AND ALL DIGEO
PRODUCTS AND SERVICES ARE PROVIDED “AS IS” AND WITHOUT A WARRANTY OF ANY
KIND. DIGEO, INC. HEREBY DISCLAIMS ALL WARRANTIES, EXPRESS OR IMPLIED, RELATING
TO THE INFORMATION IN THIS DOCUMENT AND DIGEO PRODUCTS, INCLUDING, BUT NOT
LIMITED TO, THE IMPLIED WARRANTIES OF MERCHANTABILITY, FITNESS FOR A PARTICULAR PURPOSE, AND NON-INFRINGEMENT OF THIRD PARTY INTELLECTUAL PROPERTY. The
information in this document may contain inaccurate information. Digeo, Inc. makes no
representations or warranties with respect to the accuracy or completeness of the informa
tion contained in this document, and Digeo, Inc. reserves the right to change the information in this document, product or service descriptions, and product or service specifications
at any time, without notice.
This product incorporates copyright protection technology that is protected by U.S. patents
and other intellectual property rights. Use of this copyright protection technology must be
authorized by Macrovision Corporation, and is intended for home and other limited con
sumer uses only, unless otherwise authorized by Macrovision. Reverse engineering or disassembly is prohibited.
Contains Macromedia Flash™ Player technology by Macromedia, Inc. Copyright © 19952001 Macromedia, Inc. All rights reserved. Macromedia, Flash and Macromedia Flash are
trademarks or registered trademarks of Macromedia, Inc. in the United States and interna
tionally.
Digeo, Inc. reserves the right to discontinue or change any product or service, or the documentation for any product or service, at any time, without notice.
Use of the trademarks and service marks of the National Television Academy (“NATAS/
NTA”), including the mark EMMY®, requires the prior express written permission of the
National Television Academy.
Trademarks: Digeo, the Digeo logo, Moxi, the Moxi logo, SuperTicker, and combinations
thereof are trademarks of Digeo, Inc. in the USA and other countries. All other trademarks
and trade names are the property of their respective owners.
Manufactured under license from Dolby Laboratories. Dolby and the double-D symbol are
trademarks of Dolby Laboratories.
HDMI, the HDMI logo and High-Definition Multimedia Interface are trademarks or registered trademarks of HDMI Licensing LLC.
CableCARD™ is a trademark of Cable Television Laboratories, Inc.Other trademarks are the
property of their respective owners.
© 2008 Digeo, Inc. Reproduction in whole or in part without written permission is prohibited. All rights reserved.
-
-
-
ii
Page 3

Contents
Get Started.................................................5
Watch TV.................................................... 7
Control live TV ............................................ 8
Record programs ........................................ 9
Find and playback programs ..................... 10
Other fun features ....................................11
Use this guide ........................................... 12
Learning the lingo.................................. 12
Use and program the remote .................13
Functions of the Moxi remote ...................14
Multi-function buttons........................... 14
Program the remote.................................. 16
Programming with codes ....................... 16
Programming by search .........................16
Additional programming features ..........17
Infrared emitter ..................................... 17
Use the Moxi Menu ................................. 19
Navigate the Moxi Menu........................... 20
Find & Record shows ................................ 20
Surfing channels.................................... 20
Searching by title or keyword ................ 21
Searching by category ........................... 22
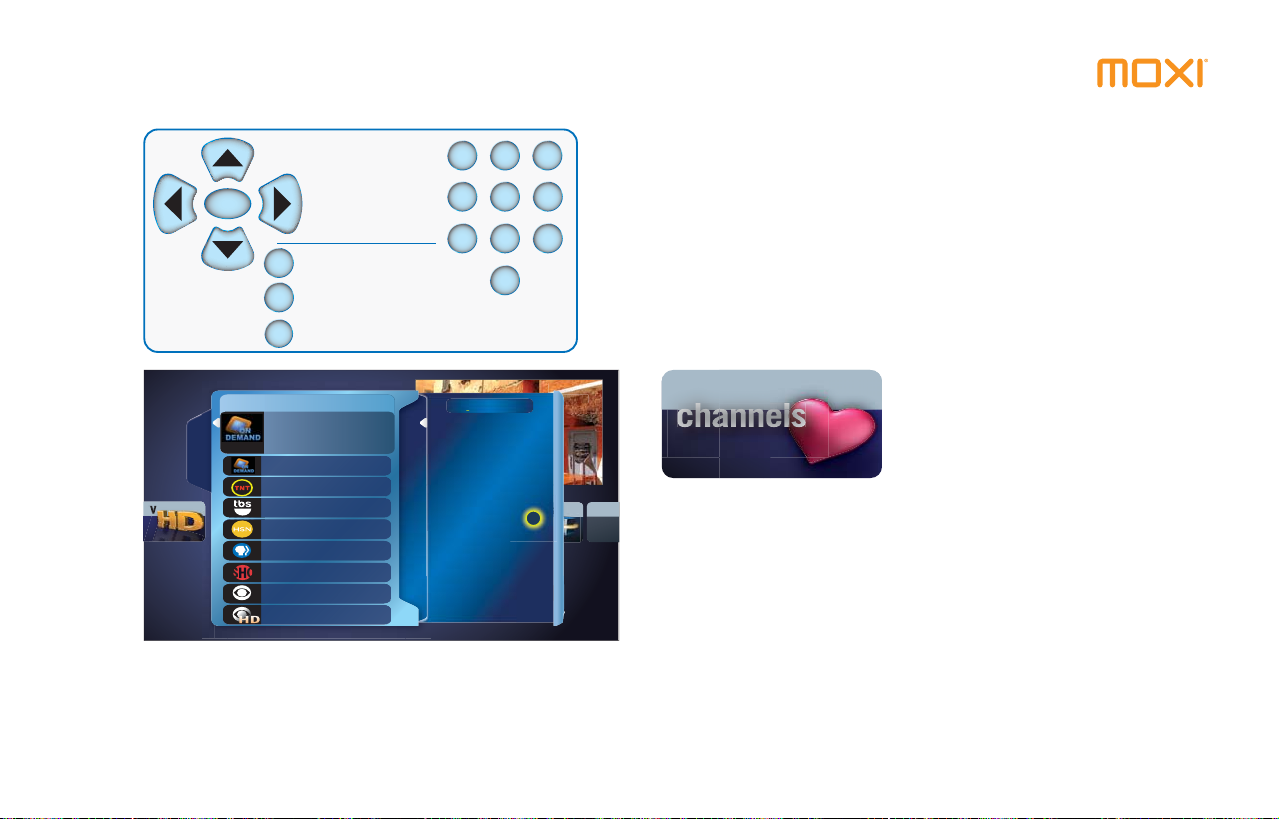
Remember your favorite channels ............. 22
Use the Moxi Flip Bar ................................ 23
Use the player bar..................................... 23
Record shows ........................................... 24
Understanding the recording
icons ..................................................... 25
Finding a previously scheduled
recording............................................... 25
Recording options ................................. 26
Recording series .................................... 27
Understanding the storage
meter .................................................... 28
Watch Pay Per View movies ...................... 29
Watch On Demand shows ........................ 29
Use SuperTicker™ .................................... 30
Reading the whole story ........................ 30
Locking topics or items.......................... 30
Enjoy Photos............................................. 31
Uploading photos.................................. 31
Viewing photos ..................................... 32
Read service messages.............................. 33
Play games ............................................... 34
Learn more about Moxi features............... 34
Software version and other details......... 34
Personalize Moxi Cable HD DVR ............ 35
Parental Controls...................................... 36
Creating a PIN ....................................... 36
Changing a PIN ..................................... 36
Locking channels or programs
by rating ............................................... 36
Turning off parental controls ................. 37
Controlling Pay Per View or
On Demand purchases .......................... 38
If you forget your PIN ............................ 39
Closed Caption......................................... 39
iii
Page 4

Widescreen............................................... 39
HDTV Setup.............................................. 40
Setting standard TV video resolution...... 40
External Hard Drive ................................... 41
Using an external hard drive ..................... 41
Sound Effects ........................................... 42
Channel List.............................................. 43
CableCARD
Troubleshoot ........................................... 45
Audio and video problems ........................ 46
No video displayed ................................ 46
Static on screen or poor picture
quality................................................... 46
TV audio and video out-of-sync ............. 46
Cannot change TV channels .................. 46
Remote or front panel control
problems................................................. 47
Cannot control the Moxi 3012
using front panel buttons ...................... 47
Cannot control TV using the remote...... 47
External hard drive issues .......................... 47
Recovering corrupted programs............. 47
Running out of storage space ................ 48
Moxi 3012 unable to recognize
your external hard drive......................... 48
Use the front panel to troubleshoot .......... 49
Changing video display output
using the front panel............................. 49
TM.................................................43
Opening the on-screen diagnostics
menu using the front panel....................49
Get Connected..........................................51
System specifications .................................52
Before connecting .....................................52
Ventilation requirements ........................53
Available ports...........................................53
Connect to the TV and receiver .................56
Connect archiving components .................57
Archiving simplified ................................58
Moxi remote programming codes .........61
TV codes for the Moxi remote control........62
Audio device codes for the Moxi
remote control.........................................67
Glossary ....................................................71
Index .........................................................75
iv
Page 5

Get Started
1
Watch TV ............................................................................................................ 7
Control live TV..................................................................................................... 8
Record programs ................................................................................................. 9
Find and playback programs .............................................................................. 10
Other fun features ............................................................................................. 11
Use this guide.................................................................................................... 12
5
Page 6
Get Started
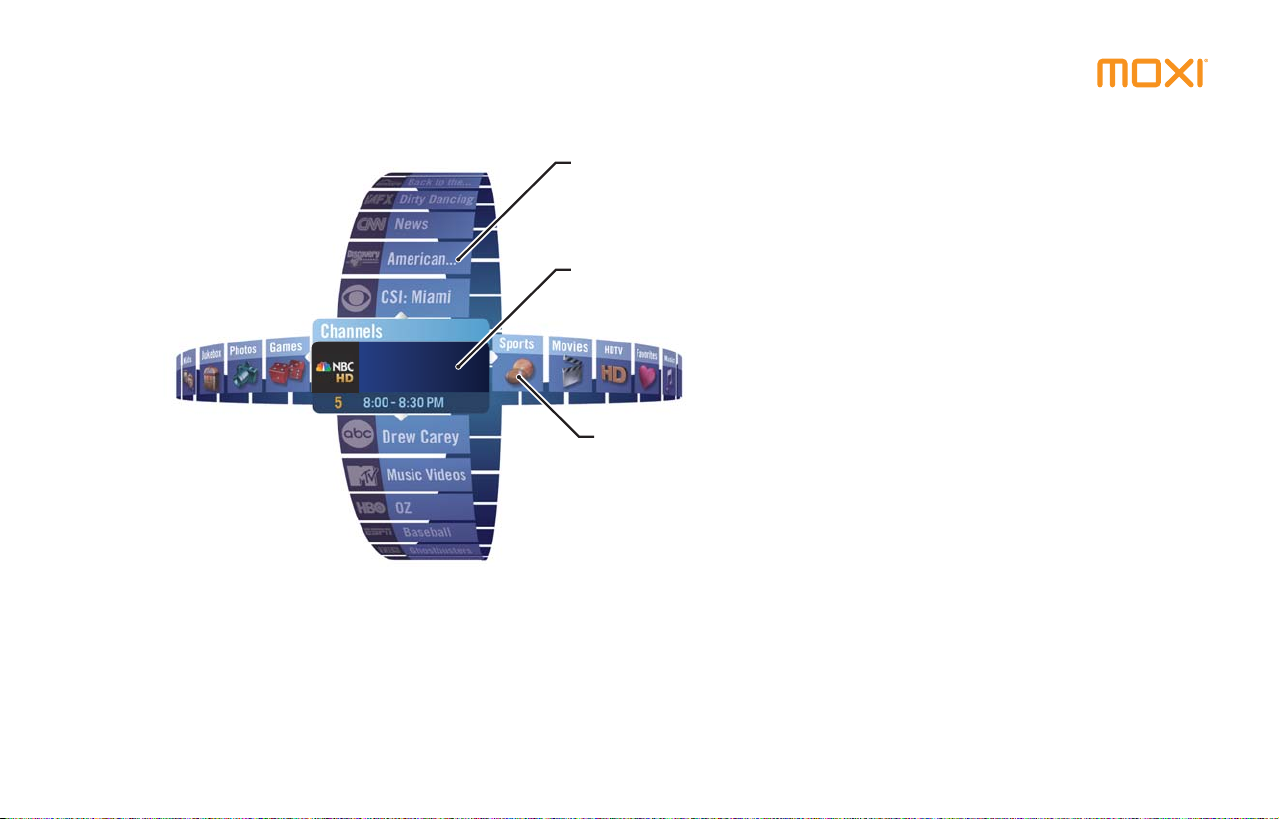
30 Rock
Vertical band with
subcategories or
selections
Center focus is the
active card
Horizontal band
with category or
lter selections
The Moxi Menu is an Emmy® Award-winning dual-axis
electronic program guide that allows you to quickly surf
channels while viewing live TV. The Moxi Menu turns
your TV into a recording system, a casual gaming device,
and a photo storage and playback device. Who knew
your TV could be so versatile! Find out more on page
Use the following diagrams to help you quickly get
started with your Moxi
®
Cable HD DVR version 3012.
20.
6
Page 7
Watch TV
back
next
info
zoom
OK
back
inf
inf
o
zoooommmmmmm
Surf for programs and watch TV. It’s only a few clicks away.
Get Started
Press the Moxi button on the remote to launch the Moxi Menu and
electronic program guide.
1
Use the Arrow buttons to surf the Channels category on the Moxi
Menu.
Channels
5
House
Home Improvement
Nova
The Unit
Dirty Jobs
The Office
9:00 - 10:00 PM
Dog Whisperer, The
Change Time Slot
Dancing With the Stars
62
Coming Up
10:00
Law & Order: Special...
11:00
KING 5 News
11:35
Tonight Show with Jay...
‘Survivor Man’ When Ryan
excludes him from a wilderness
retreat, Michael goes into the
woods for his own survival...
9:05
next
Press the OK button twice to watch the selected channel program.
OK
Press the info button at any time to view show details. Find out
info
more on page
20.
7
Page 8
Get Started
rec
rew fwd
skip
play
replay
pause
stop
Control live TV
Control live TV with the touch of your fingertip.
buy
ticker
info
OK
back
replay
play
pause
rew fw
rec
mute
jump
abc
1
2
ghi
jkl
4
5
pqrs
tuv
7
8
clear
0
live
TV
zoom
next
skip
stop
chvol
def
3
mno
6
wxyz
9
enter
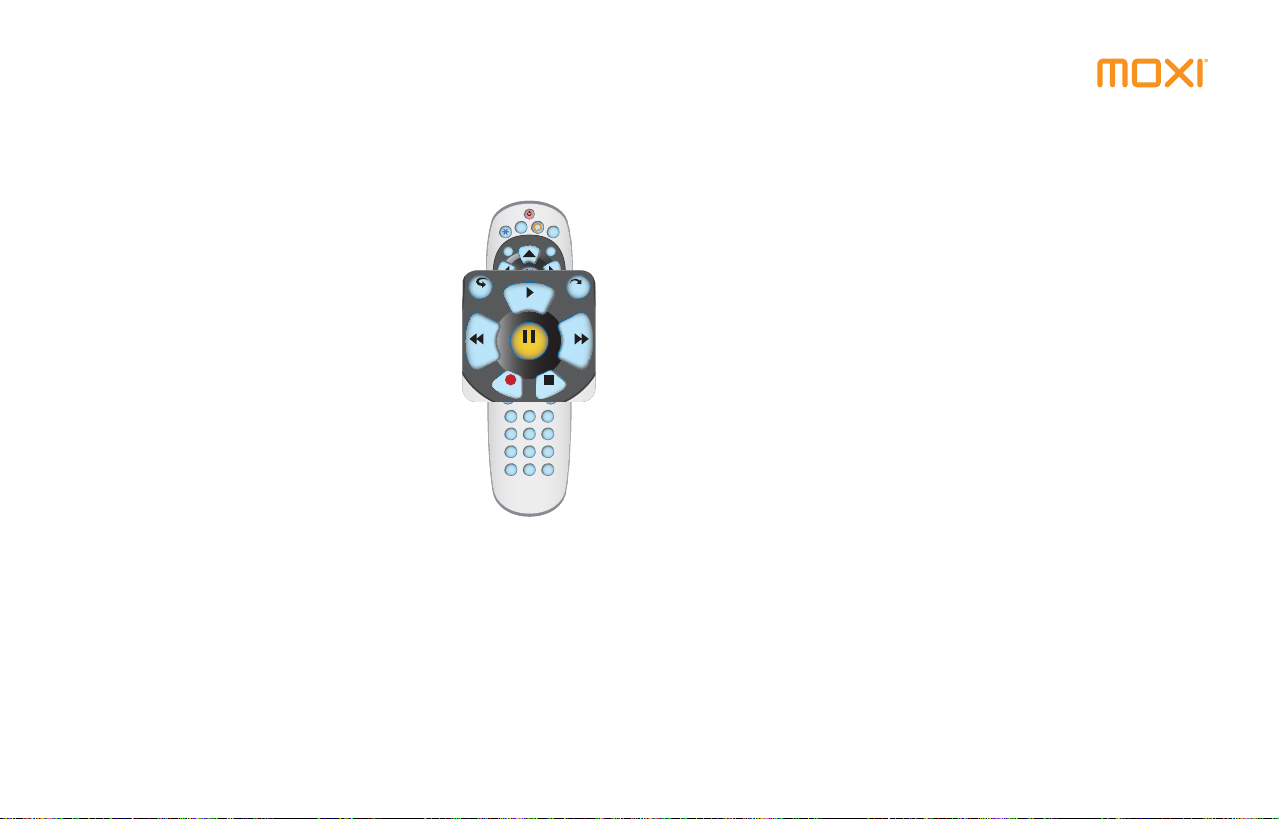
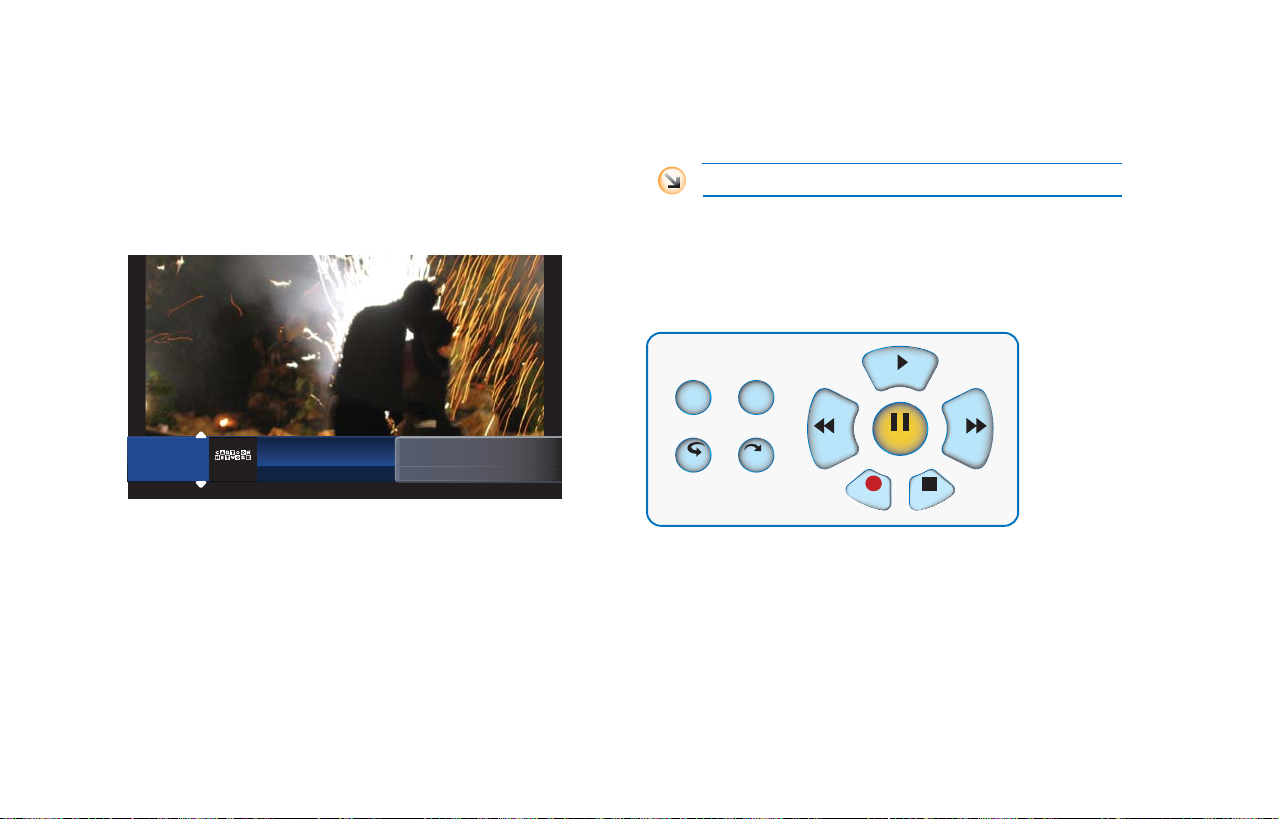
Press Pause to pause the live program you are watching.
Press Fwd up to three times (three speeds) to fast forward recorded
shows.
Press Rew up to three times (three speeds) to rewind shows.
Press Live TV to exit out of the paused TV program and watch the
program live, immediately.
Find out more on page 24.
8
Page 9
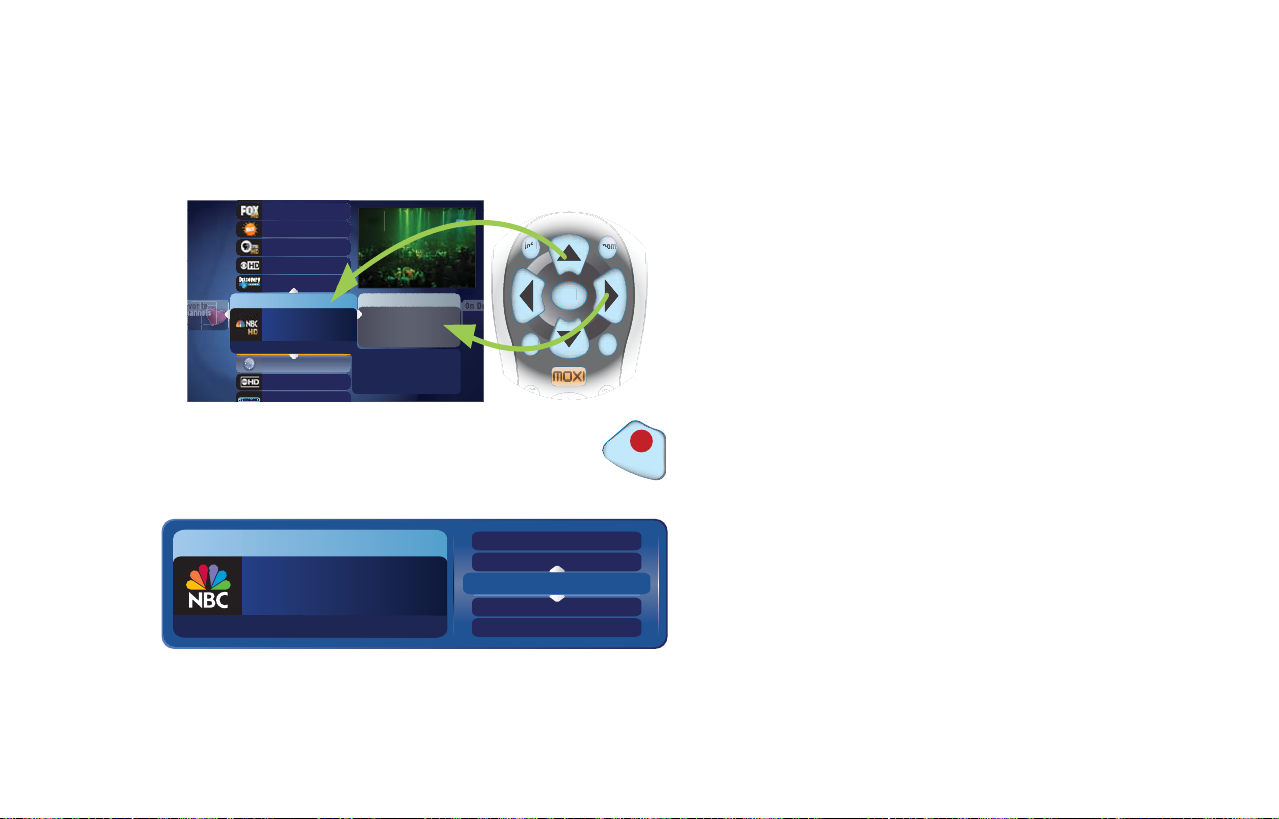
Record programs
back
next
info
zoom
OK
k
o
zoooommmmm
m
Record, and then watch your favorite programs whenever you want.
House
Home Improvement
Nova
The Unit
Dirty Jobs
Channels
The Office
9:00 - 10:00 PM
5
Dog Whisperer, The
Change Time Slot
Dancing With the Stars
62
Coming Up
10:00
Law & Order: Special...
11:00
KING 5 News
11:35
Tonight Show with Jay...
‘Survivor Man’ When Ryan
excludes him from a wilderness
retreat, Michael goes into the
woods for his own survival...
9:05
ac
next
Get Started
On the Moxi Menu press the arrow buttons on the remote
control to surf for the show you want to record.
Press Rec twice to record the selected TV show.
rec
1
Select to record once or record series on the action menu
Channels
The Office
record series
record once
watch
to record a show once, or record the entire series rather than
just a single episode.
close
9:30 - 10:00 PM
5
see all times
9
Page 10
Get Started
rec
rew fwd
skip
play
replay
pause
stop
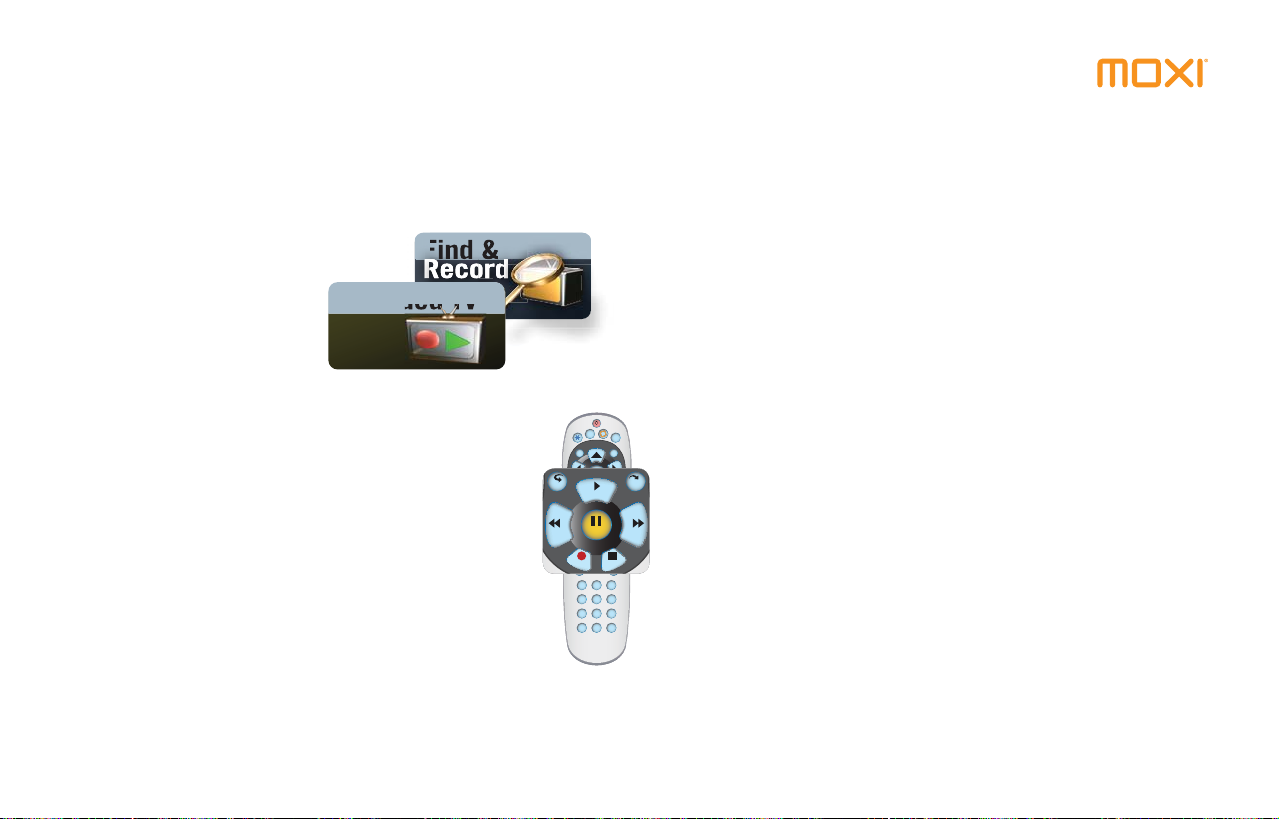
Find and playback programs
The Moxi Menu provides several ways to search for programs to
record, and to search for programs you have already recorded.
Find &
RecordRecord
Recorded TV
buy
ticker
info
OK
back
replay
play
pause
rew fw
rec
mute
jump
abc
1
2
jkl
ghi
4
5
tuv
pqrs
7
8
clear
0
Select Find & Record on the Moxi Menu to search for a TV
program or series and schedule it to record.
Scroll to Recorded TV on the Moxi Menu and select a recorded
program to watch. Once you select a program, press OK on the
remote twice to watch it.
live
TV
zoom
next
skip
stop
chvol
def
3
mno
6
wxyz
9
enter
Press the Player Controls on the remote control to manipulate
the playback of any recorded program.
Find out more on page 23.
10
Page 11
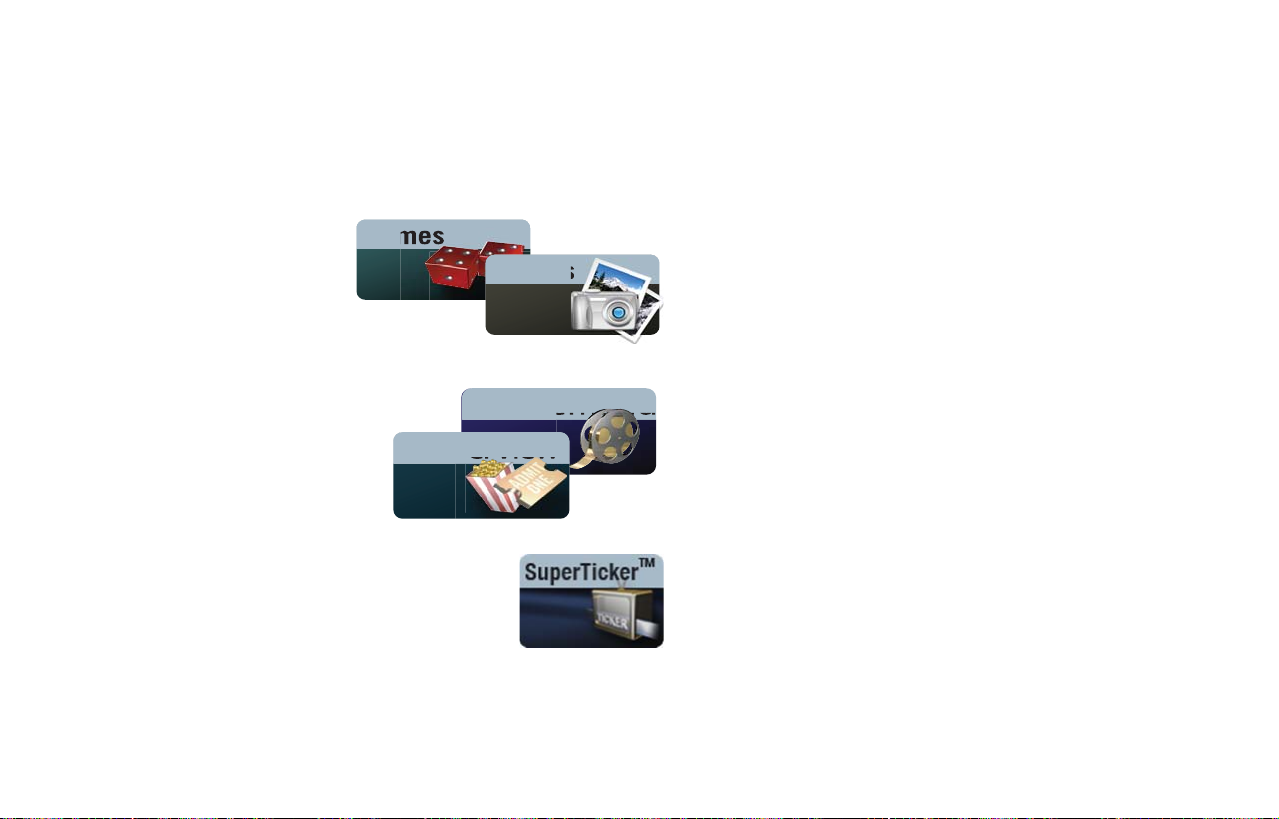
Other fun features
Games
Photos
On Demand
Pay Per View
Photos, games, on demand movies, and news headlines all from your
TV.
Get Started
Play Games such as, Video Poker, Slot Machine, and more. Use
arrow, OK, and number buttons on the remote to play the
the
games. Find out more on page
Download & View Photos on your TV. Find out more on
page
31.
Browse Pay Per View & On Demand categories to preview
and purchase On Demand and pay per view programming.
Find out more on page
SuperTickerTM runs at the bottom of the screen and brings
you one-touch access to weather, sports, news, and more. Use
the remote to see headline details. Find out more on page
34.
29.
30.
1
11
Page 12
Get Started
Use this guide
Each chapter includes a short table of contents at the beginning,
listing all the topics provided in that chapter.
At the back of this book there is a glossary and index. Use these
sections to find answers to specific questions.
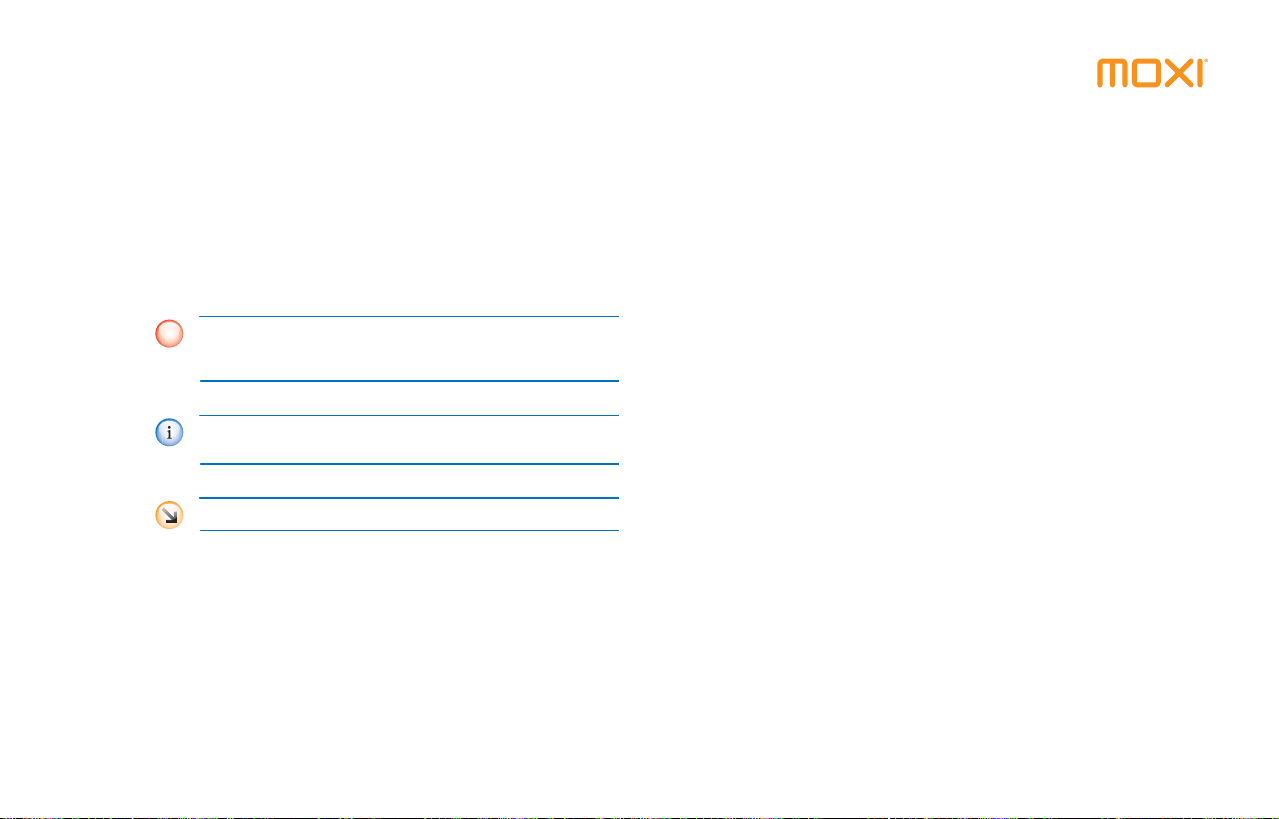
Notes appear throughout this book. The notes have icons to indicate
the subject.
When a word is displayed in bold text, it either refers to an element of
the Moxi Menu or a button on the remote or front panel that requires
user action. For example, press OK on the remote control.
Notes with a red icon contain cautionary or warning information.
!
Failure to heed this information could lead to damaged or
malfunctioning equipment or loss of data.
Notes with the blue icon contain informative tips or answers to
common questions.
Notes with the orange icon contain something to try out.
Learning the lingo
To help you navigate the Moxi Menu (see figure on page, 6), this guide
uses the following terms to describe menu elements:
• Horizontal categories—Press the orange Moxi button on the
remote control to launch the Moxi Menu that displays the
options in the horizontal band. Some categories include Settings,
Channels, Movies, and other similar options.
• Vertical cards—Navigate all horizontal categories to view more
options that appear in the vertical band.
• Center focus—Navigate through the Moxi Menu and any category or card on which you stop is the center focus. Often, the
center focus has an associated action menu.
• Action menus—Press OK on the remote for any vertical card in
focus, and different action choices and commands appear. These
menus require your input or a decision.
• Flip bar—Press the navigation arrow keys on the remote control
while watching full screen TV, which opens a banner at the bot
tom of the screen. This banner enables you to browse the electronic program guide while the current show remains full screen.
For more lingo, see the Glossary on page 71.
-
12
Page 13

Use and program the remote
Functions of the Moxi remote ............................................................................ 14
Program the remote .......................................................................................... 16
Infrared emitter ................................................................................................. 17
2
13
Page 14

Use and program the remote
This chapter provides information about remote functions and programming.
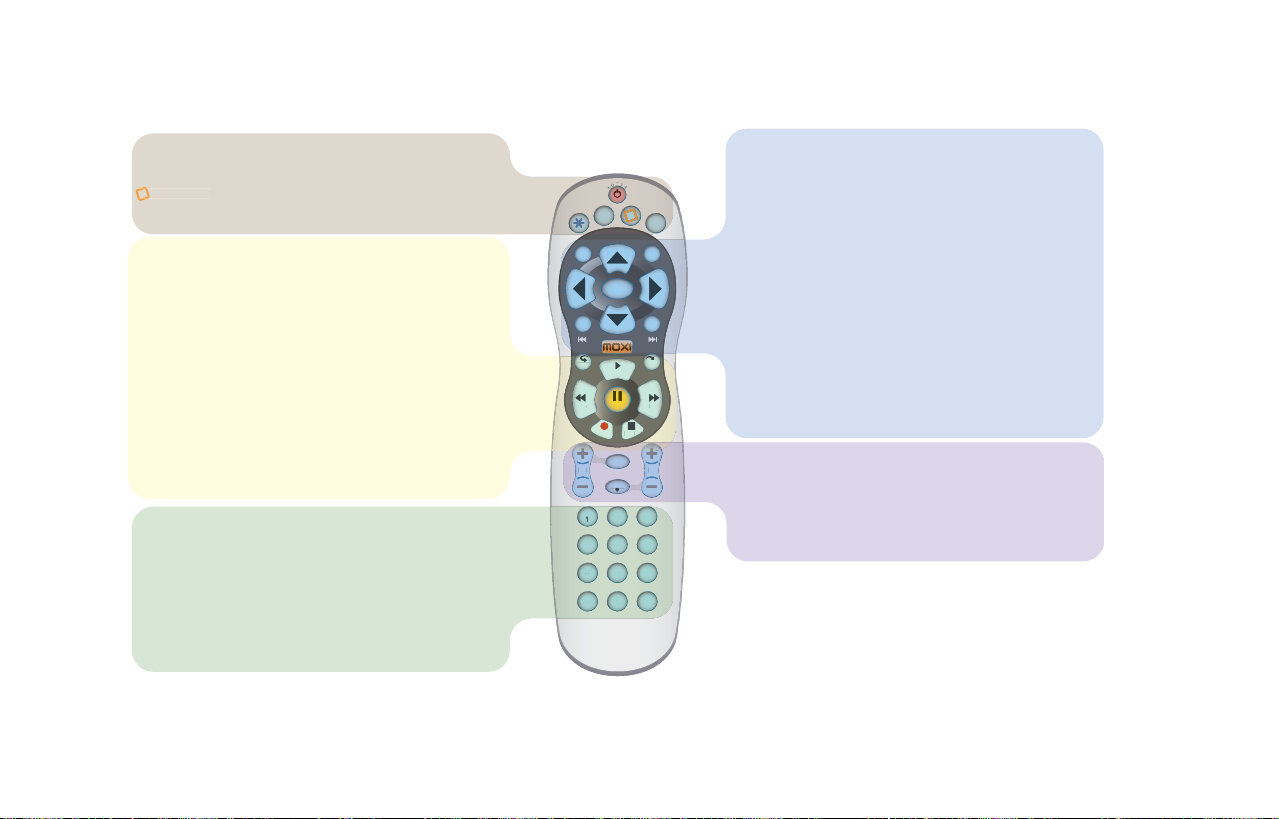
Functions of the Moxi remote
The Moxi remote operates the Moxi 3012, and—once programmed—
will simultaneously control the power, volume, and mute functions of
your TV or audio receiver, depending on the number of devices you
program.
The Moxi remote may not support certain devices.
!
Your cable operator may supply a different remote. If your remote
does not look like the one pictured in the following figure, refer to the
information provided with that remote for programming instructions.
When replacing batteries, use only high quality alkaline batteries
designed for use in electronic equipment.
Multi-function buttons
Some buttons have different functions depending on what application
you are using, whether you are watching live TV, or navigating the
Moxi Menu. For example, the ch+ button displays the flip bar, pages
through the channels category in the Moxi Menu, and also switches to
the next channel while watching live TV. See the following figure for
details on all the buttons and functions.
14
Page 15
c
fwd
skip
y
se
stop
t
oom
E
R
e
t
r
y
V
g
clear
2
abc
j
tuv
def
o
wxyz
e
3
9
chvol
jump
*buy jumps to buying PPV and toggles the SuperTicker
ticker displays and hides SuperTicker™
power turns the TV and other audio devices on and off
Moxi lens jumps to the Video on Demand category
live TV jumps to full-screen live TV
play starts a program or photo slideshow
rew multi-speed rewind for playback (press multiple times to
select speed)
fwd multi-speed fast forward for playback of stored or
recorded video (press multiple times to select the speed)
rec starts recording a show
stop stops a program or photo slideshow
pause pauses a live or recorded show, or photo slideshow
replay jumps back seven seconds, moves the Moxi Menu
back one day
skip jumps ahead in stored or recorded video
(30 second default), moves the Moxi Menu forward one day
number tunes directly to channels, enter text in menus,
make choices in games
1 press once to backspace during text entry
0 press once to add a space during text entry
clear deletes items (recorded shows and photos) from
menus and clears elements from full screen view
enter executes numeric and text entries
W
E
O
R
P
u
buy
icke
ticker
info
info
OK
back
replay
play
pla
pause
u
rew fwd
w
rec
re
stop
mute
ute
jump
abc
1
2
jkl
ghi
hi
kl
4
5
tuv
pqrs
7
8
clear
0
Use and program the remote
info displays additional information about the selected
item
live
liv
T
TV
z
zoom
TV without losing menu position
arrow navigate menus, play games (hold for turbo speed),
and exit most menus (hold left arrow for turbo speed)
OK selects or activates the chosen item
back jumps back 15 minutes, shows previous note page,
jumps 30 minutes in the Moxi Menu, goes to the
zoom toggles between an open Moxi Menu and full-screen
nex
next
previous photo
next jumps forward 15 minutes, shows next note page,
skip
jumps 30 minutes in the Moxi Menu, goes to the next
photo
MOXI takes you back to the Channels category, and then
back to full screen
chvol
def
3
mno
n
6
wxyz
9
enter
nter
vol adjust the audio volume on the TV or audio device
mute toggles sound on and off
jump goes to the last viewed channel.
ch change channels or pages through vertical menus (hold
for turbo speed)
2
15
Page 16

Use and program the remote
Program the remote
Before you begin, find the codes for your TV from the table starting on
62. Write them here:
page
____________________________________________________________
____________________________________________________________
____________________________________________________________
If you have an audio receiver, find the codes in the table starting on
67. Write them here:
page
____________________________________________________________
____________________________________________________________
____________________________________________________________
Use one of the following procedures:
• Programming with codes
• Programming by search on page 16 — use this if your brand is
not listed or if the given codes do not work.
Programming with codes
Program the Moxi remote to control TV power and volume, as well as
power, volume, and mute for an audio device.
Some older devices may not be supported. If the device fails to
respond to any code, use its original remote to control it.
1. In front of the TV, press and hold the Moxi and OK buttons simulta-
neously on the Moxi remote, until the LED at the top of the remote
blinks twice.
2. Using the number buttons on the remote, enter one of the codes for
your device that you wrote down or from the reference tables start
ing on page 61. When you enter a code correctly, the LED blinks
twice. If it blinks once, the code was invalid—try entering the code
again. If the code was correct for your device, then the device
responds automatically (turns on or off).
3. If the TV or device does not respond, start over using another listed
code. Repeat until successful, or see
page 16.
Programming by search on
Programming by search
If the TV or audio device is not listed, or the codes listed do not work,
try programming by search. Programming by search allows the remote
to cycle through codes to find one that works with the TV or audio
device.
-
16
Page 17
Use and program the remote
Once programmed with two device codes, the remote controls power
for the TV and the second audio device, as well as volume and mute
for the second (audio) device.
Some older devices may not be supported. If the device fails to
respond to any code, use its original remote to control it.
1. In front of the device, press and hold the Moxi and OK buttons
simultaneously on the Moxi remote, until the LED at the top of the
remote blinks twice.
2. Slowly, press the ch+ button repeatedly to advance through the code
list until the device responds (turns on or
3. Once the device responds, press the OK button to set the current
code.
4. Press the power button on the remote control. If the device does not
respond, repeat the previous steps pressing the ch+ button more
slowly.
off).
Additional programming features
To view which device you have programmed for a specific remote control key:
1. Press the Moxi button and OK buttons.
2. Press the info button, and then press any one of the four program-
mable keys (such as, vol+/-, mute, or power).
The LED light for the power button blinks back the code, blinking the
number of times equal to the first digit of the code, then pausing
before blinking the number of times equal to the second digit in the
code, and so forth. For the digit 0, the LED blinks rapidly several
times.
The default settings for the vol+/- and mute buttons control the TV
when there is not an audio device programmed. When an audio
device is programmed, then the default settings for the vol +/- and
mute buttons are controlled through that device.
To reset the Moxi remote to the original factory settings:
Press the Moxi plus OK buttons simultaneously and hold until the LED
light blinks twice, and then press clear, clear, clear.
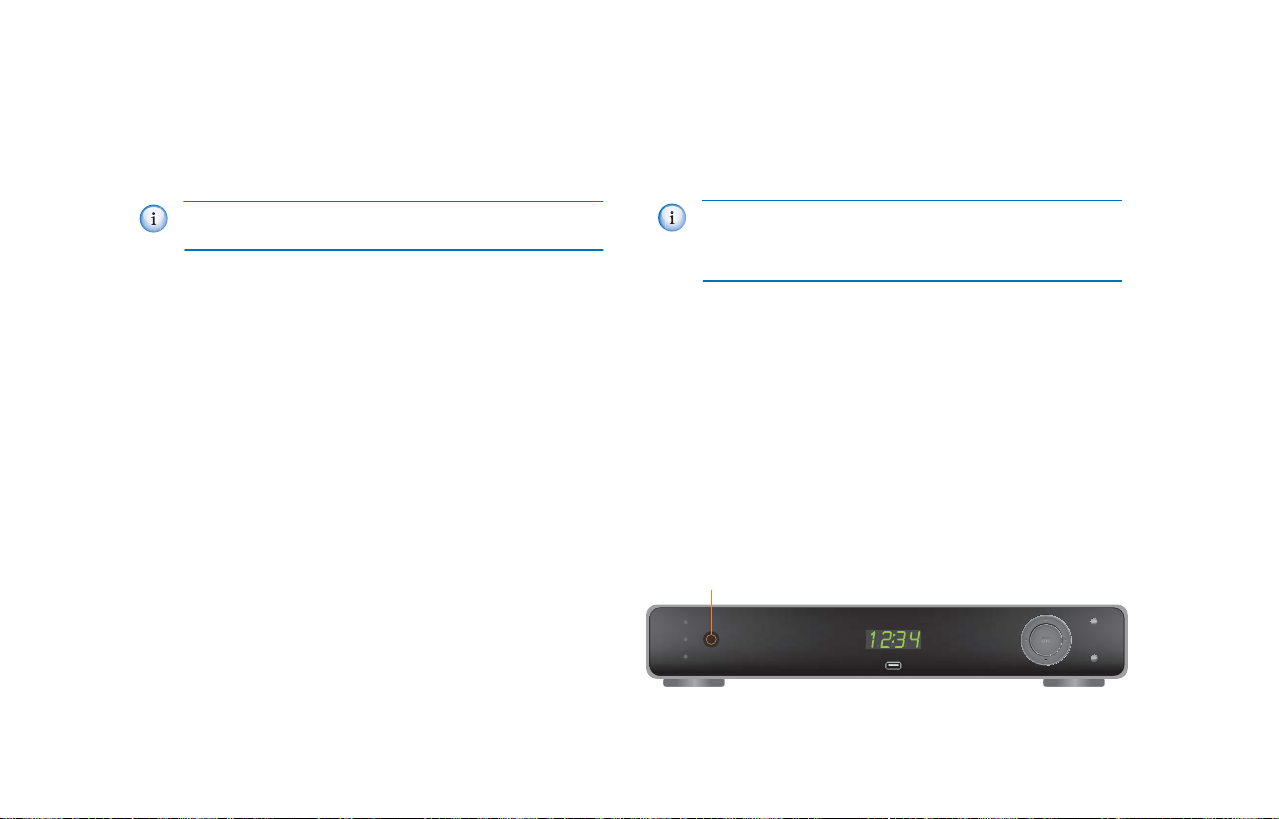
Infrared emitter
When a button on the remote is pressed, the infrared signal is sent to
an IR receiver on the front panel of the Moxi HD digital video recorder,
sending commands to electronic components.
For the IR emitter to send its signals to the Moxi 3012, it must have a
clear, unobstructed view of the infrared receiver on the front panel of
the Moxi digital video recorder. To see the receiver, shine a flashlight
at the front panel of the set-top box.
IR receiver
Power
Recording
Message
:
1234
Menu
Reset
2
17
Page 18

Use and program the remote
18
Page 19

Use the Moxi Menu
Navigate the Moxi Menu ................................................................................... 20
Find & Record shows ......................................................................................... 20
Remember your favorite channels ...................................................................... 22
Use the Moxi Flip Bar ......................................................................................... 23
Use the player bar.............................................................................................. 23
Record shows .................................................................................................... 24
Watch Pay Per View movies ............................................................................... 29
Watch On Demand shows ................................................................................. 29
Use SuperTicker™.............................................................................................. 30
Enjoy Photos...................................................................................................... 31
Read service messages ....................................................................................... 33
Play games ........................................................................................................ 34
Learn more about Moxi features ........................................................................ 34
3
19
Page 20
Use the Moxi Menu
Look here for detailed information about how to use all the fun features provided by the Moxi Menu.
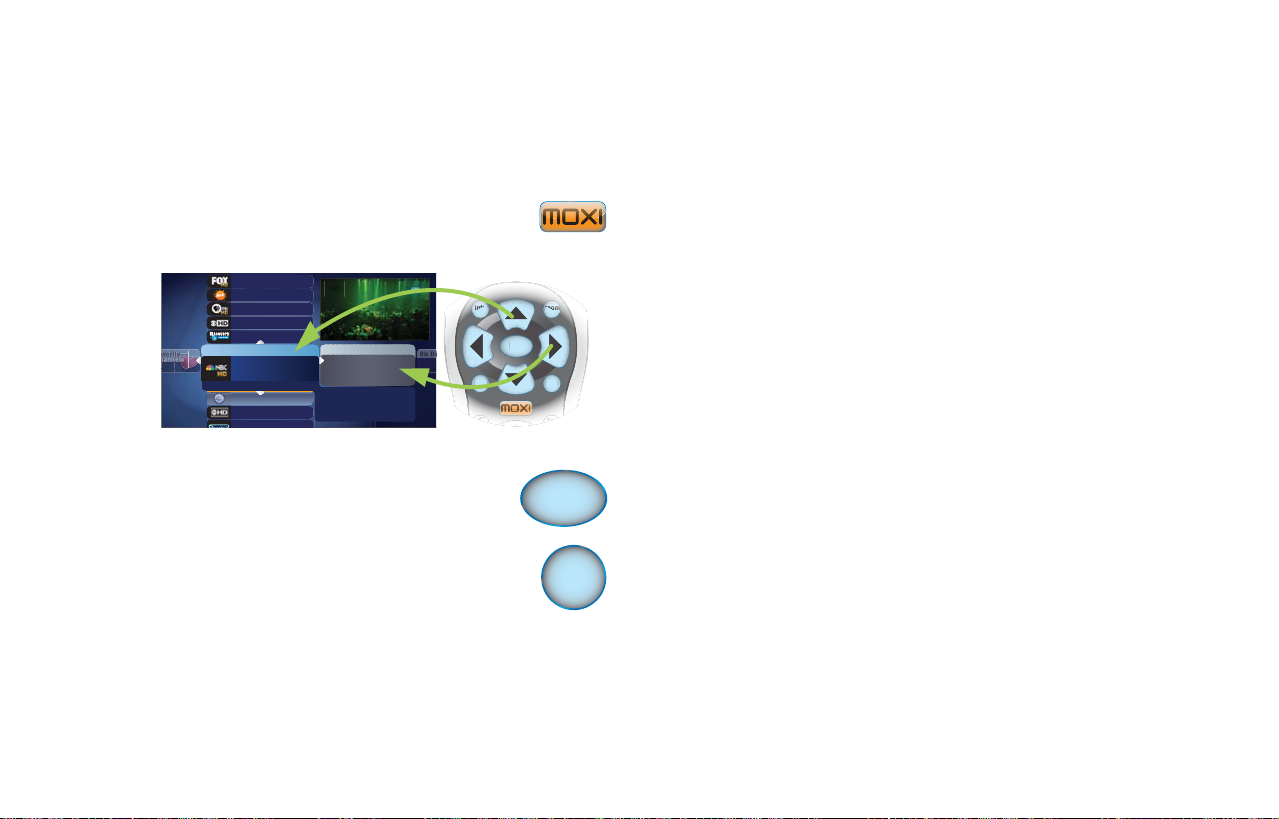
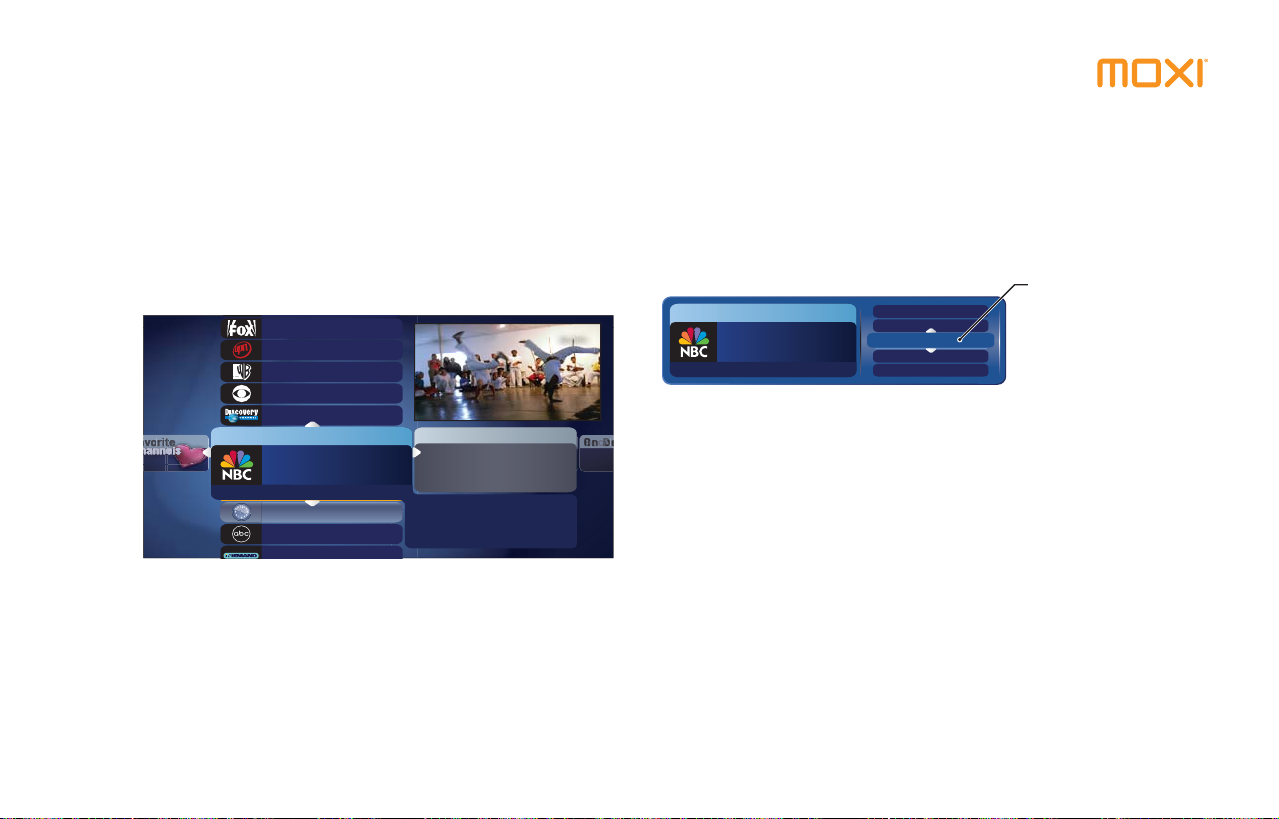
Navigate the Moxi Menu
The Moxi Menu filters TV programs and features into categories such
as Channels, Movies, Sports, Kids, and more. These category cards
appear in the horizontal band. The vertical band contains the list of
choices for that category.
Channels
5
The O.C.
Love, Inc.
Smallville
Survivor
I Shouldn’t Be Alive
Will & Grace
8:00 - 8:40 PM
Dog Whisperer, The
Change Time Slot
American Inventor
62
Coming Up
8:40
My Name Is Earl
9:30
The Office
10:00
ER
TV-14, repeat
What happened to Baby Gin?
Vince’s plans to move into a
brownstone with Will.
1. Press the orange Moxi button on the remote to open the Moxi
Menu.
2. The Channels category card is in center focus (see the previous figure). Use the up and down arrow keys on the remote to scroll vertically.
9:05
3. Press the right arrow button once to move to the Coming Up menu,
and then press the up and down arrows to scroll vertically and see
what is showing later on that channel.
4. When you find a show to watch press OK and the action menu
appears (see the following figure).
5. Press OK again to watch a show in progress or select a record option
for shows coming up.
Action menu
Channels
5
The Office
9:30 - 10:00 PM
record series
record once
watch
close
see all times
choices change
depending on
your activity
Find & Record shows
There are many ways to find shows. Besides channel or menu surfing,
you can search by title, keyword, or by category (for example, sports,
news, and kids).
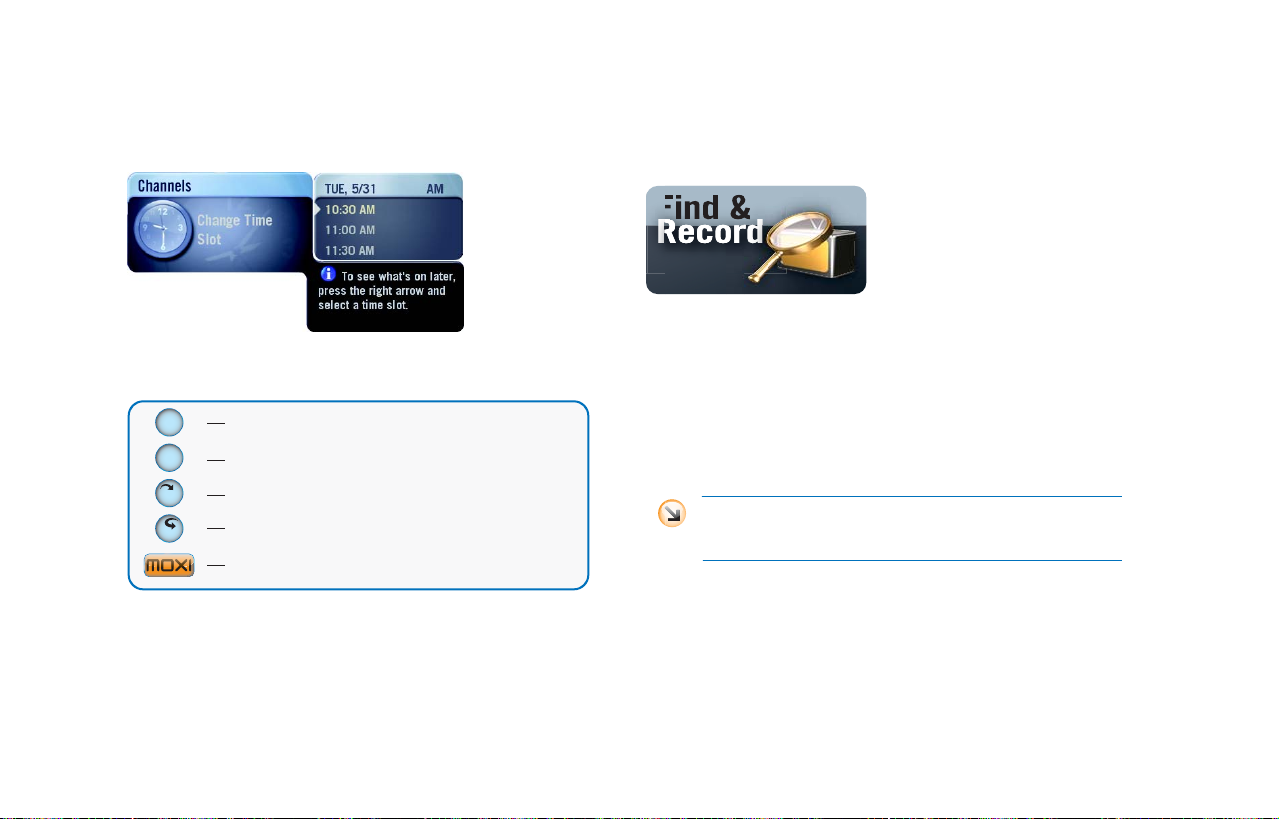
Surfing channels
For a list of current shows, scroll through the listings in the Channels
category, or other categories.
Use the Change Time Slot card to shift the list of programs to a
future time slot. The Change Time Slot card appears in most catego
ries and includes a menu that allows you to scroll to a specific time.
-
20
Page 21
Use the Moxi Menu
RecordRecord
Find &
Use the right arrow to highlight the menu, and then press OK to select
the time.
Alternatively, change the time slot by using the remote (see the following figure).
next
back
skip
replay
Advances the category schedule 30 minutes.
Goes back 30 minutes (if you are viewing future listings).
Advances the category schedule 24 hours.
Goes back 24 hours (if you are viewing future listings).
One press returns the schedule to the current time.
Searching by title or keyword
1. In the Moxi Menu, scroll to the Find & Record category.
2. Choose By Title or By Keyword, and then enter the search word.
You can use any word that may appear in the title or description. Use
the arrow keys to highlight a letter, and then press OK to enter it.
Alternatively, use the number keys as you would when entering let
ters on a telephone or writing a mobile phone text message.
3. Press the left arrow key repeatedly to dismiss the keyboard and view
the results.
4. Select a show, and then press OK to open the action menu.
When searching By Title, the results list sorts as you type. When
searching By Keyword, the results appear only after you use the
left arrow to view the results.
3
-
21
Page 22
Use the Moxi Menu
TV
Tick e
channelschannels
Favorite
C
L
O
S
E
OK
Find by Title
Free
Use either the arrow
and OK buttons...
...or the number
buttons to enter
0
Press once to add a space
Press once to backspace
1
clear
Press to clear the entire entry
17 Results
Scheduled to Record
Let It Be Me
Series Options
Let It Ride
Canceled & Deleted
Lethal Weapon
Lethal Weapon 4
Let’s Cook
By Title
Let’s Talk
Scarlet Letter, The
By Keyword
...David Letterman
By Category
...David Letterman
letters.
K
E
Y
B
O
A
R
D
43
1
ghi
4
pqrs
7
LET
A
E
I
M
Q
U
Y
2
6
abc
jkl
tuv
BACKSPACE
B
F
J
N
R
W
V
Z
3
7
SPACE
2
5
8
0
C
G
K
O
Channels
S
0
4
8
def
mno
wxyz
3
6
9
Searching by category
Search by category organizes shows scheduled in the next 24 hours
into filters such as movies, children, sports, and so on. All categories
include cards, such as More Movies that display additional matches
for the next two weeks. Shows can appear in more than one filter.
Remember your favorite channels
The Moxi Menu automatically builds a list of the 15 channels you
watch most frequently and stores them in the Favorite channels
category (see the following figure).
9:05
D
H
L
P
T
X
1
5
9
The favorites list builds from channels that appear in the Channels
category and excludes any channels blocked by parental controls.
Select the Favorite Channels category, and then do the following:
• Delete a single channel at a time by choosing the channel, and
then selecting remove channel on the action menu, or by press
ing the clear button on the remote.
• Clear the entire favorites list by selecting the Options card (you
might need to scroll down to see it), and then choosing clear all.
-
22
Page 23
Use the Moxi Flip Bar
Use the Moxi Menu
While watching full-screen TV, the Moxi Flip Bar displays anytime you
press the arrow keys, the OK button, or enter a channel number. The
flip bar provides many of the same functions as the Channels card in
the Moxi Menu (see the following figure).
Codename: Kids Next ...
4242
3:08 PM T00NP 3:00 - 3:30 PM
Fosters Home for Imagi...
TV - Y7
4:00
5:00
Zatch Bell
4:30
Pokémon
The flip bar scales back the TV picture slightly while displaying a mini
program guide about the current and upcoming shows.
• Use the up and down arrows to see what is on other channels.
• Press the right arrow, and scroll down to see what is on later.
• Press OK to open the action menu for the chosen show.
Press clear to dismiss the flip bar or player bar immediately.
Use the player bar
The player bar appears whenever you press a playback control button
(see the following figure).
play
back
replay
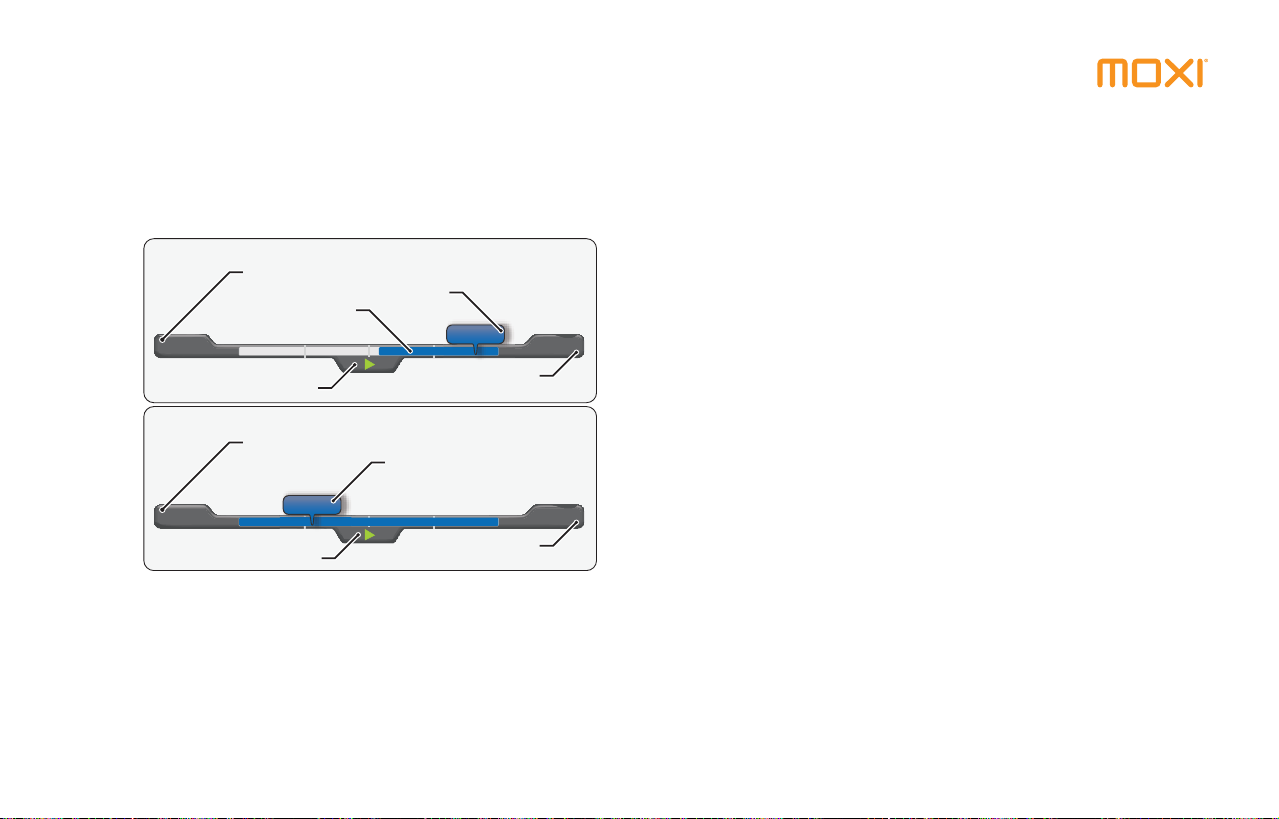
The player bar provides information about the duration of the program and your current playback state, such as:
• Current time
• Amount of the program stored in temporary memory appears in
blue (see the following Live program figure)
• Program begin and end time or the duration of a recorded program (see the following Recorded program figure)
next
skip
rew fwd
pause
rec
stop
3
23
Page 24
Use the Moxi Menu
• Playing state of the program (rewind, fast-forward, pause, play,
or recording)
When you start watching a show, the Moxi 3012 begins storing it in
temporary memory. The amount of temporary memory varies, but is
never less than 30 minutes (10 minutes for HDTV).
Live program
Time the show began
Stored in temporary
memory
1:00 2:00
Player control state
Current time or location
1:57
Time the show ends
Recorded program
Start of the show
0:00 2:00
Player control state
0:17
If you are watching a live program, you can use the playback controls,
such as rewind or replay, on any portion of the show stored in tempo
rary memory. To record it along with the remainder of the show, press
rec, and then press OK.
Current time or location
Duration of the show
Record shows
To schedule a recording, highlight it in the Moxi Menu, and then press
the rec button (or simply press rec if you are already watching the
show). Alternatively, press OK, and then choose one of the following
recording options:
• Record once — To record only the current episode of the show.
• Record series — To record this show every time it airs on the
current channel.
• See all times — To see other times the show will air in the
future. This is helpful if you missed part of a program but want
to record the entire program. You can then schedule a recording
from the search results.
-
24
Page 25
Use the Moxi Menu
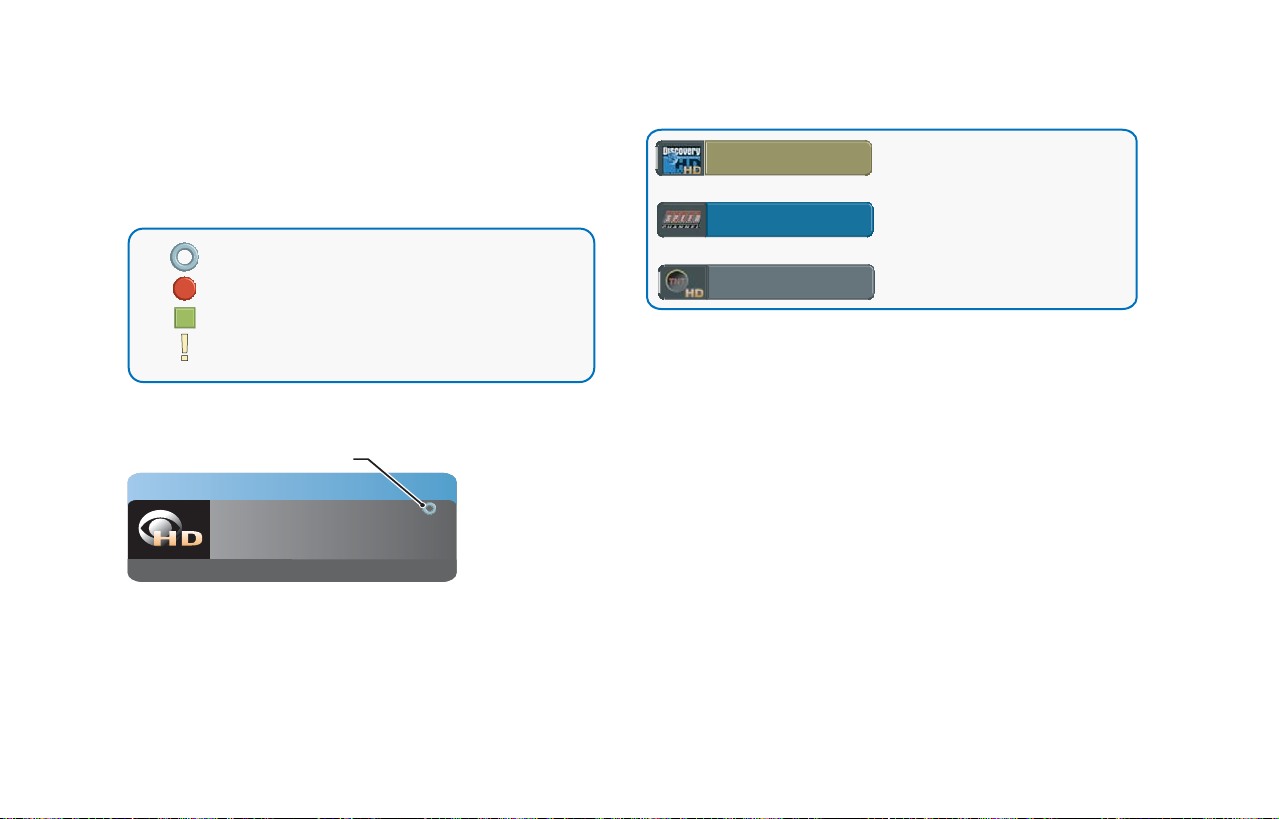
Understanding the recording icons
Program card icons appear in the upper right of a show’s card in the
Moxi Menu and let you know the status of a recorded show or sched
uled recording (see the following figure).
The show is scheduled to be recorded.
The media center is recording the show right now.
The show is recorded and can only be deleted manually.
The show is recorded and may be deleted by the Moxi 3012
when space is needed for newer shows.
Once a recording is scheduled, a blue circle icon appears on the
program card (see the following figure).
Scheduled to record icon
To Record
Formula One Racing
33
The background color of a program card indicates whether the show
is on now, in the future, recorded, or being recorded (see the follow
ing figure).
4:30 - 7:00 AM
Sun, 8/27
Fishing With Greg...
-
Formula One Racing
PGA Golf
Shows with the gold background are
recorded.
Shows with the blue background are
being recorded now or are showing
now.
Shows with a gray background are
future programs.
Finding a previously scheduled recording
To find a specific show already scheduled to record, go to the
& Record category. You can use one of the search features or
Find
open the Scheduled to Record card. A listing of all scheduled record
ings in the next two weeks appears.
-
3
-
25
Page 26

Use the Moxi Menu
T
.
e
r
e
Grey’s Anatomy
Recording options
To change recording options, when the scheduled show is in center
focus, press OK, and then choose recording options from the
options list. The menu summarizes the current options, which you can
then modify (see the following figure).
The O.C.
he O.C
Love, Inc.
ove, Inc.
Smallville
mallvill
104 8/31 8:00 - 9:00 PM
Survivor
Channels
urvivo
I Shouldn’t Be Alive
Shouldn’t Be Aliv
Options for this recording:
Start: on time
Stop: on time
Keep: 2 days
Set Relock Timer
Select an option to change it.
Dog Whisperer, The
Change Time Slot
American Inventor
13
stop
Coming Up
start
8:40
keep
9:30
close
10:00
get series
reeries
record once
My name Is Earl
watch
The Office
close
ER
see all times
1:48
You can change the start, stop, and keep settings or choose to record
the series.
• Stop: The default setting is on time. You can choose to stop the
recording up to five minutes early or up to 90 minutes late.
• Start: The default setting is on time. You can choose to start
the recording up to five minutes early or late.
•Keep: The default setting is 2 days, which means the program is
eligible for deletion after two days, but not deleted until space is
needed for new recordings. You can choose to keep the pro
gram protected until space is needed, up to four days, or until
you delete it manually.
•Close: This closes the menu and saves any changes you made.
You can press the left arrow to close and exit most menus.
• Get series or series options: This selection opens the series
options menu. For more information on controlling series record
ings, see Recording series, below.
-
26
Page 27

Use the Moxi Menu
#4 Monster Garage
Recording series
The record series option is available from the action menu anytime
you select a series episode in the Moxi Menu. If you select record
series, The Moxi digital video recorder records the series according to
your settings, which are accessible from any episode, or go to the Find
& Record category.
1. Open the Series Options card.
2. Scroll to the series you want to update.
3. Press OK.
4. Select recording options from the menu. The current options for
5. Select an option to change it.
the series are summarized on the left in the following figure.
The O.C.
Love, Inc.
Smallville
38 Series
Survivor
Options for this series recording:
I Shouldn’t Be Alive
Start: on time
Stop: on time
Channels
Keep: 2 days
Episode Limit: 2
Set Relock Timer
Accept: first-run only
Timeslots: All
Select an option to change it.
Dog Whisperer, The
Change Time Slot
American Inventor
13
start
Coming Up
stop
8:40
keep
9:30
episode limit
10:00
timeslots
reeries
record once
My name Is Earl
watch
The Office
close
ER
see all times
1:45
• Stop: The default setting is on time. You can stop the
recording up to five minutes early or up to 90 minutes late.
•Start: The default setting is on time. You can start the
recording up to five minutes early or late.
• Keep: The default setting is two days, which means the
program is eligible for deletion after two days, but it is not
deleted until space is needed for new recordings. You can
choose to keep the program protected only until space is
needed, up to four days, or until you delete it manually.
• Episode Limit: This sets the maximum number of episodes
of the series that the Moxi digital video recorder will record.
If the maximum is reached, new recordings of the series
replace the oldest recording of the series. The default setting
is five but this can be changed to any number between one
and five. You can also remove the limit by selecting unlim
-
ited.
• Accept: The default setting is accept repeats. If you do not
want repeat episodes recorded, choose first-run only.
• Timeslots: The default setting is all. With some shows, you
may want to record repeats but you do not want to record
all the repeats. For example, if a show airs several times a
day, or if a network runs a marathon, you might only want
the shows that air during a specific timeslot. The Moxi 3012
checks to see which timeslots are available and allows you to
select a single timeslot or set it to all to record every episode
that meets your other criteria.
3
27
Page 28

Use the Moxi Menu
.
e
r
e
#17 Deadliest Catch
•Priority: By default, new series recordings are added to the
bottom of the list of series recordings. Series priority only
matters when more than two series recordings are scheduled
for the same time slot. See
Prioritizing series recordings for
more information.
Prioritizing series recordings
When you schedule a new series recording, it is automatically added
to the bottom of the list of series recordings.
The O.C.
The O.C
Love, Inc.
ove, Inc.
Smallville
Smallvill
38 Series
Survivor
Survivo
9 World Rally Championship
10 UEFA Champions League Soccer
I Shouldn’t Be Alive
Shouldn’t Be Aliv
11 Rides
12 Inside Grand Prix
Channels
13 Victory By Design
14 Bicycle Racing
Set Relock Timer
15 Survivorman
16 Dirty Jobs
17 Deadliest Catch
Dog Whisperer, The
Change Time Slot
American Inventor
23
7
Coming Up
6
8:40
5
9:30
4
10:00
3
record series
record once
My name Is Earl
watch
The Office
close
ER
see all times
If more than two series recordings are scheduled for the same time on
the same day, the Moxi 3012 checks the order in the priority list and
only records the two programs with the higher priority.
2:55
For example, if there are series recordings set for Thursday evening
with series priority ranks of 4, 9, and 23, all in the 9:00 PM timeslot,
only the series with ranks of 4 and 9 are recorded.
To change the priority:
1. From the Find & Record category, select the series options card,
choose a series from the list, and then choose change priority from
the action menu.
2. The menu displays a numbered list of stored series.
3. Use the up or down arrows to prioritize the series (see the previous
figure
).
Understanding the storage meter
The Storage & Stats card in the About Moxi category provides a
disk space meter that indicates how much space is in use, storing
recorded programs. If an external hard drive is connected, the Moxi
3012 adjusts the meter to account for the extra space (see
Hard Drive on page 41). This meter provides a general idea of how
much more you can record. The exact space for future recordings
depends upon the type of recording (HD or SD), the broadcasting sta
tion, and whether or not any stored programs are eligible for deletion.
External
-
28
Page 29

Use the Moxi Menu
Pay Per View
On Demand
Watch Pay Per View movies
Using the Pay Per View category, you can see all the available movies, and then purchase them for viewing. Use the arrow buttons to
navigate the pay per view movie cards, select a movie showing from
the Coming Up menu, and then press OK to select it. Select the
record/buy option for future showings or the watch/buy option for
active programs from the action menu, and then enter your purchase
PIN (if required). Select see all times to view other viewing show
times for rent. Once rented, the movie appears in the Find & Record
category, Scheduled to Record list. After your program records, you
can find it in the Recorded TV category.
Watch On Demand shows
Using the On Demand category, you can see all the shows available
for rental, and then purchase them for viewing. On Demand shows
also appear in the Movies category. Using the remote control, you can
also press the Moxi Lens
gory.
On Demand shows start as soon as you rent them, and you can watch
them as often as you like for as long as it is available. You cannot
record On Demand shows.
During playback, you can only rewind or fast forward On Demand
shows using one speed (unlike normal fwd and rew operation). You
can pause an On Demand show for approximately five minutes, after
which live TV appears. You can resume your On Demand show where
you last left off. To resume playback, in the On Demand category,
select resume from the action menu, or access it from My Rentals.
button to view the On Demand cate-
3
29
Page 30

Use the Moxi Menu
ose
o
Use SuperTicker™
When activated, SuperTicker displays up-to-date news headlines,
weather forecasts, sports scores, business and entertainment, and
stock market updates.
To open or close SuperTicker, press the ticker button near the top of
the remote or navigate to the SuperTicker category card in the Moxi
Menu, and then press OK. SuperTicker automatically cycles through all
headlines in one topic, and then goes to the next topic.
Sports scores and stock market index numbers are delayed
approximately 15 to 20 minutes. However, all information
displayed in SuperTicker is updated every three minutes.
Reading the whole story
All headlines have a story behind them. To read the story, press info
on the remote. Use the next and back buttons to page through the
story.
ENTERTAINMENT
No halfway for hard-touring Matthews
By Ray Waddell
NASHVILLE (Billboard) - From the humble
beginnings of drummer Carter Beauford’s
mother’s basement and a crucial
Tuesday-night residency at Trax in
Charlottesville, Virginia, the Dave
lock item
k item
Matthews Band has become the biggest
lock topic
touring success story to emerge from the
more info
re inf
1990s.
l
close
Missing boy in Colorado found alive after 4 days
Missing boy in Colorado found alive after 4 days
next1 of 9
close
Locking topics or items
1. Open the SuperTicker card, and use the arrow keys to scroll to a topic
or item.
2. Press OK.
3. Choose lock topic or lock item (headline).
30
Page 31

close
lock item
lock topic
more info
Missing boy in Colorado found alive after 4 days
• When a topic is locked, the arrows at the sides of the screen
change to red and SuperTicker only scrolls through that topic.
• When an item is locked, the left and right arrows turn red along
with the up and down arrows and SuperTicker is locked on that
item.
Use the Moxi Menu
Enjoy Photos
You can load hundreds of digital photos into your Moxi Photos category and then play them back as slideshows on your TV.
The Moxi 3012 uses a five percent reserved partition of your
total hard disk drive to store photos.
Uploading photos
1. Attach a memory card reader to a USB port on the front or back
panel of the Moxi digital video recorder, insert the memory card con
taining the photos into the card reader. To avoid using a card reader,
you can also use a USB drive.
2. In the Photos category, choose load album.
The number of photos stored depends upon the file size of each
photo. The Moxi 3012 skips any photos larger than 10 MB.
3
-
To toggle between locking and unlocking SuperTicker, press .
When uploading photos, the Media Storage Capacity bar displays how much reserved photo storage space remains.
If there is insufficient storage space to load your photos, then
manually delete photo files to make room.
31
Page 32

3. Choose yes, upload to confirm. The Moxi 3012 creates a new
Would you like to add
new photos now?
Viewing photos
Photos are shown at the highest allowed resolution. (See External Hard
Drive on page 41 for more information on setting TV or monitor reso-
lutions.) Photos are sized to fit the screen without stretching them (the
aspect ratio remains correct).
From the Moxi Menu, choose the Photos category, and then scroll to
the album you want to play. The Moxi 3012
Use the Moxi Menu
album, labels it with the current date, and copies the photos stored
on the memory card.
Please connect your memory card reader
and insert your memory card.
All your new photos will be saved to a
Channels
new album labeled with today’s date.
Set Relock Timer
Media Storage Capacity
3%
re
record once
no, close
watch
yes, upload
close
see all times
gives you several options:
9/10/06
7/29/06
6/08/06
Photos
default music
01/01/06
7/20/06
Load Album
9/16/05
10/29/05
12 Photos
To delete or rotate this photo,
press OK.
• View photo — Displays the photo as uploaded into Moxi.
• Rotate 90 (clockwise)— Rotates the image 90 degrees clock-
wise.
• Rotate 90 (counter clockwise)— Rotates the image 90 degrees
counter clockwise.
• Play slideshow — Plays all photos in the selected album. During
the slideshow, each photo appears for about seven seconds. You
may use the playback controls to manually control the slideshow.
The slideshow plays continuously until you press stop.
• Open album — Displays a single photo within an album. Scroll
to the photo, and then press OK.
32
Page 33

Use the Moxi Menu
• Delete album — Removes the photo album.
There is no undo for a deleted album.
!
Photo playback tips
While viewing photos in an album or during a slideshow, you can:
• Press fwd or rew to speed up or slow down the slideshow.
• Press pause to halt the slideshow at the current picture.
• Press the right arrow, skip, or next to advance to the next
photo.
• Press the left arrow, replay, or back to return to the previous
photo.
• When the flip bar is open, press OK to see editing options for
the photo or the album. The info button also opens the editing
menu.
• As with all similar products, it is recommended that you create
backup files of all your photos. If you replace your Moxi 3012 at
any time, you cannot copy your photos onto the replacement
unit.
Read service messages
Service messages are short alerts or notices sent directly from your service provider to your Moxi 3012 about topics such as upcoming software updates, future programming, or anything else related to your
use of Moxi. When you have a service message, the message light on
the front panel of the Moxi 3012 is lit.
To read the service message:
1. In the Moxi Menu, scroll to the Service Messages category.
2. Use the up or down arrows to select the message, and then press OK
to open it.
3. Use the next and back buttons to page through the message.
Once you have read the message, you can choose to exit the message,
mark it as unread, or delete it.
3
33
Page 34

Use the Moxi Menu
Play games
The Moxi 3012 adds to the full entertainment package with fun
games you can play directly on your TV. Available games appear in the
Games category, each with on-screen playing instructions.
Games include:
Slot Machine Blackjack
Solitaire Code Breaker
Bubble Blast Tomato
Video Poker 21 Frenzy
Learn more about Moxi features
The About Moxi category offers several helpful tips on topics such as
searching for shows, describing how to stop recording repeats, and
more.
About
Moxi
Software version and other details
The Storage & Stats card in the About Moxi category lists information that may be helpful during a service call.
• Software version — the current version of the Moxi software
running on the Moxi
• Box ID — serial number or hardware device ID (HDID)
•Date — the most recent updates for account settings, entitle-
ments, and EPG data
34
Page 35

Personalize Moxi Cable HD DVR
Parental Controls ............................................................................................... 36
Closed Caption.................................................................................................. 39
Widescreen........................................................................................................ 39
HDTV Setup....................................................................................................... 40
External Hard Drive ............................................................................................ 41
Sound Effects .................................................................................................... 42
Channel List....................................................................................................... 43
CableCARD
TM
.................................................................................................... 43
4
35
Page 36

Personalize Moxi Cable HD DVR
Settings
Movie
Ratings
Lock By
Channel
VOD/
PPV
The Moxi 3012 offers multiple ways for you to customize the your personal viewing habits and preferences. Personalizing your Moxi 3012
starts in the Settings category.
Parental Controls
The Moxi 3012 includes a robust parental control feature set, including a four-digit PIN, and the ability to lock shows by MPAA rating or
channel.
Creating a PIN
The first time you use parental controls, the Moxi 3012 asks you to
create a PIN.
1. In the Settings category, scroll to the Parental Controls card, and
then press OK.
2. Use the number keys on the remote to enter a four digit PIN, and
then enter the PIN again to confirm it.
3. Choose close.
The Moxi 3012 still records scheduled shows blocked by parental controls but you must enter the PIN before you can watch them.
Changing a PIN
1. In the Settings category, scroll to the Parental Controls card, and
then press OK.
2. Choose settings, scroll left to the Change PIN card, and then press
OK.
3. Enter the old PIN, enter the new PIN, and then enter the new PIN
again to confirm it.
Locking channels or programs by rating
TV-G
TV-Y7-FV
FV
TV-Y7
TV-Y
Unlock All
TV Ratings
Mature audiences
only
TV-14
TV-PG
1. In the Settings category, scroll to the Parental Controls card, and
then press OK.
2. Choose Settings, and then choose either TV Ratings, Movie Ratings, or Lock By Channel.
Mature audiences only.
This program is specifically
designed to be viewed by adults
and therefore may be unsuitable for
children under 17.
To unlock programs with this rating,
press OK.
36
Page 37

Personalize Moxi Cable HD DVR
Each card contains a list of the rating system or a list of channels.
Scroll to the format or channel you want to control.
3. Lock the rating or channel by choosing it, and then pressing the OK
button on the remote. In the previous figure, TV-MA, TV-14, and
TV-PG are locked.
When you lock a rating, all ratings for more mature audiences are
also locked. For example, if you lock the TVPG rating, then the
TV14 and TVMA ratings are also locked. When unlocking, the
reverse is also true.
4. To exit parental controls and return to the Moxi Menu, press the
Back (or choose the back card).
Favorites
4
Locked
Amazing Stories
Proud Family, The
Locked
Locked
Locked
2:00 - 3:00 PM
Dog Whisperer, The
Options
American Inventor
Change Time Slot
104
2:34
When parental controls are turned on, the names of all locked programs are replaced with “Locked” regardless of where they appear in
the Moxi Menu.
If the V-Chip in your TV is enabled, you may see a black screen after
!
tuning to a channel with blocked content. No Moxi Menu, flip bar,
sound effects, or any other audio or video are shown or heard. To
correct this, change to an unblocked channel, or disable all V-Chip
functions and use the parental control features provided by the
Moxi 3012 to regulate viewing.
Turning off parental controls
1. Press OK on any locked program.
2. Enter your PIN to unlock all programming temporarily or choose
more options to only unlock the current channel.
To unlock or change all parental control settings, go to the Settings
category, scroll to the Parental Controls card, and then press OK.
Settings
Parental Controls:
Currently On
settings
off
close
4
37
Page 38

Personalize Moxi Cable HD DVR
C.
e
r
e
Set Relock Timer
Setting the relock timer
While configuring parental controls, you can specify how long to leave
parental controls unlocked, each time you unlock them to watch a
show.
1. In the Settings category, scroll to the Parental Controls card, and
then press OK.
2. Choose settings, scroll left to the Set Relock Timer card, and then
press OK.
3. Enter your PIN, if prompted.
4. Choose the unlock duration between one and six hours (see the fol-
lowing figure). This option appears anytime you unlock parental con-
trols.
The O.C.
The O.
Love, Inc.
ove, Inc.
Smallville
Smallvill
Survivor
Survivo
When you unlock a show, you open a
temporary viewing window. Parental
I Shouldn’t Be Alive
I Shouldn’t Be Aliv
Controls are temporarily suspended during
this time.
Channels
Choose the amount of time to suspend
Set Relock Timer
Parental Controls when unlocking a show.
After the chosen length of time, Parental
Controls will re-lock automatically.
Dog Whisperer, The
Change Time Slot
American Inventor
When you unlock a show, you
open a temporary viewing window.
Parental Controls will relock
automatically after this time.
record series
4 hours
Coming Up
record once
2 hours
8:40
My name Is Earl
watch
1 hour
9:30
The Office
close
close
10:00
ER
see all times
6 hours
Once set, the Parental Controls card category displays the relock
time (see
the following figure).
Settings
Parental Controls:
Temporarily Off
Will relock at 8:33 PM
Controlling Pay Per View or On Demand purchases
To restrict the purchase of Pay Per View or On Demand programs, use
the same PIN as with parental controls. See
for more information on creating a PIN.
1. In the Settings category, scroll to the Parental Controls card, and
then press OK.
2. Choose settings.
3. Scroll to the On Demand / Pay Per View Purchases card, and then
press OK.
4. Enter your PIN to require that the PIN be entered whenever a pur-
chase is made.
Creating a PIN on page 36
38
Page 39

Personalize Moxi Cable HD DVR
If you forget your PIN
If you forget your PIN:
1. Call your cable provider.
2. After the representative resets the PIN, create a new PIN immediately,
using the Moxi Settings, Parental Controls card (see
PIN on page 36).
Changing a
Closed Caption
Most viewers use these setting to toggle closed captioning on or off.
however, you can select one of the following close caption cards, to
set other preferences:
• Display Preferences—Choose a font type, window background
and color, and other similar close caption display settings.
• Preferred Language—Set the primary and secondary language
display reference.
• Digital Services—Scroll through the additional digital stream
service cards provided, and press OK to select them. You can only
have one selected at a time.
• Basic Services—Scroll through the various basic service cards
provided, and press OK to select them. You can only have one
selected at a time.
Widescreen
The widescreen settings only take effect if the broadcast is presented
in 16:9, or widescreen, format.
• Letter box — Maintains the aspect ratio of the original content
and adds black or gray bars at the top and bottom of the screen.
This is the best choice if you have a standard TV.
• Cropped — Fills the entire screen with the picture by cropping
out the left and right edges of the picture. This is an alternative
setting for standard TVs.
4
39
Page 40

Personalize Moxi Cable HD DVR
To use the Moxi 3012 to change the widescreen settings, do the following
1. Go to the Widescreen card in the Settings category.
2. Select the desired output setting (for example, cropped, wide mode,
or letter box), and then choose close.
HDTV Setup
The Moxi 3012 automatically adjusts the video output to match the
broadcast format and the selections you make in the HDTV Setup
card.
The video resolution options are 480i, 480p, 720p, and 1080i. Always
use the best resolution allowed by your TV. The following table dis
plays which resolutions are supported by which cables.
Tabl e 1: Video connections and supported resolutions
Connection 480i (SD) 480p 720p 1080i
HDMI digital video X X X X
Component video
(YPbPr)
S-Video X
Composite video (V) X
RF (some models) X
X X X X
-
Table 1: Video connections and supported resolutions (Continued)
Connection 480i (SD) 480p 720p 1080i
IEEE 1394 (does not
show user interface
graphics)
For information on audio cables, see table 4 on page 54.
If the screen goes blank after you select a video resolution in
error, do
video to come back. If it does not, see
page 46 to fix it.
X X X X
not push any buttons, but wait thirty seconds for
No video displayed on
Setting standard TV video resolution
If your TV is a standard definition (SD) TV, make sure 480i is the only
box checked. All other video resolutions will be output at 480i. You
can still watch HD channels and they may look considerably better
than their SD counterparts.
40
Page 41

Personalize Moxi Cable HD DVR
External Hard Drive
If you have the External Hard Drive card in the Moxi Menu, then you
may connect an external hard drive to your Moxi. To activate the
external hard drive, you may need to restart the Moxi 3012
nection. If you need to remove the external hard drive for any reason,
stop all recordings, and choose disconnect.
The Moxi 3012 supports external hard drives that use one, distinct
partition or volume. The Moxi 3012 does not recognize or support
external hard drives that are formatted at the factory with two, sepa
rate, and distinct volumes.
after con-
Using an external hard drive
To provide additional space for recorded programs, you may connect
one external hard drive to the rear eSATA port on the Moxi. Currently,
the Moxi 3012
capacity of one terabyte.
Once the Moxi 3012 recognizes the external hard drive, programs
stored on it appear in the Recorded TV category and any other appli
cable categories. If the Moxi 3012 fails to recognize the external hard
drive automatically, leave it connected and restart the Moxi 3012.
supports external drives with a maximum storage
External hard drives are required to operate continuously. If it has a
"sleep" mode, you may need to disable that mode. Consult the
manufacturer documentation for instructions (see
storage space on page 48 for troubleshooting information).
Running out of
• There is no limit to the number of external hard drives you can
associate with the Moxi 3012, but connect only one at a time.
External hard drives used with the Moxi 3012 must be
!
dedicated for use with only that Moxi 3012. Moving the
external hard drive between different units, or using it for
storing other data will cause the loss of all programs
previously stored on the external hard drive. Associating a
used external hard drive with a different Moxi 3012
-
-
requires that you reformat the external hard drive, which
results in losing stored video.
• The external hard drive is only used to store recordings, not photos.
• You do not have to decide which drive to store recorded video.
The Moxi 3012 does this for you automatically.
4
41
Page 42

Personalize Moxi Cable HD DVR
Connecting an external hard drive
Connect only one external hard drive at a time directly to the eSATA
port on the rear of the Moxi 3012.
1. Restart the Moxi 3012 and wait for it to recognize the external hard
drive. If the Moxi 3012 fails to recognize the external hard drive auto
matically, leave it connected and restart the Moxi 3012.
2. If this is the first time you have connected this hard drive to this Moxi
3012, or if the hard drive is not properly formatted, the system
prompts you to format the hard drive.
If you choose to format the external hard drive, all data on the drive
!
will be deleted. You must do this to use the external hard drive with
the Moxi 3012.
3. If you choose to reformat, then select yes to confirm.
4. Once the external hard drive is recognized as properly formatted and
ready for use, the Moxi 3012 adjusts the recording schedule to
account for the additional space.
Disconnecting an external hard drive
Disconnecting an external hard drive while it is in use (playing a
recording or recording a show), can result in corrupting stored data.
To disconnect the external hard drive:
1. Manually stop all recordings in progress by selecting the program
card in the Moxi Menu, and then choosing stop recording.
2. In the Settings category, select the External Hard Drive card.
3. Select disconnect, and then press OK.
-
A message appears notifying you that it is OK to disconnect the
drive.
If you experience issues with recordings stored on your external hard
drive, see
External hard drive issues on page 47.
Sound Effects
You can adjust the volume for remote key sound effects by choosing
between three volume levels or mute them entirely.
1. In the Settings category, go to the Sound Effects card, and press
OK on the remote.
2. Choose the desired output setting, and then choose close.
Settings
Sound Effects
medium
low
mute
close
high
42
Page 43

Personalize Moxi Cable HD DVR
Channel List
You can modify the channel list, if there are channels you never
watch, or do not want to appear in anyl channel filters.
1. In the Settings category, navigate to the Channel List card.
2. Scroll up or down to the channel you want to remove or restore.
3. Press OK.
That channel no longer appears in the main Channels category or, if
you restored it, appears once again.
CableCARD
You can view CableCARD information supplied by the CableCARD
provider from the Moxi Menu. The CableCARD device is used to
access premium channels, Pay Per View, and On Demand content.
1. In the Settings category, navigate to the CableCARD card.
2. Select info on the action menu.
3. Scroll up and down to select from the following information cards
provided by the CableCARD manufacturer, and then press OK:
• Conditional Access
• CableCARD Status
• Network Setup
• CableCARD Pairing
• DSG (digital secure gateway)
• Interactive Info
TM
4
43
Page 44

Personalize Moxi Cable HD DVR
44
Page 45

Troubleshoot
Audio and video problems ................................................................................. 46
Remote or front panel control problems............................................................. 47
External hard drive issues ................................................................................... 47
Use the front panel to troubleshoot ................................................................... 49
5
45
Page 46

Troubleshoot
This section addresses issues related to operating the Moxi 3012.
Audio and video problems
The following procedures address connectivity and configuration
issues between your cable connection, TV, and the Moxi 3012.
No video displayed
1. Check the cabling between the Moxi 3012 and the TV to make sure
it is connected correctly and securely.
2. Verify that the TV has the proper video settings (line 1, channel 3, SVideo, and so on).
3. Verify that the V-Chip in the TV is disabled. Instead, use the parental
controls on the Moxi 3012 to control viewing.
Use the front panel controls to manually set the video resolution.
1. Press the Up arrow and Menu button for three seconds.
2. Press the Left or Right arrows twice to cycle through the options,
and then press OK to choose the selected resolution option.
3. At the video display prompt on your TV, use the Up and Down
arrows to select Yes or No, and then press OK to make your selec
tion.
-
Static on screen or poor picture quality
1. Make sure the Moxi 3012 and the TV are turned on.
2. Check that all cables are connected to the proper ports and are
secure.
3. Verify that the TV is set to the correct video input.
4. Verify that the TV displays video without being connected to the
Moxi 3012. If not, this can indicate a problem with the signal, wiring,
or MSO.
TV audio and video out-of-sync
1. For TVs that have their own audio output, connect both the audio
and video from the Moxi 3012 to the TV (using cables of your choos
ing, such as HDMI, component, and so forth).
2. Then connect the TV's audio output to the audio device. This way,
the TV applies the same delay to both, and synchronization is
restored.
3. Reset the Moxi 3012 by pressing and holding the reset button until
the LED display begins to change (starting with 0000). Allow about
five minutes for the system to start.
Cannot change TV channels
1. Check the cabling between the Moxi 3012 and the TV.
2. Begin recording live TV, and then try changing the channel.
3. Make sure the remote has fresh batteries.
4. Try using the front panel to change channels.
-
46
Page 47

Troubleshoot
5. Make sure the remote is programmed correctly for your TV and is set
to the proper device mode. (See
page 13 for more information.)
Use and program the remote on
Remote or front panel control problems
Cannot control the Moxi 3012 using front panel buttons
Try using the Moxi remote. If it works, call customer service for a
replacement Moxi.
Cannot control TV using the remote
You cannot control the Moxi Menu using the remote control; however, the Moxi 3012 front panel control buttons work.
• Make sure the remote has fresh batteries.
• Check the line of sight between the remote and the front of the
Moxi 3012
• If the Moxi 3012 responds sluggishly or intermittently to remote
control key presses, the problem may be caused by the TV. Some
TVs, including those with backlight systems, emit a frequency
that interferes with the frequency used by the remote control.
Try relocating the TV or the Moxi 3012
well behind the TV.
for obstructions.
so that the Moxi 3012 is
External hard drive issues
Use the following tips if you experience issues with your external hard
drive.
Recovering corrupted programs
The Moxi 3012 may prompt you to reformat an external hard drive
that has already been formatted for use with the Moxi 3012
tains recorded programs. Your recordings may be recoverable.
1. When the message appears, select Close to dismiss the message.
2. Turn off the external hard drive and the Moxi 3012, and then restart
them both.
3. Wait until all disk activity stops. This may take several minutes but it
indicates that the Moxi 3012 is attempting to resolve the corrupt
data.
4. Check the Recorded TV category for recovered recordings. If they
do not appear, repeat this procedure once more. If they still do not
appear, the recordings are corrupt and the external hard drive must
be reformatted.
and con-
5
47
Page 48

Troubleshoot
Running out of storage space
Some external hard drives have software drivers that induce a sleep
mode when inactive. The Moxi software cannot awaken these particu
lar drives from the sleep mode, resulting in limited video recording,
storage space.
If you already connected the external hard drive to the Moxi
!
3012 and formatted the drive, then to fix this issue you must
reformat the drive. Be aware that reformatting the drive
results in losing shows already stored on the drive.
To fix an external hard drive already connected to the
HD DVR
Moxi
1. To remove the external hard drive from the Moxi 3012, in the Moxi
Menu navigate to the Settings category, select the External Hard
Drive card, and then press OK.
2. Select disconnect from the action menu.
3. Connect the external hard drive to a PC.
4. When you format the drive for use with the Moxi 3012, the software
driver is removed, so you must reinstall it. On your PC, visit the exter
nal hard drive manufacturer’s Web site, and download the software
drivers for your drive type onto the external hard drive.
5. Once the software driver installs, adjust the Sleep Mode to OFF. Be
aware that disabling the sleep mode could void your external hard
drive warranty. Consult the manufacturer’s warranty policy for more
details.
6. You can now disconnect the external hard drive from the PC, and
reconnect it to the Moxi 3012 for reformatting (see page
To prevent this issue with a new external hard drive
-
1. Before connecting your external hard to the Moxi 3012, connect your
external hard drive to a PC. The software driver application opens.
2. Adjust the Sleep Mode to OFF. Be aware that disabling the sleep
mode could void your external hard drive warranty. Consult the man
ufacturer’s warranty policy for more details.
3. You can now disconnect the external hard drive from the PC, and
then connect it to the Moxi 3012 for formatting (see page
Moxi 3012 unable to recognize your external hard drive
• If the Moxi 3012 fails to recognize the external hard drive automatically, leave it connected and restart the Moxi 3012.
• Some external hard drives use an advanced partition scheme,
which means the drive was formatted at the factory with two
partitions; a CD partition and a hard disk partition. Typically,
these partitions are recognized as two separate and distinct vol
-
umes. Currently, the Moxi 3012 does not recognize the two separate partitions. Therefore, you are unable to use these
particular, two-partition, external hard drives with your Moxi
3012.
42).
-
42).
-
48
Page 49

Troubleshoot
Use the front panel to troubleshoot
Changing video display output using the front panel
When you want to use the front panel buttons to change the video
mode/resolution, use the following button-press combination. Resolu
tion options include:
• SD (for 480i)
• 480p
• 720p
• 1080 (for 1080i)
To change the TV resolution using the front panel buttons:
1. Press the Up arrow and Menu button for three seconds.
2. Press the Left or Right arrows twice to cycle through the options,
and then press OK to choose the selected resolution option.
3. At the video display prompt on your TV, use the Up and Down
arrows to select Yes or No, and then press OK to make your selec
tion.
If you have an HDTV, go to the Settings category in the Moxi
Menu. Select HDTV Setup and choose the highest resolution that
your TV supports.
-
Opening the on-screen diagnostics menu using the front panel
When you want to use the front panel buttons to open the on-screen
diagnostics (OSD) menu, use the following button-press combination:
1. On the front panel, simultaneously press the Menu and OK buttons.
2. Hold for five seconds, and the OSD menu appears on the TV screen.
-
5
49
Page 50

Troubleshoot
50
Page 51

Get Connected
System specifications ......................................................................................... 52
Before connecting.............................................................................................. 52
Available ports................................................................................................... 53
Connect to the TV and receiver.......................................................................... 56
Connect archiving components.......................................................................... 57
6
51
Page 52

Get Connected
Use the audio, video, and additional data storage ports available when
connecting your Moxi 3012
to the TV.
System specifications
The following table lists the specifications for the Moxi 3012.
Tabl e 2: Moxi 3012 specifications
Feature Quantifier
Model number HD DVR 3012
Power supply • Line input voltage 110 V to 125 VAC
• 1.6 amps
• Frequency 50 Hz to 60 Hz
USB power (front) One USB 2.0 connectors, 5 V, 500 mA
USB power (rear) One USB 2.0 connectors, 5 V, 500 mA
HDMI power 5 V, 55 mA
IEEE 1394 One large 4-pin
Table 2: Moxi 3012 specifications (Continued)
Feature Quantifier
Operating temperature 0 degrees Celsius to 40 degrees Celsius
Dimensions (WxHxD) 17”W x 3.2”H x 12”D
Weight Approximately 10 pounds
(32 Fahrenheit to 104 Fahrenheit) from
5% to 90% non-condensing relative
Do not operate the Moxi 3012 at
extreme hot or cold temperatures even
within this range. Doing so can result in
damage to the
property and possibly personal injury.
Please refer to the Safety Information
for more instructions.
Moxi 3012 and/or other
Before connecting
Before installing, the Moxi 3012 installation environment must meet
the following physical requirements:
• Locate the Moxi 3012 within six feet of a power outlet.
• Do not use an extension cord, but rather use a power strip with
surge protection.
• Make sure the infra-red receiver on the Moxi 3012 and the
remote are free from obstructions, such as furniture and doors.
52
Page 53

Get Connected
Ventilation requirements
To prevent overheating, allow adequate ventilation and airflow
around the Moxi. The Moxi 3012
clearance on top and all sides with airflow to the rear.
2 inches
(5 cm)
See the Regulatory Information and Product Safety Information and
Warnings document for more important safety and regulatory instruc
tions and notices.
Table 3: Video cables, starting with highest quality connection
Connector shapes Cable type Description
Any Moxi set-top box
requires at least a two-inch (5 cm)
2 inches (5 cm)
2 inches
(5 cm)
HDMI A digital audio and video connection capable of displaying 480i, 480p, 720p, and 1080i video resolution.
The TV must be HDCP-compliant. If your TV has a DVI-D port but no HDMI port, you may use video out
put from the Moxi 3012 with an HDMI to DVI conversion cable. If an HDMI cable or an HDMI to DVI conversion cable is used along with an intermediate device such as an audio/video receiver, video might not
be passed through the intermediate device to the TV. If this happens, connect the Moxi 3012 directly to
the TV.
When configuring 480i, the output connection is automatically routed to the port into which the TV is
plugged.
You can also have video out from an HDMI cable and an analog port.
Available ports
Before connecting the Moxi 3012, consider the equipment to which it
will be connected. Is your TV standard definition (
tion TV (HDTV)? Is there a receiver? If so, does it accept S/PDIF? Are
you connecting an external storage device? If so, is it eSATA?
The characteristics of the connections offered on the Moxi 3012 are
table 3 (video cables), table 4 on page 54 (audio cables), and
listed in
table 5 on page 55 (external hard drives).
-
SD) or high defini-
6
-
53
Page 54

Get Connected
Tabl e 3: Video cables, starting with highest quality connection (Continued)
Connector shapes Cable type Description
Component A three-wire analog video connection capable of displaying 480i, 480p, 720p, and 1080i video resolu-
Y
P
B
P
R
tions from the Moxi. Component is the most user-friendly HD and standard video connection for the
Moxi.
54
S-Video An analog video connection with better quality than Composite. S-Video is capable of displaying 480i
V
Tabl e 4: Audio cables starting with highest quality connection
Connector shapes Cable type Description
Composite or
RCA
IEEE 1394
S/PDIF
(optical)
video from the Moxi.
An analog video connection. Composite supports 480i video output.
A high-bandwidth digital connection, sometimes called FireWire®. The Moxi 3012 provides an MPEG 2
audio and video stream for recording or display on a digital device in the same resolution as the broad
cast. No user interface graphics appear (like, Moxi Menu, flip bar, and so forth) nor is there menu audio.
A digital audio connection that carries high-quality Dolby Digital audio. No need to use an S/PDIF cable, if
using an HDMI video cable connection (transmits both video and audio).
-
Page 55

Table 4: Audio cables starting with highest quality connection (Continued)
Connector shapes Cable type Description
Get Connected
L
RCA An analog stereo audio connection. No need to use an RCA cable, if using an HDMI video cable connec-
tion (transmits both video and audio).
R
Table 5: Data storage cables starting with highest quality connections
Connector shapes Cable type Description
eSATA
Transfers data at a rate of 2400 megabits per second to and from external hard disks and optical
drives. Your actual rate of data transfer can vary.
6
55
Page 56

Get Connected
Connect to the TV and receiver
The Moxi 3012 supports multiple types of audio and video connections. It is recommended that you use the highest-quality connection
supported by both the TV or audio receiver and the Moxi.
Before installing or connecting the Moxi 3012, review all instructions
and the Regulatory Information and Product Safety Information and
Warnings document.
56
Do not plug the Moxi 3012 into a power source just yet.
!
Cable in
1
S/PDIF
3
Y
eSATA Cable Out
V
S/PDIF
Pb
L
S-Video
Pr
R
CableCARD
IEEE 1394
Cable In
HDMI USB 2.0
HDMI
2
Ethernet
Serial Port
Power
4
1. Place the Moxi 3012 in a well-ventilated open area near the TV and
audio receiver (if used), and then connect the incoming coaxial cable
to the Moxi.
2. Install one of the following video connections (refer to the previous
figure):
Page 57

Get Connected
• For HD and supported TVs, connect an HDMI cable between the Moxi
3012 and the HDTV (refer to the previous figure on page
If an HDMI cable or an HDMI to DVI conversion cable is used along
with an intermediate device such as an audio/video receiver, video
might not be passed through the intermediate device to the TV. If
this happens, connect the Moxi 3012 directly to the TV.
• If an HDMI connection is unavailable, connect component (YPbPr)
cables for HDTV.
• For televisions where HDMI or component is not an option or connect
an S-Video cable.
• When the previous options are unavailable, use a composite video
cable connected to the V port.
For complete list of available connections see, table 3 on
page 53.
3. Install one of the following audio connections (only if you are not
using HDMI):
• For digital audio, connect an S/PDIF cable to the Moxi 3012 and
receiver or TV.
• For analog audio to the TV, connect composite stereo cables between
the TV and the L and R ports.
• For analog audio with a receiver, connect composite stereo cables
between the receiver and the L and R ports.
56).
For complete list of available connections see, table 4 on
page 54.
Do not connect Moxi 3012 to a switched power source. Doing so
increases the chance that the Moxi 3012
able to record programs as scheduled.
is turned off and is not
Connect archiving components
To add components to the TV connected to the Moxi, such as a DVDrecorder or VCR, refer to the manufacturer’s documentation for each
device.
Copy protected programs cannot be archived to a VCR and
may not work with a DVDr.
When installing any secondary device, such as a VCR, do not insert the
device in the primary signal path between the Moxi 3012
as this may affect the video and audio displayed on the TV. Instead,
use a secondary video input to the TV for the VCR (see the following
figure). If the content is copy protected, the picture may still appear
distorted.
As previously noted, content providers may protect their content with
copy protection technologies that limit or prohibit the copying or
viewing of their content. If the content is protected by digital copy
and the TV,
-
6
57
Page 58

Get Connected
right protection systems, the picture on the additional component may
appear distorted or not at all.
Moxi DVR
Signal ows from the Moxi
DVR to the TV and also to
the VCR or other secondary
device. Never install the
secondary device in the
primary connection
between the Moxi DVR and
the TV.
TV
Secondary
device
You can connect a secondary, digital monitor using the IEEE 1394
port, but the monitor will not display the Moxi Menu, any other user
interface graphics, or the playback of recorded TV stored on your Moxi
3012 (see
IEEE 1394 Connectors on page 60).
Archiving simplified
The Moxi 3012 permits personal archiving subject to all applicable
third party limitations. To archive a program, you must play back the
recorded program while recording it to a connected recording device
(such as a VCR). When recording to a VCR from any port, all on-screen
activities are recorded. This includes channel changes, navigation of
the Moxi Menu, system sounds, and playback actions (pause, stop,
rewind, and fast-forward).
Choosing the archive connection
Variations in VCR and TV technology present many connection
options. Determine which connection is used between the TV and the
Moxi, and then use an alternate connection to the VCR.
When selecting the connections, consider the video resolution.
• For HD programming, use a connection that supports 720p
and/or 1080i.
• For standard definition (480i), use any video connection except
the one used by the TV. See the following table for the resolu
tions supported by each connection.
Table 6: Video connections and supported resolutions
Connection 480i 480p 720p 1080i
HDMI X X X X
Component (YPbPr) X X X X
IEEE 1394 X X X X
S-Video X
Composite (V, L, R) X
-
58
Page 59

Get Connected
Archiving to a VCR
The installation instructions in this document are generic and may
need to be adjusted to suit your equipment.
Refer to the VCR manufacturer’s documentation before installation.
Always maintain an uninterrupted primary video connection directly
from the Moxi 3012 to the TV.
To use a digital VCR to archive programs:
1. Connect one video cable between the Moxi 3012 and the VCR.
• Connect component cables if they are not already used for
the TV.
• Use composite cables if component is not available.
• Use IEEE 1394 if your VCR and the Moxi 3012 support it.
Using IEEE 1394 allows you to simultaneously view and
archive live TV only, it does not support the simultaneous
playback and archiving of previously recorded TV stored on
your Moxi 3012
Use an IEEE 1394 connection to the TV as a secondary connection
only. No user interface graphics are transmitted via IEEE 1394.
Recordings made via IEEE 1394 include any channel changes and
use of the playback controls.
.
• If IEEE 1394 is not an option, use component if it is not
already used for the TV.
• Use composite if component is not available.
2. Unless you used IEEE 1394 or HDMI, which carries audio and video,
connect an audio cable between the Moxi 3012 and your VCR. Use S/
PDIF or composite.
3. Connect another set of audio and video cables between the VCR and
the TV.
4. Play the recorded program while recording with the VCR.
Stereo audio cable
Component cable
HDMI
Serial Port
Y
V
CableCARD
IEEE 1394
Cable In
eSATA Cable Out
L
R
S/PDIF
Ethernet
Pb
S-Video
HDMI USB 2.0
Pr
S/PDIF cable
Component cable
Digital VCR
(rear view)
Power
The TV now has at least two sets of video cables: one to watch live or
recorded programming from the Moxi, and another to watch recorded
programming from the VCR.
6
59
Page 60

Get Connected
IEEE 1394 Connectors
There are several IEEE 1394 connector options. Make sure you have a
cable with the large 4-pin or 6-pin connector at one end for the Moxi
and, at the other end, a connector that fits the digital VCR (see
3012
the following figure).
There are three types of IEEE 1394 connectors:
6-pin powered
4-pin unpowered (used on Moxi systems)
4-pin (used on many digital media devices)
A cable with a 6-pin connector works in the larger 4-pin
port but does not supply power to the secondary device.
60
Page 61

Moxi remote programming codes
TV codes for the Moxi remote control ................................................................ 62
Audio device codes for the Moxi remote control ................................................ 67
7
61
Page 62

Moxi remote programming codes
This chapter provides a listing of all programmable TV and audio
device codes stored in the Moxi remote. See Use and program the
remote on page 13 for more information
TV codes for the Moxi remote control
Use the codes in table 7 to program the remote for your TV and the codes
in table 8 on page 67 to program audio devices.
Table 7 TV codes
TV Code
Admiral 026, 054, 211, 213
Advent 072, 094, 425, 447, 463
Adventura 047
Aiwa 214, 471
Akai 053, 462, 473, 522, 524, 547, 572, 586
Amark 023, 215
Amstrad 157
Anam 217, 218, 219, 220, 221, 222, 223
AOC 053
APEX 030, 038, 427
Table 7 TV codes (Continued)
TV Code
Audiovox 191, 220, 465
Belcor 073
Bell & Howell 211, 213
BenQ 454
Broksonic 165, 167
Brokwood 073
Candle 068, 091
Centurion 095, 107, 108
Citizen 068, 091, 211, 213, 233
Coby 558
Concerto 073, 095
Contec 147
Coronado 023
Craig 223
Crown 023
Curtis Mathes 016, 054, 107, 108, 211, 213
62
Page 63

Moxi remote programming codes
Table 7 TV codes (Continued)
TV Code
Daewoo 051, 068, 073, 095, 158, 159, 189, 191, 194, 196,
197, 198, 200, 202, 204, 205, 206
Daytron 073, 095, 107, 108, 207, 209
Dell 072, 094
Diamond Vision 563
Dumont 073
Dynex 167, 415, 424, 567, 577
Electro Home 073, 095
Elektra 353
Element 459
Emerson 016, 023, 053, 064, 103, 139, 158, 159, 164, 165,
166, 167, 168, 169, 392, 400, 401402, 408, 415,
424, 507, 567, 577, 590
Envision 073, 095
ESA 454, 456, 538
Fisher 355, 356
Fujitsu 460, 469, 560
Table 7 TV codes (Continued)
TV Code
Funai 047, 048, 157, 168, 211
Gateway 426
GE 015, 018, 042, 044, 049, 054, 055, 068, 073, 090,
092, 095, 101, 102, 103, 389, 390, 396, 403, 406,
407
Gibralta 023, 048, 053, 068, 073, 090, 095, 107, 108, 233,
360
Go Video 443
Goldstar (LG) 023, 053, 068, 073, 090, 107, 108, 233, 360, 361
Gradiente 104
Grundig 233
Haier 053, 073, 095, 108, 427, 519, 596, 587
HP (HDTV) 072
Hall Mark 073, 095
Hitachi 023, 068, 095, 096, 097, 098, 099, 100
Hyundai 453
iLo 524, 586
7
63
Page 64

Moxi remote programming codes
Table 7 TV codes (Continued)
TV Code
Initial 470
Inkel 364
Insignia 167, 415, 424, 450, 456, 461, 507, 523, 567, 577,
586
JC Penny 039, 053, 068, 073, 092, 095, 102, 355
Jensen 062, 461
JVC 104, 105, 106, 396, 397, 410, 589
Kawasho 073, 095
KMC 023
Konka 445, 589
Kosche TV 462
KTV 023, 053, 233, 366
Kurazai 211, 213
LG (Goldstar) 023, 053, 068, 073, 090, 107, 108, 233, 360, 361,
424, 567, 577
Lodgenet 211, 213
Logik 211, 213
Table 7 TV codes (Continued)
TV Code
Luxman 068, 073, 095
LXI 024, 026, 157, 355, 388
Mag 459
Magnavox 470, 472, 549, 595
Magnavox (Philips)
Majestic 211, 213
Marantz 053, 107, 108, 109
Matsui 582, 583, 585
Maxent 426, 533, 534
Mcintosh 555
Megatron 215
Memorex 090, 211, 213, 355, 388, 405, 423, 459
MGA/Mitsubishi 053, 068, 073, 090, 095, 107, 108, 109, 110, 216,
Mintek 470
023, 068, 071, 072, 073, 089, 090, 091, 092, 093,
094, 134, 385, 387, 397, 404, 463, 470, 472, 549,
594, 595
384, 394, 395, 398, 399, 417
64
Page 65

Moxi remote programming codes
Table 7 TV codes (Continued)
TV Code
Montgomery
Ward
NEC 028, 068, 090, 108, 200, 464
Norcent 455, 472
Olevia 073, 519, 541, 587
Orion 019, 159, 160, 161, 162, 163, 382, 423, 424, 558
Panasonic 042, 043, 044, 045, 046, 419, 429
Philco 053, 072, 023, 068, 071, 091, 463
Philips (Magnavox)
Pilot 073, 094, 233
Pioneer 019, 111, 144, 383, 551
Planar 474
Polaroid 384, 394, 459
Portland 023, 068
Prima 072
108, 022, 023, 026, 053, 071, 072, 211, 213
023, 068, 071, 072, 073, 089, 090, 091, 092, 093,
094, 134, 385, 387, 397, 404, 463, 470, 472, 549,
594, 595
Table 7 TV codes (Continued)
TV Code
ProScan 055, 070
Proton 090, 371, 372
Protron 457, 467
Proview 459
Pulsar 073
Quasar 044
Radio Shack 073
RCA 053, 042, 052, 054, 055, 068, 069, 070, 416
Realistic 022, 166, 168
Runco 525
Sampo 090, 108
Samsung 147, 015, 016, 017, 023, 031, 090, 107, 108, 134,
151, 153, 386, 411, 424, 508, 577
Sansui 423, 424
Sanyo 353, 355, 356, 376, 377
Sceptre 468
7
65
Page 66

Moxi remote programming codes
Table 7 TV codes (Continued)
TV Code
Scott 090, 108, 168, 561
Sears 023, 030, 031, 038, 039, 068, 353, 355, 356
Sharp 028, 016, 022, 023, 024, 025, 026, 027, 029, 393,
395, 409
Signature 2000 023, 026, 108, 211, 213
Sony 014, 020, 021, 178, 540
Soundesign 091
Soyo 562
Squareview 157
SunBrite TV 587
Superscan 419
Supre-Macy 380
SVA 592
Sylvania 071, 068, 072, 090, 091, 092, 093, 107, 108, 157,
158, 419, 466, 590
Symphonic 047, 157
Tatung 044, 446
Table 7 TV codes (Continued)
TV Code
Techwood 068
Teknika 023, 068, 072, 168, 213, 463, 091
Telerent 023, 213
Tera 381
Tevion 065, 414
TMK 068, 090
To sh ib a 030, 031, 038, 039, 423, 571
Totevision 233
Universal 068, 102
Vidtech 068
ViewSonic 428, 513, 515, 527, 528, 529, 533, 534, 538, 530,
531, 532, 535, 536, 537, 538, 539
Viore 031, 508, 598, 600, 601, 602
Visco 589
Vizio 062, 073, 095, 454, 538, 561, 573, 053
Wards 068, 090
66
Page 67

Moxi remote programming codes
Table 7 TV codes (Continued)
TV Code
Westinghouse 020, 458, 463
White Westinghouse
XR-1000 213
Yamaha 068
York 090, 108
Zenith 047, 048, 049, 050, 051, 391, 405, 406, 424, 434,
211, 408, 449
567, 577, 594
Audio device codes for the Moxi remote control
Use the codes in table 8 to program audio devices.
Table 8 Audio device codes
Audio Device Code
ADC 318
Adcom 325
Aiwa 176, 301, 521
Akai 142
Bose 302, 440
Carver 155, 176, 180
Daewoo 501
Denon 262, 307
Everquest 136
Fisher 063, 180
Fosgate Audionics 305
Goldstar (LG) 036, 308
7
67
Page 68

Moxi remote programming codes
Table 8 Audio device codes (Continued)
Audio Device Code
Harman Kardon 130, 257, 305, 306
Hitachi 240
Jensen 140x
JVC 114, 241
Kenwood 063, 176, 277, 444
Krol 176
LG (Goldstar) 036, 308
Luxman 281
Magnavox (Philips) 080, 119, 184, 502, 503, 504, 433
Marantz 282, 283, 284, 285, 516, 517, 518, 520
Mcintosh 557
Mission 176
NSM 176
NAD 286
Onkyo 126, 171, 304, 543, 579
Optimus 142, 229, 321
Table 8 Audio device codes (Continued)
Audio Device Code
Panasonic 032, 074, 184, 438, 441
Parasound 323
Philips (Magnavox) 080, 119, 184, 502, 503, 504, 433
Pioneer 123, 137, 251, 298
Quasar 032, 184
Radio Shack 229, 267
RCA 119, 439
Realistic 226, 268
Rotel 310
SAE 176
Samsung DVD / Reciever 546, 492
Sansui 283
Sanyo 195, 309
Scientific Atlanta 312
Scott 272
Sharp 294
68
Page 69

Table 8 Audio device codes (Continued)
Audio Device Code
Moxi remote programming codes
Sherwood 229, 267, 505, 506
Sony 041, 057, 067, 232, 287, 292, 442
Soundesign 083, 088, 148, 239, 242, 265, 311, 320
SSI 313
STS 318
Taekwang 142
Teac 314, 316
Technics 032, 184, 512
Victor 114, 241
Wards 063, 114, 241
Victor 114, 241
Yamaha 145, 254, 280, 303, 521, 542, 579
Zenith 036, 083, 088, 239, 265
7
69
Page 70

Moxi remote programming codes
70
Page 71

Glossary
Glossary
8
Numerics
1080i 1080 alternating interlaced lines is the
most common HD standard with the
greatest line count, and available on almost all HD-ready and HDTV sets.
480i 480 interlaced lines is the setting for
most standard TVs. Not all HDTVs display
480i.
480p Many HD and SDTVs can display 480
progressive scan lines.
720p 720 progressive scan lines on a TV
screen.
A
action menu: Provides different action
choices or commands. It appears in the
Moxi Menu when a user decision is required.
album: A collection of photographs in Pho-
tos.
C
card: Cards appear in a vertical list within cat-
egories in the Moxi Menu.
center focus: Any category or card that you
stop on while navigating the Moxi menu
options. Often, the focus card has an associate action menu.
E
episode limit: The maximum number of ep-
isodes for the selected program that the
DVR will record.
eSATA: External serial advance technology at-
tachment provides a serial bus standard
for connecting devices. On the DVR it is
used to connect such devices as external
hard disks.
F
favorites: The category in the Moxi Menu
that contains a list of the fifteen channels
most frequently watched.
H
HDCP: High-Bandwidth Digital Content Pro-
tection is a cryptographic method to control video delivery. Content is protected in
such a way that only entitled devices can
view it.
HDID: Hardware Device ID is a unique identi-
fier that each device can access internally.
This identifier allows Digeo servers to
identify individual devices.
HDMI: High Definition Multimedia Interface is
an uncompressed audio and video interface. HDMI supports standard, enhanced,
and HD video. It also supports digital audio.
71
Page 72

Glossary
HDTV: High Definition TV provides much bet-
ter resolution than TVs based on the NTSC
standard of 480i. HDTVs typically show
video at video resolutions of 720p and
1080i, often in addition to other resolutions.
horizontal band: The list of category op-
tions that display in the left and right axis
on the Moxi Menu.
I
IEEE 1394: A high-bandwidth digital connec-
tion sometimes called FireWire. The DVR
provides an MPEG-2 audio and video
stream, from live TV, for recording or display on a digital device.
infrared emitter: A device to send control
signals to home theater components or
any other device capable of receiving and
decoding them.
M
movie rating: The MPAA rating system al-
lows viewers to make decisions about
which movies may be appropriate for children. Moxi allows setting parental controls based on movie ratings.
Moxi Menu: Digeo’s user interface through
which consumers can explore and access
live or recorded TV programming, digital
music, photos, and games using a remote
control.
P
Parental controls: A feature providing
control of media viewing by restricting
programming by rating and requiring the
use of a PIN.
Photos: A feature that allows users to store,
organize and display digital pictures.
playback controls: Remote controls that
allow manipulation of your location within the current program. The actions include: play, pause, stop, fast-forward,
slow-motion, rewind, skip, replay, next,
and back.
player bar: A horizontal graphic that ap-
pears in the lower part of the screen
whenever you press a playback control.
The bar provides information about the
viewing location within the current program.
PPV: Pay-per-view movies available for a 24-
hour rental period.
R
recording options: Parameters that can be
altered to customize the recording. Options include: start and stop times, keep
duration, and more for series recordings.
S
S/PDIF: The Sony/Phillips Digital Interface For-
mat is a set of standards for sending and
receiving digital audio signals, including
the connectors used by the input and output digital audio devices.
SD: Standard definition is the screen resolu-
tion (480 interlaced lines) of most standard TVs.
series priority: Used by Moxi to determine
which series to record when more than
two air at the same time.
slideshow: The playback of photo albums
stored in your Moxi.
slow motion: Use slow motion on any pro-
gram to view a show at very slow speed.
Activate it by pressing pause, and then
pressing the fast-forward button once.
72
Page 73

Glossary
SuperTicker: A feature that provides access
to additional content for news, weather,
sports, and stocks. When launched, it
scales back the TV image and uses a small
area at the bottom of the screen.
S-Video: An analog video connection with
better quality than Composite. S-Video is
capable of displaying 480i from the DVR.
T
time slot: TV programs air in a time slot. Use
series options to specify which time slots
are recorded.
TV rating: A way to inform viewers on the
content of broadcast programming. Moxi
allows setting parental controls based on
TV rating.
V
V-Chip: The V-Chip is the federally-mandated
parental control function built into all TVs
larger than 13 inches that have been sold
in the United States since 1999.
video resolution: The setting that deter-
mines the lines and frames making up the
picture that appears on the TV screen.
8
73
Page 74

Glossary
74
Page 75

Index
Index
9
Numerics
21 Frenzy, 34
A
About Moxi 28, 34
album, open, 32
archiving 59
audio
device codes
See also Moxi remote.
62
B
Blackjack, 34
box ID 34
Bubble Blast, 34
C
CableCARD,
conditional access,
digital secure gateway, 43
interactive info, 43
43
manufacturer information, 43
network setup, 43
pairing, 43
status, 43
card 20
background color, 25
Find & Record 21
scheduled to record, 25
category 20
channels, 22
favorites 22
games, 34
Parental Controls, 36
Closed Caption, 39
Code Breaker, 34
components, adding, 57
composite, 54
75
Page 76

Index
connecting
DVR,
56
external hard drives, 42
HDMI cable, 57
requirements, 52
connection
secondary,
connectors
audio,
external hard drives, 42, 55
video, 53
cropped, 39
58
54
D
digital VCR, 59
DVR
connecting,
56
E
eSATA, 42, 55
external hard drives
eSATA,
settings, 41
42, 55
F
favorites, 22
Find & Record 21
find. See also search.
FireWire. See also IEEE 1394.
first-run only,
flip bar, 23
27
G
Games
21 Frenzy,
Blackjack, 34
Bubble Blast, 34
Code Breaker, 34
playing, 34
Slot Machine, 34
Solitaire, 34
Tomato, 34
Video Poker, 34
34
H
HDMI 53
HDMI cable, 57
HDTV
connections
40
I
icons, recording, 25
76
Page 77

Index
IEEE 1394, 59
infrared emitter (IR blaster), 17
installation
secondary components,
57
L
letter box, setting, 39
locking. See also parental control.
M
media center
HDMI cable,
installing secondary components, 57
ventilation requirements, 53
Moxi Flip Bar 23
Moxi Menu
favorite channels
navigating 20
TV setup, 40
Moxi remote
audio codes,
57
22
62
N
notes 12
O
On Demand
controlling purchases,
38
P
parental control 36
controlling purchases, 38
locking channels or programs, 36
PIN 36
See also PIN.
turning off,
unlock timer, 38
Pay Per View
controlling purchases,
Photos
album,
uploading, 31
using, 31
viewing slideshow, 32
PIN
changing,
creating,
resetting, 39
37
38
32
36
9
77
Page 78

Index
player bar
features of,
using the, 23
preinstallation
storage connectors,
video connectors 53
priority
changing,
setting 28
23
28
R
rating, locking by,
RCA
54
recording 24
already scheduled, list of,
icons
25
options, 26
see all times, 24
series options, 24, 27
series, repeats, 27
55
remote
button
info
33
programming by search, 16
programming with codes, 16
resolution
standard definition, setting,
supported, 40
S
search 20
by category 22
by title or keyword 21
secondary components 57
see all times, 24
series
changing priority,
episode limit, 27
priority, 28
recording, 27
service messages, reading, 33
28
40
78
Page 79

Index
settings
closed caption
cropped, 39
external hard drives, 41
letterbox, 39
widescreen, 39
setup
TV,
40
shows
recording,
slideshow 32
Slot Machine, 34
software version, 34
Solitaire, 34
sound effects, 42
standard definition, 40
Storage & Stats 28, 34
additional data 55
storage meter, understanding, 28
SuperTicker
lock topic or item,
story, reading, 30
using, 30
S-Video 54
39
24
30
T
time slot
changing
timeslots 27
Tomato, 34
troubleshooting 45
DVR, 46
media center,
no video displayed, 46
remote and front panel, 47
user interface control, 47
TV setup, 40
20
audio, video,
audio/video out-of-sync, 46
changing channels, 46
static on screen, 46
46
V
V-Chip, 37
ventilation 53
video
connections supported,
video connectors, 53
Video Poker, 34
9
40
79
Page 80

Index
W
widescreen, settings, 39
80
Page 81

Page 82

Moxi Cable HD DVR 3012
Software version 4.1c
June 2008
 Loading...