

Page 1

UC-7110 Series User’s Manual
www.moxa.com/product
Second Edition, July 2005
Moxa Technologies Co., Ltd.
Tel: +886-2-8919-1230
Fax: +886-2-8919-1231
Web:
MOXA Technical Support
Worldwide:
The Americas
www.moxa.com
support@moxa.com.tw
support@moxa.com
Page 2

UC-7110 Series User’s Manual
The software described in this manual is furnished under a license agreement and may be used only in
accordance with the terms of that agreement.
Copyright Notice
Copyright © 2005 Moxa Technologies Co., Ltd.
All rights reserved.
Reproduction without permission is prohibited.
Trademarks
MOXA is a registered trademark of The Moxa Group.
All other trademarks or registered marks in this manual belong to their respective manufacturers.
Disclaimer
Information in this document is subject to change without notice and does not represent a commitment on the
part of Moxa.
Moxa provides this document “as is,” without warranty of any kind, either expressed or implied, including, but
not limited to, its particular purpose. Moxa reserves the right to make improvements and/or changes to this
manual, or to the products and/or the programs described in this manual, at any time.
Information provided in this manual is intended to be accurate and reliable. However, Moxa assumes no
responsibility for its use, or for any infringements on the rights of third parties that may result from its use.
This product might include unintentional technical or typographical errors. Changes are periodically made to the
information herein to correct such errors, and these changes are incorporated into new editions of the
publication.
Page 3

Table of Contents
Chapter 1 Introduction ..................................................................................................1-1
Overview.................................................................................................................................. 1-2
Package Checklist.................................................................................................................... 1-2
Product Features ...................................................................................................................... 1-2
Product Specifications ............................................................................................................. 1-3
Hardware Specifications (UC-7110-LX)...................................................................... 1-3
Software Specifications (UC-7110-LX)....................................................................... 1-4
Hardware Block Diagram ........................................................................................................ 1-5
Appearance .............................................................................................................................. 1-5
Dimensions .............................................................................................................................. 1-6
Installing UC-7110................................................................................................................... 1-7
LED Indicators......................................................................................................................... 1-8
Wiring Requirements............................................................................................................... 1-8
Connecting the Power................................................................................................... 1-9
Grounding UC-7110..................................................................................................... 1-9
Connecting Data Transmission Cables .................................................................................... 1-9
Connecting to the Network........................................................................................... 1-9
Connecting to a Serial Device .................................................................................... 1-10
Serial Console Port ..................................................................................................... 1-10
Additional Functions...............................................................................................................1-11
Reset Button ............................................................................................................... 1-11
Real Time Clock......................................................................................................... 1-12
Chapter 2 Getting Started .............................................................................................2-1
Powering on UC-7110 ............................................................................................................. 2-2
Connecting UC-7110 to a PC................................................................................................... 2-2
Console Port ................................................................................................................. 2-2
Telnet............................................................................................................................ 2-3
Configuring the Ethernet Interface .......................................................................................... 2-4
Developing Your Applications................................................................................................. 2-6
Installing the UC-7110 Tool Chain .............................................................................. 2-6
Compiling Hello.c ........................................................................................................ 2-7
Uploading “Hello” to UC-7110.................................................................................... 2-8
Running “Hello” on UC-7110 ...................................................................................... 2-9
Make File Example Code ........................................................................................... 2-10
Chapter 3 Software Package ........................................................................................3-1
UC-7110 Software Architecture............................................................................................... 3-2
Read-Only File System (ROMFS)................................................................................ 3-3
Journaling Flash File System (JFFS2).......................................................................... 3-3
UC-7110 Software Package..................................................................................................... 3-4
Chapter 4 Configuring UC-7110 ...................................................................................4-1
Enabling and Disabling Daemons............................................................................................ 4-2
Adding a Web Page.................................................................................................................. 4-3
IPTABLES ............................................................................................................................... 4-3
NAT.......................................................................................................................................... 4-7
NAT Example............................................................................................................... 4-7
Enabling NAT at Bootup.............................................................................................. 4-8
Page 4

Configuring Dial-in/Dial-out Service ...................................................................................... 4-8
Dial-out Service............................................................................................................ 4-8
Dial-in Service.............................................................................................................. 4-9
Configuring PPPoE.................................................................................................................. 4-9
How to Mount a Remote NFS Server...................................................................................... 4-9
Upgrading the Kernel & Root File System............................................................................ 4-10
Upgrading the User Directory.................................................................................................4-11
User Directory Backup—UC-7110 to PC.............................................................................. 4-13
Loading Factory Defaults ...................................................................................................... 4-14
Mirroring the Application Program and Configuration.......................................................... 4-14
How to Autostart User Applications on Bootup..................................................................... 4-14
Checking the Kernel and User Directory Versions ................................................................ 4-14
Chapter 5 UC-7110 Device API .....................................................................................5-1
RTC (Real Time Clock) ........................................................................................................... 5-2
Buzzer...................................................................................................................................... 5-2
UART Interface........................................................................................................................ 5-2
Chapter 6 UC Finder ......................................................................................................6-1
Windows UC Finder ................................................................................................................ 6-2
Linux ucfinder.......................................................................................................................... 6-5
Appendix A System Commands..................................................................................... A-1
busybox (V0.60.4): µClinux normal command utility collection ........................................... A-1
File manager ................................................................................................................ A-1
Editor ........................................................................................................................... A-1
Network ....................................................................................................................... A-2
Process......................................................................................................................... A-2
Other............................................................................................................................ A-2
MOXA Special Utilities .............................................................................................. A-2
Appendix B SNMP Agent with MIB II & RS-232 Like Group ......................................... B-1
Appendix C FAQ for UC-7110 ......................................................................................... C-1
Appendix D Service Information..................................................................................... D-1
MOXA Internet Services......................................................................................................... D-2
Problem Report Form ............................................................................................................. D-3
Product Return Procedure....................................................................................................... D-4
Page 5

1
1
Chapter 1 Introduction
The MOXA UC-7110 Series of RISC-based Communication Platforms features two
RS-232/422/485 serial ports, and dual 10/100 Mbps Ethernet ports, making these products ideal
for embedded OS applications.
This chapter covers the following topics:
Overview
Package Checklist
Product Features
Product Specifications
Hardware Block Diagram
Appearance
Dimensions
Installing UC-7110
LED Indicators
Wiring Requirements
¾ Connecting the Power
¾ Grounding UC-7110
Connecting Data Transmission Cables
¾ Connecting to the Network
¾ Connecting to a Serial Device
¾ Serial Console Port
Additional Functions
¾ Reset Button (not yet activated)
¾ Real Time Clock
Page 6

UC-7110 Series User’s Manual Introduction
Overview
The UC-7110 Series of RISC-based Communication Platforms are ideal for your embedded
applications. UC-7110 comes with two RS-232/422/485 serial ports and dual 10/100 Mbps
Ethernet LAN ports to provide users with a versatile communication platform.
UC-7110 uses the ARM9 166 Mhz RISC CPU. Unlike the X86 CPU, which uses a CISC design,
the ARM9’s RISC design architecture and modern semiconductor technology provide UC-7110
with a powerful computing engine and communication functions, but without generating too much
heat. The built-in 8 MB NOR Flash ROM and 16 MB SDRAM give you enough storage capacity
to run applications on UC-7110. The dual LAN ports built into the ARM9 make UC-7110 an ideal
communication platform for some of the more simple data acquisition and protocol conversion
applications, and the two RS-232/422/485 serial ports allow you to connect a variety of different
types of serial device.
The pre-installed µClinux operating system provides an open software operating system for
software program development. This means that software written for desktop PCs is easily ported
to UC-7110 by using a GNU cross complier, so that you will not need to spend time modifying
existing software code. The Operating System, device drivers, and your own software can all be
stored in UC-7110’s Flash memory.
Package Checklist
The UC-7110 Series model currently available is:
UC-7110-LX RISC-based Universal Communicator with 2 Serial Ports, Dual Ethernet, µClinux
OS
UC-7110 Series products are shipped with the following items:
y 1 UC-7110
y UC-7110 Quick Installation Guide
y Universal Communicator Documentation & Software CD-ROM
y Ethernet cross-over cable: RJ45 to RJ45, 100 cm
y Console port cable
CBL-4PINDB9F-100: 4-pin header to DB9 (Female) cable, 100 cm
y Power Adaptor
y Product Warranty Booklet
NOTE: Notify your sales representative if any of the above items is missing or damaged.
Product Features
UC-7110 Series products have the following features:
y ARM9 166 MHz Processor
y On-board 16 MB RAM, 8 MB Flash ROM
y Two RS-232/422/485 serial ports
y Dual 10/100 Mbps Ethernet
y µClinux-Ready communication platform
y DIN-Rail or wall mounting installation
y Robust fanless design
1-2
Page 7

UC-7110 Series User’s Manual Introduction
Product Specifications
Hardware Specifications (UC-7110-LX)
CPU
RAM
Flash
LAN
LAN Protection
Serial Ports
Serial Protection
Data bits
Stop bits
Parity
Flow Control
Speed
Real Time Clock
Buzzer
Console Port
LEDs
Gross Weight
ARM9-based 32-bit RISC CPU, 166 Mhz
16 MB (12 MB of user programmable space)
8 MB (4 MB of user programmable space)
Auto-sensing 10/100 Mbps x 2
Built-in 1.5 KV magnetic isolation
The two RS-232/422/485 ports support:
RS-232 signals: TxD, RxD, DTR, DSR, RTS, CTS, DCD, GND
RS-422 signals: TxD+, TxD-, RxD+, RxD-, GND
4-wire RS-485 signals: TxD+, TxD-, RxD+, RxD-, GND
2-wire RS-485 signals: Data+, Data-, GND
15 KV ESD for all signals
5, 6, 7, 8
1, 1.5, 2
None, even, odd, space, mark
RTC/CTS, XON/XOFF
50 bps to 921.6 Kbps
Ye s
Ye s
RS-232, 3-wire (Tx, Rx, GND) (19200, n, 8 , 1)
Ready
Serial Tx, Rx (2 of each)
LAN 10/100 (one on each LAN connector)
190 g
Power input
Power Consumption
Operating temperature
Storage temperature
Regulatory Approvals
Warran ty
12-48 VDC
290 mA @ 12 VDC
-10 to 60℃, (14 to 140F), 5 to 95%RH
-20 to80℃, (-4 to 185F), 5 to 95%RH
EMC: FCC Class A, CE Class A
Safety: UL, CUL, TÜV
5 years
1-3
Page 8

UC-7110 Series User’s Manual Introduction
Software Specifications (UC-7110-LX)
Kernel
Protocol Stack
JFFS2 File System
ROMFS
Sash (V1.1.1)
Pppd (V1.13)
snmpd
busybox (V0.60.4)
Tinylogin (V0.80)
Telnetd (V1.9)
telnet (busybox V0.60.4)
inetd (Distributed 20030522)
ftpd (V8.5)
ftp (V0.16)
boa
ntpdate (V4.1.1)
Tool Chain
Arm-elf-gcc (V2.95.3)
µClinux Kernel 2.4.22
AR P, I C M P, IP V4 , T CP, UD P, F T P, Tel n e t, NT P, S N MP V 1 ,
HTTP, PPP, CHAP, PAP, NFS
User Directory (Read / Write)
Kernel, Root File System (Read Only)
Simple OS shell command
dial in/out over serial port daemon
SNMP V1 Agent daemon
Linux normal command utility
login and user manager utility
Telnet server daemon
Telnet client program
TCP server manager program
FTP server program
FTP client program
Web server daemon
Network Time Protocol client utility
C/C++ PC Cross Compiler
uClib (V0.9.19)
UC Finder
POSIX standard library
UC’s LAN IP broadcast searching utility for Windows and Linux
1-4
Page 9
UC-7110 Series User’s Manual Introduction
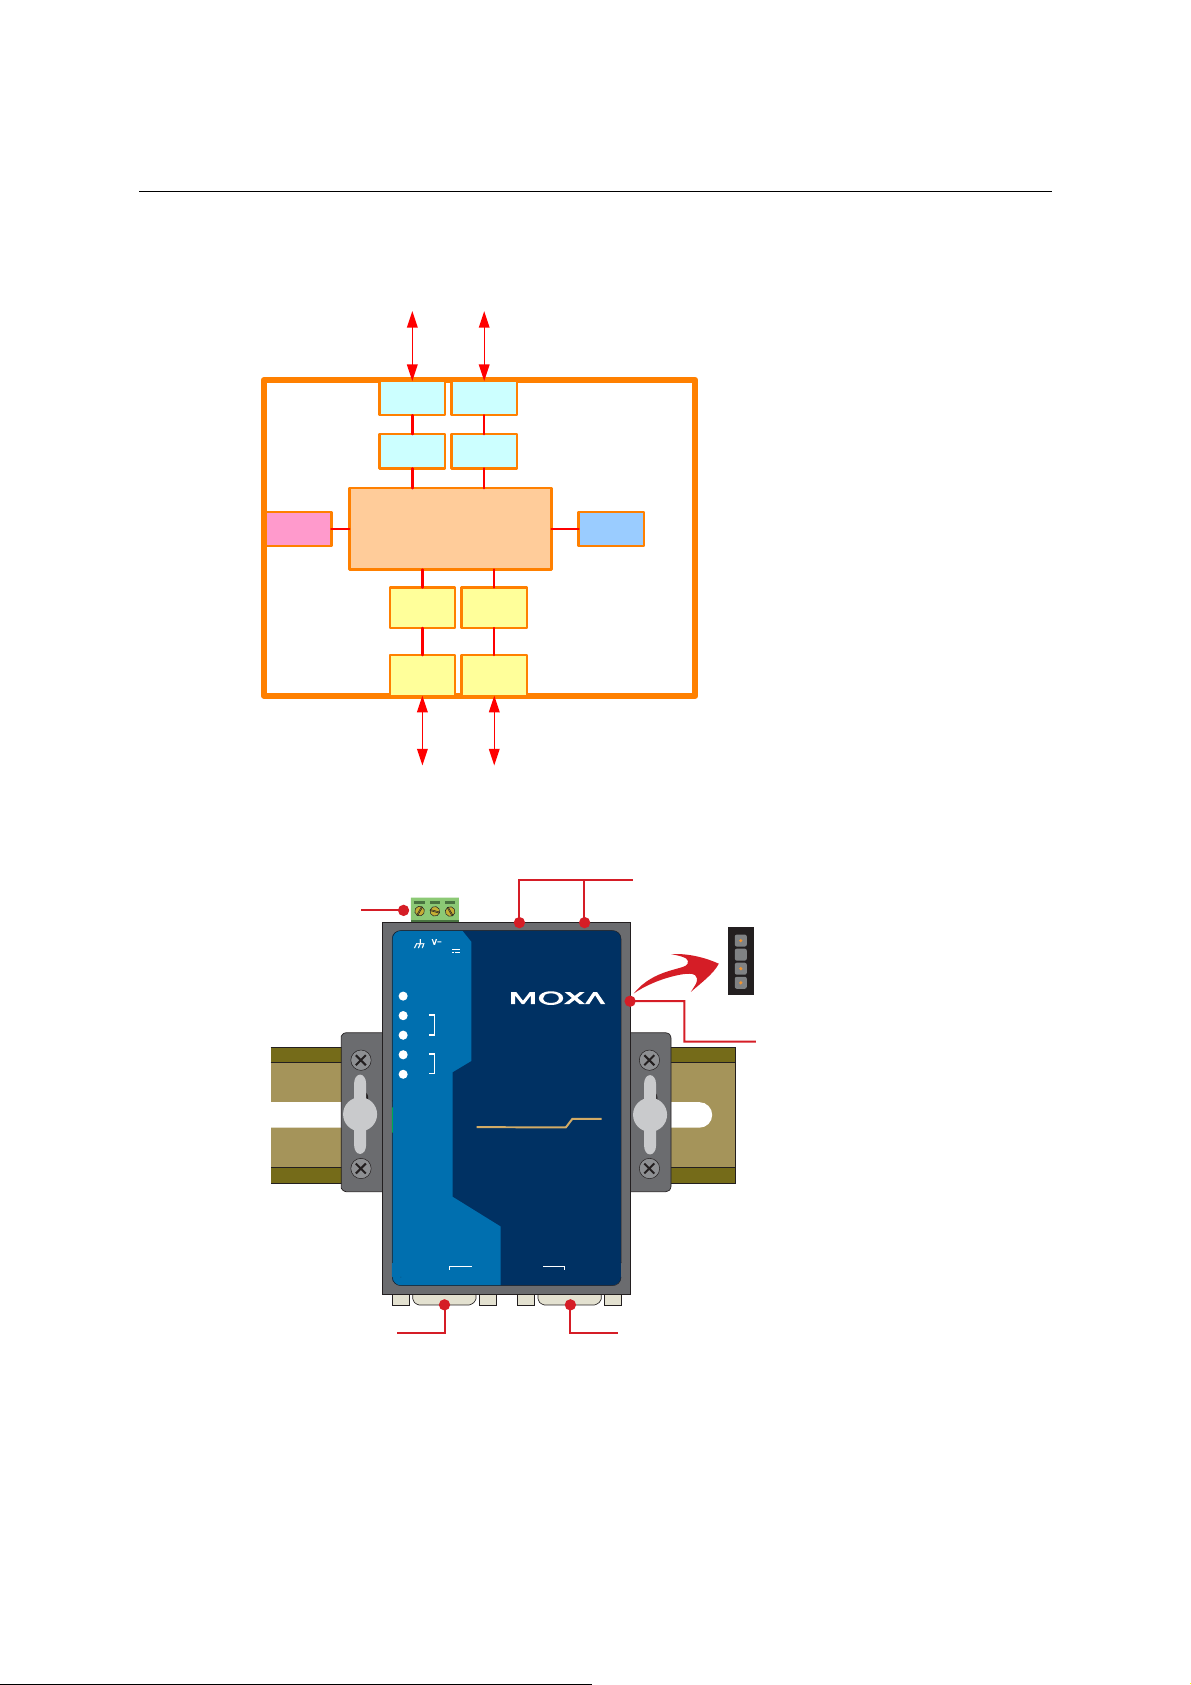
Hardware Block Diagram
Power
Circuit
Appearance
Ethernet
LAN1 LAN2
PHY PHY
S3C2500 ARM940T 166MHz
8MB Flash
16MB SDRAM
MOXA
MU150
MOXA
MU150
Port 1 Port 2
RS-232/422/485
RTC
48 VDC
12-
Serial Port 1
(RS-232/422/485)
V+ RESET
12-48V
Ready
TX
P1
RX
TX
P2
RX
UC-7110
Universal Communicator
RS-232/422/485
P1 P2
LAN1
Ethernet x 2
(10/100BaseTx)
LAN2
Serial Port 2
(RS-232/422/485)
RS-232
Console Terminal
1-5
Page 10
UC-7110 Series User’s Manual Introduction
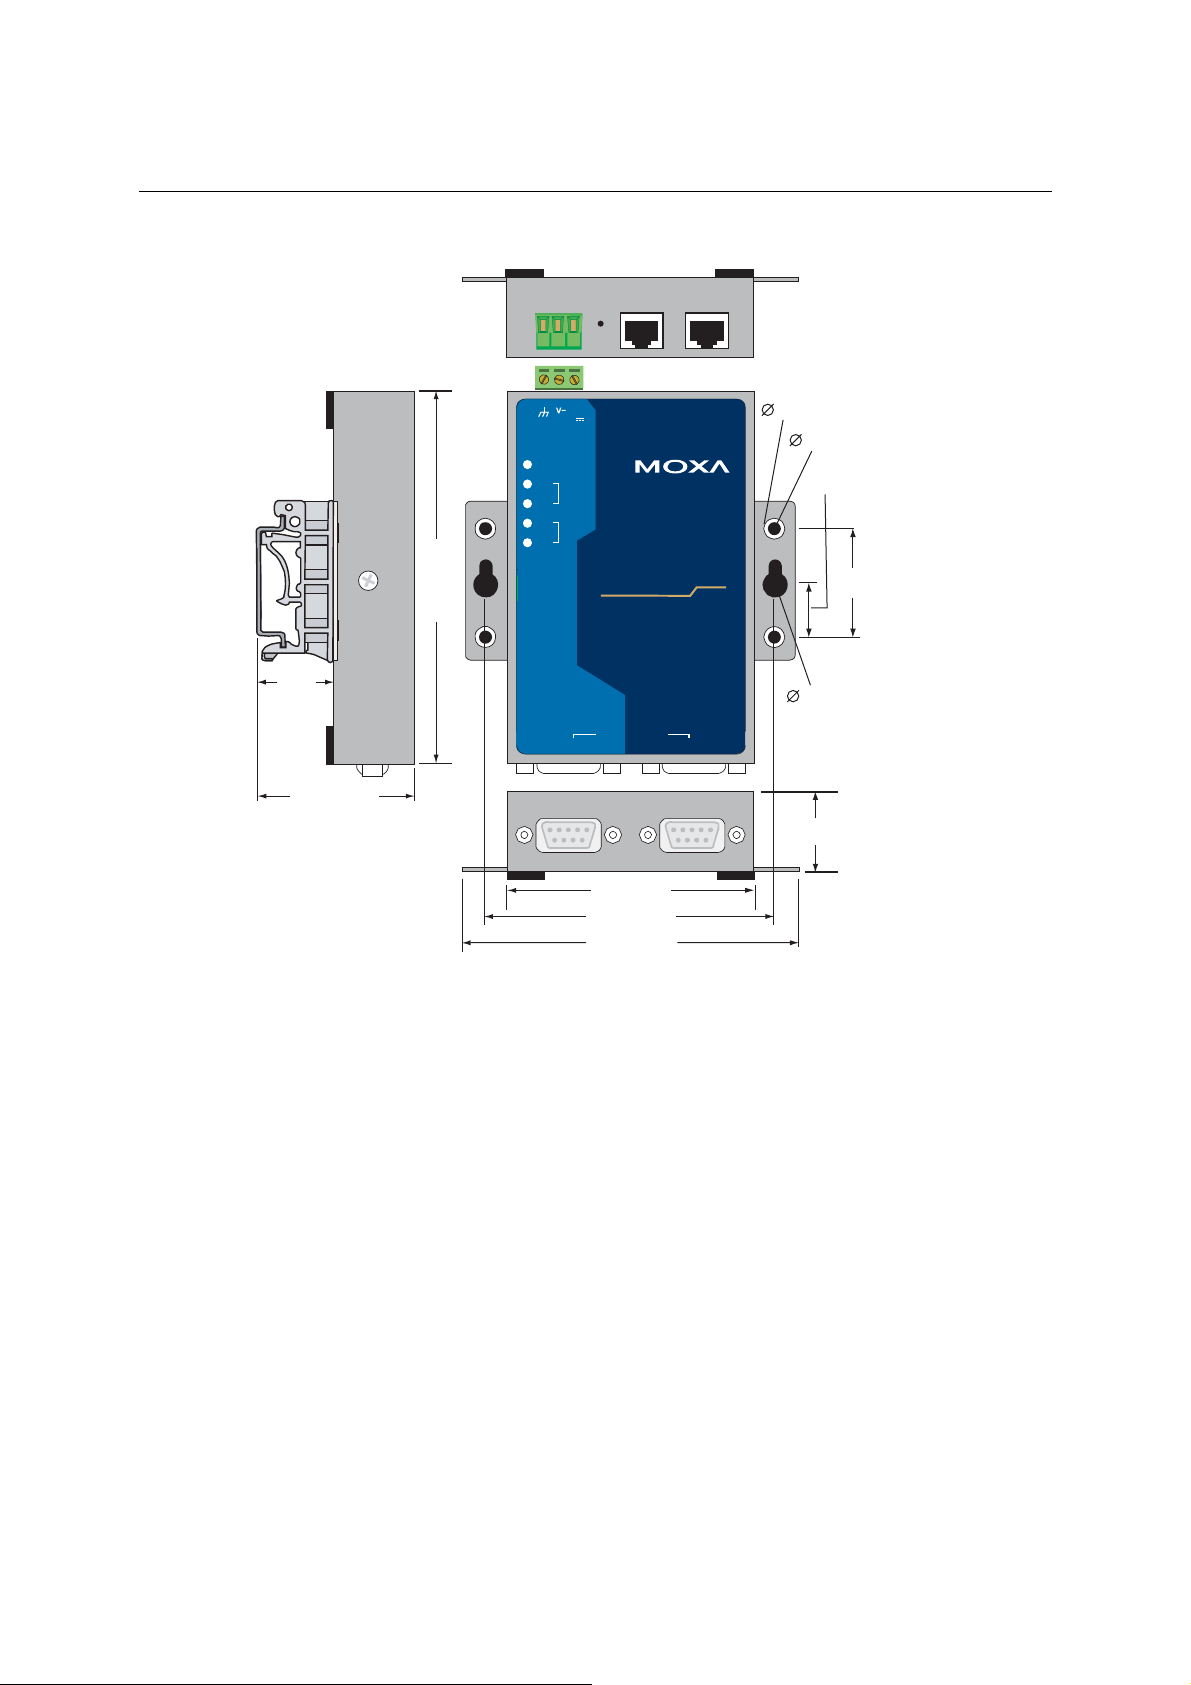
Dimensions
21.3
(0.8)
47.3 (1.56)
unit = mm (inch)
111 (4.31)
V+ RESET
12-48V
Ready
TX
P1
RX
TX
P2
RX
UC-7110
Universal Communicator
RS-232/422/485
P1 P2
77 (3.03)
88 (3.46)
100 (4.18)
LAN1
LAN2
6 (0.24)
4 (0.16)
12.5 (0.49)
25 (0.98)
7 (0.28)
26 (1.02)
1-6
Page 11
UC-7110 Series User’s Manual Introduction
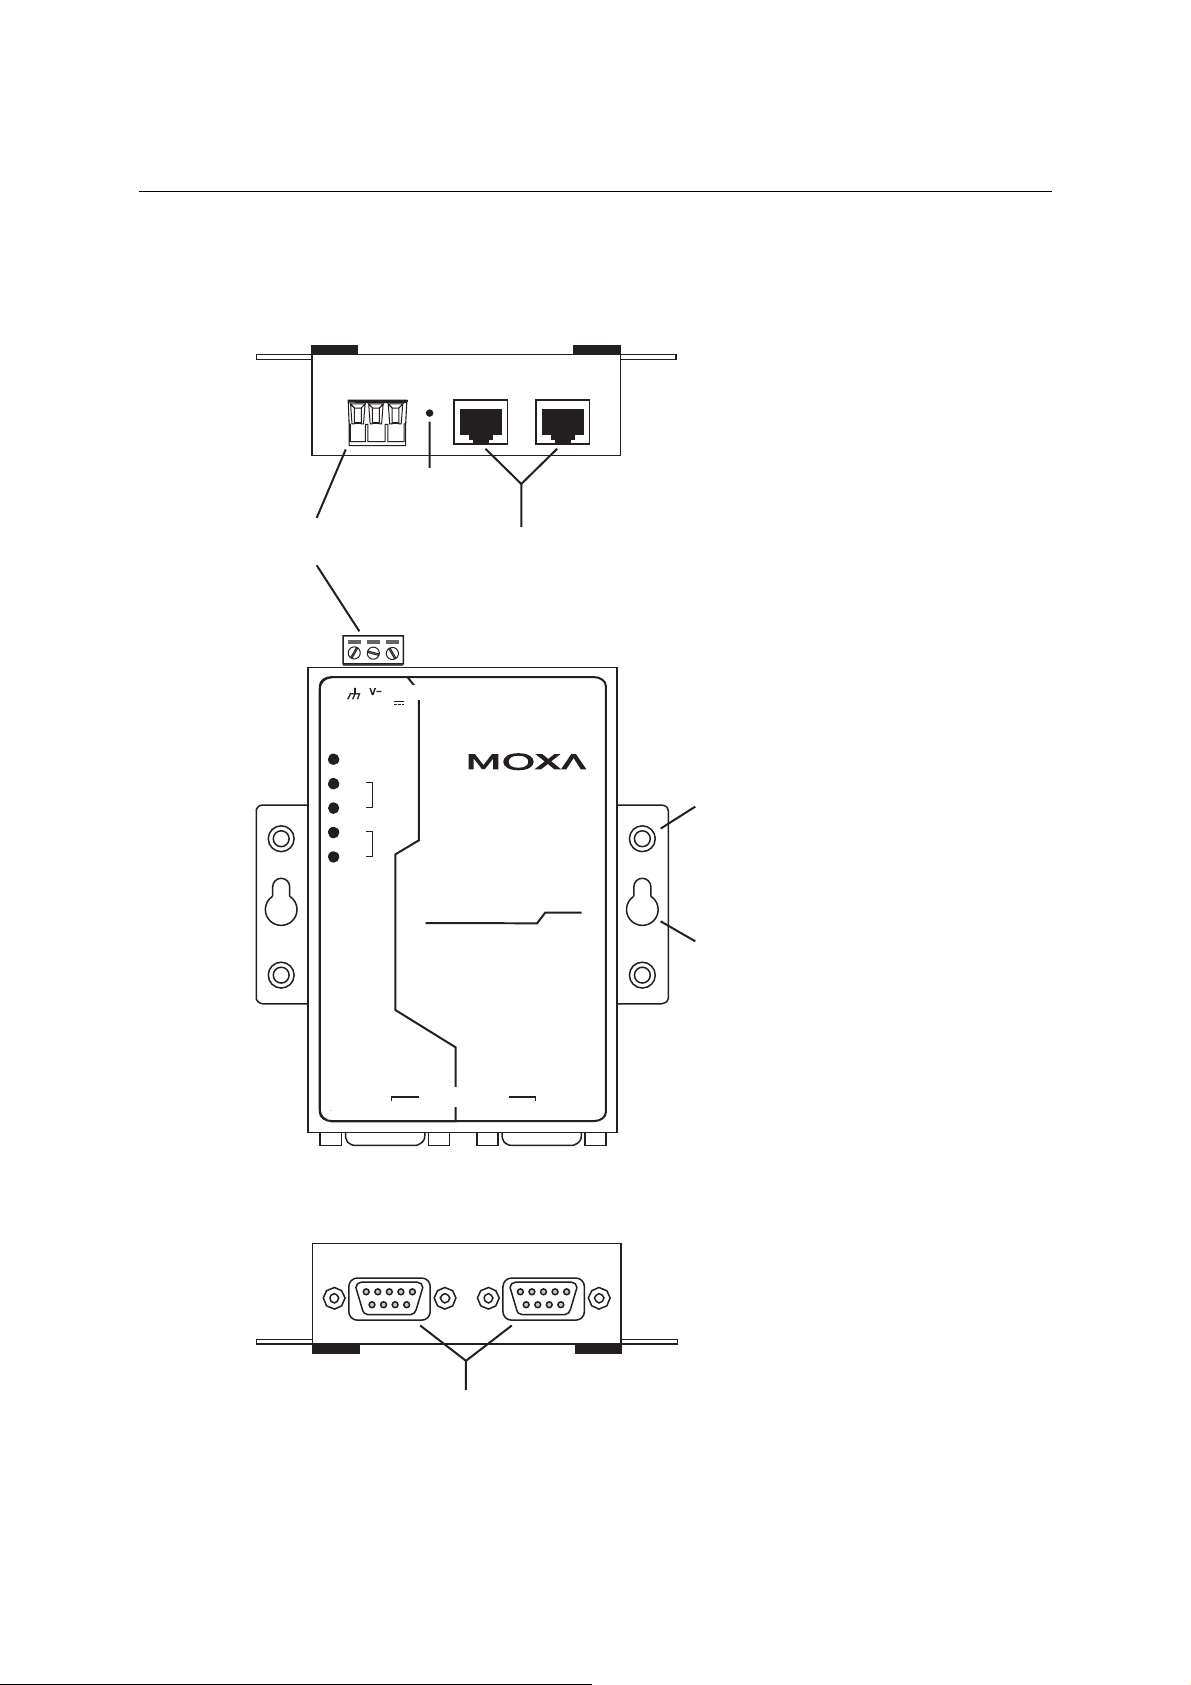
Installing UC-7110
Top-End View
Reset Button
Terminal Block
Power Input
Nameplate View
V+
12-48V
Ready
TX
P1
RX
TX
P2
RX
P1 P2
RJ45 10/100 Mbps Ethernet Ports
RESET
LAN1 LAN2
UC-7110
Universal Communicator
RS-232/422/485
DIN-Rail
screw hole
Wallmount
screw hole
Bottom-End View
DB9 (male) Serial Ports
1-7
Page 12
UC-7110 Series User’s Manual Introduction
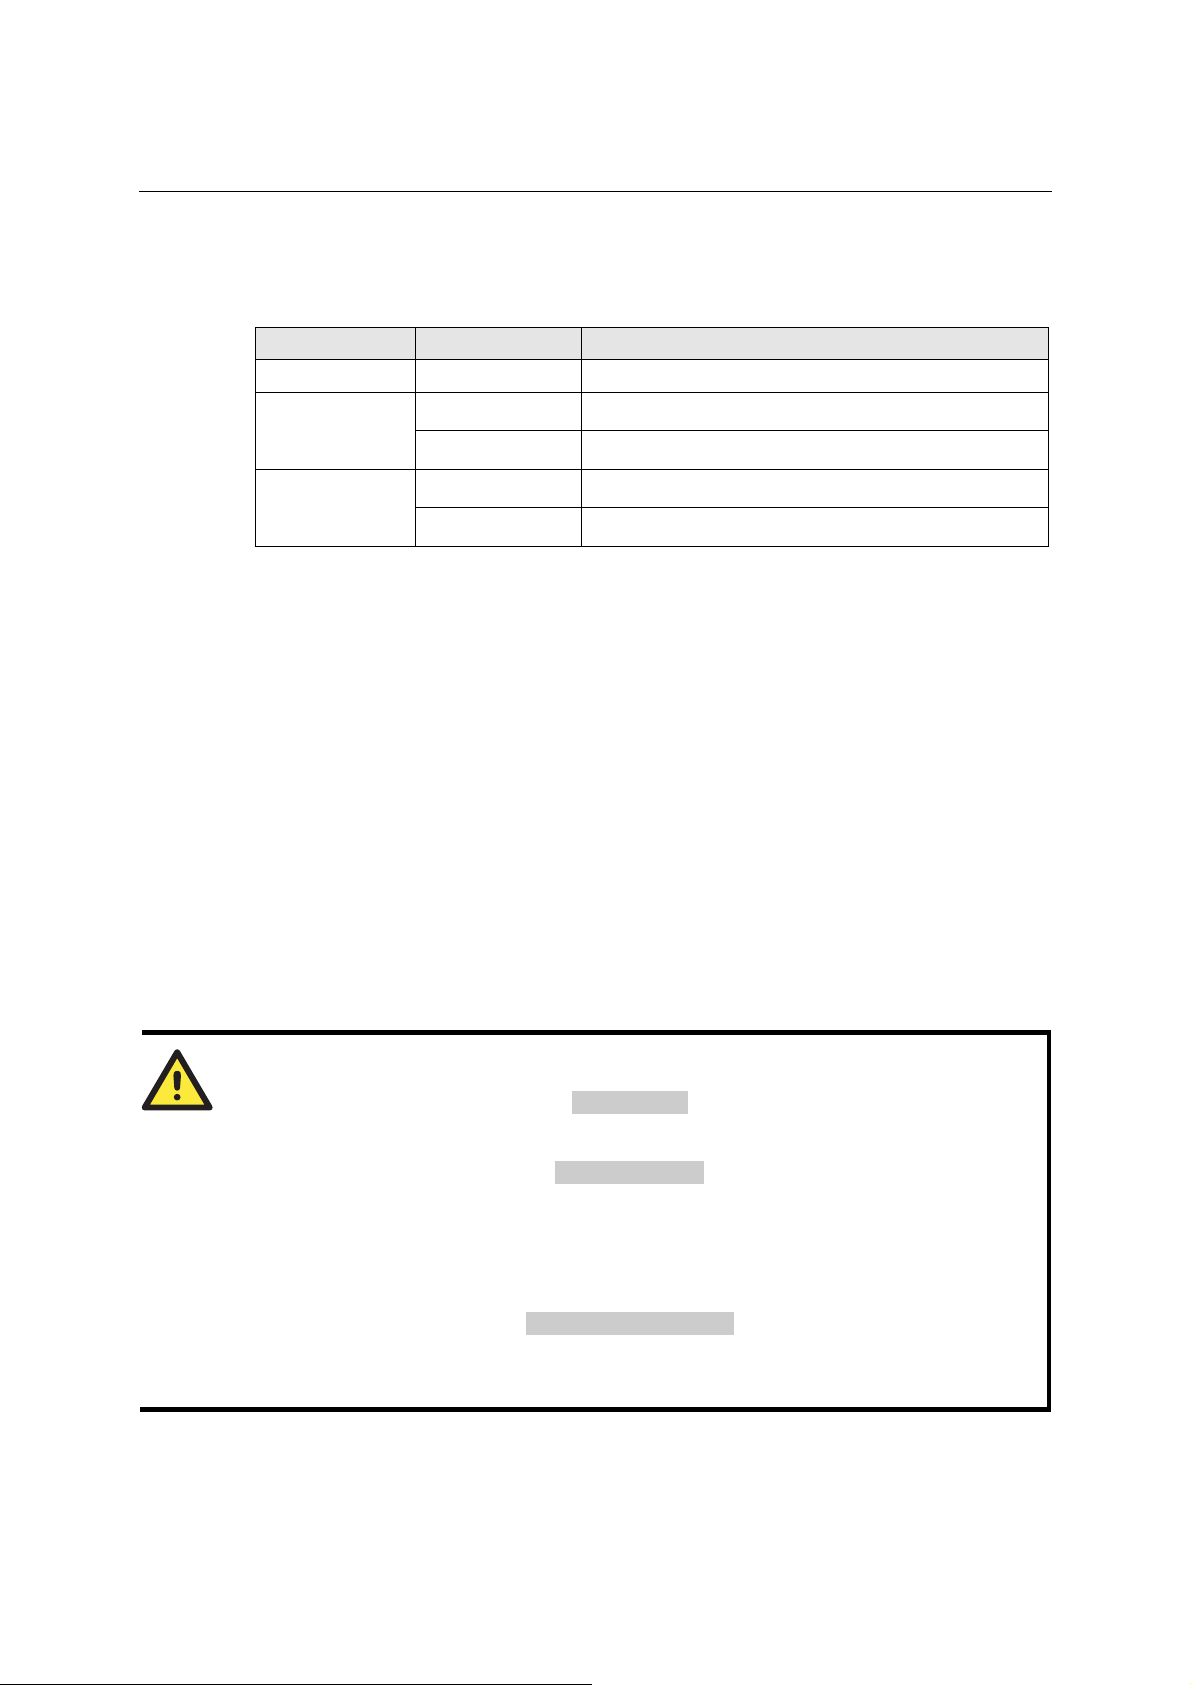
LED Indicators
The following table explains the function of the five LED indicators located on UC-7110’s top
panel.
LED Name LED Color LED Function
Ready Green Power is on and functioning normally.
P1/P2 (Tx)
Green
Off
Serial port 1/2 is transmitting data.
Serial port 1/2 is not transmitting data.
P1/P2 (Rx)
Wiring Requirements
This section describes how to connect UC-7110 to serial devices.
You should heed the following common safety precautions before proceeding with the installation
of any electronic device:
y Use separate paths to route wiring for power and devices. If power wiring and device wiring
paths must cross, make sure the wires are perpendicular at the intersection point.
NOTE: Do not run signal or communication wiring and power wiring in the same wire
conduit. To avoid interference, wires with different signal characteristics should be routed
separately.
y Use the type of signal transmitted through a wire to determine which wires should be kept
separate. The rule of thumb is that wiring that shares similar electrical characteristics can be
bundled together.
y Keep input wiring and output wiring separate.
y It is advisable to label the wiring to all devices in the system.
ATTENTION
Yellow
Off
Serial port 1/2 is receiving data.
Serial port 1/2 is not receiving data.
Safety First!
Be sure to disconnect the power cord before installing and/or wiring your UC-7110.
Wiring Caution!
Calculate the maximum possible current in each power wire and common wire. Observe all
electrical codes dictating the maximum current allowable for each wire size.
If the current goes above the maximum ratings, the wiring could overheat, causing serious
damage to your equipment.
Temperature Caution!
Be careful when handling UC-7110. When plugged in, UC-7110’s internal components generate
heat, and consequently the outer casing may feel hot to the touch.
1-8
Page 13
UC-7110 Series User’s Manual Introduction
Connecting the Power
Connect the “live-wire” end of the 12-48 VDC power adaptor to UC-7110’s terminal block. If the
power is properly supplied, the “Ready” LED will show a solid green color after a 25 to 30 second
delay.
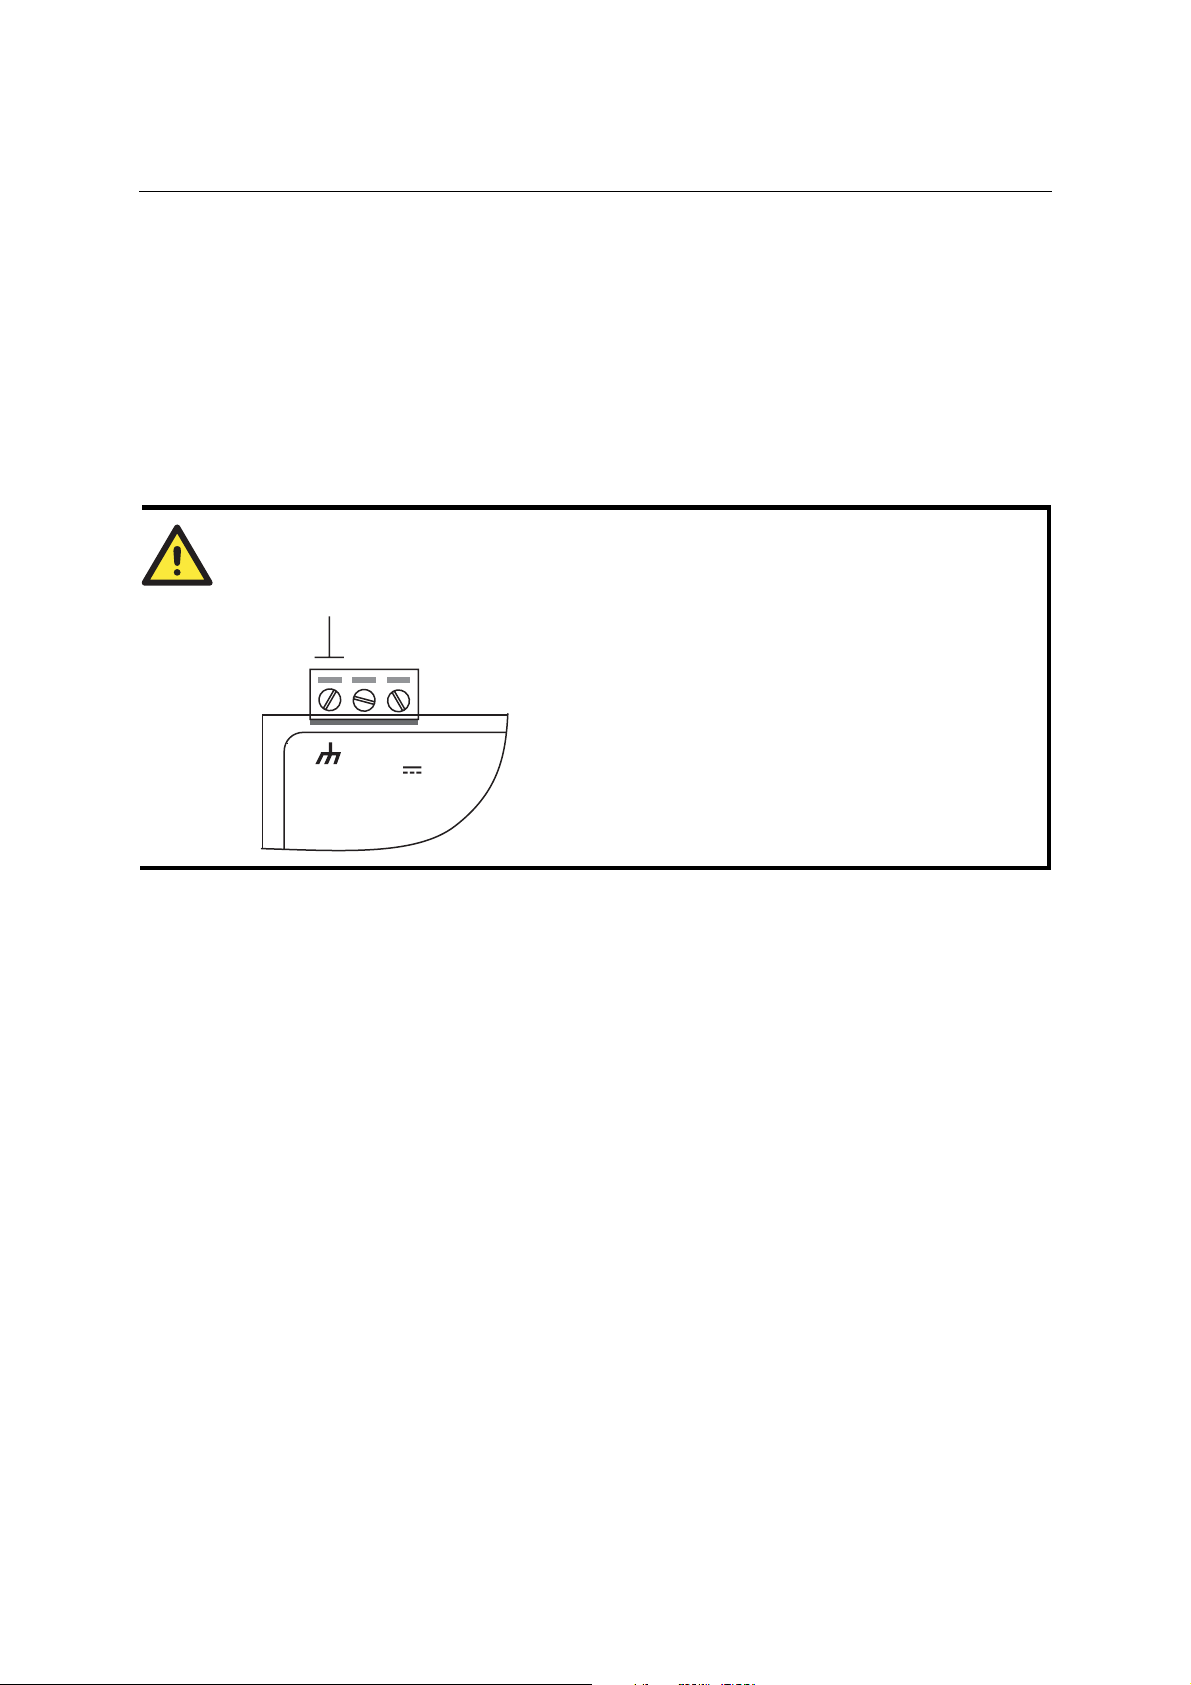
Grounding UC-7110
Grounding and wire routing helps limit the effects of noise due to electromagnetic interference
(EMI). Run the ground wire from the ground screw to the grounding surface prior to connecting
devices.
ATTENTION
This product should be mounted to a well-grounded mounting surface such as a metal panel.
SG
V+V-
12-48V
SG: The Shielded Ground (sometimes called Protected
Ground) contact is the left most contact of the
3-pin power terminal block connector when
viewed from the angle shown here. Connect the
SG wire to an appropriate grounded metal surface.
Connecting Data Transmission Cables
This section describes how to connect UC-7110 to the network, serial devices, and serial COM
terminal.
Connecting to the Network
Connect one end of the Ethernet cable to UC-7110’s 10/100M Ethernet port and the other end of
the cable to the Ethernet network. If the cable is properly connected, UC-7110 will indicate a valid
connection to the Ethernet in the following ways:
y The top-right LED on the connector maintains a solid green color when connected to a 100
Mbps Ethernet network.
y The top-left LED on the connector maintains a solid orange color when connected to a 10
Mbps Ethernet network.
y The LEDs will flash when Ethernet packets are being transmitted or received.
1-9
Page 14
UC-7110 Series User’s Manual Introduction
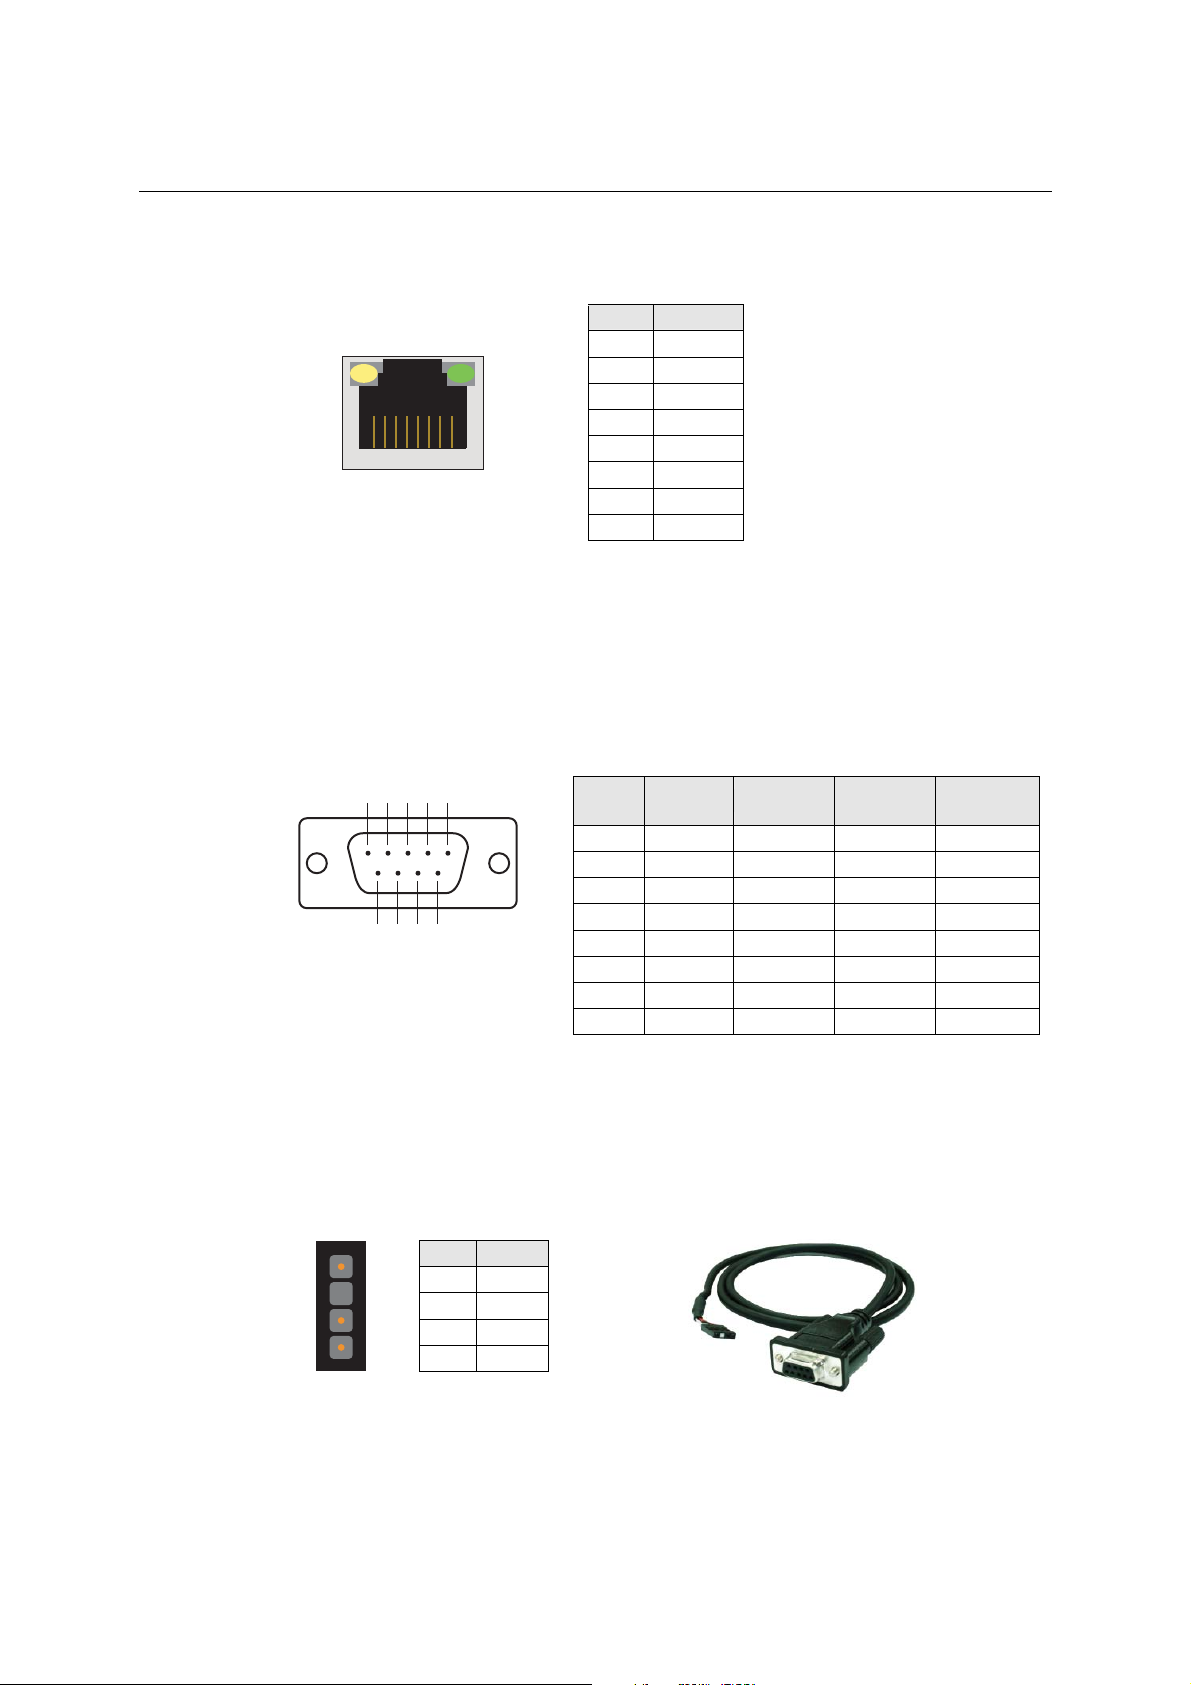
The 10/100 Mbps Ethernet LAN 1 and LAN 2 ports use 8-pin RJ45 connectors. Pinouts for these
ports are given in the following diagram.
8-pin RJ45
10 Mbps
indicator
100 Mbps
indicator
Pin Signal
1 ETx+
2 ETx3 ERx+
4 --5 ---
1
8
6 ERx7 --8 ---
Connecting to a Serial Device
Connect the serial cable between UC-7110 and the serial device(s).
Serial ports P1 and P2 use male DB9 connectors, and can be configured for RS-232/422/485 by
software. The pin assignments are shown in the following table:
DB9 Male Port
12345
6789
Serial Console Port
The serial console port is a 4-pin pin-header RS-232 port. It is designed for serial console
terminals, which are useful for identifying the UC-7110 boot up message.
Serial Console Port & Pinouts
4
3
2
1
Pin Signal
1 TxD
2 RxD
3 NC
4 GND
RS-232/422/485 Pinouts
Pin RS-232 RS-422
RS-485
(4-wire)
RS-485
(2-wire)
1 DCD TxDA(-) TxDA(-) --2 RxD TxDB(+) TxDB(+) --3 TxD RxDB(+) RxDB(+) DataB(+)
4 DTR RxDA(-) RxDA(-) DataA(-)
5 GND GND GND GND
6 DSR --- --- --7 RTS --- --- --8 CTS --- --- ---
Serial Console Cable
1-10
Page 15
UC-7110 Series User’s Manual Introduction
Additional Functions
Reset Button
Press the “RESET” button continuously for more than 5 seconds to load the factory default
configuration. After loading the factory default, the system will reboot automatically. The System
Ready LED will be blinking for the first 5 seconds. We recommend that you only use this function
if the software is not working properly. To reset the µClinux system software, always use the
software reboot command />reboot to protect the integrity of data in the process of being
transmitted. The reset button is not designed to Hard Reboot UC-7110.
ATTENTION
Resetting to factory default will not format the user directory and erase all of the user's data.
Loading factory default will only load the configuration file. The files in UC-7110 that will be
changed include:
a. /etc/boa.conf
b. /etc/hosts
c. /etc/inittab
d. /etc/password
e. /etc/ramfs.img
f. /etc/resolv.conf
g. /etc/version
h. /etc/group
i. /etc/inetd.conf
j. /etc/motd
k. /etc/protocols
l. /etc/rc
m. /etc/services
o. /home/httpd/boa.conf
p. /home/httpd/index.html
ATTENTION
This function only takes effect when the user directory is working correctly. If the user directory
has crashed, the kernel will automatically load factory default.
1-11
Page 16
UC-7110 Series User’s Manual Introduction
Real Time Clock
UC-7110’s real time clock is powered by a lithium battery. We strongly recommend that you do
not replace the lithium battery without the help of Moxa’s support team. If the battery needs to be
changed, contact the Moxa RMA service team for RMA service.
ATTENTION
The battery may explode if replaced by the incorrect type. To avoid this potential danger, always
be sure to use the correct type of battery.
1-12
Page 17

Chapter 2 Getting Started
In this chapter, we explain the basic procedure for getting UC-7110 connected.
This chapter covers the following topics:
Powering on UC-7110
Connecting UC-7110 to a PC
Configuring the Ethernet Interface
Developing Your Applications
2
2
¾ Installing the UC-7110 Tool Chain
¾ Compiling Hello.c
¾ Uploading “Hello” to UC-7110
¾ Running “Hello” on UC-7110
¾ Make File Sample Code
Page 18

UC-7110 Series User’s Manual Getting Started
Powering on UC-7110
Connect the SG wire to the Shielded Contact located on the upper left corner of the UC-7110, and
then power on UC-7110 by connecting the power adaptor. It takes about 16 seconds for the system
to boot up. Once the system is ready, the Ready LED will light up.
ATTENTION
After connecting UC-7110 to the power supply, it will take about 16 seconds for the operating
system to boot up. The green Ready LED will not turn on until the operating system is ready.
Connecting UC-7110 to a PC
There are two ways to connect UC-7110 to a PC.
Console Port
The serial console port offers users with a
convenient mean of connecting to UC-7110.
This method is particularly useful when
using UC-7110 for first time. Since the
communication is over a direct serial
connection, you do not need to know either
of the IP addresses in order to make contact.
Use serial console port settings shown at the
right. Once the connection is established, the
following window will open.
Serial Console Port Settings
Baud rate
Parity
Data bits
Stop bits
Flow Control
Terminal
19200 bps
None
8
1
None
VT100
2-2
Page 19
UC-7110 Series User’s Manual Getting Started
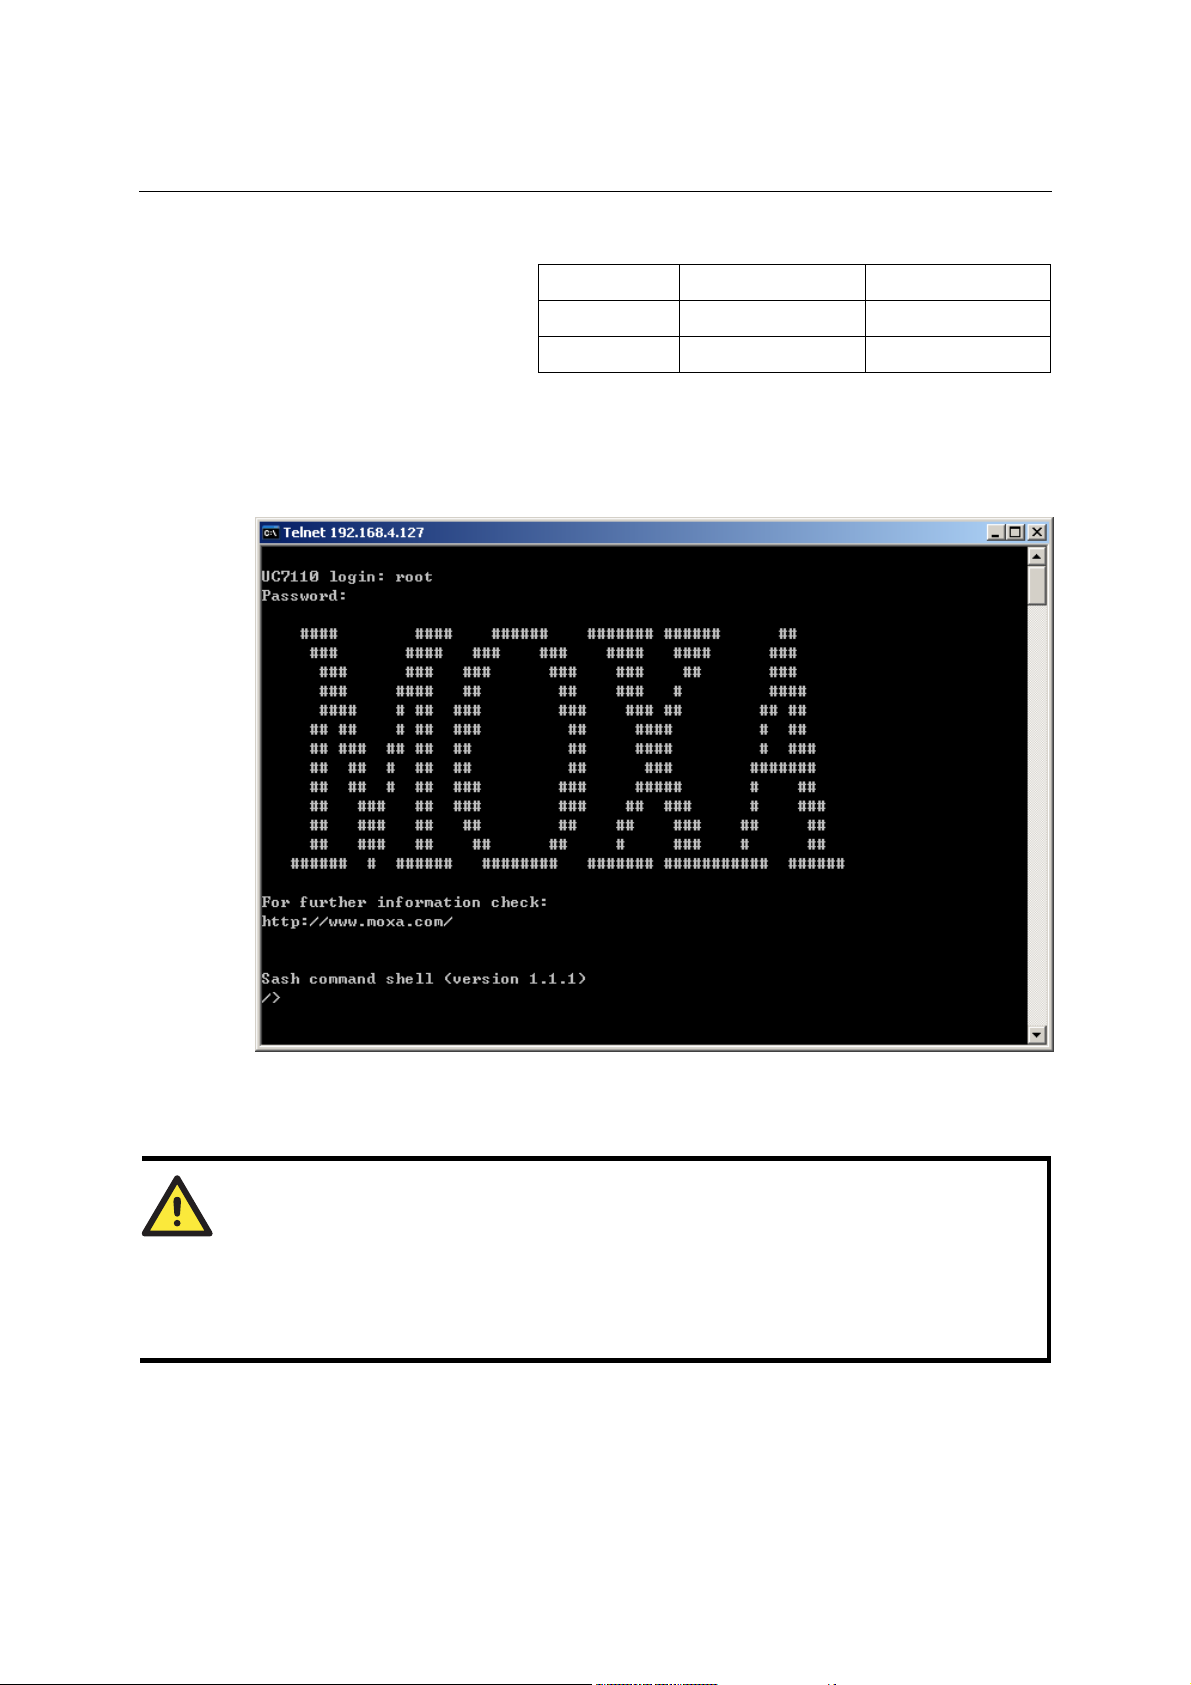
Telnet
If you know at least one of the
two IP addresses and netmasks,
then you can use Telnet to
connect to UC-7110’s console.
Telnet can be used locally by using a cross-over Ethernet cable to connect your computer to
UC-7110, or over a LAN or the Internet. The default IP addresses and netmasks are shown above.
To login, type the Login name and password as requested. The defaults are:
Login: root
Password: root
LAN 1
LAN 2
Default IP Address Default Netmask
192.168.3.127 255.255.255.0
192.168.4.127 255.255.255.0
Once you reach the “Sash command shell” you can proceed to configure UC-7110’s network
settings, as described in the next section.
ATTENTION
y Serial Console Reminder: Remember to choose VT100 as the terminal type. Use the
CBL-RJ45F9-150 cable that comes with UC-7110 to connect to the serial console port. If
you do not get connected on the first try, unplug and then re-plug UC-7110’s power cord.
y Telnet Reminder: When connecting to UC-7110 over a LAN, you must configure your
PC’s Ethernet card to be on the same subnet as the UC-7110 you wish to contact.
2-3
Page 20
UC-7110 Series User’s Manual Getting Started
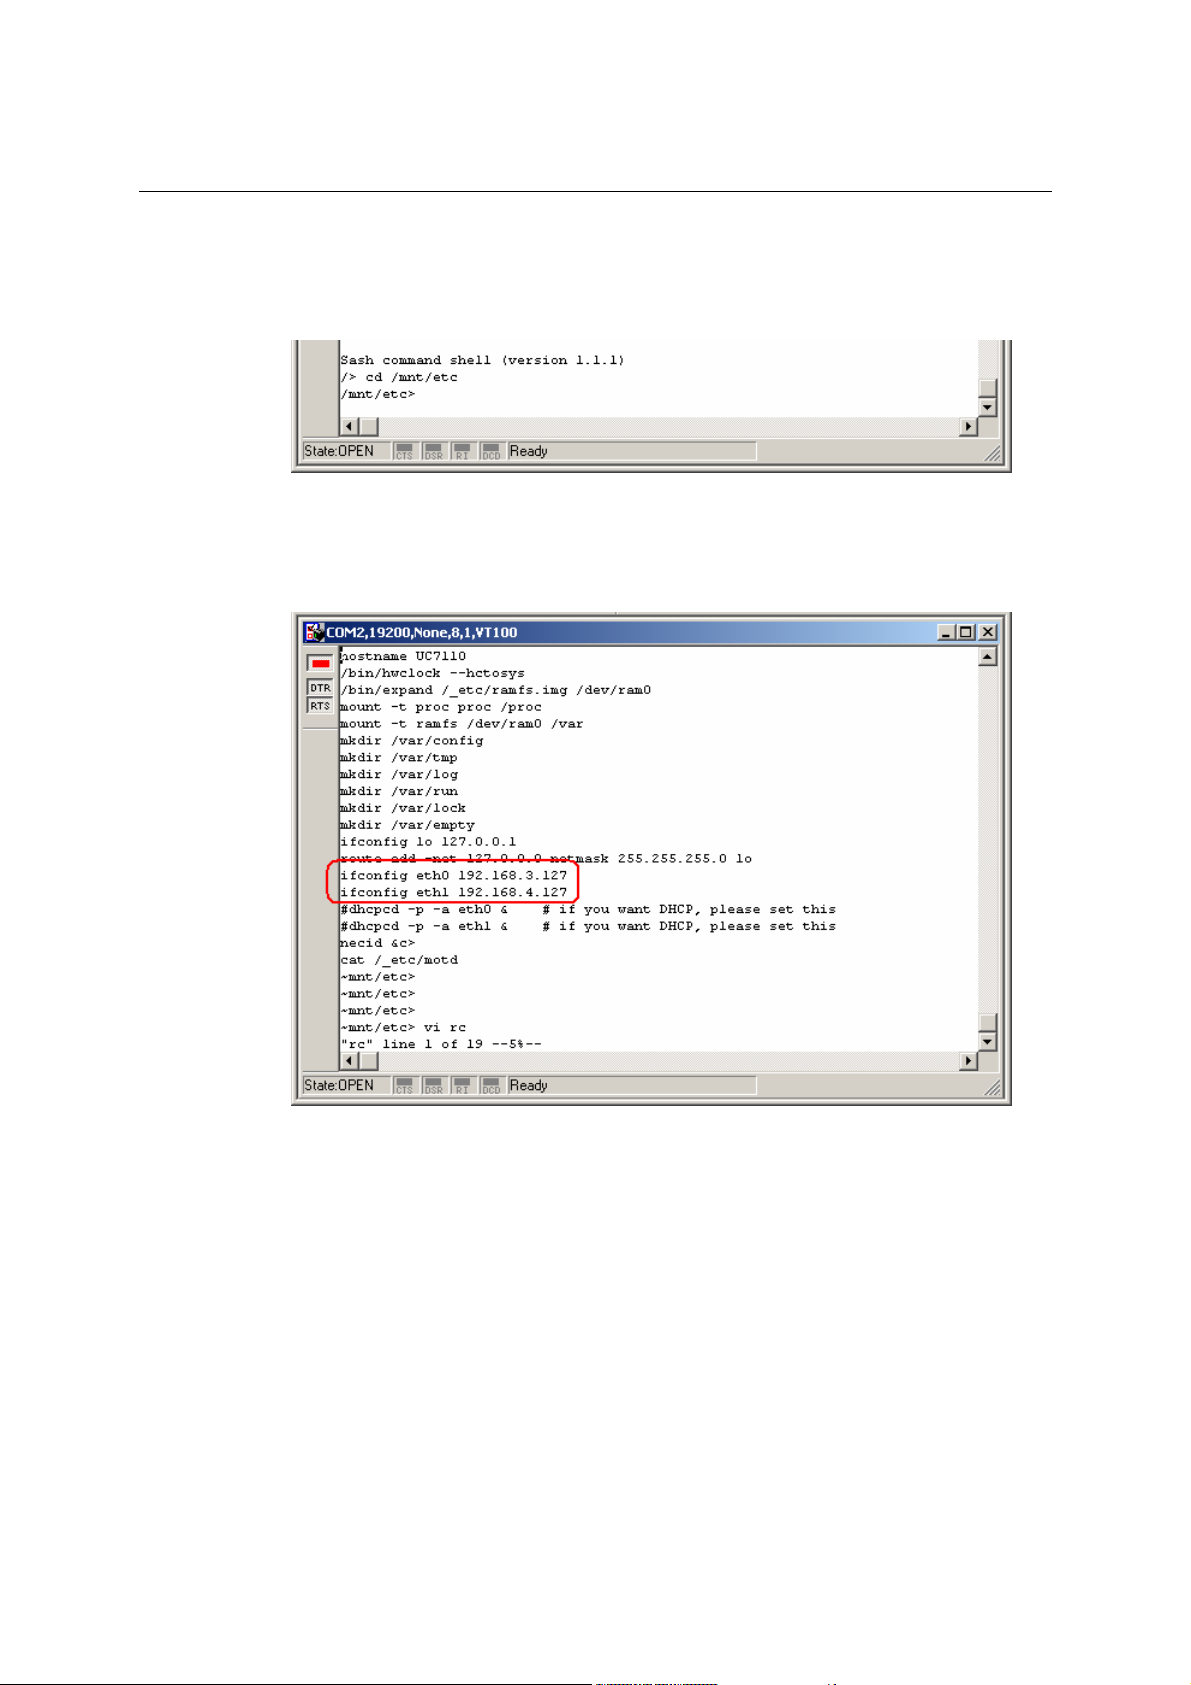
Configuring the Ethernet Interface
In this section we use the serial console to explain how to modify UC-7110’s network settings.
1. Change directories by issuing the command cd /mnt/etc.
2. Type the command vi rc to use VI Editor to edit the configuration file. The IP addresses for
UC-7110’s LAN1 and LAN2 are given as
ifconfig eth0 192.168.3.127
ifconfig eth1 192.168.4.127
as shown in the following figure. Edit these two lines to modify the static IP addresses.
2-4
Page 21

UC-7110 Series User’s Manual Getting Started
3. You may also configure UC-7110 to request IP addresses from a DHCP server. In this case,
use the sharp sign (#) to comment out one or both “ifconfig” lines, and then delete the sharp
sign in front of the “dhcpcd” lines, as shown below. Note that UC-7110 will send out DHCP
broadcast packets, and then get the IP addresses from the first DHCP server that responds.
4. Issue the vi “write” command to save the file, and then reboot. Since UC-7110 only reads the
“rc” file when booting up, you must reboot (e.g., by issuing the vi reboot command) for the
changes to take affect.
ATTENTION
You may reset the IP address immediately by issuing the command
ifconfig eth0 192.168.5.127
(This will change the IP address of LAN1.) Issuing this command will NOT, however, update
the “rc” file in UC-7110’s flash memory, so the next time you reboot, the IP address will revert
to its previous value.
2-5
Page 22

UC-7110 Series User’s Manual Getting Started
Developing Your Applications
Step 1:
Connect UC-7110 to a Linux PC.
Step 2:
Install Tool Chain (GNU Cross Compiler & uClibc).
Step 3:
Configure cross compiler and uClibc environment
variables.
Step 4:
Code & compile your program.
Step 5:
Download program to UC-7110 via FTP or NFS.
Step 6:
Debug the program. If the program is OK, proceed to
Step 7. If the program needs to be modified, go back to
Step 4.
Step 7:
Back up the user directory, and distribute the code to
additional UC-7110 units.
Installing the UC-7110 Tool Chain
x
x86
Cross
Compiler
The PC must have the Linux Operating System pre-installed to install the UC-7110 GNU Tool
Chain. Redhat 7.3/8.0 and compatible versions are recommended. The Tool Chain requires about
100 MB of hard disk space (on your PC). The UC-7110 Tool Chain can be found on the UC-7110
CD. To install Tool Chain, insert the CD into your PC and then issue the following command:
#mount /dev/cdrom /mnt/cdrom
Next, run the following script from the root to installs the compilers, linkers, and libraries in the
/usr/local directory:
#sh /mnt/cdrom/tool-chain/arm-elf-tools-20030314.sh
The Tool Chain installation will take a few minutes to complete.
ATTENTION
You can download the Tool Chain from Moxa’s website (go to the UC-7110 product page, click
on the Documentation & Drivers link, and then click on Go under Driver & Software
Downloads.
The Tool Chain is also available on the
http://www.uClinux.org/pub/uClinux/m68k-elf-tools/arm-elf-tools-20030314.sh.
www.uClinux.org website at the following link:
2-6
Page 23

UC-7110 Series User’s Manual Getting Started
Compiling Hello.c
The Tool Chain path is:
PATH=/usr/local/arm-elf/bin:$PATH
The UC-7110 CD includes several example programs. We use Hello.c to illustrate how to compile
and run applications.
Issue the following commands from your PC to compile Hello.c:
# cd /tmp/
# mkdir example
# cp –r /mnt/cdrom/example/* /tmp/example
Go to the Hello subdirectory, and then issue the command
#make
to compile Hello.c. Finally, execute the program to generate hello and hello.gdb.
2-7
Page 24

UC-7110 Series User’s Manual Getting Started
Uploading “Hello” to UC-7110
To use FTP to upload hello to UC-7110, issue the following commands from the PC side:
#ftp 192.168.3.127
ftp> cd /home
ftp> bin
ftp> put ./hello
ftp> quit
#telnet 192.168.3.127
2-8
Page 25

UC-7110 Series User’s Manual Getting Started
Running “Hello” on UC-7110
To run the “Hello” program issue the following commands from the UC-7110 side:
# chmod 755 hello
#./hello
The words “Hello World” will be printed on the screen.
ATTENTION
Be sure to calculate the amount of Flash Memory used by the User File System in the Flash
ROM. Use one of the following two commands to determine the amount of memory being used:
# df –k or # df
If the flash memory is full, you will no longer be able to save data in Flash ROM. To free up
some memory, use the console cable to connect to UC-7110’s serial console terminal, and then
delete files from the Flash ROM.
2-9
Page 26

UC-7110 Series User’s Manual Getting Started
Make File Example Code
The following Makefile file example codes are copied from the Hello example from UC-7110’s
CD-ROM.
# Generated automatically from Makefile.in by configure.
# $Id: Makefile.in,v 1.59 2002/03/24 22:20:19 jnelson Exp $
.SUFFIXES:
.SUFFIXES: .o .c
.PHONY: clean mrclean distclean depend all dist
GCC_FLAGS = -Wstrict-prototypes -Wpointer-arith -Wcast-align
-Wcast-qual\
-Wtraditional\
-Wshadow\
-Wconversion\
-Waggregate-return\
-Wmissing-prototypes\
-Wnested-externs\
-Wall \
# -Wundef -Wwrite-strings -Wredundant-decls -Winline
srcdir = .
#VPATH = .:./../extras
LDFLAGS = -g,-Wl,-T,/usr/local/arm-elf/lib/elf2flt.ld -elf2flt
LIBS =
CFLAGS = -g -O2 -pipe -Wall -I.
# Change these if necessary
YACC = bison -y
LEX = flex
CC = /usr/local/bin/arm-elf-gcc
CPP = /usr/local/bin/arm-elf-gcc -E
SOURCES = hello.c\
OBJS = $(SOURCES:.c=.o)
all: hello
hello: $(OBJS)
$(CC) -o $@ $^ $(LDFLAGS) $(LIBS)
clean:
rm -f $(OBJS) hello core *.gdb
2-10
Page 27

UC-7110 Series User’s Manual Getting Started
ATTENTION
There is another example that involves modifying the Makefile. If the target source code file is
tcps1.c, then users should modify at least 4 places to replace hello with tcps1.
Copy the Hello example’s Makefile to your source code target directory, and then modify it to
work with your program. After that, follow the procedures outlined in the previous sections:
Compiling Hello.c, Uploading “Hello” to UC-7110, and Running “Hello” on UC-7110.
2-11
Page 28

3
3
Chapter 3 Software Package
This chapter includes information about the software that is used with UC-7110 Series products.
This chapter covers the following topics:
UC-7110 Software Architecture
UC-7110 Software Package
Page 29

UC-7110 Series User’s Manual Software Package
UC-7110 Software Architecture
The pre-installed µClinux Operating System used by UC-7110 follows the standard µClinux
architecture, making programs that follow the POSIX standard easily ported to UC-7110 by using
the GNU Tool Chain provided by
device drivers for the buzzer, and UART for the serial ports are also included.
www.uClinux.org. In addition to the Standard POSIX API,
UC-7110’s Flash ROM has more than one smaller partition, which contain the Boot Loader,
Linux Kernel & Root (/) File System Image, and User Directory partitions.
For most applications, users often spend a lot
time maintaining the operating system and
modifying the system configuration. In order to
save on the total cost of development and
maintenance, UC-7110 is specially design to
User AP
User Directory
(User Configuration)
Mini Root File System
Configuration
partition a “User Directory” for storing the user’s
system configuration parameters.
UC-7110 has a built-in mechanism that prevents
system crashes, helping preserve system
reliability. The procedure is described below.
When the Linux kernel boots up, the kernel
Linux Kernel & Root
Boot Loader
HW
mounts the root file system and then enables
services and daemons. The kernel also looks for
the system configuration parameters via rc or inittab.
Normally, the kernel uses the User Directory to boot up the system. The kernel will only use the
default configuration _etc & _home when the User Directory crashes.
UC-7110 uses ROMFS for the Linux kernel image, Root File System, and Protected configuration,
3-2
Page 30

UC-7110 Series User’s Manual Software Package
and uses JFFS2 for the User Directory.
The partition sizes are hard coded into the kernel binary. You must rebuild the kernel to change the
partition sizes. The flash memory map is shown in the following table.
Flash Context Flash Address Size Access control
Boot loader 0 – 0x3ffff 256 K Read ONLY
Kernet &
Root File System
User Directory 0x400000 – 0x7fffff 4 M
In addition to the flash file systems, a RAM based file system will be mounted on /var/.
0x40000– 0x3fffff 4 M - 256 K
Read ONLY
ROMFS
Read / Write
JFFS2
Read-Only File System (ROMFS)
ROMFS is a read-only file system for Linux. This means that it is a non-journaling file system.
Unlike CRAMFS, ROMFS does not support code compression.
A working Linux system requires the kernel and at least some programs, so obviously a file
system is also needed. Most Linux disk file systems are designed to be high performance,
supporting all POSIX features, and sometimes elaborate recovery from crashes (journaling). This
makes the system quite heavy-weighted, and thus often inappropriate for some special purposes.
Additional information about ROMFS is available at:
http://romfs.sourceforge.net/
Journaling Flash File System (JFFS2)
The flash User Directory is formatted by the Journaling Flash File System (JFFS2), which
places a compressed file system on the flash, transparent to the user.
The Journaling Flash File System (JFFS2) was developed by Axis Communications in Sweden.
JFFS2 provides a file system directly on flash, rather than emulating a block device designed for
use on flash-ROM chips, and it recognizes flash-ROM chips' special write requirements, does
wear-leveling to extend flash life, keeps the flash directory structure in RAM at all times, and
implements a log-structured file system that is always consistent—even if the system crashes or
unexpectedly powers down. It does not require fsck on boot up.
JFFS2, the next version of JFFS, provides improved wear-leveling and garbage-collection
performance, improved RAM footprint and response to system-memory pressure, improved
concurrency and support for suspending flash erases, marking of bad sectors with continued use of
the remaining good sectors (thus enhancing the write-life of the devices), native data compression
inside the file system design; and support for hard links.
Key features of JFFS2 are:
y Directly targeted to Flash ROM
y Robust
y Consistent across power failure
y No integrity scan (fsck) is required at boot time after normal or abnormal shutdown
y Explicit wear leveling
y Transparent compression
3-3
Page 31

UC-7110 Series User’s Manual Software Package
Although JFFS2 is a journaling file system, this does not preclude the loss of data. The file system
will remain in a consistent state across power failures, and will always be mountable. However, if
the board is powered down during a write, then the incomplete write will be rolled back on the
next boot. Any writes that were already completed will not be affected.
Additional information about JFFS2 is available at:
http://sources.redhat.com/jffs2/jffs2.pdf
http://developer.axis.com/software/jffs/
http://www.linux-mtd.infradead.org/
UC-7110 Software Package
bin dev
upkernel
passwd -> tinylogin
login -> tinylogin
tinylogin
telnetd
snmpd
mail
sh
routed
netstat
arp
chat
pppd
portmap
ntpdate
necid
eraseall
kversion
init
expand
inetd
hwclock
ftpd
ftp
mke2fs
e2fsck
discard
dhcpcd
cpu
mtdblock1
mtdr1
mtd1
mtdblock0
mtdr0
mtd0
cum1
cum0
ttyM1
ttyM0
urandom
random
zero
ttypf
ttype
ttypd
ttypc
ttypb
ttypa
ttyp9
ttyp8
ttyp7
ttyp6
ttyp5
ttyp4
ttyp3
ttyp2
ttyp1
ttyp0
3-4
Page 32

UC-7110 Series User’s Manual Software Package
bin dev
busybox
boa
bf
backupfs
downramdisk
upramdisk
ttyS0
tty3
tty2
tty1
tty0
rom1
rom0
ptypf
ptype
ptypd
ptypc
ptypb
ptypa
ptyp9
ptyp8
ptyp7
ptyp6
ptyp5
ptyp4
ptyp3
ptyp2
ptyp1
ptyp0
ppp
pio
rtc
ram1
ram0
null
kmem
mem
cua0
console
tty
3-5
Page 33

Chapter 4 Configuring UC-7110
In this chapter, we describe how to configure UC-7110 Series products.
The following topics are covered in this chapter:
Enabling and Disabling Daemons
Adding a Web Page
IPTABLES
NAT
4
4
Configuring Dial-in/Dial-out Service
Configuring PPPoE
How to mount a remote NFS Server
Upgrading the Kernel & Root File System
Upgrading the User Directory
User Directory Backup—UC-7110 to PC
Loading Factory Defaults
Mirroring the Application Program and Configuration
How to Autostart User Applications on Bootup
Checking the Kernel and User Directory Versions
Page 34

UC-7110 Series User’s Manual Configuring UC-7110
Enabling and Disabling Daemons
The following daemons are enabled when UC-7110 boots up for the first time.
y SNMP Agent daemon: snmpd
y Telnet Server / Client daemon: telnetd
y Internet Daemons: inetd
y FTP Server / Client daemon: ftpd
y WWW Server daemon: boa
ATTENTION
How to enable/disable telnet/ftp server
a. Edit the file ‘/etc/inetd.conf’
Example (default enable):
discard dgram udp wait root /bin/discard
discard stream tcp nowait root /bin/discard
telnet stream tcp nowait root /bin/telnetd
ftp stream tcp nowait root /bin/ftpd -l
b. Disable the daemon by typing ‘#’ in front of the first character of the row.
How to enable/disable /etc/inittab www server
a. Edit the file ‘/etc/inittab’
b. Disable the www service by typing “#” in front of the first character of the row.
How to enable Network Time Protocol
ntpdate is a time adjusting client utility. UC-7110 plays the role of Time client, and sends
requests to the Network Time Server to request the correct time.
Set the time server address for adjusting the system time with the command:
/>ntpdate ntp_server_ip
Save the system time to the hardware’s real time clock, with the command:
/>hwclock --systohc
Visit
http://www.ntp/org for a recommended public NTP server list.
How to update the system time periodically via Network Time Protocol
1. Create a shell script file that includes the following description.
#!/bin/sh
ntpdate ntp_server_ip
hwclock –systohc
sleep 100 Å The min time is 100ms.
2. Save and change this shell script to run-able by typing
chmod 755 <shell-script_name>
Edit the file ‘/etc/inittab’ by adding the following line:
ntp: unkown: /directory/<shell_script_name>
4-2
Page 35

UC-7110 Series User’s Manual Configuring UC-7110
Adding a Web Page
Default Home Page address:
/home/httpd/index.html
You may change the default home page directory by editing the web server’s configuration file,
located at: /home/httpd/boa.conf
Type the following command to edit the boa.conf file:
/mnt/home/httpd>vi boa.conf
To add your web page, place your home page in the following directory:
/home/httpd/
IPTABLES
IPTABLES is an administrative tool for setting up, maintaining, and inspecting the Linux kernel’s
IP packet filter rule tables. Several different tables are defined, with each table containing built-in
chains and user-defined chains.
Each chain is a list of rules that apply to a certain type of packet. Each rule specifies what to do
with a matching packet. A rule (such as a jump to a user-defined chain in the same table) is called
a “target.”
UC-7110 supports 3 types of IPTABLES table: Filter tables, NAT tables, and Mangle tables:
A. Filter Table—includes three chains:
INPUT chain
OUTPUT chain
FORWARD chain
B. NAT Table—includes three chains:
PREROUTING chain—transfers the destination IP address (DNAT)
POSTROUTING chain—works after the routing process and before the Ethernet device
process to transfer the source IP address (SNAT)
4-3
Page 36

UC-7110 Series User’s Manual Configuring UC-7110
OUTPUT chain—produces local packets
sub-tables
Source NAT (SNAT)—changes the first source packet IP address
Destination NAT (DNAT)—changes the first destination packet IP address
MASQUERADE—a special form for SNAT. If one host can connect to the Internet, then
other computers that connect to this host can connect to the Internet when the computer
does not have an actual IP address.
REDIRECT—a special form of DNAT that re-sends packets to a local host independent
of the destination IP address.
C. Mangle Table—includes two chains
PREROUTING chain—pre-processes packets before the routing process.
OUTPUT chain—processes packets after the routing process.
It has three extensions—TTL, MARK, TOS.
The following figure shows the IPTABLES hierarchy.
4-4
Page 37

UC-7110 Series User’s Manual Configuring UC-7110
Incoming
Packets
Mangle Table
PREROUTING Chain
NAT Table
PREROUTING Chain
Local Host
Packets
Mangle Table
INPUT Chain
Filter Table
INPUT Chain
Local
Process
Mangle Table
OUTPUT Chain
NAT Table
OUTPUT Chain
Filter Table
OUTPUT Chain
NAT Table
POSTROUTING Chain
Outgoing
Packets
Other Host
Packets
Mangle Table
FORWARD Chain
Filter Table
FORWARD Chain
Mangle Table
POSTROUTING Chain
UC-7110 supports the following sub-modules. Be sure to use the module that matches your
application.
ip_conntrack ipt_MARK ipt_ah ipt_state
ip_conntrack_ftp ipt_MASQUERADE ipt_esp ipt_tcpmss
ipt_conntrack_irc ipt_MIRROT ipt_length ipt_tos
ip_nat_ftp ipt_REDIRECT ipt_limit ipt_ttl
ip_nat_irc ipt_REJECT ipt_mac ipt_unclean
ip_nat_snmp_basic ipt_TCPMSS ipt_mark
ip_queue ipt_TOS ipt_multiport
ipt_LOG ipt_ULOG ipt_owner
NOTE UC-7110 does NOT support IPV6 and ipchains.
iptables, iptables-restore, iptables-save
Use
to maintain the database.
4-5
Page 38

UC-7110 Series User’s Manual Configuring UC-7110
NOTE IPTABLES plays the role of packet filtering or NAT. Take care when setting up the IPTABLES
rules. If the rules are not correct, remote hosts that connect via a LAN or PPP may be denied
access. We recommend using the Serial Console to set up the IPTABLES.
Click on the following links for more information about iptables.
http://www.linuxguruz.com/iptables/
http://www.netfilter.org/documentation/HOWTO//packet-filtering-HOWTO.html
Since the IPTABLES command is very complex, to illustrate the IPTABLES syntax we have
divided our discussion of the various rules into three categories: Observe and erase chain rules,
Define policy rules, and Append or delete rules.
Observe and erase chain rules
Usage:
# iptables [-t tables] [-L] [-n]
-t tables: Table to manipulate (default: ‘filter’); example: nat or filter.
-L [chain]: List List all rules in selected chains. If no chain is selected, all chains are listed.
-n: Numeric output of addresses and ports.
# iptables [-t tables] [-FXZ]
-F: Flush the selected chain (all the chains in the table if none is listed).
-X: Delete the specified user-defined chain.
-Z: Set the packet and byte counters in all chains to zero.
Examples:
# iptables -L -n
In this example, since we do not use the -t parameter, the system uses the default ‘filter’ table.
Three chains are included: INPUT, OUTPUT, and FORWARD. INPUT chains are accepted
automatically, and all connections are accepted without being filtered.
#iptables –F
#iptables –X
#iptables -Z
Define policy for chain rules
Usage:
# iptables [-t tables] [-P] [INPUT, OUTPUT, FORWARD, PREROUTING, OUTPUT, POSTROUTING]
[ACCEPT, DROP]
-P: Set the policy for the chain to the given target.
INPUT: For packets coming into the UC-7110.
OUTPUT: For locally-generated packets.
FORWARD: For packets routed out through the UC-7110.
PREROUTING: To alter packets as soon as they come in.
POSTROUTING: To alter packets as they are about to be sent out.
Examples:
#iptables –P INPUT DROP
#iptables –P OUTPUT ACCEPT
#iptables –P FORWARD ACCEPT
#iptables –t nat –P PREROUTING ACCEPT
#iptables –t nat –P OUTPUT ACCEPT
#iptables -t nat –P POSTROUTING ACCEPT
In this example, the policy accepts outgoing packets and denies incoming packets.
4-6
Page 39

UC-7110 Series User’s Manual Configuring UC-7110
Append or delete rules:
Usage:
# iptables [-t table] [-AI] [INPUT, OUTPUT, FORWARD] [-io interface] [-p tcp, udp, icmp,
all] [-s IP/network] [--sport ports] [-d IP/network] [--dport ports] –j [ACCEPT. DROP]
-A: Append one or more rules to the end of the selected chain.
-I: Insert one or more rules in the selected chain as the given rule number.
-i: Name of an interface via which a packet is going to be received.
-o: Name of an interface via which a packet is going to be sent.
-p: The protocol of the rule or of the packet to check.
-s: Source address (network name, host name, network IP address, or plain IP
address).
--sport: Source port number.
-d: Destination address.
--dport: Destination port number.
-j: Jump target. Specifies the target of the rules; i.e., how to handle matched packets.
For example, ACCEPT the packet, DROP the packet, or LOG the packet.
Examples:
Example 1: Accept all packets from lo interface.
# iptables –A INPUT –i lo –j ACCEPT
Example 2: Accept TCP packets from 192.168.0.1.
# iptables –A INPUT –i eth0 –p tcp –s 192.168.0.1 –j ACCEPT
Example 3: Accept TCP packets from Class C network 192.168.1.0/24.
# iptables –A INPUT –i eth0 –p tcp –s 192.168.1.0/24 –j ACCEPT
Example 4: Drop TCP packets from 192.168.1.25.
# iptables –A INPUT –i eth0 –p tcp –s 192.168.1.25 –j DROP
Example 5: Drop TCP packets addressed for port 21.
# iptables –A INPUT –i eth0 –p tcp --dport 21 –j DROP
Example 6: Accept TCP packets from 192.168.0.24 to UC-7110’s port 137, 138, 139
# iptables –A INPUT –i eth0 –p tcp –s 192.168.0.24 --dport 137:139 –j ACCEPT
Example 7: Log TCP packets that visit UC-7110’s port 25.
# iptables –A INPUT –i eth0 –p tcp --dport 25 –j LOG
Example 8: Drop all packets from MAC address 01:02:03:04:05:06.
# iptables –A INPUT –i eth0 –p all –m mac –mac-source 01:02:03:04:05:06 –j DROP
NAT
NAT (Network Address Translation) protocol translates IP addresses used on one network into
different IP addresses used on another network. One network is designated the inside network and
the other is the outside network. Typically, UC-7110 connects several devices on a network and
maps local inside network addresses to one or more global outside IP addresses, and un-maps the
global IP addresses on incoming packets back into local IP addresses.
NOTE Click on the following link for more information about iptables and NAT:
http://www.netfilter.org/documentation/HOWTO/NAT-HOWTO.html
NAT Example
The IP address of all packets leaving LAN1 are changed to 192.168.3.127 (you will need to load
4-7
Page 40

UC-7110 Series User’s Manual Configuring UC-7110
the module ipt_MASQUERADE):
IP/Netmask:
Gateway:
PC1 (Linux or Windows)
PC2 (Linux or Windows)
192.168.3.100/24
192.168.3.127
LAN1
LAN1:eth0 192.168.3.127/24
UC-7110
LAN2:eth1 192.168.4.127/24
LAN2
IP/Netmask:
Gateway:
1.
#echo 1 > /proc/sys/net/ipv4/ip_forward
2.
#iptables -t nat –A POSTROUTING –o eth0 –j SNAT --to-source 192.168.3.127
192.168.4.100/24
192.168.4.127
or
3.
#iptables –t nat –A POSTROUTING –o eth0 –j MASQUERADE
Enabling NAT at Bootup
In most real world situations, you should use a simple shell script to enable NAT when UC-7110
boots up, as indicated below:
1. setting iptables
2. iptables-save > /home/xxx.file (xxx.file is the user defined file name)
3. vi /etc/rc
4. Append echo 1 > /proc/sys/net/ipv4/ip_forward
5. Append iptables-resotre /home/xxx.file (xxx.file is the user defined file name)
Configuring Dial-in/Dial-out Service
Dial-out Service
NAT Area / Private IP
Direct cable connection:
y Without username and password, use:
/>pppd connect ‘chat –v’ /dev/ttyM0 38400 crtscts&
y With username and password, use:
/>pppd connect ‘chat –v’ user xxxxx password xxxxx /dev/ttyM0 38400
crtscts&
Connect Using a Modem:
y Use:
/>pppd connect ‘chat –v ATDT<phone_number> CONNECT’ user xxxxx
password xxxxx /dev/ttyM0 38400 crtscts&
4-8
Page 41

UC-7110 Series User’s Manual Configuring UC-7110
ATTENTION
If dial out fails, the pppd connection will be blocked, and the user will need to shut down the
pppd, and re-dial. Since the return value is always OK (regardless of whether or not the
connection is blocked), the AP must be set up to check the network status to determine if the
connection is complete.
Dial-in Service
Direct cable connection:
y Use either of the following:
/>pppd <Local_IP_Address>:<Remote_IP_Address> /dev/ttyM1 38400
local crtscts
or
/>pppd <Local_IP_Address>:<Remote_IP_Address> /dev/ttyM0 38400
local crtscts login auth
Connect Using a Modem:
y Use:
/>pppd connect ‘chat –v AT CONNECT’
<local_IP_Address>:<Remote_IP_Address> /dev/ttyM0 38400 crtscts
login auth
Configuring PPPoE
PPPoE relies on two widely accepted standards: PPP and Ethernet, which permits the use of
PPPoE(Point-to-Point Over Ethernet).
PPPoE is a specification for connecting users on an Ethernet to the Internet through a common
broadband medium, such as a single DSL line, wireless device or cable modem, used by many
ADSL service providers. All users on the Ethernet share a common connection, so the Ethernet
principles that support multiple users on a LAN combine with the PPP principles, which apply to
serial connections.
y Create the Connection:
/>pppd pty "pppoe -I <ETHERNET_INTERFACE> -m 1412" user <USER_NAME>
password <USER_PASSWORD>&
<ETHERNET_INTERFACE>: Ethernet card connected to ADSL modem, for
example, eth0
<USER_NAME>: User account, for example, moxa@adsl.net
<USER_PASSWORD>: Password for user account
If the PPPoE is successfully connected and get IP, you may check by the command below.
y />ifconfig ppp0
How to Mount a Remote NFS Server
Currently, UC-7110 only supports NFS (Network File System) clients. Users can open NFS
service on a Linux PC for UC-7110 to push data to. UC-7110 can use NFS to mount a remote disk
as a local disk for data or log purposes.
4-9
Page 42

UC-7110 Series User’s Manual Configuring UC-7110
1. First, the NFS server must open an export directory and allow access to the IP address. Edit
the file “/etc/exports” on your Linux PC, and then run the NFS daemon. The following
example gives one possibility (refer to the NFS-HOWTO document at
http://nfs.sourceforge.net/nfs-howto/server.html):
/home/usr 192.168.3.1 (rw,no_root_squash,no_all_squash)
2. UC-7110 must run the “portmap” utility. This program is enabled by default in the “/etc/rc”
file. Use the following command to mount the remote NFS server:
/>mount –t nfs <remote-ip>:<remote-export-directory>
<local-directory>
Upgrading the Kernel & Root File System
UC-7110 combines the kernel and root file system into the file uc7110-1.x.x.bin, which can be
downloaded from
Console Terminal or Telnet Console to copy the file to UC-7110.
You can save this file to the UC-7110’s RAM disk, and then upgrade the kernel and root file
system. In what follows, we give a step by step example.
To enable the RAM disk, use the commands given below:
/>upramdisk
www.moxa.com. You must first download this file to your PC, and then use
/>cd ramdisk
Use the built-in FTP client to download the uc7110-1.x.x.bin file from the PC.
/ramdisk>ftp <destination PC’s IP>
Login Name: xxxx
Login Password: xxxx
4-10
Page 43

UC-7110 Series User’s Manual Configuring UC-7110
ftp> bin
ftp> get uc7110-1.x.x.bin
And then use the upkernel command to upgrade the kernel and root file system.
/ramdisk>upkernel uc7110-1.3.11.bin
/ramdisk>reboot
Upgrading the User Directory
UC-7110 uses ROMFS (ROM File System), which is pre-set to READ only, for the kernel and
root file system. UC-7110 provides a read/write user’s directory in the JFFS2 file system. By using
this user’s directory, the system configuration file and user’s program can be stored on this disk.
Search UC-7110’s CD-ROM for the latest user directory file, or download the file from
www.moxa.com. The format is usrdisk-1.x.x.dsk. You must download this file to a PC first,
and then use Console Terminal or Telnet Console to copy the file to the UC-7110.
You can save this file to UC-7110’s RAM disk, and then upgrade the user directory. In what
follows, we give a step by step example.
4-11
Page 44

UC-7110 Series User’s Manual Configuring UC-7110
To enable the RAM disk, use the commands given below:
/>upramdisk
/>cd ramdisk
Use the built-in FTP client to download the usrdisk-1.x.x.dsk file from the PC.
/ramdisk>ftp <destination PC’s IP>
Login Name: xxxx
Login Password: xxxx
ftp> bin
ftp> get usrdisk-1.x.x.dsk
ftp>quit
/ramdisk>bf /ramdisk/usrdisk-1.x.x.dsk
/reboot
4-12
Page 45

UC-7110 Series User’s Manual Configuring UC-7110
User Directory Backup—UC-7110 to PC
To enable the RAM disk, follow the commands given below:
/>upramdisk
/>cd ramdisk
And then use the backupfs command to backup the file system.
/ramdisk>backupfs /ramdisk/usrdisk-backup
The file system will be backed up, and you can use ftp commands to transfer the
usrdisk-backup to the FTP server on the PC.
|
+bin
4-13
Page 46

UC-7110 Series User’s Manual Configuring UC-7110
Loading Factory Defaults
The easiest way to “Load Factory Default” is with “Upgrade User directory.”
Refer to the previous section “How to Upgrade User Directory” for an introduction.
Mirroring the Application Program and Configuration
For some applications, you may need to “Mirror” (or sometimes we said “Ghost”) one UC-7110’s
user directory, and duplicate it to other UC-7110s.
To do this, use the following recommended procedure:
1. Backup the user directory to a PC.
(Refer to the previous topic User Directory Backup—UC-7110 to a PC.)
Hint:
/ramdisk>backupfs /ramdisk/<user defined file name>
2. Download the backed up user directory to the other UC-7110.
(Refer to the previous topic Upgrading the User Directory)
Hint:
/ramdisk>bf /ramdisk/<User directory file name>
How to Autostart User Applications on Bootup
Edit the /etc/rc file by adding your application program. E.g.,
/ap-directory/ap-program &
Checking the Kernel and User Directory Versions
Use the following commands to check the version of the kernel and root file system:
To check the kernel version:
/>kversion
To check the user directory version:
/>cat /etc/version
4-14
Page 47

5
5
Chapter 5 UC-7110 Device API
In this chapter, we discuss the Device API for the UC-7110 Series. We introduce the APIs for the
following functions:
RTC (Real Time Clock)
Buzzer
UART Interface
Page 48

UC-7110 Series User’s Manual UC-7110 Device API
RTC (Real Time Clock)
The device node is located at /dev/rtc. UC-7110 supports µClinux standard simple RTC
control. You must include <linux/rtc.h> to use these functions.
1. Function: RTC_RD_TIME
int ioctl(fd, RTC_RD_TIME, struct rtc_time *time);
Description: Reads time information from RTC.
2. Function: RTC_SET_TIME
int ioctl(fd, RTC_SET_TIME, struct rtc_time *time);
Description: Sets RTC time.
Buzzer
The device node is located at /dev/console. UC-7110 supports µClinux standard buzzer
control. UC-7110’s buzzer runs at a fixed frequency of 100 Hz. You must include <sys/kd.h>
to use these functions.
1. Function: KDMKTONE
ioctl(fd, KDMKTONE, unsigned int arg);
Description: Buzzer will beep, as stipulated by the function
arguments.
UART Interface
The normal tty device node is located at /dev/ttyM0…ttyM1, and modem tty device node is
located at /dev/cum0 … cum1. UC-7110 Series supports µClinux standard termios control. Moxa
UART Device API supports the configuration of ttyM0 to ttyM1 as RS-232/422/485. To use these
functions, after the Tool Chain package is installed, copy the file “CDROM/libuc7110/uc7110.h”
to the directory “/usr/local/arm-elf/include/” on your PC Linux, and then include <uc7110.h> in
your codes.
#define RS232_MODE 0
#define RS485_2WIRE_MODE 1
#define RS422_MODE 2
#define RS485_4WIRE_MODE 3
1. Function: MOXA_SET_OP_MODE
Description: Sets the interface mode.
2. Function: MOXA_GET_OP_MODE
Description: Gets the interface mode.
int mode;
mode=which mode you want to set;
int ioctl(fd, MOXA_SET_OP_MODE, &mode)
int mode;
int ioctl(fd, MOXA_GET_OP_MODE, &mode)
5-2
Page 49

6
6
Chapter 6 UC Finder
UC-7110 comes with a UC Finder utility, which has the sole purpose of searching the LAN or
intranet for UC-7110 units.
For most of applications, it’s not easy to remember the IP addresses of Universal Communicators
connected to the LAN. This is especially true for some problem solving and testing in the field.
The UC Finder utility broadcasts messages over the LAN to search for IP addresses of Universal
Communicators connected to the LAN. UC Finder searches for the class of MAC addresses
assigned to Universal Communicators. UC-7110 supports the GUI-style Windows UC Finder, and
also supports a command line utility for Linux environments.
In this chapter, we discuss the following UC Finder topics:
Windows UC Finder
Linux UCfinder
Page 50

UC-7110 Series User’s Manual UC Finder
Windows UC Finder
The following steps describe how to install UC Finder on a Windows PC.
1. Double click on the UC Finder installation program, Setup.exe, to start the installation.
2. When the Welcome to the UC Finder Setup Wizard window opens, click on Next to
continue.
3. Check the Create a desktop icon box, and then click on Next to continue.
6-2
Page 51

UC-7110 Series User’s Manual UC Finder
4. Check the Launch UC Finder checkbox to use UC Finder immediately after the installation
has finished, and then click on Next to complete the installation.
5. When the UC Finder window opens, click on Broadcast Search to search for all Universal
Communicators connected to the LAN.
6-3
Page 52

UC-7110 Series User’s Manual UC Finder
6. The Searching window will show the Universal Communicators that have been located. You
can click on Stop as soon as the Universal Communicator you are looking for is listed.
7. When the search is complete, the Broadcast Search window closes, and the Model, MAC
Address, and IP Address of all Universal Communicators that were located will be listed in
the UC Finder window.
ATTENTION
UC finder is designed solely to find IP addresses of networked Universal Communicators. It
cannot be used to configure Universal Communicators over the network. If you need to
configure UC’s IP address or other parameters, connect to UC’s console utility by Telnet (over
the network) or serial console (using the serial console cable that came with the product).
The next time you need to run UC Finder, double click on the UC Finder icon located on your
PC’s desktop to launch this utility.
6-4
Page 53

UC-7110 Series User’s Manual UC Finder
Linux ucfinder
To use the Linux ucfinder utility, copy ucfinder from the CD-ROM to your Linux PC, and then
use the command given below to start ucfinder. The ucfinder utility will automatically broadcast a
message over your LAN network to find the IP address of all UC’s connected to the LAN.
#./ucfinder
6-5
Page 54

Appendix ASystem Commands
busybox (V0.60.4): µClinux normal command utility collection
File manager
A
A
Editor
cp
ls
ln
mount
rm
chmod
sync
mv
pwd
df
mkdir
rmdir
head
tail
touch
vi
cat
zcat
grep
cut
find
more
test
sleep
echo
copy file
list file
make symbolic link file
mount and check file system
delete file
change file owner & group & user
sync file system; save system file buffer to hardware
move file
display active file directly
list active file system space
make new directory
delete directory
print the first 10 lines of each file to standard output
print the last 10 lines of each file to standard output
update the access and modification times of each file to the current time
text editor
dump file context
Compress or expand files
print lines matching a pattern
remove sections from each line of files
search for files in a directory hierarchy
dump file by one page
test if file exists or not
sleep (seconds)
echo string
Page 55

UC-7110 Series User’s Manual System Commands
Network
ping
route
netstat
ifconfig
tracerout
tftp
telnet
ftp
iptables-restore
iptables
iptables-save
Process
kill
killall
ps
sleep
Other
dmesg
stty
zcat
mknod
free
date
env
clear
reboot
halt
du
gzip, gunzip
hostname
tar
MOXA Special Utilities
ping to test network
routing table manager
display network status
set network IP address
trace route
tftp protocol
user interface to TELNET protocol
file transfer protocol
restore iptables configuration file to network
iptables command
save recent iptables configuration to file
kill process
kill process by name
report process status
suspend command on time
dump kernel log message
set serial port
dump .gz file context
make device node
display system memory usage
print or set the system date and time
run a program in a modified environment
clear the terminal screen
reboot / power off/on the server
halt the server
estimate file space usage
compress or expand files
show system’s host name
tar archiving utility
backupfs
bf
cat /etc/version
upramdisk
downramdisk
kversion
setinterface
backup file system (user directory)
build file system (user directory)
show user directory version
mount ramdisk
unmount ramdisk
show kernel version
set UART interfaces program
A-2
Page 56

B
B
Appendix BSNMP Agent with MIB II & RS-232 Like
Group
UC-7110 has a built-in SNMP (Simple Network Management Protocol) agent that supports
RFC1317 RS-232 like group and RFC 1213 MIB-II. The following table lists the variable
implementation for UC-7110.
The full SNMP object ID of UC-7110 is .iso.3.6.1.4.1.8691.9.7.1.1.0.
Note: UC-7110 does not support SNMP trap.
RFC1213 MIB-II supported SNMP variables:
system MIB interface MIB at MIB icmp MIB
sysDescr
sysObjectID
sysUpTime
sysContact
sysName
sysLocation
sysServices
ifNumber
ifTable
ifIndex
ifDescr
ifType
ifMtu
ifSpeed
ifPhysAddress
ifAdminStatus
ifOperStatus
ifLastChange
ifInOctets
ifInUcastPkts
ifInNUcastPkts
ifInDiscards
ifInErrors
ifInUnknownProtos
ifOutOctets
ifOutUcastPkts
ifOutNUcastPkts
ifOutDiscards
ifOutErrors
ifOutQLen
ifSpecific
atTable
atIfIndex
atPhysAddress
atNetAddress
icmpInMsgs
icmpInErrors
icmpInDestUnreachs
icmpInTimeExcds
icmpInParmProbs
icmpInSrcQuenchs
icmpInRedirects
icmpInEchos
icmpInEchoReps
icmpInTimestamps
icmpInAddrMasks
icmpInAddrMaskReps
icmpOutMsgs
icmpOutErrors
icmpOutDestUnreachs
icmpOutTimeExcds
icmpOutParmProbs
icmpOutSrcQuenchs
icmpOutRedirects
icmpOutEchos
icmpOutEchoReps
icmpOutTimestamps
icmpOutAddrMasks
icmpOutAddrmaskReps
Page 57

UC-7110 Series User’s Manual SNMP Agent with MIB II & RS-232 Like Group
ip MIB tcp MIB udp MIB
ipForwarding
ipDefaultTTL
ipInReceives
ipInHdrErrors
ipInAddrErrors
ipForwDatagrams
ipInUnknownProtos
ipInDiscards
ipInDelivers
ipOutRequests
ipOutDiscards
ipOutNoRoutes
ipReasmTimeout
ipReasmReqds
ipReasmFails
ipFragOKs
ipFragFails
ipFragCreates
ipAddrTable
ipAdEntAddr
ipAdEntIfIndex
ipAdEntNetMask
ipAdEntBcastAddr
ipAdEntReasmMaxSize
ipRouteTable
ipRouteDest
ipRouteIfIndex
ipRouteMetric1
ipRouteMetric2
ipRouteMetric3
ipRouteMetric4
ipRouteNextHop
ipRouteType
ipRouteProto
ipRouteAge
ipRouteMask
ipRouteMetric5
ipRouteInfo
ipNetToMediaTable
ipNetToMediaIfIndex
ipNetToMediaPhysAddress
ipNetToMediaNetAddress
ipNetToMediaType
ipRoutingDiscards
tcpRtoAlgorithm
tcpRtoMin
tcpRtoMax
tcpMaxConn
tcpActiveOpens
tcpPassiveOpens
tcpAttemptFails
tcpEstabResets
tcpCurrEstab
tcpInSegs
tcpOutSegs
tcpRetransSegs
tcpConnTable
tcpConnState
tcpConnLocalAddress
tcpConnLocalPort
tcpConnRemAddress
tcpConnRemPort
tcpInErrs
tcpOutRsts
udpInDatagrams
udpNoPorts
udpInErrors
udpOutDatagrams
udpTable
udpLocalAddress
udpLocalPort
B-2
Page 58

UC-7110 Series User’s Manual SNMP Agent with MIB II & RS-232 Like Group
snmp MIB
snmpInPkts
snmpOutPkts
snmpInBadVersions
snmpInBadCommunityNames
snmpInBadCommunityUses
snmpInASNParseErrs
snmpInTooBigs
snmpInNoSuchNames
snmpInBadValues
snmpInReadOnlys
snmpInGenErrs
snmpInTotalReqVars
snmpInTotalSetVars
snmpInGetRequests
snmpInGetNexts
snmpInSetRequests
snmpInGetResponses
snmpInTraps
snmpOutTooBigs
snmpOutNoSuchNames
snmpOutBadValues
snmpOutGenErrs
snmpOutGetRequests
snmpOutGetNexts
snmpOutSetRequests
snmpOutTraps
snmpEnableAuthenTraps
RFC1317 RS-232 like group supported variables
rs232 MIB
rs232Number
rs232PortTable
rs232PortIndex
rs232PortType
rs232PortInSigNumber
rs232PortOutSigNumber
rs232PortInSpeed
rs232PortOutSpeed
rs232AsyncPortTable
rs232AsyncPortIndex
rs232AsyncPortBits
rs232AsyncPortStopBits
rs232AsyncPortParity
rs232InSigTable
rs232InSigPortIndex
rs232InSigName
rs232InSigState
rs232OutSigTable
rs232OutSigPortIndex
rs232OutSigName
rs232OutSigState
B-3
Page 59

C
C
Appendix CFAQ for UC-7110
FAQ 1 Why can I only use vfork( ),and am unable to use fork( )?
Answer 1 uClinux only supports vfork( ). It does not support fork( ). Note that when using
vfork( ), the parent process will hang until the son process calls an exec group API,
or exits.
FAQ 2 When using a pthread group API, why can’t I use SIGUSR1 and SIGUSR2?
Answer 2 Since a pthread group API uses SIGUSR1 and SIGUSR2 to do a pthread control
suspend, restart exit function, we cannot use the SIGUSR1 and SIGUSR2 signals.
You will get the same result if you link the pthread. This means that you cannot use
-1pthred to add an option to the linker.
FAQ 3 What is the correct format for linking to an AP?
Answer 3 arm-elf-gcc –W1, -elf2flt
(In this example, the AP converts elf format to flat format.)
FAQ 4 What stack size can I use when creating a user application?
Answer 4 First note that UC-7110 is not an MMU processor. The OS is uClinux, so you must
transfer your application from ELF to FLAT format. The transfer utility (on the PC)
assigns a stack size of 0x1000 by default. If your application needs a bigger stack
size, you must use an option that specifies stack size when transferring the
application from ELF to FLAT format. The following LDFLAGS shows how to
write the stack size option:
LDFLAGS = -g,-Wl,-T,/usr/local/arm-elf/lib/elf2flt.ld
-elf2flt= "-s 32768"
You can combine this with a compress option. E.g.:
LDFLAGS = -g,-Wl,-T,/usr/local/arm-elf/lib/elf2flt.ld
-elf2flt= "-z –r -s 32768"
Refer to the next FAQ for compress options.
Keep in mind that the stack size must be indicated in decimal format. You cannot
use hex format (i.e., numbers that begin with “0x”). The following LDFLAGS
command will fail:
LDFLAGS = -g,-Wl,-T,/usr/local/arm-elf/lib/elf2flt.ld
-elf2flt= "-s 0x2000"
Use the ‘flthdr’ utility (on a PC) to check the current stack size.
Page 60

UC-7110 Series User’s Manual FAQ for UC-7110
FAQ 5 How do I compress an application program?
Answer 5 UC7110’s kernel supports ZFLAT format files. This means that when you compile
the program, you can add the compress option to reduce the size of the binary file.
Doing so will reduce the required flash space on the user disk. The disadvantage of
using the compress option is that it takes about 5% to 10% more time when loading
the program from Flash to RAM. After uncompressing and loading the program to
RAM, there is no difference. You just need to modify the makefile, LDFLAGS, as
follows:
LDFLAGS = -g,-WI,-T,/usr/local/arm-elf/lib/elf2flt.ld -elf2flt= “-z –r”
NOTE: The user directory’s JFFS2 file system also has a compress function. If you
compile the program with the ZFLAT feature, the file will only be compressed by an
additional 5% to 10% when you copy the program into JFFS2 Flash.
FAQ 6 Since UC-7110’s tool chain currently does not support GDB server, how do I
disable a function by using the Makefile example to generate the gdb file?
Answer 6 Edit the file /usr/local/arm-elf/bin/ld on the PC Linux platform. Add one line after
line 133 (the content of line 133 is: rm –f $OFILE.elf #not needed for any reason)
as follows: rm –f $OFILE.gdb. I.e., after you edit the file lines 133 and 134 will
look like:
Line 133: rm –f $OFILE.elf #not needed for any reason
Line 134: rm –f $OFILE.gdb
C-2
Page 61

D
D
Appendix DService Information
This appendix shows you how to contact Moxa for information about this and other products, and
how to report problems.
In this appendix, we cover the following topics.
MOXA Internet Services
Problem Report Form
Product Return Procedure
Page 62

UC-7110 Series User’s Manual Service Information
MOXA Internet Services
Customer satisfaction is our number one concern, and to ensure that customers receive the full
benefit of our products, Moxa Internet Services has been set up to provide technical support, driver
updates, product information, and user’s manual updates.
The following services are provided
E-mail for technical support................................
World Wide Web (WWW) Site for product information:
.............................
support@moxa.com.tw
http://www.moxa.com
D-2
Page 63

UC-7110 Series User’s Manual Service Information
Problem Report Form
MOXA UC-7110 Series
Customer name:
Company:
Tel: Fax:
Email: Date:
1. Moxa Product: UC-7110
2. Serial Number: _________________
Problem Description: Please describe the symptoms of the problem as clearly as possible, including any error
messages you see. A clearly written description of the problem will allow us to reproduce the symptoms, and
expedite the repair of your product.
D-3
Page 64

UC-7110 Series User’s Manual Service Information
Product Return Procedure
For product repair, exchange, or refund, the customer must:
Provide evidence of original purchase.
Obtain a Product Return Agreement (PRA) from the sales representative or dealer.
Fill out the Problem Report Form (PRF). Include as much detail as possible for a shorter
product repair time.
Carefully pack the product in an anti-static package, and send it, pre-paid, to the dealer. The
PRA should be visible on the outside of the package, and include a description of the problem,
along with the return address and telephone number of a technical contact.
D-4
 Loading...