

Page 1

MOXA INTERNET SHARER
SD1000
USER’S MANUAL
Page 2

Copyright Notice
This documentation is copyrighted by Moxa Technologies Co., Ltd. All rights
are reserved. Moxa Technologies reserves the right to make improvements to
the products described in this manual at any time without notice.
Information provided in this manual is intended to be accurate and reliable.
However, Moxa Technologies assumes no responsibility for its use, nor for
any infringements of rights of the fourth parties which may result from its use.
MOXA is a registered trademark of Moxa Technologies Co. Ltd. Other
product and corporate names may be trademarks of other companies and are
used only for explanation and to the owners benefit, without intent to
infringe.
Where to Contact for Help
Customer support is available by mail, fax, email or phone. Before
contacting Customer Support, we recommend you re-checking this
manual for help.
Moxa Headquarters Moxa Tech USA (CA) Moxa Tech USA (NY)
Tel: +886-2-86658535 Tel: (408)734-2224 Tel: (718)672-7354
Fax: +886-2-86656536 Fax: (408)734-4442 Tel: (718)565-9273
Www.moxa.com ftp.moxa.com Service@moxa.com.tw
Page 3

TABLE OF CONTENTS
Chapter 1 Overview 1-1
Features 1-2
Package Checklist 1-3
Functionality and Protocol 1-3
Front Panel View 1-4
Rear Panel View 1-5
Chapter 2 Before Installing Internet Sharer 2-1
What do you need before installation? 2-2
Ordering a phone line 2-3
Ordering an ISP account 2-3
Preparing PC running with LAN interface 2-3
ISP Worksheet 2-4
Chapter 3 Connecting Internet Sharer and Equipment 3-1
Connecting your modem 3-2
Connecting the Internet Sharer 3-4
Connecting your PC 3-5
Chapter 4 Installing and Configuring Internet Sharer 4-1
Installing software wizard 4-2
Starting Internet Sharer Manager 4-9
Basic Configuration 4-11
Uninstalling Internet Sharer Software 4-13
Upgrading Internet Sharer Firmware 4-14
Page 4

Chapter 5 Advanced Configuration 5-1
LAN IP address 5-2
Admin Password 5-3
DHCP 5-4
Internet IP address 5-6
Email Account 5-7
Login Script 5-8
DNS 5-10
Modem Setting 5-11
Chapter 6 Configuring Windows 95 or Windows NT 6-1
Setting up a Windows 95 Network 6-2
Installing Network Card on Windows 95 6-2
Installing TCP/IP on Windows 95 6-4
Configuring Windows 95 TCP/IP 6-7
Setting Up a Windows NT Network 6-10
Installing Network Card on Windows NT 6-10
Configuring Windows NT TCP/IP as DHCP client 6-11
Manually Configuring your TCP/IP 6-12
Chapter 7 Virtual EMail Server 7-1
Assigning Virtual Email Accounts for Your Team 7-2
Configuring Virtual Email Boxes on Internet Sharer 7-3
Set up Virtual Email Account on Outlook Express 7-5
Setting up through Internet Connection Wizard 7-5
Page 5

Email account Modification 7-11
Setup Virtual Email Account on Netscape Communicator 7-13
How to send Email to another Virtual EMail Account? 7-15
Sending and Receiving Mails 7-16
Chpater 8 Internet Sharer Monitor 8-1
What to See in the Internet Sharer Monitor? 8-2
Even Logs 8-3
Appendix A Troubleshooting A-1
Problem during installation A-1
Problems while connecting to Internet A-3
Other Problems while using Internet Sharer A-4
Appendix B Expanding Your Network B-1
Appendix C LED Descriptions C-1
Appendix D Cable Pinouts D-1
RS-232 DB9 WAN Port Pinouts with Direct Connect Wiring D-2
10BaseT RJ-45 Port Pinouts D-2
Straight-through 10BaseT Cable to Connect to a HUB uplink port D-3
Signal Switched Cable to Connect to a HUB without uplink port. D-3
Page 6

Overview
Welcome to Moxa Internet Sharer. A small sharing device gives your
team workers easy and simultaneously access to Internet.
This chapter is an overview of the Internet Sharer and includes the
following:
q Features
q Package Checklist
q Functionality and Protocol
q Front Panel View
q Rear Panel View
1
1
Overview 1-1
Page 7

The Moxa Internet Sharer is a simple, yet powerful device with one
high-speed serial port and four 10BaseT ports that gives you
simultaneous Internet access by sharing one phone line, one modem
and one Internet account. With the simple configuration, setup your
whole network for sharing will be able to be done in 5 minutes. With
its excellent functionalities, such as dial-on-demand, IP address
translation, virtual mailbox etc., it provides you with the most costeffective Internet access solution.
Features
§ Supports 56 Kbps and ISDN high-speed connectivity to allow
multiple users to Access ISP simultaneously through one dial line,
one modem and one account.
§ Built-in Virtual Server provides each staff with individual mailbox
without Mail server on your net.
§ Dial-on-demand and auto-disconnection without dialing operation.
§ Allows 1 to 4 and more users connecting to Internet simultaneously.
§ Compatible with most OS platforms.
§ Easy to uplink to another HUB.
§ Compatible with various Web browsers, FTP, Email services.
§ Plug & Play, requires no technical knowledge.
§ Security and Natural Firewall.
§ In conformance to FCC, CE.
§ Easy Configuration on Windows 95 or Windows NT.
1-2 Moxa Internet Sharer User’s Manual
Page 8

Package Checklist
Upon open your Moxa Internet Sharer, your will find :
1. One Moxa Internet Sharer
2. One 110V or 220V power adapter
3. One 3 1/2” floppy disk
4. This user’s manual.
The user’s manual is ideal for advanced users for full understanding
about all the related information and configuration. Please contact with
your distributor if anything is missing.
Functionality and Protocol
§ Virtual mailbox: 64
§ TCP sessions: 64, concurrent
§ Dial-On-Demand and automatic disconnection
§ Application Protocol: Telnet, HTTP, SMTP, POP3, NNTP, FTP,
IRC,Gopher
§ Network protocol: TCP/IP, DHCP, BOOTP
§ Security supported: PAP/CHAP
§ Fully compatible with ISP dial-up PPP protocol.
§ Compatible with all popular Internet application (Web browser,
email, FTP etc.)
Overview 1-3
Page 9
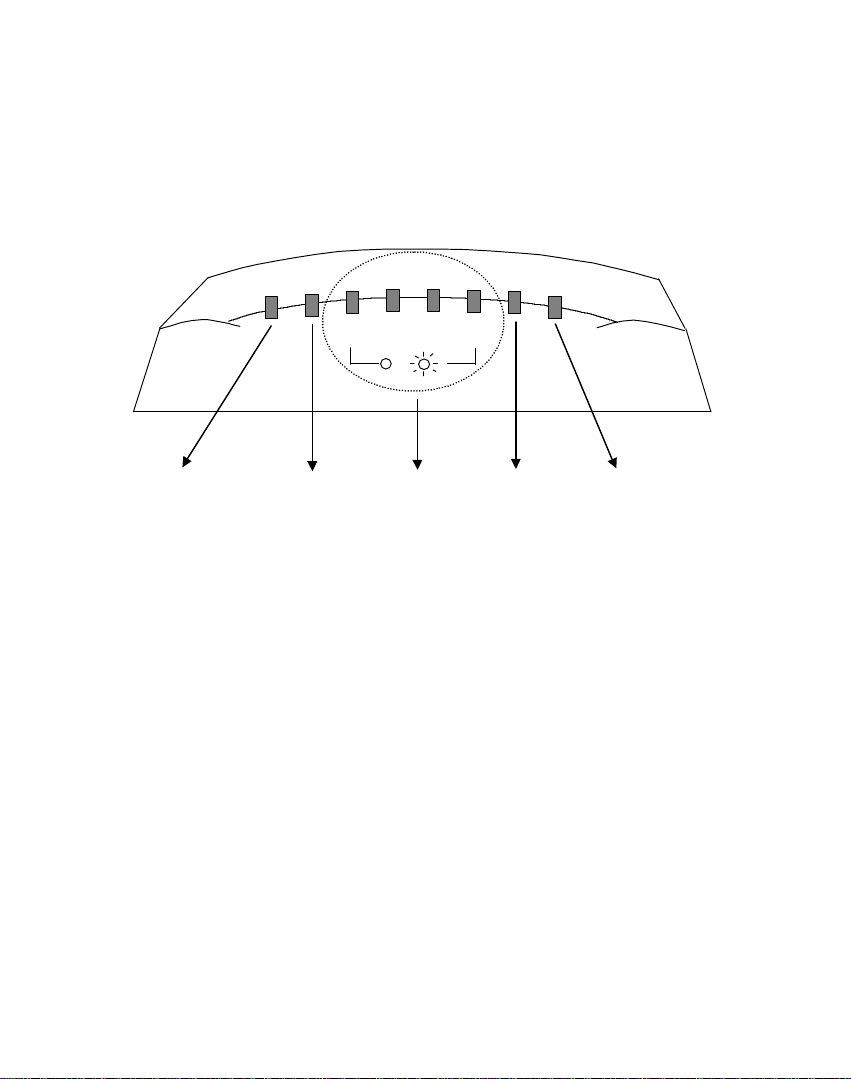
Front Panel View
Power Network Status LAN Modem
Status
COM
4 Note: For detail description, check with Appendix C LED
description.
1-4 Moxa Internet Sharer User’s Manual
Page 10
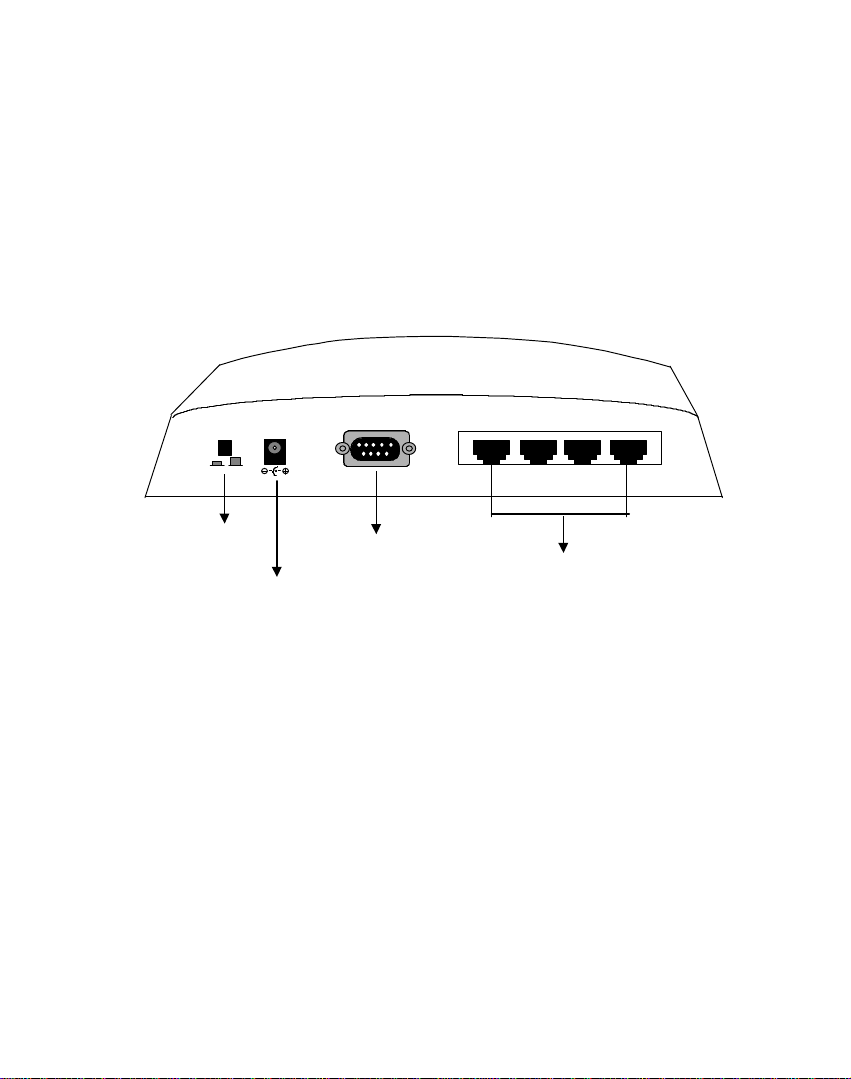
Rear Panel View
Power
Switch
Power
Connector
Serial
Connector
LAN Interface RJ45
Overview 1-5
Page 11

1-6 Moxa Internet Sharer User’s Manual
Page 12

2
2
Before Installing Internet Sharer
This chapter tells you what equipment you need to prepare before you start
Installing Internet Sharer and continue to access to Internet. Follow the list to
prepare all the equipment and list the information carefully.
q What do you need before installation?
q Ordering a phone line
q Ordering an ISP account
q Prepare a PC running Window95 or Windows NT with LAN interface
q Complete your ISP Worksheet
Before Installing Internet Sharer 2-1
Page 13

What do you need before installation?
You need one computer running Microsoft Windows 95 or Windows
NT 4.0 to configure the Internet Sharer. The Setup Wizard program on
the disk installs the Internet Sharer Manager and a Monitor utility to
your Computer. You may install the Setup program to all Computers on
the LAN to ease the configuration of networking and install the
monitor utility to every computer.
Check with the equipment you have before you start installing Internet
Sharer. Below lists the equipment needed for typical dial-up Internet
connection.
§ Internet Service Provider (ISP) dial-up account - only one account is
needed
§ Modem or ISDN terminal adapter
§ RS232 Cable for Modem (DB9 male or DB25 male) to Internet Sharer
(DB9 female). Usually you can get this cable from your modem
package.
§ One dedicated phone line or ISDN line
§ Ethernet cards for your Computers
§ RJ45 to RJ45 cables to connect your LAN cards 10BaseT interface to
Internet Sharer
§ At least one computer running Windows 95 or Windows NT
4 Note : There are more connection methods supported by Internet
Sharer. They are leased line and direct link. Please refer to
Chapter 4 Link Connection Type under Basic Configuration.
2-2 Moxa Internet Sharer User’s Manual
Page 14

Ordering a phone line
You may use your existing phone line for regular modem connection to
your ISP to save your budget. Or, you may apply for another phone
line solely used for Internet Access. For faster access, you may
consider applying ISDN line if that is available at your area.
Ordering an ISP account
If you don’t have an ISP account, contact the Internet Service Provider
(ISP) you choose and set up an account. Write down all information to
the ISP Worksheet on page 2-5 to make sure you have all the
information to set up the Internet Sharer.
You may check with your friends, your phone carrier or local yellow page
about who is the best ISP suitable for you.
Preparing PC running with LAN interface
You must have a computer with network interface to connect to
Internet Sharer so the Internet Sharer can provide the sharing functions.
Prepare one computer installed with Windows 95 and Windows NT.
Purchase an Ethernet network card and install the needed driver
TCP/IP. After you finish these basic equipment and tools, you may
proceed to install Internet Sharer. If you are not an experienced user,
please refer detail installation of your network card and finish the
installation steps. For your convenience of configuring your network,
you may check with Chapter 6 for how to configure your PC
Before Installing Internet Sharer 2-3
Page 15

4 Note : Chapter 6 tells you more about how to add network to your PC.
Don’t miss it if you are not familiar with networking.
ISP Worksheet
Write down the information that you obtain from your Internet Service
Provider on the next page. This worksheet contains the needed information
for you to configure Internet Sharer.
2-4 Moxa Internet Sharer User’s Manual
Page 16
ISP Worksheet
ISP Name:
User Name:
Password:
DNS IP address: . . .
Dial up phone number:
Do you have a Static IP address?
o No
o Yes
Your IP Address . . .
Email account :
Email Password:
Before Installing Internet Sharer 2-5
Page 17

2-6 Moxa Internet Sharer User’s Manual
Page 18

3
3
Connecting the Internet Sharer
and Equipment
After preparing all the equipment and account listed at Chapter 2, your
team are just few steps away to use the Internet Sharer freely and enjoy
the fun. Now you need to put all things together. Follow the instruction
below to connect your equipment step-by-step.
q Connecting your modem
q Connecting Internet Sharer
q Connecting your PC
ConnectingThe Internet Sharer and Equipment 3-1
Page 19
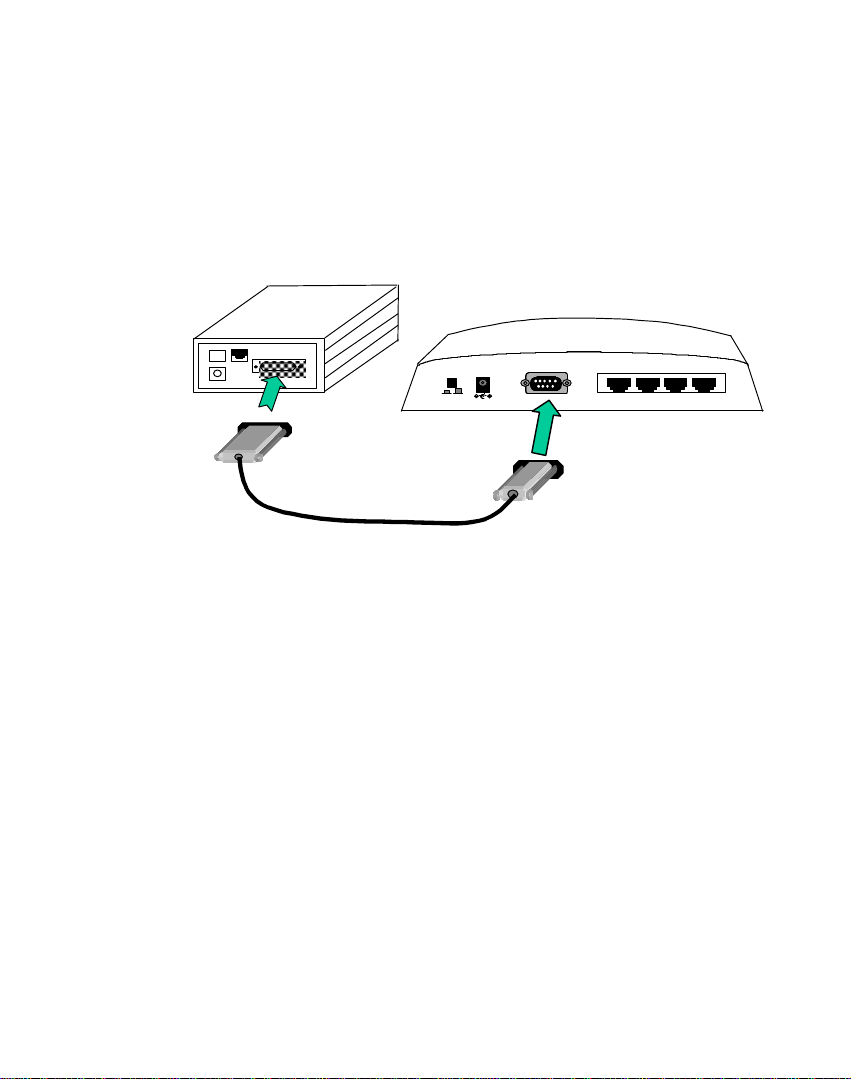
Connecting your modem
§ Connect the serial cable from your external modem or ISDN
terminal adapter to the serial connector on the back of the Internet
Sharer.
4 Note: You may check with your Modem User s Manual if you find
any problem or you want to know more about modem.
3-2 Moxa Internet Sharer User’s Manual
Page 20
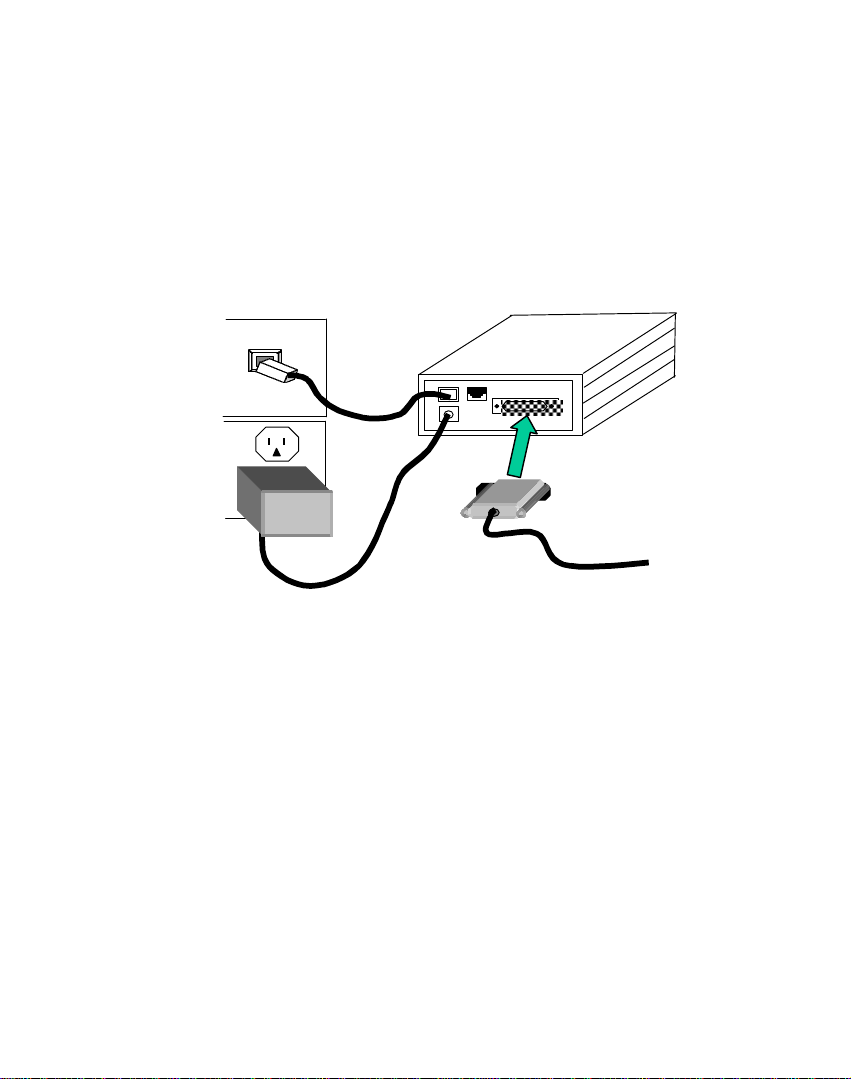
§ Connect the telephone cable from the wall outlet to the Line in port
of your modem.
§ Connect the modem power supply to your modem. Plug the other
end into a power outlet.
§ Power on your modem.
ConnectingThe Internet Sharer and Equipment 3-3
Page 21

Connecting the Internet Sharer
§ Connect the Internet Sharer power cord to the back of Internet
Sharer and to the wall outlet.
§ Connect one end of Ethernet cable to the back of the Internet
Sharer’s RJ-45 connector and a 10Mbps.
§ Power on the Internet Sharer
3-4 Moxa Internet Sharer User’s Manual
Page 22
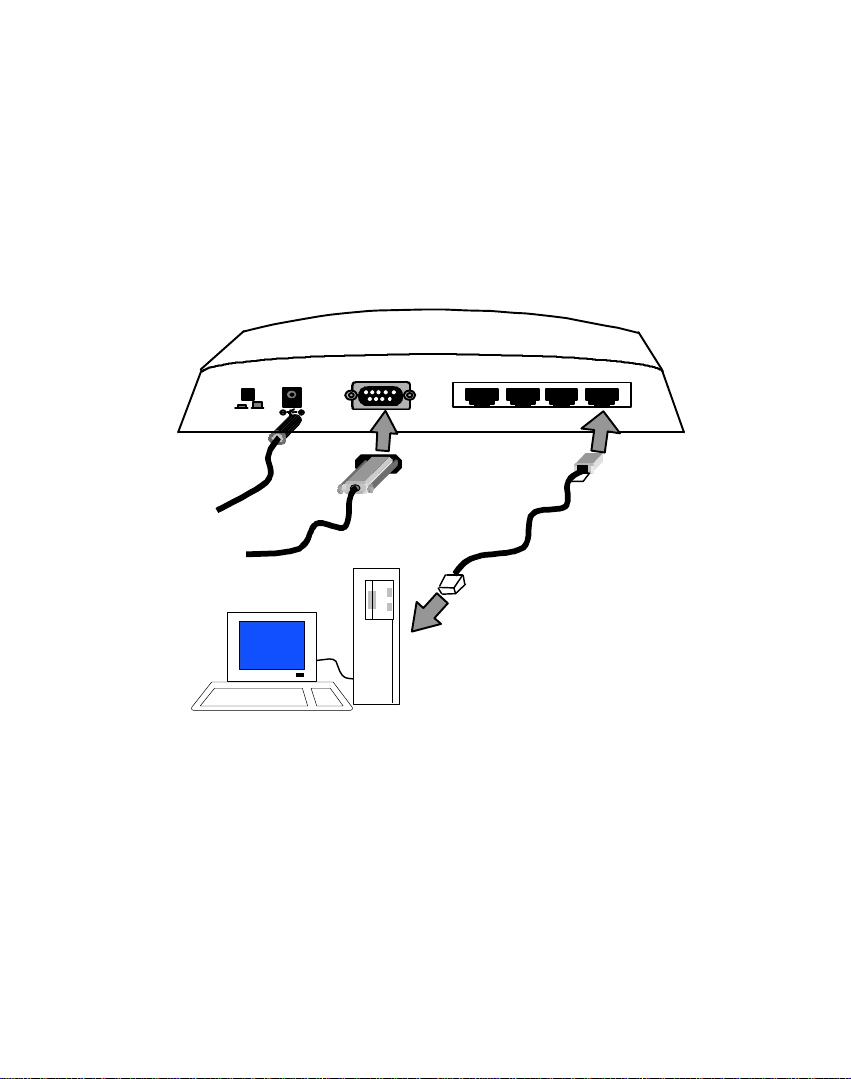
Connecting your PC
Use the Ethernet RJ-45 to RJ-45 cable you have prepared from the
previous Chapter to connect the network interface on the back of your
computer to the back sockets of Internet Sharer.
4 Note : If you have an existing TCP/IP network now, you may
continue the installation now. If you recently purchase a
network card, you may follow the network card user
manual to install the card and configure the TCP/IP step by
step. You may also check with Chapter 6 Configuring your
PC for detail.
ConnectingThe Internet Sharer and Equipment 3-5
Page 23

3-6 Moxa Internet Sharer User’s Manual
Page 24

4
4
Installing Software and Configuring
Internet Sharer
This chapter shows you how to configure Moxa Internet Sharer.
However, you need to go through the previous chapters and get
everything connected so the software will work.
The disk included in the Moxa Internet Sharer package contains the
software to configure and manage Internet Sharer through Windows 95
or Windows NT4.0 system. It also contains a utility for monitoring the
status of Internet Sharer. This chapter contains:
q Installing Internet Sharer Wizard
q Starting Internet Sharer Manager
q Uninstalling Internet Sharer
q Upgrading Internet Sharer Firmware
4 Note: Internet Sharer Wizard is used for the first time installation
only. For later change and advanced configuration, run
Internet Sharer Manager after installing the Internet Sharer
Wizard.
ConnectingThe Internet Sharer and Equipment 4-1
Page 25
To enable the Internet Sharer to run with your PCs and your account,
you need to install the software to at least one of your PC for
Configuration. You may also install the software to the rest of your PCs
for easy management and install the monitor utilities into all
computers.
Installing software wizard
Internet Sharer contains an easy Setup Wizard software to guide you
through the basic configuration steps. It not only installs the needed
files to your system, it provides the easy step-by-step window to setup
your ISP information to the Internet Sharer.
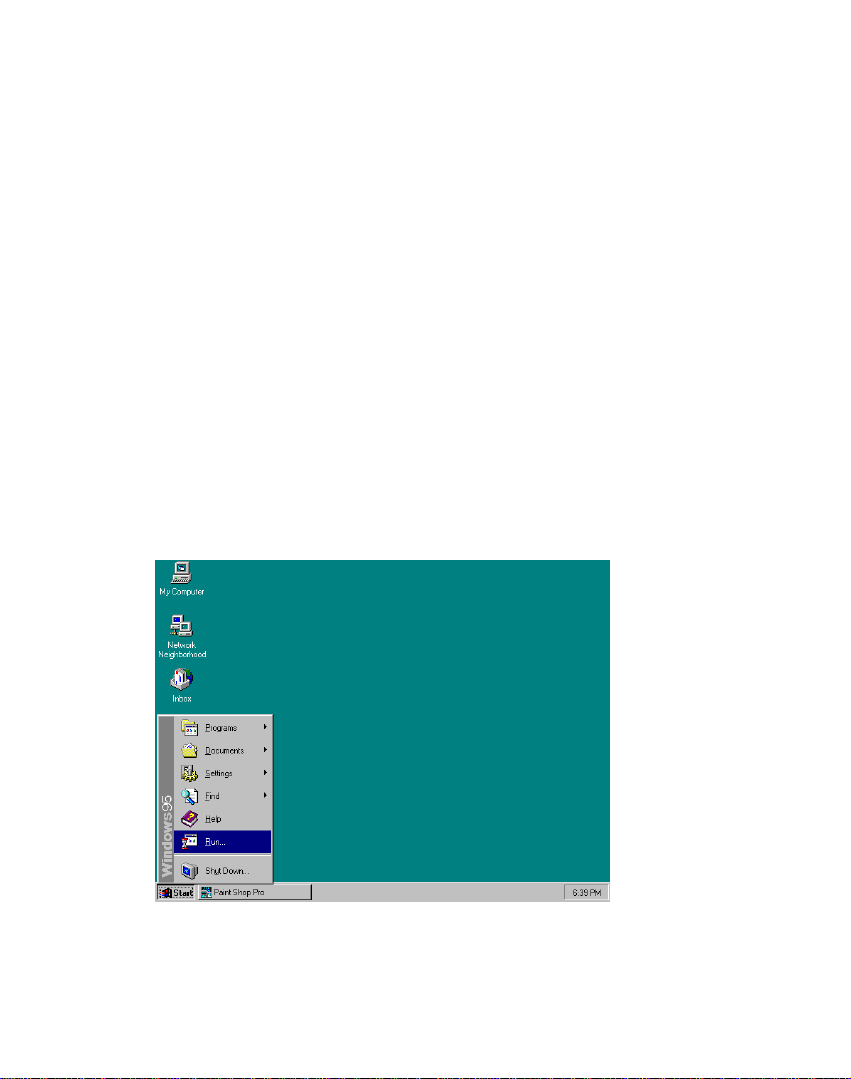
1. Insert the SD1000 disk into 3 1/2 floppy drive in your PC. From
the Start bar, click Run.
4-2 Moxa Internet Sharer User’s Manual
Page 26
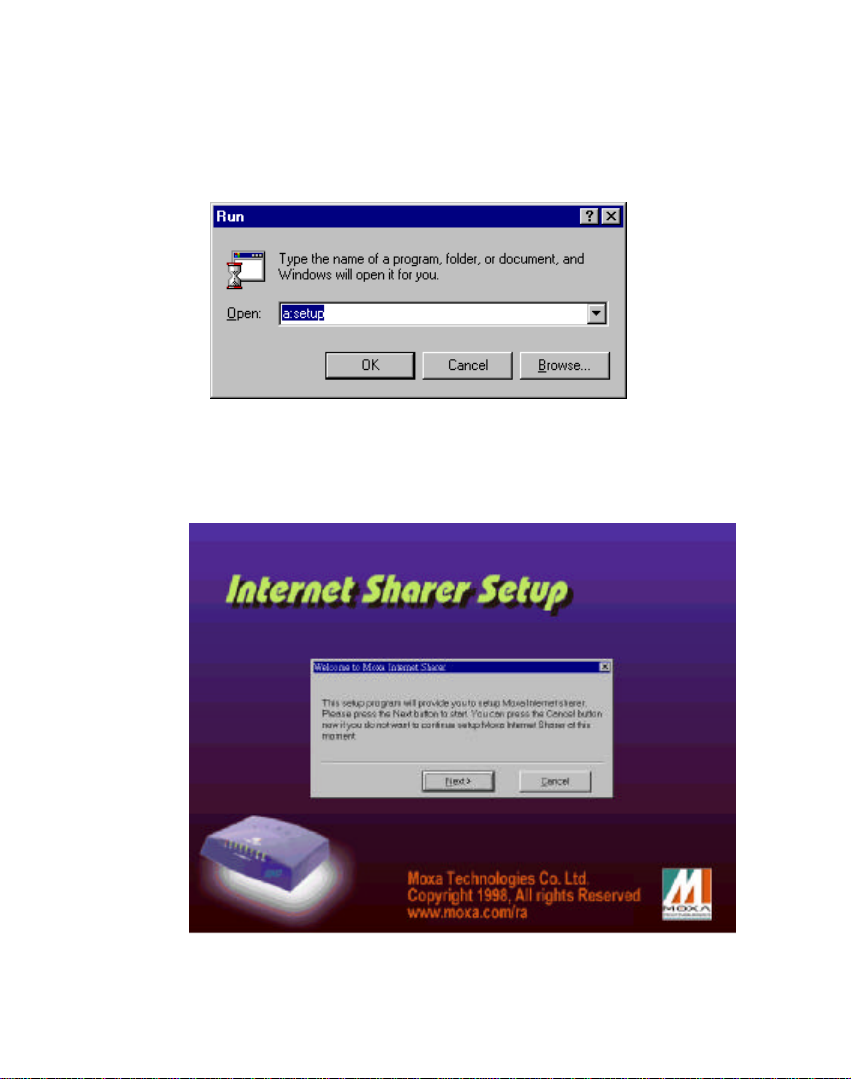
2. Under the dialog box, type in “a:setup” then press OK to continue.
3. The Setup prompts you a welcome message and ask if you want to
install the Internet Sharer software now. Click Next to continue.
Cancel to stop.
ConnectingThe Internet Sharer and Equipment 4-3
Page 27
4 Note : If you do not see this screen, but get the other Error message
screen instead, it means the Internet Sharer is not connect to
your PC properly. Recheck with Chapter 2 and reconnect
everything. Or, you may refer to Appendix A-Troubleshooting
for more information.
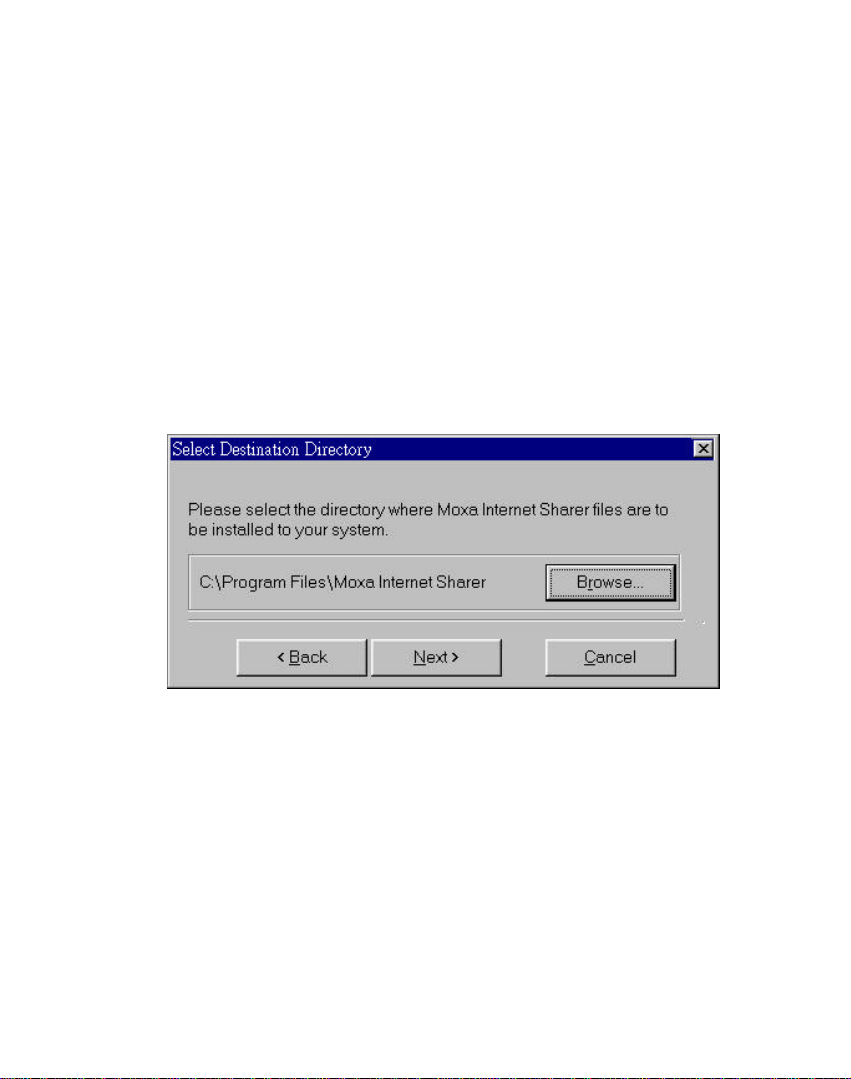
4. Enter the name of directory to install the Internet Sharer files. You
may press Next to use default directory name.
4-4 Moxa Internet Sharer User’s Manual
Page 28
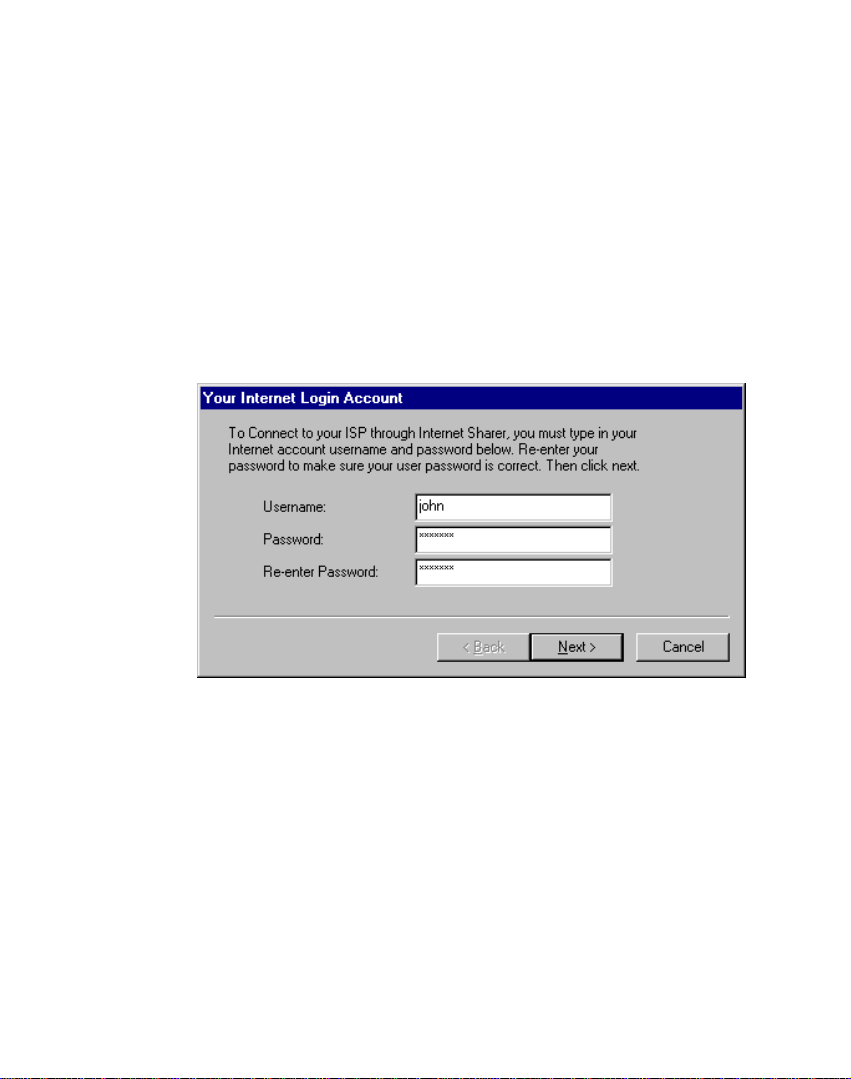
5. The following two steps are only required if no one has ever set up
the Internet Sharer before. If you are the first one to install Internet
Sharer software at your office, you have to type in the basic
information to the Internet Sharer so it contains your ISP
information to dial out. Refer to the worksheet you entered in
Chapter 2 and copy the Username and Password to the
corresponding fields. Type the password again then click Next.
4 Note : If you do not see this dialog box but jump to dialog
instead, it means the Internet Sharer has already got the
basic ISP information inside. If you like to make any change,
simply start the Internet Sharer Manger to re-configure.
Later in this chapter describes how to start Internet Sharer
Manager.
ConnectingThe Internet Sharer and Equipment 4-5
Page 29
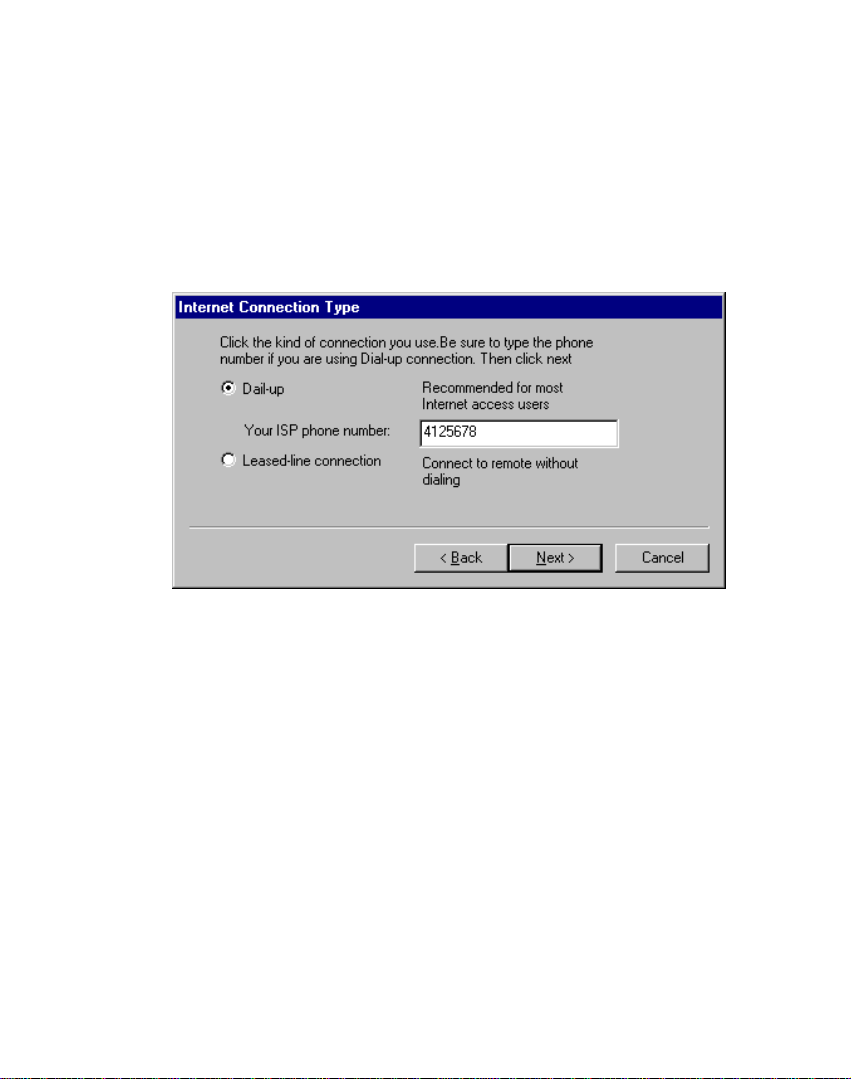
6. Select Dial-up connection for regular Internet Access and input the
ISP dial-up phone number. If you have applied for a leased line
account from your ISP, you have to select the corresponding one.
Click Next to continue.
4 Note: Choose Leased-Line only if you are sure to do that. You must
have a leased line modem and Leased-Line account with
your ISP. Internet Share Manager Configuration also
provides a Direct Connect method Continue reading this
chapter to reach how to set it up.
4-6 Moxa Internet Sharer User’s Manual
Page 30

7. Enter your Domain Name Server IP address provided by your ISP. If
you don’t have the DNS IP addresses, the Internet Share will use the
DNS assigned by your ISP remote access services while connecting.
Click Next to continue.
4 Note: You might have trouble converting a hostname to an accurate
IP address if you do not provide DNS or you have an
incorrect DNS. If this happens, check with your ISP for an
correct DNS.
ConnectingThe Internet Sharer and Equipment 4-7
Page 31

8. To ease the networking configuration troubles on your PC, select
‘Typical’ for dynamically IP address assignment. This is strongly
recommended for most non-experienced users. You may also
choose Custom if you have an existing LAN and you like to keep
your local IP addresses. Check with chapter 5 for setting up your
network at your local PC. Click Next to continue.
4 Note : This dialog box only shows up under Windows 95.For
Windows NT, you must configure your DHCP manually.
Check Chapter 8 for installation of network into Windows
NT.
9. If you select ‘Typical’ setting from the last dialog box, the Wizard
will pop up a dialog box ask you to restart your Windows 95. If you
do not restart the system now, be sure to restart before accessing
Internet.
4-8 Moxa Internet Sharer User’s Manual
Page 32

Starting Internet Sharer Manager
Setup Wizard is designed mainly for first time Internet Sharer users. If
you change your ISP or account anyhow, you may change the settings
of Internet Sharer at any time by use of Internet Share Manager. It also
provides Advanced Configuration for those configurations which are
not included in the wizard.
To start the Internet Sharer Manager, go to Program and move to the
Moxa Internet Sharer folder. Click on the Internet Sharer Manager.
ConnectingThe Internet Sharer and Equipment 4-9
Page 33

You have to make sure the Internet Sharer is connected and power on
so the Internet Sharer Manager can let you start configuring. Refer to
Chapter 2 and Appendix A Troubleshooting if the Internet Sharer
cannot be found.
4-10 Moxa Internet Sharer User’s Manual
Page 34

Basic Configuration
Click on the ‘Configure’ under the main menu of Internet Sharer
Manager. It enters the Windows for basic configuration. You can view
your current ISP information here and make any change if you want.
ConnectingThe Internet Sharer and Equipment 4-11
Page 35

Link Connection Type
There are three connection types supported by the Internet Sharer.
They are dial-up link, leased line and direct link. For regular Internet
Access, choose dial-up link.
Dial-Up link
You need a phone number to dial to. From the previous dialog box, you
may see there is a field underneath the dial-up phone number for
setting up the idle disconnect time. This is for Internet Sharer to
disconnect the link after no data transmit or receive reaching this long
of time. If you prefer not to disconnect the link at all, enter
Leased Line connection requirements
q ISP account provided for leased line connection
q Leased line to your ISP
q Modem which is configurable as leased line connection
q Computers that are connected to the Ethernet network
Direct Connect requirements
q Account assigned by the linked PPP server
q Cable which converts the Internet Sharer DB9 DTE interface to remote
serial interface. You can check with Appendix C for Cable Pinouts
q Computers that are connected to the Ethernet network
4-12 Moxa Internet Sharer User’s Manual
Page 36

Uninstalling Internet Sharer Software
Go to Start | Program | Moxa Internet Sharer from your desktop. Select
Uninstall Internet Sharer.
Select ‘Automatic’ uninstall from the popped up dialog box and the
Moxa Internet Sharer software will be removed from your system.
ConnectingThe Internet Sharer and Equipment 4-13
Page 37

Upgrading Internet Sharer Firmware
This function allows upgrade the internal software of Internet Sharer
for new features and functional improvements. You may check with
‘http://www.moxa.com” to see if any new firmware been released and
download the file to your local site. Go to Internet Sharer Manager (as
described at Chapter 3). Select the Firmware Upgrade down at the
main menu. Input the filename on the popped up dialog box. Click
Start when ready and Exit to abort.
4 Note : After upgrading completed, the Internet Sharer will be
restarted automatically to boot from the newer firmware.
Thus, it will disconnect all the line linked. Be sure the check
if anyone is up in the middle of Internet Access before
upgrading.
4-14 Moxa Internet Sharer User’s Manual
Page 38

Advanced Configuration
From the previous chapter, you have learned the steps to start Internet
Sharer Manager for changing basic configuration. From the Internet
Sharer Manager configuration dialog box, you can see the button for
‘Advance..’ providing for advanced configuration to set up the Internet
Sharer for fitting into your existing LAN, setting up Email sharing and
others. ‘Advanced..’ provides you the change of the following
configurations:
¨ LAN IP Address
¨ Admin Password
¨ DHCP
¨ Internet IP Address
¨ Email Account
¨ Login Script
5
5
¨ DNS
¨ Modem Settings
Advanced Configuration 5-1
Page 39

LAN IP address
Moxa Internet Sharer is pre-configured for installation on a network
that is not set up for TCP/IP. It uses a range of private IP addresses in a
range from 192.168.10.2 to 192.168.10.254. The Internet Sharer
address is pre-configured as 192.168.10.1.
If you already have an existing LAN and you would like to keep your
IP addressing policy, you may change the Internet Sharer IP to fit to
your addressing policy. Be aware that the network mask has to be
255.255.255.0. The LAN IP address is restricted to start with
192.168.n.n, where n is between 0 and 255, for private LAN use.
5-2 Moxa Internet Sharer User’s Manual
Page 40

Admin Password
To protect the information set to the Internet Sharer, an administrator
password is provided. After setup the password, you will be asked to
input your password each time you request to make any changes to the
Internet Sharer.
4 Note : As an administrator of your LAN, you must write down the
password and keep it at a safe place once you setup the
password. Forgotten of the password will cause trouble of not
being able to re-configure the Internet Sharer.
Advanced Configuration 5-3
Page 41

DHCP
Internet Sharer automatically enables Dynamic Host Control Protocol
(DHCP) to provide automatic IP address assignment to your local computers.
It makes it easier to setup and manage the computers on your network. This
DHCP setup is used to change your DHCP settings, to limit the range of IP
addresses used for the DHCP server. Internet Sharer can provide 253 nodes
for your local computers. You may set a specific range to reserve for some
machines which has static IP address on your LAN if needed.
5-4 Moxa Internet Sharer User’s Manual
Page 42

If you like to reserve an IP address for some specific server on your LAN,
you may remove the unwanted range and add the range of available IP
addresses. For instance, if you have a printer at address 192.168.10.5 and
another server at 192.168.10.6, you may set the range as from 192.168.10.2
to 192.168.10.4, and another range at 192.168.10.7
4 Note : You may disable the DHCP. If you do so, you will have to
manually set the IP addresses, DNS addresses, domain name
server and gateway information under the network
configuration on your computers.
Advanced Configuration 5-5
Page 43

Internet IP address
This is used to setup the dial-up Internet Access IP address assigned by
the ISP. Most of the ISP provides dynamic IP address assignment to
your dial-up connection. However, if a static IP is supported, click the
circle of Static and enter the fixed IP address assigned.
5-6 Moxa Internet Sharer User’s Manual
Page 44

Email Account
Internet Sharer supports multiple virtual email boxes by sharing one email
account for up to 64 virtual email accounts. To set this email sharing
function, you have to input your local email shared name.
If your users have their own individual email addresses, you may select
disable of this function. All user on the LAN uses their regular send
and read mail method while using Internet Sharer.
4
Note : The sharing of Email account is slightly complicated
associated with your local Email reader. There are simple
rules need to be followed. Check with Chapter 7 Virtual
Email for more information.
Advanced Configuration 5-7
Page 45

Login Script
Some ISP requires special login script to start PPP connection and log
into the Internet Service. Internet Sharer provides a simple script editor
for you to add your script to response to the remote host. It allows
Maximum 9 sets of scripts.
4 Note : Be ware that most of the scripts are case sensitive.
5-8 Moxa Internet Sharer User’s Manual
Page 46

How to Create a login script
1. From the Internet Sharer Manager, click Configure.
2. Click Advanced to continue.
3. Click on the folder instruction for Login Script.
4. If you have a command to wait for, type in the command under the
wait column.
5. If you have a command to send, you may type in your command or
scroll down to select sending USERNAME or PASSWORD.
6. Click ‘Add’ to add this set of commands to the script.
Example:
You have applied for your Internet service and your ISP instructs you
to log in and select 1 for PPP connection. While using manually log in,
it looks like:
username: john
password : john’s password
Welcome to Moxa Terminal Server
1) PPP
2) Terminal
===è 2
Steps for creating the script:
1. Under the Wait-For text box, type in
2. Under the Send text box, scroll down to select USERNAME.
3. Click ADD to add this sets of commands.
4. Follow the same rule to add ‘password’.
5. Under the Wait-For text box, type in then click ADD to end.
Advanced Configuration 5-9
Page 47

DNS
This DNS IP address is to be stored at Internet Sharer for request
Domain Name service while connect to your ISP. You should have
already setup a DNS while using Setup Wizard. If your ISP informs
you the change of their DNS, you may enter the correct IP address
here.
5-10 Moxa Internet Sharer User’s Manual
Page 48

Modem Setting
Most of the up-to-date modems on the market supports standard
modem initialization commands. However, some modems might have
problem while you use the standard commands to control it for dialing
out. To solve this problem, Internet Sharer allows you to set the special
modem initialization command if you refer to the modem
manufacturer’s user guide.
Advanced Configuration 5-11
Page 49

5-12 Moxa Internet Sharer User’s Manual
Page 50

6
6
Configuring Your Windows 95 or
Windows NT
If you are a new user for networking, recently purchase the network
cards and install the cards following their instruction. You have to
check if you install the TCP/IP before you continue the software
installation of Chapter 4.
The best way for configuring the TCP/IP under Windows 95 is by
using Moxa’s Internet Sharer software. However, if you have an
existing LAN or you like to do it manually, you can follow the
instruction later in this chapter.
This chapter describes:
¨ Setting up a Windows 95 Network
¨ Setting up a Windows NT Network
Configuring Your Windows 95 or Windows NT 6-1
Page 51

Setting up a Windows 95 Network
Installing Network Card on Windows 95
If you don’t have an existing LAN, follow the following steps to install
and configure your PC before installing Internet Sharer.
1. Click start from the Taskbar. Move your mouse cursor to Settings
then move cursor to Control Panel and click on it.
6-2 Moxa Internet Sharer User’s Manual
Page 52

2. Under Control Panel window, click on Add New Hardware.
3. Click on Network adapters under the Add New Hardware and select
the card you have from the list.
Configuring Your Windows 95 or Windows NT 6-3
Page 53

You may be asked to reboot your system to complete your Hardware
installation.
Installing TCP/IP on Windows 95
Now that you have finished installing your LAN card and the driver,
you still need TCP/IP to communicate Internet and Internet Sharer.
Most LAN card driver don’t install TCP/IP to your system. Thus, you
still need to install TCP/IP for communicating Internet Sharer and
Internet.
Please follow the steps below to add TCP/IP protocol to your
computer.
1. Right click on the Network Neighborhood from your desktop. Select
Properties.
6-4 Moxa Internet Sharer User’s Manual
Page 54

2. Click Add…from the popped up Network dialog box.
4 Note : You should see the LAN card you have selected from the step
Installing Ethernet Card with some protocols like Microsoft
Network or others. Add the TCP/IP protocol only if you cannot
see it from this list.
Configuring Your Windows 95 or Windows NT 6-5
Page 55

3. Click on Protocol then click Add
4. Select Microsoft from the Manufacturer list then select TCP/IP.
Click OK to continue.
6-6 Moxa Internet Sharer User’s Manual
Page 56

5. Now you have TCP/IP protocol. Click OK then you will be asked to
restart the system.
Congratulations! Now you have the LAN card and TCP/IP installed
on your system. You may leave the rest of the configuration jobs to
Internet Sharer because the default setup of Windows 95 TCP/IP works
with Internet Sharer or you may check with next section to manually
configure your Network to talk with Internet Sharer.
Configuring Windows 95 TCP/IP
If you have an existing local network, you may need to configure your
network settings manually so you can work on your local network and
communicate through Internet Sharer. Check here to see what you may
Configuring Your Windows 95 or Windows NT 6-7
Page 57

need to change and keep the original environment working.
1. Right click Network Neighborhood from your desktop. Select
Properties from the screen popped up.
2. Select TCP/IP from the Network screen. If you see more than one
TCP/IP settings, select the one for your network card.
3. Click on Properties.
6-8 Moxa Internet Sharer User’s Manual
Page 58

4. If you have an IP address specified for this computer. Select
‘Specify an IP address’ and input the correct address with Subnet
Mask.
4 Note : You may need to record down the IP you use. If you specify an
IP address group other from 192.168.10.0. You have to run
Internet Sharer Manager to change the Internet Sharer LAN
IP to your IP group. However, the class for 192.168. is
suggested for private use so you had better use this IP address
group to your local network. Check back with previous
chapter 5 Advance Configuration of Internet Sharer.
5. Select Gateway from the menu. Enter the Internet Sharer IP address
as your gateway.
6. Select DNS from the menu. You have to specify your Domain
Name Server properly.
Configuring Your Windows 95 or Windows NT 6-9
Page 59

Setting Up a Windows NT Network
Installing Network Card on Windows NT
Log on as a member of the Administrators group for the local computer
to install and configure TCP/ IP. Follow these steps to install network
card on a Windows NT computer:
1. Right click the Neighborhood on the desktop and click on
Properties.
2. Choose Adapter. Select Add. The system will show you a list of
network card. Follow your network card manual to choose the card
type you have or install from a disk and click OK to continue.
3. After the system installing the software for your card, Windows NT
system will prompt you a dialog box to configure the TCP/IP
protocol if your NT system already have TCP/IP driver installed.
You may continue with the section below which describes how to
configure TCP/IP.
4 Note: The Windows NT 4.0 system asks you about installing some
network protocols while installing the system. If your system
do not have the TCP/IP protocol installed, you may follow
the steps above and choose protocol to add TCP/IP.
6-10 Moxa Internet Sharer User’s Manual
Page 60

Configuring Windows NT TCP/IP as DHCP client
Using DHCP
It is recommended that you use the Internet Sharer DHCP service for
assigning your PC to work unless you have an existing LAN and some
specific IP addresses are needed. The DHCP server eases you the
trouble for setting dedicated IP address, Gateway and Domain Name
Server. You may follow the steps below to set your system using
automatic assigned IP address:
1. Right click Network Neighborhood and select Properties. Choose
Protocol.
2. Choose TCP/IP then click on Properties.
3. Select the network card using for connecting Internet Sharer.
4. Check Enable Automating DHCP Configuration.
5. You may setup the DNS address if you get the DNS address from
your ISP. You may just leave it blank if you don t have this address.
Configuring Your Windows 95 or Windows NT 6-11
Page 61

Manually Configuring your TCP/IP
If you already have an existing LAN and you would like to add another
PC to work with both your TCP/IP server on your LAN and Internet
Sharer, you need to set your TCP/IP manually without using DHCP.
1. Right click Network Neighborhood and select Properties. Choose
Protocol.
2. Choose TCP/IP then click on Properties.
3. Select the network card using for connecting Internet Sharer.
4. Choose configure IP address.
5. Enter your IP address and subnet mask as assigned by your LAN
administrator.
6. Go to DNS dialog. Enter your DNS you get from your ISP. You
may just leave it blank if you don t have this address.
7. Go to Gateway dialog. Enter the Internet Sharer IP address to the
gateway box.
6-12 Moxa Internet Sharer User’s Manual
Page 62

Virtual EMail Server
Continuing with the simple description on Chapter 4 - Advanced
setting of Internet Sharer Email Account, this Chapter provides detail
description on the Virtual Email function of Moxa Internet Sharer. You
will learn how to set up the accounts at Internet Sharer for sharing your
email account. And, you can check how you can setup the email
address for your email reading program and how to send mail.
This chapter includes:
q Assigning Virtual Email Accounts for Your Team
q Configuring the Virtual Email at Internet Sharer
q Setup Virtual Email Account under Outlook Express
q Setup Virtual Email Account under Netscape Communicator
q How to Send Email to Virtual Email users?
q Sending and Receiving Emails
7
7
4 Note : If you don’t see your email reader from this chapter, simply
follow the example provided under Assign Virtual Email under
this Chapter.
Virtual Email Server 7-1
Page 63

Assigning Virtual Email Accounts for
Internet Sharer Mail Server provides multiple individual E-mail
addresses by sharing only one E-mail account. It provides 64 email
accounts without additional software needed. The configuration is
embedded in the Internet Sharer Manager. Simply follow the
instructions below and you can setup your user s email accounts in
minutes.
Let us follow the follow Worksheet as an example. Suppose you have:
E-mail account : yourname@company.com.
users: Andy, Cindy, Frank and Michael to use the Email
The right column at the below table lists the email address to be when
your team using the Virtual Email Service. The email address will be in
the format: accountname<yourname@company.com.> You may follow
the example below and make a list for your own.
Virtual Email Account Worksheet
Your ISP assigned Email: john@yourcompany.com
account Account Name Password Email address
1 John xxxxx “john”<john@company.com>
Your Team
2 Andy xxxx “andy”<john@company.com>
3 Cindy xxxx “cindy”<john@company.com>
4 Frank xxxxxx “frank”<john@company.com>
4 Note : Password are always hidden when type in because of security
issue.
7-2 Moxa Internet Sharer User’s Manual
Page 64

Basic information needed for account Andy:
§ Assigned Email account: john@.company.com
§ account name: Andy
§ Full Email account: “andy”<john@company.com>
§ POP3 incoming mail server: the Internet Sharer IP address -
192.168.10.1 . This is for input as POP3 server for local Email
reading program like Outlook Express or Netscape.
§ SMTP outgoing mail server: company.com
Configuring Virtual Email Accounts on Internet Sharer
Enter the ISP assigned Email account:
1. Go to Start | Moxa Internet Sharer | Internet Sharer Manager.Click
“E-mail Account” on the menu screen.
2. Enable E-mail Sharing
3. Enter the POP3 server IP name/address given by your ISP. This is
usually the hostname accompanied with your email address. For
instance, it should be ‘company.com’ for the above example.
4. Enter your E-mail account assigned by your ISP.
5. Enter the corresponding password
Virtual Email Server 7-3
Page 65

Add Your Team’s E-mail Accounts
1. Enter one user’s account name and password from the worksheet.
2. Click Add to add account.
3. Continue with other user’s accounts.
4. If you have entered any wrong account, move your cursor to the
one and click remove.
7-4 Moxa Internet Sharer User’s Manual
Page 66

Set up Virtual Email Account on Outlook Express
For your convenience, a simple description of Outlook Express under
IE4.0 email setup is described below. If you are not familiar with
Outlook Express, be sure to read their on-line help so you can use the
email reader.
Setting up through Internet Connection Wizard
1. After installing Internet Explorer, it prompts you to add your Email
Information. You may also go to Outlook express and add an
account under Tool | Account then it will evoke the Internet
Connection Wizard.
2. Click Yes to enter your Mail account now.
Virtual Email Server 7-5
Page 67

Follow the Wizard to enter the outgoing message name. Be aware that this
name should be the account name you input as Internet Sharer Email
Account. For instance, john, andy, cindy or frank is the name to input here.
4 Note : This name will be used to combine with your ISP assigned
email address to send to your email receiver. For easy reply by
the receiver, be sure to input the correct name here.
7-6 Moxa Internet Sharer User’s Manual
Page 68

1. Enter the ISP assigned email address as the Email account name.
You may enter ‘john@company.com’ from the above example.
Virtual Email Server 7-7
Page 69

2. Under the Email Server Names window, select POP3 server and fill
the Incoming Mail Server with Internet Sharer IP address
192.168.10.1.
3. Under the same window. Enter your ISP assigned outgoing Mail
server to the blank for Outgoing Mail Server. This is usually the
name as ‘company.com’.
7-8 Moxa Internet Sharer User’s Manual
Page 70

4. Under the Internet Mail Logon window, enter the virtual mail
account name and password.
5. Finally, the wizard prompt you to enter a friendly name for this
account. You may enter it as Internet Sharer Account
Virtual Email Server 7-9
Page 71

6. Finally, you have to choose Connection Type as Connect using
LAN then you are ready to work on your account.
7-10 Moxa Internet Sharer User’s Manual
Page 72

Email Account Modification
You may modify your account any time by going to Outlook Express
and select account. Click Outlook Express | Tool | Account. Select the
account you have and click properties.
1. Check with the Email name and Address to see if correct. If not,
please modify it.
Virtual Email Server 7-11
Page 73

2. Move to Server. Check the Incoming POP3 to be Internet Sharer.
Also check your login name here.
7-12 Moxa Internet Sharer User’s Manual
Page 74

Setup Virtual Email Account on Netscape
Communicator
from the worksheet
Follow the same rule as described earlier in this Chapter for Assigning
Virtual Emails for Your Team. Take account
as an example:
§ Assigned Email account: john@.company.com
§ account name: Andy
§ Email account: andy<john@company.com>
§ POP3 incoming mail server: 192.168.10.1 (Internet Sharer LAN
IP address)
§ SMTP outgoing mail server: company.com.
To set up, follow the steps below:
1. Go to Netscape Communicator Preference. Move to Mail Group |
Identity. Input your account name and account address.
Virtual Email Server 7-13
Page 75

2. Move to Mail Server and input the corresponding information.
7-14 Moxa Internet Sharer User’s Manual
Page 76

How to send Email to another Virtual EMail
Account?
Simply follow the rule under Virtual Email Account Worksheet, you
can find the email address formatted as:
“virtualusername”<sharedaccount@company.com>.
You may put this email address on your name card so your customer
can send email to you using this virtual email address. While follow
the above configuration to your email reader, you automatically
attached your email address to the receiver. The receiver can click on
the reply key and reply email to you easily.
Virtual Email Server 7-15
Page 77

Tips: To add email to the address book, use
name. And, the ISP assigned email account as the email address. Then,
the email will automatically add the name while you use the
addressbook to send mails.
Sending and Receiving Mails
Internet Sharer makes no influence on the way you using Emails.
Account change is the only change that you need to do for using
Virtual Email Server. For sending and receiving mails, follow the
regular rules.
7-16 Moxa Internet Sharer User’s Manual
Page 78

Internet Sharer Monitor
Internet Sharer is designed for users access to Internet without needs to
know when to dial-up to connect or when to disconnect. However,
users - especially administrator, might want to know how is the remote
connection of the Internet Sharer while using a browser or any Internet
service. Internet Sharer Monitor is the utility designed for any network
users to monitor the Internet Sharer status. This program is installed
while you run the Setup program on the enclosed disk. It is a also a tool
to help diagnose what is going on if problems occurs when accessing
Internet.
8
8
Internet Sharer Monitor 8-1
Page 79

What to See in the Internet Sharer Monitor?
Internet Sharer Monitor is equipped with the following items:
q Connected Speed: The speed that modem communicates with
remote site for this connection.
q Connected Time: The time since the start of this connection
q Bytes Sent: The bytes been sent since this start of connection.
q Bytes Received: The bytes received from Internet since this start
of connection.
q Connect: This button is supported for users who like to manually
connect to remote without using Internet Access programs like
browsers, FTP, etc.
q A Event Log window: This window records the recent events for
user to verify the situation of the connection. This window
maintains a maximum of 20 logs. You may scroll up or down to
see the latest or previous logs.
8-2 Moxa Internet Sharer User’s Manual
Page 80

To run the monitor, go to Start, find Moxa Internet Sharer and click the
Internet Sharer Monitor bar.
The Internet Sharer Monitor will embedded in your system till you
completed close it. To close the Monitor, right click on the ‘tray’ icon
of Internet Sharer down at the Taskbar and choose close.
4 Note : If you don’t see the Monitor icon shows up at the taskbar, it
means the Internet cannot be found on your LAN. Check with
troubleshooting for detail.
Event Logs
This section describes the messages you may get under the event logs
window of Internet Sharer Monitor.
§ Modem Not Ready - Modem is not powered on or the modem is not
connected.
§ Modem Ready - Modem is connected and ready to connect to
remote.
§ No Carrier / No Answer – Carrier dropped or remote modem does
not answer after certain time.
§ Remote Busy - The phone line you are dialing is busy. You may try
back later. If this happens continuously, you may try other number
or check with your ISP to provide you another line.
§ No Dial Tone – The line from your modem to the wall outlet may
not be properly hooked or you have a broken line so the modem
cannot detect a dial tone from the line.
§ PPP Authentication Failed – Your account name and password may
Internet Sharer Monitor 8-3
Page 81

not match the one on your ISP machine. Double check with the ISP
account name and the password you type in to the Internet Sharer
using Internet Sharer Manager. If you are sure they are the one that
your ISP provided, call your ISP for the problem.
Appendix A describes what to check while problems occur. Check over
there if you find these messages cannot be solved.
8-4 Moxa Internet Sharer User’s Manual
Page 82

Appendix A Troubleshooting
This appendix gives solutions to problems that might occur during
installation and operation of Internet Sharer.
Problem during installation
& No power to the Internet Sharer
§ Check to see the power cable is firmly connected
§ Make sure the outlet connected is working
§ Press the Power button on the front panel
& Cannot install Internet Sharer Software
This happens when the Internet Sharer cannot be found. For instance, if
you try ‘ping 192.168.10.1’ from the MS-DOS prompt, you get the
response from the address you ping. In this case, you won
get response from the Internet Sharer. You may check with the
following steps:
A
A
§ Check to see if the Internet Sharer is powered on.
Troubleshooting A-1
Page 83

§ Check your cable connection between Internet Sharer and your PC
§ Check the LAN LED on the Internet Sharer. If the port connected to
your computer is not lit on, check the network cable connections on
both the Internet Sharer site and your Computer site. If it is
connected, but the LAN LED still isn t lit, try another cable.
§ Check if your LAN driver and TCP/IP protocol is properly installed
on your PC. Following are the commands to show how is the
configuration at your platform now. If you can
address, you may go to Chapter 6 to check your LAN card and
TCP/IP setting again.
§ On Windows 95: Run winipcfg from Run on the Start menu. Your
PC should have an IP address of 192.168.10.n, where n is from 2 to
254. If the IP address is not in this range, click Release and then
click Renew.
§ On Windows NT: Type ‘ipconfig’ from the command prompt. Your
PC should have an IP address of 192.168.10.n, where n is from 2 to
254. If the IP address is not in this range, try ipconfig /release
release then try
§ There may have duplicate Internet Sharer IP on your LAN. Power
down the Internet Sharer and try to ping 192.168.10.1 or the current
Internet Sharer IP address. If you can get the response, you have
another machine with the same IP. You may choose to change the IP
address of your machine. Or you may change the IP address of
Internet Sharer. You have be aware to power down your machine
before power on Internet Sharer.
§ If you have already installed the Ethernet card and TCP/IP, try to
remove the driver and reinstall it. Check if your Ethernet card has
been removed for some reason. This could happened if you are
A-2 Moxa Internet Sharer User’s Manual
Page 84

using a easy removable PCMCIA card for your notebook.
§ You may have a defect Ethernet card. Try another card.
§ If you still can’t connect to Internet Sharer or getting error
messages, try another Ethernet card.
§ Press the Power button of Internet Sharer off and on again.
Problems while connecting to Internet
You may run Internet Sharer Monitor from any PC installed with
Internet Sharer software. Check with the status log to see if any error
messages occurs especially the last log.
& Modem not Ready
§ Check if the modem power is on
§ Check if the cable connecting modem to Internet Sharer is with
correct pinouts and firmly hooked. If still not working, try a new
cable.
& Modem Ready but connect to ISP failed
§ Check if the phone line is working and connected properly.
§ Check if ‘no dial-tone’ message is shown. If so, you need to check
with your phone line. You may connect a phone to see if you can
call out from this line.
§ Run Internet Sharer Manager and verify that the phone number and
other ISP settings like account and password are correct or retype if
needed. If everything is correct, call your ISP to verify your
account.
§ Do you phone line require a prefix like for outside line?
Troubleshooting A-3
Page 85

§ Remote busy. If your ISP supports multi-line, you may go to
Internet Sharer Manager to input another phone number. You can
connect directly through the Internet Sharer Monitor.
Other Problems while using Internet Sharer
& I have connected to my ISP while I check with my Internet Sharer
Monitor. However, I cannot browse the web.
Your Domain Name Server not properly configured.
§ Try to ping one or two IP addresses from your DOS prompt, i.e.
you can ping your ISP’s IP address to see if the ISP working
properly. Try another IP if the first one is not working. If at least
one is working, it means your connection to ISP is ok. However,
you may not have a proper Domain Name Server configured. You
can try Moxa’s address at 203.67.8.1 or your DNS IP address.
§ Check if you have got the DNS from your ISP.
§ Go to Internet Sharer Manager | configure | Advance.. | DNS. Input
the correct DNS here.
§ Go to your Network Neighborhood | properties | TCP/IP properties |
DNS. Input the server IP address.
You may have Gateway problem :
§ If you do not choose typical while installing Internet Sharer
software, you have to make sure you have configure your gateway
address properly. Go to your Network Neighborhood | properties |
TCP/IP properties | Gateway. Input the gateway IP address as
Internet Sharer IP address.
& I found my Internet Sharer keep dialing out occasionally even there
A-4 Moxa Internet Sharer User’s Manual
Page 86

is no one access to Internet. What is wrong?
Those programs need to get information from Internet occasionally
enable Internet Sharer dialing out.
§ Check if Web browsers have enable something like active channel
to get Internet data after some certain minutes.
§ Check if your Email Service reads your mail every certain minutes.
& My Web browsing programs keeps popping up the dial-up connection
while I start reading any information. What should I do?
§ You must have installed your browser using Dial-up network. With
Internet Sharer, you have to select LAN while setting up your
browser or Email for Internet Connection. Thus, it is suggested that
you remove the dial-up connection from now on.
& I can access to Internet and everything is fine. However, when I try to
use some special programs, i.e. games, Netmeeting. I found troubles.
What is wrong?
§ Internet Sharer is using the NAT protocol which not allow remote to
access to your local LAN. This might have a result of not
functioning for those program needing remote to connect to your
local IP. Moxa has tested some of the well-known programs like
Microsoft NetMeeting, Yahoo pager, games – Diablo. If you find
any special programs bumping these kind of problem, you may
consult with Moxa customer service to see how will that work.
Troubleshooting A-5
Page 87

A-6 Moxa Internet Sharer User’s Manual
Page 88

Appendix B Expanding Your
Network
Internet Sharer is able to connect to another Hub to expand your
network. Thought Internet Sharer is not equipped with an Uplink port,
you can connect any one of the 10BaseT LAN port of Internet Sharer
to a HUB uplink port. The 10BaseT RJ-45 to RJ-45 link cable is easy
to find in any computer shop.
B
B
LED Description B-1
Page 89

B-2 Moxa Internet Sharer User’s Manual
Page 90

Appendix C LED Descriptions
LED Color Description
Power Red Indicate the Internet Sharer is turned on
Network Yellow Flashing indicates packet collisions on the local
Ethernet LAN
LAN 1-4 Yellow Indicates that data link has been made between
Internet Sharer and your computer network card.
Blinking light indicates data being sent or received.
C
C
Modem Yellow
COM Yellow
Indicates modem DTR is on, that modem is ready to
use
Indicates PPP link has been made between Internet
Sharer and remote server
LED Description C-1
Page 91

C-2 Moxa Internet Sharer User’s Manual
Page 92

Appendix D Cable Pinouts
Internet Sharer follows the standard cable pinouts thus you can find
most of the cables in computer stores. However, if you need have
special requirements, you may check with this section for reference.
q RS-232 DB9 WAN Port Pinouts.
q Direct link RS-232 wiring.
q Cable pinouts to connect from WAN port to modem port.
q 10BaseT Port Pinouts.
q Straight-Through 10BaseT Cable to connect to a HUB uplink
port .
q Signal switched cable to connect to a HUB without uplink port.
D
D
Cable Pinouts D-1
Page 93

RS-232 DB9 WAN Port Pinouts with Direct
PIN
Description
Connect Wiring
Signal
DCD 1 ------- DCD 1 8
RxD 2 ------- TxD 3 3
TxD 3 ------- RxD 2 2
DTR 4 ------- DSR 6 6
GND 5 ------- GND 5 7
DSR 6 ------- DTR 4 20
RTS 7 ------- CTS 8 5
CTS 8 ------- RTS 7 4
RI 9 ------- RI 9
DB9
DTE
male
Connection
Direct
connect
10BaseT RJ-45 Port Pinouts
1 Tx+
2 Tx3 RX+
6 RX-
DB9
DTE
male
DB25
DTE
male
D-2 Moxa Internet Sharer User’s Manual
Page 94

Straight-through 10BaseT Cable to Connect to a
RJ-45 Pin
Signal
Direction
RJ-45 Pin
RJ-45 Pin
Signal
Direction
RJ-45 Pin
HUB Uplink Port
1 TX+
2 TX3 RX+
4 - - 4
5 - - 5
6 RX7 - - 7
8 - - 8
à
à
ß
ß
1
2
3
6
Signal Switched Cable to Connect to a HUB
without Uplink Port.
If you have a HUB on your LAN already and the HUB is without any
uplink port, you may need to make the cable your own by the
following wiring method.
1 TX+
2 TX3 RX+
6 RX-
à
à
ß
ß
3
6
1
2
Cable Pinouts D-3
 Loading...