

Page 1

MPC-2000 Series Hardware Manual
First Edition, July 2015
www.moxa.com/product
© 2015 Moxa Inc. All rights reserved.
Page 2

MPC-2000 Series Hardware Manual
Moxa Americas
Toll
Tel:
Fax:
Moxa China (Shanghai office)
Toll
Tel:
Fax:
Moxa Europe
Tel:
Fax:
Moxa Asia
Tel:
Fax:
The software described in this manual is furnished under a license agreement and may be used only in accordance with
the terms of that agreement.
Copyright Notice
© 2015 Moxa Inc. All rights reserved.
Trademarks
The MOXA logo is a registered trademark of Moxa Inc.
All other trademarks or registered marks in this manual belong to their res pec tive manufacturers.
Disclaimer
Information in this document is subject to cha nge witho ut no tic e and doe s no t repres e nt a commitme nt o n the part of
Moxa.
Moxa provides this document as is, without warranty of any kind, either expressed or implied, including, but not limited
to, its particular purpose. Moxa reserves the rig ht to make improvements and/or changes to this manual, or to the
products and/or the programs described in this manual, a t any time .
Information provided in this manual is intended to be accurate and reliable. However, Moxa assumes no responsibility for
its use, or for any infringements on the rights of third parties that m ay res ult fr om its use.
This product might include unintentional tec hnic a l o r typographical errors. Changes are periodically made to the
information herein to correct such errors, and these changes are incorporated into new editions of the publica tio n.
Technical Support Contact Information
www.moxa.com/support
-free: 1-888-669-2872
+1-714-528-6777
+1-714-528-6778
+49-89-3 70 03 99-0
+49-89-3 70 03 99-99
-free: 800-820-5036
+86-21-5258-9955
+86-21-5258-5505
+886-2-8919-1230
-Pacific
+886-2-8919-1231
Page 3

Table of Contents
1. Introduction ...................................................................................................................................... 1-1
Overview ........................................................................................................................................... 1-2
Package Checklist ............................................................................................................................... 1-2
Product Features ................................................................................................................................ 1-3
Hardware Specifications ...................................................................................................................... 1-3
MPC-2260 Models ........................................................................................................................ 1-3
MPC-2240 Models ........................................................................................................................ 1-5
MPC-2190 Models ........................................................................................................................ 1-7
Optional Features for the MPC-2000 Series ..................................................................................... 1-9
Hardware Block Diagram ..................................................................................................................... 1-9
2. Hardware Overview........................................................................................................................... 2-1
Appearance ........................................................................................................................................ 2-2
Front View .................................................................................................................................. 2-2
Bottom View ............................................................................................................................... 2-2
Dimensions ........................................................................................................................................ 2-3
MPC-2260 .................................................................................................................................. 2-3
MPC-2240 .................................................................................................................................. 2-3
MPC-2190 .................................................................................................................................. 2-4
SavvyTouch Display Control Buttons ..................................................................................................... 2-4
Real Time Clock .................................................................................................................................. 2-5
3. Hardware Installa tion and Connectio n .............................................................................................. 3-1
Installation and Handling Notes ............................................................................................................ 3-2
Desktop Mounting ....................................................................................................................... 3-3
Panel Mounting ........................................................................................................................... 3-5
VESA Mounting ........................................................................................................................... 3-5
Wiring Requirements ........................................................................................................................... 3-9
Grounding the MPC-2000 Series Panel Computer .................................................................................... 3-9
Powering On the MPC-2000 Series ...................................................................................................... 3-10
Powering Off the MPC-2000 Series ...................................................................................................... 3-10
SavvyTouch Display Controls ...................................................................................................... 3-10
Connecting Data Transmission Cab les ................................................................................................. 3-12
Connecting to the Network ......................................................................................................... 3-12
Connecting Serial Devices .......................................................................................................... 3-13
Connecting NMEA 0183 Devices .................................................................................................. 3-14
Connecting Speakers or Headphones ................................................................................................... 3-14
Connecting a PS/2 Keyboard and Mouse .............................................................................................. 3-15
Connecting to USB Devices ................................................................................................................ 3-15
Installing a SATA Storage Drive .......................................................................................................... 3-16
On the MPC-2260 or MPC-2240 ................................................................................................... 3-16
On the MPC-2190 ...................................................................................................................... 3-17
4. Driver Installation and Configure ...................................................................................................... 4-1
Installing the VGA Driver ..................................................................................................................... 4-2
Setting Display Resolution ................................................................................................................... 4-5
Installing the Touch Screen Driver ........................................................................................................ 4-7
Performing Screen Calibration ............................................................................................................ 4-12
MPC-2260 MxGeneralIo Driver Installatio n ........................................................................................... 4-13
Installing the MxGeneralIo Drive r ................................................................................................ 4-13
MPC-2260 UART Driver Installation ..................................................................................................... 4-15
Installing the UART Driver .......................................................................................................... 4-15
5. BIOS Setup ........................................................................................................................................ 5-1
Starting the BIOS Setup Utility ............................................................................................................. 5-2
Main Information ................................................................................................................................ 5-3
Advanced Settings .............................................................................................................................. 5-3
Boot Configuration....................................................................................................................... 5-4
Peripheral Configuration ............................................................................................................... 5-4
HDC Configuration ....................................................................................................................... 5-5
Video Configuration ..................................................................................................................... 5-6
Chipset Configuration................................................................................................................... 5-8
Hardware Monitor ........................................................................................................................ 5-9
Security Settings ................................................................................................................................ 5-9
Set Supervisor Password ............................................................................................................ 5-10
Power Settings ................................................................................................................................. 5-10
Boot Settings ................................................................................................................................... 5-11
Boot Type ................................................................................................................................. 5-11
PXE Boot to LAN ........................................................................................................................ 5-11
Add Boot Options ...................................................................................................................... 5-11
USB Boot ................................................................................................................................. 5-11
Page 4

EFI Device First ......................................................................................................................... 5-12
Boot Delay Time ........................................................................................................................ 5-12
Legacy ..................................................................................................................................... 5-12
Exit Settings .................................................................................................................................... 5-13
Exit Saving Changes .................................................................................................................. 5-13
Save Change without Exit ........................................................................................................... 5-13
Exit Discarding Changes ............................................................................................................. 5-13
Load Optimal Defaults ................................................................................................................ 5-13
Load Custom Defaults ................................................................................................................ 5-13
Save Custom Defaults ................................................................................................................ 5-14
Discard Changes ....................................................................................................................... 5-14
Upgrading the BIOS .......................................................................................................................... 5-14
A. Regulator y Approv al S ta teme nt ........................................................................................................ A-1
Page 5

1
1. Introduction
The MPC-2000 series of panel computers features advanced Intel processors—3rd generation Ivy Bridge Core
or Celeron—matched with 4 GB of system memory, delivering a reliable, high-performance platform of wi de
versatility for use in industrial marine environments. With its RS-232/422/485 serial, NMEA 0183, and Gigabit
Ethernet LAN ports, the MPC-2000 series supports a wide variety of serial and marine-specific interfaces for
high-speed network communications, all with native network redundancy.
The MPC-2000 series comes with a range of standard display enhancements useful in industrial environments
(including 0 to 100% full range dimming, 178°/178° wide viewing angles, optional optical bonding, and/or a
multi-touch touch screen), as well as Moxa’s innov ative SavvyTouch display controls.
The MPC-2000 series panel computers are compliant with key industrial marine standards, such as IEC
60945-4, IEC 61174, IEC 61162, DNV2.4, and IACS E10, validating their resilient durability in marine
operations. An optional IP65-rated unibody housing provides added protection against the hars h conditio ns
found in marine environments. The MPC-2000 series delivers a ru gged, type-a pprov ed, hi gh pe rform ance an d
user friendly panel computer perfect for ECDIS navigation systems and other marine IBS applica tio ns .
The following topics are covered in this chapter:
Overview
Package Checklist
Product Features
Hardware Specifications
MPC-2260 Models
MPC-2240 Models
MPC-2190 Models
Optional Features for the MPC-2000 Series
Hardware Block Diagram
Page 6

MPC-2000 Series Hardware Introduction
1-2
Overview
The MPC-2000 series panel computer range is a flexible all-in-one computer and m onitor solution, designed for
type approved use in industrial marine environments where reliability and durability ar e key requirements.
The MPC-2000 series features Smart OSD Control, LED backlight technology, full dimming and multi-power. In
addition, you can select options such as SSD storage devices, multiple interface configurations, and operating
systems.
The models available in the MPC-2000 series are listed below:
• MPC-2260X: 26-inch fanless panel computer with Intel Celeron 1047UE 1.4 GHz processor, NMEA 0183,
RS-232/422/485 serial ports, Gigabit Ethernet LAN ports, USB 2.0 ports, dual AC/DC power inputs, and
tape bonding
• MPC-2267X: 26-inch fanless panel compute r w ith Inte l Co re i7 3517 UE 1.7 GHz proce s sor, NMEA 0183,
RS-232/422/485 serial ports, Gigabit Ethernet LAN ports, USB 2.0 ports, dual AC/DC power inputs, and
tape bonding
• MPC-2240X: 24-inch fanless panel computer with Intel Celeron 1047UE 1.4 GHz processor, NMEA 0183,
RS-232/422/485 serial ports, Gigabit Ethernet LAN ports, USB 2.0 ports, dual AC/DC power inputs, and
tape bonding
• MPC-2240Z: 24-inch fanless panel computer with Intel Celeron 1047UE 1.4 GHz processor, NMEA 0183,
RS-232/422/485 serial ports, Gigabit Ethernet LAN ports, USB 2.0 ports, dual AC/DC power inputs, tape
bonding, and projected capacitive to uc hs cr een
• MPC-2247X: 24-inch fanless panel co mputer w ith Inte l Core i7 2610 UE 1.5 GHz proces so r, NMEA 0183,
RS-232/422/485 serial ports, Gigabit Ethernet LAN ports, USB 2.0 ports, dual AC/DC power inputs, and
tape bonding
• MPC-2190X: 19-inch fanless panel computer with Intel Celeron 1047UE 1.4 GHz processor, NMEA 0183,
RS-232/422/485 serial ports, Gigabit Ethernet LAN ports, USB 2.0 ports, dual AC/DC power inputs, and
tape bonding
• MPC-2190Z: 19-inch fanless panel computer with Intel Celeron 1047UE 1.4 GHz processor, NMEA 0183,
RS-232/422/485 serial ports, Gigabit Ethernet LAN ports, USB 2.0 ports, dual AC/DC power inputs, tape
bonding, and projected capacitive to uc hs cr een
• MPC-2197X: 19-inch fanless panel co mputer w ith Inte l Core i7 3517 UE 1.7 GHz proces so r, NMEA 0183,
RS-232/422/485 serial ports, Gigabit Ethernet LAN ports, USB 2.0 ports, dual AC/DC power inputs, and
tape bonding
Package Checklist
The MPC-2000 series package is shipped with the following items:
• 1 MPC-2000 series panel computer
• 2 keys for the removable storage trays
• 1 terminal block for DC power input
• 4 5-pin Euroblock terminals for NMEA 0183 v2 inter faces
• Documentation and driver DVD
• Quick installation guide (printed)
• Warranty card
Optional accessories are also available upon request:
• Desktop mounting kit
• Wall mounting clamps
• VESA mounting kit
Page 7

MPC-2000 Series Hardware Introduction
1-3
NOTE
Please notify your sales representati
Computer
CPU:
OS:
System Chipset:
System Memory:
USB:
Sto
BIOS:
Graphics Controller:
Video Outputs:
Other Peripherals
Audio: line in/out, 3.5 mm mini jack
KB/MS:
Display
Panel Size:
Panel Type:
Aspect Ratio:
Pixels:
Pixel Pitch (RGB):
Response T
Contrast Ratio:
Light Intensity:
Viewing Angles:
Active D isplay Area:
Max Colors:
Resolution:
• VGA: 640 x 480
• SVGA: 800 x 600
• XGA: 1024 x 768
• S
• WSXGA+: 1920 x 1080
• WUXGA: 1920 x 1200
ve if any of the above items are missing or damaged.
Product Features
• 19-inch, 24-inch, or 26-inch display screen
• Color calibration for ECDIS compliance
• Fanless design
• SavvyTouch display controls
• 3rd Generation Intel® Core™ (Default: Celeron® 1047UE, 1.40 GHz with Intel® HD Graphics)
• Built-in NMEA 0183 and software selectabl e RS-232/422/485 interfa c es
• Dual AC/DC power supply units
Hardware Specifications
MPC-2260 Models
lntel Celeron® Processor 1047UE (2M Cache, 1.40G Hz)
Windows 7 Professional, Windows XP Embedded, Windo ws Embedded Standard 7, Windows XP SP3
Intel HM65
8 GB capacity, 4 GB pre-installed: 1 slot of 4 GB DDR3-1600 204 pin SO-DIMM SDRAM
4 bootable USB 2.0 hosts, type A connectors
rage: 2 SATA III interf ac es: 6 Gbp s , 2.5” removab le storage trays
64 Mbit Flash BIOS with SPI, ACPI
Intel HM65 Express chipset built in
DVI-D x 1, VGA x 1 (female)
2 PS/2 interfaces supporting standard PS/2 keyb oar d and mous e
1920 x 1200 (WUXGA)
XGA: 1280 x 1024
26” viewable image size
MVA
16:10
0.2865 (H) x 0.2865 (V) m m
ime: 15 ms (gray to gray)
1500:1
300 cd/m2
176˚/176˚
550.08 (H) x 343.8 (V) mm
16.7M (8 bit color)
Page 8

MPC-2000 Series Hardware Introduction
1-4
Ethernet Interface
LAN:
Magnetic Isolat ion P ro tec t i o n:
Serial Interface
Serial Standards:
Serial Communication Pa ra me te rs
Data Bits:
Stop Bits:
Parity:
Flow Control:
Baudrate:
Serial Signals
RS-232: TxD, RxD, DTR, DSR, RTS, CTS, DCD, GND
RS
RS
RS
NMEA Interface
Serial Standards:
Base Serial Standar d:
Optical Isolation Protectio n:
Voltage Differential:
Baudrate:
Data Bits:
Stop Bits:
Parity:
Han
LEDs
System:
LAN:
Front Panel
LEDs:
SavvyTouch Display Cont rol Buttons:
Physical Characteristics
Housing:
Weight:
Dimensions: 621 x 444 x 90 mm (24.45 x 17.48 x 3.57 in)
Mounting:
Environmental Limits
Operating Temperatur e:
Storage Temperature:
Ambient Rela
Note: If you expect the storage temperature to exceed 40°C, please ensure that the ambient relative humidity
remains below 60%.
IP Rating:
• Front: IP54
• Rear: IP22
Anti
• 0.7 g @ DNV2.4 (Class A), si
• 1 g @ DNV2.4, random wave, 3
• 2.1 g @ DNV2.4 (Class C), sine wave, 2
2 auto-sensing 10/100/1000 Mbps ports (RJ45)
1.5 kV built in
2 RS-232/422/485 ports, software-selectable (DB9 male)
5, 6, 7, 8
1, 1.5, 2
None, Even, Odd, Space, Mark
RTS/CTS, XON/XOFF, ADDC® (automatic data direction control) for RS-485
50 bps to 115.2 Kbps (supports non-standard baudrates; see user’ s manual fo r de ta ils )
-422: TxD+, TxD-, RxD+, RxD-, GND
-485-4w: TxD+, TxD-, RxD+, RxD-, GND
-485-2w: Data+, Data-, GND
8 NMEA 0183 ports
RS-422
±6 kV contact discharge, ±8 kV air discharge
-15 V to +15 V
4800 bps
8
1, 1.5, 2
None
dshake: None
Storage, Power
100M/Link x 2, 1000M/Link x 2 (on connector)
Storage
ECDIS, INFO, Brightness (+, -), MENU
Aluminum sheet metal
16.6 kg
VESA, panel, and desktop mounting
-15 to 55°C (5 to 131°F)
-20 to 60°C (-4 to 140°F)
tive Humidity: 5 to 95% (non-condensing)
-Vibration:
ne wave, 2-100 Hz, 1 Oct./min., 1.5 hr per axis
-100 Hz, 2.5 hr per axis
-50 Hz, 1 Oct./min., 1.5 hr per axis
Page 9

MPC-2000 Series Hardware Introduction
1-5
Power Requirements
Input Voltage:
• 24 VDC (18 to 36 VDC), screw
• 100 to 240 VAC, AC power inlet
Power Consumption:
Standards and Certifications
Safety: UL 60950-1
EMC:
Marine:
Green Product:
Reliability
Automatic Reboot Trigge r:
255 levels for time interval system
reset, software programmabl e
Warranty
Warranty Period:
3 year
1 year for LCD pan e l s
Details: See www .mox a.c om/war ranty
Computer
CPU:
OS: Windows 7 Professional, Windows Embedded Standard 7 , Window s XP Embedde d , Windows XP SP3
System Chipset:
System Memory:
USB:
Storage:
BIOS: 64 Mbit Flash BIOS with SPI, ACPI
Graphics Controller:
Video Output:
Other Peripherals
Audio:
KB/MS:
Display
Panel Size:
Panel Type:
Aspect Ratio:
Pixels:
Pixel Pitch (RGB):
Response Time: 25 ms (gray to gray)
Contrast Ratio:
Light Intensity:
Viewing Angles:
Active D isplay Area:
Max Colors: 16.7M (8 bit color)
Resolution:
• VGA: 640 x 480
• SVGA: 800 x 600
• XGA: 1024 x 768
• SXGA: 1280 x 1024
• WSXGA+: 1920 x 1080 (b
-type terminal block
40 to 75 W
EN 55022 Class B, EN 55024-4-2, EN 55024-4-3, EN 55024-4-4, FCC Part 15 Subpart B Class A
IEC 60945 4th, IEC 61174, IEC 61162, DNV2.4, I ACS E10
RoHS, c RoHS, WEEE
Built-in WDT (watchdog timer) supporting 1-
s for computer systems,
MPC-2240 Models
lntel Celeron® Processor 1047UE (2M Cache, 1.40G Hz), TD P 17 watts (s tandard)
Intel HM65
8 GB capacity, 4 GB pre-installed: 1 slot of 4 GB DDR3-1600 204 pin SO-DIMM SDRAM
4 bootable USB 2.0 hosts, type A connectors
2 SATA III interfaces: 6 Gbps, 2.5” removable storage trays
Intel HM65 Express chipset built-in
2 outputs: 1 DVI-D, 1 VGA (female)
line in/out, 3.5 mm mini jack
2 PS/2 interfaces supporting standard PS/2 keyb oar d and mous e
24” viewable image size
MVA
16:9
1920 x 1080 (WSXGA+)
0.276 (H) x 0.276 (V) mm
5000:1
300 cd/m2
178°/178°
531.36 (H) x 298.89 (V) mm
enchmarked setting)
Page 10

MPC-2000 Series Hardware Introduction
1-6
Ethernet Interface
LAN:
Magnetic Isolat ion P ro tec t i o n:
Serial Interface
Serial Standards:
Serial Communication Parameters
Data Bits:
Stop Bits:
Parity:
Flow Control:
Baudrate:
Serial Signals
RS-232: TxD, RxD, DTR, DSR, RTS, CTS, DCD, GND
RS
RS
RS
NMEA Interface
Serial Standards:
Ba
Optical Isolation Protectio n:
Voltage Differential:
Baudrate:
Data Bits:
Stop Bits:
Parity:
Handshake:
LEDs
System:
LAN:
Front Panel
LEDs:
SavvyTouch Display Cont rol Buttons:
Physical Characteristics
Housing:
Weight:
Dimensions: 595 x 393 x 75 mm (23.44 x 15.48 x 2.95 in)
Mounting:
Environmental Limits
Operating Temperatur e:
Storage Temperature:
Ambient Relative Humidity:
IP Rating:
Anti
• 0.7 g @ DNV 2.4 (Class A), sine wave, 2
• 1 g @ DNV 2.4, random wave, 3
• 2.1 g @ DNV 2.4 (Class C), sine wave, 2
Power Requirements
Input Voltage:
• 24 VDC (18 to 36 VDC), screw
• 100 to 240 VAC, AC power inlet
Power Consumption:
2 auto-sensing 10/100/1000 Mbps ports (RJ45)
1.5 kV built-in
2 RS-232/422/485 ports, software-selectable (DB9 male)
5, 6, 7, 8
1, 1.5, 2
None, Even, Odd, Space, Mark
RTS/CTS, XON/XOFF, ADDC® (automatic data direction control) for RS-485
50 bps to 921.6 Kbps (supports non-standard baudrates; see user’ s manual fo r d e tail s )
-422: TxD+, TxD-, RxD+, RxD-, GND
-485-4w: TxD+, TxD-, RxD+, RxD-, GND
-485-2w: Data+, Data-, GND
8 NMEA 0183 ports
se Serial Standard: RS-422
±6 kV contact discharge, ±8 kV air discharge
-15 V to + 15 V
4800 bps
8
1, 1.5, 2
None
None
Storage, Power
100M/Link x 2, 1000M/Link x 2 (on connector)
Storage
ECDIS, INFO, Brightness (+, -), Power
Aluminum sheet metal
12.4 kg
Flush mounting
-15 to 55°C (5 to 131°F)
-20 to 60°C (-4 to 140°F)
5 to 95% (non-condensing)
IP22 (IP65 models available on reques t)
-Vibration:
-100 Hz, 1 Oct./min., 1.5 hr per axis
-100 Hz, 2.5 hr per axis
-50 Hz, 1 Oct./min., 1.5 hr per ax i s
-type terminal block
40 to 75 W
Page 11

MPC-2000 Series Hardware Introduction
1-7
Standards and Certifications
Safety:
EMC:
Marine:
Green Product:
Reliability
Automatic Reboot Trigger:
255 second
hang intervals; software programmable
Warranty
Warranty Period:
Details:
Computer
CPU:
OS:
(models with OS pre
System Chipset:
System Memory:
USB:
Storage:
BIOS:
Graphics Controller:
Video Output:
Digital Input/Output:
LPT Port:
Buzzer:
Other Peripherals
Audio:
KB/MS:
Display
Panel Size:
Panel Type:
Aspect Ratio:
Pixels:
Response Time:
Contrast Ratio:
Light Intensity:
Viewing Angles:
Active D isplay Area:
Max Colors:
Display Interface:
Resolution:
• VGA: 640 x 480
• SVGA: 800 x 600
• XGA: 1024 x 768
• SXGA: 1280 x 1024
Ethernet Interface
LAN:
Magnetic Isolat ion P ro tec t i o n:
Serial Interface
Serial Standards:
UL 60950-1, CCC
EN 55022 Class B, EN 55024-4-2, EN 55024-4-3, EN 55024-4-4, FCC Part 15 Subpart B Class A
IEC 60945 4th , IEC 61174, IEC 61162, DNV2. 4, IACS E10
RoHS, c RoHS, WEEE
Built-in watchdog timer (WDT), configurabl e for rese ts following 1-
1 year
See www.moxa.com/warranty
MPC-2190 Models
lntel Celeron® Processor 1047UE (2M Cache, 1.4 GHz)
Windows 7 Professional, Windows XP Embedded, Windo ws Embedded Standard 7, Windows XP SP3
-installed available by request)
Intel BD82HM65 platform controller hub
4 GB pre-installed: 1 slots of 4 GB DDR3-1066 204 pin SO-DIMM SDRAM
USB 2.0 hosts x 4, type A connectors, supporting system boot up
2 SATA-III connectors
64 Mbit Flash BIOS SPI type, ACPI function supported
Intel HM65 Express chipset built-in
DVI-D x 1, VGA x 1 (female)
4 DIs, 4 DOs, or 8 DIs, 8 DOs (optional)
1 (available on request)
75 to 85 db (IEC 60945 complian t)
Line-in and line-out interface, with 3.5 mm mini jack
2 PS/2 interface supporting standard PS/2 keyboard and mous e
19 inch wide viewable image size
1280 x 1024 (SXGA)
2 auto-sensing 10/100/1000 Mbps ports (RJ45)
MVA
5:4
20 ms
2000:1
300 cd/m2
178°/178°
376.32 (H) x 301.06 (V) mm
16.7M (8 bits/color)
Dual channel LVDS
1.5 kV built-in
2 RS-232/422/485 ports, software-selectable (DB9 male)
Page 12

MPC-2000 Series Hardware Introduction
1-8
Serial Communication Pa ra me te rs
Data Bits:
Stop Bits:
Par
Flow Control:
Baudrate:
Serial Signals
RS
RS
RS
RS
NMEA Interface
Serial Standards:
Base Serial Standar d:
Optical Isolation Protectio n:
Voltage Differential:
Baudrate:
Data Bits:
Stop Bits:
Parity:
Handshake:
LEDs
System: Storage, Power
LAN:
Front P
LEDs:
Smart OSD:
Physical Characteristics
Housing:
Weight: 7.8 kg
Dimensions:
Mounting:
System Cooli
Environmental Limits
Operating Temperatur e:
Storage Temperature:
Ambient Relative Humidity:
IP Rating:
• Front: IP 54
• Rear: IP 22
Anti
• 0.7 g @ DNV 2.4 (Class A), sine wave, 2
• 1 g @ DNV 2.4, random wave, 3
• 1 g @ DNV 2.4 (Class C), sine wave, 2
Power Requirements
Input Voltage: 115 to 230 VAC, 50/60 Hz, 24 VDC
Power Consumption:
Standards and Certifications
Safety:
EMC:
Marine Standard:
Marine Type Approval:
Green Product:
5, 6, 7, 8
1, 1.5, 2
ity: None, Even, Odd, Space, Mark
RTS/CTS, XON/XOFF, ADDC® (automatic data direction control) for RS-485
50 bps to 115.2 Kbps (supports non-standard baudrates; see user’ s manual fo r d e tails )
-232: TxD, R xD, DTR, DSR, RTS, CTS, DCD, GND
-422: TxD+, TxD-, RxD+, RxD-, GND
-485-4w: TxD+, TxD-, RxD+, RxD-, GND
-485-2w: Data+, Data-, GND
4 NMEA 0183 ports
RS-422
±6kV contact discharge , ±8kV air discharge
-15 V to + 15 V
4800 bps
8
1, 1.5, 2
None
None
100M/Link x 2, 1000M/Link x 2 (on connector)
anel
MENU, Brightness, INFO, ECDIS, Day/Dusk/Nig ht, S tor a ge
Yes
Aluminum sheet metal
429 x 387 x 74.5 mm (16.89 x 15.24 x 2.93 in )
Flush mounting
ng: Fanless thermal design
-15 to 55°C (5 to 131°F)
-20 to 60°C (-4 to 140°F)
5 to 95% (non-condensing)
-Vibration:
-100 Hz, 1 Oct./min., 1.5 hr per axis
-100 Hz, 2.5 hr per axis
-50 Hz, 1 Oct./min., 1.5 hr per axis
40 W to 125 W (max.)
UL 60950-1, CCC
EN 55022 Class B, EN 55024-4-2, EN 55024-4-3, EN 55024-4-4, FCC Part 15 Subpart B Class A
IEC-60945 4th, IEC-61162, IEC-61174
DNV 2.4 and IACS E10, ABS, MR-A003
RoHS, c RoHS, WEEE
Page 13
MPC-2000 Series Hardware Introduction
1-9
Reliability
MTBF (mean time between fai lures):
Automatic Reboot Trigge r:
s for time interval system
reset, software programmabl e
Warranty
Warranty Period:
Details: See www .mox a.c om/war ranty
202,309 hrs
Built-in WDT (watchdog timer) supporting 1-255 level
1 year
Optional Features for the MPC-2000 Series
CPU Default lntel Celeron® processor 1047UE (2M Cache, 1.40GHz), TDP 17 watts
Options • lntel Core™ i3 processor 3217UE (3M Cache, 1.60GHz), TDP 17 watts
• lntel Core™ i7 processor 3517UE (4M Cache, 2.80GHz), TDP 17 watts
RAM Default 4 GB
Option 8 GB (max.)
OS Default N/A
Options • Windows 7 Professional
• Windows XP Embedded
• Windows Embedded St a ndard 7
• Windows XP SP3
Factory
Options
• (For MPC-2190 and MPC-2240) Projected capacitive touch screen (multi-touch, USB interface)
• Optical bonding
• Color calibrated for ECDIS
• Customized options for SSD drives
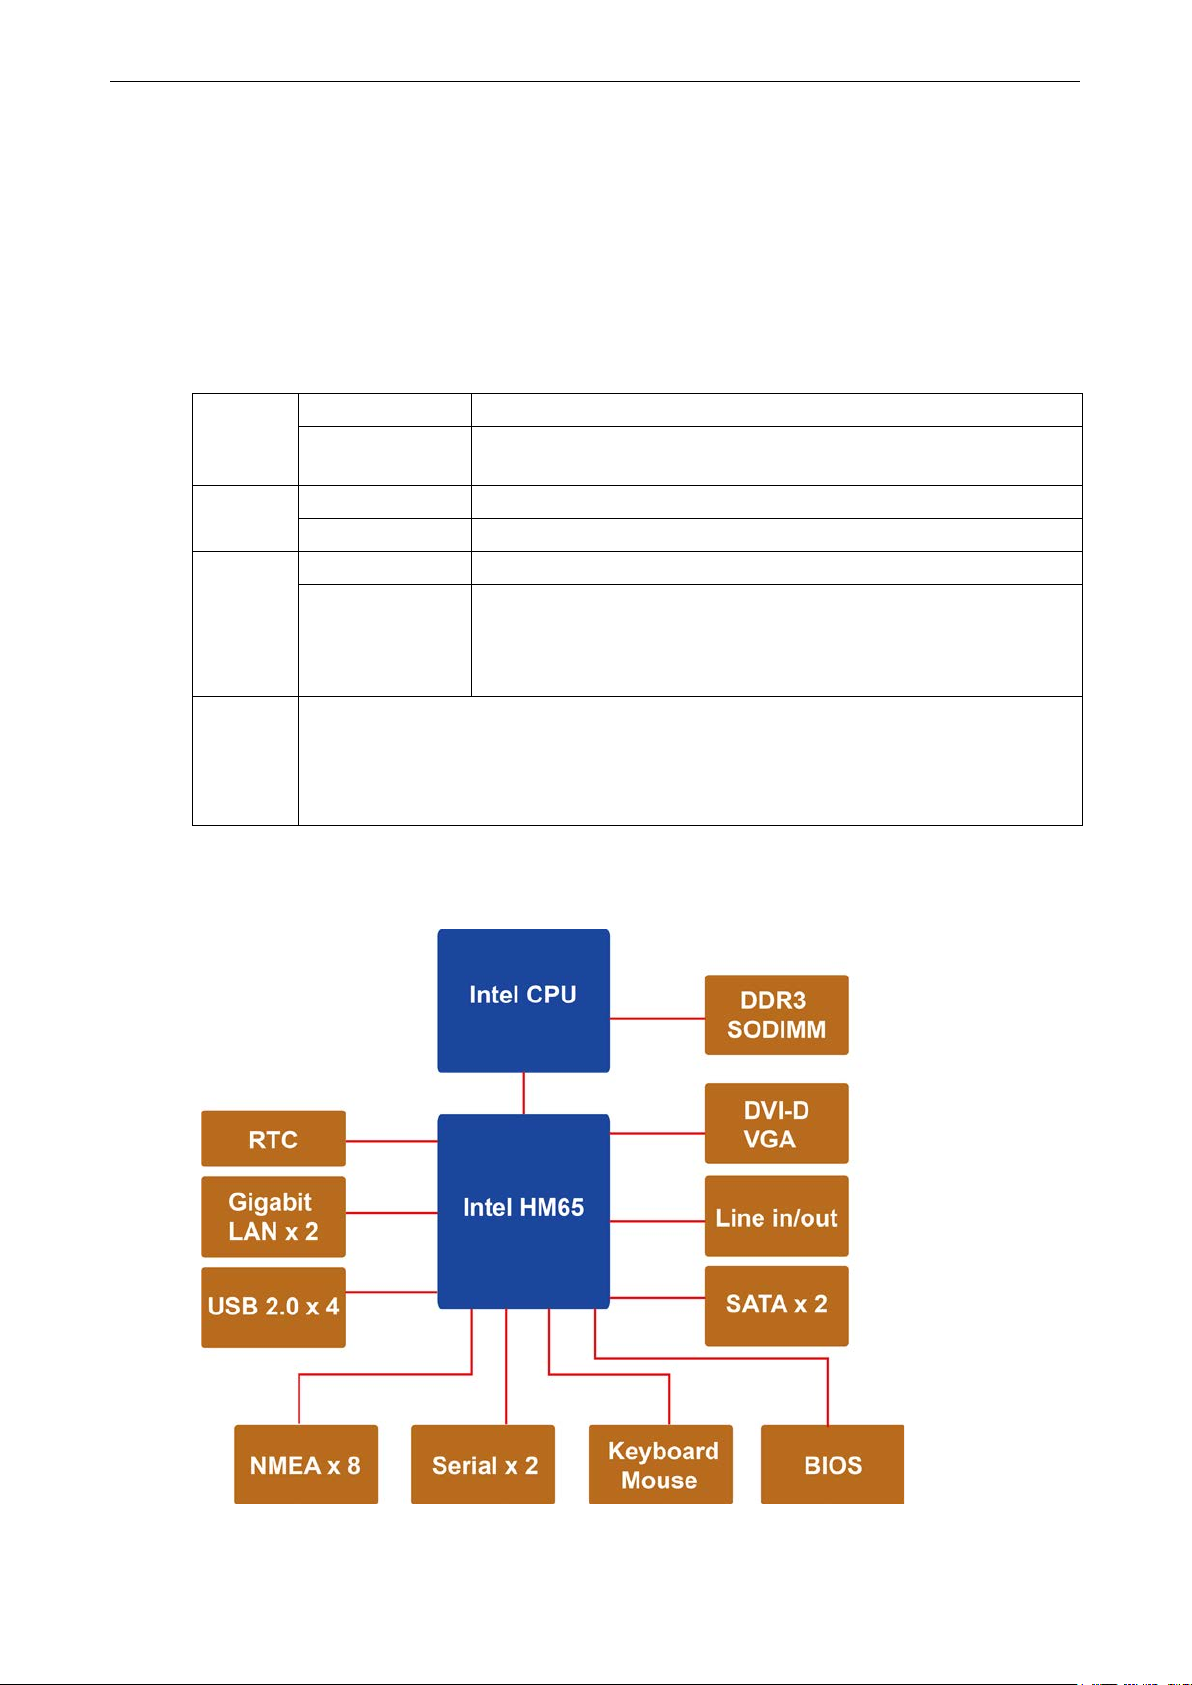
Hardware Block Diagram
Page 14

2
2. Hardware Overview
The MPC-2000 series is compact, well-designed, and hardened for industrial marine applications. The
intelligent SavvyTouch display control buttons allow you to easily locate and manipulate control buttons in low
light environments, or to receive immed ia te sys tem hardware reports for troubleshooting. The MPC-2000
series featu res a reliable and stable hardware platform with multiple serial ports, for connecting a wide variety
of data devices.
The following topics are covered in this chapter:
Appearance
F ront View
B o ttom View
Dimensions
MPC-2260
MPC-2240
MPC-2190
SavvyTouch Display Control Buttons
Real Time Clock
Page 15
MPC-2000 Series Hardware Hardware Overview
2-2
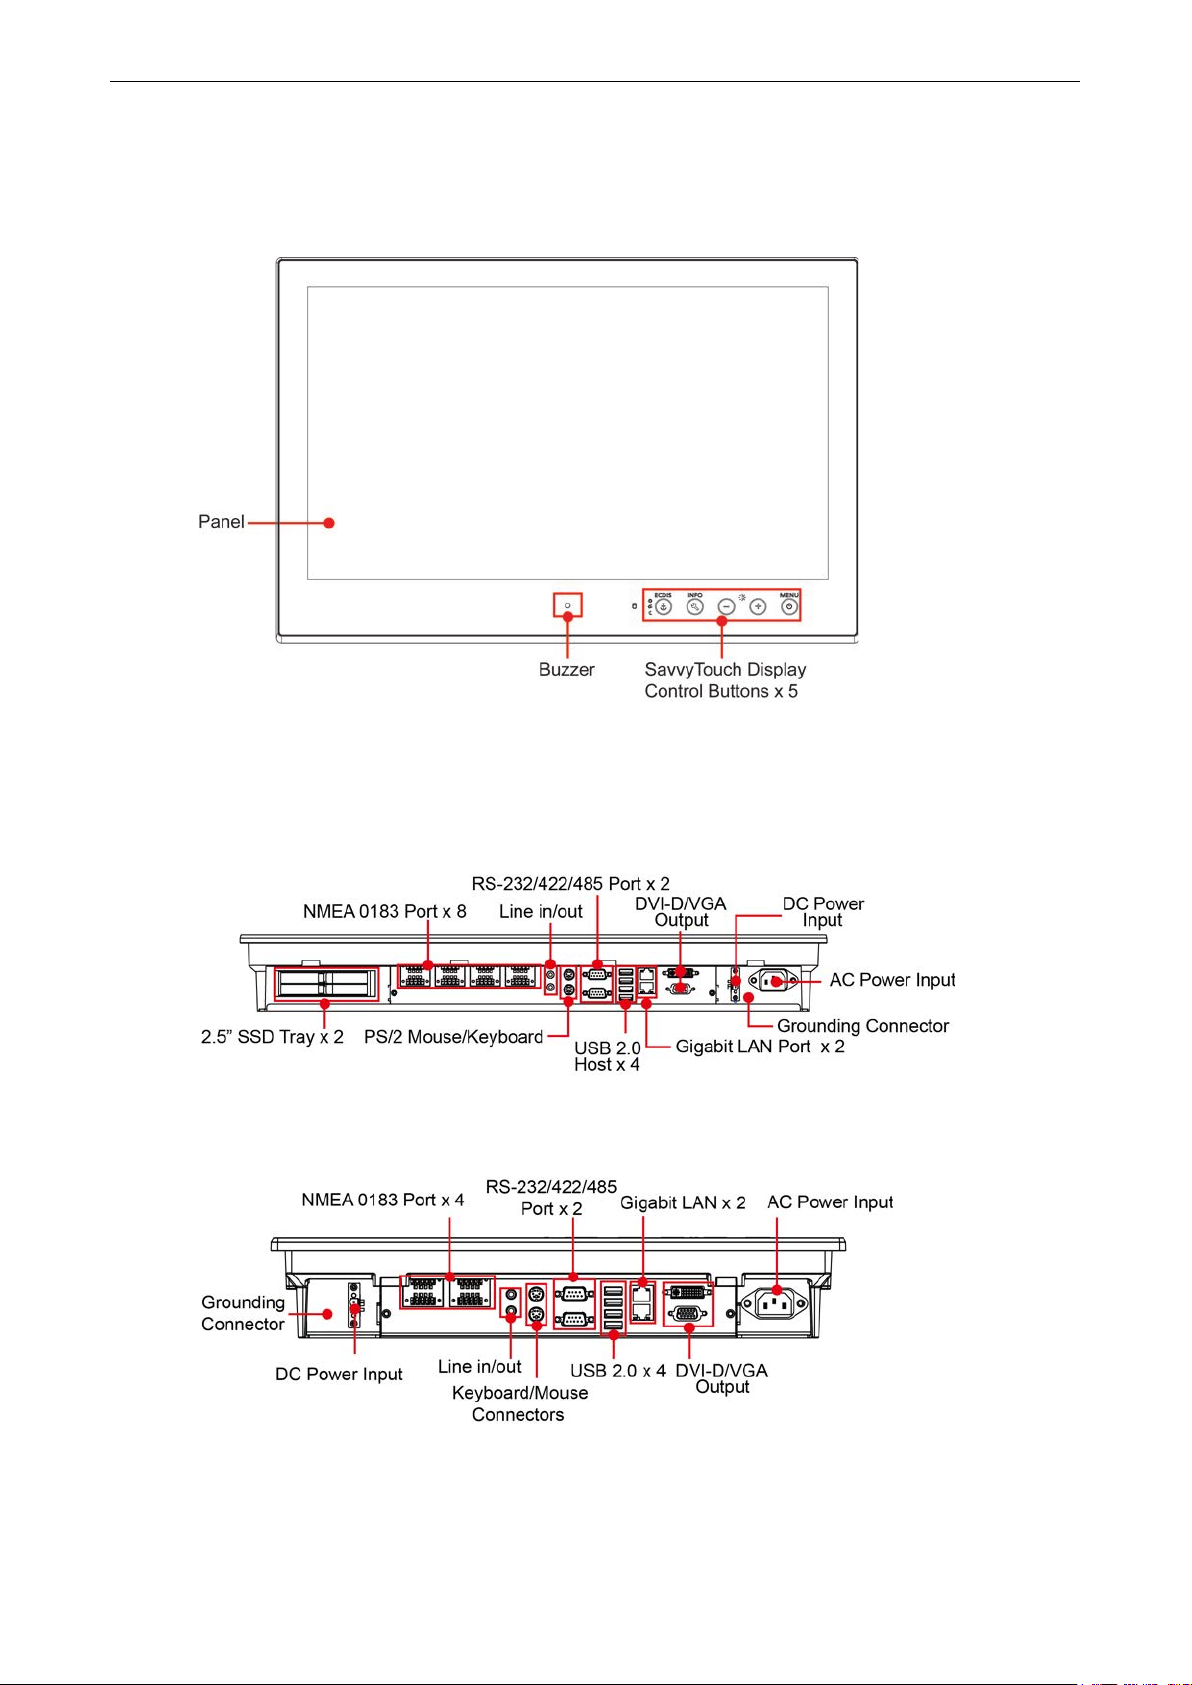
Appearance
Front View
Bottom View
MPC-2240/MPC-2260
MPC-2190
Page 16

MPC-2000 Series Hardware Hardware Overview
2-3
Dimensions
MPC-2260
MPC-2240
Page 17
MPC-2000 Series Hardware Hardware Overview
2-4
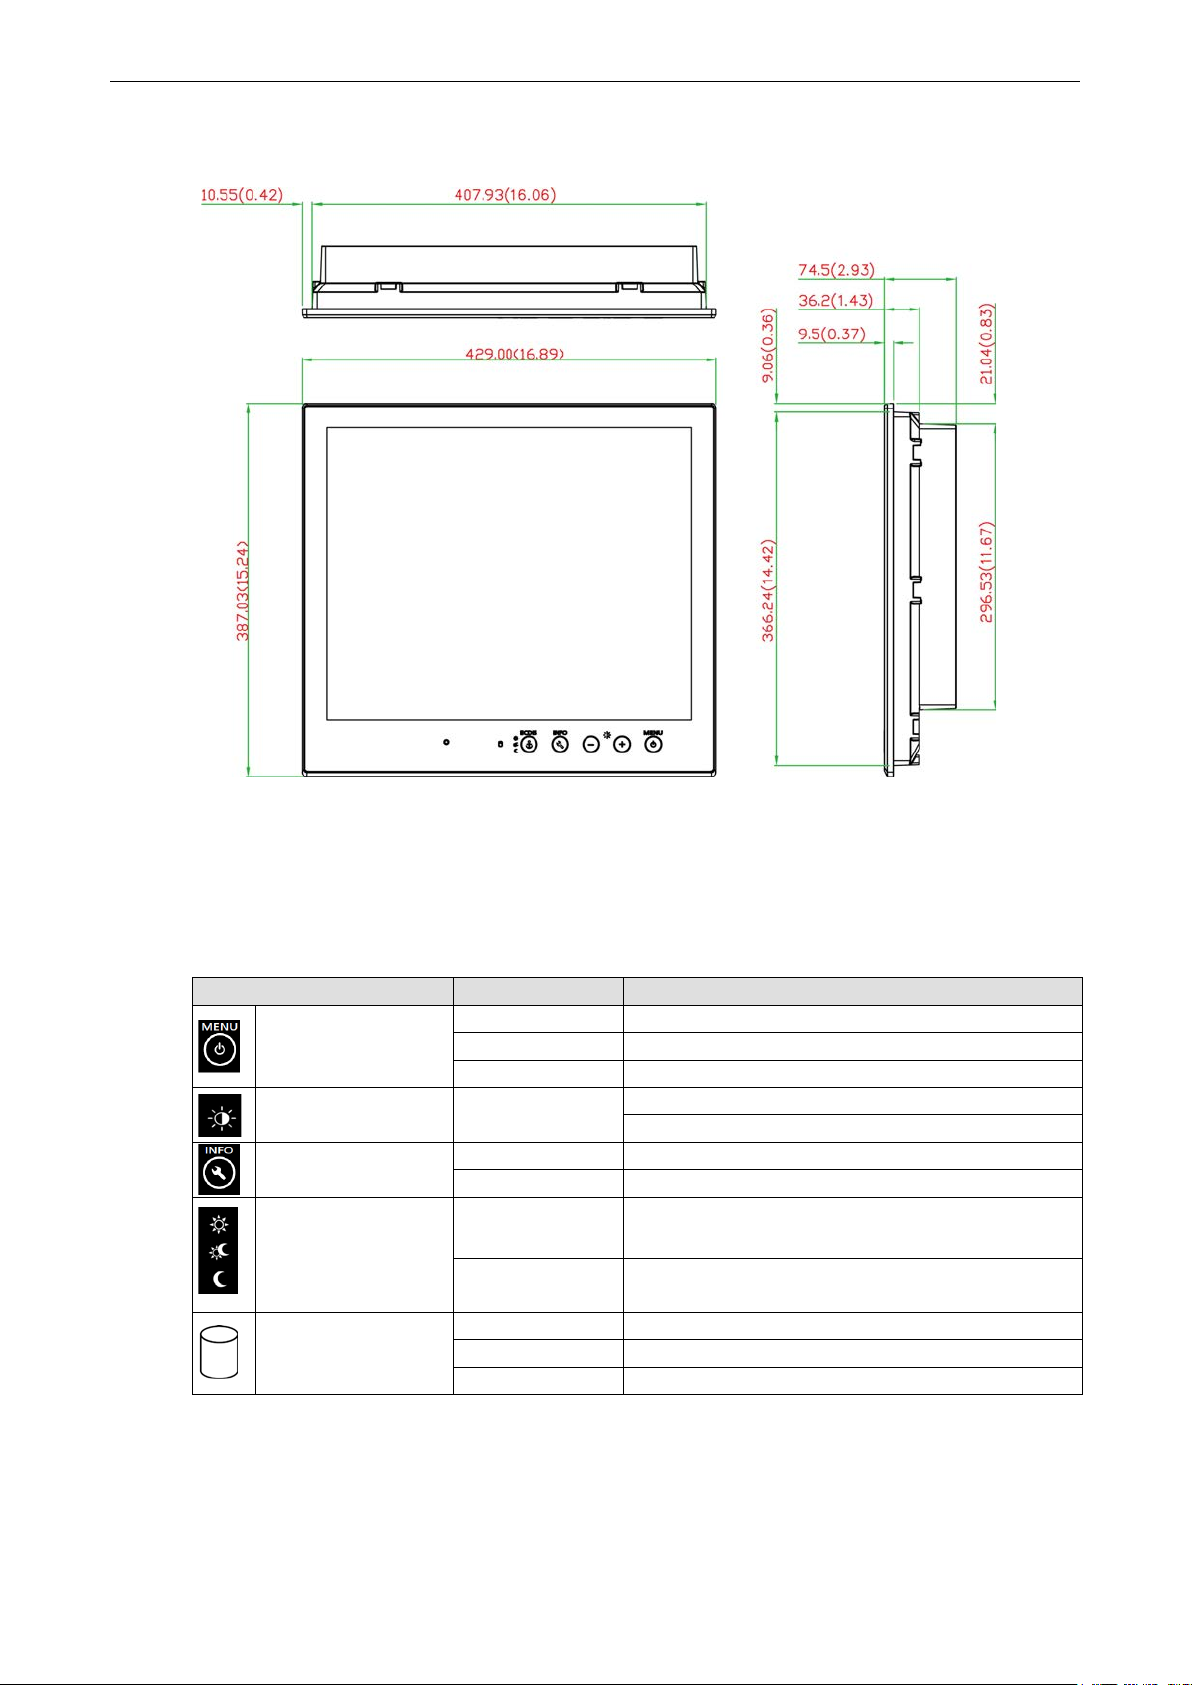
MPC-2190
SavvyTouch Display Control Buttons
The MPC-2000 series c omes with SavvyTouch display controls situated in the lower right c orner of the screen.
These intelligent buttons will light up automatically when your fingers draw near. Refer to the following table for
more information on each button.
Name Color Control Function / Color Legend
Green Computer is powered on and functioning normally.
Power
Brightness
Info
Display mode
(ECDIS models only)
Storage
Red Power on standb y and syste m is shut down.
Off Power is off.
White
Off System is functioning normally.
Red System hardware error has occurred.
White Displays the brightness mode.
Off
Red (on) Storage drive is functioning properly.
Red (blinking) Accessing or writing data to storage drive.
Off Storage drive is offline.
+: To increase brightness of display panel.
-: To decrease brightness of display panel.
Brightness of display panel is out of ECDIS stand ard
range.
Page 18

MPC-2000 Series Hardware Hardware Overview
2-5
ATTENTION
There is a risk of explosion if the wrong type of battery is used. To avoid this potential danger, always use the
correct type of battery. Contact the Moxa RMA service te am if yo u need to replace
Real Time Clock
The real-time clock in the MPC-2000 series is pow ered by a lithium battery. Do NOT replace the lithium battery
on your own. If the battery needs to be changed, please contact the Moxa RMA serv ic e team.
the battery.
Page 19

3
3. Hardware Installation and Connection
This chapter describes how to connect the MPC-2000 series to the network and to other devices.
The following topics are covered in this chapter:
Installation and Hand li n g Notes
Desktop Mounting
Pane l Mo unting
V ES A Mo unting
Wiring Requirements
Grounding the MPC-2000 Series Panel Computer
Powering On the MPC-2000 Se ries
Powering Off the MPC-2000 Series
SavvyTouch Display Controls
Connecting Data Transmission Cables
C o nne c ti ng to the Network
Connecting Serial Devices
Connecting NMEA 0183 Devices
Connecting Speak er s or H ead p hones
Connecting a PS/2 Keyboard and Mouse
Connecting to USB Devices
Installing a SATA Storage Drive
O n the MPC -2260 or MPC-2240
O n the MPC -2190
Page 20
MPC-2000 Series Hardware Hardware Installation and Connect ion
3-2
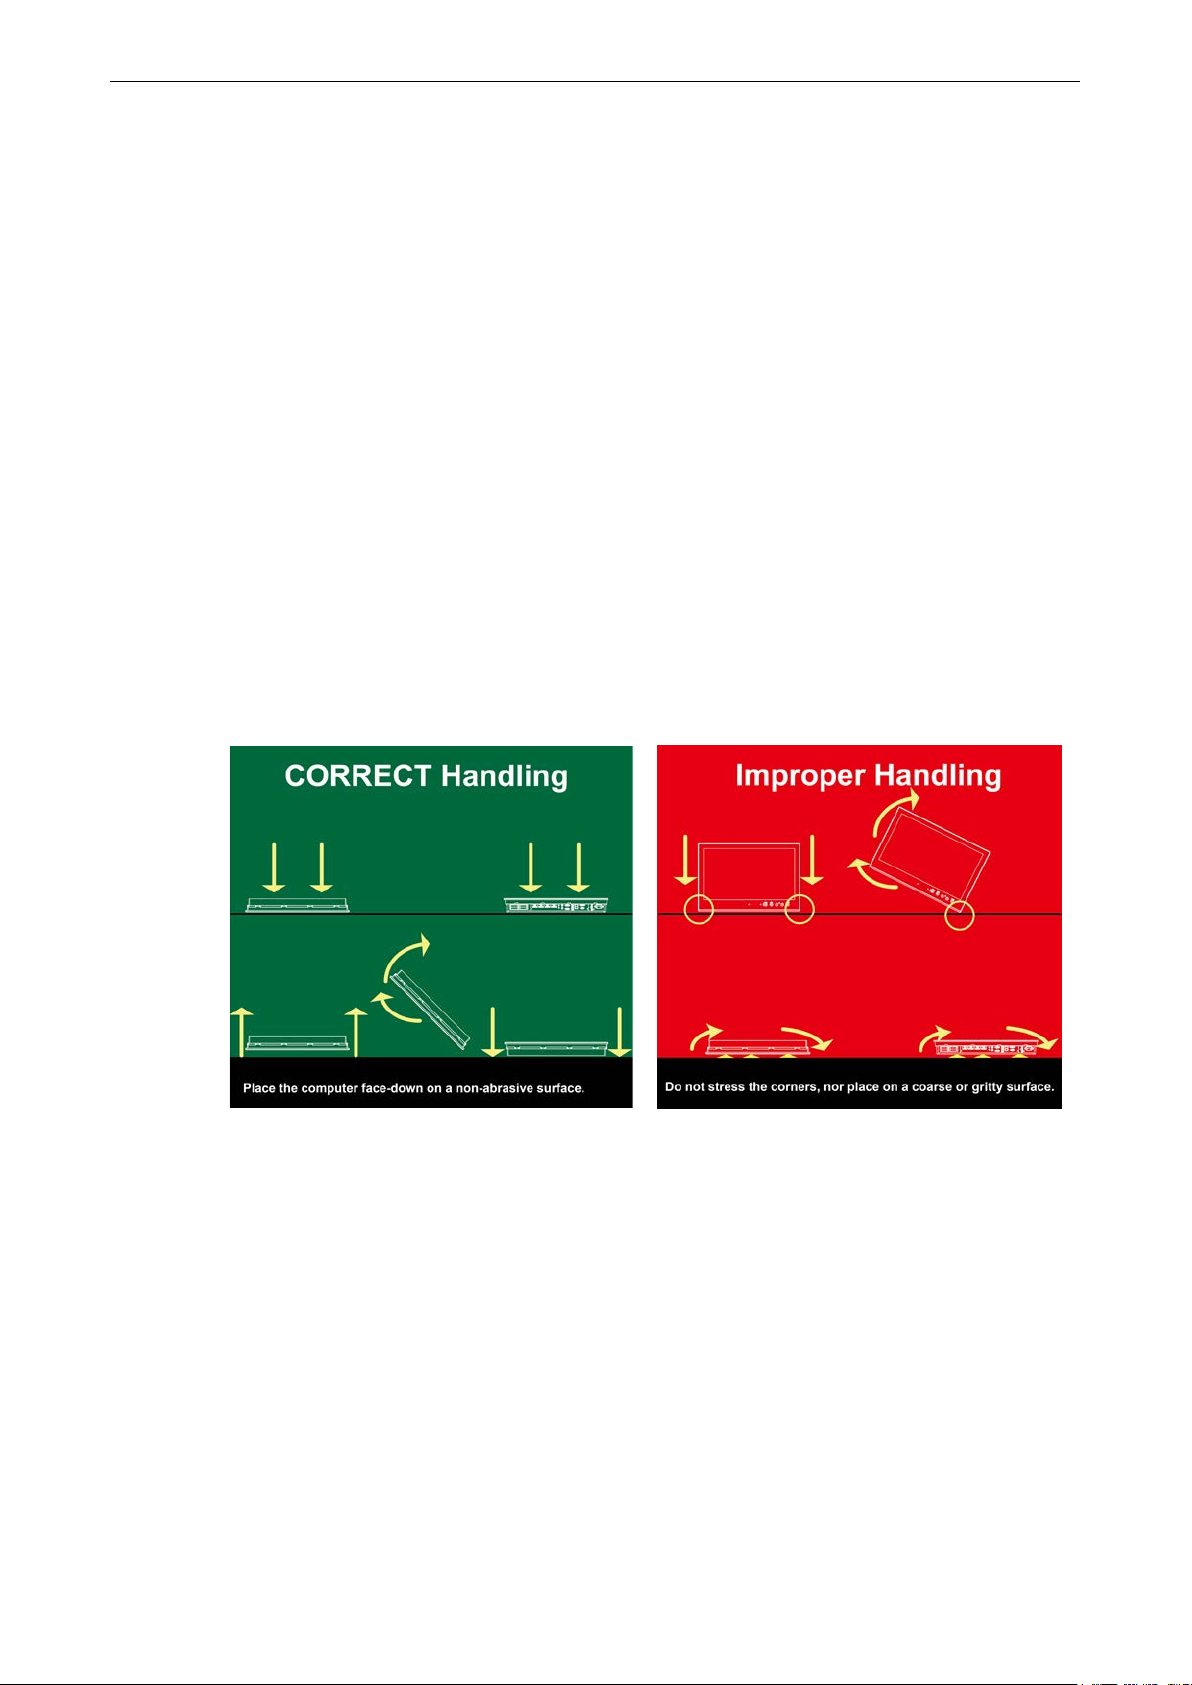
Installation and Handling Notes
Before installing or mounting the MPC-2000 series panel computer, read the following notes:
1. The MPC-2000 series is designed for mounting on a desktop, wall, or an FDMI/VESA interface. Refer to
the illustrations in the related sections for detailed instructions.
2. To prolong product lif esp an, good ventilation must be maintained around the machinery. The chassis’
heat-sink area MUST be kept clear fro m other he at gener ating items; otherwise, damage to the system
motherboard may occur. The minimal distance that must be maintained between the heat sink and another
heat source is 150 mm.
3. Do NOT install the unit horizontally (for example, lying down on its back), as heat cannot be dissipated
effectively and may cause damage to the LCD panel. To ensure adequate heat dissipation, install the unit
vertically or within a ±40 degrees slope off the vertical.
4. Exposure to extreme direct sunlight may cause a considerable increase in the temperature of the unit, and
under certain circumstances might lead to overheating. Take this into consideration when bridge equipment
is being planned (for example, sun shades, distance fro m the windo ws, and ventilation.)
5. Exposure to strong vibration or loud, chronic noise might affect functionality and/or product lifespan. It is
advised to take vibration and noise into consideration during system assembly and installation, so that the
mount point may be carefully selected to avoid exposure to undue vibration.
6. For maximum safety, at least two persons should work together to lift, place, and fasten the computer at its
mount point. Before you lift or move the computer, make sure that the system is turned off and no power
is being supplied to the system. In addition, make sure that you have prepared the correct screws for
mounting.
Page 21

MPC-2000 Series Hardware Hardware Installation and Connect ion
3-3
Desktop Mounting
The MPC-2000 series display comes with optional brackets that allow you to install the unit on a horizontal
surface, such as a desktop. Three round screws are required for each bracket. See the following figures for
detailed screw specifications and the torque values.
Page 22
MPC-2000 Series Hardware Hardware Installation and Connect ion
3-4
MPC-2260 and MPC-2240
MPC-2190
Place your MPC-2000 series display on a clean, flat, well-ventilated desktop. For proper ventilation, leave some
space between the MPC-2000 series display and other equipment.
Do NOT place equipment or objects on top of the MPC-2000 series display. Doing so might damage internal
components.
Page 23

MPC-2000 Series Hardware Hardware Installation and Connect ion
3-5
The
optional clamp mounts that
install
been cut o
hardware) or into computing stations where a
flush mount is needed.
The maximum thickne ss of the surface to
which the unit can be clamped is 11 mm.
For a secure mounting, use all 14 clamps (for
MPC
clamps (for
arms are fastened into slots on all four sides of
the
Panel Mounting
MPC-2000 series display comes with 14
enable you to
the unit onto a wall (where space has
ut to accommodate the rest of the
-2260 and MPC-2240 models) or 10
MPC-2190 models). The clamp
MPC-2000 series display.
To fasten the clamp arms to the MPC-2240 mounting slots as shown in the following figure, use the short M4
SUS (stainless) screws. Then, use the clamps to fasten the display to its mounting point. Note the torque values
shown in the figure.
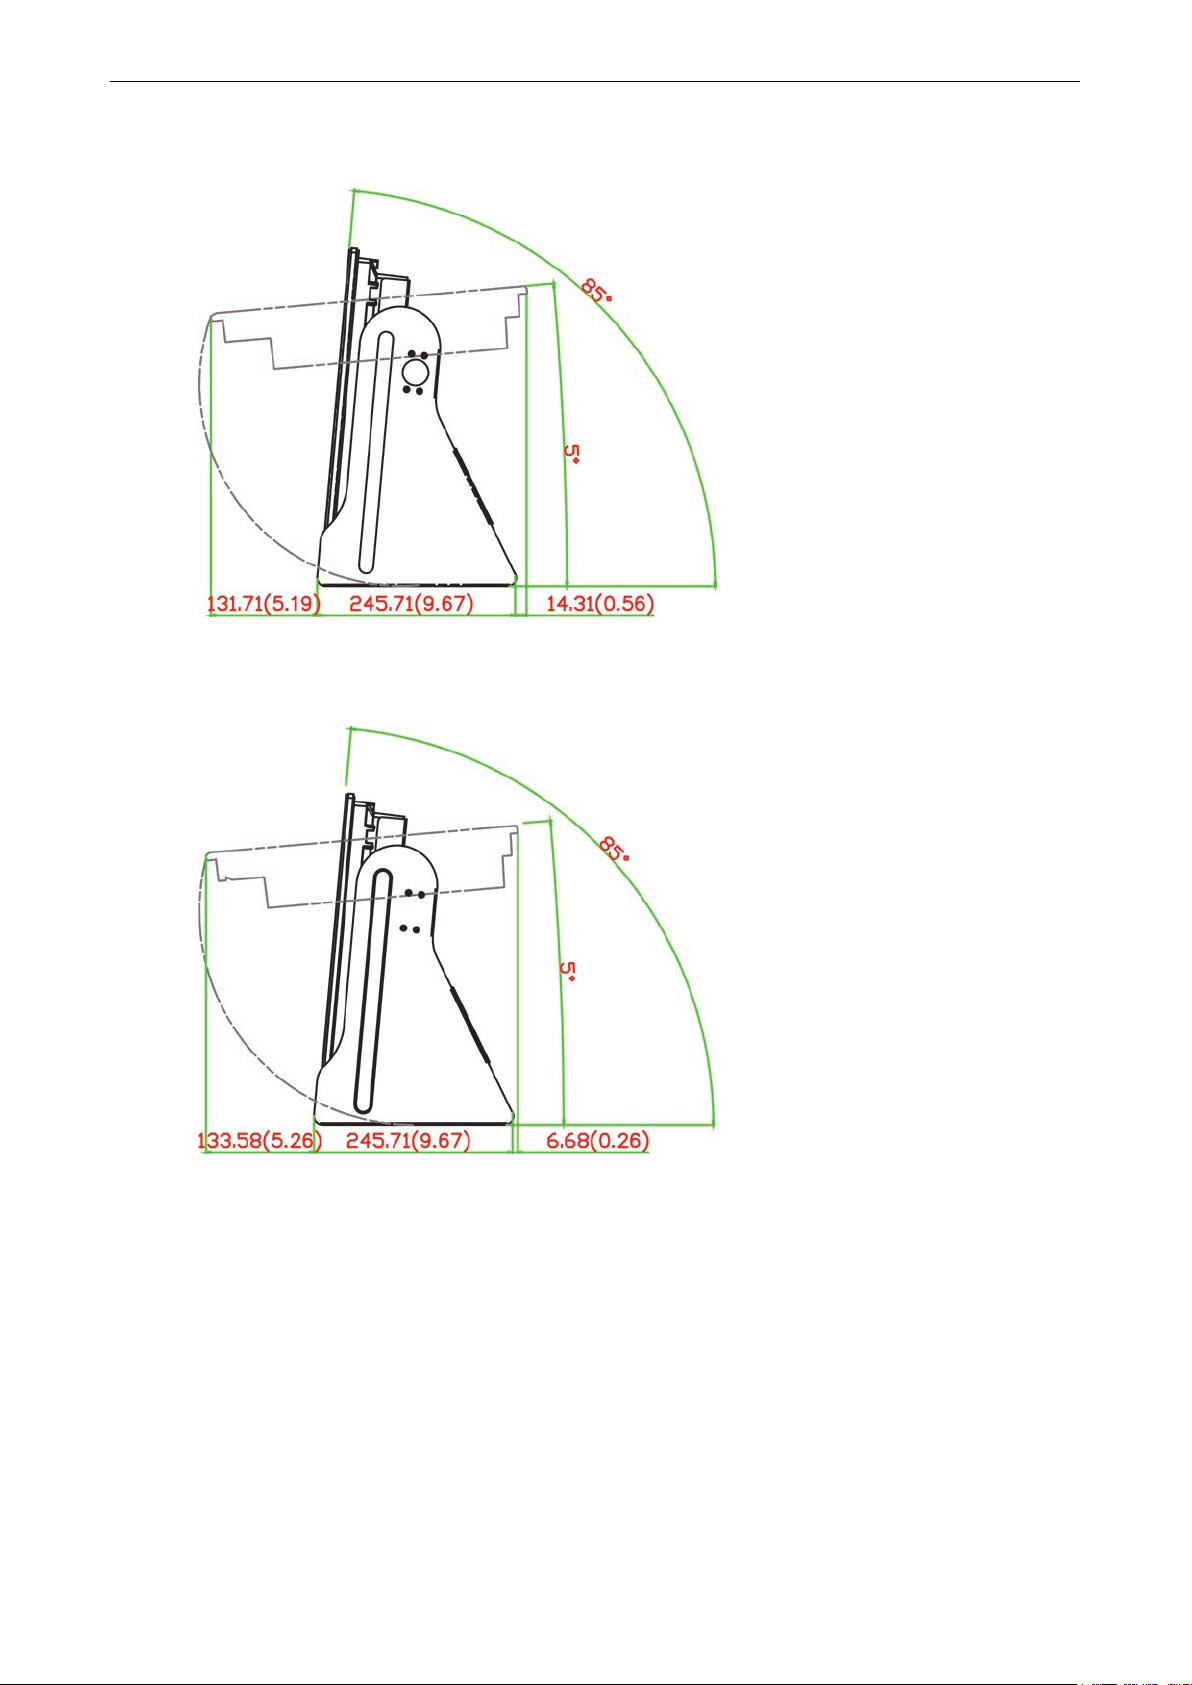
VESA Mounting
The MPC-2000 series also comes with an optional VESA mounting kit. Six f la t-headed screws and four round
screws are required to fasten the VESA mounting bracket. See the following figure for detailed screw
specifications and torque values.
Four additional screws (not included in the kit) are required to mount the unit on a VESA rack. Use M6 screws
with a length between 10 and 12 mm.
Page 24

MPC-2000 Series Hardware Hardware Installation and Connect ion
3-6
MPC-2260
Page 25

MPC-2000 Series Hardware Hardware Installation and Connect ion
3-7
MPC-2240
Page 26

MPC-2000 Series Hardware Hardware Installation and Connect ion
3-8
MPC-2190
Page 27

MPC-2000 Series Hardware Hardware Installation and Connect ion
3-9
NOTE
Do
interference, wires with different sig na l c haracteristics should be routed separately.
ATTENTION
Safety First!
Be sure to discon
Wiring Caution!
Calculate the maximum possible curre nt in each power wire and com mon wire . Observe all elec trical codes
dictating the maximum current allowab le for ea c
If the current goes above the maximum ratings, the wiring could overheat, causing serious damage to your
equipment.
Temperature Caution!
Be careful when handling the unit. When the unit is plugged in, the inte rnal components generate heat, and
consequently the outer casing may feel hot to the touc h.
We recommend taking the following precautions to minim ize he at
•
•
display if (a) the display is not positioned
Important Safety Precaution
Even though the display is rated to o
applications, it is best to ensure
increase the
life of your display and minimize service cos ts .
Before you power on the MPC
ground it. Proper g
limit the effects of noise due to electromagneti c
interference (EMI). Run the ground connection from
the ground screw to the grounding surface prior to
connecting the power.
ATTENTION
This
Wiring Requirements
This section describes how to connect serial devic e s to the MPC-2000 series.
Read and follow these safety precautions before proc eeding with the installation of any electronic devic e s:
• Use separate paths to route wiring for power and devices. If power wiring and device wir ing p aths must
cross, make sure the wires are perpendicular at the intersection point.
NOT run signal or communications wires together with power wires in the same conduit. To avoid
• Based on the type of signal transmitted through a wire, determine which wires should be kept separate and
which bundled together. The rule of thumb is that wiring that shares similar electrical characteristics can be
bundled together.
• Keep input wiring and output wiring separate.
• It is advisable to label all wires used in the system.
Position the display within ±40 ° of the ver ti c al.
Install an external fan to increase airflow upward s thr o ugh the
within ±40° of the vertical, (b) the ambient temperature exceeds 25°C, or (c) the display is used in a
location with minimal ventilatio n.
nect the power cord before installing and/or wiring your MPC-2000 series panel computer.
h wire size.
build-up within the display:
perate within the IEC 60945 standard of -15 to 55°C for marine
that the ambient temperature does not exceed 25°C. Doing so will
Grounding the MPC-2000 Series Panel Computer
-2000 series, first
rounding and wire r o uti ng help
unit is intended to be mounted to a well-grounded mounting surface, such as a metal panel.
Page 28

MPC-2000 Series Hardware Hardware Installation and Connect ion
3-10
NOTE
It takes between 10
NOTE
If the MPC
input
power
Powering On the MPC-2000 Series
1. Connect the MPC-2000 series display to a power source, do one of the following:
• Connect the terminal block to the MPC-2000 Series DC Euroblock terminal (located on the bottom
panel).
• Connect the MPC-2000 series to a power source using the AC power cord provided.
2. Touch the MENU button (on the lower right hand corner of the display panel) for about one second to turn
on the MPC-2000 series.
– 30 seconds for the system to complete the start-up process.
Powering Off the MPC-2000 Series
To power off the MPC-2000 series panel computer, touch the MENU button for about four seconds. Depending
on the power management settings you configure in the operating system, the MPC-2000 series may enter the
standby, hibernation, or system shutdown mode.
To force the MPC-2000 series to shut down, touch the MENU button for about 10 seconds.
SavvyTouch Display Controls
The MPC-2000 series comes with five SavvyTouch display controls on the front panel. These intelligent controls
turn on as your hand draws near the area of the panel where they are located.
-2000 series is powered using a DC converter, the INFO dialog displays the Error status for AC
(as shown in the following figure). This does not affect the normal oper ation of the MPC-2000 series.
MENU/Power Control
On the MPC-2000 series, the MENU button also serves as the power button. To turn on or turn off the
MPC-2000 series, press the Menu button for about four seconds. After the system is powered up, the MENU
button turns green. To power off the MPC-2000 Series, press the MENU button for about four seconds, and then
choose to enter standby, hibernation, or system shutdown mode (the available choices may be configured
using your operating syste m’ s pow er manage m e nt setting s ). If you encounter technical problems, press and
hold the MENU button for 10 seconds to force a hard shutdown.
Page 29

MPC-2000 Series Hardware Hardware Installation and Connect ion
3-11
NOTE
If the MPC
in
the System Status screen
Brightness
You can use the two brig htne ss b utto ns to se t the brightness of the screen. Press the plus (+) button to
increase screen brightness, and the minus (–) button to decreas screen brightness.
INFO
The INFO button displays a status report (shown at right) of the AC power supply, main board, CPU, memory,
the motherboard chipset, and VGA subsystems and components.
When the panel computer is working properly, the screen displays Pass for each subsystem/component (as
shown in the figure). The screen displays Error to ind ic ate that a faul ty component.
The CPU, memory, chipset and VGA components are detected only during the boot process. The AC and
motherboard power components are being monitored continuously.
-2000 series is powered using a DC converter, the systems displays Error for the AC power status
. This does not affect the operation of the MPC-2000 ser i es .
ECDIS Mode Brightness Adjustment
For ECDIS-approved models, you can use the ECDIS button to select an ECDIS display mode ( DAY, DUSK, or
NIGHT). The ECDIS mode setting overwrites the custo m display settings you specified.
The ECDIS button and ECDIS-related functions are d is abled on s tandard MPC-2000 series models.
Page 30

MPC-2000 Series Hardware Hardware Installation and Connect ion
3-12
NOTE
You can also control the MPC
command description,
(Storage)
The storage icon blinks red when data is been accessed on the MPC-2000 series.
-2000 series using commands over the UART interface. For detailed UAR T
see Appendix B: UART Commands for Display Control.
Connecting Data Transmission Cables
This section describes how to connect the MPC-2000 series to serial devices and the network.
Connecting to the Network
To connect the MPC-2000 series to a network, connect an Ethernet cable to an Ethernet port on the bottom
panel of the MPC-2000 series. The LED on the Ethernet port on the MPC-2000 series turns on to indicate that
an Ethernet connection has been established.
The following figures indicate the location of the Gigabit Ethernet ports.
MPC-2240/MPC-2260
MPC-2190
The 10/100/1000 Mbps Ethernet LAN port uses 8-pin RJ45 connectors. The follow ing d iagram shows the
pinouts and the descriptions for these ports.
Green 100 Mbps Ethernet mode
Yellow 1000 Mbps (Gigab it) Ethe rnet mode
Off No activity or 10 Mbps Ethernet mode
Pin 100 Mbps 1000 Mbps
1 ETx+ TRD(0)+
2 ETx- TRD(0)3 ERx+ TRD(1)+
4 – TRD(2)+
5 – TRD(2)6 ERx- TRD(1)7 – TRD(3)+
8 – TRD(3)-
Page 31

MPC-2000 Series Hardware Hardware Installation and Connect ion
3-13
Connecting Serial Devices
You can configure the serial ports 1 and 2 (male DB9) RS-232, RS-422, or RS-485 communications. See the
figure below for the loc ation of the serial ports.
MPC-2240/MPC-2260
MPC-2190
The following table shows the pin assignme nts.
Pin RS-232 RS-422 RS-485 (4-wire) RS-485 (2-wire)
1 DCD TxDA(-) TxDA(-) –
2 RxD TxDB(+) TxDB(+) –
3 TxD RxDB(+) RxDB(+) DataB(+)
4 DTR RxDA(-) RxDA(-) DataA(-)
5 GND GND GND GND
6 DSR – – –
7 RTS – – –
8 CTS – – –
Configuring the Serial Ports
For instructions on how to set the serial port for RS-232/422/485 communications, refer to the examples in one
of the following folders on the software CD.
• For Windows 32-bit platforms:
<Software DVD>\MPC-2000 Series\Example\X86\Release
• For Windows 64-bit platforms:
<Software DVD>\MPC-2000 Series\Example\x64\Release
Page 32

MPC-2000 Series Hardware Hardware Installation and Connect ion
3-14
MPC
MPC
Connecting NMEA 0183 Devices
The MPC-2000 series comes with either eight NMEA 0183 ports (MPC-2240 and MPC-2260 models) or eight
NMEA 0183 ports (MPC-2190 models) on the bottom pane l.
The following figures show the locatio n of the NMEA por ts and the pin ass ignme nts .
-2240/MPC-2260
-2190
Connecting Speakers or Headphones
The MPC-2000 series comes with standard 3.5 mm monaural line-in and line-out ports for connecting
microphone, speakers, and headphones. See the following figure for detailed loc ation.
MPC-2240/MPC-2260
MPC-2190
Page 33

MPC-2000 Series Hardware Hardware Installation and Connect ion
3-15
Connecting a PS/2 Keyboard and Mouse
Your MCP-2240-MP computer comes with two PS/2 connectors to connect to a PS/2 keyboard (upper connector)
and PS/2 mouse (lower connector). See the following figure for the detailed location.
MPC-2240/MPC-2260
MPC-2190
Connecting to USB Devices
The MPC-2000 series comes with four USB 2.0 ports on the bottom panel. You can conne ct USB d evices (such
as a mouse or keyboard) or an external storage drive to the USB ports.
MPC-2240/MPC-2260
MPC-2190
Page 34

MPC-2000 Series Hardware Hardware Installation and Connect ion
3-16
To install a SATA storage drive in an MPC
2240
p
you
NOTE
If you are unable to properly
storage drive in the storage tray, check that you have inserted
the
, repeat steps 1 to 6. Make sure that you have securely fastened the
2000 series, install the storage drive in the slot nearer
orage
drives, install the first storage drive in the slot nearer to the
To remove a storage drive, pull out the lever and push the
tray door to the side to eject the SATA storage drive from
Installing a SATA Storage Drive
You can install a SATA hard disk drive (HDD) or sold state drive (SSD) in the MPC-2000 series. For added
reliability, we recommend that you install an SSD in the MPC-2000 series.
The procedure to install a SATA storage drive varies depe nd ing o n your MPC-2000 series model.
On the MPC-2260 or MPC-2240
-2260 or MPC-
anel computer, complete the following steps:
Locate the storage trays on the bottom panel of the
computer. For ease of installation, we r ecommend that
place the MPC-2260 or MPC-2240 on a non-abrasive
surface with its display panel facing down.
Use the protection key to unlock the storage tray cover.
Lift the lever to ope n the storage tray cov er .
Orient the SA TA stor age (fa c e up) dr ive and ins ert it into
the slot.
Push the lever to clos e the storage tray cover.
SATA storage drive correc t l y.
Use the protectio n key to lo ck the stor age tray cov er and secure the SATA storage drive in place.
To install the second SATA storage drive
door lever.
If you are installing only one SATA storage drive in the
MPCto the display panel. If you are installing two SATA st
display panel and the second storage drive in the other
slot.
the slot; then, remove the SATA storage drive from the
computer.
secure the SATA
Page 35

MPC-2000 Series Hardware Hardware Installation and Connect ion
3-17
On the MPC-2190
To install a SATA storage drive in an MPC-2190 panel computer, c omp le te the fo llow ing steps:
1. Remove the seven screws on the back of the MPC-2190.
2. Remove the back cover of the MPC-2190 and locate the four screw holes (as indicated in the following figure)
for the storage drive.
Page 36

MPC-2000 Series Hardware Hardware Installation and Connect ion
3-18
NOTE
To fasten
screwdriver with
3. Use the screws to attach the brackets to the sides of the storage drive (HDD or SSD).
4. Align the screw holes on the brackets with the screw holes in the installation area; then, install the screws
to secure the storage drive in place as shown in the following figur e .
5. Connect the SATA cable to the stor age dr ive .
6. Re-install the cover of the MPC-2000 ser i es and fasten the screws to secure the cover in place.
the screws on the cover of the MPC-2000 series, we recommend that you use a T10 Trox (Star)
a torque of 4.5 kgf-cm.
Page 37

4
4. Driver Installation and Configure
This chapter describes how to install the VGA driver and the touch screen d river for touch screen models. After
installing the drivers, you can use the software tools to adjust display resolution and touch screen features on
the MPC-2000 series.
The following topics are covered in this chapter:
Installing the VGA Driver
Setting Display Resolutio n
Installing the Touc h Sc re e n Dri ve r
Performing Screen Calibra t ion
MPC-2260 MxGener al Io Dr i ve r Ins tal la tion
Installing the MxGeneralIo Driver
MPC-2260 UART Driver In stallation
Installing the UART Driver
Page 38

MPC-2000 Series Hardware Driver Installa t ion and Configure
4-2
Installing the VGA Driver
The steps below describe how to install the MPC-2000 series VGA driver for Windo ws Embedded Stan dard 7.
After you install the VGA driver, you can configure the display resolution settings using the utility provided by
Intel.
1. On the software CD that came with your MPC-2000 seri es, go to the [CD drive]\Driver\Win7\[32-bit or
64-bit]\2.VGA folder.
2. Double-click Win32_15319.
Page 39

MPC-2000 Series Hardware Driver Installa t ion and Configure
4-3
3. The installation wiz ard screen appears. Click Next to continue.
4. Click Next to start the installation.
5. Click Yes for the lic e nse agreement.
Page 40

MPC-2000 Series Hardware Driver Installa t ion and Configure
4-4
6. Click Next to continue.
7. Wait until the installatio n process is complete.
Page 41

MPC-2000 Series Hardware Driver Installa t ion and Configure
4-5
8. Click Next to continue.
9. Select Yes to restart the computer and click Finish to complete the VGA driver installation.
10. The MPC-2000 series will automatically re s tart.
Setting Display Resolution
Follow these steps to adjust the display resolution.
1. Right-click the Intel HD Graphics Control Panel icon on the taskbar and select Graphics Properties.
Page 42

MPC-2000 Series Hardware Driver Installa t ion and Configure
4-6
2. Select Display.
3. You can make changes to the screen resolution, refresh rate, and image rotation. Make sure that you select
Maintain Display Scaling to maximize the display to fit the screen. Click Apply to save the changes.
Page 43

MPC-2000 Series Hardware Driver Installa t ion and Configure
4-7
4. Click Customize Aspect Ratio to set the aspect ratio. To configure, adjust the image by moving the
scrolling bars.
5. Click Apply to save the changes.
Installing the Touch Screen Driver
For touch screen models, you must install the driver for the touch functio n.
1. On the software CD, go to the [CD drive]\Driver\7.Touch\
eGalaTouch_7_Vista_XP_2K_5.11.0.9126\eGalaxTouch_5.11.0.9126 folder.
2. Double-click setup to start the installation.
Page 44

MPC-2000 Series Hardware Driver Installa t ion and Configure
4-8
3. Click Next to continue.
4. Clear the Install PS/2 interface driver check box and click Next.
5. Select Install RS232 interface drive and click Next.
Page 45

MPC-2000 Series Hardware Driver Installa t ion and Configure
4-9
6. Select a calibration option and click Next.
7. To enable the touch screen function, make sure that your touch controller’s USB cable is connected to the
MPC-2000 series. Click OK to continue.
8. If required, select Support Mulit-Monitor System. Click Next to continue.
Page 46

MPC-2000 Series Hardware Driver Installa t ion and Configure
4-10
9. Accept the default de s tination folder or click Browse to choose one; then, click Next.
10. Click Next to continue.
11. If you want, select Create a eGalaxTouch Utility shor tc ut o n de sk top. Click Next to continue.
Page 47

MPC-2000 Series Hardware Driver Installa t ion and Configure
4-11
12. Wait until the installatio n is c omplete.
13. Click Yes to perform 4 points calibration.
14. The system displays a circle at each corner of the screen. Touch the center of the circle until the screen
displays OK. Repeat this step until yo u have touched a circle in each corner.
15. Click OK.
Page 48

MPC-2000 Series Hardware Driver Installa t ion and Configure
4-12
Performing Screen Cal ibra t io n
Note that you have to do 4 points calibration each time you change the display resolution. This enables the
touch function to work properly.
To perform 4 points calibration, complete the follo w ing steps:
1. Double-click the eGalaxTouch icon on the desktop.
2. The eGalaxTouch screen appears. Select the Tools tab and click 4 Points Calibration.
3. The system displays a circle at each corne r of the scre e n. Touc h the cente r of the circle until the sc reen
displays OK. Repeat this step until you have touc hed a circle in e a c h corner.
4. Click OK to complete the calibration.
Page 49

MPC-2000 Series Hardware Driver Installa t ion and Configure
4-13
MPC-2260 MxGeneralIo Driver Installation
Installing the MxGeneralIo Driver
1. Run the executable program MxGeneralIo_W7_x64.exe.
2. Click Next.
Page 50

MPC-2000 Series Hardware Driver Installa t ion and Configure
4-14
3. Click Install.
4. Click Finish.
Page 51

MPC-2000 Series Hardware Driver Installa t ion and Configure
4-15
5. Check your computer’s Device Manager to verify that MxGeneralIo PortIO Driver (KMDF) was installed
correctly.
MPC-2260 UART Driver Installation
Installing the UART Driver
1. Run the executable file MSSetup_QUADPORT.exe, located in the
MCS7840_7820_Win7_64bit_driver_v1.4.7.19_WHQL folder.
Page 52

MPC-2000 Series Hardware Driver Installa t ion and Configure
4-16
2. Click Install.
3. Click Exit.
4. Right-click Unknown device and select Update Driver Software….
Page 53

MPC-2000 Series Hardware Driver Installa t ion and Configure
4-17
5. Select Search automatically for updated driver software.
6. Select Don't Search online.
Page 54

MPC-2000 Series Hardware Driver Installa t ion and Configure
4-18
7. Click Close.
Page 55

5
5. BIOS Setup
This chapter describes the BIOS settings of the MPC-2000 series marine panel computer. The BIOS is used to
initialize basic peripherals and helps boot the operating system before the operating system is loaded. You can
access the BIOS setup screens to change the configurations of these basic input/output peripherals. The
configuration information is stored in the battery-backed up CMOS RAM, which retains the system information
after the system reboots or when the power is disconnected.
The following topics are covered in this chapte r:
Entering the BIOS Setup Utility
Main Information
Advanced Setting s
B o ot Configuration
Per i p he ral Configuration
HD C Configuration
V id e o Co nf iguration
Chipset Configuration
Hardware Monitor
Security Settings
S e t S uperv i sor Pas s word
Power Settings
Boot Settings
Boot Type
EFI Device First
Boot Delay Time
Legacy
Exit Settings
Ex it Saving Changes
S ave Change Without Exit
Ex it Discarding Changes
Load Optimal Defaults
Load Custom Defaults
Save Custom Defaults
Discard Changes
Upgrading the BIOS
Page 56

MPC-2000 Series Hardware BIOS Setup
5-2
NOTE
The
to
configure the
↑↓
← →
Starting the BIOS Setup Utility
To start the BIOS setup utility, press the F2 key while the system is booting up. The main B IOS Se tup screen
appears. Select SCU to access the BIOS Configuration screen.
BIOS does not support the touch screen function. You must connect a keyboard to the MPC-2000 series
BIOS.
A short description of each function key is displayed at the bottom of the screen.
F1: General Help
F5/F6: Change Values
F9: Setup Defaults
F10: Save and Exi t
: Select Item
: Select Menu
ESC: Exit
ENTER: Select or go to Su b me nu.
Page 57

MPC-2000 Series Hardware BIOS Setup
5-3
Main Information
The main page displays the system hardware information (such as the model name, BIOS version, and CPU
type)
Advanced Settings
Select the Advanced tab to display the Advanced scree n as show n in the following figure.
Page 58

MPC-2000 Series Hardware BIOS Setup
5-4
Boot Configuration
You can configure the numlock values in the Boot Configur ation sc re e n.
Option: On (default), Off.
Peripheral Configuration
Use this screen to configure the parallel port.
Parallel Port
This item allows you to configure the parallel p or t.
Options: Disabled (default), 378/IRQ7.
Page 59

MPC-2000 Series Hardware BIOS Setup
5-5
Mode
This setting allows you to configure the mode for the par a llel por t.
Options: SPP (default), EPP, ECP, EPP+ ECP.
HDC Configuration
You can set the host drive controller in IDE (legacy default) or AHCI mode.
The following screen appears when you select the legacy IDE mode.
HDD Detect Delay Time
This setting allows you to set the time delay when de te c ting har d d isks .
Option: 0 (default), 1, 2, 3 seconds.
Serial ATA Port 0 to 1
This setting allows you to display inf or ma tio n abo ut the install e d drives.
AHCI SALP
Note that AHCI SALP only appears when you select the AHCI mode. This setting allows you to enable
Aggressive Link Power Management (SALP) in AHCI for the host bus adapter to conserve power by
detecting when a SATA drive is no longer processing information and then immediately setting it to suspended
or sleep mode without waiting for the software to initiate power-down processes.
Host Capability Register bit 26.
Options: Enabled (default), Disabled.
Page 60

MPC-2000 Series Hardware BIOS Setup
5-6
SATA Port 0 to 1 - HotPlug
This item allows you to enable/disable hotplug capabilities (the ability to remove the drive while the computer
is running) for installed storage drives.
Options: Disable (default), Enabled.
Video Configuration
This item allows you to configure the internal graphics device (IGD) for things like memory allocation (DVMT)
and monitor types (Boot Type).
Internal Graphics Device
Page 61

MPC-2000 Series Hardware BIOS Setup
5-7
IGD—DVMT Pre-Allocated
This item allows you to configure pre-alloc ate d me mory capacity for the IGD. Pre-allocated graphics memory
is invisible to the operating system.
Options: 64 MB (default), 32 MB, 96 MB , 128 MB , 256 MB, 512 MB.
DVMT is a BIOS solution where “the optimum amount of memory is dynamically allocated and de-allocated as
needed for balanced graphics and system performanc e , through I nte l® Dir e c t AGP and a highly effic ie nt
memory utilization scheme. DVMT ensures the mos t effic ie nt us e of ava ilable system memory resources for
maximum 2D/3D graphics performance.
IGD—DVMT Size
This item allows you to configure the maximum amount of memory DVMT will use when allocating additional
memory for the inter nal gr aphics dev ic e .
Options: 256 MB (default), 128 MB, Max.
IGD – Boot Type
This item allows you to select the video device which will be acti v ate d d uring POS T.
Options: VBIOS Default (default), VGA, DVI, Integrated Panel.
Page 62

MPC-2000 Series Hardware BIOS Setup
5-8
Chipset Configuration
This item allows you to configure the chips e t setting s .
Power ON after Power Fail
This item allows you to enable/disable the computer form automatically powering up after a system crash.
Options: ON (default), OFF, Last State.
DO Level
This item allows you to set the DO default level.
Page 63

MPC-2000 Series Hardware BIOS Setup
5-9
Hardware Monitor
This item allows you to view stats like C PU and system te mperature, voltage levels, and other chipset
information.
Security Settings
This section allows users to configure secur ity settings with a supervisor password.
Page 64

MPC-2000 Series Hardware BIOS Setup
5-10
Set Supervisor Password
This item allows you set the supervisor password . Sele c t and then enter the p asswo rd , and then confirm the
password again.
To delete the password, enter Set Supervisor Password and then enter the old password; then, leave the
new password fields blank, and press en t er.
Power Settings
The section allows users to configure pow er se tting s .
Page 65

MPC-2000 Series Hardware BIOS Setup
5-11
Boot Settings
This item allows you to select the BIOS support boot device type.
Boot Type
This item allows you to enable/disable quick boot function.
Options: Dual Boot Type (default), Legacy Boot Type, UEFI Boot Type.
PXE Boot to LAN
This item allows you to enable/disable PX E boot to LAN function.
Options: Disabled (default), Enabled.
Add Boot Options
This item allows you to add the boot order options for shell, network and Removables.
Options: Last (default), Firs t.
USB Boot
This item allows you to enable/disable USB boot func tion..
Options: Enabled (default), D isab le d .
Page 66

MPC-2000 Series Hardware BIOS Setup
5-12
EFI Device First
This item allows you to determine EFI device first or legacy device first. If enabled, EFI device will be the first;
if disabled, legacy device will be the firs t.
Options: Disabled (default), Enabled.
Boot Delay Time
This item allows you to configure the delay time v alue for users to input hot key during POST time.
Options: 0 Second (default), 3 Seconds , 5 Seconds, 10 Second s .
Legacy
Normal Boot Menu
This item allows you to configure the boot menu.
Options: Normal (default), Advanc e .
Boot Type Order
This item allows you to select the boot order. Use F5/F6 to change values.
Options: Hard Disk Drive (default), CD/DVD -ROM Drive, USB, Others.
Hard Disk Drive/USB Drive
This item allows you to view installed devices such as ha rd disk drives, USB drives, or CD-ROMs. For example,
if you have inserted a USB drive into the computer, it will appear here.
Page 67

MPC-2000 Series Hardware BIOS Setup
5-13
Exit Settings
The section allows users to exit the BIOS environm e nt.
Exit Saving Changes
This item allows you to exit the BIOS enviro nme nt and save the v alues yo u have just configured.
Options: Yes (default), No.
Save Change without Exit
This item allows you to save changes without exiting the BIOS environment.
Options: Yes (default), No.
Exit Discarding Changes
This item allows you to exit without saving any changes that might have been made to the BIOS.
Options: Yes (default), No.
Load Optimal Defaults
This item allows you to revert to the factory default BIOS values.
Options: Yes (default), No.
Load Custom Defaults
This item allows you to load custom default values for the BIOS settings.
Options: Yes (default), No.
Page 68

MPC-2000 Series Hardware BIOS Setup
5-14
ATTENTION
We
storage capacity
Save Custom Defaults
This item allows you to save the current BIOS values as a “custom default” that may be reverted to at any time
by the “load custom defaults” selection just above.
Options: Yes (default), No.
Discard Changes
This item allows you to discard all settings you have jus t configur ed.
Options: Yes (default), No.
Upgrading the BIOS
This section describes how to upgrade the BIOS. However, note that an improper BIOS update may damage the
mainboard, leaving the computer unable to boot. We stro ng ly reco mme nd that yo u contact Moxa’s technical
support staff to obtain the necessary tools and the m ost current advice before attempting to upgrade the BIOS
on any Moxa devices.
Step 1: Create a Bootable USB Storage Drive
Before upgrading the BIOS, you must f irst create a bootable USB storage drive for system upgrade.
You may use any software that to create a bootable USB drive. We use Rufus as an example in this section.
1. Start Rufus and select the USB device from the
Device drop-down list.
2. Select MBR partition scheme for BIOS or UEFI
computers to boot from legacy BIOS or UEFI.
3. Select FAT (Default) from the File system
drop-down list.
4. Select 16 kilobytes (Default) from the Cluster size
drop-down list.
5. Enter a drive name in the New volume label field.
6. Check Quick format, Create a bootable disk using
FreeDOS, and Create extended label and icon
files.
7. Click Start to format and create the bootable USB
drive.
recommend that you use a USB drive with less than 2 GB of storage capacity. A USB drive with bigger
may not support FAT file format and, consequently, may fail to boot.
Page 69

MPC-2000 Series Hardware BIOS Setup
5-15
C:
C:
Step 2: Prepare the Upgrade File
You must use the BIOS upgrade installation file to upgrade the BIOS. Contact Moxa’s technical department for
assistance.
1. Get the BIOS upgrade installa tio n file. The file name should have following format: 2000xxSx.exe (xx
refers to version numbers).
2. Copy the file to the bootable USB drive.
Step 3: Run the upgrade program on the MPC-2000 Series
1. Reboot the computer , press F2 while during the boot process to access the Boot Manager.
2. Select Generic USB Flask Disk as the first boot source. Press [Enter] to continue.
3. When the boot process is complete, a command screen appears. Go to the directory where the upgrade file
is located. For example, if the upgrade file is store d in the MPC2240 folder, type cd MPC2240.
\cd MPC2240
4. Run the upgrade program by t yping 22410S02.exe. Note that the upgrade filename may vary depending
on the versions.
\MPC2240>22410S02.exe
5. The system automatica lly executes the upgrade program. Wait until the upgrade process is compl et e.
Page 70

MPC-2000 Series Hardware BIOS Setup
5-16
ATTENTION
Do NOT
process and cause damage to the mainboard.
6. After the upgrade process is complete, the computer automatically restarts. Access the BIOS S etup scr een
to verify the BIOS version on Main page. T he follo wing figure shows an example.
turn off the power supply during the BIOS upgrade process . Doing so may inter rup t the upg r ade
Page 71

A
A. Regulatory Approval Statement
This device complies with part 15 of the FCC Rules. Opera tion is s ub jec t to the following
two conditions: (1) This device may not cause har mful inte rf e re nc e , and (2 ) this devic e
must accept any interference received, includ ing inte rference that may cause undesired
operation.
Class A: FCC Warning! This equipment has been tested and found to comply with the limits for a Class A digital
device, pursuant to part 15 of the FCC Rules. These limits are designe d to provide reasonable protection
against harmful interference when the equip m e nt is oper ated in a commerc ia l e nvir o nment. This eq uipment
generates, uses, and can radiate radio frequency energy and, if not installed and used in accordance with the
instruction manual, may cause harmful interf ere nc e to radio communic a tio ns . Oper a tio n of this equipm e nt in
a residential area is likely to cause harmful inte rf e re nc e in which cas e the user wil l be requir e d to corr e c t the
interference at his/her own expense.
European Community
Warning:
This is a class A product. In a domestic environment this produc t may cause r adio interference in which case
the user may be required to take adequate measures.
 Loading...