

Page 1

ioLogik E1200H Series User’s Manual
Edition 2.2, April 2018
www.moxa.com/product
© 2018 Moxa Inc. All rights reserved.
Page 2

ioLogik E1200H Series User’s Manual
Moxa Americas
Toll
Tel:
Fax:
Moxa China (Shanghai office)
Toll
Tel:
Fax:
Moxa Europe
Tel:
Fax: +49-89-3 70 03 99-99
Moxa Asia
Tel:
Fax: +886-2-8919-1231
Moxa India
Tel:
Fax:
The software described in this manual is furnis he d under a license agre e ment and may be used only in accordance with
the terms of that agreement.
Copyright Notice
© 2018 Moxa Inc. All rights reserved.
Trademarks
The MOXA logo is a registered trademark of Moxa Inc.
All other trademarks or registered marks in this manual belong to their res pec tive manufacturers.
Disclaimer
Information in this document is subject to c hange witho ut no ti c e and doe s not represent a commitment on the part of
Moxa.
Moxa provides this document as is, without warranty of any kind, either expressed or implied, including, but not limited
to, its particular purpose. Moxa reserves the rig ht to make impro vem e nts and/o r changes to this manual, or to the
products and/or the programs described in this manual , at any time .
Information provided in this manual is intended to be accurate and reliable. However, Moxa assumes no responsibility for
its use, or for any infringements on the rights of third parties tha t may res ult fr om its use.
This product might include unintentional tec hnic al o r typographical errors. Changes are periodically made to the
information herein to correct such errors, and these changes are incorporated into new editions of the public ation.
Technical Support Contact Information
www.moxa.com/support
-free: 1-888-669-2872
+1-714-528-6777
+1-714-528-6778
+49-89-3 70 03 99-0
-free: 800-820-5036
+86-21-5258-9955
+86-21-5258-5505
+886-2-8919-1230
-Pacific
+91-80-4172-9088
+91-80-4132-1045
Page 3

Table of Contents
1. Introduction ...................................................................................................................................... 1-1
Product Model Information ................................................................................................................... 1-2
Product Features ................................................................................................................................ 1-2
Inside the Box .................................................................................................................................... 1-2
Product Specifications ......................................................................................................................... 1-3
Physical Dimensions ............................................................................................................................ 1-3
Hardware Reference ............................................................................................................................ 1-5
Panel Guide ................................................................................................................................ 1-5
LED Indicators ............................................................................................................................ 1-5
2. Initial Setup ...................................................................................................................................... 2-1
Hardware Installation .......................................................................................................................... 2-2
Connecting the Power .................................................................................................................. 2-2
Grounding the ioLogik E1200H ...................................................................................................... 2-2
Connecting to the Network ........................................................................................................... 2-2
I/O Wiring Diagrams .................................................................................................................... 2-3
Software Installation ........................................................................................................................... 2-4
Load Factory Defaults .......................................................................................................................... 2-4
3. Using the Web Console ...................................................................................................................... 3-1
Introduction to the Web Console ........................................................................................................... 3-2
Overview ........................................................................................................................................... 3-3
Network Settings ................................................................................................................................ 3-4
General Settings ......................................................................................................................... 3-4
Ethernet Configuration ................................................................................................................. 3-4
User-defined Modbus Addressing .......................................................................................................... 3-5
Default Address........................................................................................................................... 3-5
AOPC Server Settings .......................................................................................................................... 3-6
Tag Generation ................................................................................................................................... 3-6
I/O Settings ....................................................................................................................................... 3-8
DI Channels ................................................................................................................................ 3-8
DO Channels ............................................................................................................................. 3-10
AI Channels .............................................................................................................................. 3-11
AI Input Range ......................................................................................................................... 3-12
RTD Channels ........................................................................................................................... 3-14
System Management ......................................................................................................................... 3-16
IP Accessibility .......................................................................................................................... 3-16
Network Connection................................................................................................................... 3-17
Firmware Update ....................................................................................................................... 3-17
Import System Configuration Settings ......................................................................................... 3-17
Export System Configuration Settings .......................................................................................... 3-18
RS-485 Configuration................................................................................................................. 3-18
Changing the Password ..................................................................................................................... 3-18
Load Factory Defaults ........................................................................................................................ 3-19
Save/Restart .................................................................................................................................... 3-19
4. Using ioSearch .................................................................................................................................. 4-1
Introduction to ioSearch ...................................................................................................................... 4-2
ioSearch Main Screen .......................................................................................................................... 4-2
Main Screen Overview .................................................................................................................. 4-2
Main Items ........................................................................................................................................ 4-3
System ...................................................................................................................................... 4-3
Sort ........................................................................................................................................... 4-4
Quick Links ................................................................................................................................. 4-4
Main Function ..................................................................................................................................... 4-5
Locate ........................................................................................................................................ 4-5
Firmware Upgrade ....................................................................................................................... 4-5
Unlock ....................................................................................................................................... 4-6
Import ....................................................................................................................................... 4-6
Export ........................................................................................................................................ 4-6
Change IP Address ...................................................................................................................... 4-7
Batch TCP/IP Configuration on Multiple D ev ic e s ............................................................................... 4-7
Restart System ........................................................................................................................... 4-8
Reset to Default .......................................................................................................................... 4-8
Mass Deployment (Import) ........................................................................................................... 4-8
Mass Deployment (export) ........................................................................................................... 4-9
A. Modbus/TC P D efa ult Addre ss Mappings ............................................................................................ A-1
E1261H Modbus Mapping ..................................................................................................................... A-2
E1263H Modbus Mapping ..................................................................................................................... A-8
Page 4

B. Network Port Numbers ...................................................................................................................... B-1
C. Factory Defaults ................................................................................................................................ C-1
D. Pinouts .............................................................................................................................................. D-1
E. FCC Interference Statement .............................................................................................................. E-1
F. European Community (CE) ................................................................................................................ F-1
Page 5

1
1. Introduction
The ioLogik E1200H series is a stand-alone re mote Ethernet I/O server that can connect sensors and on/off
switches for automation applications ov e r Ethernet and IP-based networks.
The following topics are covered in this chapter:
Product Model Informatio n
Product Features
Inside the Box
Product Specifications
Physical Dimensions
Hardware Reference
Pane l G uid e
LED Indicators
Page 6

ioLogik E1200H Series Introduction
1-2
Product Model Information
Model Description
ioLogik E1261H Remote Ethernet I/O with 2-port Ethernet switch and 12DIOs, 5AIs an d 3RTDs, -40 to
75°C operating temperature
ioLogik E1263H Remote Ethernet I/O with 2-port Ethernet switch and 24DIOs, 10AIs and 3RTDs
-40 to 75°C operating temperature
Product Features
• IEC 60945 certification pending harsh maritime environment
• Wide temperature tolerance: operates between -40 and 75°C (-40 to 167°F)
• Seamless SCADA connectivity with Active OPC™ technology.
• User-defined Modbus/TCP addressing
• MXIO programming library for Windows and WinC E VB/VC.NET and Linux C APIs
• Web configuration with Import/Export function
Inside the Box
The ioLogik E1200H is shipped with the following items:
• ioLogik E1200H Remote Ethernet I/O Server.
NOTE: Notify your sales representative if any of the abov e items are missing or damaged.
Page 7

ioLogik E1200H Series Introduction
1-3
NOTE
The latest specifications for Moxa’ s produc ts ca n be found at
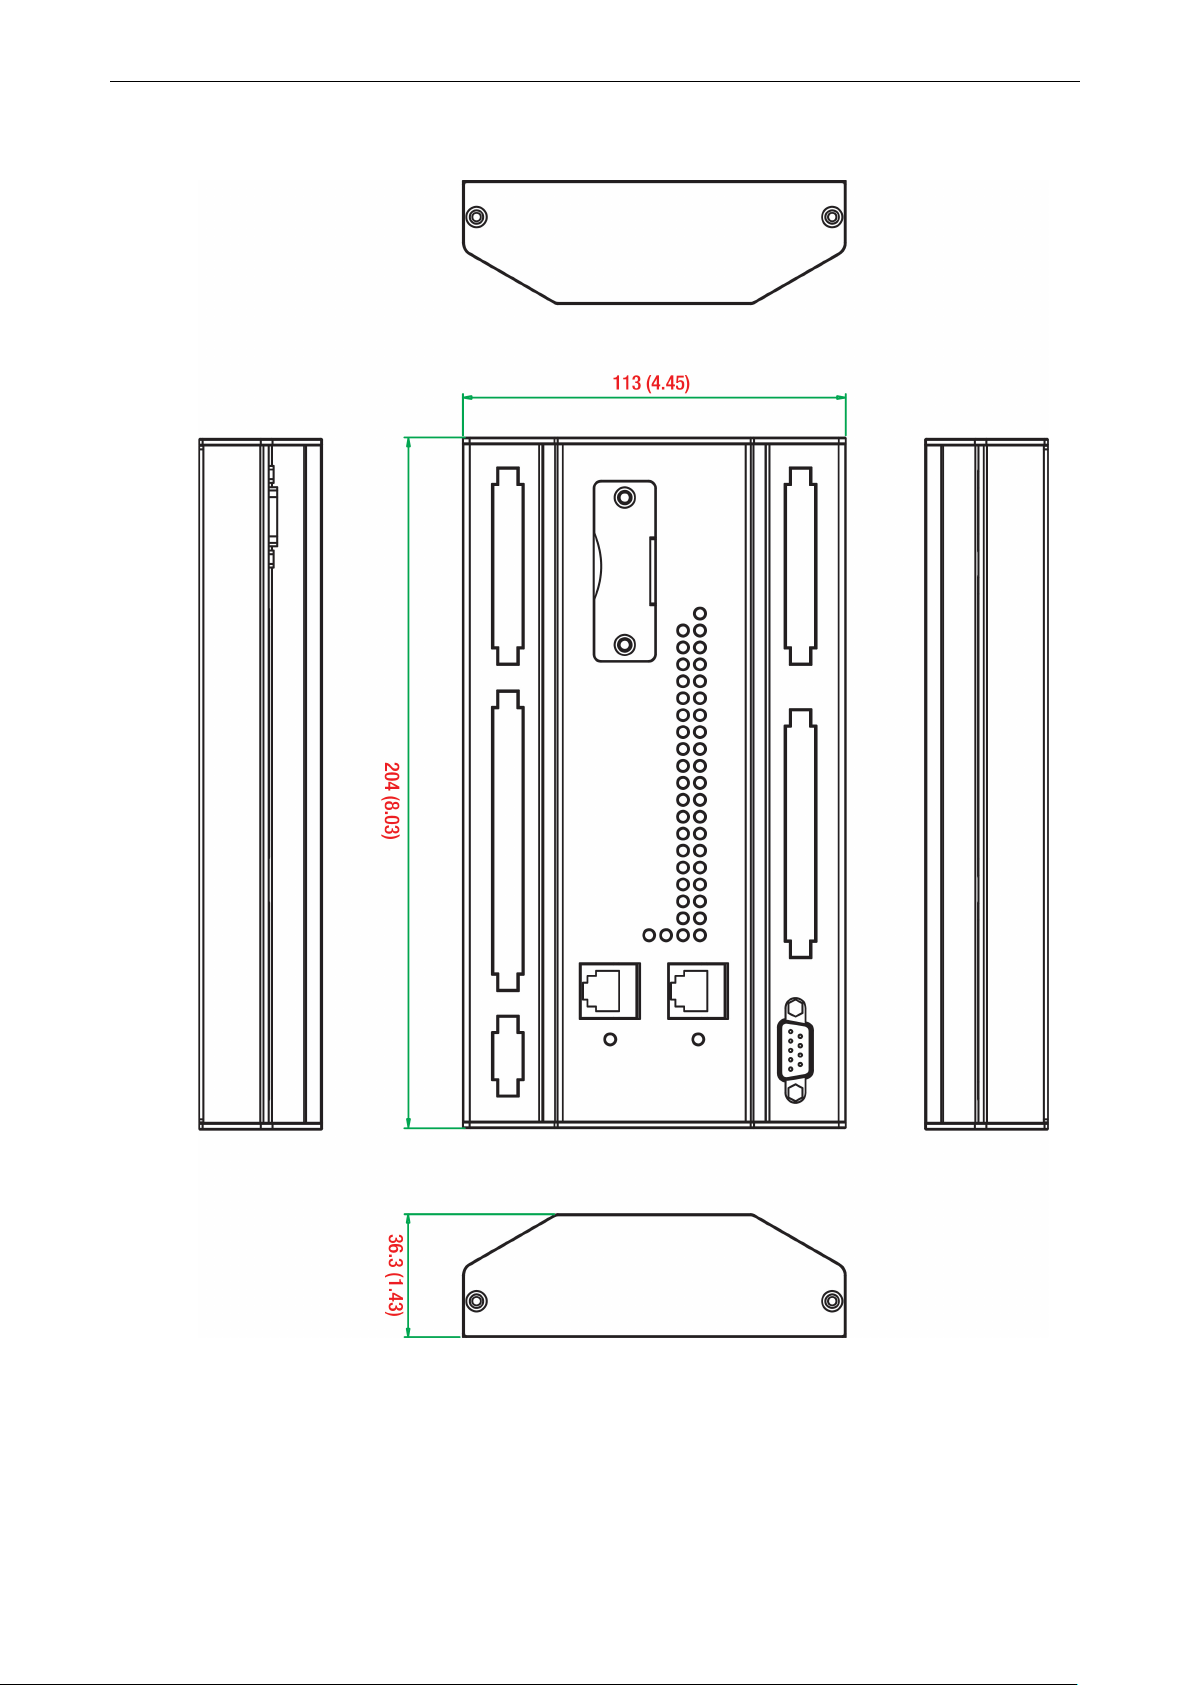
Product Specifications
Physical Dimensions
ioLogik E1261H
https://www.moxa.com.
Unit = mm (inch)
Page 8
ioLogik E1200H Series Introduction
1-4
ioLogik E1263H
Unit = mm (inch)
Page 9
ioLogik E1200H Series Introduction
1-5
NOTE
The reset button restarts the server and resets all settings to factory defaults. Remove the two screws and the
aluminum plate on top of the aluminum housing
the reset button for 5 sec. The factory
defaults will be loaded once the Ready LED turns green again. You may then re le ase the rese t butto n.
Blinking
Data Transmitting
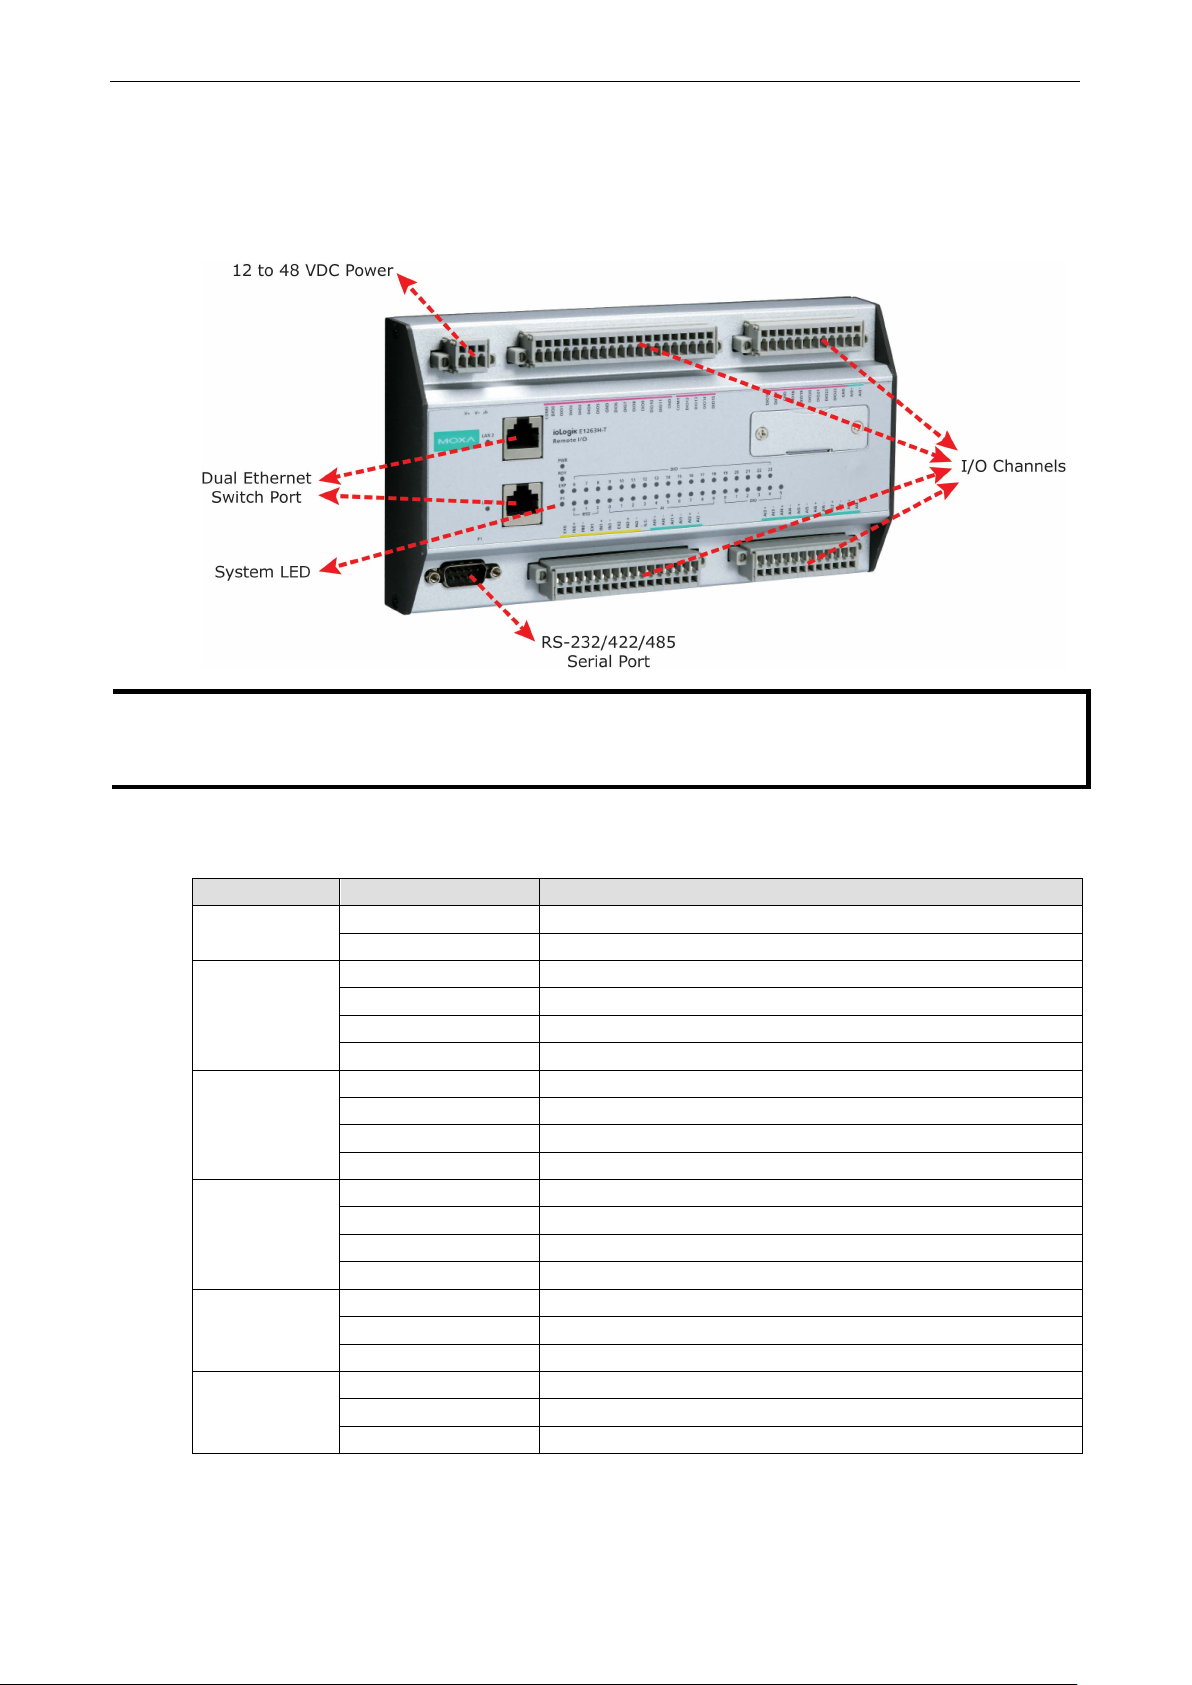
Hardware Reference
Panel Guide
LED Indicators
Type Color Description
PWR
RDY
LAN1, LAN2
P1
DIO
AI
, press and hold down
Green System power in ON
Off System power is OFF
Green System is ready
Green Blinking Located
Green/Red Blinking Safe Mode
Off System is not ready
Green 100Mb
Amber 10Mb
Off Ethernet Off
Green RS-485 Transceiver
Amber RS-485 Receiver
Blinking Data Transmitting
Off RS-485 Off
Green Channel ON
Green Blinking Counter or Pulse Mode receive input
Off Channel OFF
Green Channel enable
Red Burn out (wire off)
off Channel disable
Page 10

2
2. Initial Setup
This chapter describes how to install the ioLog ik E1200H.
The following topics are covered in this chapter:
Hardware Installation
C o nne cting the Power
G r ounding the ioLogik E1200H
C o nne cting to the Network
I/O Wiring Diagrams
Software Install at ion
Load Factory Defaults
Page 11
ioLogik E1200H Series Initial Setup
2-2
ATTENTION
Disconnect the power cord before installing o r w iring yo ur ioLogik
Do not exceed the maximum current for the wiring
Determine the maximum possible current for each power wire and common wire. Observe all electrical codes
dictating the maximum curre
the
wiring could overheat
the wires attached to
the power should be at least 2 mm in
Hardware Installation
Connecting the Power
Connect the 12 to 48 VDC power line to the ioLogik E1200H’ s te rminal b lock on the top panel. If power is
properly supplied, the Power LED will glo w a solid amb er color.
nt allowable for each wire size. If the current exceeds the maximum ra ting ,
, causing serious damage to your equipment. For safe ty r e aso ns ,
diameter.
Grounding the ioLogik E1200H
The ioLogik E1200H is equipped with a grounding point on the terminal blo ck locate d o n the top p ane l.
Connect the ground pin ( ) if earth ground is available.
Connecting to the Network
The ioLogik E1200H has two built-in Ethernet switch ports for connecting a standard direct or cross-over
Ethernet cable from RJ45 port to either the host PC or another ioLogik E1200H device. For initial setup of the
ioLogik E1200H, it is recommended that the ioLogik E1200H be configured using a direct connection to a host
computer rather than remotely over the network.
Configure the host PC’s IP address to 192.168.127 .xxx (where xxx ranges from 001 to 253). When using
Windows, you will need to do the configuration from the Control Panel.
E1200H.
ioLogik E1200H Default IP Address Default Netmask Default Gateway
192.168.127.254 255.255.255.0 None
Use the web console or ioSearch config ur ati o n utility to connect to the ioLogik E1200H. Once the ioLogik
E1200H has been detected, modify the settings as n eeded for your network environment, and then restart the
server. Refer to Chapters 3 and 4 or further details.
Page 12

ioLogik E1200H Series Initial Setup
2-3
I/O Wiring Diagrams
Page 13
ioLogik E1200H Series Initial Setup
2-4
Software Installation
ioSearch is a search utility that helps the user locate io Log ik E1200H devices on the local network. You may
download the latest version of ioSearc h fro m Moxa’s website.
1. Installing ioSearch: Download the ioSearch utility from Moxa’s website, double click the installation file,
and then follow the installation wizard’s instructions to complete the installation. You can also download and
install the MXIO DLL library separately.
2. Open ioSearch: After installation is finished, run ioSearch from Start Program Files MOXA IO
Server
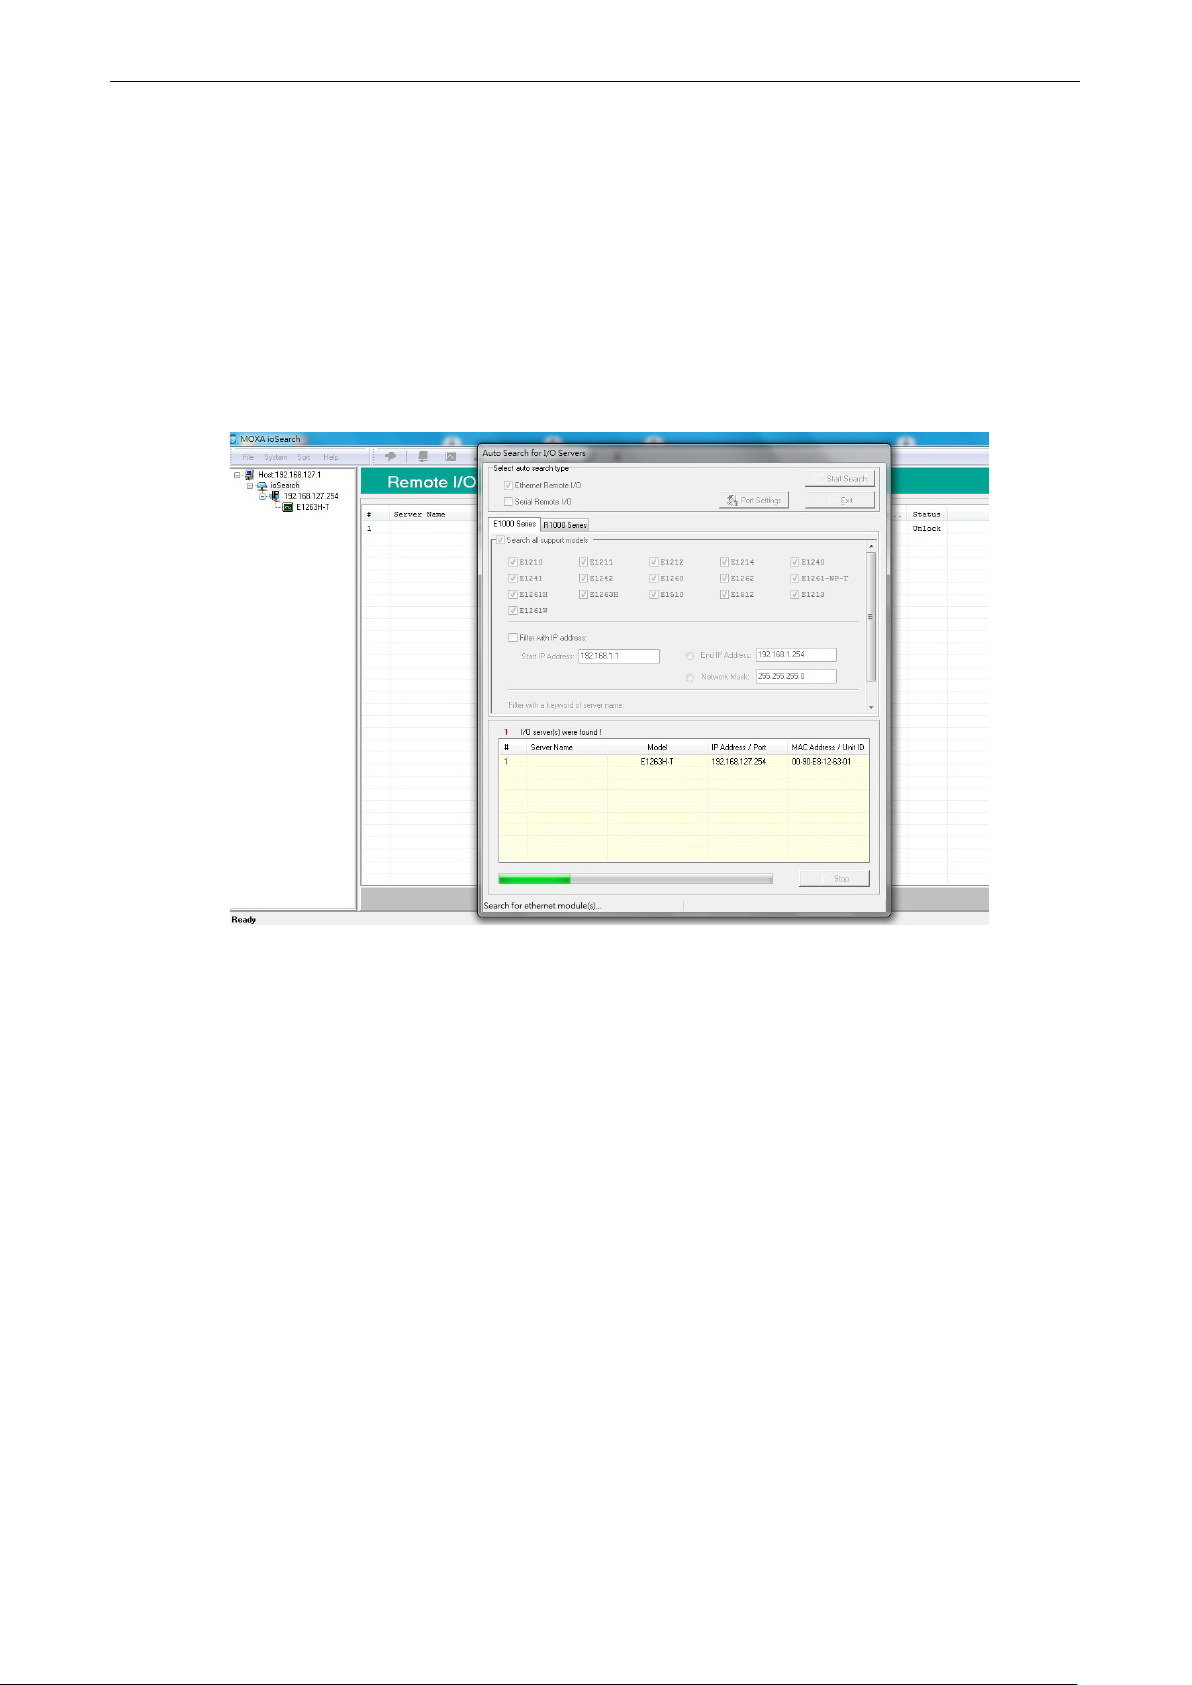
3. Search the network for the server: On the menu bar, select System Auto Scan Active Ethernet
I/O Server. A dialog window will pop up. Click Start Search to begin sear c hing fo r the ioLog ik E1200H.
Utility ioSearch
If multiple ioLogik E1200H units are installed on the same network, remember that each unit has the same
default IP address. You will need to assign a differe nt IP addre s s to eac h unit to avoid IP conflicts.
Load Factory Defa ults
There are three ways to restore the ioLogik E1200H to the factory defaults.
1. Press and hold the RESET button for 5 seconds (under the reset protection cover).
2. Right-click the specified ioLogik in the ioSearch utility and select Reset to Default.
3. Select Load Factory Default from the web console
Page 14

3
3. Using the Web Console
The ioLogik E1200H’s main configur ation and management utility is the built-in web console, which can be
used to configure a wide range of options.
The following topics are covered in this chapter:
Introduction to the Web Console
Overview
Network Settings
General Settings
Ethe r ne t Co nfiguration
User-defined Modbus Addressing
Default Address
AOPC Server S et tings
Tag Generation
I/O Settings
DI Channels
D O C hanne ls
AI Channels
AI Input Range
R T D Cha nne ls
System Manageme nt
IP Accessibility
N e t work Connection
F i r mware Update
Import System Configuration Settings
Export System Configuration Settings
RS-485 Configuration
Changing the Password
Load Factory Defaults
Save/Restart
Page 15

ioLogik E1200H Series Using the Web Console
3-2
Introduction to the Web Console
The ioLogik E1200H web console is a bro wser-based configuration utility. When the ioLogik E1200H is
connected to your network, you may enter the server’s IP address in your web browser to access the web
console.
The left panel is the navigation panel and contains an expandable menu tree for navigating among the various
settings and categories. When you click on a menu item in the navigation panel, the main window will display
the corresponding options for that item. Co nfiguration changes can then be made in the main window. For
example, if you click on Network Settings in the navigation panel, the main window will show a page of
basic settings that you can configure.
You must click on the Submit button after making configuration changes. The Submit button will be located
at the bottom of every page that has configurable settings. If you navigate to another page without clicking
the Submit button, your changes will not be retained.
Submitted changes will not take effect until they are saved and the ioLogik E1200H is restarted!
You may save and restart the server in one step by clicking on the Save/Restart button after you submit a
change. If you need to make several changes before restar ting, you may save your changes without
restarting by selecting Save/Restart in the navigatio n panel. If you restart the ioLogik E1200H without
saving your configuration, the ioLogik E1200H will disc ard all s ub m itte d chang e s .
Page 16

ioLogik E1200H Series Using the Web Console
3-3
Overview
The Overview page contains basic inform atio n abo ut the ioLogik E1200H, including the mode l name, serial
number, firmware vers ion, MAC address, and current IP address. Most importantly, you can see the current
I/O status by hitting the F5 key on the computer keyboard to refr esh the page .
Page 17
ioLogik E1200H Series Using the Web Console
3-4
Network Settings
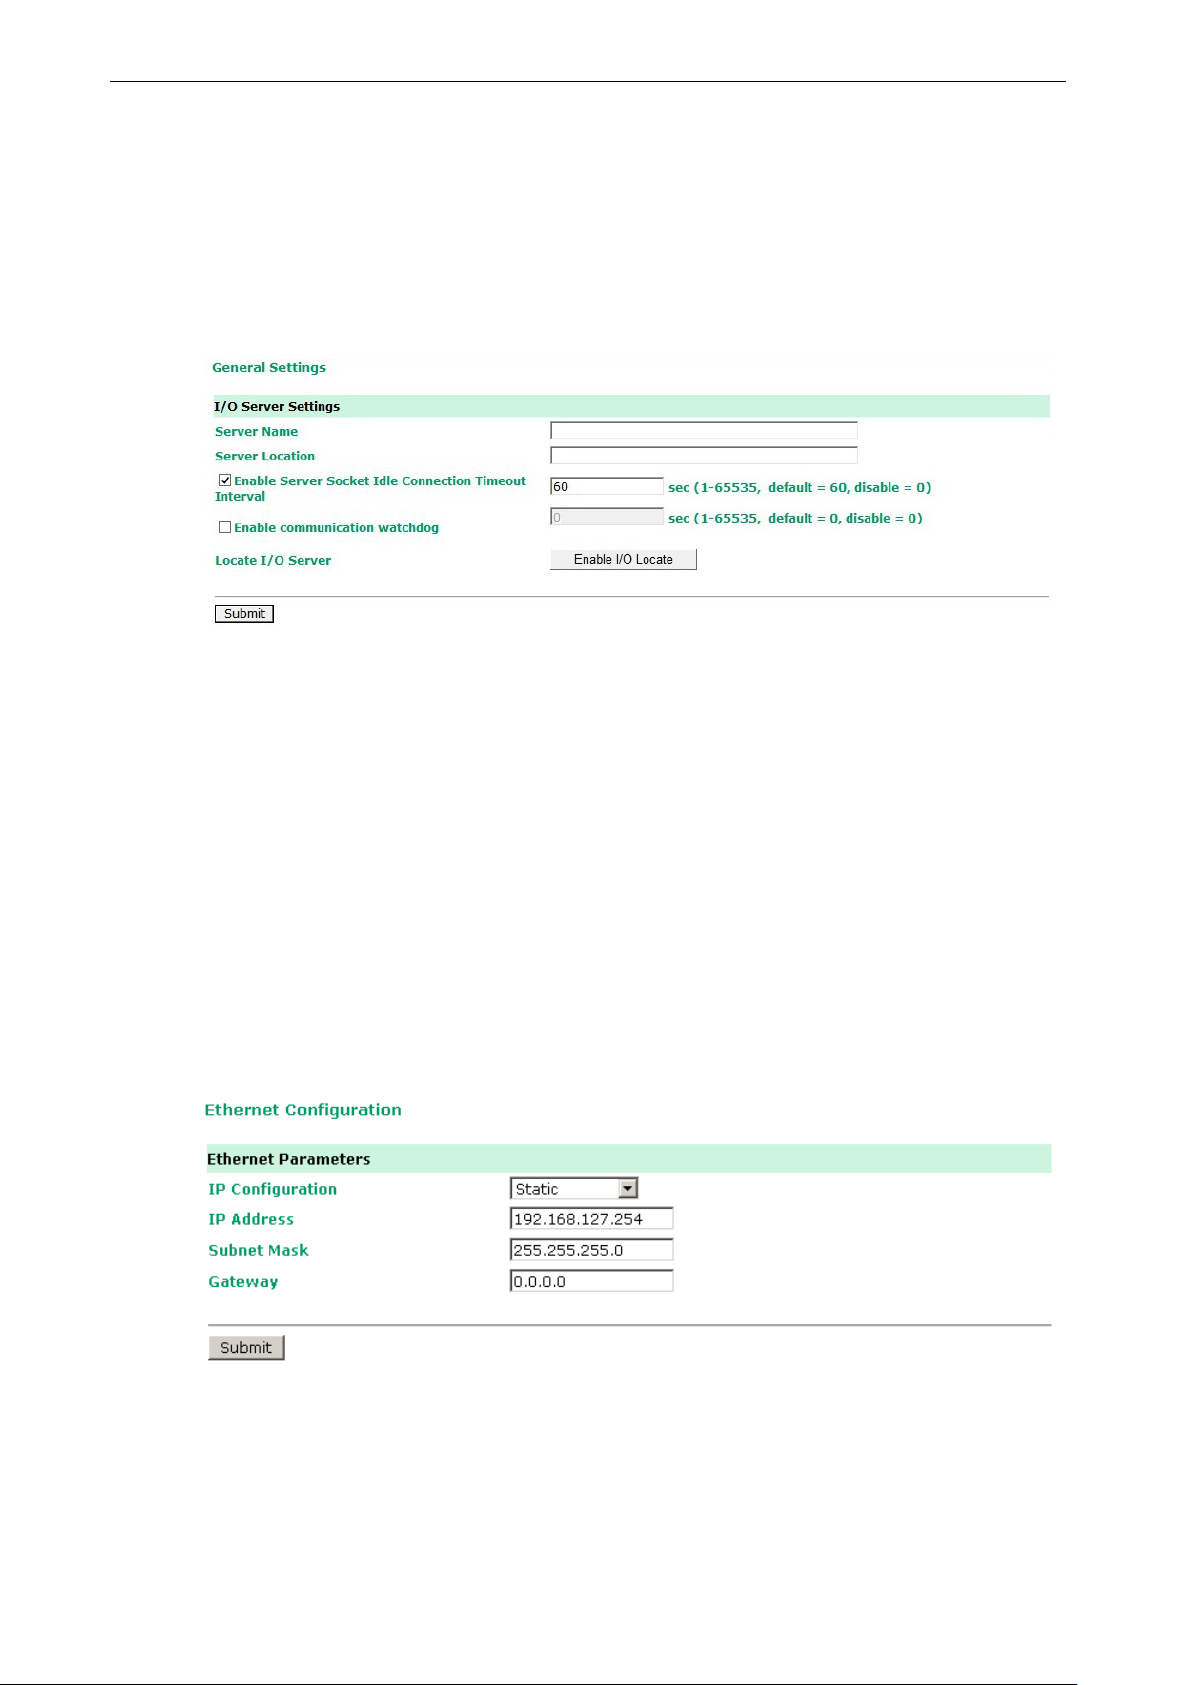
General Settings
On the General Settings page, you can assign a server name and location to assist you in differentiating
between different ioLogik E1200H units. You may also configure the Modbus/T C P idle inter v a l or enable the
Communication Watchdog function.
The Communication Watchdog activ ate s Safe Mode after a specified amount of time has passed following a
loss of network connectivity. Saf e Mode is desig ned espec ially for products that have output channels to
output a suitable value or status when the ioLogik E1200H cannot be controlled by a remote PC (due to
network failure, for exa mple). B y default, the Watchdog is disabled. Users can configure how each output
channel responds on the I/O Settings page.
To enable the Watchdog, check Enable connection watchdog, set the timeout value, and then restart the
server. With Watchdog enabled, the io Log ik E1200H will enter Safe Mode after there is a disr up tion in
communication that exceeds the specified time limit.
For easier location of devices when troubleshooting, enable the remote control of LEDs on the E1200H series
devices by selecting "Enable I/O Locate , " to allow remote toggling of the "Ready" LED from off to flashing.
Ethernet Configuration
On the Ethernet Configuration page, you can set up a static or dynamic IP addr e ss for the ioLogik E1200H,
and configure the subnet mask and gateway addres s .
Page 18
ioLogik E1200H Series Using the Web Console
3-5
ATTENTION
Disable the user
Server to control or monitor the ioLogik
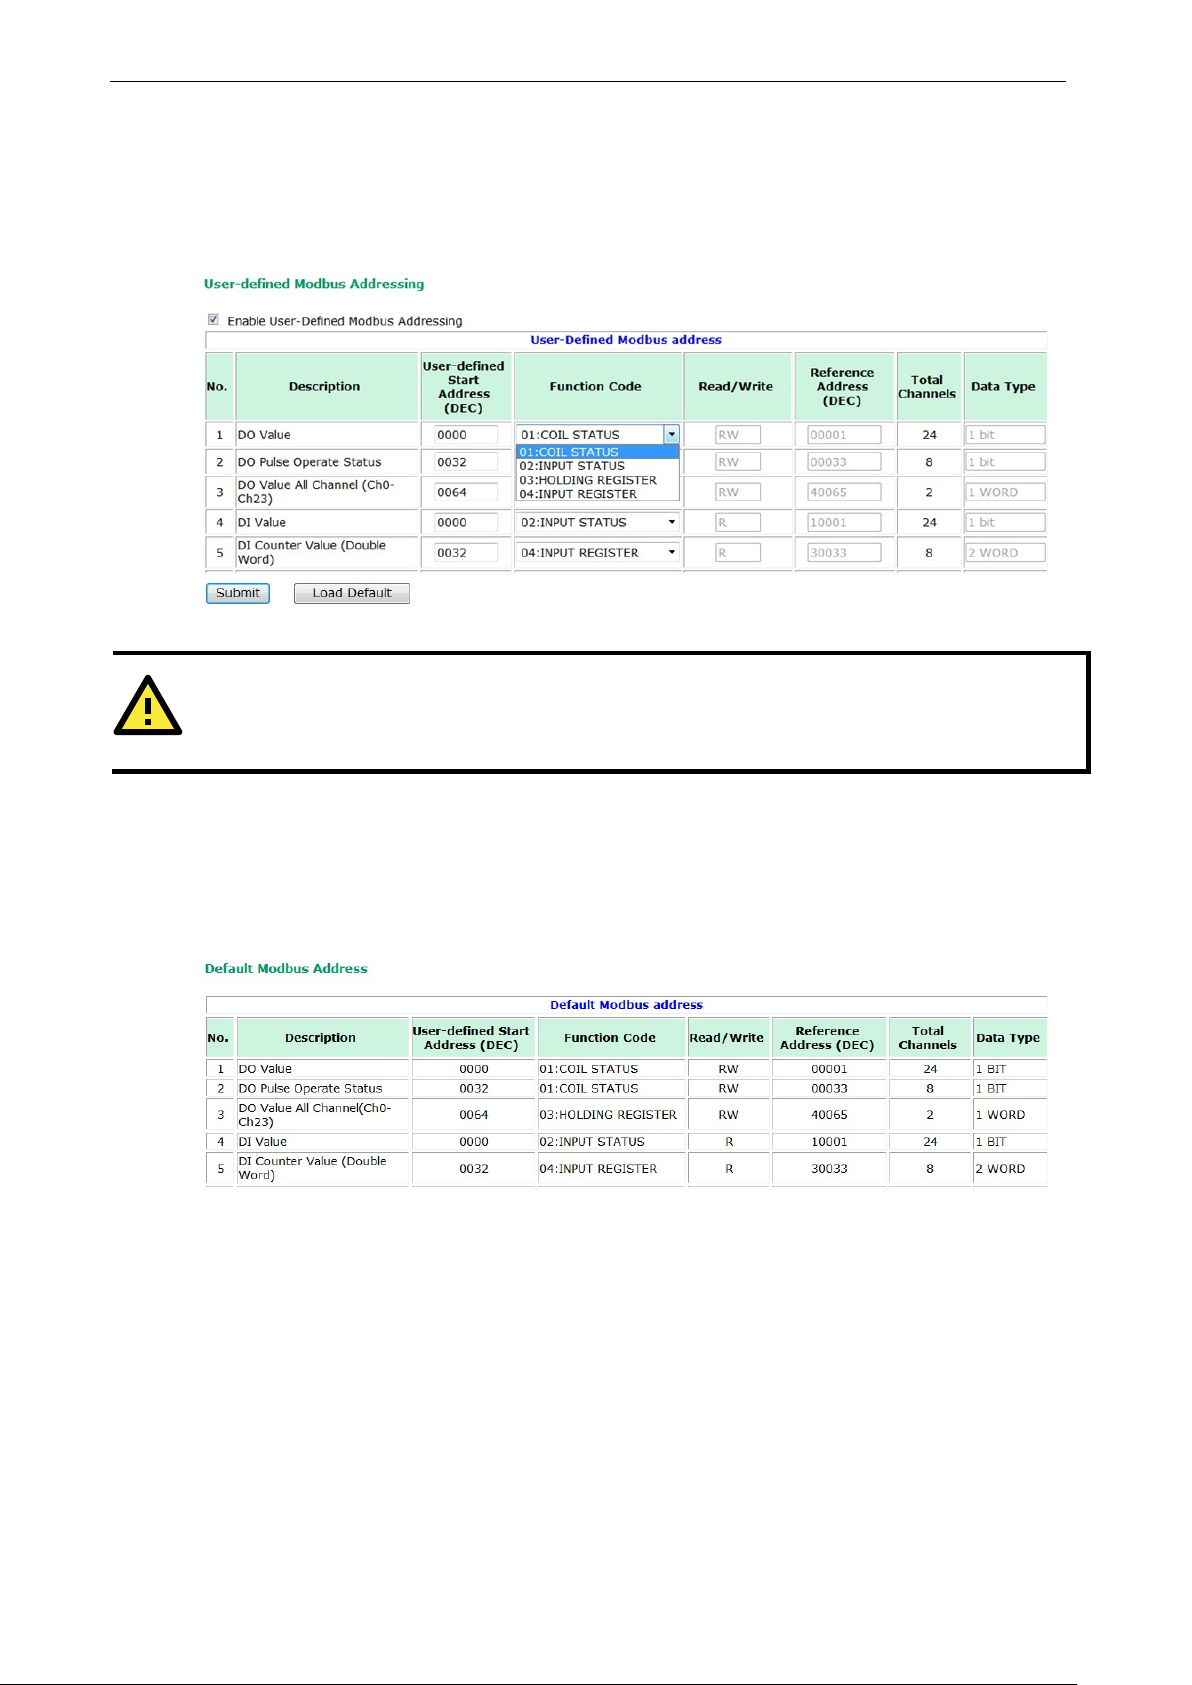
User-defined Modbus Addressing
The input and output address can be configured in a different format on a specific settings p age . Check the
“Enable User-defined Modbus Addressing ” box, select the Modbus function, and then configure the start
address of each item.
-defined modbus addressing function if using the MXIO(.N ET) library or using Active OPC
Default Address
On this settings page, you can view the default Modbus address for all I/O devices. The page only displays the
start address of each item. For example, if the DI Value starts from 10001, then the 1
address is 10001 and the 2
E1200H’s I/O Status.
st
nd
DI is 10002. Please refer to the diagram at the top of the follow ing page.
DI channel’s Modbus
Page 19

ioLogik E1200H Series Using the Web Console
3-6
AOPC Server Setti ngs
Moxa’s Active OPC Server™ is a software package operated as an OPC driver of an HMI or SCADA system. It
seamlessly connects M oxa’s ioLogik products to a wide variety of SCADA systems, including the most popular:
Wonderware, Citect, and iFix. Active OPC Server ™ confor ms to the OPC Found ation’s latest data access
standard, DA 3.0, and will connect with other standards-compliant devices and host OPC machines.
Active OPC Server can be downloaded from the Moxa Website, and may be found from Moxa’s online support
page, www.moxa.com/support/
After downloading the AOPC software, unzip it and run Install.exe. The installation program will guide you
through the installation process and insta ll the A c tive OPC Server Utili ty .
For more details on AOPC installation and use, ple as e r efer to the Active OPC User’s Manual.
.
Tag Generation
Tag configuration of an ioLogik E1200H is specified by its web console. Open the browser and go to the Active
OPC Server Settings page.
Follow these steps to create the tag from the ioLogik E1200H to Active OPC Server:
In the AOPC & I/O Settings page,
Check the “Enable Ac tive OPC” box and specify the IP address where the Active OPC Server is installed.
Select the I/O channels that need to be created in the Active OPC Server.
Configure the Heartbeat Interval, if nece ssary .
Page 20

ioLogik E1200H Series Using the Web Console
3-7
Click the “Submit” button and click the Save/Restart button on the next page.
On the Create AOPC Tag page, click on the Create Tags button to push the tag c onfiguration to Active OPC
Server.
Launch the Active OPC Server program; tags will be automatically c reated.
Save the configuration of the Active OPC Server when exiting the progr a m.
Page 21

ioLogik E1200H Series Using the Web Console
3-8
I/O Settings
DI Channels
The status of each DI (digital input) channel appears on the DI Channels page.
You can also configure each channel’s digi tal inp ut m od e and p aram e ters by clicking on the channel. DI
channels can operate in DI mode or Event Counter mode.
Page 22

ioLogik E1200H Series Using the Web Console
3-9
For Event Counter mode, configure “Lo to H i, ” “Hi to Lo, ” or “Both” to trigger the counter. The counter should
be set to either start, or stop. If it is in stop mode, the counter can be activated by the Modbus command.
Make sure that the Counter Filter is not set to 0; otherwise, the c o unte r w ill neve r be activated.
The alias name and the logic definition can also be configured on this page.
Page 23

ioLogik E1200H Series Using the Web Console
3-10
DO Channels
On the DO Channels page, configure each DO (digital outp ut) channel b y c lic k i ng on the channel. D O
Channels can operate in DO mode or Pulse Output mode. In DO mode, outp ut is eithe r on o r off. In Puls e
Output mode, configure the low width and high width to generate a squar e wave.
The Power On Setting field is used to specify the channel’s configuration when the ioLogik E1200H is
powered on, and the Safe Stat us S et ti ng field specifies the channel’s configuration when the ioLogik
E1200H enters Safe Mode. Note that Safe Status is controlled by the Connection Watchdog, which is disabled
by default. If the Connection Watchdog is disabled, the ioLogik E1200H will never enter Safe Mode and your
Safe Status settings will have no effect.
Users may also configure aliases and logic definitions on this page.
Page 24

ioLogik E1200H Series Using the Web Console
3-11
AI Channels
The current status of each AI (analog input) channel c an be viewe d o n the AI Channe ls page .
Click on a specific channel to enable or disable the AI channel by checking the “Enable AI Channel” box. Auto
Scaling and Slope-intercept functions of the AI value can be defined on this page.
Page 25

ioLogik E1200H Series Using the Web Console
3-12
AI Input Range
There are four modes in the analog input range: [0-10 V], [4-20 mA], [0-20 mA], [4-20 mA (burnout)], only
[0-10 V] and [4-20 mA] supports peer to peer networking.
Burnout mode can indicate if the current analog input has burnt out.
The 4-20 mA burnout mode is defined in the diagram at the top of the following page:
Users can define burnout values (BO, default 2mA) for selected ranges. When input values are in the burnout
range, raw data will register as 0000h to indicate analog input burnout. The definitio n of raw d ata is as
follows:
Burnout Value (BO): 0.0 < BO < 4.0, user defined (default 2mA)
Burnout State: 0 ≦ AI < BO mA , S/W output 0000h
Under range: BO ≦ AI < 4 mA, S/W output raw data
Normal range: 4≦ AI ≦ 20 . 00 mA, S/W output raw data until FFFEh.
Over range: > 20.00 mA , S/W output FFFFh
The Auto scaling function maps the original AI value linearly to a scaled value. Note that the scaled value’s
Modbus address differs from the original value .
Page 26

ioLogik E1200H Series Using the Web Console
3-13
The slope-intercept function is used to compe nsate w hen the me asur e ment req uires a slight adjustment.
Page 27

ioLogik E1200H Series Using the Web Console
3-14
RTD Channels
The current status of each RTD (Resistance Temperature Detector) channel can be viewed on the RTD
Channel page.
Click on a specific channel to access the RTD channel settings .
Select the “Enable RTD Channel” box and then select the sensor type that meets the physical attachment to
the ioLogik E1200H.
The ioLogik E1200H allows you to calibrate the temperature sensors. In each channel configuration section,
follow the instructions and click Calibrate button to start the RTD sensor calibration. Each calibration
requires around 30 seconds (per channel).
Page 28

ioLogik E1200H Series Using the Web Console
3-15
The ioLogik E1200H allows you to manua lly adj us t the curr ent temp er ature reading. In each channel
configuration section, select the channel, apply the offset value, and click the “Submit” button to perform the
task.
Page 29

ioLogik E1200H Series Using the Web Console
3-16
System Management
IP Accessibility
You can control network access to the ioLogik E1200H from the IP Accessibility page by only allowing access
from specific IP addresses. When the accessible IP list is enabled, a host’s IP address must be listed in order
to gain access to the ioLogik E1200H.
Specify a range of addresses by using a combination of an IP address an d n etmask, as follows:
To allow access to a specific IP address
Enter the IP address in the corresponding fie ld ; enter 255.255.255.255 for the netmask.
To allow access to hosts on a specific subnet
For both the IP address and netmask, use 0 for the last d igit (e.g., 192.168.1.0 and 255.255.255.0).
To allow unrestricted access
Deselect the Enable the ac ces sibl e IP list option.
Refer to the following table for additional configuration examples.
Allowed Hosts IP address/Netmask
Any host Disable
192.168.1.120 192.168.1.120 / 255.255. 255.255
192.168.1.1 to 192.168.1.254 192.168.1.0 / 255.255.25 5.0
192.168.0.1 to 192.168.255.254 192.168.0.0 / 25 5.255.0.0
192.168.1.1 to 192.168.1.126 192.168.1.0 / 255.255.25 5.128
192.168.1.129 to 192.168.1.254 192.168.1.128 / 255.255.255.128
Page 30

ioLogik E1200H Series Using the Web Console
3-17
Network Connection
TCP connections from other hosts ap p ear on the Network Conne c tio n page. This information can assist you
with managing your devices.
Firmware Update
Load new or updated firmware onto the ioLogik from the Firmware Update page.
Import System Configuration Settings
Import a configuration into the ioLogik server from the Import System Config page. This function can be used
to duplicate settings between ioLogik servers. You will be prompted for the location of the configuration file
(i.e., “ik1261.txt”).
Page 31

ioLogik E1200H Series Using the Web Console
3-18
ATTENTION
If you forget the password
is by using the reset button to load
the factory defaults.
Before you set a password for the first time, it is a good idea to export the configuration to a file when you have
finished setting up your ioLogik
. Your configuration can then be easily imported back into the ioLogik
E1200H
Export System Configuration Settings
On the Export System Config page, you can save the ioLogik’s configuration into a file for backup or import
into another ioLogik server.
RS-485 Configuration
The RS-485 port is used to communicate with other RS-485 devices or to li nk t o anoth er ioL ogik R S-485 I /O
server. The RS-485 port can run Modbus/RTU or I/O command sets. The baudrate is set under the RS-485
Setting. The default settings are baudrate = 115200, parity check = N, data bits = 8, and stop bit = 1.
Changing the Password
For all changes to the ioLogik E1200H’s password protection settings, you will first ne ed to enter the old
password. Leave this blank if you are setting up password pro te c tion for the first time. To set up a new
password or change the existing password, enter your desired password under both New p assword and
Confirm password. To remove password protection, leave the New password and Confirm password
fields blank.
if you need to reset the ioLogik E1200H due to a forgotten password or for other reasons.
, the ONLY way to configure the ioLogik E1200H
E1200H
Page 32

ioLogik E1200H Series Using the Web Console
3-19
Load Factory Defa ults
This function will reset all of the ioLogik E1200H’s settings to the factory default values. All previous settings,
including the console password will be los t.
Save/Restart
If you change the configuration, do not forget to reboot the syste m .
Page 33

4
4. Using ioSearch
This chapter describes ioSearch, which is used to search for and locate ioLogik E1200H units.
The following topics are covered in this chapter:
Introduction to ioSearch
ioSearch Main Screen
Main Screen Overview
Main Items
System
Sort
Q uic k Links
Main Function
Locate
Firmware Upgrade
Unlock
Import
Export
Change IP Address
B atc h TC P/IP Configuration on Multiple Devices
Restart System
R e s e t to Default
Mas s Deployment (Import)
Mass Deployment (export)
Page 34

ioLogik E1200H Series Using ioSearch
4-2
1 2 4
5
3
Introduction to ioSearch
ioSearch is for locating or searching for an Logik E1200H on the physical network. The following functions are
supported by the ioSearch utility.
• Search for and locate ioLogik E1200H units.
• IP address configuration.
• Firmware upgrade for multiple ioLogik E1200H units (same model).
• Export configuration files from multip le io Log ik E1200H units.
• Import a configuration file to multiple ioLogik E1200H units (same model).
• Reset to default for multiple ioLogik E1200H units.
ioSearch Main Screen
Main Screen Overview
The main screen displays the result of the broadcast search of the ioLogik E1200H.
ioSearch Main Screen
1. Title
2. Menu bar
3. Quick link
4. Navigation panel
5. Main window
Page 35

ioLogik E1200H Series Using ioSearch
4-3
Main Items
System
Several operations are possible fr om the System menu.
Auto Scan Ac tive Ethern et I/O Ser vers will search for ioLogik servers on the network. When connecting for
the first time or recovering from a network disconnection, you can use this command to find I/O servers that
are on the network.
Network Interface allows you to select a network to use, if the PC has multiple ne twork adaptors installed.
Page 36

ioLogik E1200H Series Using ioSearch
4-4
4
Locate an ioLogik E1200H
Sort
The Sort menu allows the server list in the navigation panel to be sorted by io Log ik connection and server
(model).
Quick Links
Quick links are provided to search for I/O servers on the network and sort the server list.
1 Automatically search the local networ k
2 Sort by ioLogik E1200H’s IP address (connection)
3 Sort by ioLogik E1200H model
5 Upgrade Firmware
6 Import settings
7 Export settings
8 Unlock an ioLogik E1200H which is passwor d protected
9 Change IP Address of an ioLogik E1200H
Page 37

ioLogik E1200H Series Using ioSearch
4-5
ATTENTION
Do not interrupt the firmware update process! An interr up tion in the pr oc e s s may result in your device
becoming unrecoverable.
Main Function
Right click on a particular ioLogik E1200H to view the ioSearch function menu.
Locate
The locate function helps users find a dedica te d io Log ik o n the netw ork. Whe n this func tion is triggered, the
ready LED on the selected unit will start to blink indicating its lo c ation.
Firmware Upgrade
The ioLogik E1200H supports a remote firmware upgrade function. Enter the path to the firmware file or click
on the icon to browse for the file. The wizard will lead you through the process until the server is restarted.
Batch Upgrades on Multiple Devices of the Same Model
Batch firmware upgrades are possible on multiple devices of the same ioLogik model. To upgrade multiple
models, press the “Shift” key, select “ioLogik”, and right click to process multiple firmware upgrades.
Page 38

ioLogik E1200H Series Using ioSearch
4-6
Unlock
If an ioLogik E1200H is passwor d protecte d, unlock the ioLogik E1200H by entering the password before using
any of the functions.
Import
Select this command to reload a configuration that was exporte d to a text file .
Importing one configuration file to multiple ioLogik E1200H u nits (same model) is allowed. To do this, press the
“Shift” key, select “ioLogik”, and then right click .
Export
The export function is used to export the current configuration file of an ioLogik E1200H. The export file format
will be ik12xx.txt where “xx ” r epresents the model type of the ioLogik E1200H.
Exporting multiple files for differ e nt models of io Log ik E1200H is allowed. The file format is ik12xx_MAC
Address.txt, where the xx represents the model types of the ioLogik E1200H.
e.g., ik1214_00-90-E8-66-32-19.txt
To export multiple configuration f ile s , select the ioLogik and right click to process this function.
Page 39

ioLogik E1200H Series Using ioSearch
4-7
Change IP Address
The Change IP Address function can be used to directly modify the IP Address, especially for first time
installation.
Changing the IP address for multiple ioLogik E1200H’s is allowed. Select the ioLogik E1200H and then right
click to process this function.
Batch TCP/IP Configuration on Multiple Devices
Users can batch modify IP a ddresses, subnet masks, and gateways for devices of the same model from a single
window while submitting the changes at one time. First, select several devices of the same model, click the
right mouse button, and then click “Change IP Address” in the pop-up menu to launch a new window.
The following screenshot shows the window used to modify IP addresses, subnet masks, and gatewa ys. Users
can modify each item and click “Set” to confirm the modification, or click the “Advance” button to automatically
assign IP addresses incrementally.
Page 40

ioLogik E1200H Series Using ioSearch
4-8
After the “Advance” button is clicked, a window will pop up to allow users to use ioSearch to set the IP address
by MAC address. ioSearch will automatically s e t sequential I P ad dr e sse s on the selected devices, with the
subnet mask and gateway set to the same value.
Restart System
Select this command to restart the selected ioLogik E1200H.
Restarting multiple ioLogik E1200H units is allowed. Select the ioLogik E1200H and right click to process this
function.
Reset to Default
Select this function to reset all setting s , including console password, to factory default values.
Resetting multiple ioLogik E1200H units to the default configuration is allowed. Select the ioLogik E1200H and
right click to process this function.
Mass Deployment (Import)
Users can import E1200H series module informatio n via ioSearch. Select this command to reload a
configuration from an exported.CSV file.
Page 41

ioLogik E1200H Series Using ioSearch
4-9
Mass Deployment (export)
Users can export E1200H series module information via ioSearch. The export file format will be
E1200H_Series_List.
Page 42

A
A. Modbus/TCP Default Address Mappings
The following topics are covered in this appendix :
E1261H Modbus Mapping
E1263H Modbus Mapping
Page 43

ioLogik E1200H Series Modbus/TCP Def a ult Address Mappings
A-2
NOTE
The Modbus/TCP ID of the ioLogik
4 or 104
3xxxx
0x0000
12
1 word
R
Get DI WordValue
00008
0x0007
1 bit
CH7 DO V alue 0 : O ff 1: On
E1200H is set to “1” by default.
E1261H Modbus Mapping
Fixed + Dynamic Default addresses
Func
Code
1 or 101 0xxxx 0x0000 12 1 bit R/W DO Value
1 or 101 0xxxx 0x0020 8 1 bit R/W DO Pulse Operate Status
1 or 101 0xxxx 0x0100 8 1 bit R/W DI Counter Start
1 or 101 0xxxx 0x0120 8 1 bit R/W DI Counter Clear
1 or 101 0xxxx 0x0300 24 1 bit R/W DIO Direction (DIO0-DIO11)
2 or 102 1xxxx 0x0000 12 1 bit R Get DI Value
4 or 104 3xxxx 0x0020 8 2 word R Get DI Counter Value Hi&Lo w Word
4 or 104 3xxxx 0x0040 NA 1 word R GET DI Value all Channel (Ch0~11)
4 or 104 3xxxx 0x0200 5 1 word R Read AI Value (Raw data)
4 or 104 3xxxx 0x0210 5 2 word R Read AI Value Scaling (flo at)
4 or 104 3xxxx 0x0230 5 1 word R Read AI current Mode Status
4 or 104 3xxxx 0x0600 3 1 word R RTD Value
3 or 103 4xxxx 0x0000 12 1 word R/W DO Value
3 or 103 4xxxx 0x0020 8 1 word R/W DO Pulse Operate Status
3 or 103 4xxxx 0x0040 NA 1 word R/W DO WordValue (Ch0-11)
3 or 103 4xxxx 0x0100 8 1 word R/W DI Counter Start
3 or 103 4xxxx 0x0120 8 1 word R/W DI Counter Cle ar
3 or 103 4xxxx 0x0250 5 1 word R/W AI Mode
3 or 103 4xxxx 0x0610 3 1 word R/W RTD Sensor Type
Ref.
Address
Address Channel
Num
Data type R/W Description
0xxxx Read/Write Coils (Support function 1, 5, 15)
Reference Address Data Type Description
DO Channel
00001 0x0000 1 bit CH0 DO Value 0: Off 1: On
00002 0x0001 1 bit CH1 DO V alue 0 : O ff 1: On
00003 0x0002 1 bit CH2 DO V alue 0 : O ff 1: On
00004 0x0003 1 bit CH3 DO V alue 0 : O ff 1: On
00005 0x0004 1 bit CH4 DO V alue 0 : O ff 1: On
00006 0x0005 1 bit CH5 DO V alue 0 : O ff 1: On
00007 0x0006 1 bit CH6 DO V alue 0 : O ff 1: On
00009 0x0008 1 bit CH8 DO V alue 0 : O ff 1: On
00010 0x0009 1 bit CH9 DO V alue 0 : O ff 1: On
00011 0x000A 1 bit CH10 DO Value 0: Off 1: On
00012 0x000B 1 bit CH11 DO Value 0: Off 1: On
00033 0x0020 1 bit CH0 DO Pulse Operate Status 0: Off 1: On
00034 0x0021 1 bit CH1 DO Pulse Operate Status 0: Off 1: On
00035 0x0022 1 bit CH2 DO Pulse Operate Status 0: Off 1: On
00036 0x0023 1 bit CH3 DO Pulse Operate Status 0: Off 1: On
Page 44

ioLogik E1200H Series Modbus/TCP Def a ult Address Mappings
A-3
00262
0x0105
1 bit
CH5 DI Counter Operate Status 0: Stop 1: Start(R/W)
Reference Address Data Type Description
00037 0x0024 1 bit CH4 DO Pulse Operate Status 0: Off 1: On
00038 0x0025 1 bit CH5 DO Pulse Operate Status 0: Off 1: On
00039 0x0026 1 bit CH6 DO Pulse Operate Status 0: Off 1: On
00040 0x0027 1 bit CH7 DO Pulse Operate Status 0: Off 1: On
DI Channel
00257 0x0100 1 bit CH0 DI Counter Operate Status 0: Stop 1: Start(R/W)
00258 0x0101 1 bit CH1 DI Counter Operate Status 0: Stop 1: Start(R/W)
00259 0x0102 1 bit CH2 DI Counter Operate Status 0: Stop 1: Start(R/W)
00260 0x0103 1 bit CH3 DI Counter Operate Status 0: Stop 1: Start(R/W)
00261 0x0104 1 bit CH4 DI Counter Operate Status 0: Stop 1: Start(R/W)
00263 0x0106 1 bit CH6 DI Counter Operate Status 0: Stop 1: Start(R/W)
00264 0x0107 1 bit CH7 DI Counter Operate Status 0: Stop 1: Start(R/W)
00289 0x0120 1 bit CH0 DI Clear Count Value
Read Always return:0
Write: 1 : Clear counter v a lue
0 : Return illegal data value(0x03)
00290 0x0121 1 bit CH1 DI Clear Count Value
Read Always return:0
Write: 1 : Clear counter v a lue
0 : Return illegal data value(0x03)
00291 0x0122 1 bit CH2 DI Clear Count Value
Read Always return:0
Write: 1 : Clear counter v a lue
0 : Return illegal data value(0x03)
00292 0x0123 1 bit CH3 DI Clear Count Value
Read Always return:0
Write: 1 : Clear counter v a lue
0 : Return illegal data value(0x03)
00293 0x0124 1 bit CH4 DI Clear Count Value
Read Always return:0
Write: 1 : Clear counter v a lue
0 : Return illegal d ata value (0x 03)
00294 0x0125 1 bit CH5 DI Clear Count Value
Read Always return:0
Write: 1 : Clear counter v a lue
0 : Return illegal data value(0x03)
00295 0x0126 1 bit CH6 DI Clear Count Value
Read Always return:0
Write: 1 : Clear counter v a lue
0 : Return illegal data value(0x03)
00296 0x0127 1 bit CH7 DI Clear Count Value
Read Always return:0
Write: 1 : Clear counter v a lue
0 : Return illegal data value(0x03)
00769 0x0300 1 bit DIO0
1: output DO mode
0: input DI mode
00770 0x0301 1 bit DIO1
1: output DO mode
0: input DI mode
Page 45

ioLogik E1200H Series Modbus/TCP Def a ult Address Mappings
A-4
0: input DI mode
10003
0x0002
1 bit
CH2 DI Value, 0=OFF, 1=ON (Read only)
Reference Address Data Type Description
00771 0x0302 1 bit DIO2
1: output DO mode
0: input DI mode
00772 0x0303 1 bit DIO3
1: output DO mode
0: input DI mode
00773 0x0304 1 bit DIO4
1: output DO mode
0: input DI mode
00774 0x0305 1 bit DIO5
1: output DO mode
00775 0x0306 1 bit DIO6
1: output DO mode
0: input DI mode
00776 0x0307 1 bit DIO7
1: output DO mode
0: input DI mode
00777 0x0308 1 bit DIO8
1: output DO mode
0: input DI mode
00778 0x0309 1 bit DIO9
1: output DO mode
0: input DI mode
00779 0x030A 1 bit DIO10
1: output DO mode
0: input DI mode
00780 0x030B 1 bit DIO11
1: output DO mode
0: input DI mode
1xxxx Read only Coils (Support function 2)
Reference Address Data Typ e Description
DI Channel
10001 0x0000 1 bit CH 0 DI V a lu e , 0=OFF, 1=ON (Read only)
10002 0x0001 1 bit CH 1 DI V a lu e , 0=OFF, 1=ON (Read only)
10004 0x0003 1 bit CH 3 DI V a lu e , 0=OFF, 1=ON (Read only)
10005 0x0004 1 bit CH 4 DI Value, 0=OFF, 1=ON (Read only)
10006 0x0005 1 bit CH 5 DI V a lu e , 0=OFF, 1=ON (Read only)
10007 0x0006 1 bit CH 6 DI V a lu e , 0=OFF, 1=ON (Read only)
10008 0x0007 1 bit CH 7 DI V a lu e , 0=OFF, 1=ON (Read only)
10009 0x0008 1 bit CH 8 DI V a lu e , 0=OFF, 1=ON (Read only)
10010 0x0009 1 bit CH 9 DI V a lu e , 0=OFF, 1=ON (Read only)
10011 0x000A 1 bit CH10 DI Value, 0=OFF, 1=ON (Read only)
10012 0x000B 1 bit CH11 DI Value, 0=OFF, 1=ON (Read only)
Page 46

ioLogik E1200H Series Modbus/TCP Def a ult Address Mappings
A-5
30002
0x0001
1 word
CH1 DI WordValue, 0=OFF, 1=ON (Read only)
AI Channel
3xxxx Read only Registers (Support function 4)
Reference Address Data Type Description
DI Channel
30001 0x0000 1 word CH0 DI WordValue, 0=OFF, 1=ON (Read only)
30003 0x0002 1 word CH2 DI WordValue, 0=OFF, 1=ON (Read only)
30004 0x0003 1 word CH3 DI WordValue, 0=OFF, 1=ON (Read only)
30005 0x0004 1 word CH4 DI WordValue, 0=OFF, 1=ON (Read only)
30006 0x0005 1 word CH5 DI WordValue, 0=OFF, 1=ON (Read only)
30007 0x0006 1 word CH6 DI WordValue, 0=OFF, 1=ON (Read only)
30008 0x0007 1 word CH7 DI WordValue, 0=OFF, 1=ON (Read only)
30009 0x0008 1 word CH8 DI WordValue, 0=OFF, 1=ON (Read only)
30010 0x0009 1 word CH9 DI WordValue, 0=OFF, 1=ON (Read only)
30011 0x000A 1 word CH10 DI WordValue, 0=OFF, 1=ON (Read only)
30012 0x000B 1 word CH11 DI WordValue, 0=OFF, 1=ON (Read o nly )
30033 0x0020 1 word C H0 DI Counte r Value Hi- Word (Read only)
30034 0x0021 1 word C H0 DI Counte r Value Lo- Word (Read only)
30035 0x0022 1 word C H1 DI Counte r Value Hi- Word (Read only)
30036 0x0023 1 word C H1 DI Counte r Value Lo- Word (Read only)
30037 0x0024 1 word C H2 DI Counte r Value Hi- Word (Read only)
30038 0x0025 1 word C H2 DI Counte r Value Lo- Word (Read only)
30039 0x0026 1 word C H3 DI Counte r Value Hi- Word (Read only)
30040 0x0027 1 word C H3 DI Counte r Value Lo- Word (Read only)
30041 0x0028 1 word C H4 DI Counte r Value Hi- Word (Read only)
30042 0x0029 1 word C H4 DI Counte r Value Lo- Word (Read only)
30043 0x002A 1 word C H5 DI Counte r Value Hi- Word (Read only)
30044 0x002B 1 word C H5 DI Counte r Value Lo- Word (Read only)
30045 0x002C 1 word CH6 DI Counter Value Hi- Word (Read only)
30046 0x002D 1 word CH6 DI Counter Value Lo- Word (Read only)
30047 0x002E 1 word C H 7 DI Counte r Value Hi- Word (Re ad o nly)
30048 0x002F 1 word CH7 DI Counter Value Lo- Word (Read only)
30065 0x0040 1 word DI Value (Ch0~15)
Bit0 = Ch0 DI Value (0=OFF, 1=ON)
...Bit15 = Ch15 DI Value (0=OFF, 1=ON)
30513 0x0200 1 word CH0 Read AI Value(RAW)
30514 0x0201 1 word CH1 Read AI Value(RAW)
30515 0x0202 1 word CH2 Read AI Value(RAW)
30516 0x0203 1 word CH3 Read AI Value(RAW)
30517 0x0204 1 word CH4 Read AI Value(RAW)
30529 0x0210 1 word CH0 Read AI Scaling Value Hi (float)
30530 0x0211 1 word CH0 Read AI Scaling Value Low (float)
30531 0x0212 1 word CH1 Read AI Scaling Value Hi (float)
30532 0x0213 1 word CH1 Read AI Scaling Value Low (float)
30533 0x0214 1 word CH2 Read AI Scaling Value Hi (float)
30534 0x0215 1 word CH2 Read AI Scaling Value Low (float)
30535 0x0216 1 word CH3 Read AI Scaling Value Hi (float)
30536 0x0217 1 word CH3 Read AI Scaling Value Low (float)
30537 0x0218 1 word CH4 Read AI Scaling Value Hi (float)
30538 0x0219 1 word CH4 Read AI Scaling Value Low (float)
30561 0x0230 1 word Read AI 1 Current Mode Status
Page 47

ioLogik E1200H Series Modbus/TCP Def a ult Address Mappings
A-6
40035
0x0022
1 word
CH2 DO Pulse Operate Status 0: Off 1: On
Reference Address Data Type Description
0: Normal
1: Burn Out
2: Over Range
30562 0x0231 1 word Read AI 1 Current Mode Status
0: Normal
1: Burn Out
2: Over Range
30563 0x0232 1 word Read AI 2 Current Mode Status
0: Normal
1: Burn Out
2: Over Range
30564 0x0233 1 word Read AI 3 Current Mode Status
0: Normal
1: Burn Out
2: Over Range
30565 0x0234 1 word Read AI 4 Current Mode Status
0: Normal
1: Burn Out
2: Over Range
RTD Channel
31537 0x0600 1 word CH0 RTD Value
<R> 0~65535, Unit:0.1 (Ohm, Celsius, Fahrenheit)
31538 0x0601 1 word CH1 RTD Value
<R> 0~65535, Unit:0.1 (Ohm, Celsius, Fahrenheit)
31539 0x0602 1 word CH2 RTD Value
<R> 0~65535, Unit:0.1 (Ohm, Celsius, Fahrenheit)
4xxxx Read/Write Registers (Support function 3, 6, 16)
Reference Address Data Type Description
DO Channel
40001 0x0000 1 word CH0 DO V alue 0: Off 1: O n
40002 0x0001 1 word CH1 DO V alue 0: Off 1: O n
40003 0x0002 1 word CH2 DO V alue 0: Off 1: O n
40004 0x0003 1 word CH3 DO V alue 0: Off 1: O n
40005 0x0004 1 word CH4 DO V alue 0: Off 1: O n
40006 0x0005 1 word CH5 DO Value 0: Off 1: On
40007 0x0006 1 word CH6 DO V alue 0: Off 1: O n
40008 0x0007 1 word CH7 DO V alue 0: Off 1: O n
40009 0x0008 1 word CH8 DO V alue 0: Off 1: O n
40010 0x0009 1 word CH9 DO V alue 0: Off 1: O n
40011 0x000A 1 word CH10 DO Value 0: Off 1: On
40012 0x000B 1 word CH11 DO Value 0: Off 1: On
40033 0x0020 1 word C H0 DO Puls e Operate Status 0: Off 1: On
40034 0x0021 1 word C H1 DO Puls e Operate Status 0: Off 1: On
40036 0x0023 1 word C H3 DO Puls e Operate Status 0: Off 1: On
40037 0x0024 1 word C H4 DO Puls e Operate Status 0: Off 1: On
40038 0x0025 1 word C H5 DO Puls e Operate Status 0: Off 1: On
40039 0x0026 1 word C H6 DO Puls e Operate Status 0: Off 1: On
40040 0x0027 1 word CH7 DO Pulse Oper ate Sta tus 0: Off 1: On
40065 0x0040 1 word D O all V al ue (Ch0~15 )
Page 48

ioLogik E1200H Series Modbus/TCP Def a ult Address Mappings
A-7
40257
0x0100
1 word
CH0 DI Counter Operate Status 0: Stop 1: Start(R/W)
AI Channel
Reference Address Data Type Description
Bit0 = Ch0 DO V alue (0=OFF, 1=ON)
…
Bit15 = C h15 DO Value (0=OFF, 1=ON)
DI Channel
40258 0x0101 1 word C H1 DI Counte r Operate Status 0: Stop 1: Start(R/W)
40259 0x0102 1 word C H2 DI Counte r Operate Status 0: Stop 1: Start(R/W)
40260 0x0103 1 word C H3 DI Counte r Operate Status 0: Stop 1: Start(R/W)
40261 0x0104 1 word CH4 DI Counter Operate Status 0: Stop 1: Start(R/W)
40262 0x0105 1 word C H5 DI Counte r Operate Status 0: Stop 1: Start(R/W)
40263 0x0106 1 word C H6 DI Counte r Operate Status 0: Stop 1: Start(R/W)
40264 0x0107 1 word C H7 DI Counte r Operate Status 0: Stop 1: Start(R/W)
40289 0x0120 1 word C H0 DI C le ar Count Value
Read Always return:0
Write: 1 : Clear counter v a lue
0 : Return illegal data value(0x03)
40290 0x0121 1 word C H1 DI C le ar Count Value
Read Always return:0
Write: 1 : Clear counter v a lue
0 : Return illegal data value(0x03)
40291 0x0122 1 word C H2 DI C le ar Count Value
Read Always return:0
Write: 1 : Clear counter v a lue
0 : Return illegal data value(0x03)
40292 0x0123 1 word C H3 DI C le ar Count Value
Read Always return:0
Write: 1 : Clear counter value
0 : Return illegal data value(0x03)
40293 0x0124 1 word C H4 DI C le ar Count Value
Read Always return:0
Write: 1 : Clear counter v a lue
0 : Return illegal data value(0x03)
40294 0x0125 1 word C H5 DI C le ar Count Value
Read Always retur n:0
Write: 1 : Clear counter v a lue
0 : Return illegal data value(0x03)
40295 0x0126 1 word C H6 DI C le ar Count Value
Read Always return:0
Write: 1 : Clear counter v a lue
0 : Return illegal data value(0x03)
40296 0x0127 1 word C H7 DI C le ar Count Value
Read Always return:0
Write: 1 : Clear counter v a lue
0 : Return illegal data value(0x03)
40593 0x0250 1 bit CH0 AI 0 Mode: 0 : 0-10V, 2 :4-20mA(Bout), 3 :0-20mA
40594 0x0251 1 bit CH0 AI 1 Mode: 0 : 0-10V, 2 :4-20mA(Bout), 3 :0-20mA
40595 0x0252 1 bit CH0 AI 2 Mode: 0 : 0-10V, 2 :4-20mA(Bout), 3 :0-20mA
40596 0x0253 1 bit CH0 AI 3 Mode: 0 : 0-10V, 2 :4-20mA(Bout), 3 :0-20mA
40597 0x0254 1 bit CH0 AI 4 Mode: 0 : 0-10V, 2 :4-20mA(Bout), 3 :0-20mA
41553 0x0610 1 word CH0 RTD Sensor Type
41554 0x0611 1 word CH1 RTD Sensor Type
1=PT100, 4=PT1000
Page 49

ioLogik E1200H Series Modbus/TCP Def a ult Address Mappings
A-8
4 or 104
3xxxx
0x0210
10
2 word
R
Read AI Value Scaling (float)
00012
0x000B
1 bit
CH11 DO Value 0: Off 1: On
Reference Address Data Type Description
1=PT100, 4=PT1000
41555 0x0612 1 word CH2 RTD Sensor Type
1=PT100, 4=PT1000
E1263H Modbus Mapping
Fixed + Dynamic Default addresses
Func
Code
1 or 101 0xxxx 0x0000 24 1 bit R/W DO Value
1 or 101 0xxxx 0x0020 8 1 bit R/W DO Pulse Operate Status
1 or 101 0xxxx 0x0100 8 1 bit R/W DI Counter Start
1 or 101 0xxxx 0x0120 8 1 bit R/W DI Counter Clear
1 or 101 0xxxx 0x0300 24 1 bit R/W DIO Direction (DIO0-DIO23)
2 or 102 1xxxx 0x0000 24 1 bit R Get DI Value
4 or 104 3xxxx 0x0000 24 1 word R Get DI WordValue
4 or 104 3xxxx 0x0020 8 2 word R Get DI Counter Value Hi&Low Word
4 or 104 3xxxx 0x0040 NA 2 word R GET DI Value all Channel (Ch0~23 )
4 or 104 3xxxx 0x0200 10 1 word R Read AI Value (Raw data)
4 or 104 3xxxx 0x0230 10 1 word R Read AI current Mode Status
4 or 104 3xxxx 0x0600 3 1 word R RTD Value
3 or 103 4xxxx 0x0000 24 1 word R/W DO Value
3 or 103 4xxxx 0x0020 8 1 word R/W DO Pulse Operate Status
3 or 103 4xxxx 0x0040 NA 2 word R/W DO WordValue (Ch0-23)
3 or 103 4xxxx 0x0100 8 1 word R/W DI Counter Start
3 or 103 4xxxx 0x0120 8 1 word R/W DI Counter Clear
3 or 103 4xxxx 0x0250 10 1 word R/W AI Mode
3 or 103 4xxxx 0x0610 3 1 word R/W RTD Sensor Type
Reference Address Channel Data Type R/W Description
0xxxx Read/Write Coils (Support function 1, 5, 15)
Reference Address Data Type Description
DO Channel
00001 0x0000 1 bit CH0 DO V alue 0 : O ff 1: On
00002 0x0001 1 bit CH1 DO V alue 0 : O ff 1: On
00003 0x0002 1 bit CH2 DO Value 0: Off 1: On
00004 0x0003 1 bit CH3 DO V alue 0 : O ff 1: On
00005 0x0004 1 bit CH4 DO V alue 0 : O ff 1: On
00006 0x0005 1 bit CH5 DO V alue 0 : O ff 1: On
00007 0x0006 1 bit CH6 DO V alue 0 : O ff 1: On
00008 0x0007 1 bit CH7 DO V alue 0 : O ff 1: On
00009 0x0008 1 bit CH8 DO V alue 0 : O ff 1: On
00010 0x0009 1 bit CH9 DO V alue 0 : O ff 1: On
00011 0x000A 1 bit CH10 DO Value 0: Off 1: On
00013 0x000C 1 bit CH12 DO Value 0: Off 1: On
00014 0x000D 1 bit CH13 DO Value 0: Off 1: On
00015 0x000E 1 bit CH14 DO Value 0: Off 1: On
Page 50

ioLogik E1200H Series Modbus/TCP Def a ult Address Mappings
A-9
00038
0x0025
1 bit
CH5 DO Pulse Operate Status 0: Off 1: On
00263
0x0106
1 bit
CH6 DI Counter Operate Status 0: Stop 1: Start(R/W)
0 : Return illegal data value(0x03)
Reference Address Data Type Description
00016 0x000F 1 bit CH15 DO Value 0: Off 1: On
00017 0x0010 1 bit CH16 DO Value 0: Off 1: On
00018 0x0011 1 bit CH17 DO Value 0: Off 1: On
00019 0x0012 1 bit CH18 DO Value 0: Off 1: On
00020 0x0013 1 bit CH19 DO Value 0: Off 1: On
00021 0x0014 1 bit CH20 DO Value 0: Off 1: On
00022 0x0015 1 bit CH21 DO Value 0: Off 1: On
00023 0x0016 1 bit CH22 DO Value 0: Off 1: On
00024 0x0017 1 bit CH23 DO Value 0: Off 1: On
00033 0x0020 1 bit CH0 DO Pulse Operate Status 0: Off 1: On
00034 0x0021 1 bit CH1 DO Pulse Operate Status 0: Off 1: On
00035 0x0022 1 bit CH2 DO Pulse Operate Status 0: Off 1: On
00036 0x0023 1 bit CH3 DO Pulse Operate Status 0: Off 1: On
00037 0x0024 1 bit CH4 DO Pulse Operate Status 0: Off 1: On
00039 0x0026 1 bit CH6 DO Pulse Operate Status 0: Off 1: On
00040 0x0027 1 bit CH7 DO Pulse Operate Status 0: Off 1: On
DI Channel
00257 0x0100 1 bit CH0 DI Counter Operate Status 0: Stop 1: Start(R/W)
00258 0x0101 1 bit CH1 DI Counter Operate Status 0: Stop 1: Start(R/W)
00259 0x0102 1 bit CH2 DI Counter Operate Status 0: Stop 1: Start(R/W)
00260 0x0103 1 bit CH3 DI Counter Operate Status 0: Stop 1: Start(R/W)
00261 0x0104 1 bit CH4 DI Counter Operate Status 0: Stop 1: Start(R/W)
00262 0x0105 1 bit CH5 DI Counter Operate Status 0: Stop 1: Start(R/W)
00264 0x0107 1 bit CH7 DI Counter Operate Status 0: Stop 1: Start(R/W)
00289 0x0120 1 bit CH0 DI Clear Count Value
Read Always return:0
Write: 1 : Clear counter v a lue
00290 0x0121 1 bit CH1 DI Clear Count Value
Read Always return:0
Write: 1 : Clear counter v a lue
0 : Return illegal data value(0x03)
00291 0x0122 1 bit CH2 DI Clear Count Value
Read Always return:0
Write: 1 : Clear counter v a lue
0 : Return illegal data value(0x03)
00292 0x0123 1 bit CH3 DI Clear Count Value
Read Always return:0
Write: 1 : Clear counter v a lue
0 : Return illegal data value(0x03)
00293 0x0124 1 bit CH4 DI Clear Count Value
Read Always return:0
Write: 1 : Clear counter v a lue
0 : Return illegal d ata value (0x 03)
00294 0x0125 1 bit CH5 DI Clear Count Value
Read Always return:0
Write: 1 : Clear counter v a lue
0 : Return illegal data value(0x03)
Page 51

ioLogik E1200H Series Modbus/TCP Def a ult Address Mappings
A-10
Reference Address Data Type Description
00295 0x0126 1 bit CH6 DI Clear Count Value
Read Always return:0
Write: 1 : Clear counter v a lue
0 : Return illegal data value(0x03)
00296 0x0127 1 bit CH7 DI Clear Count Value
Read Always return:0
Write: 1 : Clear counter v a lue
0 : Return illegal data value(0x03)
00769 0x0300 1 bit DIO0
1: output DO mode
0: input DI mode
00770 0x0301 1 bit DIO1
1: output DO mode
0: input DI mode
00771 0x0302 1 bit DIO2
1: output DO mode
0: input DI mode
00772 0x0303 1 bit DIO3
1: output DO mode
0: input DI mode
00773 0x0304 1 bit DIO4
1: output DO mode
0: input DI mode
00774 0x0305 1 bit DIO5
1: output DO mode
0: input DI mode
00775 0x0306 1 bit DIO6
1: output DO mode
0: input DI mode
00776 0x0307 1 bit DIO7
1: output DO mode
0: input DI mode
00777 0x0308 1 bit DIO8
1: output DO mode
0: input DI mode
00778 0x0309 1 bit DIO9
1: output DO mode
0: input DI mode
00779 0x030A 1 bit DIO10
1: output DO mode
0: input DI mode
00780 0x030B 1 bit DIO11
1: output DO mode
0: input DI mode
00781 0x030C 1 bit DIO12
1: output DO mode
0: input DI mode
00782 0x030D 1 bit DIO13
1: output DO mode
0: input DI mode
00783 0x030E 1 bit DIO14
1: output DO mode
0: input DI mode
Page 52

ioLogik E1200H Series Modbus/TCP Def a ult Address Mappings
A-11
Reference Address Data Type Description
00784 0x030F 1 bit DIO15
1: output DO mode
0: input DI mode
00785 0x0310 1 bit DIO16
1: output DO mode
0: input DI mode
00786 0x0311 1 bit DIO17
1: output DO mode
0: input DI mode
00787 0x0312 1 bit DIO18
1: output DO mode
0: input DI mode
00788 0x0313 1 bit DIO19
1: output DO mode
0: input DI mode
00789 0x0314 1 bit DIO20
1: output DO mode
0: input DI mode
00790 0x0315 1 bit DIO21
1: output DO mode
0: input DI mode
00791 0x0316 1 bit DIO22
1: output DO mode
0: input DI mode
00792 0x0317 1 bit DIO23
1: output DO mode
0: input DI mode
1xxxx Read only Coils (Support function 2)
Reference Address Data Type Description
DI Channel
10001 0x0000 1 bit CH 0 DI V a lu e , 0=OFF, 1=ON (Read only)
10002 0x0001 1 bit CH 1 DI V a lu e , 0=OFF, 1=ON (Read only)
10003 0x0002 1 bit CH 2 DI V a lu e , 0=OFF, 1=ON (Read only)
10004 0x0003 1 bit CH 3 DI V a lu e , 0=OFF, 1=ON (Read only)
10005 0x0004 1 bit CH 4 DI V a lu e , 0=OFF, 1=ON (Read only)
10006 0x0005 1 bit CH 5 DI V a lu e , 0=OFF, 1=ON (Read only)
10007 0x0006 1 bit CH 6 DI V a lu e , 0=OFF, 1=ON (Read only)
10008 0x0007 1 bit CH 7 DI V a lu e , 0=OFF, 1=ON (Read only)
10009 0x0008 1 bit CH 8 DI V a lu e , 0=OFF, 1=ON (Read only)
10010 0x0009 1 bit CH 9 DI Value, 0=OFF, 1=ON (Read only)
10011 0x000A 1 bit CH10 DI Value, 0=OFF, 1=ON (Read only)
10012 0x000B 1 bit CH11 DI Value, 0=OFF, 1=ON (Read only)
10013 0x000C 1 bit CH12 DI Value, 0=OFF, 1=ON (Read only)
10014 0x000D 1 bit CH13 DI Value, 0=OFF, 1=ON (Read only)
10015 0x000E 1 bit CH14 DI Value, 0=OFF, 1=ON (Read only)
10016 0x000F 1 bit CH15 DI Value, 0=OFF, 1=ON (Read only)
10017 0x0010 1 bit CH16 DI Value, 0=OFF, 1=ON (Read only)
10018 0x0011 1 bit CH17 DI Value, 0=OFF, 1=ON (Read only)
10019 0x0012 1 bit CH18 DI Value, 0=OFF, 1=ON (Read only)
10020 0x0013 1 bit CH19 DI Value, 0=OFF, 1=ON (Read only)
Page 53

ioLogik E1200H Series Modbus/TCP Def a ult Address Mappings
A-12
30002
0x0001
1 word
CH1 DI WordValue, 0=OFF, 1=ON (Read only)
30040
0x0027
1 word
CH3 DI Counter Value Lo- Word (Read only)
Reference Address Data Type Description
10021 0x0014 1 bit CH20 DI Value, 0=OFF, 1=ON (Read only)
10022 0x0015 1 bit CH21 DI Value, 0=OFF, 1=ON (Read only)
10023 0x0016 1 bit CH22 DI Value, 0=OFF, 1=ON (Read only)
10024 0x0017 1 bit CH23 DI Value, 0=OFF, 1=ON (Read only)
3xxxx Read Registers (Support function 4)
Reference Address Data Type Description
DI Channel
30001 0x0000 1 word CH0 DI WordValue, 0=OFF, 1=ON (Read only)
30003 0x0002 1 word CH2 DI WordValue, 0=OFF, 1=ON (Read only)
30004 0x0003 1 word CH3 DI WordValue, 0=OFF, 1=ON (Read only)
30005 0x0004 1 word CH4 DI WordValue, 0=OFF, 1=ON (Read only)
30006 0x0005 1 word CH5 DI WordValue, 0=OFF, 1=ON (Read only)
30007 0x0006 1 word CH6 DI WordValue, 0=OFF, 1=ON (Read only)
30008 0x0007 1 word CH7 DI WordValue, 0=OFF, 1=ON (Read only)
30009 0x0008 1 word CH8 DI WordValue, 0=OFF, 1=ON (Read only)
30010 0x0009 1 word CH9 DI WordValue, 0=OFF, 1=ON (Read only)
30011 0x000A 1 word CH10 DI WordValue, 0=OFF, 1=ON (Read o nly)
30012 0x000B 1 word CH11 DI WordValue, 0=OFF, 1=ON (Read o nly )
30013 0x000C 1 word CH12 DI WordValue, 0=OFF, 1=ON (Read only )
30014 0x000D 1 word CH13 DI WordValue, 0=OFF, 1=ON (Rea d onl y )
30015 0x000E 1 word CH14 DI WordValue, 0=OFF, 1=ON (Rea d only)
30016 0x000F 1 word CH15 DI WordValue, 0=OFF, 1=ON (Re ad o nly)
30017 0x0010 1 word CH16 DI WordValue, 0=OFF, 1=ON (Read o nly)
30018 0x0011 1 word CH17 DI WordValue, 0=OFF, 1=ON (Read o nly)
30019 0x0012 1 word CH18 DI WordValue, 0=OFF, 1=ON (Read o nly)
30020 0x0013 1 word CH19 DI WordValue, 0=OFF, 1=ON (Read o nly)
30021 0x0014 1 word CH20 DI WordValue, 0=OFF, 1=ON (Read o nly)
30022 0x0015 1 word CH21 DI WordValue, 0=OFF, 1=ON (Read o nly)
30023 0x0016 1 word CH10 DI WordValue, 0=OFF, 1=ON (Read o nly)
30024 0x0017 1 word CH11 DI WordValue, 0=OFF, 1=ON (Read o nly)
30033 0x0020 1 word C H0 DI Counte r Value Hi- Word (Read only)
30034 0x0021 1 word C H0 DI Counte r Value Lo- Word (Read only)
30035 0x0022 1 word C H1 DI Counte r Value Hi- Word (Read only)
30036 0x0023 1 word C H1 DI Counte r Value Lo- Word (Read only)
30037 0x0024 1 word C H2 DI Counte r Value Hi- Word (Read only)
30038 0x0025 1 word C H2 DI Counte r Value Lo- Word (Read only)
30039 0x0026 1 word C H3 DI Counte r Value Hi- Word (Read only)
30041 0x0028 1 word C H4 DI Counte r Value Hi- Word (Read only)
30042 0x0029 1 word C H4 DI Counte r Value Lo- Word (Read only)
30043 0x002A 1 word C H5 DI Counte r Value Hi- Word (Read only)
30044 0x002B 1 word C H5 DI Counte r Value Lo- Word (Read only)
30045 0x002C 1 word CH6 DI Counter Value Hi- Word (Read only)
30046 0x002D 1 word CH6 DI Counter Value Lo- Word (Read only)
30047 0x002E 1 word C H 7 DI Counte r Value Hi- Word (Re ad o nly)
30048 0x002F 1 word CH7 DI Counter Value Lo- Word (Read only)
Page 54

ioLogik E1200H Series Modbus/TCP Def a ult Address Mappings
A-13
AI Channel
30548
0x0223
1 word
CH9 Read AI Scaling Value Low (float)
Reference Address Data Type Description
30065 0x0040 1 word DI Value (Ch0~15)
Bit0 = Ch0 DI Value (0=OFF, 1=ON)
Bit15 = Ch15 DI Value (0=OFF, 1=ON)
30066 0x0041 1 word DI Value (Ch16~23)
Bit0 = Ch16 DI V alue (0=OFF, 1=ON)
…
Bit7 = Ch23 DI Value (0=OFF, 1=ON)
30513 0x0200 1 word CH0 Read AI Value(RAW)
30514 0x0201 1 word CH1 Read AI Value(RAW)
30515 0x0202 1 word CH2 Read AI Value(RAW)
30516 0x0203 1 word CH3 Read AI Value(RAW)
30517 0x0204 1 word CH4 Read AI Value(RAW)
30518 0x0205 1 word CH5 Read AI Value(RAW)
30519 0x0206 1 word CH6 Read AI Value(RAW)
30520 0x0207 1 word CH7 Read AI Value(RAW)
30521 0x0208 1 word CH8 Read AI Value(RAW)
30522 0x0209 1 word CH9 Read AI Value(RAW)
30529 0x0210 1 word CH0 Read AI Scaling Value Hi (float)
30530 0x0211 1 word CH0 Read AI Scaling Value Low (float)
30531 0x0212 1 word CH1 Read AI Scaling Value Hi (float)
30532 0x0213 1 word CH1 Read AI Scaling Value Low (float)
30533 0x0214 1 word CH2 Read AI Scaling Value Hi (float)
30534 0x0215 1 word CH2 Read AI Scaling Value Low (float)
30535 0x0216 1 word CH3 Read AI Scaling Value Hi (float)
30536 0x0217 1 word CH3 Read AI Scaling Value Low (float)
30537 0x0218 1 word CH4 Read AI Scaling Value Hi (float)
30538 0x0219 1 word CH4 Read AI Scaling Value Low (float)
30539 0x021A 1 word CH5 Read AI Scaling Value Hi (float)
30540 0x021B 1 word CH5 Read AI Scaling Value Low (float)
30541 0x021C 1 word CH6 Read AI Scaling Value Hi (float)
30542 0x021D 1 word CH6 Read AI Scaling Value Low (float)
30543 0x021E 1 word CH7 Read AI Scaling Value Hi (float)
30544 0x021F 1 word CH7 Read AI Scaling Value Low (float)
30545 0x0220 1 word CH8 Read AI Scaling Value Hi (float)
30546 0x0221 1 word CH8 Read AI Scaling Value Low (float)
30547 0x0222 1 word CH9 Read AI Scaling Value Hi (float)
30561 0x0230 1 word Read AI 1 Current Mode Status
30562 0x0231 1 word Read AI 1 Current Mode Status
30563 0x0232 1 word Read AI 2 Current Mode Status
0: Normal
1: Burn Out
2: Over Range
0: Normal
1: Burn Out
2: Over Range
0: Normal
1: Burn Out
2: Over Range
Page 55

ioLogik E1200H Series Modbus/TCP Def a ult Address Mappings
A-14
2: Over Range
40002
0x0001
1 word
CH1 DO V alue 0 : O ff 1: On
Reference Address Data Type Description
30564 0x0233 1 word Read AI 3 Current Mode Status
0: Normal
1: Burn Out
2: Over Range
30565 0x0234 1 word Read AI 4 Current Mode Status
0: Normal
1: Burn Out
2: Over Range
30566 0x0235 1 word Read AI 5Current Mode Status
0: Normal
1: Burn Out
2: Over Range
30567 0x0236 1 word Read AI 6 Current Mode Status
0: Normal
1: Burn Out
30568 0x0237 1 word Read AI 7 Current Mode Status
0: Normal
1: Burn Out
2: Over Range
30569 0x0238 1 word Read AI 8 Current Mode Status
0: Normal
1: Burn Out
2: Over Range
30570 0x0239 1 word Read AI 9 Current Mode Status
0: Normal
1: Burn Out
2: Over Range
RTD Channel
31537 0x0600 1 word CH0 RTD Value
<R> 0~65535, Unit:0.1 (Ohm, Celsius, Fahrenheit)
31538 0x0601 1 word CH1 RTD Value
<R> 0~65535, Unit:0.1 (Ohm, Celsius, Fahrenheit)
31539 0x0602 1 word CH2 RTD Value
<R> 0~65535, Unit:0.1 (Ohm, Celsius, Fahrenheit)
4xxxx Read/Write Registers (Support function 3, 6, 16)
Reference Address Data Type Description
DO Channel
40001 0x0000 1 word CH0 D O Value 0: Off 1: On
40003 0x0002 1 word CH2 D O Value 0: Off 1: On
40004 0x0003 1 word CH3 D O Value 0: Off 1: On
40005 0x0004 1 word CH4 D O Value 0: Off 1: On
40006 0x0005 1 word CH5 DO Value 0: Off 1: On
40007 0x0006 1 word CH6 D O Value 0: Off 1: On
40008 0x0007 1 word CH7 D O Value 0: Off 1: On
40009 0x0008 1 word CH8 D O Value 0: Off 1: On
40010 0x0009 1 word CH9 D O Value 0: Off 1: On
40011 0x000A 1 word CH10 DO Value 0: Off 1: On
40012 0x000B 1 word CH11 DO Value 0: Off 1: On
Page 56

ioLogik E1200H Series Modbus/TCP Def a ult Address Mappings
A-15
40035
0x0022
1 word
CH2 DO Pulse Operate Status 0: Off 1: On
0 : Return illegal data value(0x03)
Reference Address Data Type Description
40013 0x000C 1 word CH12 DO Value 0: Off 1: On
40014 0x000D 1 word CH13 DO Value 0: Off 1: On
40015 0x000E 1 word CH14 DO Value 0: Off 1: On
40016 0x000F 1 word CH15 DO Value 0: Off 1: On
40017 0x0010 1 word CH16 DO Value 0: Off 1: On
40018 0x0011 1 word CH17 DO Value 0: Off 1: On
40019 0x0012 1 word CH18 DO Value 0: Off 1: On
40020 0x0013 1 word CH19 DO Value 0: Off 1: On
40021 0x0014 1 word CH20 DO Value 0: Off 1: On
40022 0x0015 1 word CH21 DO Value 0: Off 1: On
40023 0x0016 1 word CH22 DO Value 0: Off 1: On
40024 0x0017 1 word CH23 DO Value 0: Off 1: On
40033 0x0020 1 word CH0 DO Pulse Operate Status 0: Off 1: On
40034 0x0021 1 word CH1 DO Pulse Operate Status 0: Off 1: On
40036 0x0023 1 word CH3 DO Pulse Operate Status 0: Off 1: On
40037 0x0024 1 word CH4 DO Pulse Operate Status 0: Off 1: On
40038 0x0025 1 word CH5 DO Pulse Operate Status 0: Off 1: On
40039 0x0026 1 word CH6 DO Pulse Operate Status 0: Off 1: On
40040 0x0027 1 word CH7 DO Pulse Operate Status 0: Off 1: On
40065 0x0040 1 word DO all Value (Ch0~15)
Bit0 = Ch0 DO V alue (0=OFF, 1=ON)
...
Bit15 = Ch15 DO Value (0=OFF, 1=ON)
40066 0x0041 1 word DO all Value (Ch16~23)
Bit0 = Ch16 DO Value (0=OFF, 1=ON)
...
Bit7 = Ch23 DO Value (0=OFF, 1=ON)
DI Channel
40257 0x0100 1 word CH0 DI Counter Operate Status 0: Stop 1: Start(R/W )
40258 0x0101 1 word CH1 DI Counter Operate Status 0: Stop 1: Start(R /W)
40259 0x0102 1 word CH2 DI Counter Operate Status 0: Stop 1: Start(R/W )
40260 0x0103 1 word CH3 DI Counter Operate Status 0: Stop 1: Start(R/W )
40261 0x0104 1 word CH4 DI Counter Operate Status 0: Stop 1: Start(R/W)
40262 0x0105 1 word CH5 DI Counter Operate Status 0: Stop 1: Start(R/W )
40263 0x0106 1 word CH6 DI Counter Operate Status 0: Stop 1: Start(R/W )
40264 0x0107 1 word CH7 DI Counter Operate Status 0: Stop 1: Start(R/W )
40289 0x0120 1 word CH0 DI Clear Count Value
Read Always return:0
Write: 1 : Clear counter v a lue
0 : Return illegal data value(0x03)
40290 0x0121 1 word CH1 DI Clear Count Value
Read Always return:0
Write: 1 : Clear counter v a lue
40291 0x0122 1 word CH2 DI Clear Count Value
40292 0x0123 1 word CH3 DI Clear Count Value
Read Always return:0
Write: 1 : Clear counter v a lue
0 : Return illegal data value(0x03)
Read Always return:0
Write: 1 : Clear counter v a lue
Page 57

ioLogik E1200H Series Modbus/TCP Def a ult Address Mappings
A-16
Reference Address Data Type Description
0 : Return illegal data value(0x03)
40293 0x0124 1 word CH4 DI Clear Count Value
Read Always return:0
Write: 1 : Clear counter v a lue
0 : Return illegal data value(0x03)
40294 0x0125 1 word CH5 DI Clear Count Value
Read Always return:0
Write: 1 : Clear counter value
0 : Return illegal data value(0x03)
40295 0x0126 1 word CH6 DI Clear Count Value
Read Always return:0
Write: 1 : Clear counter v a lue
0 : Return illegal data value(0x03)
40296 0x0127 1 word CH7 DI Clear Count Value
Read Always retur n:0
Write: 1 : Clear counter v a lue
0 : Return illegal data value(0x03)
AI Channel
40593 0x0250 1 bit CH0 AI 0 Mode: 0 : 0-10V, 2 :4-20mA(Bout), 3 :0-20mA
40594 0x0251 1 bit CH0 AI 1 Mode: 0 : 0-10V, 2 :4-20mA(Bout), 3 :0-20mA
40595 0x0252 1 bit CH0 AI 2 Mode: 0 : 0-10V, 2 :4-20mA(Bout), 3 :0-20mA
40596 0x0253 1 bit CH0 AI 3 Mode: 0 : 0-10V, 2 :4-20mA(Bout), 3 :0-20mA
40597 0x0254 1 bit CH0 AI 4 Mode: 0 : 0-10V, 2 :4-20mA(Bout), 3 :0-20mA
40598 0x0255 1 bit CH0 AI 5 Mode: 0 : 0-10V, 2 :4-20mA(Bout), 3 :0-20mA
40599 0x0256 1 bit CH0 AI 6 Mode: 0 : 0-10V, 2 :4-20mA(Bout), 3 :0-20mA
40600 0x0257 1 bit CH0 AI 7 Mode: 0 : 0-10V, 2 :4-20mA(Bout), 3 :0-20mA
40601 0x0258 1 bit CH0 AI 8 Mode: 0 : 0-10V, 2 :4-20mA(Bout), 3 :0-20mA
40602 0x0259 1 bit CH0 AI 9 Mode: 0 : 0-10V, 2 :4-20mA(Bout), 3 :0-20mA
41553 0x0610 1 word CH0 RTD Sensor Type
1=PT100, 4=PT1000
41554 0x0611 1 word CH1 RTD Sensor Type
1=PT100, 4=PT1000
41555 0x0612 1 word CH2 RTD Sensor Type
1=PT100, 4=PT1000
Page 58

B. Network Port Numbers
68
UDP
BOOTP/DHCP
ioLogik E1200H Network Port Usage
Port Type Usage
80 TCP Web console service
502 TCP Modbus/TCP communication
4800 UDP Auto search
69 UDP Export/import configuration file
9900 TCP Active OPC Server
9500 TCP Active OPC Server
B
Page 59

C. Factory Defaults
Default Gateway
0.0.0.0
Server Name
N/A
ioLogik E1200H series products are configured with the following factory defaults:
Default IP address 192.168.127.254
Default Netmask 255.255.255.0
Communication watchdog Disable
Modbus/TCP Alive Check On
Modbus/TCP Timeout Interval 60 sec
DI Mode DI
Filter time 100 ms
Trigger for counter Lo to H i
Counter status Stop
DO Mode DO
DO Safe Status Disable
Power on status Disable
Low width for pulse 1 ms (1.5 s for rel a y)
Hi width for pulse 1 ms (1.5 s for relay)
Output pulses 0 (continuous)
DIO Mode DO
AI Mode Voltage
Scaling and Slop-Intercept Disable
Password N/A
C
Server Location N/A
Scaling Disable
Page 60

Terminal Block Pin Assignments
D
D. Pinouts
Page 61

E
E. FCC Interference Statement
Federal Communication Commission Warning!
This equipment has been tested and found to comply with the limits for a Class A digital device, pursuant to
part 15 of the FCC Rules. Operation is subject to the follo w ing two conditions: (1) This device may not cause
harmful interference, and (2) this device must accept any interference received, including interference that
may cause undesired operation.
These limits are designed to provide reasonable protection against harmful interference when the equipment is
operated in a commercial environment. This equip ment g e nera te s , uses, and can radiate radio frequency
energy and, if not installed and used in accordance with the instruction manual, may cause harmful
interference to radio communications. Op e r a tio n of this equipme nt in a resid e ntia l area is likely to cause
harmful interference in which case the user will b e req uir ed to corr e c t the interf e renc e at his ow n expense.
Page 62

F
F. European Community (CE)
This is a Class A product. In a domestic environment, this product may cause radio interference in which case
the user may be required to take adequate measures.
 Loading...