

Page 1

Moxa Managed Ethernet Switch
Redundancy Protocol (UI 2.0)
User’s Manual
Edition 4.0, September 2017
www.moxa.com/product
Models covered by this manual:
EDS-528E, EDS-518E, EDS-510E, EDS-G508E, EDS-G512E,
EDS-G512E-8PoE, EDS-G516E, IKS-6726A, IKS-6728A,
IKS-6728A-8PoE, IKS-G6524A, IKS-G6824A, ICS-G7526A, ICS-G7826A,
ICS-G7528A, ICS-G7828A, ICS-G7748A, ICS-G7848A, ICS-G7750A,
ICS-G7850A, ICS-G7752A, ICS-G7852A Series
© 2017 Moxa Inc. All rights reserved.
Page 2

Moxa Managed Ethernet Switch
Redundancy Protocol (UI 2.0)
User’s Manual
The software described in this manual is furnished under a license agreement and may be used only in accordance with
the terms of that agreement.
Copyright Notice
© 2017 Moxa Inc. All rights reserved.
Trademarks
The MOXA logo is a registered trademark of Moxa Inc.
All other trademarks or registered marks in this manual belong to their respective manufacturers.
Disclaimer
Information in this document is subject to change without notice and does not represent a commitment on the part of
Moxa.
Moxa provides this document as is, without warranty of any kind, either expressed or implied, including, but not limited
to, its particular purpose. Moxa reserves the right to make improvements and/or changes to this manual, or to the
products and/or the programs described in this manual, at any time.
Information provided in this manual is intended to be accurate and reliable. However, Moxa assumes no responsibility for
its use, or for any infringements on the rights of third parties that may result from its use.
This product might include unintentional technical or typographical errors. Changes are periodically made to the
information herein to correct such errors, and these changes are incorporated into new editions of the publication.
Technical Support Contact Information
www.moxa.com/support
Moxa Americas
Toll
-free: 1-888-669-2872
Tel:
+1-714-528-6777
Fax:
+1-714-528-6778
Moxa China (Shanghai
office)
Toll
-free: 800-820-5036
Tel:
+86-21-5258-9955
Fax:
+86-21-5258-5505
Moxa Europe
Tel:
+49-89-3 70 03 99-0
Fax:
+49-89-3 70 03 99-99
Moxa Asia
-Pacific
Tel:
+886-2-8919-1230
Fax:
+886-2-8919-1231
Moxa India
Tel:
+91-80-4172-9088
Fax:
+91-80-4132-1045
Page 3

Table of Contents
1. Introduction to Redundancy Protocol ................................................................................................ 1-1
2. Turbo Ring ........................................................................................................................................ 2-1
The Turbo Ring Concept ...................................................................................................................... 2-2
Setting up “Turbo Ring” or “Turbo Ring V2” ............................................................................................ 2-2
Determining the Redundant Path of a “Turbo Ring” Ring................................................................... 2-2
Determining the Redundant Path of a “Turbo Ring V2” Ring .............................................................. 2-3
Ring Coupling Configuration .......................................................................................................... 2-3
Dual-Ring Configuration (applies only to “Turbo Ring V2”) ................................................................ 2-5
Dual-Homing Configuration (applies only to “Turbo Ring V2”) ........................................................... 2-5
Configuring “Turbo Ring” and “Turbo Ring V2” ........................................................................................ 2-6
Configuring “Turbo Ring” .............................................................................................................. 2-6
Configuring “Turbo Ring V2” ......................................................................................................... 2-8
3. Turbo Chain ....................................................................................................................................... 3-1
The Turbo Chain Concept ..................................................................................................................... 3-2
Setting Up Turbo Chain ....................................................................................................................... 3-2
Configuring “Turbo Chain”.................................................................................................................... 3-2
Head Switch Configuration ............................................................................................................ 3-3
Member Switch Configuration ....................................................................................................... 3-3
Tail Switch Configuration .............................................................................................................. 3-3
4. STP/RSTP/MSTP ............................................................................................................................... 4-1
The STP/RSTP/MSTP Concept ............................................................................................................... 4-2
What is STP? .............................................................................................................................. 4-2
How STP Works ........................................................................................................................... 4-3
Differences between STP, RSTP, and MSTP ..................................................................................... 4-4
STP Example ...................................................................................................................................... 4-5
Using STP on a Network with Multiple VLANs .......................................................................................... 4-6
Configuring STP/RSTP ......................................................................................................................... 4-6
Configuring MSTP ............................................................................................................................... 4-9
Configuration Limits of STP/RSTP ........................................................................................................ 4-12
5. V-ON ................................................................................................................................................. 5-1
The V-ON Concept .............................................................................................................................. 5-2
V-ON Topology ................................................................................................................................... 5-3
Overall Network Fast Recovery ...................................................................................................... 5-3
Local Network Fast Recovery ........................................................................................................ 5-4
Instructions for Setting Up V-ON .......................................................................................................... 5-4
Page 4
1
1. Introduction to Redundancy Protocol
Setting up Redundancy Protocol on your network helps protect critical links against failure, protects against
network loops, and keeps network downtime at a minimum.
Redundancy Protocol allows you to set up redundant loops in the network to provide a backup data
transmission route in the event that a cable is inadvertently disconnected or damaged. This is a particularly
important feature for industrial applications, since it could take several minutes to locate the disconnected or
severed cable. For example, if the Moxa switch is used as a key communications component of a production line,
several minutes of downtime could cause a big loss in production and revenue. The Moxa switch supports three
different protocols to support this Redundancy Protocol function:
• Turbo Ring and Turbo Ring V2
• Turbo Chain
• Rapid Spanning Tree and Spanning Tree Protocols (IEEE 802.1W/802.1D-2004)
When configuring a redundant ring, all switches on the same ring must be configured to use the same
redundancy protocol. You cannot mix the Turbo Ring, Turbo Ring V2, and STP/RSTP protocols on the same ring.
The following table lists the key differences between the features of each protocol. Use this information to
evaluate the benefits of each, and then determine which features are most suitable for your network.
Turbo Ring Turbo Ring V2 Turbo Chain STP RSTP
Topology Ring Ring Chain Ring, Mesh Ring, Mesh
Fast Ethernet
Recovery Time
< 300 ms < 20 ms < 20 ms Up to 30 sec. Up to 5 sec.
Gigabit Ethernet
Recovery Time
< 50 ms < 50 ms
NOTE
Most of Moxa’s managed switches now support three proprietary Turbo Ring protocols
:
Turbo Ring refers to the original version of Moxa’s proprietary redundant ring protocol, which has a
recovery time of under 300 ms.
Turbo Ring V2 refers to the new generation Turbo Ring, which has a recovery time of under 20 ms for
Fast
Ethernet ports and under 50 ms for Gigabit Ethernet ports.
Turbo Chain is a new Moxa proprietary protocol with unlimited flexibility that allows
you to construct any
type of redundant network topology. The recovery time is under 20 ms for Fast Ethern
et ports and under 50
ms for Gigabit Ethernet ports. To achieve a recovery time under 50 ms in a Gigabit Turbo Chain, we
recommend using a Gigabit fiber port as Head port.
In this manual, we use the terminology
Turbo Ring and Turbo Ring V2 to differentiate between rings
configured for one or the other of these protocols.
Page 5

Managed Ethernet Switch Redundancy Protocol (UI 2.0) Introduction to Redundancy Protocol
1-2
Gigabit Ethernet Redundant Ring Capability (< 50 ms)
Ethernet has become the default data communications
medium for industrial automation applications. In fact,
Ethernet
is often used to integrate video, voice, and
high
-rate industrial application data transfers into one
network.
Moxa switches come equipped with a redundancy
G
igabit Ethernet protocol called Gigabit Turbo Ring. With
Gigabit Turbo Ring, if any segm
ent of the network gets
disconnected, your automation system will be back to
normal in less than
300 ms (Turbo Ring) or 50 ms (Turbo
Ring V2)
.
NOTE
Port trunking and Turbo Ring
, Turbo Ring V2, and Turbo Chain can be enabled simultaneously to form a
backbone.
However, firmwares released before edition 5.0
do not support port trunking with Turbo Ring V2 and
Turbo Chain. Doing so will increase the bandwidth of the backbone, and also provide redundancy. For example,
suppose that two physical ports, 1 and 2, are trunked to form trunk group Trk1, and then Trk1 is set as one
Turbo Ring path
. If port 1 gets disconnected, the remaining trunked port, port 2, will share the traffic. If port
s
1 and 2 are both disconnected,
then Turbo Ring will create a backup path within 300 ms.
Page 6

2
2. Turbo Ring
The following topics are covered in this chapter:
The Turbo Ring Concept
Setting up “Turbo Ring” or “Turbo Ring V2”
Determining the Redundant Path of a “Turbo Ring” Ring
Determining the Redundant Path of a “Turbo Ring V2” Ring
Ring Coupling Configuration
Dual-Ring Configuration (applies only to “Turbo Ring V2”)
Dual-Homing Configuration (applies only to “Turbo Ring V2”)
Configuring “Turbo Ring” and “Turbo Ring V2”
Configuring “Turbo Ring”
Configuring “Turbo Ring V2”
Page 7
Managed Ethernet Switch Redundancy Protocol (UI 2.0) Turbo Ring
2-2
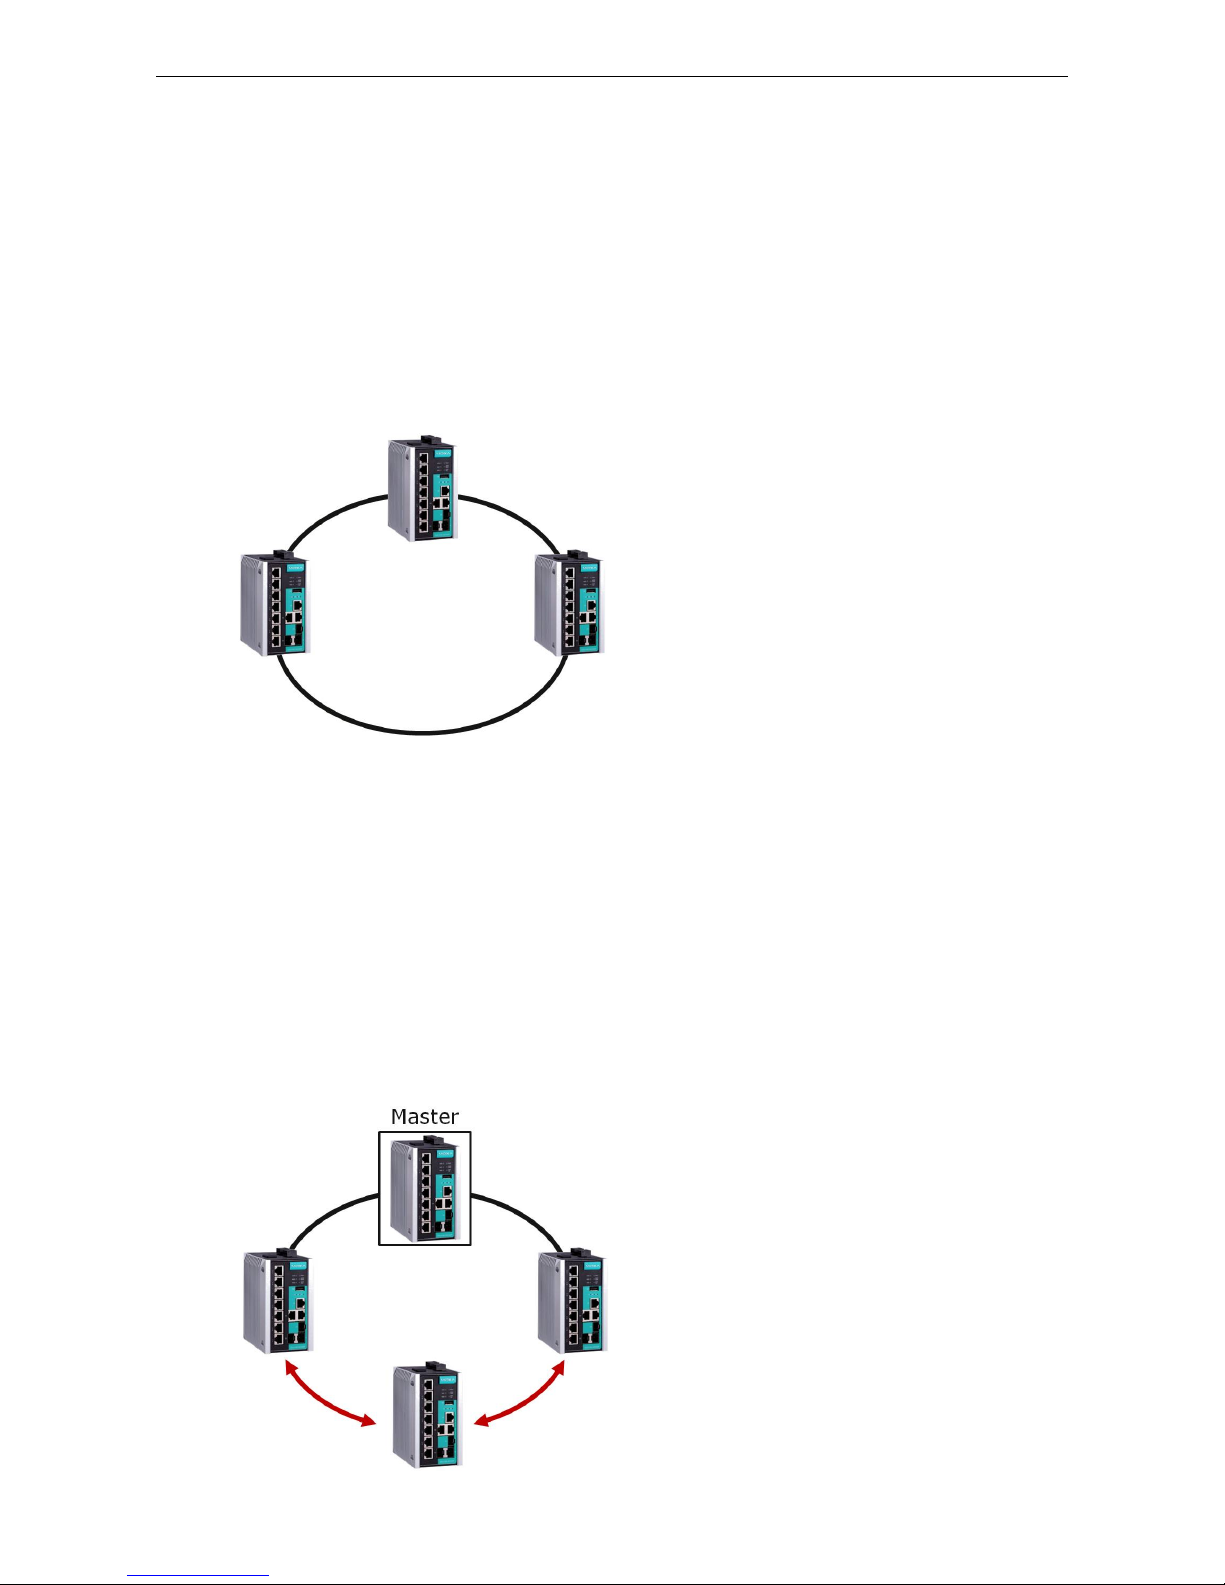
The Turbo Ring Concept
Moxa developed the proprietary Turbo Ring protocol to optimize redundancy and achieve a faster recovery time
on the network.
The Turbo Ring and Turbo Ring V2 protocols identify one switch as the master of the network, and then
automatically block packets from traveling through any of the network’s redundant loops. In the event that one
branch of the ring gets disconnected from the rest of the network, the protocol automatically readjusts the ring
so that the part of the network that was disconnected can reestablish contact with the rest of the network.
Setting up “Turbo Ring” or “Turbo Ring V2”
Select any two ports as redundant ports.
Connect the redundant ports to form the Turbo Ring.
The user does not need to configure any of the switches as the master to use Turbo Ring or Turbo Ring V2. If
none of the switches in the ring is configured as the master, then the protocol will automatically assign master
status to one of the switches. In fact, the master is only used to identify which segment in the redundant ring
acts as the backup path. In the following subsections, we explain how the redundant path is selected for rings
configured for Turbo Ring, and Turbo Ring V2.
Determining the Redundant Path of a “Turbo Ring” Ring
In this case, the redundant segment (i.e., the segment that will be blocked during normal operation) is
determined by the number of switches in the ring, and where the ring master is located.
When the Number of Switches in the Turbo Ring is Even
If there are 2N
switches (an even number) in the “Turbo
Ring”
ring, then the backup segment is one of the two
segments connected to the (N+1)
st switch (i.e., the
switch
directly opposite the
master).
Page 8

Managed Ethernet Switch Redundancy Protocol (UI 2.0) Turbo Ring
2-3
When the Number of Switches in the Turbo Ring is Odd
If there are 2N+1
switches
(an odd number) in the “Turbo
Ring”
ring, with switches and segments labeled
counterclockwise, then segment N+1 will serve as the
backup path
.
For the example shown here, N=1, so that N+1=2.
Determining the Redundant Path of a “Turbo Ring V2” Ring
For a
“Turbo Ring V2” ring, the backup segment is the
segment connected to the 2nd redundant port on the
master.
See
Configuring “Turbo Ring V2” in the
Configuring “Turbo
Ring” and “Turbo Ring V2”
section below.
Ring Coupling Configuration
For some systems, it may not be convenient to connect all devices in the system to create one BIG redundant
ring, since some devices could be located in a remote area. For these systems, Ring Coupling can be used to
separate the devices into different smaller redundant rings, but in such a way that they can still communicate
with each other.
ATTENTION
In
a VLAN environment, the user must set Redundant Port, Coupling Port, and Coupling Control Port
to
join all VLANs,
since these ports act as the backbone to transmit all packets of different VLANs to different
switches
.
Page 9
Managed Ethernet Switch Redundancy Protocol (UI 2.0) Turbo Ring
2-4
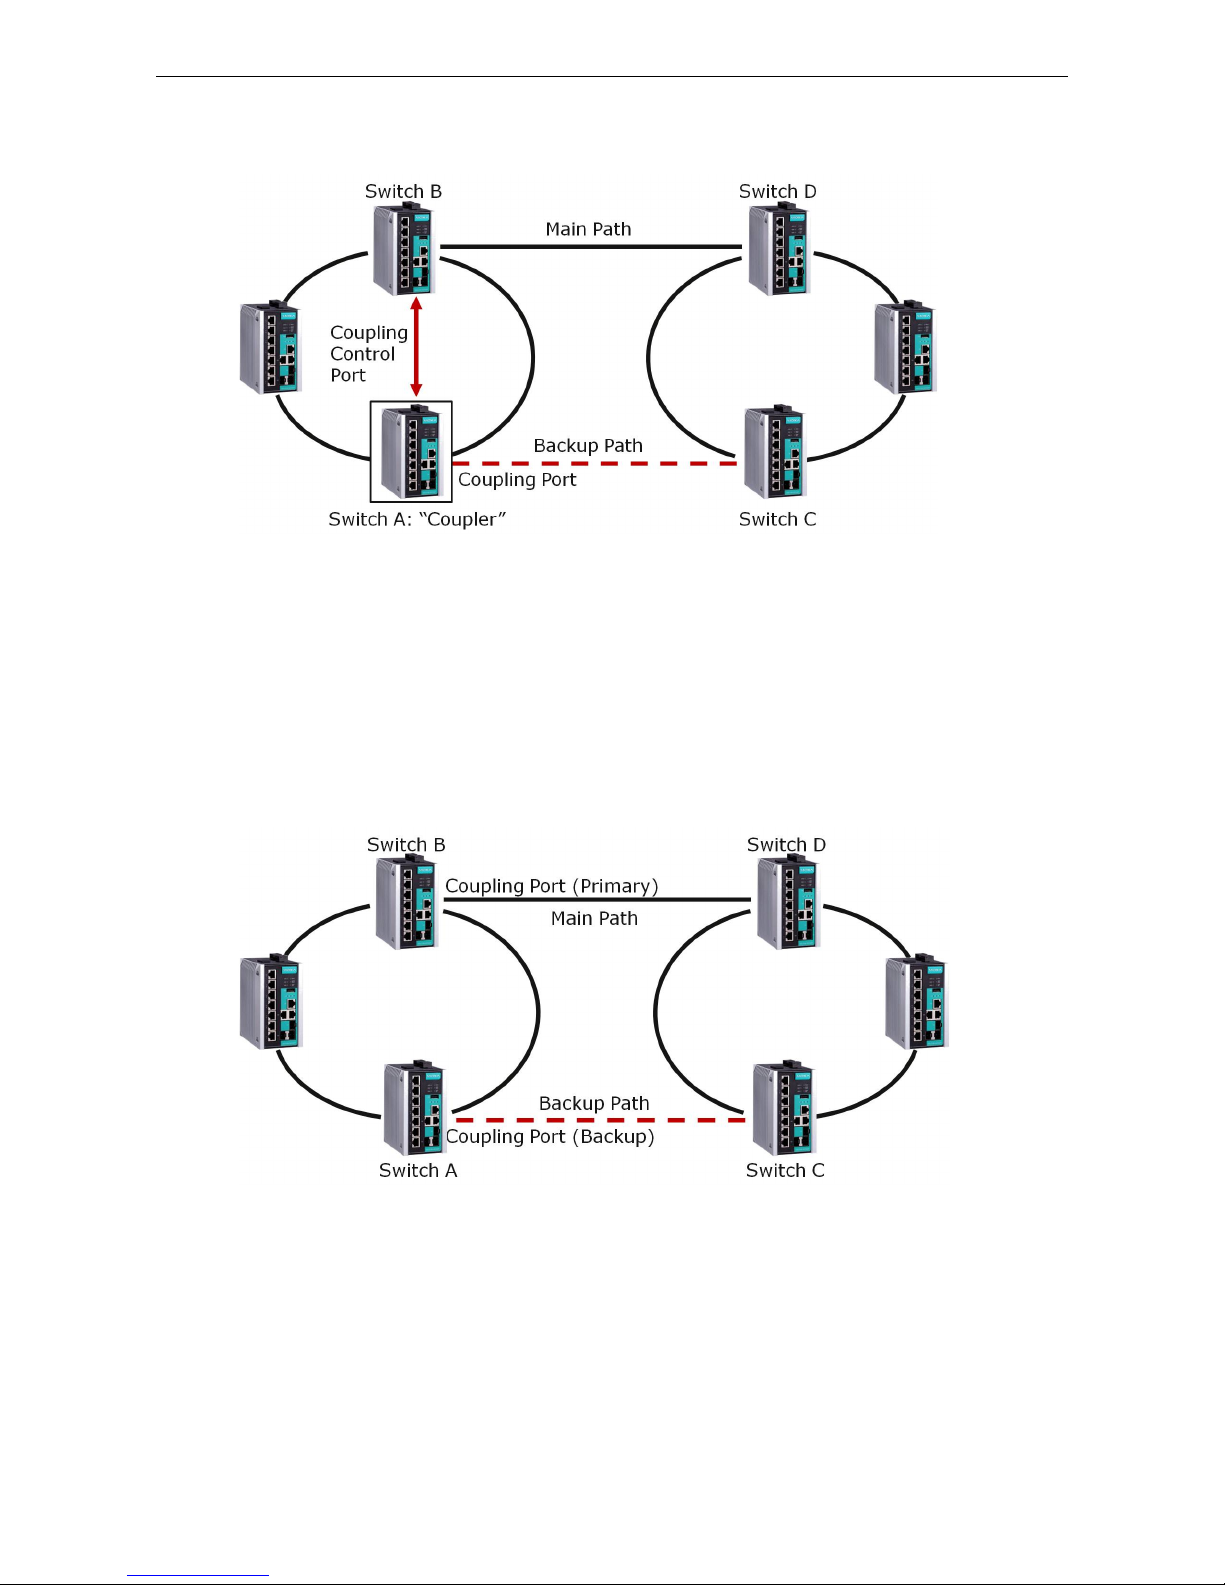
Ring Coupling for a “Turbo Ring” Ring
To configure the Ring Coupling function for a “Turbo Ring” ring, select two switches (e.g., Switch A and B in the
above figure) in the ring, and another two switches in the adjacent ring (e.g., Switch C and D). Decide which
two ports in each switch are appropriate to be used as coupling ports, and then link them together. Next, assign
one switch (e.g., Switch A) to be the coupler and connect the coupler’s coupling control port with Switch B (for
this example).
The coupler switch (i.e., Switch A) will monitor Switch B through the coupling control port to determine whether
or not the coupling port’s backup path should be recovered.
Ring Coupling for a “Turbo Ring V2” Ring
Note that the ring coupling settings for a “Turbo Ring V2” ring are different from a “Turbo Ring” ring. For Turbo
Ring V2, Ring Coupling is enabled by configuring the Coupling Port (Primary) on Switch B, and the Coupling
Port (Backup) on Switch A only. You do not need to set up a coupling control port, so that a “Turbo Ring V2”
ring does not use a coupling control line.
The Coupling Port (Backup) on Switch A is used for the backup path, and connects directly to an extra
network port on Switch C. The Coupling Port (Primary) on Switch B monitors the status of the main path,
and connects directly to an extra network port on Switch D. With ring coupling established, Switch A can
activate the backup path as soon as it detects a problem with the main path.
Page 10
Managed Ethernet Switch Redundancy Protocol (UI 2.0) Turbo Ring
2-5
ATTENTION
Ring Coupling only needs to be enabled on one of the switches serving as the Ring Coupler. The Coupler must
designate different ports as the two Turbo Ring ports and the coupling port.
NOTE
You do not need to use the same
switch for both Ring Coupling and Ring Master.
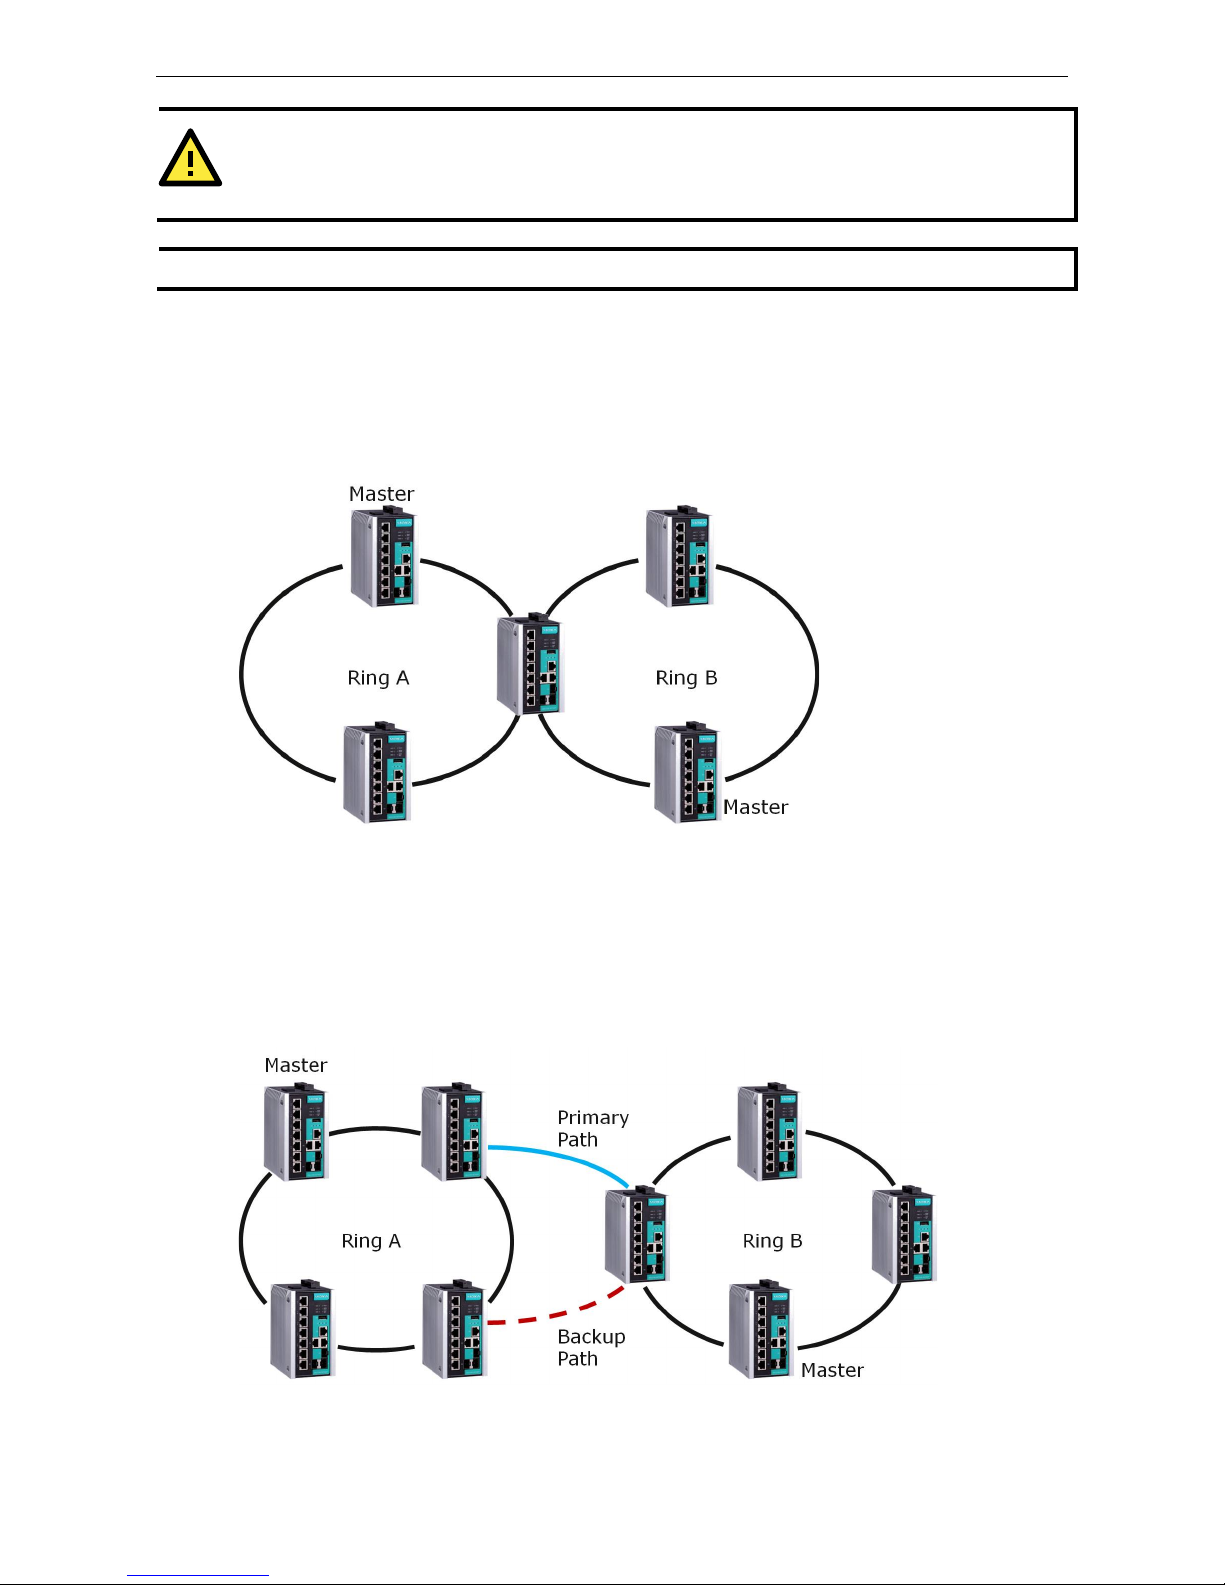
Dual-Ring Configuration (applies only to “Turbo Ring V2”)
The dual-ring option provides another ring coupling configuration, in which two adjacent rings share one
switch. This type of configuration is ideal for applications that have inherent cabling difficulties.
Dual-Ring for a “Turbo Ring V2” Ring
Dual-Homing Configuration (applies only to “Turbo Ring V2”)
The dual-homing option uses a single Ethernet switch to connect two networks. The primary path is the
operating connection, and the backup path is a back-up connection that is activated in the event that the
primary path connection fails.
Dual-Homing for a “Turbo Ring V2” Ring
Page 11
Managed Ethernet Switch Redundancy Protocol (UI 2.0) Turbo Ring
2-6
Configuring “Turbo Ring” and “Turbo Ring V2”
Use the scrollbar at the top of the Redundancy Protocol page to select Turbo Ring, Turbo Ring V2, Turbo
Chain, RSTP, or MSTP. Note that the configuration pages for these five protocols are different.
Protocol
Setting Description Factory Default
Turbo Ring Select this item to change to the Turbo Ring configuration page. None
Turbo Ring V2 Select this item to change to the Turbo Ring V2 configuration
page.
Turbo Chain Select this item to change to the Turbo Chain configuration
page.
RSTP (IEEE
802.1D-2004)
Select this item to change to the RSTP configuration page.
MSTP (IEEE 802.1s) Select this item to change to the MSTP configuration page.
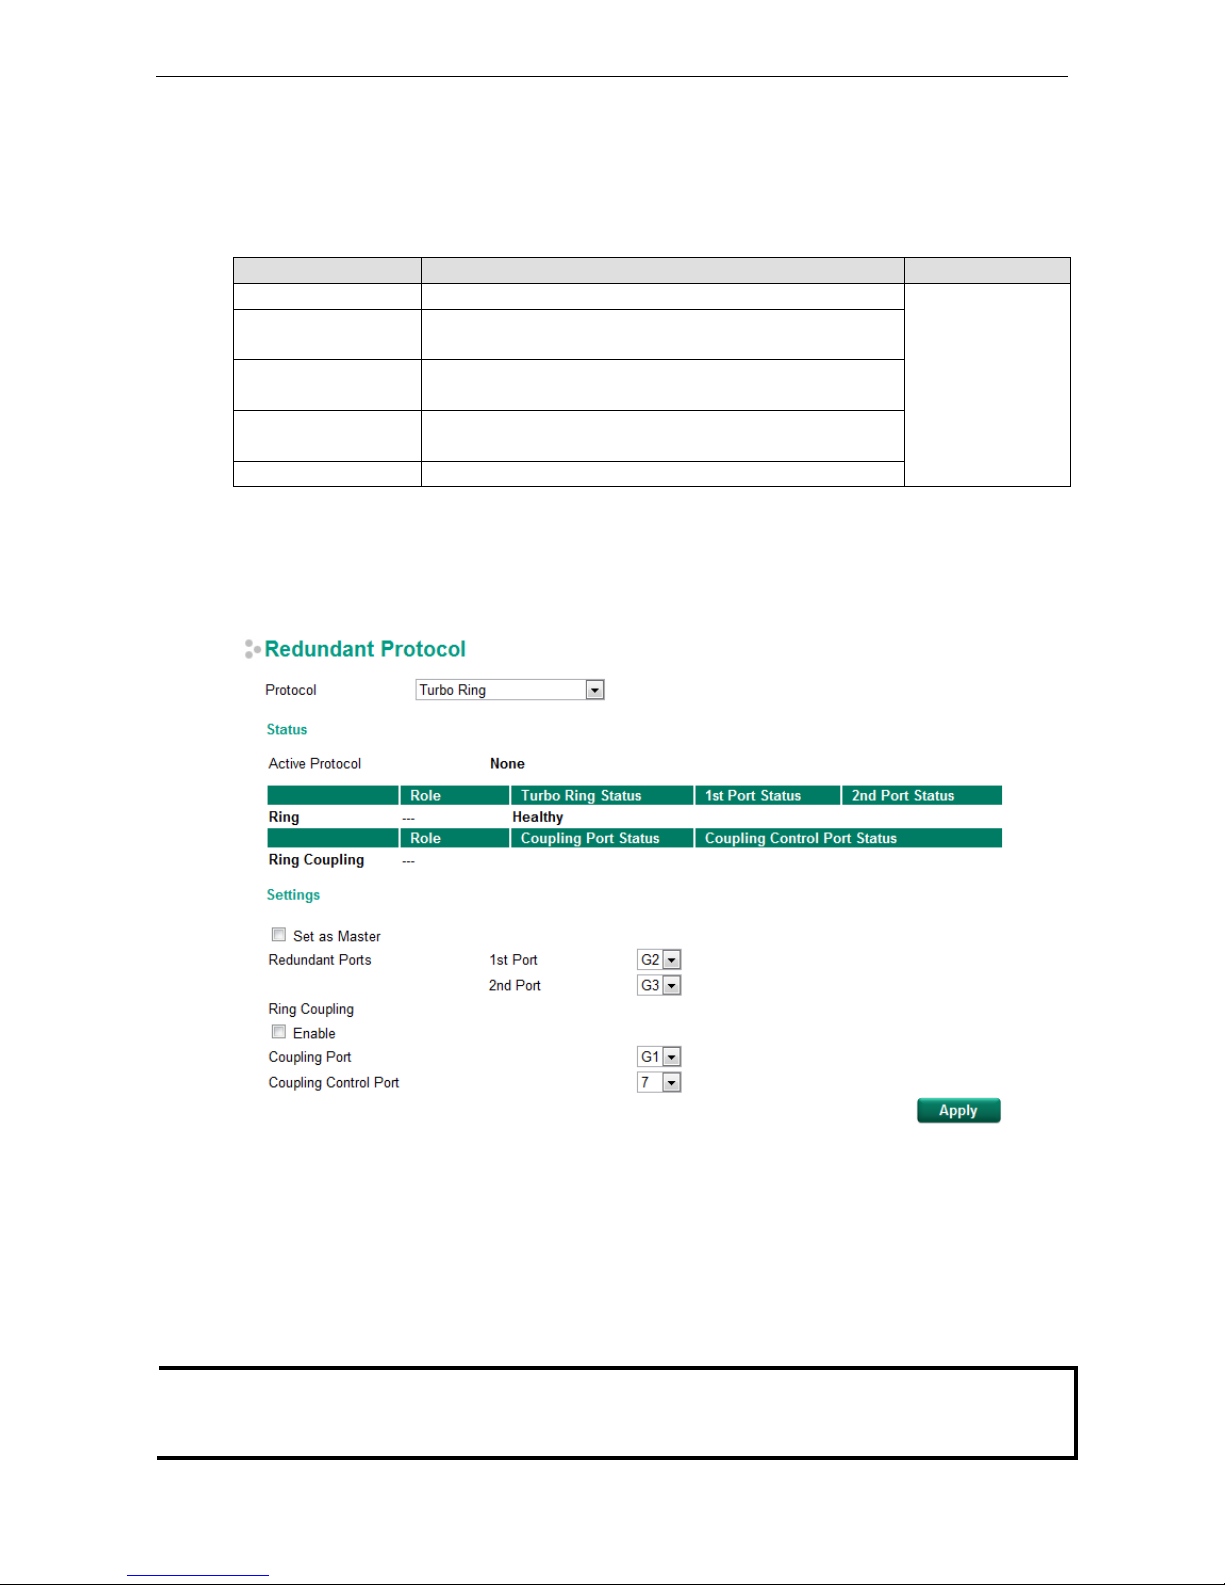
Configuring “Turbo Ring”
The following figure indicates which Turbo Ring parameters can be configured. A more detailed explanation of
each parameter follows.
Explanation of “Status” Items
Active Protocol
Shows which redundancy protocol is in use: Turbo Ring, Turbo Ring V2, Turbo Chain, RSTP, MSTP or
None.
Ring: Role
Indicates whether or not this switch is the Master or Slave of the Turbo Ring.
NOTE
The user does not need to set the master to use Turbo Ring. If master is
not
set, the Turbo Ring protocol will
assign master status to one of the
switches
in the ring. The master is only used to determine which segment
serves as the backup path.
Page 12

Managed Ethernet Switch Redundancy Protocol (UI 2.0) Turbo Ring
2-7
Ring: Turbo Ring Status
Shows Healthy if the ring is operating normally, and shows Break if the ring’s backup link is active.
Ring: 1st Port Status / Ring: 2nd Port Status
The “Ports Status” indicators show Forwarding for normal transmission, Blocking if this port is connected to
a backup path and the path is blocked, and Link down if there is no connection.
Ring Coupling: Role
Indicates whether or not this switch is assigned as coupler.
Ring Coupling: Coupling Port Status
Ring Coupling: Coupling Control Port Status
The “Ports Status” indicators show Forwarding for normal transmission, Blocking if this port is connected to
a backup path and the path is blocked, and Link down if there is no connection.
Explanation of “Settings” Items
Set as Master
Setting Description Factory Default
Enabled
Select this switch as Master
Not checked
Disabled Do not select this switch as Master
Redundant Ports
Setting Description Factory Default
1st Port Select any port of the switch to be one of the redundant ports. Port G2
2nd Port Select any port of the switch to be one of the redundant ports. Port G3
Ring Coupling: Enable
Setting Description Factory Default
Enable Select this switch as Coupler Not checked
Disable Do not select this switch as Coupler
Ring Coupling: Coupling Port
Setting Description Factory Default
Coupling Port Select any port of this switch to be the coupling port Port G1
Ring Coupling: Coupling Control Port
Setting Description Factory Default
Coupling Control Port Select any port of this switch to be the coupling control port Port 7
Page 13

Managed Ethernet Switch Redundancy Protocol (UI 2.0) Turbo Ring
2-8
Configuring “Turbo Ring V2”
The following figure indicates which Turbo Ring V2 parameters can be configured. A more detailed explanation
of each parameter follows.
NOTE
When using the Dual
-Ring architecture, you
must configure settings for both Ring 1 and Ring 2. In this case, the
status of both rings will appear under “Status.”
Explanation of “Status” Items
Active Protocol
Shows which redundancy protocol is in use: Turbo Ring, Turbo Ring V2, Turbo Chain, RSTP, MSTP or
None.
Ring 1/2: Role
Indicates whether or not this switch is the Master or Slave of the Turbo Ring. (When using the Dual-Ring
architecture and this switch is selected to operate on both rings, you must configure settings for both Ring 1
and Ring 2 at this switch. In this case, the status of both rings will appear under “Status.”)
NOTE
The user does not need to set the master to use Turbo Ring. If master is
not
set, the Turbo Ring protocol will
assign master status to one of the
switches
in the ring. The master is only used to determine which segment
serves as the backup path.
Ring 1/2: Turbo Ring Status
Shows Healthy if the ring is operating normally, and shows Break if the ring’s backup link is active.
Page 14

Managed Ethernet Switch Redundancy Protocol (UI 2.0) Turbo Ring
2-9
Ring 1/2: 1st Port Status / Ring 1/2: 2nd Port Status
The “Ports Status” indicators show Forwarding for normal transmission, Blocking if this port is connected to
a backup path and the path is blocked, and Link down if there is no connection.
Ring Coupling: Role
Indicates None, Dual Homing, or Ring Coupling.
Ring Coupling: Primary Port
The “Primary Port” indicators show Forwarding for normal transmission, and Link down if there is no
connection.
Ring Coupling: Backup Port Status
The “Backup Port Status” indicators show Forwarding, Blocking, or Link down.
Explanation of “Settings” Items
Ring 1
Setting Description Factory Default
Enabled Enable the Ring 1 settings checked
Disabled Disable the Ring 1 settings
Ring 2*
Setting Description Factory Default
Enabled Enable the Ring 2 settings Not checked
Disabled Disable the Ring 2 settings
NOTE
You should enable both Ring 1 and Ring 2
when the switch interconnects between Ring 1 and Ring 2 in the
Dual
-Ring architecture.
Set as Master (Ring 1/2)
Setting Description Factory Default
Enabled Select this switch as Master Not checked
Disabled Do not select this switch as Master
Redundant Ports (Ring 1/2)
Setting Description Factory Default
1st Port Select any port of this switch to be one of the redundant ports. Ring 1: G2
Ring 2: G1
2nd Port Select any port of this switch to be one of the redundant ports. Ring 1: G3
Ring 2: 7
Ring Coupling: Enable
Setting Description Factory Default
Enable Select this switch as Coupler
Not checked
Disable Do not select this switch as Coupler
Ring Coupling: Coupling Mode
Setting Description Factory Default
Dual Homing Select this item to change to the Dual Homing configuration
page
Primary port: 1
Backup port: 2
Ring Coupling
(backup)
Select this item to change to the Ring Coupling (backup)
configuration page
Port 1
Ring Coupling
(primary)
Select this item to change to the Ring Coupling (primary)
configuration page
Port 1
Page 15

Managed Ethernet Switch Redundancy Protocol (UI 2.0) Turbo Ring
2-10
NOTE
The Turbo Ring DIP Switches located on the
outer casing of the EDS E series switches
can be used to configure
switch
Turbo Ring protocols (Turbo Ring or Turbo Ring V2).
If the
Turbo Ring DIP Switch is enabled from any access interface (web-based UI, console, or Telnet)
, and
the 4
th
DIP Switch on the switch outer casing is set to ON, the Redundancy
Protocol will be set automatically to
the
Turbo Ring protocol based on the version configured in the Turbo Ring DIP Switch page, and the
corresponding Redundant Ports, Coupling Ports
, and Coupling Control Port will be fixed to the
assigned factory
default port number automatically.
In this case, you will not be able to use the web-
based UI, console, or Telnet
i
nterface to change the status of the DIP Switch and all settings in the Redundancy Protocol page will not
be
allow
ed to be configured, as shown in the following figure:
In addition
, those default Redundant Ports, Coupling Ports, and Coupling Control Port will be added
automatically to all VLANs (i.e.
, to act as “Trunk Ports”) if you set the 4th DIP Switch to the “ON”
position when
the Turbo Ring DIP Switch is enabled. Once you flip the 4th DIP Switch back from
ON to OFF
when the Turbo
Ring DIP Switch is e
nabled, such default Redundant Ports, Coupling Ports,
and Coupling Control Port that were
added to all VLANs will be restored to their previous software settings.
NOTE
If you would like to enable VLAN and/or port trunking on any of the last four ports, do not use the fourth DIP
switch to activate Turbo Ring. In this case, you should use the Web, Telnet, or Serial console to activate Turbo
Ring.
NOTE
Turbo Ring V2 or Turbo Chain is one function of V
-ON technology that
should be enabled in layer 2 and layer 3
switches. For
a detailed introduction, please refer to Chapter 5, V-ON.
Page 16

3
3. Turbo Chain
The following topics are covered in this chapter:
The Turbo Chain Concept
Setting Up Turbo Chain
Configuring “Turbo Chain”
Head Switch Configuration
Member Switch Configuration
Tail Switch Configuration
Page 17

Managed Ethernet Switch Redundancy Protocol (UI 2.0) Turbo Chain
3-2
The Turbo Chain Concept
Moxa’s Turbo Chain is an advanced software technology that gives network administrators the flexibility of
constructing any type of redundant network topology. When using the “chain” concept, you first connect the
Ethernet switches in a chain and then simply link the two ends of the chain to an Ethernet network, as
illustrated in the following figure.
Turbo Chain can be used on industrial networks that have a complex topology. If the industrial network uses a
multi-ring architecture, Turbo Chain can be used to create flexible and scalable topologies with a fast
media-recovery time.
Setting Up Turbo Chain
1. Select the Head switch, Tail switch, and Member switches.
2. Configure one port as the Head port and one port as the Member port in the Head switch, configure one port
as the Tail port and one port as the Member port in the Tail switch, and configure two ports as Member ports
in each of the Member switches.
3. Connect the Head switch, Tail switch, and Member switches as shown in the above diagram.
The path connecting to the Head port is the main path, and the path connecting to the Tail port is the backup
path of the Turbo Chain. Under normal conditions, packets are transmitted through the Head Port to the LAN
network. If any Turbo Chain path is disconnected, the Tail Port will be activated so that packet transmission can
continue.
Configuring “Turbo Chain”
Use the scrollbar at the top of the Redundancy Protocol page to select Turbo Ring, Turbo Ring V2, Turbo
Chain, RSTP, or MSTP. Note that the configuration pages for these five protocols are different.
Protocol
Setting Description Factory Default
Turbo Ring Select this item to change to the Turbo Ring configuration page.
None
Turbo Ring V2
Select this item to change to the Turbo Ring V2 configuration
page.
Turbo Chain Select this item to change to the Turbo Chain configuration page.
RSTP (IEEE
802.1D-2004)
Select this item to change to the RSTP configuration page.
MSTP (IEEE 802.1s) Select this item to change to the MSTP configuration page.
Page 18

Managed Ethernet Switch Redundancy Protocol (UI 2.0) Turbo Chain
3-3
The following figures indicate which Turbo Chain parameters can be configured. A more detailed explanation of
each parameter follows.
Head Switch Configuration
Member Switch Configuration
Tail Switch Configuration
Page 19

Managed Ethernet Switch Redundancy Protocol (UI 2.0) Turbo Chain
3-4
Explanation of “Status” Items
Active Protocol
Shows which redundancy protocol is in use: Turbo Ring, Turbo Ring V2, Turbo Chain, RSTP, MSTP or
None.
Port
Shows which ports have been assigned for redundancy protocol usage.
Port Role
Shows the role that has been assigned to any specific redundancy port: Head, Member, or Tail.
Port Status
The “Ports Status” indicators show Forwarding for normal transmission, Blocked if this port is connected to
the Tail port as a backup path and the path is blocked, and Link down if there is no connection.
Explanation of “Settings” Items
Role
Setting Description Factory Default
Head Select this switch as Head Switch
Member
Member Select this switch as Member Switch
Tail Select this switch as Tail Switch
Head Role
Setting Description Factory Default
Head Port Select any port of this switch to be the head port. G2
Member Port Select any port of this switch to be the member port. G3
Member Role
Setting Description Factory Default
1st Member port Select any port of this switch to be the 1st member port G2
2nd Member port Select any port of this switch to be the 2nd member port G3
Tail Role
Setting Description Factory Default
Tail Port Select any port of this siwtch to be the tail port. G2
Member Port Select any port of this switch to be the member port. G3
NOTE
Turbo Ring V2 or Turbo Chain is one function of V
-ON technology that
should be enabled in layer 2 and layer 3
switches. For
a detailed introduction, please refer to Chapter 5, V-ON.
Page 20

4
4. STP/RSTP/MSTP
The following topics are covered in this chapter:
The STP/RSTP/MSTP Concept
What is STP?
How STP Works
Differences between STP, RSTP, and MSTP
STP Example
Using STP on a Network with Multiple VLANs
Configuring STP/RSTP
Configuring MSTP
Configuration Limits of STP/RSTP
Page 21

Managed Ethernet Switch Redundancy Protocol (UI 2.0) STP/RSTP/MSTP
4-2
The STP/RSTP/MSTP Concept
Spanning Tree Protocol (STP) was designed to help reduce link failures on a network, and provide an automatic
means of avoiding loops. This is particularly important for networks that have a complicated architecture, since
unintended loops in the network can cause broadcast storms. Moxa switches’ STP feature is disabled by default.
To be completely effective, you must enable RSTP/STP on every Moxa switch connected to your network.
Rapid Spanning Tree Protocol (RSTP) implements the Spanning Tree Algorithm and Protocol defined by IEEE
802.1D-2004. RSTP provides the following benefits:
• The topology of a bridged network will be determined much more quickly compared to STP.
• RSTP is backwards compatible with STP, making it relatively easy to deploy. For example:
Defaults to sending 802.1D style BPDUs if packets with this format are received.
STP (802.1D) and RSTP (802.1w) can operate on different ports of the same switch, which is particularly
helpful when switch ports connect to older equipment such as legacy switches.
You get essentially the same functionality with RSTP and STP. To see how the two systems differ, see the
Differences between STP, RSTP, and MSTP section in this chapter.
NOTE
The STP protocol is part of the IEEE Std 802.1D,
2004
Edition bridge specification. The following explanation
uses
“bridge” instead of “switch.”
What is STP?
STP (802.1D) is a bridge-based system that is used to implement parallel paths for network traffic. STP uses a
loop-detection process to:
• Locate and then disable less efficient paths (i.e., paths that have a lower bandwidth).
• Enable one of the less efficient paths if a more efficient path fails.
The figure below shows a network made up of three LANs separated by three bridges. Each segment uses at
most two paths to communicate with the other segments. Since this configuration can give rise to loops, the
network will overload if STP is NOT enabled.
If STP is enabled, it will detect duplicate paths and prevent, or block, one of the paths from forwarding traffic.
In the following example, STP determined that traffic from LAN segment 2 to LAN segment 1 should flow
through bridges C and A since this path has a greater bandwidth and is therefore more efficient.
Bridge B
Bridge C
LAN 1
LAN 2
LAN 3
Bridge A
Page 22

Managed Ethernet Switch Redundancy Protocol (UI 2.0) STP/RSTP/MSTP
4-3
What happens if a link failure is detected? As shown in next figure, the STP process reconfigures the network
so that traffic from LAN segment 2 flows through bridge B.
STP will determine which path between each bridged segment is most efficient, and then assign a specific
reference point on the network. When the most efficient path has been identified, the other paths are blocked.
In the previous 3 figures, STP first determined that the path through bridge C was the most efficient, and as a
result, blocked the path through bridge B. After the failure of bridge C, STP re-evaluated the situation and
opened the path through Bridge B.
How STP Works
When enabled, STP determines the most appropriate path for traffic through a network. The way it does this is
outlined in the sections below.
STP Requirements
Before STP can configure the network, the system must satisfy the following requirements:
• All bridges must be able to communicate with each other. The communication is carried out using Bridge
Protocol Data Units (BPDUs), which are transmitted in packets with a known multicast address.
• Each bridge must have a Bridge Identifier that specifies which bridge acts as the central reference point, or
Root Bridge, for the STP system—bridges with a lower Bridge Identifier are more likely to be designated as
the Root Bridge. The Bridge Identifier is calculated using the MAC address of the bridge and a priority
defined for the bridge. For example, the default priority setting of Moxa switches is 32768.
• Each port has a cost that specifies the efficiency of each link. The efficiency cost is usually determined by
the bandwidth of the link, with less efficient links assigned a higher cost.
Bridge B
Bridge C
LAN 1
LAN 2
LAN 3
Bridge A
Bridge B
Bridge C
LAN 1
LAN 2
LAN 3
Bridge A
Page 23

Managed Ethernet Switch Redundancy Protocol (UI 2.0) STP/RSTP/MSTP
4-4
STP Calculation
The first step of the STP process is to perform calculations. During this stage, each bridge on the network
transmits BPDUs. The following items will be calculated:
• Which bridge should be the Root Bridge. The Root Bridge is the central reference point from which the
network is configured.
• The Root Path Costs for each bridge. This is the cost of the paths from each bridge to the Root Bridge.
• The identity of each bridge’s Root Port. The Root Port is the port on the bridge that connects to the Root
Bridge via the most efficient path. In other words, the port connected to the Root Bridge via the path with
the lowest Root Path Cost. The Root Bridge, however, does not have a Root Port.
• The identity of the Designated Bridge for each LAN segment. The Designated Bridge is the bridge with the
lowest Root Path Cost from that segment. If several bridges have the same Root Path Cost, the one with the
lowest Bridge Identifier becomes the Designated Bridge. Traffic transmitted in the direction of the Root
Bridge will flow through the Designated Bridge. The port on this bridge that connects to the segment is
called the Designated Bridge Port.
STP Configuration
After all of the bridges on the network agree on the identity of the Root Bridge, and all other relevant
parameters have been established, each bridge is configured to forward traffic only between its Root Port and
the Designated Bridge Ports for the respective network segments. All other ports are blocked, which means
that they will not be allowed to receive or forward traffic.
STP Reconfiguration
Once the network topology has stabilized, each bridge listens for Hello BPDUs transmitted from the Root Bridge
at regular intervals. If a bridge does not receive a Hello BPDU after a certain interval (the Max Age time), the
bridge assumes that the Root Bridge, or a link between itself and the Root Bridge, has ceased to funtion. This
will trigger the bridge to reconfigure the network to account for the change. If you have configured an SNMP
trap destination, the first bridge to detect the change will send out an SNMP trap when the topology of your
network changes.
Differences between STP, RSTP, and MSTP
RSTP is similar to STP, but includes additional information in the BPDUs that allow each bridge to confirm that
it has taken action to prevent loops from forming when it decides to enable a link to a neighboring bridge.
Adjacent bridges connected via point-to-point links will be able to enable a link without waiting to ensure that
all other bridges in the network have had time to react to the change. The main benefit of RSTP is that the
configuration decision is made locally rather than network-wide, allowing RSTP to carry out automatic
configuration and restore a link faster than STP.
STP and RSTP spanning tree protocols operate without regard to a network’s VLAN configuration, and maintain
one common spanning tree throughout a bridged network. Thus, these protocols map one loop-free, logical
topology on a given physical topology. MSTP uses VLANs to create multiple spanning trees in a network, which
significantly improves network resource utilization while maintaining a loop-free environment.
Page 24

Managed Ethernet Switch Redundancy Protocol (UI 2.0) STP/RSTP/MSTP
4-5
STP Example
The LAN shown in the following figure has three segments, with adjacent segments connected using two
possible links. The various STP factors, such as Cost, Root Port, Designated Bridge Port, and Blocked Port are
shown in the figure.
• Bridge A has been selected as the Root Bridge, since it was determined to have the lowest Bridge Identifier
on the network.
• Since Bridge A is the Root Bridge, it is also the Designated Bridge for LAN segment 1. Port 1 on Bridge A is
selected as the Designated Bridge Port for LAN Segment 1.
• Ports 1 of Bridges B, C, X, and Y are all Root Ports since they are nearest to the Root Bridge, and therefore
have the most efficient path.
• Bridges B and X offer the same Root Path Cost for LAN segment 2. However, Bridge B was selected as the
Designated Bridge for that segment since it has a lower Bridge Identifier. Port 2 on Bridge B is selected as
the Designated Bridge Port for LAN Segment 2.
• Bridge C is the Designated Bridge for LAN segment 3, because it has the lowest Root Path Cost for LAN
Segment 3:
The route through bridges C and B costs 200 (C to B=100, B to A=100)
The route through bridges Y and B costs 300 (Y to B=200, B to A=100)
• The Designated Bridge Port for LAN Segment 3 is port 2 on bridge C.
Page 25

Managed Ethernet Switch Redundancy Protocol (UI 2.0) STP/RSTP/MSTP
4-6
Using STP on a Network with Multiple VLANs
IEEE Std 802.1D, 1998 Edition, does not take into account VLANs when calculating STP information—the
calculations only depend on the physical connections. Consequently, some network configurations will result in
VLANs being subdivided into a number of isolated sections by the STP system. You must ensure that every
VLAN configuration on your network takes into account the expected STP topology and alternative topologies
that may result from link failures.
The following figure shows an example of a network that contains VLANs 1 and 2. The VLANs are connected
using the 802.1Q-tagged link between switch B and Switch C. By default, this link has a port cost of 100 and
is automatically blocked because the other switch-to-switch connections have a port cost of 36 (18+18). This
means that both VLANs are now subdivided—VLAN 1 on switches A and B cannot communicate with VLAN 1 on
switch C, and VLAN 2 on switches A and C cannot communicate with VLAN 2 on switch B.
To avoid subdividing VLANs, all inter-switch connections should be made members of all available 802.1Q
VLANs. This will ensure connectivity at all times. For example, the connections between switches A and B, and
between switches A and C, should be 802.1Q tagged and carrying VLANs 1 and 2 to ensure connectivity.
Configuring STP/RSTP
Use the scrolling bar at the top of the Redundancy Protocol page to select among Turbo Ring, Turbo Ring V2,
Turbo Chain, RSTP, or MSTP. Note that configuration pages for these five protocols are different.
Protocol
Setting Description Factory Default
Turbo Ring Select this item to change to the Turbo Ring configuration page.
None
Turbo Ring V2
Select this item to change to the Turbo Ring V2 configuration
page.
Turbo Chain Select this item to change to the Turbo Chain configuration page.
RSTP (IEEE
802.1D-2004)
Select this item to change to the RSTP configuration page.
MSTP (IEEE 802.1s) Select this item to change to the MSTP configuration page.
Page 26

Managed Ethernet Switch Redundancy Protocol (UI 2.0) STP/RSTP/MSTP
4-7
The following figure indicates which Spanning Tree Protocol parameters can be configured. A more detailed
explanation of each parameter follows.
Explanation of “Status” Items
Active Protocol
Shows which redundancy protocol is in use: Turbo Ring, Turbo Ring V2, Turbo Chain, RSTP, MSTP, or
None.
Role
This field only appears when RSTP mode is selected. The field indicates whether or not this switch is the Root
of the Spanning Tree (the root is determined automatically).
Explanation of “Settings” Items
Forwarding delay (sec.)
Setting Description Factory Default
Numerical value input
by user
The amount of time this device waits before checking to see if it
should change to a different state.
15
Bridge priority
Setting Description Factory Default
Numerical value
selected by user
Increase this device’s bridge priority by selecting a lower
number. A device with a higher bridge priority has a greater
chance of being established as the root of the Spanning Tree
topology.
32768
Hello time (sec.)
Setting Description Factory Default
Numerical value input
by user
The root of the Spanning Tree topology periodically sends out a
“hello” message to other devices on the network to check if the
topology is healthy. The “hello time” is the amount of time the
root waits between sending hello messages.
2
Page 27

Managed Ethernet Switch Redundancy Protocol (UI 2.0) STP/RSTP/MSTP
4-8
Max. Age (sec.)
Setting Description Factory Default
Numerical value input
by user
If this device is not the root, and it has not received a hello
message from the root in an amount of time equal to “Max.
Age,” then this device
will reconfigure itself as a root. Once two
or more devices on the network are recognized as a root, the
devices will renegotiate a new Spanning Tree topology.
20
Enable STP per Port
Setting Description Factory Default
Enable/Disable
Select to enable the port as a node on the Spanning Tree
topology.
Disabled
NOTE
We suggest not enabling the Spanning Tree Protocol once the port is connected to a device (PLC, RTU, etc.) as
opposed to network equipment. The reason is that it will cause unnecessary
negotiation.
Edge (Firmware before V5.0)
Setting Description Factory Default
Auto 1.
If the port does not receive a BPDU within 3 seconds,
the port will be in the forwarding state.
2. Once the port receives a BPDU, it will start the RSTP
negotiation process.
Auto
Force Edge The port is fixed as an edge port and will always be in the
forwarding state
False The port is set as the normal RSTP port
Edge (Firmware V5.0 or later)
Setting Description Factory Default
Auto 1. If the port does not receive a BPDU
within 3 seconds,
the port will be in the forwarding state
2. Once the port receives a BPDU, it will start the RSTP
negotiation process
Auto
True 1. The port is an edge port
2. Once the port receives a BPDU, it will start the RSTP
negotiation process
False The port is set as the normal RSTP port
Priority
Setting Description Factory Default
Numerical value
selected by user
Increase this port’s priority as a node on the Spanning Tree
topology by entering a lower number.
128
Cost
Setting Description Factory Default
Numerical value input
by user
Input a higher cost to indicate that this port is less suitable as a
node for the Spanning Tree topology.
200000
Status
Indicates the current Spanning Tree status of this port. Forwarding for normal transmission, Blocking for
block transmission, or Link down for no connection.
Page 28

Managed Ethernet Switch Redundancy Protocol (UI 2.0) STP/RSTP/MSTP
4-9
Configuring MSTP
Use the scrollbar at the top of the Redundancy Protocol page to select Turbo Ring, Turbo Ring V2, Turbo
Chain, RSTP, or MSTP. Note that configuration pages for these five protocols are different.
Protocol
Setting Description Factory Default
Turbo Ring Select this item to change to the Turbo Ring configuration page.
None
Turbo Ring V2
Select this item to change to the Turbo Ring V2 configuration
page.
Turbo Chain Select this item to change to the Turbo Chain configuration page.
RSTP (IEEE
802.1D-2004)
Select this item to change to the RSTP configuration page.
MSTP (IEEE 802.1s) Select this item to change to the MSTP configuration page.
The following figure indicates which Multiple Spanning Tree Protocol parameters can be configured. A more
detailed explanation of each parameter follows.
Explanation of “Status” Items
Status
Indicates the Root bridge of the Spanning Tree.
Explanation of “Global Settings” Items
Forwarding Delay (sec.)
Setting
Description
Factory Default
Numerical value input by user
(4-30)
The amount of time this device waits before checking
to see if it should change to a different state.
15
Page 29

Managed Ethernet Switch Redundancy Protocol (UI 2.0) STP/RSTP/MSTP
4-10
Hello time (sec.)
Setting Description Factory Default
Numerical value input by user
(1-10)
The root of the Spanning Tree topology periodically
sends out a “hello” message to other devices on the
network to check if the topology is healthy. The “hello
time” is the amount of time the root waits between
sending hello messages.
2
Max Hops
Setting Description Factory Default
Numerical value input by user
(6-40)
The MSTP maximum hops value is the maximum
number of hops in the region.
Configure the maximum
number of hops a BPDU can be forwarded in the MSTP
region.
20
Max. Age (sec.)
Setting Description Factory Default
Numerical value input by user
(6-40)
If this device is not the root, and it has not received a
hello message from the root in an amount of time
equal to “Max. Age,” then this device will reconfigure
itself as a root. Once two or more devices on the
network are recognized as a root, the devices will
renegotiate to set up a new Spanning Tree topology.
20
Revision Level
Setting Description Factory Default
Numerical value input by user
(0-65535)
The MSTP revision level is the revision number of the
configuration. All EDS switches in an MSTP region
must be configured with the same revision level.
0
Region Name
Setting Description Factory Default
Character string The region name helps define the logical boundary of
the network. All EDS switc
hes in an MSTP region must
be configured with the same name.
MSTP
Configuration confirm
Setting Description Factory Default
Enable/Disable Clicking “Apply” button will only save the MSTP
settings temporarily; you can select to enable this
configuration to activate the MSTP settings during the
operation.
Disabled
Explanation of “Instance Settings” Items
Instance ID
Setting Description Factory Default
Numerical value selected by
user
Within each MST region, the MSTP maintains multiple
spanning-tree instances. A common and internal
spanning tree (CIST) is a collection of the following:
ISTs in each MST region, and the common spanning
tree (CST) that interconnects the MST regions, and a
single spanning tree. All other MST instances are
numbered from 1 to 15.
Cist
Page 30

Managed Ethernet Switch Redundancy Protocol (UI 2.0) STP/RSTP/MSTP
4-11
Vlan Mapping
Setting Description Factory Default
Numerical value input by user
(1-4094)
Configure which VLAN ID is mapped to the multiple
spanning-tree instances.
None
Bridge priority
Setting Description Factory Default
Numerical value selected by
user
Increase this device’s bridge priority by selecting a
lower number. A device with a higher bridge priority
has a greater chance of being established as the root
of the Spanning Tree topology.
32768
Enable
Setting Description Factory Default
Enable/Disable Select to enable the port as a node on the Multiple
Spanning Tree topology.
Disabled
Priority
Setting Description Factory Default
Numerical value selected by
user
Increase this port’s priority as a node on the Multiple
Spanning Tree topology by entering a lower number.
128
Cost
Setting Description Factory Default
Numerical value input by user Input a higher cost to indicate that this port is less
suitable as a node for the Multiple Spanning Tree
topology. Use the default value (0) to use port speed
in the auto port cost.
0
Oper Cost
It indicates the cost of the path to the other bridge from this transmitting bridge at the specified port.
Edge
Setting
Description
Factory Default
Enable/Disable Select to enable the port as the edge port for the
Multiple Spanning Tree topology.
Disabled
State
Indicates the current Multiple Spanning Tree status of this port. The “Blocking” status indicates the
transmission is blocked; the “Learning” status indicates the MAC address of the device is being recorded in the
MAC table, and the “Forwarding” status indicates normal transmission.
Role
Indicates the current port role status.
Setting Port Role Status Factory Default
Port Role Backup
Alternate port
Root port
Designated port
Disable
None
Page 31

Managed Ethernet Switch Redundancy Protocol (UI 2.0) STP/RSTP/MSTP
4-12
Configuration Limits of STP/RSTP
The Spanning Tree Algorithm places limits on three of the configuration items described previously:
[Eq. 1]: 1 sec ≦ Hello Time ≦ 10 sec
[Eq. 2]: 6 sec ≦ Max. Age ≦ 40 sec
[Eq. 3]: 4 sec ≦ Forwarding Delay ≦ 30 sec
These three variables are further restricted by the following two inequalities:
[Eq. 4]: 2 x (Hello Time + 1 sec) ≦ Max. Age ≦ 2 x (Forwarding Delay – 1 sec)
Moxa EDS-600’s firmware will alert you immediately if any of these restrictions are violated. For example,
setting
Hello Time = 5 sec, Max. Age = 20 sec, and Forwarding Delay = 4 sec does not violate Eqs. 1 through 3, but
does violate Eq. 4, since in this case,
2 x (Hello Time + 1 sec) = 12 sec, and 2 x (Forwarding Delay – 1 sec) = 6 sec.
You can remedy the situation in many ways. One solution is simply to increase the Forwarding Delay value to
at least 11 sec.
HINT: Perform the following steps to avoid guessing:
Step 1: Assign a value to Hello Time and then calculate the left most part of Eq. 4 to get the lower limit of Max.
Age.
Step 2: Assign a value to Forwarding Delay and then calculate the right most part of Eq. 4 to get the upper
limit for Max. Age.
Step 3: Assign a value to Forwarding Delay that satisfies the conditions.
Page 32

5
5. V-ON
The following topics are covered in this chapter:
The V-ON Concept
V-ON Topology
Overall Network Fast Recovery
Local Network Fast Recovery
Instructions for Setting Up V-ON
Page 33

Managed Ethernet Switch Redundancy Protocol (UI 2.0) V-ON
5-2
The V-ON Concept
Moxa’s V-ON (Video-Always-ON) technology is a solution to make networks more reliable. If there is a
communication error on a network, V-ON can help ensure downtime is effectively eliminated. V-ON can
guarantee the following recovery times:
• Layer 2 unicast and multicast communication under 50 ms
• Layer 3 unicast and multicast communication under 300 ms
Unlike general redundancy technologies, such as RSTP, which redirect communications from a broken path to
a redundant path, V-ON can guarantee both layer 2 unicast fast recover and also the fast recovery of overall
communications on layer 2 multicast and layer 3 unicast/multicast networks. Moxa’s V-ON technology can be
utilized across many applications such as video surveillance systems and PLC networks.
For example, video surveillance is very important as it is deployed to enhance public safety and secure property.
In emergencies, it is not acceptable for a very important surveillance system to experience downtime. For
applications where video loss is not acceptable, Moxa’s V-ON technology can recover across subnet
communications within 300 ms, which overcomes the previous limitations of long recovery times on multicast
networks.
In fact, Moxa’s V-ON technology can be implemented for any multicast application. For example, the implicit
multicast communication for PLCs can recover from unexpected problems within 50 ms on a layer 2 network.
Therefore, it reduces downtime and improves the overall equipment effectiveness for mission-critical
applications.
NOTE
Layer 2 communication means the packet
is transmitted to the destination without routing. Layer 3
communication means the packet
is transmitted to the destination with routing.
Why V-ON Technology
Traditional Network Network using Moxa’s V-ON Solution
The figure above shows a traditional network with
standard RSTP, VRRP, and IGMP protocols for
multicast video stream. However, standard IGMP is
not optimized for multicast video transmission.
Once a network is down, a ring transmission path
changes in a few seconds, but the recovery time of
a multicast transmission path may be up to 125
seconds. This is not an acceptable recovery time
for many mission-critical applications.
Moxa’s V-ON technology focuses on the
optimization of multicast transmissions. The
figure above shows Moxa’s recommended
ring/chain network with V-ON technology for
multicast video streams. By using Moxa’s V-ON
technology, the recovery time of layer 2 multicast
traffic redundancy is under 50 ms and the
recovery time of layer 3 routing redundancy is
under 300 ms.
Page 34

Managed Ethernet Switch Redundancy Protocol (UI 2.0) V-ON
5-3
V-ON Topology
V-ON can be adapted for use in many applications but can generally be classified into two types:
Overall network fast recovery (layer 2 + layer 3 networks)
• Layer 2 unicast and multicast recovery times of less than 50 ms
• Layer 3 unicast and multicast recovery times of less than 300 ms
Local network fast recovery (pure layer 2 networks)
• Layer 2 unicast and multicast recovery times of less than 50 ms
Overall Network Fast Recovery
For mission-critical applications that include layer 2 and layer 3 networks, the topology should be as below:
Topology 1. Topology 2.
To complete all of V-ON’s settings, the following features should be set properly in all layer 2 and 3 switches.
For all layer 2 and 3 switches:
• Turbo Ring V2/Turbo Chain
• Multicast Fast Forwarding Mode
For layer 3 switches only:
• VRRP Fast Switchover Mode
• Multicast Local Route
For configuration details, please refer to the Instructions for setting up V-ON.
NOTE
To guarantee the performance of V
-ON, please adhere to the following:
•
The topology of your network should be the same as topology 1 or 2 as shown above. (However,
you can
have more than one Turbo Chain in your application and you can have up to 250 nodes in a single chain)
•
Turbo Chain must uplink to Turbo Ring’s layer 2 switch
•
Only one pair of VRRP-enabled layer3 switches are employed
•
It is recommended to use 1G/10G fiber optic cables within the V-ON topology
Page 35

Managed Ethernet Switch Redundancy Protocol (UI 2.0) V-ON
5-4
Local Network Fast Recovery
If a mission-critical application only uses on pure layer 2 networks, V-ON can be used to guarantee the fast
recovery of unicast and multicast transmissions in the layer 2 network. For example, in a simple PLC network
such as the one depicted in the diagram below, the network can achieve recovery times in layer 2 unicast and
multicast networks of less than 50 ms.
Example 1. Example 2.
To complete the settings for V-ON in a pure layer 2 network, the following features should be enabled:
For all layer 2 switches:
• Turbo Ring V2/Turbo Chain
• Multicast Fast Forwarding Mode
NOTE
For pure layer 2 application
s, V-ON does not have any constraints regarding
topology. Any Turbo Ring or Chain
topology can meet the fast recovery performance.
Instructions for Setting Up V-ON
Step 1. Enable Turbo Ring V2 for all switches in the ring - For detailed configurations, please refer to the
Turbo Ring chapter in this manual.
Step 2. Enable Turbo Chain for all switches in the chain - For detailed configurations, please refer to the Turbo
Chain chapter in this manual.
Step 3. Enable Multicast Fast Forwarding Mode for all switches – In the IGMP Snooping Setting page, as
shown below, the IGMP Snooping and the Multicast Fast Forwarding Mode should both be enabled. The
Multicast Fast Forwarding Mode can guarantee the fast recovery of multicast communications when
unexpected communication failures occur.
Page 36

Managed Ethernet Switch Redundancy Protocol (UI 2.0) V-ON
5-5
Enable IGMP Snooping (Global)
Setting Description Factory Default
Enable/Disable Select
the Enable IGMP Snooping checkbox near the top of the
window to enable the IGMP Snooping function globally.
Disabled
Query Interval (sec)
Setting Description Factory Default
Numerical value, input
by the user
Sets the query interval of the Querier function globally. Valid
settings are from 20 to 600 seconds.
125
Enable Multicast Fast Forwarding Mode
Setting Description Factory Default
Enable/Disable Select the Enable Multicast Fast Forwarding Mode checkbox
to
achieve fast multicast forwarding path re-learning while the
ring redundant network is down.
Note: Turbo Ring V2 or Turbo Chain must be enabled.
Disabled
Enable IGMP Snooping
Setting Description Factory Default
Enable/Disable Enables or disables the IGMP Snooping function on that
particular VLAN.
Enabled if IGMP
Snooping is enabled
globally
Querier
Setting Description Factory Default
Disable Disables the querier function of Moxa’s switch. V1/V2
V1/V2 and V3 checkbox V1/V2: Enables the switch to send IGMP snooping
queries that
are compatible in both versions 1 and 2.
V3: Enables the switch to send IGMP snooping version 3
queries
Static Multicast Querier Port
Setting Description Factory Default
Select/Deselect Select the ports that will connect to the multicast routers.
These ports will receive all multicast packets from the source.
This option is only active when IGMP Snooping is enabled.
Disabled
For more details of the IGMP Snooping Settings, please refer to Moxa Managed Ethernet Switch UM.
Page 37

Managed Ethernet Switch Redundancy Protocol (UI 2.0) V-ON
5-6
NOTE
Ports of Turbo Ring's layer 2 switches
that connect to Turbo Chain should be enabled as the static multicast
querier port.
Step 4. Enable VRRP Fast Switchover Mode for two layer 3 switches – In the VRRP Settings page, as shown
below, both VRRP and VRRP Fast Switchover Mode should be enabled. The VRRP Fast Switchover Mode can
guarantee fast recovery on layer 3 communications from unexpected communication failure. For example,
below are four different LANs that enabled the VRRP and VRRP Fast Switchover Mode.
Enable VRRP
Setting Description Factory Default
Enable/Disable Enable or disable VRRP Disable
Advertisement Interval (ms)
Setting Description Factory Default
25 to 1000 Defines the VRRP advertisement interval 1000
Enable VRRP Fast Switchover Mode
Setting Description Factory Default
Enable/Disable
Checkmark Enable VRRP Fast Switchover Mode to achieve fast
VRRP backup router, which will take over the role of master if
the VRRP master is down.
Disabled
VRRP Interface Table
Setting Description Factory Default
VRRP Enable Enable or disable the VRRP entry Disabled
Virtual IP
A L3 switch/router in the same VRRP group must have identical
virtual IP addresses as the other VRRP groups. This virtual IP
address must belong to the
same address range as the real IP
address of the interface.
0.0.0.0
Virtual Router ID Virtual Router ID is used to assign a VRRP group. The L3
switch/router, which operate as master/backup, should have
the same ID. Moxa’s L3 switch/router supports one virtual
router ID for each interface. IDs can range from 1 to 255.
1
Priority
Determines priority in a VRRP group. The priority value range is
1 to 254, with 254 the highest priority. If several L3
switches/routers have the same priority, the router with the
higher IP address will have the higher priority.
100
Preemption Mode
Determines whether or not a backup L3 switch/router will take
over the authority of the master.
Enable
For more details about VRRP Settings, please refer to Layer 3 Routing (UI 2.0) UM.
Page 38

Managed Ethernet Switch Redundancy Protocol (UI 2.0) V-ON
5-7
N
OTE
When enab
ling VRRP Fast Switchover Mode:
•
The maximum number of VRRP Interfaces is 60
•
The Advertisement Interval will be fixed as 25 ms
•
The Preemption Mode will be disabled
•
The Priority of VRRP interfaces will be the same in every layer 3 switch
Step 5. Enable Multicast Local Route for two layer 3 switches - Multicast Local Route is a method of
forwarding traffic to multicast groups based on source and downstream VLAN settings. As shown in the
example below, the multicast stream from VLAN 2 can be forwarded to VLAN 3 and 4; VLAN 3 can be forwarded
to VLAN 4 and 5.
Enable Local Route
Setting Description Factory Default
Enable/Disable Enable Local Route function Disabled
Source VLAN
The VLAN ID that the source multicast stream comes from.
Downstream VLAN
The VLAN ID(s) that the source multicast stream is going to.
Add
Add a new rule for multicast routing.
Delete
Remove the selected rule(s) from the table.
Modify
Modify the contents of the selected rule(s) in the Table.
NOTE
The maximum num
ber of Rules is 16.
The maximum number of Downstream VLAN
s in each Rule is 16.
 Loading...