

Page 1

EOM-G103-PHR-PTP Series Hardware
User’s Manual
Edition 2.0, February 2017
www.moxa.com/product
© 2017 Moxa Inc. All rights reserved.
Page 2

EOM-G103-PHR-PTP Series Hardware
Moxa Americas
Toll
Tel:
Fax:
Moxa China (Shanghai office)
Toll
Tel:
Fax:
Moxa Europe
Tel:
Fax
Moxa Asia
Tel:
Fax:
Moxa India
Tel:
Fax:
User’s Manual
The software described in this manual is furnished under a license agreement and may be used only in accordance with
the terms of that agreement.
Copyright Notice
© 2017 Moxa Inc. All rights reserved.
Trademarks
The MOXA logo is a registered trademark of Moxa Inc.
All other trademarks or registered marks in this manual belong to their respective manufacturers.
Disclaimer
Information in this document is subject to change without notice and does not represent a commitment on the part of
Moxa.
Moxa provides this document as is, without warranty of any kind, e ither expre ssed or impl ied , in cludin g, but not limit ed
to, its particular purpose. Moxa reserves the right to make improvements and/or changes to this manual, or to the
products and/or the programs described in this manual, at any time.
Information provided in this manual is intended to be accurate and reliable. However, Moxa assumes no responsibility for
its use, or for any infringements on the rights of third parties that may result from its use.
This product might include unintentional technical or typographical errors. Changes are periodically made to the
information herein to correct such errors, and these changes are incorporated into new editions of the publication.
Technical Support Contact Information
www.moxa.com/support
-free: 1-888-669-2872
+1-714-528-6777
+1-714-528-6778
+49-89-3 70 03 99-0
: +49-89-3 70 03 99-99
+91-80-4172-9088
+91-80-4132-1045
-free: 800-820-5036
+86-21-5258-9955
+86-21-5258-5505
-Pacific
+886-2-8919-1230
+886-2-8919-1231
Page 3

Table of Contents
1. Introduction ...................................................................................................................................... 1-1
Overview ........................................................................................................................................... 1-2
Package Checklist ............................................................................................................................... 1-2
Product Features ................................................................................................................................ 1-2
EOM-G103-PHR-PTP Hardware Specifications ......................................................................................... 1-3
EOM-G103-PHR-PTP Hardware Block Diagram ........................................................................................ 1-4
Appearance ........................................................................................................................................ 1-4
EOM-G103-PHR-PTP Embedded Module .......................................................................................... 1-4
EOM-G103-PHR-PTP Evaluation Board ............................................................................................ 1-5
Dimensions (unit: mm) ................................................................................................................ 1-5
2. EOM-G103-PHR-PTP Functionality ..................................................................................................... 2-1
EOM-G103-PHR-PTP Embedded Module Functions ................................................................................... 2-2
LAN Ports ................................................................................................................................... 2-2
Console Port ............................................................................................................................... 2-2
GPIO ......................................................................................................................................... 2-2
Pin Assignments ................................................................................................................................. 2-2
Pin assignment table for JP1 (2 x 40) ............................................................................................. 2-3
Pin assignment table for JP2 (2 x 10) ............................................................................................. 2-3
3. EOM-G103-PHR-PTP-ST Functionality ............................................................................................... 3-1
EOM-G103-PHR-PTP-ST Development Board .......................................................................................... 3-2
Combining the EOM-G103-PHR-PTP-ST with the Embedded Module ........................................................... 3-2
LED Indicators .................................................................................................................................... 3-3
Wiring Requirements ........................................................................................................................... 3-4
Connecting the Power ......................................................................................................................... 3-4
LAN Ports and Pin Assignments ............................................................................................................ 3-4
Reset Button ...................................................................................................................................... 3-5
4. PCB Layout and Design Guidelines .................................................................................................... 4-1
General Rules ..................................................................................................................................... 4-2
Power Ground Rules ............................................................................................................................ 4-2
Chassis Ground .................................................................................................................................. 4-2
Magnetic Noise Zone ........................................................................................................................... 4-3
Differential Signa l L ayout ..................................................................................................................... 4-3
USB Signal Layout .............................................................................................................................. 4-3
Heat Sink Requireme n rs ...................................................................................................................... 4-3
Design Guidelines ............................................................................................................................... 4-4
Page 4

1
1. Introduction
Thank you for purchasing the Moxa EOM-G103-PHR-PTP embedded module. The product’s features include
four 10/100 Mbps Ethernet ports and one UART serial port. The EOM-G103-PHR-PTP is ideal as the core module
of an industrial embedded system design.
The EOM-G103-PHR-PTP Evaluation Kit, which is d esigned for system and software program development at
the system evaluation stage, is also available. The kit includes the EOM-G103-PHR-PTP and
EOM-G103-PHR-PTP-ST, which is the carrier board used to evaluate the EOM-G103-PHR-PTP.
In this manual, we introduce the hardware features and functions of the EOM-G103-PHR-PTP embedded
module and the EOM-G103-PHR-PTP Evaluation Kit. After a brief introduction to the hardware features, the
manual focuses on installation and hardware configuration with device interfaces.
The following topics are covered in this chapter:
Overview
Package Checklist
Product Features
EOM-G103-PHR-PTP Hardware Specifications
EOM-G103-PHR-PTP Hardware Block Diagram
Appearance
EOM-G103-PHR-PTP Embedded Module
EOM-G103-PHR-PTP Evaluation Board
Dimensions (unit: mm)
Page 5

EOM-G103-PHR-PTP Series Introduction
1-2
NOTE
Please notify your sales representative if any of the above items ar
Overview
The EOM-G103-PHR-PTP full Gigabit managed redundancy modules are designed for device manufacturers
who would like to embed and integrate the advanced functionality of IEC 62439-3 supported modules. The
EOM-G103-PHR-PTP embedded modules provide enhanced performance and reliability for certain
mission-critical a pplications, but with minimal effort.
IEC 62439-3 Clause 4 (PRP) and IEC 62439-3 Clause 5 (HSR) are the newest standardized redundancy
protocols for industrial automation networks where zero recovery time is needed. PRP and HSR are suit able for
electrical substation au tomation and other mission-critical applications that cannot tolerate any system
downtime.
The EOM-G103-PHR-PTP series modules are complia nt with the latest IEC 62439-3 standards and provide an
easy and cost-effective integrated solution for adding a redundancy module to a non-IEC 62439-3 supported
product. The modules support two IEC 62439-3 Ethernet ports (SGMII (MAC mode) or SERDES (1000Base-X)
interface) for constructing PRP or HSR networks and one standard Ethernet port (SGMII (MAC mode) or
SERDES (1000Base-X) interface) for connecting with standard IEEE 802.3 Ethern et devices. The
EOM-G103-PHR-PTP series also provide an extr a S GMII (MAC mode) or SERDES (1000Base-X) interface for
building up a local access Ethernet console port to easily maintain, contro l, and manage certain devices right
at the local site.
Package Checklist
The EOM-G103-PHR-PTP package includes t he EOM-G103-PHR-PTP embedded module only. The
EOM-G103-PHR-PTP Evaluation Kit is available separately for evaluation purposes. The EOM-G103-PHR-PTP
Evaluation Kit package contains the following items:
• One EOM-G103-PHR-PTP embedded module
• One EOM-G103-PHR-PTP-ST, the carrier board of the EOM-G103-PHR-PTP evaluation kit
• Ethernet cable
• USB-IF cable
• Universal power adapter
• Warranty card
Product Features
The EOM-G103-PHR-PTP embedded module has the following features:
• ARM9 32-bit 192 MHz processor
• On-board 32 MB RAM, 16 MB flash
• Two 10/100/1000Base Ethernet ports for PRP or HSR redundant networks and one 10/100/1000Base
Ethernet port for network switching
• One UART serial port for console control
• Compact size for easy integration at any field site
• Full-function evaluation kit for quick evaluation and application development
e missing or damaged.
Page 6

EOM-G103-PHR-PTP Series Introduction
1-3
Technology
Standards:
IEEE 802.3 for 10BaseT
IEEE 802.3u for 100BaseT(X) and 100BaseFX
IEEE 802.3ab for 1000BaseT(X)
IEEE 802.3z for 1000BaseX
Protocols:
Interface
Ethernet Ports:
Connectors:
Console Port:
GPIO:
Power Requirements
Input Voltage:
Input Current:
Physical Characteristics
Dimensions:
Weight:
Environmental Limits
Operating Temperature:
Note:
Storage Temperature:
Ambient Relative Humid it y:
Standards and Certifications
EMI:
Note: Please check Moxa’s website for the most up
Warranty
Warranty Period:
Details:
EOM-G103-PHR-PTP Hardware Specifications
PRP/HSR
3 10/100/1000Base ports
1 connector with 2 x 40 pins, and 1 connector with 2 x 10 pins
10/100/1000 Mbps Ethernet console port or USB console
3 programmable I/O pins
3.3 V
1.625 W @ 3.3 V
80 x 1.6 x 65 mm (3.15 x 0.06 x 2.56 in)
28.6 g (0.06 lb)
-40 to 60°C (-40 to 140°F)
Products with a a higher operating temperature are available by special request.
-40 to 85°C (-40 to 185°F)
5 to 95% (non-condensing)
FCC Part 15 Subpart B Class A, EN 55032 Class A, CE Class A
-to-date certification status.
5 years
See www.moxa.com/warranty
Page 7
EOM-G103-PHR-PTP Series Introduction
1-4
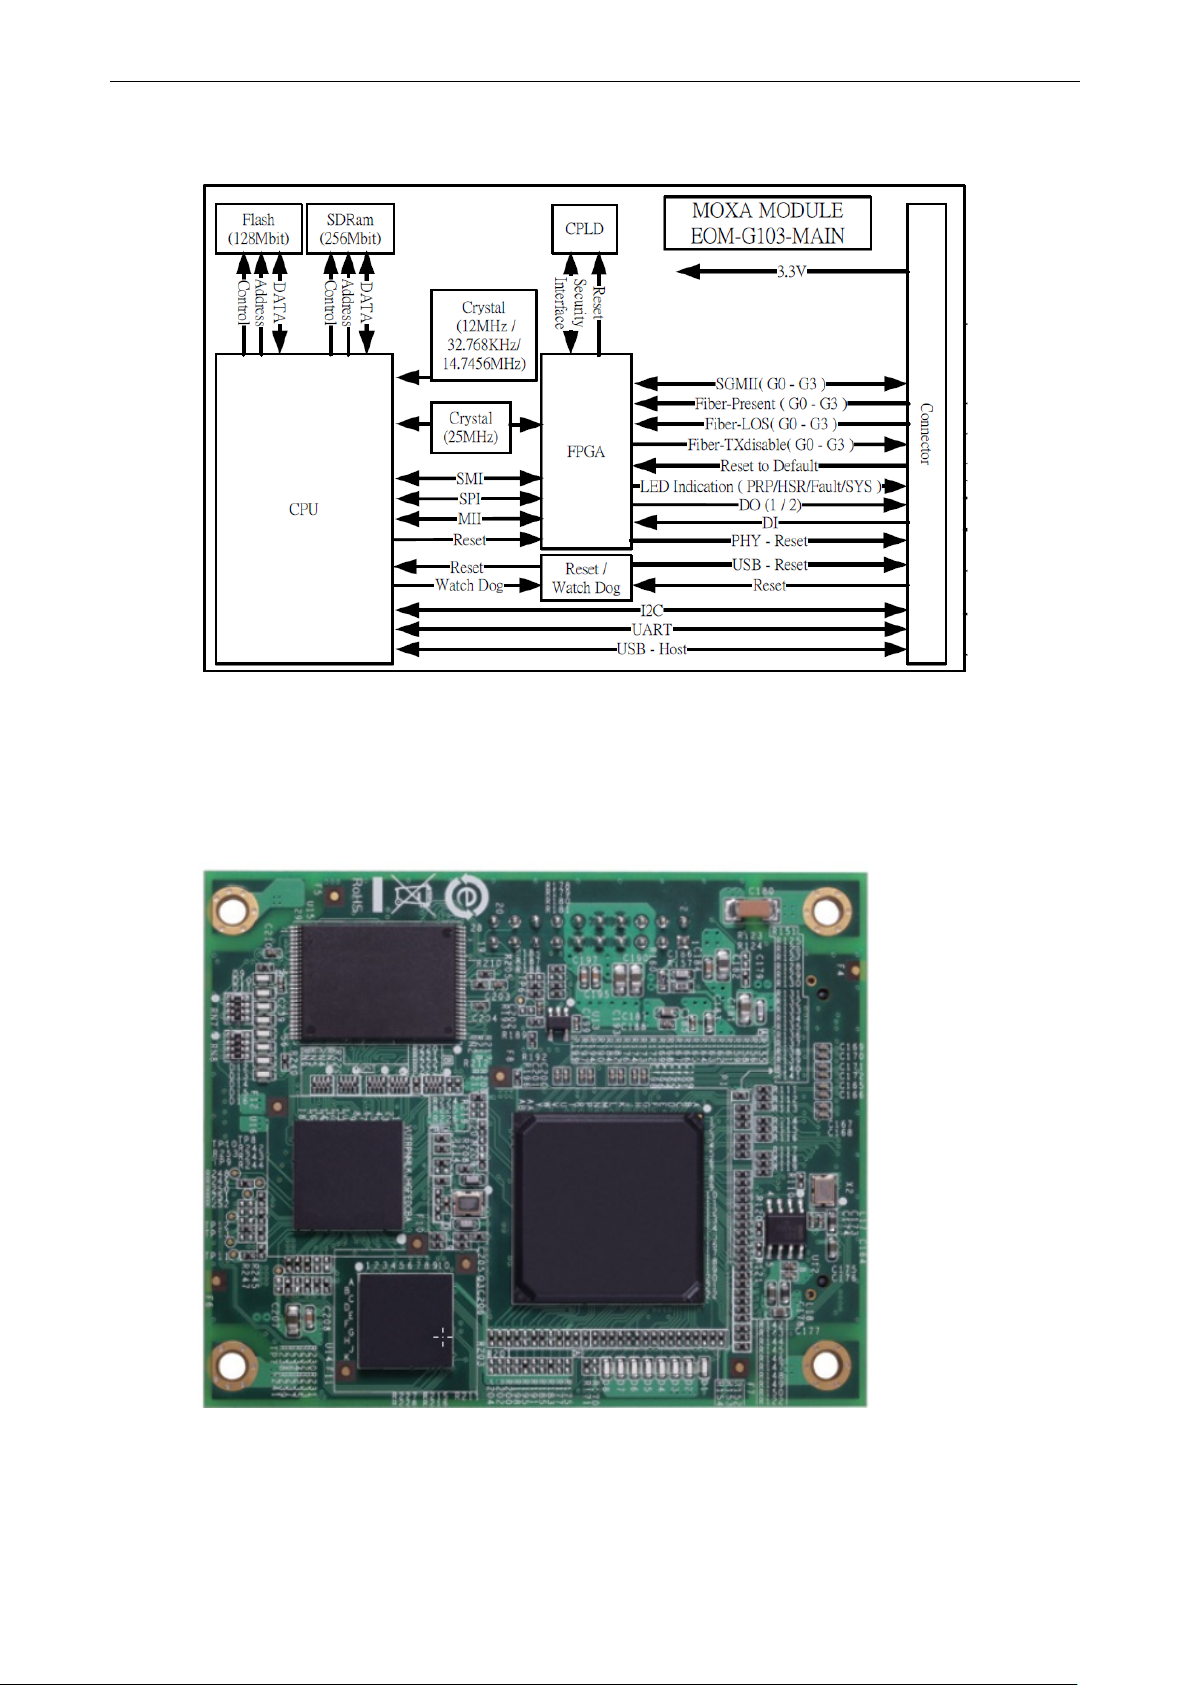
EOM-G103-PHR-PTP Hardware Block Diagram
Appearance
EOM-G103-PHR-PTP Embedded Module
Page 8

EOM-G103-PHR-PTP Series Introduction
1-5
EOM-G103-PHR-PTP Evaluation Board
Dimensions (unit: mm)
Page 9

2
2. EOM-G103-PHR-PTP Functionality
In this chapter, we introduce the basic features of the EOM-G103-PHR-PTP embedded module.
The following topics are covered in this chapter:
EOM-G103-PHR-PTP Embedded Module Functions
LAN Ports
Console Port
GPIO
Pin Assignments
Pin assignment table for JP1 (2 x 40)
Pin assignment table for JP2 (2 x 10)
Page 10

EOM-G103-PHR-PTP Series EOM-G103-PHR-PTP Functionality
2-2
EOM-G103-PHR-PTP Embedded Module Functions
LAN Ports
The EOM-G103-PHR-PTP embedded module has t hree 10/100/1000 Mbps SGMII (MAC mode) / SERDES
(1000Base-X) LAN ports that can be used to set up a redundant PRP/HSR network.
Console Port
The EOM-G103-PHR-PTP embedded module has 1 10/100/1000 Mbps Ethernet console port or USB console
port for onsite configuration.
GPIO
The EOM-G103-PHR-PTP embedded module provides 3 software-selectable GPIOs with one input and two
outputs. The GPIOs give users the ability to design customized functionality.
Pin Assignments
Page 11

EOM-G103-PHR-PTP Series EOM-G103-PHR-PTP Functionality
2-3
Pin assignment table for JP1 (2 x 40)
Pin Signal Pin Signal Pin Signal Pin Signal
1 GND 2 GND 41 PRP_LED 42 DI
3 DTR(UART) 4 DCD(UART) 43 FAULT_LED 44 Reserved
5 RTS(UART) 6 DSR(UART) 45 STAT_R_LED 46 Reserved
7 TXD(UART) 8 CTS(UART) 47 STAT_G_LED 48 Reserved
9 GND 10 RXD(UART) 49 TX_DIS_G3(SFP) 50 GND
11 GXB_RX_P_0(SGMII) 12 GND 51 PRESENT_G3(SFP) 52 Reserved
13 GXB_RX_N_0(SGMII) 14 GXB_TX_P0(SGMII) 53 LOS_G3(SFP) 54 Reserved
15 GND 16 GXB_TX_N0(SGMII) 55 TX_DIS_G2(SFP) 56 GND
17 GXB_RX_P_1(SGMII) 18 GND 57 PRESENT_G2(SFP) 58 SDA-(I2C)
19 GXB_RX_N_1(SGMII) 20 GXB_TX_P1(SGMII) 59 LOS_G2(SFP) 60 SCK-(I2C)
21 GND 22 GXB_TX_N1(SGMII) 61 TX_DIS_G1(SFP) 62 GND
23 GXB_RX_P_2(SGMII) 24 GND 63 PRESENT_G1(SFP) 64 MDIO-PHY(SMI)
25 GXB_RX_N_2(SGMII) 26 GXB_TX_P2(SGMII) 65 LOS_G1(SFP) 66 MDC-PHY(SMI)
27 GND 28 GXB_TX_N2(SGMII) 67 TX_DIS_G0(SFP) 68 GND
29 GXB_RX_P_3(SGMII) 30 GND 69 PRESENT_G0(SFP) 70 Reserved
31 GXB_RX_N_3(SGMII) 32 GXB_TX_P3(SGMII) 71 LOS_G0(SFP) 72 Reserved
33 GND 34 GXB_TX_N3(SGMII) 73 Reserved 74 GND
35 COUP_LED 36 GND 75 Reserved 76 USB-HOST-DP
37 QB_LED 38 DO(1) 77 Reserved 78 USB-HOST-DM
39 HSR_LED 40 DO(0) 79 Reserved 80 GND
Pin assignment table for JP2 (2 x 10)
Pin Signal Pin Signal
1 Reserved 2 Reserved
3 Reserved 4 Reserved
5 Reserved 6 Reserved
7 3.3V 8 3.3V
9 3.3V 10 3.3V
11 3.3V 12 GND
13 GND 14 GND
15 GND 16 GND
17 Reset_PHY 18 Reset
19 Reserved 20 Reset to Default
Page 12

EOM-G103-PHR-PTP Series EOM-G103-PHR-PTP Functionality
2-4
ended input
Signal JP1 pin# Pin Name Pin Type Description
SGMII/SerDes
UART
LED indication
FIBER_TX_DISA
BLE
FIBER_PRESENT
Fiber_LOS
11 GXB_RX_P_0
13 GXB_RX_N_0
14 GXB_TX_P_0
16 GXB_TX_N_0
17 GXB_RX_P_1
19 GXB_RX_N_1
20 GXB_TX_P_1
22 GXB_TX_N_1
23 GXB_RX_P_2
25 GXB_RX_N_2
26 GXB_TX_P_2
28 GXB_TX_N_2
29 GXB_RX_P_3
31 GXB_RX_N_3
32 GXB_TX_P_3
34 GXB_TX_N_3
4 DCD I Data carrier detect. It operate at 3.3V.
7 TXD O Serial output data. It operate at 3.3V.
10 RXD I Serial input data. It operate at 3.3V.
3 DTR O Data terminal ready. It operate at 3.3V.
6 DSR I Data set ready. It operate a t 3.3V.
5 RTS O Request to send. It operate at 3.3V.
8 CTS I Clear to send. It operate at 3.3V.
39 HSR_LED O
41 PRP_LED O
43 FAULT_LED O
45 STAT_R_LED O
47 STAT_G_LED O
67 TX_DIS_G0
61 TX_DIS_G1
55 TX_DIS_G2
49 TX_DIS_G3
69 PRESENT_G0
63 PRESENT_G1
57 PRESENT_G2
51 PRESENT_G3
71 LOS_G0
65 LOS_G1
59 LOS_G2
53 LOS_G3
I Port A.Receive pairs.Differential Input data.
O Port A.Transmit pairs.Differential Output data.
I Port B.Receive pairs.Differential Input data.
O Port B.Transmit pairs.Dif ferential Output data.
I InterLink.Receive pairs.Differential Input data.
O InterLink.Transmit pairs.Differential Output data.
Ethernet cosnsole.Receive pairs.Differential Input
I
data.
O
O
Ethernet cosnsole.Transmit pairs.Differential
Output data.
HSR Mode status LED. Active Low. It op erate at
3.3V.
PRP Mode status LED. Active High. It operate at
3.3V.
Fault indication LED. Active Low.The system is
operating abnormally. It operate at 3.3V.
System information LED. Active Low. The System
has passed self-diagnosis test on boot-up and is
ready to run. It operate at 3.3V.
System information LED. Active Low. The System
has failed self-diagnosis test on boot-up and is
ready to run. It operate at 3.3V.
The TX_DISABLE signal is high to turn off the laser
output. The laser will turn on when TX_DISABLE is
low.Active Low. G0(port A ). G1(port B).
G2(InterLink). G3(Ethernet Console).It oper ate at
3.3V.
SFP module Detect. Active low. Singal-ended input
reference signal from fiber optical module. This
I
pins must be pull high 4.7K ohm. G0(port A).
G1(port B). G2(InterLink). G3(Ethernet
Console).It operate at 3.3V.
Fiber Signal Detect. Active low. Singalreference signal from fiber optical module. This
pins must be pull high 4.7K ohm.G0(port
I
A),G1(port B),G2(InterL ink ), G3 (E thernet
Console). It operate at 3.3V .
Page 13

EOM-G103-PHR-PTP Series EOM-G103-PHR-PTP Functionality
2-5
Signal JP1 pin# Pin Name Pin Type Description
Management data I/O. It operate at 3.3V. The
MII
Management
Interface
I2C
USB interface
Digatal output
Digatal input 42 DI I General Purpose Input. It operate at 3.3V.
POWER
Reserved
Signal JP2 pin# Pin Name Pin Type Description
Reset
Power
Reserved 1-6, 19 Reserved
Type Description
I Input
O Output
I/O Input/Output
PWR POWER
GND GROUND
PU Internal pull-up resistor
64 MDIO-PHY I/O PU
66 MDC-PHY O
58 SDA I/O PU Serial data line. It operate at 3.3V.
60 SCK O Serial data clock. It operate at 3.3V.
76
78
38 DO(1)
40 DO(0)
1,2,9,12,1
5,18,21,24
,27,30,33,
36,50,56,6
2,68,74,80
35,37,44,4
6,48,52,54
,70,72,73,
75,77,79
17 Reset_PHY O
18 Reset I
20
7-11 3.3V PWR PO WER. 3.3V.
12-16 GND GND Ground.
USB-HOST-DP
USB-HOST-D
M
GND GND Ground.
Reset to
Default
I/O USB Data +. Host side.
I/O USB Data -. Host side.
O General Purpose Output. It operate at 3.3V.
input data value on the MDIO pin is valid and
latched on the rising e dge of MDC.
Management data clock. It operate at 3.3V. The
chip sources a 2MHz clock to the external Phy
device
Do Not Connect. These pins should not be
connected. Do not connect these pins together.
Active Low. Reset the PHY chip. It operate at 3.3V.
Active Low. Reset the MOXA module. It operate at
3.3V.
Active Low. The low status for five continuous
I
seconds to load the factory default settings. It
operate at 3.3V.
Do Not Connect. These pins should not be
connected. Do not connect these pins together.
Page 14

3
3. EOM-G103-PHR-PTP-ST Functionality
This chapter includes information about the EOM-G103-PHR-PTP-ST (carrier board of the EOM-G103-PHR-PTP
Evaluation Kit).
The following topics are covered in this chapter:
EOM-G103-PHR-PTP-ST Development Board
Combining the EOM-G103-PHR-PTP-ST with the Embedded Module
LED Indicators
Wiring Requirements
Connecting the Power
LAN Ports and Pin Assignments
Reset Button
Page 15

EOM-G103-PHR-PTP Series EOM-G103-PHR-PTP-ST Functionality
3-2
EOM-G103-PHR-PTP-ST Development Board
The EOM-G103-PHR-PTP Evaluation Kit is a PCB board a with complete layout. The kit helps users evaluate,
develop, and integrate the EOM-G103-PHR-PTP embedded module into their systems and applications. Simply
combine the EOM-G103-PHR-PTP embedded module with the Evaluation Kit to start porting the relevant
software, and create a solution for the applications you wish to implement.
Number Description
1 Terminal block for DI and Relay
2 USB storage port(ABC-02-USB-T)
3 USB console port
4 Reset to factory default by pressing and hold the button for 5 seconds
5 Ethernet Console port: 10/100/1000BaseT(X)
6 Interlink port: 10/100/1000BaseT(X)
7 PRP/HSR redundant port A: 10/100/1000BaseT(X)
8 PRP/HSR redundant port B: 10/100/1000BaseT(X)
9 Interlink port: 100/1000BaseFX
10 PRP/HSR redundant port A: 100/1000BaseFX
11 PRP/HSR redundant port B: 100/1000BaseFX
24 System reboot
25 DO(1) (LED Display)
26 Power input
Combining the EOM-G103-PHR-PTP-ST with the Embedded Module
Insert the EOM-G103-PHR-PTP embedded module vertically onto the EOM-G103-PHR-PTP-ST. Note tha t the
Pin marked “JP1 and JP2” on the embedded module must be matched with the Pin marked “JP4 and JP5” on the
EOM-G103-PHR-PTP-ST. Be careful when installing the board to avoid damaging the pins.
Page 16

EOM-G103-PHR-PTP Series EOM-G103-PHR-PTP-ST Functionality
3-3
LED Indicators
Number LED Color State Description
Power is being supplied to the main system’s power input
PWR1
Power is not being supplied to the mai n system’s power
input PWR1
System has passed self-diagnosis test on boot-up and is
ready to run
1. Syste m is undergoing the self-diagnosis test
2. Syste m detects the ABC-02 USB plugged into the USB
storage port
3. Blinks once per second when pressing the reset button
for 5 seconds
4. Blinks rapidly when the reset button has b een pressed
continuously for 5 seconds, ind icating that the device
will be reset to factory defaults
System failed self-diagnosis on boot-up.
• RAM Test Fail/System Info. Read Fail/Switch In i tial
Fail/PTP PHY Error.
• FW Checksum Fail/Uncompress Fail (+ Green Coupler lit
on: SW FAIL)
1. Syste m has failed, or is under quick inspection
2. The relay signal contact is open
3. ABC-02 loading/saving failure
When there is a secure connection (or link) to a 1000 Mbps
device on any port.
When there is a secure connection (or link) to 10/100 Mbps
Ethernet device on any port.
22 PWR 1 amber
20 STATE
21 FAULT red
18 PRP green
19 HSR green
12 (Console)
13 (Interlink)
14(A)
15(B)
Link/Act/
Speed
green
blinking
red ON
green
blinking When data is being transmitted or received at 1000 Mbps.
amber
blinking When data is being transmitted or received at 10/100 Mbps.
ON
OFF
ON
ON
OFF The system is operating normally
ON PRP is working
OFF PRP is not enabled
ON HSR is working
OFF HSR is not enabled
ON
ON
OFF Link down or no link
Page 17

EOM-G103-PHR-PTP Series EOM-G103-PHR-PTP-ST Functionality
3-4
ATTENTION
Safety First!
Be sure to disconnect the power cord before installing and/or wiring your
.
Wiring Requirements
In this section, we describe how to connect the EOM-G103-PHR-PTP Evaluation Kit to devices.
Read the following safety precautions before proceeding with the in stallation of any electronic device :
• Use separate paths to route wiring for power and devices. If power wiring and device wiring paths must
cross, make sure the wires are perpend icular at the intersection point.
NOTE: Do not run signal or communication wiring and power wiring in the same wire conduit. To avoid
interference, wires with different signal characteristics should be routed separately.
• Use the type of signal transmitted through a wire to determine which wir es should be kept separate. The
rule of thumb is that wiring that shares similar electrical characteristics can be bundled together.
• Keep input wiring and output wiring separate.
• It is advisable to label the wiring to all devices in the system.
• Be sure to disconnect the power cord before installing and/or wiring your EOM-G103-PHR-PTP Evaluation
Kit.
Connecting the Power
You may use the power jack for connecting the power. The power input range of the EOM-G103-PHR-PTP
Evaluation Kit is from 12 VDC. If the power is properly suppli ed, the “Power” LED will light up in yellow after 3
to 5 seconds.
Power Ground Rules:
Do not split the ground plane into separate planes for analog, digital, and power pins. A single, contiguous
ground plane is recommended.
• Route high-speed signals above a solid and unbroken ground plane.
• Fill copper in the unused area of signal planes and connect these coppers to the ground plane through vias.
• Stagger the placement of vias to avoid creating long gap in the plane due to via voids.
LAN Ports and Pin Assignments
The EOM-G103-PHR-PTP Evaluation Kit has four 10/100/1000 Mbps LAN ports for connecting to a network . The
LAN ports use 8-pin RJ45 connectors. See the following diagram for the pinouts.
EOM-G103-PHR-PTP Evaluation Kit
8-pin RJ45 Pin Signal
1 TRD(0)+
2 TRD(0)3 TRD(1)+
4 TRD(2)+
5 TRD(2)–
6 TRD(1)7 TRD(3)+
8 TRD(3)–
Page 18

EOM-G103-PHR-PTP Series EOM-G103-PHR-PTP-ST Functionality
3-5
Reset Button
The EOM-G103-PHR-PTP Evaluation Kit has two reset buttons: Manual Reset and Reset to Default.
Press the Manual Reset button to reset the hardware of the EOM-G103-PHR-PTP Evaluation Kit and the
EOM-G103-PHR-PTP embedded module.
Press the Reset button continuously for at least 5 seconds to load the software factory default configuration.
After the factory default configuration has been loaded, the system will reboot automatically.
Page 19

4
4. PCB Layout and Design Guidelines
This chapter includes informatio n about using the EOM-G103-PHR-PTP embedded module to design products
that comply with the EMI standard.
The printed circuit board is the single most important factor that affects EMI and overall performance. In order
to meet these requirements, it depends on good design practices. The goal here is to minimize digital and
common mode noise as well as to provide shielding between the PCB’s internal circuitry and the external
environment. These PCB design pr a ctices should apply to the entire PCB design.
The following topics are covered in this chapter:
General Rules
Power Ground Rules
Chassis Ground
Magnetic Noise Zone
Differential Signal Layout
USB Signal Layout
Heat Sink Requiremenrs
Design Guidelines
Page 20

EOM-G103-PHR-PTP Series PCB Layout and Design Guidelines
4-2
General Rules
• Place components so as to avoid long loop traces.
• Use a metal box to shield the printed circuit board.
• Use a ferrite core on the DC power cord to reduce EMI.
• Provide controlled impedance on all high-speed digital signal traces with the right terminat io n sch emes to
prevent reflection and ringing.
• Ensure that the power line is rated for the application and optimized with decoupling capacitors.
• Keep power and ground noise under 100 mV peak to peak.
• Ensure that the switching DC-DC converter is filtered and properly shielded as the DC-DC power converter
can produce a great deal of EMI noise.
• Avoid via and pad in the path on any critical signal as via and pad will induce unwanted capacitance and
inductance which can cause reflection and distortion.
Power Ground Rules
• Do not split the ground plane into separate planes for analog, digital, and power pins. A single, contiguous
ground plane is recommended.
• Route high-speed signals above a solid and unbroken ground plane.
• Fill copper in the unused area of signal planes and connect these coppers to the ground plane through vias.
• Stagger the placement of vias to avoid creating long gap in the plane due to via voids.
Chassis Ground
The chassis ground and magnetics serve two purposes: they help to reduce EMI noise emissions from the signal
ground plane to the PCB’s external environment, and act as a shield to protect the PCB components from ESD.
Place the chassis ground on all PCB layers and use conne ction mounting holes to join the chassis ground on
different PCB layers The chassis ground on the PCB is directly connected to the metal shield of the equipment
through the connection mounting holes. Use a trench/moat to isolate the chassis ground plane from the signal
ground plane. The chassis ground region extends from the front edge of the PCB board (RJ45 connectors) to the
magnetics and around the edge of the board as shown below.
Page 21

EOM-G103-PHR-PTP Series PCB Layout and Design Guidelines
4-3
Magnetic Noise Zone
• Void both power and ground planes on all PCB layers directly u n d er the magnetics.
• The chassis ground should extend from the magnetics to the RJ45 connector.
• Do not route any digital signals between the PHY and RJ45 connector.
• Add transformer to Port 1 and Port 2 as shown in figure 3 when connecting to external cable is required.
Differential Signal Layout
• Differential pair (GXB_TX_P/N or GXB_RX_P/N) should be routed away from all other signals and keeps 100
ohms differential Impedance.
• Keep both traces of each differential pair as identical to each other as possible.
• Route each differential pair on the sa me PCB layer.
• Route both (GXB_TX_P/N or GXB_RX_P/N) pairs far away from each other at least 20 mil s pace as sh own
below.
• The transmit, receive, and clock signals should be kept away from each other.
• Do not space single-ended and differential pair traces close than threes the height above the nearest plane
USB Signal Layout
The following layout guidelines apply to the USB_DP and USB_DM differential pair signals:
• Route the signals close to each other as parallel traces on the PCB, and not parallel with other non-USB
signal traces to minimize crosstalk.
• Doubling the space from the USB_DP/USB_DM signal pair to adjacent signal traces helps prevent crosstalk.
Do not worry about crosstalk between the two USB_DP/USB_DM signal traces. Also can adopt the ground
guard get up the USB_DP/USB_DM signal pair wrapping to decrease crosstalk and EMI.
• The USB_DP/USB_DM signal traces must also be the same length . This mi nimiz es the ef fect of com mon
mode current on EMI. Lastly do not route over plane splits.
• The trace impedance for the USB_DP/USB_DM signals should be 45W±10% (to ground). The impedance is
90W±10% between the differential signal pairs USB_DP and USB_DM to match the 90W±10% USB twisted
pair cable impedance. The trace impedance can be controlled by carefully selecting the line width, trace
distance from power or ground planes, and physical proximity of nearby traces.
• Do not forget the USB data line must be make the impedance matching finally, to avoid the signal reflection.
• Minimize the length of high-speed clock and periodic signal traces that run parallel to high speed USB signal
lines to minimize crosstalk.
• Based on EMI testing experience, the minimum suggested spacing to clock signals is 50 mils.
• Based on simulation data, use 20-mil minimum spacing between high-speed USB signal pairs and other
signal traces for optimal signal quality. This helps to prevent crosstalk
Heat Sink Requiremenrs
Chip Part reference TC (case temperature)
MOXA ART U16 109°C (228.2°F)
FPGA EP4CGX75CF23I7N P1 90°C (194°F)
Page 22

EOM-G103-PHR-PTP Series PCB Layout and Design Guidelines
4-4
Design Guidelines
You may quickly enable the PRP/HSR function on the System by integrating the EOM-G103-PHR-PTP Series to
the main system board. The configuration and communication interfaces between the system main board and
EOM-G103-PHR-PTP module are UART and SGMII (MAC mode) and SERDES (1000Base-X), respectively. All
management and IP-based functions are activated by the System main board and the EOM-G103-PHR-PTP
series provide several functions, including PRP/HSR redundancy pr otocols, VLAN filtering, Multica st filtering,
and time zone settings (refer to the user’s manual for details).
 Loading...