

Page 1

PCI Express Board User’s Manual
Ninth Edition, March 2014
www.moxa.com/product
© 2014 Moxa Inc. All rights reserved.
Page 2

PCI Express Board User’s Manual
The software described in this manual is furnished under a license agreement and may be used only in accordance with
the terms of that agreement.
Copyright Notice
© 2014 Moxa Inc. All rights reserved.
Trademarks
The MOXA logo is a registered trademark of Moxa Inc.
All other trademarks or registered marks in this manual belong to their respective manufacturers.
Disclaimer
Information in this document is subject to change without notice and does not represent a commitment on the part of
Moxa.
Moxa provides this document as is, without warranty of any kind, either expressed or implied, including, but not limited
to, its particular purpose. Moxa reserves the right to make improvements and/or changes to this manual, or to the
products and/or the programs described in this manual, at any time.
Information provided in this manual is intended to be accurate and reliable. However, Moxa assumes no responsibility for
its use, or for any infringements on the rights of third parties that may result from its use.
This product might include unintentional technical or typographical errors. Changes are periodically made to the
information herein to correct such errors, and these changes are incorporated into new editions of the publication.
Technical Support Contact Information
www.moxa.com/support
Moxa Americas
Toll
-free: 1-888-669-2872
Tel:
+1-714-528-6777
Fax:
+1-714-528-6778
Moxa China (Shanghai office)
Toll
-free: 800-820-5036
Tel:
+86-21-5258-9955
Fax:
+86-21-5258-5505
Moxa Europe
Tel:
+49-89-3 70 03 99-0
Fax:
+49-89-3 70 03 99-99
Moxa Asia
-Pacific
Tel:
+886-2-8919-1230
Fax:
+886-2-8919-1231
Moxa India
Tel:
+91-80-4172-9088
Fax:
+91-80-4132-1045
Page 3

Table of Contents
1. Introduction ...................................................................................................................................... 1-1
Overview ........................................................................................................................................... 1-2
PCI Express Solution .................................................................................................................... 1-2
ESD Protection ............................................................................................................................ 1-2
ADDC™ (Automatic Data Direction Control) f or RS-485 .................................................................... 1-2
Operating System Support ........................................................................................................... 1-2
Moxa Serial Comm Tool................................................................................................................ 1-3
Intelligent RS-485 ....................................................................................................................... 1-3
Applications ....................................................................................................................................... 1-3
Features ............................................................................................................................................ 1-3
Package Checklist ............................................................................................................................... 1-3
Installation Flowchart .......................................................................................................................... 1-4
2. Hardware Installation ....................................................................................................................... 2-1
CP-118EL-A Dimensions ...................................................................................................................... 2-2
CP-168EL-A Dimensions ...................................................................................................................... 2-2
CP-104EL-A Dimensions ...................................................................................................................... 2-3
CP-102E Dimensions ........................................................................................................................... 2-3
CP-102EL Dimensions ......................................................................................................................... 2-4
CP-132EL Dimensions ......................................................................................................................... 2-4
CP-132EL-I Dimensions ....................................................................................................................... 2-5
CP-114EL Dimensions ......................................................................................................................... 2-5
CP-114EL-I Dimensions ....................................................................................................................... 2-6
CP-116E-A Dimensions ........................................................................................................................ 2-6
CP-134EL-A-I Dimensions .................................................................................................................... 2-7
CP-118E-A-I/138E-A-I Dimensions ....................................................................................................... 2-7
Plugging the Board into an Expansion Slot ............................................................................................. 2-8
3. Software Installation ........................................................................................................................ 3-1
Windows Drivers ................................................................................................................................. 3-2
Windows 7/8/8.1 (32-bit/64-bit) ................................................................................................... 3-2
Windows 2008/Vista (32-bit/64-bit) ............................................................................................ 3-13
Windows 2003/XP (32-bit/64-bit) ................................................................................................ 3-25
Windows 2000 .......................................................................................................................... 3-37
Non-Windows Drivers ........................................................................................................................ 3-49
DOS ........................................................................................................................................ 3-49
Linux (32-bit/64-bit) .................................................................................................................. 3-52
SCO ......................................................................................................................................... 3-53
4. Configuring Intelligent RS-485 ......................................................................................................... 4-1
Windows Users ................................................................................................................................... 4-2
Linux Users ........................................................................................................................................ 4-5
5. Serial Programming Tools ................................................................................................................. 5-1
Moxa PComm ..................................................................................................................................... 5-2
Installing PComm ........................................................................................................................ 5-2
PComm Programming Library ....................................................................................................... 5-2
Utilities .............................................................................................................................................. 5-2
Diagnostics (for Moxa boards only) ................................................................................................ 5-2
Monitor (for Moxa boards under Windows 2000/XP/2003/Vista/2008/7(x86 and x64) .......................... 5-3
Terminal Emulator ....................................................................................................................... 5-4
RS-485 Programming .......................................................................................................................... 5-4
ADDC™ ...................................................................................................................................... 5-4
6. Pin Assignments ................................................................................................................................ 6-1
PCIe Board Accessories Table ............................................................................................................... 6-2
CP-118EL-A ....................................................................................................................................... 6-2
Board Side Pin Assignments-Female SCSI VHDCI68 ......................................................................... 6-3
Device Side Pin Assignm ents ........................................................................................................ 6-4
CP-168EL-A ....................................................................................................................................... 6-5
Board Side Pin Assignments-Female SCSI VHDCI68 ......................................................................... 6-5
Device Side Pin Assignm ents ........................................................................................................ 6-5
CP-104EL-A ....................................................................................................................................... 6-6
Board Side Pin Assignments-Female DB44 ...................................................................................... 6-6
Device Side Pin Assignm ents ........................................................................................................ 6-7
CP-102E ............................................................................................................................................ 6-7
Board Side Pin Assignments-Male DB9 ........................................................................................... 6-7
CP-102EL .......................................................................................................................................... 6-8
Board Side Pin Assignments—Female DB25 .................................................................................... 6-8
Device Side Pin Assignm ents ........................................................................................................ 6-8
Page 4

CP-132EL/CP-132EL-I ......................................................................................................................... 6-9
Board Side Pin Assignments—Female DB25 .................................................................................... 6-9
Device Side Pin Assignm ents ........................................................................................................ 6-9
CP-114EL/CP-114EL-I ....................................................................................................................... 6-10
Board Side Pin Assignments—Female DB44 .................................................................................. 6-10
Device Side Pin Assignm ents ...................................................................................................... 6-11
CP-118E-A-I/CP-138E-A-I .................................................................................................................. 6-12
Board Side Pin Assignments—Female DB78 .................................................................................. 6-12
Device Side Pin Assignm ents—Male DB9 ...................................................................................... 6-14
Male DB25 (CBL-M78M25x8-100) ................................................................................................ 6-14
CP134EL-A-I .................................................................................................................................... 6-15
Board Side Pin Assignments—Female DB44 .................................................................................. 6-15
Device Side Pin Assignm ents—Male DB9 ...................................................................................... 6-16
Male DB25 (CBL-M44M25x4-50).................................................................................................. 6-16
CP-116E-A ....................................................................................................................................... 6-17
Board Side Pin Assignments—Female SCSI VHDCI68 ..................................................................... 6-17
Device Side Pin Assignm ents—Male DB9 ...................................................................................... 6-17
Male DB25 ( OPT8B+ / CBL-M68M25x8-100) ................................................................................ 6-17
Female DB25 (OPT8A+/S+) ........................................................................................................ 6-18
7. Troubleshooting ................................................................................................................................ 7-1
A. Product Specifications ....................................................................................................................... A-1
CP-118EL-A Specifications ................................................................................................................... A-2
CP-168EL-A Specifications ................................................................................................................... A-3
CP-104EL-A Specifications ................................................................................................................... A-4
CP-102E Specifications ........................................................................................................................ A-5
CP-102EL Specifications ...................................................................................................................... A-6
CP-132EL Series Specifications ............................................................................................................. A-7
CP-114EL Series Specifications ............................................................................................................. A-8
CP-118E-A-I Specifications .................................................................................................................. A-9
CP-138E-A-I Specifications ................................................................................................................ A-10
CP-134EL-A-I Specifications ............................................................................................................... A-11
CP-116E-A Specifications ................................................................................................................... A-12
Page 5

1
1. Introduction
Moxa’s PCI Express serial boards meet the new slot standard for expansion boards, and work with any PCI
Express slots. The boards have multiple RS-232/422/485 serial ports for connecting data acquisition
equipment and other serial devices to a PC.
The following topics are covered in this chapter:
Overview
PCI Express Solution
ESD Protection
ADDC™ (Automatic Data Direction Control) for RS-485
Operating System Support
Moxa Serial Comm Tool
Intelligent RS-485
Applications
Features
Package Checklist
Installation Flowchart
Page 6
PCI Express Boards Introduction
1-2
Overview
Moxa’s new PCI Express Multiport Serial Boards are designed for POS and ATM applications and for use by
industrial automation system manufacturers and system integrators. The boards are compatible with all
popular operating systems, and each of them supports data rates of up to 921.6 kbps and provides full modem
control signals, ensuring compatibility with a wide range of serial peripherals. In addition, all models work with
PCI Express x1, allowing the boards to be installed in any available PCI Express slot (including x1, x2, x4, x8,
x16, x32).
PCI Express Solution
The boards comply with PCI Express Spec. 1.1. The ports’ transmission parameters are configured after the
boards are installed. The PCI BIOS automatically assigns the IR Q and I/O addresses. For this reason, you must
plug the boards into the computer before installing the drivers. For m ore PCI Express information, re fer to the
“Technical Reference” appendix.
ESD Protection
The PCI Express boards come with15 kV ESD protection built in to prevent damage to the boards from lightning
or high potential voltage. The surge protection feature makes the PCI Express boards suitable for industrial,
factory-type applications, and for use with applications that are subject to severe weather conditions.
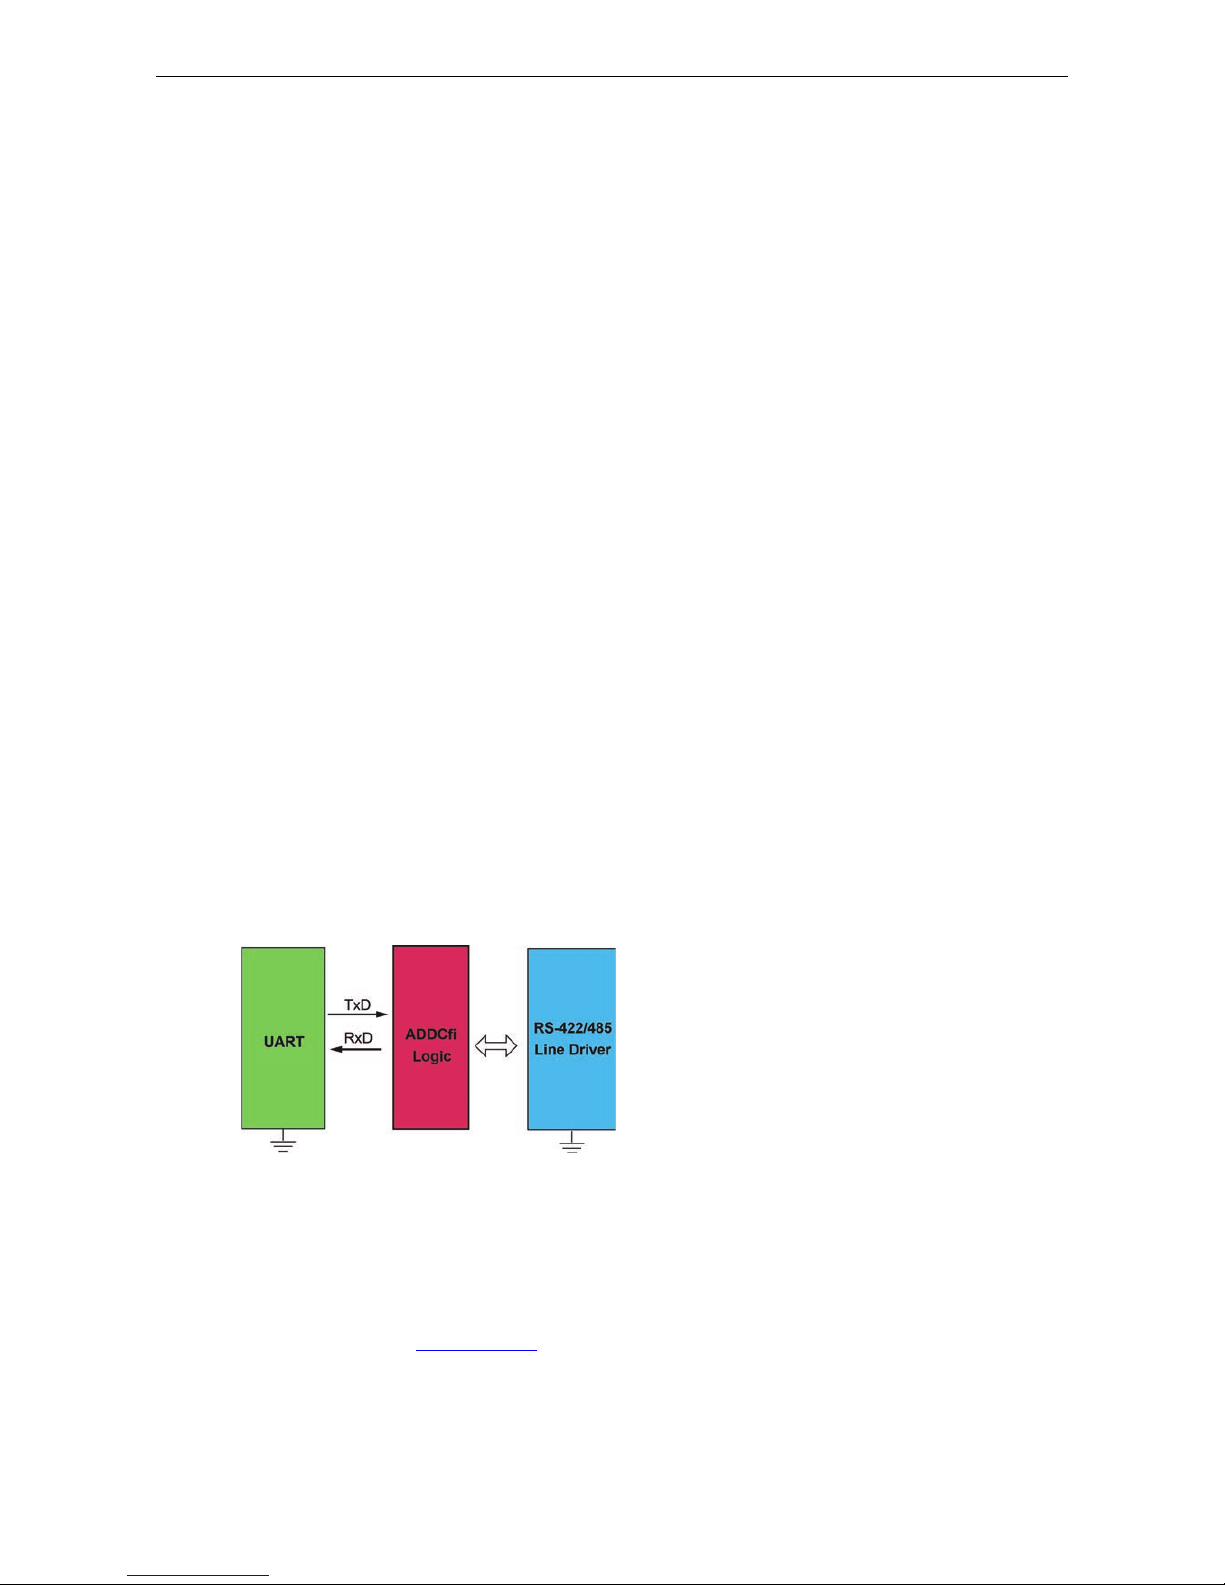
ADDC™ (Automatic Data Direction Control) for RS-485
RS-485 uses differential data transmission over two wires to transmit data from one station to another, and
allows multiple trans mitters and receivers to be used on the same data line. RS-485 uses half-duplex
transmission, which means that transmission and receptio n sha re the same data channels. For this reason,
only one transmitter can be active at any given time.
Moxa’s serial boards have a built-in circuitry to switch transmitters on and off autom atically. We call this form
of switching ADDC® (automatic data direction control). ADDC® is much easier to implement than the
traditional “handshaking” method that uses the RTS signal .
Operating System Support
The PCI Express boards are compatible with all major industrial platforms, including Windows
2000/XP/2003/Vista/2008, Windows 7/8/2012, Windows CE, DOS, Linux, and SCO. Moxa device drivers are
provided for smoother installation, configuration, and performance.
Visit Moxa’s website at
www.moxa.com to download the latest drivers and user’s manuals for all of Moxa’s
products.
Page 7

PCI Express Boards Introduction
1-3
Moxa Serial Comm Tool
For application development, Moxa provides an easy-to-use serial communication libr a ry called PComm that
runs under Windows NT/95/98/2000/XP/2003. Use this library to develop your own applications with Visual
Basic, Visual C++, Borland Delphi, etc. Utilities suc h a s Data Scope, Monitor, Termin al Emulator, and
Diagnostics are included to make it easier to debug, monitor communication status, provide terminal emulation,
and transfer files.
Intelligent RS-485
With Intelligent RS-485 , you only need one click to automatically tune the Pull High/Low and Termination
resistors and get your system ready to go!
Applications
The PCI Express boards are suitable for many different applications, including:
• Internet/Intranet Connections
• Remote Access
• Multi-user Applications
• Industrial Automation
• Office Automation
• Telecommunications
• PC-based Vending Machines and Kiosks
• POS (Point-of-Sale) Systems
Features
The PCI Express boards have the following outstanding features:
• PCI Express ×1 compliant
• Low profile board for compact-sized PCs
• Data flow LED display onboard
• 128-byte FIFO and on-chip H/W, S/W flow control
• 50 bps to 921.6 kbps transmission speed
• Embedded 15 kV ESD surge protection
• Drivers are provided for all major industrial platforms: Windows 2000, Windows XP/2003/Vista/2008
(32-bit/64-bit), Windows 7 (32-bit/64-bit), Windows 8 (32-bit/64-bit), Windows 2012 (64-bit), Windows
CE, Windows XP Embedded, DOS, Linux (32-bit/64-bit), SCO
Package Checklist
The following items are included in the PCI Express board package:
• PCI Express serial board
• Low profile bracket
• Documentation and Software CD-ROM
• Quick Installation Guide
NOTE
Please notify your sales
representative if any of the above items are missing or damaged.
Page 8
PCI Express Boards Introduction
1-4
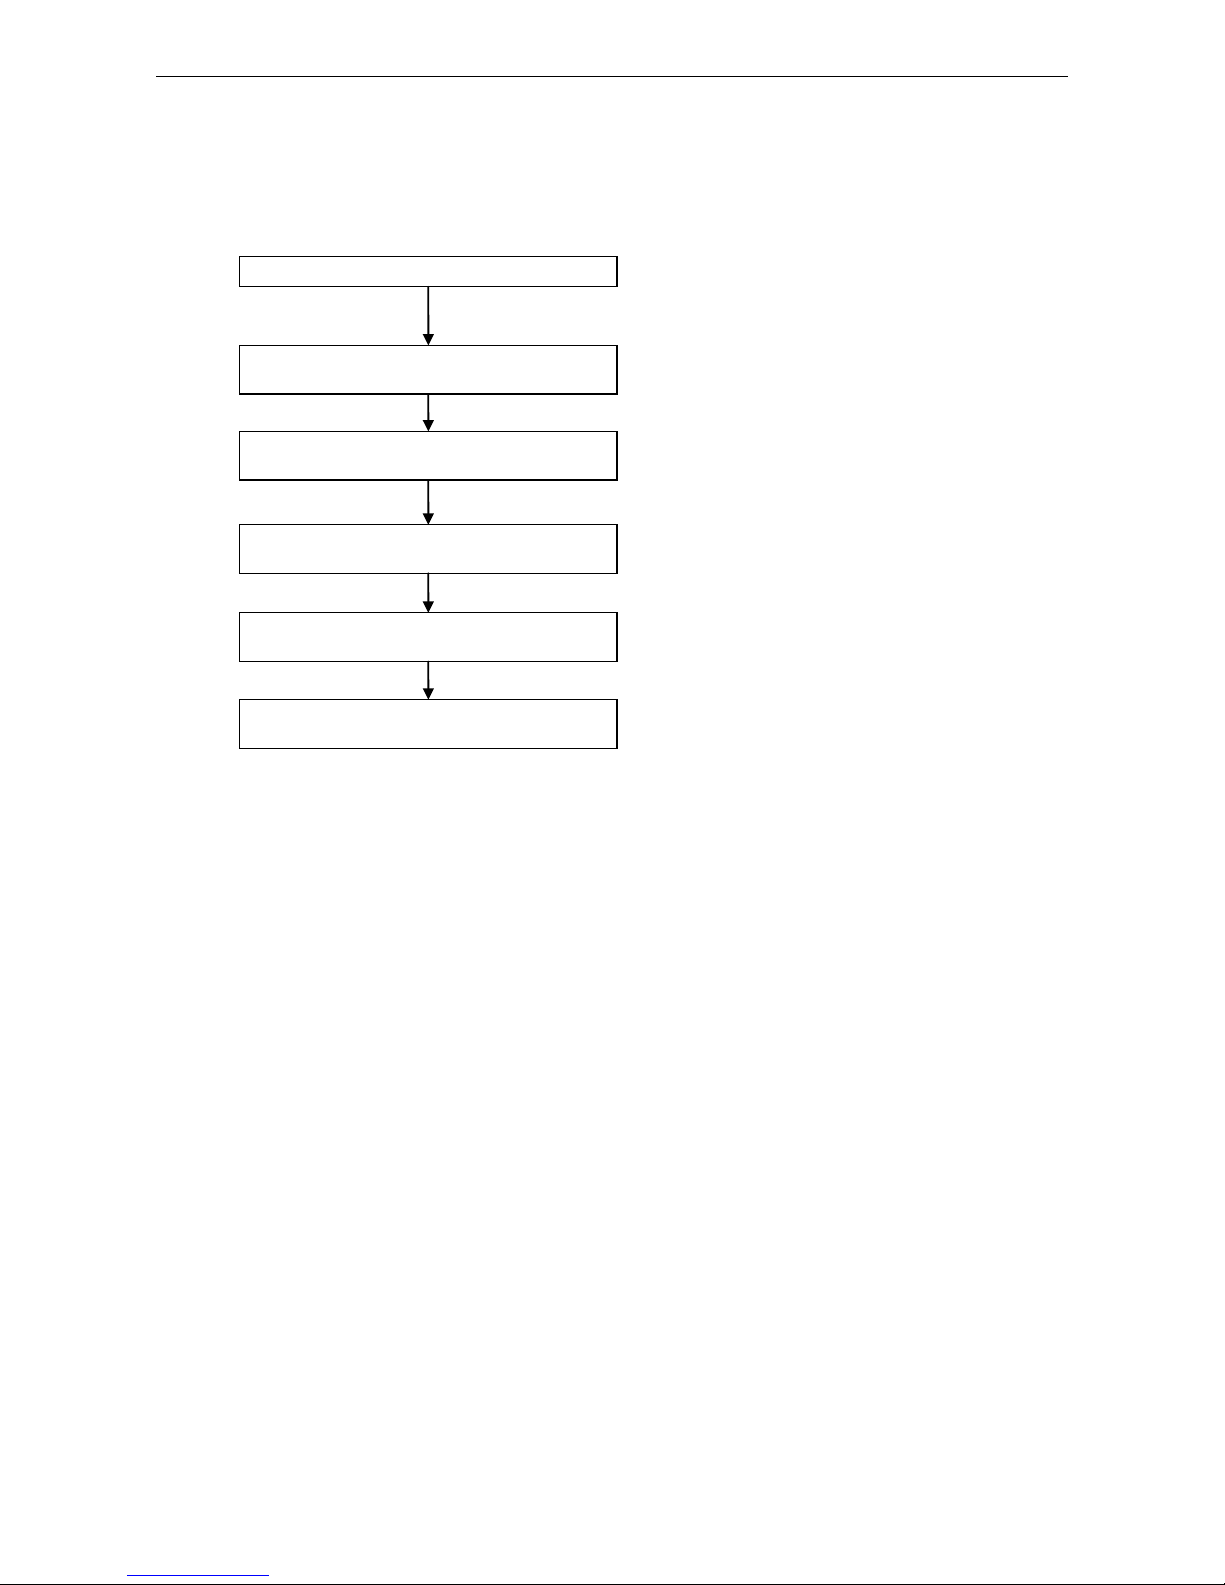
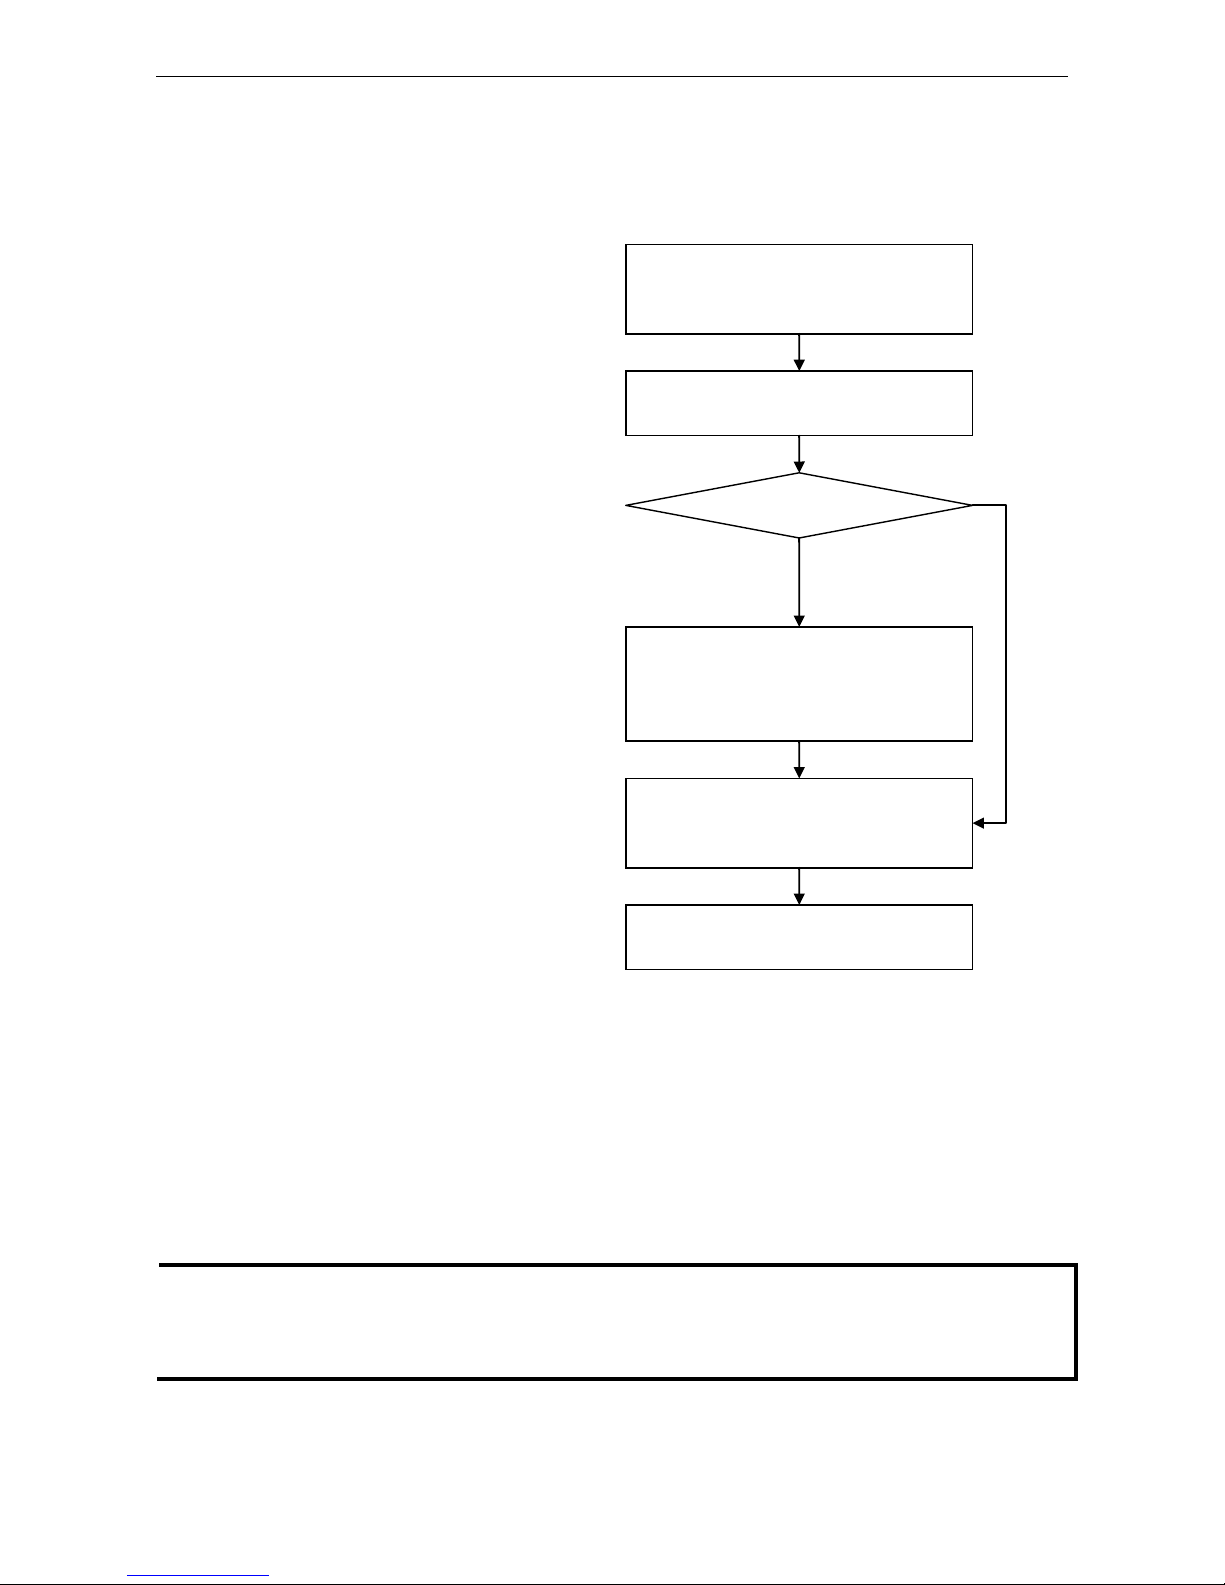
Installation Flowchart
The following flowchart provides a brief summary of the procedure you should follow t o install the PCI Express
boards, and provides references to chapters with more detailed information:
If the card supports Intelligent RS
-485 function,
you can perform diagnosis and auto
-tuning.
Chapter 4, Intelligent RS-485 Setting
Restart the system, and check the driver
initialization status .
Chapter 3, Software Installation
Connect the serial devices to the PCI Express
board’s serial ports.
Chapter 6, Pin Assignments
Install the drivers and configure the boards and
ports.
Chapter 3, Software Installation
Install the boards in PCI Express expansion slots.
Chapter 2, Hardware Installation
Develop and run your serial communication
applications
Chapter 5, Serial Programming Tools
Page 9

2
2. Hardware Installation
In this chapter, we show the dimensions diagrams of all of the boards in the PCI Express Series, and describe
the hardware installation procedure. Since the BIOS automatically assigns the PCI Express board’s IRQ number
and I/O addresses, you must plug in the board before installing the driver (driver installation is discussed in
Chapter 3).
The following topics are covered in this chapter:
CP-118EL-A Dimensions
CP-168EL-A Dimensions
CP-104EL-A Dimensions
CP-102E Dimensions
CP-102EL Dimensions
CP-132EL Dimensions
CP-132EL-I Dimensions
CP-114EL Dimensions
CP-114EL-I Dimensions
CP-116E-A Dimensions
CP-134EL-A-I Dimensions
CP-118E-A-I/138E-A-I Dimensions
Plugging the Board into an Expansion Slot
Page 10
PCI Express Boards Hardware Installation
2-2
CP-118EL-A Dimensions
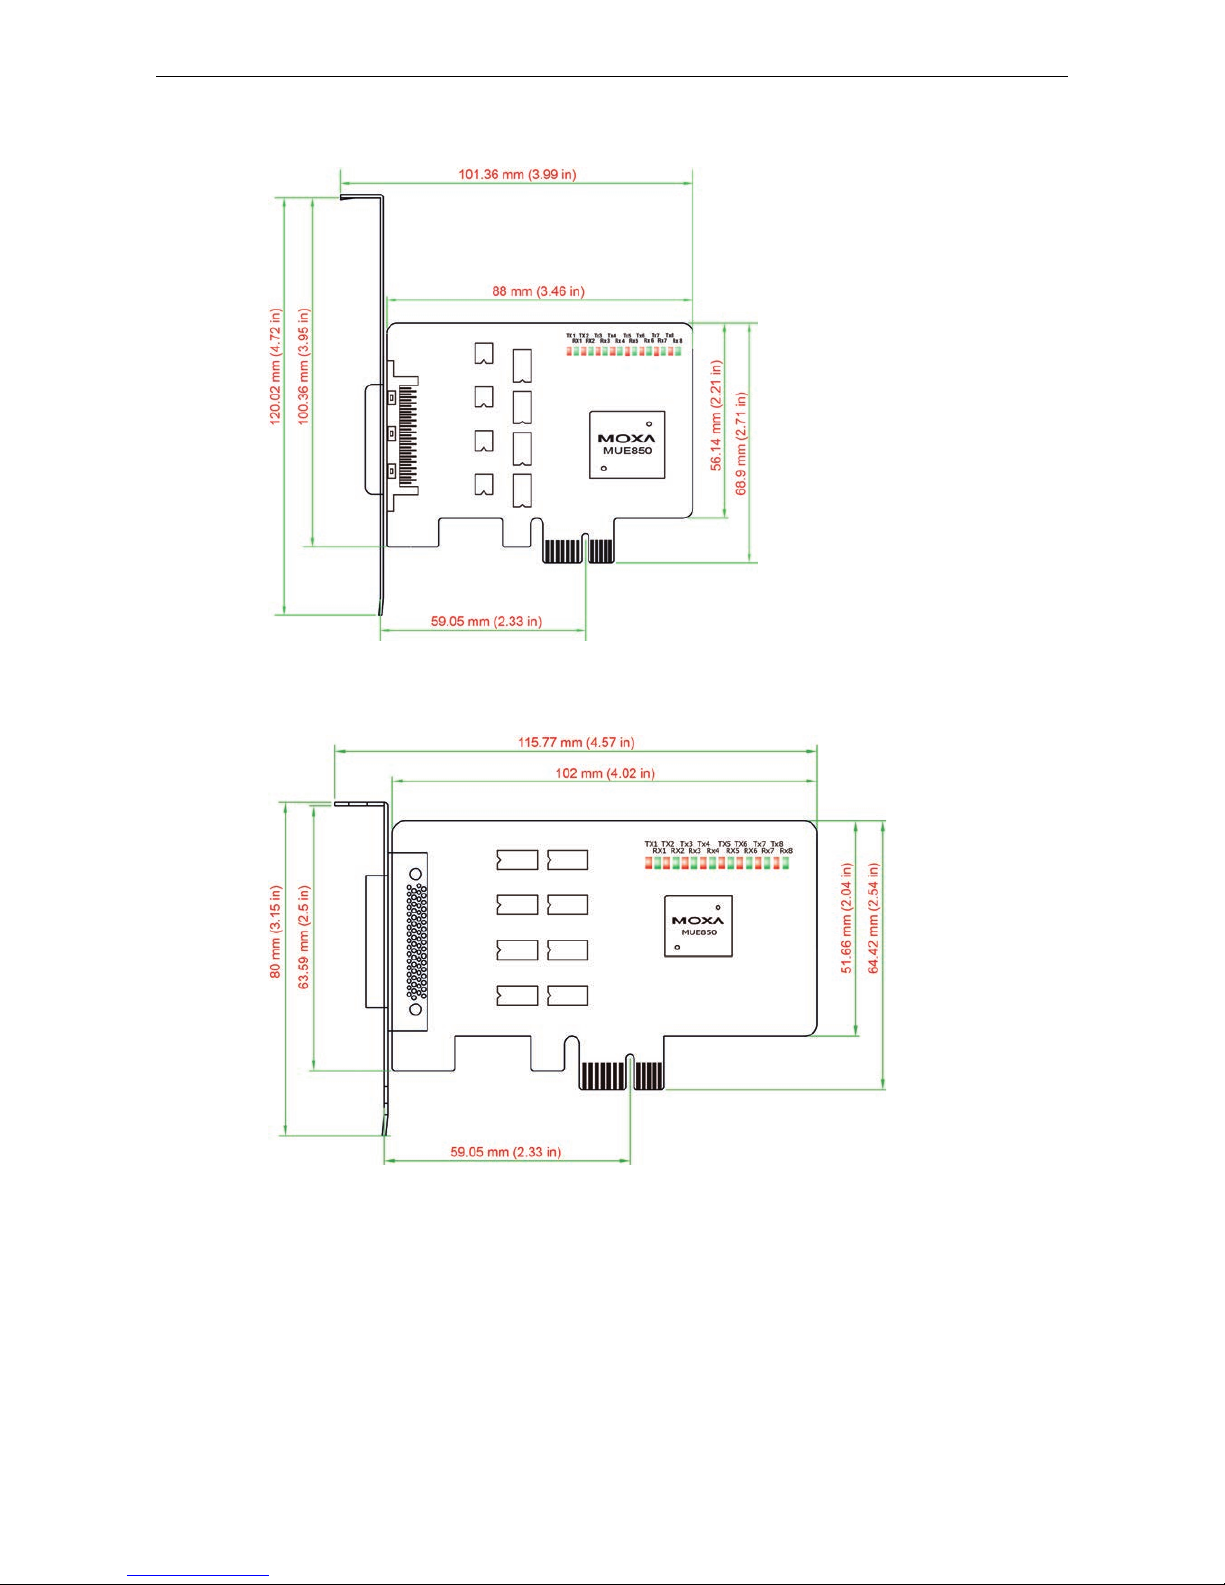
CP-168EL-A Dimensions
Page 11
PCI Express Boards Hardware Installation
2-3
CP-104EL-A Dimensions
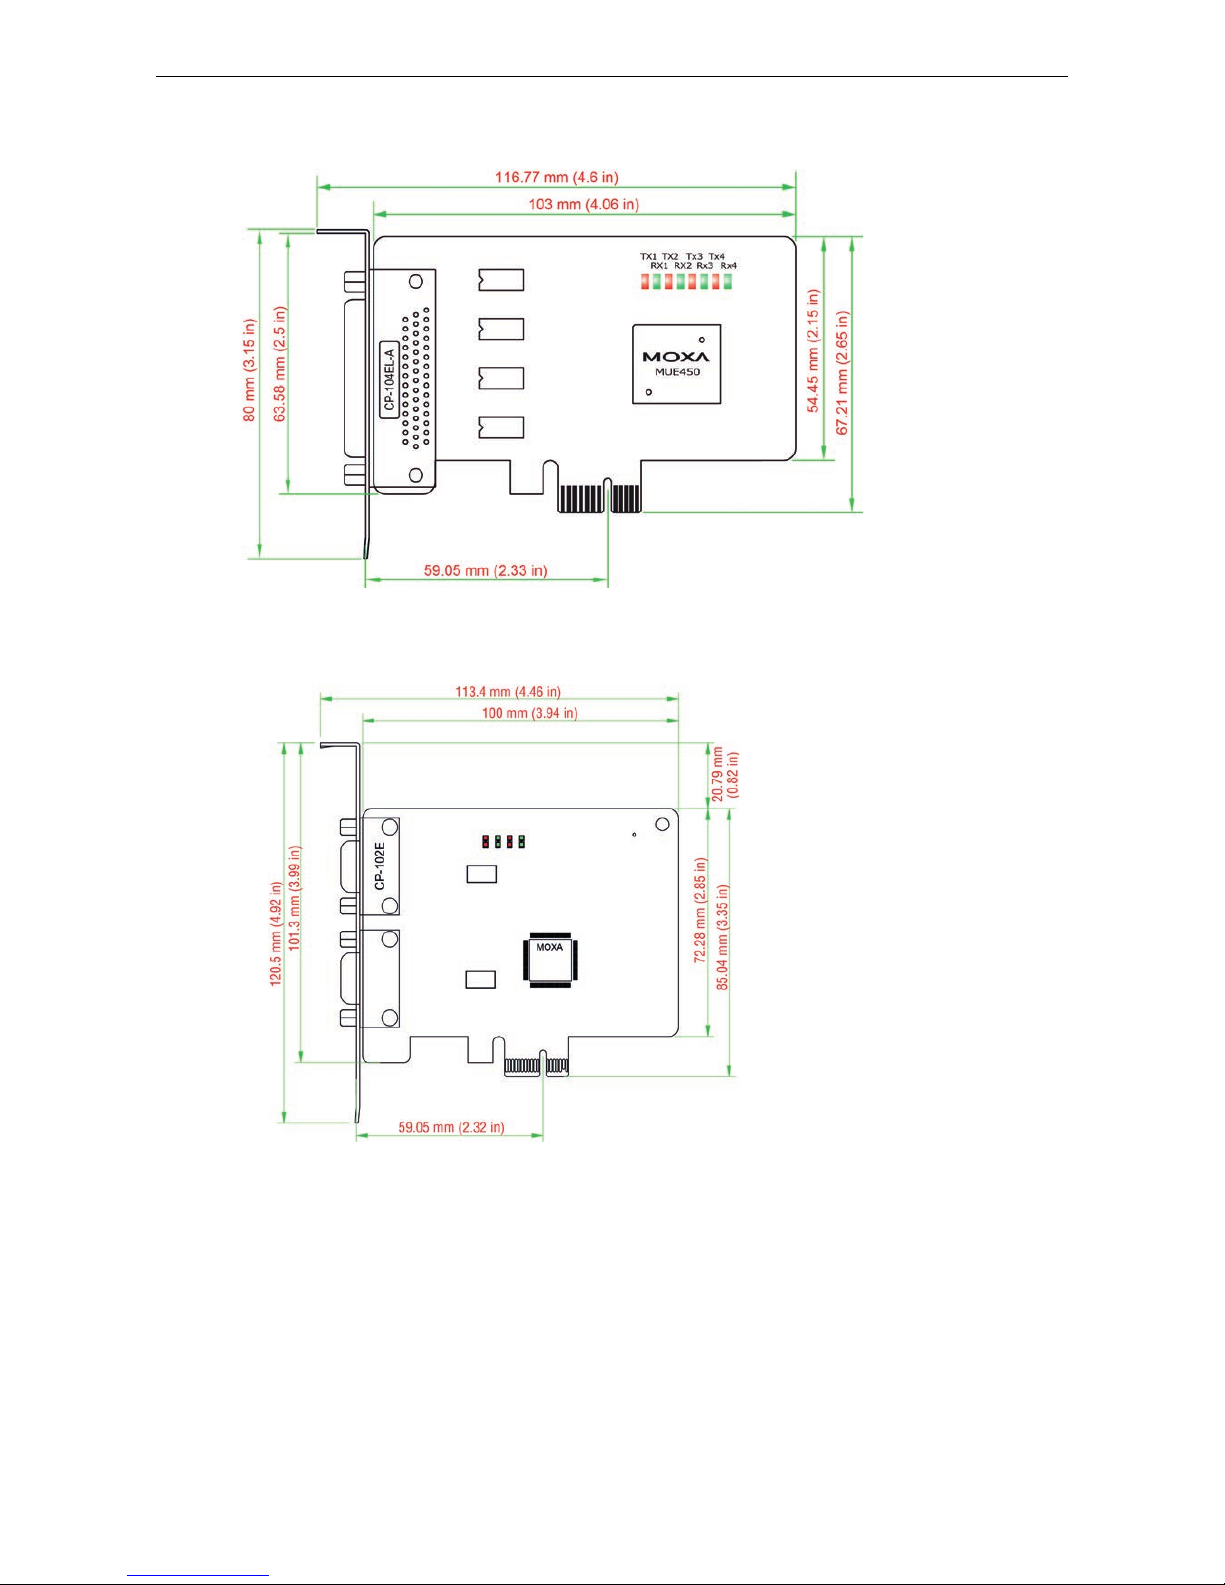
CP-102E Dimensions
Page 12

PCI Express Boards Hardware Installation
2-4
CP-102EL Dimensions
CP-132EL Dimensions
Page 13
PCI Express Boards Hardware Installation
2-5
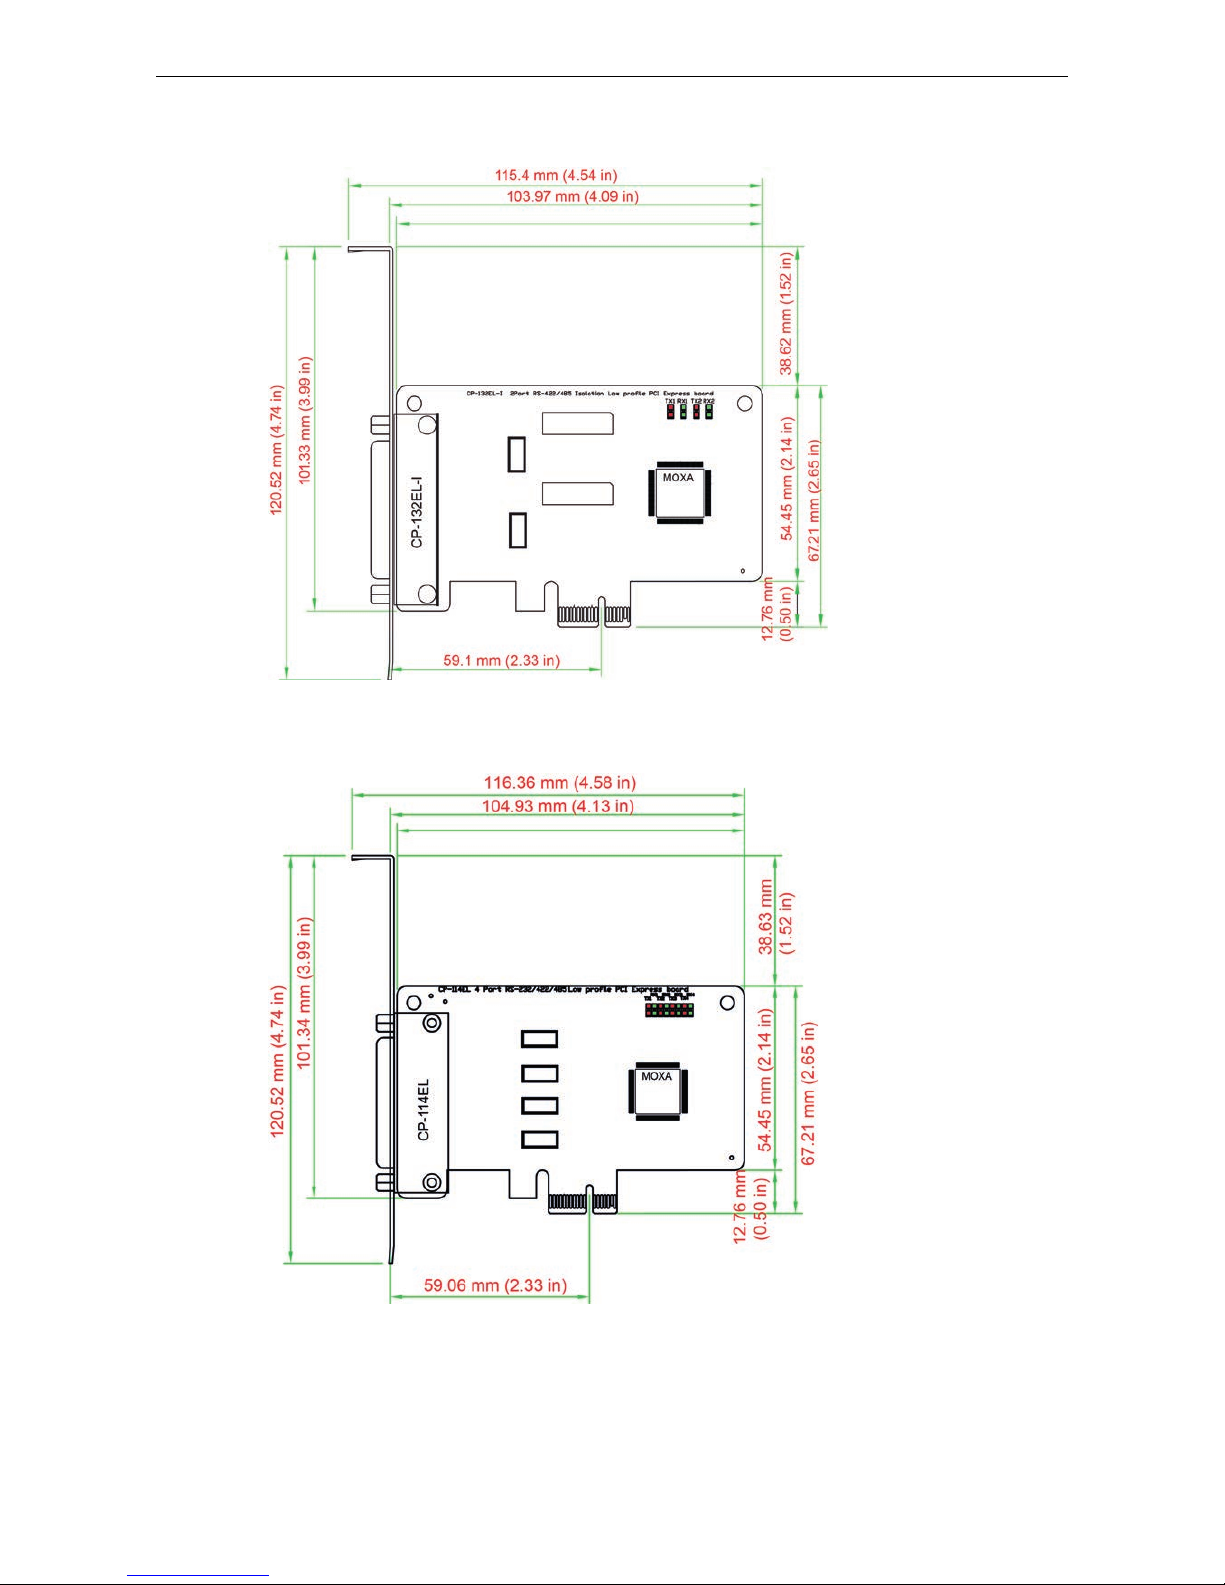
CP-132EL-I Dimensions
CP-114EL Dimensions
Page 14
PCI Express Boards Hardware Installation
2-6
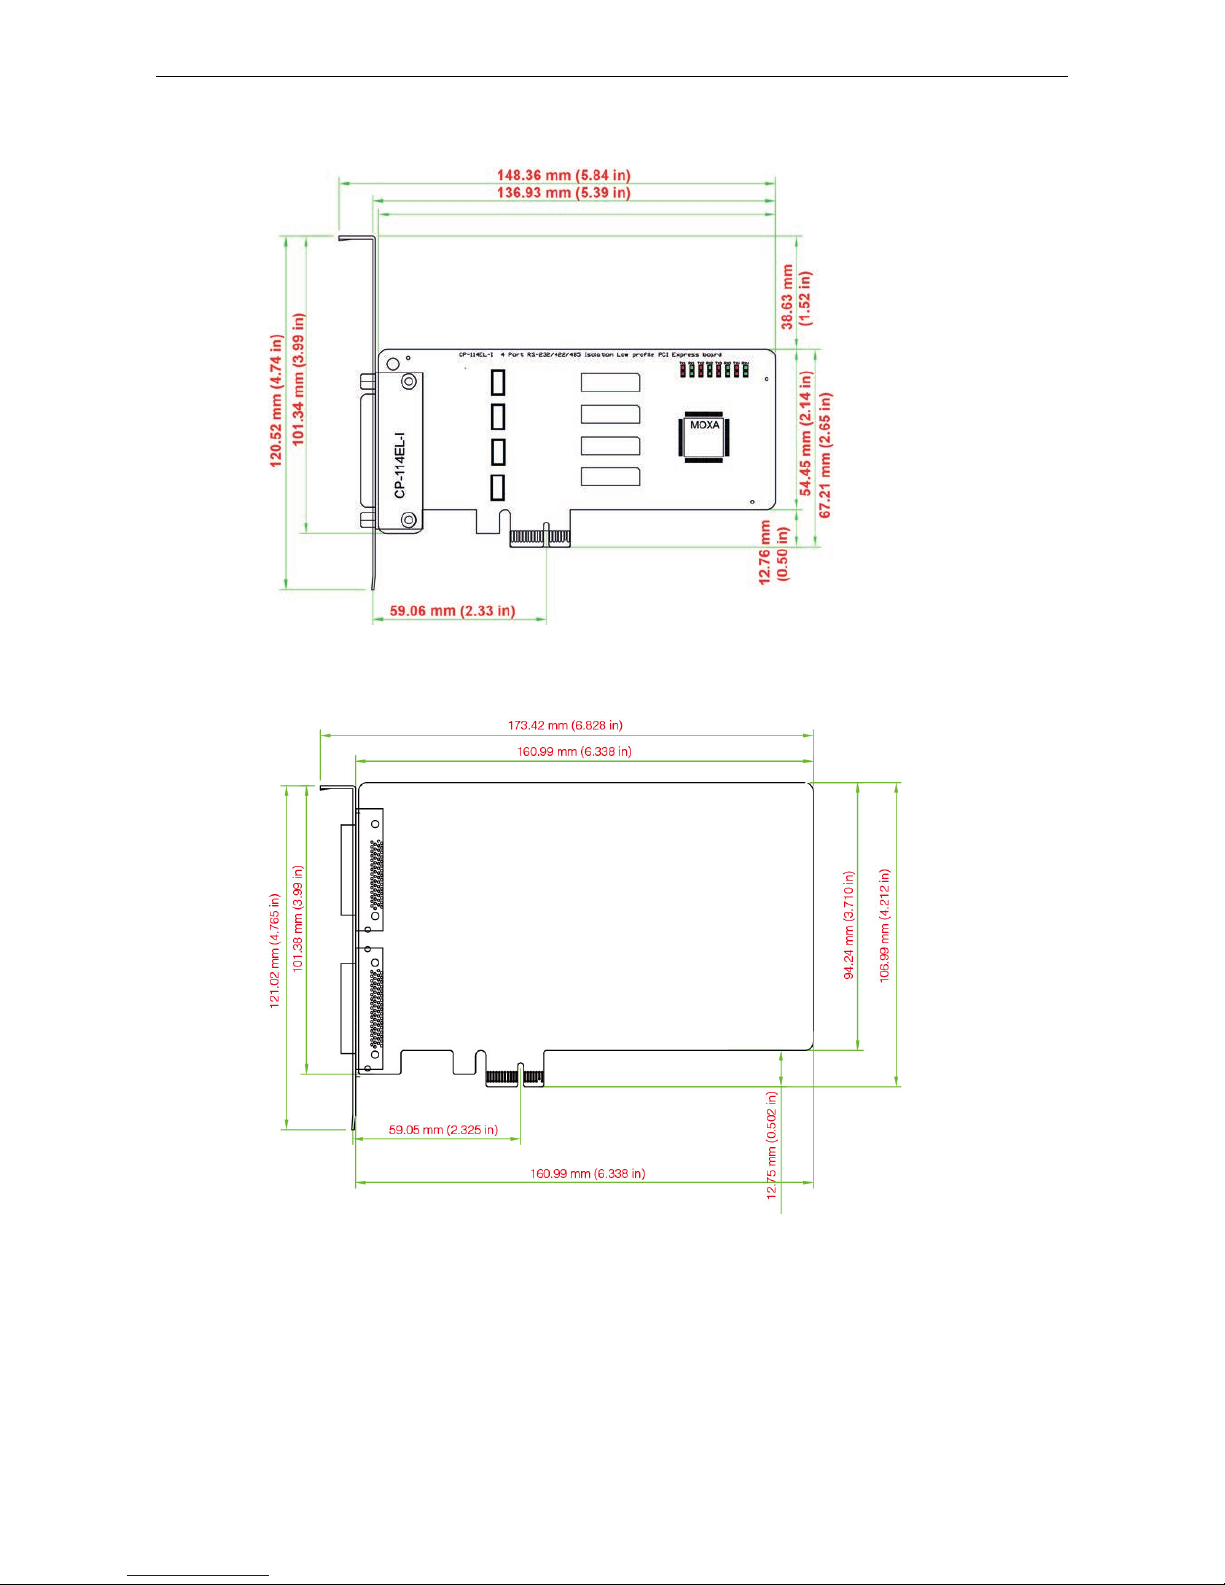
CP-114EL-I Dimensions
CP-116E-A Dimensions
Page 15
PCI Express Boards Hardware Installation
2-7
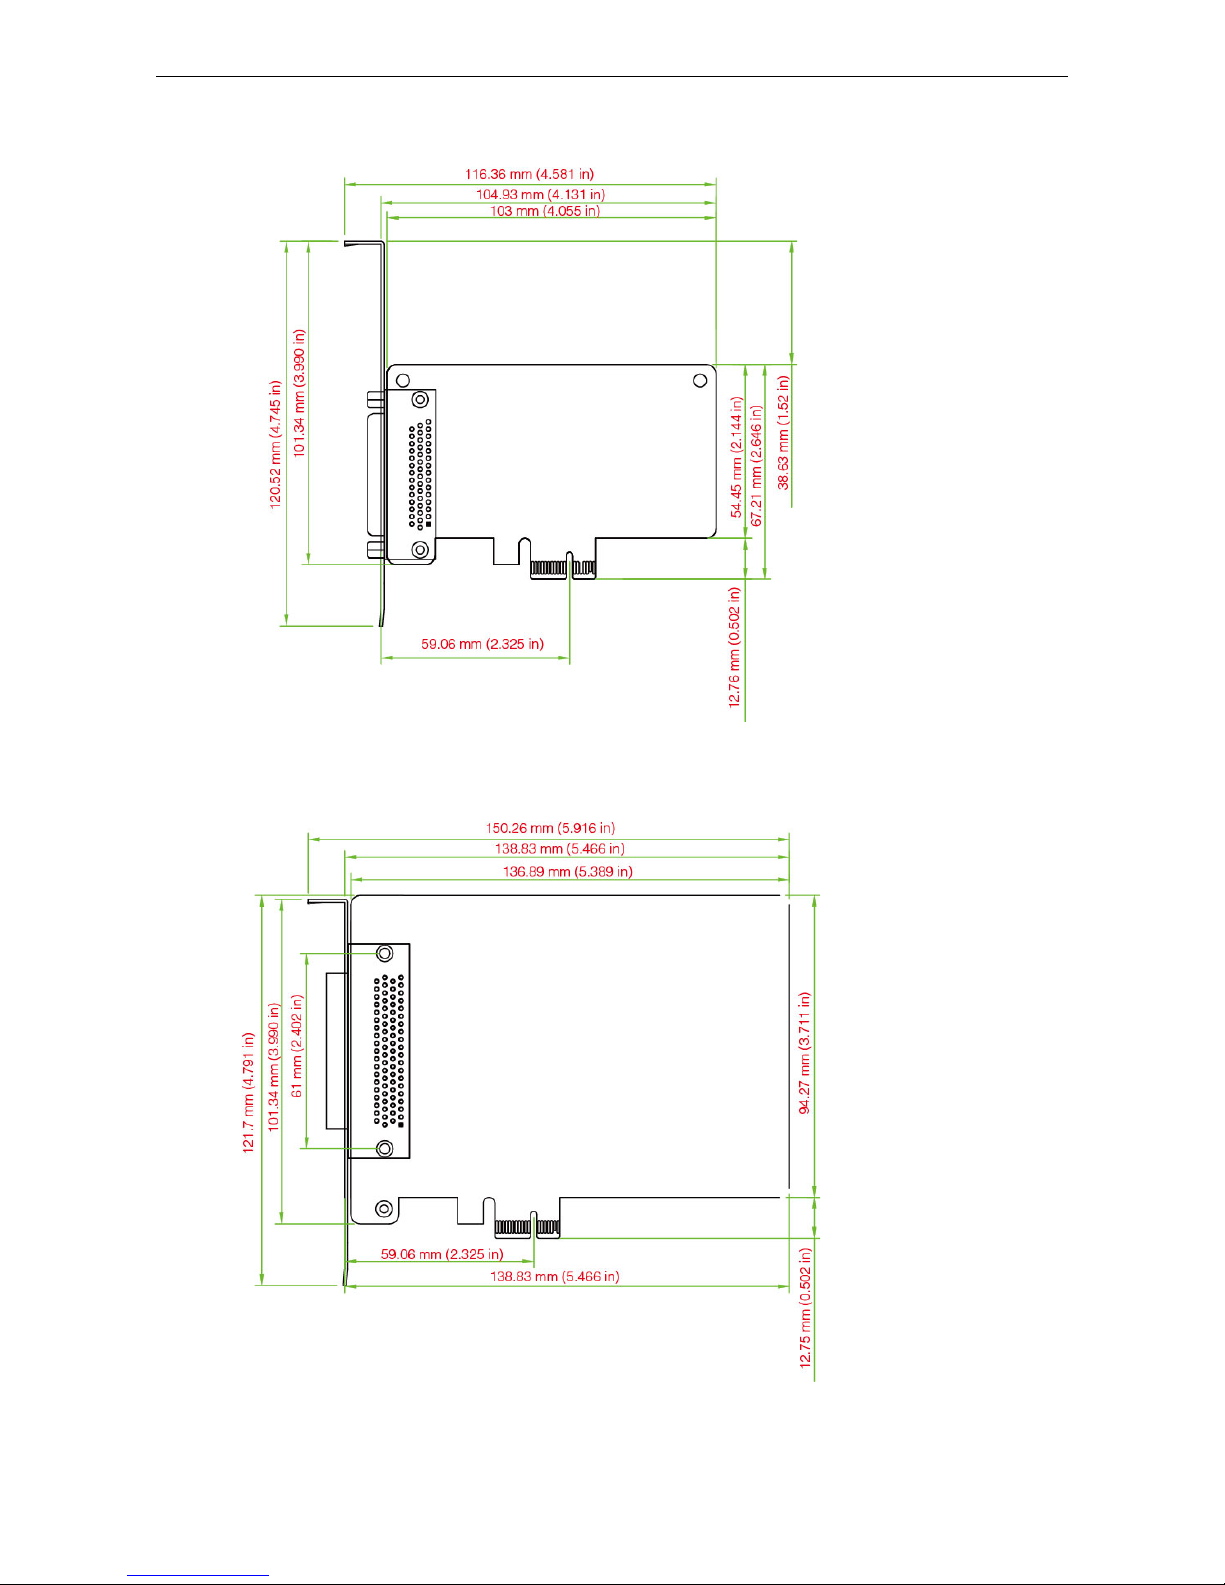
CP-134EL-A-I Dimensions
CP-118E-A-I/138E-A-I Dimensions
Page 16
PCI Express Boards Hardware Installation
2-8
Plugging the Board into an Expansion Slot
Since the BIOS automatically assigns the PCI Express board’s IRQ number and I/O addresses, you must plug
the board into one of the computer’s expansion slots before installing the driver.
Step 1: Power off the PC.
WARNING
To avoid damaging your system and board, make sure you turn off your computer before installing the board.
Step 2: Remove the PC’s cover.
Step 3: Remove the slot cover bracket if there is one.
Step 4: Plug the PCI Express board firmly into a free PCI Express slot.
Step 5: Fasten the holding screw to fix the control board in place.
Step 6: Replace the PC’s cover.
Step 7: Power on the PC. The BIOS will automatically set the IRQ and I/O address.
NOTE
Each Moxa PCI Express board uses one unique IRQ and I/O address, both of which are assigned automatically
by the PCI BIOS.
Step 8: Proceed with the software installation discussed in the next chapter, “Software Installation.”
Page 17

3
3. Software Installation
In this chapter, we give installation, configuration, and update/removal procedures for the driver for Windows
2000, Windows 2003/XP/Vista/2008 (32-bit/64-bit), Windows 7/8/8.1 (32-bit/64-bit), Windows 2012 (64-bit),
DOS, Linux (32-bit/64-b it ), SC O, and WinCE 5.0. Before proceeding with the software ins ta lla tion, complete
the hardware installation discu ssed in the previous chapter, “Hardware Installation.”
Refer to the next chapter, “Serial Programming Tools,” for information about developing your own serial
programming applications. Note that you can install up to 4 PCI Express boards in one system, provided
sufficient I/O address and IRQ number resources are available.
You can download the drivers from the Moxa website.
The following topics are covered in this chapter:
Windows Drivers
Windows 7/8/8.1 (32-bit/64-bit)
Windows 2008/Vista (32-bit/64-bit)
Windows 2003/XP (32-bit/64-bit)
Windows 2000
Non-Windows Drivers
DOS
Linux (32-bit/64-bit)
SCO
Page 18
PCI Express Boards Software Installation
3-2
Windows Drivers
Moxa provides drivers that allow you to use the PCI Express Series serial boards under Windows 7/8 and
Windows 2008/Vista/2003/XP/2000.
The overall procedure for installing the Windows
drivers for the PCI Express boards is
summarized in the flowchar t on th
e right.
Windows 7/8/8.1 (32-bit/64-bit)
Since the Windows 8 installation procedures and popup windows are almost the same as Windows 7, in this
section we describe the installation p rocedure for Windows 7 to illustrate.
Installing the Driver
The following procedure describes how to install the CP-104EL-A driver for t he first time with Windows 7. First,
make sure that you have already plugged the board or boards into the system’s PCI Express slot(s).
NOTE
If you have already installed a CP
-104EL-A or other Moxa PCI Express board in your computer, and you are
installing additional boards, Windows 7 will automatically detect and install the new board(s) the next time you
boot up the computer. In this case, proceed directly to the next section, “Configuring the Ports,” to configure
the ports’ serial transmission par a meters.
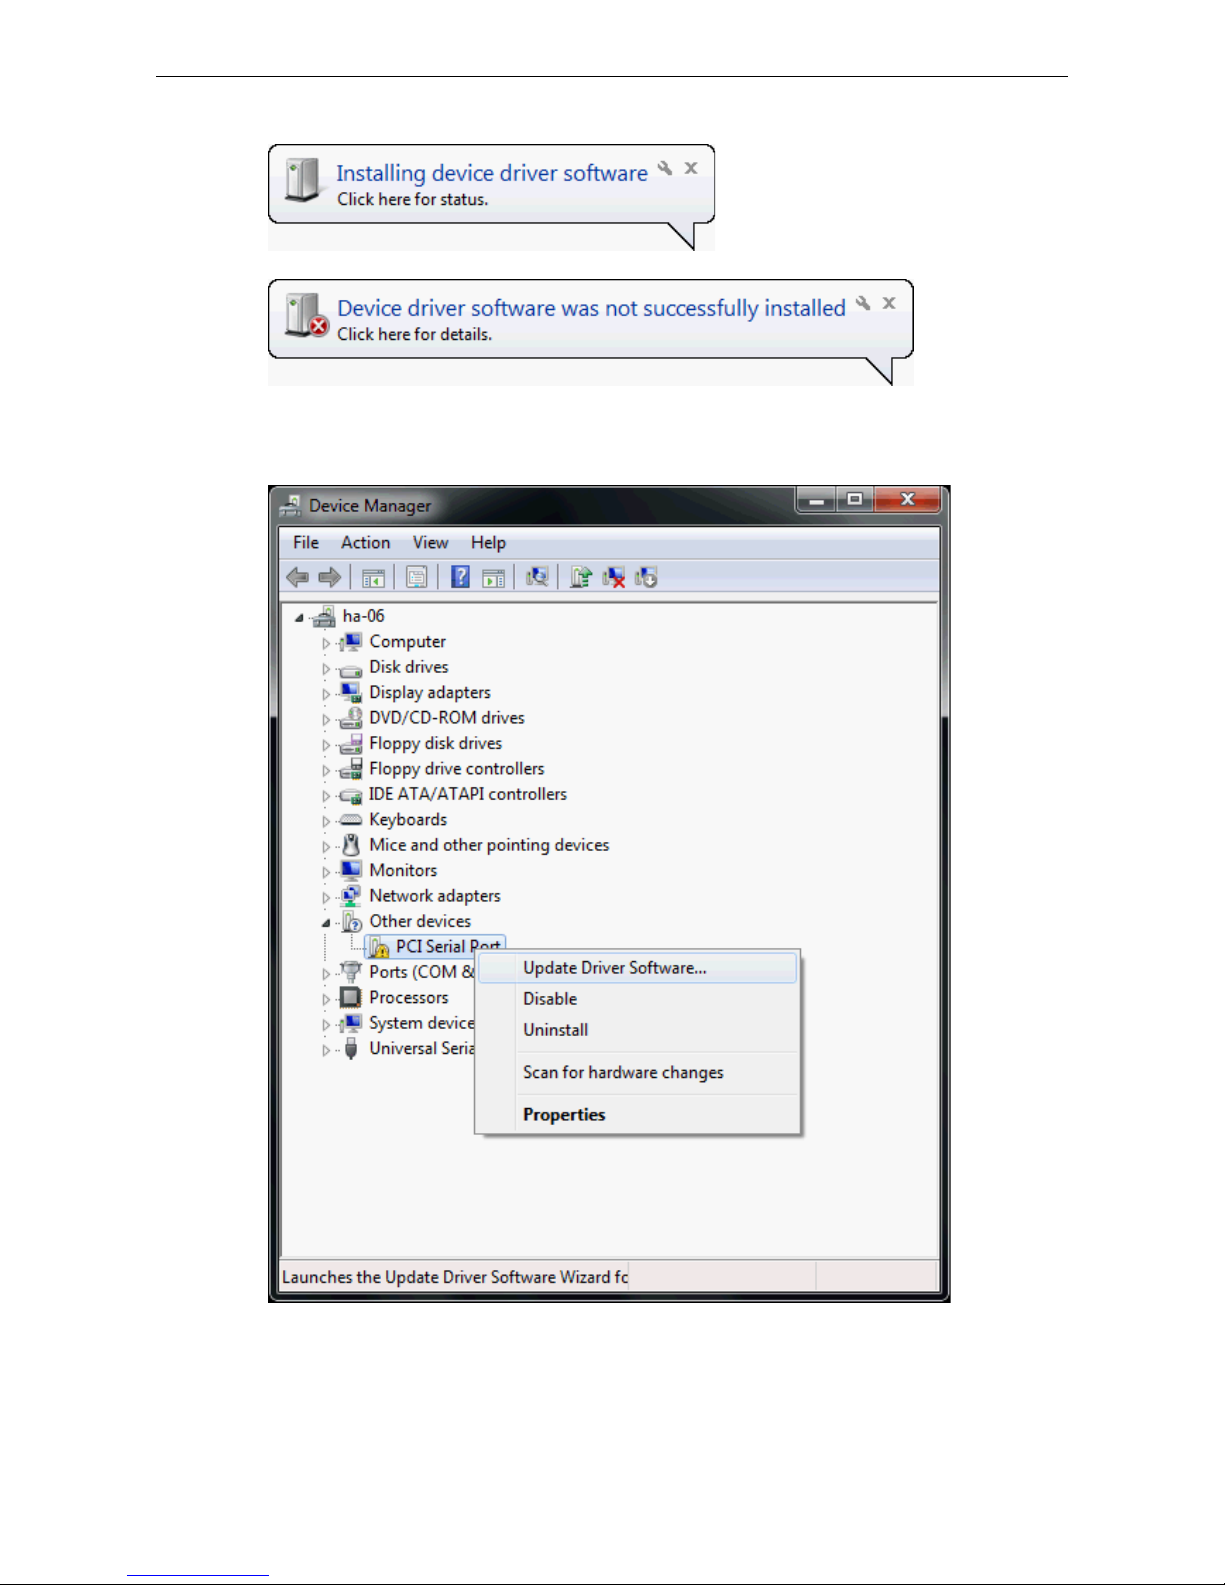
1. After plugging the board into an expansion slot and powering on your PC, Windows 7 will automatically
detect the new board, and a popup window* that states Device driver software was not successfully
installed will appear in the lower right corner of your computer screen.
Plug the PCI Express board into an empty
PCI Express slot. See the Hardware
Installation chapter for details.
Turn on your PC. Windows will
automatically detect the board .
Install the driver from the Documentatio n
and Software CD. See the Installing the
Driver for the First Time subsection in
this chapter for detailed instructions.
Configure the board’s ports. See the
Configuring the Ports subsection in this
chapter for detailed instructions.
The PCI Express board and ports are ready
to use.
Driver already installed?
No Yes
Page 19
PCI Express Boards Software Installation
3-3
*The popup message will not appear in Windows 8.
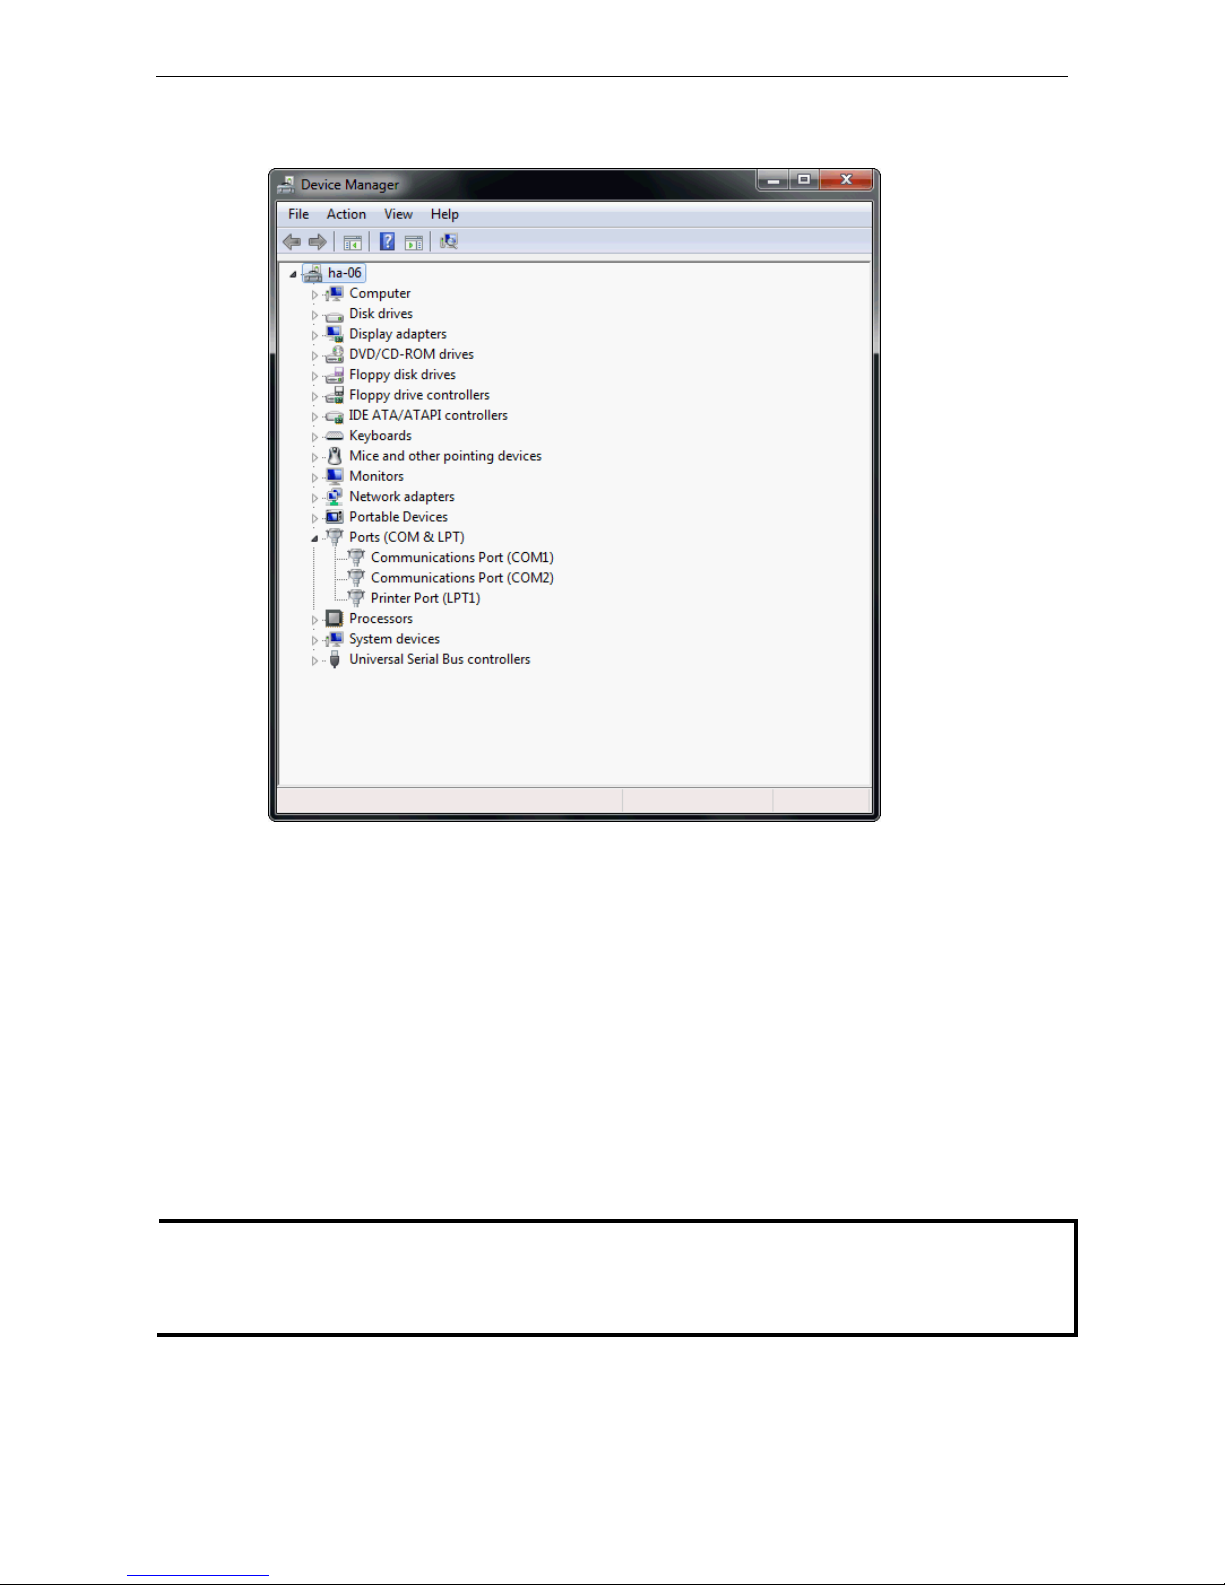
2. Go to Device Manager/Other devices to install the PCI Serial Port driver. Right click on the PCI Serial
port. Windows will offer to conn ect to the Windows update site to search for a d river. Select Update Driver
Software….
Page 20
PCI Express Boards Software Installation
3-4
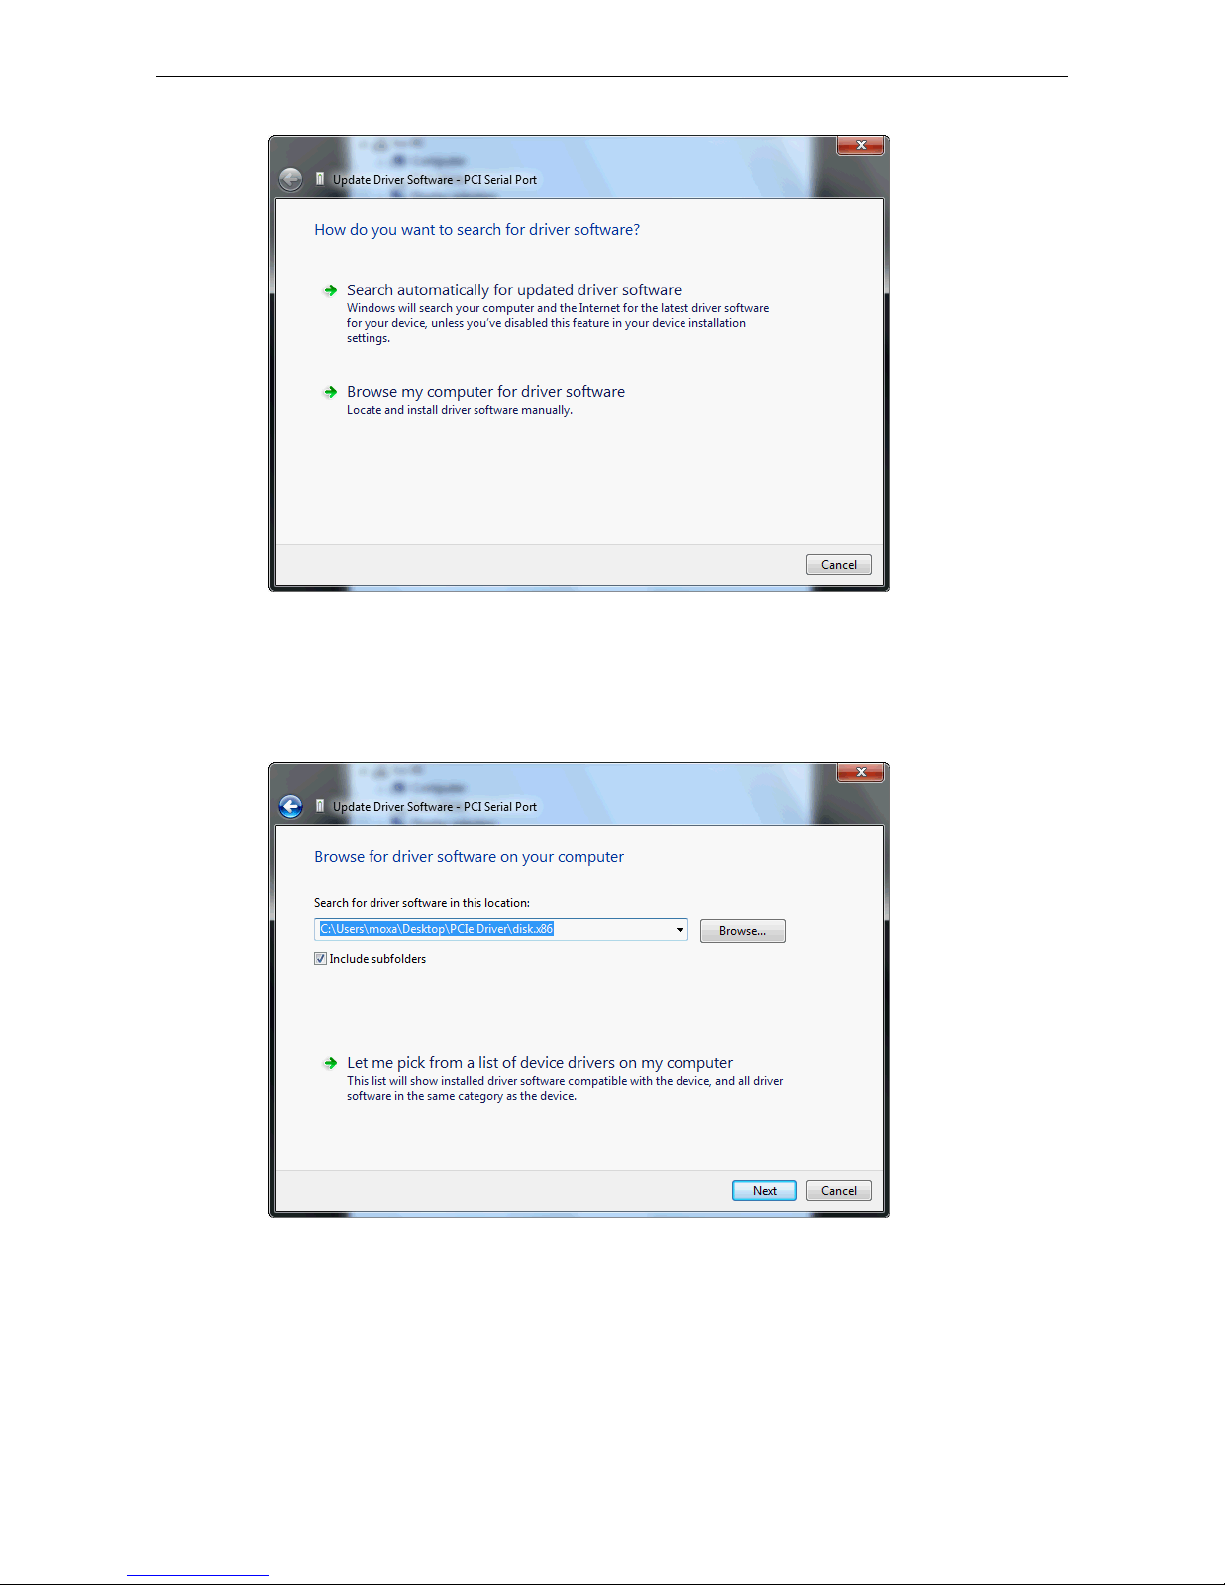
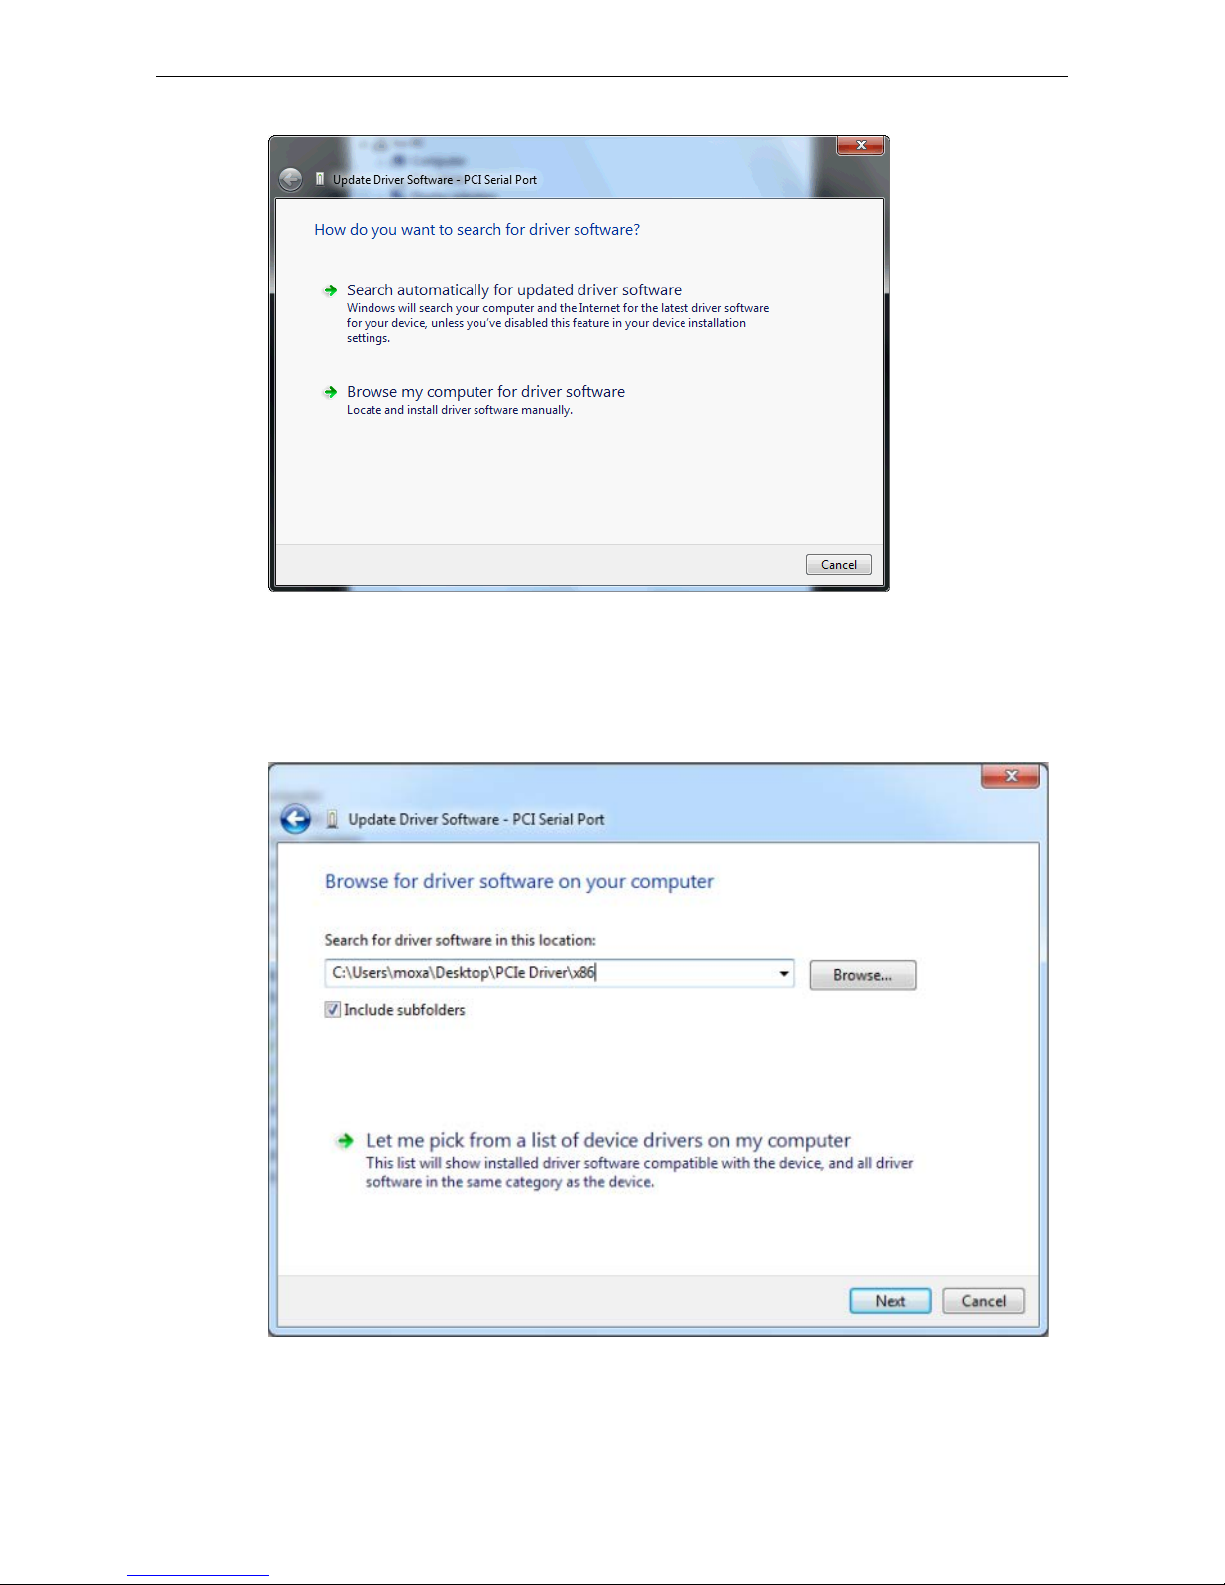
3. Select Browse my computer for device software to continue.
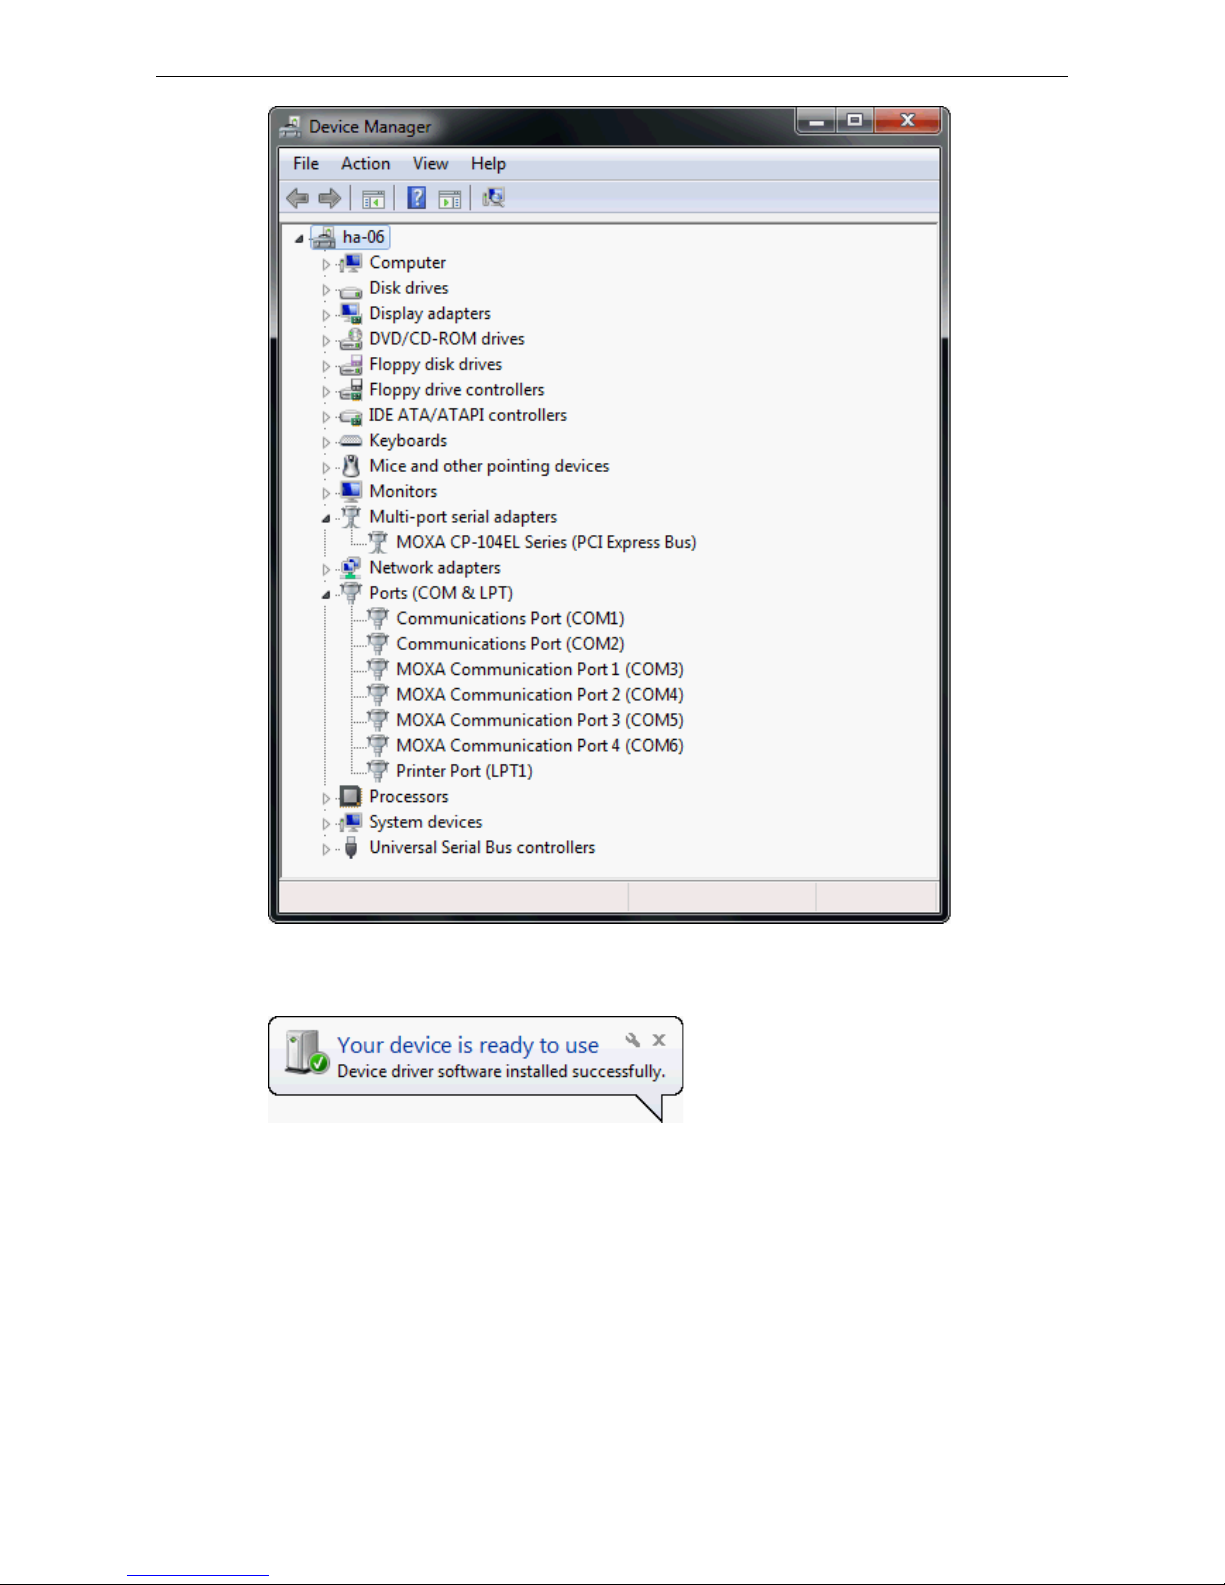
4. Select Search for driver software in this location, select Include subfolders, and then click Browse.
If the system is a 32-bit (x86) platform, navigate to the \CP-104EL-A Series\Software\Windows
7\x86 folder on the CD. If the system is a 64-bit (x64) platform, navigate to the \CP-104EL-A
Series\Software\Windows 7\x64 folder on the CD, and then click Next to continue.
The following figure shows the path for x86.
Page 21
PCI Express Boards Software Installation
3-5
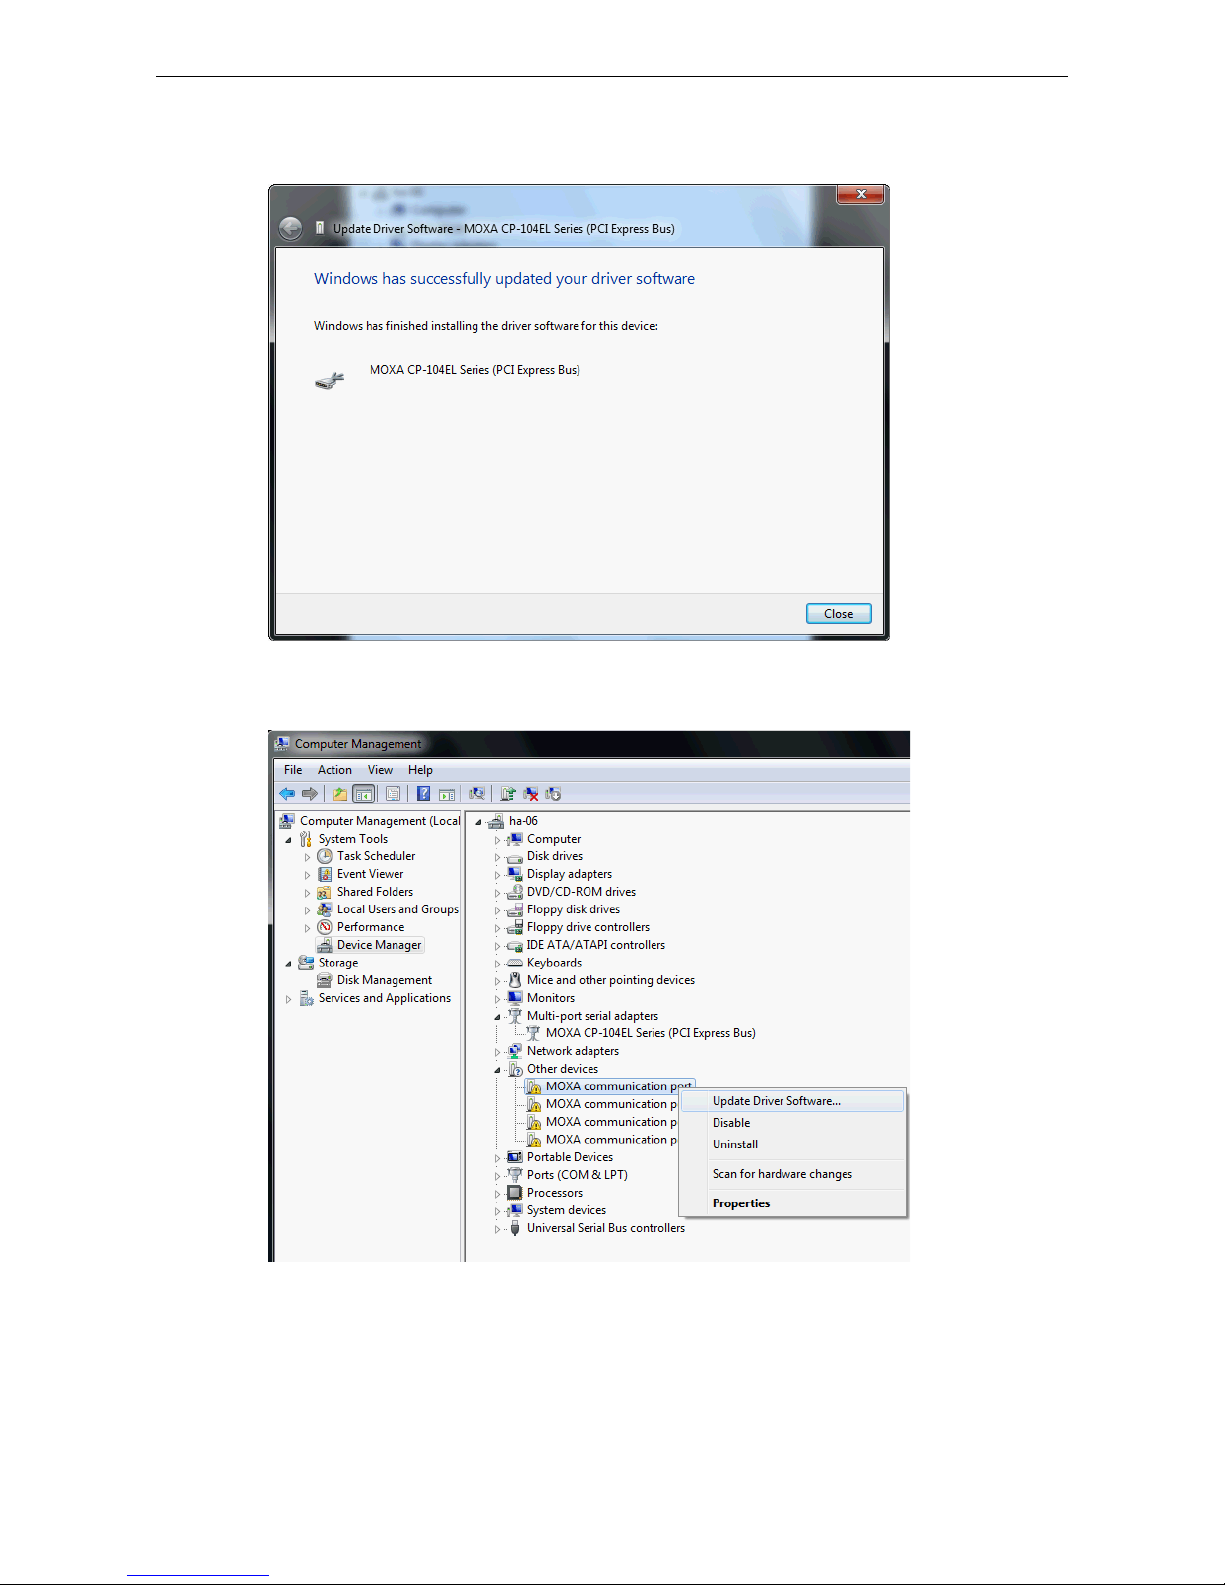
5. Wait while the driver software is installed. The next window shows the model name of the board, and
indicates that Windows has complet ed the driver installation. Click Close to proceed with the rest of the
installation procedure.
6. After installing the multiport serial adapter driver, install the Moxa Port driver next. Right click on MOXA
communication port. A popup window will open to help you install the driver for MOXA Port 0. Select
Update Driver Software…
Page 22
PCI Express Boards Software Installation
3-6
7. Select Browse my computer for device software to continue.
8. Select Search for driver software in this location, select Include subfolders, and then click Browse.
If the system is a 32-bit (x86) platform, navigate to the \CP-104EL-A Series\Software\Windows
7\x86 folder on the CD. If the system is a 64-bit (x64) platform, navigate to the \CP-104EL-A
Series\Software\Windows 7\x64 folder on the CD, and then click Next to cont inue.
The following figure shows the path for x86.
Page 23

PCI Express Boards Software Installation
3-7
9. After all files have been copied to the system, a window showing Windows has successfully updated
your driver software will open to indicate that it has finished installing MOXA Port 0. The Port installation
procedure is complete when Port 0 has been set up.
10. Repeat Step 7 through Step 11 for each of the remaining three ports. The last port to be installed wil l be
Moxa Port 3, as shown in the following figure.
Page 24
PCI Express Boards Software Installation
3-8
11. In Window s 7, a message stating Your device is ready to use will pop up* to inform you that the
hardware was installed successfully.
*The popup message will not appear in Windows 8.
Page 25

PCI Express Boards Software Installation
3-9
Configuring the Ports
After the driver has been installed, use Device Manager to configure the CP-104EL-A serial ports.
1. Expand the Multi-port serial adapters tab, right click MOXA CP-104EL Series (PCI Express Bus), and
then click Properties to open the board’s configuration panel.
Page 26

PCI Express Boards Software Installation
3-10
2. Click the port you would like to configure to highlight it, and then click Port Setting.
3. Select a COM number for the port from the Port Number pull-down list. Select the Auto Enumerating
COM Number option to map subsequent ports automatically. The p ort numbers will be assigned in
sequence. For example, if COM 3 is assigned to Port 1, then COM 4 (if not already occupied) will be assigned
to Port 2, etc.
Page 27
PCI Express Boards Software Installation
3-11
4. Select an Rx FIFO Trigger from the Rx FIFO Level pull-down list. Rx FIFO trigger levels of High, Middle,
and Low are available, with the default set to High (120 bytes). Select Set the change to all ports option
to apply this Rx FIFO Trigger to all ports.
5. Select a Tx FIFO Level from the Tx FIFO Leve l pull-down list. Tx FIFO Levels of High, Middle, and Low
are available, with the default set to High (128 bytes). Select Set the change to all ports option to apply
the just defined Tx FIFO Size to all ports.
Tx FIFO
Rx FIFO
High
128
120
Middle
64
60
Low 1 1
Unit: Bytes
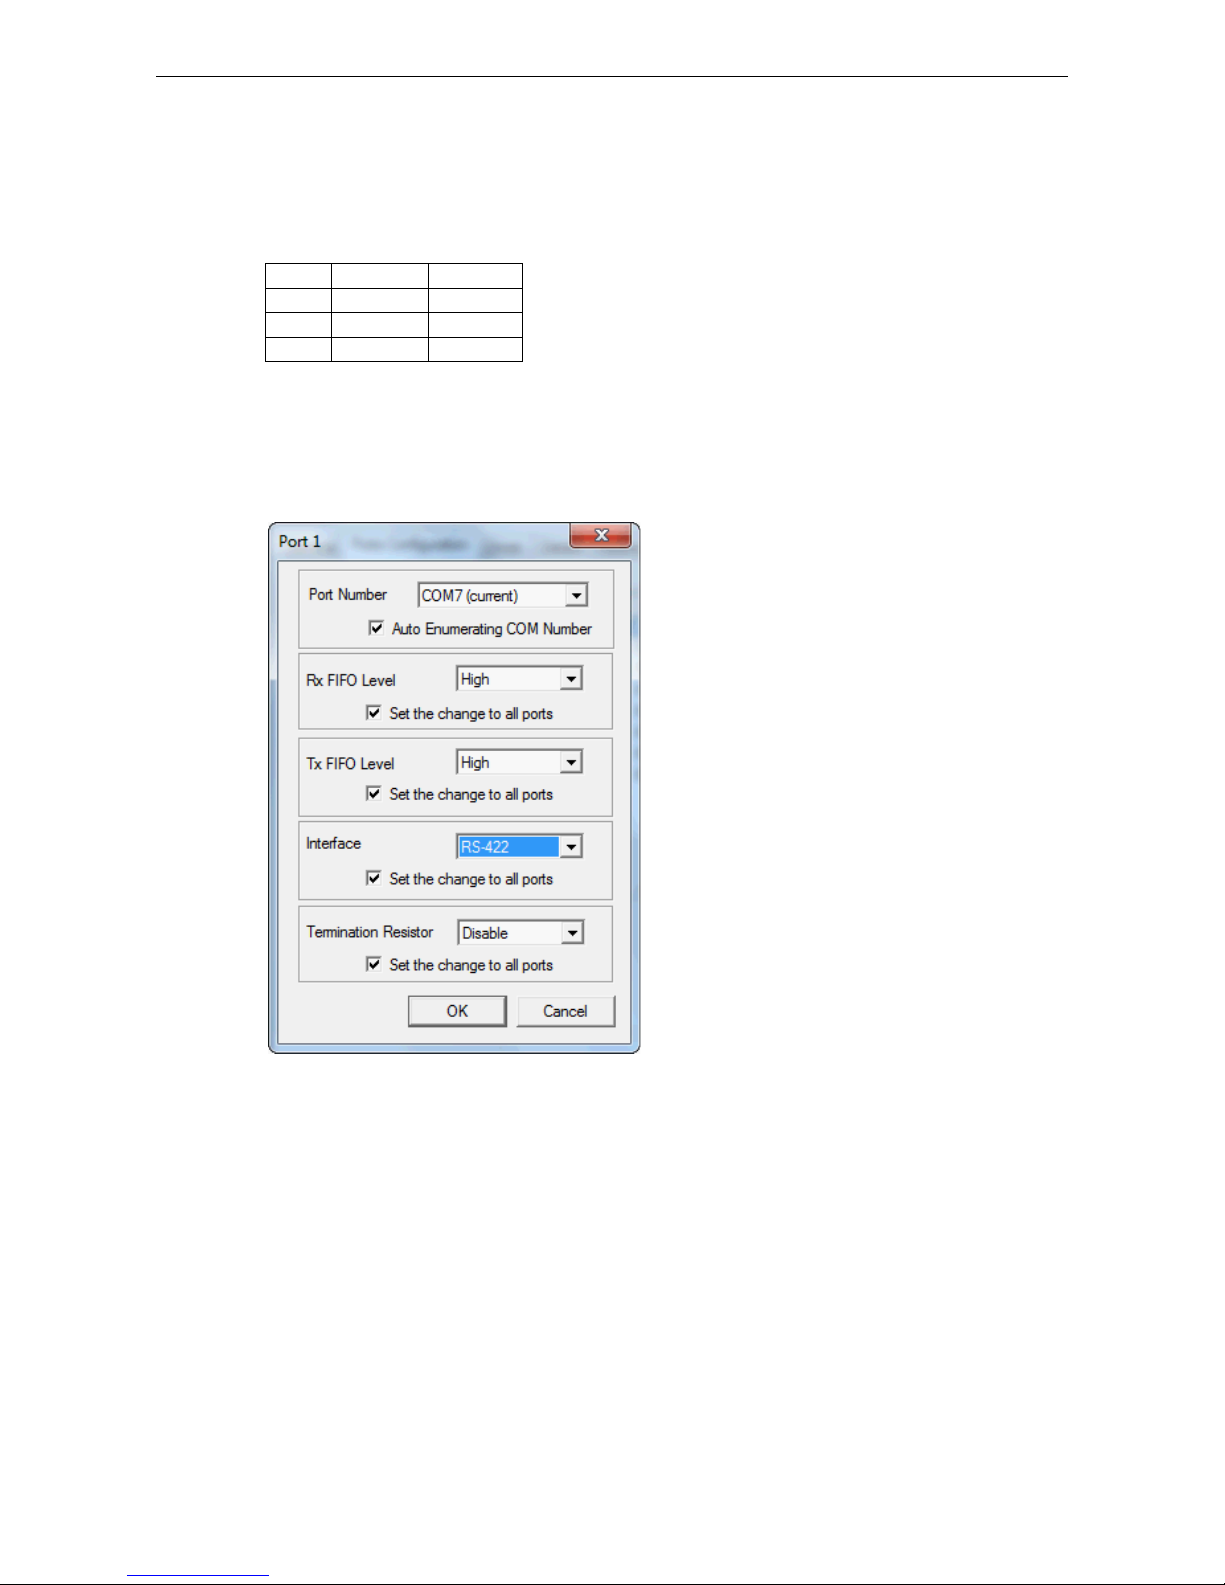
6. If you are using CP-118EL-A, CP-114EL, CP-114EL-I, CP-132EL, or CP-132EL-I, select Interface (RS-232,
RS-422, RS-485-2W, or RS-485-4W) and Termination Resistor (120Ω, Enable, or Disable) to configure.
We use the CP-118EL-A to illustrate. The following figure shows the settings for configuring the port for
RS-422 and no Termination Resistor (select Disable).
7. Click OK to save the port settings, and then click OK in the Property window to finish the port settings
procedure.
Page 28
PCI Express Boards Software Installation
3-12
Removing the Driver
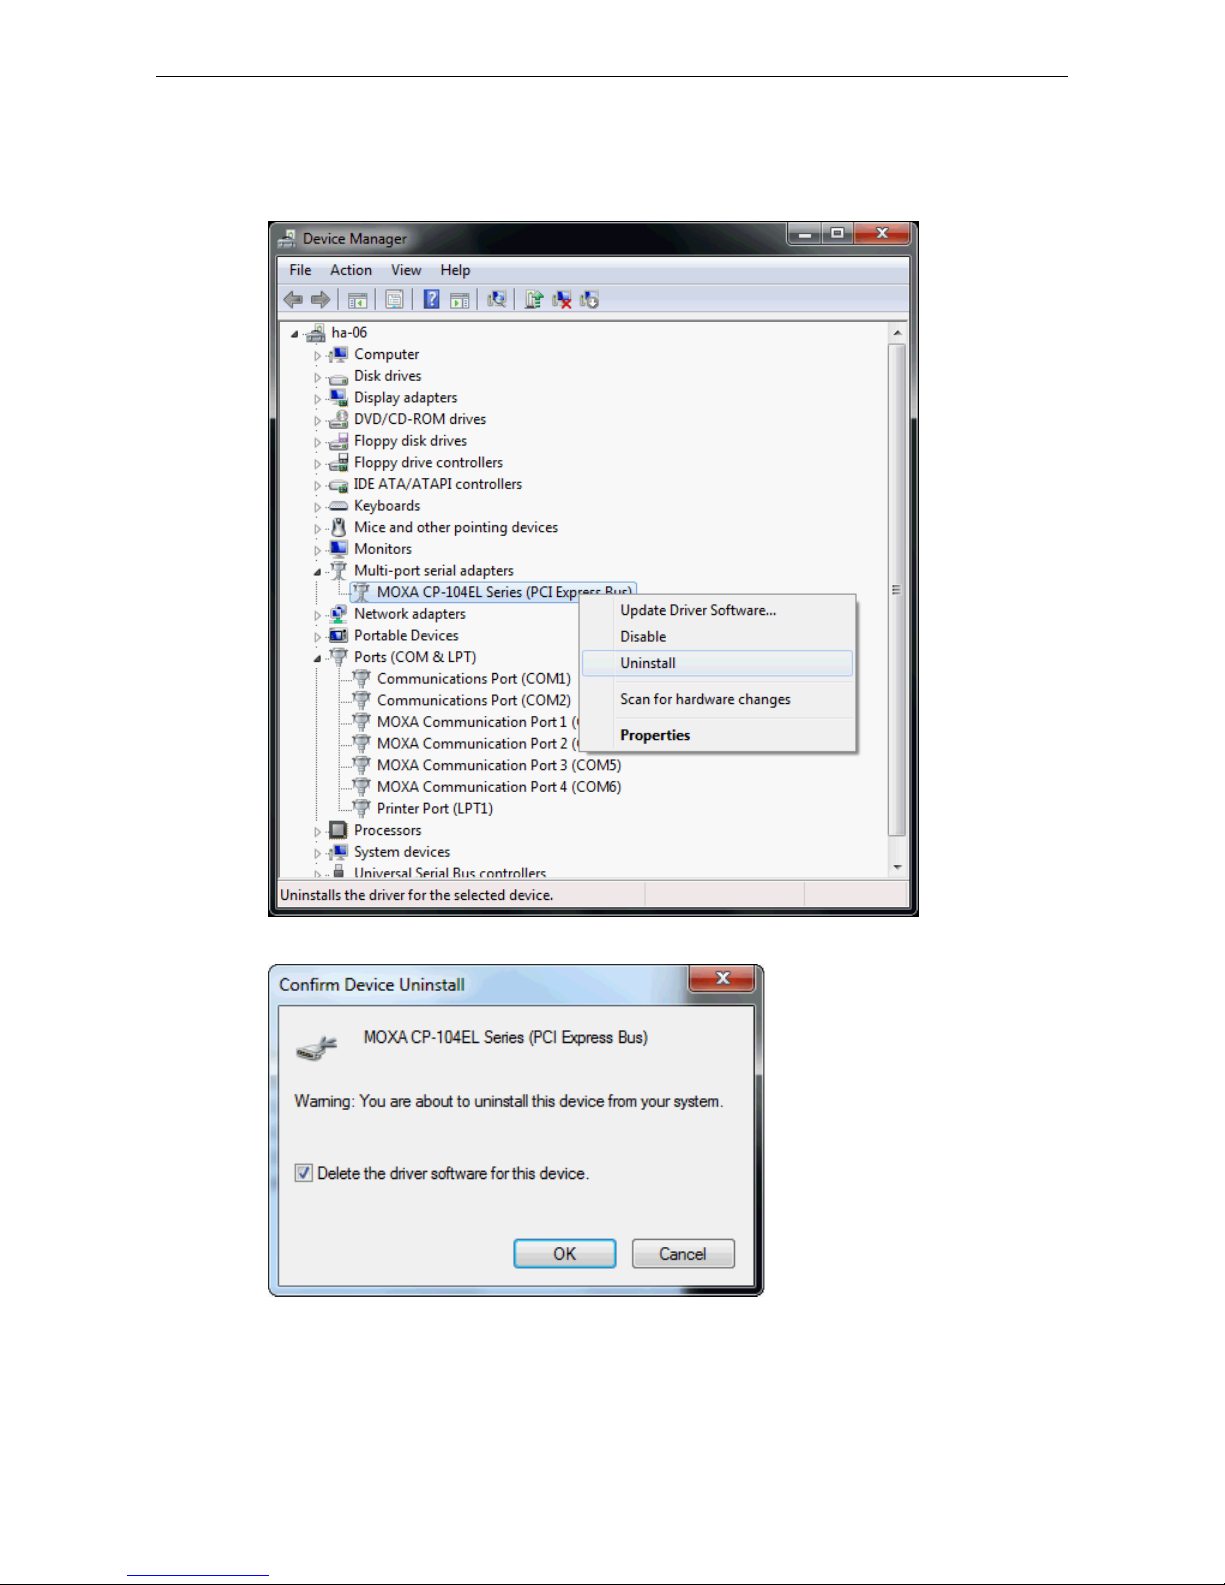
1. Open Device Manager and use the mouse to place the cursor over the CP-104EL-A Series board under
Multi-port serial adapters, click th e r ight mouse button, and then select the Uninstall option.
2. Select Delete the driver software for this device and click OK to proceed with uninstalling the board.
Page 29
PCI Express Boards Software Installation
3-13
3. The Device Manager window refreshes a utomatically, showing that the driver and ports for the
CP-104EL-A Series board have been removed.
Windows 2008/Vista (32-bit/64-bit)
In this section, we describe the installation procedure for Windows Vista . The installation procedure for
Windows 2008 is similar.
Windows 2008 and Windows Vista support up to 256 serial ports from COM1 to COM256. In order to make the
best use of Windows 2008/Vista’s mu lti-process/multi-thread advanced features, 32-bit and 64-bit Windows
2008/Vista device drivers were developed for Moxa multiport boards. The drivers conform to the Win32 COMM
API standard.
Installing the Driver
The following procedure describes how to install the CP-114EL driver for the first time with Windows Vista. First,
make sure that you have already plugged the board or boards into the system’ s PCI Express slot(s).
NOTE
If you have already installed a CP
-114EL or other Moxa PCI Express board in your computer, and you are
installing additional boards, Windows 200
8/Vista will automatically detect and insta
ll the new board(s) the next
time you boot up the computer. In this case, proceed direc tly to the next section, “Conf iguring the Ports,” to
configure the ports’ serial transmission parameters.
Page 30
PCI Express Boards Software Installation
3-14
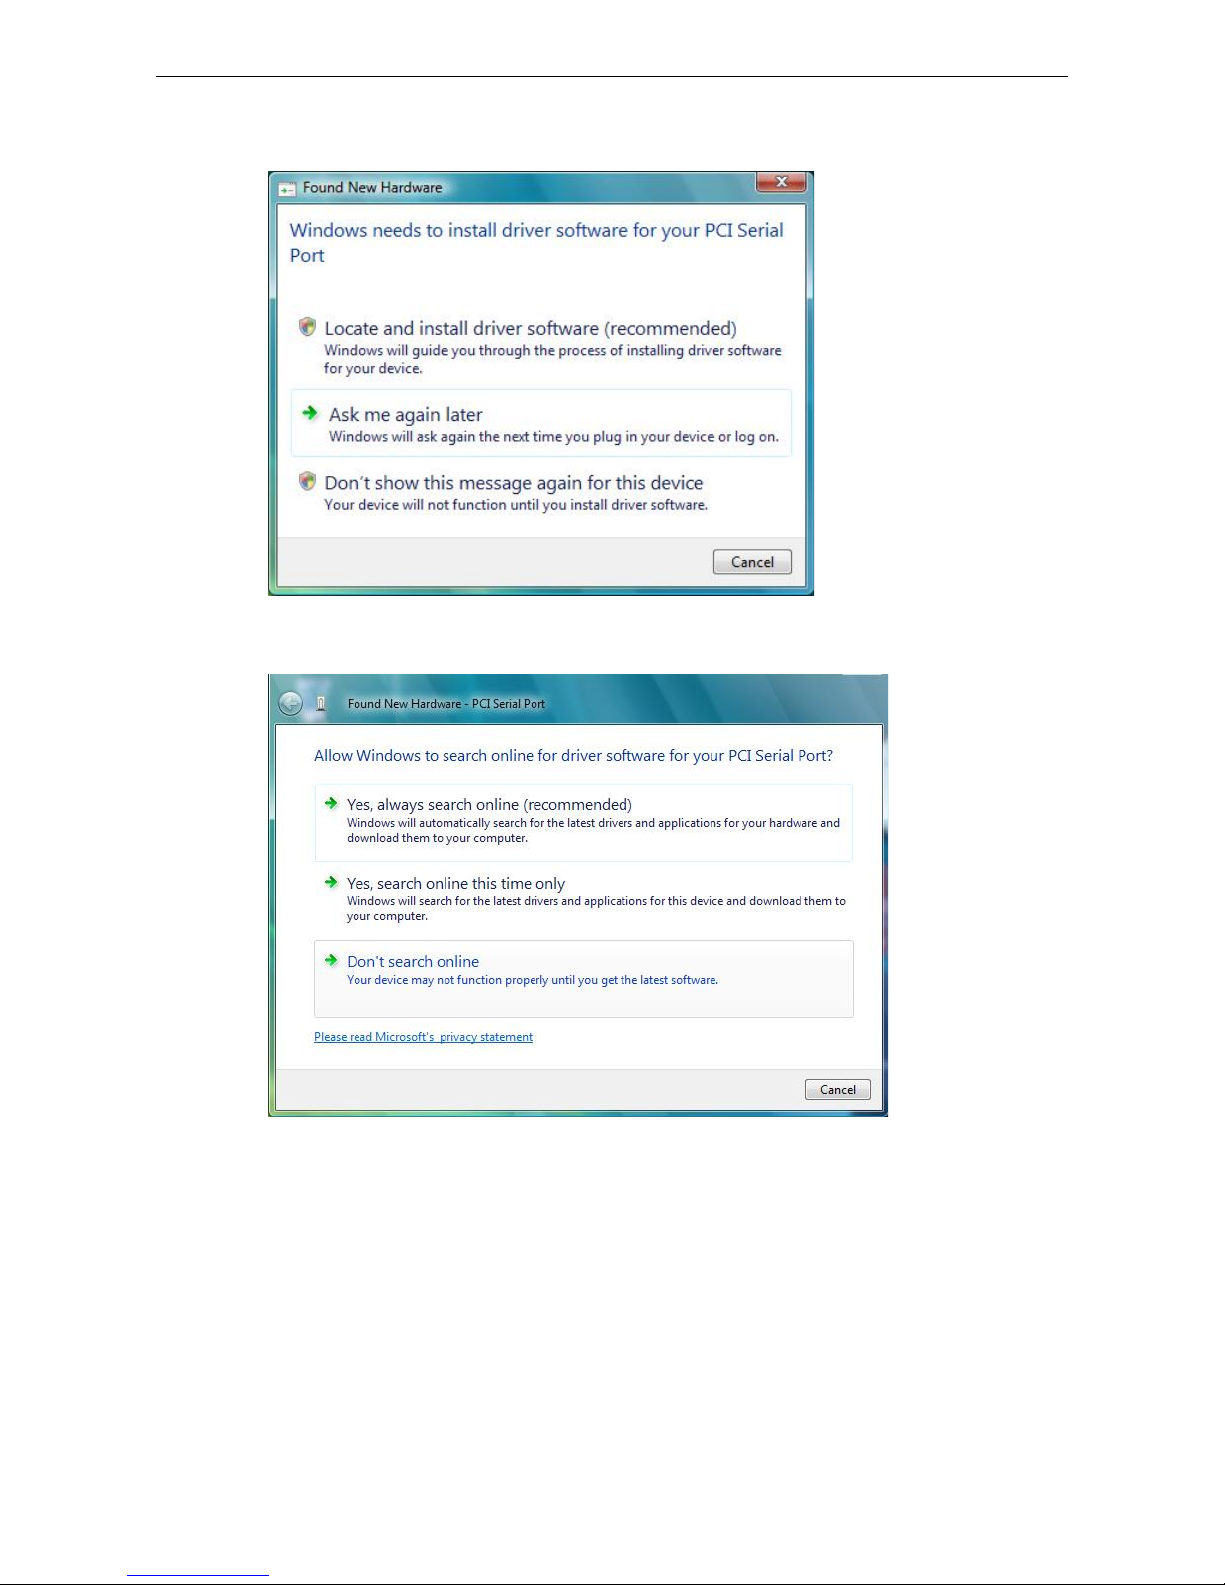
1. After plugging the board into an expansion slot and powering on your PC, Windows Vista will automatically
detect the new board, and the Found New Hardware window will open.
2. The Found New Hardware – PCI Serial Port window will open automatically. This window will offer to
connect to the Windows update site to search for a driver. Select Don’t search online.
Page 31

PCI Express Boards Software Installation
3-15
3. Select I don’t have the disc. Show me other options, and then click Browse my computer for device
software (advanced) to continue.
Page 32

PCI Express Boards Software Installation
3-16
4. Select Search for driver software in this location, select Include subfolders, and then click Browse.
If the system is a 32-bit (x86) platform, navigate to the \CP-114EL Series\Software\Windows
2008_Vista\x86 folder on the CD. If the system is a 64-bit (x64) platform, navigate to the \CP-114EL
Series\Software\Windows 2008_Vista\x64 folder on the CD, and then click Next to continue.
The following figure shows the path for x86.
The following figure shows the path for x64.
Page 33

PCI Express Boards Software Installation
3-17
5. Wait while the installation wizard searches for the correct drivers. The next window that opens cautions you
that although this software has not passed Windows Logo testing, the driver has been tested and shown
that it can support the Windows OS. Click Install this driver software anyway to proceed.
6. Wait while the driver software is installed. The next window shows the model name of the board, and
indicates that Windows has complet ed the driver installation. Click Close to proceed with the rest of the
installation procedure.
Page 34

PCI Express Boards Software Installation
3-18
7. The Found New Hardware window will open to help you install the driver for MOXA Port 0. Select Don’t
search online.
8. Select Browse my computer for driver software (advanced).
Page 35

PCI Express Boards Software Installation
3-19
9. Select Search for driver software in this location, select Include subfolders, and then click Browse.
If the system is a 32-bit (x86) platform, navigate to the \CP-114EL Series\Software\Windows
2008_Vista\x86 folder on the CD. If the system is a 64-bit (x64) platform, navigate to the \CP-114EL
Series\Software\Windows 2008_Vista\x64 folder on the CD, and then click Next to continue.
The following figure shows the path for x86.
The following figure shows the path for x64.
Page 36

PCI Express Boards Software Installation
3-20
10. Wait while the ins tallation wizard searches. The next window that open s caut io ns you that although this
software has not passed Windows Logo testing, the driver has been tested and shown that it can support
the Windows OS. Click Install this driver software anyway to proceed.
11. After all files have been copied to the system, the software for this device has been successfully
installed window will open to indicate that it has finished installing Port 0. The port installation procedure
is complete when Port 0 has been set up.
12. The Your devices are ready to use popup will reappear to inform you that the hardware was installed
successfully.
Page 37

PCI Express Boards Software Installation
3-21
Configuring the Ports
After the driver has been installed, use Device Manager to configure the CP-114EL serial ports.
1. Click Start Settings Control Panel System, select the Hardware tab, and then click Device
Manager.
2. Expand the Multi-port serial adapters tab, right click MOXA CP-114EL Series (PCI Express Bus), and
then click Properties to open the board’s configuration panel.
Page 38

PCI Express Boards Software Installation
3-22
3. Click the port you would like to configure to highlight it, and then click Port Setting.
4. Select a COM number for the port from the Port Number pull-down list.
5. Select the Auto Enumerating COM Number option to map subsequent ports automatically. The port
numbers will be assigned in sequence. For example, if COM 3 is assigned to Port 1, then COM 4 (if not
already occupied) will be assigned to Port 2, etc.
6. Select an Rx FIFO Trigger from the Rx FIFO Level pull-down list. Rx FIFO trigger levels of High, Middle,
and Low are available, with the default set to High (120 bytes). Select Set the change to all ports option
to apply this Rx FIFO Trigger to all ports.
7. Select a Tx FIFO Level from the Tx FIFO Level drop-down list. Tx FIFO Levels of High, Middle, and Low
are available, with the default set to High (128 bytes). Select Set the change to all ports option to apply
the just defined Tx FIFO Size to all ports.
Tx FIFO
Rx FIFO
High
128
120
Middle
64
60
Low 1 1
Unit: Bytes
Page 39

PCI Express Boards Software Installation
3-23
8. If you use the CP-114EL, CP-114EL-I, CP-132EL, CP-132EL-I, CP-118EL-A, select Interface (RS-232,
RS-422, RS-485-2W, or RS-485-4W) and Termination Resistor (120Ω, Enable, or Disable) to configure.
We use CP-114EL to illustrate. The following figure shows the settings for configuring the port for RS-422
and no Termination Re sistor (select Disable ).
9. Click OK to save the port settings, and then click OK in the Property window.
Using Event Log
To use the Event Log to check the installation of your MOXA boards, click Start Settings Control Panel
Administrative Tools Event Viewer to enter the Event Viewer utility. Look under the System category
to find the latest information relev a nt to Mox a’s drivers.
Removing the Driver
1. To uninstall the driver, click Start Settings Control Panel System, select the Hardware tab, and
then click Device Manager. Use the mo use to place the cursor over the CP-114EL Series board under
Multi-port serial adapters, click th e r ight mouse button, and then select the Uninstall option.
Page 40

PCI Express Boards Software Installation
3-24
2. Select Delete the driver software for this device and click OK to proceed with uninstalling the board.
3. The Device Manager window refreshes automatically, showing that the driver and ports for the CP-114EL
Series board have been removed.
Page 41

PCI Express Boards Software Installation
3-25
Windows 2003/XP (32-bit/64-bit)
In this section, we describe the installation procedure for Windows XP. The installation procedure for Windows
2003 is similar.
Windows 2003/XP support up to 256 serial ports, from COM1 to COM256. In order to make the best use of
Windows 2003/XP’s multi-process/multi-thread advanced features, 32-bit and 64-bit Windows 2003/XP device
drivers were developed for Moxa multiport boards. The drivers conform to the Win32 COMM API standard.
Installing the Driver
The following procedure shows how to install the CP-118EL-A driver for the first time under Windows XP. First,
make sure that you have already plugged the board or boards into the system’s PCI Express slot(s).
NOTE
If you have already installed a CP
-118EL-A or other Moxa PCI Express board in your computer, and you are
installing additional boards, Windows 2003/XP will automatically detect and install the new board(s) the next
time you boot up the computer. In this case, proceed direc tly to the next section, “Conf iguring the Ports,” to
configure the ports’ serial transmission parameters.
1. After plugging the board into an expansion slot and powering on your PC, Windows XP will automatically
detect the new board, and the Found New Hardware balloon will open in the bottom right corner of the
Windows desktop.
2. The Welcome to the Found New Hardware Wizard window will open automatically. This window will
offer to connect to the Windows update site to search for a driver. Select No, not at this time and click
Next to continue.
Page 42

PCI Express Boards Software Installation
3-26
3. Select Install from a list or specific location (Advanced), and then click Next to continue
4. Select Search for the best driver in these locations, select In clu de this location in the
search, and then click Browse. If the system is a 32-bit (x86) platform, navigate to the \CP-118EL
Series\Software\Windows XP_2003\x86 folder on the CD. If the system is a 64-bit (x64) platform ,
navigate to the \CP-118EL Series\Software\Windows XP_2003\x64 folder on the CD, and then click
Next to continue.
The following figure shows the path for x86.
Page 43

PCI Express Boards Software Installation
3-27
The following figure shows the path for x64.
5. Wait while the installation wizard searches for the correct drivers. The next window that opens cautions you
that although this software has not passed Windows Logo testing, the driver has been tested and shown
that it can support the Windows OS. Click Continue Anyway to proceed.
Page 44

PCI Express Boards Software Installation
3-28
6. Wait wh ile the driver software is installed.
7. The next window shows the model name of the board, and indicates that Windows has completed the driver
installation. Click Finish to proceed with the rest of the installation procedure.
Page 45

PCI Express Boards Software Installation
3-29
8. The Foun d New Hardware Wizard window will open to help you install the driver for Moxa Port 0. This
window will offer to connect to the Windows update site to search for a driver. Select No, not at this time
and then click Next to continue.
9. Select Install from a list or specific location (Advanced), and then click Next to proceed.
Page 46

PCI Express Boards Software Installation
3-30
10. Select Search for the best driver in these locations, select Include this location in the search, and
then click Browse. If necessary, use the Browse button to navigate to the \CP-118EL
Series\Software\Windows XP_2003\x86 folder (32 bit platform) or \CP-118EL
Series\Software\Windows XP_2003\x64 folder (64 bit platform), and then click Next to proceed.
The following figure shows the path for x86.
The following figure shows the path for x64.
Page 47

PCI Express Boards Software Installation
3-31
11. Wait while the ins tallation wizard searches. The next window that open s caut io ns you that although this
software has not passed Windows Logo testing, the driver has been tested and shown that it can support
the Windows OS. Click Continue Anyway to proceed.
12. Wait while the wizard installs the software.
Page 48

PCI Express Boards Software Installation
3-32
13. After all files have been copied to the system, the Completing the Found New Hardware Wizard
window will open to indicate that it has finished installing Port 0. Click Finish to proceed with the rest of the
installation.
14. Repeat Step 7 through Step 11 for each of the remaining seven ports. The last port to be installed will be
Moxa Port 7, as shown in the following figure.
15. The Found New Hardware balloon will reappear to inform you that the hardware was installed
successfully.
Page 49

PCI Express Boards Software Installation
3-33
Configuring the Ports
After the driver has been installed, use Device Manager to configure the CP-118EL serial ports.
1. Click Start Settings Control Panel System, select the Hardware tab, and then click Device
Manager.
2. Expand the Multi-port serial adapters tab, right click Moxa CP-118EL Series (PCI Express Bus), and
then click Properties to open the board’s configuration panel.
Page 50

PCI Express Boards Software Installation
3-34
3. Click the port you would like to configure to highlight it, and then click Port Setting.
4. Select a COM number for the port from the Port Number drop-down list.
5. Select the Auto Enumerating COM Number option to map subsequent ports automatically. The port
numbers will be assigned in sequence. For example, if COM 3 is assigned to Port 1, then COM 4 (if not
already occupied) will be assigned to Port 2, etc.
6. Select an Rx FIFO Tri gger from the Rx FIFO Level drop-down list. Rx FIFO trigger levels of High, Middle,
and Low are available, with the default set to High (120 bytes). Select Set the change to all ports option
to apply this Rx FIFO Trigger to all ports.
7. Select a Tx FIFO Level from the Tx FIFO Level drop-down list. Tx FIFO Levels of High, Middle, and Low
are available, with the default set to High (128 bytes). Select Set the change to all ports option to apply
the just defined Tx FIFO Size to all ports.
Tx FIFO
Rx FIFO
High
128
120
Middle
64
60
Low 1 1
Unit:
Bytes
Page 51

PCI Express Boards Software Installation
3-35
8. If you use the CP-118EL-A, CP-114EL, CP-114EL-I, CP-132EL, CP-132EL-I, select Interface (RS-232,
RS-422, RS-485-2W, or RS-485-4W) and Termination Resistor (120Ω, Enable, or Disable) to configure.
The CP-114EL is used to illustrate. The following figure shows the settings for configuring the port for
RS-422 and no Termination Resistor (select Disable).
9. Click OK to save the port settings, and then click OK in the Property window to finish the port settings
procedure.
Using Moxa PComm Utility
The PComm Diagnostic program is a useful tool for checking the status of Moxa’s multiport boards. The
program can be used to test internal and external IRQ, TxD/ RxD, UART, CTS/RTS, DTR/DSR, etc. Use this
program to ensure that your Moxa boards and ports are working properly.
To start the program, click Start Programs PComm Lite 2000 PComm Diagnostic.
NOTE
You can download the PComm Lite software for free from Moxa’s website at
www
.moxa.com/support/free_downloads.htm.
Page 52

PCI Express Boards Software Installation
3-36
Using Event Log
To use the Event Log to check the installation of your Moxa boards, click Start Settings Control Panel
Administrative Tools Event Viewer to enter the Event Viewer utility. Look under the System category
to find the latest information relevant to Moxa’s drivers.
Removing the Driver
1. To uninstall the driver, click Start Settings Control Panel System, select the Hardware tab, and
then click Device Manager. Use the mo use to place the cursor over the CP-118EL Series board under
Multi-port serial adapters, click th e r ight mouse button, and then select the Uninstall... option.
2. Click OK to proceed with uninstalling th e board.
Page 53

PCI Express Boards Software Installation
3-37
3. The Device Manager window refreshes automatically, showing that the driver and ports for the CP-118EL
Series board have been removed.
Windows 2000
In this section, we describe the installation procedure for Windows 2000.
Windows 2000 supports up to 256 serial ports, from COM1 to COM256. In order t o utilize fully Windows 2000’s
multi-process and multi-thread advanced features, pure 32-bit Windows 20 00 device drivers were developed
for Moxa multiport boards. The drivers conform to the Win32 COMM API standard.
Installing the Driver for the First Time
The following procedure shows how to install the CP-118EL-A driver for the first time under Windows 2000.
First, make sure you have already plugged the board or boards into the system’s PCI Express slot(s).
NOTE
If you have already installed a CP
-118EL-A or other Moxa PCI Express board in your computer, and you are
installing additional boards, Windows 2000 will automatically detect and install the new board(s) the next time
you bo
ot up the computer. In this case, proceed directly to the n e xt section, “Configuring the Ports,” to
configure the ports’ serial transmission parameters.
1. After plugging the board into an expansion slot and powering on your PC, Windows 2000 will automatically
detect the new board, and the Found New Hardware window will be displayed for a moment or two.
Page 54

PCI Express Boards Software Installation
3-38
2. When the Welcome to the Found New Hardware Wizard window open s, click Next to continue.
3. Select Sea rch for a suitable driver for my device (recommended), and then click Next to continue.
Page 55

PCI Express Boards Software Installation
3-39
4. Select Specify a location and then click Next to continue.
5. Navigate to the \CP-118EL Series\Software\Windows 2K folder on the software CD, and then clic k OK
to continue.
6. Click Next to copy the driver files to your system.
Page 56

PCI Express Boards Software Installation
3-40
7. The next window that opens cautions you that although this software has not passed Windows Logo testing,
the driver has been tested and shown that it can support the Windows OS. Click Yes to proceed.
8. Wait while the files are copied to your hard drive.
9. The next window shows the model number of the boar d, and indicates that Windows has completed the
driver installation. Click Finish to continue with the rest of the insta llation procedure.
Page 57

PCI Express Boards Software Installation
3-41
10. The Found New Hardware Wizard window will open to help you install the driver for Moxa Port 0. Click
Next to continue.
11. Select Search for a suitable driver for my device (recommended), and then click Next to continue.
Page 58

PCI Express Boards Software Installation
3-42
12. Select Specify a location and then click Next to continue.
13. Navigate to the \CP-118EL Series\Software\Windows 2K folder on the software CD, and t hen click OK
to continue.
14. Wait while the installation wizard searches.
Page 59

PCI Express Boards Software Installation
3-43
15. The next window that opens cautions you that although this software has not passed Windows Logo testing,
the driver has been tested and shown that it can support the Windows OS. Click Yes to proceed.
16. Wait while the files are copied to your hard drive.
17. After all files have been copied to the system, the Completing the Found New Hardware Wizard
window will open to indicate that it has finished installing Port 0. Click Finish to proceed with the rest of the
installation.
Page 60

PCI Express Boards Software Installation
3-44
Configuring the Ports
After the driver has been installed, use Device Manager to configure the CP-118EL serial ports.
1. Click Start Settings Control Panel System, select the Hardware tab, and then click Device
Manager.
2. Expand the Multi-port serial adapters tab, right click Moxa CP-118EL Series (PCI Express Bus), and
then click Properties to open the board’s configuration panel.
Page 61

PCI Express Boards Software Installation
3-45
3. Basic information about the board is displayed on the General page. Click the Ports Configuration tab to
configure the board’s serial ports.
4. Click the port you would like to configure to highlight it, and then click Port Setting.
5. Select a COM number for the port from the Port Number drop-down list.
6. Select the Auto Enumerating COM Number option to map subsequent ports automatically. The port
numbers will be assigned in sequence. For example, if COM 3 is assigned to Port 1, then COM 4 (if not
already occupied) will be assigned to Port 2, etc.
Page 62

PCI Express Boards Software Installation
3-46
7. Select an Rx FIFO Trigger from the Rx FIFO Level drop-down list. Rx FIFO trigger levels of High, Middle,
and Low are available, with the default set to High (120 bytes). Select Set the change to all ports option
to apply this Rx FIFO Trigger to all ports.
8. Select a Tx FIFO Level from the Tx FIFO Level drop-down list. Tx FIFO Levels of High, Middle, and Low
are available, with the default set to High (128 bytes). Select Set the change to all ports option to apply
the just defined Tx FIFO Size to all ports.
Tx FIFO Rx FIFO
High 128 120
Middle 64 60
Low 1 1
Unit: Bytes
9. If you use the CP-118EL-A, CP-114EL, CP-114EL-I, CP-132EL, CP-132EL-I, select Interface (RS-232,
RS-422, RS-485-2W, or RS-485-4W) and Termination Resistor (120Ω, Enable, or Disable) to configure.
We use the CP-114EL to illustrate. The following figure shows the settings for configuring the port for
RS-422 and no Termination Resistor (select Disable).
10. Click OK to save the port settings, and then click OK in the Property window to finish the port settings
procedure.
Page 63

PCI Express Boards Software Installation
3-47
Using Moxa PComm Utility
The PComm Diagnostic program is a useful tool for checking th e status of Moxa’s multiport serial boards. The
program can be used to test internal and external IRQ, TxD/ RxD, UART, CTS/RTS, DTR/DSR, etc. Use this
program to ensure that your Moxa boards and ports are working properly.
To start the program, click Start Programs PComm Lite 2000 PComm Diagnostic.
NOTE
You can download the PComm Lite software for free from Moxa’s website at
www.moxa.com/support/free_downloads.htm
.
Using Event Log
To use the Event Log to check the installation of your Moxa boards, click Start Settings Control Panel
Administrative Tools Event Viewer to enter the Event Viewer utility. Look under the System category
to find the latest information relevant to Moxa’s drivers.
Removing the Driver
1. To uninstall the driver, click Start Settings Control Panel System, select the Hardware tab, and
then click Device Manager. Use the mo use to place the cursor over the CP-118EL Series board under
Multi-port serial adapters, click th e r ight mouse button, and then se lect the Uninstall... option.
Page 64

PCI Express Boards Software Installation
3-48
2. Click OK to proceed with uninstalling th e board.
3. The Device Manager window refreshes automatically, showing that the driver and ports for the CP-118EL
Series board have been removed.
Page 65

PCI Express Boards Software Installation
3-49
Non-Windows Drivers
Drivers are provided for DOS, Linux, and SCO.
DOS
Moxa DOS API-232 is a software package that assists users in developing new programs, or debugging existing
programs for serial communications. This section explains how to install the package, how to set up the driver,
and how to load or unload the driver.
Moxa provides drivers that allow you to use the following serial board products under DOS:
• PCI Express Boards: CP-102E, CP-102EL, CP-132EL, CP-132EL-I CP-104EL-A, CP-114EL, CP-114EL-I,
CP-118EL-A, CP-168EL-A, CP-118E-A-I, CP-138E-A-I, CP-134EL-A-I, CP-116E-A
WARNING
If you are using a Serial ATA HDD under DOS, the installation process will hang. To prevent the installation
process from hanging, change your HDD
to an IDE drive.
NOTE
The following procedure shows how to install the CP
-168EL driver under DOS.
Installing the Driver
1. Run the installation program, DOSINST.EXE from the \Software\DOS folder on the Documentation and
Software CD. Specify the target API-232 directory (e.g.,
C:\Moxa) to which the driver will be copied. Press
F2 to start the installation.
2. After the installation is complete, a window will open to ask if you want to run SETUP.EXE. Press Y to run
the program.
Page 66

PCI Express Boards Software Installation
3-50
Setting up the Driver
This section covers some of the setup program’s most frequently used functions. For complete details, press F1
to open the on-line help file.
1. Run BIN\SETUP.EXE.
2. Press Enter to select the model name of the Moxa board you are installing.
3. A window will open displaying basic configuration information for all boards of this type currently installed
in the system. Press PgDn to configure the port settings.
4. You may enter or modify the settings of each port at this stage. The values displayed first are the port’s
initial values that were set up when the d river was installed.
5. Press F10 to save the changes and exit the SETUP program.
Page 67

PCI Express Boards Software Installation
3-51
Legends
In this section, we explain the meaning of some of the fields and functions.
Port number
This is the ID of the port. Application software uses port number (ID) when referring to a port. You can set the
port numbers to any number between 0 and 255 (inclusive). However, you must ensure that you assign each
port a unique port number. If you are developing your own application software, then you m ay want to sel ect
port numbers that take into consideration the structure of the program.
TxD buffer size
The TxD buffer is the transmission (output) buffer allocated by the system for each port.
RxD buffer size
The RxD buffer is the receiving (input) buffer allocated by the system for each port.
F5 Group Edit
This convenient function allows you to edit the configuration of several ports at one time as a group.
Loading the Driver
After completing the setup procedure, r u n BIN\DP-DRV.EXE from the DOS prompt to load the driver. The
driver will automatically detect the boards that have already been installed. If one or more boards are detected,
you will see a message similar to the following :
Smartio/Industio Family DOS driver Version 1.7
Setup driver ...
CP-168EL series (Bus= x ,Dev=y) : OK!
Device driver setup O.K.
This indicates that the CP-168EL Series driver has been installed properly. At this point, you may execute
applications that support API-232 functions, or start developing applications using the API-232 library.
Page 68

PCI Express Boards Software Installation
3-52
Unloading the Driver
To unload (release) the driver from memory, type DP-DRV/Q at the DOS prompt and then press Enter.
Linux (32-bit/64-bit)
Moxa provides drivers that allow you to use the following serial boards under Linux.
• PCI Express Boards: CP-118EL, CP-168EL, CP-104EL, CP-102E, CP-102EL, CP-132EL, CP-132EL-I,
CP-114EL, CP-114EL-I, CP-118E-A-I/ CP-138E-A-I/ CP-134EL-A-I/CP-116E-A
NOTE
The following procedure shows how to install the CP
-114EL driver under Linux.
Execute the following commands from the Linux prompt:
1. #mount /dev/cdrom /mnt/cdrom
#cd /
#mkdir moxa
#cd moxa
#cp /mnt/cdrom/<driver directory>/driv_linux_smart_vx.x_build_yymmddhh.tgz.
#tar –xzvf driv_linux_smart_vx.x_build_yymmddhh.tgz.
2. #cd mxser
#make clean; make install
3. #cd /mo xa/mxser/driver
#./msmknod
4. #modprobe mxupcie
5. For th e CP-132EL, CP-132EL-I, CP-114EL, CP-114EL-I, use the Moxa Port Configuration Tool to set
Interface and Termination Resistor f or the MUE series. The MUE series includes CP-102E, CP-102EL,
CP-132EL, CP-132EL-I, CP-114EL and CP-114EL-I.
Usage: muestty <operation > device
Device: The MUE series device node
Operation: -h Help
-g Get interface and terminator type
-i intf Set interface type with options below
-t value Set termination resistor with options below
intf RS232 RS-232 mode
RS422 RS-422 mode
RS4852W RS-485 2-wire mode
RS4854W RS-485 4-wire mode
value NONTERM Non termination resistor
120TERM 120ohm termination resistor
For example:
To set the MUE interface
# muestty –i RS422 /dev/ttyMUE2
To set the MUE termination resistor
# muestty –t 120TERM /dev/ttyMUE2
6. Use the Moxa diagnostics utility to verify the driver status:
#cd /moxa/mxser/utility/diag
#./msdiag
7. Use the Moxa terminal utility to test th e tty ports:
#cd /moxa/mxser/utility/term
#./msterm
Page 69

PCI Express Boards Software Installation
3-53
SCO
• SCO OpenServer 5
• SCO OpenServer 6
• SCO UnixWare 7
Follow the steps given in this section to install the SCO OpenServer 5/6 & SCO UnixWare 7 driver. The
installation procedures for SCO UnixWare 7 and SCO OpenServer 5/6 are similar.
1. Copy the driver file .tar to your host.
2. #tar xvf <driver tar file>
#/tmp/moxa/mxinstall
3. The window shown below will open next. Press RETURN to continue.
=============================================================
Copyright© 2008 Moxa Inc.
All Rights Reserved.
Moxa Smartio/Industio Family Device Driver Installation (Ver. 1.11)
=============================================================
For SCO UnixWare 7
Tar files, please wait.....O.K.
Press RETURN to continue
NOTE
If your environment is SCO OpenServer 5/6, you can skip steps 4 and 5.
4. When you see the screen below, select “Esc” to exit and reboot your computer.
MOXA Smartio/Industio Family Installation Utility (Ver 1.11)
Smartio/Industio Family Basic Configuration
Board No.
Board Type
I/O Address
Interrupt
Bus/Dev No.
1
None
------------
------------
------------
2
None
------------
------------
------------
3
None
------------
------------
------------
4
None
------------
------------
------------
PgDn: getty Setting
Enter: Confirm Input Value
Esc: Exit
Tab: Change Item
5. After rebooting the computer, type “moxaadm”; when you see MAIN MENU, select Basic Configuration.
MAIN MENU
Basic Configuration
Advanced Configuration
Interface Configuration
Port Monitoring
Terminal Emulation
Driver Removal
Exit
Page 70

PCI Express Boards Software Installation
3-54
6. You will see the following screen. Press Enter to select the MOXA Multiport Serial Board you installed by port
and by model. For example, if you installed the CP-104EL, select 4 ports and then CP-104EL.
MOXA Smartio/Industio Family Installation Utility (Ver 1.11)
Smartio/Industio Family Basic Configuration
Board No.
Board Type
I/O Address
Interrupt
Bus/Dev No.
1
None
------------
------------
------------
2
None
------------
------------
------------
3
None
------------
------------
------------
4
None
------------
------------
------------
PgDn: getty Setting
Enter: Confirm Input Value
Esc: Exit
Tab: Change Item
7. The board ’s basic information, such as I/O addr ess, Bus No., and Device No., will be sho w n . The SCO
system will assign the resources au tomatically to the PCI Express board you selected.
8. Next, press “Esc” to exit and reboot your computer.
NOTE
Steps 9 and 10 are only for the CP
-132EL Series and CP-114EL Series
9. After rebooting, type “moxaadm”. When you see MAIN MENU, select Interface Configuration to set your
Resister and Interface. For example, if you want to set one of the CP-114EL ports as RS-422 and 120Ω, you
have to select RS-422 and 120Ω.
10. Save your Interface Configuration and then reboot the computer again.
11. Note that whenever you change a MAIN MENU item, you need to reboot your computer.
Page 71

4
4. Configuring Intelligent RS-485
In this chapter, we describe how to use the “Auto-Tuning” and “Diagnosis” tools supported by Moxa's
Intelligent RS-485 boards to tune your RS-485 network. The Auto-Tuning tool tests your RS-485 network and
then configures certain Moxa boards (CP-118E-A-I, CP-138E-A-I, CP-134EL-A-I, and CP-116E-A)
automatically. The Diagnosis tool can tell you how to manually configure other Moxa boards, as well as
non-Moxa boards. We use the CP-134EL-A board to demonstrate how to use the Intelligent RS-485 tools under
Windows 7/8/8.1.
The basic procedure you should follow is illustrated in the following workflow diagram:
The following topics are covered in this chapter:
Windows Users
Linux Users
Use the “Auto-Tuning” tool.
Use the “Diagnosis” tool.
Adjust non-Moxa devices based on the
Diagnosis tool’s “Status” readout.
Communication OK?
No Yes
Communication OK?
Start Communication.
No Yes
Page 72

PCI Express Boards Intelligent RS-485 Settings
4-2
Windows Users
Take the following steps to use the Intelligent RS-485 function.
1. Expand the Multi-port serial adapters tab, right click MOXA CP-134EL-A Series (PCI Express Bus), and
then click Properties to open the configura tion panel.
2. Double-click the COM number you wish to conf igure.
Page 73

PCI Express Boards Intelligent RS-485 Settings
4-3
3. Check the Auto Enumerating COM Number option to map subsequent ports automatically. The port
numbers will be assigned in sequence. Select Interface (RS-232, RS-422, RS-485-2W, or RS-485-4W)
from the drop-down box. An Auto Tuning function is provided with RS-485-2W. Click OK to save the
settings.
4. Click OK on the Ports Configuration pag e to save the settings.
5. Test if the communication is OK. If it’s not OK, proceed to Step 6.
6. Click on the COM Number, and then click Auto Tuning and click OK. The PCIe board will automatically
detect the RS-485 environment and suggest the correct Bias Resistor and Termination Resistor. Click OK to
save the setting. To apply the setting, you need to click OK on the Ports Configuration page.
7. Test if the communication is OK. If it’s not OK, proceed to Step 8.
Page 74

PCI Express Boards Intelligent RS-485 Settings
4-4
8. Go to the properties screen and select COM Port needs to be diagnosed. Click Start Diagnosis and then
when the CAUTION message appears, click OK.
9. Adjust “non-MOXA” devices according to the Status.
Status Cause Adjust Pull-High
/Low Resistor
Adjust Terminator
Resistor
Waveform Distortion Too many devices
–
Receive Reflect Signal Long distance –
Data Error Too many devices & long distance
NOTE
The Diagnosis tool is extremely sensitive, and consequently could indicate errors even if the communication
status okay. In this case, you can decide whether or not to make the suggested co n f iguration changes.
10. Repeat from Step 6 unt i l the communication is o kay.
Page 75

PCI Express Boards Intelligent RS-485 Settings
4-5
Linux Users
Take the following steps to configure the Intelligent RS-485 function.
1. Use the following command to do the configuration.
#./muestty -g /dev/ttyMUE1
2. Test if the communication is OK. If it’s OK, nothing further needs to be done. If it’s not OK, proceed with
Step 3.
3. Use the following command for the Auto-Tuning process. Enter “Y” to make the value effective
immediately.
#./muestty -a (baud rate value) /dev/ttyMUE1
4. Test if the communication is OK. If it’s OK, nothing further needs to be done. If it’s no t OK, pro ceed with
Step 5.
5. Use the fo llowing command to run diagnosis.
#./muestty -d (baud rate value) /dev/ttyMUE1
Page 76

PCI Express Boards Intelligent RS-485 Settings
4-6
6. Adjust non-MO XA devices acc or ding to the Status
Status Cause Adjust Pull-High
/Low Resistor
Adjust Terminator
Resistor
Waveform Distortion Too many devices
–
Receive Reflect Signal Long distance –
Data Error Too many devices & long distance
NOTE
The Diagnosis tool is extremely sensitive, and
consequently could indicate erro rs even if the communication
status okay. In this case, you can decide whether or not to make the suggested co n f iguration changes.
7. Repeat from Step 3 until the communication is OK.
Page 77

5
5. Serial Programming Tools
Moxa provides an easy to use yet powerful serial programming library and communication troubleshooting
utilities under Windows 2000/XP/2003/Vista/2008/7(x86 and x64), Windows 95/98, and Windows NT. The
following sections provide details about the installation, the library, and the utilities for various platforms.
The following topics are covered in this chapter:
Moxa PComm
Installing PComm
PComm Programming Library
Utilities
Diagnostics (for Moxa boards only)
Monitor (for Moxa boards under Windows 2000/XP/2003/Vista/2008/7(x86 and x64)
Terminal Emulator
RS-485 Programming
ADDC™
Page 78

PCI Express Boards Serial Programming Tools
5-2
Moxa PComm
PComm, a professional serial communication tool for PCs, is a software package that runs under Windows
NT95/98/2000/XP/2003/Vista/2008/7(x86 and x64). PComm provides:
• A powerful serial communication library that simplifies serial programming tasks for most popular
programming languages. The serial communication library is useful for developing applications for data
communications, remote access, data acquisition, and industrial control under Windows
NT95/98/2000/XP/2003/Vista/2008/7(x86 and x64), and is a simpler programming solution compared to
the more complex Windows Win32 COMM API.
• Useful utilities such as diagnostics, moni t or, and terminal emulat or.
• Illustrative sample programs.
• Comprehensive on-line documentation.
Installing PComm
To install PComm, run \Setup.exe from the Documentation and Software CD. Note that the PComm
diagnostics and monitor utilities are for Moxa boards only. To use these utilities, you must have a M oxa board
and the appropriate Windows (NT/95/98/2000/XP/2003/Vista/2008/7(x86 and x64) device driver installed in
your system. See the “Software Installation” chapter for instructions on how to install the drivers.
After installing PComm, click Start, select Program Files, and then the PComm Lite group to select from the
list of utilities and documents.
PComm Programming Library
The serial communication library helps you develop serial communications programs for any COM port that
complies with the Microsoft Win32 API. This library facilitates the implementation of multi-process,
multi-thread serial communication programs, and greatly reduces the time r eq uired to develop applications.
For a complete description of the library functions and sample programs for Visual C++, Visual Basic, and
Delphi, check the help file and the sample programs in the PComm directory.
Utilities
In this section, we provide brief descriptions of each utility. For more information about these utilities, read the
on-line help from the Documentation and Software CD.
Diagnostics (for Moxa boards only)
This convenient diagnostics program, which only works with Moxa boards and ports, provides internal and
external testing of IRQ, TxD/RxD, UART, CTS/RTS, DTR/DSR, DTR/DCD, etc. The diagnostics program allows
the user to check both the hardware and software functions.
To run the diagnostics program, click Start Program PComm Lite Diagnostic. A typical test report
for a Moxa board is as follows:
Page 79

PCI Express Boards Serial Programming Tools
5-3
Monitor (for Moxa boards under Windows
2000/XP/2003/Vista/2008/7(x86 and x64)
This useful port status monitoring program allows you to monitor data transmission of selected Moxa COM
ports. The program monitors data transmission/rece iving throughput, and communication line status, with
data updated and displayed on the screen at regular time intervals. Click a specific port to see a graph of the
current communication parameters and status of that port.
To run the Monitor program, click Start Program PComm Lite Monitor.
Page 80

PCI Express Boards Serial Programming Tools
5-4
Terminal Emulator
Use Terminal Emulator to connect to your PC’s serial ports to check if data is being transmitted correctly.
Terminal Emulator features multi-windows, and supports VT100 and ANSI terminal types. You can transfer
data interactively, send patterns periodically, and transfer files using ASCII, XMODEM, YMODEM, ZMODEM,
and KERMIT protocols.
To run Terminal Emulator, click Start Program PComm Lite Terminal Emulator.
RS-485 Programming
If you are using your CP-118EL Series board for RS-485 applications, in addition to reading this section, you
should also refer to the “Connection Cables and Cable Wiring” chapter for more details about using RS-485.
The CP-118EL Series supports 2-wire half-duplex RS-485 and 4-wire full duplex RS-485 communication. Ports
configured for 2-wire RS-485 use the Data+ and Data- pins for both transmitting and receiving data. Moxa’s
own ADDC™ (Automatic Data Direction Control) technology is used to switch between transmission and
reception.
ADDC™
ADDC™ is the best method for switching between transmission and reception when using 2-wire RS-485.
When using ADDC™, additional code is not required to switch between data transmission and reception, since
the board’s built-in intelligent hardware mechanism automatically manages the switching mechanism. RS-485
programming using ADDC™ mode is just as simple and straightforward as RS-232 or RS-422 programming.
Page 81

6
6. Pin Assignments
The following topics are covered in this chapter:
PCIe Board Accessories Table
CP-118EL-A
Board Side Pin Assignments-Female SCSI VHDCI68
Device Side Pin Assignments
CP-168EL-A
Board Side Pin Assignments-Female SCSI VHDCI68
Device Side Pin Assignments
CP-104EL-A
Board Side Pin Assignments-Female DB44
Device Side Pin Assignments
CP-102E
Board Side Pin Assignments-Male DB9
CP-102EL
Board Side Pin Assignments—Female DB25
Device Side Pin Assignments
CP-132EL/CP-132EL-I
Board Side Pin Assignments—Female DB25
Device Side Pin Assignments
CP-114EL/CP-114EL-I
Board Side Pin Assignments—Female DB44
Device Side Pin Assignments
CP-118E-A-I/CP-138E-A-I
Board Side Pin Assignments—Female DB78
Device Side Pin Assignments—Male DB9
Male DB25 (CBL-M78M25x8-100)
CP134EL-A-I
Board Side Pin Assignments—Female DB44
Device Side Pin Assignments—Male DB9
Male DB25 (CBL-M44M25x4-50)
CP-116E-A
Board Side Pin Assignments—Female SCSI VHDCI68
Device Side Pin Assignments—Male DB9
Male DB25 ( OPT8B+ / CBL-M68M25x8-100)
Female DB25 (OPT8A+/S+)
Page 82

PCI Express Boards Pin Assignments
6-2
PCIe Board Accessories Table
To select a PCIe board accessories please refer to the following table:
PCIe Board Model Connector Type Interface
CP-118EL-A CBL-M68M9x8-100/
OPT8-M9+
DB9 male RS-232
RS-422/4-wireRS-485
2-wireRS-485
OPT8B+/
CBL-M68M25x8-100
DB25 male
OPT8A+/OPT8S+ DB25 female
CP-168EL-A CBL-M68M9x8-100/
OPT8-M9+
DB9 male RS-232
OPT8B+/OPT8C+ DB25 male
OPT8A+/OPT8S+ DB25 female
CP-104EL-A CBL-M44M9x4-50 DB9 male RS-232
CBL-M44M25x4-50 DB25 male
CP-102EL CBL-M25M9x2-50 DB9 male RS-232
CP-132EL/
CP-132EL-I
CBL-M25M9x2-50 DB9 male RS-422/4-wire RS-485/
2-wire RS-485
CP-114EL/
CP-114EL-I
CBL-M44M9x4-50 DB9 male RS-232
RS-422/4-wire RS-485
2-wire RS-485
CBL-M44M25x4-50 DB25 male
CP-118E-A-I/
CP-138E-A-I
CBL-M78M9x8-100 DB9 male RS-232
RS-422/4-wireRS-485
2-wire RS-485
CBL-M78M25x8-100 DB25 male
CP-134EL-A-I CBL-M44M9x4-50 DB9 male RS-422/4-wire RS-485/
2-wire RS-485
CBL-M44M25x4-50 DB25 male
CP-116E-A OPT8-M9+/
CBL-M68M9x8-100
DB9 male RS-232
RS-422/4-wire RS-485
2-wire RS-485
OPT8B+/
CBL-M68M25x8-100
DB25 male
OPT8A+/OPT8S+ DB25 female
CP-118EL-A
The CP-118EL-A board has a female SCSI VHDCI68 connector on the board, with various connection options
available for connecting from the board to your serial devices. In this chapter, we provide pin assignments for
the board side connector, as well as pin assignments for device side connectors for the different connection
options.
The CP-118EL-A board supports RS-232, RS-422, 4-wire RS-485, and 2-wire RS-485. Note that the RS-422
standard uses a balanced voltage digital interface to allow 9600 bps communication over cables of up to 4000
feet in length. You can connect ten receivers to one driver for broadcasting systems. The RS-485 standard is an
enhanced version of the RS-422 balanced line standard. It allows multiple drivers and receivers to work on a
multidrop network. A maximum of 32 drivers and 32 receivers can be set up on a multidrop network. The
CP-118EL-A board supports both 2-wire half-duplex and 4-wire full-duplex RS-485 communications. In 2-wire
RS-485, Data+/- pins are used for both data transmitting and receiving.
Page 83

PCI Express Boards Pin Assignments
6-3
Board Side Pin Assignments-Female SCSI VHDCI68
RS-232
Pin Signal Pin Signal Pin Signal Pin Signal Pin Signal Pin Signal
1 RxD6 13 DCD4 25 TxD2 37 RI7 49 RI5 61 TxD1
2 CTS6 14 RTS4 26 GND 38 RTS7 50 CTS5 62 DSR1
3 RI6 15 RI4 27 TxD0 39 DCD7 51 RxD5 63 DTR1
4 RTS6 16 CTS4 28 DSR0 40 DTR7 52 RxD3 64 DCD1
5 DCD6 17 RxD4 29 DTR0 41 DSR7 53 CTS3 65 RTS1
6 DTR6 18 RxD2 30 DCD0 42 TxD7 54 RI3 66 RI1
7 DSR6 19 CTS2 31 RTS0 43 GND 55 RTS3 67 CTS1
8 TxD6 20 RI2 32 RI0 44 TxD5 56 DCD3 68 RxD1
9 GND 21 RTS2 33 CTS0 45 DSR5 57 DTR3
10 TxD4 22 DCD2 34 RxD0 46 DTR5 58 DSR3
11 DSR4 23 DTR2 35 RxD7 47 DCD5 59 TxD3
12 DTR4 24 DSR2 36 CTS7 48 RTS5 60 GND
RS-422 and 4-wire RS-485
Pin Signal Pin Signal Pin Signal Pin Signal
1 TxD6+(B) 18 TxD2+(B) 35 TxD7+(B) 52 TxD3+(B)
5 TxD6-(A) 22 TxD2-(A) 39 TxD7-(A) 56 TxD3-(A)
6 RxD6-(A) 23 RxD2-(A) 40 RxD7-(A) 57 RxD3-(A)
8 RxD6+(B) 25 RxD2+(B) 42 RxD7+(B) 59 RxD3+(B)
9 GND 26 GND 43 GND 60 GND
10 RxD4+(B) 27 RxD0+(B) 44 RxD5+(B) 61 RxD1+(B)
12 RxD4-(A) 29 RxD0-(A) 46 RxD5-(A) 63 RxD1-(A)
13 TxD4-(A) 30 TxD0-(A) 47 TxD5-(A) 64 TxD1-(A)
17 TxD4+(B) 34 TxD0+(B) 51 TxD5+(B) 68 TxD1+(B)
2-wire RS-485
Pin Signal Pin Signal Pin Signal Pin Signal
6 D6-(A) 23 D2-(A) 40 D7-(A) 57 D3-(A)
8 D6+(B) 25 D2+(B) 42 D7+(B) 59 D3+(B)
9 GND 26 GND 43 GND 60 GND
10 D4+(B) 27 D0+(B) 44 D5+(B) 61 D1+(B)
12 D4-(A) 29 D0-(A) 46 D5-(A) 63 D1-(A)
Page 84

PCI Express Boards Pin Assignments
6-4
Device Side Pin Assignments
Male DB9 (CBL-M68M9x8-100/OPT8-M9+)
Pin RS-232 RS-422/RS-485-4W RS-485-2W
1 DCD TxD-(A) –
2 RxD TxD+(B) –
3 TxD RxD+(B) Data+(B)
4 DTR RxD-(A) Data-(A)
5 GND GND GND
6 DSR – –
7 RTS – –
8 CTS – –
9 – – –
Male DB25 (OPT8B+/ CBL-M68M25x8-100)
Pin RS-232 RS-422/RS-485-4W RS-485-2W
2 TxD RxD+(B) Data+(B)
3 RxD TxD+(B) –
4 RTS – –
5 CTS – –
6 DSR – –
7 GND GND GND
8 DCD TxD-(A) –
20 DTR RxD-(A) Data-(A)
Female DB25 (OPT8A+/S+)
Pin RS-232 RS-422/RS-485-4W RS-485-2W
2 RxD TxD+(B) –
3 TxD RxD+(B) Data+(B)
4 CTS – –
5 RTS – –
6 DTR RxD-(A) Data-(A)
7 GND GND GND
8 DCD TxD-(A) –
20 DSR – –
Page 85

PCI Express Boards Pin Assignments
6-5
CP-168EL-A
The CP-168EL-A board has a female SCSI VHDCI68 connector on the board, with various connection options
available for connecting from the board to your serial devices. In this chapter, we give pin assignments for the
board side connector, as well as pin assignments for device side connectors for the different connection options.
The CP-168EL-A board supports the RS-232 interface onboard.
Board Side Pin Assignments-Female SCSI VHDCI68
RS-232
Pin Signal Pin Signal Pin Signal Pin Signal Pin Signal Pin Signal
1 RxD6 13 DCD4 25 TxD2 37 RI7 49 RI5 61 TxD1
2 CTS6 14 RTS4 26 GND 38 RTS7 50 CTS5 62 DSR1
3 RI6 15 RI4 27 TxD0 39 DCD7 51 RxD5 63 DTR1
4 RTS6 16 CTS4 28 DSR0 40 DTR7 52 RxD3 64 DCD1
5 DCD6 17 RxD4 29 DTR0 41 DSR7 53 CTS3 65 RTS1
6 DTR6 18 RxD2 30 DCD0 42 TxD7 54 RI3 66 RI1
7 DSR6 19 CTS2 31 RTS0 43 GND 55 RTS3 67 CTS1
8 TxD6 20 RI2 32 RI0 44 TxD5 56 DCD3 68 RxD1
9 GND 21 RTS2 33 CTS0 45 DSR5 57 DTR3
10 TxD4 22 DCD2 34 RxD0 46 DTR5 58 DSR3
11 DSR4 23 DTR2 35 RxD7 47 DCD5 59 TxD3
12 DTR4 24 DSR2 36 CTS7 48 RTS5 60 GND
Device Side Pin Assignments
Male DB9 (CBL-M68M9x8-100/OPT8-M9+)
Pin RS-232
1 DCD
2 RxD
3 TxD
4 DTR
5 GND
6 DSR
7 RTS
8 CTS
9 –
Page 86

PCI Express Boards Pin Assignments
6-6
Male DB25 (OPT8B+/ CBL-M68M25x8-100)
Pin RS-232
2 TxD
3 RxD
4 RTS
5 CTS
6 DSR
7 GND
8 DCD
20 DTR
Female DB25 (OPT8A+/S+)
Pin RS-232
2 RxD
3 TxD
4 CTS
5 RTS
6 DTR
7 GND
8 DCD
20 DSR
CP-104EL-A
Board Side Pin Assignments-Female DB44
RS-232
Port 1
Port 2
Port 3
Port 4
13
TxD 9 TxD 5 TxD 1 TxD
14
RxD
10
RxD 6 RxD 2 RxD
15
RTS
11
RTS 7 RTS 3 RTS
28
CTS
24
CTS
20
CTS
16
CTS
29
DTR
25
DTR
21
DTR
17
DTR
30
DSR
26
DSR
22
DSR
18
DSR
42
DCD
39
DCD
35
DCD
31
DCD
44
GND
41
GND
37
GND
33
GND
Page 87

PCI Express Boards Pin Assignments
6-7
Device Side Pin Assignments
Male DB9 (CBL-M44M9x4-50)
Pin RS-232
1 DCD
2 RxD
3 TxD
4 DTR
5 GND
6 DSR
7 RTS
8 CTS
9 –
Male DB25 (CBL-M44M25x4-50)
Pin RS-232
2 TxD
3 RxD
4 RTS
5 CTS
6 DSR
7 GND
8 DCD
20 DTR
CP-102E
Board Side Pin Assignments-Male DB9
The CP-102E has two male DB9 connectors onboard.
Male DB9
Pin RS-232 Signals
1 DCD
2 RxD
3 TxD
4 DTR
5 GND
6 DSR
7 RTS
8 CTS
9 –
Page 88

PCI Express Boards Pin Assignments
6-8
CP-102EL
Board Side Pin Assignments—Female DB25
RS-232
Pin RS-232 Pin RS-232
1 – 13 –
2 DCD1 14 –
3 GND 15 DTR1
4 CTS1 16 DSR1
5 RxD1 17 RTS1
6 – 18 TxD1
7 – 19 –
8 – 20 –
9 DTR0 21 DCD0
10 DSR0 22 GND
11 RTS0 23 CTS0
12 TxD0 24 RxD0
Device Side Pin Assignments
Male DB9 (CBL-M25M9x2-50)
Pin RS-232
1 DCD
2 RxD
3 TxD
4 DTR
5 GND
6 DSR
7 RTS
8 CTS
9 –
Page 89

PCI Express Boards Pin Assignments
6-9
CP-132EL/CP-132EL-I
Board Side Pin Assignments—Female DB25
RS-422 & 4-wire RS-485 2-wire RS-485
Pin Signal Pin Signal
1 – 14 –
2 TxD1-(A) 15 RxD1-(A)
3 GND1 16 –
4 – 17 –
5 TxD1+(B) 18 RxD1+(B)
6 – 19 –
7 – 20 –
8 – 21 TxD0-(A)
9 RxD0-(A) 22 GND0
10 – 23 –
11 – 24 TxD0+(B)
12 RxD0+(B) 25 –
13 –
Pin Signal Pin Signal
1 – 14 –
2 – 15 Data1-(A)
3 GND1 16 –
4 – 17 –
5 – 18 Data1+(B)
6 – 19 –
7 – 20 –
8 – 21 –
9 Data0-(A) 22 GND0
10 – 23 –
11 – 24 –
12 Data0+(B) 25 –
13 –
Device Side Pin Assignments
Male DB9 (CBL-M25M9x2-50)
Pin RS-422/RS-485-4W RS-485-2W
1 TxD-(A) –
2 TxD+(B) –
3 RxD+(B) Data+(B)
4 RxD-(A) Data-(A)
5 GND GND
6 – –
7 – –
8 – –
9 – –
Page 90

PCI Express Boards Pin Assignments
6-10
CP-114EL/CP-114EL-I
Board Side Pin Assignments—Female DB44
RS-232
Pin Signal Pin Signal Pin Signal Pin Signal
1 TxD3 13 TxD0 25 DTR1 37 GND
2 RxD3 14 RxD0 26 DSR1 38 –
3 RTS3 15 RTS0 27 – 39 DCD1
4 – 16 CTS3 28 CTS0 40 –
5 TxD2 17 DTR3 29 DTR0 41 GND
6 RxD2 18 DSR3 30 DSR0 42 DCD0
7 RTS2 19 – 31 DCD3 43 –
8 – 20 CTS2 32 – 44 GND
9 TxD1 21 DTR2 33 GND
10 RxD1 22 DSR2 34 –
11 RTS1 23 – 35 DCD2
12 – 24 CTS1 36 –
RS-422 & 4-wire RS-485
Pin Signal Pin Signal Pin Signal Pin Signal
1 RxD3(+) 13 RxD0(+) 25 RxD1(-) 37 GND
2 TxD3(+) 14 TxD0(+) 26 – 38 –
3 – 15 – 27 – 39 TxD1(-)
4 – 16 – 28 – 40 –
5 RxD2(+) 17 RxD3(-) 29 RxD0(-) 41 GND
6 TxD2(+) 18 – 30 – 42 TxD0(-)
7 – 19 – 31 TxD3(-) 43 –
8 – 20 – 32 – 44 GND
9 RxD1(+) 21 RxD2(-) 33 GND
10 TxD1(+) 22 – 34 –
11 – 23 – 35 TxD2(-)
12 – 24 – 36 –
Page 91

PCI Express Boards Pin Assignments
6-11
2-wire RS-485
Pin Signal Pin Signal Pin Signal
1 Data3+(B) 16 – 31 –
2 – 17 Data3-(A) 32 –
3 – 18 – 33 GND3
4 – 19 – 34 –
5 Data2+(B) 20 – 35 –
6 – 21 Data2-(A) 36 –
7 – 22 – 37 GND2
8 – 23 – 38 –
9 Data1+(B) 24 – 39 –
10 – 25 Data1-(A) 40 –
11 – 26 – 41 GND1
12 – 27 – 42 –
13 Data0+(B) 28 – 43 –
14 – 29 Data0-(A) 44 GND0
15 – 30 –
Device Side Pin Assignments
Male DB9 (CBL-M44M9x4-50)
Pin RS-232 RS-422/RS-485-4W RS-485-2W
1 DCD TxD-(A) –
2 RxD TxD+(B) –
3 TxD RxD+(B) Data+(B)
4 DTR RxD-(A) Data-(A)
5 GND GND GND
6 DSR – –
7 RTS – –
8 CTS – –
9 – – –
Male DB25 (CBL-M44M25x4-50)
Pin RS-232 RS-422/RS-485-4W RS-485-2W
2 TxD RxD+(B) Data+(B)
3 RxD TxD+(B) –
4 RTS – –
5 CTS – –
6 DSR – –
7 GND GND GND
8 DCD TxD-(A) –
20 DTR RxD-(A) Data-(A)
22 – – –
Page 92

PCI Express Boards Pin Assignments
6-12
CP-118E-A-I/CP-138E-A-I
Board Side Pin Assignments—Female DB78
RS-232
Pin Signal Pin Signal Pin Signal Pin Signal
1 GND7 21 RTS7 40 CTS7 60 DCD7
2 TXD7 22 DTR7 41 DSR7 61 RXD7
3 – 23 RTS6 42 – 62 DCD6
4 GND6 24 DTR6 43 CTS6 63 RXD6
5 TXD6 25 – 44 DSR6 64 –
6 GND5 26 RTS5 45 CTS5 65 DCD5
7 TXD5 27 DTR5 46 DSR5 66 RXD5
8 – 28 RTS4 47 – 67 DCD4
9 GND4 29 DTR4 48 CTS4 68 RXD4
10 TXD4 30 – 49 DSR4 69 –
11 GND3 31 RTS3 50 CTS3 70 DCD3
12 TXD3 32 DTR3 51 DSR3 71 RXD3
13 – 33 RTS2 52 – 72 DCD2
14 GND2 34 DTR2 53 CTS2 73 RXD2
15 TXD2 35 – 54 DSR2 74 –
16 GND1 36 RTS1 55 CTS1 75 DCD1
17 TXD1 37 DTR1 56 DSR1 76 RXD1
18 – 38 RTS0 57 – 77 DCD0
19 GND0 39 DTR0 58 CTS0 78 RXD0
20 TXD0 59 DSR0
Page 93

PCI Express Boards Pin Assignments
6-13
RS-485-4W/RS-422
Pin Signal Pin Signal Pin Signal Pin Signal
1 GND7 21 – 40 – 60 TXD72 RXD7+ 22 RXD7- 41 – 61 TXD7+
3 – 23 – 42 – 62 TXD64 GND6 24 RXD6- 43 – 63 TXD6+
5 RXD6+ 25 – 44 – 64 –
6 GND5 26 – 45 – 65 TXD57 RXD5+ 27 RXD5- 46 – 66 TXD5+
8 – 28 – 47 – 67 TXD49 GND4 29 RXD4- 48 – 68 TXD4+
10 RXD4+ 30 – 49 – 69 –
11 GND3 31 – 50 – 70 TXD312 RXD3+ 32 RXD3- 51 – 71 TXD3+
13 – 33 – 52 – 72 TXD214 GND2 34 RXD2- 53 – 73 TXD2+
15 RXD2+ 35 – 54 – 74 –
16 GND1 36 – 55 – 75 TXD117 RXD1+ 37 RXD1- 56 – 76 TXD1+
18 – 38 – 57 – 77 TXD019 GND0 39 RXD0- 58 – 78 TXD0+
20 RXD0+ 59 –
RS-485-2W
Pin Signal Pin Signal Pin Signal Pin Signal
1 GND7 21 – 40 – 60 –
2 DATA7+ 22 DATA7- 41 – 61 –
3 – 23 – 42 – 62 –
4 GND6 24 DATA6- 43 – 63 –
5 DATA6+ 25 – 44 – 64 –
6 GND5 26 – 45 – 65 –
7 DATA5+ 27 DATA5- 46 – 66 –
8 – 28 – 47 – 67 –
9 GND4 29 DATA4- 48 – 68 –
10 DATA4+ 30 – 49 – 69 –
11 GND3 31 – 50 – 70 –
12 DATA3+ 32 DATA3- 51 – 71 –
13 – 33 – 52 – 72 –
14 GND2 34 DATA2- 53 – 73 –
15 DATA2+ 35 – 54 – 74 –
16 GND1 36 – 55 – 75 –
17 DATA1+ 37 DATA1- 56 – 76 –
18 – 38 – 57 – 77 –
19 GND0 39 DATA0- 58 – 78 –
20 DATA0+ 59 –
Page 94

PCI Express Boards Pin Assignments
6-14
Device Side Pin Assignments—Male DB9
PIN RS-232 RS-422/RS-485-4W RS-485-2W
1 DCD TxD-(A) –
2 RxD TxD+(B) –
3 TxD RxD+(B) Data+(B)
4 DTR RxD-(A) Data-(A)
5 GND GND GND
6 DSR – –
7 RTS – –
8 CTS – –
Male DB25 (CBL-M78M25x8-100)
PIN RS-232 RS-422/RS-485-4W RS-485-2W
2 TxD RxD+(B) Data+(B)
3 RxD TxD+(B) –
4 RTS – –
5 CTS – –
6 DSR – –
7 GND GND GND
8 DCD TxD-(A) –
20 DTR RxD-(A) Data-(A)
Page 95

PCI Express Boards Pin Assignments
6-15
CP134EL-A-I
Board Side Pin Assignments—Female DB44
RS-422
Pin Signal Pin Signal Pin Signal
1 RXD4+ 16 CTS4+ 31 TXD42 TXD4+ 17 RXD4- 32 CTS43 RTS4+ 18 RTS4- 33 GND4
4 – 19 – 34 –
5 RXD3+ 20 CTS3+ 35 TXD36 TXD3+ 21 RXD3- 36 CTS37 RTS3+ 22 RTS3- 37 GND3
8 – 23 – 38 –
9 RXD2+ 24 CTS2+ 39 TXD210 TXD2+ 25 RXD2- 40 CTS211 RTS2+ 26 RTS2- 41 GND2
12 – 27 – 42 TXD113 RXD1+ 28 CTS1+ 43 CTS114 TXD1+ 29 RXD1- 44 GND1
15 RTS1+ 30 RTS1-
RS-485-4W
Pin Signal Pin Signal Pin Signal
1 RXD4+ 16 – 31 TXD42 TXD4+ 17 RXD4- 32 –
3 – 18 – 33 GND4
4 – 19 – 34 –
5 RXD3+ 20 – 35 TXD36 TXD3+ 21 RXD3- 36 –
7 – 22 – 37 GND3
8 – 23 – 38 –
9 RXD2+ 24 – 39 TXD210 TXD2+ 25 RXD2- 40 –
11 – 26 – 41 GND2
12 – 27 – 42 TXD113 RXD1+ 28 – 43 –
14 TXD1+ 29 RXD1- 44 GND1
15 – 30 –
Page 96

PCI Express Boards Pin Assignments
6-16
RS-485-2W
Pin Signal Pin Signal Pin Signal
1 DATA4+ 16 – 31 –
2 – 17 DATA4- 32 –
3 – 18 – 33 –
4 – 19 – 34 –
5 DATA3+ 20 – 35 –
6 – 21 DATA3- 36 –
7 – 22 – 37 –
8 – 23 – 38 –
9 DATA2+ 24 – 39 –
10 – 25 DATA2- 40 –
11 – 26 – 41 –
12 – 27 – 42 –
13 DATA1+ 28 – 43 –
14 – 29 DATA1- 44 –
15 – 30 –
Device Side Pin Assignments—Male DB9
PIN RS-232 RS-422/RS-485-4W RS-485-2W
1 DCD TxD-(A) –
2 RxD TxD+(B) –
3 TxD RxD+(B) Data+(B)
4 DTR RxD-(A) Data-(A)
5 GND GND GND
6 DSR – –
7 RTS – –
8 CTS – –
Male DB25 (CBL-M44M25x4-50)
PIN RS-232 RS-422/RS-485-4W RS-485-2W
2 TxD RxD+(B) Data+(B)
3 RxD TxD+(B) –
4 RTS – –
5 CTS – –
6 DSR – –
7 GND GND GND
8 DCD TxD-(A) –
20 DTR RxD-(A) Data-(A)
Page 97

PCI Express Boards Pin Assignments
6-17
CP-116E-A
Board Side Pin Assignments—Female SCSI VHDCI68
Pin Signal Pin Signal Pin Signal Pin Signal Pin Signal Pin Signal
1 RxD6 13 DCD4 25 TxD2 37 – 49 – 61 TxD1
2 CTS6 14 RTS4 26 GND 38 RTS7 50 CTS5 62 DSR1
3 – 15 – 27 TxD0 39 DCD7 51 RxD5 63 DTR1
4 RTS6 16 CTS4 28 DSR0 40 DTR7 52 RxD3 64 DCD1
5 DCD6 17 RxD4 29 DTR0 41 DSR7 53 CTS3 65 RTS1
6 DTR6 18 RxD2 30 DCD0 42 TxD7 54 – 66 –
7 DSR6 19 CTS2 31 RTS0 43 GND 55 RTS3 67 CTS1
8 TxD6 20 – 32 – 44 TxD5 56 DCD3 68 RxD1
9 GND 21 RTS2 33 CTS0 45 DSR5 57 DTR3 – –
10 TxD4 22 DCD2 34 RxD0 46 DTR5 58 DSR3 – –
11 DSR4 23 DTR2 35 RxD7 47 DCD5 59 TxD3 – –
12 DTR4 24 DSR2 36 CTS7 48 RTS5 60 GND – –
Device Side Pin Assignments—Male DB9
PIN RS-232 RS-422/RS-485-4W RS-485-2W
1 DCD TxD-(A) –
2 RxD TxD+(B) –
3 TxD RxD+(B) Data+(B)
4 DTR RxD-(A) Data-(A)
5 GND GND GND
6 DSR – –
7 RTS – –
8 CTS – –
Male DB25 ( OPT8B+ / CBL-M68M25x8-100)
PIN RS-232 RS-422/RS-485-4W RS-485-2W
2 TxD RxD+(B) Data+(B)
3 RxD TxD+(B) –
4 RTS – –
5 CTS – –
6 DSR – –
7 GND GND GND
8 DCD TxD-(A) –
20 DTR RxD-(A) Data-(A)
Page 98

PCI Express Boards Pin Assignments
6-18
Female DB25 (OPT8A+/S+)
PIN RS-232 RS-422/RS-485-4W RS-485-2W
2 RxD TxD+(B) –
3 TxD RxD+(B) Data+(B)
4 CTS – –
5 RTS – –
6 DTR RxD-(A) Data-(A)
7 GND GND GND
8 DCD TxD-(A) –
20 DSR – –
Page 99

7
7. Troubleshooting
Common PCI Express Series problems and possible solutions are as follows. If you still have problems after
reading this chapter, contact your dealer or Moxa for help, or use the Problem Report Form at the end of this
manual to report problems to your dealer.
1. The Moxa PCI Express board cannot be detected by the Moxa driver while installing the driver.
Hardware causes and solutions:
a. Express slot. It is also possible that a slot has malfunctioned. In this case, try other slots until you find
one that works.
b. The motherboard does not have an available IRQ for the PCI Express board. In this case, enter the BIOS
and make sure there is an available IRQ under PCI/PnP settings.
2. The Moxa PCI Express board and driver are activated but cannot transfer (transmit/receive)
data.
Hardware Causes and Solutions:
a. Ma ke sure the cable wiring is connected correctly. Refer to the “Pin Assignments” chapter for correct
cable connections.
b. The cable or the board could be defective. Try other ports, cables, or boards to verify this, or use the
PComm Diagnostic utility to test the Moxa board and port conditions. If the Diagnostic program reports
an error, replace the faulty components.
Software Causes and Solutions:
a. PCI Express Series boards will check the line status (CTS) before transmitting data if the RTS/CTS flow
control feature is set to Enable in the configuration or application program. Refer to the “Connection
Cables and Cable Wiring” chapter for proper wiring diagrams, and check the line status of the suspected
port using the diagnostics LED indicato rs on the mini tester.
b. The board control application may not be written correctly according to the corresponding API of the
operating system. To check this problem, run another application that you know is correct, or use the
utilities provided by Moxa (such as PComm Terminal emulator or HyperTerminal under Windows
platform).
Page 100

A
A. Product Specifications
The following topics are covered in this appendix:
CP-118EL-A Specifications
CP-168EL-A Specifications
CP-104EL-A Specifications
CP-102E Specifications
CP-102EL Specifications
CP-132EL Series Specifications
CP-114EL Series Specifications
CP-118E-A-I Specifications
CP-138E-A-I Specifications
CP-134EL-A-I Specifications
CP-116E-A Specifications
 Loading...