

Page 1

MPC-2000 Series Linux Software
User’s Manual
Version 1.0, August 2019
www.moxa.com/product
© 2019 Moxa Inc. All rights reserved.
Page 2

MPC-2000 Series Linux Software
Moxa Americas
Toll
Tel:
Fax:
Moxa China (Shanghai office)
Toll
Tel:
Fax:
Moxa Europe
Tel:
Fax:
Moxa Asia
Tel:
Fax:
Moxa India
Tel:
Fax:
User’s Manual
The software described in this manual is furnished under a license agreement and may be used only in accordance with
the terms of that agreement.
Copyright Notice
© 2019 Moxa Inc. All rights reserved.
Trademarks
The MOXA logo is a registered trademark of Moxa Inc.
All other trademarks or registered marks in this manual belong to their respective manufacturers.
Disclaimer
Information in this document is subject to change without notice and does not represent a commitment on the part of
Moxa.
Moxa provides this document as is, without warranty of any kind, either expressed or implied, including, but not limited
to, its particular purpose. Moxa reserves the right to make improvements and/or changes to this manual, or to the
products and/or the programs described in this manual, at any time.
Information provided in this manual is intended to be accurate and reliable. However, Moxa assumes no responsibility for
its use, or for any infringements on the rights of third parties that may result from its use.
This product might include unintentional technical or typographical errors. Changes are periodically made to the
information herein to correct such errors, and these changes are incorporated into new editions of the publication.
Technical Support Contact Information
www.moxa.com/support
-free: 1-888-669-2872
+1-714-528-6777
+1-714-528-6778
+49-89-3 70 03 99-0
+49-89-3 70 03 99-99
+91-80-4172-9088
+91-80-4132-1045
-free: 800-820-5036
+86-21-5258-9955
+86-21-5258-5505
+886-2-8919-1230
-Pacific
+886-2-8919-1231
Page 3

Table of Contents
1. Introduction ...................................................................................................................................... 1-1
Overview ........................................................................................................................................... 1-2
Software Specifications........................................................................................................................ 1-2
Software Components .................................................................................................................. 1-2
2. System Configuration ........................................................................................................................ 2-1
Getting Started .................................................................................................................................. 2-2
Connecting From an SSH Console ......................................................................................................... 2-4
Windows Users ........................................................................................................................... 2-5
Linux Users ................................................................................................................................ 2-5
Adjusting the System Time .................................................................................................................. 2-6
Setting the Time Manually ............................................................................................................ 2-6
systemd-timesyncd Service .......................................................................................................... 2-7
NTP Client .................................................................................................................................. 2-8
Manage the Service by systemd script ........................................................................................... 2-9
Setting the Time Zone ............................................................................................................... 2-10
Cron—Daemon for Executing Scheduled Commands .............................................................................. 2-13
The Partition in the System ................................................................................................................ 2-14
Adding Swap Space in the System ...................................................................................................... 2-14
Resizing and Adding a Partition .......................................................................................................... 2-15
Inserting a USB Storage into the Computer .......................................................................................... 2-20
Inserting a SD Storage into the Computer ........................................................................................... 2-21
Checking the Linux Version ................................................................................................................ 2-22
Checking Moxa’s Control Version ........................................................................................................ 2-23
APT—Installing and Removing Packages .............................................................................................. 2-23
Audio Player ..................................................................................................................................... 2-24
Video Player ..................................................................................................................................... 2-27
Web Browser .................................................................................................................................... 2-27
Brightness control ............................................................................................................................. 2-27
Introduction.............................................................................................................................. 2-27
Auto-brightness control mode ..................................................................................................... 2-29
Manual brightness control mode .................................................................................................. 2-31
3. Managing Communications ............................................................................................................... 3-1
Changing the Network Settings ............................................................................................................ 3-2
Changing the “interfaces” Configuration File ................................................................................... 3-2
Configure the VLAN tag in “interfaces” ........................................................................................... 3-3
Adjusting IP Addresses with “ifconfig” ............................................................................................ 3-3
DNS Client ......................................................................................................................................... 3-4
/etc/hostname ............................................................................................................................ 3-4
/etc/resolv.conf ........................................................................................................................... 3-4
/etc/nsswitch.conf ....................................................................................................................... 3-5
Apache Web Server ............................................................................................................................. 3-5
Install the apache web server ....................................................................................................... 3-5
Default Homepage ....................................................................................................................... 3-5
Disabling the CGI Function ........................................................................................................... 3-6
Saving Web Pages to a USB Storage Device.................................................................................... 3-6
IPTABLES .......................................................................................................................................... 3-8
IPTABLES Hierarchy ..................................................................................................................... 3-9
IPTABLES Modules ....................................................................................................................... 3-9
Observe and Erase Chain Rules ................................................................................................... 3-10
Define Policy for Chain Rules....................................................................................................... 3-11
Append or Delete Rules .............................................................................................................. 3-11
NAT (Network Address Translation) ..................................................................................................... 3-12
NAT Example ............................................................................................................................ 3-13
Enabling NAT at Bootup ............................................................................................................. 3-13
NFS (Network File System) Client ....................................................................................................... 3-14
Wireless Management ....................................................................................................................... 3-14
Device Driver for WPEA-172GN – rt5572sta.ko ............................................................................. 3-14
Device Driver for WPEA-172GN - rt2800usb.ko ............................................................................. 3-16
iw ............................................................................................................................................ 3-17
wpasupplicant ........................................................................................................................... 3-17
Celluar Management – cell_mgnt ........................................................................................................ 3-18
4. Programming Guide .......................................................................................................................... 4-1
The Device Driver Source .................................................................................................................... 4-2
Getting Product Serial Number ............................................................................................................. 4-2
Multi-arch Development Tools .............................................................................................................. 4-2
Year 2038 Problem – Recompile the Program with 64-bits glibc ................................................................ 4-3
Device IOCTL ..................................................................................................................................... 4-3
Page 4

RTC (Real Time Clock) ......................................................................................................................... 4-3
UART ................................................................................................................................................ 4-4
Digital I/O.......................................................................................................................................... 4-4
WDT (Watch Dog Timer) ...................................................................................................................... 4-5
Introduction................................................................................................................................ 4-5
Watchdog Usage ......................................................................................................................... 4-5
WDT IOCTL Commands ................................................................................................................ 4-5
How the WDT Works .................................................................................................................... 4-5
Brightness Control Programming .......................................................................................................... 4-6
Introduction................................................................................................................................ 4-6
Programming the Brightness ......................................................................................................... 4-6
Programming Example - br-setbrightness-example.c ..................................................................... 4-10
Qt Programming ............................................................................................................................... 4-12
Introduction.............................................................................................................................. 4-12
Qt5 Tutorial Using Qt Creator ...................................................................................................... 4-12
Qt Programming Reference ......................................................................................................... 4-19
mtdev (multitouch protocol translation library) ..................................................................................... 4-19
Introduction.............................................................................................................................. 4-19
The multitouch and evdev .......................................................................................................... 4-20
Examples ................................................................................................................................. 4-21
5. System Restore ................................................................................................................................. 5-1
Embedded Computer Restore Environment 1 ......................................................................................... 5-2
Embedded Computer Restore Environment ..................................................................................... 5-2
Embedded Computer Restore Procedure ......................................................................................... 5-2
Saving the System to the USB Drive ................................................................................................... 5-10
Brightness Controller Firmware Upgrade .............................................................................................. 5-12
A. Software Components ....................................................................................................................... A-1
Page 5

1
1. Introduction
Thank you for purchasing the Moxa MPC-2000 Series x86, ready-to-run embedded computers. This manual
introduces the software configuration and management of the MPC-2070/2120-LX and MPC-2101/2121-LX
computers (referred to as the “MPC-2000 Series Linux-based computers”), which run the Linux operating
system. For hardware installation, connector interfaces, setup, and upgrading the BIOS, please refer to the
“Hardware User’s Manual.”
Linux is an open, scalable operating system that allows you to build a wide range of innovative, small footprint
devices. Software written for desktop PCs can be easily ported to the embedded computer with a GNU cross
compiler and a minimum of source code modifications. A typical Linux-based device is designed for a specific
use, and is often not connected to other computers, or a number of such devices connect to a centralized,
front-end host. Examples include enterprise tools such as industrial controllers, communications hubs,
point-of-sale terminals, and display devices that include HMIs, advertisement appliances, and interactive
panels.
The following topics are covered in this chapter:
Overview
Software Specifications
Software Components
Page 6
MPC-2000 Series Linux Software Introduction
1-2
Overview
The MPC-2000 Series Linux-based computers are based on the Intel® Atom(TM) CPU and feature
RS-232/422/485 serial ports, dual LAN ports, and USB 2.0 hosts. The serial ports make it ideal for connecting
a wide range of serial devices to the panel computers, and the dual 10/100 Mbps Ethernet ports offer a reliable
solution for network redundancy, which taken together promises continuous data communication and
management operations. For added convenience, the panel computers have DI/DO for connecting digital
input/output devices. In addition, the SD and USB ports provide the MPC-2000 Series Linux-based computers
with data buffering and storage expansion capabilities, which in turn provide the necessary reliability for
industrial applications.
Preinstalled with Linux, the MPC-2000 Series Linux-based panel computers provide programmers with a
friendly environment for developing sophisticated, bug-free application software at a lower cost.
The MPC-2000 Series Linux-based panel computers support a wide operating temperature range of -40 to 70°C,
making them suitable for use in harsh industrial environments.
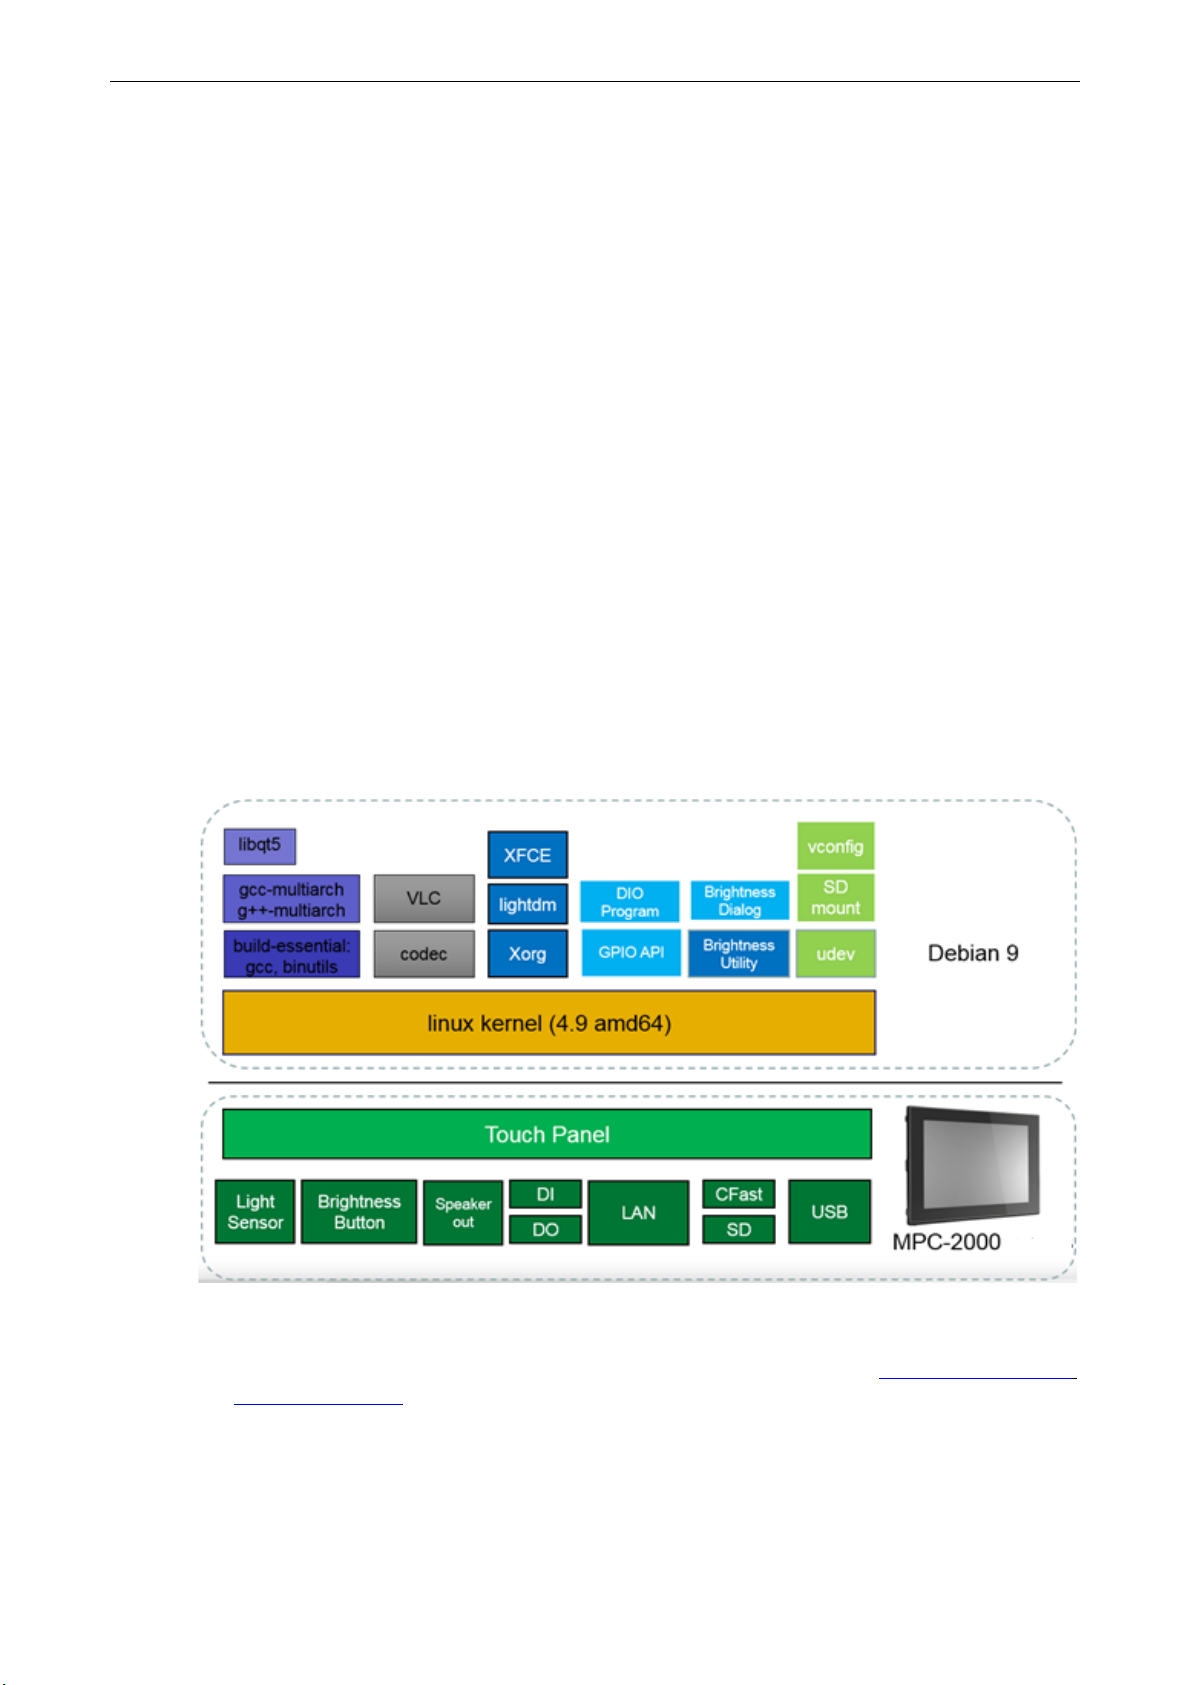
Software Specifications
The Linux operating system, preinstalled on the MPC-2000 Series Linux-based panel computers, is the Debian
Stretch distribution. The Debian project involves a worldwide group of volunteers who endeavor to produce an
operating system distribution composed entirely of free software. The Debian GNU/Linux follows the standard
Linux architecture, making it easy to use programs that meet the POSIX standard. Program porting can be
done with the GNU Tool Chain provided by Moxa. In addition to Standard POSIX APIs, device drivers for the
Moxa UART and other special peripherals are also included. An example software architecture is shown below.
The above software architecture is only an example. Different models or different build revisions of the Linux
operating system may include components not shown in the above illustration. For information and
documentation related to Debian GNU/Linux and the free software concept, refer to http://www.debian.org/
and http://www.gnu.org/
Software Components
The MPC-2000 Series Linux-based panel computers come preinstalled with the Debian Stretch Linux
distribution.
Page 7

2
2. System Configuration
In this chapter, we explain how to operate a MPC-2000 Series Linux-based panel computer using your desktop.
There are three ways to connect to the panel computer: through a Touch Panel monitor, from a Windows or
Linux machine via SSH over the network console. This chapter describes basic Linux operating system
configurations. Advanced network management and configuration instructions will be described in the Chapter
3, Managing Communications.
The following topics are covered in this chapter:
Getting Started
Connecting From an SSH Console
Windows Users
Linux Users
Adjusting the System Time
Setting the Time Manually
systemd-timesyncd Service
NTP Client
Manage the Service by systemd script
Setting the Time Zone
Cron—Daemon for Executing Scheduled Commands
The Partition in the System
Adding Swap Space in the System
Resizing and Adding a Partition
Inserting a USB Storage into the Computer
Inserting a SD Storage into the Computer
Checking the Linux Version
Checking Moxa’s Control Version
APT—Installing and Removing Packages
Audio Player
Video Player
Web Browser
Brightness control
Introduction
Auto-brightness control mode
Manual brightness control mode
Page 8
MPC-2000 Series Linux Software System Configuration
2-2
Getting Started
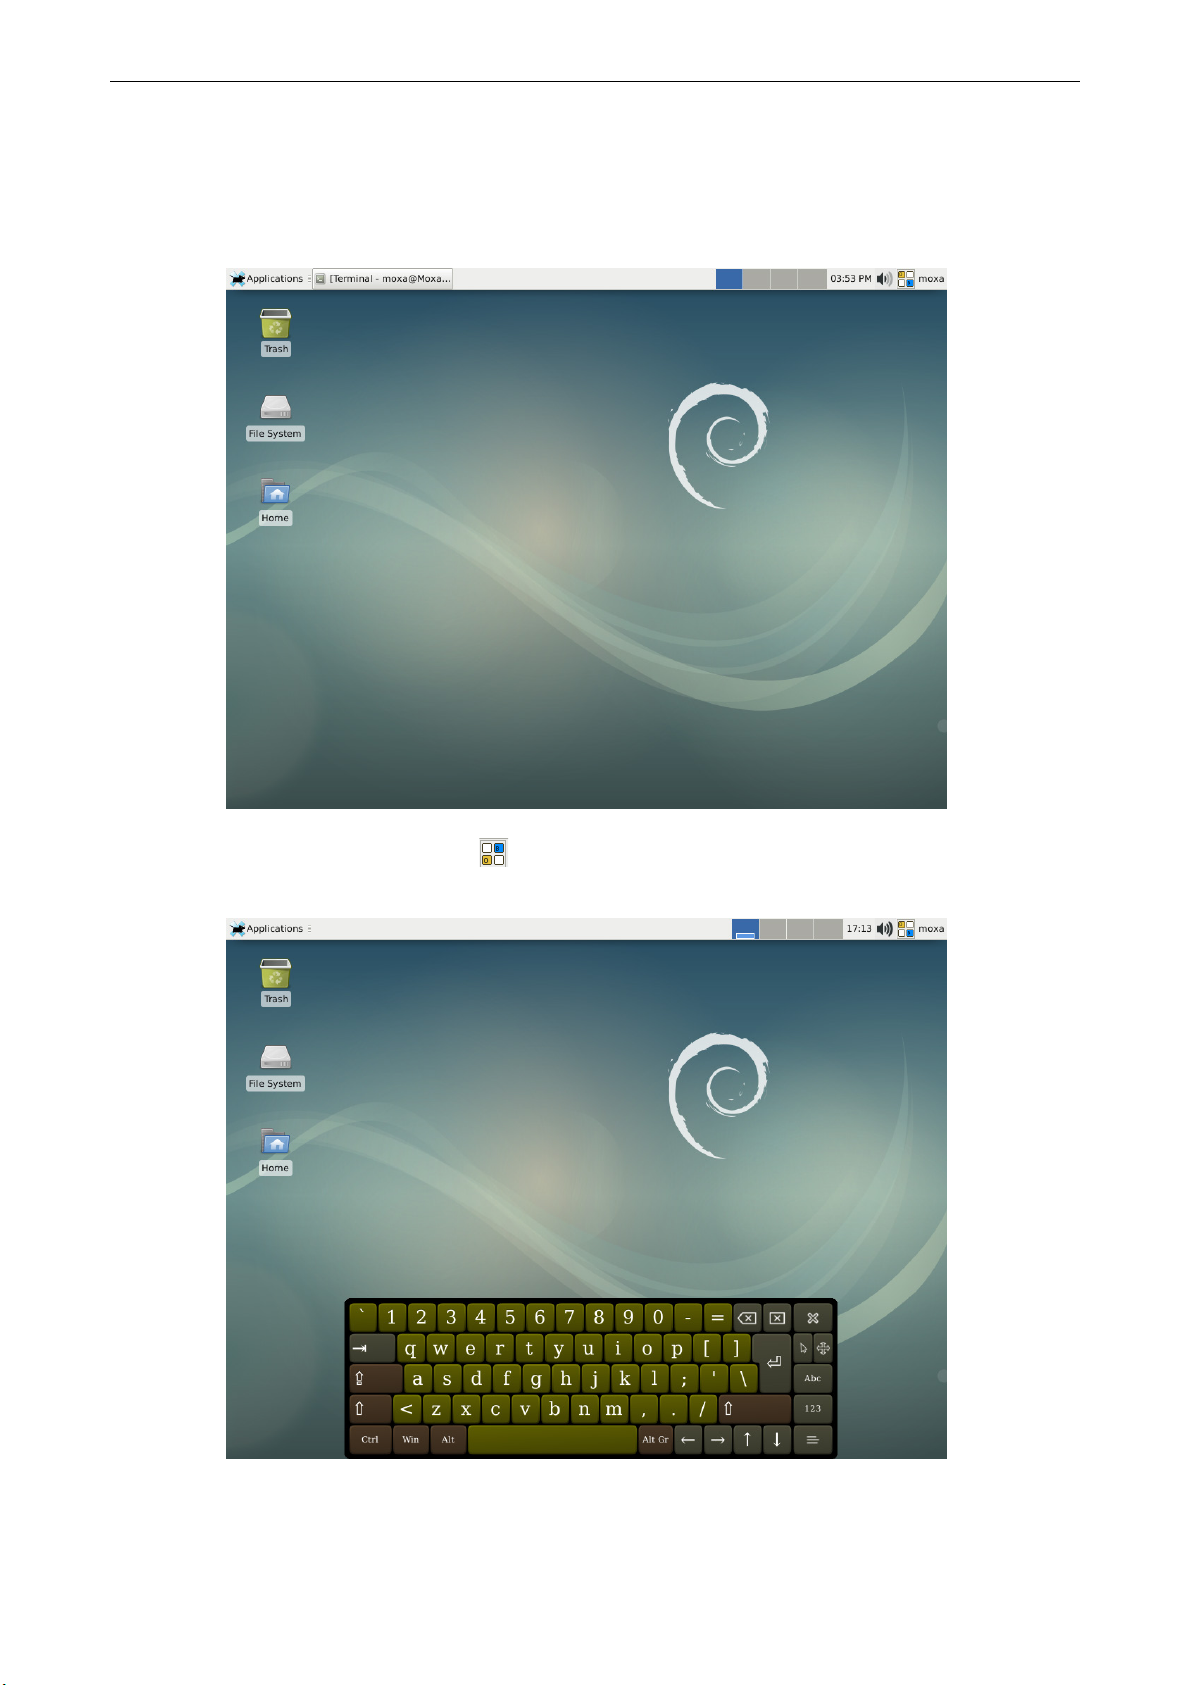
1. Power up the panel computer by connecting it to the power adaptor.
It takes approximately 30 seconds for the system to boot up. Once the system is ready, a XFCE desktop
screen will appear on your touch panel.
2. Click the virtual keyboard icon on the upper corner.
The virtual keyboard will be displayed on the desktop.
Page 9
MPC-2000 Series Linux Software System Configuration
2-3
ATTENTION
The
autologin
support user authentication before using the device.
....
moxa@Moxa:~# sudo xfce4-panel -V
...
lightdm function is configured in automatic login mode. You can comment out the
-user=moxa and autologin-user-timeout=0 in the /etc/lightdm/lightdm.conf file to
moxa@Moxa:~# sudo vi /etc/lightdm/lightdm.conf
...
# autologin-user=moxa
# Autologin-user-timeout=0
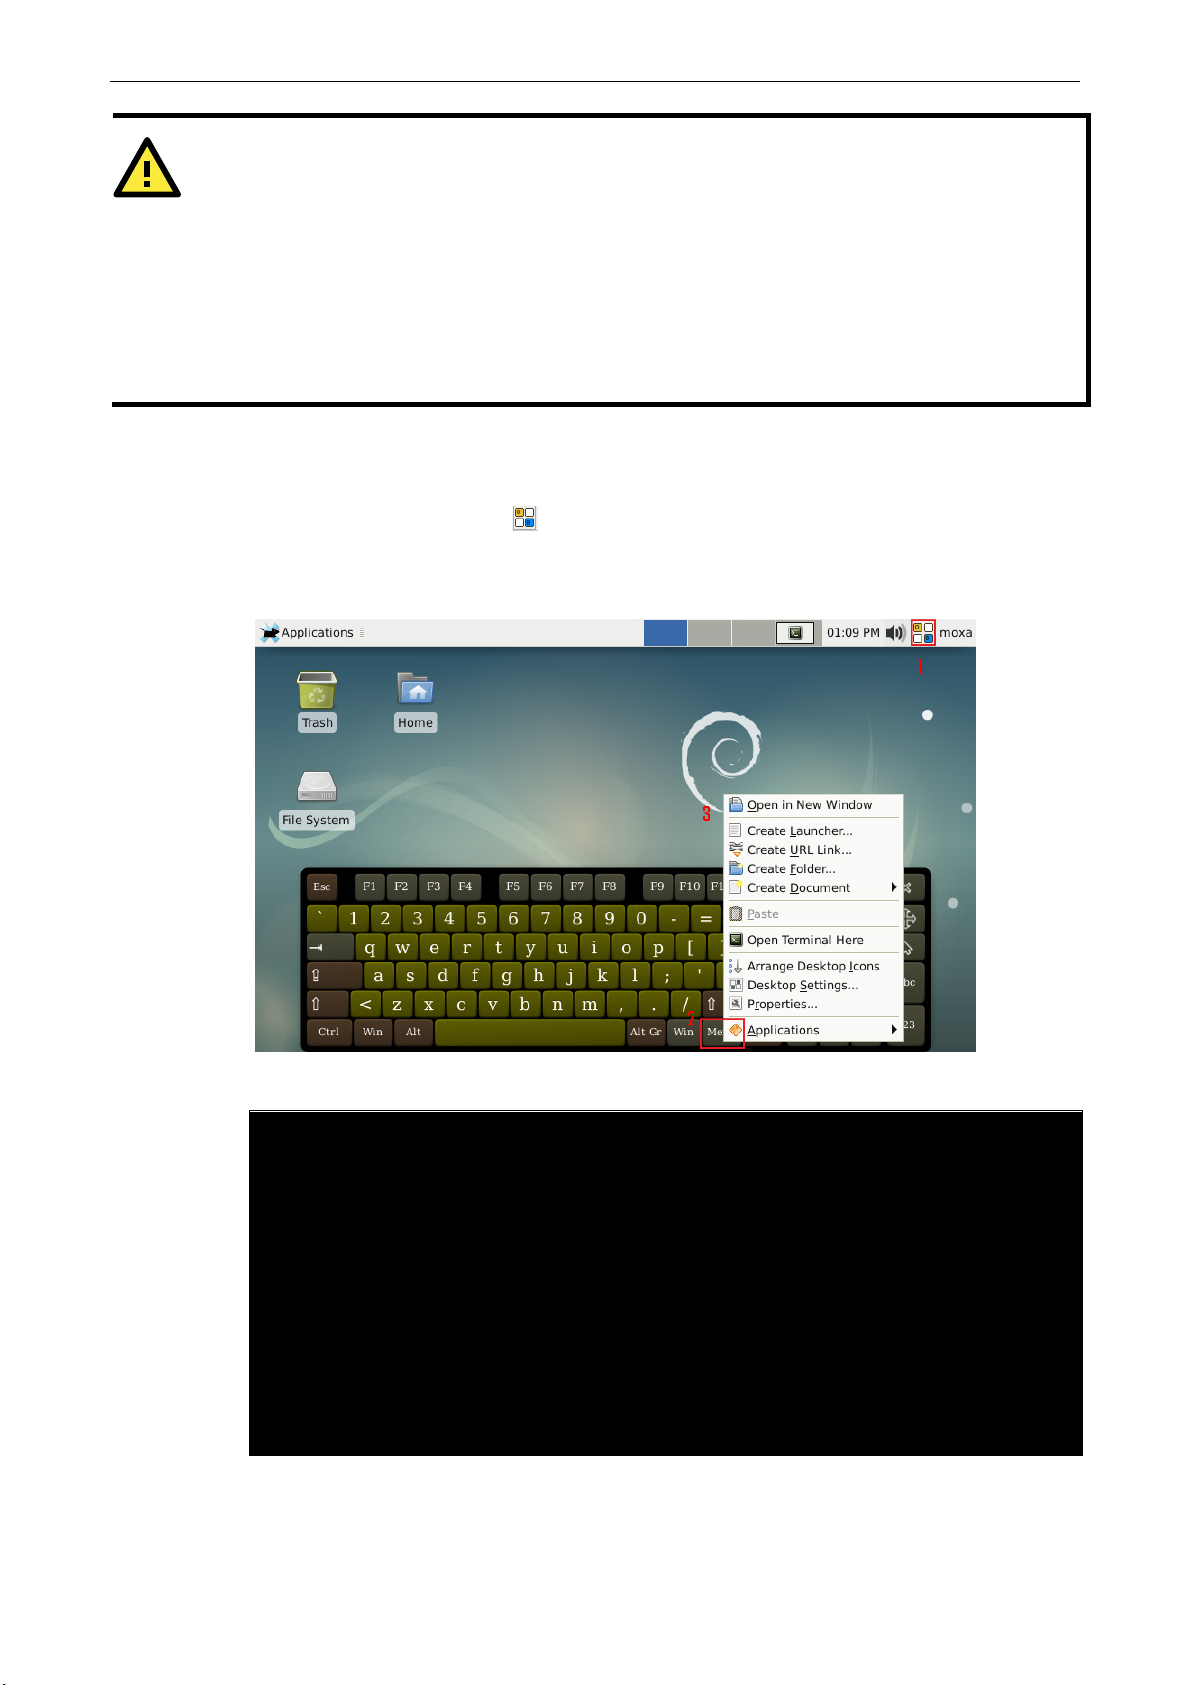
3. Right-click to open the desktop menu.
If you are not using a mouse device, the virtual keyboard supports the right-click function as follows:
a. Press the virtual keyboard icon .
b. Press the Menu key on the virtual keyboard.
The pop-up menu will be displayed on the desktop.
The XFCE4 and Xorg version:
xfce4-panel 4.12.1 (Xfce 4.12)
Copyright (c) 2004-2011
The Xfce development team. All rights reserved.
Please report bugs to <http://bugzilla.xfce.org/>.
moxa@Moxa:~# sudo Xorg -version
X.Org X Server 1.19.2
Release Date: 2017-03-02
X Protocol Version 11, Revision 0
Build Operating System: Linux 4.9.0-8-amd64 x86_64 Debian
...
xorg-server 2:1.19.2-1+deb9u4 (https://www.debian.org/support)
Page 10
MPC-2000 Series Linux Software System Configuration
2-4
LAN 1
192.168.3.127
255.255.255.0
ATTENTION
For security concern, the system is set up to log out if the SSH remote console or serial console is inactive for
5 minutes. If you don’t need this setting in the development phase, you can comment the con
The sshd automatic logout is configured in
....
Connecting From an SSH Console
The embedded computers support the SSH console to offer users better network security compared to Telnet.
The default IP addresses and netmasks of the network interfaces are as follows:
Default IP Address Netmask
LAN 2 192.168.4.127 255.255.255.0
Before using the SSH client, you should change the IP address of your development workstation so that the
network ports are on the same subnet as the IP address for the LAN port that you will connect to. For example,
if you will connect to LAN1, you could set your PC’s IP address to 192.168.3.126, and the netmask to
255.255.255.0. If you will connect to LAN2, you could set your PC’s IP address to 192.168.4.126, and the
netmask to 255.255.255.0.
Use a cross-over Ethernet cable to connect your development workstation directly to the target computer, or
use a straight-through Ethernet cable to connect the computer to a LAN hub or switch. Next, use a SSH client
on your development workstation to connect to the target computer. After a connection has been established,
type the login name and password as requested to log on to the computer. The default values are both moxa.
Login: moxa
Password: moxa
...
# Remote session termination
ClientAliveInterval 300
ClientAliveCountMax 0
figuration.
/etc/ssh/sshd_config
Page 11
MPC-2000 Series Linux Software System Configuration
2-5
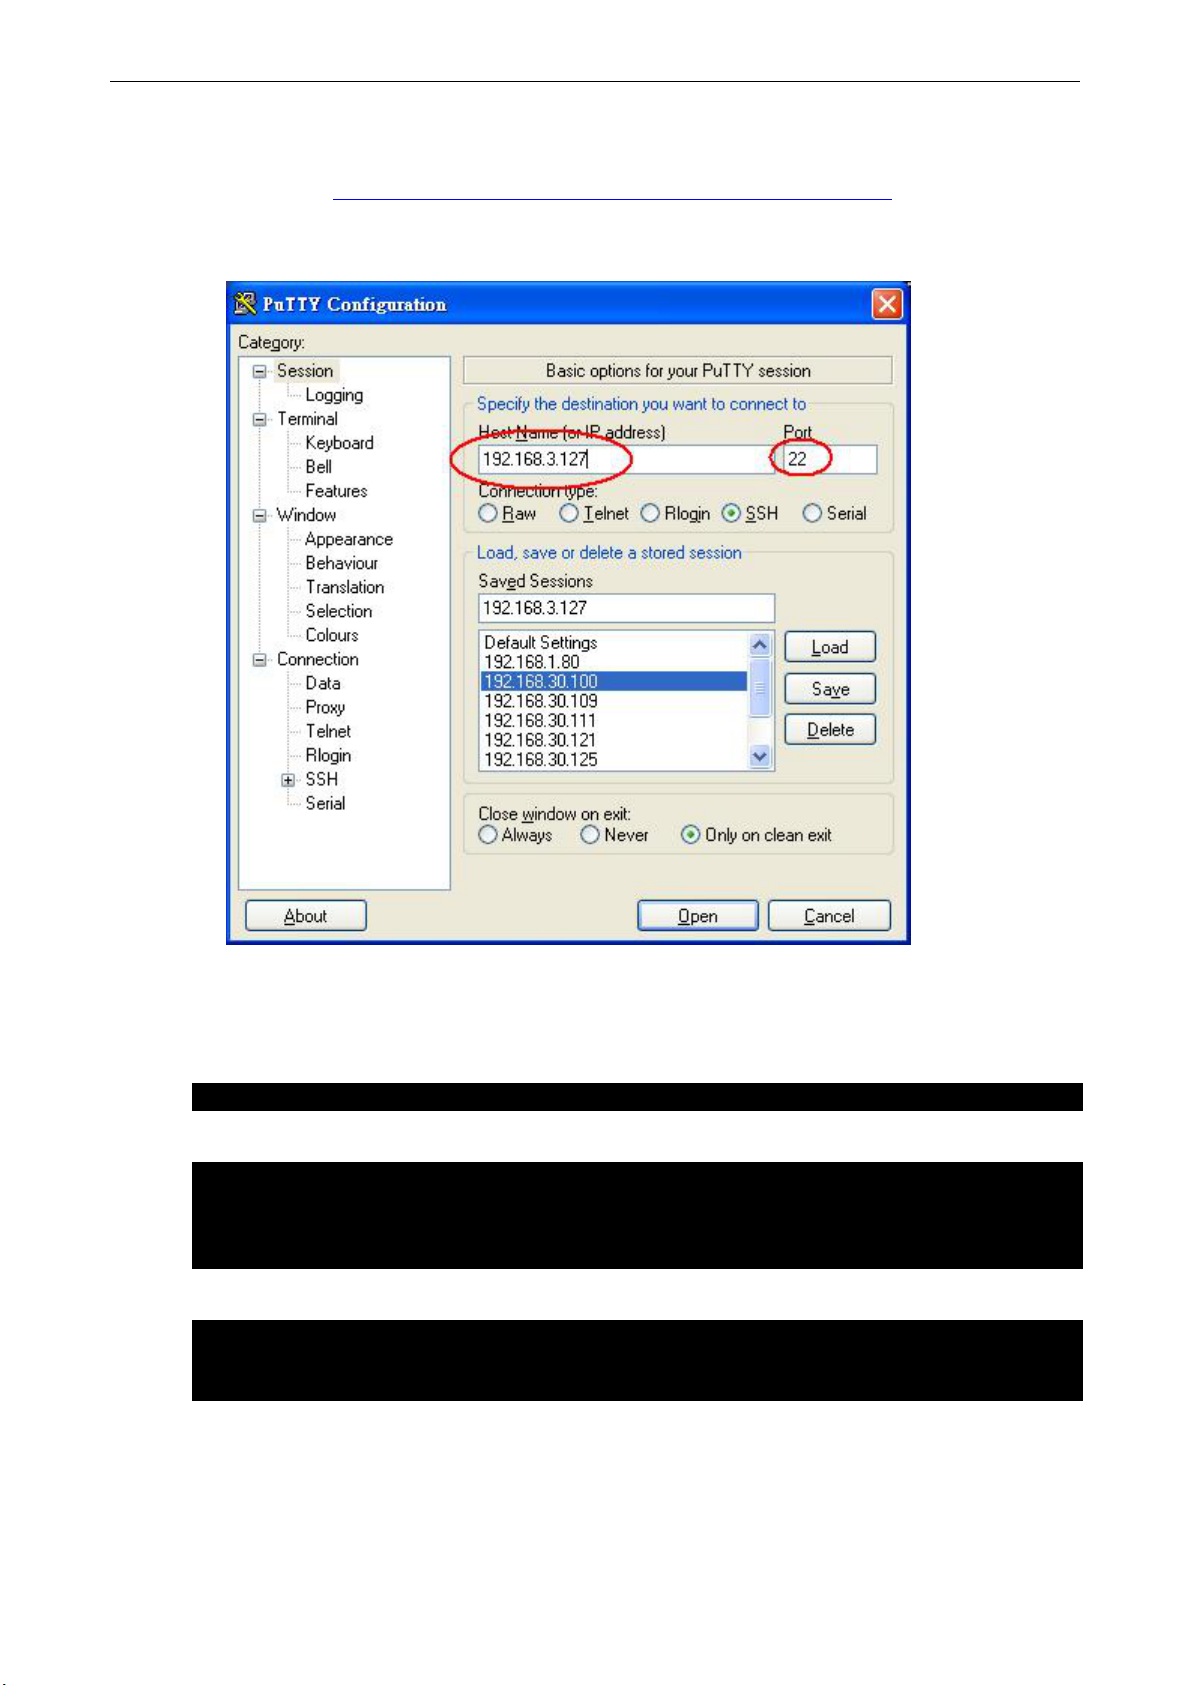
#ssh moxa@192.168.3.127
[root@Jim_notebook root]# ssh moxa@192.168.3.127
Are you sure you want to continue connection (yes/no)? yes_
moxa@Moxa:~# sudo –i
root@Moxa:~$
Windows Users
Click on the link http://www.chiark.greenend.org.uk/~sgtatham/putty/download.html to download PuTTY
(free software) to set up an SSH console for the embedded computer in a Windows environment. The following
screen shows an example of the configuration that is required.
Linux Users
From a Linux machine, use the ssh command to access the embedded computer’s console utility via SSH.
Select yes to open the connection.
The authenticity of host ‘192.168.3.127 (192.168.3.127)’ can’t be established.
RSA key fingerprint is 8b:ee:ff:84:41:25:fc:cd:2a:f2:92:8f:cb:1f:6b:2f.
In addition, use sudo -i to login as root to have more privileges.
[sudo] password for moxa:
Page 12

MPC-2000 Series Linux Software System Configuration
2-6
ATTENTION
To enable sudo on your computer, you must first add a user to the sudo group. To add a user to the sudo group,
use the useradd command, as below
useradd [USER
Using the sudoers file, sudo may be carefully tailored on a user
privileges that can be tailored to individual computers within the network. For more information on
conf
Linux.com; introduction to sudo:
http://www.linux.com/learn/tutor
Debian introduction to the sudo command:
https://wiki.debian.org/sudo
Ubuntu (a Debian sub
https://help.ubuntu.com/community/Sudoers
A sample sudoers file for an extended network:
http://www.sudo.ws/sudo/sample.sudoers
root@Moxa:~# date
root@Moxa:~#
-ACCOUNT-NAME-HERE] sudo
iguration, usage, and best practices with the sudo command, you may refer to the following websites:
-distribution) documentation for the sudoers file:
:
ials/306766:linux-101-introduction-to-sudo
.
Adjusting the System Time
The MPC-2070/2120-LX or MPC-2101/2121-LX has two time settings. One is the system time, and the other is
provided by an RTC (Real Time Clock) built into the MPC-2000 hardware.
-by-user basis to allow a specific hierarchy of
Setting the Time Manually
Use the date command to query the current system time or to set a new system time. Use hwclock to query
the current RTC time or to set a new RTC time.
Use the following command to set the system time.
# date MMDDhhmmYYYY
MM: Month
DD: Date
hhmm: Hour and Minute
YYYY: Year
Use the following command to write the current system time to the RTC.
# hwclock -w
Tue Jul 17 10:59:33 CST 2018
root@Moxa:~# hwclock
2018-07-17 11:01:06.233615+0800
root@Moxa:~# date 071711102018
Tue Jul 17 11:10:00 CST 2018
root@Moxa:~# hwclock –w
root@Moxa:~# date ; hwclock
Tue Jul 17 11:10:12 CST 2018
2018-07-17 11:10:12.233615+0800
Page 13

MPC-2000 Series Linux Software System Configuration
2-7
root@Moxa:~# systemctl start systemd-timesyncd
root@Moxa:~# systemctl enable systemd-timesyncd
root@Moxa:~# reboot
root@Moxa:~# systemctl status systemd-timesyncd
Mar 12 05:12:47 Moxa systemd[1]: Started Network Time Synchronization.
[Time]
3.debian.pool.ntp.org
root@Moxa:~# systemctl restart systemd-timesyncd
root@Moxa:~# timedatectl set-ntp true
root@Moxa:~# timedatectl status
RTC in local TZ: no
systemd-timesyncd Service
The systemd-timesyncd daemon has been added for synchronizing the system clock across the network. This
service default is disabled. You can start this service manually by this command.
You can enable this service and reboot. It would be start after boot.
After reboot, the systemd-timesyncd service should run in background.
● systemd-timesyncd.service - Network Time Synchronization
Loaded: loaded (/lib/systemd/system/systemd-timesyncd.service; enabled; vendor
preset: enabled)
Drop-In: /lib/systemd/system/systemd-timesyncd.service.d
└─disable-with-time-daemon.conf
Active: active (running) since Mon 2018-03-12 05:12:47 EDT; 31min ago
Docs: man:systemd-timesyncd.service(8)
Main PID: 297 (systemd-timesyn)
Status: "Idle."
Tasks: 2 (limit: 4915)
CGroup: /system.slice/systemd-timesyncd.service
└─297 /lib/systemd/systemd-timesyncd
Mar 12 05:12:47 Moxa systemd[1]: Starting Network Time Synchronization...
When the systemd-timesyncd starting, it reads the configurations from /etc/systemd/timesyncd.conf.
Choosing from the NTP server pool
to configure.
NTP=jp.pool.ntp.org
FallbackNTP=0.debian.pool.ntp.org 1.debian.pool.ntp.org 2.debian.pool.ntp.org
Restart the systemd-timesyncd service.
If NTP is not enabled, you can enable it by this command.
Once that’s done, the time should be kept correctly.
Local time: Wed 2018-07-04 14:55:00 CST
Universal time: Wed 2018-07-04 06:55:00 UTC
RTC time: Wed 2018-07-04 06:55:00
Time zone: Asia/Taipei (CST, +0800)
Network time on: yes
NTP synchronized: yes
Page 14
MPC-2000 Series Linux Software System Configuration
2-8
root@Moxa:~# date ; hwclock
root@Moxa:~#
ATTENTION
Before using the NTP client utility, check your IP address and ne
sure an Internet connection is available.
root@Moxa:~# systemctl status systemd-timesyncd
Docs: man:systemd-timesyncd.service(8)
root@Moxa:~# systemctl enable systemd-timesyncd
root@Moxa:~# reboot
ATTENTION
Before using the time sync utility, check your IP address and network settings (gateway and DNS) to make sure
an Internet connection is available.
NTP Client
You can use NTP (Network Time Protocol) client that is used to initialize a time request to a remote NTP server.
Use ntpdate to update the system time.
# ntpdate time.stdtime.gov.tw
# hwclock –w
Visit http://www.ntp.org
for more information about NTP and NTP server addresses.
root@Moxa Mar 12 05:58:42 EDT 2018
root@Moxa:~# hwclock
2018-03-12 05:59:23.436777-0400
root@Moxa:~# date 031217592018.30
Mon Mar 12 17:59:30 EDT 2018
root@Moxa:~# hwclock –w
root@Moxa:~# date ; hwclock
Mon Mar 12 18:00:42 EDT 2018
2018-03-12 18:00:42.468011-0400
The Debian Linux system has a built-in system-timesyncd that is used for Network Time Synchronization. This
service default is disabled.
twork settings (gateway and DNS) to make
● systemd-timesyncd.service - Network Time Synchronization
Loaded: loaded (/lib/systemd/system/systemd-timesyncd.service; disabled; vendor
preset: enabled)
Drop-In: /lib/systemd/system/systemd-timesyncd.service.d
└─disable-with-time-daemon.conf
Active: inactive (dead)
Enable the system-timesyncd service by the systemctl enable command and reboot.
Page 15

MPC-2000 Series Linux Software System Configuration
2-9
[Unit]
WantedBy=default.target
moxa@Moxa:~# sudo vi /usr/local/bin/networking-check.sh
done
root@Moxa:~# chmod a+x /usr/local/bin/networking-check.sh
root@Moxa:~# systemctl start networking-check
root@Moxa:~# ps aux|grep networking-check
root 2276 0.0 0.0 12784 980 pts/0 S+ 14:49 0:00 grep networking-check
root@Moxa:~# cat /var/log/networking-check.log
...
Manage the Service by systemd script
Linux services can be started or stopped using system script. If you want to start up some service, you can use
systemctl to enable or disable the service.
You can follow this example to add or remove your service in the system. First, you should write a system
service unit. This example creates a systemd service unit at /etc/systemd/system/networking-check.service.
After=snmpd.service
[Service]
ExecStart=/usr/local/bin/networking-check.sh
[Install]
After: Instructs systemd on when the script should be run. In our case the script will run after snmpd.service
has started.
ExecStart: This field provides a full path the actual script to be execute
WantedBy: Into what boot target the systemd unit should be installed
This is minimum example of a system script. More information please check systemd.service. Next create
/usr/local/bin/networking-check.sh script to check the network status. This example will ping a global DNS
server to check if network is available and write the results in /var/log/networking-check.log.
#!/bin/sh
while [ 1 ]; do
date >> /var/log/networking-check.log
ping -q -w 1 8.8.8.8
if [ $? -eq 0 ]; then
echo "Network is available" >> /var/log/networking-check.log
else
echo "Network is not available" >> /var/log/networking-check.log
fi
sleep 1
Before we launch this service, we need to make this script executable:
Then we can start the networking-check service by this command.
The networking-check.sh should run in background.
root 2260 0.0 0.0 4288 1500 ? Ss 14:49 0:00 /bin/sh /usr/local/bin/networking-check.sh
The /var/log/networking-check.log should be created.
Wed Mar 14 14:49:09 EDT 2018
Network is available
Page 16

MPC-2000 Series Linux Software System Configuration
2-10
root@Moxa:~# systemctl stop networking-check
root@Moxa:~# systemctl enable networking-check
root@Moxa:~# reboot
root@Moxa:~# systemctl disable networking-check
root@Moxa:~# export TZ=America/Los_Angeles
Tue Jan 29 01:37:22 PST 2019
root@Moxa:~# unset TZ
Tue Jan 29 17:39:54 CST 2019
Remember use this command to stop this service to prevent the log of this example occupied too much disk
space.
Finally, you can enable this service at boot time by this command and reboot the system.
To disable this service by the systemctl disable command.
Setting the Time Zone
You can choose one of these methods to change the time zone.
• Environment variable - TZ
• dpkg-reconfigure tzdata
• timedatectl
• xfce4-panel clock widget
Using the Environment variable - TZ
You can export the TZ environment variable to change the time zone.
root@Moxa:~# date
Unset the TZ before using another method to configure the time zone.
root@Moxa:~# date
Page 17
MPC-2000 Series Linux Software System Configuration
2-11
Current default time zone: 'US/Central'
Universal Time is now: Tue Jan 29 09:44:29 UTC 2019.
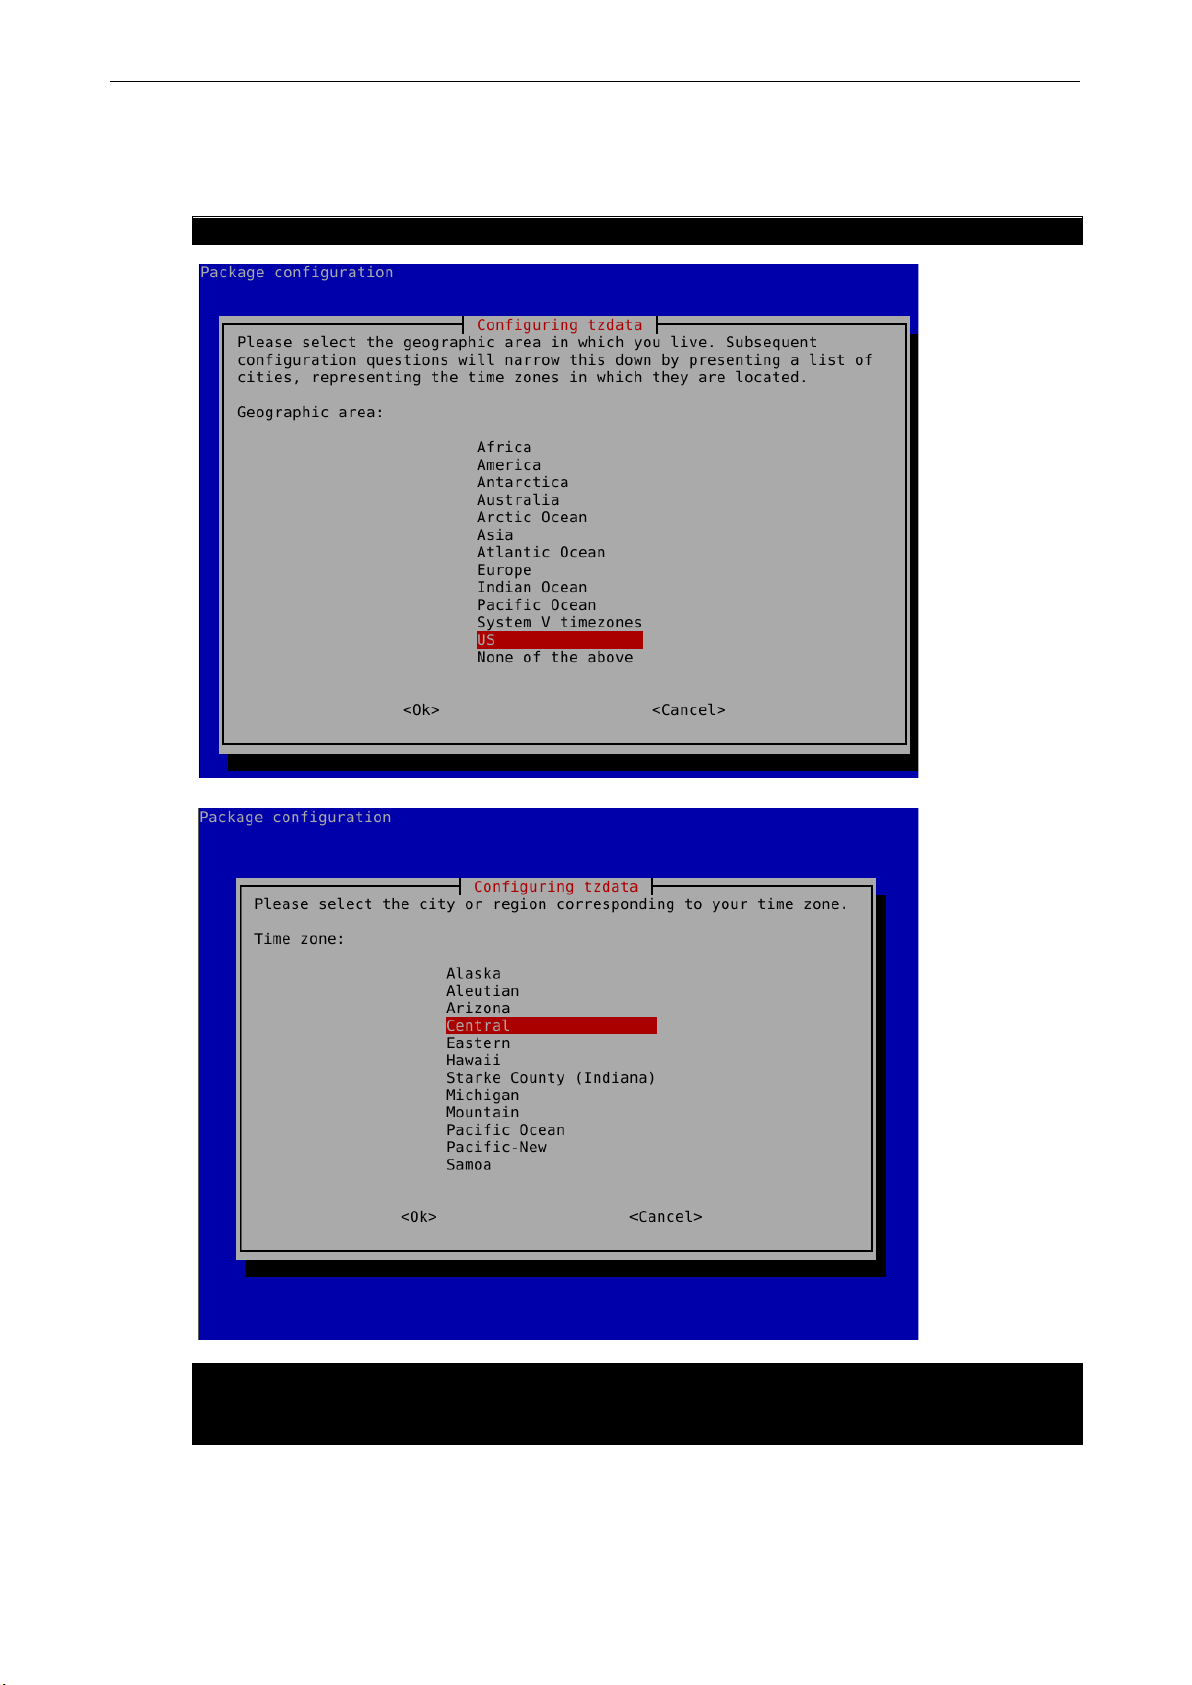
Using the dpkg-reconfigure tzdata.
This is the example on how to use dpkg-reconfigure to change the time zone.
root@Moxa:~# dpkg-reconfigure tzdata
Local time is now: Tue Jan 29 03:44:29 CST 2019.
Page 18

MPC-2000 Series Linux Software System Configuration
2-12
moxa@Moxa:~# timedatectl list-timezones
UTC
moxa@Moxa:~# sudo timedatectl set-timezone Asia/Tokyo
moxa@Moxa:~# timedatectl
RTC in local TZ: no
Using timedatectl
Display the time zone list using the timedatectl command.
Africa/Abidjan
Africa/Accra
…
Set timezone by timedatectl
Show the settings
Local time: Tue 2019-01-22 16:05:47 JST
Universal time: Tue 2019-01-22 07:05:47 UTC
RTC time: Tue 2019-01-22 07:05:46
Time zone: Asia/Tokyo (JST, +0900)
Network time on: no
NTP synchronized: no
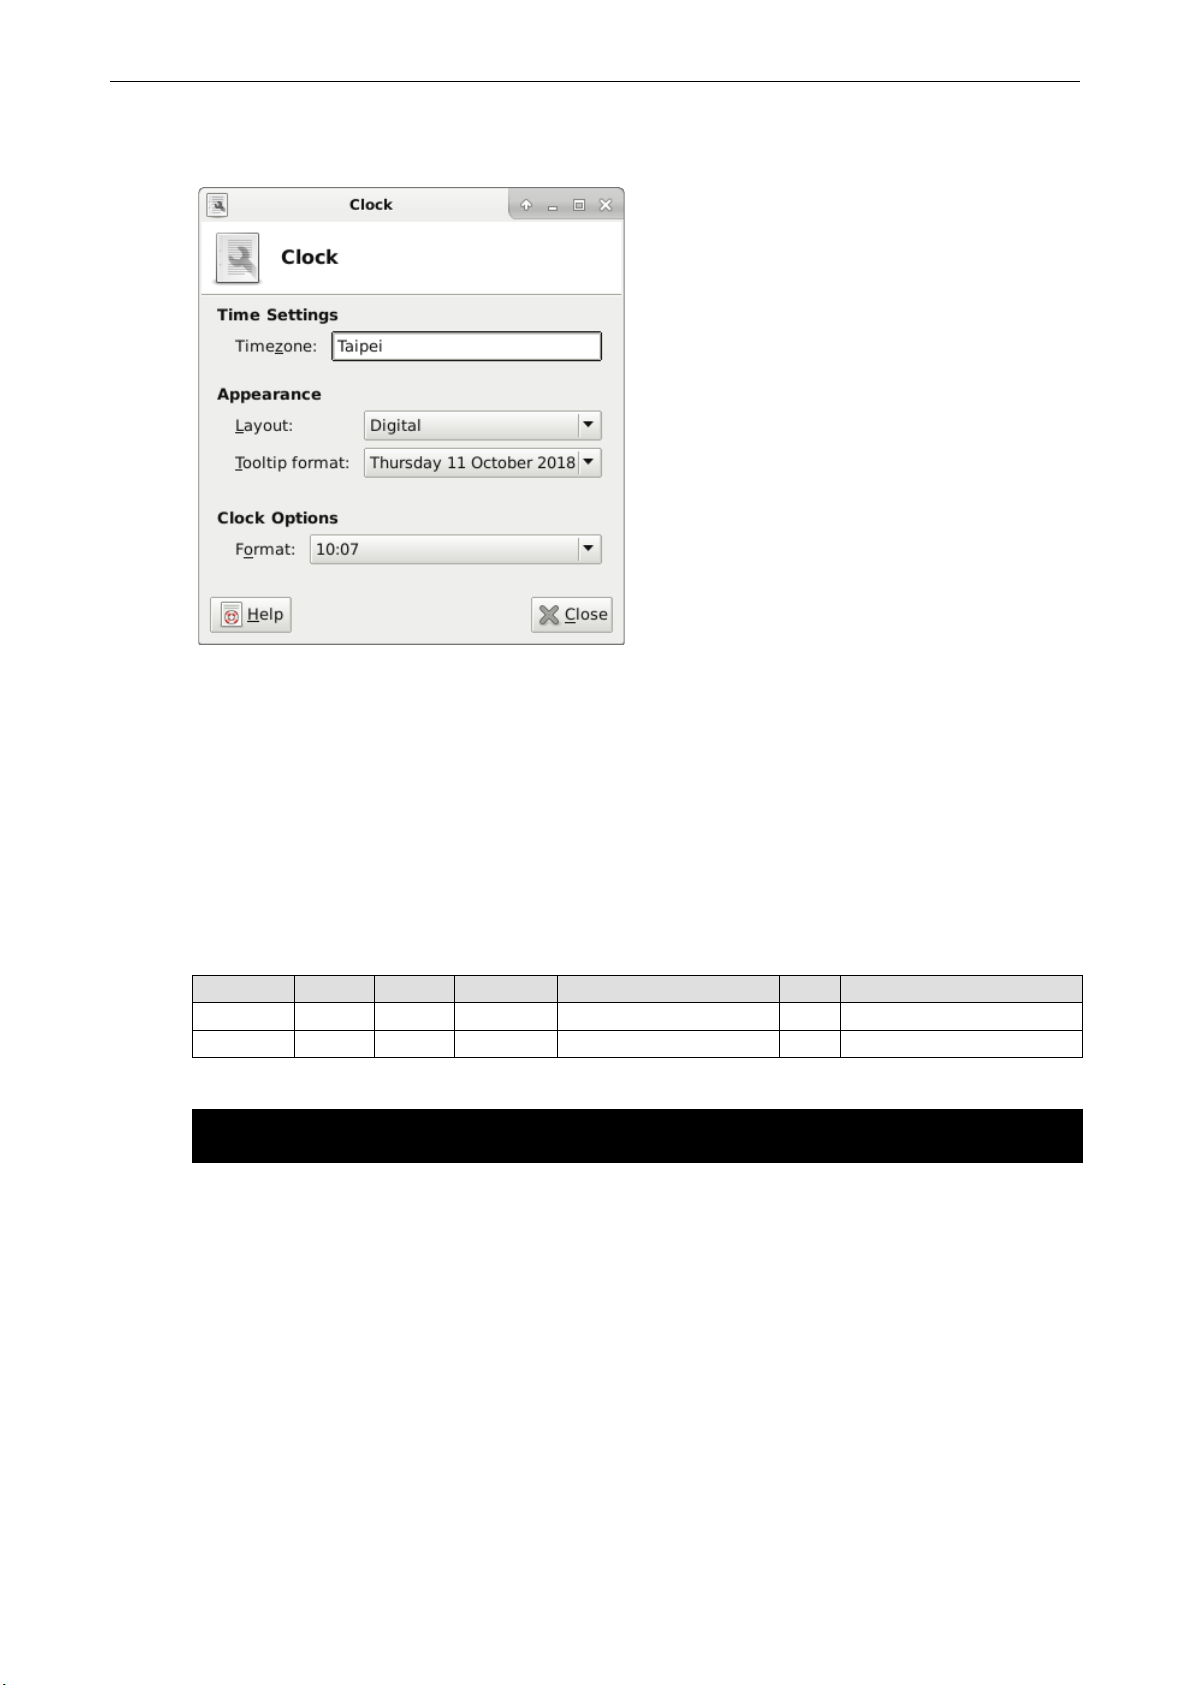
Using the xfce4-panel Clock Widget
To set the time zone in the XFCE window, right-click on the Clock on the icon tray at the top right of your
computer screen.
Page 19
MPC-2000 Series Linux Software System Configuration
2-13
#minute hour date month dow user command
* 8 * * * root /path/to/your/program
This should show the Time Settings, Appearance, and Clock Options. Enter the time zone in the text box and
click the Close button to change the time zone in the system.
Cron—Daemon for Executing Scheduled Commands
The Cron daemon will search /etc/crontab for crontab files.
Cron wakes up every minute and checks each command to see if it should be run at that time. When executing
commands, output is mailed to the owner of the crontab (or to the user named in the MAILTO environment
variable in the crontab, if such a user exists).
Modify the file /etc/crontab to set up your scheduled applications. Crontab files have the following format:
Mm H dom mon Dow user command
Minute Hour date month Week user command
0-59 0-23 1-31 1-12 0-6 (0 is Sunday)
For example, issue the following command if you want to launch a program at 8:00 every day:
The following example demonstrates how to use Cron to update the system time and RTC time every day at
8:00.
1. Write a shell script named fixtime.sh and save it to /home/.
#!/bin/sh
ntpdate time.stdtime.gov.tw
hwclock –w
exit 0
2. Change the mode of fixtime.sh
# chmod 755 fixtime.sh
3. Modify the /etc/crontab file to run fixtime.sh at 8:00 every day.
Add the following line to the end of crontab:
* 8 * * * root /home/fixtime.sh
Page 20

MPC-2000 Series Linux Software System Configuration
2-14
moxa@Moxa:~# sudo vi /etc/fstab
#usbfs /proc/bus/usb usbfs defaults 0 0
moxa@Moxa:~# sudo blkid
...
moxa@Moxa:~# sudo dd if=/dev/zero of=/var/swapfile bs=512 count=2097156
moxa@Moxa:~# sudo mkswap /var/swapfile
moxa@Moxa:~# sudo vi /etc/fstab
/var/swapfile none swap sw 0 0
Moxa@Moxa:~# sudo reboot
/var/swapfile file 1048572 0 -1
moxa@Moxa:~# free
Swap: 1048572 0 1048572
The Partition in the System
The storage size installed in the Linux operating system is at least 8 GB. The kernel, grub, /, /etc, /home, and
/var are installed in one partition.
The / is mounted by label configured in /etc/fstab.
...
LABEL=root / ext4 noatime,errors=remount-ro 0 1
The label naming is checked using the blkid command.
...
/dev/sda1: LABEL="root" UUID="3a5039b5-4002-4865-9a53-e0eb2326bd84" TYPE="ext4"
PARTUUID="20f4f528-01"
Adding Swap Space in the System
The memory is large and cheap in the embedded computer system. We don’t plan the swap space in the
operating system. If your applications need more memory, in addition to add more RAM, setting swap space
solve the problem of insufficient memory. You can follow these steps to adding the swap file to support swap
in the system.
Create a swap file. This example creates a 4G size swap file located at /var/swapfile.
Set up a Linux swap space.
Update /etc/fstab to use the swap file in booting.
Then reboot the system for the swap space to be active. The swapon -s command shows a summary of the
swap space.
<...Wait the system reboot...>
moxa@Moxa:~# sudo swapon -s
Filename Type Size Used Priority
The free shows the free shows the memory and swap usage information.
total used free shared buff/cache available
Mem: 12191600 1600412 9787112 219100 804076 10112868
Page 21
MPC-2000 Series Linux Software System Configuration
2-15
Resizing and Adding a Partition
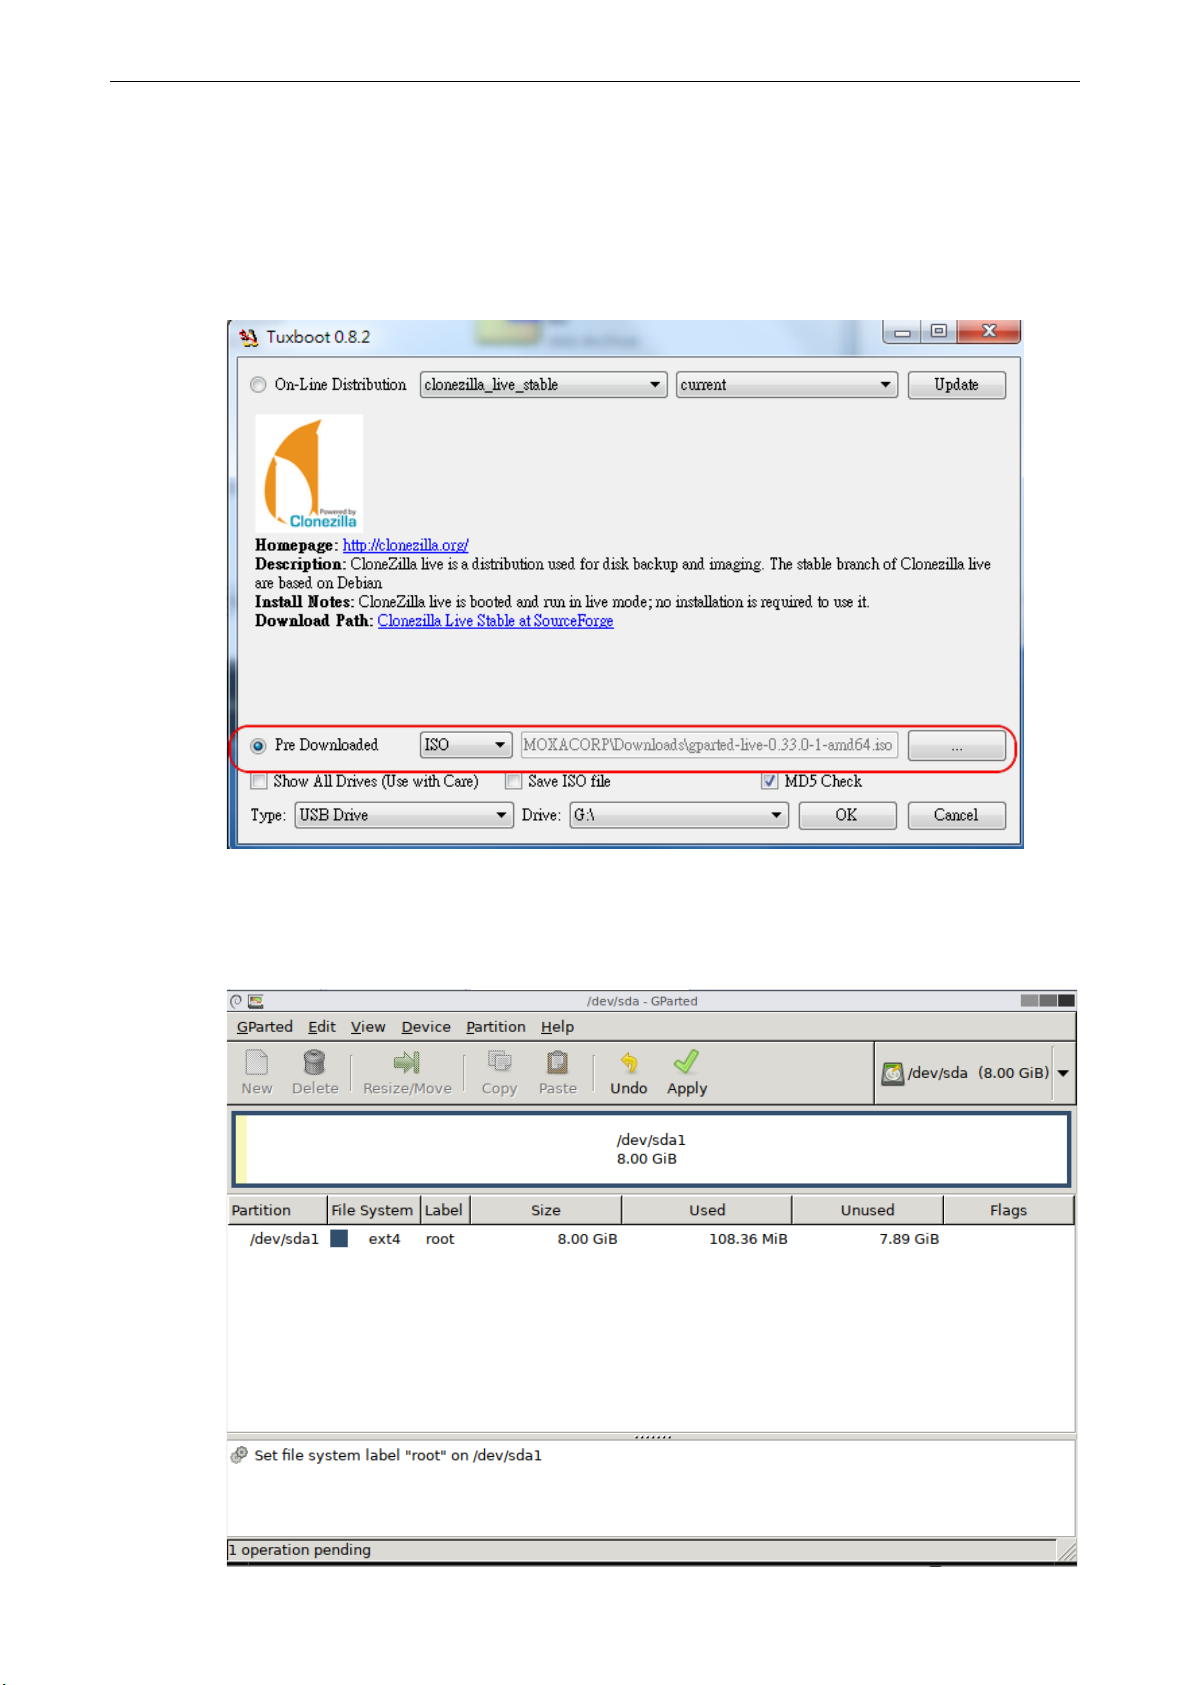
1. Download the GParted Live ISO from the GParted’s website.
Then format a FAT16/FAT32 filesystem USB flash driver at least with 300MB size.
2. Use Tuxboot to create the GParted USB driver.
The latest Tuxboot can be downloaded from the Tuxboot’s website.
3. Unmount, remove and insert the GParted USB driver to boot in Moxa embedded computer. After boot into
GParted USB driver, it shows the disk partition information in a graphic dialog.
This example resizes and creates a new partition labeled as data and mount the new partition at
/media/data.
Page 22
MPC-2000 Series Linux Software System Configuration
2-16
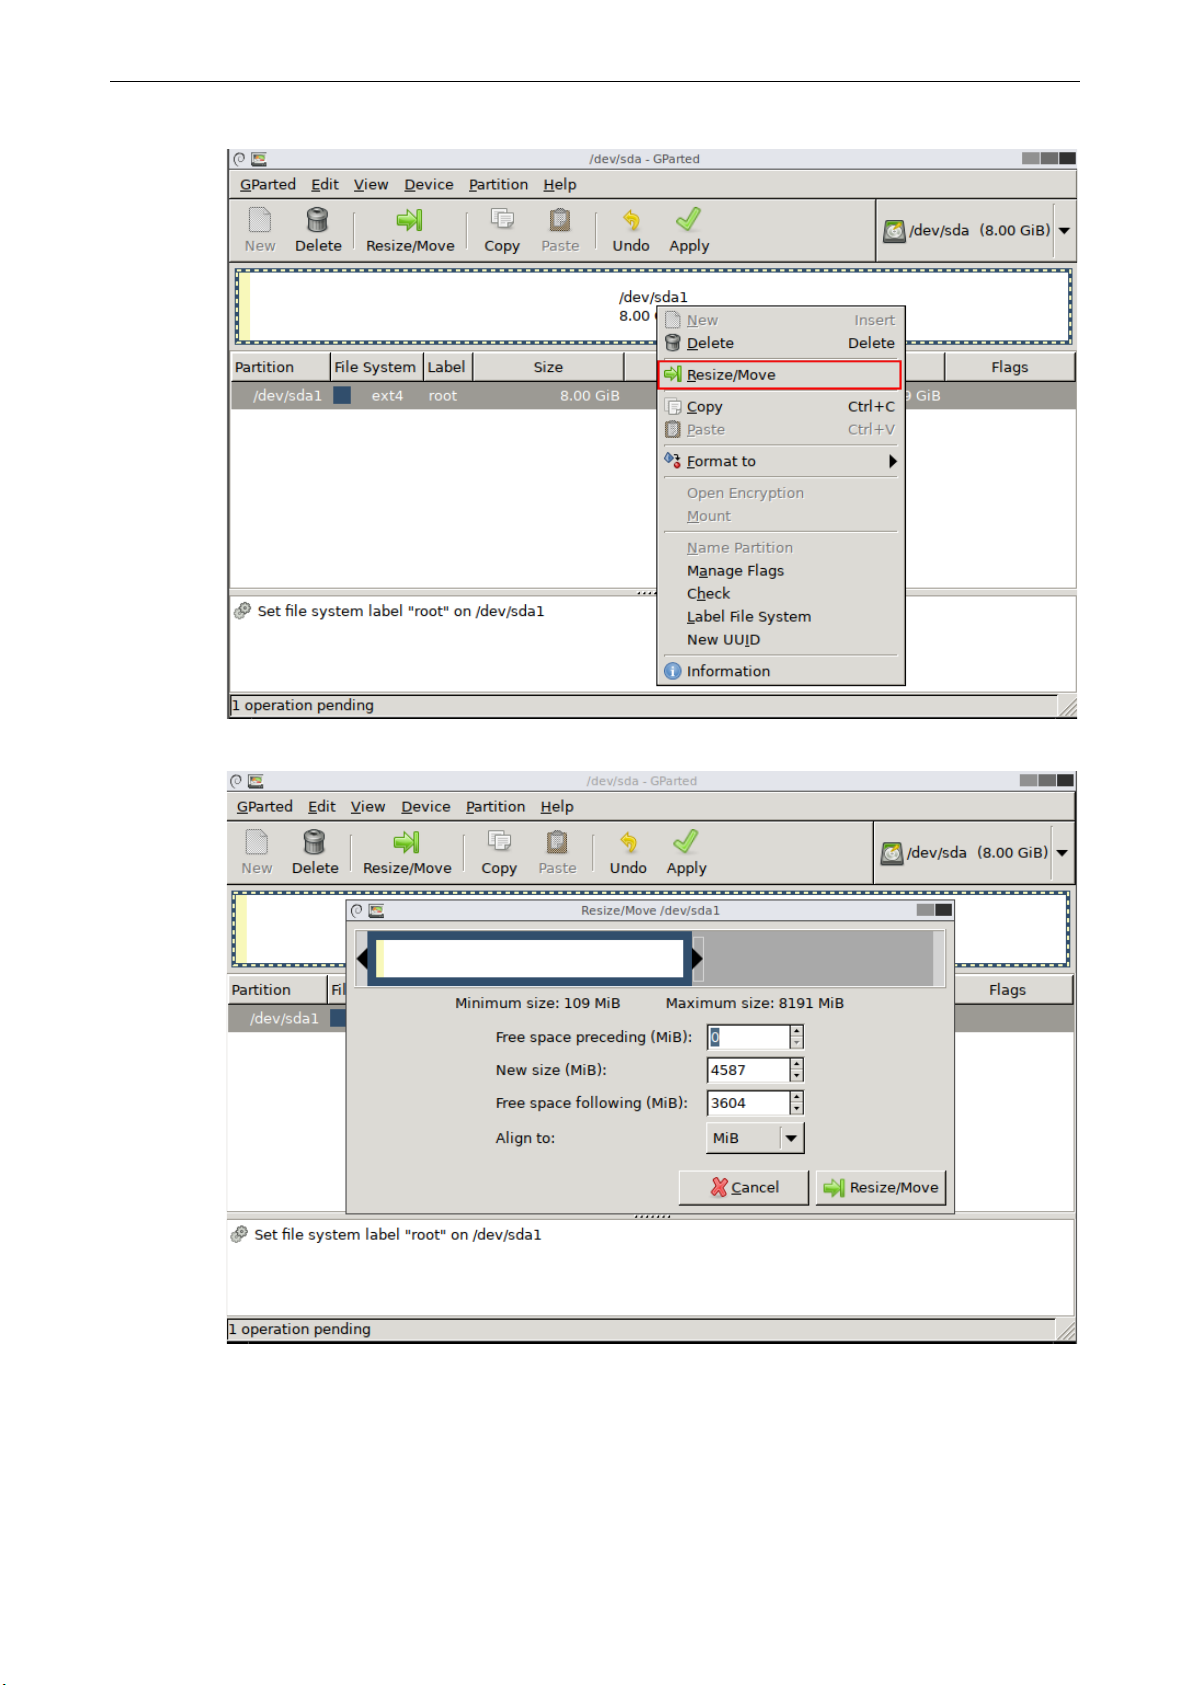
4. Right click on partition #1, /dev/sda1 to Resize or Move it.
5. Use the slider bar to resize partition #1.
Page 23
MPC-2000 Series Linux Software System Configuration
2-17
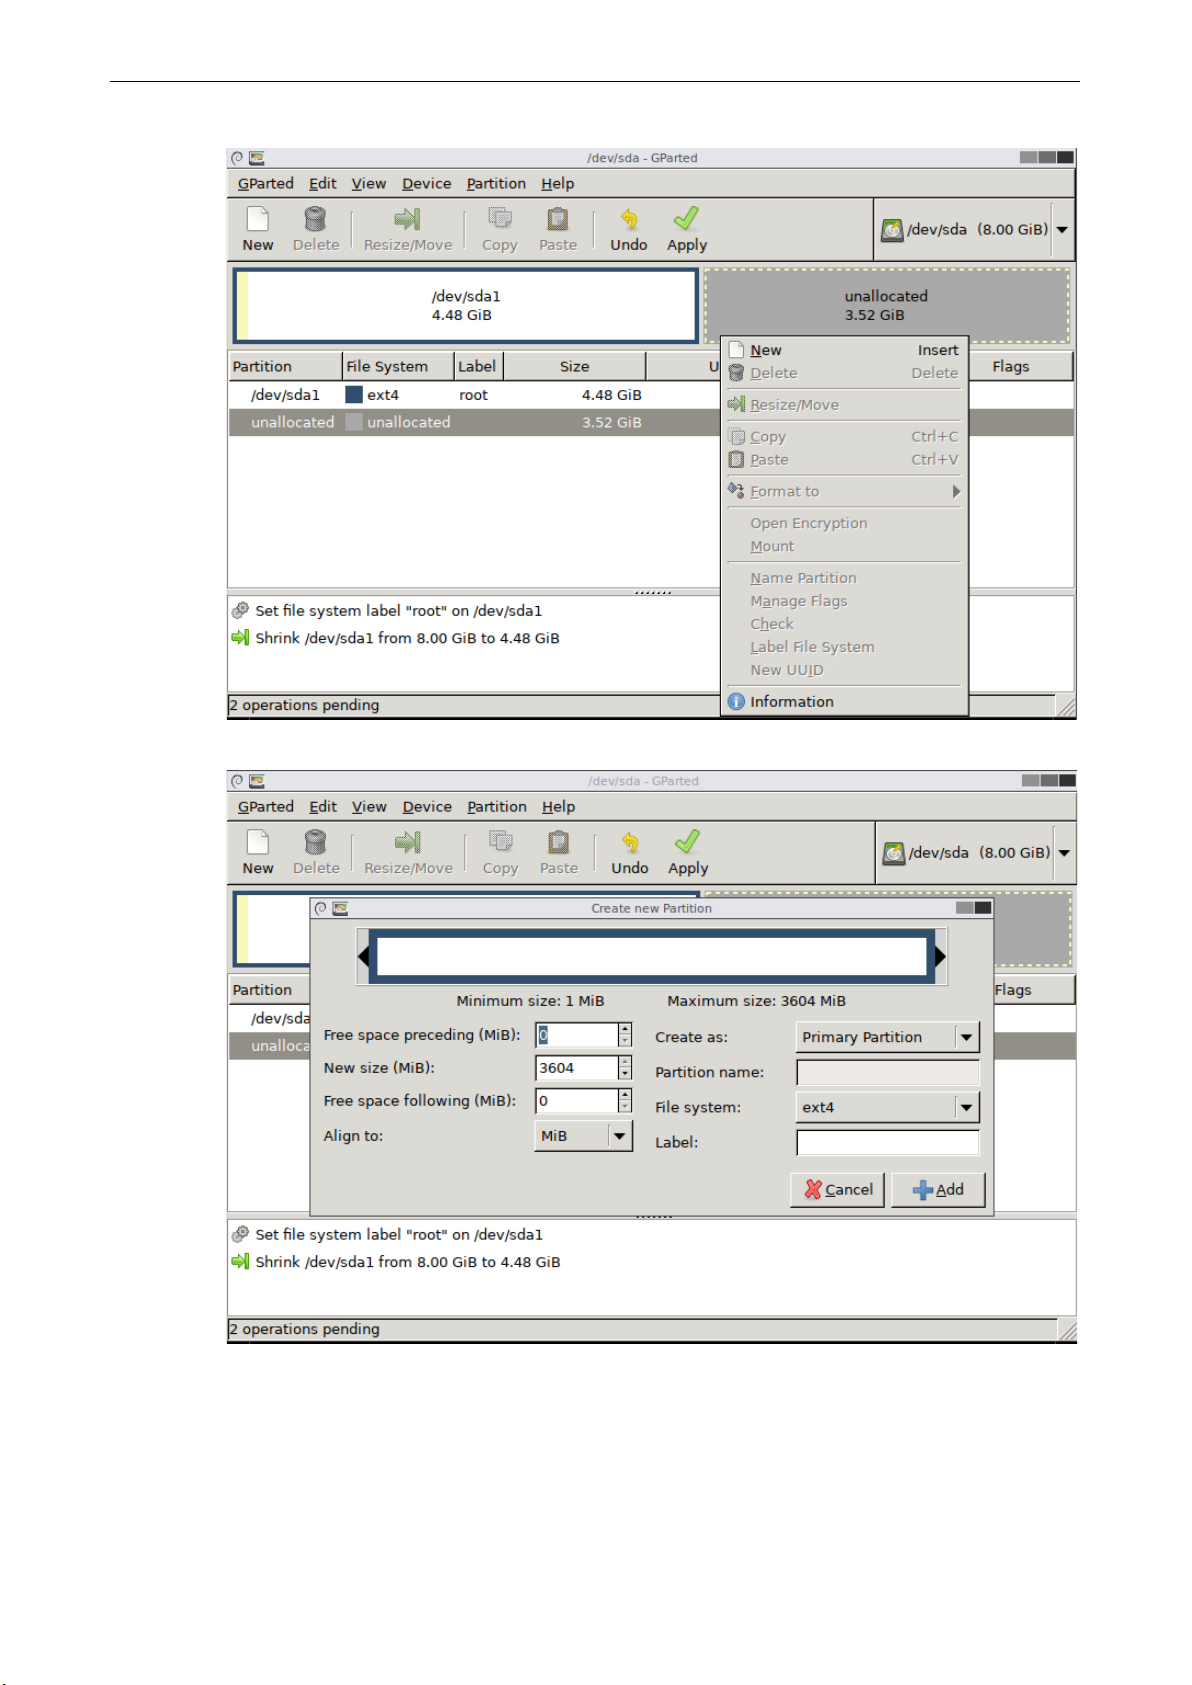
6. Right-click on the unallocated space to New a partition.
7. Add this partition.
Page 24

MPC-2000 Series Linux Software System Configuration
2-18
8. Apply the New Partition Creation.
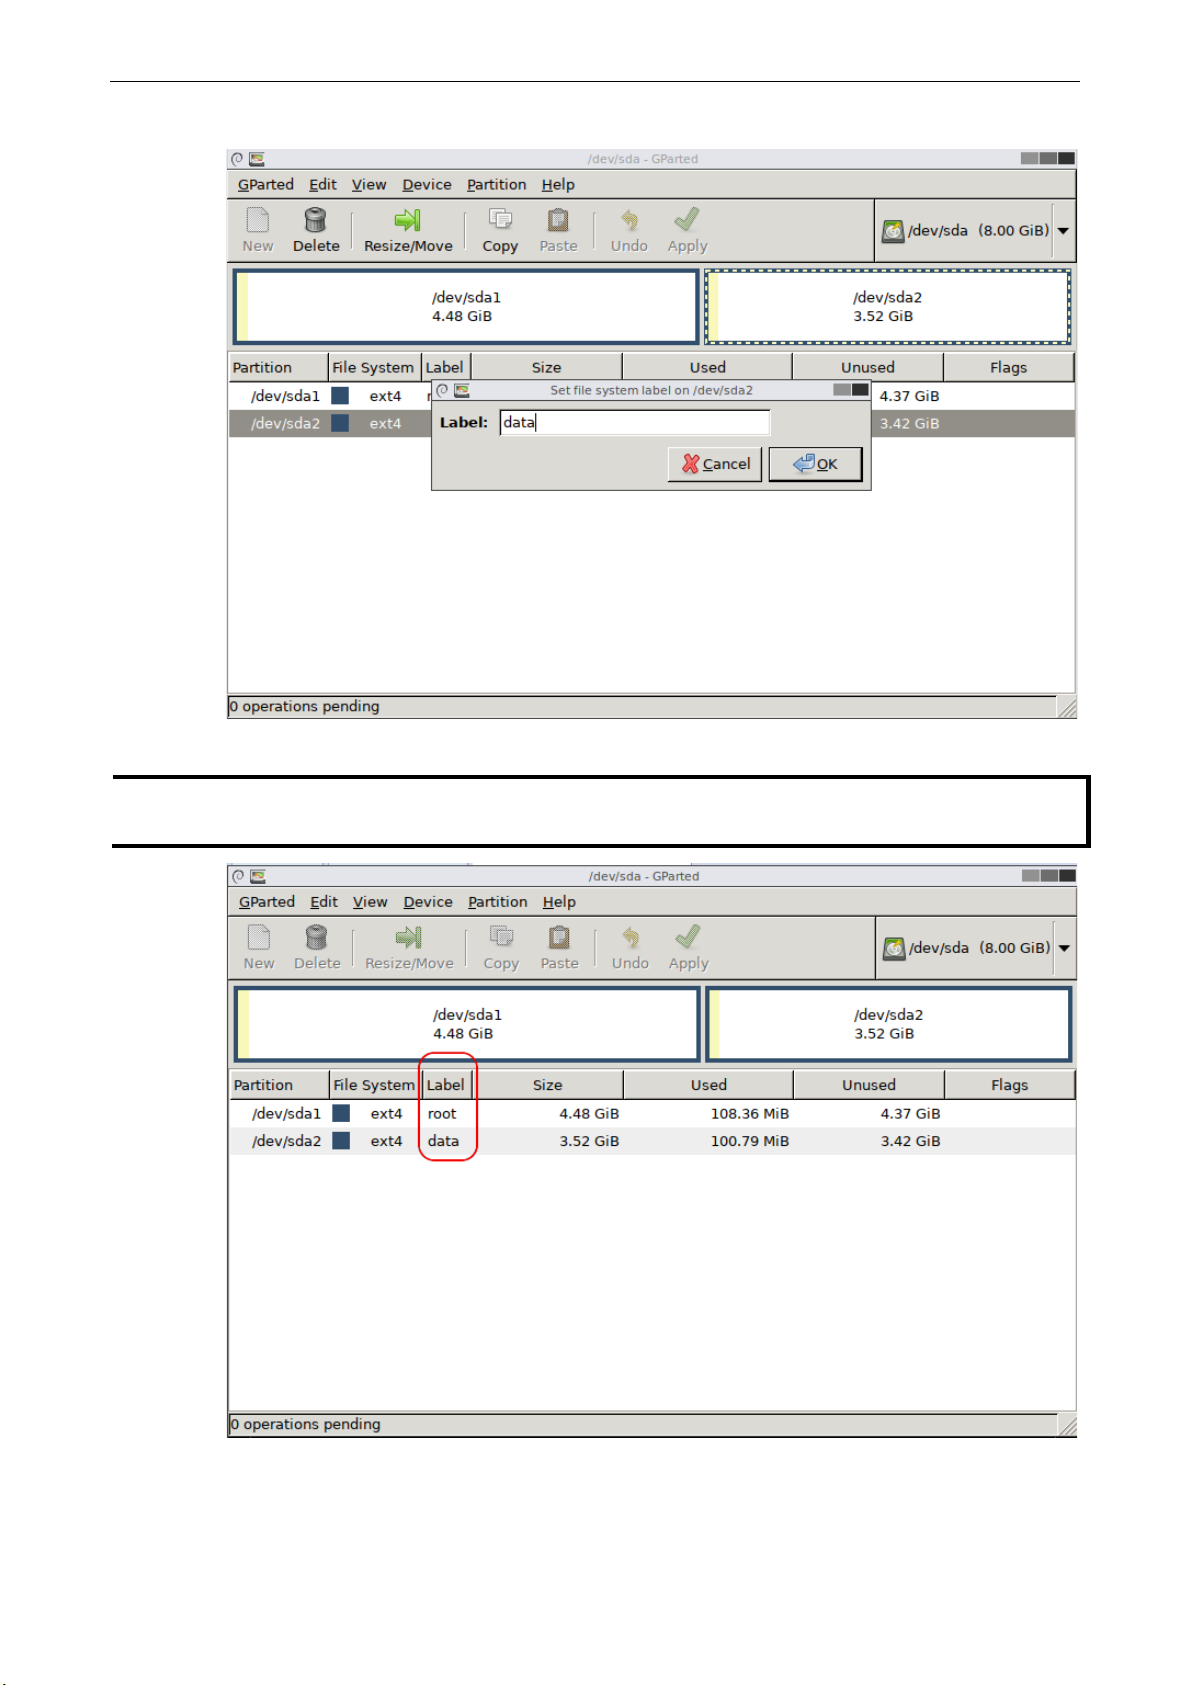
9. Set the label of the partition by right-click on Label File System menu item.
Page 25
MPC-2000 Series Linux Software System Configuration
2-19
NOTE
Don’t change the /dev/sda1 label name because we mount the root
using.
10. The label we set is data.
The OS partition, /dev/sda1, we named it as root. The second partition, /dev/sda2, we called it as data.
-filesystem by label for mass-production
11. Close the GParted dialog.
Page 26
MPC-2000 Series Linux Software System Configuration
2-20
root@Moxa:~# dmesg
[ 564.762273] sd 6:0:0:0: [sdb] Attached SCSI removable disk
root@Moxa:~# cat /proc/partitions
8 17 1985535 sdb1
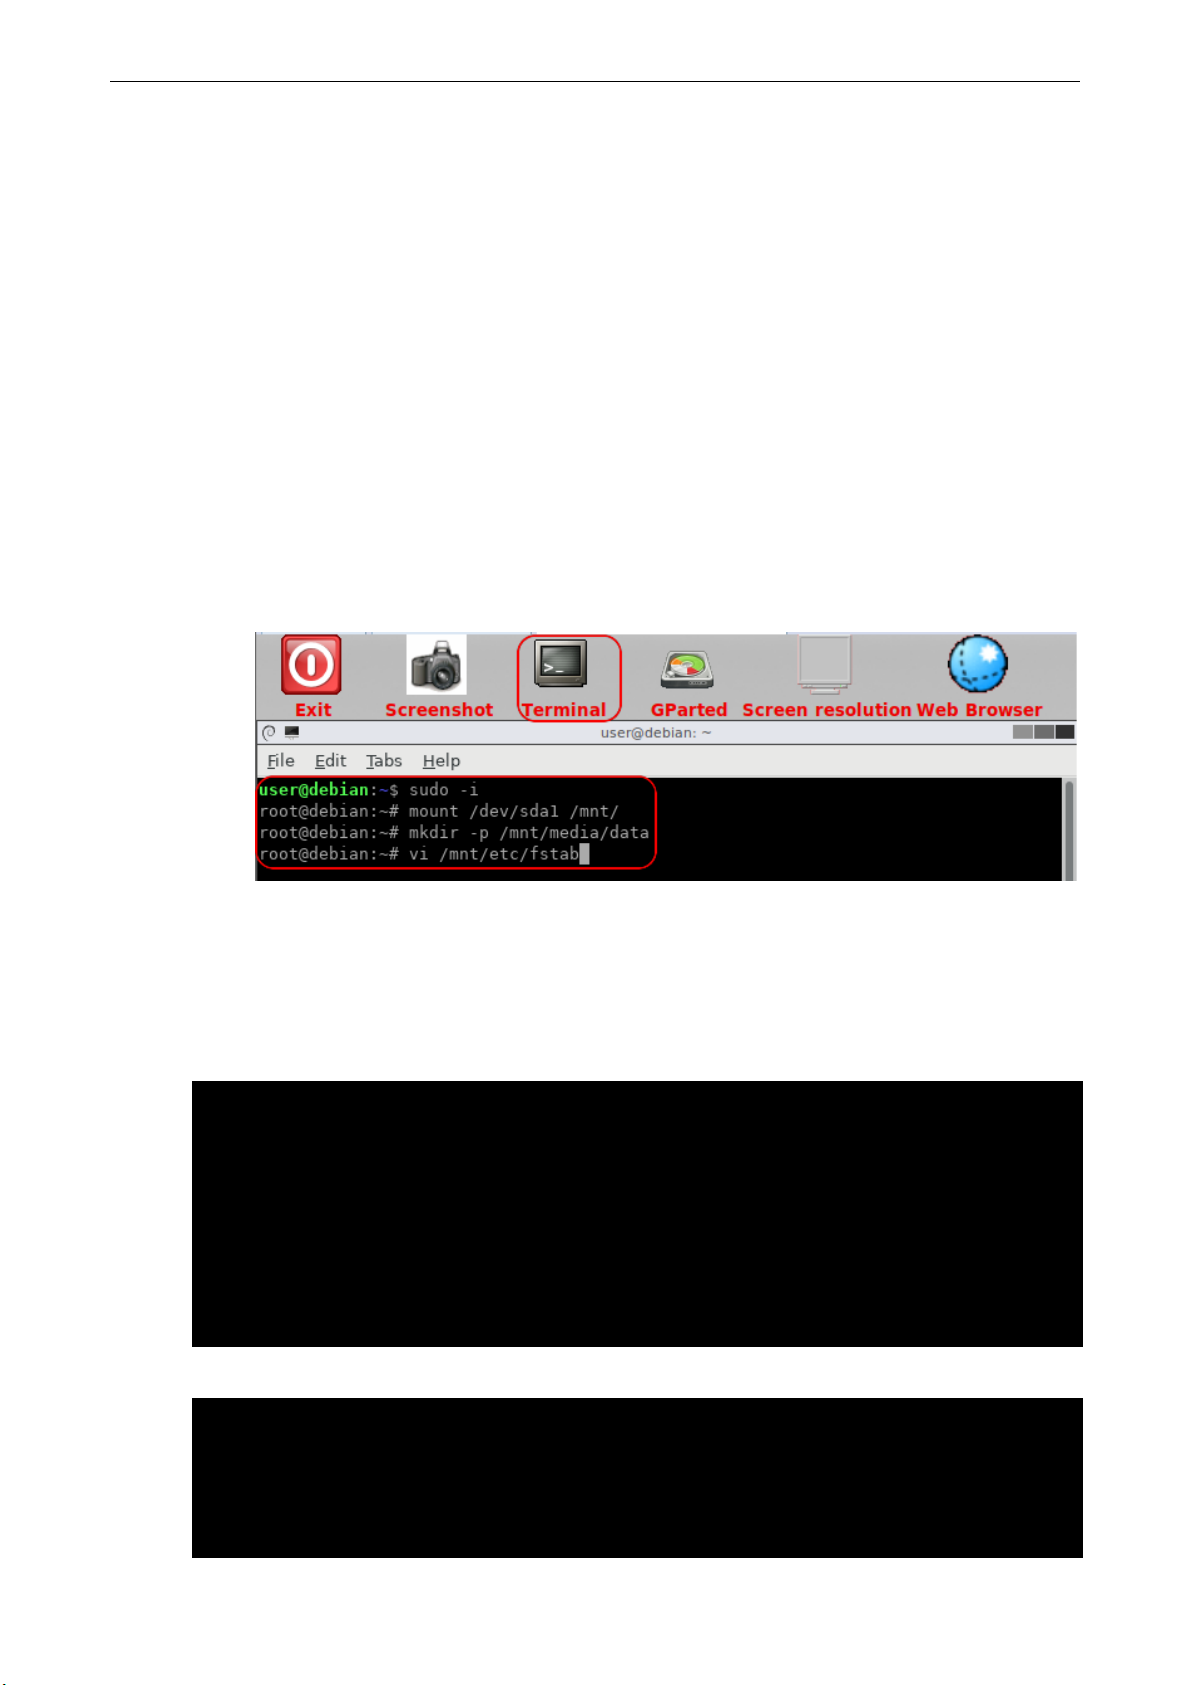
12. Double-click the Terminal, we need to edit /etc/fstab in the CFast storage, /dev/sda1.
a. Change to root as follows:.
# sudo -i
Then mount /dev/sda1 at a path
# mount /dev/sda1 /mnt
b. Create /mnt/media/data as the mount point for partition #2, data.
# mkdir -p /mnt/media/data
c. Edit /mnt/etc/fstab to mount the partition, data, at boot time.
# vi /mnt/etc/fstab
…
LABEL=data /media/data ext4 errors=remount-ro 0 1
…
d. Reboot the system to boot from CFast card to check these setting.
# umount /mnt
# reboot
Inserting a USB Storage into the Computer
This system doesn’t support auto mounting USB storage devices automatically. In a Linux system, you should
mount the USB devices manually. Before mounting the USB storage, you should check the name of the USB
storage using the dmesg command.
...
[ 564.751226] sd 6:0:0:0: Attached scsi generic sg1 type 0
[ 564.752400] sd 6:0:0:0: [sdb] 3973118 512-byte logical blocks: (2.03 GB/1.89 GiB)
[ 564.753008] sd 6:0:0:0: [sdb] Write Protect is off
[ 564.753013] sd 6:0:0:0: [sdb] Mode Sense: 03 00 00 00
[ 564.753674] sd 6:0:0:0: [sdb] No Caching mode page found
[ 564.753797] sd 6:0:0:0: [sdb] Assuming drive cache: write through
[ 564.759333] sdb: sdb1
Or check /proc/partitions
major minor #blocks name
8 0 7824600 sda
8 1 7823576 sda1
8 16 1986559 sdb
Page 27
MPC-2000 Series Linux Software System Configuration
2-21
root:~# mount –t vfat /dev/sdb1 /mnt
root:~# mount
tf8,errors=remount-ro)
...
/dev/sdb1 /mnt vfat defaults,nofail 0 0
ATTENTION
Remember to type the command # sync before you disconnect the USB storage device. If you do not issue the
command, you may lo
External devices that are to be mounted when present but ignored if absent may require the nofail option. This
prevents errors being reported at boot.
#KERNEL!="mmcblk[0-9]p[0-9]", GOTO="media_by_label_auto_mount_end"
#LABEL="media_by_label_auto_mount_end"
moxa@Moxa:~# sudo sed -i s/^#//
/etc/udev/rules.d/11-media-by-label-auto-mount.rules
Mount the USB storage partition 1, /dev/sdb1, on /mnt.
Mount the USB storage partition 1, /dev/sdb1, on /mnt.
...
/dev/sdb1 on /mnt type vfat
(rw,relatime,fmask=0022,dmask=0022,codepage=437,iocharset=ascii,shortname=mixed,u
If you want to automatic mount the USB storage at boot time, you can add it in /etc/fstab
LABEL=root / ext4 noatime,errors=remount-ro 0 1
#usbfs /proc/bus/usb usbfs defaults 0 0
se data.
Inserting a SD Storage into the Computer
The SD slot supports the SD, SDHC, and SDXC formats, and is used as the extend storage in the system. The
SD auto-mounting is disabled in the system but we prepared an udev rule to support the auto-mounting feature.
You can remove the comment, #, which is the first character in
/etc/udev/rules.d/11-media-y-label-auto-mount.rules to support the SD auto-mounting feature.
## Import FS infos
#IMPORT{program}="/sbin/blkid -o udev -p %N"
## Get a label if present, otherwise specify one
#ENV{ID_FS_LABEL}!="", ENV{dir_name}="%E{ID_FS_LABEL}"
#ENV{ID_FS_LABEL}=="", ENV{dir_name}="sd-%k"
## Global mount options
#ACTION=="add", ENV{mount_options}="relatime"
# Filesystem-specific mount options
#ACTION=="add", ENV{ID_FS_TYPE}=="vfat|ntfs",
ENV{mount_options}="$env{mount_options},utf8,gid=100,umask=002"
## Mount the device
#ACTION=="add", RUN+="/bin/mkdir -p /media/%E{dir_name}", RUN+="/bin/mount -o
%E{mount_options} /dev/%k /media/%E{dir_name}"
## Clean up after removal
#ACTION=="remove", ENV{dir_name}!="", RUN+="/bin/umount -l /media/%E{dir_name}",
RUN+="/bin/rmdir /media/%E{dir_name}"
## Exit
You can use the sed command to remove all beginning # matched from lines.
Page 28

MPC-2000 Series Linux Software System Configuration
2-22
root@Moxa:~# blkid /dev/mmcblk0p1
/dev/mmcblk0p1: LABEL="MySD" UUID="70CC-82A8" TYPE="vfat"
root@Moxa:~# mount
t=ascii,shortname=mixed,utf8,errors=remount-ro)
root@Moxa:~# blkid /dev/mmcblk0p1
/dev/mmcblk0p1: UUID="70CC-82A8" TYPE="vfat"
root@Moxa:~# mount
(rw,nosuid,nodev,relatime,size=807264k,mode=700,uid=1000,gid=1000)
moxa@MOXA:~# uname –a
Linux Moxa 4.9.0-8-amd64 #1 SMP Debian 4.9.130-2 (2018-10-28) x86_64 GNU/Linux
moxa@MOXA:~# lsb_release -a
Codename: stretch
This is the SD auto-mounting rule. It mounts the media by label at first. This means that If the SD card has a
label name, it will be auto-mounted at this path, /media/LABEL_NAME. If the SD card doesn’t have a label
name, it will be auto-mounted to /media/sd-mmcblk0pX, where X is the partition number. Both these cases of
mounting the SD card to the system are covered in the examples below:
Case #1, the SD card auto-mounted to /media/LABEL_NAME
Use blkid to read the SD card’s label name.
The inserted SD card will be auto-mounted to /media/MySD
sysfs on /sys type sysfs (rw,nosuid,nodev,noexec,relatime)
...
/dev/mmcblk0p1 on /media/MySD type vfat
(rw,relatime,gid=100,fmask=0002,dmask=0002,allow_utime=0020,codepage=437,iocharse
Case #2, the SD card auto-mounted to /media/sd-mmcblk0pX
Use blkid to read the SD card’s label name.
Check the mounted storage by mount command.
sysfs on /sys type sysfs (rw,nosuid,nodev,noexec,relatime)
...
/dev/mmcblk0p1 on /media/sd-mmcblk0p1 type vfat
(rw,relatime,gid=100,fmask=0002,dmask=0002,allow_utime=0020,codepage=437,iocharse
t=ascii,shortname=mixed,utf8,errors=remount-ro)
tmpfs on /run/user/1000 type tmpfs
Checking the Linux Version
The program uname, which stands for “Unix Name” and is part of the UNIX operating system, prints the name,
version, and other details about the operating system running on the computer. Use the -a option to generate
a response similar to the one shown below:
Check the distribution specification.
No LSB modules are available.
Distributor ID: Debian
Description: Debian GNU/Linux 9.8 (stretch)
Release: 9.8
Page 29

MPC-2000 Series Linux Software System Configuration
2-23
moxa@Moxa:~# kversion –a
moxa@Moxa:~#
moxa@MOXA:~# sudo apt-get update
moxa@MOXA:~#
moxa@MOXA:~# sudo apt-get install IPsec-tools
moxa@MOXA:~#
moxa@MOXA:~# sudo apt-get remove IPsec-tools
moxa@MOXA:~#
moxa@MOXA:~# sudo apt-get remove IPsec-tools --purge
moxa@MOXA:~#
ATTENTION
You can free up the cache space with the command
Checking Moxa’s Control Version
The program kversion determines the Linux system released version. Use the -a option to check the built date.
The built date format is YYMMDDHH. You can use kversion to check the released image version in
troubleshooting. This example shows the built date, 19030611, which means it was built at 2019/03/06 11:00.
MPC-2121 firmware version 1.0 Build 19030611
APT—Installing and Removing Packages
APT is the Debian tool used to install and remove packages. Before installing a package, you need to configure
the apt source file, /etc/apt/sources.list.
Next, use vi editor to configure /etc/apt/sources.list.
root@Moxa:~# vi /etc/apt/sources.list
deb http://ftp.us.debian.org/debian/ stretch main
deb-src http://ftp.us.debian.org/debian/ stretch main
deb http://security.debian.org/ stretch/updates main
deb-src http://security.debian.org/ stretch/updates main
# Stretch-updates, previously known as 'volatile'
deb http://ftp.us.debian.org/debian/ stretch-updates main
deb-src http://ftp.us.debian.org/debian/ stretch-updates main
#deb http://ftp.debian.org/debian stretch-backports main
#deb-src http://ftp.debian.org/debian stretch-backports main
Update the source list after you configure it.
Once you indicate which package you want to install (IPsec-tools, for example), type:
Use one of the following commands to remove a package:
For a complete package removal:
# apt-get clean.
Page 30
MPC-2000 Series Linux Software System Configuration
2-24
moxa@MOXA:~# sudo apt-get clean
moxa@MOXA:~#
moxa@MOXA:~# sudo apt-mark hold linux-image-4.9.0-8-amd64
moxa@MOXA:~# sudo apt-get upgrade
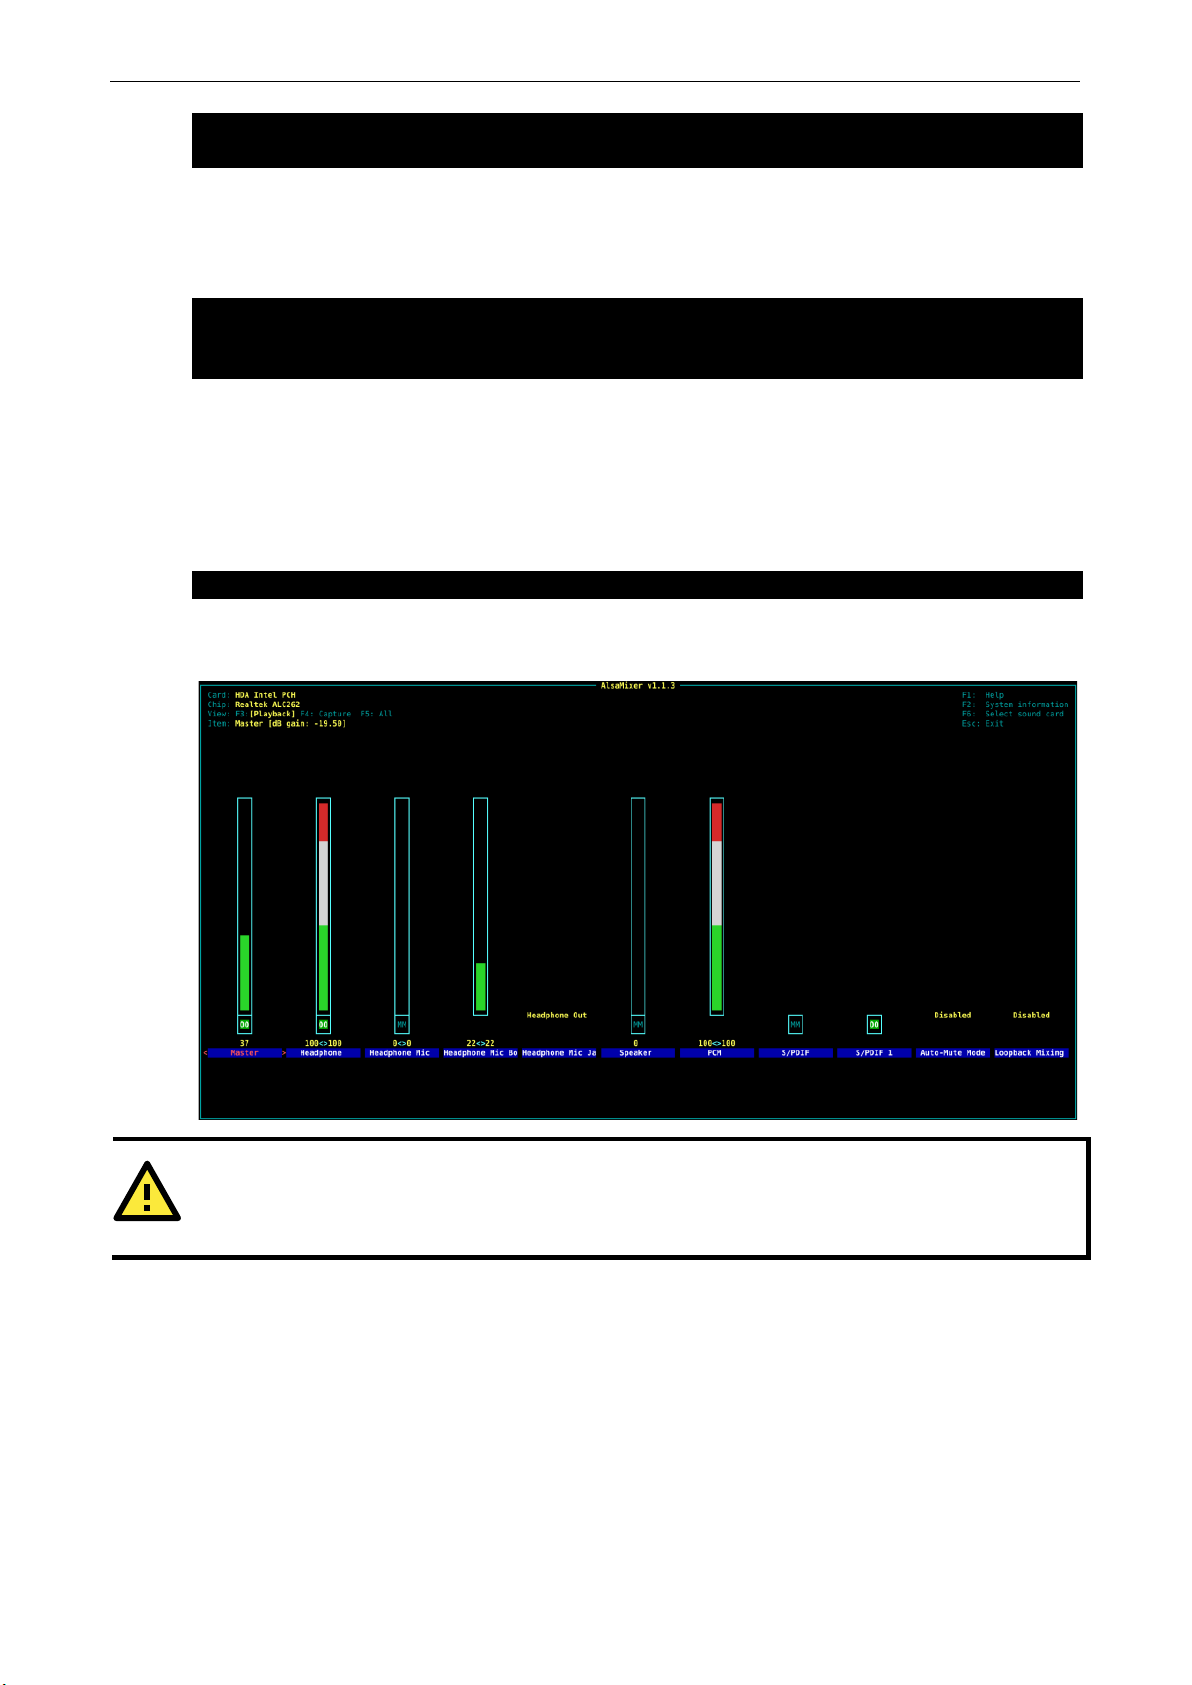
moxa@Moxa:~$ sudo alsamixer
ATTENTION
The audio output sets the headphone as default playback interface. If you used speaker, you should select the
output device as speakers.
The Linux system software is continuous updated and available in Debian repository. If you want to use the
latest released software, you can upgrade it by apt command. This example holds the Linux kernel package
because if the kernel upgraded, the kernel module might need to rebuild and install again. So we upgrade the
whole system except the kernel image package was hold.
moxa@MOXA:~# sudo apt-get update
Audio Player
The MPC-2101/2121-LX has an audio playback interface. The system default installs the command-line
playback utility alsa-utils. The alsamixer is the soundcard mixer for ALSA soundcard driver. You can use the
alsamixer to control the audio output or use it to control the volume.
Press F3 or TAB to select the soundcard output interface in the alsamixer playback view. In this case, we choose
headphone as the soundcard output interface. The volume can control by Master, headphone or PCM interface.
Page 31

MPC-2000 Series Linux Software System Configuration
2-25
moxa@Moxa:~$ aplay /home/moxa/Download/test.wav
Press F4 or TAB to enter the capture view. The MPC-2070/2120-LX or MPC-2101/2121-LX doesn't have the
capture feature. You can ignore the capture control in this platform.
Press F5 or TAB to control all the features in the ALL view.
The alsa-utils supports aplay for command-line sound player for ALSA soundcard. For supported sound file
formats, the sampling rate, bit depth, and so forth can be automatically determined from the sound file header.
In this case, we playback the wav file by aplay utility.
Page 32

MPC-2000 Series Linux Software System Configuration
2-26
ATTENTION
The audio output sets the headphone as default playback interface. If you used speaker, you should select the
output device as speakers.
moxa@Moxa:~$ sudo apt-get install audacious
The XFCE has the Pulse Audio Volume Control applet to control your pulse audio volume levels using the pulse
audio mixer.
The XFCE has many popular audio apps. Audacious is an advanced audio player. It is free, lightweight, based
on GTK+, is focused on audio quality and supporting a wide range of audio codecs. You can install it from
Internet.
Page 33

MPC-2000 Series Linux Software System Configuration
2-27
moxa@Moxa:~$ sudo apt-get install vlc
moxa@Moxa:~$ sudo apt-get install browser-plugin-vlc
moxa@Moxa:~$ sudo apt-get install chromium
moxa@Moxa:~$ sudo apt-get install firefox-esr
Video Player
The XFCE has many popular video player apps. The VLC Media Player is the famous free and open source
cross-platform media player owned by the non-profit organization VideoLAN. It's a simple, fast and powerful
media player for playing files, discs, webcams, and for streaming. Plays most codes such as MPEG-2, DivX,
H.264, MKV, WebM, WMV, and MP3 with no codec packs needed. You can install it from Internet using the
following command:
Or install the browser-plugin-vlc.
Web Browser
The Linux system by default doesn’t install a web browser. To install the chromium browser use the following
command.
If you like the Firefox browser, you can install the firefox-esr package.
Brightness control
Introduction
The panel computer embeds with a brightness controller. It supports the auto-brightness control mode and
manually brightness control mode. This Linux platform provides a brightness control utility, Brightness Control
dialog, for configure the automatically or manually brightness control.
The Brightness Control Dialog can launch from the Application icon.
Applications System Brightness Control Utility
Page 34

MPC-2000 Series Linux Software System Configuration
2-28
The Brightness Control Dialog will show in the desktop. The MPC-2101/2121 supports auto-brightness control
mode. It shows the Panel, light sensor and display signals at the status bar. If one of these signals is OFF, the
hardware might have some issues and the auto-brightness control mode cannot work. The Auto Brightness
Control checkbox will be disabled in the Brightness Control Dialog.
The MPC-2070/2120 does not support auto brightness control mode. The status bar shows it’s not supported
auto brightness control and the Auto Brightness Control checkbox will be disabled.
Page 35

MPC-2000 Series Linux Software System Configuration
2-29
Auto-brightness control mode
Use can click the Auto Brightness Control checkbox to enable the Auto Brightness Control mode or enable
Manually Brightness Control mode in MPC-2101/2121-LX.
The ambient brightness will be divided into 1 to 8 levels in auto-brightness control mode. The lower numbers
indicate that the environment brightness is darker. The light sensor automatically measures the ambient
lightness and then automatically adjusts the display brightness according to the ambient brightness level.
Meanwhile, users can manually configure the settings of the display brightness in correspondence with the
ambient brightness levels.
Page 36

MPC-2000 Series Linux Software System Configuration
2-30
The Brightness Change Holdtime is the brightness level change interval. The minimum value is 1 and the
maximum is 30. Default value is 10. One unit of the hold time is 800 ms; the maximum is 30 is 24 seconds.
Then click the Apply button to apply the setting. The applied value will be saved in the brightness controller.
The saved values will be used in next boot.
Page 37

MPC-2000 Series Linux Software System Configuration
2-31
Manual brightness control mode
Use can click to uncheck the Auto Brightness Control checkbox. It enables the manually brightness control
mode in MPC-2101/2121-LX.
User can specify a brightness value or drag the slider to set a value.
Page 38

MPC-2000 Series Linux Software System Configuration
2-32
ATTENTION
Apply the display brightness as 0 in manually brightness control mode would turn off the backlight and nothing
displayed in the panel. The computer is not power off. You can click the brightness key to turn on the display
backlight.
ATTENTION
The Brightness Control Dialog and upgrade_mcfwr.sh cannot run at the same time. If the upgrade_mcfwr.sh is
running, the Brightness Control Dialog cannot r
Then click the Apply button to apply the brightness value. The brightness value would be kept in Brightness
Controller and load in next boot.
un and pop up the alert dialog to exit the program.
Page 39

3
3. Managing Communications
The MPC-2070/2120-LX or MPC-2101/2121-LX ready-to-run embedded computer is a network-based platform
designed to serve as a front-end for data acquisition, panel display and industrial control applications. This
chapter describes how to configure the various communication functions supported by the Linux operating
system.
The following topics are covered in this chapter:
Changing the Network Settings
Changing the “interfaces” Configuration File
Configure the VLAN tag in “interfaces”
Adjusting IP Addresses with “ifconfig”
DNS Client
/etc/hostname
/etc/resolv.conf
/etc/nsswitch.conf
Apache Web Server
Install the apache web server
Default Homepage
Disabling the CGI Function
Saving Web Pages to a USB Storage Device
IPTABLES
IPTABLES Hierarchy
IPTABLES Modules
Observe and Erase Chain Rules
Define Policy for Chain Rules
Append or Delete Rules
NAT (Network Address Translation)
NAT Example
Enabling NAT at Bootup
NFS (Network File System) Client
Wireless Management
Device Driver for WPEA-172GN – rt5572sta.ko
Device Driver for WPEA-172GN - rt2800usb.ko
iw
wpasupplicant
Celluar Management – cell_mgnt
Page 40

MPC-2000 Series Linux Software Managing Communications
3-2
LAN1
192.168.3.127
255.255.255.0
moxa@Moxa:~# cd /etc/network
moxa@Moxa:/etc/network# sudo vi interfaces
# The loopback network interface
broadcast 192.168.4.255
# The primary network interface
iface enp1s0 inet dhcp
root@Moxa:~# /etc/init.d/networking restart
Changing the Network Settings
The MPC-2070/2120-LX or MPC-2101/2121-LXcomputer has two 10/100 Ethernet ports. The default IP
addresses and netmasks of these network interfaces are:
Default IP Address Netmask
LAN2 192.168.4.127 255.255.255.0
These network settings can be modified by changing the interfaces configuration file, or they can be adjusted
temporarily with the ifconfig command.
Changing the “interfaces” Configuration File
Type cd /etc/network to change directories.
Type vi interfaces to edit the network configuration file with vi editor. You can configure the MPC-2070/2120-LX
or MPC-2101/2121-LX’s Ethernet ports for static or dynamic (DHCP) IP addresses.
Static IP Address
As shown in the following example, the default static IP addresses can be modified.
auto lo
iface lo inet loopback
# The primary network interface
auto enp1s0
iface enp1s0 inet static
address 192.168.3.127
netmask 255.255.255.0
broadcast 192.168.3.255
auto enp2s0
iface enp2s0 inet static
address 192.168.4.127
netmask 255.255.255.0
Dynamic IP Address using DHCP
To configure one or both LAN ports to request an IP address dynamically, replace static with DHCP and then
delete the rest of the lines.
auto enp1s0
After modifying the boot settings of the LAN interface, issue the following command to activate the LAN settings
immediately.
Page 41

MPC-2000 Series Linux Software Managing Communications
3-3
root@Moxa:~# vconfig add enp1s0 10
root@Moxa:~# ip addr add 192.168.10.127/24 dev enp1s0.10
root@Moxa:~# ip link set enp1s0.10 up
root@Moxa:~# ip link set enp1s0.10 down
root@Moxa:~# vconfig rem enp1s0.10
root@Moxa:~# ifconfig enp1s0 192.168.1.1
root@Moxa:~#
Configure the VLAN tag in “interfaces”
This example shows how to tag the LAN1 with VLAN ID, 10, of the raw interface enp1s0. The tag will be active
after reboot or networking restarted.
# The loopback network interface
...
# Tag the VLAN ID, 10, of the Ethernet interface, enp1s0.
auto enp1s0.10
iface enp1s0.10 inet static
address 192.168.5.127
netmask 255.255.255.0
Vlan-raw-device enp1s0
...
You can use the vconfig command to manually tag the VLAN ID.
Configure the network setting for the VLAN interface.
Configure the network setting for the VLAN interface.
If you subsequently need to delete the interface, use this command to bring down and delete it.
Adjusting IP Addresses with “ifconfig”
IP settings can be adjusted during run-time, but the new settings will not be saved to the disk without
modifying the file /etc/network/interfaces. For example, type the command # ifconfig enp1s0 192.168.1.1
to change the IP address of LAN1 to 192.168.1.1.
Page 42

MPC-2000 Series Linux Software Managing Communications
3-4
NOTE
Predictable Network Interface Names
Starting with v197 systemd/udev will automatically assign predictable, stable network interface names for all
local Ethernet, WLAN and WWAN interfaces. This is a departure from the traditional interface naming scheme
("eth0", "eth1", "wlan0", ...), but should fix real problems.
The classic naming scheme for network interfaces applied by the kernel is to simply assign names beginning
with "eth0", "eth1", ... to all interfaces as they are probed by the drivers. As the driver probing is generally not
predictable for modern technology this means that as soon as
assignment of the names "eth0", "eth1" and so on is generally not fixed anymore and it might very well happen
that "eth0" on one boot ends up being "eth1" on the next. This can have serious security implicatio
example in firewall rules which are coded for certain naming schemes, and which are hence very sensitive to
unpredictable changing names.
The Predictable Network Interface Name is assigned fixed names based on firmware/topology/location
information
even if hardware is added or removed (i.e. no re-enumeration takes place) and that broken hardware can be
replaced seamlessly. That said, they admittedly are
everybody is used to. Example: "enp5s0"
moxa@Moxa:~# sudo vi /etc/hostname
MOXA
moxa@Moxa:~# sudo /etc/init.d/hostname.sh start
moxa@Moxa:~# hostname
moxa@MOXA:/etc# cat resolv.conf
moxa@MOXA:/etc#
has the big advantage that the names are fully automatic, fully predictable, that they stay fixed
DNS Client
multiple network interfaces are available the
ns, for
sometimes harder to read than the "eth0" or "wlan0"
The MPC-2070/2120-LX or MPC-2101/2121-LX supports DNS client (but not DNS server). To set up DNS client,
you need to edit three configuration files: /etc/hostname, /etc/resolv.conf, and /etc/nsswitch.conf.
/etc/hostname
Edit /etc/hostname:
Re-configure the hostname.
Check the new hostname.
/etc/resolv.conf
This is the most important file that you need to edit when using DNS. For example, before using # ntpdate
time.stdtime.gov.tw to update the system time, you will need to add the DNS server address to the file. Ask
your network administrator which DNS server address you should use. The DNS server’s IP address is specified
with the nameserver command. For example, add the following line to /etc/resolv.conf (assuming the DNS
server’s IP address is 8.8.8.8): nameserver 8.8.8.8
#
# resolv.conf This file is the resolver configuration file
# See resolver(5).
#
nameserver 8.8.8.8
nameserver 8.8.4.4
Page 43

MPC-2000 Series Linux Software Managing Communications
3-5
# /etc/nsswitch.conf
netgroup: nis
moxa@Moxa:~# sudo apt-get install apache2
moxa@Moxa:~# sudo apt-get remove apache2
/etc/nsswitch.conf
This file defines the sequence of files, /etc/hosts or /etc/resolv.conf, to be read to resolve the IP address. The
hosts line in /etc/nsswitch.conf means that the /etc/host first and DNS service should be used to resolve the IP
address
#
# Example configuration of GNU Name Service Switch functionality.
# If you have the `glibc-doc-reference’ and `info’ packages installed, try:
# `info libc “Name Service Switch”‘ for information about this file.
passwd: compat
group: compat
shadow: compat
hosts: files dns
networks: files
protocols: db files
services: db files
ethers: db files
rpc: db files
Apache Web Server
Install the apache web server
The Apache web server is one of the famous web server. You can install it by the apt command.
Manually uninstall the apache2 server.
Default Homepage
The Apache web server’s main configuration file is /etc/apache2/sites-enabled/000-default.conf, with
the default homepage located at /var/www/html/index.html.
Save your own homepage to the following directory:
/var/www
Save your CGI page to the following directory:
/var/www/cgi-bin
Before you modify the homepage, use a browser (such as Microsoft Internet Explorer or Mozilla Firefox) from
your PC to test if the Apache web server is working. Type the LAN1 IP address in the browser’s address box to
open the homepage. For example, if the default IP address 192.168.3.127 is still active, type:
http://192.168.3.127/
To test the default CGI page, type:
http://192.168.3.127/cgi-bin/w3mmail.cgi
Page 44

MPC-2000 Series Linux Software Managing Communications
3-6
root@Moxa:/etc# vi /etc/apache2/sites-available/default
#</Directory>
moxa@MOXA:~# sudo service apache2 restart
ATTENTION
When you develop your own CGI application, make sur
root@Moxa:/etc# vi /etc/apache2/sites-avaliable/default
root@Moxa:/etc# vi /etc/apache2/sites-avaliable/default-ssl
Disabling the CGI Function
The CGI function is enabled by default. If you want to disable the function, modify the file
/etc/apache2/sites-enabled/000-default.
Type # vi /etc/apache2/sites-enabled/000-default to edit the configuration file. Comment out the
following lines:
#ScriptAlias /cgi-bin/ /var/www/cgi-bin/
#<Directory “/var/www/cgi-bin/”>
# AllowOverride None
# Options ExecCGI -MultiViews +SymLinksIfOwnerMatch
# #Order allow,deny
# Order deny,allow
# Allow from all
#</Directory>
#ScriptAlias /cgi-bin/ /var/www/cgi-bin/
#<Directory “/var/www/cgi-bin/”>
# AllowOverride None
# Options ExecCGI -MultiViews +SymLinksIFOwnerMatch
# #Order allow,deny
# Order deny,allow
# Allow from all
Restart the apache server.
e your CGI file is executable.
Saving Web Pages to a USB Storage Device
Some applications may have web pages that take up a lot of storage space. This section describes how to save
web pages to the USB mass storage device, and then configure the Apache web server’s DocumentRoot to open
these pages. The files used in this example can be downloaded from Moxa’s website.
Prepare the web pages and then save the pages to the USB storage device. Click on the following link to
download the web page test suite: http://www.w3.org/MarkUp/Test/HTML401.zip.
Uncompress the zip file to your desktop PC, and then use FTP to transfer it to the embedded computer’s USB
mount directory, EX: /media/usb0.
# vi /etc/apache2/sites-avaliable/default
and
# vi /etc/apache2/sites-avaliable/default-ssl
to edit the configuration file.
Page 45

MPC-2000 Series Linux Software Managing Communications
3-7
moxa@Moxa:~# sudo service restart apache2
Change the DocumentRoot directory to the USB storage directory /media/usb0/www.
...
<VirtualHost *:80>
...
...
DocumentRoot /media/usb0/www
<Directory />
Options FollowSymLinks
AllowOverride None
</Directory>
...
...
ScriptAlias /cgi-bin/ /media/usb0/www/cgi-bin/
<Directory “/media/usb0/www/cgi-bin/”>
AllowOverride None
Options ExecCGI -MultiViews +SymLinksIfOwnerMatch
Order allow,deny
Allow from all
</Directory>
...
</VirtualHost>
“etc/apache2/sites-avaliable/default”
<VirtualHost *:443>
...
...
DocumentRoot /media/usb0/www
<Directory />
Options FollowSymLinks
AllowOverride None
</Directory>
...
...
ScriptAlias /cgi-bin/ /media/usb0/www/cgi-bin/
<Directory “/media/usb0/wwwz/cgi-bin/”>
AllowOverride None
Options ExecCGI -MultiViews +SymLinksIfOwnerMatch
Order allow,deny
Allow from all
</Directory>
...
</VirtualHost>
/etc/apache2/sites-avaliable/default-ssl”
Use the following commands to restart the Apache web server:
# service restart apache2
Start your browser and connect to the embedded computer by typing the current LAN1 IP address in the
browser’s address box.
Restart the apache server.
Page 46

MPC-2000 Series Linux Software Managing Communications
3-8
ATTENTION
Visit the Apache website at http://httpd.apache.or
servers.
IPTABLES
IPTABLES is an administrative tool for setting up, maintaining, and inspecting the Linux kernel’s IP packet filter
rule tables. Several different tables are defined, with each table containing built-in chains and user-defined
chains.
Each chain is a list of rules that apply to a certain type of packet. Each rule specifies what to do with a matching
packet. A rule (such as a jump to a user-defined chain in the same table) is called a target.
The MPC-2070/2120-LX OR MPC-2101/2121-LX supports three types of IPTABLES: Filter tables, NAT tables,
and Mangle tables.
Filter Table—includes three chains:
• INPUT chain
• OUTPUT chain
• FORWARD chain
NAT Table—includes three chains:
• PREROUTING chain—transfers the destination IP address (DNAT).
• POSTROUTING chain—works after the routing process and before the Ethernet device process to transfer
the source IP address (SNAT).
• OUTPUT chain—produces local packets.
• Sub-tables
• Source NAT (SNAT)—changes the first source IP address of the packet.
• Destination NAT (DNAT)—changes the first destination IP address of the packet.
• MASQUERADE—a special form for SNAT. If one host can connect to the Internet, then the other computers
that connect to this host can connect to the Internet when the computer does not have an actual IP address.
• REDIRECT—a special form of DNAT that re-sends packets to a local host independent of the destination IP
address.
g/docs/ for more information about setting up Apache
Mangle Table—includes two chains
• PREROUTING chain—pre-processes packets before the routing process.
• OUTPUT chain—processes packets after the routing process.
• Mangle tables can have one of three extensions—TTL, MARK, TOS.
Page 47

MPC-2000 Series Linux Software Managing Communications
3-9
IPTABLES Hierarchy
The following figure shows the IPTABLES hierarchy.
IPTABLES Modules
The iptables supports the following sub-modules. Be sure to use the module that matches your application.
arptable_filter.ko arp_tables.ko arpt_mangle.ko ip_conntrack_amanda.ko
ip_conntrack_ftp.ko ip_conntrack_h323.ko ip_conntrack_irc.ko ip_conntrack.ko
ip_conntrack_netbios_ns.ko ip_conntrack_netlink.ko ip_conntrack_pptp.ko ip_conntrack_proto_sctp.ko
ip_conntrack_sip.ko ip_conntrack_tftp.ko ip_nat_amanda.ko ip_nat_ftp.ko
ip_nat_h323.ko ip_nat_irc.ko ip_nat.ko ip_nat_pptp.ko
ip_nat_sip.ko ip_nat_snmp_basic.ko ip_nat_tftp.ko ip_queue.ko
iptable_filter.ko iptable_mangle.ko iptable_nat.ko iptable_raw.ko
ip_tables.ko ipt_addrtype.ko ipt_ah.ko ipt_CLUSTERIP.ko
ipt_dscp.ko ipt_DSCP.ko ipt_ecn.ko ipt_ECN.ko
ipt_hashlimit.ko ipt_iprange.ko ipt_LOG.ko ipt_MASQUERADE.ko
ipt_NETMA P.k o ipt_owner.ko ipt_recent.ko ipt_REDIRECT.ko
ipt_REJECT.ko ipt_SAME.ko ipt_TCPMSS.ko ipt_tos.ko
ipt_TOS.ko ipt_ttl.ko ipt_TTL.ko ipt_ULOG.ko
Page 48

MPC-2000 Series Linux Software Managing Communications
3-10
ATTENTION
IPTABLES plays the role of packet filtering or NAT. Be careful when setting up the IPTABLES rules. If the rules
are not correct, remote hosts that connect via a LAN or
console to set up the IPTABLES. Click on the following links for more information about IPTABLES.
http://www.linuxguruz.com/iptables/
http://www.netfilter.org/documentation/HOWTO//packet
The basic syntax to enable and load an IPTABLES module is as follows:
# lsmod
# modprobe ip_tables
# modprobe iptable_filter
# modprobe iptable_mangle
# modprobe iptable_nat
Use lsmod to check if the ip_tables module has already been loaded in the MPC-2070/2120-LX or
MPC-2101/2121-LX. Use modprobe to insert and enable the module.
Use iptables, iptables-restore, and iptables-save to maintain the database.
Since the IPTABLES command is very complex, to illustrate the IPTABLES syntax we have divided our
discussion of the various rules into three categories: Observe and erase chain rules, Define policy rules,
and Append or Delete rules.
Observe and Erase Chain Rules
Usage:
# iptables [-t tables] [-L] [-n]
-t tables: Table to manipulate (default: ‘filter’); example: NAT or filter.
-L [chain]: List all rules in selected chains. If no chain is selected, all chains are listed.
-n: Numeric output of addresses and ports.
# iptables [-t tables] [-FXZ]
-F: Flush the selected chain (all the chains in the table if none is listed).
-X: Delete the specified user-defined chain.
-Z: Set the packet and byte counters in all chains to zero.
PPP may be denied. We recommend using the VGA
-filtering-HOWTO.html
Example:
# iptables -L -n
In this example, since we do not use the -t parameter, the system uses the default “filter” table. Three chains
are included: INPUT, OUTPUT, and FORWARD. INPUT chains are accepted automatically, and all connections
are accepted without being filtered.
# iptables –F
# iptables –X
# iptables –Z
Page 49

MPC-2000 Series Linux Software Managing Communications
3-11
Define Policy for Chain Rules
Usage:
# iptables [-t tables] [-P] [INPUT, OUTPUT, FORWARD, PREROUTING, OUTPUT, POSTROUTING] [ACCEPT,
DROP]
-P: Set the policy for the chain to the given target.
INPUT: For packets coming into the MPC-2070/2120-LX or MPC-2101/2121-LX.
OUTPUT: For locally-generated packets.
FORWARD: For packets routed out through the MPC-2070/2120-LX or MPC-2101/2121-LX.
PREROUTING: To alter packets as soon as they come in.
POSTROUTING: To alter packets as they are about to be sent out.
Example:
#iptables –P INPUT DROP
#iptables –P OUTPUT ACCEPT
#iptables –P FORWARD ACCEPT
#iptables –t nat –P PREROUTING ACCEPT
#iptables –t nat –P OUTPUT ACCEPT
#iptables -t nat –P POSTROUTING ACCEPT
In this example, the policy accepts outgoing packets and denies incoming packets.
Append or Delete Rules
Usage
# iptables [-t table] [-AI] [INPUT, OUTPUT, FORWARD] [-io interface] [-p tcp, udp, icmp, all] [-s IP/network]
[--sport ports] [-d IP/network] [--dport ports] –j [ACCEPT. DROP]
-A: Append one or more rules to the end of the selected chain.
-I: Insert one or more rules in the selected chain as the given rule number.
-i: Name of an interface via which a packet is going to be received.
-o: Name of an interface via which a packet is going to be sent.
-p: The protocol of the rule or of the packet to check.
-s: Source address (network name, host name, network IP address, or plain IP address).
--sport: Source port number.
-d: Destination address.
--dport: Destination port number.
-j: Jump target. Specifies the target of the rules; i.e., how to handle matched packets.
For example, ACCEPT the packet, DROP the packet, or LOG the packet.
Page 50

MPC-2000 Series Linux Software Managing Communications
3-12
ATTENTION
In Example 8, remember to issue the command # modprobe ipt_mac first to load the module ipt_mac.
ATTENTION
Click the following l
http://www.netfilter.org/documentation/HOWTO//packet
Examples:
Example 1: Accept all packets from the lo interface.
# iptables –A INPUT –i lo –j ACCEPT
Example 2: Accept TCP packets from 192.168.0.1.
# iptables –A INPUT –i enp1s0 –p tcp –s 192.168.0.1 –j ACCEPT
Example 3: Accept TCP packets from Class C network 192.168.1.0/24.
# iptables –A INPUT –i enp1s0 –p tcp –s 192.168.1.0/24 –j ACCEPT
Example 4: Drop TCP packets from 192.168.1.25.
# iptables –A INPUT –i enp1s0 –p tcp –s 192.168.1.25 –j DROP
Example 5: Drop TCP packets addressed for port 21.
# iptables –A INPUT –i enp1s0 –p tcp --dport 21 –j DROP
Example 6: Accept TCP packets from 192.168.0.24 to MPC-2070/2120-LX OR MPC-2101/2121-LX’s port 137,
138, 139
# iptables –A INPUT –i enp1s0 –p tcp –s 192.168.0.24 --dport 137:139 –j ACCEPT
Example 7: Log TCP packets that visit MPC-2070/2120-LX or MPC-2101/2121-LX’s port 25.
# iptables –A INPUT –i enp1s0 –p tcp --dport 25 –j LOG
Example 8: Drop all packets from MAC address 01:02:03:04:05:06.
# iptables –A INPUT –i enp1s0 –p all –m mac --mac-source 01:02:03:04:05:06 –j DROP
NAT (Network Address Translation)
The NAT (Network Address Translation) protocol translates IP addresses used on one network into IP addresses
used on a connecting network. One network is designated the inside network and the other is the outside
network. Typically, the MPC-2070/2120-LX or MPC-2101/2121-LX connects several devices on a network and
maps local inside network addresses to one or more global outside IP addresses, and un-maps the global IP
addresses on incoming packets back into local IP addresses.
ink for more information on NAT:
-filtering-HOWTO.html
Page 51

MPC-2000 Series Linux Software Managing Communications
3-13
NAT Example
The IP address of all packets leaving LAN1 are changed to 192.168.3.127 (you will need to load the module
ipt_MASQUERADE):
Enabling NAT at Bootup
In most real world situations, you will want to use a simple shell script to enable NAT when the
MPC-2070/2120-LX or MPC-2101/2121-LX boots up. The following script is an example.
#!/bin/bash
# If you put this shell script in the /home/nat.sh
# Remember to chmod 744 /home/nat.sh
# Edit the rc.local file to make this shell startup automatically.
# vi /etc/rc.local
# Add a line in the end of rc.local /home/nat.sh
EXIF= “enp1s0” #This is an external interface for setting up a valid IP address.
EXNET= “192.168.4.0/24” #This is an internal network address.
# Step 1. Insert modules.
# Here 2> /dev/null means the standard error messages will be dump to null device.
modprobe ip_tables 2> /dev/null
modprobe ip_nat_ftp 2> /dev/null
modprobe ip_nat_irc 2> /dev/null
modprobe ip_conntrack 2> /dev/null
modprobe ip_conntrack_ftp 2> /dev/null
modprobe ip_conntrack_irc 2> /dev/null
# Step 2. Define variables, enable routing and erase default rules.
PATH=/bin:/sbin:/usr/bin:/usr/sbin:/usr/local/bin:/usr/local/sbin
export PATH
echo “1” > /proc/sys/net/ipv4/ip_forward
/sbin/iptables -F
/sbin/iptables -X
/sbin/iptables -Z
/sbin/iptables -F -t nat
/sbin/iptables -X -t nat
/sbin/iptables -Z -t nat
/sbin/iptables -P INPUT ACCEPT
Page 52

MPC-2000 Series Linux Software Managing Communications
3-14
ATTENTION
Click on the following links for more information about NFS.
ht
http://www.faqs.org/rfcs/rfc1317.html
moxa@Moxa:~$ sudo vi /etc/modprobe.d/rt2800usb.conf
Blacklist rt2800usb
/sbin/iptables -P OUTPUT ACCEPT
/sbin/iptables -P FORWARD ACCEPT
/sbin/iptables -t nat -P PREROUTING ACCEPT
/sbin/iptables -t nat -P POSTROUTING ACCEPT
/sbin/iptables -t nat -P OUTPUT ACCEPT
# Step 3. Enable IP masquerade.
#ehco 1 > /proc/sys/net/ipv4/ip_forward
#modprobe ipt_MASQUERADE
#iptables –t nat –A POSTROUTING –o enp1s0 –j MASQUERADE
NFS (Network File System) Client
The Network File System (NFS) is used to mount a disk partition on a remote machine (as if it were on a local
hard drive), allowing fast, seamless sharing of files across a network. NFS allows users to develop applications
for the MPC-2070/2120-LX or MPC-2101/2121-LXwithout worrying about the amount of disk space that will be
available. The MPC-2070/2120-LX or MPC-2101/2121-LXonly supports NFS client protocol.
tp://www.ietf.org/rfc/rfc1213.txt
The following procedure illustrate how to mount a remote NFS Server.
1. Scan the NFS Server’s shared directory:
# showmount –e HOST
showmount: Shows the mount information of an NFS Server
-e: Shows the NFS Server’s export list.
HOST: IP address or DNS address
2. Establish a mount point on the NFS Client site:
# mkdir –p /home/nfs/public
3. Mount the remote directory to a local directory:
# mount -t nfs -o nolock 192.168.3.100:/home/public /home/nfs/public
(This is where 192.168.3.100 is the example IP address of the NFS server.)
Wireless Management
MPC-2101/2121 differs from MPC-2070/2120 had a mini-PCIE slot for wireless module installation. Currently it
supports the WPER-172GN Wi-Fi module and UBlox L280 cellular module in the Linux system. The Wi-Fi module
is manageable by iw, wpa_supplicant or hostapd software package in the system. The cellular module is
manageable by cell_mgmt utility.
Device Driver for WPEA-172GN – rt5572sta.ko
There are two choices of device driver for WPER-172GN. One is the rt5572sta.ko. The source is opened at,
https://github.com/cristiklein/ralink
/lib/modules/4.9.0-8-amd64/kernel/drivers/net/wireless/rt5572sta.ko. You can follow these steps to put
another driver in blacklist. The system will load the rt5572sta.ko during boot up.
. We have built and install it in the released Linux image. It’s located at
Page 53

MPC-2000 Series Linux Software Managing Communications
3-15
moxa@Moxa:~$ sudo vi /etc/network/interfaces
...
moxa@Moxa:~# sudo ifconfig ra0 up
DD1D0050F204104A0001101044000102103C0001031049000600372A000120
root@Moxa:~# vi /etc/wpa_supplicant/wpa2.conf
root@Moxa:~#
NOTE
You can use
Configure the ra0 interface in /etc/network/interfaces
...
auto ra0
iface ra0 inet static
address 192.168.5.127
network 192.168.5.0
netmask 255.255.255.0
Then reboot the system. The ra0 interface should be up if the WPER-172GN module installed in the mini-PCIE
slot. Type ifconfig or ip command can check the network interface up and down status.
You can use iwlist to manually scan the wireless network.
moxa@Moxa:~# sudo iwlist ra0 scanning
...
Cell 16 - Address: 70:62:B8:64:21:10
Protocol:802.11b/g/n
ESSID:"dlink_24GHz_luke"
Mode:Managed
Frequency:2.412 GHz (Channel 1)
Quality=73/100 Signal level=-61 dBm Noise level=-92 dBm
Encryption key:on
Bit Rates:54 Mb/s
IE: WPA Version 1
Group Cipher : TKIP
Pairwise Ciphers (2) : CCMP TKIP
Authentication Suites (1) : PSK
IE: IEEE 802.11i/WPA2 Version 1
Group Cipher : TKIP
Pairwise Ciphers (2) : CCMP TKIP
Authentication Suites (1) : PSK
IE: Unknown:
In the above scan result, we want to associate with “dlink_24GHz_luke” access point. Configure wpasupplicant
to associate with the access point.
network={
ssid="dlink_24GHz_luke"
psk=12345678
}
root@Moxa:~# wpa_supplicant -D wext -i ra0 -c /etc/wpa_supplicant/wpa2.conf -B
-B means run wpa_supplicant in the background.
-D specifies the wireless driver. wext is the generic driver.
-c specifies the path for the configuration file.
-d to replace the -B in debugging purpose.
Page 54

MPC-2000 Series Linux Software Managing Communications
3-16
root@Moxa:~# iwconfig ra0
Tx excessive retries:0 Invalid misc:0 Missed beacon:0
root@Moxa:~# sudo dhclient ra0
Use the ip command to verify the IP address assigned by DHCP. The IP address is
4: ra0: <BROADCAST,MULTICAST,UP,LOWER_UP> mtu 1500 qdisc pfifo_fast state UP group
root@Moxa:~#
root@Moxa:~# ping 8.8.8.8
rtt min/avg/max/mdev = 3.571/6.809/12.633/4.127 ms
# Debian 9 "Stretch"
deb http://http.debian.net/debian/ stretch main contrib non-free
root@Moxa:~# apt-get update
root@Moxa:~# apt-get install firmware-misc-nonfree
Use the iwconfig command to verify that you are indeed connected to the SSID.
ra0 Ralink STA ESSID:"dlink_24GHz_luke" Nickname:"RT2870STA"
Mode:Managed Frequency=2.412 GHz Access Point: 70:62:B8:64:21:10
Bit Rate=54 Mb/s
RTS thr:off Fragment thr:off
Encryption key:A5C4-EB2D-CC06-07AF-461C-4F2B-05F4-C3C3 [2] Security
mode:restricted Security mode:open
Link Quality=83/100 Signal level:-63 dBm Noise level:-84 dBm
Rx invalid nwid:0 Rx invalid crypt:0 Rx invalid frag:0
Obtain IP address by DHCP
192.168.3.90 from below.
root@Moxa:~# ip addr show ra0
default qlen 1000
link/ether 00:0e:8e:6e:f9:63 brd ff:ff:ff:ff:ff:ff
inet 192.168.5.127/24 brd 192.168.5.255 scope global ra0
valid_lft forever preferred_lft forever
inet 192.168.3.90/24 brd 192.168.3.255 scope global ra0
valid_lft forever preferred_lft forever
inet6 fe80::20e:8eff:fe6e:f963/64 scope link
valid_lft forever preferred_lft forever
Ping the global IP address to test connectivity.
PING 8.8.8.8 (8.8.8.8) 56(84) bytes of data.
64 bytes from 8.8.8.8: icmp_seq=1 ttl=119 time=12.6 ms
64 bytes from 8.8.8.8: icmp_seq=2 ttl=119 time=3.57 ms
64 bytes from 8.8.8.8: icmp_seq=3 ttl=119 time=4.22 ms
^C
--- 8.8.8.8 ping statistics ---
3 packets transmitted, 3 received, 0% packet loss, time 2004ms
Device Driver for WPEA-172GN - rt2800usb.ko
To support the rt2800usb.ko, you should add a non-free component, firmware-misc-nonfree, in the system.
First of all, configure /etc/apt/sources.list to install the non-free components.
Update the list of available packages
In Debian Stretch: Install the firmware-misc-nonfree package
Page 55

MPC-2000 Series Linux Software Managing Communications
3-17
moxa@Moxa:~$ sudo iw list
moxa@Moxa:~$ sudo iw dev wlan0 scan
moxa@Moxa:~$ sudo iw event
moxa@Moxa:~$ sudo iw dev wlan0 connect TARGET_AP_SSID
moxa@Moxa:~$ sudo iw dev wlan0 connect TARGET_AP_SSID key 0:abcde d:1:6061626364
moxa@Moxa:~$ sudo iw dev wlan0 disconnect
moxa@Moxa:~$ sudo iw –help
moxa@Moxa:~$ sudo vi /etc/wpa_supplicant/wpa_supplicant.conf
}
moxa@Moxa:~$ sudo vi /etc/wpa_supplicant/wpa_supplicant.conf
}
moxa@Moxa:~$ sudo vi /etc/wpa_supplicant/wpa_supplicant.conf
ssid="MYAPSSID"
Connect the device to your system. The rt2800usb kernel module is automatically loaded for supported devices.
Configure your wireless interface by iw or wpasupplicant as appropriate.
iw
iw is a new nl80211 based CLI configuration utility for wireless devices. It replaces the old tool iwconfig, which
uses Wireless Extensions interface, is deprecated and recommended to switch to iw and nl80211.
Get device capabilities:
Scanning
Listening to events
Establishing a basic connection to an AP that has encryption disabled.
To connect to an AP that use WEP, you can use:
Disconnect from the current network.
Get the usage information of the iw utility.
wpasupplicant
Create /etc/wpa_supplicant/wpa_supplicant.conf for connecting to an AP that has encryption disabled.
network={
ssid="MYAPSSID"
key_mgmt=NONE
To connect to an AP that uses WEP, the configuration is as follows:
network={
ssid="MYAPSSID"
key_mgmt=NONE
wep_key0=1234567890
wep_key1="abcde"
wep_key2="1234567890123"
wep_tx_keyidx=0
priority=5
To connect to an AP that use WPA, the configuration is as follows:
network={
Page 56

MPC-2000 Series Linux Software Managing Communications
3-18
psk=”1234567890”
}
moxa@Moxa:~$ sudo wpa_supplicant –Dnl80211 –iwlan0 -c
/etc/wpa_supplicant/wpa_supplicant.conf –B
moxa@Moxa:~$ sudo iw dev wlan0 link
moxa@Moxa:~$ sudo vi /etc/network/interfaces
wpa-conf /etc/wpa_supplicant/wpa_supplicant.conf
moxa@Moxa:~# sudo cell_mgmt help
moxa@Moxa:~# sudo cell_mgmt signal
lte -68 dbm
moxa@Moxa:~# sudo cell_mgmt sim_status
+CPIN: READY
Module=u-blox TOBY-L2 series
LCID=
moxa@Moxa:~# sudo cell_mgmt operator
Chunghwa Telecom
Manually run the wpa_supplicant in daemon mode with the above configures.
Then you can check the connection using the iw command.
After /etc/wpa_supplicant/wpa_supplicant.conf has confirmed, edit /etc/network/interfaces to use
wpa_supplicant.
...
auto wlan0
iface wlan0 inet dhcp
wpa-driver nl80211
Then you can “ifdown wlan0” and “ifup wlano” to check the wpa_supplicant configure.
Celluar Management – cell_mgnt
The MPC-2101/2121 has a mini-PCIE slot. You can install a LTE mini-PCIE module on this slot. Most popular
mini-PCIE module supports AT command or QMI interface. We provide a cellular management utility,
cell_mgmt, for cellular module management. You can check the help information from the cellular
management.
Following are the example used the cellular management utility managed the cellular module, Ublox L280.
Get the signal strength.
Get the SIM card status.
Check module information.
WWAN_node=enp0s29u1u4
AT_port=/dev/ttyACM0
GPS_port=NotSupport
LAC=
CellID=
ICC-ID=89886920042526767236
IMEI=358503060403350
QMI_port=NotSupport
Check operator information.
Page 57

MPC-2000 Series Linux Software Managing Communications
3-19
moxa@Moxa:~# sudo cell_mgmt power_off
moxa@Moxa:~# sudo cell_mgmt power_on
moxa@Moxa:~# sudo cell_mgmt at "at+csq"
+CSQ: 23,99 OK
moxa@Moxa:~# sudo cell_mgmt reset
port) converter now disconnected from
port) converter now disconnected from
port) converter now disconnected from
port) converter now disconnected from
port) converter now disconnected from
[ 1752.570857] usb-storage 1-1.3.1:1.7: USB Mass Storage device detected
Power on/off the cellular module.
Network already stopped
Clearing state...
root@Moxa:~# ls -al /dev/ttyACM0
ls: cannot access /dev/ttyACM0: No such file or directory
Check at command.
Reset the cellular module and check the cellular module connect and disconnect information.
root@Moxa:~# dmesg
...
[ 1740.205317] usb 1-1.3.1: USB disconnect, device number 8
[ 1740.206225] option1 ttyUSB0: GSM modem (1-
ttyUSB0
[ 1740.206303] option 1-1.3.1:1.0: device disconnected
[ 1740.206930] qmi_wwan 1-1.3.1:1.2 wwan0: unregister 'qmi_wwan'
usb-0000:00:1d.0-1.3.1, WWAN/QMI device
[ 1740.233955] option1 ttyUSB1: GSM modem (1-
ttyUSB1
[ 1740.233993] option 1-1.3.1:1.3: device disconnected
[ 1740.235131] option1 ttyUSB2: GSM modem (1-
ttyUSB2
[ 1740.235167] option 1-1.3.1:1.4: device disconnected
[ 1740.237083] option1 ttyUSB3: GSM modem (1-
ttyUSB3
[ 1740.237122] option 1-1.3.1:1.5: device disconnected
[ 1740.238483] option1 ttyUSB4: GSM modem (1-
ttyUSB4
[ 1740.238520] option 1-1.3.1:1.6: device disconnected
[ 1752.436526] usb 1-1.3.1: new high-speed USB device number 9 using ehci-pci
[ 1752.536781] usb 1-1.3.1: New USB device found, idVendor=1bc7, idProduct=1201
[ 1752.536803] usb 1-1.3.1: New USB device strings: Mfr=1, Product=2, SerialNumber=3
[ 1752.536817] usb 1-1.3.1: Product: Android
[ 1752.536829] usb 1-1.3.1: Manufacturer: Android
[ 1752.536841] usb 1-1.3.1: SerialNumber: 0123456789ABCDEF
[ 1752.556214] option 1-1.3.1:1.0: GSM modem (1-port) converter detected
[ 1752.557043] usb 1-1.3.1: GSM modem (1-port) converter now attached to ttyUSB0
[ 1752.561008] qmi_wwan 1-1.3.1:1.2: cdc-wdm0: USB WDM device
[ 1752.561956] qmi_wwan 1-1.3.1:1.2 wwan0: register 'qmi_wwan' at
usb-0000:00:1d.0-1.3.1, WWAN/QMI device, 02:29:d8:91:80:f5
[ 1752.562375] option 1-1.3.1:1.3: GSM modem (1-port) converter detected
[ 1752.562909] usb 1-1.3.1: GSM modem (1-port) converter now attached to ttyUSB1
[ 1752.563628] option 1-1.3.1:1.4: GSM modem (1-port) converter detected
[ 1752.564122] usb 1-1.3.1: GSM modem (1-port) converter now attached to ttyUSB2
[ 1752.569265] option 1-1.3.1:1.5: GSM modem (1-port) converter detected
[ 1752.569558] usb 1-1.3.1: GSM modem (1-port) converter now attached to ttyUSB3
[ 1752.569960] option 1-1.3.1:1.6: GSM modem (1-port) converter detected
[ 1752.570227] usb 1-1.3.1: GSM modem (1-port) converter now attached to ttyUSB4
Page 58

MPC-2000 Series Linux Software Managing Communications
3-20
[ 1752.571702] scsi host2: usb-storage 1-1.3.1:1.7
[ 1753.571280] scsi 2:0:0:0: Direct-Access Linux File-CD Gadget 0000 PQ: 0 ANSI: 2
root@Moxa:~# cell_mgmt gps_on
GPS function is *ENABLE*
root@Moxa:~# cell_mgmt start APN="Internet"
root@Moxa:~# ping -I enp0s29u1u4 8.8.8.8
GPS on/off.
GPS function is *ENABLE*
root@Moxa:~# cat /dev/ttyUSB1
root@Moxa:~# cell_mgmt gps_on
Connect/disconnect to/from the operator.
PIN code: Disabled or verified
Clearing state...
root@Moxa:~# ifconfig
enp0s29u1u4: flags=4163<UP,BROADCAST,RUNNING,MULTICAST> mtu 1500
inet6 fe80::6855:faff:fef0:2c19 prefixlen 64 scopeid 0x20<link>
ether 6a:55:fa:f0:2c:19 txqueuelen 1000 (Ethernet)
RX packets 2 bytes 132 (132.0 B)
RX errors 0 dropped 0 overruns 0 frame 0
TX packets 12 bytes 2064 (2.0 KiB)
TX errors 0 dropped 0 overruns 0 carrier 0 collisions 0
root@Moxa:~# dhclient enp0s29u1u4
root@Moxa:~# ifconfig enp0s29u1u4
enp0s29u1u4: flags=4163<UP,BROADCAST,RUNNING,MULTICAST> mtu 1500
inet 192.168.1.100 netmask 255.255.255.0 broadcast 192.168.1.255
inet6 fe80::6855:faff:fef0:2c19 prefixlen 64 scopeid 0x20<link>
ether 6a:55:fa:f0:2c:19 txqueuelen 1000 (Ethernet)
RX packets 9 bytes 948 (948.0 B)
RX errors 0 dropped 0 overruns 0 frame 0
TX packets 30 bytes 5870 (5.7 KiB)
TX errors 0 dropped 0 overruns 0 carrier 0 collisions 0
root@Moxa:~# ping -I enp0s29u1u4 8.8.8.8
PING 8.8.8.8 (8.8.8.8) from 10.166.110.17 wwan0: 56(84) bytes of data.
64 bytes from 8.8.8.8: icmp_seq=1 ttl=46 time=284 ms
64 bytes from 8.8.8.8: icmp_seq=2 ttl=46 time=94.8 ms
root@Moxa:~# cell_mgmt stop
Killed old client process
Stopping network with '_qmicli --wds-stop-network=1138741424 --client-cid=10'...
Network stopped successfully
Clearing state...
root@Moxa:~# ifconfig enp0s29u1u4
enp0s29u1u4: flags=4163<UP,BROADCAST,RUNNING,MULTICAST> mtu 1500
inet6 fe80::6855:faff:fef0:2c19 prefixlen 64 scopeid 0x20<link>
ether 6a:55:fa:f0:2c:19 txqueuelen 1000 (Ethernet)
RX packets 12 bytes 1144 (1.1 KiB)
RX errors 0 dropped 0 overruns 0 frame 0
TX packets 36 bytes 6822 (6.6 KiB)
TX errors 0 dropped 0 overruns 0 carrier 0 collisions 0
Page 59

MPC-2000 Series Linux Software Managing Communications
3-21
ping: Warning: source address might be selected on device other than enp0s29u1u4.
PING 8.8.8.8 (8.8.8.8) from 192.168.3.127 enp0s29u1u4: 56(84) bytes of data.
ATTENTION
The MPC
PCIe slot. The cell_mgnt is
only for miniPCIe LTE module.
-2000 serial has two models, only the MPC-2101/2121 supports the mini-
Page 60

4
4. Programming Guide
The following topics are covered in this chapter:
The Device Driver Source
Multi-arch Development Tools
Year 2038 Problem – Recompile the Program with 64-bits glibc
Device IOCTL
RTC (Real Time Clock)
UART
Digital I/O
WDT (Watch Dog Timer)
Introduction
Watchdog Usage
WDT IOCTL Commands
How the WDT Works
Brightness Control Programming
Introduction
Programming the Brightness
Programming Example - br-setbrightness-example.c
Qt Programming
Introduction
Qt5 Tutorial Using Qt Creator
Qt Programming Reference
mtdev (multitouch protocol translation library)
Introduction
The multitouch and evdev
Examples
Page 61

MPC-2000 Series Linux Software Programming Guide
4-2
moxa@Moxa:~$ sudo dmidecode -s "baseboard-manufacturer"
TACCA1000000
bios-vendor
processor-frequency
moxa@Moxa:~$ vi selftests/Makefile
CFLAGS += -O3 –Wl,-no-as-needed –Wall -m32
moxa@Moxa:~$ make
set-2038: ELF 32-bit LSB shared object, Intel 80386, version 1 (SYSV), dynamically
The Device Driver Source
The device driver sources are available at:
Getting Product Serial Number
https://github.com/Moxa-Linux
The product information can read by dmidecode. You can use following commands to get the information.
MOXA
moxa@Moxa:~$ sudo dmidecode -s "baseboard-serial-number"
Refer to the following keywords for getting other product information.
bios-version
bios-release-date
system-manufacturer
system-product-name
system-version
system-serial-number
system-uuid
baseboard-manufacturer
baseboard-product-name
baseboard-version
baseboard-serial-number
baseboard-asset-tag
chassis-manufacturer
chassis-type
chassis-version
chassis-serial-number
chassis-asset-tag
processor-family
processor-manufacturer
processor-version
Multi-arch Development Tools
The MPC-2070/2120-LX OR MPC-2101/2121-LX is a native 64-bits Linux operating system. The system installs
multi-arch development tools to support 32-bits programs in the 64-bits operating system. You can compile
your program with -m32 CFLAGS to output the 32 bits program. For example, add -m32 in CFLAGS in the
selftests program.
...
Build the program and check the file type.
moxa@Moxa:~$ file set-2038
Page 62

MPC-2000 Series Linux Software Programming Guide
4-3
linked, interpreter /lib/ld-linux.so.2, for GNU/Linux 2.6.32,
Run the test program – The test result are all OK.
moxa@Moxa:~$ ./set-2038
int ioctl(int d, int request,…);
<request> argument in or out
int ioctl(fd, RTC_RD_TIME, struct rtc_time *time);
Description: read time information from the RTC. It will return the value on argument
3.
int ioctl(fd, RTC_SET_TIME, struct rtc_time *time);
Description: set RTC time. Argument 3 will be passed to RTC.
BuildID[sha1]=662623acbf53f7b9db464b88d9e20cf1611e3458, not stripped
Run this program in a 64-bits environment.
Year 2038 Problem – Recompile the Program with 64-bits glibc
In a 32-bits operating system, C the standard 4-byte format assumes the beginning of time is January 1, 1970,
at 12:00:00 a.m. It rolls over to a negative (and invalid) value is 2,147,483,647, which translates into January
19, 2038. On this date, any 32-bits C programs that use the standard time library will start to have problems
with date calculations. To correct it simply recompile the programs with the 64-bits library that uses 8-byte
values for the storage format.
Device IOCTL
The MPC-2070/2120-LX or MPC-2101/2121-LX is a Linux operating system. Most device supports the ioctl
system call to control the device. The ioctl system call is shown below:
Input:
<d> open device node return file handle
Refer the Linux’s man page for detailed documentation:
# man ioctl
RTC (Real Time Clock)
The device node is located at /dev/rtc. It supports the standard Linux simple RTC control. You must include
<Linux/rtc.h>.
Function: RTC_RD_TIME
Function: RTC_SET_TIME
Page 63

MPC-2000 Series Linux Software Programming Guide
4-4
DI3
/sys/class/gpio/di3/value
moxa@Moxa:~# sudo echo 0 > /sys/class/gpio/do1/value
moxa@Moxa:~# sudo echo 1 > /sys/class/gpio/do1/value
moxa@Moxa:~# sudo cat /sys/class/gpio/di1/value
sprint(buf, "/sys/class/gpio/do%d/value", gpio);
close(fd);
UART
The normal tty device nodes are /dev/ttyS0, /det/ttyS1, … in Linux. The UART port supports standard Linux
termios control. The serial interface default operation mode is set to RS-232, you can use this command to
change the operation mode.
setinterface device-node [interface-no]
device-node: /dev/ttySn; n = 0,1,2,...
interface-no: [see following table]:
Interface-no Operation Mode
None Display current setting
0 RS-232
1 RS-485 2-wires
2 RS-422 or RS-485 4-wires
Digital I/O
Digital Output channels can be set to high or low. The channels are controlled by /sys file. Following is the
DI/DO number mapping table.
Function Sysfs file
DI1 /sys/class/gpio/di1/value
DI2 /sys/class/gpio/di2/value
DI4 /sys/class/gpio/di4/value
DO1 /sys/class/gpio/do1/value
DO2 /sys/class/gpio/do2/value
The DI/DO can be accessed via /sys/class/gpio/diN/value or /sys/class/gpio/doN/value. All the GPIO
sysfs files have been exported by
/etc/systemd/system/multi-user.target.wants/mx_gpio_export.service at boot. You don’t need to
export the GPIO entry. You can use cat or echo to access the GPIO directly in a shell program.
To set DO1 to status as low in shell script:
To set DO1 to status as high in shell script:
To read the DI1 status in shell script:
In case of setting the value of DO1 in C:
fd = open(buf, O_WRONLY);
// Set GPIO high status
write(fd, "1", 1);
// Set GPIO low status
write(fd, "0", 1);
Page 64

MPC-2000 Series Linux Software Programming Guide
4-5
sprint(buf, "/sys/class/gpio/di%d/value", gpio);
close(fd);
moxa@Moxa:~# sudo systemctl enable watchdog
moxa@Moxa:~$
…
interval = 29
In case of getting the value of DI1 in C:
fd = open(buf, O_RDONLY);
read(fd, &value, 1);
if(value == '0')
{
// Current GPIO status low
}
else
{
// Current GPIO status high
}
WDT (Watch Dog Timer)
Introduction
The WDT works like a watchdog function, and can be enabled or disabled. When the WDT function is enabled
and the application does not acknowledge it, the system will reboot.
Watchdog Usage
User can set the ack time from a minimum of 1 sec to a maximum of 1days.The default timer is 60. So, if the
watchdog daemon crashes, the system will reboot after the timeout has passed.
WDT IOCTL Commands
The Linux Watchdog Device IOCTL Commands can found in /usr/include/Linux/watchdog.h.
How the WDT Works
Debian project supports a watchdog daemon. The watchdog daemon checks if your system is still working. If
programs are no longer executed it will perform the hard reset of the system. The standard watchdog driver
and package have been installed in the system. If you need to run the watchdog once the system boots up, you
can use the systemctl to enable the watchdog function.
The watchdog configure file is located in /etc/watchdog.conf. The acknowledgement interval can be set to any
number between 2 seconds and 58 seconds. Currently we configure the watchdog daemon to acknowledge in
29 seconds because the watchdog daemon suggests to acknowledge twice before the watchdog timer timeout
and the daemon might sleep. The realtime is to lock itself into memory, so it is never swapped out to prevent
the delay of watchdog acknowledge. The priority set the schedule priority for realtime mode.
watchdog-device = /dev/watchdog
…
Page 65

MPC-2000 Series Linux Software Programming Guide
4-6
realtime = yes
…
pidfile=/var/run/crond.pid
ping=10.144.7.254
interface=eth0
moxa@Moxa:~# sudo systemctl disable watchdog
moxa@Moxa:~# sudo systemctl status watchdog
priority = 1
If you want to monitor the execution of some daemon, eg: crond, you can configure the pidfile to monitor the
daemon.
If you want to monitor network is alive, you can configure the ping and interface to check the gateway in the
local area network. Eg. The system will reset if ping the gateway 10.144.7.254 from eth0 over 5 times.
If you want to remove it from systemd, you can use this command.
To check if the watchdog daemon is enabled or disabled. You can use this command.
Brightness Control Programming
Introduction
The panel computer embeds with a micro-controller (uC) which controls the display brightness. User can read
or write the control commands to /dev/ttyS2 with 9600 baud rate, 8 data bits, no flow control to control the
display brightness.
Example: Scenario of Get Brightness value command
X86 /dev/ttyS2 (9600 N 8 1) uC
0xF0 0x01 0xC0 0xC0 --->
<--- 0xF0 0x02 0xC0 0x01
Example: Scenario of Set Brightness value command
X86 /dev/ttyS2 (9600 N 8 1) uC
0xF0 0x02 0xC1 0x01 0xC2 --->
<--- 0xF0 0x01 0xC1 0x01
Programming the Brightness
The brightness control command is serial protocol. We have prepared an example code for brightness
programming. You can check the example code, br-util. The API is in br.h.
/*
* Open the brightness control device, /dev/ttyS2, in 9600n81.
* return: the device descriptor
*/
int open_brightness_control(void);
/*
* Close the brightness control device, /dev/ttyS2.
*/
void close_brightness_control(int fd);
/*
* X86 uC
Page 66

MPC-2000 Series Linux Software Programming Guide
4-7
* Get auto brightness control status
* 0xF0 0x01 0xC2 0xC2 --->
* <--- 0xF0 0x02 0xC2 0x01 0xC3
*
* int fd: the device descriptor
* return:
* 0: Auto brightness control is disabled
* 1: Auto brightness control is enabled
* -4: write brightness command fail
* -5: read the response of brightness command fail
* -6: The response is not the expected value
*/
int get_auto_brightness_control_status(int fd);
/*
* X86 uC
* Enable auto brightness control
* 0xF0 0x02 0xC3 0x01 0xC4 --->
* <--- 0xF0 0x01 0xC3 0xC3
*
* Disable auto brightness control
* 0xF0 0x02 0xC3 0x00 0xC3 --->
* <--- 0xF0 0x00 0xC3 0xC3
* <--- 0xF0 0x01 0xC3 0xC3
* int fd: the device descriptor
* int on_off:
* 0: disable the auto brightness control
* 1: enable the auto brightness control
* 2: enable the auto-sent brightness control (debugging purpose)
* return:
* 0: success
* -2: on_off is not 0 or 1
* -4: write brigthness command fail
* -5: read the response of brightness command fail
* -6: The response is not the expected value
*/
int set_auto_brightness_control(int fd, int on_off);
/*
* Set the brightness level
*
* X86 uC
* 0xF0 0x02 0xC1 0x01 0xC2 --->
* <--- 0xF0 0x01 0xC1 0x01
* int fd: the device descriptor
* int br_value: The brightness level is in 0, 1, ..., 10.
* return:
* 0: Success
* -3: br_value is not in 1 ~ 10
* -4: Write brightness command fail
* -5: Read the response of set brightness command fail
* -6: Set brightness fail
*/
int set_brightness(int fd, int br_value);
/*
* Get the brightness level
*
Page 67

MPC-2000 Series Linux Software Programming Guide
4-8
* X86 uC
* 0xF0 0x01 0xC0 0xC0 --->
* <--- 0xF0 0x02 0xC0 0x01
* int fd: the device descriptor
* int value: The brightness level is in 0, 1, ..., 10.
* return:
* 0: Success
* -4: Write the GET BRIGHTNESS command fail
* -5: Read the response of set brightness command fail
*/
int get_brightness(int fd, int *br_value);
/*
* Set the hold time in auto brightness control mode.
*
* X86 uC
* 0xF0 0x02 0xE9 0x0A 0xF3 --->
* <--- 0xF0 0x01 0xE9 0xE9
* int fd: the device descriptor
* int holdtime: The holdtime is the time interval to poll the brightness of the light source.
* return:
* 0: Success
* -3: holdtime is not in 1 ~ 10
* -4: Write brightness command fail
* -5: Read the response of set brightness command fail
* -6: Set brightness fail
*/
int set_auto_brightness_control_holdtime(int fd, int holdtime);
/*
* Get the hold time in auto brightness control mode.
*
* X86 uC
* 0xF0 0x01 0xE9 0xE9 --->
* <--- 0xF0 0x02 0xE9 0x02 0xEB
* int fd: the device descriptor
* int *holdtime: The holdtime is the time interval to poll the brightness of the light source.
* return:
* 0: Success
* -4: Write the GET BRIGHTNESS command fail
* -5: Read the response of set brightness command fail
*/
int get_auto_brightness_control_holdtime(int fd, int *holdtime);
/*
* Set the light sensor and brightness mapping for auto brightness control
*
* X86 uC
* 0xF0 0x02 0xE1 0x02 0xE3 --->
* <--- 0xF0 0x01 0xE1 0xE1
* int fd: the device descriptor
* int lightsensor_level: It's in 0xE1 (Level 1), 0xE2, ..., 0xE8 (Level 8).
* int br_value: It's in 1, 2, ..., 10.
* return:
* 0: Success
* -2: lightsensor_level is not in 1 ~ 8
* -3: br_value is not in 1 ~ 10
* -4: Set light sensor and brightness mapping fail
Page 68

MPC-2000 Series Linux Software Programming Guide
4-9
* -5: Read the response of set brightness command fail
* -6: Set brightness mapping response fail
*/
int set_auto_brightness_level(int fd, int lightsensor_level, int br_value);
/*
* Get the light sensor and brightness mapping for auto brightness control
*
* X86 uC
* 0xF0 0x01 0xE1 0xE1 --->
* <--- 0xF0 0x02 0xE1 0x02 0xE3
* int fd: the device descriptor
* int lightsensor_level: It's in 0xE1 (Level 1), 0xE2 (Level 2), ..., 0xE8 (Level 8).
* int br_level: It's in 1, 2, ..., 10.
* return:
* 0: Success
* -2: lightsensor_level is not in 1 ~ 8
* -4: Set light sensor and brightness mapping fail
* -5: Read the response of set brightness command fail
* -6: Get light sensor/brightness mapping fail
*/
int get_auto_brightness_level(int fd, int lightsensor_level, int *br_level);
/*
* Get the firmware version
*
* X86 uC
* 0xF0 0x01 0xC7 0xC7 --->
* <--- 0xF0 0x02 0xC7 0x12 0xD9
* 0xF0 0x01 0xCA 0xCA --->
* <--- 0xF0 0x02 0xCA 0x22 0xEC
*
* The firmware version is: 0x1222, V1.2.2 S02
*
* int fd: the device descriptor
* int *frm_ver: The firmware version.
* return:
* 0: Success
* -4: Write the GET FIRMWARE VERSION command fail
* -5: Read the response of command fail
* -6: Set brightness fail
*/
int get_firmware_version(int fd, int *frm_ver);
/*
* X86 uC
* Get brightness system status
* 0xF0 0x01 0xCE 0xCE --->
* <--- 0xF0 0x02 0xCE 0x03 0xE1
*
* int fd: the device descriptor
* int *value: The brightness system status.
* return:
* 0: Success
* -4: Write the get brightness system status command fail
* -5: Read the response command fail
* -6: Response command incorrect
*/
Page 69

MPC-2000 Series Linux Software Programming Guide
4-10
#include "br.h"
#include <stdio.h>
printf("Set brightness: %d.\n", i);
int get_brightness_system_status(int fd, int *value);
A user program should include the br.h to include these API. To control the brightness, you should open the
brightness controller and close it finally. The program would like this:
…
int mc_fd;
…
/* open the brightness controller */
mc_fd = open_brightness_control();
…
/* get/set/... the information from the brightness controller */
set_brightness(mc_fd, 5);
…
/* close the brightness controller */
close_brightness_control(mc_fd);
Programming Example - br-setbrightness-example.c
The br-setbrightness-example.c is an example of the set brightness programming. You can download this
example code from Moxa’s web site.
#include <unistd.h>
#include <fcntl.h>
#include <string.h>
#include <stdlib.h>
#include <sys/select.h>
#include <sys/time.h>
#include <sys/types.h>
#include <unistd.h>
#include "br.h"
#define VERSION "1.0"
int main(int argc, char *argv[]) {
int i, mc_fd;
mc_fd = open_brightness_control();
if( mc_fd < 0 ) {
if ( mc_fd == -1 )
printf("%s opened fail.\n", BRIGHTNESS_DEVICE);
else if( mc_fd == -2)
printf("Please close another process using %s.\n", BRIGHTNESS_DEVICE);
goto __exit2;
}
/* Set brightness manually in Auto Brightness Mode disabled. */
for ( i=MIN_BRIGHTNESS_VALUE; i<= MAX_BRIGHTNESS_VALUE; i++) {
if ( i == 0 )
printf("Turn off the backlight at level %d.\n", i);
else
Page 70

MPC-2000 Series Linux Software Programming Guide
4-11
sleep(1);
CC=${CROSS_COMPILE}gcc
set_brightness(mc_fd, i);
}
__exit1:
close_brightness_control(mc_fd);
__exit2:
return 0;
}
The Makefile:
STRIP=${CROSS_COMPILE}strip
CFLAGS+= -fPIC -DBUILTDATE='"$(shell date +%y%m%d%H)"'
# The source of brightness control utility
TARGET1=br-util
# The set brightness programming example code
TARGET2=br-setbrightness-example
all: ${TARGET1} ${TARGET1}-debug ${TARGET2} ${TARGET2}-debug
libbr.a: br.o
ar r libbr.a br.o
libbr.so: br.o
$(CC) br.o -shared -o libbr.so
${TARGET1}: ${TARGET1}.c libbr.a
${CC} $(CFLAGS) ${TARGET1}.c -o ${TARGET1} -L. -lbr
${STRIP} -s ${TARGET1}
${TARGET1}-debug: ${TARGET1}.c libbr.a
# Define -DDEBUG for debugging purpose
${CC} $(CFLAGS) -DDEBUG br.c ${TARGET1}.c -o ${TARGET1}-debug
${TARGET2}: ${TARGET2}.c libbr.a
${CC} $(CFLAGS) ${TARGET2}.c -o ${TARGET2} -L. -lbr
${STRIP} -s ${TARGET2}
${TARGET2}-debug: ${TARGET2}.c libbr.a
# Define -DDEBUG for debugging purpose
${CC} $(CFLAGS) -DDEBUG br.c ${TARGET2}.c -o ${TARGET2}-debug
install: all
mkdir -p $(DESTDIR)/usr/local/bin
install -m uog+rx $(TARGET1) $(DESTDIR)/usr/local/bin
chmod a+s $(DESTDIR)/usr/local/bin/$(TARGET1)
clean:
/bin/rm -rf *.o *.a *.so ${TARGET1} ${TARGET1}-debug ${TARGET2} ${TARGET2}-debug
Page 71

MPC-2000 Series Linux Software Programming Guide
4-12
moxa@Moxa:~/br-util/# sudo make
br-setbrightness-example-debug
moxa@Moxa:~/br-util/# sudo ./br-setbrightness-example
Type make to compile the executable.
gcc -fPIC -DBUILTDATE='"19020111"' -c -o br.o br.c
ar r libbr.a br.o
ar: creating libbr.a
gcc -fPIC -DBUILTDATE='"19020111"' br-util.c -o br-util -L. -lbr
strip -s br-util
# Define -DDEBUG for debugging purpose
gcc -fPIC -DBUILTDATE='"19020111"' -DDEBUG br.c br-util.c -o br-util-debug
gcc -fPIC -DBUILTDATE='"19020111"' br-setbrightness-example.c -o
br-setbrightness-example -L. -lbr
strip -s br-setbrightness-example
# Define -DDEBUG for debugging purpose
gcc -fPIC -DBUILTDATE='"19020111"' -DDEBUG br.c br-setbrightness-example.c -o
Launch the executable. The display brightness will be changed.
Qt Programming
Introduction
Qt (pronounced as "cute", not "cu-tee") is a cross-platform framework that is usually used as a graphical toolkit,
although it is also very helpful in creating CLI applications.
Qt5 Tutorial Using Qt Creator
This Tutorial demonstrates using Qt Creator to make a GUI application. The image bellow shows this Qt
application.
Page 72

MPC-2000 Series Linux Software Programming Guide
4-13
The Steps to Make a Qt Application Using Qt Creator
1. Start a New Qt Creator Project from Application Development Qt Creator.
2. Open the Qt Creator application and click the New Project button, or File New File or Project … from
the top menu.
3. In the New Project dialog box choose Qt Widgets Application and then click the Choose… button.
Page 73

MPC-2000 Series Linux Software Programming Guide
4-14
4. In the next dialog box enter the name of the project and choose the location to create the project in. Click
the Next > button when done.
5. The Qt Kit can now be selected. It can be modified by clicking the Manage… or Details... button.
6. Click the Next > button and leave the class information at the default values.
Page 74

MPC-2000 Series Linux Software Programming Guide
4-15
7. At this stage the Run button can be clicked to build and run the new Qt Creator application (or use Ctrl +
R on the keyboard to run). When the application runs, a window will appear that can be resized and closed.
8. Edit the Application Window Graphically
To start editing the new application window in Qt Creator:
1. Expand the Forms folder at the top left of Qt Creator and double-click the mainwindow.ui file that appears.
Qt Creator will now change to Design mode allowing the hello application window to be edited.
The widgets is in the right side. The widget attribute is in the left side. The Application form is in the centric.
You can drag-and-drop the widgets on the form.
2. Add Text label
Page 75

MPC-2000 Series Linux Software Programming Guide
4-16
3. Drag and drop two Label widgets from the pane at the left of the window form, under Display Widgets.
Drop the labels onto the form.
4. Add and Edit a Button Widget.
5. Add a Push Button to the window form by dragging and dropping it from the left widget pane under
Buttons.
Page 76

MPC-2000 Series Linux Software Programming Guide
4-17
The Object names, Attributes, Alignment, … are configurable in the right side.
6. Connecting the Button to Code.
7. We now want to connect the button to the code that will run when it is clicked. Right-click the button on the
form and select Go to slot… on the menu that pops up. Choose clicked() in the dialog box that pops up
and then click the OK button.
Page 77

MPC-2000 Series Linux Software Programming Guide
4-18
8. Application Operational Code.
The application code can now be written. The code writes “Hello, world!” to the first text label in the window
and increments a count in the second text label every time that the button is clicked.
The code listing below shows the code added to the button click handler in the mainwindow.cpp file.
#include "mainwindow.h"
#include "ui_mainwindow.h"
MainWindow::MainWindow(QWidget *parent) :
QMainWindow(parent), ui(new Ui::MainWindow)
{
ui->setupUi(this);
}
MainWindow::~MainWindow()
{
delete ui;
}
void MainWindow::on_pushButton_clicked()
{
// display text message in first label
ui->label->setText("Hello, world!");
}
Page 78

MPC-2000 Series Linux Software Programming Guide
4-19
9. Build and Run the Application
Save changes to the project. This can be done using File Save All from the top menu or Ctrl + Shift +
S on the keyboard.
The Qt 5 Hello World Tutorial project can be built by clicking the hammer icon on the left toolbar of Qt
Creator. The application can be run by clicking the green triangle icon on the left toolbar.
Qt Programming Reference
The Qt programming has many documentations in the Qt official web site.
You can check the Qt Reference Pages for more detail information.
http://doc.qt.io/qt-5/reference-overview.html
mtdev (multitouch protocol translation library)
Introduction
The mtdev is the multitouch protocol library which transforms all variants of kernel MT events to the slotted
type B protocol. This platform has installed the multitouch protocol translation library. The developer can
include /usr/include/mtdev.h which supports the API for multitouch programming. mtview is the multitouch
example.
Page 79

MPC-2000 Series Linux Software Programming Guide
4-20
Initialize the mtdev structure and configure it by reading the protocol capabilities
Argument
struct mtdev *dev: the mtdev to open
Returns true if the device is idle, i.e., there are no fetched events in the pipe and
IOCTL command
EVIOCGRAB
On success, 0 is returned and dev is set to the newly allocated struct. On failure,
Return
None
The multitouch and evdev
The mtdev is the multitouch protocol library which transforms all variants of kernel MT events to the slotted
type B protocol. This platform has installed the multitouch protocol translation library. The developer can
include /usr/include/mtdev.h and /usr/include/libevdev-1.0/libevdev/libevdev.h headers to support the
multitouch programming. Parts of the functions sorted out from the header files are given below:
WDIOC_GETSUPPORT
Function int mtdev_open(struct mtdev *dev, int fd)
Description
through the file descriptor.
Argument Int fd: file descriptor of the kernel device
Return Returns zero on success, negative error number otherwise.
Function void mtdev_close(struct mtdev *dev)
Description Deallocates all memory associated with mtdev, and clears the mtdev structure.
Argument Struct mtdev *dev: the mtdev to close
Return None
Function struct mtdev *mtdev_new_open(int fd)
Description Close conversion and delete mtdev
Argument dev: the mtdev in use
Return None
Function int mtdev_idle(struct mtdev *dev, int fd, int ms)
Description Check state of kernel device
Argument struct mtdev *dev: the mtdev in use
Argument int fd: file descriptor of the kernel device
Argument int ms: number of milliseconds to wait for activity
Return
there is nothing to fetch from the device.
Function int mtdev_get(struct mtdev *dev, int fd, struct input_event* ev, int ev_max)
Description Get processed events from mtdev.
Argument struct mtdev *dev: the mtdev in use
Argument int fd: file descriptor of the kernel device
Argument struct input_event *ev: array of input events to fill
Argument int ev_max: maximum number of events to read
Return On success, return 0. Otherwise, return < 0 value.
Description Grab or ungrab the device through a kernel EVIOCGRAB. This prevents other
clients (including kernel-internal ones such as rfkill) from receiving events from
this device.
Function int libevdev_new_from_fd(int fd, struct libevdev **dev)
Description Get the current watchdog timeout.
Argument int fd: A file descriptor to the device in O_RDWR or O_RDONLY mode.
Argument Struct libevdev **dev: The newly initialized evdev device.
Return
a negative errno is returned and the value of dev is undefined.
Function void libevdev_free(struct libevdev *dev)
Description Clean up and free the libevdev struct. After completion, the struct *libevdev is
invalid and must not be used.
Note: This function may be called before libevdev_set_fd().
Argument Struct libevdev *dev: The evdev device
Page 80

MPC-2000 Series Linux Software Programming Guide
4-21
Argument
unsigned int code The EV_ABS event code to query for, one of ABS_X, ABS_Y, etc.
moxa@Moxa:~/mtview$ make
lXi
/dev/input/event5: eGalax Inc. eGalaxTouch EXC3146-3899-09.00.00
Function int libevdev_has_event_code(const struct libevdev *dev, unsigned int type,
unsigned int code)
Description Check the device supports this event type and code.
Argument struct libevdev *dev: The evdev device, already initialized with libevdev_set_fd()
Argument unsigned int type: he event type for the code to query (EV_SYN, EV_REL, etc.)
Argument unsigned int code: The event code to query for, one of ABS_X, REL_X, etc.
Return return 1 if the device supports this event type and code, or 0 otherwise.
Function int libevdev_get_abs_minimum(const struct libevdev *dev, unsigned int code);
Description Get the minimum axis value for the given axis, as advertised by the kernel.
Argument struct libevdev *dev: The evdev device, already initialized with libevdev_set_fd()
Return return axis minimum for the given axis or 0 if the axis is invalid
Function int libevdev_get_abs_maximum(const struct libevdev *dev, unsigned int code);
Description Get the maximum axis value for the given axis, as advertised by the kernel.
Argument struct libevdev *dev: The evdev device, already initialized with libevdev_set_fd()
Argument unsigned int code The EV_ABS event code to query for, one of ABS_X, ABS_Y, etc.
Return return axis minimum for the given axis or 0 if the axis is invalid
Examples
The mtview is the multitouch example. You can compile and reference this example to support multitouch input
feature in your application. (Note: The system has multiple input devices, you should select the touch device
for mtview using.)
make all-recursive
make[1]: Entering directory '/home/moxa/mtview'
Making all in tools
make[2]: Entering directory '/home/moxa/mtview/tools'
gcc -DHAVE_CONFIG_H -I. -I.. -I/usr/include/libevdev-1.0/ -I/usr/include/cairo
-I/usr/include/glib-2.0 -I/usr/lib/x86_64-linux-gnu/glib-2.0/include
-I/usr/include/pixman-1 -I/usr/include/freetype2 -I/usr/include/libpng16 -g -O2
-MT mtview.o -MD -MP -MF .deps/mtview.Tpo -c -o mtview.o mtview.c
mv -f .deps/mtview.Tpo .deps/mtview.Po
/bin/bash ../libtool --tag=CC --mode=link gcc -g -O2 -lmtdev -levdev -lX11 -
-lm -lcairo -o mtview mtview.o
libtool: link: gcc -g -O2 -o mtview mtview.o -lmtdev -levdev -lX11 -lXi -lm -lcairo
make[2]: Leaving directory '/home/moxa/mtview/tools'
Making all in man
make[2]: Entering directory '/home/moxa/mtview/man'
make[2]: Nothing to be done for 'all'.
make[2]: Leaving directory '/home/moxa/mtview/man'
make[2]: Entering directory '/home/moxa/mtview'
make[2]: Leaving directory '/home/moxa/mtview'
make[1]: Leaving directory '/home/moxa/mtview'
moxa@Moxa:~/mtview# sudo ./tools/mtview
Available devices:
/dev/input/event0: CHICONY HP Basic USB Keyboard
/dev/input/event1: Power Button
/dev/input/event2: Sleep Button
/dev/input/event3: Power Button
/dev/input/event4: PC Speaker
Page 81

MPC-2000 Series Linux Software Programming Guide
4-22
/dev/input/event6: Video Bus
moxa@Moxa:~/mtview$
/dev/input/event7: Logitech USB Optical Mouse
Select the device event number [0-7]: 5
XIO: fatal IO error 11 (Resource temporarily unavailable) on X server ":0.0"
after 4793 requests (48 known processed) with 0 events remaining.
Page 82

5
5. System Restore
The MPC-2000-LX is installed with a Linux operating system, which is located in the CFast card shipped with the
MPC-2000 panel computer. Although it rarely happens, you may find on occasion that operating system files
and/or the disk file system have been damaged. In this chapter we describe how to restore the Linux operating
system.
The following topics are covered in this chapter:
Embedded Computer Restore Environment 1
Embedded Computer Restore Environment
Embedded Computer Restore Procedure
Saving the System to the USB Drive
Brightness Controller Firmware Upgrade
Page 83

MPC-2000 Series Linux Software System Restore
5-2
NOTE
The USB disk should be at least 4 GB
Embedded Computer Restore Environment 1
Embedded Computer Restore Environment
The restore environment includes the MPC-2070/2120-LX or MPC-2101/2121 embedded computer and a
bootable USB disk with the restore programs and system image file.
Hardware
The hardware used includes a PC, a MPC-2070/2120-LX or MPC-2101/2121-LX computer and a USB disk with
the restore programs.
Embedded Computer Restore Procedure
Step 1: Prepare Your USB drive
For Windows Users:
1. Execute tuxboot from the Clonezilla/tuxboot/Windows folder on the Software CD, select Pre Download, and
then click “…”.
Linux users can get the Linux version of tuxboot from sourceforge to make the Clonezilla USB stick.
https://sourceforge.net/projects/tuxboot/files/0.8/Linux/
Page 84

MPC-2000 Series Linux Software System Restore
5-3
2. Select the ISO file in the directory of <Software DVD> \Restore\Clonezilla_Image\
3. Select USB Drive type, select a Drive, and then click OK to continue.
Page 85

MPC-2000 Series Linux Software System Restore
5-4
The boot files will be copied to your USB drive.
4. When finished, click Exit to stop the program.
Manually extract the os_image.zip from the path
\Restore\CloneZilla_Image\VX.Y.Z_Build_YYMMDDHH folder to \home\partimag on the USB
drive.
Page 86

MPC-2000 Series Linux Software System Restore
5-5
Step 2: Change the BIOS Settings
You will need to change the BIOS settings to boot from the USB disk.
1. Turn on the computer and press F2. Select Setup Utility in the following screen.
2. Select Boot and then select Legacy. Press Enter to continue.
Page 87

MPC-2000 Series Linux Software System Restore
5-6
WARNING
An incorrect boot priority will lead to restore or boot failure.
3. Select Boot order.
4. Select USB disk and then press “+” to move it to the first boot device position.
5. Press F10 and then press Enter to save and exit BIOS setup.
Page 88

MPC-2000 Series Linux Software System Restore
5-7
Step 3: Restore the system from USB drive
Connect the USB disk to any of the computer’s USB ports and then reboot the computer. The system will boot
from the USB disk and the Pre-installation Environment and the restore utility will appear.
1. Select clonezilla live restore disk.
2. Wait for the USB drive boot process to finish.
Page 89

MPC-2000 Series Linux Software System Restore
5-8
3. Enter y to continue the restore process.
4. Wait for the process to finish.
Page 90

MPC-2000 Series Linux Software System Restore
5-9
5. Select Poweroff to power off the computer.
6. Remove the USB drive after the computer has been powered off.
Step 4: Change the BIOS Settings to Boot from the Original Disk
Now you will need to change the boot priority so that it can boot from the original disk.
1. As the system reboots, press F2 to enter the BIOS setup menu.
2. Select Hard Disk Drive and then press + to move to the first boot device position, and then press Enter.
Make sure the hard disk has first boot priority.
3. Press F10 and then press Enter to save and exit BIOS settings.
Page 91

MPC-2000 Series Linux Software System Restore
5-10
Step 5: Reboot the Computer
You need to wait about 10 to 15 minutes for the system to restart, since the system configuration files will be
initiated while booting up for the first time. Do not turn off the computer or shut down the computer
while the system is restarting; otherwise, the IIS service will be terminated. When the operating system has
successfully launched, you will need to restart your computer so that the new settings can be activated.
Saving the System to the USB Drive
You may also save the current system to the USB drive for system restore in case the system crashes. Before
saving the system to the USB drive, we suggest you remove all files under \home\partimag on the USB drive.
In addition, change the BIOS settings to make the USB drive the first boot priority.
When the system has been launched, do the following:
1. Select clonezilla live save disk.
2. Wait for the USB drive boot process to finish.
Page 92

MPC-2000 Series Linux Software System Restore
5-11
3. Enter y to continue.
4. Wait for the process to finish.
Page 93

MPC-2000 Series Linux Software System Restore
5-12
root@Moxa:~/# upgrade_mcfwr.sh
EX: upgrade_mcfrm.sh /home/moxa/MPC-2121_V100.S02.hex
root@Moxa:~/# upgrade_mcfwr.sh /home/moxa/MPC-2121_V100.S02.hex
5. Select Poweroff so that the computer will power off when the process is finished.
Brightness Controller Firmware Upgrade
The brightness can be controlled by the Brightness Controller, which works with a preinstalled firmware. The
firmware is embedded in the Brightness Controller and it can be upgraded by the upgrade_mcfwr.sh utility.
This is the usage information of this utility.
Please input the micro-controller firmware in the argument
This is an example to upgrade the firmware, FWR_MCU_MPC-2121_V1.20S00.
1
*** Erasing flash from 0x1000 ***
*** Flash erase code area finished ***
Enter a command >
MOXA MCU Firmware Version V1.20S00
---------------------------------
1. Erase the firmware flash block
2. Receive HEX file
?. Print command List
Enter a command > 2
Ready to receive Hex file...
!!!Please don’t power-off or stop the upgrade before it finished!!!
Start the ASCII transfer and firmware upgrade
ASCII upload of "./MPC-2121_V100.S02.hex"
Page 94

MPC-2000 Series Linux Software System Restore
5-13
6.4 Kbytes transferred at 929 CPS... Done.
root@Moxa:~/# br-util -f
The firmware version: 1.0.0S02 (1002)
ATTENTION
The Brightness Control Dialog and upgrade_mcfwr.sh cannot run at the same t
Brightness Control Dialog . Then the upgrade_mcfwr.sh can run.
Firmware upgrade finished.
You can check the firmware version by br-util -f.
root@Moxa:~/
After the firmware upgraded finished, you can check the firmware version by `br-util -f` command.
Or check the firmware version in Brightness Control Dialog.
ime. You should close the
Page 95

A. Software Components
bash-completion
1:2.1-4.3
all programmable completion for the bash shell
binutils-multiarch
2.28-5
Binary utilities that support multi-arch targets
Name Version Description
accountsservice 0.6.43-1 query and manipulate user account information
acl 2.2.52-3+b1 Access control list utilities
adduser 3.115 all add and remove users and groups
adwaita-icon-theme 3.22.0-1+deb9u1 all default icon theme of GNOME
alsa-utils 1.1.3-1 Utilities for configuring and using ALSA
anacron 2.3-24 cron-like program that doesn't go by time
apg 2.2.3.dfsg.1-4+b1 Automated Password Generator - Standalone version
apt 1.4.9 commandline package manager
apt-listchanges 3.10 all package change history notification tool
apt-utils 1.4.9 package management related utility programs
aspell 0.60.7~20110707-3+b2 GNU Aspell spell-checker
aspell-en 2016.11.20-0-0.1 all English dictionary for GNU Aspell
at-spi2-core 2.22.0-6+deb9u1 Assistive Technology Service Provider Interface (dbus core)
avahi-autoipd 0.6.32-2 Avahi IPv4LL network address configuration daemon
avahi-daemon 0.6.32-2 Avahi mDNS/DNS-SD daemon
base-files 9.9+deb9u8 Debian base system miscellaneous files
base-passwd 3.5.43 Debian base system master password and group files
bash 4.4-5 GNU Bourne Again SHell
A
bind9-host 1:9.10.3.dfsg.P4-12.3+de
b9u4
binfmt-support 2.1.6-2 Support for extra binary formats
binutils 2.28-5 GNU assembler, linker and binary utilities
bluetooth 5.43-2+deb9u1 all Bluetooth support
bluez 5.43-2+deb9u1 Bluetooth tools and daemons
bluez-obexd 5.43-2+deb9u1 bluez obex daemon
bridge-utils 1.5-13+deb9u1 Utilities for configuring the Linux Ethernet bridge
bsdmainutils 9.0.12+nmu1 collection of more utilities from FreeBSD
bsdutils 1:2.29.2-1+deb9u1 basic utilities from 4.4BSD-Lite
build-essential 12.3 Informational list of build-essential packages
busybox 1:1.22.0-19+b3 Tiny utilities for small and embedded systems
bzip2 1.0.6-8.1 high-quality block-sorting file compressor - utilities
ca-certificates 20170717 all Common CA certificates
ca-certificates-java 20170531+nmu1 all Common CA certificates (JKS keystore)
clang 1:3.8-36 C, C++ and Objective-C compiler (LLVM based)
clang-3.8 1:3.8.1-24 C, C++ and Objective-C compiler (LLVM based)
coinor-libcgl1 0.58.9-1+b1 COIN-OR Cut Generation Library
coinor-libcoinmp1v5:a
md64
coinor-libosi1v5 0.106.9-2+b1 COIN-OR Open Solver Interface
colord 1.3.3-2 system service to manage device colour profiles -- system daemon
1.7.6+dfsg1-2 Simple C API for COIN-OR Solvers Clp and Cbc -- library
Version of 'host' bundled with BIND 9.X
Page 96

MPC-2000 Series Linux Software Software Components
A-2
dialog
1.3-20160828-2
Displays user-friendly dialog boxes from shell scripts
doc-debian
6.4
all Debian Project documentation and other documents
Name Version Description
colord-data 1.3.3-2 all system service to manage device colour profiles -- data files
console-setup 1.164 all console font and keymap setup program
console-setup-Linux 1.164 all Linux specific part of console-setup
coreutils 8.26-3 GNU core utilities
cpio 2.11+dfsg-6 GNU cpio -- a program to manage archives of files
cpp 4:6.3.0-4 GNU C preprocessor (cpp)
cpp-6 6.3.0-18+deb9u1 GNU C preprocessor
cracklib-runtime 2.9.2-5 runtime support for password checker library cracklib2
crda 3.18-1 wireless Central Regulatory Domain Agent
cron 3.0pl1-128+deb9u1 process scheduling daemon
cups-common 2.2.1-8+deb9u3 all Common UNIX Printing System(tm) - common files
cups-pk-helper 0.2.6-1+b1 PolicyKit helper to configure cups with fine-grained privileges
dash 0.5.8-2.4 POSIX-compliant shell
dbus 1.10.26-0+deb9u1 simple interprocess messaging system (daemon and utilities)
dbus-user-session 1.10.26-0+deb9u1 all simple interprocess messaging system (systemd --user
integration)
dbus-x11 1.10.26-0+deb9u1 simple interprocess messaging system (X11 deps)
dconf-gsettings-backe
nd:amd64
dconf-service 0.26.0-2+b1 simple configuration storage system - D-Bus service
debconf 1.5.61 all Debian configuration management system
debconf-i18n 1.5.61 all full internationalization support for debconf
debian-archive-keyring 2017.5 all GnuPG archive keys of the Debian archive
debian-faq 8.1 all Debian Frequently Asked Questions
debianutils 4.8.1.1 Miscellaneous utilities specific to Debian
desktop-base 9.0.2+deb9u1 all common files for the Debian Desktop
desktop-file-utils 0.23-1 Utilities for .desktop files
dh-python 2.20170125 all Debian helper tools for packaging Python libraries and
0.26.0-2+b1 simple configuration storage system - GSettings back-end
applications
dictionaries-common 1.27.2 all spelling dictionaries - common utilities
diffutils 1:3.5-3 File comparison utilities
discover 2.1.2-7.1+deb9u1 hardware identification system
discover-data 2.2013.01.11 all Data lists for Discover hardware detection system
distro-info-data 0.36 all information about the distributions' releases (data files)
dleyna-server 0.4.0-1.1 DBus service to interact with DLNA Digital Media Servers
dmidecode 3.0-4 SMBIOS/DMI table decoder
dmsetup 2:1.02.137-2 Linux Kernel Device Mapper userspace library
dnsmasq-base 2.76-5+deb9u1 Small caching DNS proxy and DHCP/TFTP server
docbook-xml 4.5-8 all standard XML documentation system for software and systems
dosfstools 4.1-1 utilities for making and checking MS-DOS FAT filesystems
dpkg 1.18.25 Debian package management system
dpkg-dev 1.18.25 all Debian package development tools
e2fslibs:amd64 1.43.4-2 ext2/ext3/ext4 file system libraries
e2fsprogs 1.43.4-2 ext2/ext3/ext4 file system utilities
emacsen-common 2.0.8 all Common facilities for all emacsen
enchant 1.6.0-11+b1 Wrapper for various spell checker engines (binary programs)
etherwake 1.09-4+b1 tool to send magic Wake-on-LAN packets
ethtool 1:4.8-1+b1 display or change Ethernet device settings
evince 3.22.1-3+deb9u1 Document (PostScript, PDF) viewer
evince-common 3.22.1-3+deb9u1 all Document (PostScript, PDF) viewer - common files
Page 97

MPC-2000 Series Linux Software Software Components
A-3
findutils
4.6.0+git+20161106-2
utilities for finding files--find, xargs
ive style and language support
database)
Name Version Description
evolution-data-server 3.22.7-1 evolution database backend server
evolution-data-server-
common
exfat-fuse 1.2.5-2 read and write exFAT driver for FUSE
exfat-utils 1.2.5-2 utilities to create, check, label and dump exFAT filesystem
exo-utils 0.10.7-1 Utility files for libexo
expect 5.45-7+deb9u1 Automates interactive applications
fakeroot 1.21-3.1 tool for simulating superuser privileges
file 1:5.30-1+deb9u2 Recognize the type of data in a file using "magic" numbers
firmware-Linux-free 3.4 all Binary firmware for various drivers in the Linux kernel
fontconfig 2.11.0-6.7+b1 generic font configuration library - support binaries
fontconfig-config 2.11.0-6.7 all generic font configuration library - configuration
fonts-crosextra-caladea 20130214-1 all Sans-serif font metric-compatible with Cambria font
fonts-crosextra-carlito 20130920-1 all Sans-serif font metric-compatible with Calibri font
fonts-dejavu 2.37-1 all metapackage to pull in fonts-dejavu-core and
fonts-dejavu-core 2.37-1 all Vera font family derivate with additional characters
fonts-dejavu-extra 2.37-1 all Vera font family derivate with additional characters (extra
fonts-droid-fallback 1:6.0.1r16-1.1 all handheld device font with extens
fonts-liberation 1:1.07.4-2 all Fonts with the same metrics as Times, Arial and Courier
fonts-linuxlibertine 5.3.0-2 all Linux Libertine family of fonts
fonts-noto-mono 20161116-1 all "No Tofu" monospaced font family with large Unicode coverage
freepats 20060219-1 all Free patch set for MIDI audio synthesis
fuse 2.9.7-1+deb9u2 Filesystem in Userspace
g++ 4:6.3.0-4 GNU C++ compiler
g++-6 6.3.0-18+deb9u1 GNU C++ compiler
g++-6-multilib 6.3.0-18+deb9u1 GNU C++ compiler (multilib support)
g++-multilib 4:6.3.0-4 GNU C++ compiler (multilib files)
gawk 1:4.1.4+dfsg-1 GNU awk, a pattern scanning and processing language
gcc 4:6.3.0-4 GNU C compiler
gcc-6 6.3.0-18+deb9u1 GNU C compiler
gcc-6-base:amd64 6.3.0-18+deb9u1 GCC, the GNU Compiler Collection (base package)
gcc-6-multilib 6.3.0-18+deb9u1 GNU C compiler (multilib support)
gcc-multilib 4:6.3.0-4 GNU C compiler (multilib files)
gconf-service 3.2.6-4+b1 GNOME configuration database system (D-Bus service)
gconf2-common 3.2.6-4 all GNOME configuration database system (common files)
gcr 3.20.0-5.1 GNOME crypto services (daemon and tools)
gdb 7.12-6 GNU Debugger
gdisk 1.0.1-1 GPT fdisk text-mode partitioning tool
geoip-database 20170512-1 all IP lookup command line tools that use the GeoIP library (country
3.22.7-1 all architecture independent files for Evolution Data Server
fonts-dejavu-extra
variants)
(fallback)
gettext-base 0.19.8.1-2 GNU Internationalization utilities for the base system
ghostscript 9.26a~dfsg-0+deb9u1 interpreter for the PostScript language and for PDF
gimp 2.8.18-1+deb9u1 GNU Image Manipulation Program
gimp-data 2.8.18-1+deb9u1 all Data files for GIMP
gir1.2-accountsservice
-1.0
0.6.43-1 GObject introspection data for AccountService
Page 98

MPC-2000 Series Linux Software Software Components
A-4
64
gir1.2-gcr-3:amd64
3.20.0-5.1
GObject introspection data for the GCR library
3.0:amd64
md64
64
Name Version Description
gir1.2-appindicator3-0.
1:amd64
gir1.2-atk-1.0:amd64 2.22.0-1 ATK accessibility toolkit (GObject introspection)
gir1.2-atspi-2.0:amd64 2.22.0-6+deb9u1 Assistive Technology Service Provider (GObject introspection)
gir1.2-caribou-1.0 0.4.21-1+b1 GObject introspection for the Caribou library
gir1.2-clutter-1.0:amd
64
gir1.2-clutter-gst-3.0:
amd64
gir1.2-cogl-1.0:amd64 1.22.2-2 GObject introspection data for the Cogl 1.0 library
gir1.2-coglpango-1.0:a
md64
gir1.2-evince-3.0:amd
0.4.92-4 Typelib files for libappindicator3-1
1.26.0+dfsg-3 GObject introspection data for the Clutter 1.0 library
3.0.24-1 Gobject introspection data for Clutter GStreamer elements
1.22.2-2 GObject introspection data for the CoglPango 1.0 library
3.22.1-3+deb9u1 GObject introspection data for the evince libraries
gir1.2-freedesktop:am
d64
gir1.2-gck-1:amd64 3.20.0-5.1 GObject introspection data for the GCK library
gir1.2-gconf-2.0 3.2.6-4+b1 GNOME configuration database system (GObject-Introspection)
gir1.2-gdesktopenums
-3.0
gir1.2-gdkpixbuf-2.0:a
md64
gir1.2-gdm-1.0 3.22.3-3+deb9u2 GObject introspection data for the GNOME Display Manager
gir1.2-glib-2.0:amd64 1.50.0-1+b1 Introspection data for GLib, GObject, Gio and GModule
gir1.2-gnomebluetooth
-1.0:amd64
gir1.2-gnomedesktop-
gir1.2-gst-plugins-bas
e-1.0
gir1.2-gstreamer-1.0 1.10.4-1 GObject introspection data for the GStreamer library
gir1.2-gtk-3.0:amd64 3.22.11-1 GTK+ graphical user interface library -- gir bindings
gir1.2-gtkclutter-1.0:a
md64
gir1.2-gtksource-3.0:a
md64
gir1.2-gweather-3.0:a
1.50.0-1+b1 Introspection data for some FreeDesktop components
3.22.0-1 GObject introspection for GSettings desktop-wide schemas
2.36.5-2+deb9u2 GDK Pixbuf library - GObject-Introspection
3.20.1-1 Introspection data for GnomeBluetooth
3.22.2-1 Introspection data for GnomeDesktop
1.10.4-1 GObject introspection data for the GStreamer Plugins Base library
1.8.2-2 GObject introspection data for the GTK+ Clutter library
3.22.2-1 gir files for the GTK+ syntax highlighting widget
3.20.4-1 GObject introspection data for the GWeather library
gir1.2-ibus-1.0:amd64 1.5.14-3+deb9u1 Intelligent Input Bus - introspection data
gir1.2-javascriptcoregt
k-4.0:amd64
gir1.2-json-1.0:amd64 1.2.6-1 GLib JSON manipulation library (introspection data)
gir1.2-mutter-3.0:amd
64
gir1.2-networkmanage
r-1.0:amd64
gir1.2-nmgtk-1.0:amd
gir1.2-pango-1.0:amd
64
2.18.6-1~deb9u1 JavaScript engine library from WebKitGTK+ - GObject introspection
3.22.3-2 GObject introspection data for Mutter
1.6.2-3+deb9u2 GObject introspection data for NetworkManager
1.4.4-1+deb9u1 GObject introspection data for libnm-gtk
1.40.5-1 Layout and rendering of internationalized text - gir bindings
data
Page 99

MPC-2000 Series Linux Software Software Components
A-5
gnupg
2.1.18-8~deb9u4
GNU privacy guard - a free PGP replacement
Name Version Description
gir1.2-polkit-1.0 0.105-18+deb9u1 GObject introspection data for PolicyKit
gir1.2-rsvg-2.0:amd64 2.40.16-1+b1 gir files for renderer library for SVG files
gir1.2-soup-2.4:amd64 2.56.0-2+deb9u2 GObject introspection data for the libsoup HTTP library
gir1.2-sugarext-1.0 0.110.0-4 Sugar Learning Platform - toolkit GObject introspection
gir1.2-telepathyglib-0.
12
gir1.2-telepathylogger
-0.2
gir1.2-upowerglib-1.0:
amd64
gir1.2-webkit2-4.0:am
d64
gjs 1.46.0-1+b2 Mozilla-based javascript bindings for the GNOME platform
gkbd-capplet 3.22.0.1-1+b1 GNOME control center tools for libgnomekbd
glib-networking:amd64 2.50.0-1+b1 network-related giomodules for GLib
0.24.1-1.1 GLib Telepathy connection manager library
(GObject-Introspection)
0.8.2-2 Telepathy logger service - introspection
0.99.4-4+b1 GObject introspection data for upower
2.18.6-1~deb9u1 Web content engine library for GTK+ - GObject introspection data
glib-networking-comm
on
glib-networking-servic
es
gnome-accessibility-th
emes
gnome-backgrounds 3.22.1-1 all Set of backgrounds packaged with the GNOME desktop
gnome-control-center-
data
gnome-desktop3-data 3.22.2-1 all Common files for GNOME desktop apps
gnome-icon-theme 3.12.0-2 all GNOME Desktop icon theme
gnome-keyring 3.20.0-3 GNOME keyring services (daemon and tools)
gnome-settings-daemon 3.22.2-2+deb9u2 daemon handling the GNOME session settings
gnome-shell 3.22.3-3 graphical shell for the GNOME desktop
gnome-shell-common 3.22.3-3 all common files for the GNOME graphical shell
gnome-sushi 3.21.91-2 sushi is a quick previewer for nautilus
gnome-themes-standa
rd:amd64
gnome-themes-standa
rd-data
gnome-user-guide 3.22.0-1 all GNOME user's guide
2.50.0-1 all network-related giomodules for GLib - data files
2.50.0-1+b1 network-related giomodules for GLib - D-Bus services
3.22.2-2 all Accessibility themes for the GNOME desktop
1:3.22.2-3 all configuration applets for GNOME - data files
3.22.2-2 Adwaita GTK+ 2 theme — engine
3.22.2-2 all Adwaita GTK+ 2 theme — common files
gnupg-agent 2.1.18-8~deb9u4 GNU privacy guard - cryptographic agent
gpgv 2.1.18-8~deb9u4 GNU privacy guard - signature verification tool
grep 2.27-2 GNU grep, egrep and fgrep
groff-base 1.22.3-9 GNU troff text-formatting system (base system components)
grub-common 2.02~beta3-5+deb9u1 GRand Unified Bootloader (common files)
grub-pc 2.02~beta3-5+deb9u1 GRand Unified Bootloader, version 2 (PC/BIOS version)
grub-pc-bin 2.02~beta3-5+deb9u1 GRand Unified Bootloader, version 2 (PC/BIOS binaries)
grub2-common 2.02~beta3-5+deb9u1 GRand Unified Bootloader (common files for version 2)
gsettings-desktop-sch
emas
gsfonts 1:8.11+urwcyr1.0.7~pre4
3.22.0-1 all GSettings desktop-wide schemas
4-4.3
all Fonts for the Ghostscript interpreter(s)
Page 100

MPC-2000 Series Linux Software Software Components
A-6
gvfs:amd64
1.30.4-1
userspace virtual filesystem - GIO module
hunspell-en-us
20070829-7
all English_american dictionary for hunspell
installation-report
2.62
all system installation report
iputils-ping
3:20161105-1
Tools to test the reachability of network hosts
Name Version Description
gstreamer1.0-alsa:am
d64
gstreamer1.0-plugins-
base:amd64
gstreamer1.0-plugins-
good:amd64
gstreamer1.0-pulseau
dio:amd64
gstreamer1.0-x:amd64 1.10.4-1 GStreamer plugins for X11 and Pango
gtk-update-icon-cache 3.22.11-1 icon theme caching utility
gtk2-engines-pixbuf:a
md64
gtk2-engines-xfce 3.2.0-2 GTK+-2.0 theme engine for Xfce
gvfs-backends 1.30.4-1 userspace virtual filesystem - backends
gvfs-common 1.30.4-1 all userspace virtual filesystem - common data files
gvfs-daemons 1.30.4-1 userspace virtual filesystem - servers
gvfs-libs:amd64 1.30.4-1 userspace virtual filesystem - private libraries
gzip 1.6-5+b1 GNU compression utilities
hddtemp 0.3-beta15-52+b1 hard drive temperature monitoring utility
hdparm 9.51+ds-1+deb9u1 tune hard disk parameters for high performance
hicolor-icon-theme 0.15-1 all default fallback theme for FreeDesktop.org icon themes
hostname 3.18+b1 utility to set/show the host name or domain name
1.10.4-1 GStreamer plugin for ALSA
1.10.4-1 GStreamer plugins from the "base" set
1.10.4-1 GStreamer plugins from the "good" set
1.10.4-1 GStreamer plugin for PulseAudio
2.24.31-2 pixbuf-based theme for GTK+ 2.x
i965-va-driver:amd64 1.7.3-1 VAAPI driver for Intel G45 & HD Graphics family
iamerican 3.4.00-5 all American English dictionary for ispell (standard version)
ibritish 3.4.00-5 all British English dictionary for ispell (standard version)
icedtea-netx-common 1.6.2-3.1 all NetX - implementation of the Java Network Launching Protocol
(JNLP)
ienglish-common 3.4.00-5 all Common files for British and American ispell dictionaries
ifenslave 2.9 all configure network interfaces for parallel routing (bonding)
ifenslave-2.6 2.9 all transitional package, use "ifenslave"
ifupdown 0.8.19 high level tools to configure network interfaces
iio-sensor-proxy 2.0-4 IIO sensors to D-Bus proxy
init 1.48 metapackage ensuring an init system is installed
init-system-helpers 1.48 all helper tools for all init systems
initramfs-tools 0.130 all generic modular initramfs generator (automation)
initramfs-tools-core 0.130 all generic modular initramfs generator (core tools)
iproute 1:4.9.0-1+deb9u1 all transitional dummy package for iproute2
iproute2 4.9.0-1+deb9u1 networking and traffic control tools
iptables 1.6.0+snapshot20161117-6 administration tools for packet filtering and NAT
irqbalance 1.1.0-2.3 Daemon to balance interrupts for SMP systems
isc-dhcp-client 4.3.5-3+deb9u1 DHCP client for automatically obtaining an IP address
isc-dhcp-common 4.3.5-3+deb9u1 common manpages relevant to all of the isc-dhcp packages
iso-codes 3.75-1 all ISO language, territory, currency, script codes and their
translations
ispell 3.4.00-5 International Ispell (an interactive spelling corrector)
iw 4.9-0.1 tool for configuring Linux wireless devices
 Loading...