

Page 1

UPort 1100 Series User’s Manual
Edition 9.0, February 2017
www.moxa.com/product
© 2017 Moxa Inc. All rights reserved.
Page 2

UPort 1100 Series User’s Manual
Moxa Americas
Toll
Tel:
Fax:
Moxa China (Shanghai office)
Toll
Tel:
Fax:
Moxa Europe
Tel:
Fax:
Moxa Asia
Tel:
Fax:
Moxa India
Tel:
Fax:
The software described in this manual is furnished under a license agreement and may be used only in accordance with
the terms of that agreement.
Copyright Notice
© 2017 Moxa Inc. All rights reserved.
Trademarks
The MOXA logo is a registered trademark of Moxa Inc.
All other trademarks or registered marks in this manual belo ng to their respective manufacturers.
Disclaimer
Information in this document is subject to change without notice and does not represent a commitment on the part of
Moxa.
Moxa provides this document as is, without warranty of any kind, either expressed or implied, including, bu t n ot limited
to, its particular purpose. Moxa reserves the right to make improvements and/or changes to this manual, or to the
products and/or the programs described in this manual, at any time.
Information provided in this manual is intended to be accurate and reliable. However, Moxa assumes no responsibility for
its use, or for any infringements on the rights of third parties that may result from its use.
This product might include unintentional technical or typographical errors. Changes are periodically made to the
information herein to correct such errors, and these changes are incorporated into new editions of the publication.
Technical Support Contact Information
www.moxa.com/support
-free: 1-888-669-2872
+1-714-528-6777
+1-714-528-6778
+49-89-3 70 03 99-0
+49-89-3 70 03 99-99
+91-80-4172-9088
+91-80-4132-1045
-free: 800-820-5036
+86-21-5258-9955
+86-21-5258-5505
-Pacific
+886-2-8919-1230
+886-2-8919-1231
Page 3

Table of Contents
1. Introduction .......................................................................................................................................... 1
Overview .............................................................................................................................................. 2
ARDC (Automatic Recovery Data Communication) .............................................................................. 2
Package Checklist .................................................................................................................................. 2
Product Features ................................................................................................................................... 3
Product Specifications ............................................................................................................................ 3
LED Indicators ....................................................................................................................................... 5
Adjustable Pull High/Low, Terminator Resistors for the RS-485 Port ...................................................... 6
2. Installation and Configuration .............................................................................................................. 1
Initial Driver Installation ......................................................................................................................... 2
Hardware Installation ...................................................................................................................... 4
Windows 98/ME and Windows 2000 .................................................................................................. 4
Windows XP, Windows 2003/Vista, and Windows 2008 and 2012 (32-bit and 64-bit) .............................. 5
Configuring the COM Port .............................................................................................................. 10
Configuring the Converter ............................................................................................................. 11
Removing the Converter ............................................................................................................... 13
Uninstalling the Driver .................................................................................................................. 14
Advanced UPort 1100 Driver Functions ................................................................................................... 15
Enable Fixed-base COM Mode ................................................................................................................ 15
Install Linux Driver .............................................................................................................................. 16
Linux Kernel 2.4.20 and above ....................................................................................................... 16
Linux Kernel 2.6.x ........................................................................................................................ 17
Installing the Windows CE Driver ........................................................................................................... 19
Installation with an installation package for Win CE 6.0 ..................................................................... 20
Installation with an installation package for Win CE 5.0 ..................................................................... 27
Removing the Moxa WinCE 5.0 / CE 6.0 Driver................................................................................. 29
Installation with a CAB File ............................................................................................................ 30
Removing the Moxa WinCE 5.0 / CE 6.0 Driver................................................................................. 32
3. Pin Assignment ..................................................................................................................................... 1
UPort DB9 Pin Assignments ..................................................................................................................... 1
Terminal Block Pin Assignments .............................................................................................................. 1
A. EMI Notices ........................................................................................................................................... 1
EMI Notices (Class B) ............................................................................................................................. 1
GREEN Notices ...................................................................................................................................... 1
Page 4

1
1. Introduction
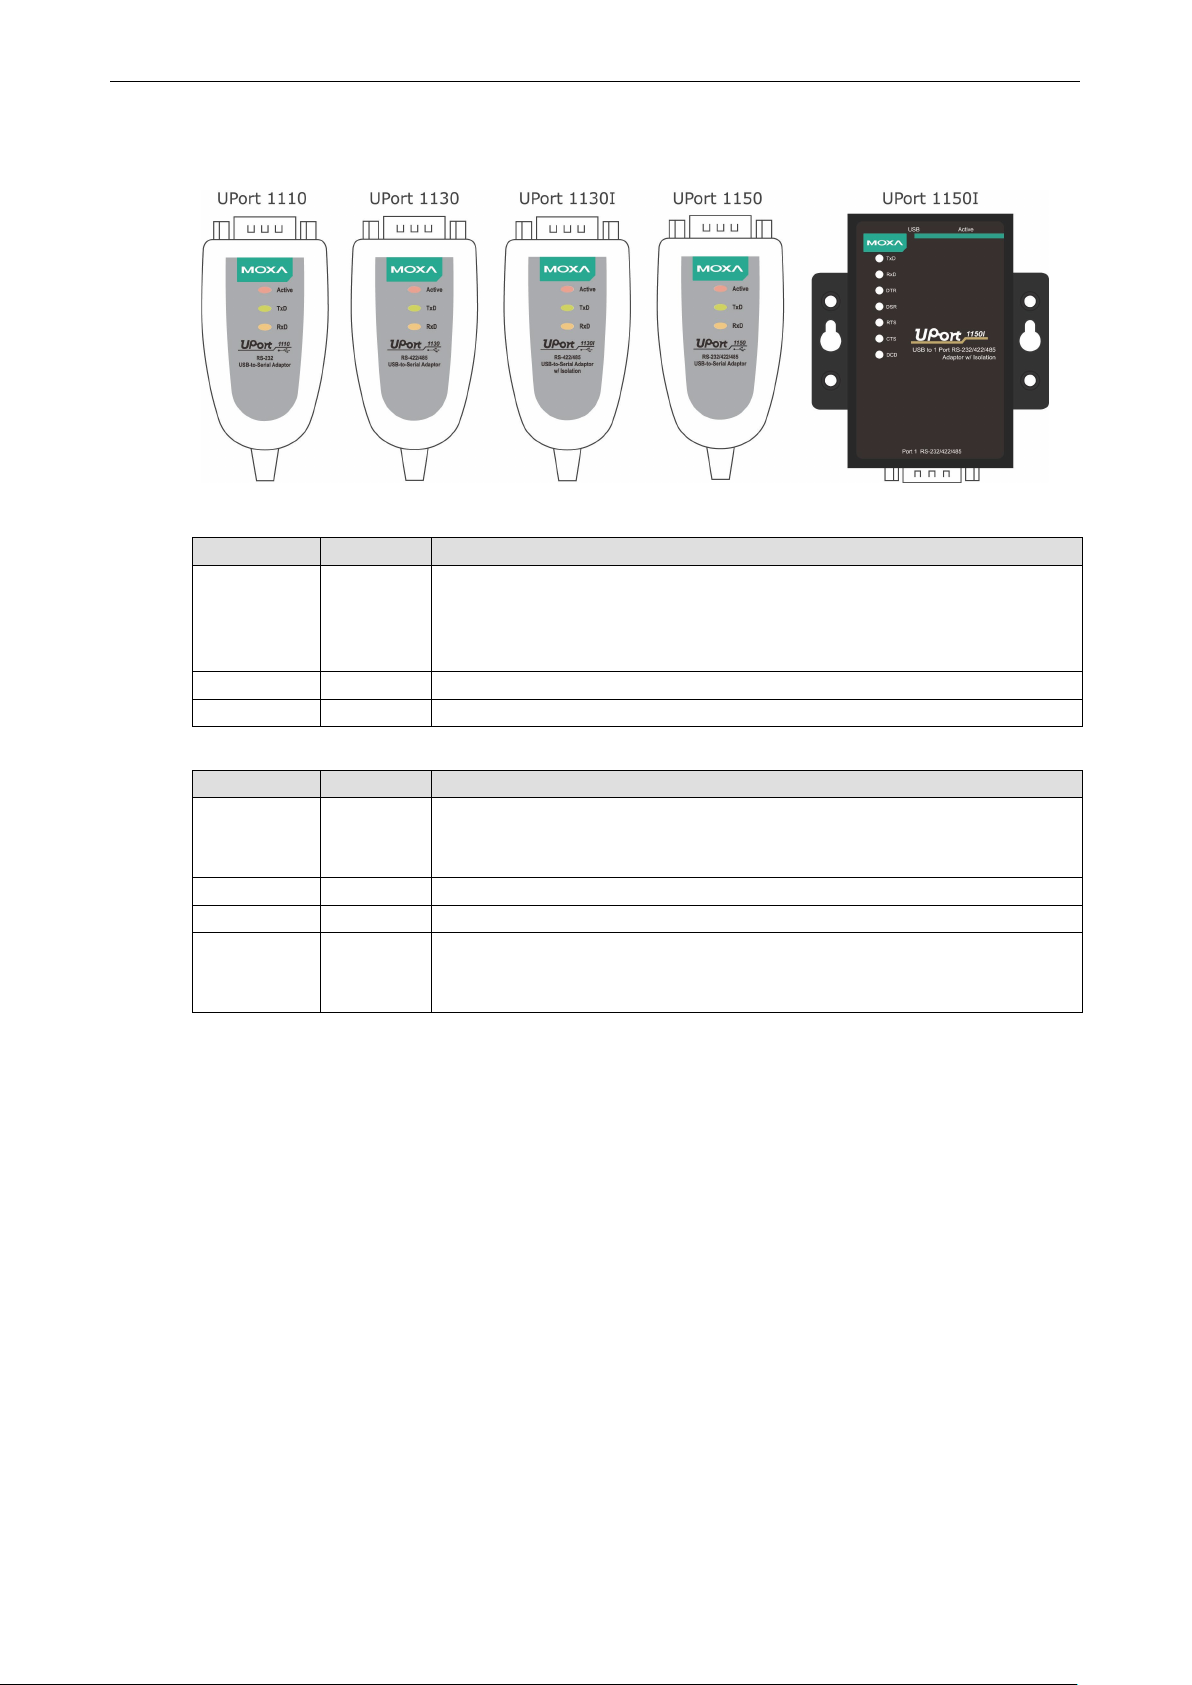
The UPort 1100 Series of USB-to-serial converters provides an easy way to add COM ports to your computer.
The UPort 1110 provides one RS-232 port; the UPort 1130 and UPort 1130I each provide one RS-422/RS-485
port; the UPort 1150 and U Port 1150I each provide one RS-232/422/485 por t. As a plug-and-play USB device,
the converters are perfect for mobile, instrumentation, and point-of-sale applications.
The UPort 1100 series includes the following models:
UPort 1110: 1-port RS-232 USB-to-serial converter.
UPort 1130: 1-port RS-422/485 USB-to-serial converter.
UPort 1130I: 1-port RS-422/485 USB-to-serial converter with isolation protection.
UPort 1150: 1-port RS-232/422/485 USB-to-serial converter.
UPort 1150I: 1-port RS-232/422/485 USB-to-serial converter with isolation protection.
The following topics are covered in this chapter:
Overview
ARDC (Automatic Recovery Data Communication)
Package Checklist
Product Features
Product Specifications
LED Indicators
Adjustable Pull High/Low, Terminator Resistors for the RS-485 Port
Page 5

UPort 1100 Series Introduction
1-2
Overview
The UPort 1100 series is part of Moxa’s UPort line of USB-to-serial converters. The UPort line provides a range
of easy-to-use solutions for adding COM ports through a PC’s USB port. Simply install the drivers, connect the
UPort to your computer, plug in your serial devices, and you’re ready to go. Programming is not re quired, and
you do not need to worry about IRQs, configuring a board, power requirements, or connection schemes.
The UPort 1100 series provides single COM port expansion. The UPort 1110 adds one RS-232 port to your
computer, which is the same type of COM port that is built into most PC motherboards. The UPort 1130/1130I
adds one port that is configurable for RS-422, 2-wire RS-485, and 4-wire RS-485 modes. The UPort
1150/1150I adds one RS-232, RS-422, 2 wire RS-485, or 4 wire RS-485 port to your computer. All of these
models can operate at speeds of up to 12 Mbps, which are much faster than the current maximum serial
transfer rate. The converter is bus-powered, so no external power supply is required.
ARDC (Automatic Recovery Data Communication)
ARDC (Automatic Recovery Data Communication) makes it easier to recover data tra nsmission, even if the
cable is accidentally unplugged. This means that you do not need to worry about reconfiguring complex
settings to ensure smooth data transmission. If the USB cable is accidentally unplugged, simply plug it back
into the same port, and the converter will automatically reconnect with the host and continue to transfer data.
This feature not only eliminates the need for reconfiguration, but it also reduces the probability of data loss.
Package Checklist
The following items are included in your UPort 1110/1130/1130I/1150 package:
• UPort 1100 Series USB-to-serial converter
• Documentation and software CD
• Quick installation guide (printed)
• Warranty card
The UPort 1130/1130I/1150 also come with the following item:
• 1 serial adapter: Mini DB9F-to-TB
The following items are included in your UPort 1150I package:
• 1 UPort 1150I USB-to-serial converter
• 1 serial adapter: Mini DB9F-to-TB
• USB cable: CBL-USBA/B-100
• Velcro lockdown strap for the USB cable
• Documentation and software CD
• Quick installation guide (printed)
• Warranty card
Please notify your sales representative if any of the above items are missing or damaged.
Page 6

UPort 1100 Series Introduction
1-3
USB Interface
Compliance:
Connector:
USB type A: UPort 1110/1130/1130I/1150
USB type B: UPort 1150I
Speed:
Serial Interface
Number of Ports:
Serial Standards:
UPort 1110: RS
UPort 1130/1130I: RS
UPort 1150
Connector:
Serial Line Protection
Op
Performance
Baudrate:
Serial Communication Parameters
Data Bits:
Stop Bits:
Parity:
Flow Control:
FIFO:
Serial Signals
RS
RS
RS
RS
RS
Operating Systems
Windows Real COM Drivers
Android Driver
Linux Real TTY Drivers
Note: Please refer to Moxa’s website for the latest driver support information.
Product Features
The UPort converter has the following f eatures:
• Full-speed USB operation at up to 12 Mbps
• Additional I/O or IRQ not required
• Serial transmission speed up to 921.6 kbps
• 64-byte FIFO and built-in hardware and software flow control
• Support for RS-422, 2-wire RS-485, and 4-wire RS-485 (UPort 1130/1130I/1150/1150I)
• Terminal block adapter (UPort 1130/ 1130I/1150/1150I)
• 2 kV Optical isolation protection (UPort 1130I/1150I only)
Product Specifications
USB 1.0/1.1 compliant, USB 2.0 compatible
12 Mbps (Full-speed USB)
1
-232
-422/485
/1150I: RS-232/422/485
DB9 male
tical Isolation: 2 kV (UPort 1130I and 1150I)
50 bps to 921.6 kbps
5, 6, 7, 8
1, 1.5, 2
None, Even, Odd, Space, Mark
RTS/CTS, XON/XOFF
64 bytes
-232: TxD, RxD, RTS, CTS, DTR, DSR, DC D, GN D
-422: TxD+(B), TxD-(A), RxD+(B ), Rx D -(A ), GN D
-485-4w: TxD+(B), TxD-(A), RxD+(B), RxD-(A), GND
-485-2w: Data+(B), Data-(A), GN D
-485 Data Direction: ADDC® (Automat ic Data Dir ec ti on Con tro l )
Page 7

UPort 1100 Series Introduction
1-4
Physical Characteristics
Housing:
UPort 1110/1130/1130I/1150: ABS + PC
UPort 1150I: Metal
Weight:
P
UPort 1110/1130/1130I/1150: 60 g (0.13 lb)
UPort 1150I: 80 g (0.17 lb)
Dimensions
UPort 1110/1130/1130I/1150: 37.5 x 20.5 x 60 mm
UPort
Environmental Limits
Operating Temperature:
Storage Temperature:
Ambient Relative Humid it y:
Note: Please contact Moxa
Standards and Certifications
EMC:
EMI:
EMS:
IEC 61000
IEC 61000
IEC 61000
IEC 61000
IEC 61000
IEC 61000
Power Requirements
Power Consumption:
UPort 1110: 5 VDC, 30
UPort 1130: 5 VDC, 60 mA
UPort
UPort 1150: 5 VDC, 77 mA
UPort 1150I: 5 VDC, 260 mA
MTBF (mean time between failures)
Time:
Telcordia (Bellcore), GB
Warranty
Warranty Period:
Details:
roduct only:
(L x W x H):
1150I: 52 x 80 x 22 mm
0 to 55°C (32 to 131°F)
-20 to 70°C (-4 to 158°F)
5 to 95% (noncondensing)
if you require products guaranteed to function properly at higher altitudes.
EN 55032/24
CISPR 32, FCC Part 15B Class B
-4-2 ESD: Contact: 4 kV; Air: 8 kV
-4-3 RS: 80 MHz to 1 GHz, 3 V/m
-4-4 EFT: Power 1 kV; Signal 0.5 kV
-4-5 Surge: Power 2 kV
-4-6 CS: 150 kHz to 80 MHz, 3 V/m
-4-8 PFMF
mA
1130I: 5 VDC, 65 mA
1,949,025 hrs
5 years
See www.moxa.com/warranty
Page 8
UPort 1100 Series Introduction
1-5
LED Indicators
UPort 1110/1130/1130I/1150 LED description:
Name Color Description
Active Red This LED indicates normal operation.
Steady: The UPort is operational.
Off: A fault condition exists: there may b e a problem with the converter, the
driver installation, or PC configuration.
TxD Green Blinking: Serial device i s tr ansmitting data.
RxD Yellow Blinking: Serial device is receiv ing d a ta.
UPort 1150I LED description:
Name Color Description
Active Red Steady: The UPort is operational.
Off: A fault condition exists: there may be a problem with the converter, the
driver installation, or PC configuration.
TxD Green Blinking: Serial device i s tr ansmitting data.
RxD Yellow Blinking: Serial device is receiv ing d a ta.
DTR, DSR,
RTS, CTS,
DCD
Red Steady: Require these signals to operate.
Off: Disable these signals to opera te.
Page 9
UPort 1100 Series Introduction
1-6
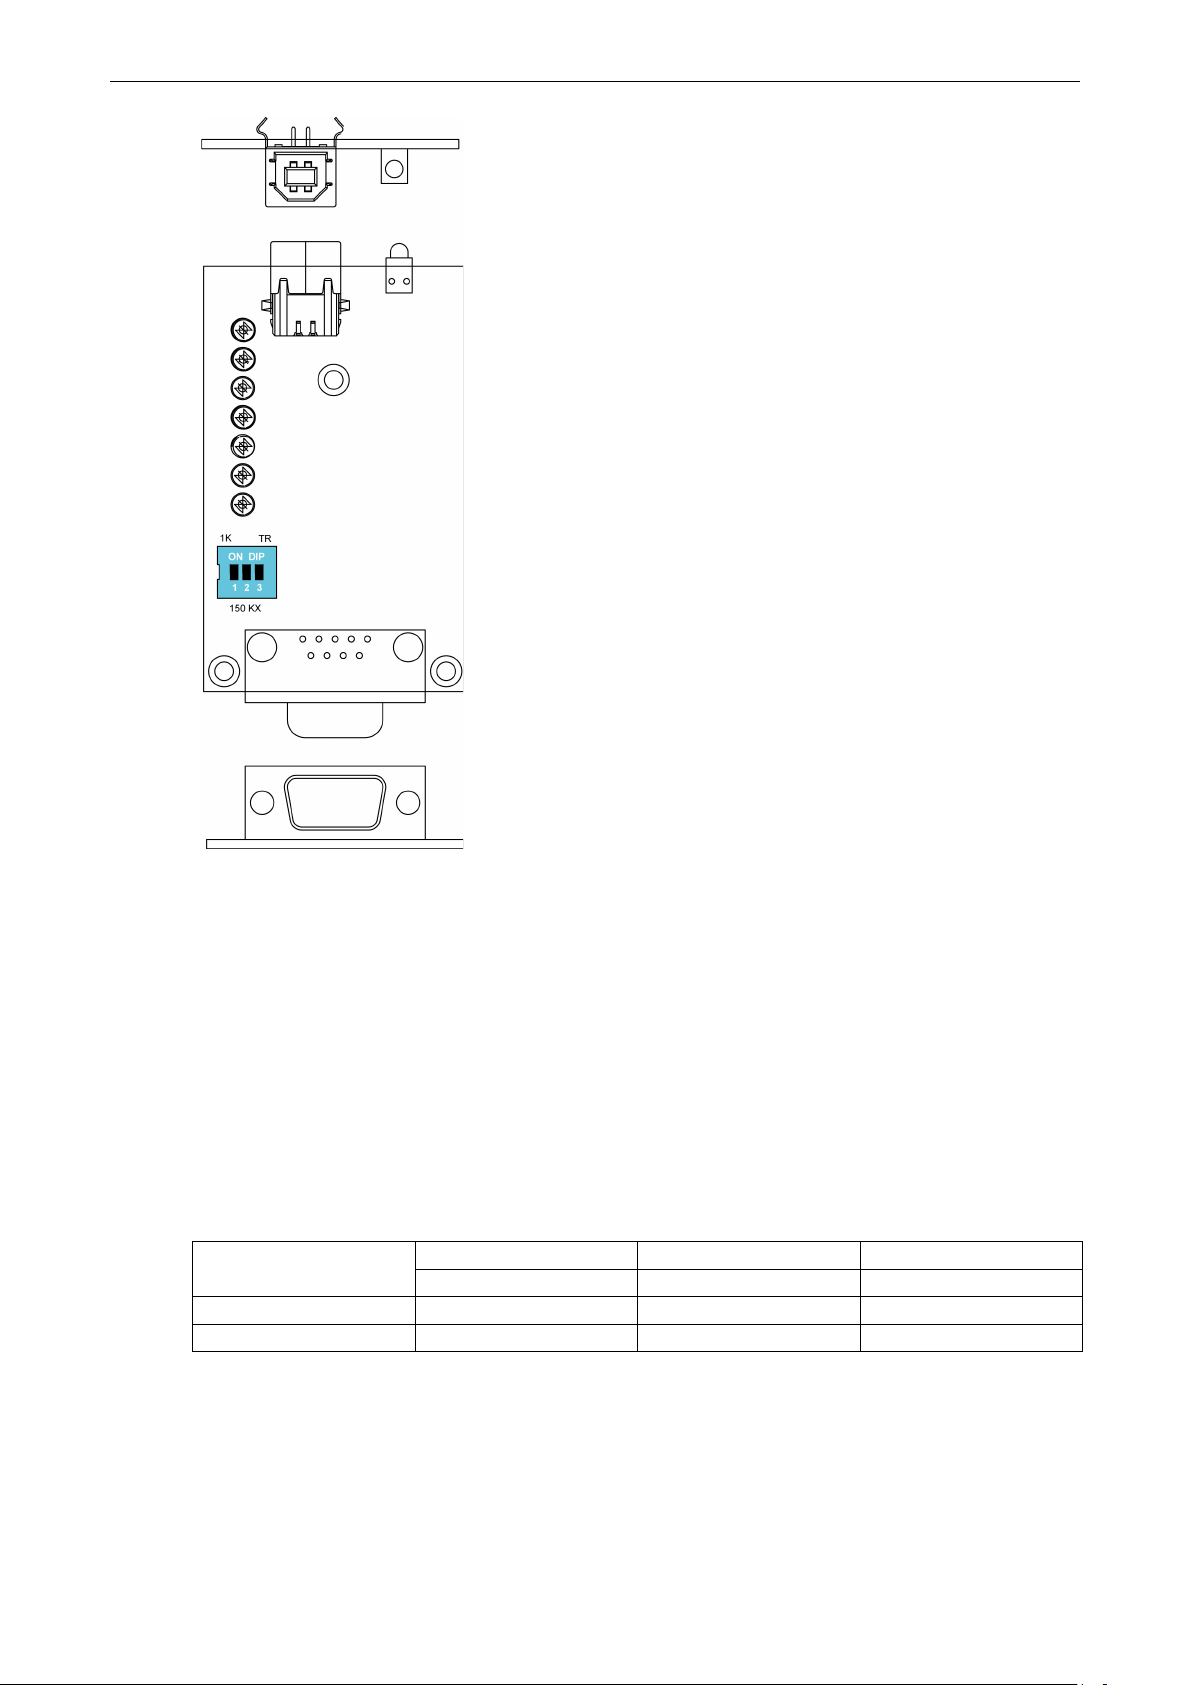
Adjustable Pull High/Low, Terminator Resistors for th e RS-485 Port
In some critical environments, you may need to add termination resistors to prevent the reflection of serial
signals. When using termination resistors, it is important to set the pull high/low resistors correctly so that the
electrical signal is not corrupted. The UPort uses DIP switches to set the pull high/low resistor values for each
serial port.
To set the pull high/low resistors to 150 kΩ, make sure both of the assigned DIP switches are in the OFF
position.
To set the pull high/low resistors to 1 kΩ, make sure both of the assigned DIP switches are in the ON
position. This is the default setting.
SW
ON 1kΩ 1kΩ 120 Ω
OFF 150 kΩ 150 kΩ Disable
1 2 3
Pull High Pull Low Terminator
Page 10

2
2. Installation and Configuration
Installation of the converter i s a simple process. First, install t h e driver; then, plug the converter into a USB
port. When the converter is plugged in, Windows will load the correct drivers for the converter and the new
COM port. In this chapter, basic in stallation and configuration procedures are explained. Although the
installation screens will be for Windows 2000, the procedures are essentially the same for Windows 98 and later
versions of Windows operating system.
The following topics are covered in this chapter:
Initial Driver Installation
Hardware Installation
Windows 98/ME and Windows 2000
Windows XP, Windows 2003/Vista, and Windows 2008 and 2012 (32-bit and 64-bit)
Configuring the COM Port
Configuring the Converter
Removing the Converter
Uninstalling the Driver
Advanced UPort 1100 Driver Functions
Enable Fixed-base COM Mode
Install Linux Driver
Linux Kernel 2.4.20 and above
Linux Kernel 2.6.x
Installing the Windows CE Driver
Installation with an installation package for Win CE 6.0
Installation with an installation package for Win CE 5.0
Removing the Moxa WinCE 5.0 / CE 6.0 Driver
Installation with a CAB File
Removing the Moxa WinCE 5.0 / CE 6.0 Driver
Page 11
UPort 1100 Series Installation and Configuration
2-2
Initial Driver Installation
The Documentation and Software CD contains the drivers for the converter. You may also download the drivers
at www.moxa.com
Use Windows Explore r to locate the driver installation file, which will be Setup or Install. O n the
Documentation and Software CD, this file will be located in the UPort 1100/Software folder, filed by
operating system. Double-click the Setup or Install file.
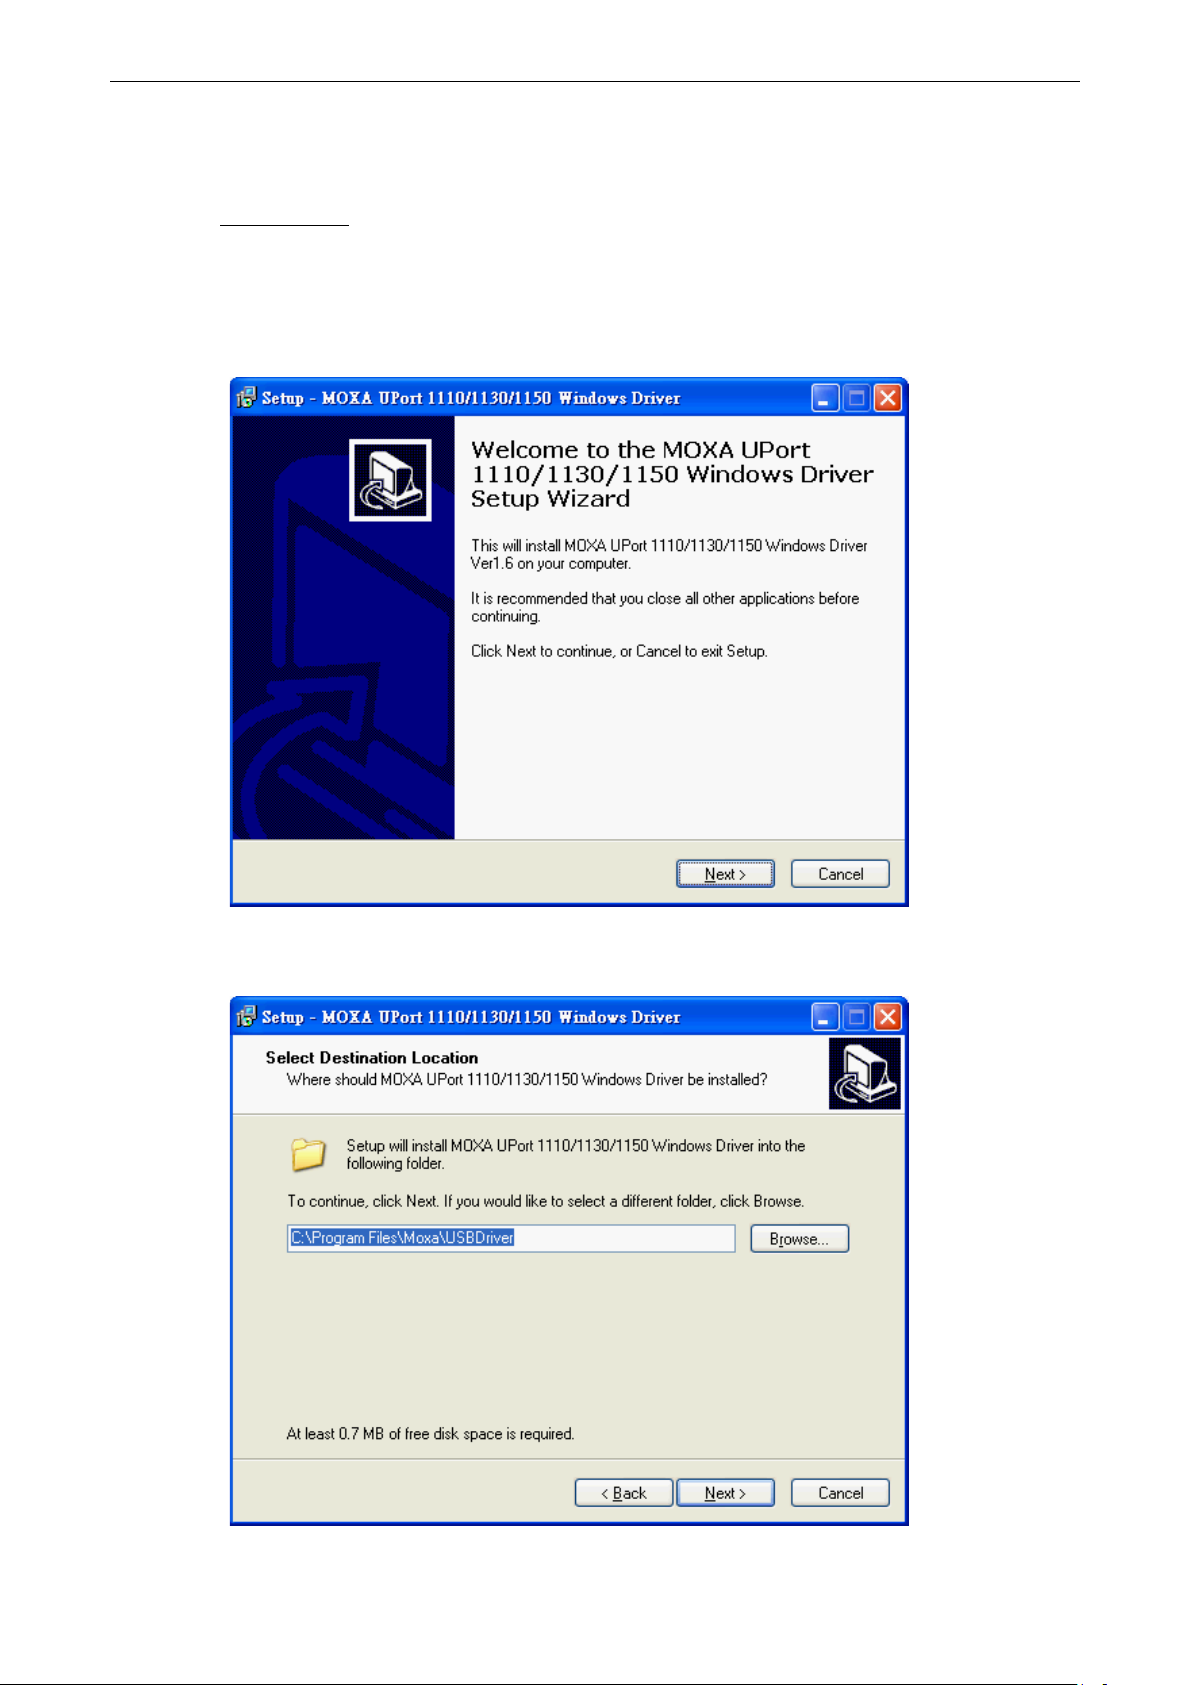
1. The Setup Wizard will open. Click Next to begin installing the driver.
. The installation pro cedure is the same for all Window s operating systems.
2. Click Next to install the driver in the indicated folder, or use the drop-down folder list to locate a different
folder.
Page 12
UPort 1100 Series Installation and Configuration
2-3
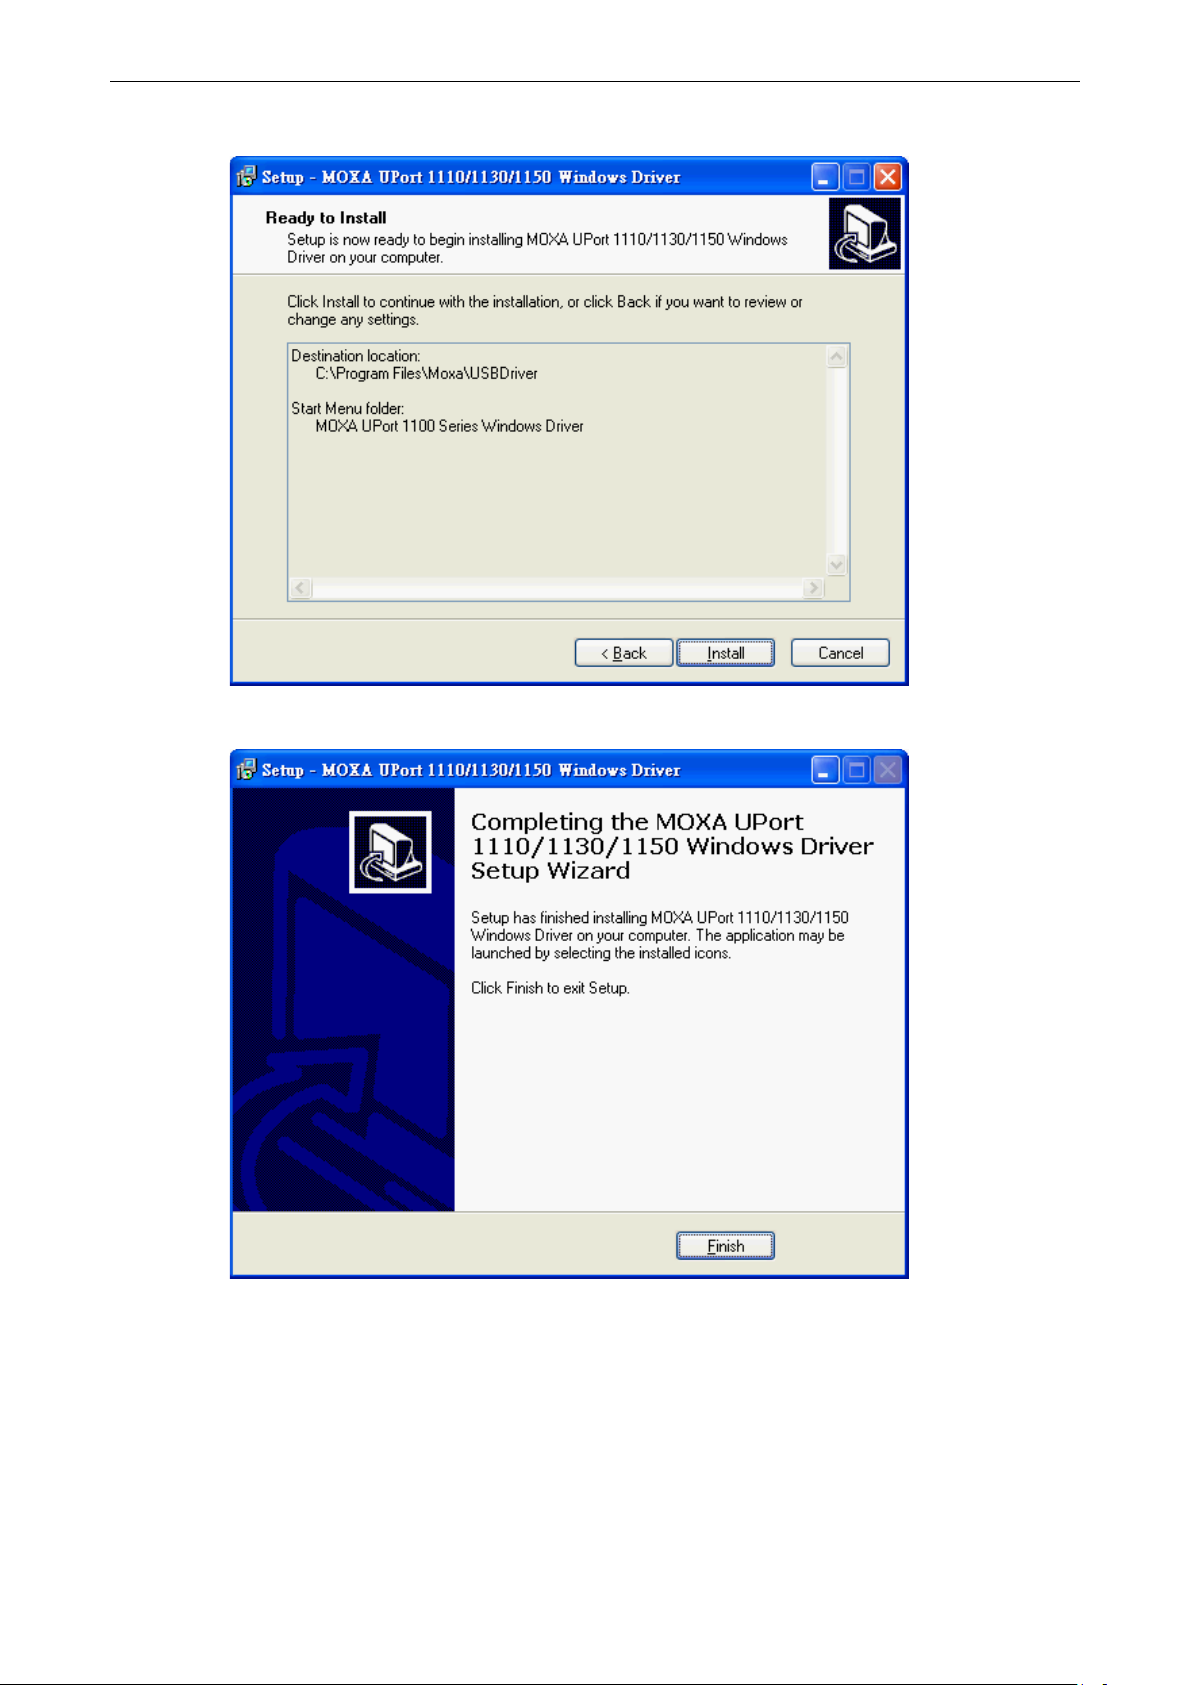
3. Click Install to proceed with th e installation.
4. Click Finish to complete the installation of the driver.
Page 13
UPort 1100 Series Installation and Configuration
2-4
ATTENTION
For best results, we recommend that you install the driver before pluggin g the converter into the USB port.
Please refer to the previous section on Initial Driver Installation for instructions.
Hardware Installation
After installing the driver, plug the converter into any upstream USB port, such as a USB port on your computer.
Windows will automatically detect the converter and begin installing the driver. When Windows finishes
installing the driver for the converter, it will detect a ne w COM port an d will then inst all another dri ver for t he
new COM port.
Windows 98/ME and Windows 2000
The following instructions are for Windows 98 and Windows 2000 systems:
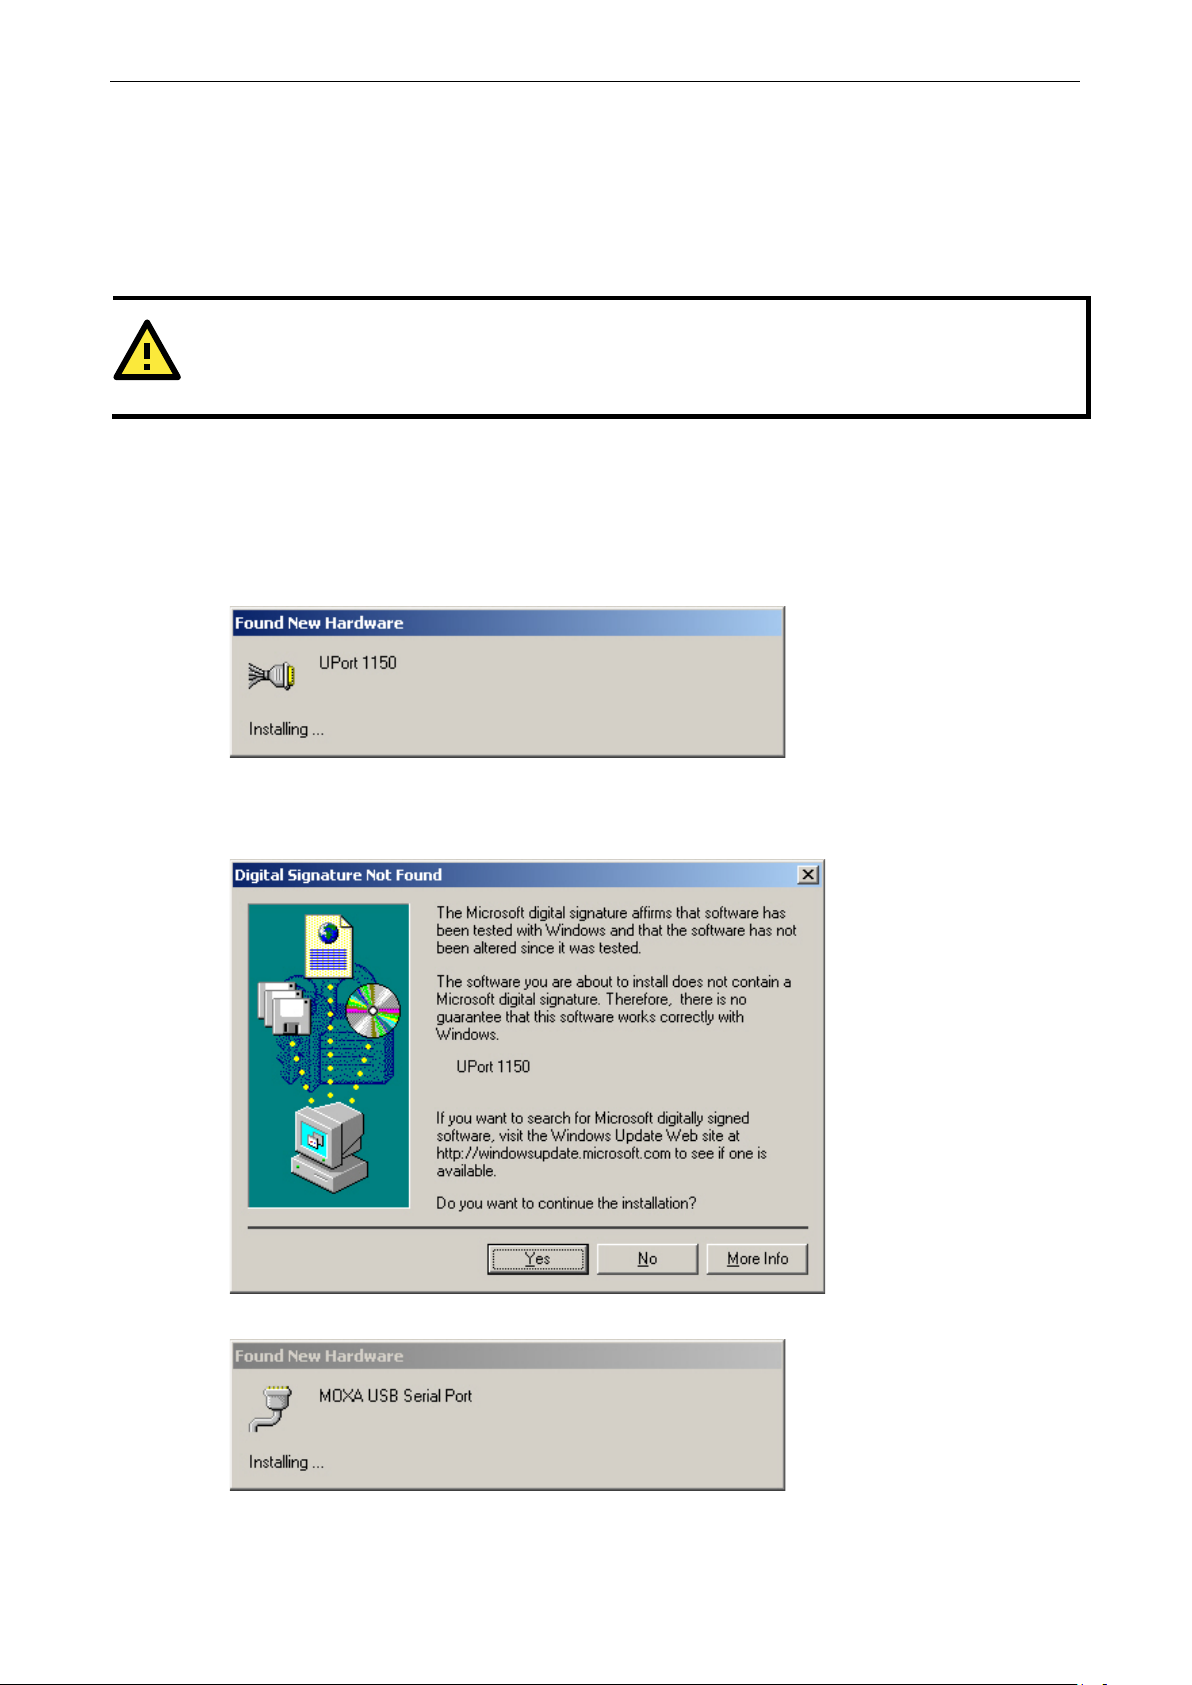
1. After plugging the converter into a USB port, the Found New Hardware window should open
automatically. The USB icon indicates th at the USB port is being installed. No action is required.
2. Windows 98 users may skip to the next step. On Windows 2000 systems, a window will pop up cautioning
you that this software has not passed Windows logo testing. This is a standard warning, and Moxa has
thoroughly tested the driver for safe Windows operation. Please click Yes to proceed.
3. Windows will automatically detect and install the new serial port. No further action is required
Page 14

UPort 1100 Series Installation and Configuration
2-5
Windows XP, Windows 2003/Vista, and Windows 2008 and 2012 (32-bit and 64-bit)
Case 1: The UPort Driver is Certified
If the UPort driver that you installed has been certified by M icrosoft, the UPort and the UPort’s se rial ports will
be installed automatically when you plug the UPort into your computer’s USB port.
Case 2: The UPort Driver is NOT Certified
If the UPort driver that you installed has not been certified by Microsoft, then plugging the driver into your
computer’s USB port will activate the UPort installation program. The first part of the installation procedure
installs the software for the UPort itself; the second part of the procedure installs the serial ports.
The following instructions are for Windows XP, Windows 2003/Vista, Windows 2008, and Windows 2012
systems.
1. After plugging the converter into a USB port, Windows will automatically detect the new device. The Found
New Hardware speech balloon will appear in the bottom right corner of the Windows desktop. No action
is required yet.
2. After a moment, the Found New Hardware Wizard will open. If you see the following screen, select No, not
this time, then click Next.
Page 15

UPort 1100 Series Installation and Configuration
2-6
3. On the next window that appears, select Install the software automatically (Recommended); then
click Next.
4. The installation wizard will search for the correct drivers. After a moment, a window will pop up cautioning
you that this software has not passed Windows logo testing. This is a standard warning, and Moxa has
thoroughly tested the driver for sa f e Windows operation. Please click Continue Anyway to proceed.
5. Windows will take a few moments installing the UPort d river.
Page 16

UPort 1100 Series Installation and Configuration
2-7
6. The next window indicates that Windows has completed the installation. Cli ck Finish to continue with
installation procedu re.
7. After Win dow s has co mp leted insta ll ing the c on verter, it will automatically detect the new COM port. The
Found New Hardware speech balloon will appear in the bottom right corner of the Windows desktop.
8. The Found New Hardware Wizard will open. If you see the following screen, select No, not this time, then
click Next.
Page 17

UPort 1100 Series Installation and Configuration
2-8
9. After a moment, the Found New Hardware Wizard will open. Select Install the software automatically
(Recommended), then click Next.
10. The installation wizard will search for the correct drivers. After a moment, a window will pop up cautioning
you that this software has not passed Windows logo testing. This is a standard warning, and Moxa has
thoroughly tested the driver for safe Windows operation. Please click Continue Anyway to proceed.
Page 18

UPort 1100 Series Installation and Configuration
2-9
11. Windows will take a few moments installing the driver.
12. The next window indicates that Windows ha s completed the installation. Click Finish to proceed with
installation procedu re.
13. The Found New Hardware speech balloon will reappear, indicating that the installation was successful.
Page 19

UPort 1100 Series Installation and Configuration
2-10
Configuring the COM Port
After the driver and hardware have been successfully installed, the new COM port will have a COM number and
can be accessed and controlled just like your PC’s built-in COM ports. If you need to change the baudrate, parity,
or other COM port settings, you may use your serial communication application to make those changes. You
may also go to Device Manager and right-click the MOXA USB Serial Port, which will be listed under Ports
along with your PC’s built-in COM ports. In the context menu that pops up, you may select Properties in order
to modify the COM port settings.
Page 20

UPort 1100 Series Installation and Configuration
2-11
Configuring the Converter
If you need to change the COM number that the converter assigns to the COM port, or adjust other advanced
settings, you may go to Device Manager and right-click the UPort converter, which w ill be listed under
Multi-port serial adapters. In the context menu that pops up, you may select Properties in order to modify
the COM port settings.
In the Port Configuration tab, you will see the new COM port listed. Click Port Setting to modify the COM
number and other parameters.
Page 21

UPort 1100 Series Installation and Configuration
2-12
ATTENTION
Before modifying these settings, make sure that you have closed any applications that may be accessing the
COM port, such as HyperTerminal.
You may change the Port Number and enable or disable the Fast Flush function. For the UPort 1130/1130I, you
may also select between RS-422, 2-wire RS -485 and 4-wire RS-485 modes. Please note that Auto
Enumerating COM Number and Set the change to all ports are not available for this model of UPort.
* The UPort 1100 only supp orts RS-232. For this reason, when using the UPort 1100, the Interface drop-down
box will be inactive.
*The UPort 1150/1150I support RS-232, RS-422, 2-wire RS-485, and 4-wire RS-485. The default setting is
RS-232.
The Fast Flush function is specifically designed to handle Win32 PurgeComm() function calls and is enabled by
default. When Fast Flush is enabled, the d river will automatically clear the local buffer when it receives a
PurgeComm() command. When Fast Flush is disabled, the driver will r epeatedly query the converter unti l it
verifies that there is no more data in the buffer. Disabling this function can cause lower throughput for
applications that use PurgeComm() heavily.
Page 22

UPort 1100 Series Installation and Configuration
2-13
Removing the Converter
The converter is a plug-and play-device. No special procedures are required to remove the converter; you may
simply pull the converter out of the USB port. You should verify that no data is being transmitted before
removing the converter.
Removing the converter does not remove the drivers. The drivers remain in place so that the converter can be
automatically detect ed and i nstalled if it is plugged back into the USB port.
The converter can also be uninstalled through the Device Manager, the sa me as other Windows devices.
Right-click the converter, which will be found under Multi-port serial adaptors; then, select Uninstall from
the context menu.
Page 23

UPort 1100 Series Installation and Configuration
2-14
Uninstalling the Driver
The UPort driver may be removed through Add/Remove Programs in the Windows Control Panel. Click Remove
next to MOXA UPort 1110/1130/1150 Windows Driver Verx.x.
Page 24

UPort 1100 Series Installation and Configuration
2-15
Advanced UPort 1100 Driver Functions
The utilities of Moxa’s UPort 1100 Series give users a convenient tool for configuring and maintaining UPort
series products. In this section, we introduce the “Fixed-base COM Mode” function that enables users to set
COM names on the host PC.
Enable Fixed-base COM Mode
Moxa’s UPort 1100 series provides the unique Fixed-base COM function that allows users to set a specific
beginning COM port number. Regardless of which UPort is plugged into the host, the COM port numbers for the
UPort’s serial ports will be numbered sequentially—starting with the initial COM port number.
To use “Fixed-base COM Mode,” be sure to check the “Enable Fixed-base COM Mode” check box. Note the
default setting for “Fixed-base COM Mode” is set at disable.
The COM numbers are assigned sequentially and are not tied to a specific UPort device or USB port number. For
example, let’s assume that you’ve set COM1 as the first COM number that will be assigned. If a UPort 1150 is
plugged into your computer’s USB port 1, your computer assigns COM1 to the UPort’s serial port. When the
UPort 1150 is plugged into USB port 2, the computer still assigns COM1 to the UPort’s serial port.
When “Fixed-base COM Mode” is enabled for the first time, all the COM port numbers and serial port
parameters will reset to their default values. You can then set the COM numbers and configuration parameters
to the values needed for your application(s). Note: If you subs equently disable “Fixed-base COM Mode,” all the
parameters will be restored to their original settings.
Page 25

UPort 1100 Series Installation and Configuration
2-16
Install Linux Driver
Linux Kernel 2.4.20 and above
The Linux driver for the Moxa UPort 1000 Series converters will map Linux host ttyUSBxx ports to UP ort device
ports. Once the mapping has been set up, Linux users and applications can connect to a device port as if it were
a ttyUSBxx port. These drivers have been designed and tested for the majority of Linux distributions, including
Linux kernel version 2.4.20 and ab ove. Please check Moxa’s website (h ttp://www.moxa.com) for the latest
Linux kernel support.
The Linux drivers support the following models:
• UPort 1110: 1-port RS-232 USB-to-Serial Converter.
• UPort 1130: 1-port RS-422/485 USB-to-Serial Converter.
• UPort 1130I: 1-port RS-422/485 USB-to-serial converter with isolation p rotection.
• UPort 1150: 1-port RS-232/422/485 USB-to-Serial Converter.
• UPort 1150I: 1-port RS-232/422/485 USB-to-Serial Converter with isolation protection.
In this section, we provide four procedures to introduce the Moxa Linux Driver.
1. Installing the Linux Driv e r File
2. Loading/Unloading the Moxa Driver
3. Setting the Serial Parameters
4. Removing the Moxa Linux Driver
Installing the Linux Driver Files
Obtain the driver file from the Document and Software CD, or from the Moxa website at
http://www.moxa.com
To install and load the Linux drivers, enter the following commands from the Linux prompt:
# mount /dev/cdrom/ mnt
# cd /
# mkdir moxa
# cd /moxa
# cp /mnt/<driver directory>/driv_linux2.4_uport1p_vx.x_build_yymmddhh.tgz/moxa
# tar -xvfz driv_linux2.4_uport1p_vx.x_build_yymmddhh.tgz
# cd /mxu1100_24/driver
# make clean
# make install
*Note: yy = year, mm = month, dd = day, hh = hour
.
Loading the Moxa Driver
After installing the driver, you can load the Moxa driver. The drive r will be loaded automatically when the UPort
1100 is plugged into your PC, or you can load the driver manually.
# modprobe mxuport1100_24
You can verify that the driver has loaded by entering the following command:
# lsmod
For additional information, please refer to readme.txt in the mxuport1100_24 directory.
Page 26

UPort 1100 Series Installation and Configuration
2-17
Unloading the Moxa Driver
The driver will not be unloaded when you remove the MOXA UPort 1100 from the PC. The Moxa driver must be
unloaded manually.
#rmmod mxuport1100_24
You can verify that the driver has loaded by entering the following command:
# lsmod
For additional information, please refer to readme.txt in the mxuport1100_24 directory.
Setting the Serial Parameters
The UPort 1130 supports three interfaces (RS-485 2W, RS-485 4W, RS-422); the UPort 1150/1150I support
four interfaces (RS-232, RS-485 2W, RS-485 4W, RS -422). You can execute the setserial command to set the
port’s interface. The supported parameters are listed below.
Parameter Value Interface
port 0 RS-232
port 1 RS-485 2W
port 2 RS-422
port 3 RS-485 4W
Example:
To set the port’s information, type:
# setserial /dev/ttyUSB0 port 1
To retrieve the port's information, type:
# setserial -G /dev/ttyUSB0
Removing the Moxa Driver and Utility Files
To remove the Moxa files, navigate to /moxa/mxuport1100_24, and then type:
#make clean;
Both the driver and uti lity files will be remo ved.
Linux Kernel 2.6.x
The Linux driver provide d with the UPort 1100 maps Linux host ttyUSBxx ports to UPort device ports. Once the
mapping has been set up, Linux users and applications can connect to a device port as if it were a ttyUSBxx port.
These drivers have been designed and tested for the majority of Linux distributions, including Linux kernel
version 2.6.x and higher versions. Please check Moxa’s website (http://www.moxa.com.
kernel support.
) for the latest Linux
The Linux drivers support the following models:
• UPort 1110: 1-port RS-232 USB-to-Serial Converter.
• UPort 1130: 1-port RS-422/485 USB-to-Serial Converter.
• UPort 1130I: 1-port RS-422/485 USB-to-Serial Converter with isolation Protection.
• UPort 1150: 1-port RS-232/422/485 USB-to-Serial Converter.
• UPort 1150I: 1-port RS-232/422/485 USB-to-Serial Converter with isolation protection.
Page 27

UPort 1100 Series Installation and Configuration
2-18
In this section, we provide four procedures to introduce the Moxa Linux Driver.
1. Installing Linux Driver File
2. Loading/Unloading the Moxa Driver
3. Setting the Serial Parameters
4. Removing the Moxa Linux Driver
Installing Linux Driver Files
Obtain the driver file from the Document and Software CD, or from the Moxa website at
http://www.moxa.com.
To install and load the Linux drivers, enter the following commands from the Linux prompt:
# mount /dev/cdrom/ mnt
# cd /
# mkdir moxa
# cd /moxa
# cp /mnt/<driver directory>/driv_linux2.6_uport1p_v1.1_build_xx.tgz/moxa
# tar -xvfz driv_linux2.6_uport1p_v1.1_build_xx.tgz
# tar -xvfz driv_linux2.6_uport1p_v1.1_build_xx.tgz
# cd / mxu11x0/driver
# make clean
# make install
Loading the Moxa Driver
After installing the driver, you will be able to load t he Moxa driver. The driver will be loaded autom atically when
the UPort 1100 is plugged into your PC, or you can load the driver manually by typing the following command:
# modprobe mxu11x0
You can verify that the driver has loaded by entering the following command:
# lsmod
For additional information, please refer to readme.txt in the mxu11x0 directory.
Unloading the Moxa Driver
The driver will not be unloaded when you remove the UPort 1100 from the PC. The Moxa driver must be
unloaded manually.
#rmmod mxu11x0
You can verify that the driver has loaded by entering the following command:
# lsmod
For additional information, please refer to readme.txt in the mxu11x0directory.
Page 28

UPort 1100 Series Installation and Configuration
2-19
Setting the Serial Parameters
The UPort 1130/1130I supports three interfaces (RS-485 2W, RS-485 4W, RS-422);the UPort 1150/1150I
supports four interfaces (RS-232, RS-485 2W, RS-485 4W, RS-422). If you want to switch to a different
interface, execute the setserial command to set the port's interface. The suppor ted parameters are listed
below.
Parameter Value Interface
port 0 RS-232
port 1 RS-485 2W
port 2 RS-422
port 3 RS-485 4W
For example:
To set the port’s information type:
# setserial /dev/ttyUSB0 port 1
To retrieve the port's information type:
# setserial -G /dev/ttyUSB0
Removing the Moxa Driver and Utility Files
To remove the Moxa files, navigate to /moxa/mxu11x0 and then execute:
#make clean;
Both the driver and utility files will be removed .
Installing the Windows CE Driver
In this section, the driver installation procedures for installing Windows CE 5.0 and Windows CE 6.0 driver are
described. Both WinCE 5.0 and WinCE 6.0 require the installation of WinCE 6.0 platform builder. In addition,
you will also need to install Visual Studio 2005 if you are using WinCE 6.0. WinCE 6.0 platform builder has all
the necessary tools to help you to design, create, build, test, and debug a Windows CE. WinCE 6.0 platform
Builder, together with Visual Studio 2005, provides a workspace where you can work on OS designs and
projects to build your own embedded system.
With WinCE 6.0, you need to install Visual Studio 2005 & WinCE 6.0 Builder first. When installing Visual Studio
2005, you can select the language with .NET Framework SDK or use the “default.”
After you’ve installed VS 2005; run WinCE 6.0 Builder “setup.exe” to install and download the files. You need
to select “x86” for the WinCE 6.0 operating system. Note that this process will take a couple of hours as the
folder size is around 3GB.
The Win CE drivers support the following models:
UPort 1110: 1-port RS-232 USB-to-Serial Converter.
UPort 1130: 1-port RS-422/485 USB-to-Serial Converter.
UPort 1150: 1-port RS-232/422/485 USB-to-Serial Converter.
UPort 1150I: 1-port RS-232/422/485 USB-to-Serial Converter with isolation protection.
UPort 1130I: 1-port RS-422/485 USB-to-serial converter with isolation protection.
Follow “Installing Visual Studio 2005” to install the UPort 1100 Series WinCE 6.0 driver.
Page 29

UPort 1100 Series Installation and Configuration
2-20
Installation with an installation package for Win CE 6.0
Installation procedure
Copy the UPort 1100 WinCE 6.0 driver package onto your computer and extract. Double-click on the installation
package, and it will automatically copy the Mxser folder to
C:\ MOXAUP1100\wince600\U1100.
1. Launch Vi sual Studio 2005 with Platform Builder WinCE6.0 . Open the OSDesign that you want to install.
In Visual Studio 2005, click File New Project and select “Platform Builder for CE 6.0”. Select “OS
Design” for the template then click OK.
Page 30

UPort 1100 Series Installation and Configuration
2-21
2. The WinCE 6.0 OS Design Wizard will start, click “Next” to continue. In the “Board Support Packages” page,
select the “CEPC: x86.” Click “Next.”
Page 31

UPort 1100 Series Installation and Configuration
2-22
3. Under Design Templates and Design Template Variants, select your environment, such as PDA Device or
Mobile Handheld, and then click Next. In Application & Media and Networking & Communication, also select
your environment, such as .NET Compact Framework 2.0, ActiveSync, Quarter VGA Resources-Portrait
Mode, or TCP/IPv6 Support.
Page 32

UPort 1100 Series Installation and Configuration
2-23
Page 33

UPort 1100 Series Installation and Configuration
2-24
4. When the OS Design Project Wizard Complete screen appears, click Finish. A notification will pop up.
Click “Acknowledge” to finish the project.
Page 34

UPort 1100 Series Installation and Configuration
2-25
5. Open the project you created. Click Project on top of the screen; then, select Add Existing Subproject.
Switch the folder to “C:\ MOXAUP1100\wince600\U1100” and add subprojects into your OS Design. Assign
the pbpxml file to a different folder (i.e. mxu11x0.pbpxml).
6. After the subproject is added, you may configur e the “mxupce6.reg” registry file with the location
[HKEY_LOCAL_MACHINE\Drivers\USB\ClientDrivers\MXU_11x0].
Page 35

UPort 1100 Series Installation and Configuration
2-26
7. Open “Build” and select “Advanced Build Commands” and “Build Sysgen”. Thi s operation will take
you a few minutes.
8. After building sysgen, select “Build” and “Make Run-Time Image” to create the WinCE OS image. Finally,
copy your image file to the target host.
9. Configure the interface on the target device, using the configuration tool found in “Start Programs
MOXA UP Configuration Panel\UPort Configuration Utility”.
Page 36

UPort 1100 Series Installation and Configuration
2-27
Installation with an installation package for Win CE 5.0
In this section, we show how to install the Moxa WinCE 5.0 driver on a Windows CE 5.0 operating system
directly.
1. Obtain a copy of the U Port 1110/1130/1150 WinCE 5.0 driver package and extract it to your computer.
Double-click the installation package to copy the files automatically to the UPort folder
\WINCE500\PLATFORM\ (e.g., C:\WINCE500\PLATFORM\U11x0) and import the UPort
1110/1130/1150 WinCE 5.0 driver into the Catalog.
2. Open your workspace in Platform Builder and then open “Manage Catalog Items” under View Catalog.
The UPort 1110/1130/1150 WinCE 5.0 driver is located in the “Third Party” folder.
3. Right-click on the driver “USB to Serial Adapters (Prefi x COM)” or “USB to Serial Adapters (Prefix MXU)” and
then choose “Add to OS Design.” After adding the driver, you should be able to find it in your workspace. At
this point, you can start building your operating sy stem and download it to a target.
Page 37

UPort 1100 Series Installation and Configuration
2-28
Page 38

UPort 1100 Series Installation and Configuration
2-29
Removing the Moxa WinCE 5.0 / CE 6.0 Driver
For WinCE 6.0 Driver:
1. Select driver to Remove.
2. Swit ch the folder to C:\ MOXAUP1100 \ and double-click “unins000.exe” to remove installation folder.
For WinCE 5.0 Driver:
1. In the “OSDesign_View”, delete “USB to Serial Adapters (Prefix XXX)”.
2. Remove driver from control panel.
3. Check “clean before building”
Page 39

UPort 1100 Series Installation and Configuration
2-30
Installation with a CAB File
Install the UPort 1100 series WinCE driver to target host.
1. First, install Microsoft ActiveSync on the source PC. Before running ActiveSync on the source PC, use an
RS-232 null modem cable to connect the WinCE device (CEPC) to the PC.
2. Go to the “Command Prompt” on the WinCE device and execute the repllog command. A new partnership
window will appear. Select “No” and then click on “Next.” You will see “Connected” in ActiveSync.
Page 40

UPort 1100 Series Installation and Configuration
2-31
3. Click on the “Explore” button in the ActiveSync window and then copy the UP1100_COM_v1.0_Setup.CAB
(For WinCE 6.0) or UP1100_COM_v1.1_Setup.CAB (For WinCE 5.0) file to the Mob i le /Ta r g et Device.
4. Double-click on the CAB file to start installing the UPort 1100 series WinCE driver. After installing the driver,
plug the UPort 1100 series device into the USB port of the WinCE Device. The driver will be loaded
automatically. At this point, the UPort 1100 series is ready to use.
Page 41

UPort 1100 Series Installation and Configuration
2-32
Removing the Moxa WinCE 5.0 / CE 6.0 Driver
1. Enter Con t rol Panel Remove Programs.
2. Select MOXA UPort 1110/1130/1150 Windows CE6 Driver Ver1.0
(For WinCE 6.0)
or
MOXA UPort 1110/1130/1150 Windows CE5 Driver Ver1.1
(For WinCE 5.0)
3. Click Remove.
4. Interface configuration
On the target device, go to Start Programs MOXA UP Configuration Panel\UPort Configuration
Utility to find the configuration tool.
Page 42

UPort DB9 Pin Assignments
The UPort 1100 series uses male DB9 connectors. Pin assignments are show n in the following diagram:
3
3. Pin Assignment
DB9 (male) Pin RS-232
1 DCD (in) TxD-(A) –
2 RxD (in) TxD+(B) –
3 TxD (out) RxD+(B) Data+(B)
4 DTR (out) RxD-(A) Data-(A)
5 GND GND GND
6 DSR (in) – –
7 RTS (out) – –
8 CTS (in) – –
Terminal Block Pin Assignments
The UPort 1130/1130I/1150/1150I comes with a DB9 to terminal block converter, with pin assignments as
shown below:
Terminal Block Pin
1 TxD+(B) –
2 TxD-(A) –
3 RxD+(B) Data+(B)
4 RxD-(A) Data-(A)
5 GND GND
RS-422 4-wire
RS-485
RS-422 4-wire
RS-485
2-wire RS-485
2-wire RS-485
Note that the converter maps pin 1 on the DB9 connector to pin 2 on the terminal block and pin 2 on the DB9
connector to pin 1 on the terminal block.
Page 43

EMI Notices (Class B)
Electromagnetic Compatibility Notices
This device complies with part 15 of the FCC Rules. Operation is subject to the
FCC
(U.S. Only)
IC
(Canada Only)
following two conditions:
(1) This device may not cause harmful interference, and
(2) This device must accept any interference received, including interference
that may cause undesired operation.
The Class B digital apparatus meets all requirements of the Canadian
Interference-Causing Equipment Regulation. Cet appareil numerique de la
class [*] respecte toutes les exigences du Reglement sur le materiel
brouilleur du Canada.
A
A. EMI Notices
GREEN Notices
WEEE Directive - 2002/96/EC
The symbol of the crossed-out wheeled bin indicates that at end-of-life of the
equipment separate collection is required in the EU Member States. The black
bar specifies that the appliance is put on the market after August 13, 2005.
Reference: Directive 2002/96/EC.
 Loading...