

Page 1

P/N: 1802001021022
Technical Support Contact Information
www.moxa.com/support
2021 Moxa Inc. All right s reserved.
IEC-G102-BP Series
Quick Installation Guide
Version 2.1, January 2021
*1802001021022*
Page 2

Package Checklist
The IEC-G102-BP Series, which is an industrial next-generation IPS, is
shipped with the items listed below. If any of these items are missing or
damaged, please contact your customer service representative for
assistance.
• 1 Industrial next-generation IPS
• 1 USB-C to DB9 cable
• Quick insta llation guide (printed)
• Warranty card
Features
Advanced Industrial Networking Capability
• MAC and IP addresses policy enforcement
• IPS/IDS to monitor and prevent cyberthreats
• Virtual Patch mitigates the manual effort of having to patch devices
for vulnerabilities
• Industrial Protocol Whitelisting ensures the safety of industria l
equipment
• Efficient industrial device identification and network traffic analysis
• Hardened hardware for -40 to 75°C operating temperature (T model)
- 2 -
Page 3
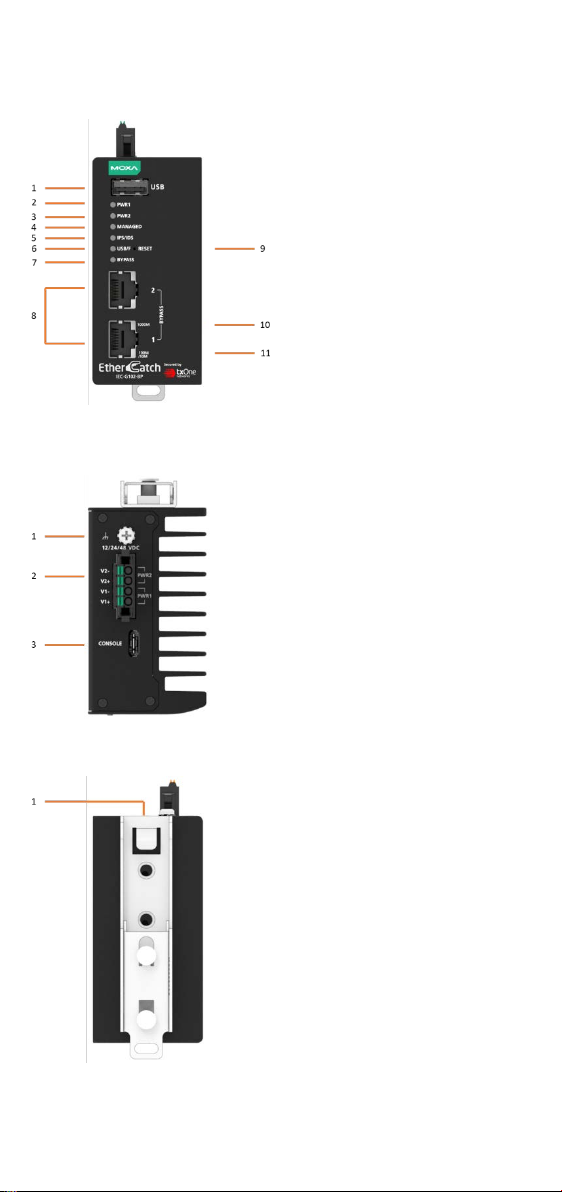
Panel Views of IEC-G102-BP Series
Front Panel
Front Panel:
MANAGED status LED indicator
10/100/1000Mbps copper port
10.
11.
Top Panel:
terminal block with latch
Rear Panel:
1. USB port for ABC-02-USB
2. Power input PWR1 LED
indicator
3. Power input PWR2 LED
indicator
Top Panel
4.
5. IPS/IDS state LED indicator
6. USB mount status and FAULT
LED indicator
7. BYPASS status LED indicator
8.
9. RESET and REBOOT button
1000Mbps copper port speed
LED indicator
10/100Mbps copper port
speed LED indicator
1. Grounding screw
2. 4-pin
for two power inputs
3. Type-C serial console port
Rear Panel
1. DIN-rail mounting kit
- 3 -
Page 4

Mounting Dimensions
STEP 1:
Insert the upper lip of the DIN-rail
kit into the mounting rail.
STEP 2
Press the
to
snaps into place.
DIN-rail Mounting
In the package, the metal DIN-rail mounting kit is fixed to the back panel
of the IEC-G102-BP Series. Mount the IEC-G102-BP Series on the
corrosion-free mounting rail that adheres to the EN 60715 standard.
Suggested Installation Method
:
IEC-G102-BP Series
wards the mounting rail until it
- 4 -
Page 5

Suggested Removal Method
STEP 1:
Pull down the latch on the DIN-rail
kit with a screwdriver.
STEP
Slightly pull the
Series
remove it from the mounting rail.
STEP 2: Mounting the IEC-G102-BP Series on the wall
requires two screws. Use the
with
wall mount plates attached, as a guide to mark the
correct locations of t
screws should be less than 6.0 mm in diameter, and
the shafts should be less than 3.5 mm in diameter, as
shown in the figure on the right.
2:
forward and lift up to
IEC-G102-BP
Wall Mounting
For some applications, you will find it convenient to mount the
IEC-G102-BP Series on the wall, as shown in the following illustrations.
STEP 1: Remove the aluminum DIN-rail attachment plate from the rear
panel of the IEC-G102-BP Series, and then attach the wall mount plates
with M3 screws, as shown in the below figure.
IEC-G102-BP Series
he 2 screws. The heads of the
- 5 -
Page 6

Wiring Requirements
WARNING
Do not disconnect
switched off or the area is known to be non
devices may only be connected to the supply voltage shown on
the type plate. The devices are designed for operation with a
Safety Extra
y may only be connected to
the supply voltage connections and to the signal contact with the
Safety Extra
EN60950-1/ VDE0805.
ATTENTION
This un it is a built
unit is in stalled in another
piece of equipment, the equipment enclosing the unit must
comply with fire enclosure regulat ion IEC 60950
(or similar regulation).
ATTENTION
Safety First!
Be sure to disconnect the power cord before installing and/or
wiring your
Calculate the maximum possible current in each power wire and
common wire. Observe all electrical codes dictating the
maximum current allowable for each wire
If the current goes above the maximum ratings, the wiring could
overheat, causing serious damage to your equipment.
WARNING
Hot Surface. Do not touch.
modules or wires unless power has been
-Low Voltage. Thus, the
-Low Voltages (SELV) in compliance with IEC950/
-in type. When the
IEC-G102-BP Series.
-hazardous. The
-1/EN60950-1
size.
Please read and follow these guidelines:
• Use separate paths to route wiring for power and devices. If power
wiring and device wiring paths must cross, make sure the wires are
perpendicular at the intersect ion point.
NOTE: Do not run signal or communications wiring and power wiring
through the same wire conduit. To avoid interference, wires with
different signal characteristics should be routed separately.
• You can use the type of signal transmitted through a wire to
determine which wires should be kept separate. The ru le of thum b is
that wiring sharing similar electrical characteristics can be bundled
together.
• You should separate input wiring from output wir ing.
• We advise that you label the wiring to all devices in the system.
• This product is intended for installation in Restricted Access Location.
- 6 -
Page 7

Grounding the IEC-G102-BP Series
ATTENTION
This product
mounting surface such as a metal panel.
Side View
STEP 1:
Use a small flat-blade screwdriver to press
a wire locker.
STEP 2:
Insert a positive/negative DC wire into the
V+/V
STEP 3:
Release the wire locker, and check
whether the wire is
Grounding and wire routing help limit the effects of noise due to
electromagnetic interference (EMI). Run the ground connection from the
ground screw (M3 type) to the grounding surface prior to connecting
devices.
is intended to be mounted to a well-grounded
Wiring the Redundant Power Inputs
The IEC-G102-BP Series has two sets of power inputs—power input 1 and
power input 2. The top and side views of the terminal block connector are
shown below.
Top View
The power cord adapter should be connected to a socket outlet with an
earthing connection. The power cord and adapter must comply with Class
II construction.
This product is intended to be supplied by a UL Listed Power Adapter or
DC power source marked ‘L.P.S’ or ‘Limited Power Source’, rated 12 to 48
VDC, 0.605 A (min.), and Tma 75°C (min.). If you require further
assistance, please contact your Moxa representative.
- terminals respectively.
fixed.
Communication Connections
Each IEC-G102-BP Series has two types of communication port:
• 1 TYPE-C console port (RS-232 interface, baudrate: 115200)
• 2 10/100/1000BaseT(X) Ethernet ports
TYPE-C Console Port Connection
The IEC-G102-BP Series provides one TYBP-C console port located the
top on panel. Please connect the Moxa EtherCatch to a PC COM port using
a TYPE-C to DB9 connection cable, and then launch a console terminal
software, e.g. Moxa PComm Terminal Emulator, to access the
IEC-G102-BP Series console configuration utility.
- 7 -
Page 8

TYPE-C to DB9 Cable Wiring
P2
2
A5
BROWN
B5
GREEN
3
A6
RED
B6
BLUE
A7
ORANGE
B7
PURPLE
A8
YELLOW
B8
GREY
8
A3
BLACK
Description
P1
P2
TXD 2 A5, B5
RXD 3 A6, B6
GND 5 A7, B7
CTS 7 A8, B8
RTS 8 A3, B3
MDI Port Pinouts
MDI-X Port Pinouts
8-pin RJ45
Pin
Signal
1
Tx+ 2 Tx- 3 Rx+ 6 Rx-
Pin
Signal
1
Rx+ 2 Rx- 3 Tx+ 6 Tx-
P1
5
7
B3
WHITE
PIN Definition
10/100/1000BaseT(X) Ethernet Port Connection
The 10/100/1000BaseT(X) ports located on the IEC-G102-BP Series front
panel are used to connect to Ethernet-enabled devices. Most users will
choose to configure these ports for Auto MDI/MDI-X mode, in which case
the port’s pinouts are adjusted automatically depending on the type of
Ethernet cable used (straight-through or cross-over), and the type of
device (NIC-type or HUB/Switch-type) connected to the port. No matter
which case you are connecting, we share pinouts for both MDI (NIC-type)
ports and MDI-X (HUB/Switch-type) ports.
10/100Base T(x) RJ45 Pinouts
- 8 -
Page 9

1000BaseT RJ45 Pinouts
Pin
MDI
MDI-X
1
BI_DA+
BI_DB+
2
BI_DA-
BI_DB-
3
BI_DB+
BI_DA+
4
BI_DC+
BI_DD+
5
BI_DC-
BI_DD-
6
BI_DB-
BI_DA-
7
BI_DD+
BI_DC+
8
BI_DD-
BI_DC-
NOTE
DO NOT power off the device when loading default settings.
LED
Color
State
Description
Power is being supplied to power input P1
on the main module.
Power is NOT being supplied to power
input P1 on the main module.
Power is being supplied to power input P2
on the main module.
input P2 on the main module.
The IEC-G102-BP Series is managed by
Security Dashboard Console.
The IEC-G102-BP Series is NOT
Console.
1. When MANAGED LED is blinking
defaults.
Intrusion Detection and Prevention
System is enabled.
Intrusion Detection and Prevention
System is d isabled.
The Reset Button
The reset button has two features:
1. Reboot system: Press and hold the reset button for between 2 and 10
seconds. The MANAGED LED will begin to blink every second, which
means the system is rebooting.
2. Reset to factory default: Press and hold the reset button for more
than 10 seconds. The MANAGED LED will begin to blink every
half-second, which means the syst em is resetting itself to factory
default.
LED Indicators
The front panel of the IEC-G102-BP Series has several LED indicators. The
function of each LED is described in the following table:
PWR1 Amber
On
Off
On
PWR2 Amber
Power is NOT being supplied to power
Off
On
Off
managed by Security Dashboard
MANAGED Green
every 1 second, the IEC-G102-BP
Series is rebooting the system.
Blinkin g
2. When the MANAGED LED is blinking
every 0.5 second, the IEC-G102-BP
Series is resetting to factory
IPS/IDS Green
On
Off
- 9 -
Page 10

LED
Color
State
Description
USB/F
On
An ABC-02-USB has been detected.
Blinkin g
USB data transmitting.
On
Hardware BYPASS is enabled.
Off
Hardware BYPASS is NOT enabled.
On
Ethernet link up.
Off
Ethernet link down.
Blinkin g
Data is being transmitted.
On
Ethernet link up.
Off
Ethernet link down.
Blinkin g
Data is being transmitted.
Input Current
0.605 A @ 12 V
0.143 A @ 48 V
Input Voltage
12/24/48 VDC, dual power input
Power Consumption
7.26 W (max.)
Operating Temperature
-10 to 60°C (14 to 140°F), standard models
models
Storage Temperature
-40 to 85°C
BYPASS Amber
1000M Green
10/100M Green
Green
RED On
Specifications
Hardware or system fault.
0.297 A @ 24 V
-40 to 75°C (-40 to 185°F), wide-temp.
- 10 -
 Loading...