

Page 1
movinglife.com
OWNER'S MANUAL
Page 2
WELCOME! 1
WELCOME TO ATTO
Page 3

2 WELCOME!
Intentionally left blank
Page 4

WELCOME! 3
WELCOME!
Welcome to MovingLife ATTO's family of users.
MovingLife mission is to produce topnotch superior quality products and services for the benefit of mobility-limited
users. Made by professionals and real users, ATTO is handed to you knowing it will become not just another scooter
but an extension of your body, part of your life. As such, we made an enormous effort to design and manufacture
each and every one of its 500 parts with great attention and care, which we hope you will be able to appreciate.
However, being human means, we are not perfect and therefore, for the benefit of both users and makers, we urge
you to contact us with any remark, idea for a change, complaint and even complements! We want to hear it all, so
please register your ATTO and give us a feedback on the appropriate form on our website.
Enjoy your ATTO!
REGISTER NOW
Please visit MovingLife website and register your ATTO product. Once
registered you will become part of the MovingLife community, receive safety
notices and recall information and will be able to enjoy news, updates, and
special benefits.
www.movinglife.com/register
Page 5

4 WELCOME!
Intentionally left blank
Page 6

TABLE OF CONTENT 5
TABLE OF CONTENT
PREFACE ............................................................................................................................................................................ 7
ABOUT THIS MANUAL ....................................................................................................................................................... 9
BACKGROUND ................................................................................................................................................................. 12
SAFETY ............................................................................................................................................................................. 14
ATTONOMY ..................................................................................................................................................................... 28
OPERATING ATTO ............................................................................................................................................................ 31
TRANSPORTING ATTO ..................................................................................................................................................... 63
TROUBLESHOOTING ........................................................................................................................................................ 65
MAINTENANCE ................................................................................................................................................................ 67
SPECIFICATIONS .............................................................................................................................................................. 73
LIMITED WARRANTY ....................................................................................................................................................... 76
CONTACT INFORMATION ................................................................................................................................................ 78
Page 7

6 TABLE OF CONTENT
Intentionally left blank
Page 8
PREFACE 7
CAUTION
specifications on which they are based are subject to
PREFACE
change without notice.
Trademarks
Important Notice
ATTO is a registered trademark of MovingLife Ltd.
This document is delivered subject to the following
conditions and restrictions:
This Owner’s Manual contains proprietary information
of MovingLife Ltd. This information is supplied solely
for the purpose of assisting authorized users of
MovingLife Ltd. products.
This manual is designed to serve as an accompanying
document to the ATTO Mobility Scooter.
Other company and brand, product and service names
are for identification purposes only and may be
trademarks or registered trademarks of their
respective holders. Data is subject to change without
notice.
This product is covered by MovingLife Ltd. patents
pending.
No part of the contents of this manual may be used
for any other purposes, disclosed to any person or
firm, or reproduced by any means, without the
express prior written permission of MovingLife Ltd.
The text and drawings in this manual are for the
purposes of illustration and reference only. The
Federal law restricts this device to sale by or on the
order of a physician.
Page 9

8 PREFACE
Indications for Use
The MovingLife ATTO Mobility Scooter is an indoor
scooter that provides transportation for a disabled or
elderly person.
The intended user of ATTO is the occupant who will
be driving it and who may be assisted by an assistant
for non-driving operations such as opening and
folding the mobility scooter.
Intended Users
A motorized three-wheeled vehicle is a batterypowered device intended for medical purposes that is
used for outside transportation by disabled persons.
The ATTO is intended for people with an injury,
physical disability, or medical condition which means
that they are unable to walk or have difficulty in
walking.
Intended users should assess eyesight, reaction time,
balance and posture, ability to sit for long periods of
time, concentration and ability to get on and off the
mobility scooter. Intended users should be able to
judge distances, recognize obstacles and hazards, and
be able to see pedestrians and other road users.
Page 10
ABOUT THIS MANUAL 9
NOTE
WARNING
CAUTION
encounter a question for which you have not found an
ABOUT THIS MANUAL
For information on opening the shipping container
and unboxing ATTO please refer to the UNBOXING
SUPPLEMENT located in the container box.
Purpose of this manual
answer, please contact a MovingLife dealer near you
or the company's technical support via our web site
www.movinglife.com
Symbols and warning
Please pay attention to all warnings and cautions in
this Owner's Manual. They are here to help you
prevent injuries and damages that may occur if you do
not read or ignore the instructions.
This Owner Manual is an essential tool for any user of
a MovingLife ATTO. The manual includes usage and
operation guidelines, warnings concerning dangers
while operating the ATTO including when changing
from the folded position to the drive position and vice
versa, while driving and during transportation of the
ATTO.
The purpose of the manual is to prepare you and get
you acquainted with the product and all its
capabilities. The manual is aimed at providing you
with all the answers to questions that may arise
during the operation and use of the ATTO. If you
The warning frame includes information concerning
your safety and warnings of possible injuries.
Caution is intended to draw your attention to a
possible risk or damage to your ATTO and other
properties.
Page 11

10 ABOUT THIS MANUAL
NOTE
WARNING
REQUIRES TOOLS
PINCH POINT
Some more general information we would like you
to consider.
In this Owner's Manual, you will also find some
additional special symbols and warning as follows:
Pinch Point warning: A pinch point warning refers
to an area where you must pay extra attention to
your fingers to be sure your fingers are not pinched
between two metal parts.
Wrench warning: If you see a warning with a
wrench and you are not a certified technician
please ignore the instructions and seek a
professional or contact MovingLife support to help
you find one.
Users and certified technicians
THIS CLAUSE CONTAIN A MUST-READ
INFORMATION CONCERNING USERS AND CERTIFIED
TECHNICIANS.
This Owner's Manual contains important information
for the safe operation and use of this product. DO
NOT use this product or any available optional
equipment without first reading and completely
understanding these instructions and any additional
instructional material supplied with this product or
optional equipment. If you are unable to understand
the warnings, cautions or instructions, contact a
healthcare professional, an authorized MovingLife
dealer or technical personnel before attempting to
use this equipment – otherwise, injury or damage
may occur.
Page 12
ABOUT THIS MANUAL 11
NOTE
ATTO users: do not service or operate this equipment
without first reading and understanding this Owner's
Manual. If you are unable to understand the
warnings, cautions, and instructions, contact
MovingLife technical support before attempting to
service or operate this equipment – otherwise injury
or damage may result. Procedures other than those
described in this manual must be performed by a
qualified technician.
MovingLife Qualified Technicians: do not service or
operate this equipment without first reading and
understanding the Owner's Manual and service
manual. If you are unable to understand the warnings,
cautions and instructions, contact MovingLife
technical support before attempting to service or
operate this equipment – otherwise, injury or damage
may result.
This Owner’s Manual is compiled from the latest
specifications and product information available at
the time of publication. We reserve the right to
make changes as they become necessary or
available. Any changes to our products may result
in slight variations between the illustrations and
explanations in this manual and the product you
have purchased.
Page 13

12 BACKGROUND
If you are using a mobility vehicle for the first time, or
BACKGROUND
MovingLife's ATTO is an advanced-technology Class A
mobility scooter, designed for use indoors and on
sidewalks. When driving on a pavement you should
follow the rules for pedestrians. You should give
pedestrians priority and show consideration for other
pavement users, particularly those with a hearing or
visual impairment who may not be aware that you are
there.
In most countries, mobility scooters may only be used
by a disabled person, or by a nondisabled person who
is demonstrating a vehicle before sale, training a
disabled user or taking the vehicle to or from a place
for maintenance or repair. A disabled person in this
context is someone with an injury, physical disability,
or medical condition which means that they are
unable to walk or have difficulty in walking.
if it has been a while since you have driven one, you
are strongly advised to get some training to ensure
that you can steer and control the vehicle properly,
especially on uneven surfaces. Your assessment
should include checking your eyesight, reaction time,
balance and posture, ability to sit for long periods of
time, concentration and ability to get on and off the
ATTO. You may also want to consider having a regular
review of your driving skills.
Although in most countries there are no legal eyesight
requirements, good vision is important for driving a
mobility vehicle safely. You should be able to judge
distances, recognize obstacles and hazards, and be
able to see pedestrians and other road users. Poor
eyesight could be a contributory factor in an accident
and could make you liable for a compensation claim.
Vision can change with age and you are
recommended to have regular sight tests.
If you are eligible to be registered as severely sight
impaired (blind), you should not drive a mobility
scooter as this would put yourself and others at risk. If
Page 14
BACKGROUND 13
NOTE
you are eligible to be registered as sight impaired
(partially sighted), you should speak to your
optometrist or doctor.
If you regularly take medication that makes you
drowsy, you should consider whether it would be safe
to use a mobility scooter. If you are in any doubt,
consult your doctor. You should not use a mobility
scooter if you have been drinking alcohol.
Laws and regulation may vary from country to
country and from state to state. Always check with
local authorities to ensure you can use your
mobility scooter and of the restrictions that apply.
Certification and Compliance
ATTO can be used on footpaths, pavements,
bridleways, and in pedestrian areas and can be used
on the road if a pavement is not available, or where it
is necessary to cross the road.
Subject to space availability and depending on local
regulations, you may be able to travel in your ATTO on
buses and trains, so long as those vehicles are
constructed or adapted to carry a mobility scooter,
and providing that your ATTO fits in.
The ATTO Mobility Scooter is designed to comply with
the following international safety requirements for
medical electrical equipment:
Safety: EN 12184 and ISO 7176-15
EMC: ISO 7176-21
Risk Management: ISO 14971
Regulatory Compliance: EEC: Annex V of 93/42/EEC
The European Medical Devices Directive of 93/42/EEC
classifies the ATTO Mobility Scooter as a Class I device
Device cleared by FDA :
K160909
Page 15
14 SAFETY
contact with the ground.
Safe
BE
BE
SAFETY
Beware of snow, ice, sleet, rain,
strong wind, sand, broken glass
and other obstacles and
Safety highlights
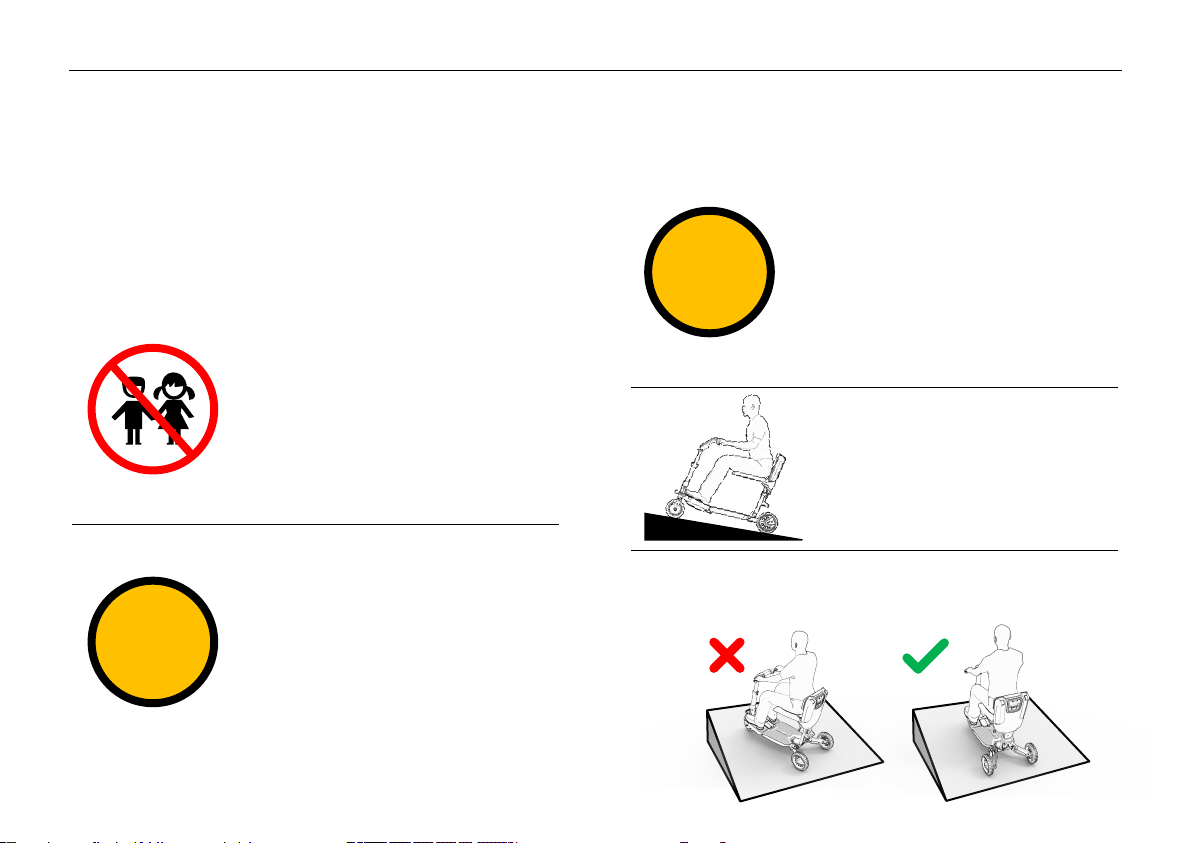
ATTO is not a toy and should not
be used by children, unless they
are the intended users who
comply with laws and regulations
and with the minimum
requirements specified in the
specification section of this
Owner's Manual.
ATTO is not intended for showoff driving or any other use other
than the intended use. This
mobility scooter must be used
only in areas intended for
pedestrians and under conditions
allowing safe use and good
Careful
Always climb or descend an incline by driving
straight up or straight down the incline.
interferences. All those and
other such irregularities are
dangerous to you and to others
and should be avoided to
prevent injury and damage.
Do not try to descend or climb an
incline with an angle greater
than recommended. See the
“Specifications” section of this
Owner's Manual.
Page 16
SAFETY 15
WARNING
CAUTION
First time users
Carefully read and follow the following safety
instructions.
FIRST TIME USER – Do not operate your ATTO for
the first time before reading and completely
understanding this Owner's Manual.
Safety and usage instructions
DISCLAIMER: MovingLife Ltd. is not and cannot be
held responsible for any damage or injury incurred
due to improper or unsafe use of the MovingLife's
ATTO. MovingLife Ltd. specifically disclaims
responsibility for any bodily injury or property
damage that may occur during any use that does not
comply with applicable federal, state, or local laws or
ordinances.
• Do not use this product or any available optional
equipment without first reading and completely
understanding these instructions. If you are
unable to understand the warnings, cautions or
instructions, contact a healthcare professional, an
authorized MovingLife dealer or MovingLife
technical support before attempting to use this
equipment, otherwise, injury or damage may
occur.
• There are certain situations, including some
medical conditions, where the ATTO user will
have to practice operating the ATTO in the
presence of a trained attendant. A trained
attendant can be defined as a family member or
care professional especially trained in assisting an
ATTO user in various daily living activities. Consult
with your physician if you are taking any
medication that may affect your ability to operate
your ATTO safely.
• If you feel uncomfortable with your new ATTO or
do not understand the instructions presented in
Page 17

16 SAFETY
this Owner's Manual, or if, for any reason, you do
not feel capable of performing the activities
necessary to open, fold, assemble, disassemble,
operate, or maintain your ATTO, please contact
the authorized MovingLife dealer you purchased
this ATTO from or contact MovingLife technical
support at the number showed on page 79.
General
• Always turn the power off when the unit is not in
use.
• Always make sure your seat is locked in fully
opened position before driving your ATTO.
• Always remain properly seated when operating
your ATTO.
• Use caution when driving on soft or uneven
surfaces such as grass and gravel.
• Use caution on decks where there is no railing.
• Turning too sharply around a corner can cause the
ATTO to tip over. Avoid this danger at all times by
steering a wide arc around corners and obstacles.
To avoid the risk of tipping over, reduce speed
before negotiating any turns.
• For emergency stop, press the On/Off button.
• Never attempt to drive over or off obstacles
higher than 20 mm (3/4”) when driving forward
and 18 mm (45/64”) when driving in reverse. This
could be unsafe and could damage the ATTO.
• Avoid turning off the power while the ATTO is
moving. Doing so will cause the ATTO to come to
an abrupt stop.
• Avoid reaching or bending while driving your
ATTO. Bending forward creates the risk of
accidental throttle lever contact. Bending
sideways while seated creates the risk of tipping
over. It is important to maintain a stable center of
gravity and keep the ATTO from tipping.
Driving in public
• Do not ride your ATTO in traffic, on public streets
and roadways.
• Be aware that it may be difficult for traffic to see
you when you are seated on the ATTO. Obey all
Page 18

SAFETY 17
local pedestrian traffic rules. Wait until your path
is clear of traffic, and then proceed with extreme
caution.
• If the power button is switched off while driving
on horizontal level plan at maximum speed
(Limited by software) of 6.4 km/h (4 mph), it will
come to a stop with a maximum stopping distance
of 1.1 m (about 4 ft). Please consider this distance
when driving.
• Do not attempt to use your ATTO on stairs or
escalators. Always use an elevator.
• Do not operate your ATTO where you could not
safely or legally walk.
• Never operate your ATTO near steps or curbs
where you might accidentally drop a wheel of the
edge.
• Enter narrow driving paths/doorways slowly and
with caution and always look out for additional
obstacles such as car mirrors or door knobs.
Sharp turns
• Avoid sudden starts while the handlebar is turned
sharply.
• Do not make a sharp turn or a sudden stop while
riding your ATTO.
• Always reduce your speed and maintain a stable
center of gravity when cornering sharply. Do not
corner sharply when driving at higher speeds.
• Always reduce the speed of your ATTO when
making turns.
Driving angles
• Do not attempt to climb ramps, slopes, curbs, or
any low-rise slope with an angle greater than the
limits specified on the Technical Specification.
• When climbing an incline, do not drive at an angle
to the incline. Drive your ATTO straight up the
incline. This greatly reduces the risk of tipping
over or falling.
• For maximum stability, lean forward on your seat
while proceeding up ramps, slopes, curbs, or any
low rise.
Page 19

18 SAFETY
• Drive with caution when attempting to negotiate
any incline, even handicap access ramps.
• Do not traverse or drive across the face of a slope.
• Do not attempt to negotiate an incline that is
covered with snow, ice, cut or wet grass, leaves,
or any other potentially hazardous material.
• Try to keep your ATTO moving when climbing an
incline. If you do come to a stop, restart and
accelerate slowly and carefully.
• While you are driving down a slope, if your ATTO
starts to move faster than you feel is safe, release
the thumb lever and allow your ATTO to come to
a stop. When you feel that you have gained
control of your ATTO again, press the thumb lever
and continue safely down the remainder of the
slope.
• Do not place your ATTO in freewheel mode when
on an incline or decline.
• Never park on inclines or declines.
• If you must stop on an incline, always lean
forward to shift the center of gravity and prevent
the ATTO from tipping over backwards.
Reversing
• Make sure that there are no obstacles behind you
while reversing your ATTO.
• Do not attempt to have your ATTO move
backward down any step, curb or other obstacle.
This may cause the ATTO to fall or tip over.
Arms and legs
• When getting on or off your ATTO, do not put
most or all of your weight on the edge of the
deck. Doing so may cause the ATTO to tip over.
• Do not leave your hands and legs off the ATTO
when driving.
• Keep your hands and legs away from the wheels
while driving the ATTO. Be aware that loose fitting
clothing may get caught in moving parts.
• Always keep your legs on the feet pads while you
are seated on your ATTO.
Page 20

SAFETY 19
Weather
• Do not operate or store your ATTO where it will
be exposed to rain, snow, mist, and below
freezing temperatures.
• Do not operate your ATTO during stormy weather
to reduces the risk of an accident or possible
damage to the ATTO
• Operating in rain, snow, salt, mist conditions and
on icy or slippery surfaces may have an adverse
effect on the electrical system.
• The temperature of ATTO surfaces that can come
into direct contact with the driver and/or
assistant’s skin during normal use and which are
within the driver reach shall not exceed 41
motor surface can reach temperatures greater
than 41
when folding or unfolding the ATTO or wait until
the motor is cooled down.
• Do not touch the motor when folding or unfolding
the ATTO, until the motor is cooled down.
• Do not hose down your ATTO.
0
C after driving. Do not touch these parts
0
C. The
• Maintain and store ATTO in a clean and dry
condition and avoid exposure to rain, snow, ice,
salt, or standing water.
Power off
• To prevent injury to yourself or others, always
ensure that the power is switched off when
getting on or off the ATTO.
Freewheel
For information on setting the ATTO in Freewheel
mode see the “Operating the freewheel” section in
this manual.
• Always check that the front wheel is engaged (not
in freewheel mode) before driving. Do not switch
off the power when the ATTO is still moving
forward. This will bring the ATTO to a very abrupt
stop.
• Be aware when the drive wheel is unlocked
(freewheel mode) or locked (driving mode).
Page 21

20 SAFETY
• The drive-wheel has to be switched to engaged-
mode (not in freewheel mode) while transporting
the ATTO. For instruction see the Freewheel
section on page 57.
• Never sit on your ATTO when it is in freewheel
mode.
Lifting
• Do not attempt to lift or move your ATTO by any
of its removable parts including the seat or driving
console. Personal injury and damage to the ATTO
may result.
Medical condition
• Never operate the ATTO while you are under the
influence of alcohol.
• Never operate the ATTO if your health condition
or medications you are taking cause you to feel
dizzy, affect your vision, or affect your ability to
safely operate the ATTO in any other way.
• Consult your physician if you are taking prescribed
medication or if you have any physical limitations.
Some medications and limitations may impair
your ability to operate the ATTO in a safe manner.
Load
• Never use the ATTO to carry or tow, push or pull
anything but yourself.
• You may use dedicated accessories approved by
MovingLife to carry shopping bags and a small
luggage only if done according to instructions and
only if the combined weight of the passenger plus
load does not exceed the maximum allowed
weight of the ATTO.
External devices
• Contact with tools can cause electrical shock.
• Do not connect or allow anyone except an
authorized MovingLife representative to connect
any electrical or mechanical device to your ATTO.
Unauthorized accessories will void the warranty
and may cause damage or injury.
Page 22

SAFETY 21
capabilities. We recommend that you perform
WARNING
Unusual usage
• Never try to use your ATTO beyond its limitations
as detailed in this Owner's Manual.
• Never sit on your ATTO while it is in a moving
vehicle.
• Never sit on your ATTO when it is being used in
connection with any type of lift or elevation
product. Your ATTO is not designed with such use
in mind and MovingLife shall not be liable to any
damage or injury incurred from such use.
• Programming of the controller shall only be
carried out by authorized personnel. Incorrect
programming can result in safety hazards for the
driver.
Battery and charger
• Do not allow unsupervised children to play near
this equipment while the batteries are charging.
• Never charge a frozen battery.
• If you encounter a damaged or cracked battery,
immediately enclose it in a plastic bag and call
your authorized MovingLife dealer for recycle and
disposal instructions.
• Always avoid/prevent damage to AC and DC
cords.
• Do not connect an extension cord to the battery
charger
• Use only original MovingLife Li-Ion battery.
Modifications
This product has been designed and engineered to
provide maximum utility. However, under no
circumstances should you modify, add, remove, or
disable any part or function of your ATTO. Personal
injury and damage to the ATTO may result.
1. Do not modify your ATTO in any way not
authorized by MovingLife.
2. Do not use accessories if they have not been
tested or approved by MovingLife.
3. Get to know the feel of your ATTO and its
Page 23
22 SAFETY
a safety check before each use to make sure
WARNING
WARNING
your ATTO operates safely.
Weight limitation
1. Please refer to the specifications table for
weight capacity information.
2. Stay within the specified weight capacity for
your ATTO. Exceeding the weight capacity voids
your warranty. The manufacturer will not be
held responsible for injuries or property
damage resulting from failure to observe
weight limitations.
3. Do not carry passengers on the ATTO. Carrying
passengers on the ATTO may affect the center
of gravity, resulting in tipping over or a falling.
Temperature
1. Some of the parts of the ATTO are susceptible
to change in temperature. The controller can
only operate in temperature that ranges
between minus 20°C and plus 50°C.
2. At extreme low temperatures the batteries may
freeze, and your ATTO may not operate. In
extreme high temperatures it may operate at
slower speeds due to a safety feature of the
controller, which prevents damage to the
motors and other electrical components.
3. ATTO surfaces temperatures can increase or
decrease when exposed to external sources of
heat or cold (e.g. sunlight, outdoor
environment).
Page 24
SAFETY 23
on ATTO.
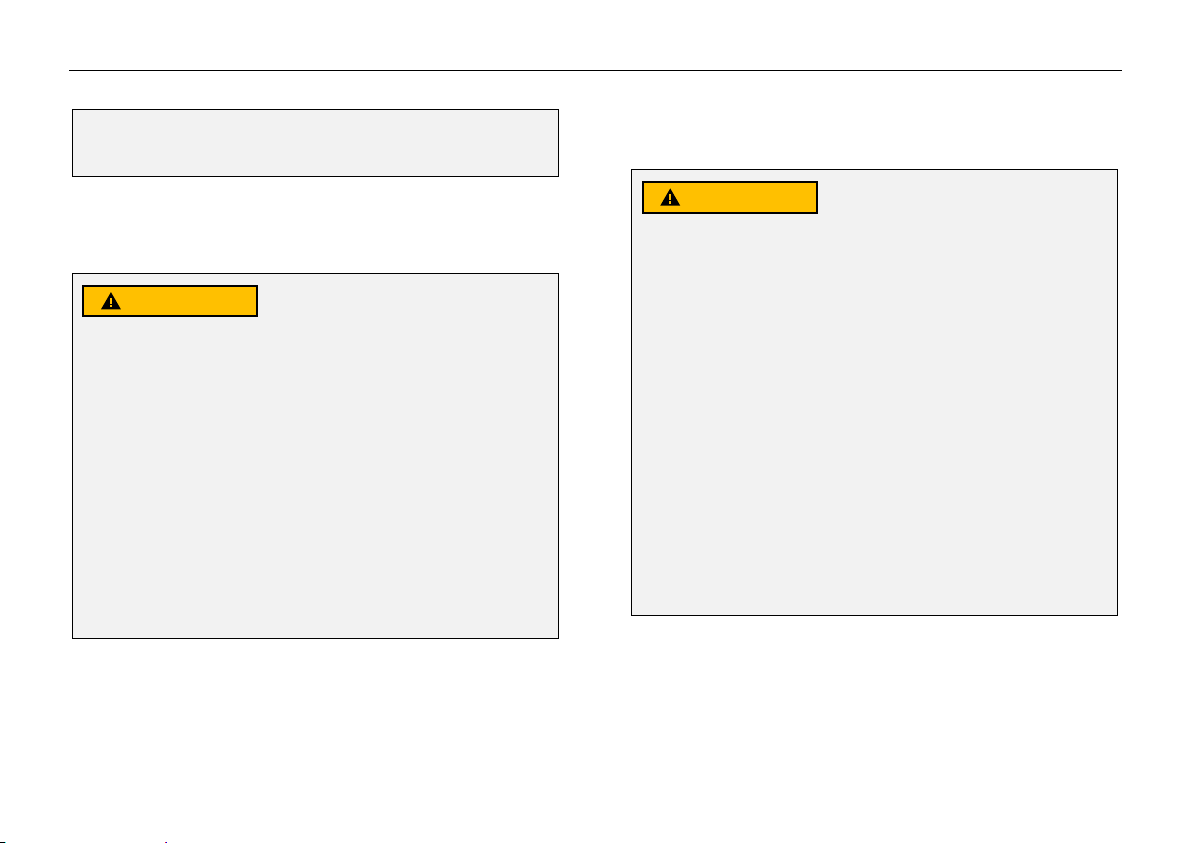
Safety labels
The following safety symbols are used on ATTO to
identify warnings, mandatory actions and prohibited
actions. It is very important for you to read and
understand them completely.
Place unit on level
ground when
changing from “D”
drive mode to “N”
freewheel mode or
freewheel mode to
drive mode.
N = Unlocked /
freewheel.
D = Locked / drive
mode.
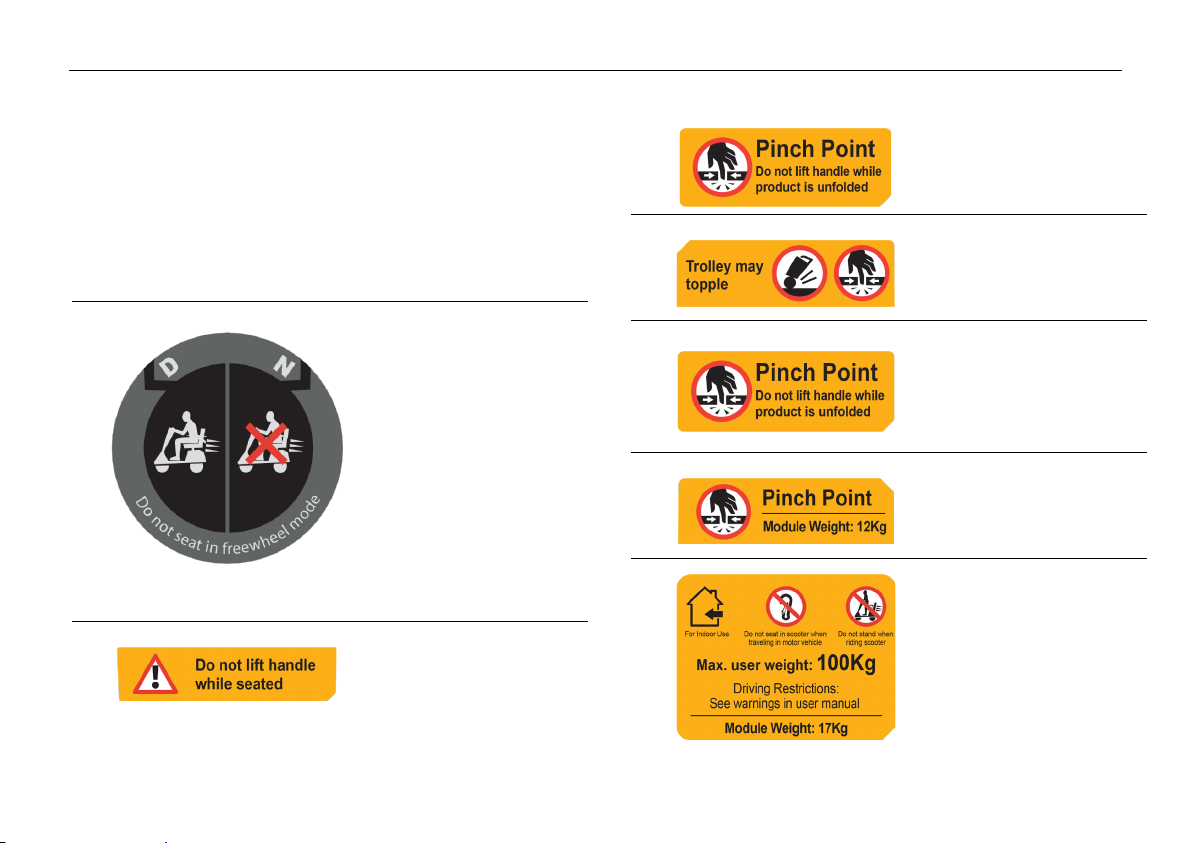
Do not lift marked
handle while seated
Marked handle is
not intended for
product lifting.
ATTO may topple
when not in parking
mode.
Marked handle
must not be used
while ATTO in
opened position.
Indicates front
module weight in
kilograms.
Indicates ATTO's
maximum user
weight capacity.
Indicates rear
module weight in
kilograms.
Page 25
24 SAFETY
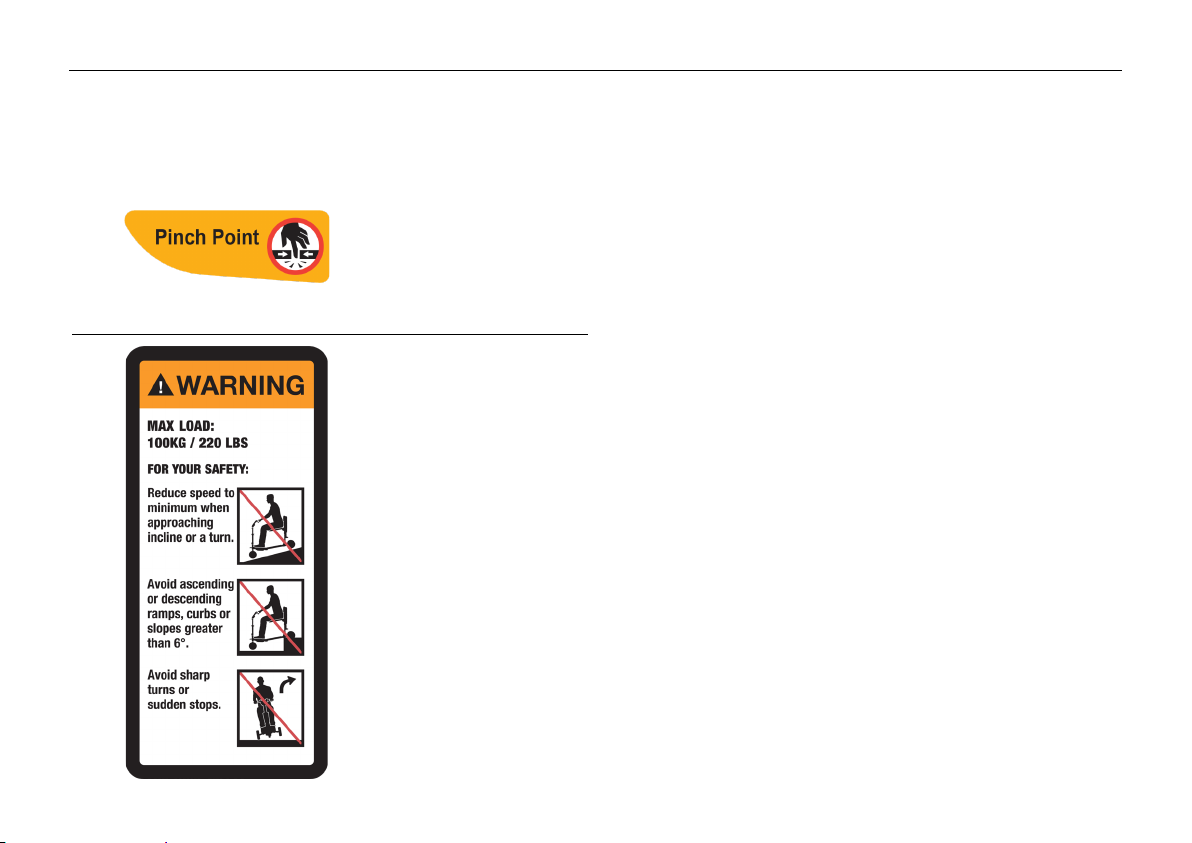
Damaged labels
Pinch/Crush points
created during the
operation of ATTO
(opening, closing,
assembly, and
disassembly).
Indicate ATTO's
maximum user
weight capacity.
Reduce speed to
minimum when
approaching incline
or a turn.
Avoid ascending or
descending ramps,
curbs or slopes
greater than 6 Deg.
Avoid sharp turns or
sudden stops.
In case labels are unreadable for any reason, please
consult this chapter and contact MovingLife for a new
set of labels free of charge.
Compliance and Warning Labels
The ATTO Mobility Scooter system components are
equipped with various product compliance labels and
icons. These are strategically positioned to provide
important information regarding safe operation of the
system.
For a description of the labels and symbols used as
well as details of their location, refer to the following:
• Safety Rating and Manufacturer Identification
Label on page 78.
• Symbols and Descriptions on pages 23-24.
NOTE: Additional labels used on system controls,
accessories and disposables are illustrated and
described in the following sections:
• Labels on ATTO Mobility Scooter Controls on
page 23.
Page 26

SAFETY 25
WARNING
EMC information
It is very important that you read this information
regarding the possible effects of electromagnetic
interference on your ATTO.
Each mobility scooter can resist EMI up to certain
intensity. This is called the "EMI immunity level". The
higher the EMI immunity level, the greater the
protection from EMI. Currently the ATTO technology
has an immunity level of at least 20 V/m, which
provides useful protection from the more common
sources of EMI.
Electromagnetic Interference (EMI) from radio wave sources
Mobility scooters may be susceptible to
electromagnetic interference (EMI), which is
interfering electromagnetic energy (EM) emitted from
sources such as radio stations, TV stations, amateur
radio (HAM) transmitters, two-way radios, and
cellular phones. The interference (from radio wave
sources) can cause the mobility scooter to release its
brakes, move by itself, or move in unintended
directions. It can also permanently damage the
mobility scooter control system. The intensity of the
interfering EM energy can be measured in volts per
meter (V/m).
There are a number of sources of relatively intense
electromagnetic fields in the daily environment. Some
of these sources are obvious and easy to avoid.
Others are not apparent and exposure is unavoidable.
However, we believe that by following the warning
listed below, your risk to EMI will be minimized.
The sources of radiated EMI can be broadly classified
into three types:
1) Hand-held portable transceivers. These are
transmitters-receivers with the antenna mounted
directly on the transmitting unit. These devices
include citizens band (CB) radios, walkie-talkies,
security, fire and police transceivers, cellular
Page 27

26 SAFETY
telephones, and other personal communication
devices).
NOTE: Some cellular telephones and similar devices
transmit signals while they are on, even when not
being used.
2) Medium-range mobile transceivers, such as those
used in police cars, fire trucks, ambulances and
taxis. These usually have the antenna mounted on
the outside of the vehicle.
3) Long-range transmitters and transceivers, such as
commercial broadcast transmitters (radio and TV
broadcast antenna towers) and amateur (HAM)
radios.
NOTE: Other types of hand-held devices, such as
cordless phones, laptop computers, AM/FM radios, TV
sets, CD players, cassette players, and small
appliances such as electric shavers and hair dryers are
not likely to cause EMI problems to your ATTO, as far
as we know.
Mobility Scooter Electromagnetic Interference (EMI)
Because EM energy rapidly becomes more intense as
one move closer to the transmitting antenna (source),
the EM fields from hand-held radio wave sources
(transceivers) are of special concern. It is possible to
unintentionally bring high levels of EM energy very
close to the mobility scooter control system while
using these devices. This can affect mobility scooter
movement and braking.
Therefore, the warnings listed below are intended to
prevent possible interference with the control system
of the ATTO. Electromagnetic interference (EMI) from
sources such as radio and TV stations, amateur radio
(HAM) transmitters, two-way radios, and cellular
phones can affect mobility scooters.
Page 28

SAFETY 27
WARNING
WARNING
and note whether there is a source of EMI
Following the warnings listed below should reduce
the chance of unintended brake release or scooter
movement, which could result in serious injury.
1) Do not operate hand-held transceivers
(transmitters receivers), such as citizens band
(CB) radios, or turn on personal
communication devices such as cellular
phones while the ATTO is turned ON;
2) Be aware of nearby transmitters, such as
radio or TV stations, and try to avoid getting
close to them;
3) If unintended movement or brake release
occurs, turn the ATTO OFF as soon as it is safe;
4) Be aware that adding accessories or
components, or modifying the ATTO, may
make it more susceptible to EMI (NOTE: There
is no easy way to evaluate their effect on the
overall EMI immunity of the ATTO);
5) Report all incidents of unintended movement
or brake release to the ATTO manufacturer
Important
EMI/RFI – ATTO has passed an EMI immunity test
according to EN 60601-1 Class B.
Modification of any kind to the electronics of the
ATTO as manufactured by MovingLife may adversely
affect the EMI immunity levels.
The operation of the ATTO might disturb the
operation of devices in its environment due to
emitting of electromagnetic fields (e.g. alarm
systems of shops, automatic doors, etc.).
Radiation
The ATTO Mobility Scooter does not generate any
hazardous radiation.
nearby.
Page 29

28 ATTONOMY
ATTONOMY
Page 30

ATTONOMY 29
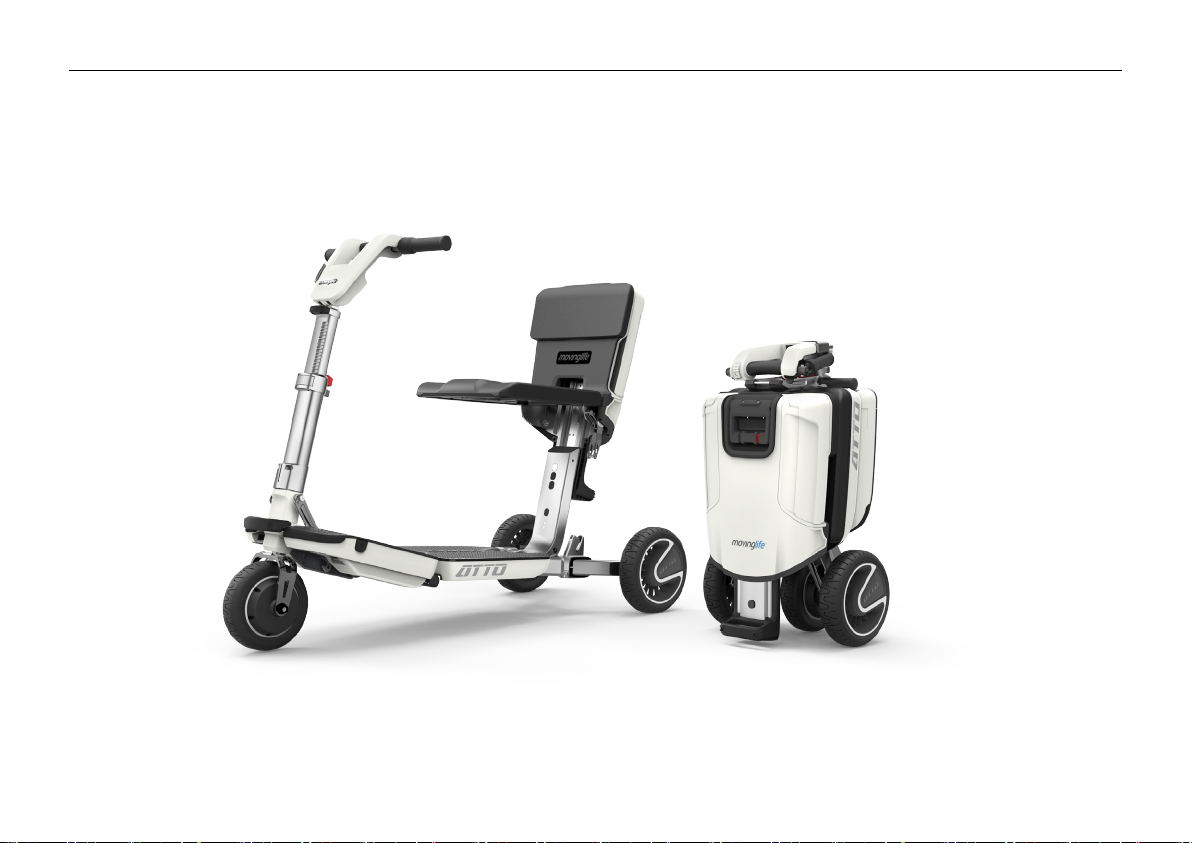
Figure 1 - ATTO in folded mode
Figure 2 - ATTO in driving mode
Page 31

30 ATTONOMY
Figure 3 – ATTO in trolley mode
Page 32

WARNING
PINCH POINT
OPERATING ATTO
ATTO is very easy to operate; it requires no special skills
and can be learned by following the steps described in
the following pages and by practice.
The first step is reading through this chapter of the
Owner's Manual and understanding the sequence of
steps required for opening and closing (folding) the
ATTO. Once completed, use the manual to guide you
while you practice each step. It may be difficult at first
but will be very easy once you have practice it several
times.
To help you learn we have created a simple video you
can watch under the videos section of our website:
www.movinglife.com/videos
Injury hazard due to improper assembly,
disassembly, opening or closing ATTO. Ensure that
all components in the ATTO have been correctly
placed before continuing to the next step. Always
check that all locked devices are holding correctly.
Opening
1. Make sure your ATTO is on flat ground before
opening. Make sure you have clearance of 2 meters
(7 feet) from the side of the back wheels.
Operations described below are done near and
around pinching points. Be careful and follow
instructions to prevent injury. Make sure your fingers
are away from moving parts that may be closing gaps
while moving.
Page 33

32 OPERATING ATTO
2 3 1 1 2
2. Release the adjustment lever of the handle bar (1)
and bring the handle bar to an upright position (2),
4. Press the rod button (1) and tilt it away from the
main ATTO body (2). (see Figure 6).
then bring the lever back to its secured position (3).
(see Figure 4).
Figure 4
3. Press the central release button until it clicks and
remains pressed (see Figure 5).
Figure 5
Figure 6
5. Hold ATTO by the main handle and the handlebar
(see Figure 7).
Figure 7
Page 34

OPERATING ATTO 33
NOTE
6. Tilt ATTO toward the rod until the front wheel
touches the ground (see Figure 8).
8. Gently move the handle down until ATTO is flat
(see Figure 10).
Figure 8
7. Using the main handle, pull the main body away
from the rod, thus rolling the back wheels away
from the front wheel (see Figure 9).
Figure 9
Keep holding the rod at upright position.
Figure 10
9. Place handle in its designated place (see Figure 11).
Figure 11
Page 35

34 OPERATING ATTO
NOTE
1 2 1 2 3
90°
10. Lock the rod in upright position by pushing the
front lever down until it clicks and locks in place (1)
(see Figure 12). In case the front lever requires too
much force to operate, you should apply horizontal
11. Place one hand on the tiller and with the other
hand release the secure lever of the back handle (1)
and bring the handle to upright position at 90
degrees (2). (see Figure 13).
pressure on the main handle towards the front of
the ATTO (2). This will release the pressure on the
front lever and will make it easier to lock (3).
For proper operation please do not flip the handle to
180 degrees from closed position. If you did and you
are unable to lift the chair backwards, return the
handle to its original position and try again.
Figure 13
Figure 12
Page 36

OPERATING ATTO 35
WARNING
1
2
Using the handle, pull the back of the chair backwards
until it clicks and locks in place (see Figure 14).
Figure 15
Figure 14
13. Open both sides of the handle bar (see Figure 16).
12. Continue using the handle for pulling up the chair
until it clicks and locks in place (see Figure 15).
Do not sit on the chair before it clicks in place to
prevent it from sliding down again.
Figure 16
Page 37

36 OPERATING ATTO
PINCH POINT
Driving console angle
1 2 3
Adjusting for maximum comfort
Several adjustments can be made for maximum
comfort. Some adjustments can be made by the user,
while other adjustments must only be made by a
certified technician. The adjustments that can be made
by the user are detailed in this section.
Tiller height
Seat height
Tiller angle
Operations described in this chapter are performed
near and around pinching points. Be careful and
follow instructions to prevent injury. Make sure your
fingers are away from moving parts that may be
closing gaps while moving.
Adjusting Driving Console height
Open the rod lever and hold it (1) while adjusting the
height of the handle bar at your convenience (2).
Bring the lever back to the secure position once you're
done (3). (see Figure 18).
Figure 17 Comfort adjustments
Figure 18 Driving Console height lever
Page 38

OPERATING ATTO 37
REQUIRES TOOLS
1 2 3
Adjusting Driving Console angle
Seat height adjustment
ATTO’s Driving Console can be adjusted to your comfort
in a variety of angels. To adjust the Driving Console, you
should first be seated on your ATTO:
1. Hold the Driving Console in one hand and release
the adjusting lever using the other hand (1).
(see Figure 19).
2. Adjust the Driving Console angel so you can reach
and hold it comfortably with a clear view of the
display area (2).
3. Tighten the adjustment lever once you're done (3).
Figure 19 Driving console tilt adjustment
Adjusting seat height must be performed only by
certified technician to prevent injury and damage.
Although ATTO's seat is thin and stylish, it was designed
to provide comfort and safety and can be adjusted
according to user's preferences. The seat mechanism
can be locked at one of four fixed heights. To adjust
seat height please follow the following steps, no tools
needed:
1. ATTO must be in opened position in order to adjust
seat height. Lift the seat to upright position, locate
the seat height adjustment cover at the seat base
right under the seat pivots and remove it by
pressing on 2 side spots with a screwdriver (see
Figure 20, Step 1).
Page 39

38 OPERATING ATTO
WARNING
Step 1
Step 2
Step 3
Step 4
3. Once the bracket has been removed you should be
able to remove the bulky metal pin (located in one
of the three adjustment holes) holding the seat in
its place. Remove the pin while holding the seat
with your other hand (see Figure 21, Step 3).
Figure 21 Seat height adjustment holes
4. Now you can adjust the seat to any of the four
Figure 20 Seat height cover
holes height and reinsert the pin to hold it in place
(see Figure 21, Step 4).
5. Reinsert the metal bracket and the cover.
2. Under the cover you will find a metal bracket that
has to be removed. Hold the bracket between your
fingers and lift it out. Remember the bracket
position to make it easier to put it back in place
again (see Figure 20, Step 2).
When the seat is in its highest position, the ATTO will
be more inclined to tip over.
Page 40

OPERATING ATTO 39
REQUIRES TOOLS
Tiller angle adjustment
The tiller angle adjustment must be done by certified
technician only, to prevent injury and damage.
The Steering Rod (tiller) angle can be adjusted in one of
two positions according to user comfort. The default
position will be adequate for most users, larger users
may want the Steering Rod further away from their
body for more space. In order to adjust the angle, you
need a 4 mm Allen wrench (hex key).
1. ATTO must be in the opened position in order to
adjust the tiller angle. Once opened, locate and
release the two Alan (hex) screws shown in Figure
22 while holding the tiller in upright position (you
need to hold the tiller to prevent it from falling
while releasing the screws).
2. Move the tiller into the desired position and tighten
the two screws back again using a thread locker
(such as Loctite).
Figure 22 Steering Rod angle adjustment screws
Driving Console
The Driving Console (your ATTO's dashboard) contains
all the controls and display needed for operating your
ATTO while driving.
Figure 23 Driving Console overview
Page 41

40 OPERATING ATTO
WARNING
ON/OFF and speed control buttons
When driving in crowded places and near obstacles,
use extra care and reduce the maximum speed to a
limit allowing you to control your ATTO without
presenting a risk to other people and to yourself.
Display panel
Figure 24 On/Off and speed control
A. The On/Off button is located at the center of
the Driving Console below the display panel. To
turn ATTO on press and hold the button until
ATTO starts.
B. The two buttons on the sides of the ON/OFF
switch marked with "+" and "–" are your speed
limit control. Along with the number shown on
the display panel, they allow you to set the
maximum speed ATTO will develop at full
throttle. While ATTO is not moving, Click the
"+" button to increase the speed and the "-"
button to decrease the speed.
Figure 25 Display Panel
Page 42

OPERATING ATTO 41
NOTE
Battery level meter – When ATTO power is ON the
battery meter indicates the approximate battery charge
level. As with all Li-ion batteries, the charge level
indication is accurate only when the battery is fully
charged. All other indications are approximate and
intended to give you a rough idea of the battery charge
level. Please refer to the "Specification" chapter in this
Owner's Manual for more information on your battery
range.
Throttle
Your ATTO will automatically turn itself off if the
battery output falls below operation voltage.
Direction mode – ATTO can drive both forward and
backward. The current driving direction is shown on the
display panel by an arrow pointing forward or
backward, depending on user's selection. To switch the
driving direction, press on the direction button located
near the left hand grip.
Figure 26 Driving Throttle
The throttle is used for driving and controlling the
driving speed. Place your thumb on the throttle lever
and press it down to accelerate. To decelerate, release
the throttle lever to your level of comfort. To bring the
ATTO to a complete stop simply remove your thumb
from the lever which will set the lever to its "off"
position, bringing the ATTO to a halt after 1.2 meter.
Page 43

42 OPERATING ATTO
WARNING
Reverse and horn buttons
Always bring the ATTO to a full stop before changing
the driving direction.
USB port
ATTO is equipped with a general USB charging port
providing up to 1A charging current. If an error
Figure 27 Reverse and horn buttons
A. ATTO is equipped with a driving direction
button. Press on the button to change the
driving direction. Once the driving direction has
changed, ATTO will sound a single beep when in
forward driving mode, and a double beep when
in reverse driving mode. In addition, a large
arrow on the display panel will indicate the
current driving mode. When ATTO is turned on
it is always in Forward driving mode.
B. Press the horn button to sound the horn.
Always use the horn when needed to prevent
accident or injury.
accorded, the port is disabled, and the ATTO will
operate as normal. The error will be reset after
restarting of the ATTO’s controller (power off/on cycle).
Display Dimming
Pressing the "+" and "-" buttons simultaneously will
toggle the dimming option.
Beep sounds
Beeps caused by pressing buttons may be enabled or
disabled. To Enable, press the "+" and "Horn" buttons
simultaneously. To Mute the beeps, press the "-" and
"Horn" buttons simultaneously (horn is always active).
Page 44

OPERATING ATTO 43
WARNING
WARNING
PINCH POINT
Handle bar grips
Figure 28 Handlebar grips
There are two grips on the handlebar, one on each side.
To change the grips from folded position to drive
position simply lift the grip around its pivot and it will
lock itself in the open position. To fold it back again
(only when you are about to fold ATTO), simply pull the
grip away from the handlebar and down to an angle of
nearly 90 degrees where it will automatically lock itself
in the new position.
Getting on ATTO
• Verify that the ATTO is turned off.
• Verify that the ATTO is fully opened and secured.
See the "Opening" section of this Owner's Manual.
• Carefully place one foot on the approximate center
of the deck and seat yourself comfortably and
securely on the seat.
Do not lean on the handlebar tiller for support during
stepping on or off the ATTO. The handlebar might
unintentionally move and cause you to lose your
balance which could result in personal injury.
Be careful of pinch points near the grip hinge. To
prevent injury, keep your fingers away from metal
parts and hold the grip and the handlebar only in
non-exposed areas covered with plastic and rubber.
Never step on or off the ATTO using the seat or the
seat backrest for support. The seat back may fold
down and may cause you to lose your balance, which
could result in personal injury.
Page 45

44 OPERATING ATTO
NOTE
Getting off ATTO
Turning ATTO on
• Verify that the power is turned off.
• Carefully place one foot on the ground, transfer
your weight to that leg, and slowly come to a
standing position.
• Step away from the ATTO.
Driving
INSPECTIONS PRIOR TO USING YOUR ATTO:
1. Please check that the battery is in its place and
verify it is locked and not protruding off the
surface.
2. Please check that the battery is fully charged or
has enough capacity to carry you to your desired
destination.
3. Verify that the freewheel lever is in locked
position.
4. Verify that all locking parts are in fully opened
position and locked in place.
Press and hold the “On” button to turn ATTO on. All
lights will come on momentarily and then the following
information will be indicated:
• Set maximum speed
• Forward driving direction (default)
• Battery charge level status
See Figure 29 Typical display after turning on.
Figure 29 Typical display after turning on
• We recommend that you select a maximum speed
setting (using the "+" and "-" buttons near the
On/Off switch) at which you feel comfortable, safe,
and in control of your ATTO.
Page 46

OPERATING ATTO 45
WARNING
• Make sure that you are seated safely and properly
on your ATTO.
• For you first driving sessions, make sure that your
ATTO starts out on a level surface and that you will
continue driving on a level surface.
• Never touch the Freewheel/brake release lever
while driving.
• Do not bend, lean, or reach for objects if you
must pick them up from the ATTO deck or from
either side of the ATTO.
• Movements may change your center of gravity
and the weight distribution of the ATTO and
cause your ATTO to tip over, possibly resulting in
personal injury.
• Never switch the ATTO to the Freewheel mode
when somebody is sitting on it.
• For proper operation, the Freewheel/brake
release lever should always be securely engaged.
• Always bring your ATTO to a complete stop
before stepping up or down from the ATTO.
Forward driving
• Place your hands on the handgrips. Move the tiller
to the center position to drive straight forward.
• Make sure you are in forward drive mode by
looking at the Direction Arrow on the display. If the
arrow points forward (away from your body to the
front) then you are in Forward Mode. If the arrow
points backwards in the direction of your body than
you should click the Direction Button until you hear
one beep and making sure the Direction Arrow is
pointing forward.
• Use your right thumb to operate the drive throttle.
Press the throttle lightly to move forward.
• Increase the pressure applied by your thumb to
increase your speed.
• To stop ATTO, release all pressure on the throttle.
The throttle will automatically return to the upper
(off) position and your ATTO will come to a gradual
stop. NOTE: Always bring your ATTO to a full stop
before changing direction from forward to reverse,
or from reverse to forward.
Page 47

46 OPERATING ATTO
Reverse driving
Stopping
• Place your hands on the handgrips.
• Use one of your left fingers to press the direction
button located on the left side of the Driving
Console.
• You should hear a double beep confirming you are
now driving backwards. If you hear a single beep
you are in forward drive mode and should click the
direction button again.
• Use your right thumb to operate the drive throttle.
Press the throttle lightly to move backwards.
• Increase the pressure applied by your thumb to
increase your reverse speed.
• To stop ATTO, release all pressure on the throttle.
The throttle will automatically return to the upper
(off) position and your ATTO will come to a gradual
stop.
• You should know that for safety reasons ATTO's
speed in reverse is slower than the maximum speed
set on the speed control dial.
Just let go of the drive throttle, which will automatically
return to the upper (off). The ATTO automatically
brakes using the regenerative brake. This will be
followed by entering the ATTO into "parking" mode
using the electro-mechanical brake.
Emergency braking
In case you must stop, and you have released the drive
throttle, but your ATTO continues to move, press the
On/Off switch until the ATTO turns off and stops.
Steering
• Steering your ATTO is easy and intuitive.
• With both hands on the handgrips of the tiller, turn
the tiller to the right or to the left to change the
moving direction accordingly.
• Make certain to maintain sufficient clearance when
turning your ATTO so that the rear wheels will clear
any obstacle.
Page 48

OPERATING ATTO 47
WARNING
WARNING
• Use a left finger to click the direction button. You
Turning too sharply around a corner can cause the
ATTO to tip over. Avoid this danger by steering a
wide arc around corners and obstacles. Also, to avoid
the risk of tipping over, reduce speed before
negotiating any turns.
should hear a double beep confirming you are now
driving backwards.
• Turn the tiller in the direction in which you wish to
drive backwards.
• Note that for safety reasons ATTO's speed in
reverse is slower than the maximum speed set on
the speed control dial.
Steering in a tight spot
If you must steer in a tight spot, such as entering a
doorway or when turning around:
• Bring your ATTO to a full stop.
• Turn the speed control to the slowest speed
setting.
• Turn the tiller to the direction in which you wish to
drive.
• Press gently on the thumb throttle and slowly turn
your ATTO.
Steering in Reverse
Backing up your ATTO requires special attention to
what you are doing:
Driving on slopes
Stopping distance on slopes can be significantly
greater than on level ground
More and more buildings have ramps with specified
degrees of inclination, designed for easy and safe
access. Some ramps may have switchbacks (180
degrees turn) that require you to have good cornering
skills on your ATTO.
• Proceed with extreme caution as you approach the
downgrade of a ramp or other incline.
Page 49

48 OPERATING ATTO
straight up the incline. This greatly reduces the
possibility of tipping over or falling. Always exercise
WARNING
WARNING
WARNING
WARNING
• Take wide swings with your ATTO around any tight
corners. If you do that, the ATTO’s rear wheels will
follow a wide arc, not cut the corner short, and not
extreme caution when negotiating an incline.
bump into or get hung up on any railing corners.
• When driving down a ramp, keep ATTO's speed set
to the slowest speed setting to ensure a safely
controlled descent.
• Avoid sudden stops and starts.
Do not drive your ATTO across the side of an incline
or diagonally up or down an incline; Avoid stopping,
as much as possible, while driving up or down an
incline.
When climbing an incline, try to keep ATTO moving. If
you must stop, start up again slowly, and then
accelerate cautiously. When driving down an incline, do
so by adjustment the speed to the slowest setting and
driving in the forward direction only. If your ATTO starts
to move down the incline faster than you anticipated or
desired, allow it to come to a complete stop by
releasing the throttle. Then push the throttle forward
You should not travel up or down a potentially
hazardous incline (i.e., areas covered with snow, ice,
cut grass, or wet leaves).
slightly to ensure a safely controlled descent.
When on any sort of an incline or decline, never
When climbing an incline, do not zigzag or drive at an
angle up the face of the incline. Drive your ATTO
place the ATTO in freewheel mode while seated on it
or standing next to it.
Page 50

OPERATING ATTO 49
WARNING
WARNING
6° MAX
When approaching an incline, it is best to lean forward
Even though your ATTO is capable of climbing slopes
greater than that illustrated in Figure 30, do not,
(see Figure 31 and Figure 32). This shifts the center of
gravity of you and your ATTO toward the front of the
ATTO for improved stability.
under any circumstances, exceed the incline
guidelines or any other specifications presented in
this manual. Doing so could cause your ATTO to
become unstable, resulting in personal injury and/or
damage to your ATTO.
Figure 31 Normal driving position
Figure 30 Maximum recommended incline angle
Any attempt to climb or descend a slope steeper than
what is shown in Figure 30 may make ATTO unstable
and cause it to tip over, resulting in personal injury.
Figure 32 Shifts center of gravity
Page 51

50 OPERATING ATTO
WARNING
PINCH POINT
2
1
Turning corners
Turning at high speed may cause a tipping over. Factors
affecting the possibility of tipping over include turning
speed, steering angle (how sharply you are turning the
steering tiller), uneven road surfaces, inclined road
surfaces, a transition from low grip area to high grip
area (as moving from a grass surface to a paved surface
- especially at high speed while turning), and abrupt
changes of direction. High speed turning is not
recommended. If you feel you are about to tip over
while turning, reduce speed and steering angle (i.e.,
make the turn wider) to prevent your ATTO from
tipping over.
When you turn a sharp corner, reduce speed. When
you use the ATTO at a high speed, do not turn
sharply. This will reduce the risk of overturning and
falling. Always exercise discretion when taking a turn
to avoid injury and damage to property.
Folding (closing)
1. Make sure ATTO is on flat ground before folding it.
Operations described in this chapter are done near
and around pinching points. Be careful and follow
instructions to prevent injury. Make sure your fingers
are away from moving parts that may be closing gaps
while moving.
2. Fold both sides of the handle bar (see Figure 33).
Figure 33
Page 52

OPERATING ATTO 51
2 1 3
3. Release the secure lever of the back handle (1) and
bring the handle to 100 degrees position (2). Allow
4. Push the back of the chair forwards until it clicks
(see Figure 36).
the seat to slide down until it clicks in place (3).
(See Figures 34 and 35).
Figure 34
Figure 35
Figure 36
5. Use one hand to keep the rod upright. Using your
other hand, release the front lever (1) In case the
front lever requires too much force to operate, you
should apply horizontal pressure on the main
handle towards the front of the ATTO (2). This will
release the pressure on the front lever and will
make it easier to open (3). (see Figure 37).
Page 53

52 OPERATING ATTO
PINCH POINT
2 3 1
Figure 38
6. Using the main handle to pull the center upwards
and towards the rod (1) until it clicks and locks in
place (2). (See Figure 39).
Be careful not to pinch your finger between the
Figure 37
chassis. This area is a pinch point and requires your
full attention.
Switch hands. Use one hand to keep the rod upright
and use your other hand to lift the main handle
(see Figure 38).
Page 54

OPERATING ATTO 53
can separate ATTO into two segments as described
WARNING
2 3 1 2 1 2 1
8. Release the adjustment lever of the handle bar (1)
and bring the handle bar to a horizontal position
(2). Then bring the lever back to secure position (3).
(see Figure 41).
Figure 39
7. Pull the rod lever (1) to adjust the height of the
handle bar to the lowest position and bring the
lever back to the secure position (2).
(See Figure 40).
Figure 41
Separating the chassis
Lifting ATTO by yourself may be challenging for some
Figure 40
people and therefore not recommended. If you have
another person to assist you, we suggest lifting the
product together. If you need to lift ATTO alone, you
Page 55

54 OPERATING ATTO
below. Lifting ATTO as a whole may be too heavy and
1
2
2. Open both separation levers (see Figure 43). In
may cause injury or damage.
case the separation levers require too much
force to operate, you should apply horizontal
ATTO's front and rear halves (chassis) can be easily and
effortlessly separated in only a few seconds by
operating a knob and two handles. The same technique
applies to putting the two halves back together. This is
pressure on the driving console towards the
center of the ATTO. This will release the
pressure on the separation levers and will make
them easier to open.
very useful when storing ATTO in the trunk or in an
airplane's overhead bins.
1. Make sure the handle bar is secured at an
upright position (see Figure 42).
Figure 43
Figure 42
Page 56

OPERATING ATTO 55
3. Hold the handle bar with one hand and press
the central release button with the second
hand until it clicks (see Figure 44).
Figure 44
4. Carry the front chassis from the handle bar and
separate from the back chassis (see Figure 45).
Lifting separated chassis
1. Once the two chassis have been separated and you
are ready to lift them, for instance into your car
trunk, make sure both chassis are set flat on the
ground where they will not be an obstacle to you
or to others.
2. Grab the one of the chassis from designated
handles and carry it to its destination
(See Figure 46).
3. Repeat the previous step on the other chassis.
4. Lay the chassis flat and secure them with straps
(or other ways) to insure safety and damage free
transportation.
Figure 45
Page 57

56 OPERATING ATTO
Rear
Front
Module
Lifting
Handles
Module
Lifting
Handles
Connecting the chassis
1. Make sure the handle bar is secured at an upright
position (see Figure 47).
Figure 47
Place the back chassis vertically. Hold the front chassis
from the handle bar and bring it towards the back
chassis (see Figure 48).
Figure 46 – liffting points
Figure 48
Page 58

OPERATING ATTO 57
WARNING
2. Bring the two parts together. Use the hanging
hooks (see Figure 49) to locate the two ends
properly. At this point the central release button
will click.
Figure 50
Figure 49
3. Close the two separation levers until they click (see
Figure 50). In case the separation levers require too
much force to operate, you should apply horizontal
pressure on the driving console handle towards the
center of the ATTO. This will release the pressure
on the separation levers and will make them easier
to open.
NOTE: DO NOT try to open ATTO for driving before
the two levers are secured in the downwards
position
Freewheel
ATTO is equipped with a manual freewheel lever, which
when pushed to “N” state it is in freewheel mode and
allows the ATTO to be pushed.
When ATTO is in freewheel mode, the braking
system is disengaged, and ATTO will move freely with
very little force. This can cause injury and property
damage to anyone and anything nearby.
Page 59

58 OPERATING ATTO
WARNING
• Change to freewheel mode only on a level surface.
• Ensure ATTO's power is turned off.
• Never sit on ATTO while handling the freewheel
lever.
After you have finished pushing your ATTO, always
lock the brakes by changing to non-freewheel mode.
Before driving ATTO again, make sure the freewheel
lever is pushed backwards to mode "D" (see Figure 52).
Operating the freewheel
In case the battery dies or ATTO is not driving, ATTO
may be rolled manually. This will require releasing the
mechanic auto-brake of the front wheel pushing the
free wheel lever towards mode "N" (see Figure 51).
Figure 51 Releasing the freewheel
Figure 52 Securing the freewheel
Battery and charger
ATTO's charger is a small yet smart and powerful
charger with the ability to connect to any electrical grid
rating 110VAC – 240VAC. It is fully approved and safe to
use.
• When connecting the charger, connect the DC
charging cord to the battery charge plug before
connecting the charger AC cord to the electrical
outlet.
• When disconnecting the charger, always do so in
reverse order of the connecting procedure.
Page 60

OPERATING ATTO 59
NOTE
1
2
Installing the battery
To install the battery, insert first the back end of the
battery (1) and then push the front until the battery
clicks and locks in place (2). (See Figure 55).
Figure 53 ATTO’s Li-ion Battery
Figure 54 ATTO’s Charger
Make sure the battery is properly connected before
folding ATTO or turning it on.
Figure 55
Page 61

60 OPERATING ATTO
WARNING
1
2
Removing the battery
Use the handle for carrying the battery when removed
from ATTO (see Figure 58).
Identify the battery release button highlighted in red
frame in Figure 56.
Figure 58
Figure 56 - battery release button
To remove the battery from ATTO, press the release
button (1) and pull the battery out (2). (see Figure 57).
• NEVER attempt to recharge the batteries by
attaching cables directly to the battery terminals.
• DO NOT attempt to recharge the battery and
operate ATTO at the same time.
• DO NOT attempt to recharge the battery when
ATTO has been exposed to any type of moisture.
• DO NOT attempt to recharge the battery when
ATTO is outside.
Figure 57
• DO NOT sit on ATTO while recharging the
battery.
Page 62

OPERATING ATTO 61
maintain good battery state and maximize its
life span always charge the battery when the
WARNING
NOTE
NOTE
• New battery MUST be fully charged prior to
initial use of ATTO. ALWAYS fully charge new
battery before initial use or battery life will be
reduced.
• As a general rule, you should charge your battery
at 60% of full charge before placing in storage for
long period of time.
• Only use a charger approved by MovingLife.
• Use of improper extension cord for the charger
could result in risk of fire and electric shock.
Charging the battery can be done on board and off
board, meaning you can connect the charger when the
battery is in its place inside ATTO or when it is taken out
of ATTO.
Charging the battery
a. The battery should not be emptied. To
battery meter reaches 2 green lines.
b. Before placing the battery for a long period
of time make sure to charge it at about 60%
of full charge.
1. Connect the charger to the electric socket. The
Green LED should turn green to indicate the
charger is properly connected to the socket.
2. Connect the other end of the charger to ATTO’s
battery. The charger LED will turn red to indicate
the battery is not fully charged and that charging is
taking place.
3. When the battery is fully charged, the LED will turn
green. This may take up to 6 hours. Once charging
is complete, disconnect the charger from the wall
socket and then disconnect the battery from the
charger.
Battery can be charged either when connected to
ATTO or out of ATTO.
Page 63

62 OPERATING ATTO
WARNING
Maximizing battery‘s life time
Code Severity Explanation and what to do
Always keep batteries in cool dry conditions to
prevent damage to the battery and surrounding
equipment.
Error Codes
When ATTO's smart controller detects a problem, you
will be notified by a letter (A-Z) shown on the Driving
Console display.
Some errors are not significant and do not affect your
ability to use ATTO such as a call for service, while other
errors are severe and critical enough to cause ATTO to
stop operating, all for your own safety.
The following table details error codes and their
meanings:
USB port reports an error.
Low
Low
High
Low
Low
Disconnect any device. Check if
port is wet. Restart ATTO.
Throttle may be pressed while
ATTO is turned on. Release the
throttle. If problem persists
restarts ATTO.
Motor Sensors malfunction.
Contact support.
Motor reports an overload.
Shutdown ATTO, wait 10
minutes and restart.
Controller is over heated.
Shutdown ATTO, wait 10
minutes and restart.
Page 64

OPERATING ATTO 63
NOTE
Code Severity Explanation and what to do
Internal communication error
High
High
Low
Low
occurred do to wiring or
internal electric problem.
Contact support.
Internal electric problem.
Contact support.
Controller sensed over or
under Voltage. Stop ATTO and
restart.
Blinking ‘F’.
Freewheel handle is in Neutral
mode. Turn it to Drive mode to
turn on Atto.
Error codes may be updated in future software
versions.
Page 65

64 TRANSPORTING ATTO
WARNING
NOTE
To transport ATTO in a car please see the “Separating
TRANSPORTING ATTO
the chassis” chapter in this Owner’s Manual.
ATTO can be effortlessly transported in many types of
vehicles, on land, see or by air.
Transport of ATTO on commercial aircraft is subject to
federal regulations and airline policy. Please consult
your airline prior to your flight to ensure your ATTO and
its lithium-ion battery is permitted.
To transport ATTO:
For safety reasons, remove the battery and place it
in a safe location.
Make sure it is fully closed.
To prevent injury and damage, secure ATTO in a
way that will prevent it from moving around or
shaking.
Cover or otherwise secure the tiller and handlebar
to prevent it from being damaged due to moving
objects or by ATTO shifting around during
transport.
• If your ATTO and its components are not properly
and securely stowed, the ATTO or components
may shift around while driving causing injury or
damage.
• If the ATTO is transported in a vehicle when fully
assembled and in open position, no one should
sit on the ATTO during loading and transport.
• If you use an external lifting system, be sure to
secure your ATTO as it could fall off the lift.
When transporting ATTO, make sure it is always in an
environment within the allowed specifications for
humidity and temperature.
Page 66

TROUBLESHOOTING 65
chapter of this Owner's Manual. Once you
TROUBLESHOOTING
If your ATTO does not operate
1. IF YOU TURN ATTO ON AND IT IMMEDIATELY
SHUTS ITSELF, PLEASE CHECK TO ENSURE THE
FREEWHEEL LEVER IS IN DRIVING MODE.
2. MAKE SURE THE CHARGER IS NOT CONNECTED
TO YOUR ATTO.
3. Check the battery, is it charged? If you are not
sure, you can connect it to the charger and wait
for the green LED.
Once you are sure the battery is not empty;
4. Make sure the battery is properly placed in its
battery housing on the ATTO, and that there is
no foreign material such as paper or dirt
interfering with the electrical contact between
the battery and its connector.
If that’s ok;
5. Check the fuse; if it is blown, replace it
following the procedure in the "Maintenance"
ATTO is ON but does not move
Start by checking the freewheel lever; make sure it is in
locked position as described in the "Operation" chapter
of this Owner's Manual.
Charging problems
If batteries fail to charge within 12 hours:
• Check the battery connections.
• It may be necessary to have the batteries checked
• It may be necessary to have the charger tested.
made sure the fuse is good;
6. Try to turn the ATTO on by pressing the On/Off
button for at least 2 seconds. If the ATTO does
not turn on please contact an authorized
MovingLife dealer.
and perhaps replaced by an authorized MovingLife
dealer.
Page 67

66 TROUBLESHOOTING
WARNING
NOTE: ATTO's battery can be charged while it is
installed on the ATTO or when it is removed from the
ATTO.
Do not leave the battery pack and charger plugged in
for more than 12 hours. Damage to the battery pack
and a hazardous condition may result.
Page 68

MAINTENANCE 67
MAINTENANCE
ATTO’s expected service life is 10 years and it will
extend much longer provided care and maintenance
procedures are carefully followed.
Please follow the maintenance procedures whenever
needed or at least once a year.
Replacement parts are available from MovingLife and
authorized service facilities (See back cover for details).
Electrical fuse
Your ATTO Battery has a protecting fuse at the bottom
of the battery pack (see Figure 63).
Figure 63 Fuse location
Possible causes for the fuse to blow
The fuse is designed to protect the battery from over
charging/discharging. You should check the condition of
the fuse if:
• The battery is not charging.
• A charged battery is connected to ATTO but
ATTO does not turn on.
• ATTO has turned off unexpectedly during
operation.
Page 69

68 MAINTENANCE
WARNING
NOTE
Working Fuse
Blown Fuse (Replace)
Replacing a blown fuse
To check the fuse (see Figure 65):
Figure 64 Identifying fuse condition
• Remove the battery and place it on a secure surface
such as a table, with its bottom facing up.
• Remove the fuse plastic cover.
• Pull out the fuse.
Examine the fuse to see if it is blown. A blown fuse has
a gap in the wire. In case it is blown (see Figure 64),
replace it with a new fuse blade type ATO or ATC,
Green (30A).
Once a new fuse has been placed please remember to
place the plastic cover back in its place (Figure 65).
Figure 65 Replacing a blown fuse
Never soak your ATTO in any liquid. This may cause
personal injury and/or damage to your ATTO.
If the fuse continues to blow, an underlying
electrical fault needs professional attention. Please
contact an authorized MovingLife dealer.
Page 70

MAINTENANCE 69
NOTE
REQUIRES TOOLS
Lubrication
Do not replace the fuse repeatedly. You must correct
the underlying problem. Failure to correct the
problem could cause injury or damage and will void
the warranty.
There are two lubrication areas where a light spray of
lubricant should be applied every six months or more
rapidly if opening and closing ATTO becomes more
difficult to perform (you may use other light lubricant
as long as they are not sticky or corrosive on aluminum
and plastics).
Do not attempt electrical repairs. Consult MovingLife
or your authorized MovingLife dealer.
Wheels and Tires
Your ATTO is equipped with one front motor with solid
tire and two rear wheels with solid tires. This means
that there is no air in any of the tires. The tires are filled
with foam and you will never have a flat tire even if you
puncture the tire. If for any reason there is a need to
replace a tire due to erosion or damage, please contact
an authorized MovingLife dealer.
Lubrication points are shown in Figure 66:
1. Seat post including tracks.
2. Wheel shafts.
Clean the areas to be lubricated with clean cloth leaving
no fibers, sand or dust on the ATTO. Once you are done
lubricating and testing the ATTO for proper and easy
operation, clean the entire surrounding parts from
lubricant residues.
Page 71

70 MAINTENANCE
WARNING
1
2
Battery & Charging
• These batteries are maintenance-free.
• Your ATTO is being equipped with Li-ion battery,
which does not have a “memory” issue and
therefore it is not necessary to completely
discharge the battery before recharging it.
Figure 66
All the bearings on your ATTO are permanently
lubricated and sealed and therefore no lubrication is
required.
Battery
ATTO's battery holds a substantial amount of power.
Shorting of the terminals can result in burns or other
injuries and in damage to the battery and to the
electronic components of your ATTO. Always use
care and caution when handling the battery.
• If you are not going to use your ATTO for an
extended period of time, charge the batteries to
60% of full charge before storing your ATTO. The
batteries can be left unmaintained for up to 6
months if they are properly charged and kept at
room temperature approximately 22 °C (~ 72° F).
• If you have not used your ATTO for more than one
month, make sure that you charge the batteries on
the night before you are going to use your ATTO.
This will ensure that you start operating your ATTO
with a fully charged battery.
• There is no danger of spillage or leakage, so these
batteries are safe to transport on aircrafts, busses,
trains, etc.
• Following the procedures set out in this Owner's
Manual will extend the life of your batteries.
Page 72

MAINTENANCE 71
WARNING
WARNING
• If electrical terminals on the ATTO become
corroded, they need to be cleaned by a certified
MovingLife technician.
• If battery terminals become corroded, it has to be
replaced with a new battery.
FIRE HAZARD! Do not cover the battery charger and
ventilation slot while charging your battery. Only use
the battery charger in well-ventilated areas.
• Remove the battery pack from the ATTO.
• Store your ATTO in ambient, dry environment.
• Avoid storing your ATTO where it will be exposed to
temperature extremes.
Always protect batteries from freezing temperatures
and never charge a frozen battery. This damages the
battery and can cause personal injury.
To use ATTO after an extended period of storage:
Cleaning, body care
ATTO's body is made of ABS parts, a durable plastic
with integrated paint. To help ATTO retain high gloss
you may clean it using clean cloth moistened with
water.
Storage
If you plan to not use your ATTO for an extended
period, it is best to:
• Open ATTO if it was closed / folded during storage.
• Visually inspect all user adjustment levers, look for
possible damage in plastic and metal parts, and
ensure all moving parts works and has no evidence
of corrosion. If you do find a part which do not
function as expected or has corrosion, call a
certified technician for advice how to continue.
• Insert the battery and turn ATTO on.
• Check that the display and all buttons work as
expected. If you find no problems you may use
ATTO, otherwise call a certified MovingLife
technician.
Page 73

72 MAINTENANCE
Disposal
Your ATTO must be disposed of according to applicable
local and national statutory regulations. Contact your
local waste disposal agency or authorized MovingLife
dealer for information on proper disposal of packaging,
metal frame components, plastic components,
electronics, and battery.
Spare parts
Spare parts can be purchased directly from MovingLife
or from a local representative (check back cover for
dealer contact information).
Page 74

SPECIFICATIONS 73
Part
Kg
Lbs
Front half
12
26.4
Rear half
17
37.5
Assembled *
29
63.9
Battery
1.85
4.1
Part
Height
Length
Width
Trolley mode
72 (28)
39 (15.3)
42 (16.5)
Drive mode
90 (35)
120 (47)
56 (22)
Weight Capacity
SPECIFICATIONS
Maximum user weight is 100 Kg (220 Lbs.).
Dimensions
Model
When folded, ATTO is the most compact mobility
ATTO Mobility Scooter Type I
Speed
ATTO’s maximum speed (limited by software) is 6.4
km/h (4 mph). Maximum driving speed can be set to
one of the presets by simply clicking a button and
watching the indication on ATTO's clear view display.
Weight
scooter in the world. Nevertheless, when open and
ready to drive, ATTO is the largest and most
comfortable in its category.
ATTO’s dimensions, units in cm (inch):
Ground clearance
ATTO's minimum ground clearance is 10 cm (4”).
* Without the battery
Front wheel drive motor
To allow smooth and continuous drive over many years
and large distances, we developed a unique, fully
customized, brushless, permanent magnet DC motor,
combining solid core and powerful gear along with
Page 75

74 SPECIFICATIONS
Battery model
Metric
Imperial
250 W/h
16 Km
10 Mile
robust braking mechanism. Via sophisticated software
algorithms the motor utilizes modern reverse charging
techniques for deceleration and stopping providing
smooth driving experience.
Charger
UL and CE approved Charger with self-shutdown
functionality for safety and extended battery and
charger lifetime.
Tires
Controller
PU filled non-pneumatic tires.
Unique Brushless DC Motor Controller. Genuine
Battery
ATTO uses a powerful, yet compact, lightweight
advanced 48 Volts Lithium-Ion battery. Weighing only 2
kg (4.4 lbs.), the battery allows for more than 16 km (10
miles) of continuous driving while requiring only 4
hours (on average) to fully charge. You can charge ATTO
on-board and off-board, meaning that you can (but do
not have to), take the battery off the ATTO in order to
charge it. Removing the battery is as easy as pressing a
button. Reinstalling the battery is as easy as putting it
back in place.
product by MovingLife Ltd. Unique LED Display with
options of Dimming and a clear error display. Internal
data and error log for easy maintenance and
traceability. MovingLife Controller provides 10A
continues working current with maximum of 30A peak.
Turning Radius
1.35 meters (53”).
Freewheel mode
Yes.
Operating range
Maximum incline
6 degrees.
Page 76

SPECIFICATIONS 75
WARNING
Height Restrictions
Responsibility of the Manufacturer
Preliminary tests show that a minimum height of 150
cm (5 Feet) is required for safe driving. This is NOT a
formal recommendation, we have not concluded the
tests yet, and you should check with your medical
advisor.
Environment
ATTO was designed and tested according to strict water
resistance IP54 standard, requiring the equipment to be
water resistant to splash from multiple angles, for a
long period of time and at high pressure. After taking a
50 litters shower ATTO continued to work with zero
malfunctions, which guarantees resistance to normal
outdoor conditions. Nevertheless, we recommend
storing ATTO indoor to ensure maximal lifetime of high
performance and for safety reasons use it only under
dry weather conditions.
Flammability
ATTO Is designed according to UL94 V-0.
The manufacturer considers itself responsible for the
effects on safety, reliability, and performance of the
equipment only if:
• Calibration, service and repairs of the ATTO
Mobility Scooter are carried out by MovingLife Ltd
personnel or anyone authorized by MovingLife Ltd.
• The equipment is used in accordance with
instructions for use.
Owners and operators should always adhere to the
following precautions:
• Refrain from modifying the ATTO Mobility
Scooter hardware or software in any way.
• Never allow untrained personnel to operate the
ATTO Mobility Scooter.
• Always report to MovingLife Ltd authorized
representatives only.
Page 77

76 LIMITED WARRANTY
change of ownership must be registered in the
LIMITED WARRANTY
MovingLife warrants this product to be free from defects
in materials and workmanship for two years with the
exclusions & exceptions specified below.
If within such warranty period, any such product shall be
proven defective, such product shall be repaired or
replaced at MovingLife's discretion. This warranty does
not include any labor or shipping charges incurred in
replacement part installation or repair of any such
product.
MovingLife’s sole obligation and your exclusive remedy
under this warranty shall be limited to such repair and/or
replacement.
Any part replaced under warranty is warranted to be
free from manufacturing defects until expiry of the
original ATTO warranty.
The warranty shall not be affected by change of
ownership of the ATTO within the warranty period. Such
MovingLife’s registration database.
For warranty service, please contact the authorized
MovingLife dealer where you purchased your ATTO.
Any defects must be reported to a MovingLife
authorized workshop as quickly as possible. Your
warranty may be invalidated if you continue to drive
your ATTO when a fault becomes apparent.
In the event you do not receive satisfactory warranty
service, please write directly to MovingLife at the
address on the back cover, provide authorized
MovingLife dealer’s name, address, and date of
purchase, indicate the nature of the defect and, if the
product or the defect part carries a serial number,
indicate the serial number. Do not return products to our
factory or shipping center without our written prior
consent.
This warranty does not include worldwide warranty
service outside the origin country of purchase.
Worldwide warranty service can be provided for
additional fee and only in countries where there is active
MovingLife distribution, if made possible.
Page 78

LIMITED WARRANTY 77
WARRANTY EXCLUSIONS & EXCEPTIONS
• ATTO Battery - one-year limited warranty.
Gradual deterioration in battery performance
due to not following usage instructions specified
in owner’s manual or worn out through heavy
use is not covered. The ATTO Warranty includes
an ATTO Battery Warranty against failures of the
high voltage battery as a result of manufacturing
defects. The capacity of a lithium-ion high
voltage battery naturally decreases over the
period of use due to inherent technical reasons
(natural wear and tear). Should a capacity check
at a MovingLife Authorized Workshop within the
warranty period of one-year show that the net
• Seat upholstery
• ATTO tires/tire tubes
• Repairs and/or modifications made to any part
of the product or accessories without specific
and prior written consent from MovingLife
• Circumstances beyond the control of MovingLife
• Damage caused by: battery malfunction, abuse,
misuse, accident, or negligence, improper
operation, maintenance, or storage, commercial
use or use other than normal
• Labor, service calls, shipping, and other charges
incurred for repair of the product
• If the serial number has been removed or
defaced
Such evaluation will be solely determined by Moving
Life.
battery capacity has dropped below 70% of its
original value at the delivery of the new ATTO,
the portion below 70% will be regarded as
excessive capacity loss.
To maintain your ATTO Battery Warranty, your
ATTO must be inspected at the correct service
intervals as recommended by your ATTO local
dealer or by MovingLife Authorized dealer.
• ABS plastic
Moving Life shall not be liable for any consequential or
incidental damages whatsoever.
There is no other express warranty.
Implied warranties, including those of merchantability
and fitness for a particular purpose, are limited to one
year from the date of original purchase and to the extent
permitted by law.
Page 79

78 LIMITED WARRANTY
Any and all implied warranties are excluded. This is the
exclusive remedy. Liabilities for consequential damages
under any and all warranties are excluded.
This warranty gives you specific legal rights and you may
also have other legal rights which vary from
country/state to country/state.
Page 80

CONTACT INFORMATION 79
CONTACT INFORMATION
Legal Manufacturer
MovingLife ltd.
Netzer Sereni 709500 Israel
Tel: +972(73)-391-3999
Email: info@movinglife.com
Authorized service
facilities label
Serial number label
Authorized representative
Obelis Group Ltd.
Bd Général Wahis, 53,
B-1030 Brussels
Belgium
US IMPORTER:
MovingLife Inc.
Tour Scotia, 1002 rue Sherbrooke O.
Bureau 1900, Montreal, Quebec, H3A 3L6 Canada
Tel +1(347)761-3317
Page 81

80 Notes
Notes
Page 82

Notes 81
RG-012-ATTO-1
ATTO Owner's Manual
English
RG-012-ATTO-1 Owners Manual ENG Ver 2.8
nd
2
Issue - July 2018
Copyright © 2018-2019
All rights reserved
 Loading...