

Movie Vision MV1055 Installation Manual
Owner’s/Installation
Manual
Model: MV1055
For operational or technical assistance, after reading this manual,
please call us toll free at (800) 638-3600 or visit www.magnadyne.com
10.2” Flip-down Widescreen
Multimedia System

2
Driving: Be aware of road and traffic conditions. Keep
the volume at a low level.
Moisture: Do not expose the product to water or
excessive moisture. This could cause electrical
shorts, fire or other damage.
Parking: Parking in direct sunlight can produce very high
temperatures inside your vehicle. Give the car interior a
chance to cool down before starting playback.
Proper Power Supply: This product is designed to oper-
ate with a 12 Volt DC, negative ground battery system.
Protecting the Disc Mechanism: Avoid inserting any for-
eign objects into the slot of this player. Failure to observe
this precaution may cause malfunction of this
unit.
Repairs: Contact our customer service representa-
tives. Do not attempt to disassemble or adjust this
product yourself.
Installation:
The unit should be installed in a horizontal
position.
Cleaning: Use a soft cloth with some purified water to
clean the screen. Do not use any cleaner or chemical to clean the screen. Usually, a dry cloth will do.
Warnings:
Be careful not to drop or apply undue pressure to the
front panel of monitor. If the screen cracks due to misuse, the warranty will be voided!
The driver should neither watch the display nor
operate the system while driving.
Watching the display or operating the system will
distract the driver from looking ahead of the vehicle
and can cause accidents. Always stop the vehicle
in a safe location and use the parking brake before
watching the display or operating the system. In
some states and countries, passengers are also prohibited from watching the display.
Never install the product in a location where it interferes with your field of vision.
Safety Information
CAUTION:
THIS MOBILE DVD PLAYER IS A CLASS I LASER
PRODUCT. HOWEVER, THIS MOBILE DVD PLAYER USES
A VISIBLE/INVISIBLE LASER BEAM WHICH COULD CAUSE
HAZARDOUS RADIATION EXPOSURE IF DIRECTED.
BE SURE TO OPERATE THE MOBILE DVD PLAYER
CORRECTLY AS INSTRUCTED. USE OF CONTROLS OR
ADJUSTMENTS OR PERFORMANCE OF PROCEDURES
OTHER THAN THOSE SPECIFIED HEREIN MAY RESULT
IN HAZARDOUS RADIATION EXPOSURE. DO NOT OPEN
COVERS AND DO NOT REPAIR YOURSELF. REFER
SERVICING TO QUALIFIED PERSONNEL.
CAUTION:
FCC REGULATIONS STATE THAT ANY UNAUTHORIZED
CHANGES OR MODIFICATIONS TO THIS EQUIPMENT
MAY VOID THE USER’S AUTHORITY TO OPERATE IT.
WARNING:
• TO REDUCE THE RISK OF FIRE OR ELECTRIC
SHOCK, DO NOT EXPOSE THIS EQUIPMENT TO
RAIN OR MOISTURE.
• THIS DEVICE IS INTENDED FOR CONTINUOUS
OPERATION.
• TO REDUCE THE RISK OF FIRE OR ELECTRIC
SHOCK AND ANNOYING INTERFERENCE, USE
ONLY THE RECOMMENDED ACCESSORIES.
This product incorporates copyright protection technology that is protected by method claims of certain U.S.
patents and other intellectual property rights owned by
Magnadyne Corporation and other rights owners. Use of
this copyright protection technology must be authorized
by Magnadyne Corporation and is intended for home
and other limited viewing uses only unless otherwise
authorized by Magnadyne Corporation. Reverse engineering or disassembly is prohibited.
Region Management Information:
This Mobile DVD Player is designed and manufactured
to respond to the Region Management Information
that is recorded on a DVD disc. If the Region number
described on the DVD disc does
not correspond to the
Region number of this Mobile DVD Player, this Mobile
DVD Player cannot play this disc.
Entertainment Center Functions and Locations . . . 3-4
Remote Control Functions and Locations . . . . . . . 4
System Menu Setup . . . . . . . . . . . . . . . . . . . . . 5
TFT Menu Setup . . . . . . . . . . . . . . . . . . . . . . . 6
Audio Control . . . . . . . . . . . . . . . . . . . . . . . . . . 7
Playing a Movie Disc. . . . . . . . . . . . . . . . . . . . . 8-10
Playing a MP3 File . . . . . . . . . . . . . . . . . . . . . 10-12
Auxiliary Audio/Video Inputs . . . . . . . . . . . . . . . . 12
Dome Light Operation . . . . . . . . . . . . . . . . . . . . 13
Headphone Operation . . . . . . . . . . . . . . . . . . 13
Wiring . . . . . . . . . . . . . . . . . . . . . . . . . . . . . . . 14
Installation . . . . . . . . . . . . . . . . . . . . . . . . . . . 15
Warranty . . . . . . . . . . . . . . . . . . . . . . . . . . . . 16
Index
Use this Product Safely
3
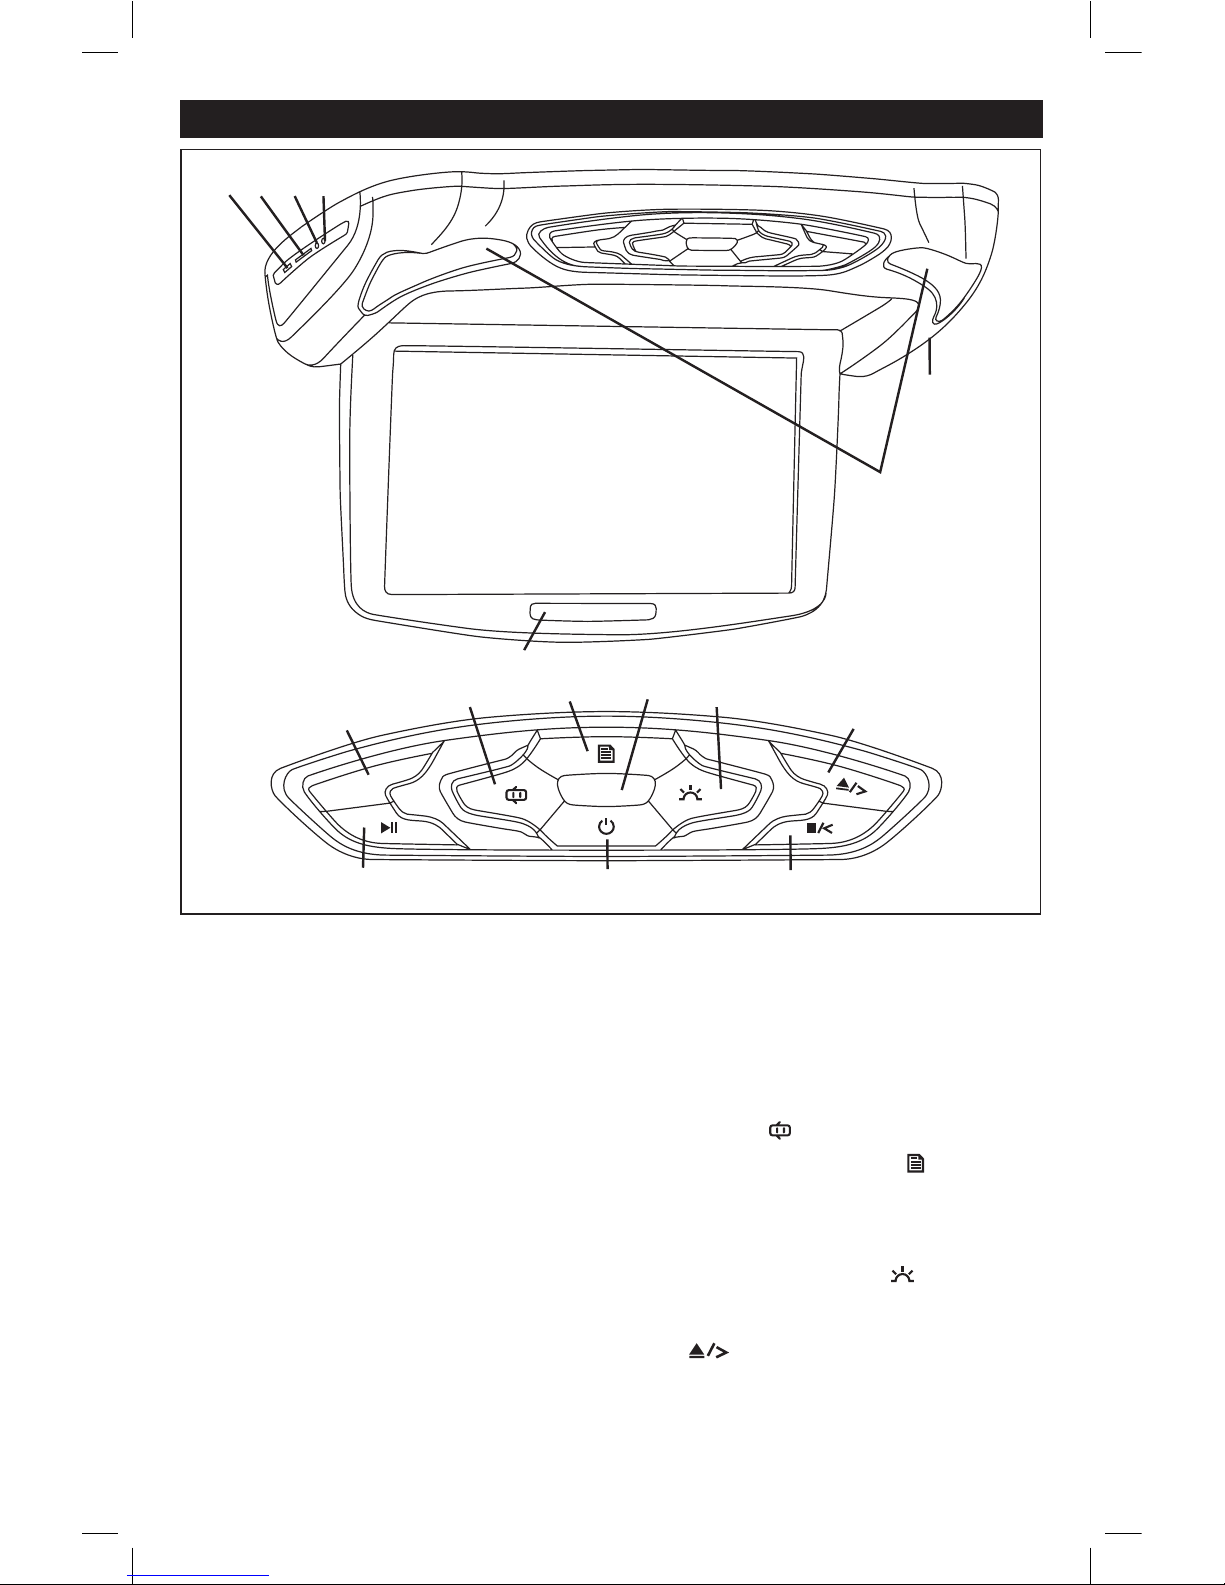
Entertainment Center Functions and Locations
1. USB Slot: Insert a USB drive to play videos, view
pictures or listen to music. Use the controls on the
MV1055 or remote control to access the files on
the drive.
2. SD Card Slot: Insert a SD card with the contacts
facing towards the roof to play videos, view pictures or listen to music. Use the controls on the
MV1055 or remote control to access the files on
the SD card.
3.
3.5mm Auxiliary Audio/Video Input Jack: Plug-in
a device with a 3.5mm audio/video input plug
to
play videos, view pictures or listen to music. The
MV1055 will not control the device so use the controls on the input device to access files.
4.
3.5mm Headphone Jack: Plug-in headphones with a
3.5mm jack to hear the audio.
Note: Headphone will only work when the internal
speakers are activated. (see page 7)
5.
Disc Slot: Insert a disc into the slot with label facing up.
6. Dome Lights
7. IR Repeater
: The audio signal is converted to an
infrared light and transmitted to the headphones.
8. Mode Button: Press to select between sources:
DVD, AV1 (internal audio/video RCA inputs) or
AV2 (external 3.5mm audio/video input jack).
9. Dome Light Door Button: When the vehicle’s door
is open the dome lights automatically turn on. To
turn off the dome lights when the vehicle’s door is
open press the button.
10. System Menu Button: Press the button to
access the TFT Menu Setup features.
11. Remote Control Sensor: Point the remote control
at this area to remotely control the MV1055.
12. Dome Light Button: Press the button to turn
on or off the dome light.
13. Disc Eject/TFT Menu Adjustment Button: Press
the button to eject the disc from the unit.
Note: For TFT Menu Setup button function refer
to the TFT Menu Setup section of this manual for
more information. (Page 6)
1
2
3
4
6
7
M
O
D
E
5
11
8
13
9
10
12
14
15
16
4
Entertainment Center Functions and Locations (continued)
14. Disc Stop/TFT Menu Adjustment Button: Press
the button to pre-stop disc play. Press the
play button to resume play where the disc
play was stopped. Press the button twice to
stop disc play then press the play button to
start play from the beginning of the disc.
Note: For TFT Menu Setup button function refer
to the TFT Menu Setup section of this manual for
more information. (Page 6)
15. Power Button: Press this button to turn the
entertainment center on or off.
16. Play/Pause Button: Press the button to pause
play, press again to resume play.
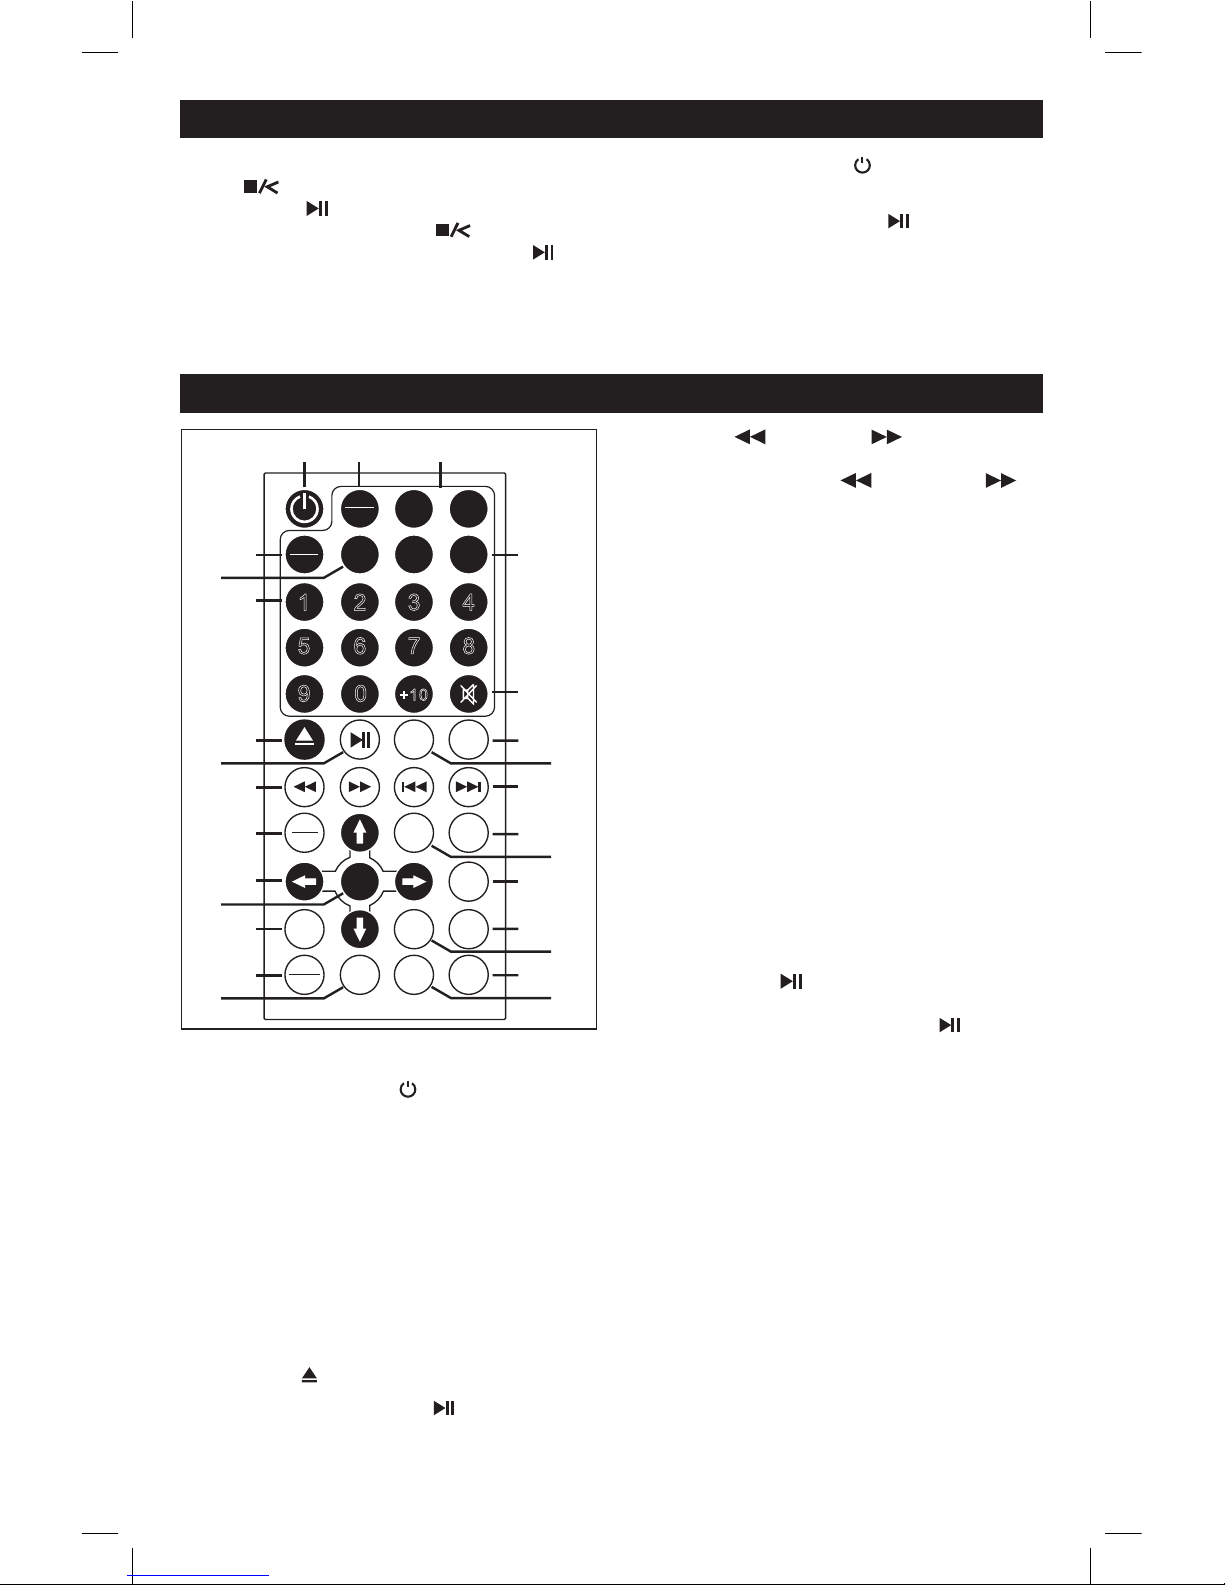
Remote Control Functions and Locations
Note: Install the battery before operating the remote.
1. Power Button: Press this button to turn the
entertainment center on or off.
2. TFT Menu Button: Press to access the TFT Menu
Setup features of the MV1055.
3. Channel - and + Buttons: No function.
4.
Mode Button (AV/TV DVD): Press to select between
sources: DVD, AV1 (internal audio/video RCA inputs)
or AV2 (external 3.5mm audio/video input jack).
5. Auto Button: No function.
6. Numeric Key Pad
7. Eject Button : Press to eject the disc.
8. Play/Pause Button: Press the button to pause
play, press again to resume play.
9.
Backwards and Forward Play Buttons: Use
these buttons to change the play speed to x2, x4, x8
or x20 either backwards ( ) or forwards ( ).
10. DVD Menu Button: Press to access the DVD’s
menu features.
11. Navigation Buttons: Press to navigate in menus
up, down, left or right.
12. Enter Button: Confirms the selected item.
13. Return Button: Returns to previous menu in MP3
mode.
14. Disc, SD Card and USB Mode Selector: Press to
select between DISC (DVD/CD), CARD (SD card)
or USB (USB drive) mode.
15. DVD Audio Button (R/L): Changes the language
on multi-language movie disc.
16.
Volume Buttons: Press the VOL + to increase the
volume or press the VOL - to decrease the volume.
17. Mute Button: Mutes the volume.
18. Repeat Button: Press to repeat chapters, titles,
tracks and discs.
19. Stop Button: Press to pre-stop disc play. Press
the play button to resume play where the disc
play was stopped. Press the button twice to stop
disc play then press the play button to resume
play from the beginning of the disc.
20. Next and Previous Selection: In the movie mode
pressing these buttons will select the next or previous chapter. In the music mode pressing these
buttons will select next or previous track/file.
21. Setup Button: Access the System Setup menus.
22.
Display Button (DISP): Displays source information.
23. Program Button: Programs play sequence.
24. Subtitle Button: Accesses movie disc’s subtitle
languages.
25.
Title Button: Displays title information if available.
26. Zoom Button: Enlarges or reduces the size of
picture.
27. A-B Button: Record a selected section of a movie
or music to play repeatedly.
TFT
MENU
CH+
CH-
AV/T V
DVD
AUTO
1 2 3 4
5 6 7 8
9 0
+1 0
STOP
REPEAT
DVD
MENU
DISP
SETUP
ENTER
PROGRAM
RETURN
TITL E
SUBTITLE
SD
USB
R/L
A-B
ZOOM
VOL + VOL-
1
2
3
4
5
6
7
8
9
10
11
13
15
14
12
16
17
18
19
20
21
22
24
25
23
26
27

5
System Menu Setup
System Menu Setup:
1. Press the SETUP button on remote control to enter
the system menu setup screen.
2. Use the , , and buttons to select the menu
item you want to change.
3. Once the menu item is selected, press the button to activate options for that menu item.
4. Use the and buttons to select the option you
want then press the ENTER button.
5. Press the SETUP button to exit the system menu
setup screen.
System Menu Setup Items:
TV SYSTEM
PAL
NTSC
AUTO
POWER RESUME (The disc play will resume play-
ing when the power was turned off )
ON
OFF
AUTO PLAY SETTING (Disc auto play)
ON
OFF
TV TYPE
4:3 PS
4:3 LB
16:9
PASSWORD (Password to lock Ratings menu)
_ _ _ _
1. Enter the password “0000” and press the ENTER
button. The unlock symbol will appear next
to _ _ _ _.
2. Go to the Rating sub-menu and make the necessary change.
3. Return to the Password sub-menu and enter
“0000” password and press the ENTER button.
The lock symbol will appear next to _ _ _ _.
The system is now password protected.
RATING (For movies)
1 KID SAFE
2 G
3 PG
4 PG13
5 PG-R
6 R
7 NC-17
8 ADULT
DEFAULT (Return all setting to default settings)
RESTORE
Language Setup Items:
OSD LANGUAGE (On Screen Display language)
ENGLISH
CHINESE
GERMAN
SPANISH
FRENCH
PORTUGUESE
RUSSIAN
AUDIO LANG
CHINESE
ENGLISH
RUSSIAN
SPANISH
GERMAN
PORTUGUESE
SUBTITLE LANG
CHINESE
ENGLISH
RUSSIAN
SPANISH
GERMAN
PORTUGUESE
MENU LANG
CHINESE
ENGLISH
RUSSIAN
SPANISH
GERMAN
PORTUGUESE
DVD
MENU
DISP
SETUP
ENTER
PROGRAM
TV SYSTEM
POWER RESUME
AUTO PLAY
TV TYPE
PASSWORD
RATING
DEFAULT
 Loading...