

Page 1
S
PRINTER
Bedienungsanleitung / Instruction Manual: MovieTech SPRINTER Seite 1 von 18
Page 2

S
PRINTER
Bedienungsanleitung / Instruction Manual: MovieTech SPRINTER Seite 2 von 18
Inhalt
Lieferumfang Seite 03
Sicherheitshinweise Seite 04
Aufbau: Pushbar mit Lenker Seite 06
Nutzung: Pushbar mit Lenker Seite 09
Aufbau: Anbringung von Plattformen Seite 11
Nutzung: Dolly auf Schienen Seite 14
Mögliches Dolly-Zubehör „SPRINTER“ Seite 16
Umsetzen des Drehkreuzes Seite 17
Feststellen des Drehkreuzes Seite 18
Page 3
S
PRINTER
Bedienungsanleitung / Instruction Manual: MovieTech SPRINTER Seite 3 von 18
Vielen Dank, dass Sie sich für den Kauf des MovieTech Leicht-Dolly „SPRINTER“
entschieden haben.
Lieferumfang:
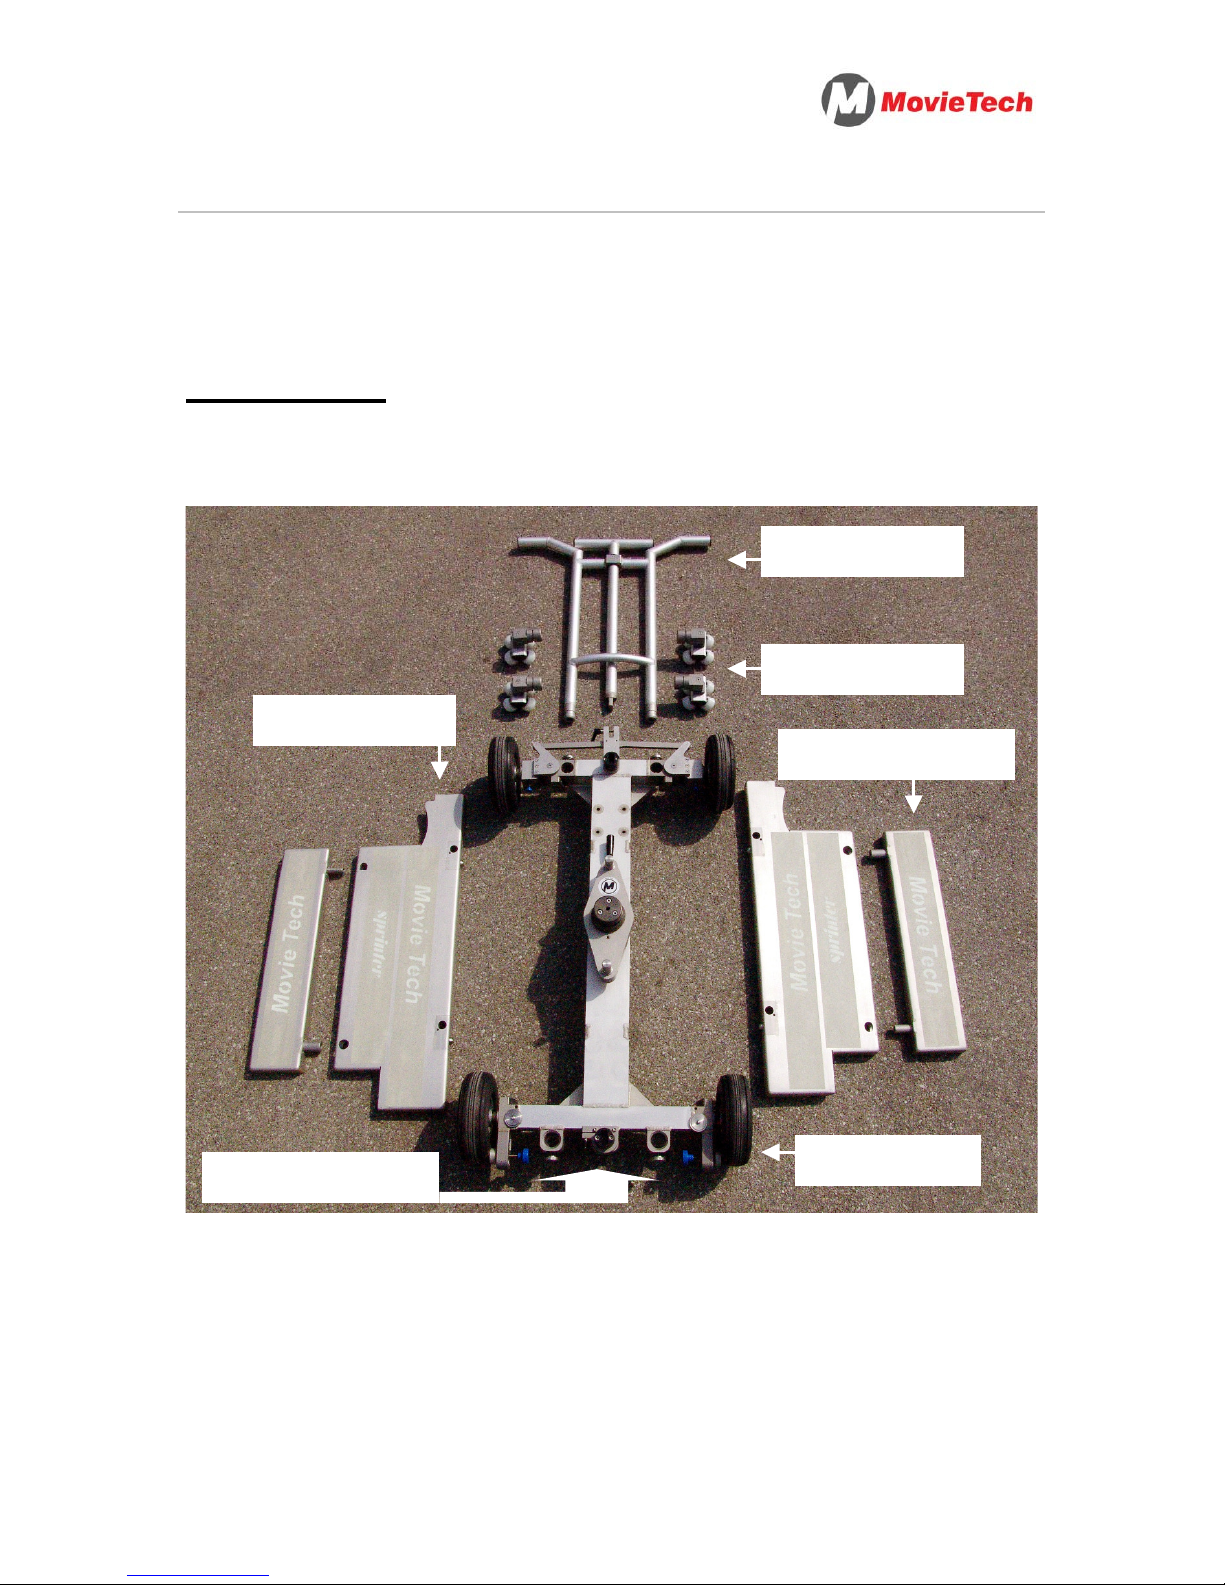
Der SPRINTER wird Ihnen mit folgenden Teilen ausgeliefert:
Hinweis: Die Abbildungen in dieser Anleitung können produktionsbedingt vom vorliegenden Produkt abweichen.
Pushbar mit Lenker
2 Paar Schienenräder
2 Paar Lufträder
2 Standard-Plattformen
2 Erweiterungs-Plattformen
Dolly-Basis mit Drehkreuz
Page 4

S
PRINTER
Bedienungsanleitung / Instruction Manual: MovieTech SPRINTER Seite 4 von 18
Sicherheitshinweise!
Bitte beachten Sie vor dem Aufbau und der Nutzung des SPRINTER bitte folgende
Hinweise:
Bei einem Radwechsel den Wagen stets entlasten.
Achten Sie auf die maximale Beladung. Die Lufträder können aufgrund zu
hohen Drucks platzen.
Der SPRINTER darf nur auf stabilem und ebenem Untergrund eingesetzt
werden.
Geschwindigkeit bitte stets anpassen. Bei Kurvenfahrten gilt extreme Vorsicht.
Bei schiefen Ebenen muss der Sprinter so gesichert sein, dass er nicht ins
Rollen kommt.
Vorsicht vor möglichen Einquetschungen beim Aufbau und während des
Betriebs. Zum Beispiel beim Hochheben der Vorderachse!
Zu Freileitungen (Hochspannung) ist ein ausreichend großer
Sicherheitsabstand einzuhalten. Bei unbekannter Spannung ist ein
Mindestabstand von 5m einzuhalten.
Die maximal zulässige Windgeschwindigkeit beachten.
Während des Aufbauvorgangs und beim Betrieb des Jib Arms ist stets genau
auf den korrekten Gewichtsausgleich zu achten.
Schienensysteme sind ohne Gefälle zu verlegen. Die Schienen sind so zu
nivellieren, so dass keine Seitenneigung entsteht.
Keine Fortbewegung bevor die Teile (z.B. Kamera) gesichert sind.
Vermeiden Sie Kontakt mit den Rädern während der Fortbewegung.
Der gesamte Fahrbereich muss unter allen Umständen frei von Hindernissen
sein.
Berücksichtigen Sie sicherheitstechnisch die örtlichen Gegebenheiten.
Lassen Sie den aufgebauten Dolly nicht unbeaufsichtigt. Gegen unbefugte
Benutzung sichern.
Bedienung nur durch geschultes und qualifiziertes Personal.
Page 5

S
PRINTER
Bedienungsanleitung / Instruction Manual: MovieTech SPRINTER Seite 5 von 18
Beim Verfahren besteht die Möglichkeit des Anstoßens an Hindernissen oder
Personen. Die gewünschten Kameraeinstellungen sind daher ausreichend zu
proben.
Die maximale Beladung von 300 kg nicht überschreiten.
Vermeiden Sie rückartige Bewegungen vor allem beim Jib-Arm Einsatz.
Vor jeder Benutzung muss durch Sicht- und Funktionsprüfung die Sicherheit
beim Einsatz geprüft werden (gemäß DIN 15999).
Wegen der Gefahr eines Blitzschlages ist bei einem nahenden Gewitter der
Betrieb einzustellen.
Stets auf die korrekte Gleichgewichtslage achten.
Page 6
S
PRINTER
Bedienungsanleitung / Instruction Manual: MovieTech SPRINTER Seite 6 von 18
Aufbau des Dolly: Pushbar mit Lenker
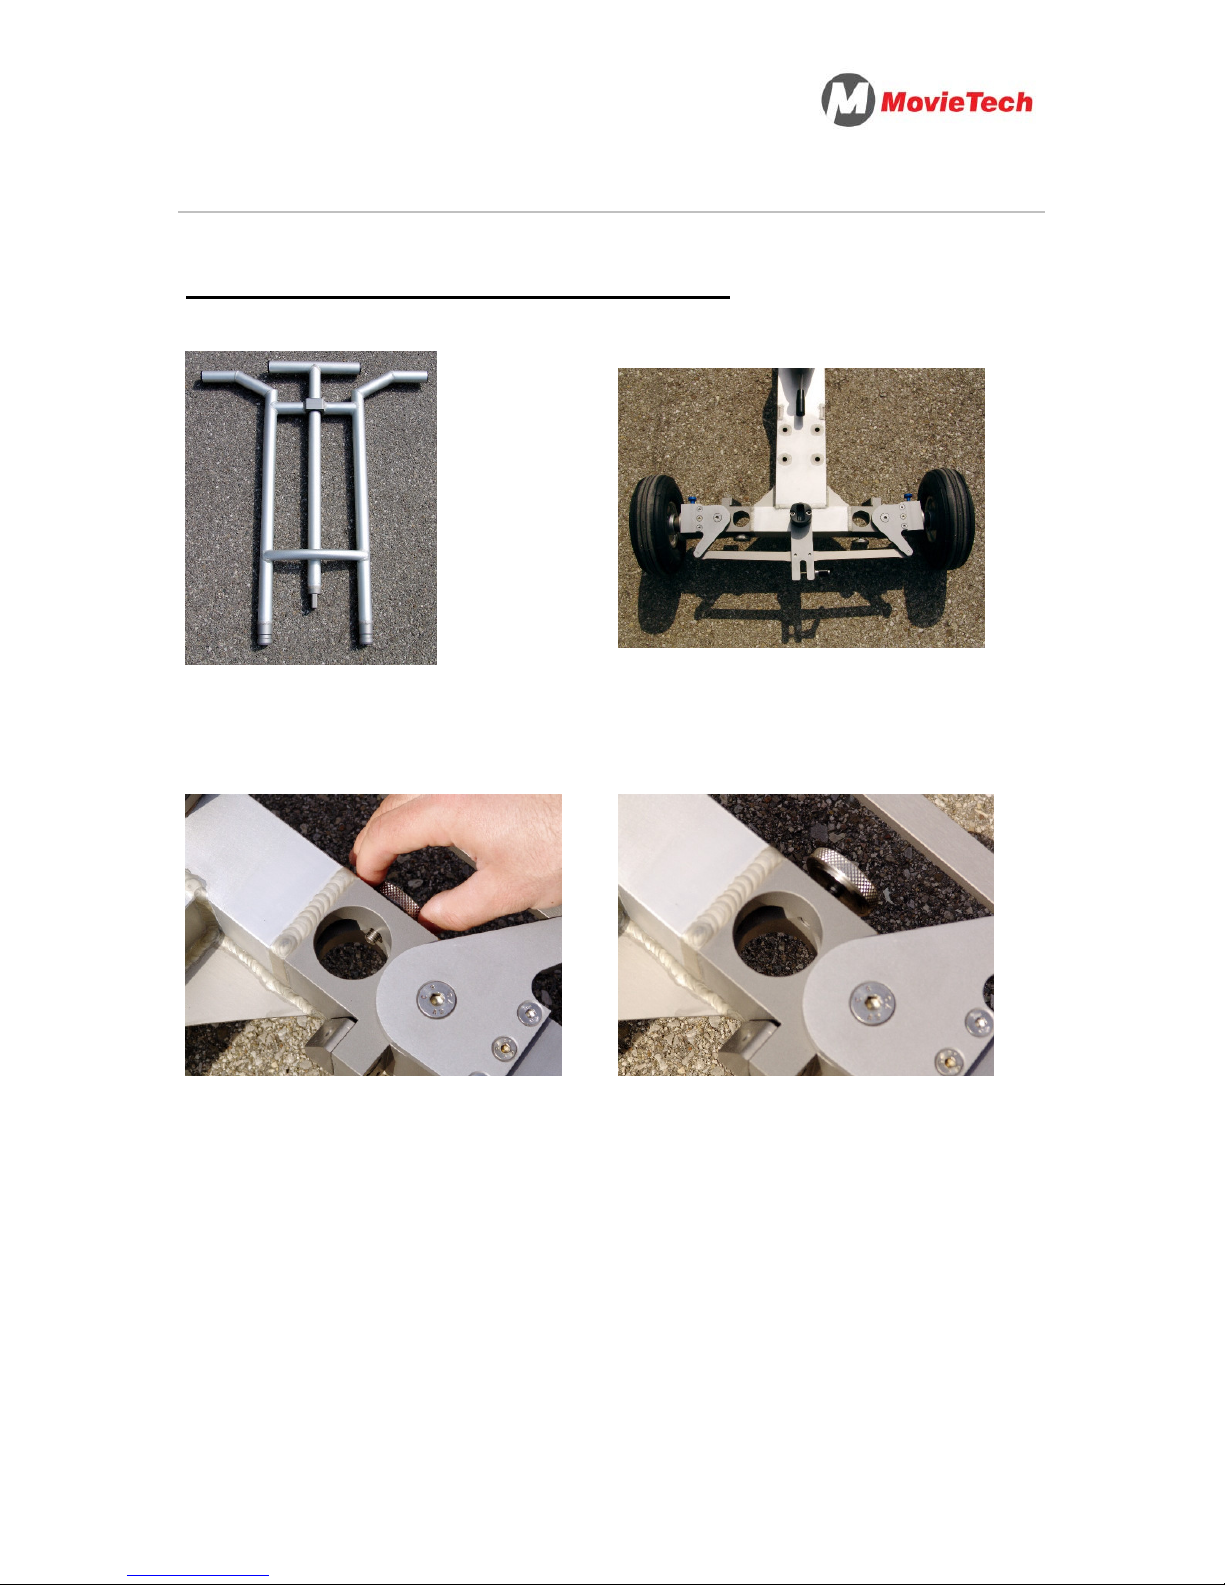
1) Legen Sie sich die Pushbar für den
Aufbau parat.
2) Stellen Sie zudem den Dolly in
Position.
3) Drehen Sie die Schrauben soweit
aus der Halterung, damit die Pushbar
eingesetzt werden kann.
4) Die Öffnung - wie im Bild zu sehen -
sollte für die Pushbar-Montage
ausreichen.
Page 7
S
PRINTER
Bedienungsanleitung / Instruction Manual: MovieTech SPRINTER Seite 7 von 18
Aufbau des Dolly: Pushbar mit Lenker
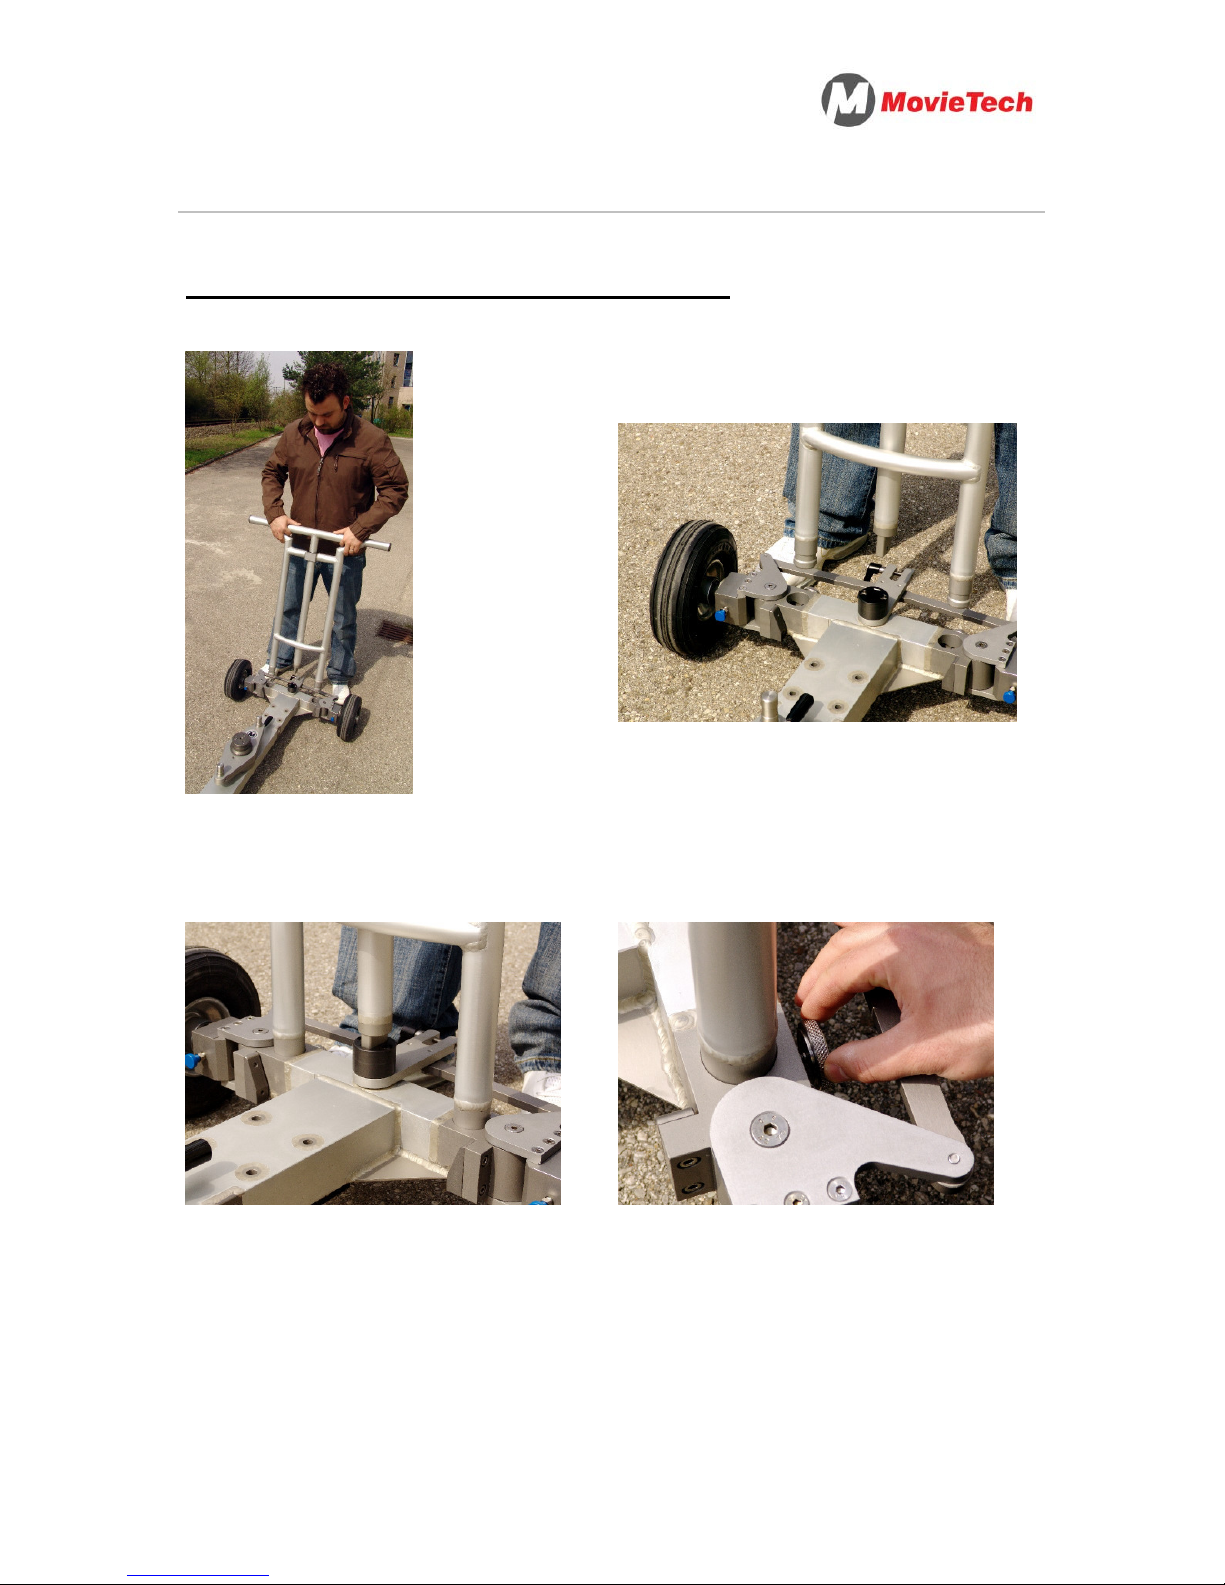
5) Bringen Sie die Pushbar in eine
senkrechte Position.
6) Drücken Sie nun die Pushbar in die
vorgesehenen Löcher.
7) Detailansicht von Punkt 6) 8) Ziehen Sie nun die
Sicherungschrauben zur Fixierung an
Page 8
S
PRINTER
Bedienungsanleitung / Instruction Manual: MovieTech SPRINTER Seite 8 von 18
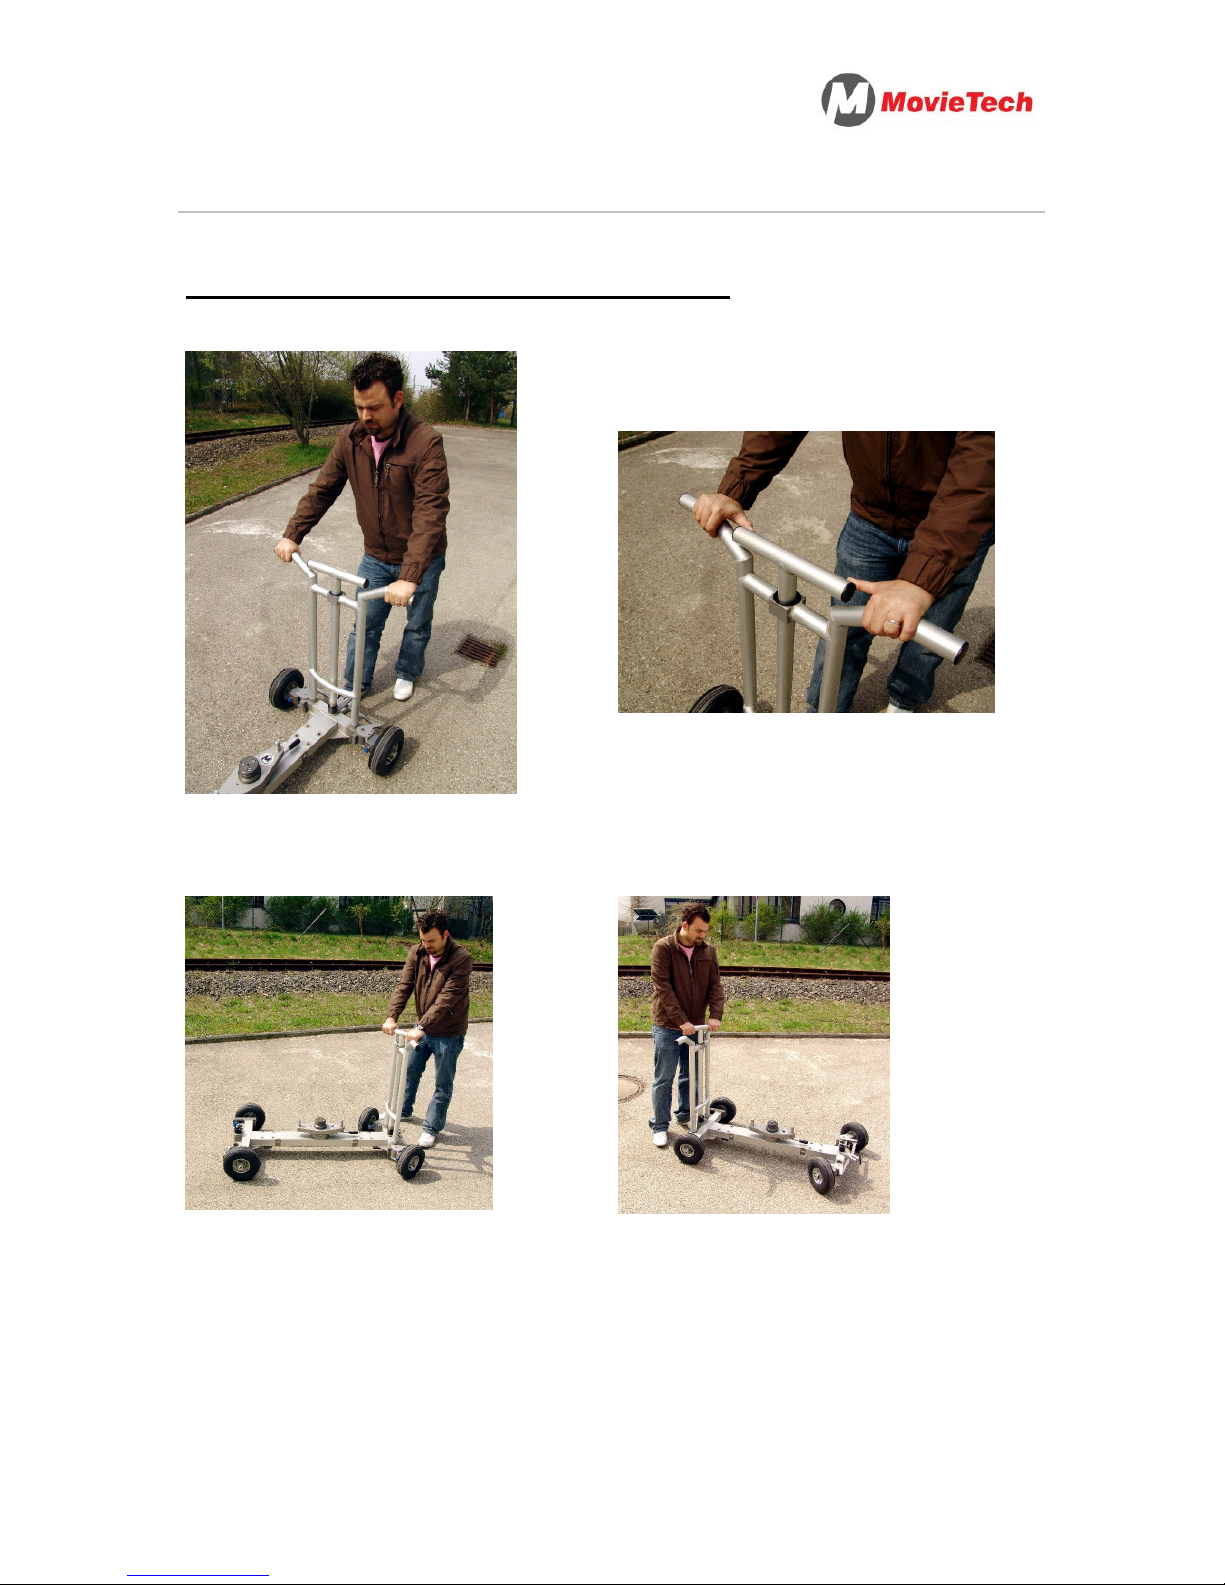
Aufbau des Dolly: Pushbar mit Lenker
9) Lenkbeispiel Handhaltung A 10) Lenkbeispiel Handhaltung B
11) Lenkbeispiel Frontsteuerung 12) Lenkbeispiel rückseitige Steuerung
Page 9
S
PRINTER
Bedienungsanleitung / Instruction Manual: MovieTech SPRINTER Seite 9 von 18
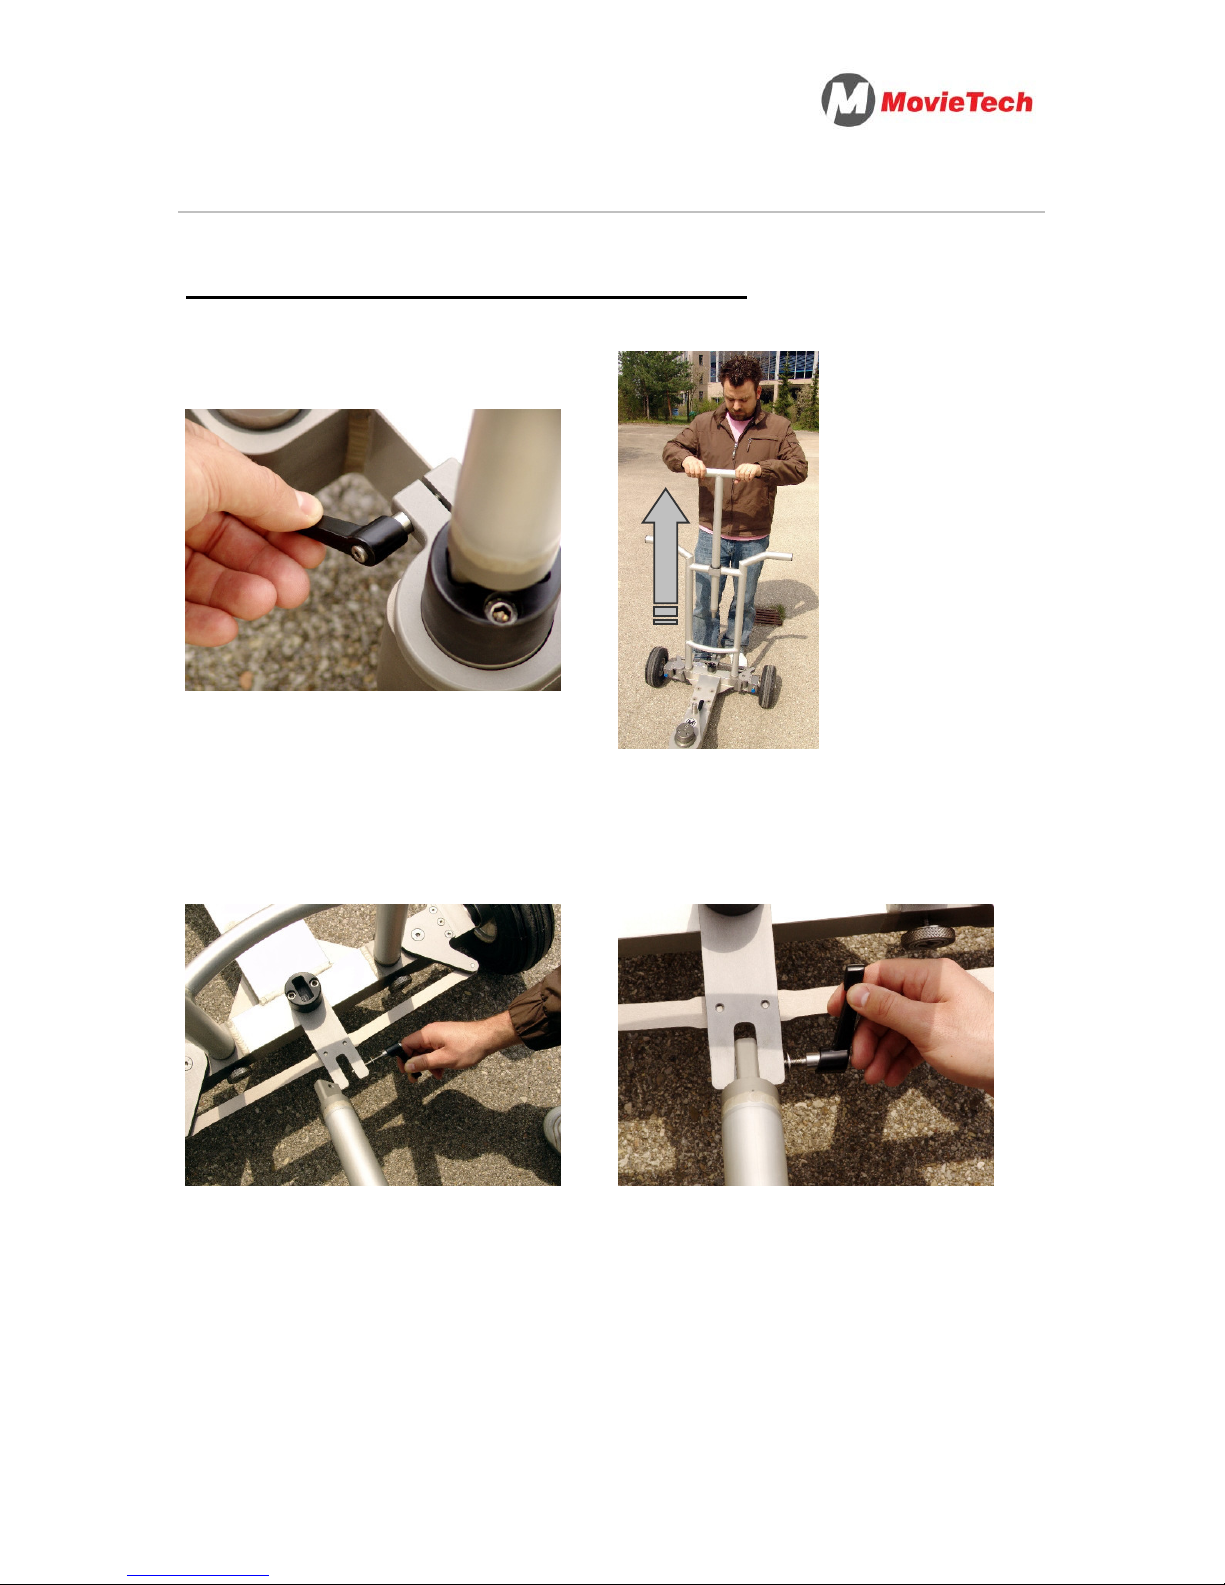
Nutzung des Dolly: Pushbar mit Lenker
13) Durch einen Klemmhebel an der
Lenkstangen-Halterung kann der
Lenkwinkel fixiert werden.
14) Um die Ziehfunktion des Dollies zu
nutzen, müssen Sie die Lenkstange
aus der Halterung ziehen.
15) Nun den Klemmhebel soweit
herausschrauben, dass die
Zuglenkstange in die Halterung
geschoben werden kann.
16) Die Lenkstange in der Öffnung
mithilfe des Klemmhebels fixieren.
Page 10
S
PRINTER
Bedienungsanleitung / Instruction Manual: MovieTech SPRINTER Seite 10 von 18
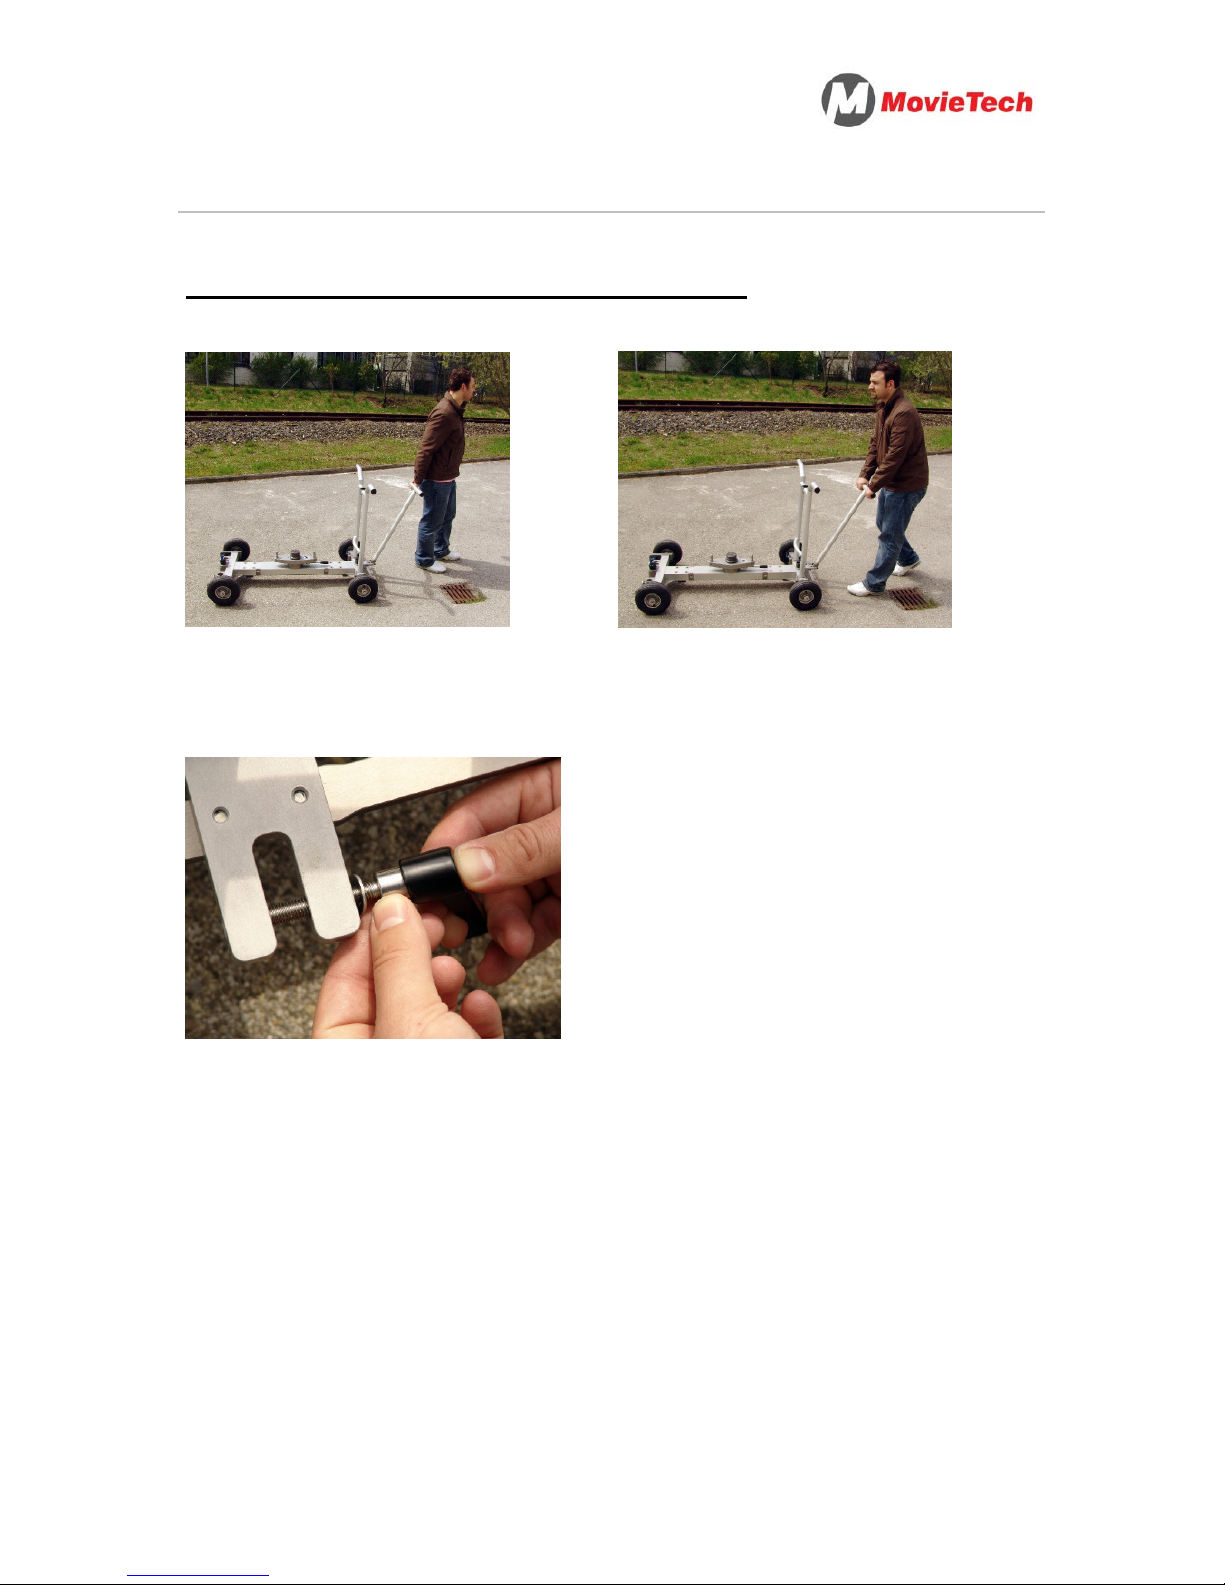
Nutzung des Dolly: Pushbar mit Lenker
17) Bildbeispiel A: Ziehen des Dollies 18) Bildbeispiel B: Schieben des
Dollies
19) Tipp: Für einen beschleunigten
Schraubvorgang, ziehen Sie den
Klemmhebel mit Druck des Daumens
auf die Schraube heraus und drehen
die Schraube am glatten Teil mit dem
Daumen und Zeigefinger der anderen
Hand.
Page 11
S
PRINTER
Bedienungsanleitung / Instruction Manual: MovieTech SPRINTER Seite 11 von 18
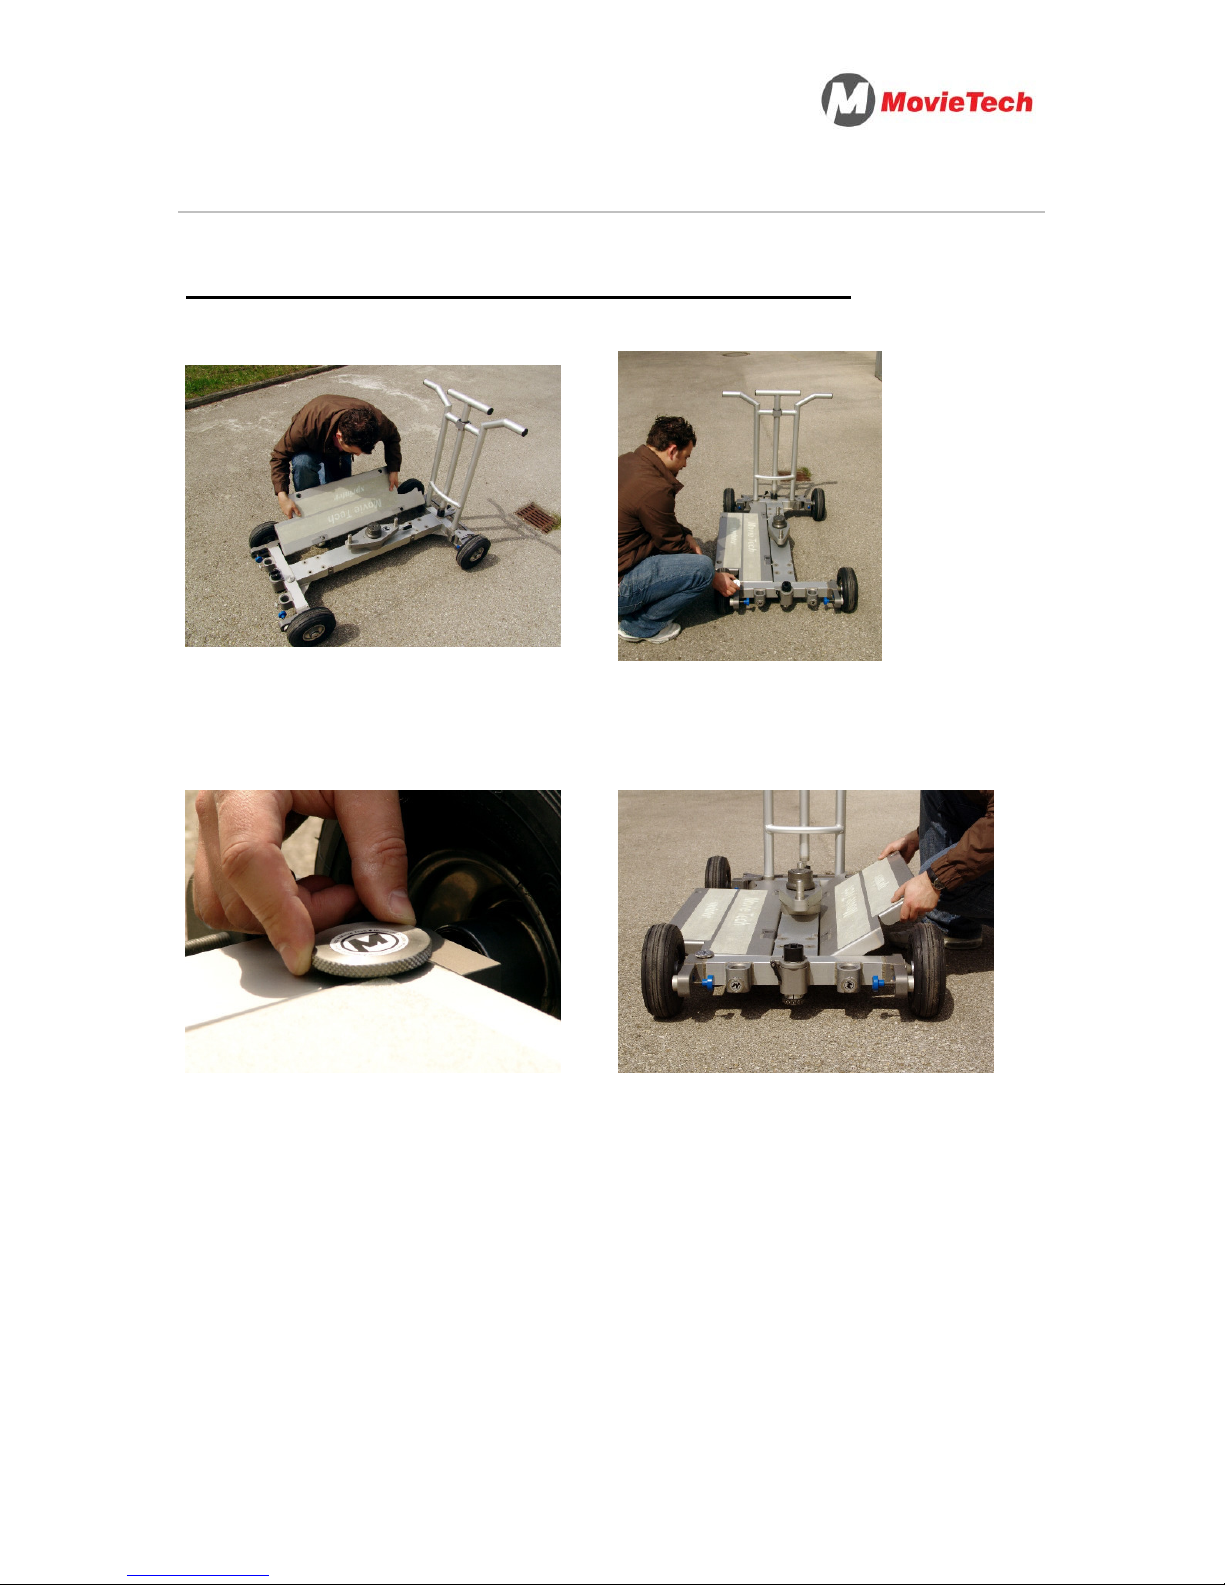
Aufbau des Dolly: Anbringung der Plattformen
20) Hängen Sie die Plattform seitlich in
die Aussparungen am Dolly.
21) Fixieren Sie nun die Plattform
mithilfe der Sicherungsschraube.
22) Detailansicht der
Sicherungsschraube
23) Die Montage der zweiten Plattform
erfolgt wie bei den Punkten 20) & 21)
Page 12
S
PRINTER
Bedienungsanleitung / Instruction Manual: MovieTech SPRINTER Seite 12 von 18
Aufbau des Dolly: Anbringung der Plattformen
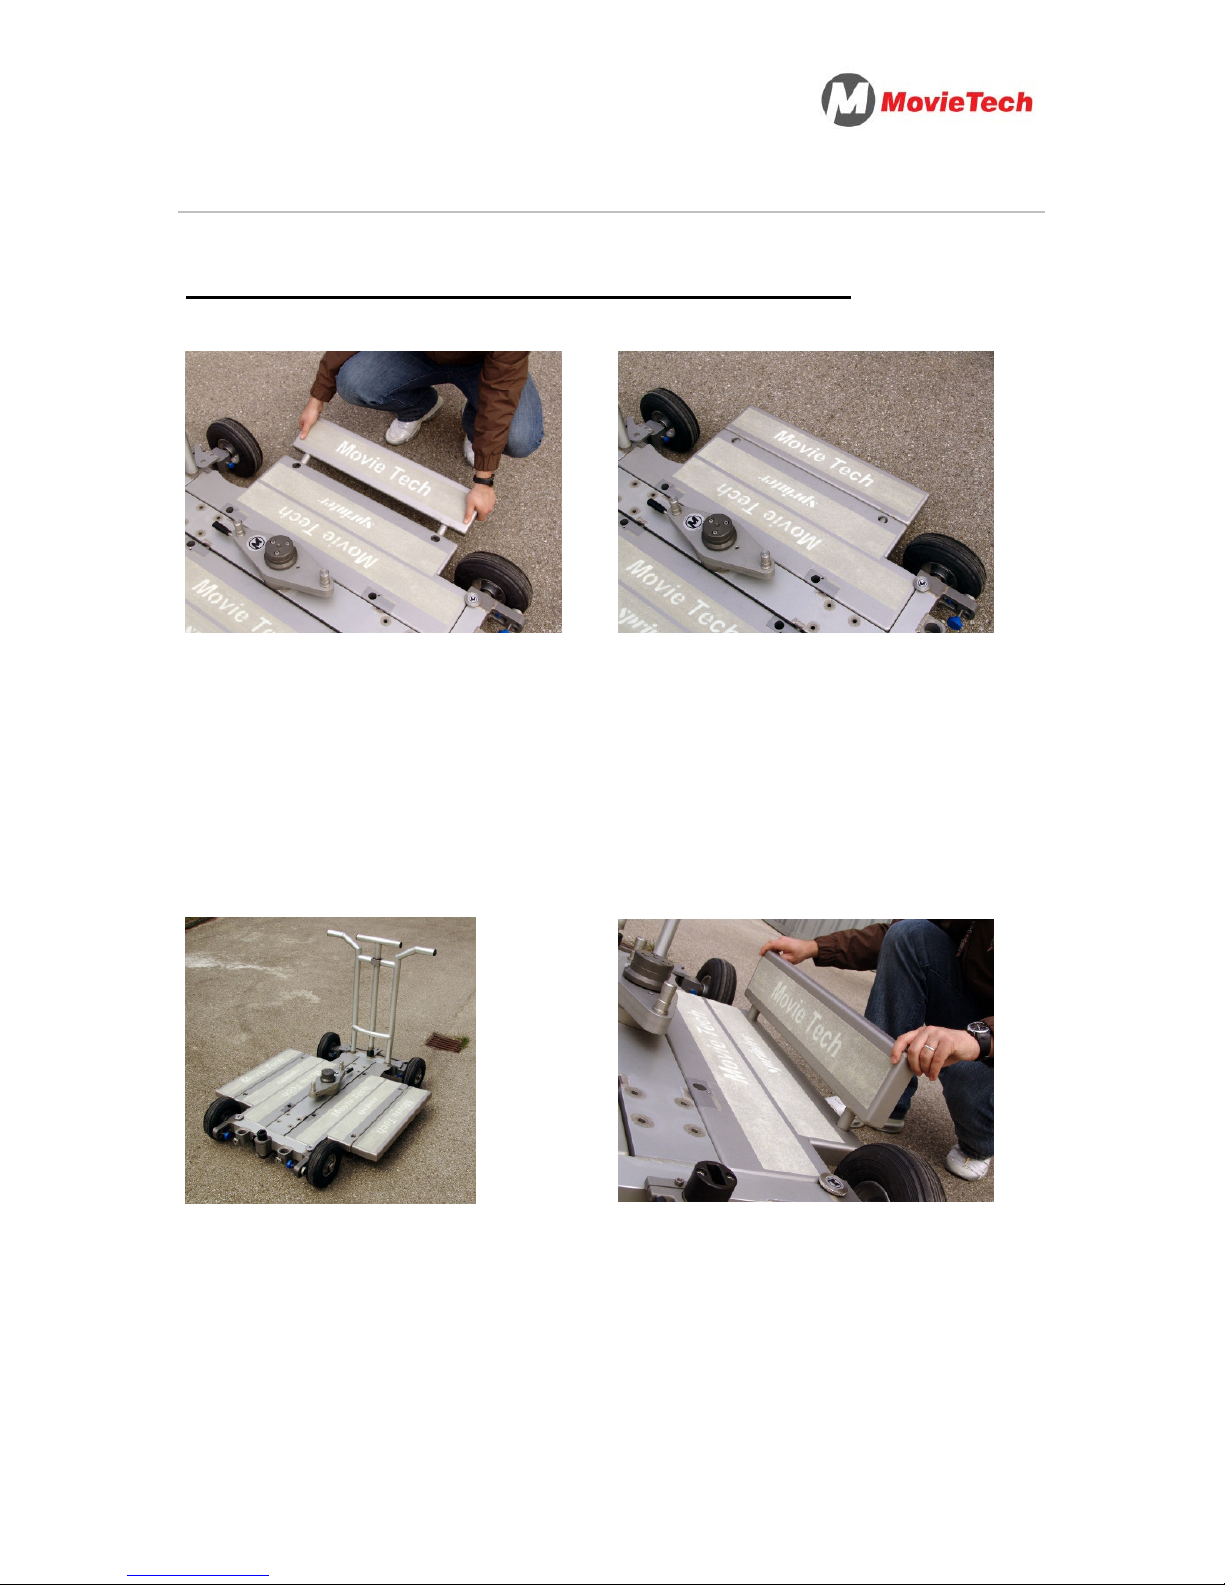
23) Zur Verbreiterung der Plattformen
führen Sie die Zusatzplattform mit den
Bolzen parallel in die vorgesehenen
Öffnungen. Eine weitere Sicherung ist
nicht erforderlich. Achten Sie jedoch
darauf, dass die Erweiterung
gleichmäßig montiert wird, um
Verkanten zu vermeiden.
24) Korrekt angebrachte
Zusatzplattform
25) Dolly mit allen Plattformen und
Luftreifen
26) Die Erweiterungsplattformen
können auch hochkant montiert
werden, z.B. zum Transport von
Zubehör
Page 13
S
PRINTER
Bedienungsanleitung / Instruction Manual: MovieTech SPRINTER Seite 13 von 18
Aufbau des Dolly: Anbringung der Plattformen
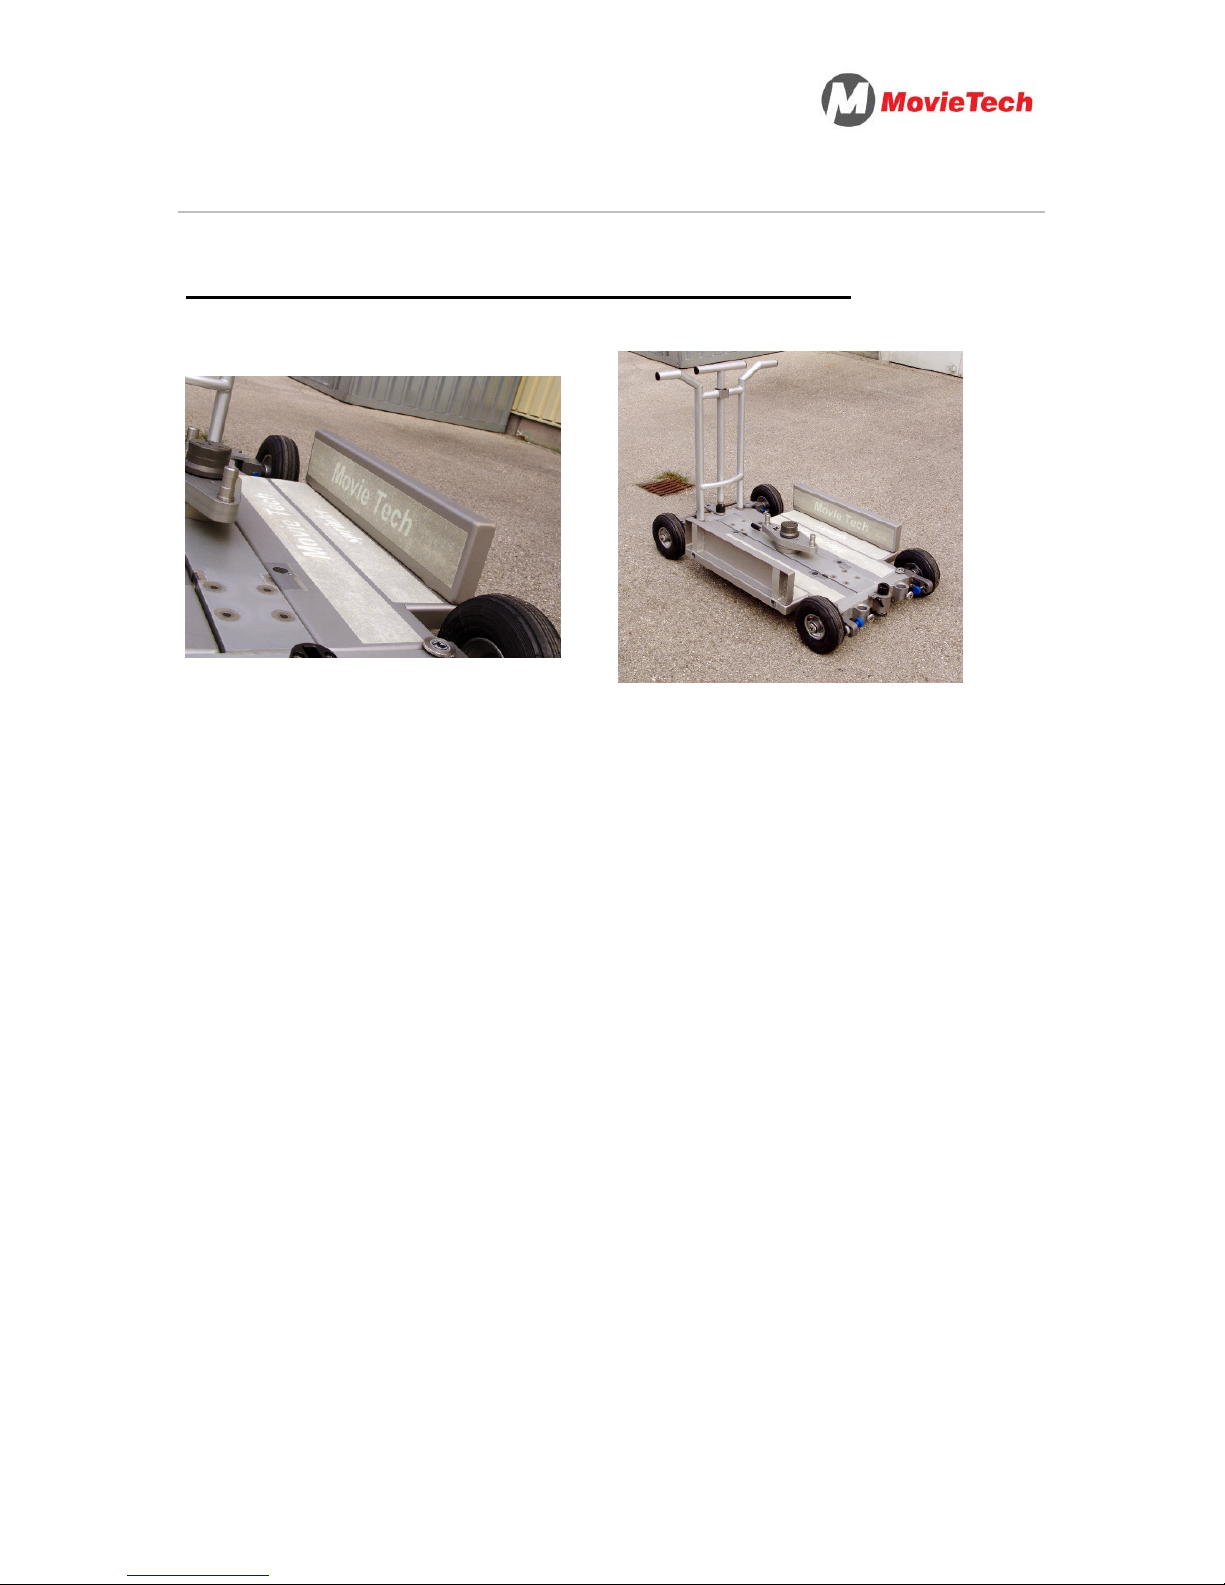
27) Korrekt angebrachte
Zusatzplattform (hochkant)
28) Gesamtansicht des Dollies
Page 14
S
PRINTER
Bedienungsanleitung / Instruction Manual: MovieTech SPRINTER Seite 14 von 18
Nutzung des Dollys auf Schienen
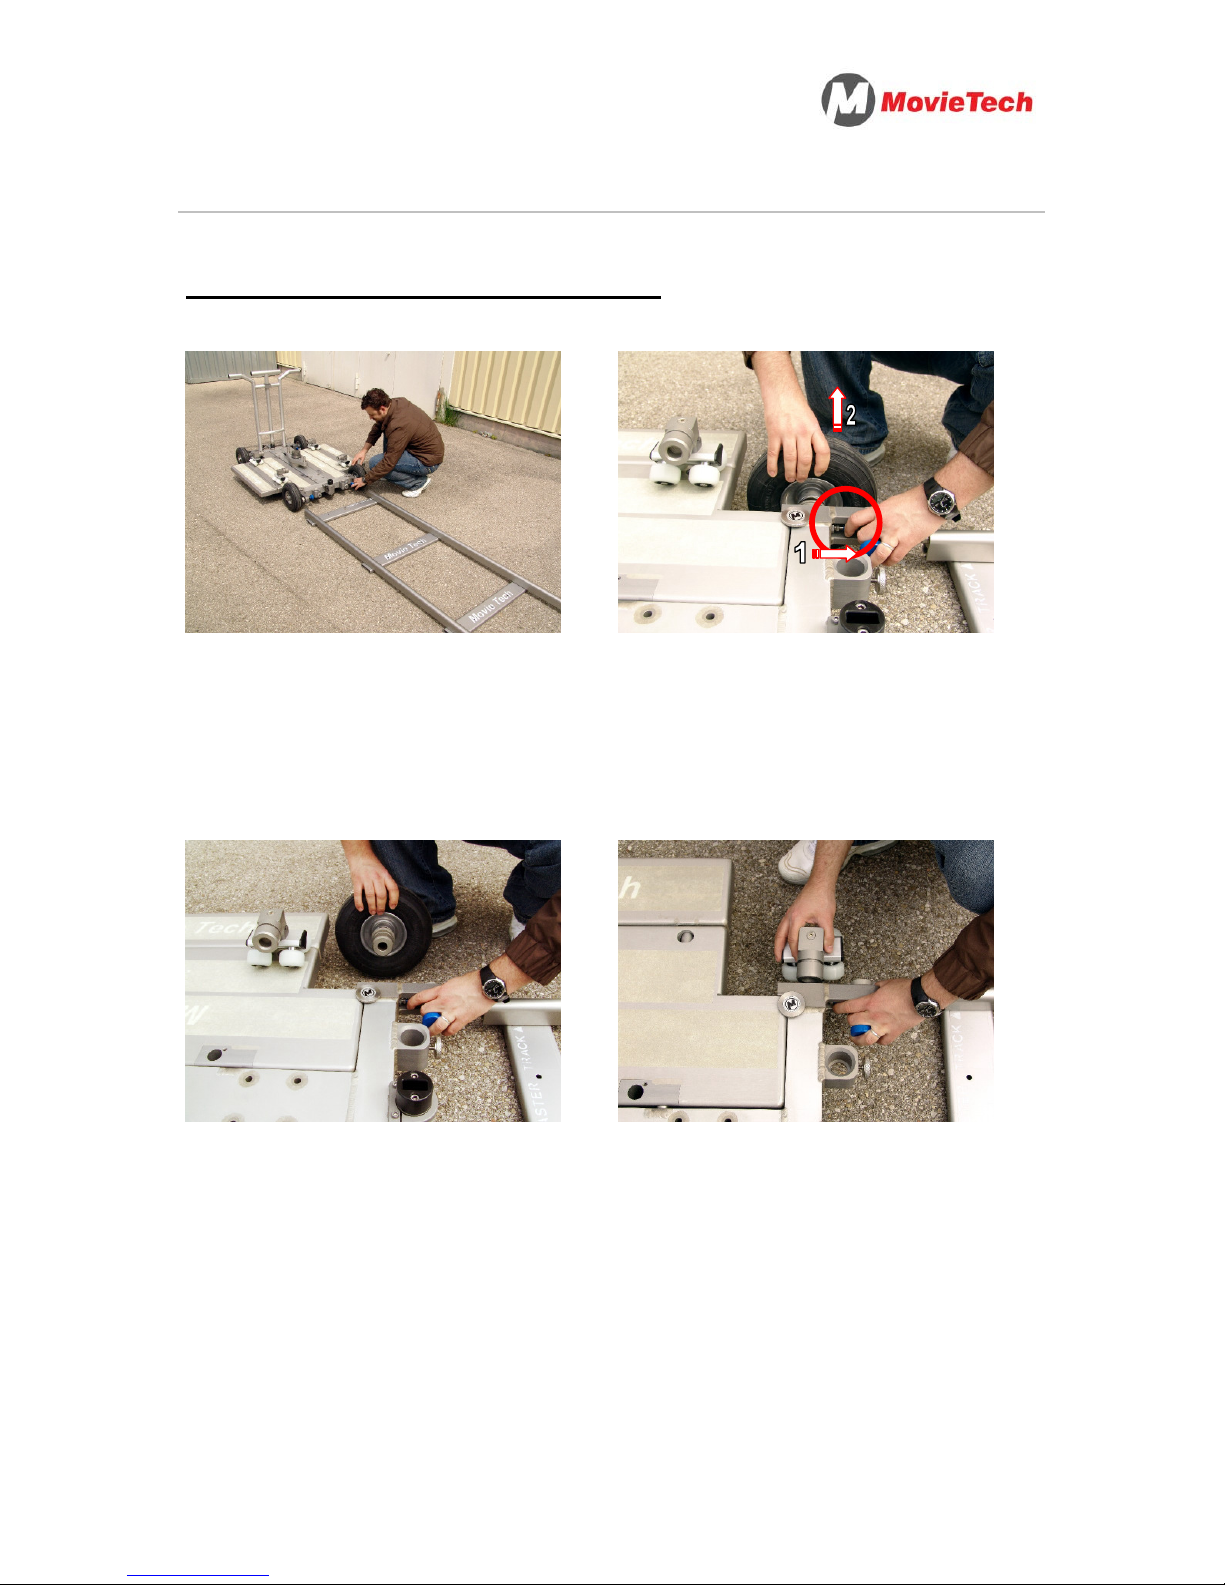
29) Bringen Sie den Dolly in Position
vor die Schienen.
30) Ziehen Sie den Rastbolzen (1)
neben der Bremsarretierung wie im
Bild dargestellt und nehmen dann (2)
den Reifen aus der gelösten
Verankerung.
31) Detailbild des herausgezogenen
Reifens.
32) Schieben Sie das Schienenrad in
die freie Halterung und fixieren Sie es
durch Einrasten des Bolzens.
Page 15
S
PRINTER
Bedienungsanleitung / Instruction Manual: MovieTech SPRINTER Seite 15 von 18
Nutzung des Dollys auf Schienen
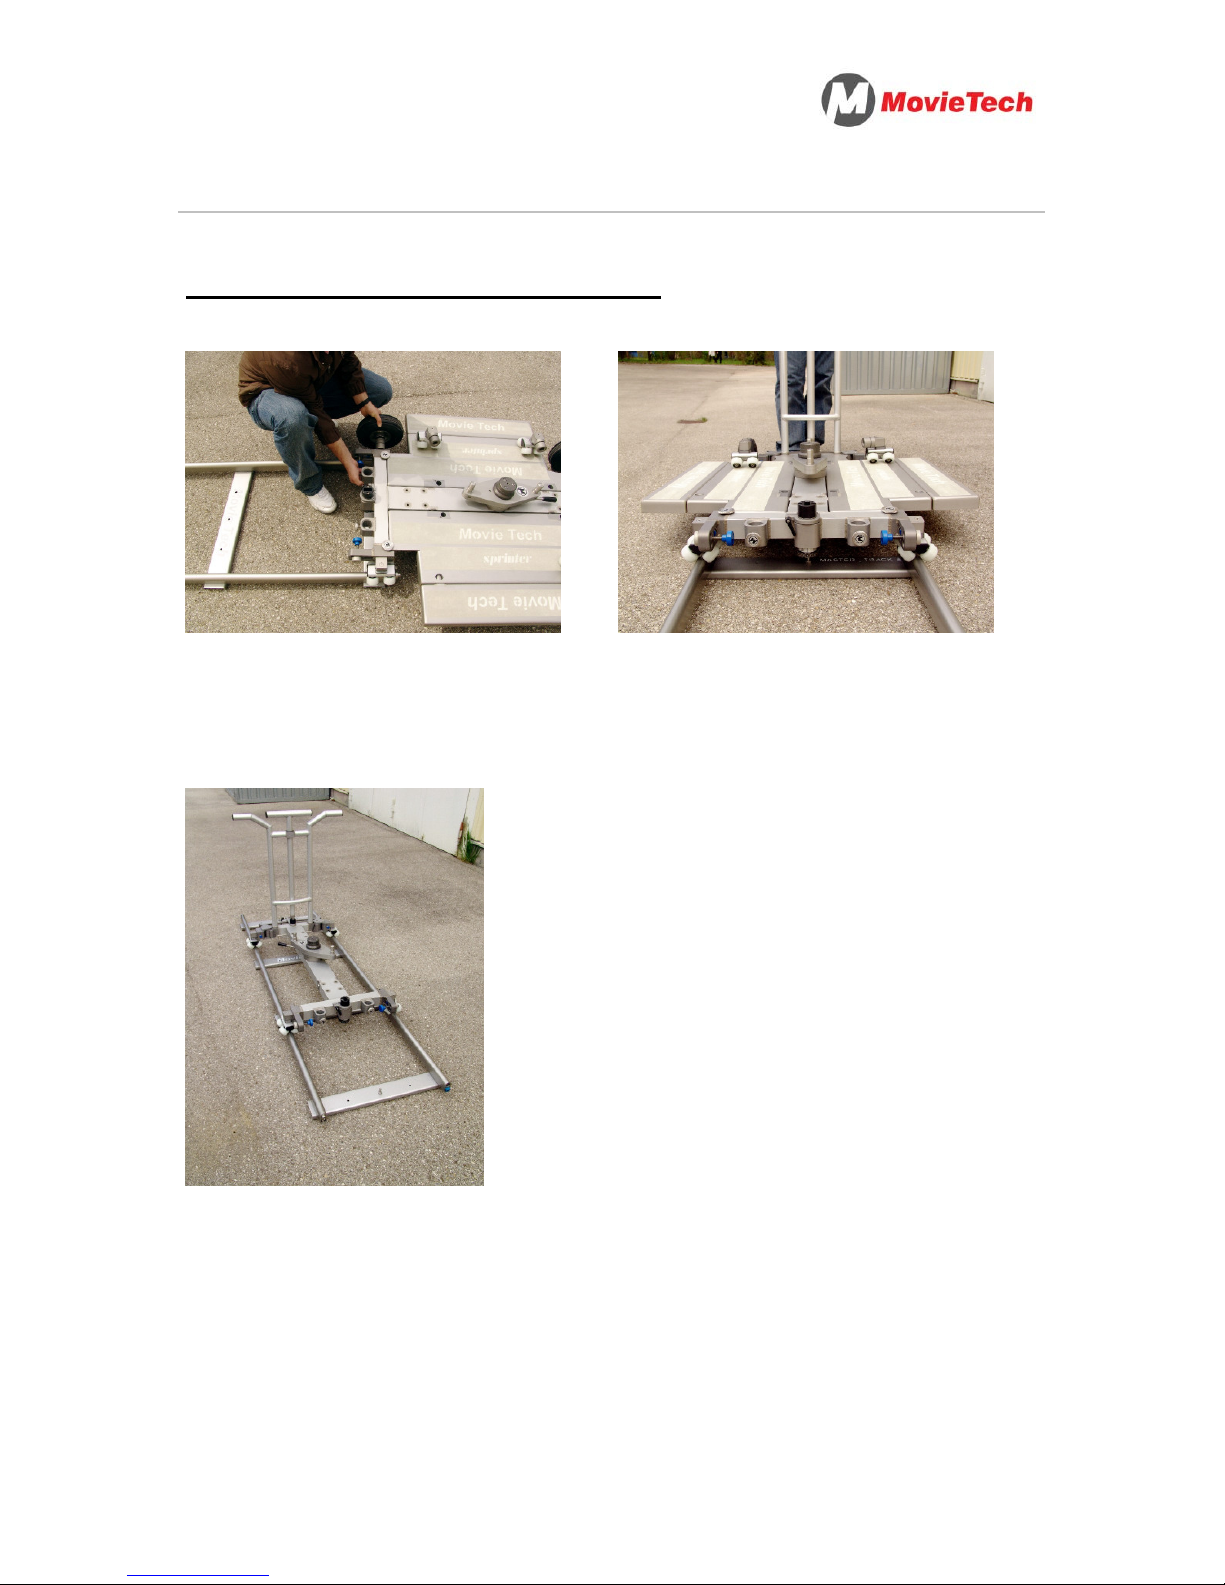
33) Die Montage der weiteren
Schienenräder erfolgt wie bei den
Punkten 30) - 32)
34) Frontansicht des Dollies mit zwei
angebrachten Schienenräder auf der
Schiene.
35) Dolly ohne Plattformen und
komplettem Schienenradsatz.
Page 16
S
PRINTER
Bedienungsanleitung / Instruction Manual: MovieTech SPRINTER Seite 16 von 18
Mögliches Dolly-Zubehör „SPRINTER“
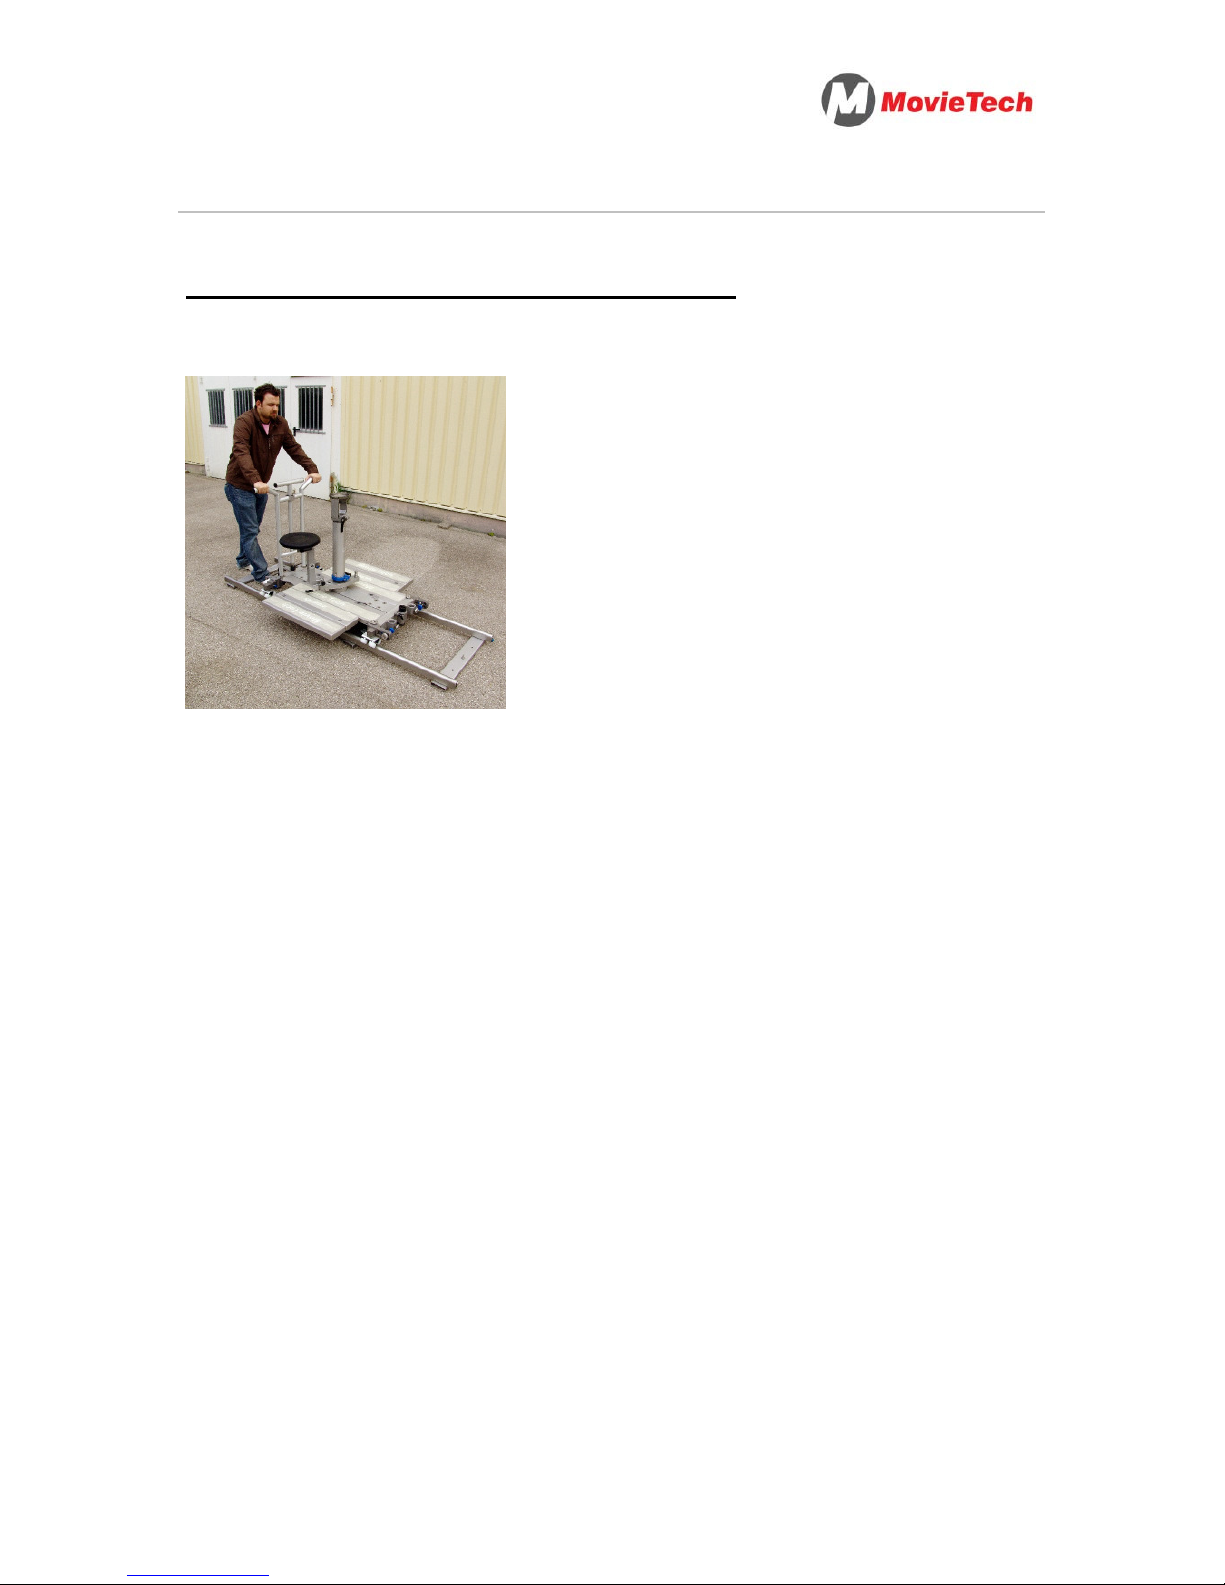
36) Dolly mit Plattformen und
komplettem Schienenradsatz.
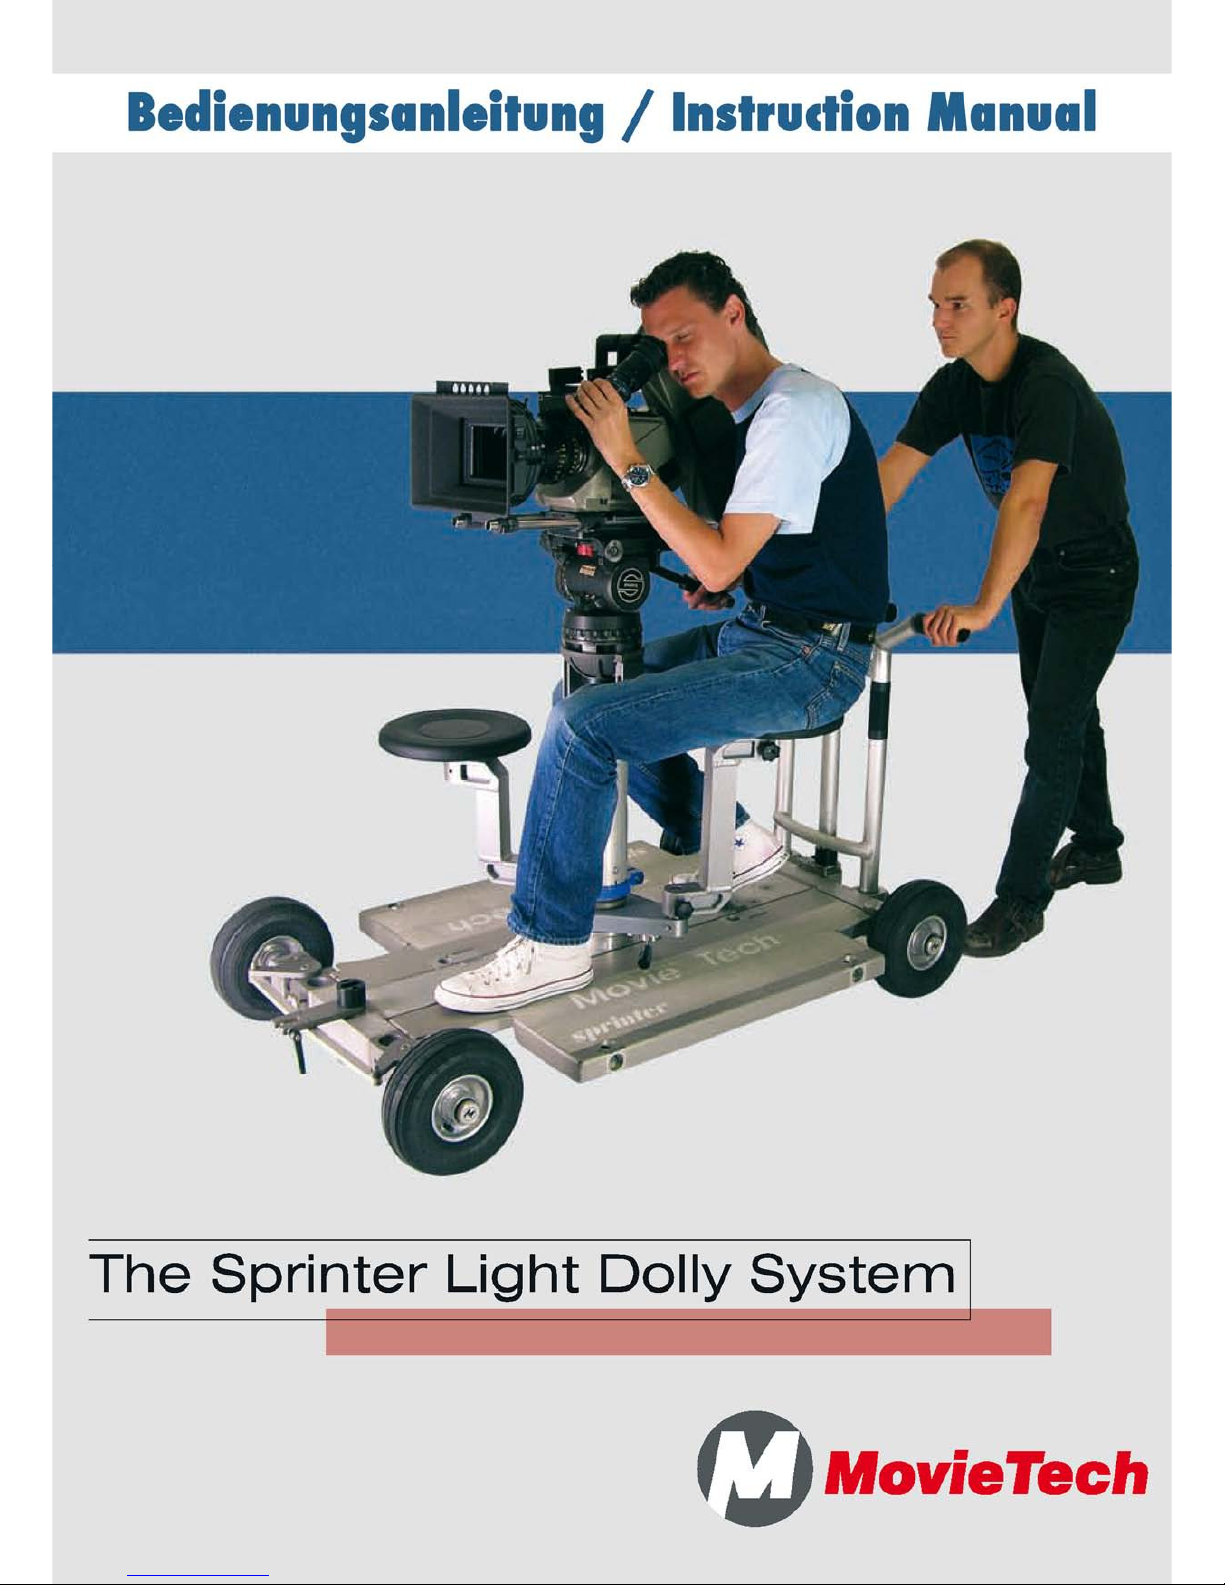
Zusätzlich ist für den SPRINTER unter
anderem folgendes Zubehör erhältlich:
(wie auf dem Bild abgebildet)
- Bazooka (z.B. Art.-Nr. 2133)
- Kugelschale (z.B. Art.-Nr. 2032)
- Sitzarm (z.B. Art.-Nr. 2056)
- Sitz (z.B. Art.-Nr. 2058)
Weiteres Zubehör finden Sie im
Zubehör-Katalog oder auf Anfrage.
Page 17
S
PRINTER
Bedienungsanleitung / Instruction Manual: MovieTech SPRINTER Seite 17 von 18
Umsetzen des Drehkreuzes
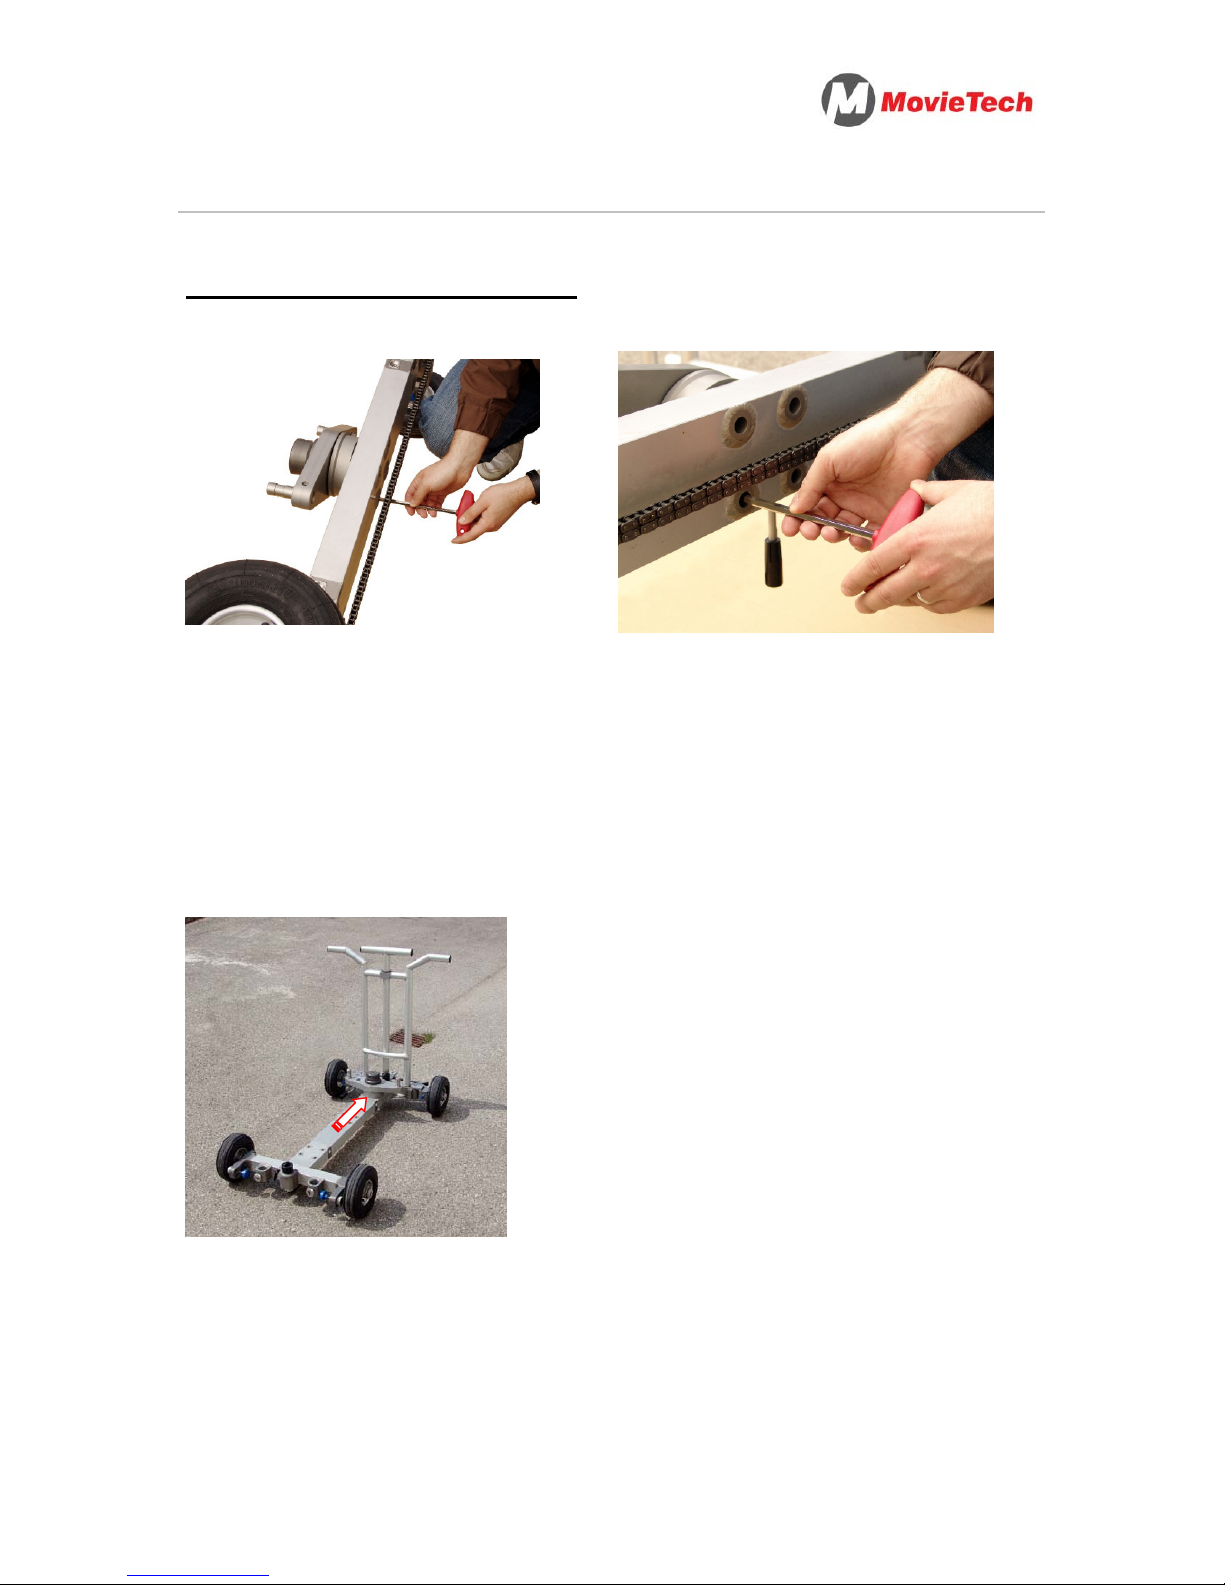
37) Zum Umsetzen des Drehkreuzes
bitte den Dolly auf die Seite legen.
Mithilfe eines Inbusschlüssels (Größe
8) können Sie nun die Schrauben des
Drehkreuzes lösen.
Tipp: Eine zweite Person kann das
schwere Drehkreuz gegen
Herunterfallen sichern.
38) Das Drehkreuz kann nun auf die
weitere Montageposition gesetzt und
verschraubt werden. Dabei die
Schrauben sicher anziehen.
39) Versetztes Drehkreuz auf dem
Dolly
Page 18
S
PRINTER
Bedienungsanleitung / Instruction Manual: MovieTech SPRINTER Seite 18 von 18
Feststellen des Drehkreuzes
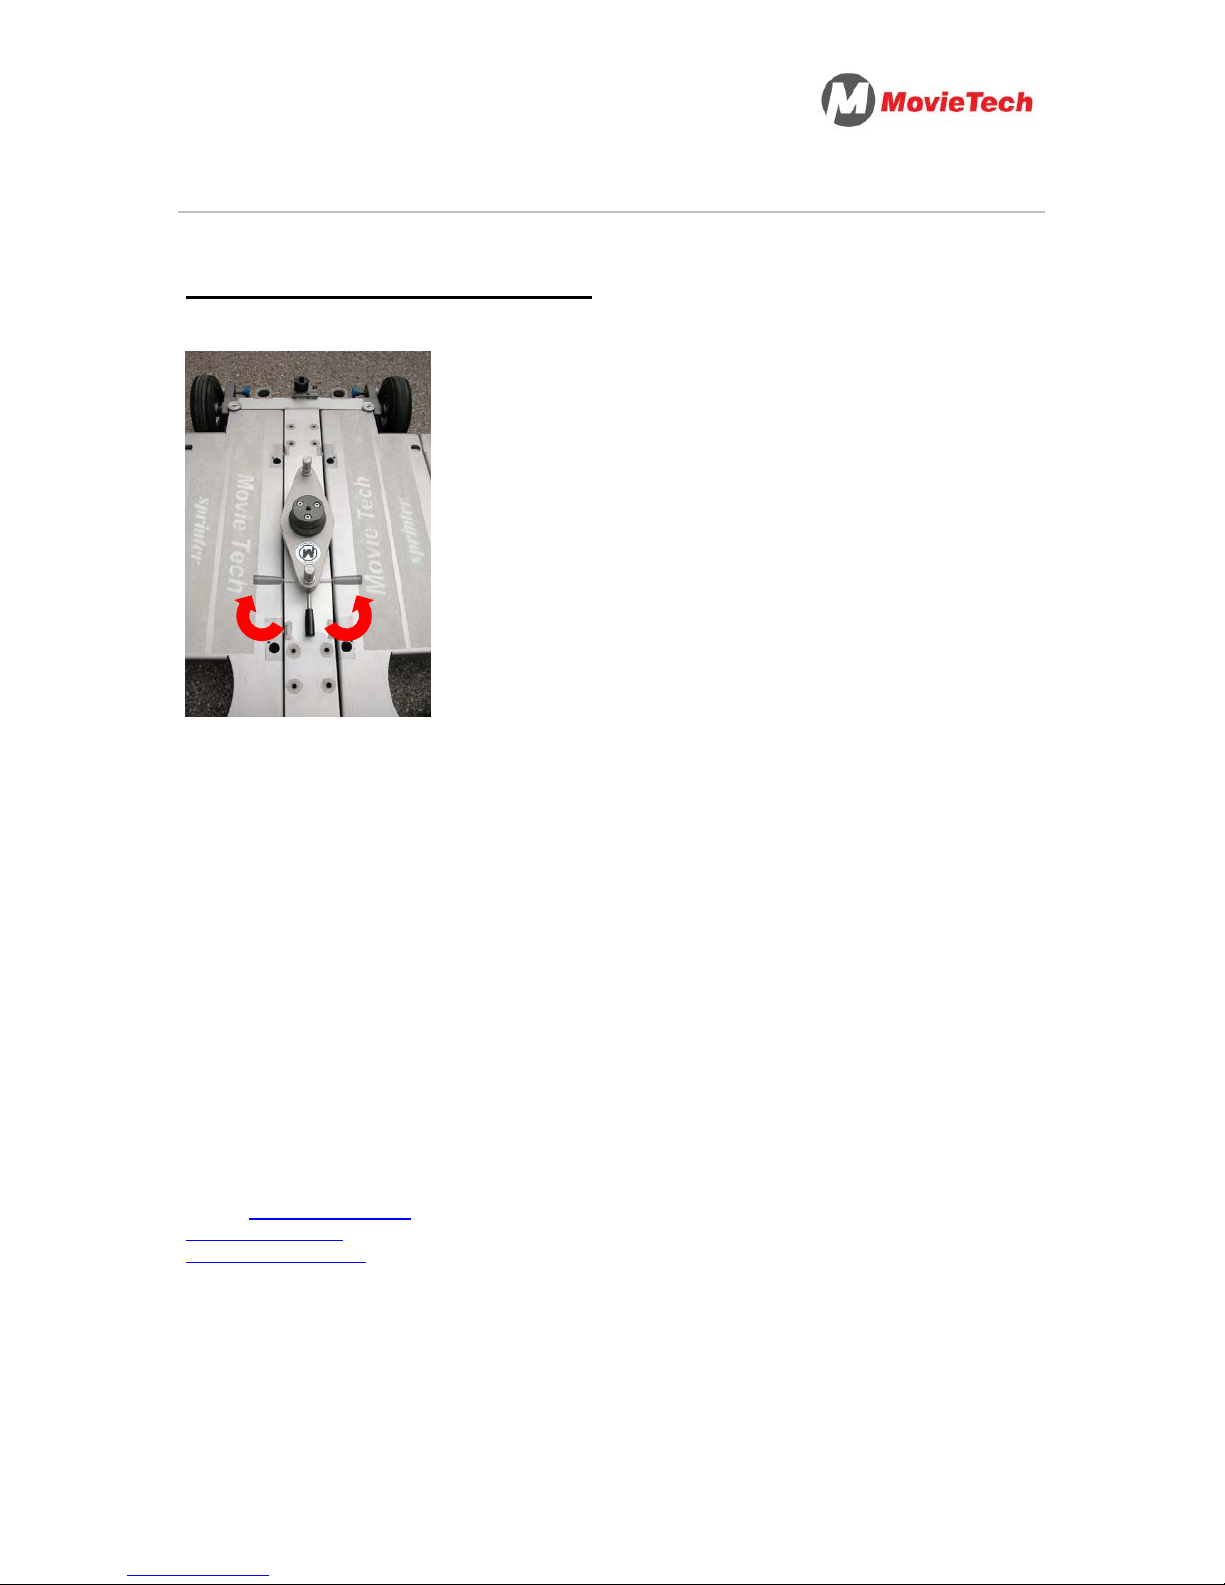
40) Das Drehkreuz kann durch
Anziehen des Arretierungshebels an
einer gewünschten Position festgestellt
werden.
Weitere Informationen:
Movie Tech AG / ABC-Products GmbH
Martin-Kollar-Str. 9
D-81829 München
Tel.: 089 - 43 68 91 3
E-Mail: [email protected]
www.movietech.de
www.abc-products.de
Page 19
S
PRINTER
Instruction Manual: MovieTech SPRINTER Page 1 of 18
Page 20

S
PRINTER
Instruction Manual: MovieTech SPRINTER Page 2 of 18
Index
Lieferumfang page 03
Scope of delivery page 04
Setup: pushbar with steering page 06
Use: pushbar with steering page 09
Setup: mounting the boards page 11
Use: Dolly on Tracks page 14
Possible dolly accessories „SPRINTER“ page 16
Converting the turnstile page 17
Toggle the turnstile page 18
Page 21
S
PRINTER
Instruction Manual: MovieTech SPRINTER Page 3 of 18
Thank you very much that you have decided to purchase the MovieTech light dolly
"SPRINTER".
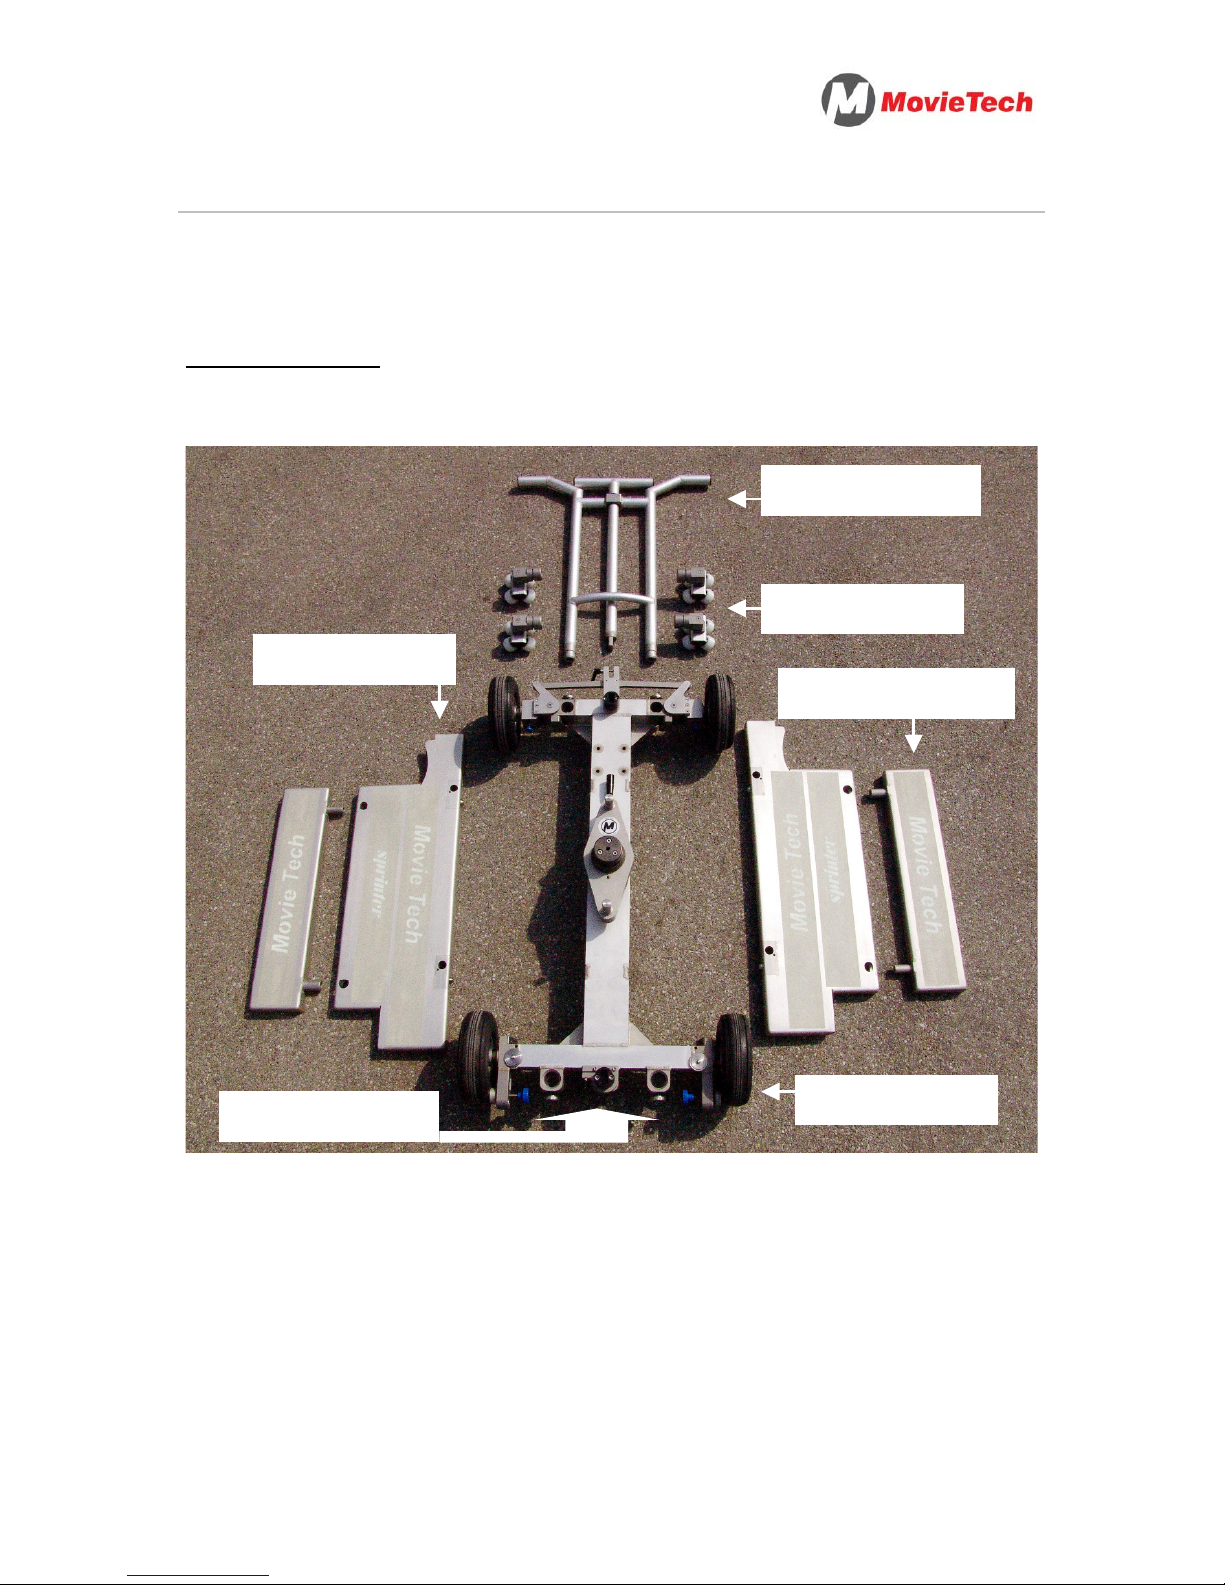
Scope of delivery:
The sprinter is delivered to you with the following parts:
Note: The illustrations in these manual can differ conditional on production from the product on hand.
pushbar with steering rod
track-wheels set
pneumatic wheels set
2 standard boards
2 board extensions
Dolly-frame with turnstile
Page 22

S
PRINTER
Instruction Manual: MovieTech SPRINTER Page 4 of 18
Safety references!
Please consider the following references before the assembling and the use of the
SPRINTER:
Always relieve the car while changing a tire.
Pay attention to the maximum loading. The air wheels can burst due to a too
high pressure.
The SPRINTER may be used only on stable and even underground.
Please always adjust speed. An extreme caution applies to curve journeys.
The sprinter must be so protected at inclined planes that he does not come in
rolling.
Caution with possible bruises during the construction and the handling. For
example when lifting the front axle up!
A sufficiently large safe distance has to be kept to overhead cables (high
voltage). At a unknown tension a minimum distance of 5m (16.4 ft) has to be
kept.
The maximally permissible wind velocity hast to be considered.
During the construction process and for the operation of the jib-arm always
pay attention to the correct weight compensation exactly.
Track systems are to be shifted without downward gradients. The tracks have
to be levelled out so that no side inclination arises.
No movement before the parts (e.g. camera) are secured.
Avoid contact with the wheels during the locomotion.
The complete driving area must be free of obstacles at all cost.
Consider safety-relevant the local conditions.
Do not leave the dolly unsupervised. Secure against unauthorized use.
Bedienung nur durch geschultes und qualifiziertes Personal.
Driving mistakes can leave to the possibility of knocking against obstacles or
persons. The desired camera focusing is to be rehearsed therefore sufficiently.
Do not exceed the maximum loading of 300 kg (661.39 lb).
Avoid jerky movements primarily by using the jib-arm.
Page 23

S
PRINTER
Instruction Manual: MovieTech SPRINTER Page 5 of 18
Before every use the safety must be checked by view- and functional-test (in
accordance with DIN 15999).
Because of the danger of a thunderstrike the dolly use has to be stopped at an
approaching thunderstorm.
Always pay attention to the correct equilibrium position.
Page 24
S
PRINTER
Instruction Manual: MovieTech SPRINTER Page 6 of 18
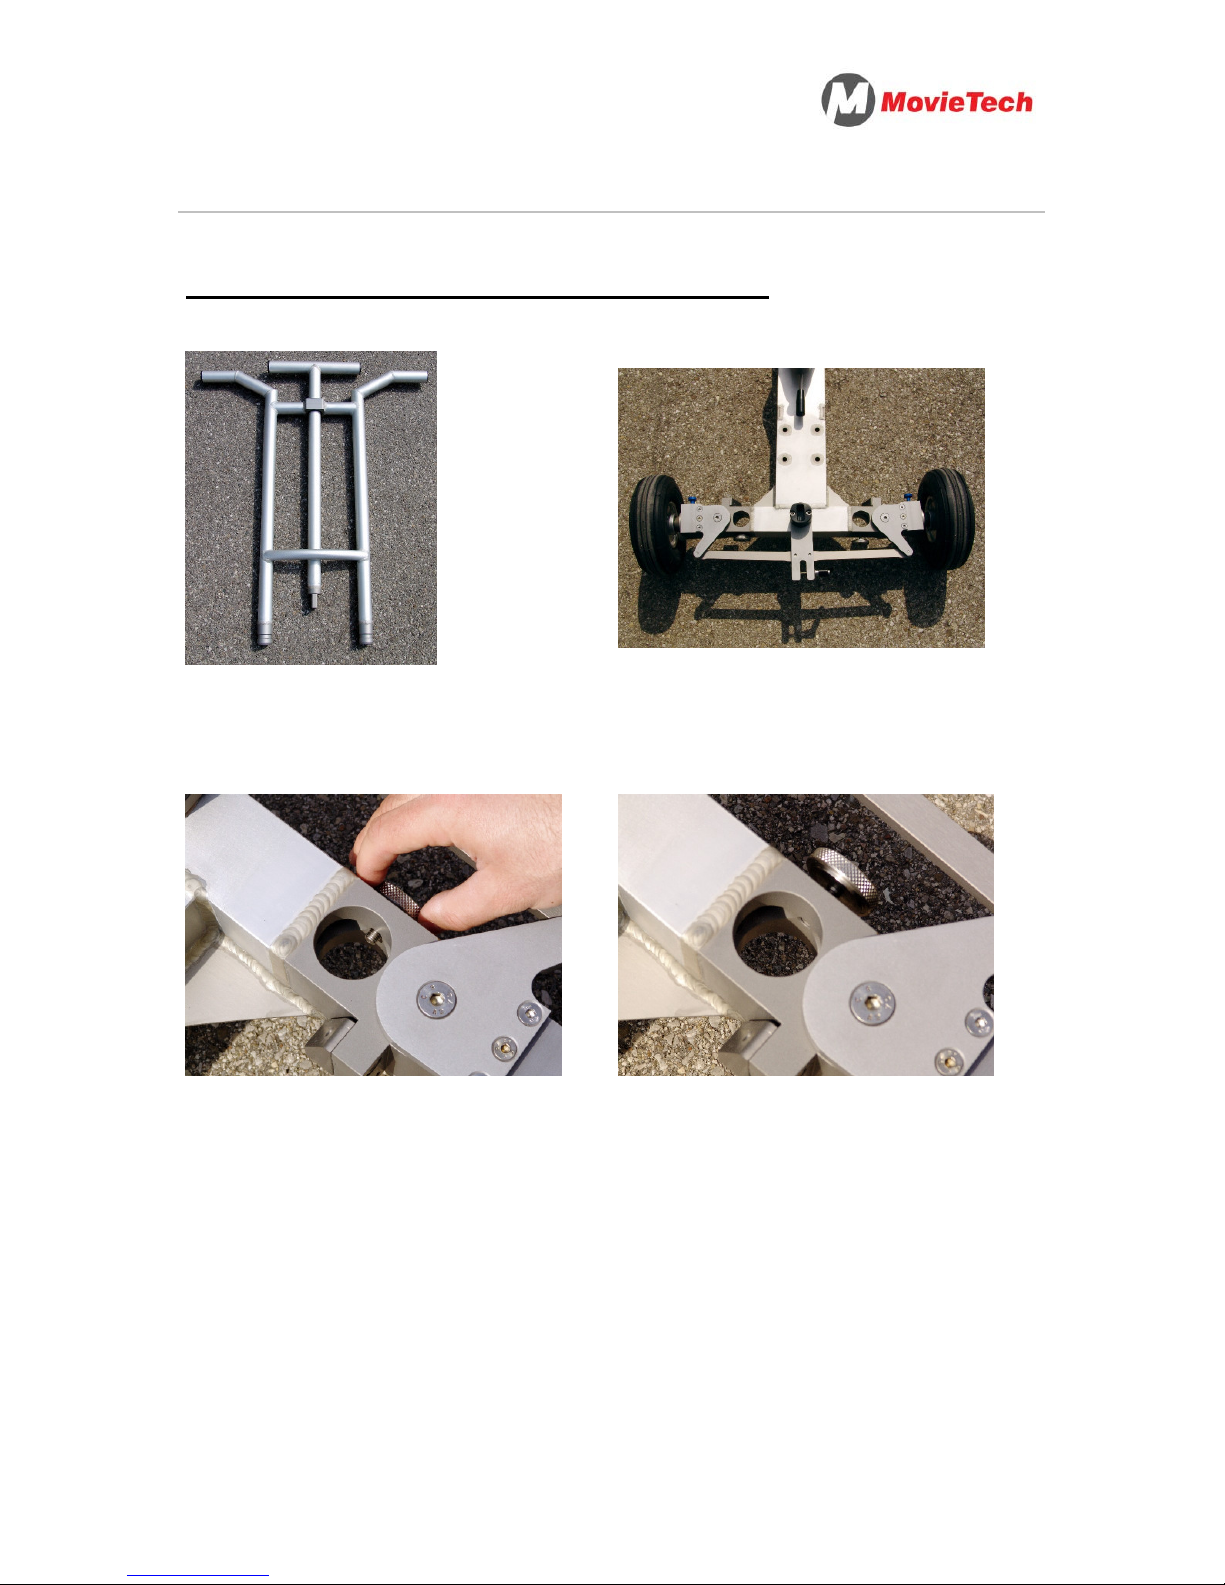
Setup of the dolly: pushbar with steering
1) Put the pushbar ready for
construction.
2) Place the dolly in position.
3) Turn the screws so far from the
mount, so that the Pushbar can be
used.
4) The opening - to see as in the
picture - should be sufficient for the
pushbar assembly.
Page 25
S
PRINTER
Instruction Manual: MovieTech SPRINTER Page 7 of 18
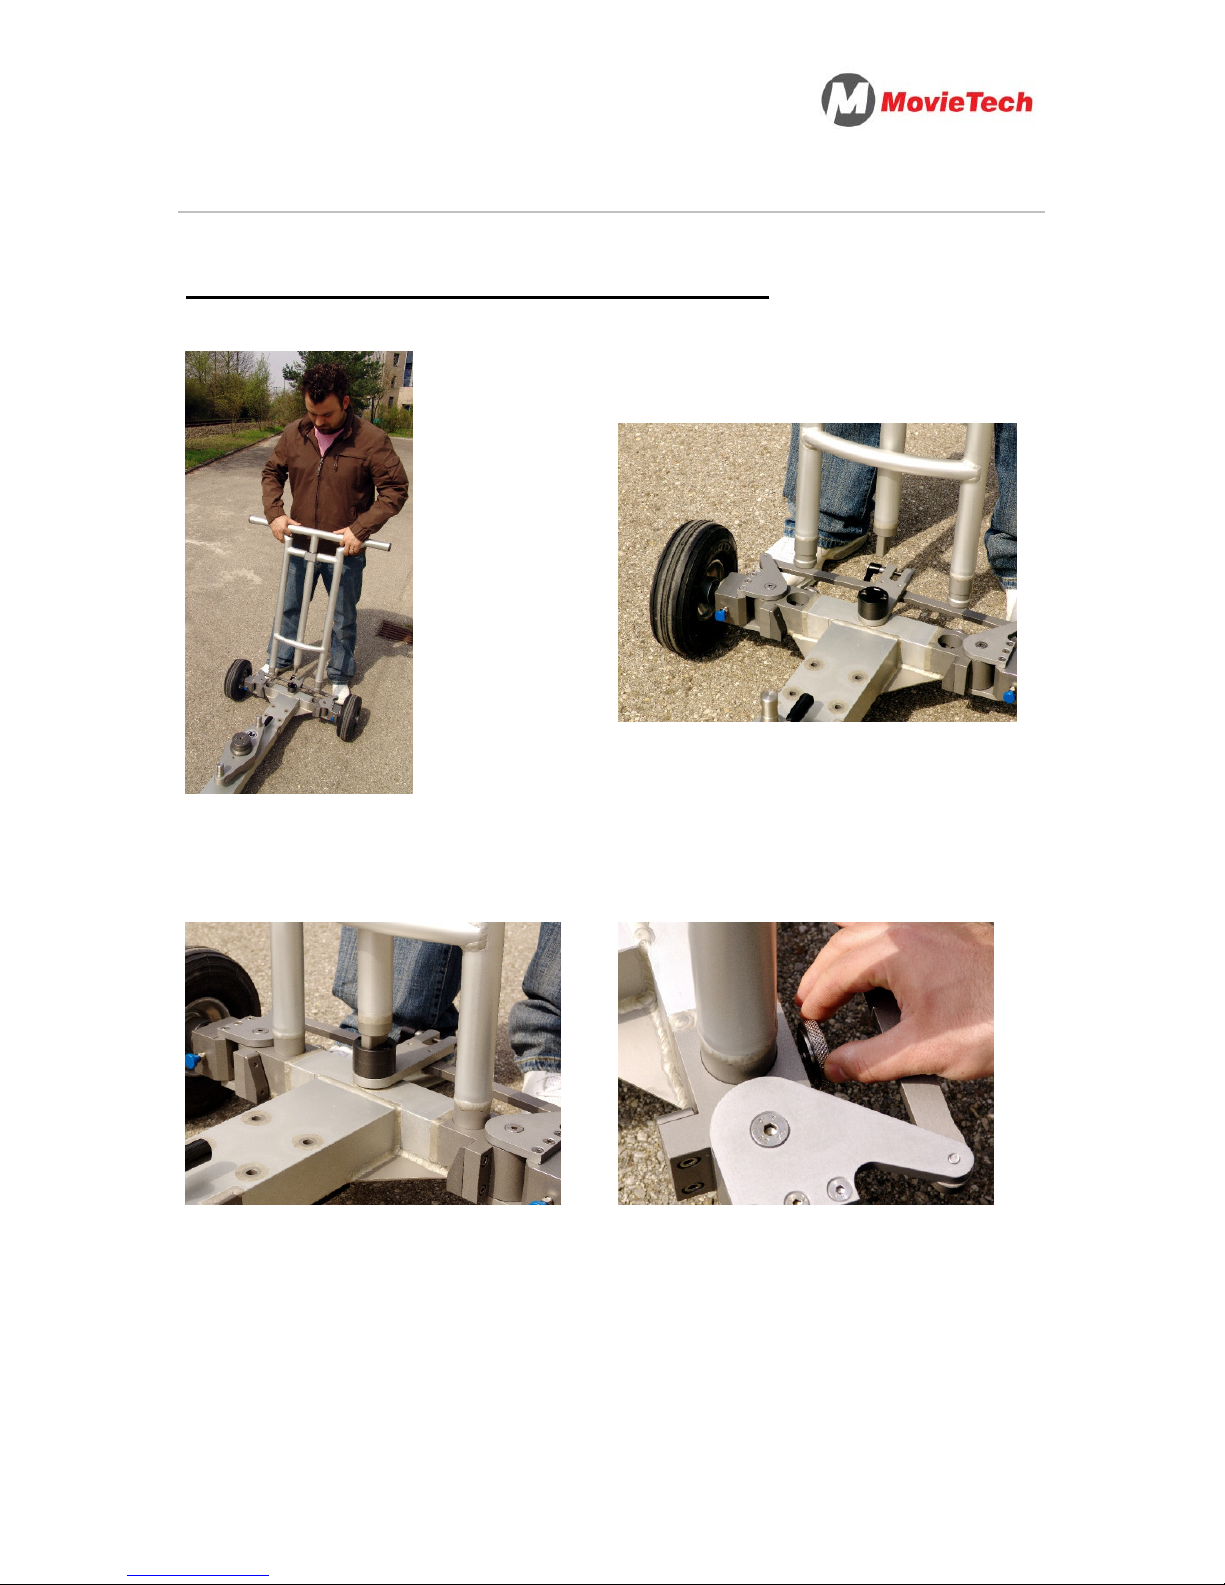
Setup of the dolly: pushbar with steering
5) Bring the pushbar into a vertical
position.
6) Now press the pushbar into the
intended holes.
7) Detail view of point 6) 8) Tight the safeguarding screws for
the fixation.
Page 26
S
PRINTER
Instruction Manual: MovieTech SPRINTER Page 8 of 18
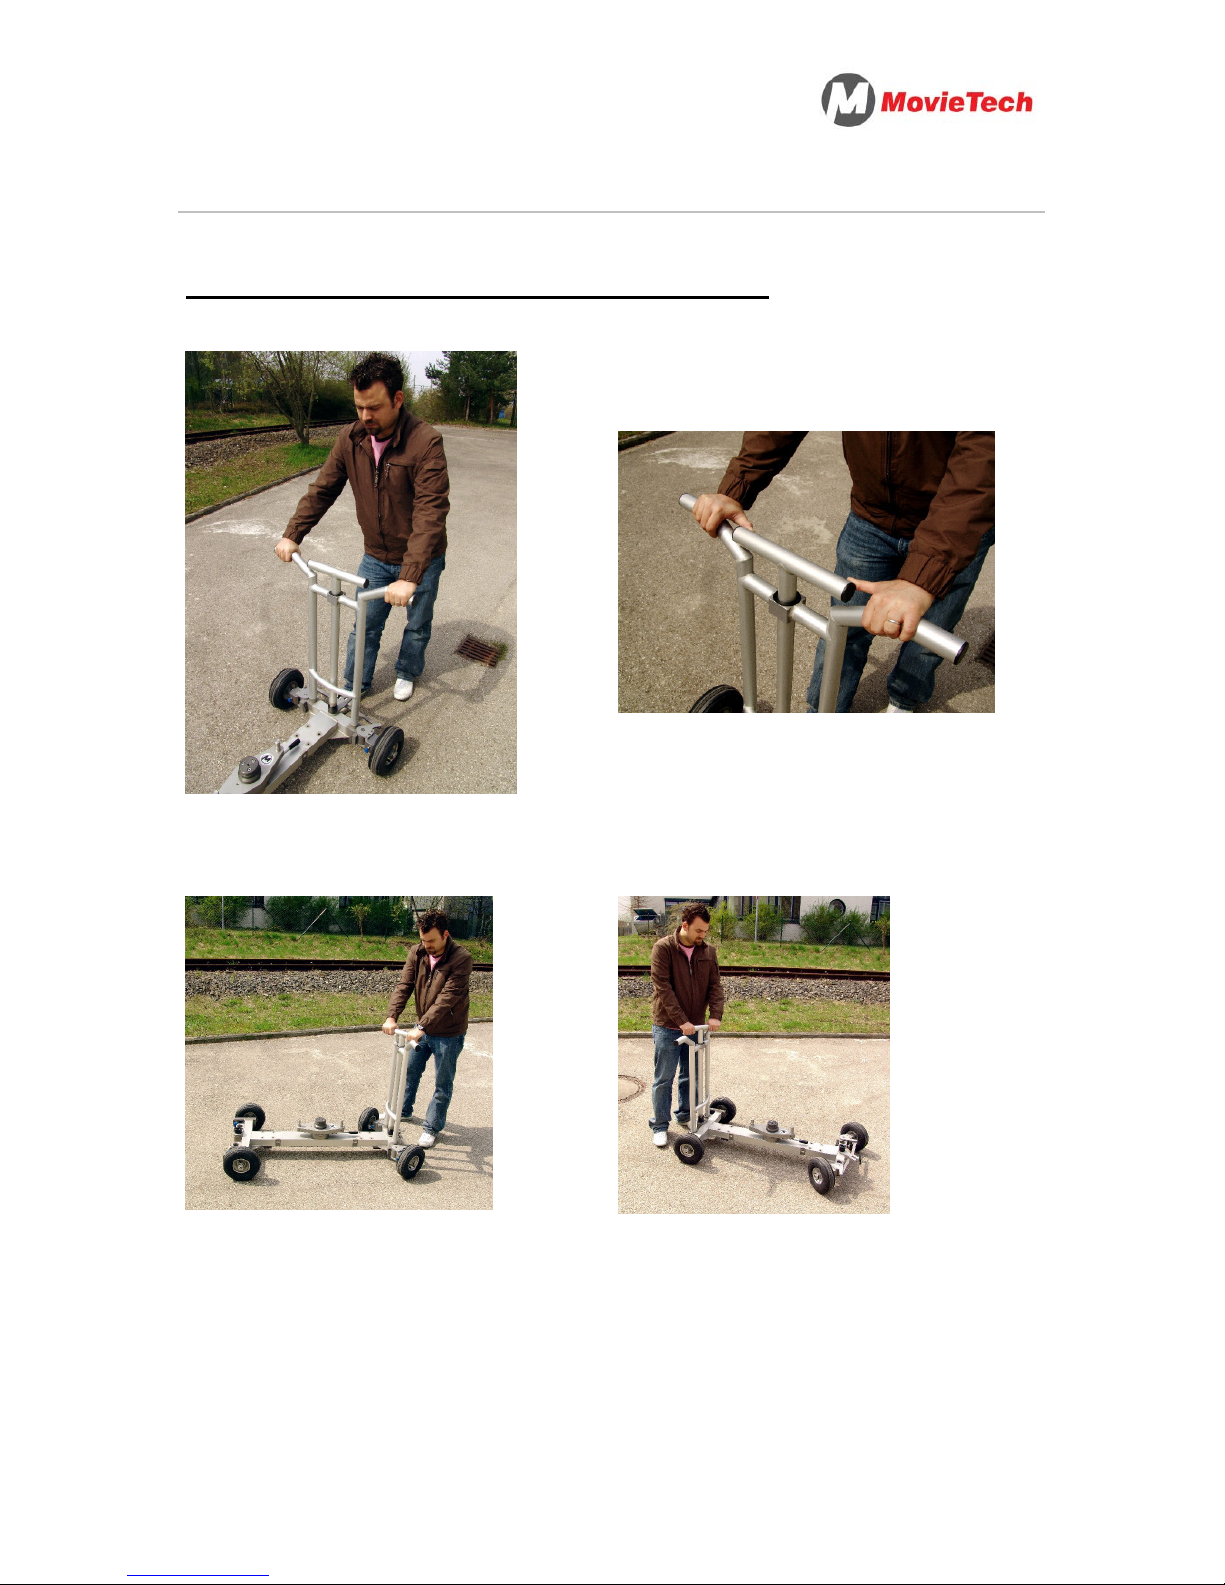
Setup of the dolly: pushbar with steering
9) Steering example hand position A 10) Steering example hand position B
11) Steering example front control 12) Steering example rear control
Page 27
S
PRINTER
Instruction Manual: MovieTech SPRINTER Page 9 of 18
Use of the dolly: pushbar with steering
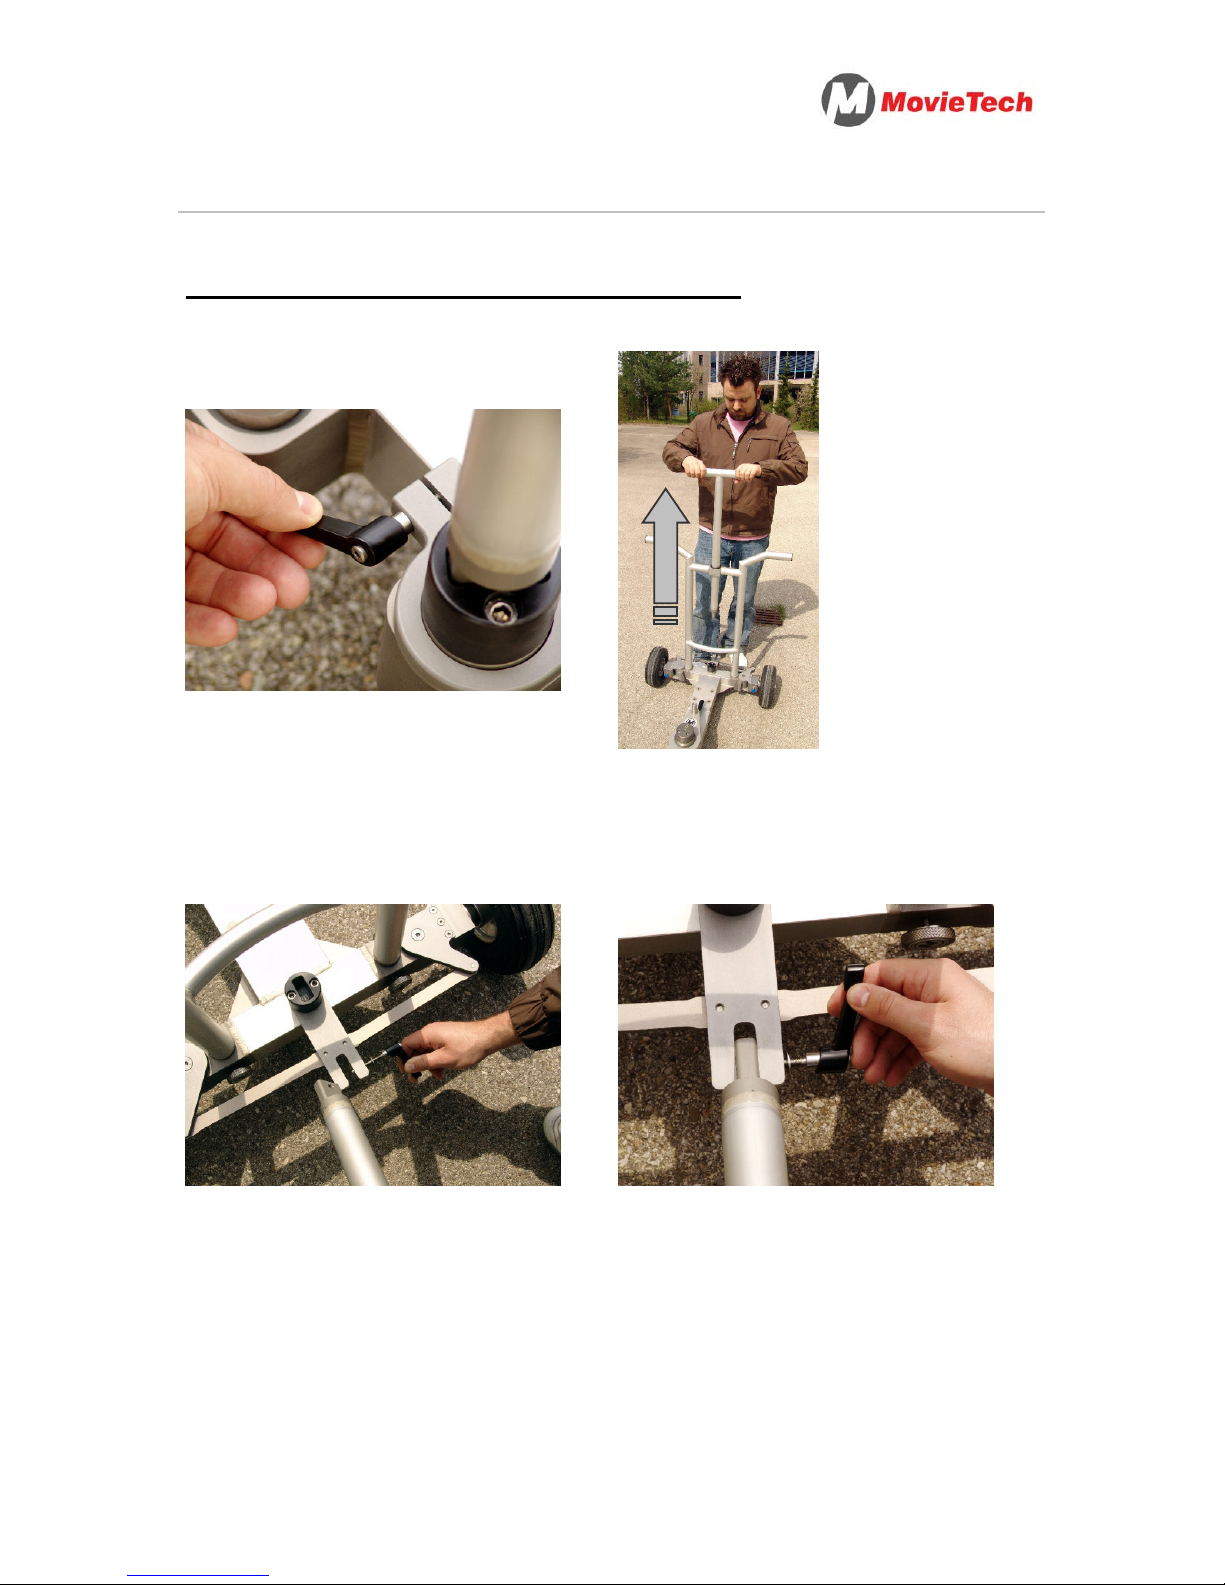
13) By a sticking lever at the steering
mount the steering angle can be fixed.
14) To use the pulling function of the
dolly, you have to pull the steering out
of the mount.
15) Now screw out the sticking lever,
so that the handlebar can be slid into
the mount.
16) Fix the handlebar in the opening
with the help of the sticking lever.
Page 28
S
PRINTER
Instruction Manual: MovieTech SPRINTER Page 10 of 18
Use of the dolly: pushbar with steering
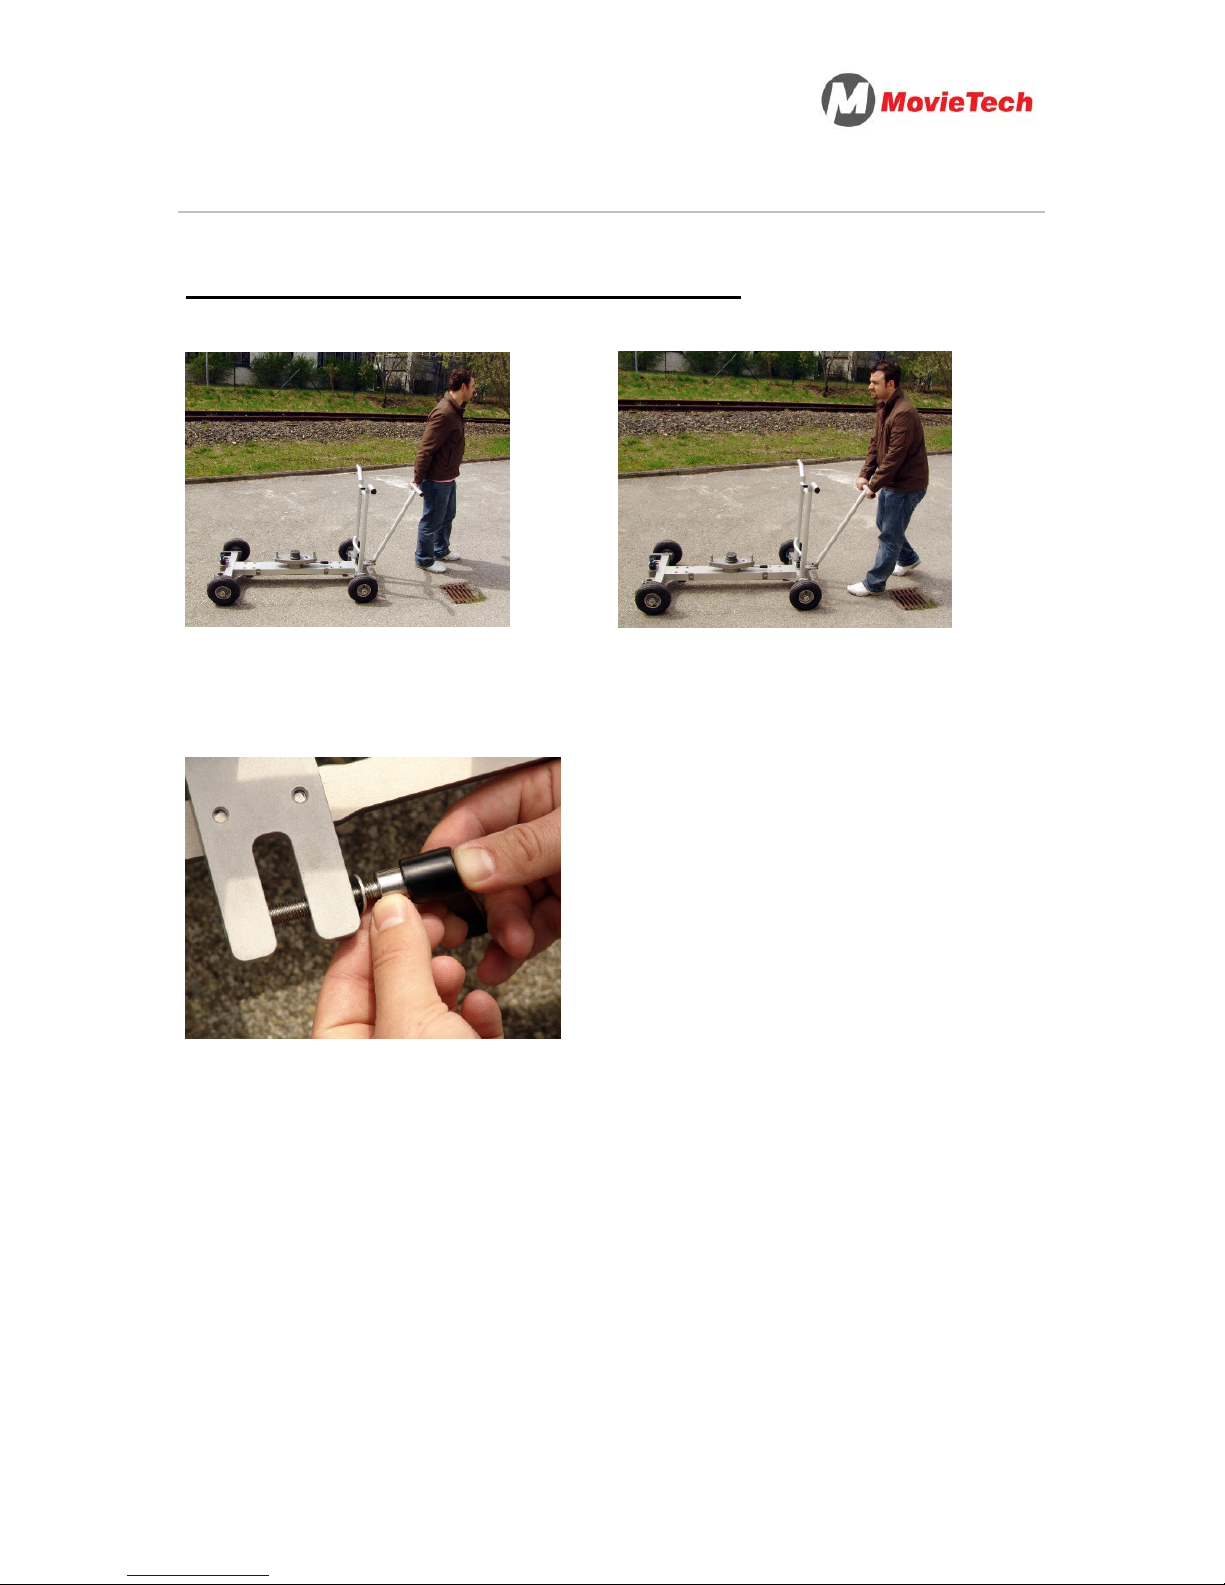
17) Picture example A: Pulling the dolly 18) Picture example B: Pushing the
dolly
19) Tip: Pull the sticking lever out with
pressure of the thumb on the screw
and turn the screw at the smooth part
with the thumb and forefinger of the
other hand, for a faster screwing
process.
Page 29
S
PRINTER
Instruction Manual: MovieTech SPRINTER Page 11 of 18
Setup of the dolly: mounting the boards
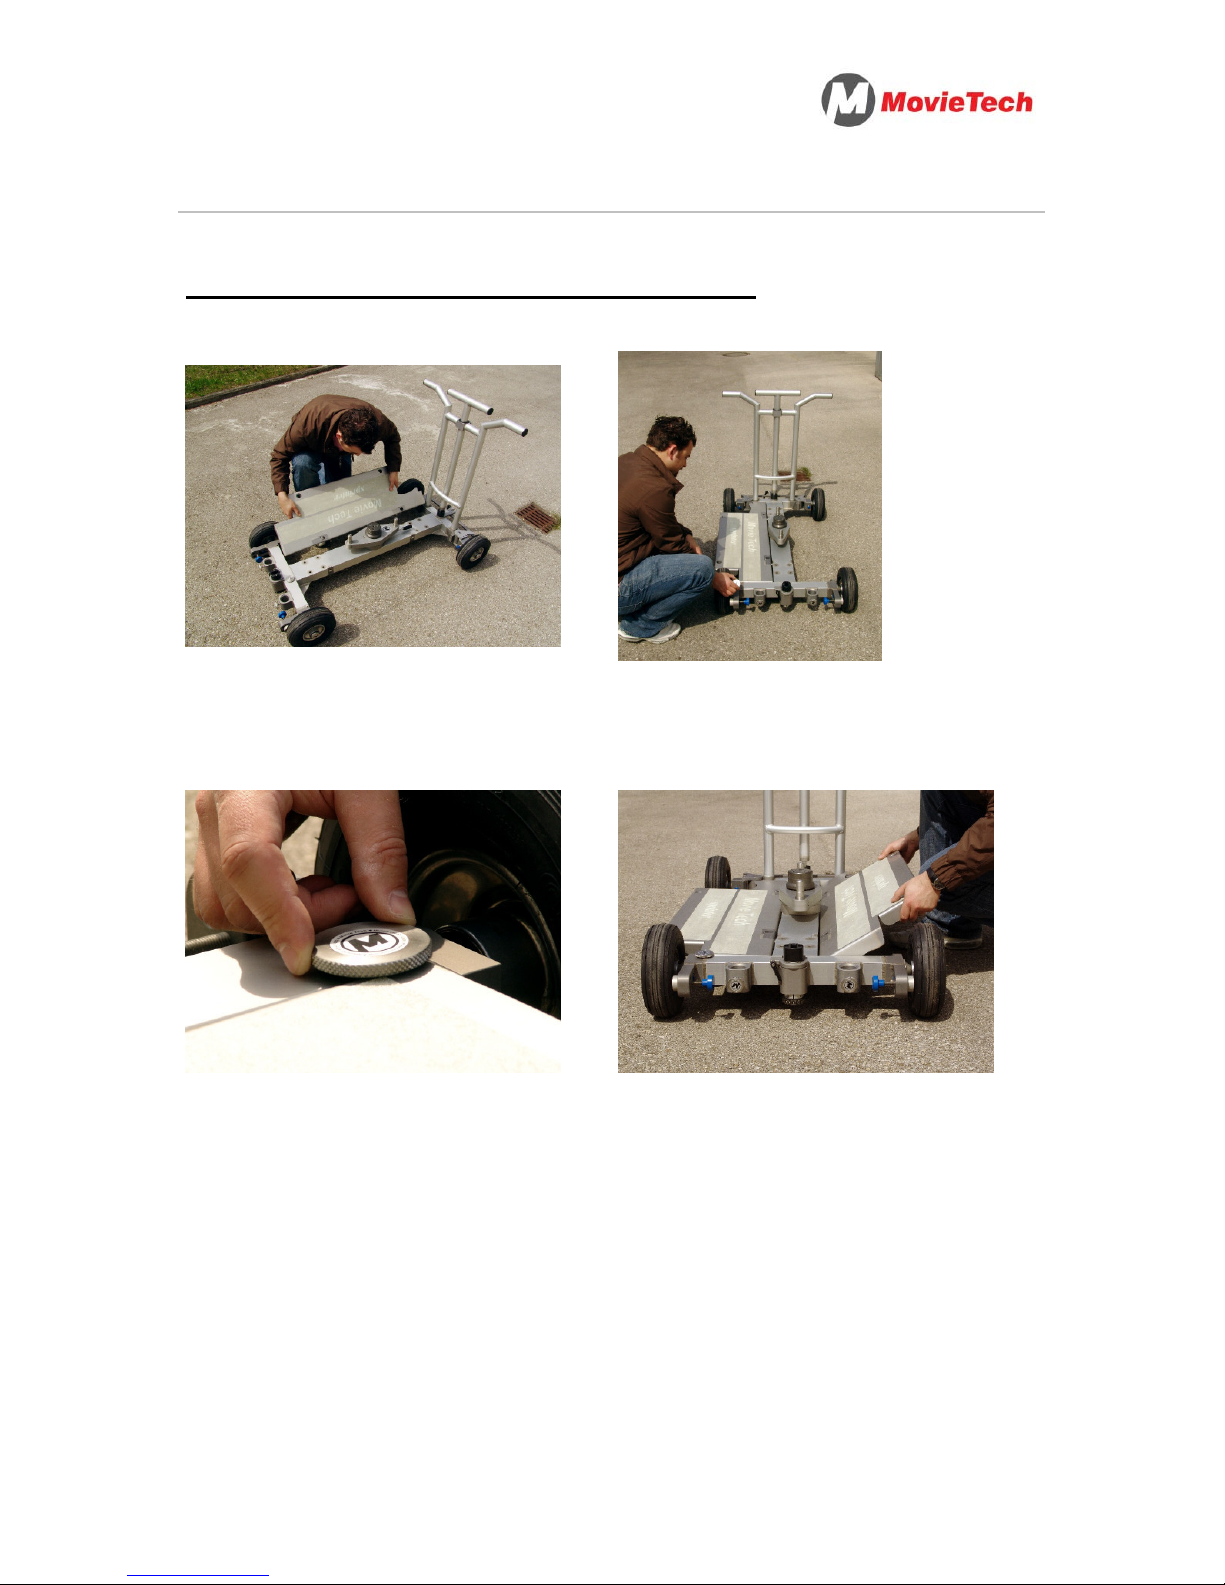
20) Hang the platform at the side into
the cut-outs at the dolly.
21) Fix the platform with the help of the
safeguarding screw now.
22) Detail view of the safeguarding
screw
23) The assembly of the second
platform is carried out as in the case of
the points 20) & 21)
Page 30
S
PRINTER
Instruction Manual: MovieTech SPRINTER Page 12 of 18
Setup of the dolly: mounting the boards
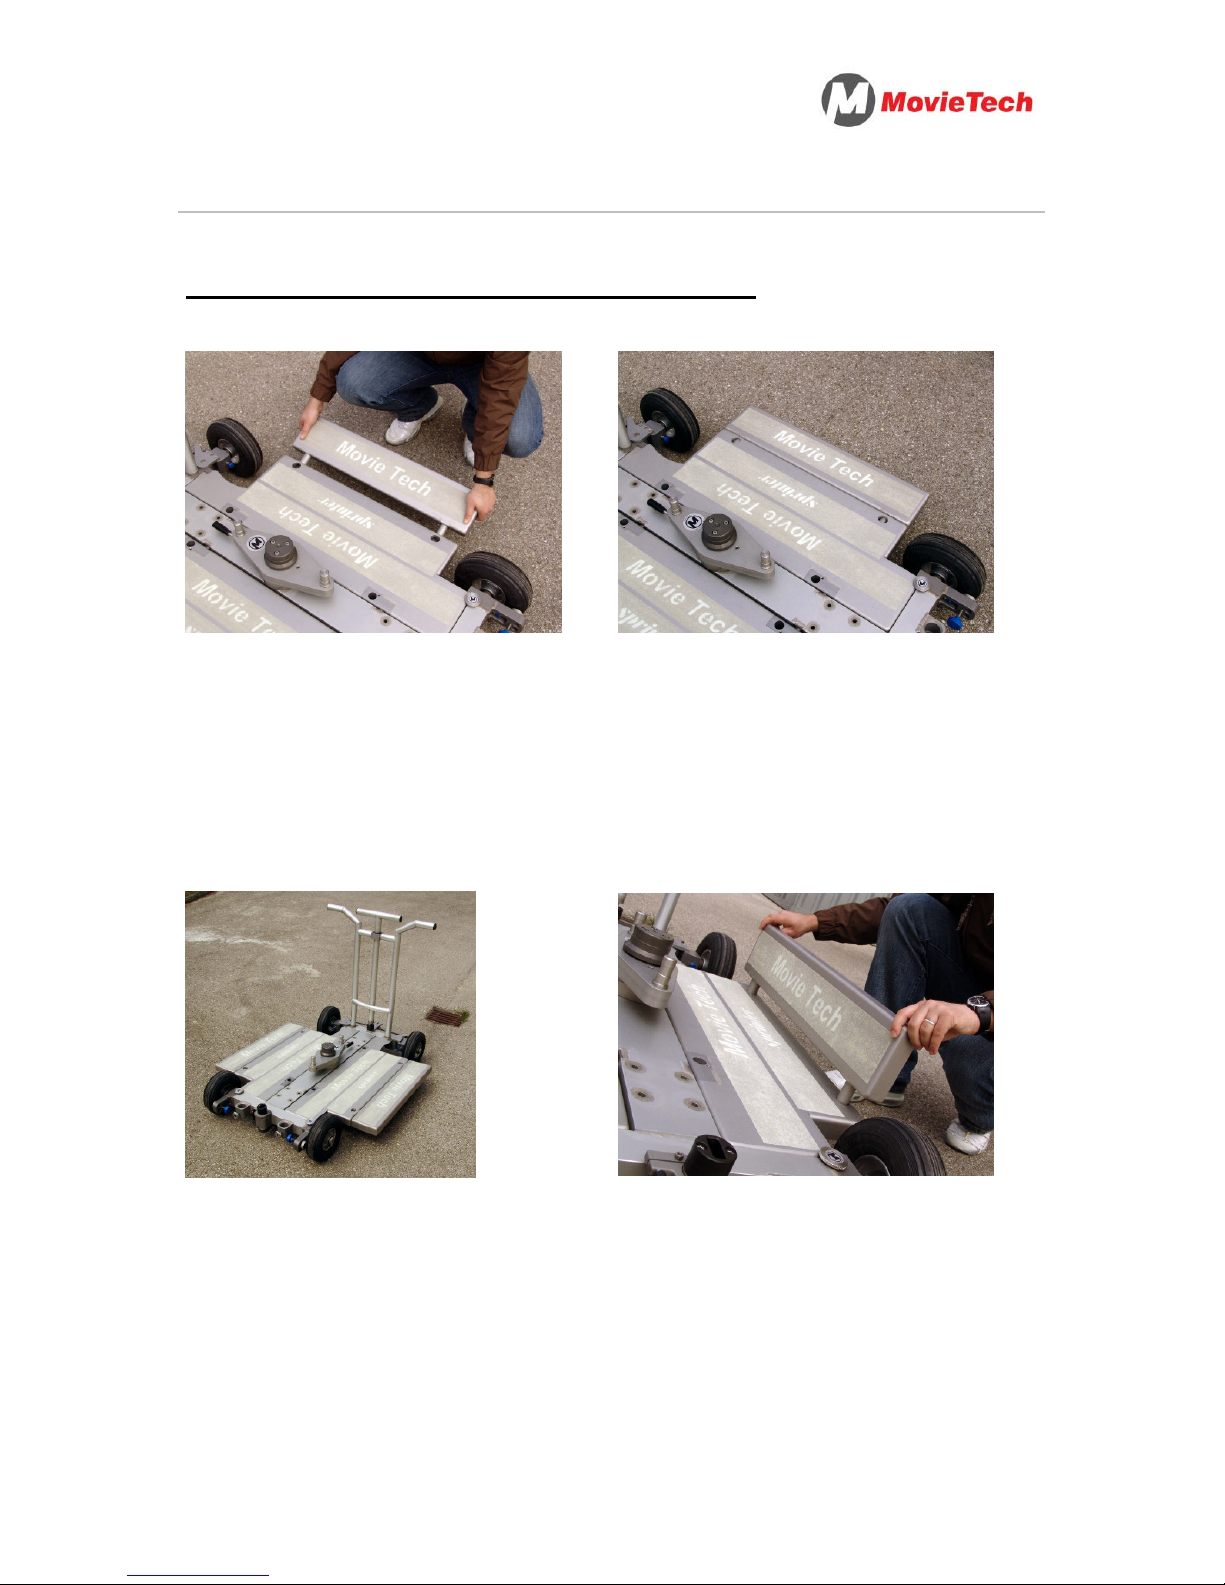
23) To broaden the platforms insert the
auxiliary platform with the pins parallel
into the intended openings. A further
safety device is not necessary. Make
sure however that the extension is
installed constant, in order to avoid a
tilting.
24) Correctly attached auxiliary
platform
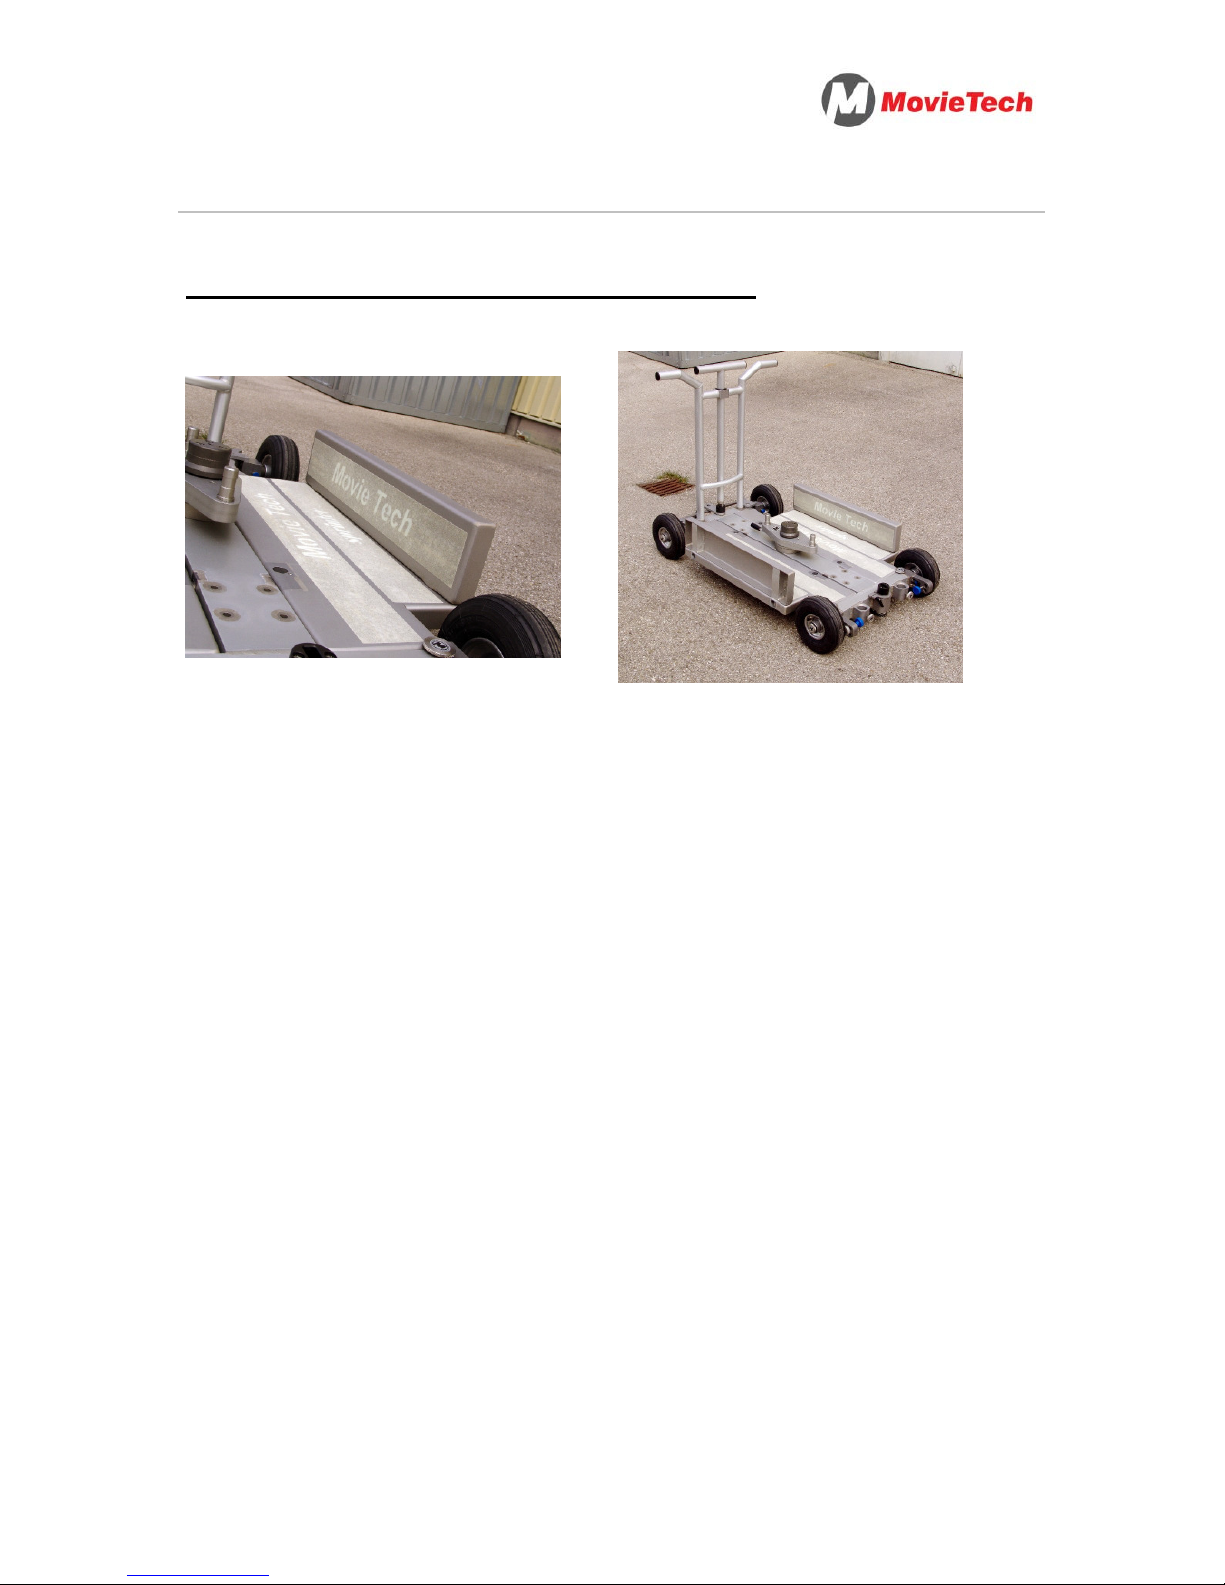
25) Dolly with all platforms and
pneumatic tyres
26) The extension platforms can be
installed also upright, e.g. for the
transport of accessories.
Page 31
S
PRINTER
Instruction Manual: MovieTech SPRINTER Page 13 of 18
Setup of the dolly: mounting the boards
27) Correctly attached auxiliary
platform (upright)
28) The general view of the dolly
Page 32
S
PRINTER
Instruction Manual: MovieTech SPRINTER Page 14 of 18
Using the dolly on tracks
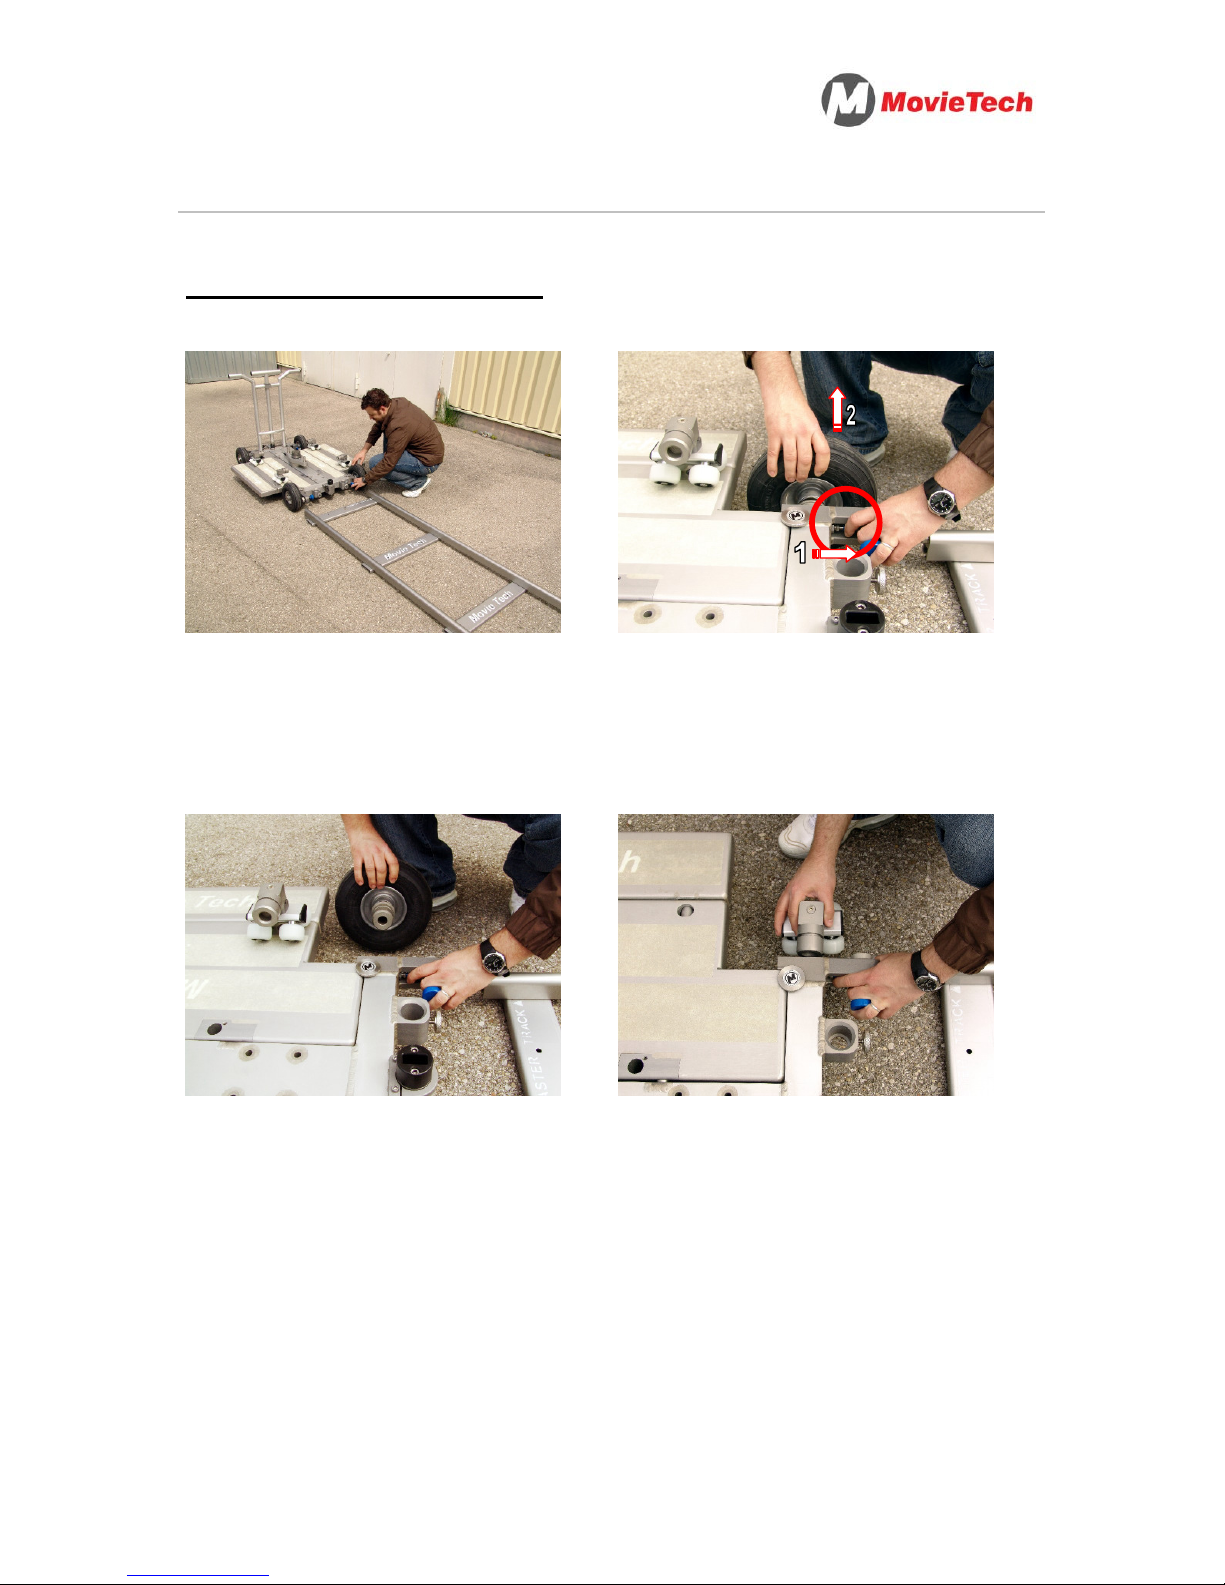
29) Bring the dolly into position in front
of the tracks.
30) Draw the drop-in pin (1) next to the
braking detent as represented in the
picture and then take the tyre from the
unfixed anchorage (2).
31) Detail picture of the tyre pulled out. 32) Push the track wheel into the free
mount and fix it by clicking in the bolt.
Page 33
S
PRINTER
Instruction Manual: MovieTech SPRINTER Page 15 of 18
Using the dolly on tracks
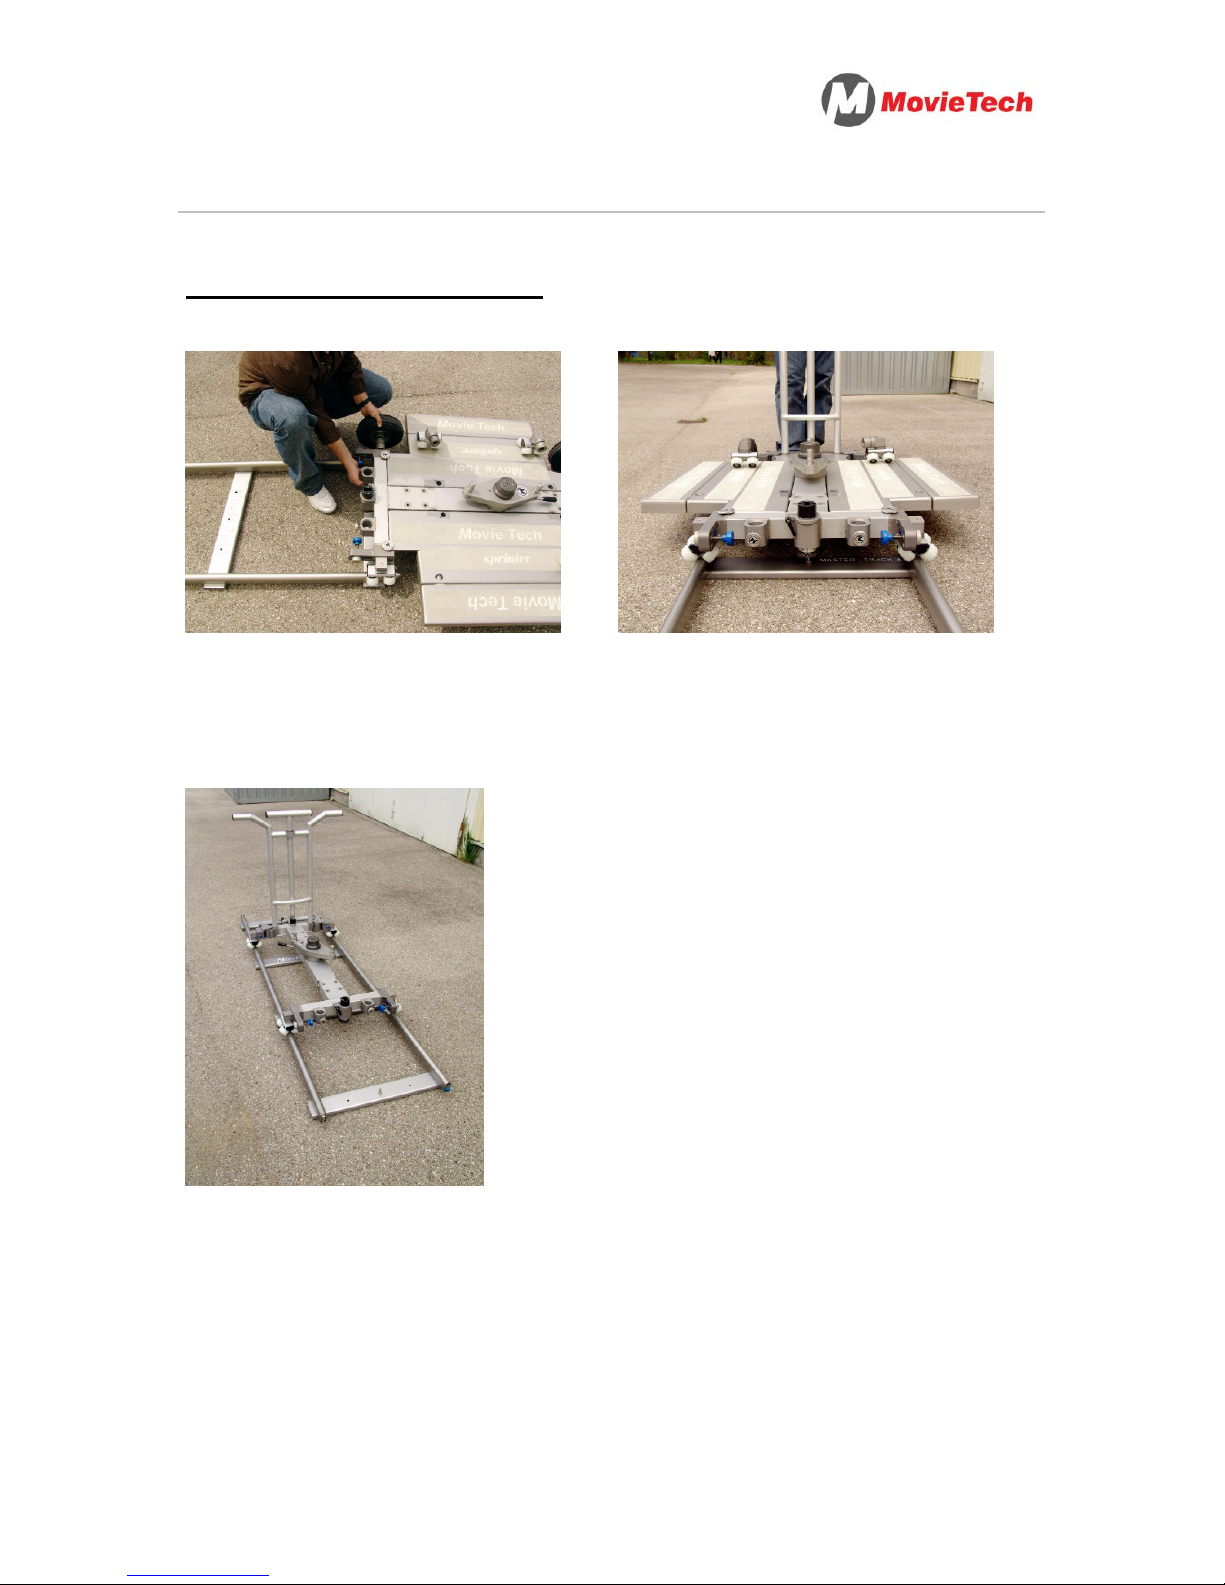
33) The assembly of further track
wheels takes place as described at the
points 30) - 32)
34) The front view of the dolly with two
placed track wheels on the rail.
35) Dolly without platforms and a
complete track wheel set.
Page 34
S
PRINTER
Instruction Manual: MovieTech SPRINTER Page 16 of 18
Possible dolly accessories „SPRINTER“
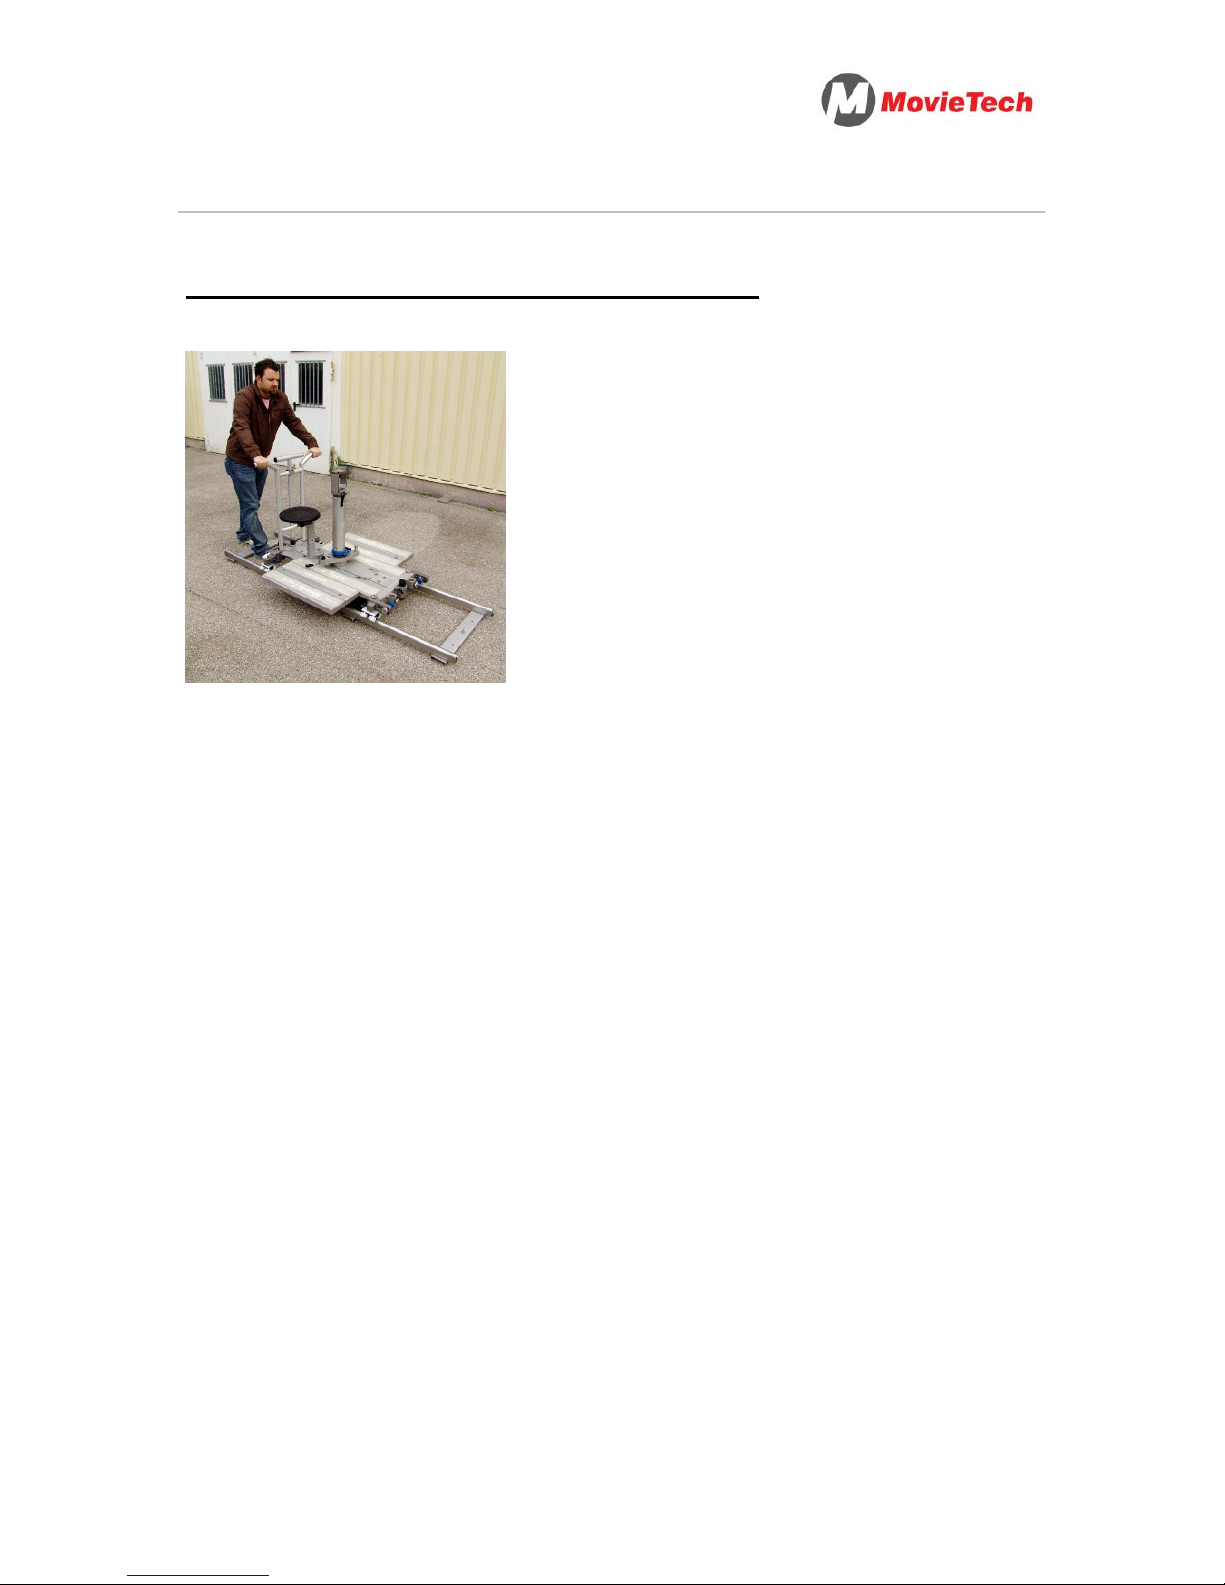
36) Dolly with platforms and complete
track-wheel set.
Additionally, following accessories are
available for the SPRINTER (some
illustrated as in the picture):
- Bazooka (e.g. No. 2133)
- Ball adapter (e.g. No. 2032)
- Seat arm (e.g. No. 2056)
- Round seat (e.g. No. 2058)
Find further accessories in the accessory
catalog or on request.
Page 35
S
PRINTER
Instruction Manual: MovieTech SPRINTER Page 17 of 18
Converting the turnstile
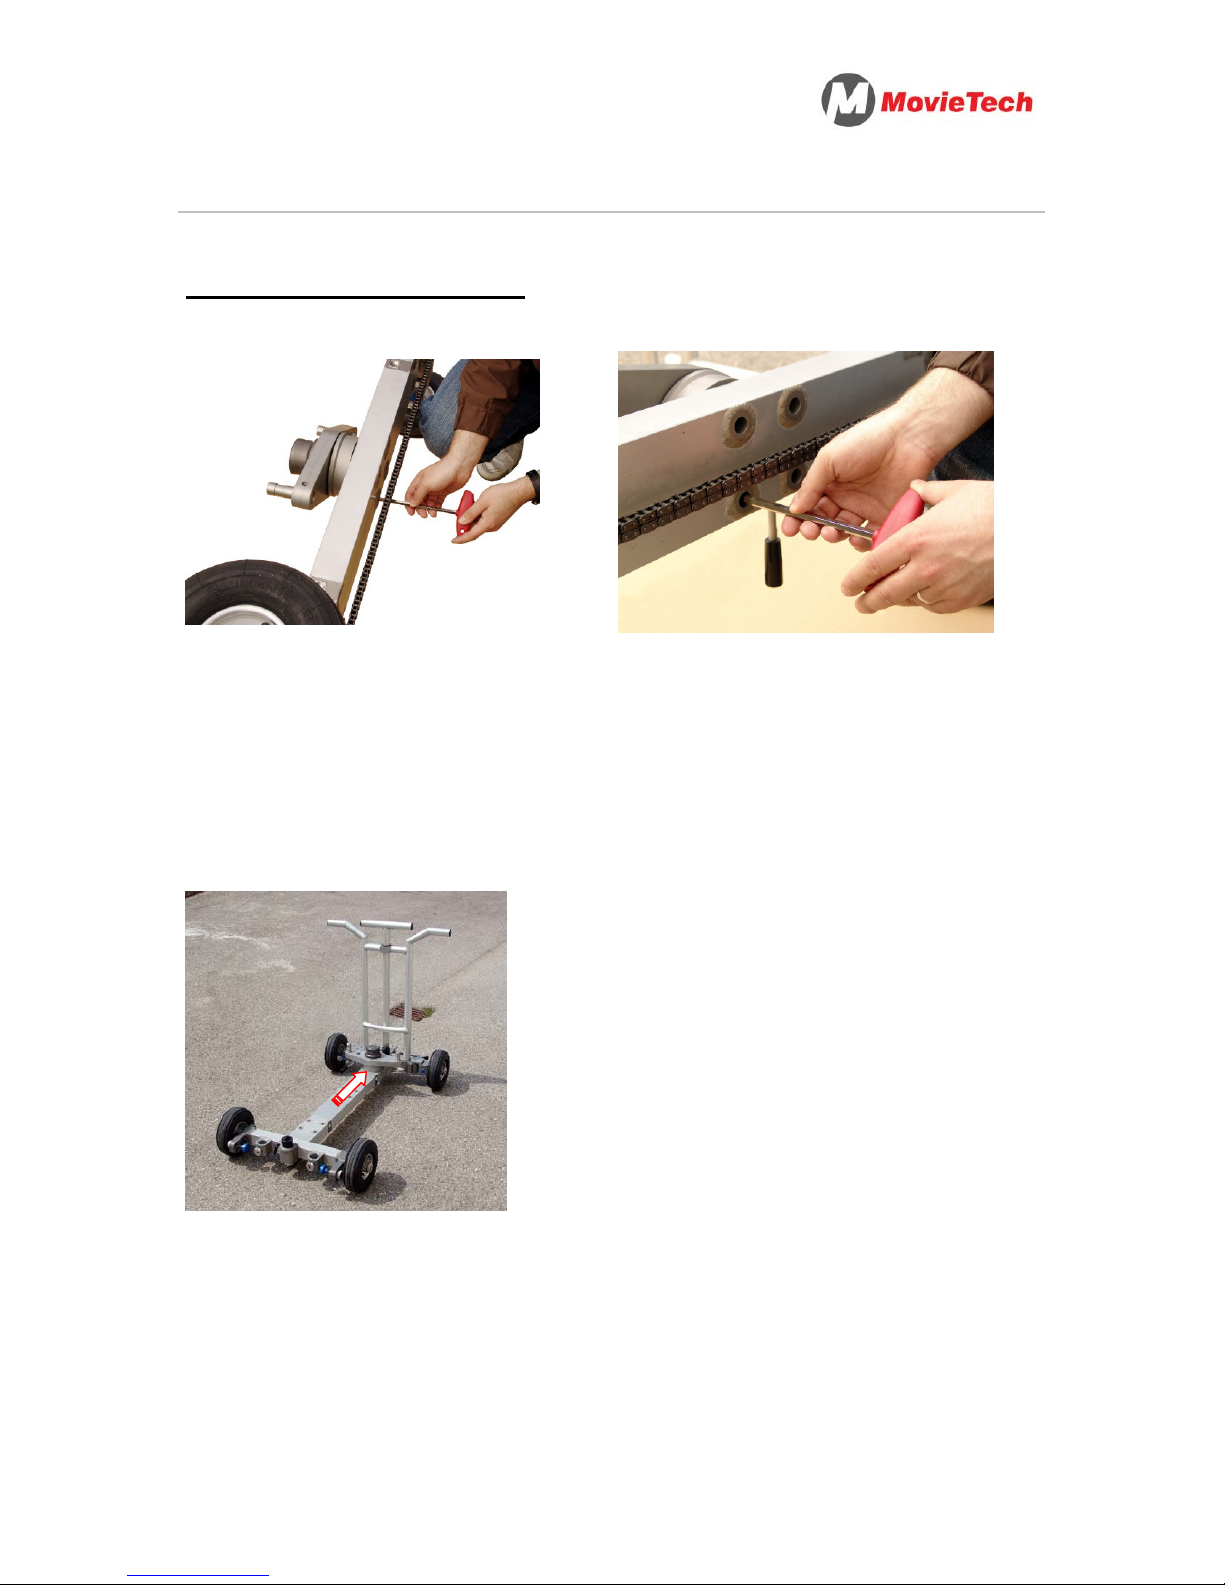
37) For converting the turnstile please
put the dolly on the side. With the help
of a Allen key (size 8) you can undo
the screws of the turnstile.
Tip: A second person can safeguard
the heavy turnstile against falling
down.
38) The turnstile can be put and
screwed together on the further
assembly position now. Tightening the
screws for certain.
39) Moved turnstile on the dolly
Page 36
S
PRINTER
Instruction Manual: MovieTech SPRINTER Page 18 of 18
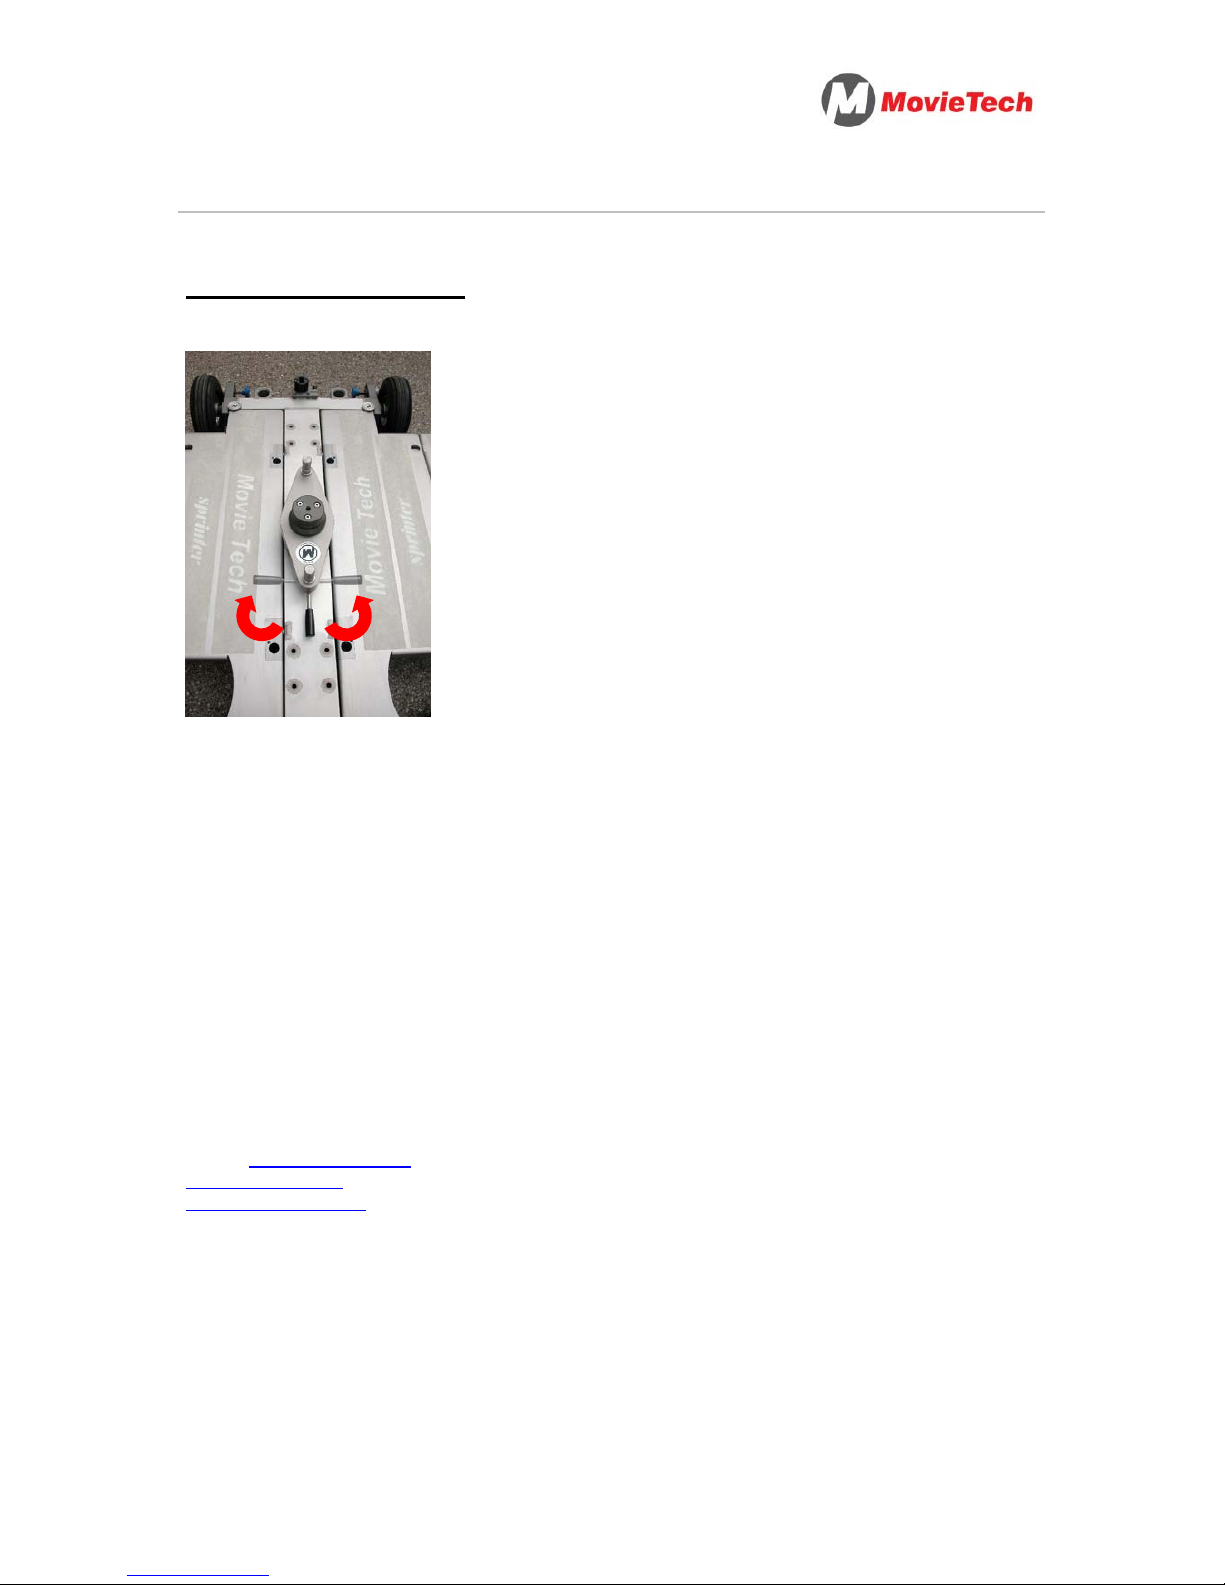
Toggle the turnstile
40) The turnstile can be fixed at a desired
position by attracting of the detent lever.
Further informations:
Movie Tech AG / ABC-Products GmbH
Martin-Kollar-Str. 9
D-81829 München
Tel.: 089 - 43 68 91 3
E-Mail: [email protected]
www.movietech.de
www.abc-products.de
 Loading...