

movie-intercom RC4, W-Dim3, LumenDimM2, W-Dim4, LumenDimM4 Quick Start Manual
...
RC4 Wireless dimmers
Quick Start Guide
Related RC4 products
- LumenDimM2 - W-Dim3
- LumenDimM4 - W-Dim4
- LumenDim4
LightingFX Tools
phone +49 (0)30-2232 0575
fax +49 (0)30-2232 0571
web
www.movie-inter.com
mail
info@movie-inter.com
movie-intercom
®
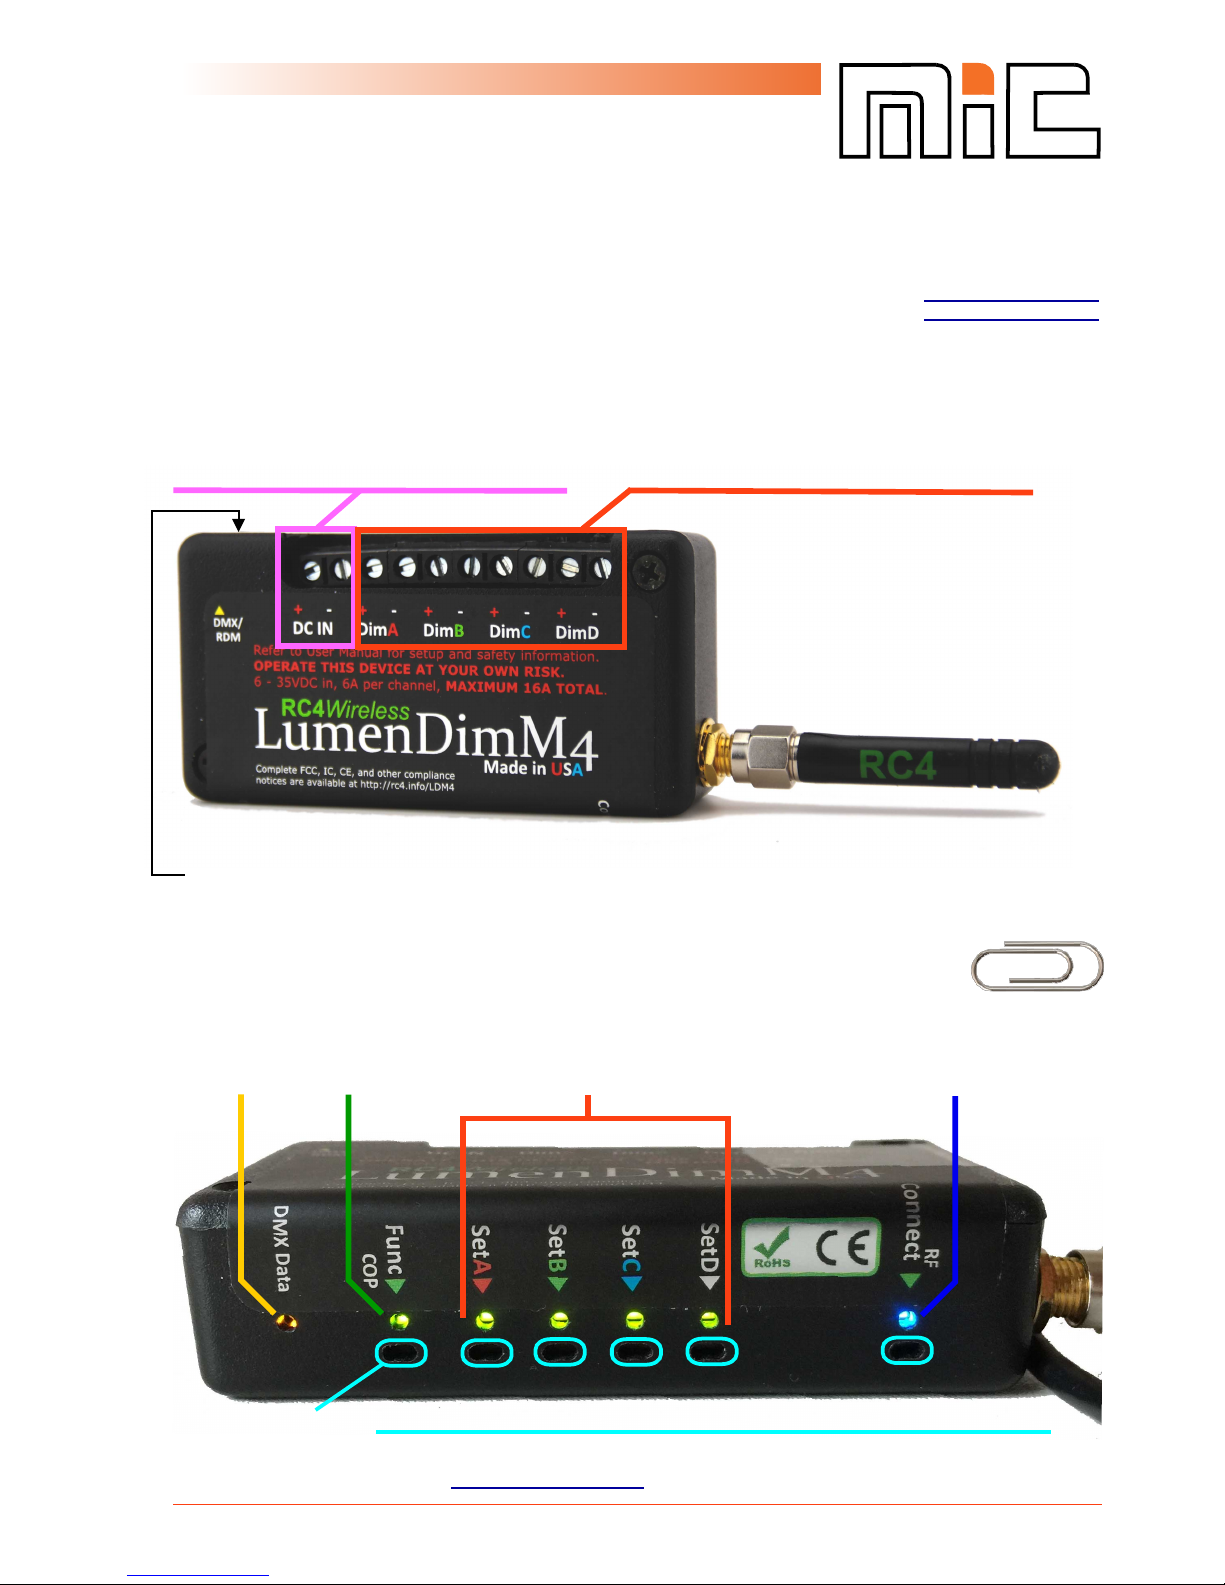
Screw terminals for connection of
power supply (DC IN: 6 - 32 VDC) and 4 channels DC out (DimA, B, C, D)
3.5 mm jack for wired DMX IN/OUT (requires optional available adaptor)
Buttons and Indicators
Positive terminals (marked with "+")
are internally connected with each
other.
recommended tool for
push buttons: paper clip
V1.0-2018e © movie-intercom 2018
support@movie-inter.com
movie-intercom Blücherstr. 21 10961 Berlin, Germany
recessed buttons under oval holes > push with bent paper clip
Output indicator LEDs
channel A, B, C, D
RF status LED
linked/not linked
COP LED
> see next page
DMX data LED
steadily on when
DMX data received
Func button
Max. output/channel: 5 A continuous,
10 A non-continuous
Max. Total power handling: 16 A

Getting started
Support RC4 wireless Lumendim/W-DMX DC dimmers quick start guide
V 1.0
page 2 of 3
DC power is applied to the DC IN > COP LED is blinking.
Linking with a transmitter
1. Link the dimmer with a Lumenradio or W-DMX transmitter.
If the dimmer was linked with an unknown transmitter before you need to unlink it first:
Push "Connect" longer than 5 seconds > blue LED goes OFF
2. Link with transmitter:
1: @ transmitter push "link" button > LED @ transmitter starts blinking
2. @ RC4 dimmer push ""Connect" > blue LED is blinking, if linked: LED steadily ON
Set-up of DMX channels and dimmer curves
1. You will need to have a linked dimmer with a transmitter.
Use a simple dimmer console or a DMX tester connected at the DMX input of the
wireless transmitter for set-up.
2. If there is a present DMX signal DMX data LED @ dimmer is ON
3. Set all DMX channels to level 0.
The first transmitted DMX channel and its according level will assign the DMX channel
AND its dimmer curve to dimmer output channel A, B, C or D at the same time.
Use a bent paper clip > set-up the level due to the table shown below > push "SET A" >
depending on the level this DMX channel AND dimmer curve is assigned to this DC output channel.
HINT: If you set at first channel A > channels B, C and D are set automatically.
DMX channel B = DMX address A+1, C = DMX address A+2, D = DMX address A+3
V1.0-2018e © movie-intercom 2018
support@movie-inter.com
movie-intercom Blücherstr. 21 10961 Berlin, Germany
Dimmer curve, digital persistance, PWM frequency
Level % (0-100)
Level DEC (0-255)
Non-dim > ON/OFF
OFF (no digital persistance), no modulation
Linear > use fur tungsten bulbs
OFF (no digital persistance), 77 Hz PWM
100%
(80% or higher)
70%
(60 - 79%)
255
(205 or higher)
180
(154 - 204)
ISL fast > use for LED, fast response needed
OFF (no digital persistance), 5 kHz PWM (default)
ISL slow > use for LED smooth dimming
default DP: Fast medium, 5 kHz PWM (default)
Channel ignored
no change of current settings
50%
(40 - 59%)
30%
(20 - 39%)
128
(103 - 153)
77
(52-102)
less than 20%
less than 52
 Loading...