

Page 1
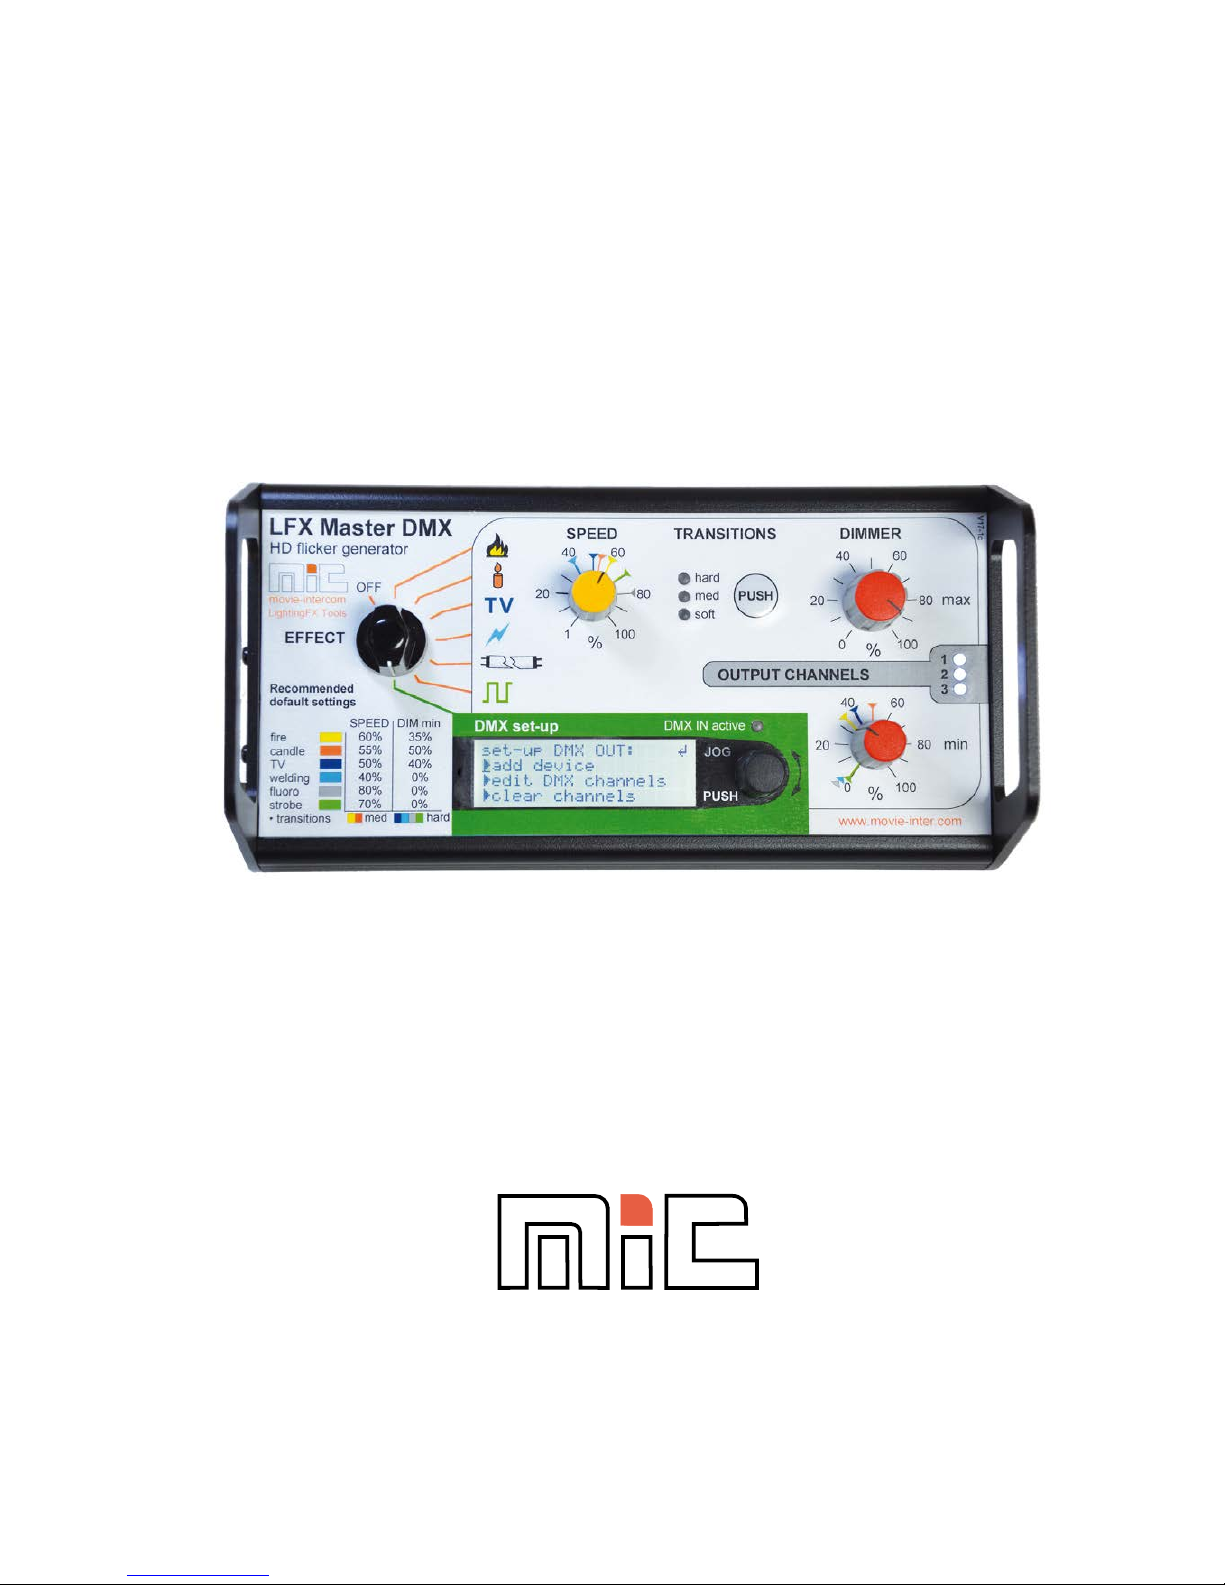
User manual
LFX Master DMX
www.movie-inter.com
movie-intercom
LightingFX Tools
®
vaild from firmware version > 2.0
Page 2

copyright © movie-intercom® 2018
edition June 2018- en 2.0.1
Please download the latest user manual from our website.
Please be advised depending on the software version function may differ.
This user manual is valid for the LFX Master DMX from firmware version >2.0
download the latest user manual:
http://www.movie-inter.com/en/support/downloads
This user manual is also available in German language
https://www.movie-inter.com/support/downloads-2/
No part of this document may be used for distribution, reproduction, transmission, transcription, storage in a data retrieval system, or translated into any language in any form by any means without the prior written permission of movieintercom. If you are downloading files from our web page for your personal use,
make sure to check for updated versions. movie-intercom LightingFX Tools cannot take any liability for downloaded files, as technical data are subject to
change without notice.
Page 3

User manual LFX Master DMX page 3 of 35
Content
Chapter
Topic
1.
2.
3.
3.1
Intended use
Safety instructions
General features
Control panel & DMX-512 connections, power supply
Page
4
4
5
5
3.2
3.3
3.4
3.5
Pre-programmed effects
Dimmer MAX & min
Three output channels
Transitions function
3.6
3.7
4.
5.
Mechanical mounting
General set-up procedure
Online configuration tool www.lfxmaster.com
Quick Start Guide
6
7
8
9
9
10
10
11
6.
6.1
6.2
6.2.1
Product Overview, use of JOG
Menu map
Configuration of DMX OUT overview, device library
6.2.2
6.2.3
Device library for Kinoflo
12
13
15
16
Kinoflo Gel library
Device library for Arri
Arri Gel library
Device library other
17
18
19
20
6.2.4
6.2.5
6.2.6
6.2.7
6.3
6.3.1
6.3.2
6.3.3
Configuration of DMX IN/-presets overview
Device preset set-up
Customize DMX OUT channels in "Expert mode"
Delete a DMX channel
Function "overwrite" a DMX channel
21
22
22
23
Use of external Dimmer console
DMX IN preset "3x OUT separate dim control"
DMX IN preset "full remote control"
24
25
26
27
6.3.4
6.3.5
6.3.6
7.
Software update
8.
9.
10.
11.
Trouble shooting
Specifications
Cleaning & disposal
Address & support
Use the "enable"-function for remote control
Custom DMX IN patching
Indicating DMX IN values
28
29
30
31
32
33
34
35
edition June 2018- en 2.0.1
www.movie-inter.com
Page 4
edition June 2018- en 2.0.1
www.movie-inter.com
User manual LFX Master DMX page 4 of 35
Chapter 1
Intended use
This product is for professional use only and has been designed for indoor use in dry environment.
Please read this manual carefully before operation and follow the safety information.
The LFX Master DMX lighting effect generator allows for control of lamps connected at the
DMX-512 output.
The DMX-512 input allows for remote control of the unit or to extend the functions using an
external dimmer console.
Chapter 2
Safety - PLEASE READ
It is important to read ALL safety and installation instructions to avoid any damage to the
product and potential injury to yourself and others.
Only use this product if all cables, connectors and the product itself are undamaged.
The device must be used in accordance with local regulations only.
Do not operate the product if the ambient temperature exceeds 40°C / 104°F.
Exposure to moisture may cause damage to the product and will void your warranty.
Damage caused by inadequate cleaning or maintenance is not covered by the warranty.
Never connect the PSU and a battery or other power source at DC IN/OUT 1 and 2 at the
same time!
Only use the power supply unit (PSU) delivered from movie-intercom LightingFX Tools.
DANGER
Risk of injury or death through epileptic seizure.
Do not use the effect near stairways, in corridors or near public exits. Provide advance notice that strobe lighting is in use. Display advisory notices on the set, at the pointof ticket
sales, on tickets if possible, in the program, and at the entrance(s) to the venue or studio.
Avoid extended periods of continuous flashing, particularly at frequencies of 10 to 20 flashes per second. At flash rates below 5 flashes per second, it is estimated that only 5% of
flicker-sensitive persons will be at risk of seizure.
Make sure that personnel at the venue are trained in the care of a person who is having
an epileptic seizure and able to provide care if necessary. If strobes are in use and a person has a seizure, switch the strobes off immediately. Mount strobes as high above head
height as practicable.
Page 5
User manual LFX Master DMX page 5 of 35
Chapter 3
General features
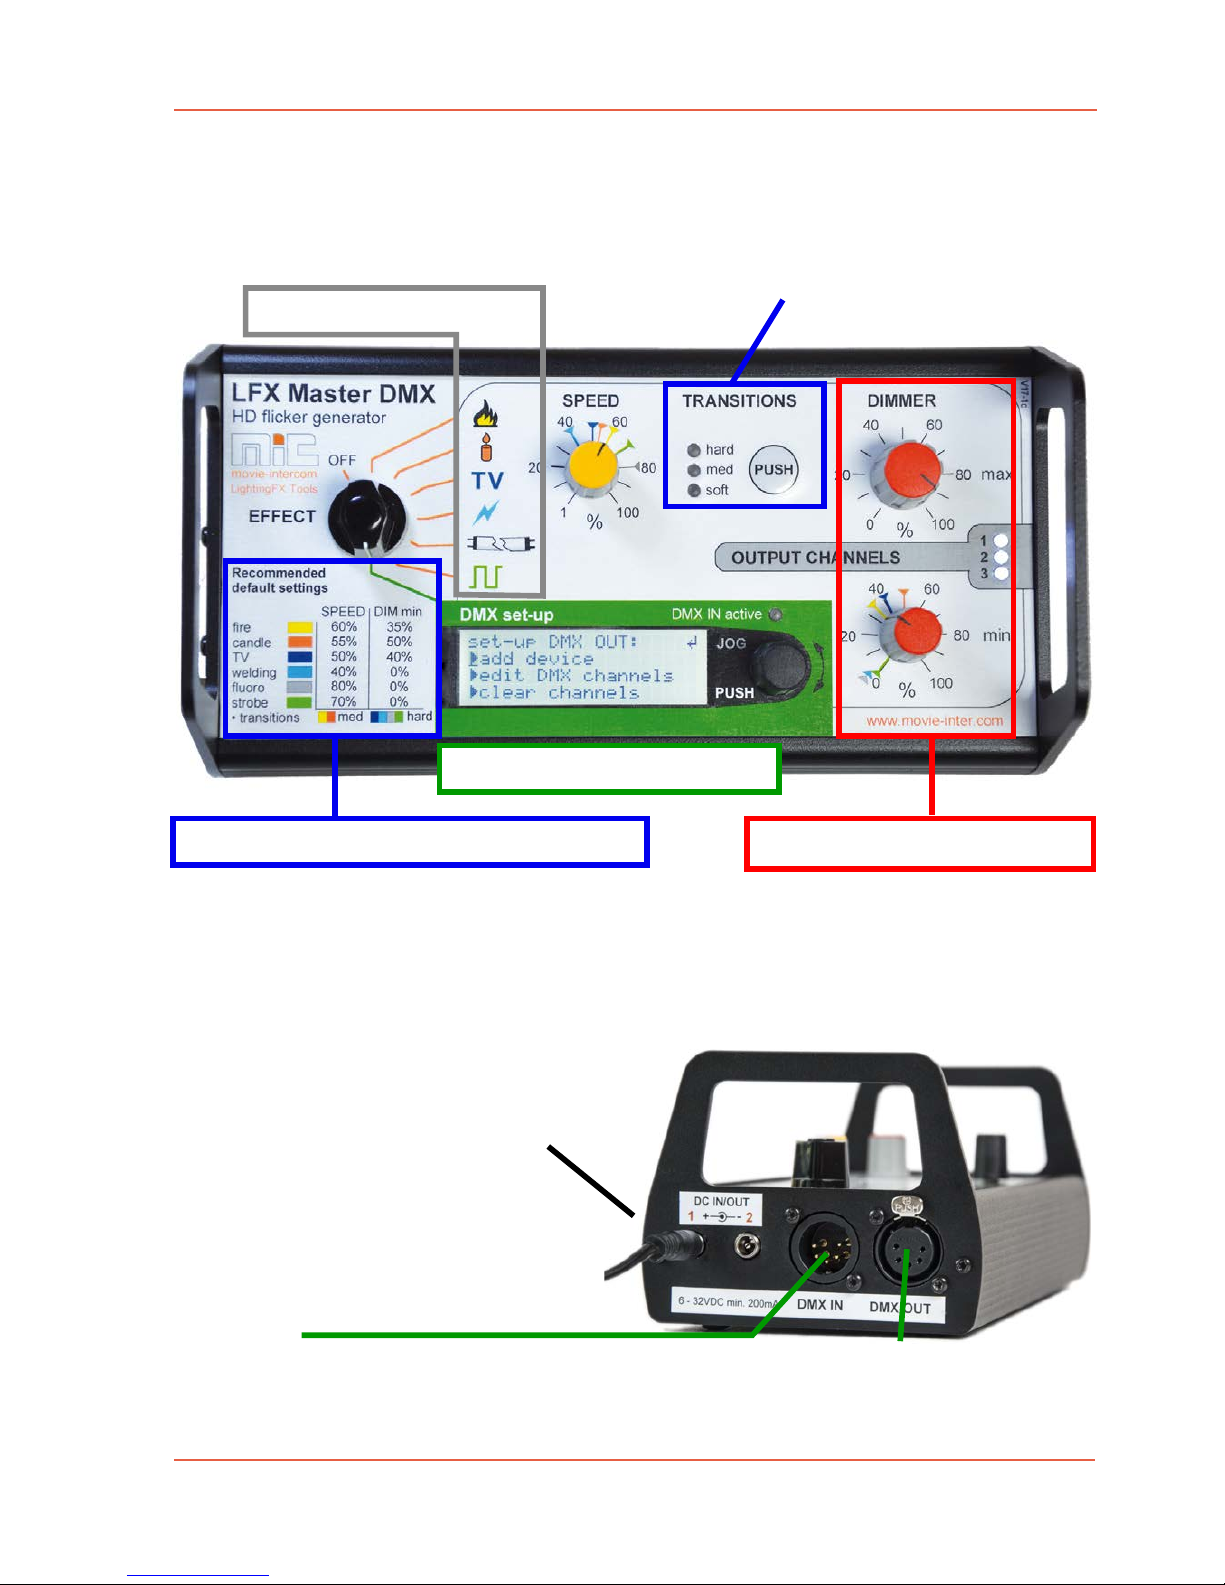
3.1 Control panel
A coloured label represents the recommended default settings - set SPEED, TRANSITIONS
and DIMMER min to the corresponding coloured markers located on each scale.
Connections
Connect PSU 12 VDC here @ 1 or 2
- 1 and 2 throughput
- use second DC jack for powering
an external device, e.g. wireless
DMX transmitter or dimmer console
The DC input is internally protected
against short-circuit/polarity for the unit.
Caution: both DC-inputs are directly
connected with each other!
DMX input
- connect dimmer console/existing DMX universe here
- use as an inline device in an existing DMX universe, auto-terminate
edition June 2018- en 2.0.1
www.movie-inter.com
Start using the default settings of an effect.
Dimmer values for channel 1-3
DMX OUT
connect
device here
shapes edges of a flicker curve
DMX configuration IN & OUT
Effect presets
Page 6
edition June 2018- en 2.0.1
www.movie-inter.com
User manual LFX Master DMX page 6 of 35
Power supply unit
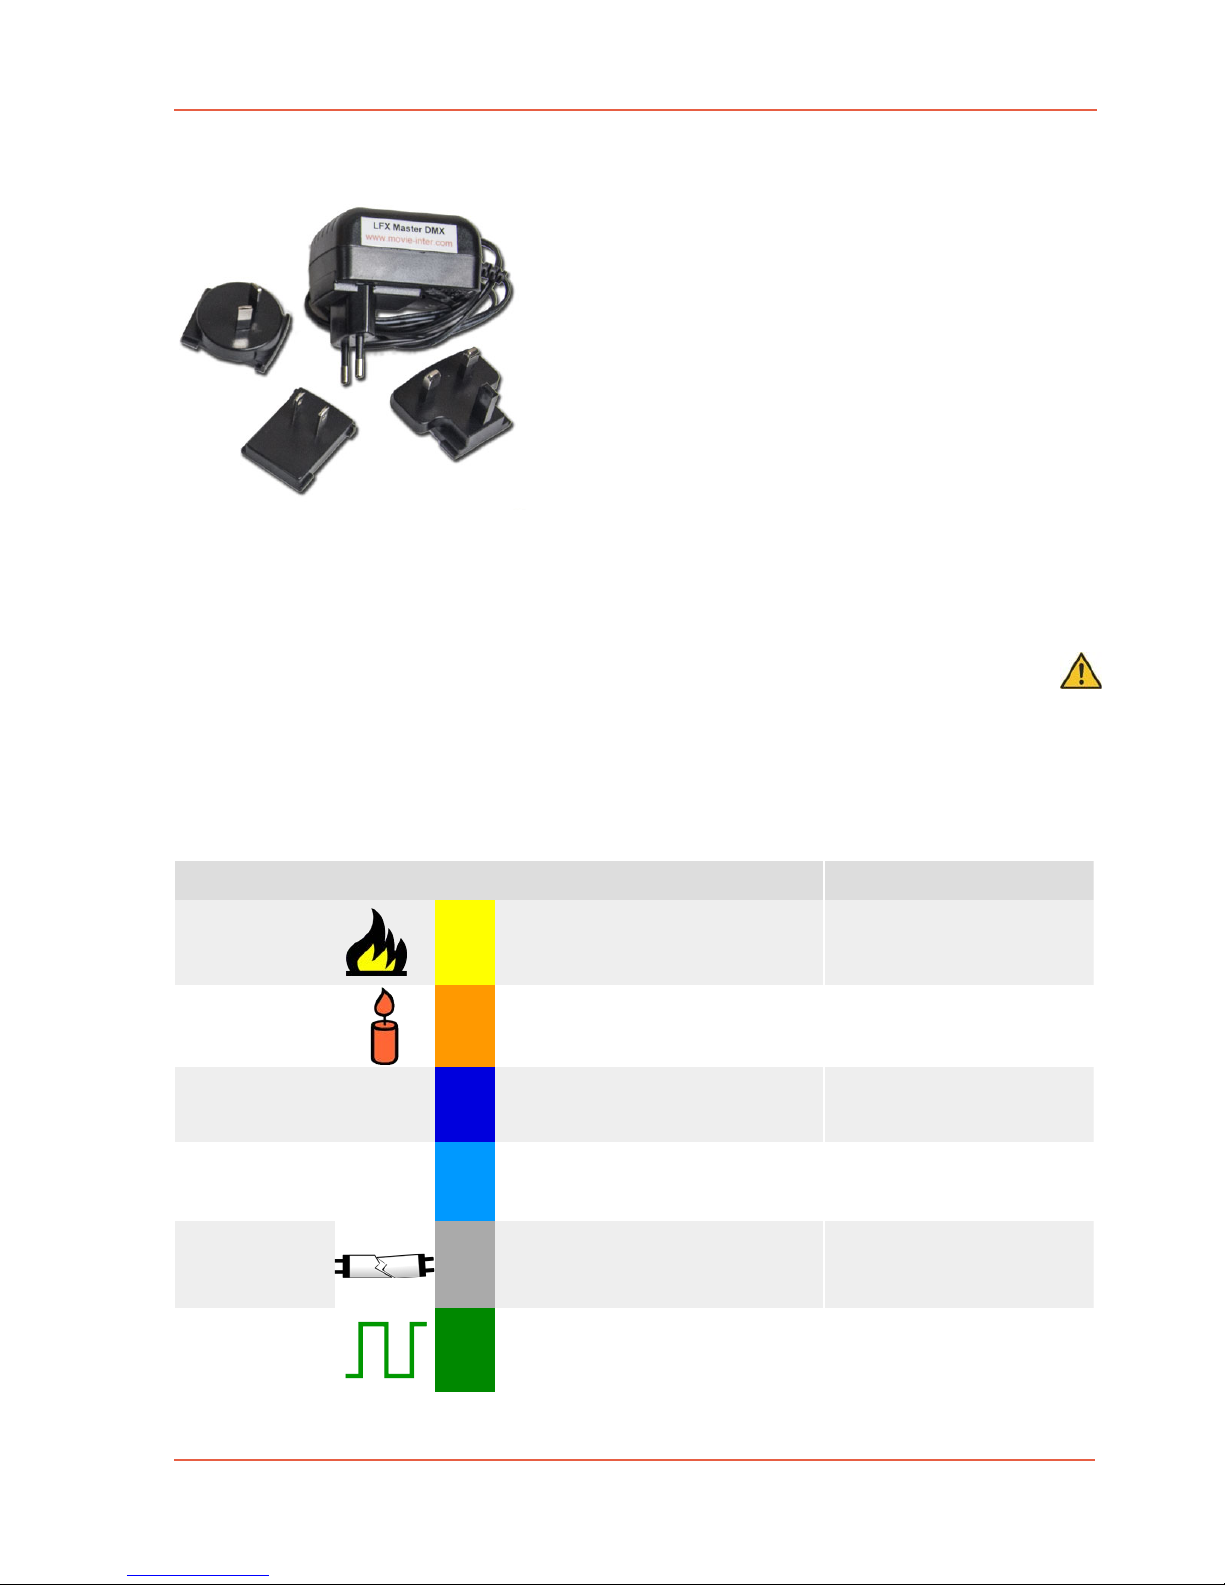
Exclusively use the external PSU (Power supply unit) for
operation, included in delivery.
Plug-in the mains connector to 100 - 240 VAC/ 50 to 60
Hz. Please replace the interchangeable adaptor plug for
EU, US, UK, AU.
Connect the round DC-plug to the LFX Master DMX´s
DC input 1 or 2.
Alternatively use a battery (5 - 32 VDC) with a round
standard 2.1mm power plug, center positive.
Or use the USB > Power cable to poeer ot up.
3.2 Pre-programmed effects
Natural looking lighting effects
The unit is equipped with six pre-programmed effect presets. Obey safety instructions!
Each effect preset has a resolution of 24 fps at default values.
A coloured label on the control panel represents the recommended settings - set SPEED
and DIMMER min to the corresponding coloured markers located on each scale.
TRANSITIONS is set automatically to the recommended mode after selection of an effect.
preset name
fire
candle
TV
welding
"broken" fluoro
strobe
label
TV
!
application hints
single channel fire FX or use three
lamps for fire with flickering shadows,
torche
a slidely flickering candle FX, oil lamp,
lantern
play with TRANSITIONS and DIMMER min, reduce DIMMER min if
used with three channels
choose a lamp with small light
omitting surface, e.g. household type 60 W bulb
flickering effect of a TV, RGB color
shifts if used in RGB mode of LED fixture or with three lamps geled
effect of welding or a short-circuit
set CCT to about 6500 Kelvin,
set TRANSITIONS to "med"
with LED
LED: set CCT to about 6500
Kelvin or above, for tungsten:
small wattage (bulb inertia)
"broken" fluoro will not come on, flickering tube LFX for LED or tungsten
rectangle signal, neon signs, flasher,
stroboscope, turn indicator;
speed from 70 msec to 28 sec
let "tube" turn on live by turning
DIMMER min to 100% rapidly
use as sequencer with 3 channels
CH2 & 3, each has 33% delay
Page 7
User manual LFX Master DMX page 7 of 35
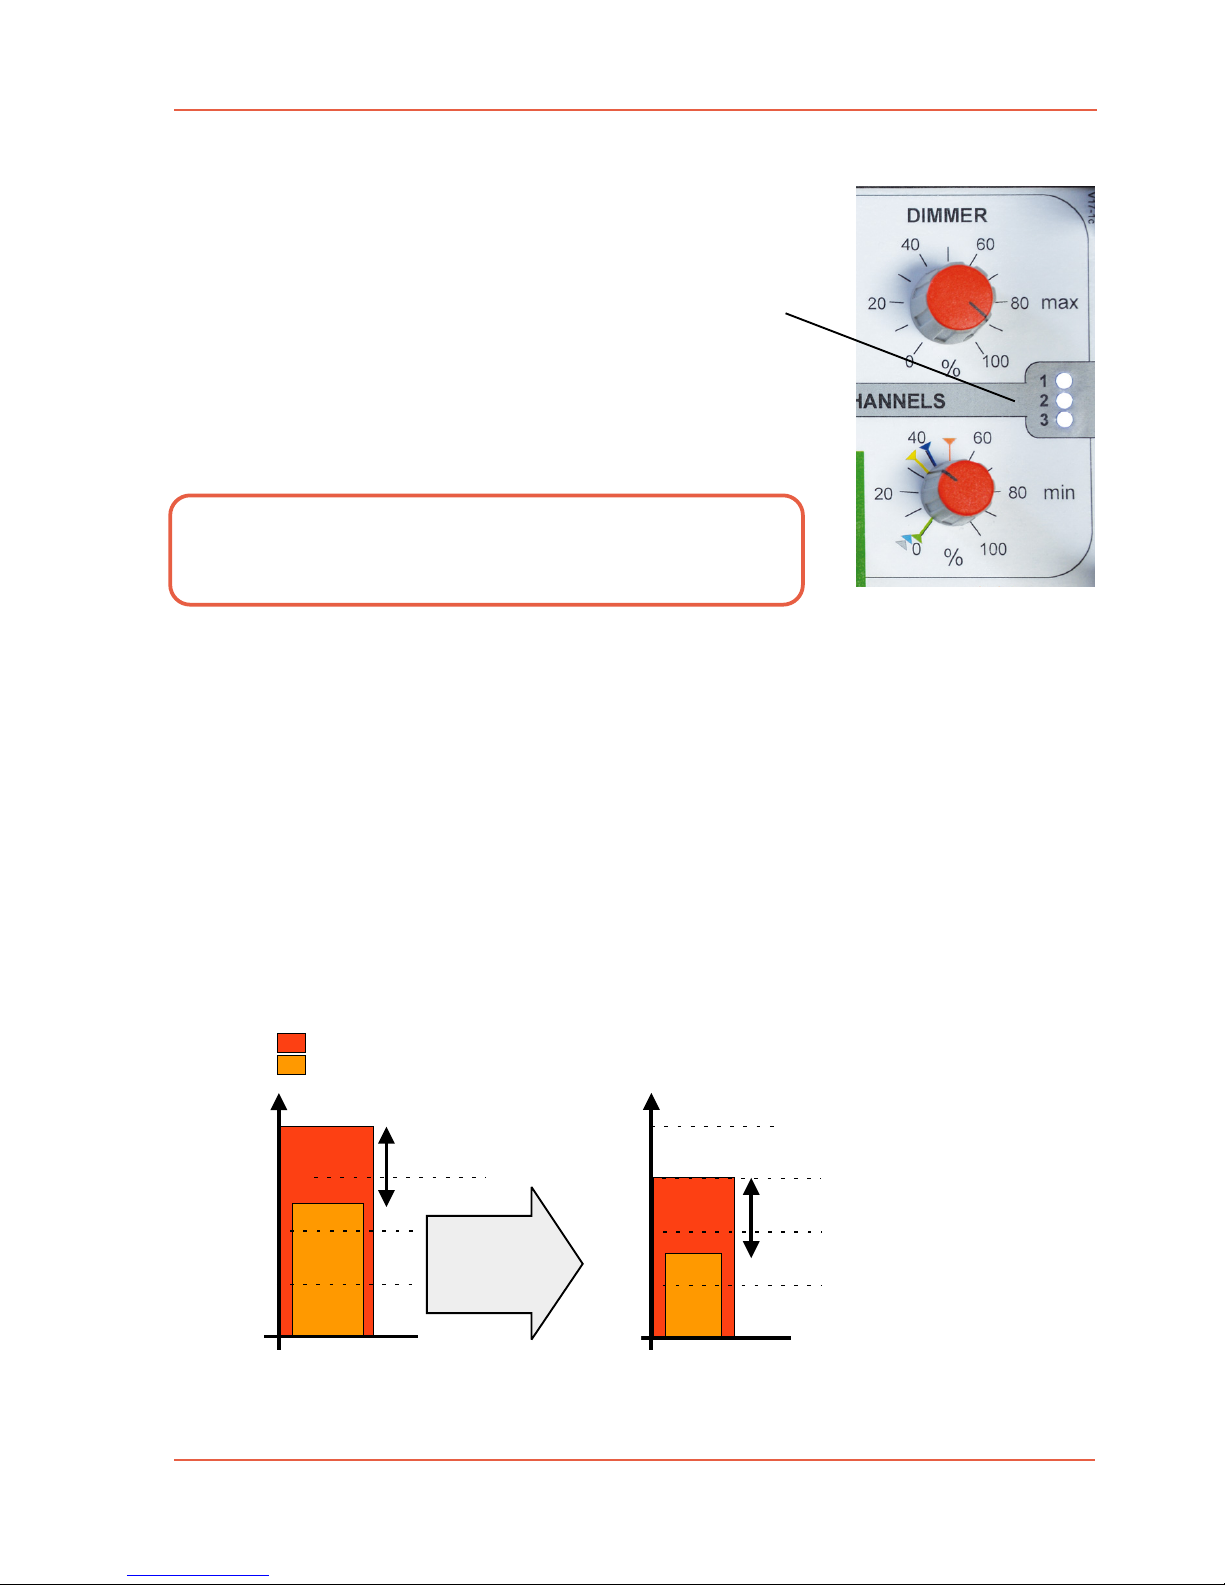
3.3 Dimmer MAX & min
Each generated lighting effect can be dimmed.
The LFX Master DMX provides the limitation of the …
- upper ("max") brightness level
- lower ("min") brightness level.
"Dimmer min" defines the intensity of flicker variations.
The brightness level alternates between these two values.
The "Dimmer max" knob dims all three channels.
Independend dimming of the channels
If you prefer to dim the three channels separately please use an external dimmer console
connected at "DMX-IN" and use the DMX-IN preset "3xOUT separate dim".
A minimum of six DMX channels are required for the console. > page 26
Relation between DIMMER max opposite DIMMER min
The value of DIMMER min always depends on the value of DIMMER max.
We strongly recommend to adjust the upper brightness limit ("DIMMER max") at first and
then adjust the value of DIMMER min.
In the DMX OUT configuration please select/edit effect channels DIM OUT 1, DIM OUT 2 or DIM OUT 3.
edition June 2018- en 2.0.1
www.movie-inter.com
If the maximum brightness level is reduced,
at the same time the minimum brightness level
will be decreased!
100%
brightness level
100%
50%
0 %
60%
value of Dimmer max. (incl. lower brightness level)
value of Dimmer min = lower brightness level
brightness alternation
100%
50%
0 %
80%
60%
upper limit
lower limit
after reducing
DIMMER max
brightness alternation
Monitor of
channels 1, 2, 3
Page 8
edition June 2018- en 2.0.1
www.movie-inter.com
User manual LFX Master DMX page 8 of 35
3.4 Three output channels
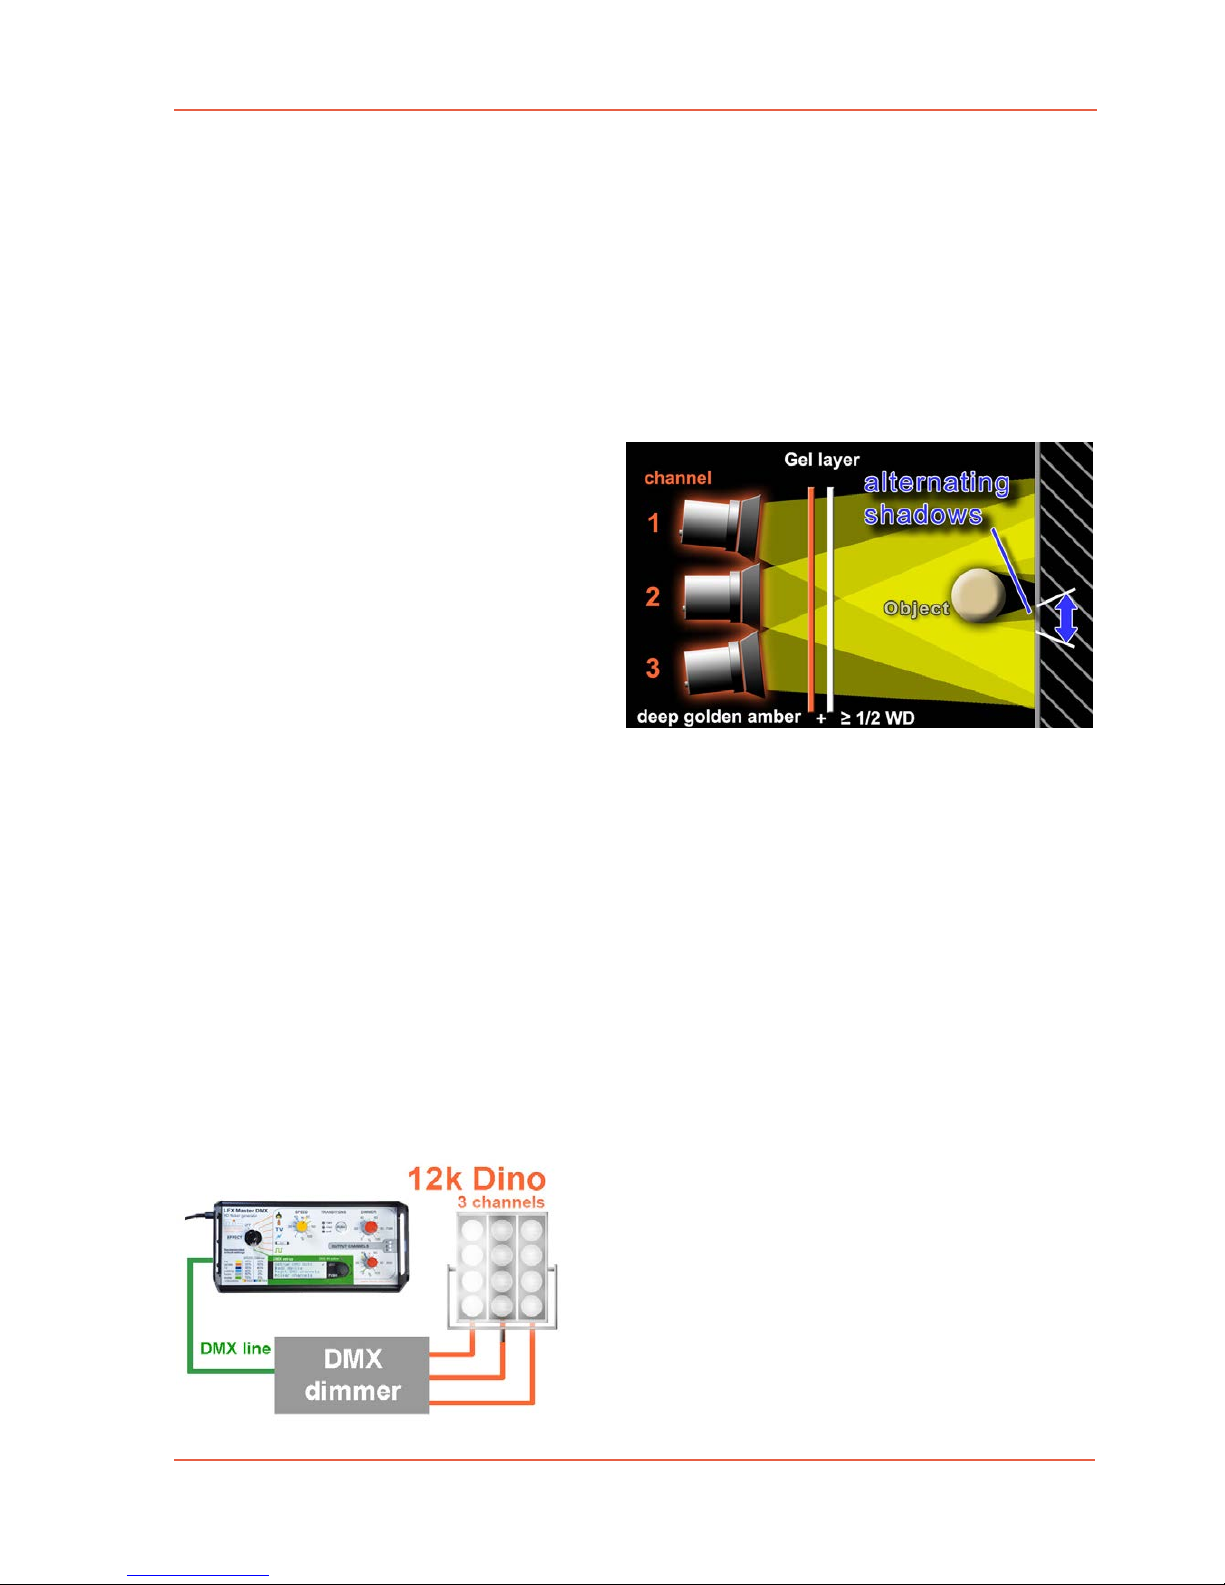
Original flames of a fireplace are in motion. The direction of the omitted light is changing.
Therefore a fire effect may look more realistic if it is created by lighting sources from different directions.
The 3 channel “fire” preset of the LFX Master DMX automatically alternates the dim levels of
each channel the way a real flame would behave – flickering shadows.
For TV effects with three channels even the colour changes if RGB lamp mode is choosen.
Realistic looking fire with 3 channels
As shown to the right three lamps – separately controlled by the LFX Master DMX
– will initiate three different cast shadows
of an object on a surface.
The suggested gel “deep golden amber”
is used to adjust the colour temperature.
The attached 1/2 white diffusion softens
the cast shadows of the three lamps, the
effect looks more natural.
If you remove the object you will not see any flickering shadows.
If the projection surface is too far away from the object you will not see
flickering shadows.
A single channel effect could have the same result, but, saves a lot of hardware set-up time.
Besides the adaptation to the filament inertia for tungsten the “Transitions” feature of the
LFX Master DMX also modifies the transitions between the channels, keep in mind for LED.
Gel and parameter library
With LED fixtures: add a gel by adding a DMX channel with a fixed value, or even bettter:
choose a gel from the gel library by gel name if set-up with an Arri or Kinoflo device preset.
Attach the three fixtures close to each other. WD gel is not required cause source is soft
anyway.
High power fire light
Choose the easy way to get a high power flickering
fire light.
Let it burn with one or multiple dino lights!
You may use a DMX-512 based 3 x 5k dimmer
hooked up at the DMX output of the LFX Master
DMX flicker generator.
Select device preset "tungsten dimmer".
Choose "hard" transitions for this effect.
Page 9
User manual LFX Master DMX page 9 of 35
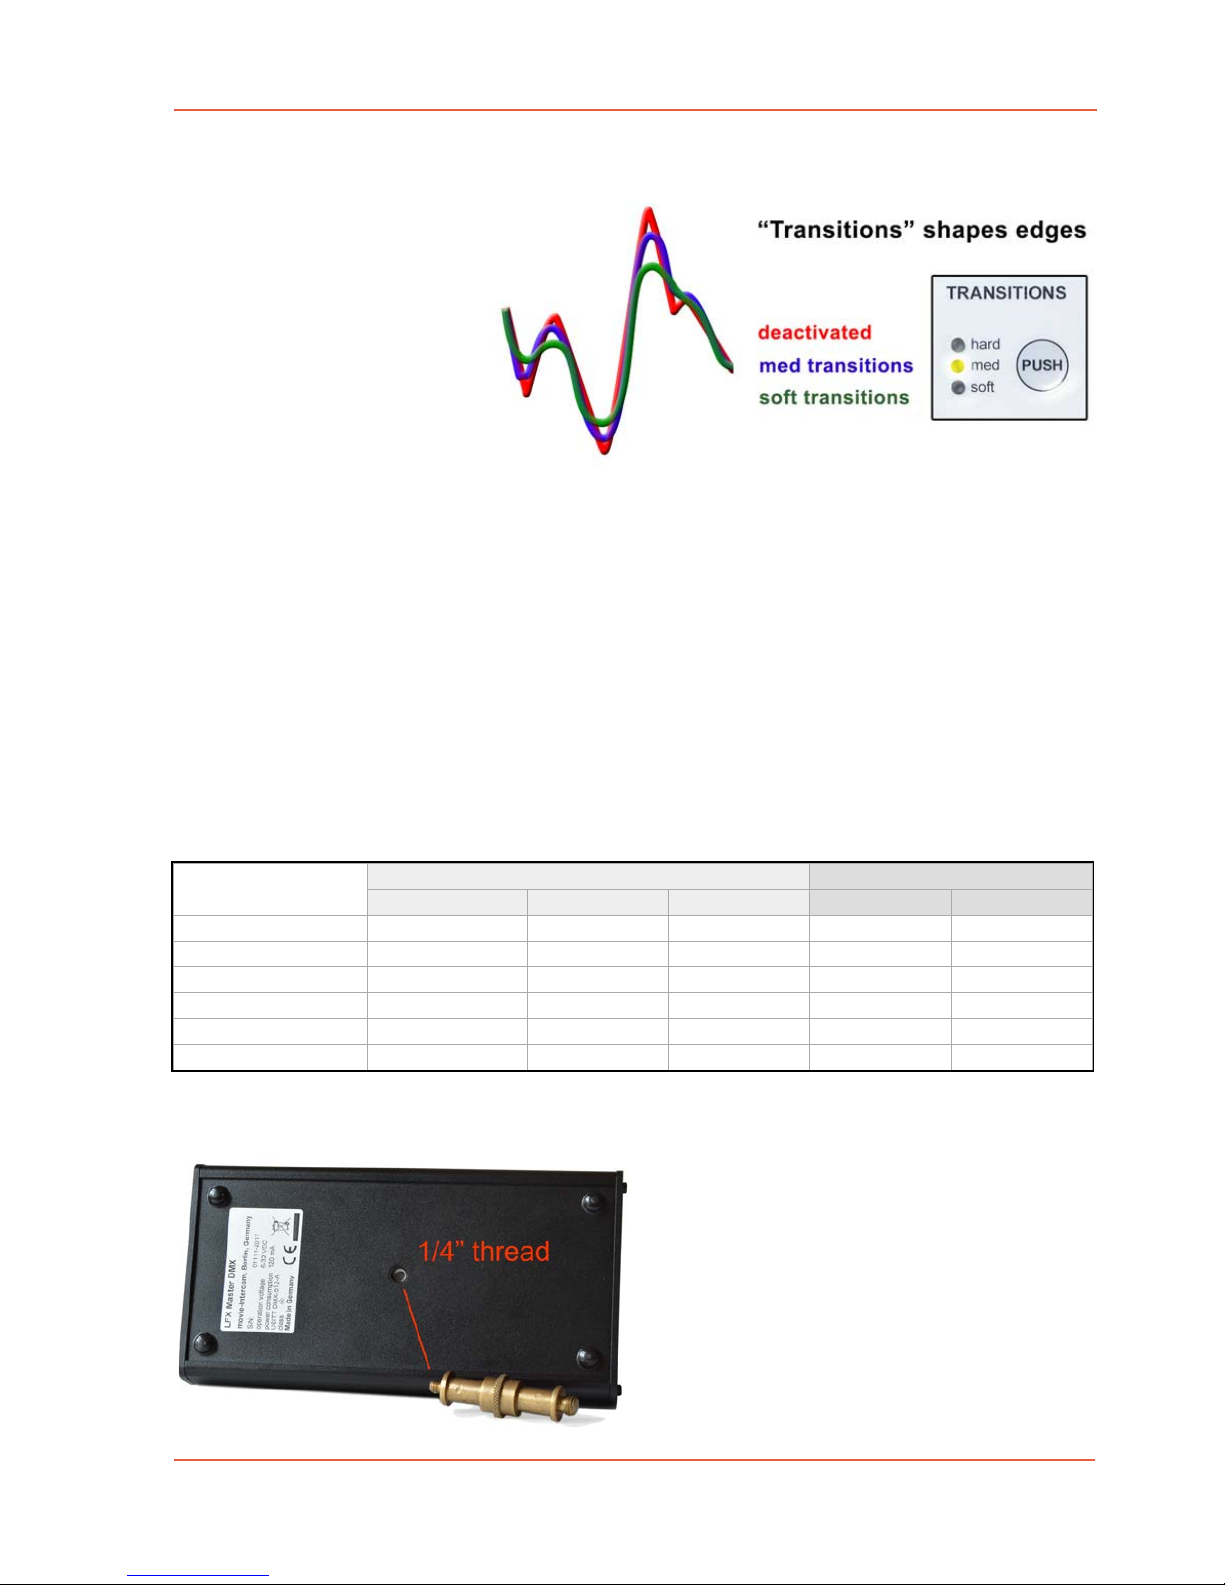
3.5 Transitions function
Use every type and size of
tungsten lamps or LED.
A result of an effect would look
different with the same signal
used at different lamp types/sizes, particularly if an LED lamp
is used.
“Transitions” adapts effects to
the duration of persistence of
various types of filaments or to
LED lamps.
The timing difference between the moment of electrical deactivation and the time of a completely extinguished light depends on the power of the bulb.
Choose the transition mode depending on the used type and size of lamp (bulb inertia).
Thus any lighting effect looks excellent – with a 10K, a redhead, a household type 60 W
bulb, fluoros or LED. The “Transitions” feature of the LFX Master DMX also modifies the
transitions between the channels
Also use “Transitions” for different styles of e.g. fire – from aggressive to smooth.
The Transition mode is automatically pre-selected if you turn rotary switch "EFFECT" to any
effect symbol. For Strobe effects "Transitions" is deactivated.
Depending on the manufacturer of the lamp a LED fixture might have different DMX input
signal pocessing. Some might "smooth" the signal, prefer to disable the "smooth" function.
3.6 mechanical mounting
Located on the rear bottom of the LFX
Master DMX there is a 1/4" thread.
Use a standard brass pin for mounting, maximum length of the 1/4"
screw must not exceed 8 mm.
edition June 2018- en 2.0.1
www.movie-inter.com
Effect
Fire
Tungsten
60 W bulb
med
150-800 W
med
Candle
TV
Welding
"broken" tube
soft
med
med
hard
hard
hard
hard
hard
Strobe - -
LED
>1 kW
hard
"smooth" off
med
"smooth" ON
hard
hard
hard
soft
med
hard
hard
hard
hard
hard
hard
hard
hard
- - -
recommended settings for "Transistions"
Page 10
edition June 2018- en 2.0.1
www.movie-inter.com
User manual LFX Master DMX page 10 of 35
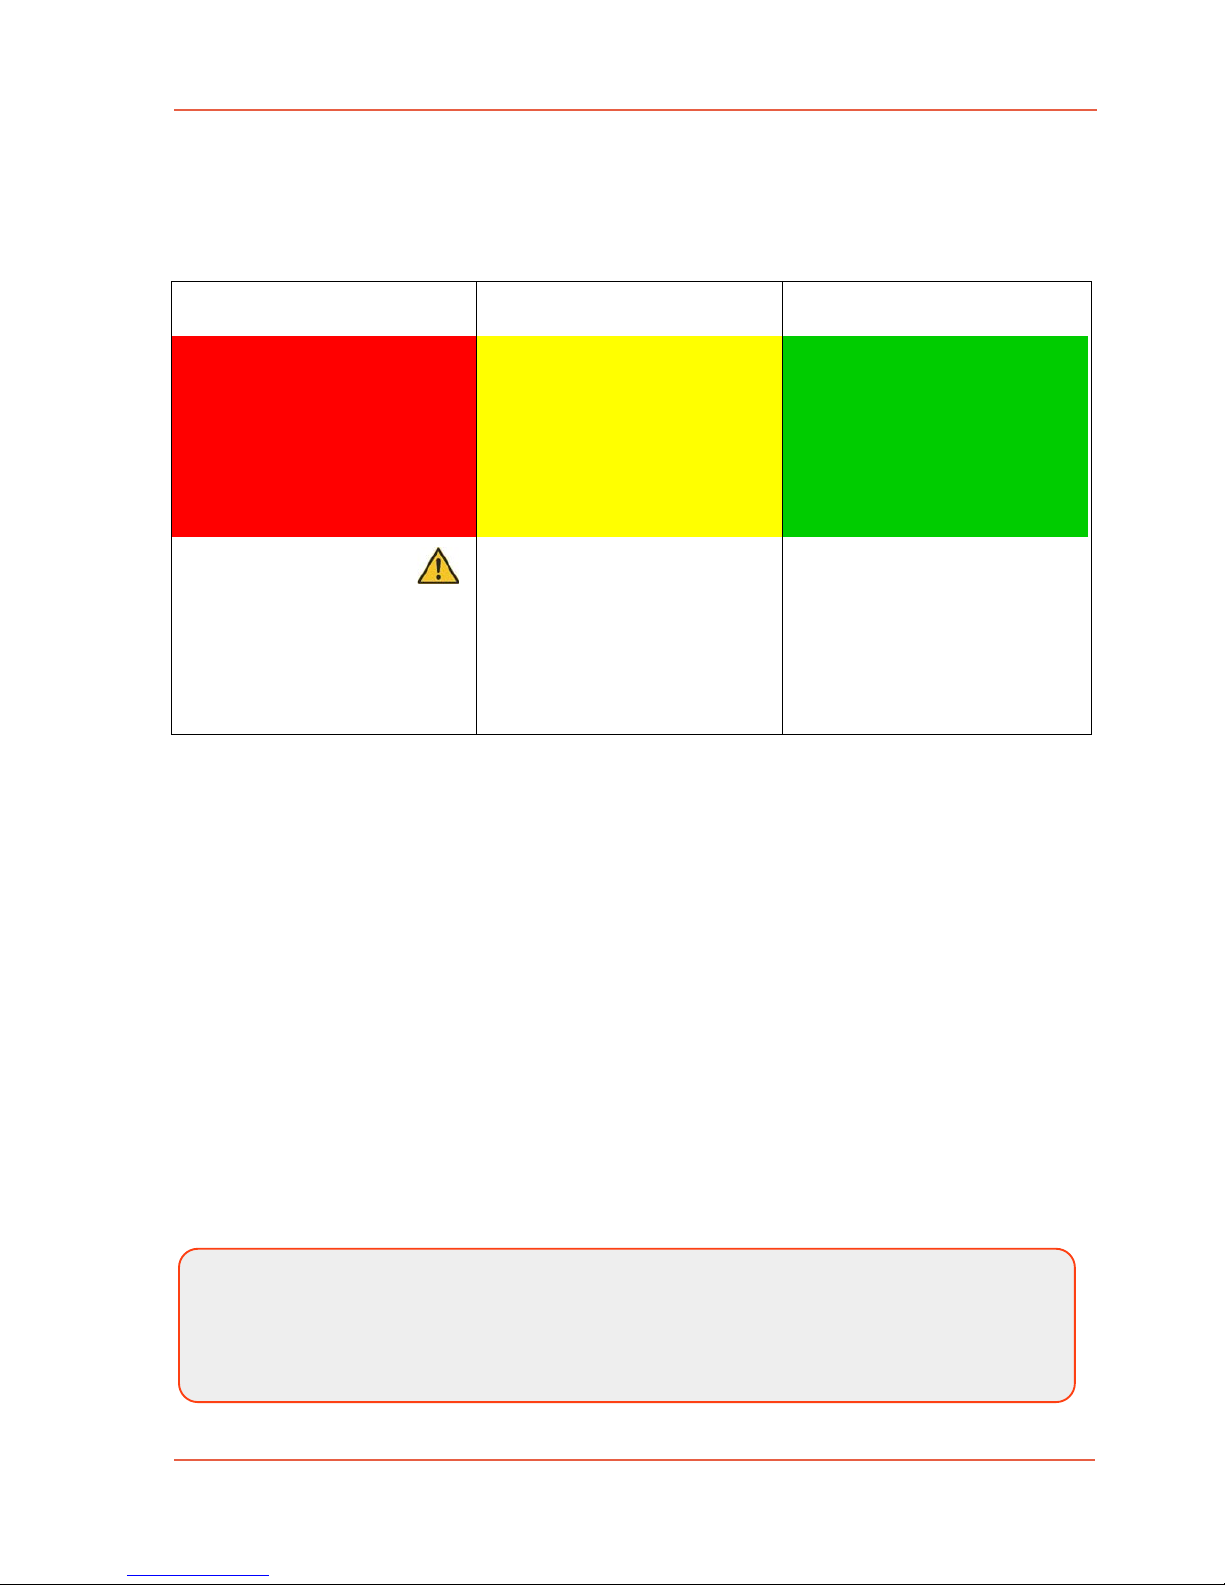
3.7 General set-up procedure
First of all choose the lamp(s) you would like to control.
Got through steps 1 to 3.
For control of tungsten lamps one or many externally connected DMX-512 based dimmer
packs are required.
LED fixtures normally does not require a dimmer pack and can be controlled directly.
Add as many LED devices as required using a device preset.
Chapter 4
Online configuration Tool
On www.lfxmaster.com you may configure any output setting using an arbitrary number of
lights.
Enter the type and number of lamps, the set-up assistant will guide you through the settings.
Finally e-mail this step-by-step guide to your account.
This web site is permanently updated with new LED fixtures and features.
1 2 3
Power up @ DC-input 5-32
VDC 1 or 2
Connect a DMX device @
DMX OUT
WARNING
Never connect two power
sources at the same time
using DC IN/OUT 1 and 2!
Turn "EFFECT" to position
"DMX set-up"
Set-up the DMX communication with one or many
lamps using DMX-OUT device presets or custom setup
Choose a device preset
or
use the custom configuration
Turn "EFFECT" to any EFFECT position.
Start with the default settings printed on the control
panel.
create lighting effect
Risk of fire!
We would be very pleased if you would inform us about the successful use of a light
not included in the DMX device list. We update the device list constantly - that helps
other users!
A contact link can be found on this website.
Page 11
User manual LFX Master DMX page 11 of 35
Chapter 5
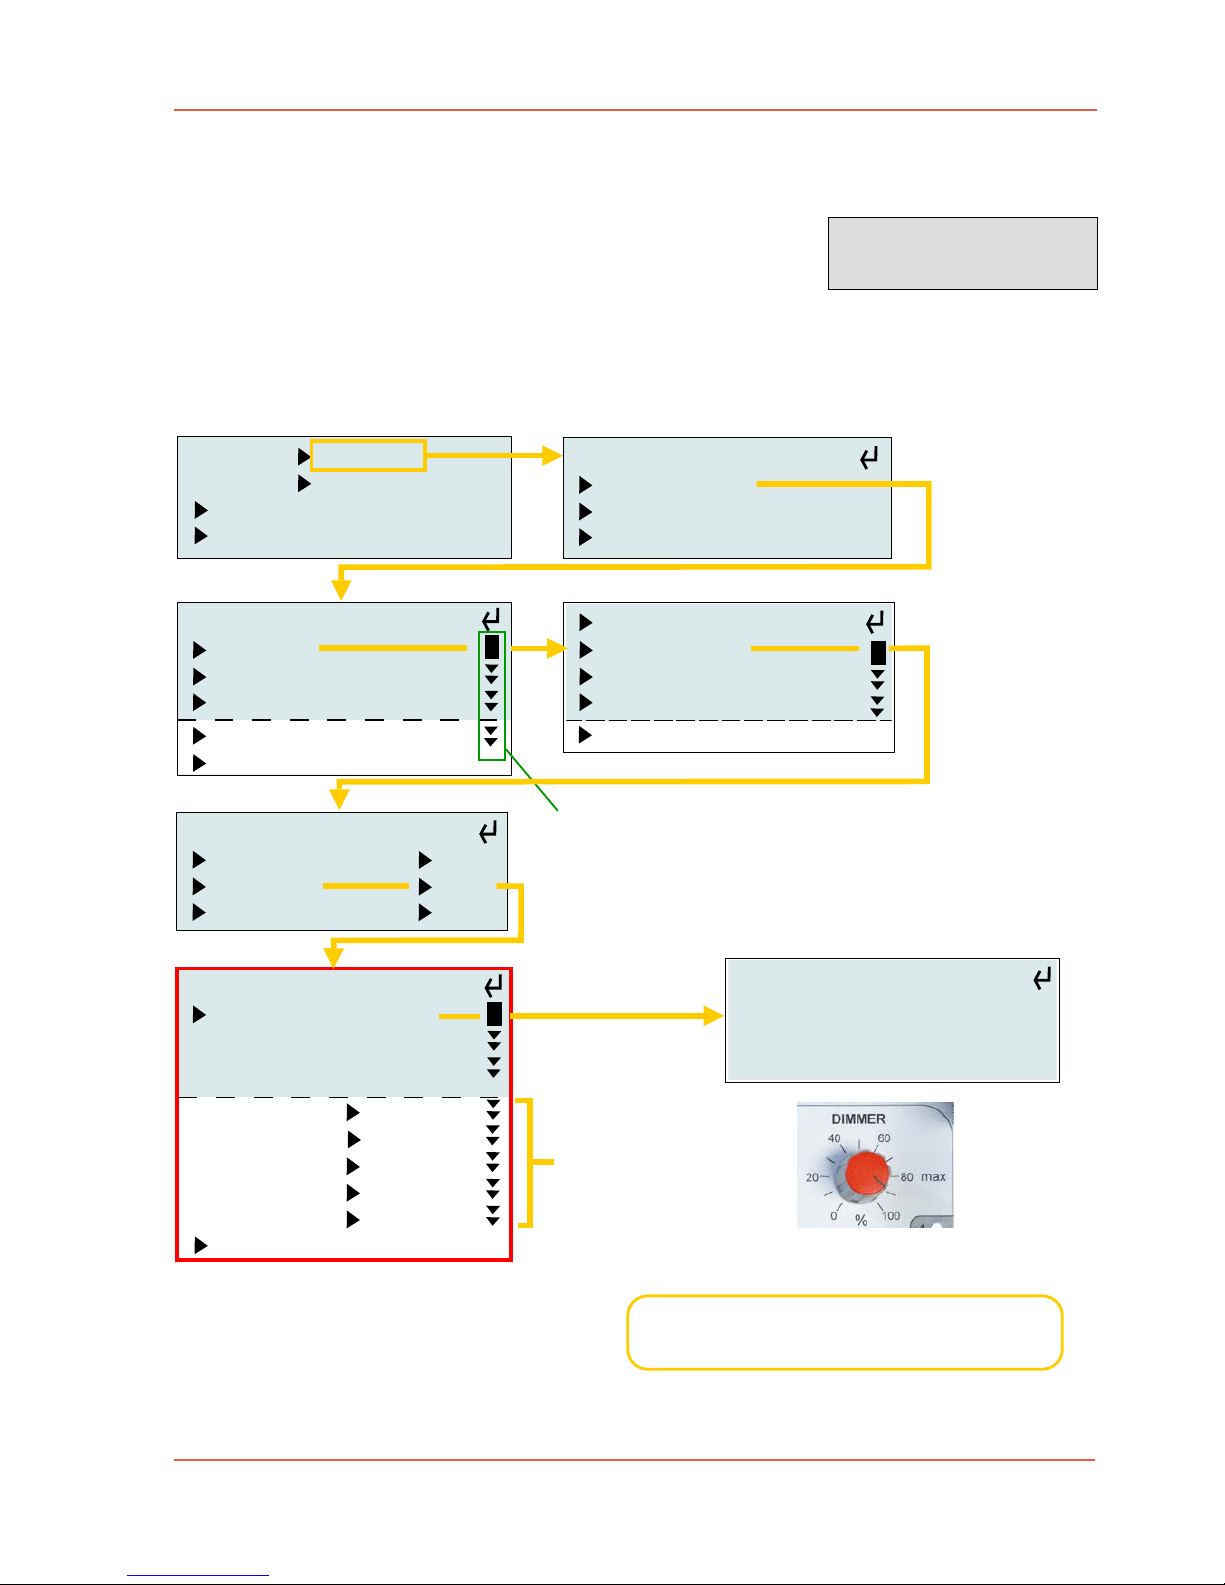
Quick start guide for DMX OUT
1. Connect a DMX device at DMX OUT
2. Turn "EFFECT" to position "DMX set-up".
Connect the "Select LED" via DMX @ DMX OUT
Turn/push the JOG for navigation through the menu.
edition June 2018- en 2.0.1
www.movie-inter.com
Example here:
KinoFlo "Select LED"
set-up
DMX OUT
basics
DMX IN
help
set-up DMX OUT:
add device
edit DMX channels
clear channels
manufacturer:
KinoFlo
Arri
2 CH generic LED
tungsten dimmer
expert mode
FreeStyle
Select LED
Diva LED
Celeb LED
Parabeam/Parazip
for Select LED
CONFIRM SETTINGS
address = function
001 = DIM OUT 1
002 = CCT 2500K
003 = G/M 0 G/M
004 = GEL Apricot
005 = HUE 0º
006 = SAT 0%
expert mode
Scrollbar: more content visible
below last line, turn JOG to scroll
Set DMX start address for DIM OUT 1.
Optionally set values for Kelvin, G/M, GEL, ...
AND CONFIRM SETTINGS.
set-up Select LED
to "GEL/HUE mode"
8 bit, Smooth=off!
set DMX address 001
Set-up the Kino Flo fixture as
instructed on the display!
Add other devices for LFX Master
channel 2 & 3 for multi-channel LFX.
choose mode:
white mode
GELS/HUE
RGB
help
help
help
set here parameters
during this set-up or
edit it later in "DMX
OUT" > "edit DMX
channels"
Set level
Dimmer
max > 0 for
live preview
3. Create an effect > Turn "EFFECT" to any effect symbol.
Page 12
User manual LFX Master DMX 2.0 page 12 of 35
Chapter 6
Product overview
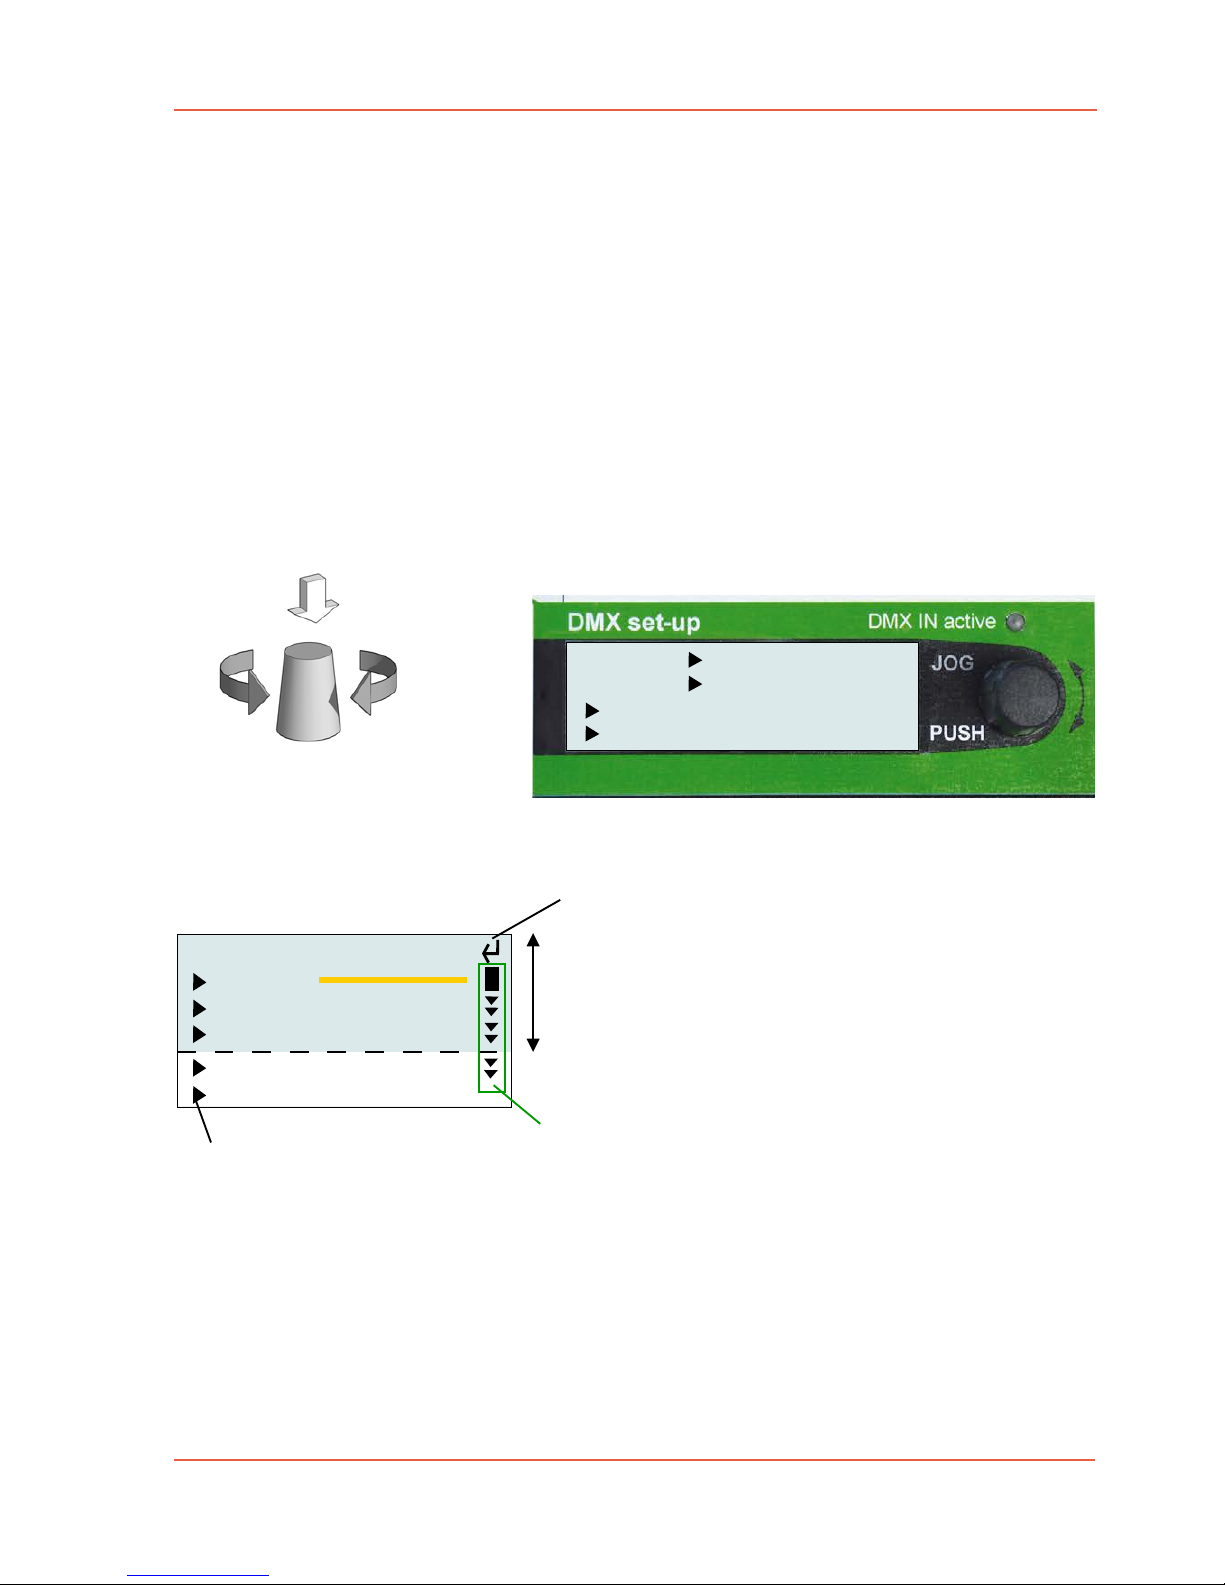
The main purpose of the display is the DMX configuration and it signals received DMX data
when detected, then the green indicator "DMX IN active" is on.
Effects are set-up with all knobs (except "JOG") and the "Transitions" button.
The DMX OUT fixture library makes it very easy to set-up or edit existing values > page 16
Navigation with the JOG
Rotating the JOG allows for stepping through the menu items or adjusting selected values.
A push on the JOG selects a menu item or submits an action.
Symbols within the menu
Related topics
• DMX OUT device library > page 16
• custom DMX OUT configuration > page 22
• DMX IN presets > page 24
• custom DMX IN patching > page 29
edition June 2018- en 2.0.1
www.movie-inter.com
set-up
DMX OUT
basics
DMX IN
help
manufacturer:
KinoFlo
Arri
2 CH generic LED
tungsten dimmer
expert mode
Scrollbar: more content visible below last line,
turn JOG to scroll
visible area on display without scrolling
back
JOG: turn & push function
menu item > submenu available
First level - knob EFFECT in position "DMX set-up"
Page 13
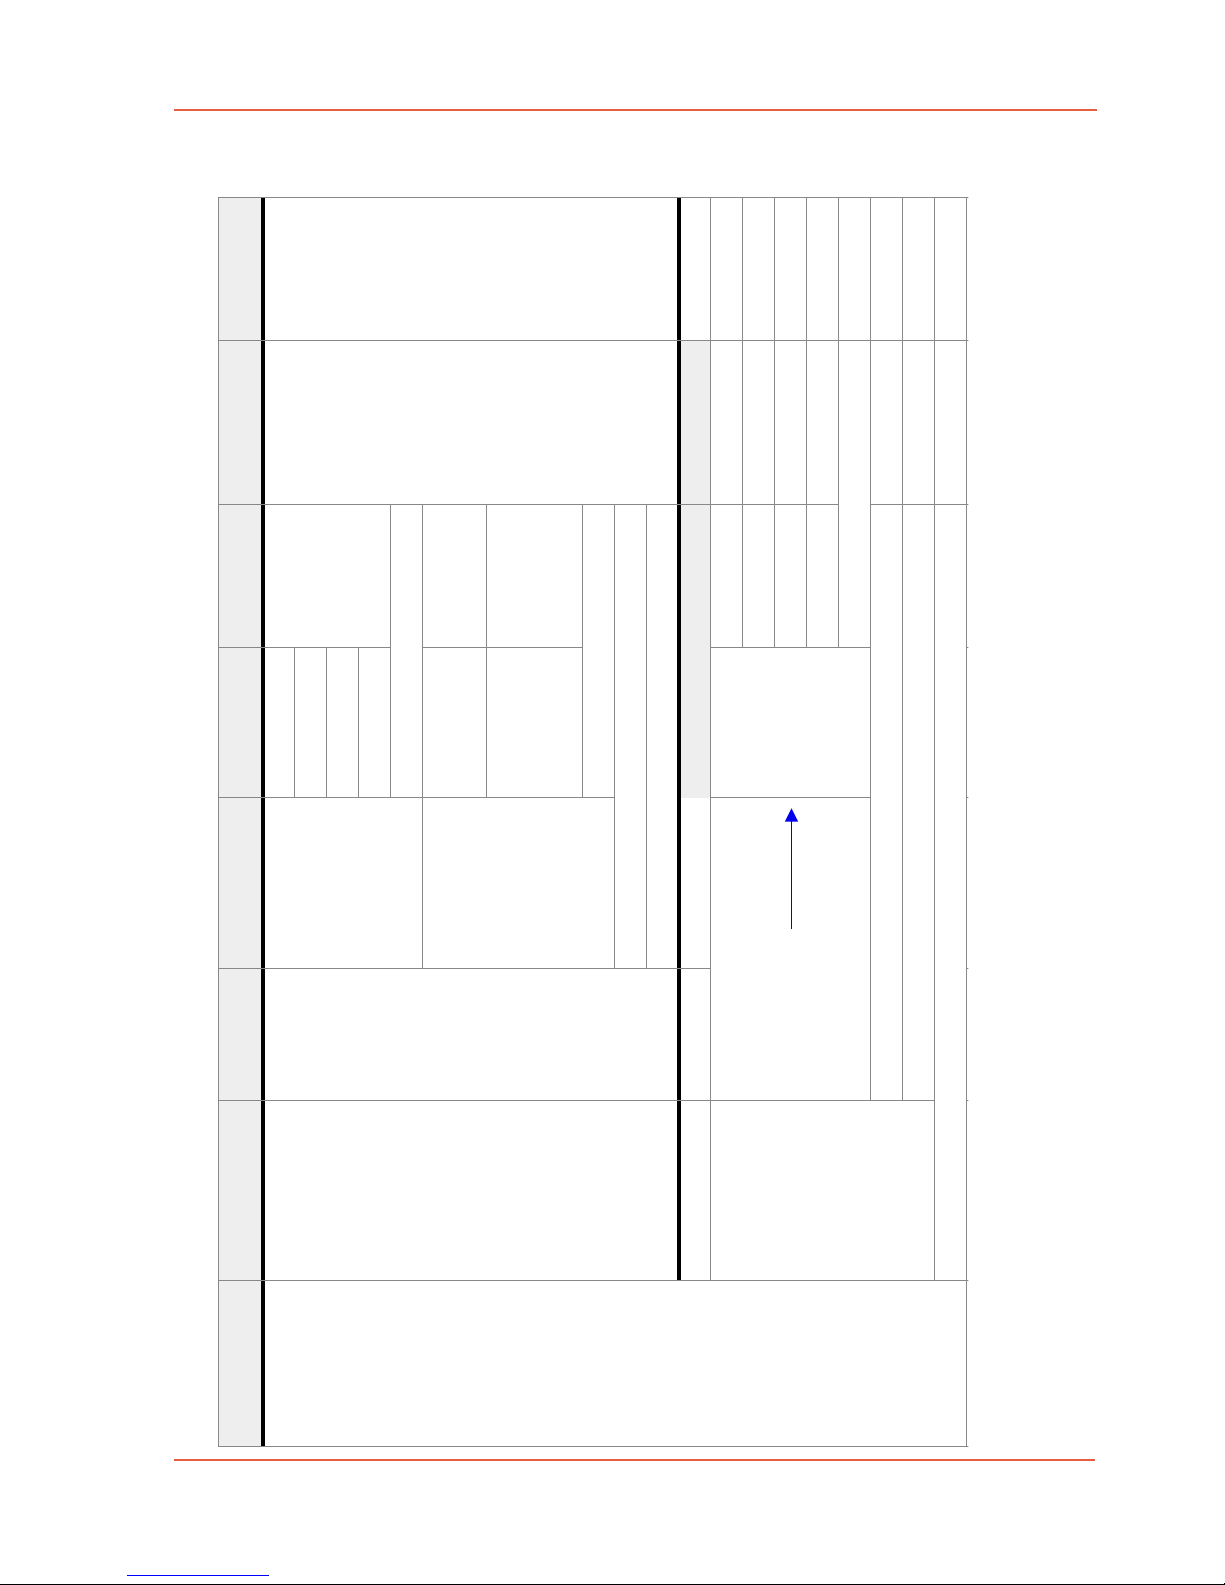
6.1 Menu map - table 1 of 2
User manual LFX Master DMX 2.0 page 13 of 35
edition June 2018- en 2.0.1
www.movie-inter.com
Level 1 2 3
set-up DMX OUT
add device Manufacturer
brand device
KinoFlo
Freestyle
Select LED
choose mode detailed config
for each device
• White
• GELS/HUE
• RGB
set-up list with all
channels and
functions
>CONFIRMATI-
ON
Diva LED
Celeb LED
Arri
Parabeam
Arri L5, 7,10-C
• CCT
• RGBW
Skypanel-C
• CCT
• RGBW
• GEL
2 CH generic LED
Broadcaster 2+
tungsten dimmer
choose function
choose value confirmation
instructions
detailed set-up
instructions for
device
edit DMX channels
Expert mode DMX OUT (example)
address > function
001 > Dim OUT 1
002 > fix 000
003 > fix 000
add channel > choose function and values
clear channels
exit
• Dim OUT 1
• Dim OUT 2
• Dim OUT 3
• fix value
• delete
for fix: 0...255
DMX channel 0...255
yes or no?
Page 14
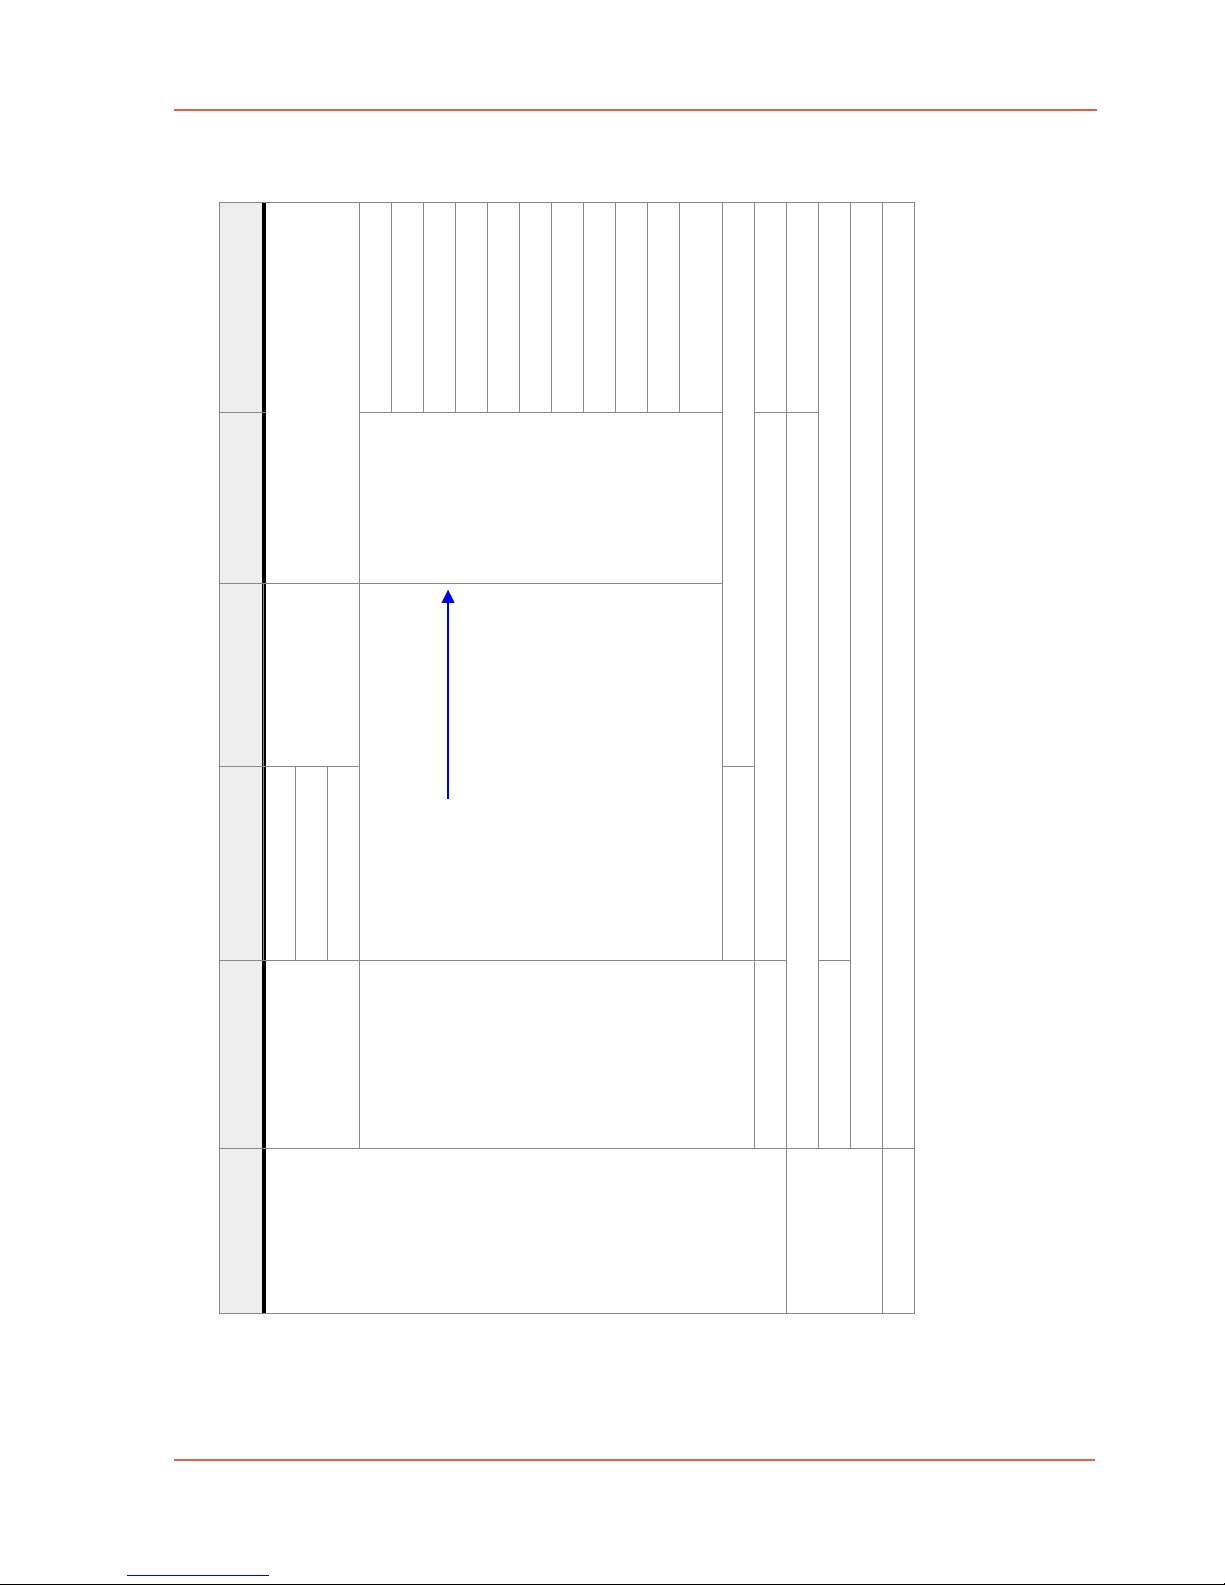
Level 1 2 3
set-up DMX IN load preset
• 3x out separate dim
• full remote control
instructions choose function
choose value
edit DMX channels
• optocal sensor IN
Expert mode DMX IN (example)
address > function
001 > Patch 004
002 > fix 000
...
list of DMX channels & its function, value
...
for fix: 0...255
DMX channel 0...255
Basics
clear channels
add input channel
deletes all input channels
factory reset
software version info screen
help
www.lfxmaster.com
general information screen how to set-up
calls expert mode, adds next available DMX channel
yes or no?
yes or no?
edition June 2018- en 2.0.1
www.movie-inter.com
edition June 2018- en 2.0.1
www.movie-inter.com
edition June 2018- en 2.0.1
www.movie-inter.com
6.1 Menu map - table 2 of 2
User manual LFX Master DMX 2.0 page 14 of 35
Page 15
User manual LFX Master DMX page 15 of 35
6.2 configuration of DMX OUT overview
There are two ways to configure DMX OUT:
edition June 2018- en 2.0.1
www.movie-inter.com
1
The most easy way:
Use a device preset from the fixture library
If the connected device is present in the preset list it
is advisable to use this preset.
You may edit this preset later in the expert mode.
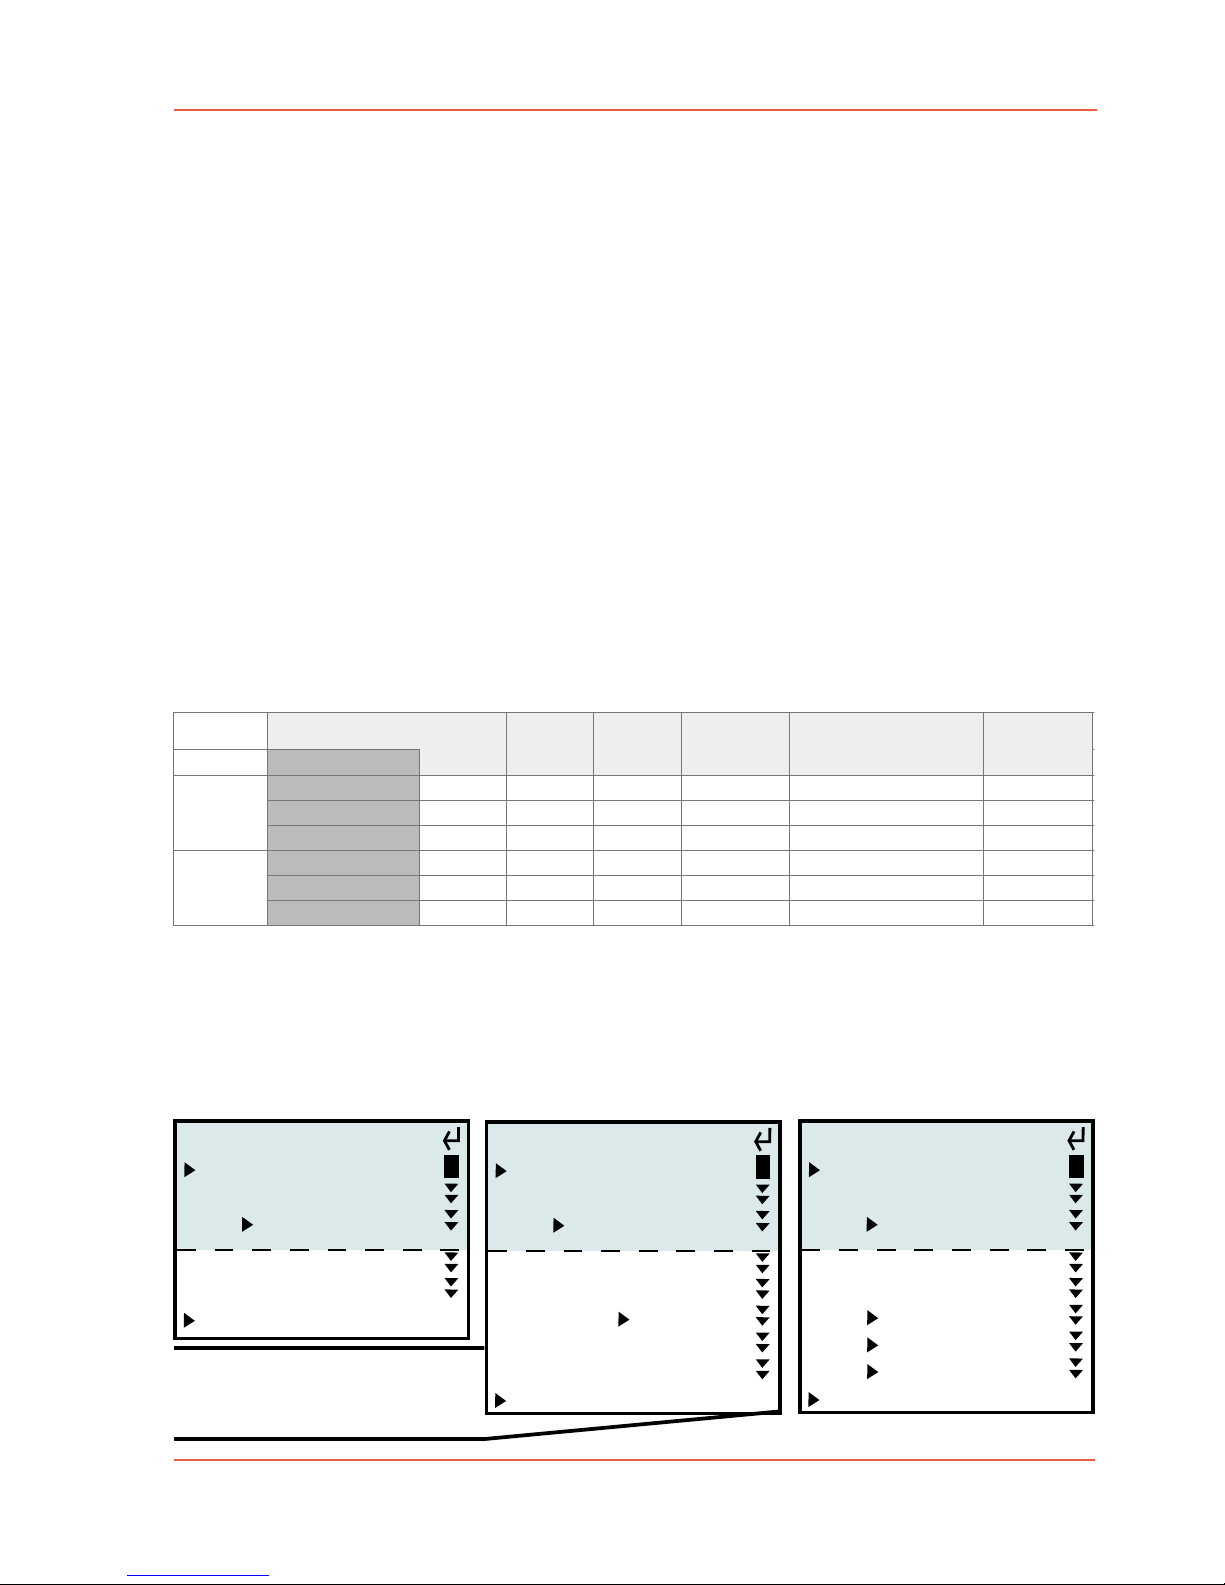
Available device presets
Kino Flo: Freestyle
Mode
White
allocated
DMX channels
3
GELS/HUE
RGB66
2
Expert mode:
customize DMX OUT configuration
modifiy extisting settings
or
manually add a DMX channel >
allocate a function:
DIM OUT 1, DIM OUT 2, DIM OUT
3 or a fixed DMX value
arbitrary configuration of all DMX
channels
for more details > page 22
Select LED
Diva LED
White
GELS/HUE
3
6
RGB
White63
Celeb LED
GELS/HUE
RGB66
White
GELS/HUE
3
6
Parabeam/Parazip
Arri: L5-C
RGB
6
1
CCT
RGBW79
L7-C
L10-C
CCT
RGBW79
CCT
RGBW79
Skypanel-C
Broadcaster 2+
CCT
GEL717
RGBW
9
4
2 channel generic LED
tungsten dimmer
2
12
Page 16
edition June 2018- en 2.0.1
www.movie-inter.com
User manual LFX Master DMX page 16 of 35
Device library
The LFX Master DMX provides a pre-programmed device library for easy set-up of
most Arri and KinoFlo LED fixtures and some others.
A device preset automatically sets-up all required DMX output channels due to the
fixture mode shown on the following pages.
Instead of DMX displaying parameters as DMX values the device presets for Arri/Kinoflo
show "real" values like "2500" Kelvin or Hue Angle in degrees, gels by gel name.
The LFX Master DMX will convert these entries to DMX values not visible for the user.
After confirmation of the suggested settings you will see instructions on the screen of the LFX Master DMX how to set-up the connected device.
If you prefer to see the DMX value instead of the "real" fixture parameter please use the
"expert mode" > page 22
Recommended LED fixture modes
Before you choose a device preset please be aware which mode is most suitable for the
lighting effect.
Recommended LED fixture modes
Effect
Fire
Brand
Kino Flo
fixture mode
White X
Candle TV
X X
Welding "broken" fluoro
X X
Arri
GELS/HUE
RGB
X
-
CCT
GEL
X
X
X
-
-
X
X
X
X
-
X
-
X
X
X
X
X
RGBW - - X - -
Strobe
X
X
X
X
-
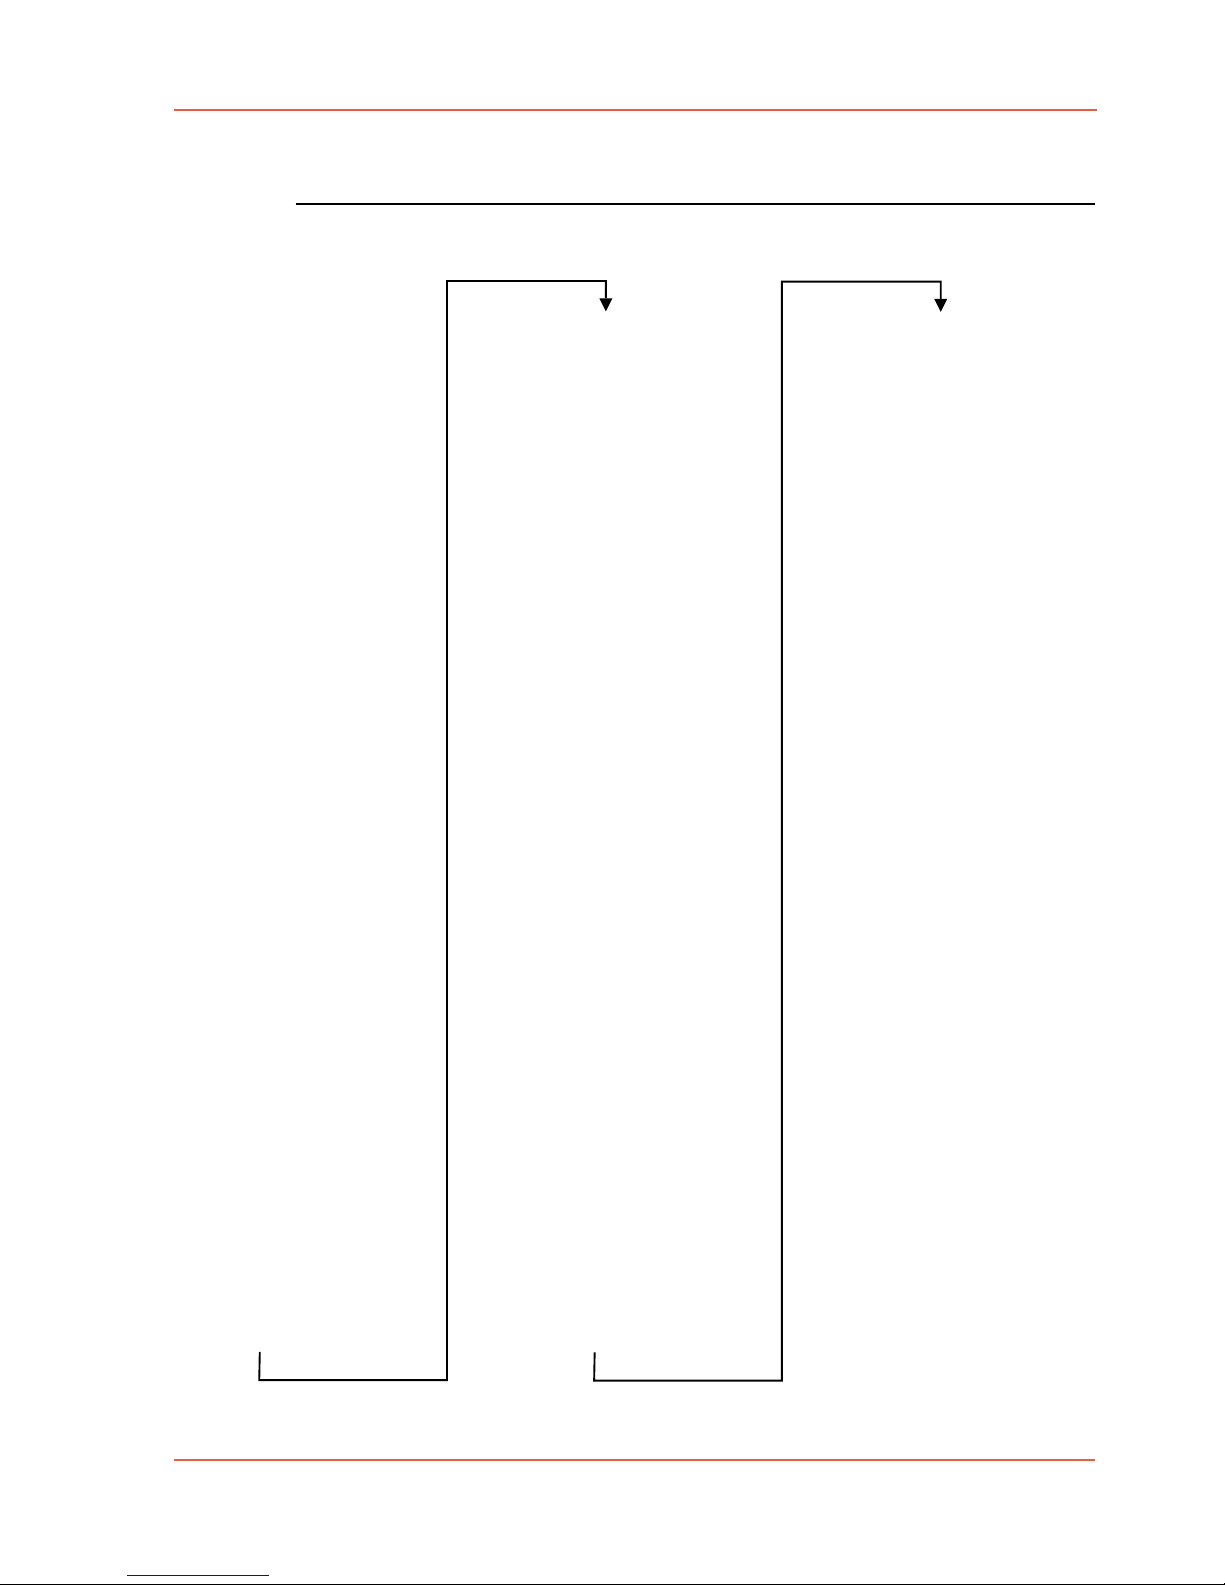
6.2.1 Kinoflo device library
valid for all LED fixtures using 8 bit resolution
White mode GELS/HUE mode RGB Mode
CCT = 2700 ... 6500K CCT = 2500 ... 9900K CCT = 2500 ... 9900K
for
Kinflo
LED
CONFIRM SETTINGS
address = function
001 DIM OUT 1
002=CCT 2500K
003=G/M 0 G/M
expert mode
for
Kinflo
LED
CONFIRM SETTINGS
address = function
001 DIM OUT 1
002=CCT 2500K
003=G/M 0 G/M
004=GEL Apricot
005=HUE 0º
006=SAT 0%
expert mode
for
Kinflo
LED
CONFIRM SETTINGS
address = function
001 DIM OUT 1
002=CCT 2500K
003=G/M 0 G/M
004 R DIM OUT 1
005 G DIM OUT 2
006 B DIM OUT 3
expert mode
Note: In order to control the Gels, the G/M
channel needs to be set 0 G/M.
In order to control HUE and Saturation set
G/M: 0, AND GEL: -NO GEL-
Page 17
edition June 2018- en 2.0.1
www.movie-inter.com
User manual LFX Master DMX page 17 of 35
6.2.1 Kinoflo device library (continued)
Gel library
listed in alphabetical order for GELS/HUE mode
- NO GELAlice Blue
Apricot
Bastard Amber
Bright Blue
Bright Pink
Bright Red
Bright Rose
Chocolate
Chrome Orange
Congo Blue
Cosmetic Peach
Dark Amber
Dark Blue
Dark Green
Dark Lavender
Dark Magenta
Dark Pink
Dark Salmon
Dark Steel Blue
Dark Y Green
Daylight Blue
Deep Amber
Deep Blue
Deep Gld Amber
Deep Lavender
Deep Orange
Deep Straw
Deeper Blue
English Rose
Fern Green
Fire
Flame Red
Flesh Pink
Follies Pink
Gold Amber (default)
Gold Tint
Just Blue
KF 20K Blue Sky
KF Blue Screen
KF Candle Flame
KF Flo Cool White
KF Flo Warm White
KF Green Screen
KF LP Sodium Vpr
KF Mercury Vpr
Lagoon Blue
Lavender
Lavender Tint
Leaf Green
Light Amber
Light Blue
Light Lavender
Light Pink
Light Red
Light Rose
Light Salmon
Lighter Blue
Lilac Tint
Lime Green
Loving Amber
M Bastard Amber
Magenta
Marine Blue
Mauve
Med Blue-Green
Medium Amber
Medium Blue
Medium Pink
Medium Red
Medium Yellow
Middle Rose
Mist Blue
Moonlight Blue
Moss Green
Orange
Orange
Palace Blue
Pale Amber Gold
Pale Blue
Pale Gold
Pale Green
Pale Lavender
Pale Navy Blue
Pale Red
Pale Rose
Pale Salmon
Pale Violet
Pale Yellow
Paler Lavender
Peacock Blue
Pink
Primary Green
Primary Red
Rose Pink
Rose Purple
Rosy Amber
Scarlet
Sky Blue
Slate Blue
Smokey Pink
Sp Steel Blue
Special Lavender
Special M Blue
Spring Yellow
Steel Blue
Straw
Straw Tint
Summer Blue
Sunset Red
Surprise Peach
Surprise Pink
True Blue
Violet
White Flame
Yel l ow
Zenith Blue
Page 18
edition June 2018- en 2.0.1
www.movie-inter.com
User manual LFX Master DMX page 18 of 35
6.2.2 Arri device library
valid for LED fixtures using 8 bit resolution
L5-C, L7-C, L10-C
CCT, mode 2 RGBW, mode 4
CCT = 2800 ... 10000K
for
L5-C
CONFIRM SETTINGS
address = function
001 DIM OUT 1
002=CCT 2800K
003=G/M 0 G/M
expert mode
for
L5-C
CONFIRM SETTINGS
address = function
001 MAS fix 255
002 R DIM OUT 1
003 G DIM OUT 2
004 B DIM OUT 3
005=WHT fix 000
expert mode
CCT, mode 2 GEL, mode 16 RGBW, mode 4
CCT = 2800 ... 10000K
Skypanel-C
for
Skypanel-C
CONFIRM SETTINGS
address = function
001 DIM OUT 1
002=CCT 2800K
003=G/M 0 G/M
004=FAN fix 000
005=PRE fix 000
006=RES fix 000
007=RES fix 000
expert mode
for
Skypanel-C
CONFIRM SETTINGS
address = function
001 DIM OUT 1
002=CT1 3200K
003=CM1 BestColor
004=GB1 LEE
005=GC1 ColorFilt
006=GE1 Gd Amber
007 XFA 100: 0
008=CT2 3200K
009=CM2 BestColor
010=GB2 LEE
011=GC2 ColorFilt
012=GE2 Li Red
013=GXT Direct
014=FAN fix 000
015=RES fix 000
016=RES fix 000
017=RES fix 000
expert mode
for
Skypanel-C
CONFIRM SETTINGS
address = function
001 MAS fix 255
002 R DIM OUT 1
003 G DIM OUT 2
004 B DIM OUT 3
005=WHT fix 000
006=FAN fix 000
007=RES fix 000
008=RES fix 000
009=RES fix 000
expert mode
HINT
Fire effect with shifting
colors in Gel mode
Set channel 007/XFA (Crossfade between gel 1 and 2) to
function "DIM OUT 3"
Page 19
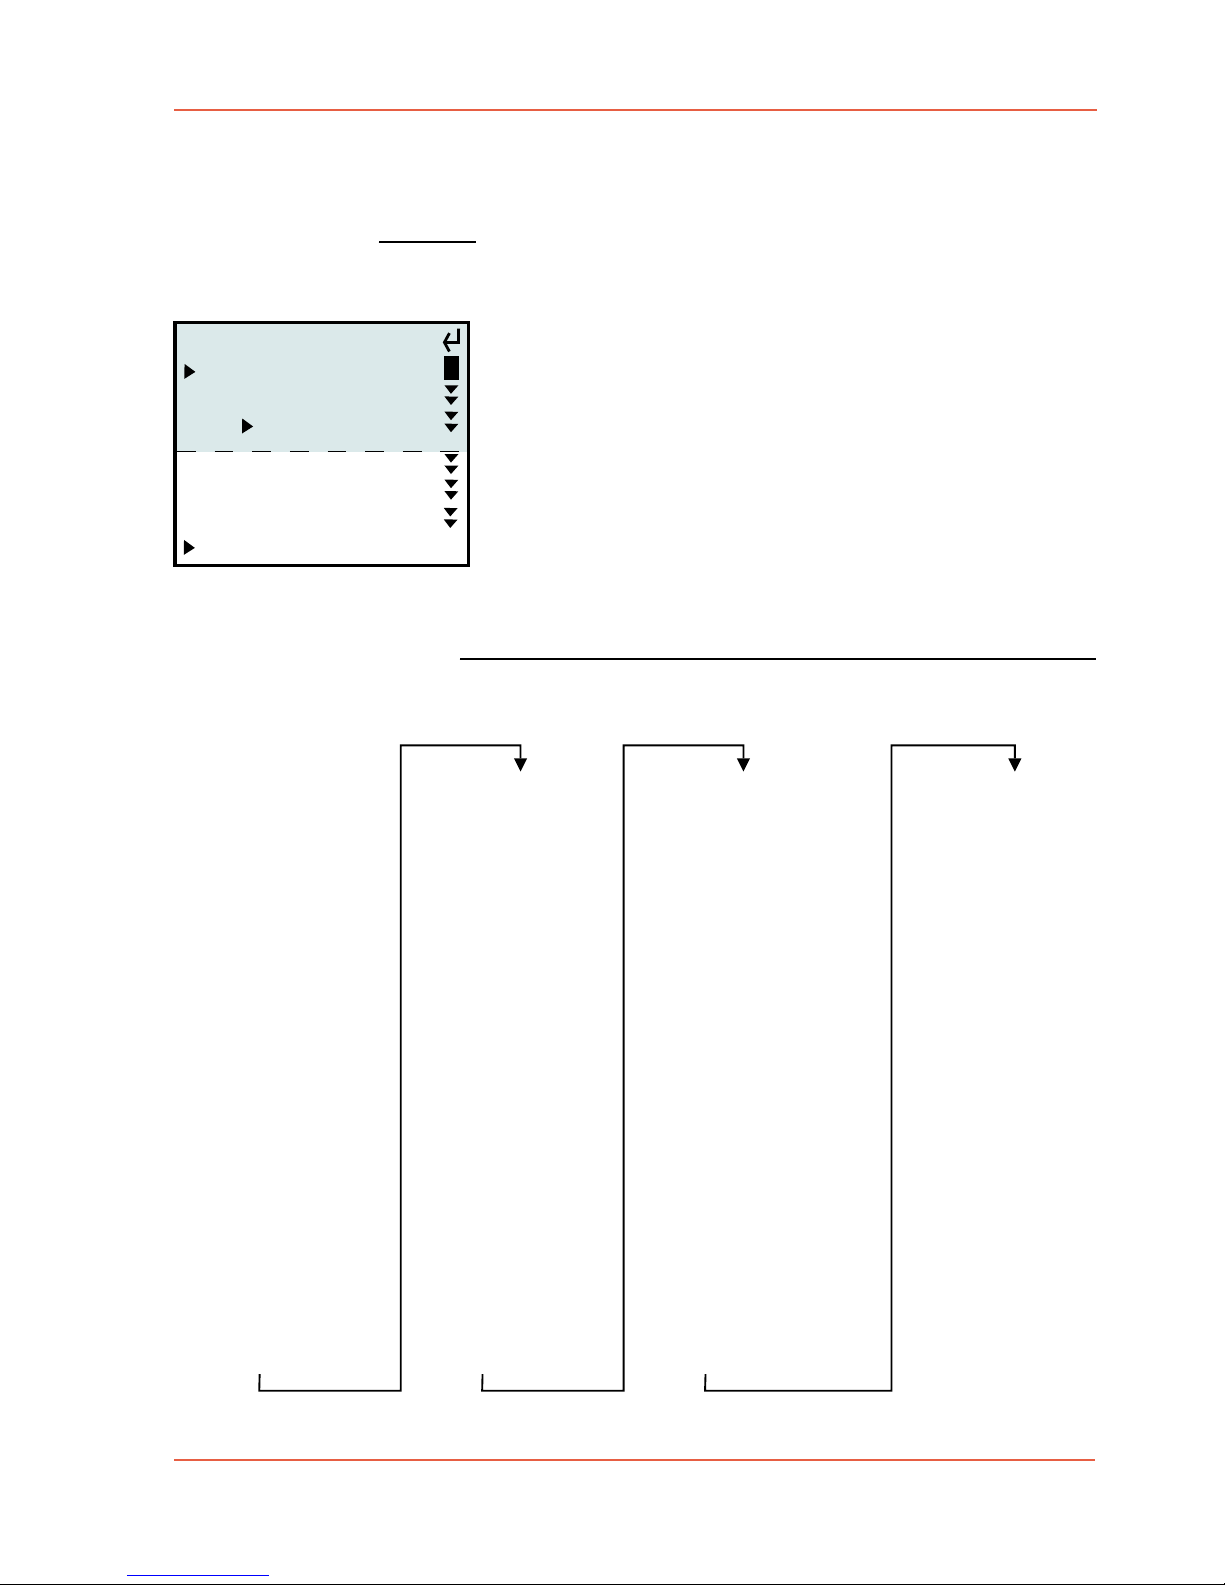
edition June 2018- en 2.0.1
www.movie-inter.com
User manual LFX Master DMX page 19 of 35
6.2.3 Arri device library (continued)
Broadcaster 2+
CCT = 2800 ... 6500K
for
Broadcaster 2+
CONFIRM SETTINGS
address = function
001 DIM OUT 1
002=CCT 2800K
003=G/M 0 G/M
004=RES fix 000
expert mode
Gel library Skypanel
listed in alphabetical order for GEL mode 16 (default shown bold)
Alice Blue
Apricot
Bastard Amber
Bright Pink
Bright Red
Bright Rose
Chocolate
Dark Amber
Dark Green
Dark Lavender
Dark Magenta
Dark Pink
Dark Salmon
Dark Steel Blue
Dark Yellow Green
Daylight Blue
Deep Amber
Deep Blue
Deep Golden Amber
Deep Lavender
Deeper Blue
English Rose
Evening Blue
Fern Green
Fire
Flame Red
Flesh Pink
Gold Amber
Gold Tint
Golden Amber
Just Blue
Lavender
Lavender Tint
LEE Green
Light Amber
Light Blue
Light Lavender
Light Pink
Light Red
Light Rose
Light Salmon
Lilac Tint
Lime Green
Loving Amber
Magenta
Marine Blue
Medium Amber
Paler Lavender
Peacock Blue
Pink
Med. Bastard Amber
Medium Pink
Medium Yellow
Middle Rose
Primary Red
Rose Pink
Rose Purple
Scarlet
Mist Blue
Moss Green
No Color Blue
No Color Straw
Sky Blue
Slate Blue
Smokey Pink
Special Lavender
Palace Blue
Pale Amber Gold
Pale Blue
Pale Gold
Spring Yellow
Steel Blue
Straw
Straw Tint
Pale Green
Pale Lavender
Pale Navy Blue
Pale Rose
Summer Blue
Sunset Red
Surprise Peach
Surprise Pink
Pale Salmon
Pale Violet
Pale Yellow
True Blue
Yel l ow
Zenith Blue
Page 20
edition June 2018- en 2.0.1
www.movie-inter.com
User manual LFX Master DMX page 20 of 35
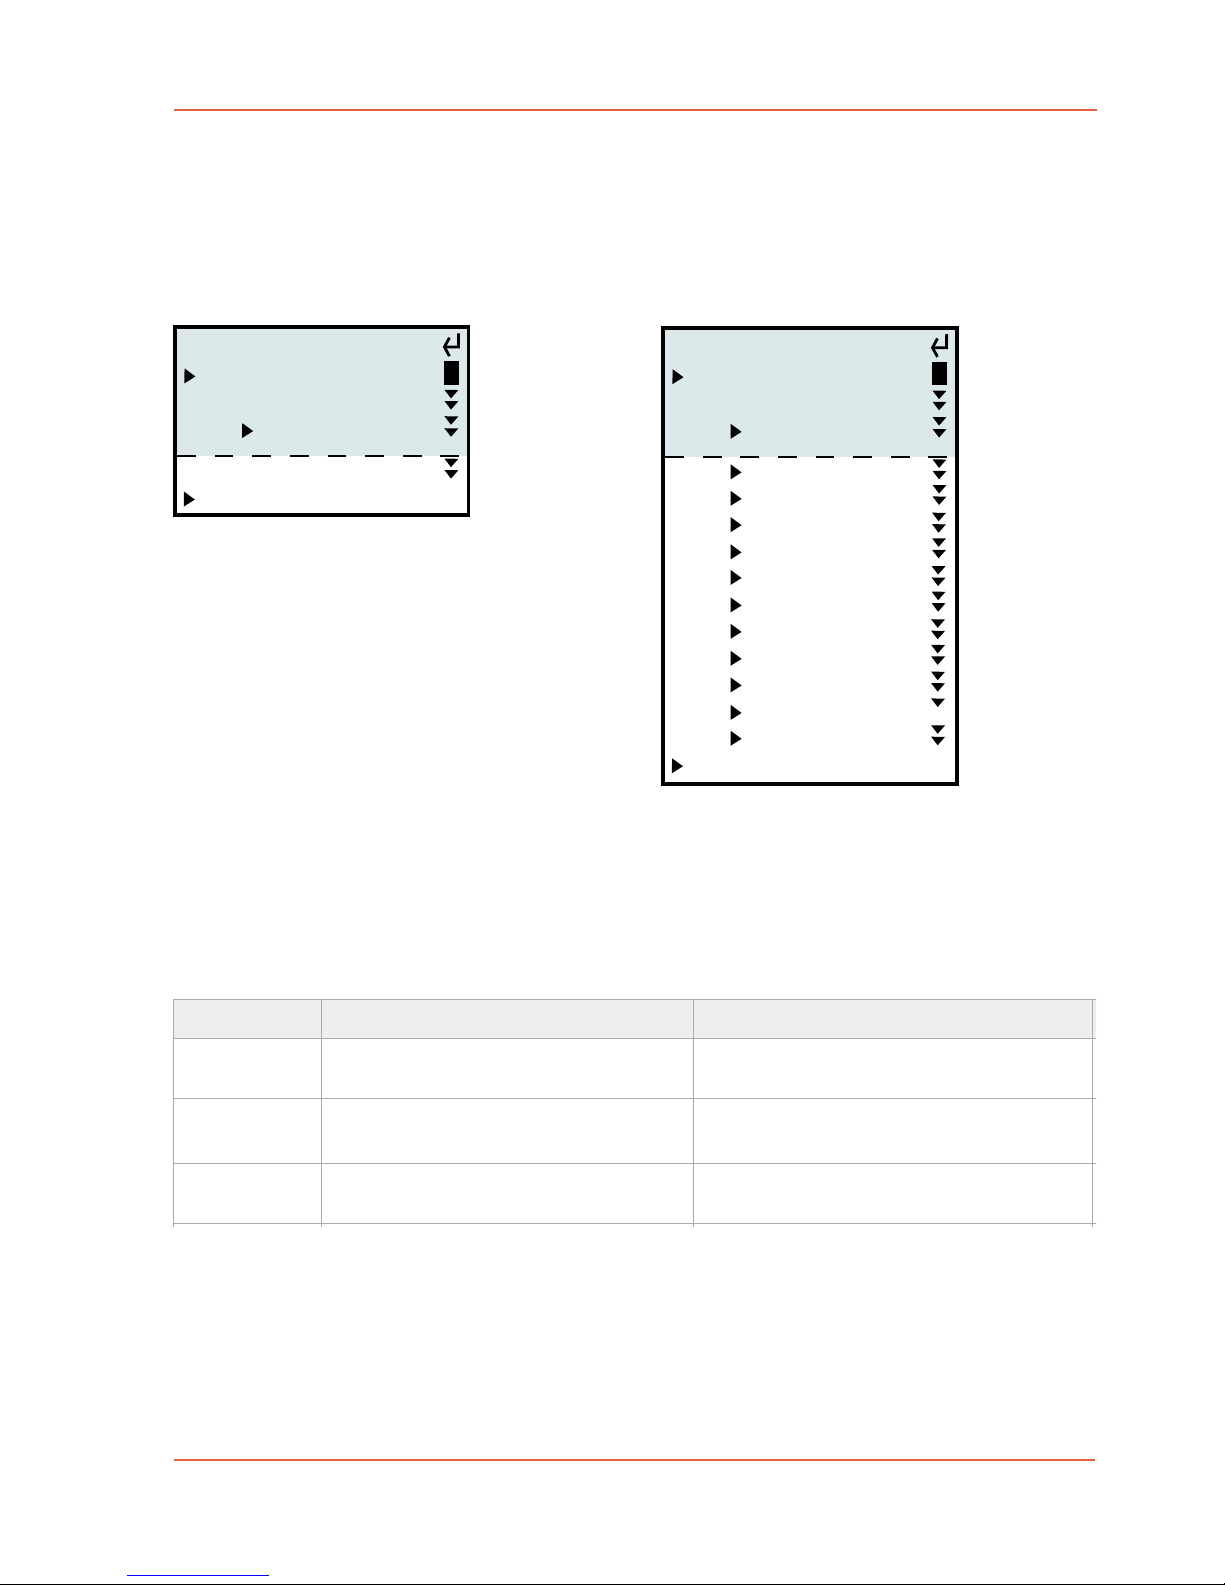
6.2.3 Other device libraries
2 channel generic LED preset Tungsten:
for other LED fixtures for 12 channel tungsten dimmer
for 2CH generic
CONFIRM SETTINGS
address = function
001 DIM OUT 1
002=CCT fix 000
expert mode
for tungsten
CONFIRM SETTINGS
address = function
001 DIM OUT 1
002 DIM OUT 2
003 DIM OUT 3
004 DIM OUT 1
005 DIM OUT 2
006 DIM OUT 3
007 DIM OUT 1
008 DIM OUT 2
009 DIM OUT 3
010 DIM OUT 1
011 DIM OUT 2
012 DIM OUT 3
expert mode
Mode PROS CONS
White/CCT
GEL/HUE
simple config, requires less DMX
channels
opposite "White/CCT" mode additionally add a gel, green/magenta, hue
adjustment of Kelvin and dim level only
requires at least 6 DMX channels
RGB/RGBW
separate control of red green and
blue channel > TV effects
requires at least 6 DMX channels
Please see the according user manual of the DMX device for more details.
PRO - CONTRA modes
Page 21
for Select LED
CONFIRM SETTINGS
address = function
001 DIM OUT 1
002=CCT 2500K
003=G/M 0 G/M
004=GEL Apricot
005=HUE 0º
006=SAT 0%
expert mode
User manual LFX Master DMX page 21 of 35
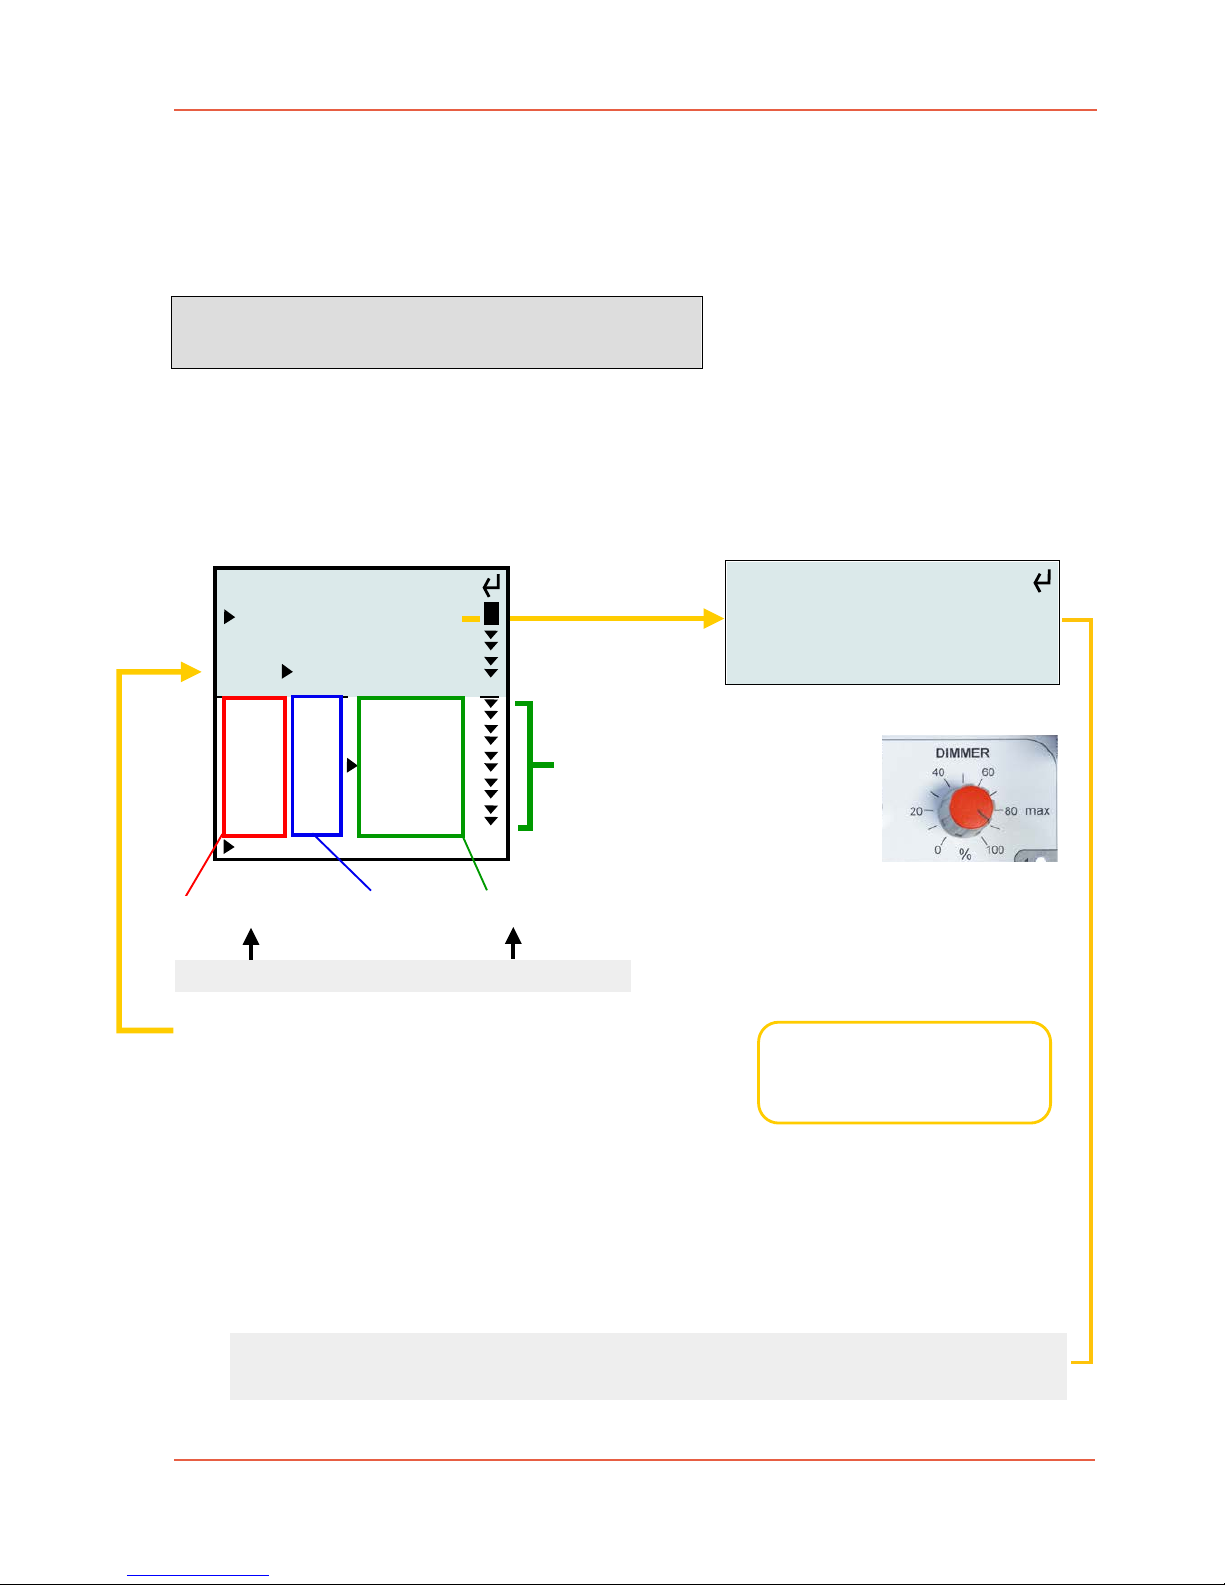
6.2.4 Device preset set-up
If a device preset is added the LFX Master DMX automatically looks for the next available
continuous DMX channel block required. Alternatively choose an arbitrary DMX start address.
1. Turn "EFFECT" to position "DMX set-up
2. Navigate to DMX OUT > add device > KinoFlo > Select LED > GELS/HUE
edition June 2018- en 2.0.1
www.movie-inter.com
set DMX start address > click on value
Optinally edit values for Kelvin, G/M, GEL, ...
AND CONFIRM SETTINGS > channels, labels &
parameters will be copied to the expert mode
set-up Select LED
to "GEL/HUE mode"
8 bit, Smooth=off!
set DMX address 001
Set-up the Kino Flo fixture as
instructed on the display!
Add additional devices
for LFX Master channel
2 & 3
set here parameters >
click on values
edit in expert mode
either if required
Set level
Dimmer max
for live view
Example here:
with Kino Flo "Select LED" in GELS/HUE mode
DMX channel function value (e.g. 2500 - 9900K)
click to change value by turning the JOG
3. Turn "EFFECT" to any effect position to view a lighting effect
You are done.
CONFIRM
Hint
If you click on "expert mode" before you have confirmed the settings the intructions
how to set-up the fixture will not show up.
Page 22
edition June 2018- en 2.0.1
www.movie-inter.com
User manual LFX Master DMX page 22 of 35
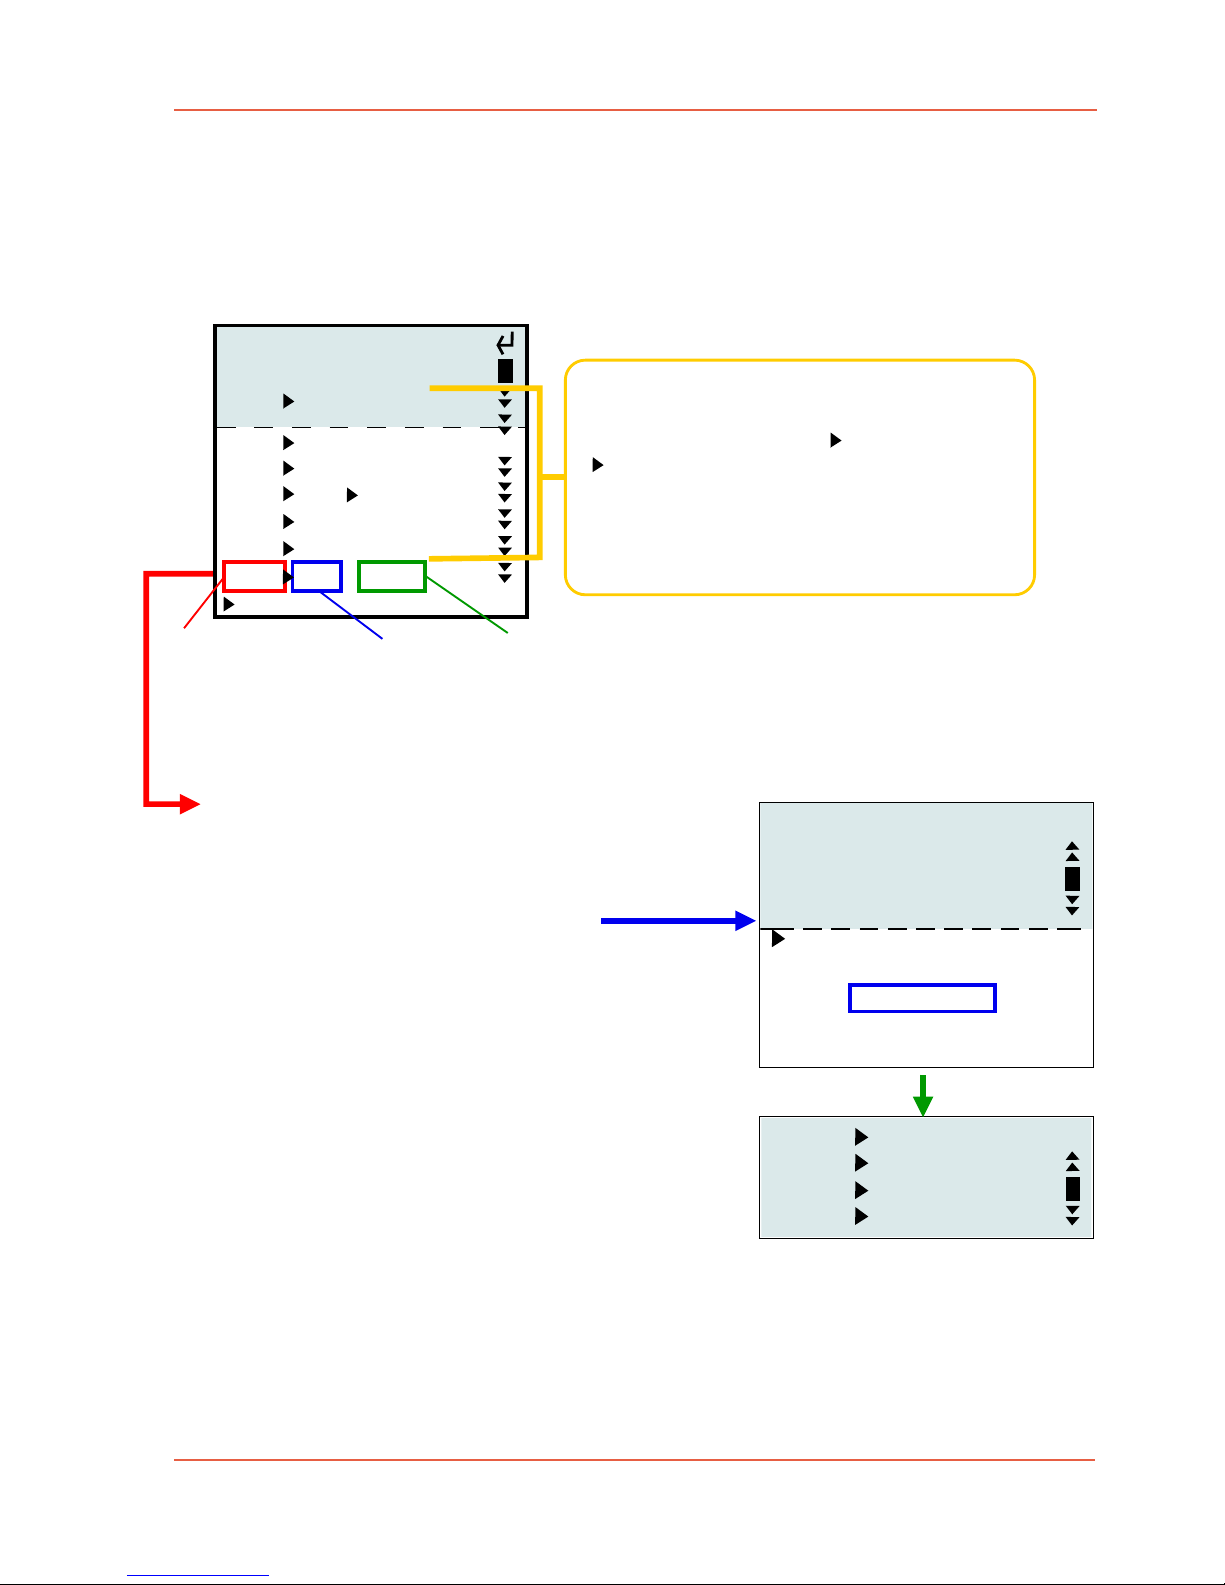
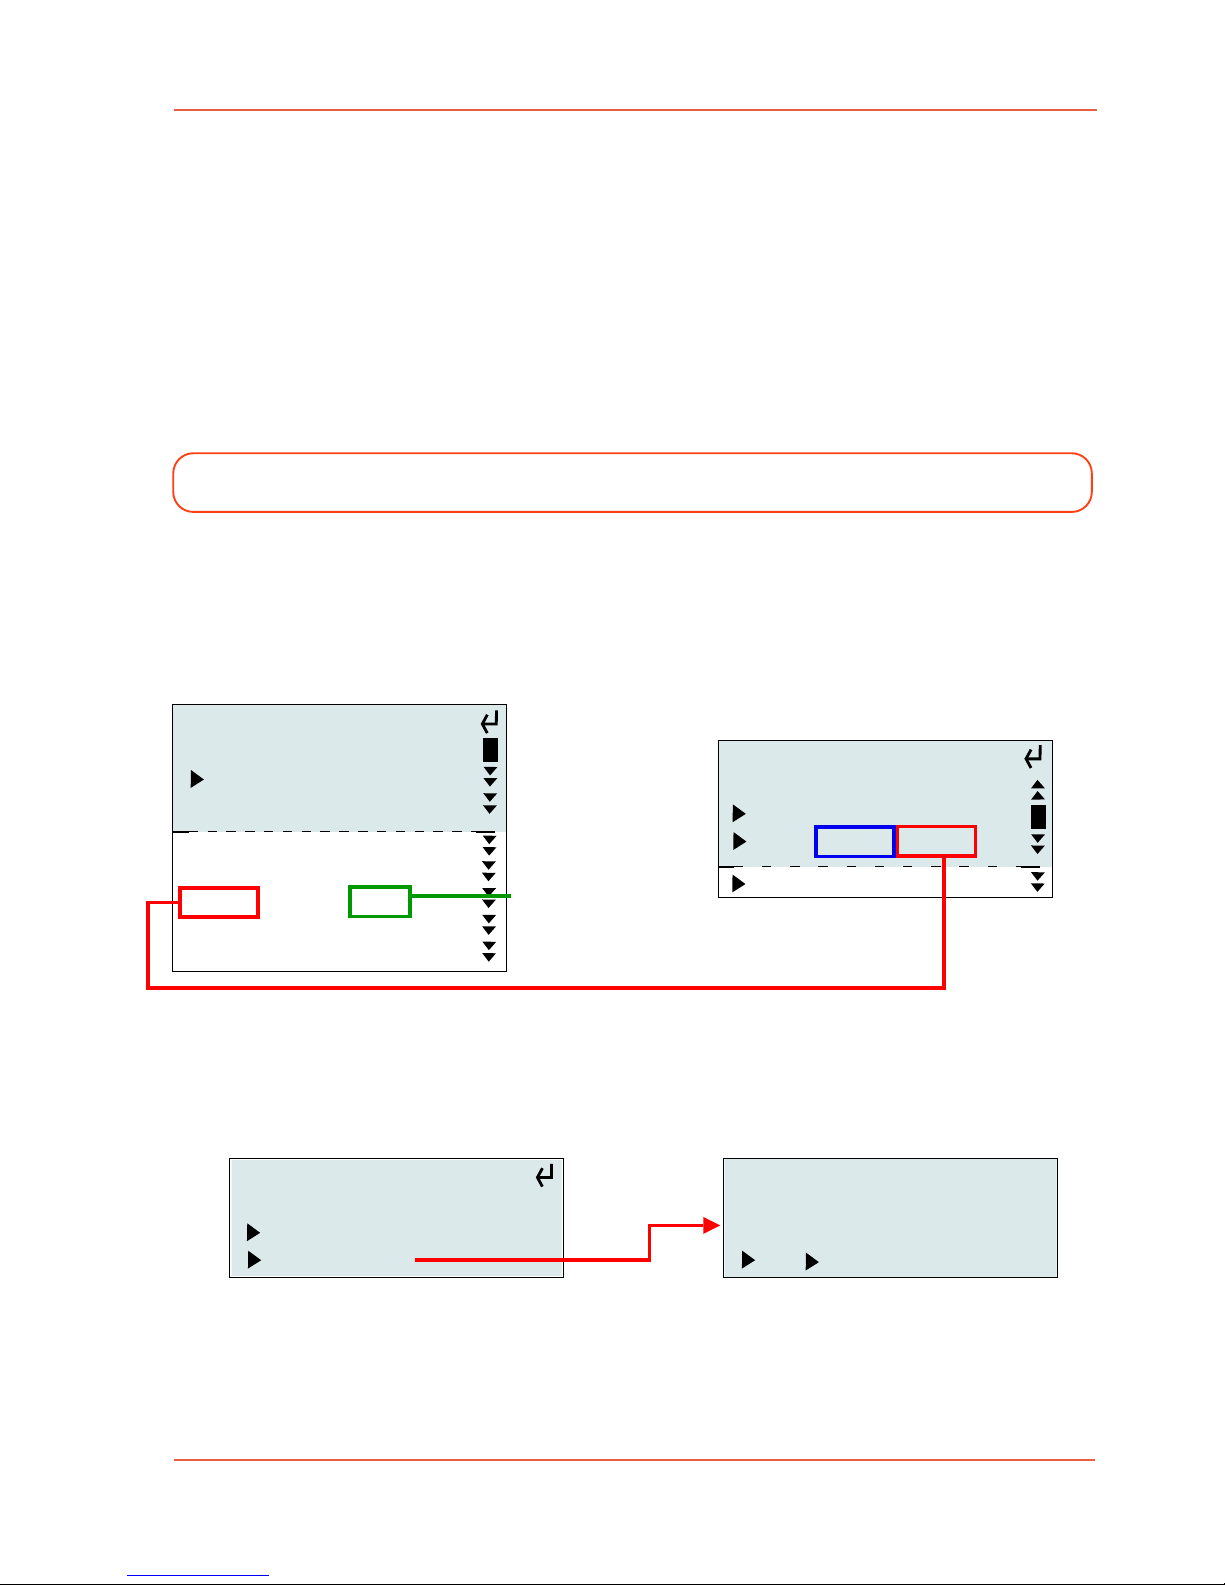
6.2.5 Customize DMX-OUT channels in "Expert mode"
1. Turn "EFFECT" to position "DMX set-up"
2. Navigate to "DMX OUT" > "edit DMX channels"
DMX channel function fixed value (0…255)
3. click on "add DMX channel" (or use the JOG to edit existing channels, functions & values)
A new line is inserted, the next available
DMX channel is automatically added.
Edit the DMX address if required.
Push JOG to change DMX address, push to confirm
4. Turn JOG: select function >push JOG
Turn JOG to select a function (within arrows)
Push JOG to confirm
5. Turn & push JOG: choose the value
e.g. set the Kelvin value here
6.2.6 Delete a DMX channel
1. Navigate to DMX OUT > edit DMX channels
2. select the channel you would like to delete by clicking on the function.
3. scroll & choose "delete" & click JOG
001: :
002: :
003: :
004:>>>>Dim Out 1<<<<:
add: Dim Out 2 :
: Dim Out 3 :
: fix :
: delete :
: cancel :
001 DIM OUT 1
002 fix 000
003 fix 000
004 fix >060<
select function of a DMX channel
set value
Copied parameters from a device preset.
Click on DMX channel, function or
parameter to edit.
Show DMX values 0...255
Delete the channel > add a new one with
function "FIX", same DMX channel
Expert mode DMX OUT
address > function
001 DIM OUT 1
002 CCT 2500K
003 G/M 0 G/M
004 GEL Apricot
005 HUE 0º
006 SAT 0%
007 FIX 000
add DMX channel
Page 23
edition June 2018- en 2.0.1
www.movie-inter.com
User manual LFX Master DMX page 23 of 35
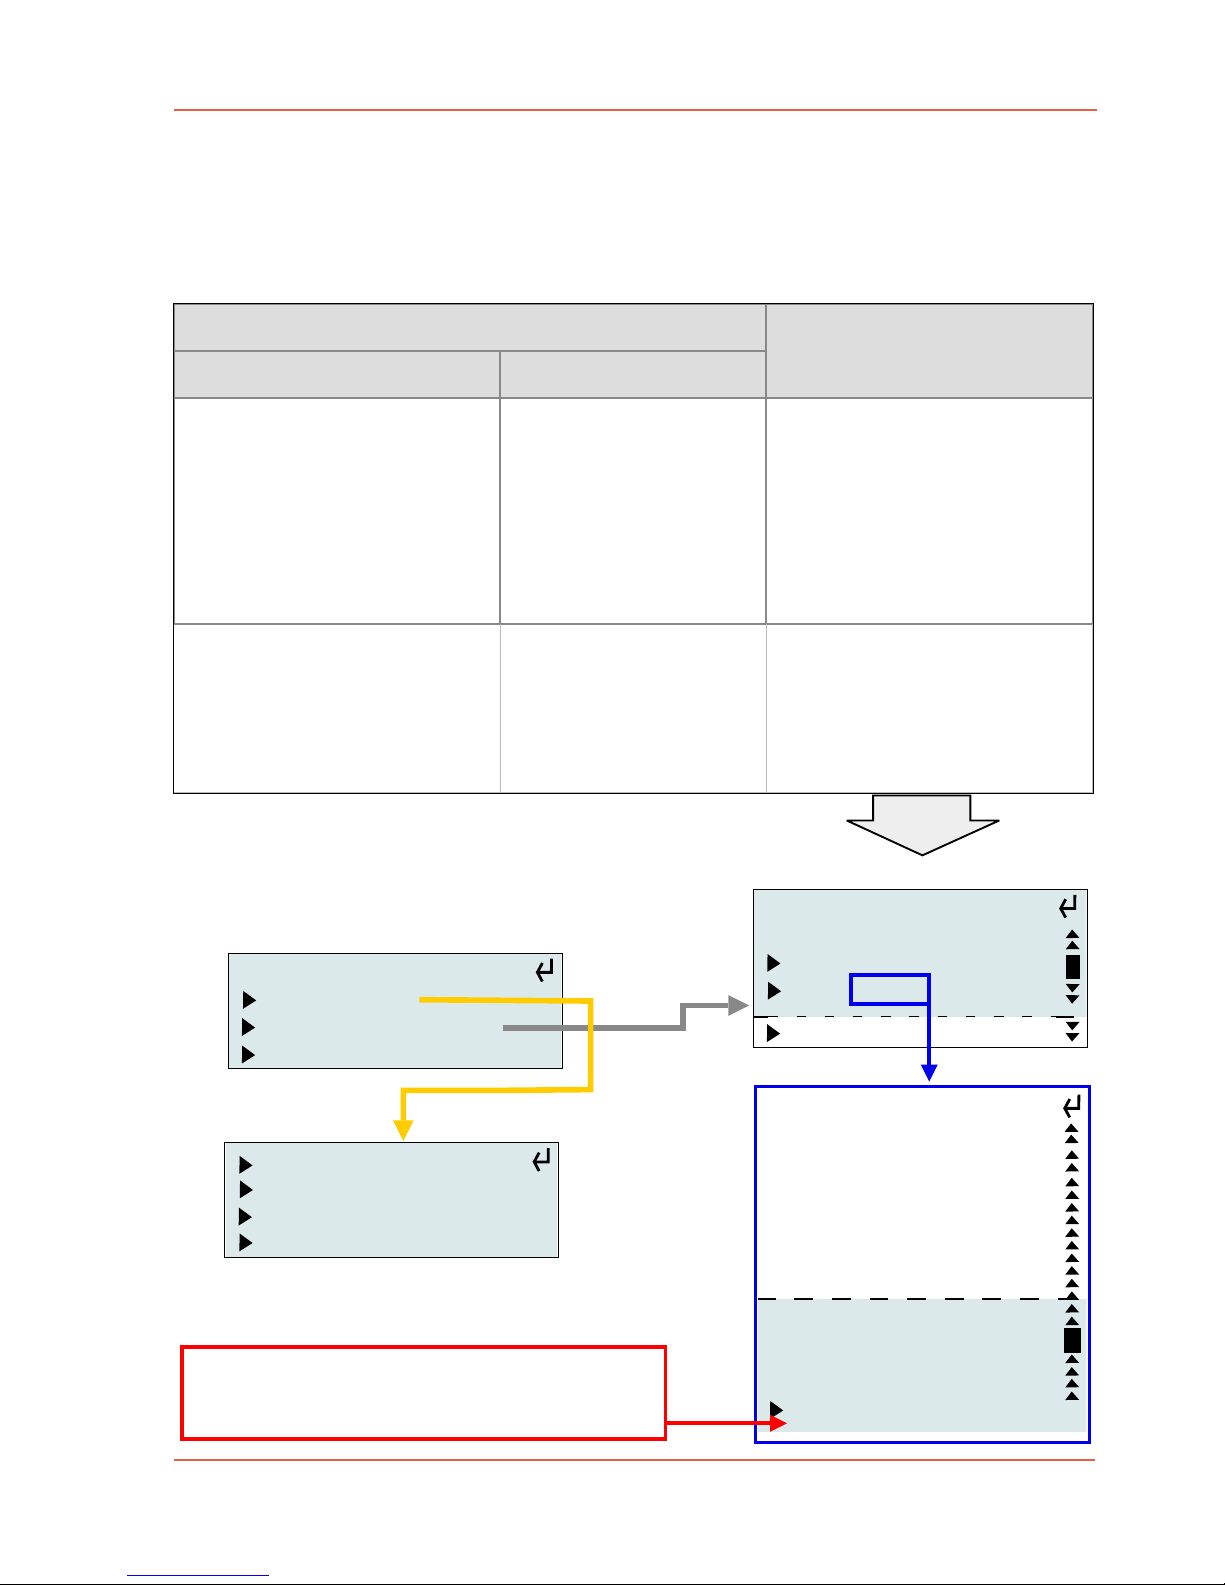
6.2.7 Function overwrite a DMX channel
This function simplifies the configuration if DMX input channels and output channels are
used.
DMX channels in a DMX universe are unique.
For that reason it would be a conflict if you try to use a DMX channel as an output channel
and input channel.
To avoid unnecessary manual deleting of a DMX output channel and manually adding it
again to the DMX input the overwrite function prompts a question how to proceed with this
channel.
Example
As shown in chapter "6.3.4 DMX in patching" we intend to put the DMX output channel on
an externaly connected dimmer console for live adjustment of the gel.
Expert mode DMX OUT
address = function
add DMX channel
010 = DIM OUT 1
012 = fix 000
013 = fix 000
014 = fix 000
015 = fix 000
016 = fix 000
Expert mode DMX IN
address > function
add input channel
001: Patch 014
exit
given DMX OUTPUT configuration
We add an DMX input channel using
DMX channel 14 for live GEL adjustment
1.
In the expert mode of DMX IN select (or add a new channel) for
DMX input channel 001 > patch to DMX channel 014.
2.
3.
Because channel 014 is already used by DMX OUT an alert
comes up:
4.
5.
If "OK" is choosen the DMX OUT channel 014 will be deleted.
Instead DMX IN channel 014 will be inserted as a patch for fader
#1 (DMX channel 001) of the dimmer console.
Now you can adjust the GEL with fader #001 live.
would be a conflict, DMX channel cannot be allocated twice
The fixed value of
OUTPUT 014
e.g. sets the gel
DMX address 014 in
use: fix
choose different
overwrite
The "Overwrite"-function works in both directions, DMX IN>OUT and DMX OUT>IN
This will delete
the corresponding
setting. Proceed?
OK cancel
Page 24
User manual LFX Master DMX page 24 of 35
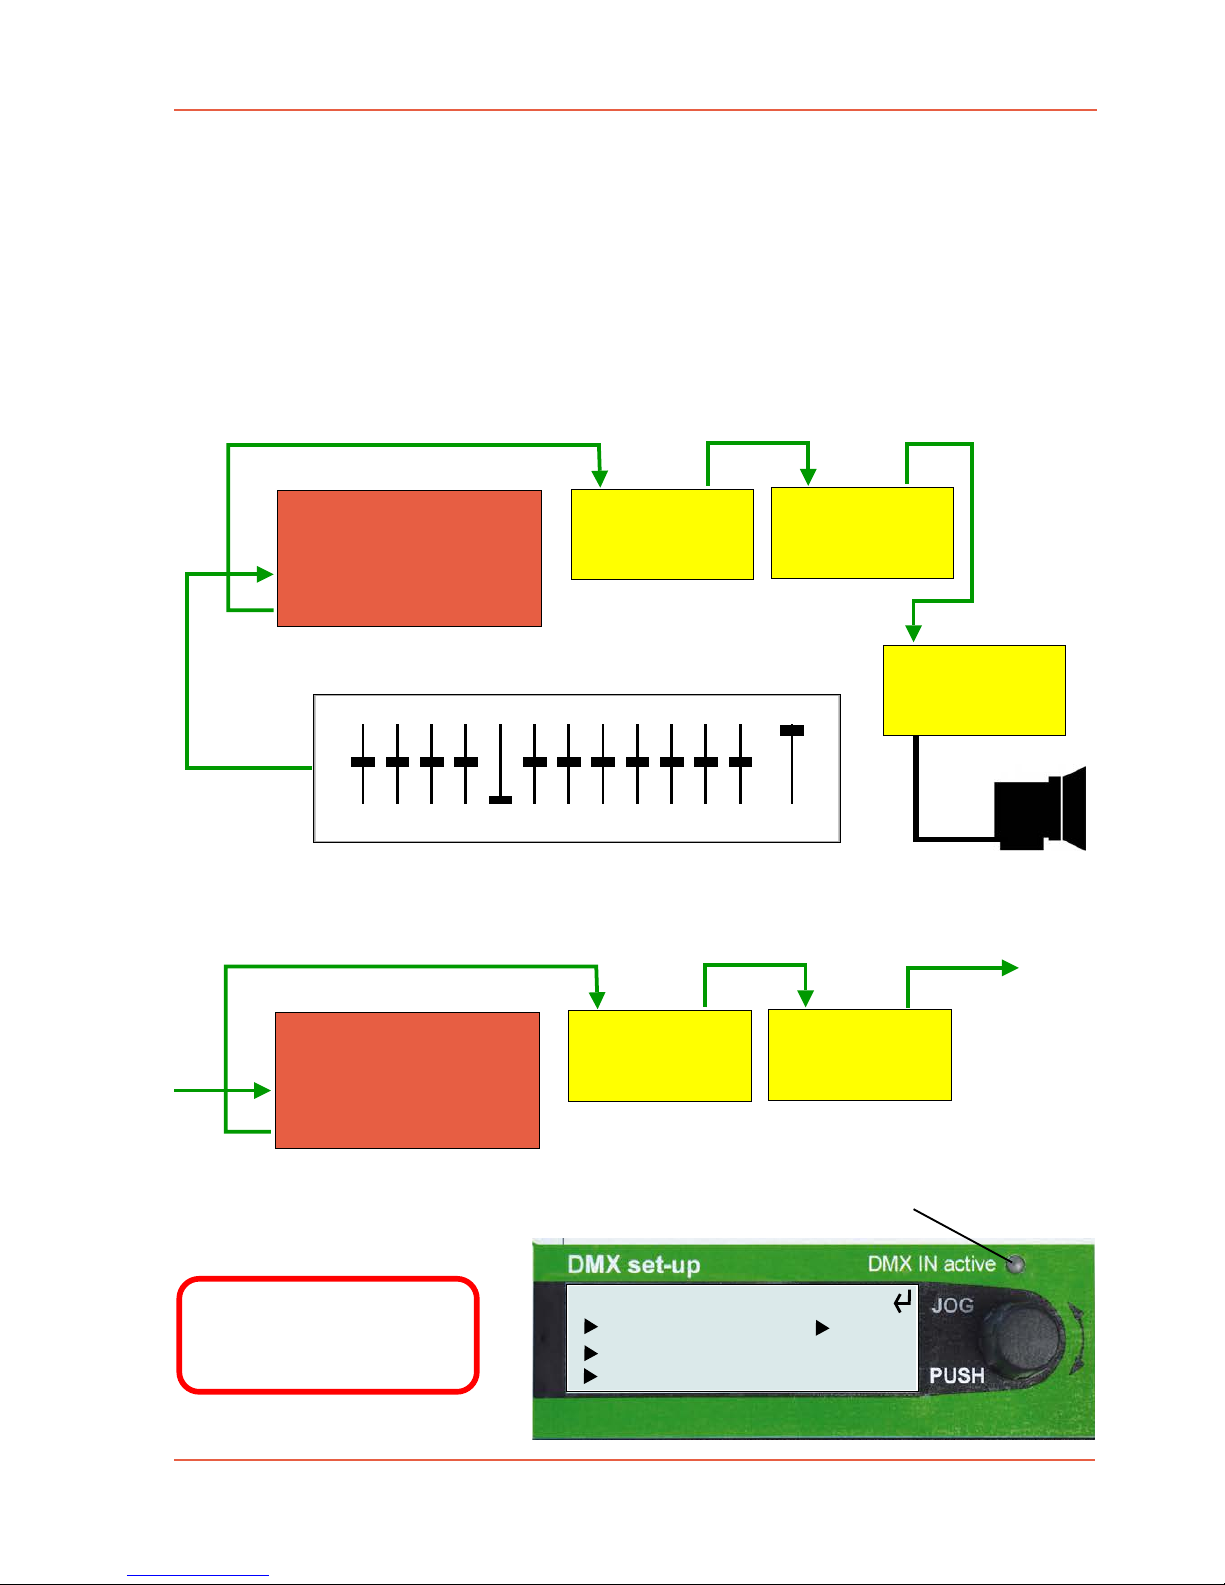
Chapter 6.3
Configuration of DMX IN/-presets overview
available options HINT: configure FIRST DMX OUT, then DMX IN
Basics
1. Turn rotary switch "EFFECT" to position "DMX set-up"
2. With JOG go to "DMX IN"
edition June 2018- en 2.0.1
www.movie-inter.com
DMX IN preset
custom configuration
(Expert Mode)
3x OUT separate dim control
remotely control dim levels (MAX &
min) of all three output channels separately
requires at least a 6-channel dimmer
console
full remote control
remote control all EFFECTS
using 9 DMX channels
Control of:
- all Dim levels (6 ch)
- EFFECT preset (1 ch)
- speed (1 ch)
- transitions (1 ch)
Patch any function or DMX IN
address to any DMX output channel
in the expert mode.
all options available
Example:
- Put the dimmer settings on six faders of the console for separate dim
control of the three LFX Master DMX
output channels (also use as RGB
separate adjustment for TV effects)
Control all effects of the LFX
Master DMX with a remote
dimmer console
Examples:
- Put the colour temperature settings
for a LED fixture on a fader of the
console.
- Put speed setting of the LFX Master
DMX on a second fader.
set-up DMX IN
load preset
edit DMX channels
clear channels
3xOUT separate Dim
full remote control
optical sensor IN
expert mode
: MAX OUT 1
: min OUT 1
: MAX OUT 2
: min OUT 2
: MAX OUT 3
: min OUT 3
: EFFECT
Espe: Speed
addr: Transitions
001: Enable
002:>Patch< 004
add: delete
Note: DMX IN preset "optical sensor IN"
is reserved for future products
Delete a channel by calling its function >
scroll down > select "delete" > push JOG
Expert mode DMX IN
address > function
add input channel
001: Patch 004
exit
list of functions
list of input channels
Page 25
edition June 2018- en 2.0.1
www.movie-inter.com
User manual LFX Master DMX page 25 of 35
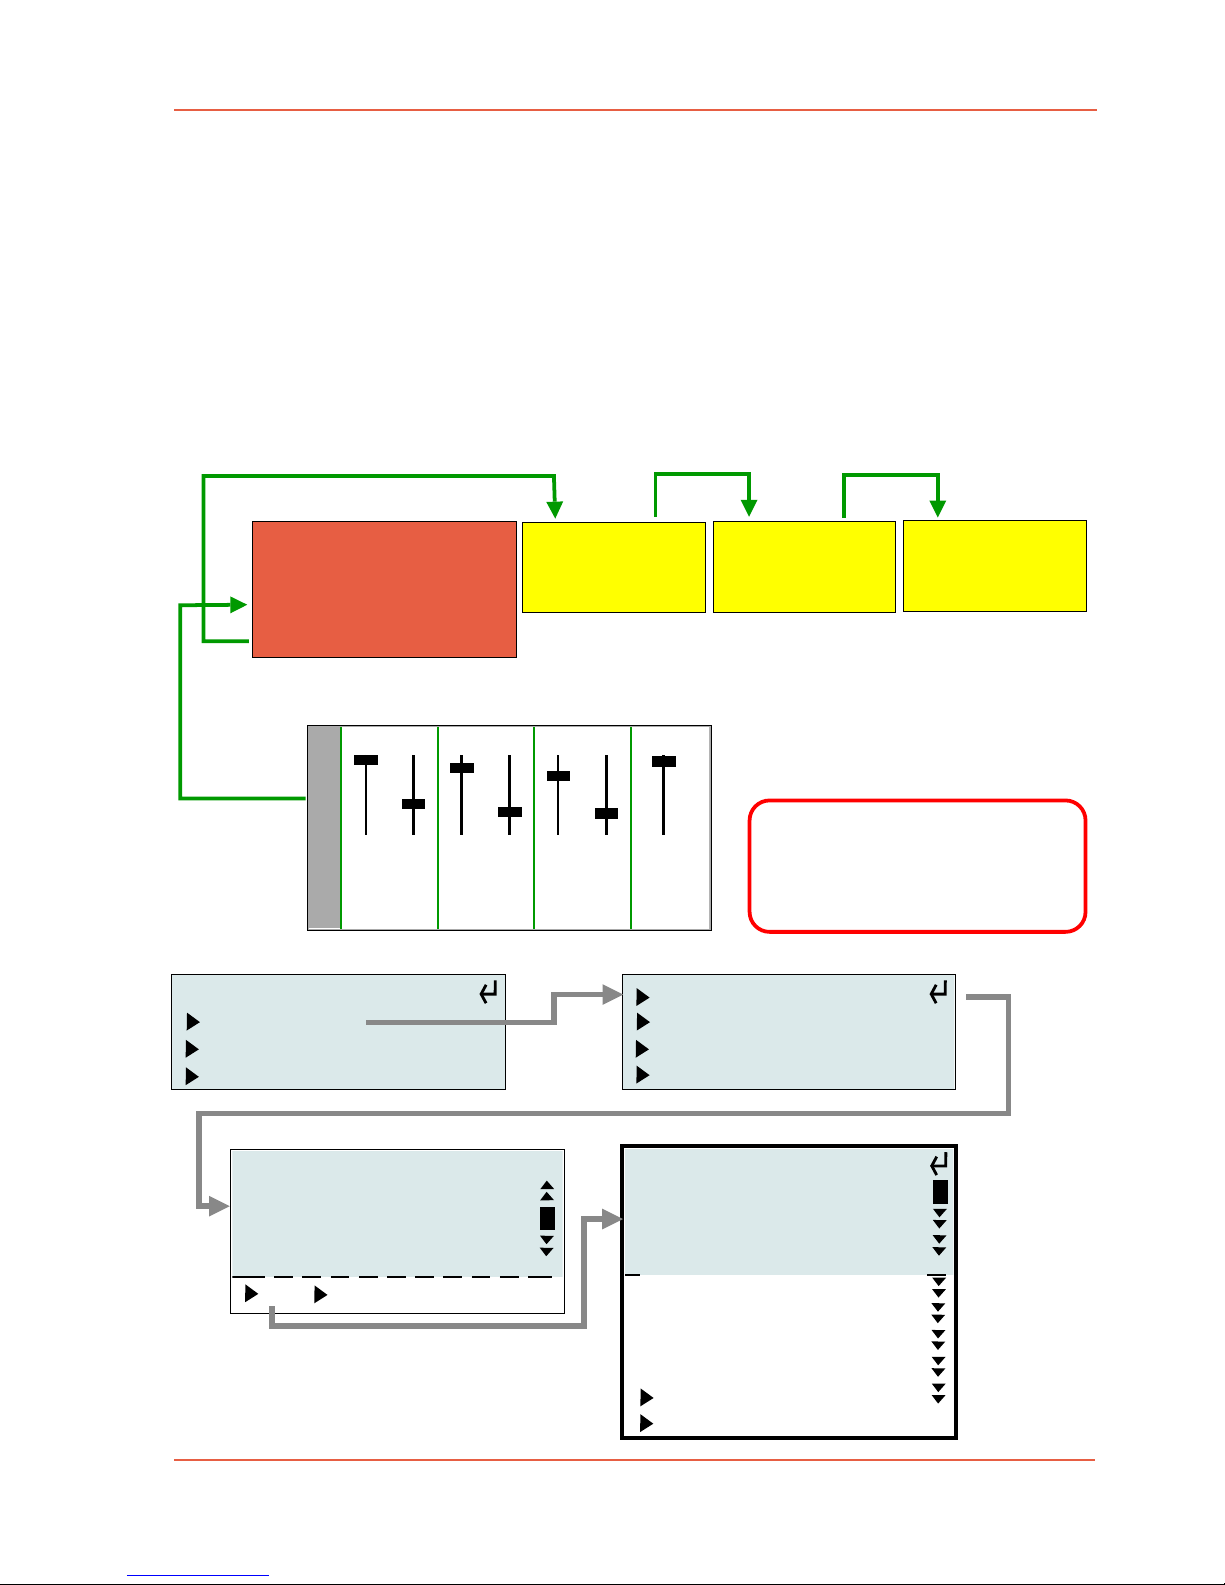
6.3.1 Use of an external dimmer console
With an external dimmer console you can extend the functionality of the LFX Master DMX.
We recommend to apply a simple 12 channel DMX console. See more details > next page
Use LFX Master DMX with a dimmer console.
Use LFX Master DMX with an advanced dimmer console in an existing DMX universe
LFX Master DMX
DMX IN
DMX OUT
DMX IN DMX OUT
LED fixture 1
DMX IN DMX OUT
LED fixture 2
DMX line
CH
1 2 3 4 5 6 7 8 9 10 11 12 Master
Dimmer console
DMX OUT
LFX Master DMX
DMX IN
DMX OUT
DMX IN DMX OUT
LED fixture 1
DMX IN DMX OUT
LED fixture 2
DMX universe
other devices
set-up DMX IN
load preset
edit DMX channels
clear channels
help
If a valid DMX signal is detected at DMX IN this green indicator comes on
DMX IN DMX OUT
Tungsten dimmer
DMX IN is disabled if
switch "EFFECT" is on
position "DMX set-up"!
Page 26
edition June 2018- en 2.0.1
www.movie-inter.com
User manual LFX Master DMX page 26 of 35
6.3.2 DMX IN preset "3x OUT separate dim control"
This preset allows for separate control of the three output channels of the LFX Master DMX.
If selected the input DMX channels are allocated to the dim functions of the flicker box.
Applications:
- for fire effects with flickering shadows using different lamps with different dim levels.
- TV effects with shifting colors: precisely define the color intensity and variation of red,
green and blue
set-up DMX IN
load preset
edit DMX channels
clear channels
3xOUT separate Dim
full remote control
optical sensor IN
expert mode
Expert mode DMX IN
address = function
001 = MAX OUT 1
002 = min OUT 1
003 = MAX OUT 2
004 = min OUT 2
005 = MAX OUT 3
006 = min OUT 3
add input channel
exit
Edit the DMX addresses and functions the same way as accomplished
in the DMX OUT expert mode.
LFX Master DMX
DMX IN
DMX OUT
DMX IN DMX OUT
LED fixture 1
DMX IN DMX OUT
LED fixture 2
DMX line
1 2 3 4 5 6 Master
OUT 1 OUT 2 OUT 3
MAX
min
MAX
min
MAX
min
Dimmer console
DMX OUT
DMX IN DMX OUT
LED fixture 3
DMX Start Adress: 001set DMX start address: 001
6 channels are required
If this preset is activated the
Dimmer max & min knobs at
LFX Master DMX are automatically disabled.
Dim OUT 1, 2 & 3
with MAX/min levels
using 6 DMX channels
001= startaddress
ok cancel
Page 27
User manual LFX Master DMX page 27 of 35
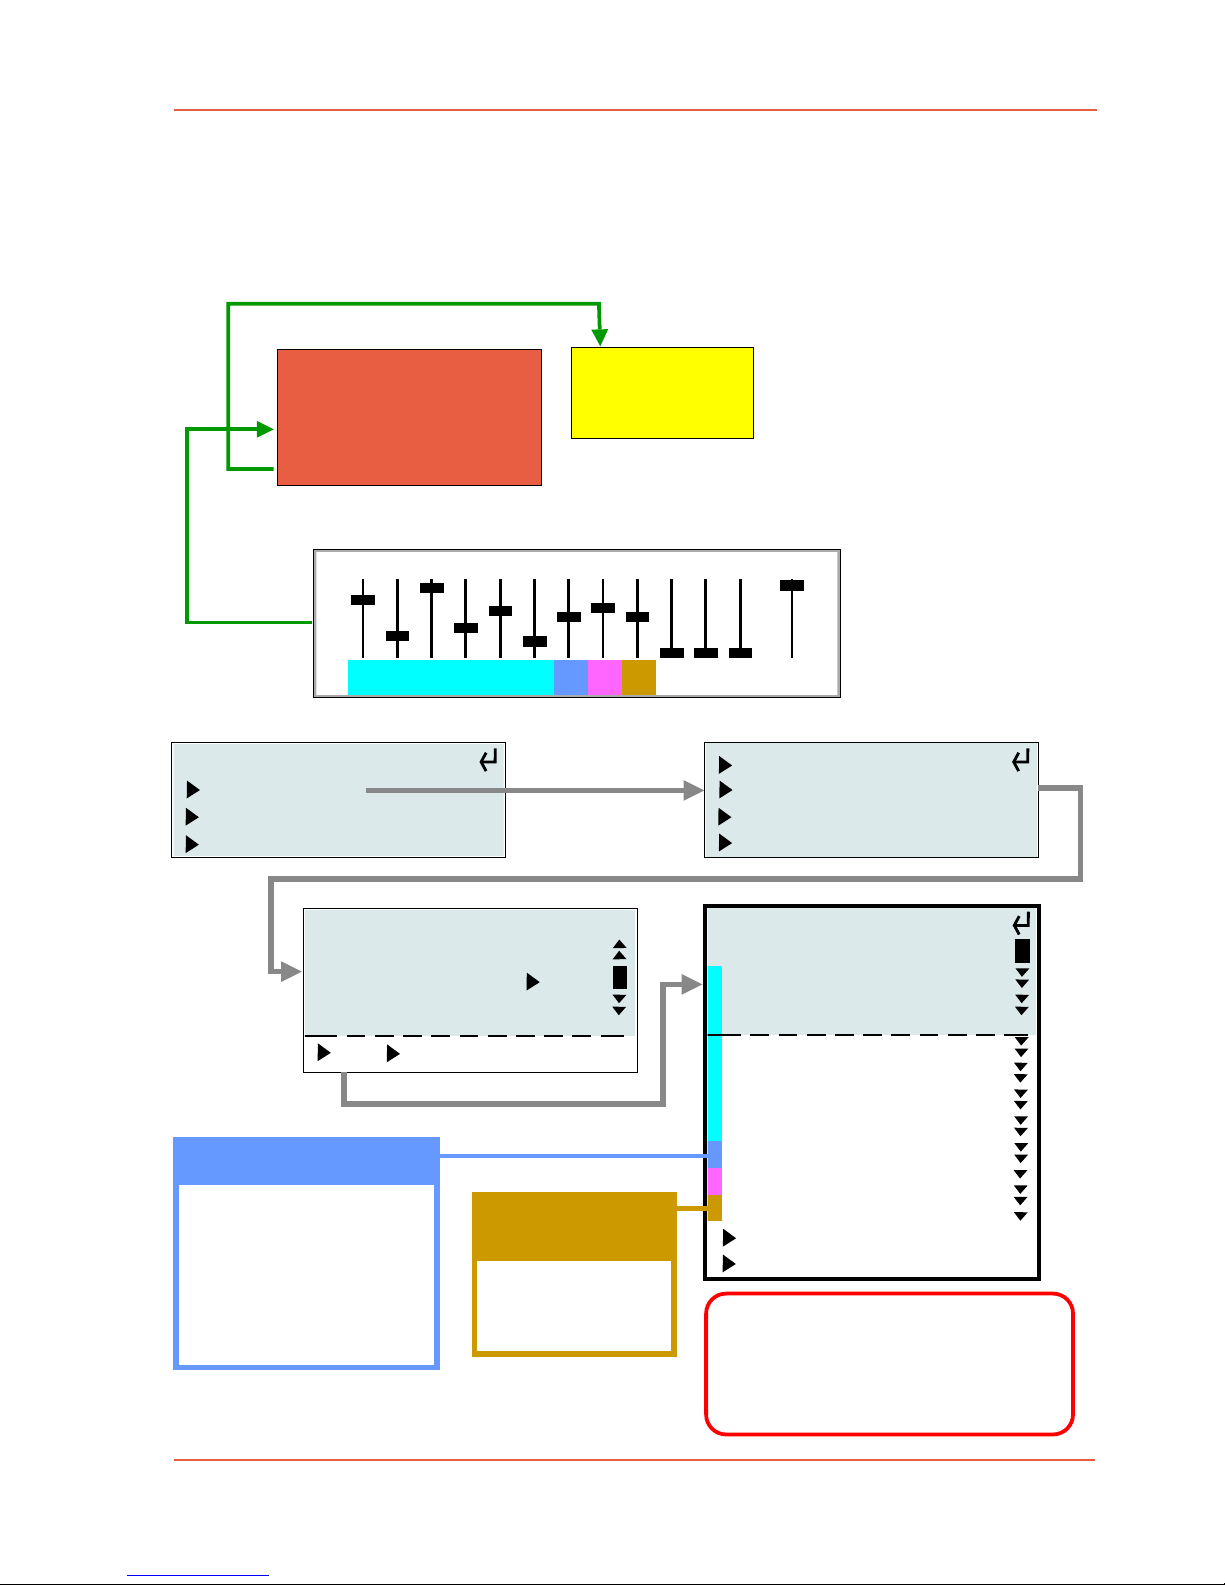
6.3.3 DMX IN preset "full remote control"
This preset loads all required settings for remote control of the LFX Master DMX via DMX.
Remote control is disabled if switch "EFFECT" is on position "DMX set-up".
edition June 2018- en 2.0.1
www.movie-inter.com
LFX Master DMX
DMX IN
DMX OUT
DMX IN DMX OUT
LED fixture 1
DMX line
Dimmer console
DMX OUT
set-up DMX IN
load preset
edit DMX channels
clear channels
3xOUT separate Dim
full remote control
optical sensor IN
expert mode
Expert mode DMX IN
address = function
001 = MAX OUT 1
002 = min OUT 1
003 = MAX OUT 2
004 = min OUT 2
005 = MAX OUT 3
006 = min OUT 3
007 = Effect
008 = Speed
009 = Transitions
add input channel
exit
dimmer console DMX Start address
Edit the DMX addresses and functions the same
way as done in the DMX OUT expert mode.
DMX Start Adress: 001
DMX Values for EFFECT
0 – 14% = OFF
15 – 29% = fire
30 – 35% = candle
36 – 51% = tv
52 – 68% = welding
69 – 84% = fluoro
85 -100% = strobe
DMX values for
TRANSITIONS
0 - 33% = hard
34 - 66% = med
67 -100% = soft
In remote control mode
knobs on LFX Master control
panel are disabled.
1 2 3 4 5 6 7 8 9 10 11 12 Master
E S T
You need to add the "Enable"function manually. It´s not inclucded in this DMX IN preset.
> next page
Full remote control
LFX Master: 9 DMX
channels used help
001= startaddress
ok cancel
Page 28
User manual LFX Master DMX page 28 of 35
edition June 2018- en 2.0.1
www.movie-inter.com
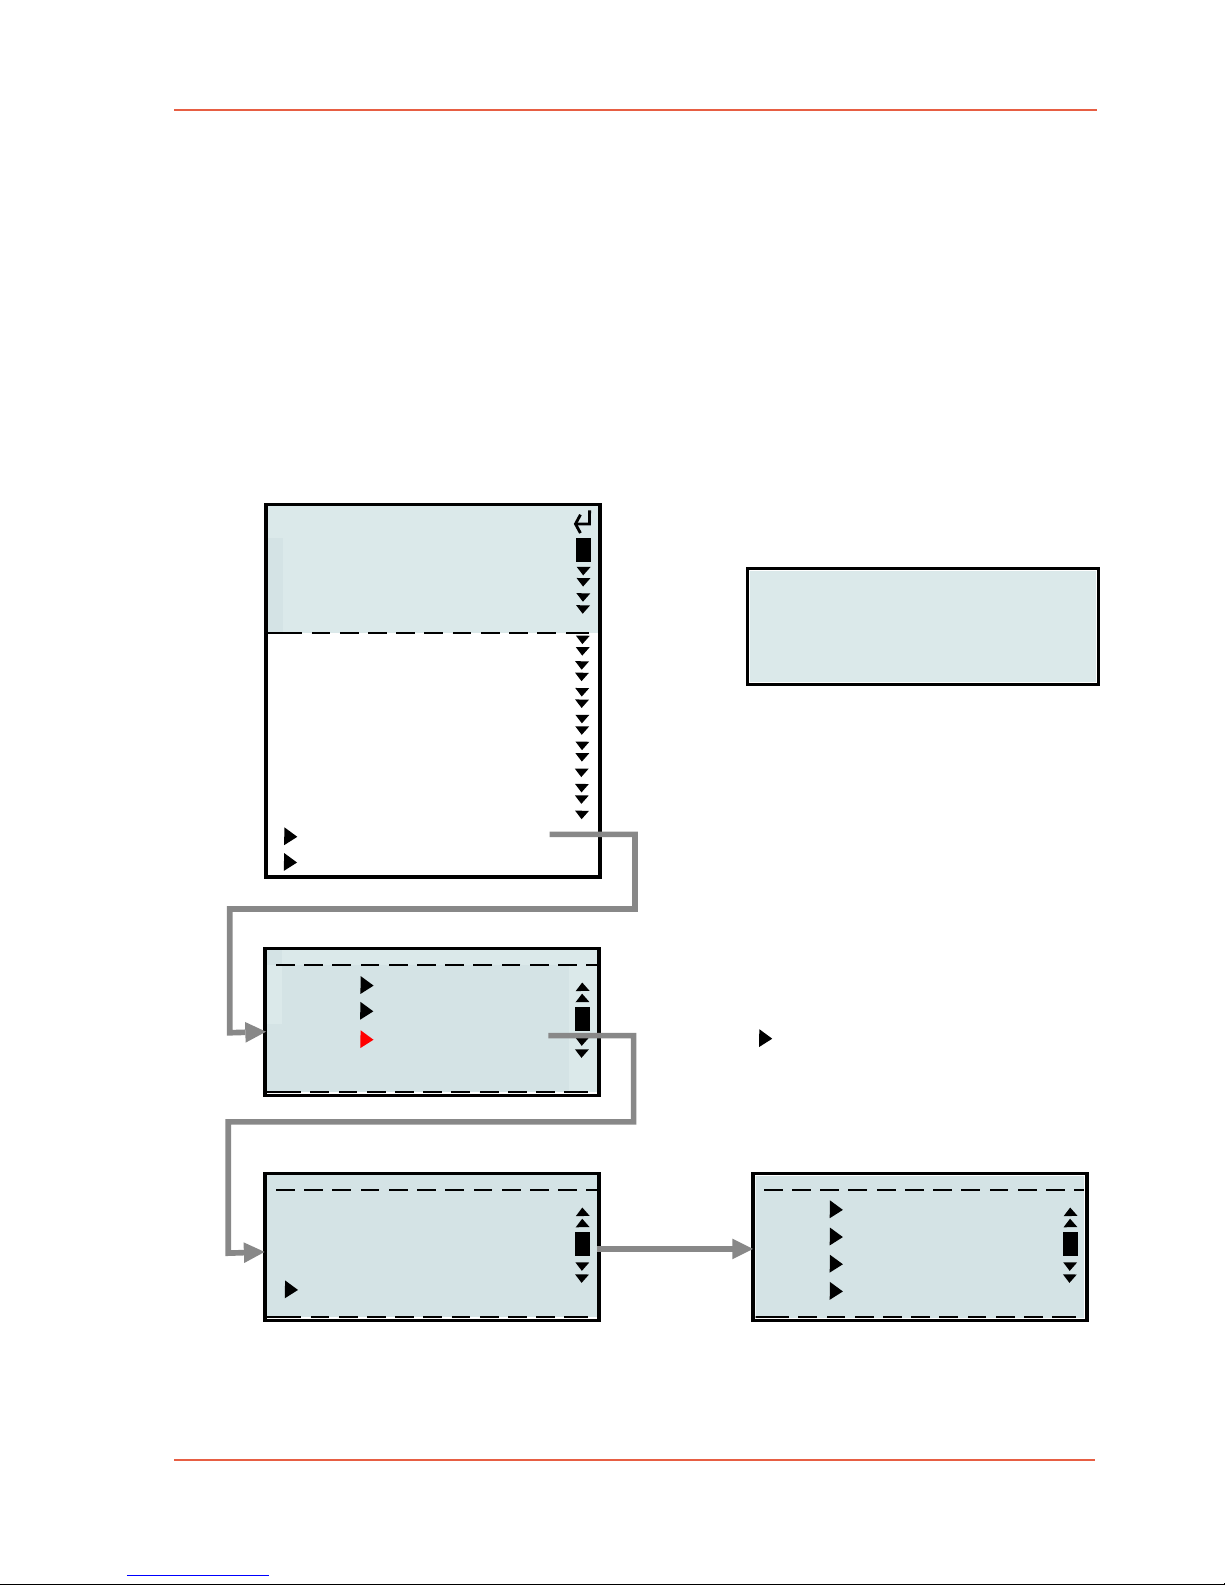
6.3.4 DMX IN "Enable"-function
This function adds a trigger function to the LFX Master DMX.
If the DMX value for this input channel is < 5% all DIM OUT channels will be disabled,
if the value is > 5% the selected effect will be used.
Most likely this function is added to the "full remote control" DMX IN preset. You may also
use the "Enable"-function without the "full remote control" DMX IN preset.
You may use this function to trigger e.g. a welding effect with just a single DMX channel.
1. Set rotary switch "EFFECT" to position "DMX set-up"
2. With JOG navigate to DMX IN > "edit DMX channels" >
Expert mode DMX IN
address = function
001 = MAX OUT 1
002 = min OUT 1
003 = MAX OUT 2
004 = min OUT 2
005 = MAX OUT 3
006 = min OUT 3
007 = Effect
008 = Speed
009 = Transitions
add input channel
exit
008 Speed
009 Transitions
010 Patch > 002
add input channel
008:Speed :
009:Transistions:
010>Enable <
add:Patch :
3.
4.
Click on "add input channel"
Click on " Patch"
change function to "Enable"
007 Effect
008 Speed
009 Transistions
010 Enable
if required change
the DMX channel here
5.
disabled
OUT
MAX:
1
100%
min:
25%
Speed
72%
2
82%
3
50%
37%
10%
"disabled" status shown on display
Page 29
edition June 2018- en 2.0.1
www.movie-inter.com
User manual LFX Master DMX page 29 of 35
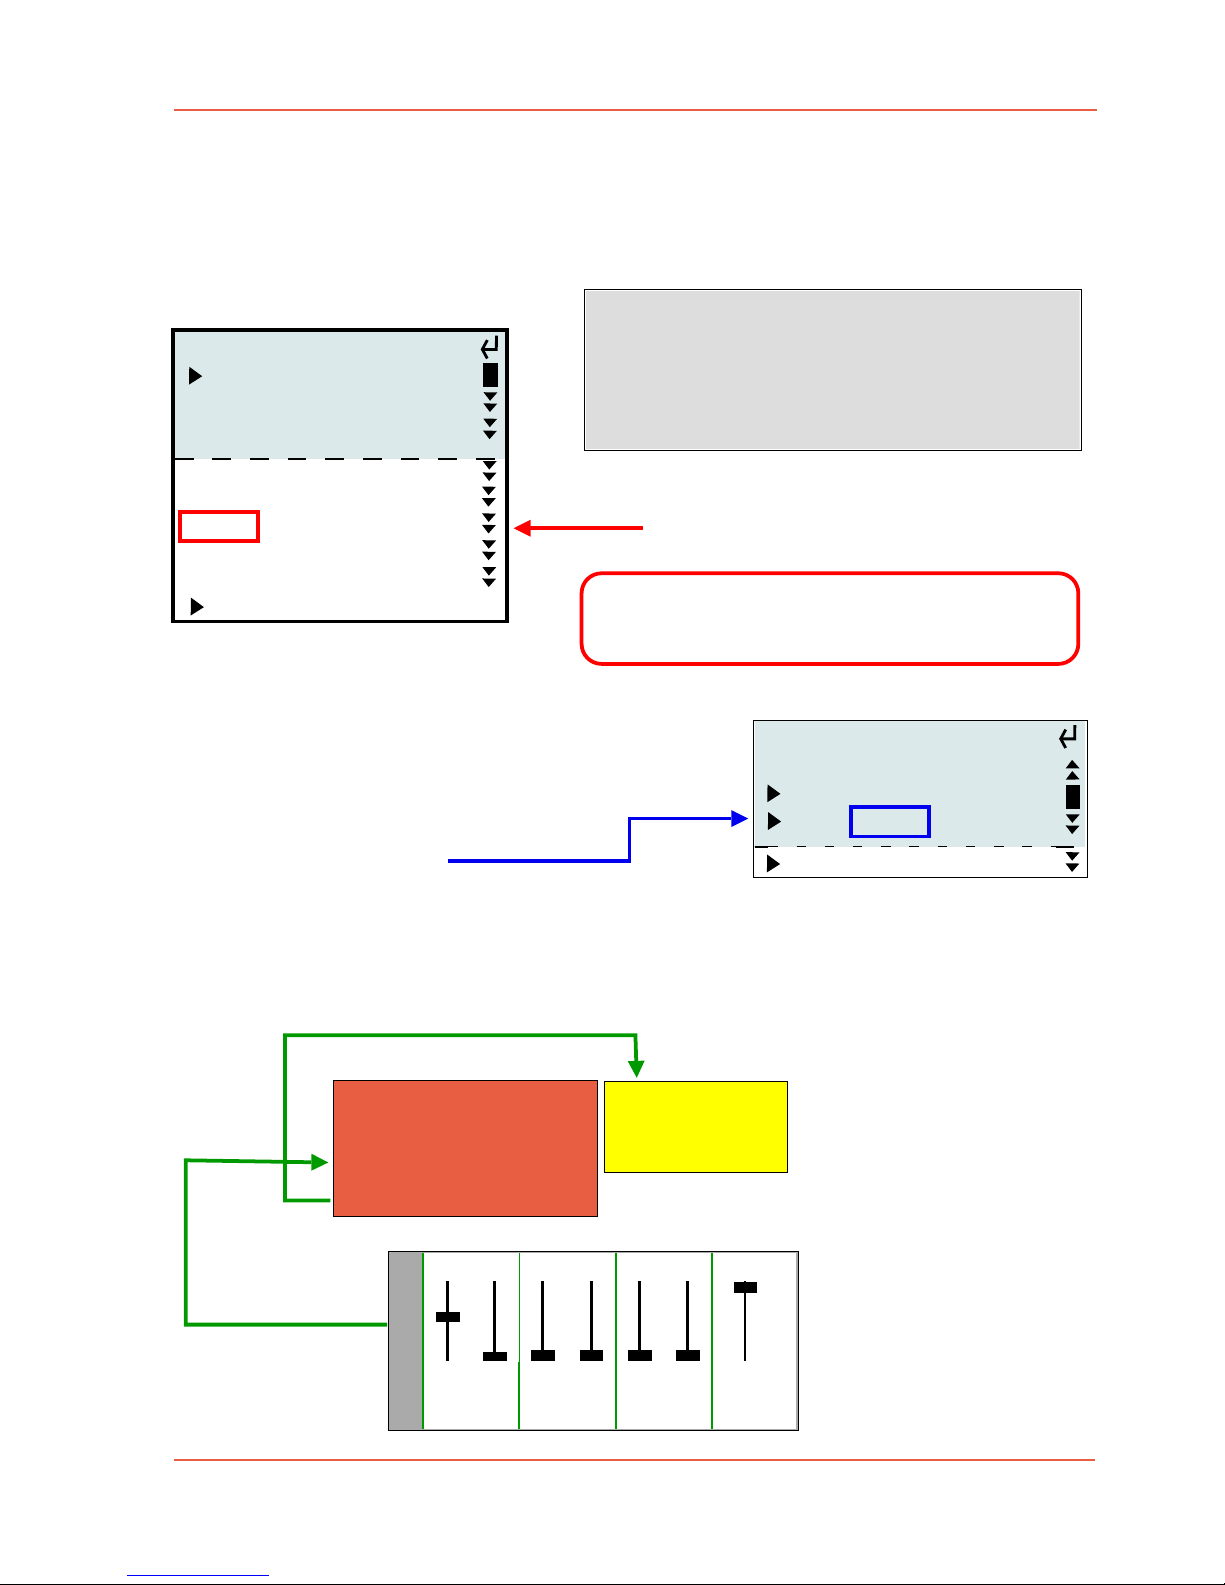
6.3.5 Custom DMX IN patching (Expert Mode)
With this feature you are able to individually "outsource" every DMX channel along with its
according function to a dimmer console.
LFX Master DMX
DMX IN
DMX OUT
DMX IN DMX OUT
LED fixture 1
DMX line
1 2 3 4 5 6 Master
GEL
Dimmer console
DMX OUT
DMX start address: 001
for Select LED
CONFIRM SETTINGS
address = function
011 = DIM OUT 1
012 = CCT fix 000
013 = G/M fix 000
014 = GEL fix 000
015 = HUE fix 000
016 = SAT fix 000
expert mode
DMX address 10 - 16
DMX channel 014 is the gel
of fixture 1.
How to set-up
1. Go to "DMX set-up" > "DMX IN" > "edit DMX channels"
> "add channel"
2. With JOG choose address 001
(the first fader on the console)
3. choose function "patch"
4. choose the DMX address you want to patch (DMX channel 014 of fixture 1)
5. Confirm in the following alert to overwrite the channel (because it has been used by
fixture 1). Channel 014 of the DMX OUT config will be removed!
Expert mode DMX IN
address > function
add input channel
001: Patch 014
exit
As shown in the example you can add any
other patch of a connected device or LFX
Master DMX function to a console.
given DMX OUTPUT configuration
Example here:
Kino Flo Select LED in mode "GELS/HUE"
We would like to control the gel using a
fader on the dimmer console.
Page 30
edition June 2018- en 2.0.1
www.movie-inter.com
User manual LFX Master DMX page 30 of 35
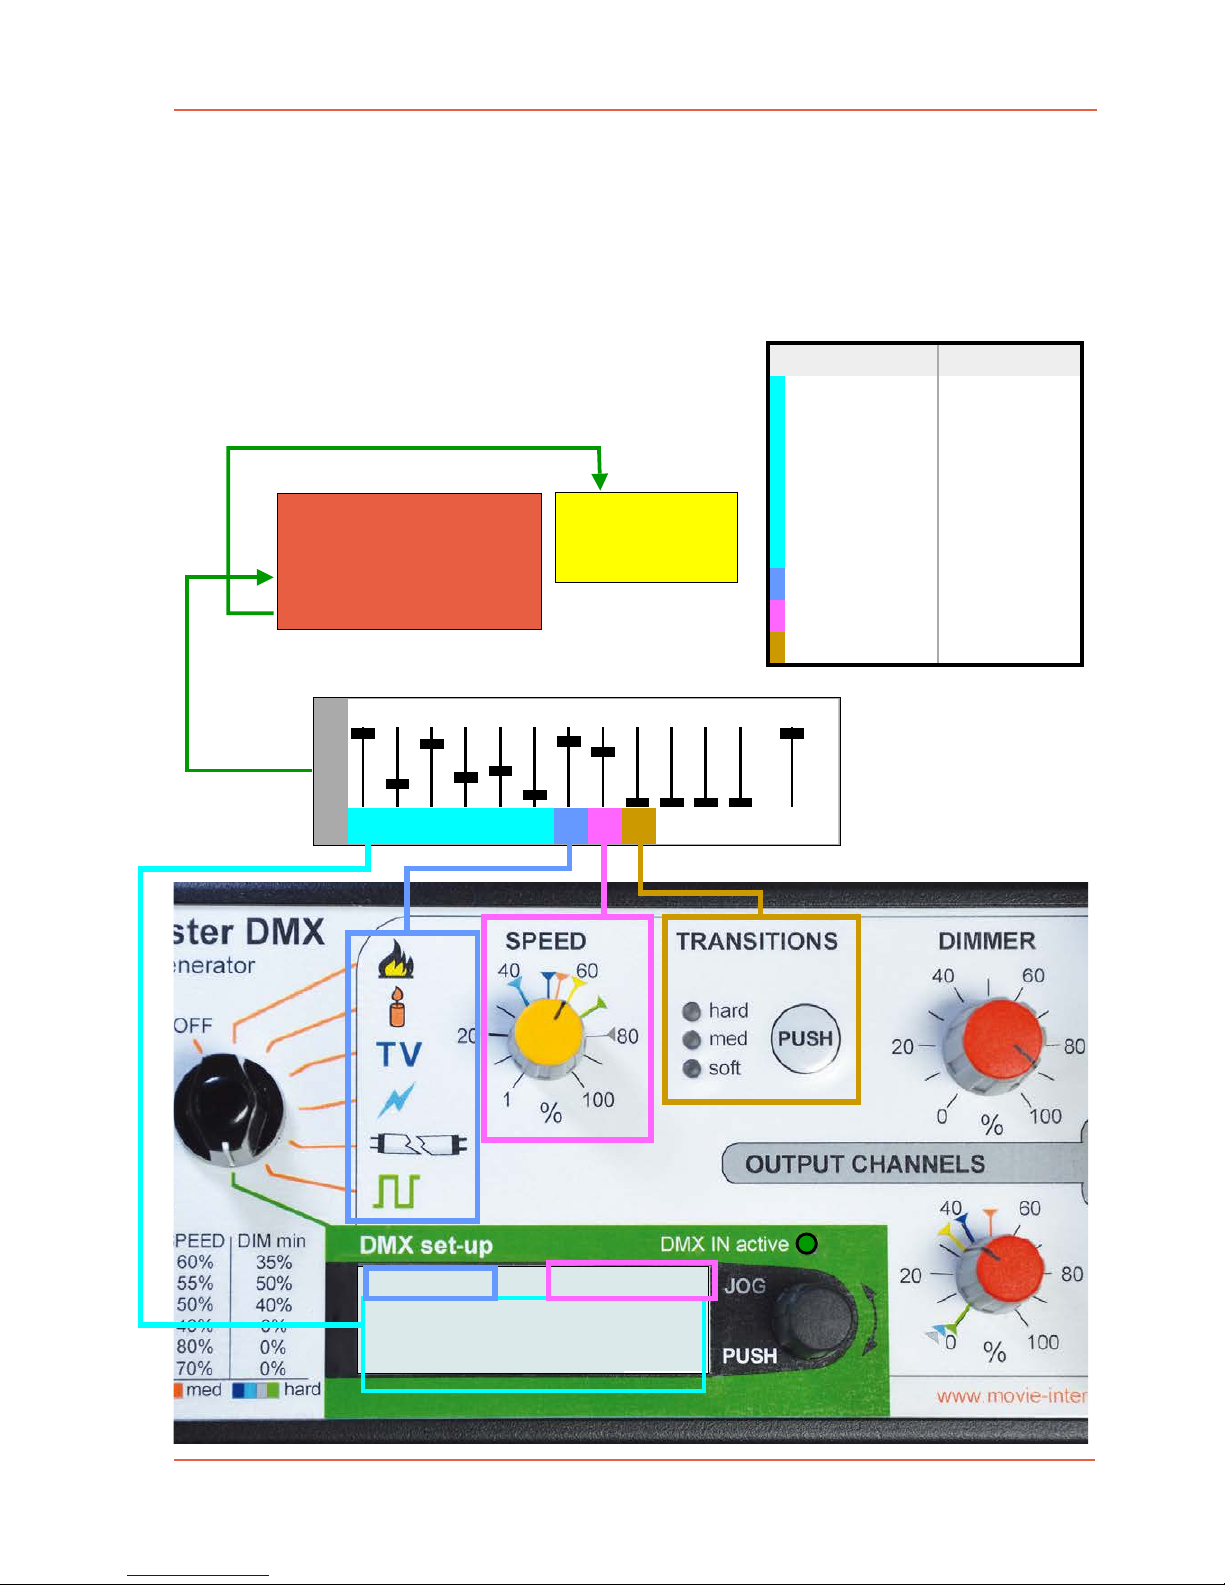
6.3.6 Indicating DMX IN values
If a DMX IN source is deteced AND the rotary knob EFFECT is on any effect position the
DMX input values are displayed.
Remote control is disabled if switch "EFFECT" is on position "DMX set-up".
fluoro
OUT
MAX:
1
100%
min:
25%
Speed
72%
2
82%
3
50%
37%
10%
LFX Master DMX
DMX IN
DMX OUT
DMX IN DMX OUT
LED fixture 1
DMX line
1 2 3 4 5 6 7 8 9 10 11 12 Master
Dimmer console
DMX OUT
DMX start address: 001
DMX channel function
001
002
MAX OUT 1
min OUT 1
003
004
MAX OUT 2
min OUT 2
005
006
MAX OUT 3
min OUT 3
007
008
Effect
Speed
009 Transitions
DMX map
hardware set-up example:
Page 31
User manual LFX Master DMX page 31 of 35
Chapter 7
Software update
The LFX Master DMX functions are based on software.
Updating the software may add new features.
To update the software you will need a micro SD-card,
type SD or SDHC, max. of 32 GB
1. Copy the new software, received by e-mail, to the root level of the SD-card.
It needs to by formatted as FAT 32 (mots likely that´s the default format of new SD-cards)
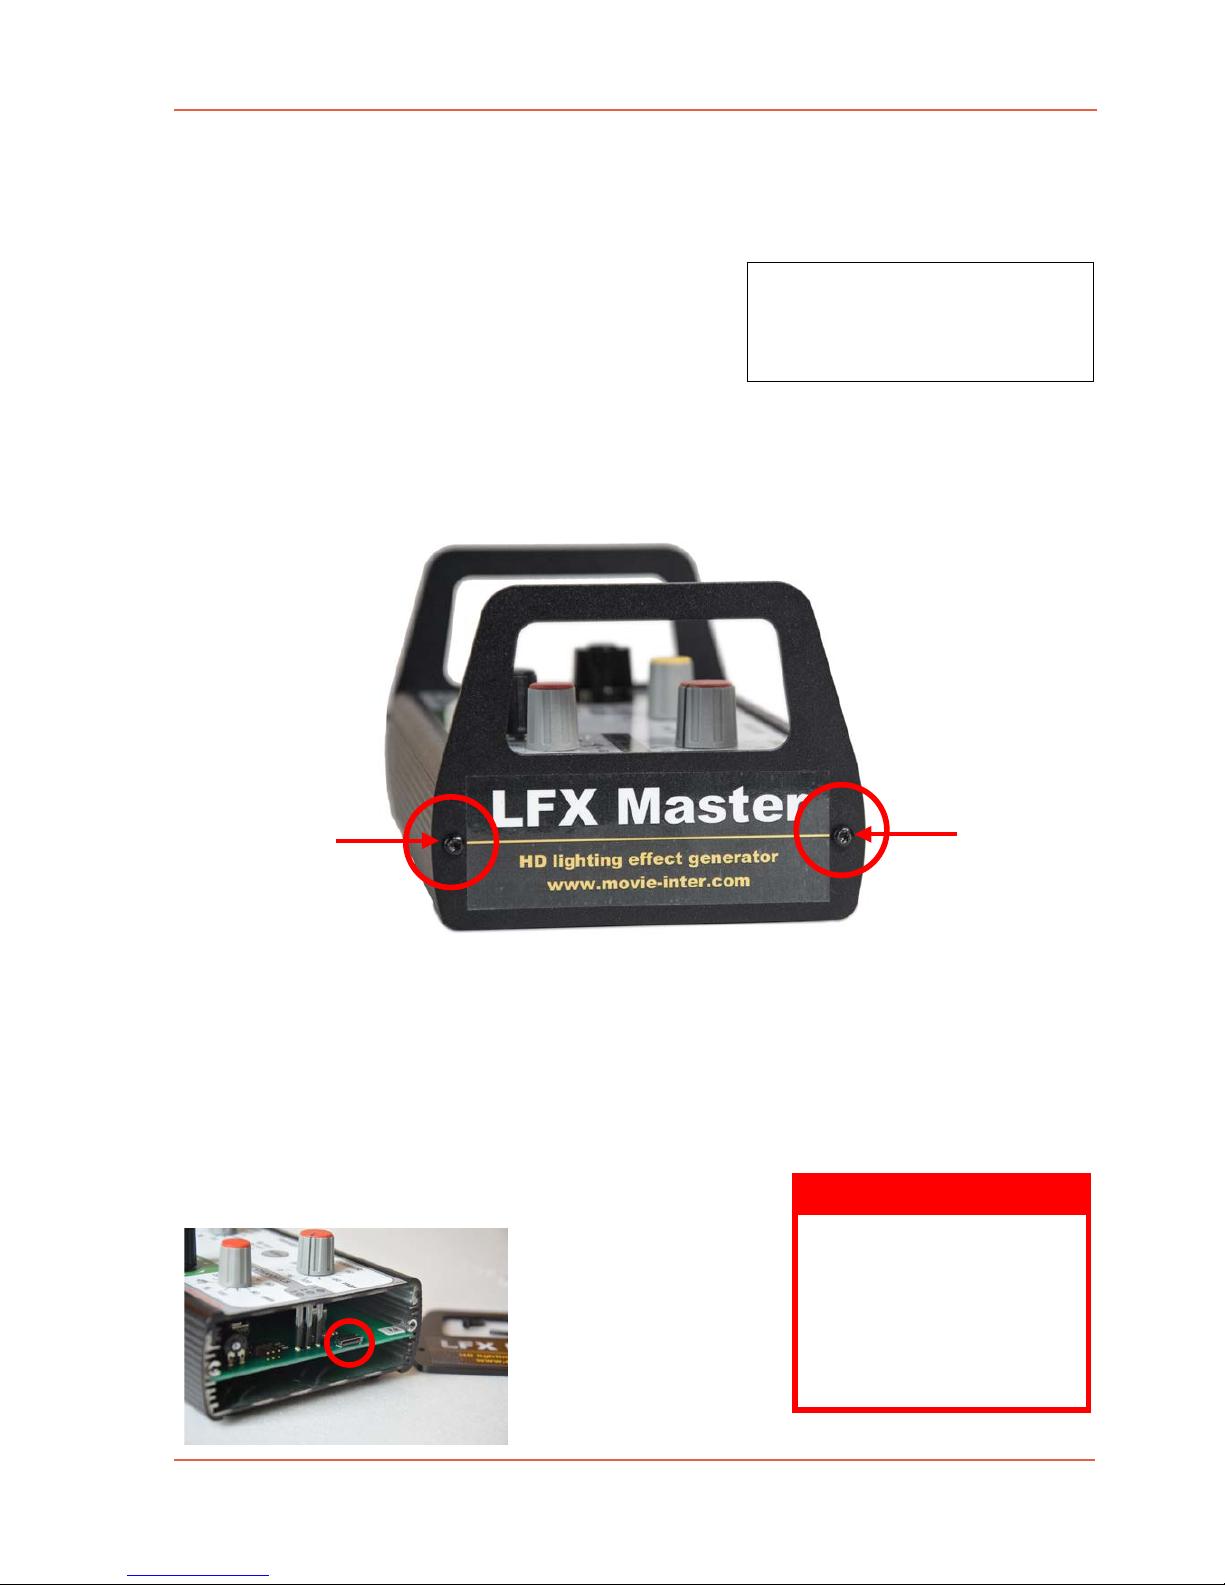
2. Please remove the right hand side cover by screwing off the two screws (Torx 10).
The SD-card slot is located on the edge of the circuit board.
3. remove DC power plug (!)
4. insert the SD-card into the slot, contacts of the card should face down
5. power up the LFX Master DMX
6. follow the instructions shown on the display
7. Remove the SD-card and re-assemble the side panel
edition June 2018- en 2.0.1
www.movie-inter.com
required equipment
- micro SD-card (max. 32 GB)
- Screwdriver TX10
WARNING
DO NOT INTERRUPT THE
POWER SUPPLY UNTIL
THE UPDATE PROCESS
IS FINISHED!
It takes about 4 seconds.
2 x TX 10
micro SD-card slot
Page 32
edition June 2018- en 2.0.1
www.movie-inter.com
User manual LFX Master DMX page 32 of 35
Chapter 8
Trouble shooting
Basic conditions for operation
1. The device and - especially the power supply unit - has no damages.
2. The operation voltage is 100 - 240 VAC @50/60 Hz or powered by USB with adaptor.
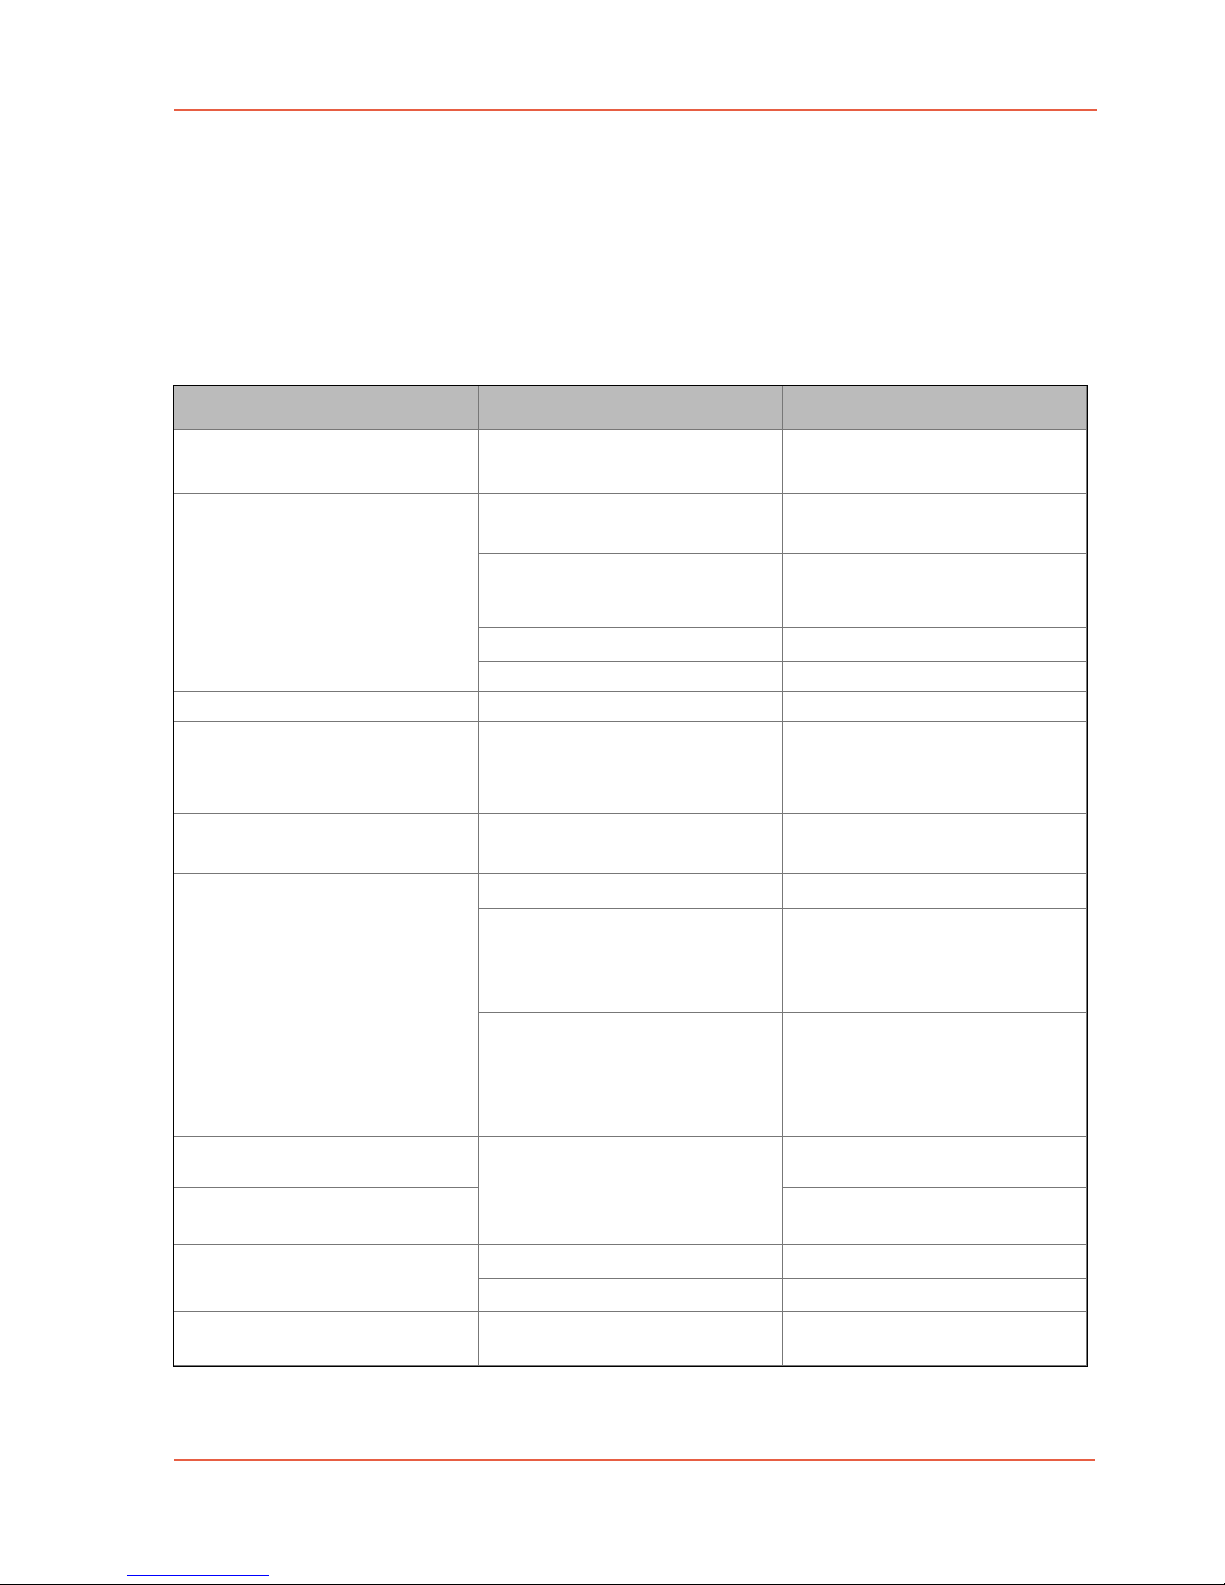
symptom possible reason solution
no display, no lights on the unit
connected lamps remain off
power missing or supply voltage
too low > 6 - 32 VDC, min 120 mA
no DMX communication
check power supply, power is fine if
display is illuminated
Set-up DMX OUT & DMX settings
at lamp
connected lamp remains on
Some DMX channels might have
been overwritten by DMX IN settings
connected device is switched off
check if all output channels are still
present & configure it correctly
Switch it on
Value of DIM max is too low
Value of MIN DIM is too high
increase DIM max
decrease MIN DIM
flicker effect is bad
There are visible steps at the LED
fixture for an effect
An effect of a LED fixture looks
smooth
effect settings need to be adjusted
Transitions is set to "hard"
start with the default values effect
preset (labeled on the control panel), then change one value after
the other
set "Transitions" to "med" or "soft"
Transitions is set to "soft"
fixture settings wrong
Set "Transitions to "hard" or "med"
for KinoFlo: set function "smooth" =
OFF
Effect with tungsten @ DMX dimmer looks smooth
no Effect with tungsten @ DMX
dimmer or lamp steadily on
Unit does not work despite all solutions shown above has been tested
fixture delays DMX input signal
wrong settings @ external dimmer
TEST: Choose any EFFECT, set
DIM min to 100%, then rotate DIM
MAX quickly, if there is a delay in
response the fixture is not configured correctly or not applicable.
set dimmer curve to "linear"
excessive heat?
- set "pre-heat" > OFF and/or
- must not be set in "switch"-mode
let unit cool down
excessive humidity?
nothing helps
let unit dry
please contact us, we check it out
for you
Page 33
User manual LFX Master DMX page 33 of 35
Chapter 9
Specifications
edition June 2018- en 2.0.1
www.movie-inter.com
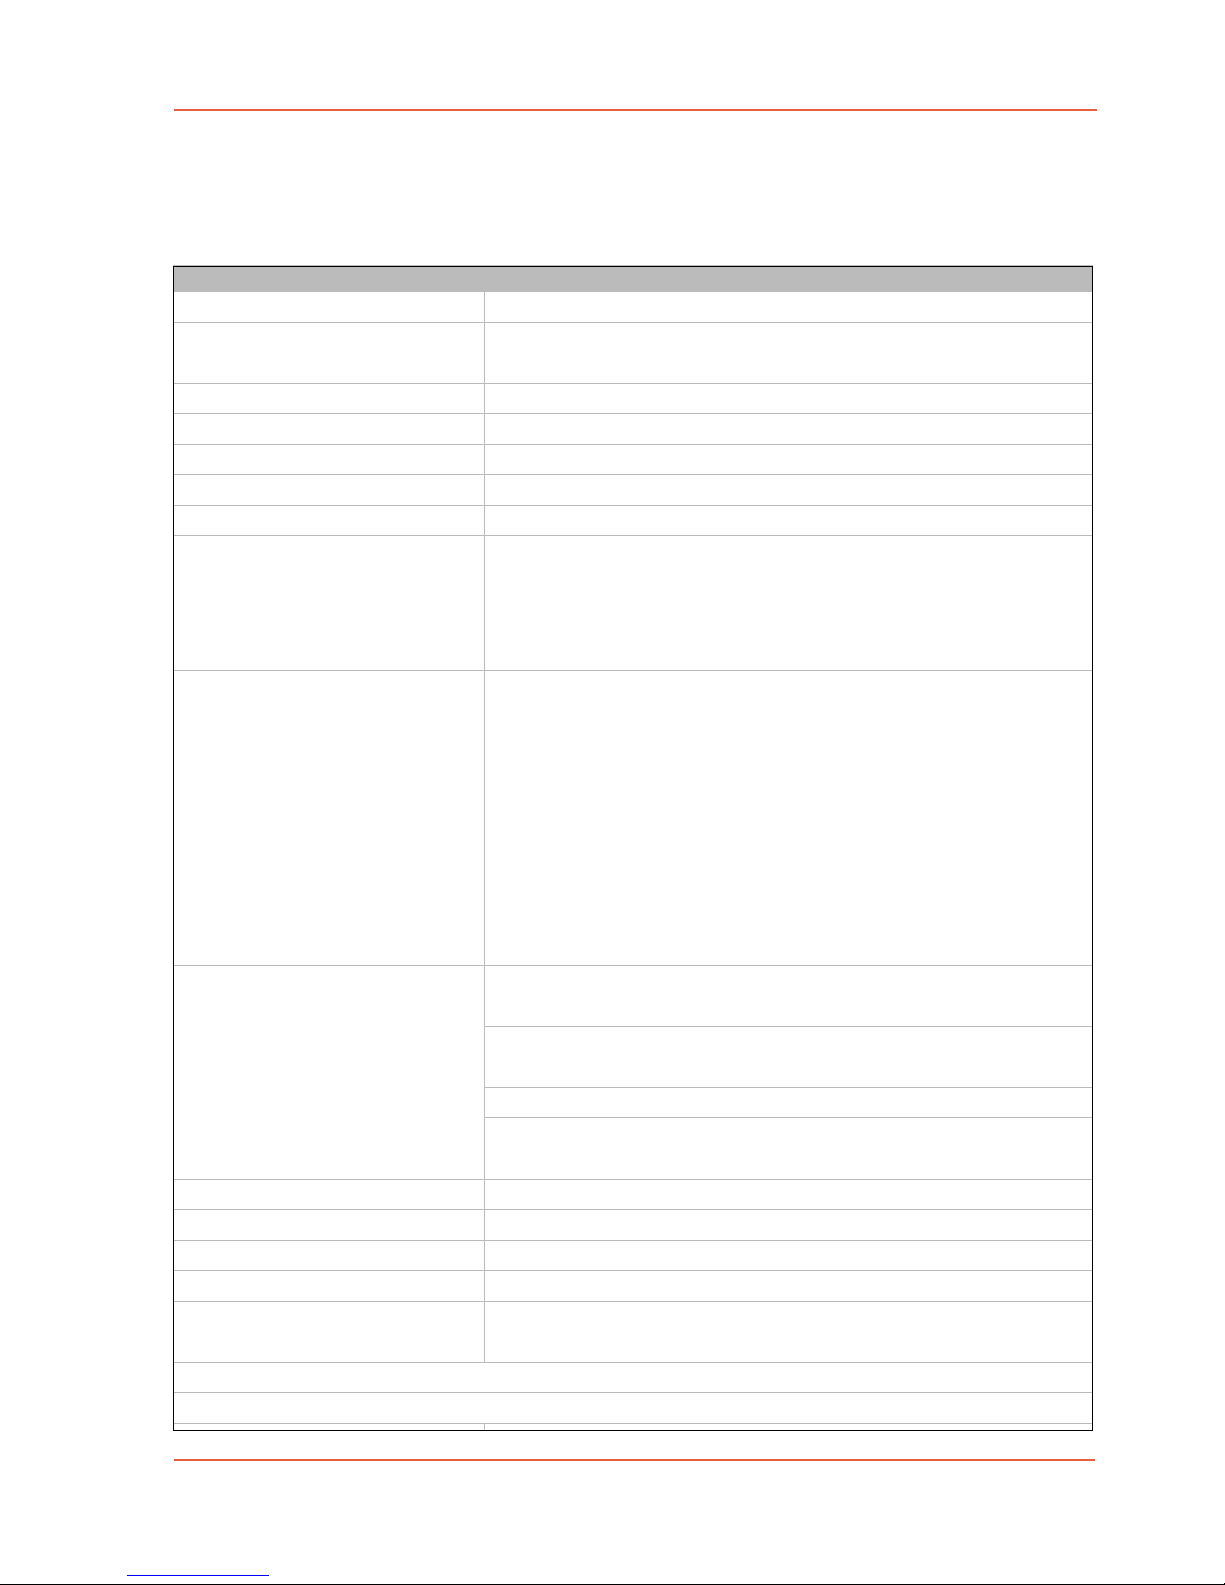
order code
operating voltage
lmdx
5 – 32 VDC, min 120 mA, universal PSU included for 90 –
240 VAC, 50/60 Hz, adapter plugs: US, UK, EU, AU
temperature operating range
Dimensions
weight
DMX protocol
-10°C …65°C
(l x w x h) 20 x 11 x 8.6 cm
650 gramms (1.4 lbs) without PSU
USITT DMX-512-A
DMX sockets
DMX output
Device presets
DMX input presets
5-pin XLR
assisted configuration with device preset or custom DMX
configuration.
Set DMX channels for CCT, G/M, gel and RGB or allocate
an output channel to a DMX channel.
Pre-defined DMX set-up for
Kino Flo: FreeStyle LED, Select LED, Diva-Lite LED, Celeb
LED, Parabeam, Parazip, supported modes: White, GELS/
HUE, RGB, gel library by gel names
Arri: Skypanel-C with LEE gel library by gel names, L5-C,
L7-C, L10-C, Broadcaster 2+,
2 channel generic LED
12 channel tungsten dimmer pack
custom DMX channel/function allocation for all others
Extend the functionality with a simple DMX console and
presets @ DMX INPUT (dimmer console required)
resolution preset
separate dim (MAX & min) control for output channels 1, 2
and 3
remote control via DMX IN for all effects
DMX patch to any device channel or LFX Master DMX function
24 fps, 60 seconds loop @ default value
HD effects
enclosure
software updates
Fire, Candle, TV, Welding, “broken” fluoro, strobe
Strobe t= 70 msec …28 secs, aspect ratio 50%
made of 3 mm thick aluminum
no shipping, provided by e-mail, micro SD-card slot for updates built-in
Mounting
All specs shown above are subject to change without prior notice.
1/4" thread on bottom of enclosure
Page 34
edition June 2018- en 2.0.1
www.movie-inter.com
User manual LFX Master DMX page 34 of 35
Chapter 10
Cleaning and disposal
Cleaning the unit
ONLY clean the unit when disconnected completely from all cables!
Use a clean slightly wet cloth.
Do not use any detergents for cleaning.
Disposal
In order to avoid any possible effects resulting from the disposal of electrical an electronic
equipment containing substances damaging the environment and human health, the European Parliament and Council directives 2002/96/EC on waste electrical and electronic
equipment (WEEE) and 2002/95/EC on the restriction of the use of certain hazardous
substances in electrical and electronic equipment (RoHS) have been transferred into national law in all EU member states.
The product you have purchased was developed in line with the current state of the art in an
environmentally friendly manner and with the view of recycling.
The product is labelled with the symbol shown to the right. If you wish to dispose
this product, this symbol obliges you to do so separately from industrial sorted
waste.
Waste equipment should be shipped to movie-intercom. We will dispose the waste
for you.
Electrical equipment does not belong in regular waste.
European Union declaration of conformity
This product corresponds to the following specifications under strict observance of the in-
stallation instructions and technical specifications:
Standard 2004/108/EG of the European Parliament and the council from 15.
December 2004 for law provision adaptation of the member states concerning
the electronical
compatibility and for abrogation of standard 2014/30/EU.
The device passed the test. Berlin, June 22, 2017
Page 35
User manual LFX Master DMX page 35 of 35
Chapter 10
Address & support
Please do not hesitate to contact movie-intercom.
We are looking forward to answer your questions.
edition June 2018- en 2.0.1
www.movie-inter.com
postal address
movie-intercom
Bluecherstr. 21
10961 Berlin
Germany
!
phone 24h / 7 days
+49 30 2232 0575
fax
+49 30 2232 0571
"
#
e-mail
web/online shop
http://www.movie-inter.com
Online configurator
for LFX Master DMX
www.lfxmaster.com
@
$%&
$%&
 Loading...