

Movea MR3 User Manual
GYR4101US
ULTRA R4000
PC/TV UniVersal remoTe wiTh
air moUse and mUsiC disPlay
United States Version
Table Of Contents
Introduction . . . . . . . . . . . . . . . . . . . . . . . . . . . . . . . . . . . . . . . . . . . . . . . . . . . . . . . . . 1
Battery Installation and Information . . . . . . . . . . . . . . . . . . . . . . . . . . . . . . . . . . . . . . .
Battery Saver . . . . . . . . . . . . . . . . . . . . . . . . . . . . . . . . . . . . . . . . . . . . . . . . . . . . . . . .
Gyro Operation. . . . . . . . . . . . . . . . . . . . . . . . . . . . . . . . . . . . . . . . . . . . . . . . . . . . . . .
Product Diagram . . . . . . . . . . . . . . . . . . . . . . . . . . . . . . . . . . . . . . . . . . . . . . . . . . . . .
Button Cluster Locations . . . . . . . . . . . . . . . . . . . . . . . . . . . . . . . . . . . . . . . . . . . . . . . .
RCU Mode Selection
Transport Control
Menu Navigation
Gyro Activation/Select . . . . . . . . . . . . . . . . . . . . . . . . . . . . . . . . . . . . . . . . . . . . . . . .
Channel/Volume Control & Media Center Green Button . . . . . . . . . . . . . . . . . . . . . . . .
MCE Shortcut Buttons . . . . . . . . . . . . . . . . . . . . . . . . . . . . . . . . . . . . . . . . . . . . . . . . .
Numeric Keypad. . . . . . . . . . . . . . . . . . . . . . . . . . . . . . . . . . . . . . . . . . . . . . . . . . . . .
Shortcut Buttons . . . . . . . . . . . . . . . . . . . . . . . . . . . . . . . . . . . . . . . . . . . . . . . . . . . . .15
Connect . . . . . . . . . . . . . . . . . . . . . . . . . . . . . . . . . . . . . . . . . . . . . . . . . . . . . . . . . . . 16
Backlighting . . . . . . . . . . . . . . . . . . . . . . . . . . . . . . . . . . . . . . . . . . . . . . . . . . . . . . . .17
Power/Standby Toggle Button. . . . . . . . . . . . . . . . . . . . . . . . . . . . . . . . . . . . . . . . . . .
RF Sync, Setup & Synchronizing The Remote and The PC, Receiver Installation . . . . . . .
USB Features & Compatibility . . . . . . . . . . . . . . . . . . . . . . . . . . . . . . . . . . . . . . . . . . .
Programming the Remote. . . . . . . . . . . . . . . . . . . . . . . . . . . . . . . . . . . . . . . . . . . . . .
Find Out If You Need to Program the Remote. . . . . . . . . . . . . . . . . . . . . . . . . . . . . . . .
Programming Methods
Using Automatic Code Search . . . . . . . . . . . . . . . . . . . . . . . . . . . . . . . . . . . . . . . . . . .
Using Direct Entry. . . . . . . . . . . . . . . . . . . . . . . . . . . . . . . . . . . . . . . . . . . . . . . . . . . . 21
Volume Punch Through . . . . . . . . . . . . . . . . . . . . . . . . . . . . . . . . . . . . . . . . . . . . . . . .
Learning . . . . . . . . . . . . . . . . . . . . . . . . . . . . . . . . . . . . . . . . . . . . . . . . . . . . . . . 23-24
Learning Tips . . . . . . . . . . . . . . . . . . . . . . . . . . . . . . . . . . . . . . . . . . . . . . . . . . . . . . .
Code Learning . . . . . . . . . . . . . . . . . . . . . . . . . . . . . . . . . . . . . . . . . . . . . . . . . . . . . .
Learning Commands
Clearing an Individual Learned Function . . . . . . . . . . . . . . . . . . . . . . . . . . . . . . . . . . .
Deleting All Learned Functions. . . . . . . . . . . . . . . . . . . . . . . . . . . . . . . . . . . . . . . . . . .
Music Mode . . . . . . . . . . . . . . . . . . . . . . . . . . . . . . . . . . . . . . . . . . . . . . . . . . . . . . . .25
Ultra R4000 Service Application . . . . . . . . . . . . . . . . . . . . . . . . . . . . . . . . . . . . . . . . .
Music Display Navigation . . . . . . . . . . . . . . . . . . . . . . . . . . . . . . . . . . . . . . . . . . . . . .
Troubleshooting . . . . . . . . . . . . . . . . . . . . . . . . . . . . . . . . . . . . . . . . . . . . . . . . . . 27-30
Remote Code List
. . . . . . . . . . . . . . . . . . . . . . . . . . . . . . . . . . . . . . . . . . . . . . . . 6,25
. . . . . . . . . . . . . . . . . . . . . . . . . . . . . . . . . . . . . . . . . . . . . . . . . . . 7-8
. . . . . . . . . . . . . . . . . . . . . . . . . . . . . . . . . . . . . . . . . . . . . . . . . . 9-10
. . . . . . . . . . . . . . . . . . . . . . . . . . . . . . . . . . . . . . . . . . . . . 20-22
. . . . . . . . . . . . . . . . . . . . . . . . . . . . . . . . . . . . . . . . . . . . . . . 23-24
. . . . . . . . . . . . . . . . . . . . . . . . . . . . . . . . . . . . . . . . . . . . . . . . . 31-59
Introduction
1
1
2
3
3
11
11
13
14
17
18
19
20
20
20
22
23
23
24
25
25
26
This users’ manual describes the operation of the ULTRA R4000 PC/TV Universal Remote
Control Unit with Air Mouse and Music Display (RCU). The RCU contains an embedded micro
gyro for motion sensing and in-air control of a floating cursor. This RCU features IR code
database and IR learning capabilities to universally control standard home theater devices
such as TVs, VCRs, Digital Video Recorders (DVR), DVD players, CD players, cable/SAT boxes,
etc. This RCU links directly to your Windows Media Player Audio library. Using the Music
Display on the RCU you can browse through your audio files and listen to your music on the
PC without going to your computer.
The RCU is also equipped with a 2.4 GHz RF transceiver to send cursor movement information
and other commands to the PC via a USB transceiver. The radio frequency (RF) transceiver
delivers a range of up to 100 feet with no line-of-sight requirement. The 800 possible
channels of the RF transceiver provide high resistance to interference from other radio devices.
Battery Installation and Information
The ULTRA R4000 Motion-Sensing RCU requires four AAA Alkaline batteries. To install the batteries:
1. Remove the battery compartment cover.
2. Insert the batteries, matching the batteries to the (+) and (-) marks inside the battery
compartment.
3. Replace the battery compartment cover and snap it into place.
Note: Reprogramming may be required after batteries are replaced.
Battery Saver
The RCU saves battery power by automatically going into a low-power state if no button is
pressed after a few seconds. See the Gyro section for gyro battery saver mode.
Product Registration Information
Keep your sales receipt to obtain warranty parts and service and for proof of purchase. Attach it
here and record the serial number in case you need it. The serial number is located on the product.
Model Number _______________________________
Serial Number ______________________ Purchase Date _____________
Dealer/Address/Phone ________________________________________
1
Gyro Operation
The RCU provides in-air control of the PC’s
cursor via patented gyroscopic motion
sensing technology. This means mouse-like
cursor control, from anywhere in the
room, without the need of a flat surface.
There is no line-of-sight requirement
so you don’t have to point the RCU at the PC
you are controlling. Remember the
following things when using the in-air cursor
control feature of the RCU:
• Use your thumb to press the gyro and
mouse buttons.
• Click the center button to activate the
gyro motion-sensing control. Single click
and hold to move the cursor and release
it to “park” the cursor where you want it.
Double click the center button and release it
for continuous cursor movement similar to a
standard mouse.
• The right and left buttons function like
standard mouse right-click and left-click
buttons.
• Move the cursor by flexing your wrist, not
your arm or body, much as you would with
a flashlight; side to side and up and down.
Placing your arm on an armrest or on your
lap will make this motion more comfortable.
• The RF Transmit LED indicates when gyro
motion or other information is being
sent. The LED does not illuminate when
transmitting IR information.
2 3
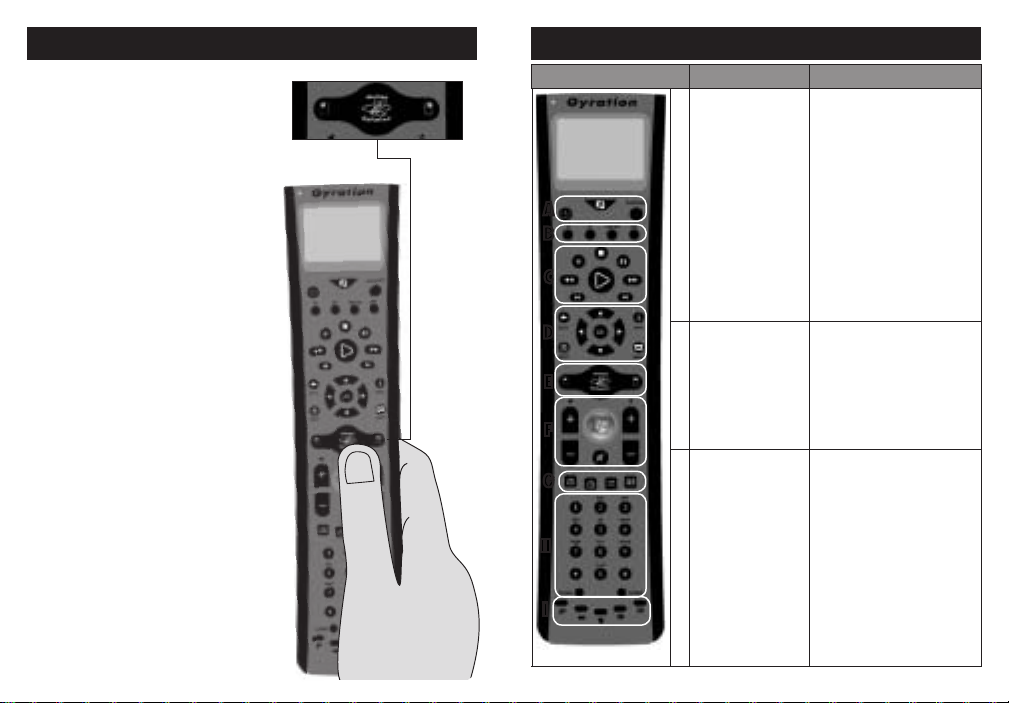
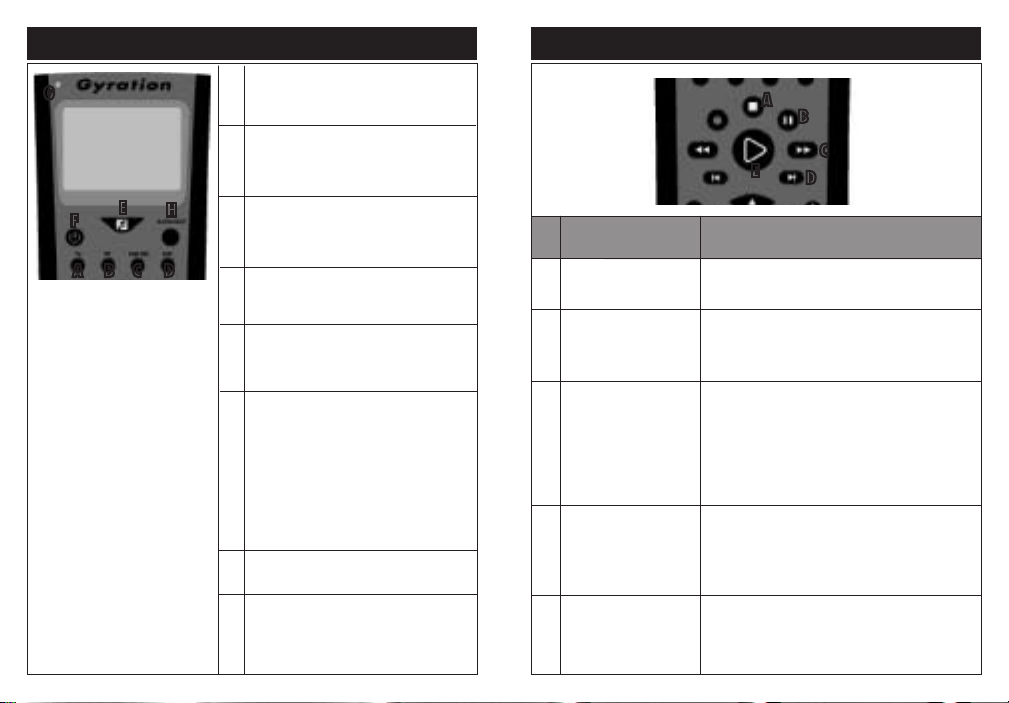
Product Diagram
Button Cluster Locations
A
B
C
D
E
F
G
H
I
Button Cluster Function
A
Power (standby), Music
Display Button, Display
Backlighting
B
RCU mode selection
and power
C
Transport control
Power/Standby: Places
the PC into Standby (or power
off dependant on the PC
configuration)
“Music Display Button”
Start Music display interaction
with PC
Backlight: Turns on and off the
backlight
RF Status LED is located at top
left corner (next to Gyration
company name)
Selects RCU mode
TV: IR legacy control
PC: RF communication to PC
Cable/Satellite: IR legacy
control
Auxiliary: IR legacy control
Standard AV control for selected
transport or Windows Media
Player, Windows Media Center,
DVR, etc. (Play, pause, stop, etc)
Includes IR control of legacy
devices if supported in IR
database
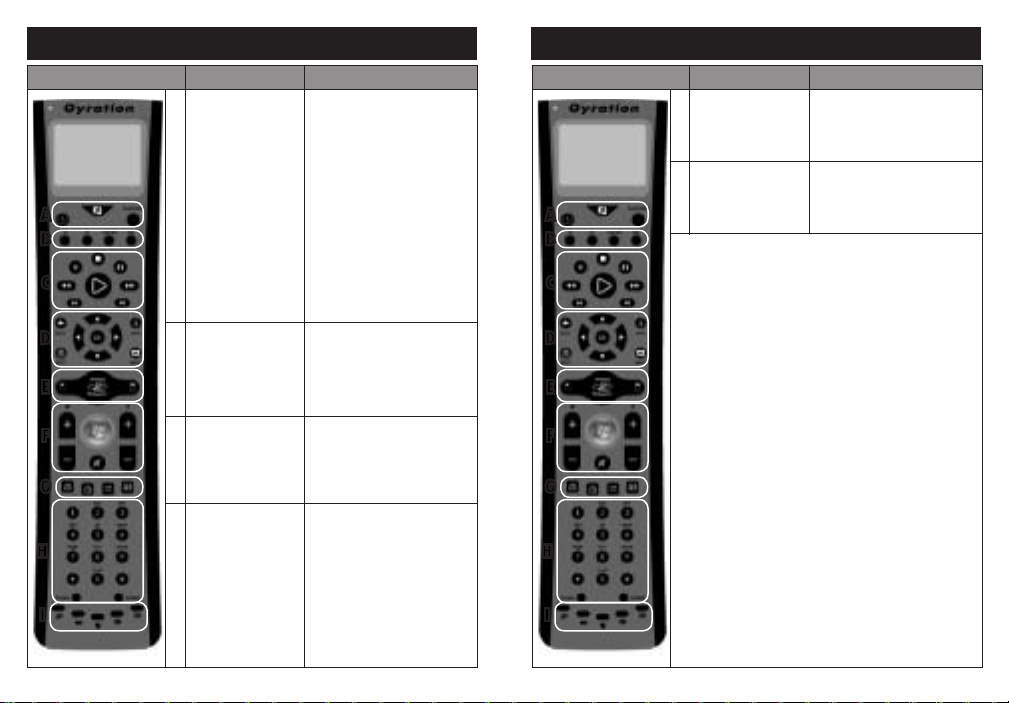
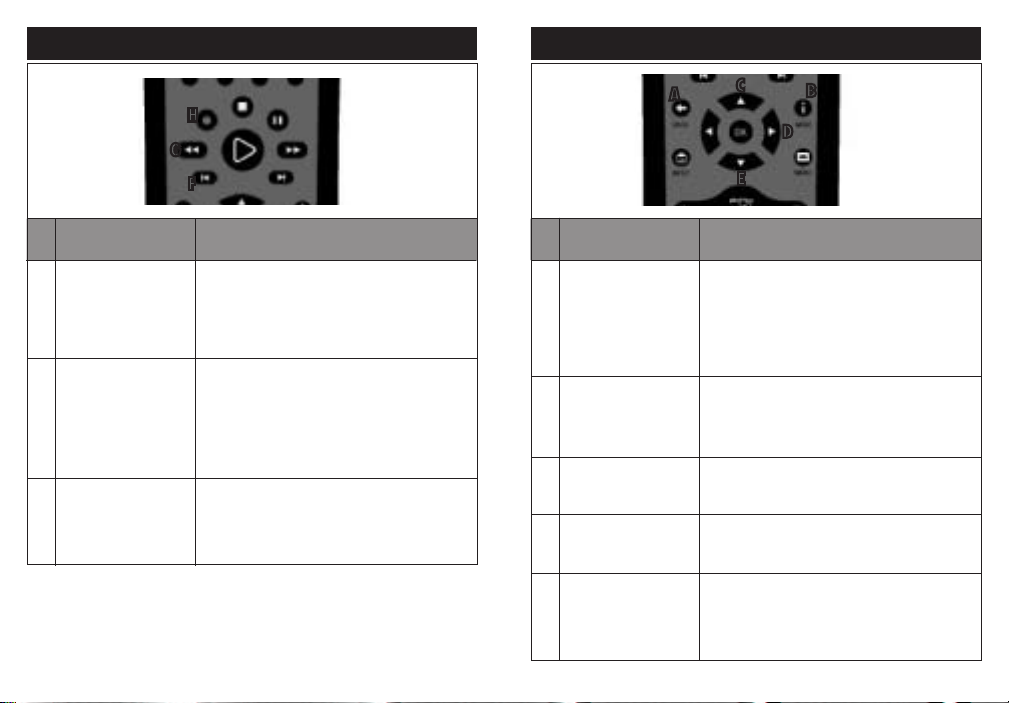
Product Diagram (continued)
Button Cluster Locations
A
B
C
Button Cluster Function
D
Menu navigation
Standard menu navigation: up,
down, left, right, OK.
Includes MS required buttons:
BACK: RF=Back, IR=Last
MORE: RF= More Info, IR=None
Includes other buttons:
INPUT: RF=none, IR=TV Input
selection
MENU: RF=DVD Menu, IR=Menu
Product Diagram (continued)
Button Cluster Locations
A
B
C
Button Cluster Function
H
Alpha-numeric keypad
I
US: Hotkeys
(For US/North
American Remotes only)
Standard 0-9 keys with alpha
characters, plus *, space, #,
CLEAR, and ENTER
My Videos, Mail, Web, My
Radio, Favorites
D
E
Gyro button cluster
E
F
F
G
Volume and Channel
control, eHome (Vista
MCE Green Button),
Mute
G
Media Center shortcuts
H
I
4
Center button activates gyro
for in-air cursor control. Outer
buttons function like standard left
and right mouse buttons.
Standard volume up/down,
channel up/down, Vista Media
Center eHome, and volume mute.
Shortcuts buttons to easily
navigate within the Media Center
environment.
Recorded-TV, Live TV, My
Pictures, Guide
D
E
F
G
H
I
5
RCU Mode Selection
A
G
E
F
A
B C D
H
Puts RCU into TV control mode for
communicating with TV via IR protocol.
B
Puts RCU into PC control mode for
communicating with Media Center PC via
RF protocol.
C
Puts RCU into Cable / Satellite control mode
for communicating with Cable or Satellite
box via IR protocol.
D
Puts RCU into Aux mode for communicating
with an auxiliary device via IR protocol.
E
Music Display Button - Turns on Display and
puts RCU into Music control mode for playing
music stored on your PC.
PC, TV, CAB/SAT, AUX mode:
F
Powers on/off the selected device.
PC Mode:
Issues a standby command. If the system is
active, the first button pressed puts it into
standby mode. If the system is already in
standby mode, a button press will awaken.
G
Transmit LED indicator for RF transmission only
H
Backlight – Toggles the backlight for the
button keys. If the Display is active, the
Display backlight will turn on or off.
6 7
Transport Control
F
TV, CAB/SAT, AUX
Mode or Music Mode:
Puts selected device into
A
Stop mode, if supported
Puts selected device into
B
Pause mode, if supported
Puts selected device into
C
Fast Forward mode, if
supported
Skip command, if
D
supported by selected
device
Puts selected device into
E
Play mode, if supported
Stops media playback and positions pointer to start
of media
First button press will pause the media at present
position. Subsequent button presses toggles between
pause and playback at present position pointer.
First press speeds up the time base of the media
stream to the first FF value (3X). If media is a slide
show, skips to next picture.
Subsequent button presses cycle through the FF speed
values looping through 0 (normal speed) 3X, 20X,
60X. If slide show, skips to next picture.
Skips ahead an increment:
CD and Playlists skip to next song. DVD skips to next
chapter. Slide show skips to next picture. DVR skips
29 seconds.
Start (if paused, continue) playback of media at
present position pointer. Used by Media Center for
Media Center media, DVR, CD/DVD, playlists and
slide shows.
A
B
C
E
D
D
PC Mode
Transport Control
Menu Navigation
TV, CAB/SAT, AUX
Mode or Music Mode:
Replay command, if
F
supported by selected
device
Puts selected device
G
into Reverse mode, if
supported
Puts selected device into
H
Record mode, if supported
H
G
F
F
Move the position pointer back an increment:
CD and Playlist: skips back to previous song. DVD:
skips back to previous chapter. Slide show: skips back
to previous picture. DVR skips back 7 seconds
First press speeds up the time base and reverses
direction of the media stream to the first rewind value
(3X). Second press cycles through the reverse speed
values looping through 0 (normal speed) 3X, 20X,
60X. If media is a slide show, skips to previous picture
Records the TV show to disk. Starts recording at the
beginning of the show as defined by on-screen TV
program guide (if the pause buffer enables it)
D
PC Mode
TV, CAB/SAT, AUX
Mode or Music Mode:
BACK - IR: Goes
A
back one location (if
supported)*
MORE - IR: Provides
B
more information (If
supported)
Menu Navigation Up*
C
Menu Navigation Right*
D
Menu Navigation Down*
E
* See Music Display Navigation
Section for information on using
the Music Display
A
C
B
D
E
PC Mode
Goes back one location of the user interface back stack
Provide information if available for the focus point
Moves the focus point up one location, if at top of the
screen takes no action
Moves focus point right one position, if at rightmost
position takes no action
Moves the focus point down one location, if at bottom of
the screen takes no action
8 9

Menu Navigation
F
I
TV, CAB/SAT, AUX
Mode or Music mode:
Menu Navigation Left*
F
Menu OK
G
Performs action indicated
by focus point*
Menu
H
IR: Setup menu
Moves focus point left one position, if at leftmost position
goes back 1 page in the user interface stack
Performs action indicated by focus point
Media Center “DVD Menu”
Gyro Activation/Select
C
A
B
G
H
Simulates a left-mouse button-click
A
Simulates a right-mouse button-click
B
PC Mode
Activates gyroscope for motion-sensing cursor control, motion-sensing menu
C
navigation, or other motion-sensing features
Channel/Volume Control & Media
Center Green Button
A
TV Input
I
IR: (TV Mode) Cycles
through the TV inputs.
No action in other modes
* See Music Display Navigation
Section for information on using
the Music Display
No action
PC, TV, AUX or CAB/SAT Mode
Goes to Windows Vista
A Goes to Windows Vista Media Center Home page,
Media Center Home
page, launches Media
Center if not running
already.
10
launches Media Center if not running already.
11
PC Mode
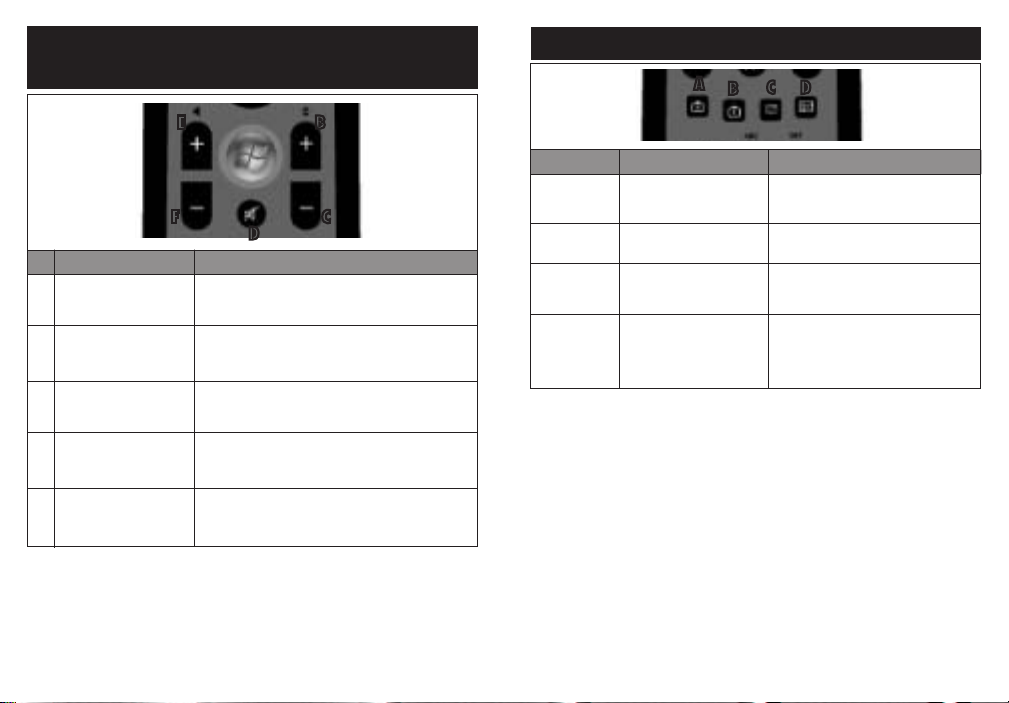
Channel/Volume Control & Media
Center Green Button
E
B
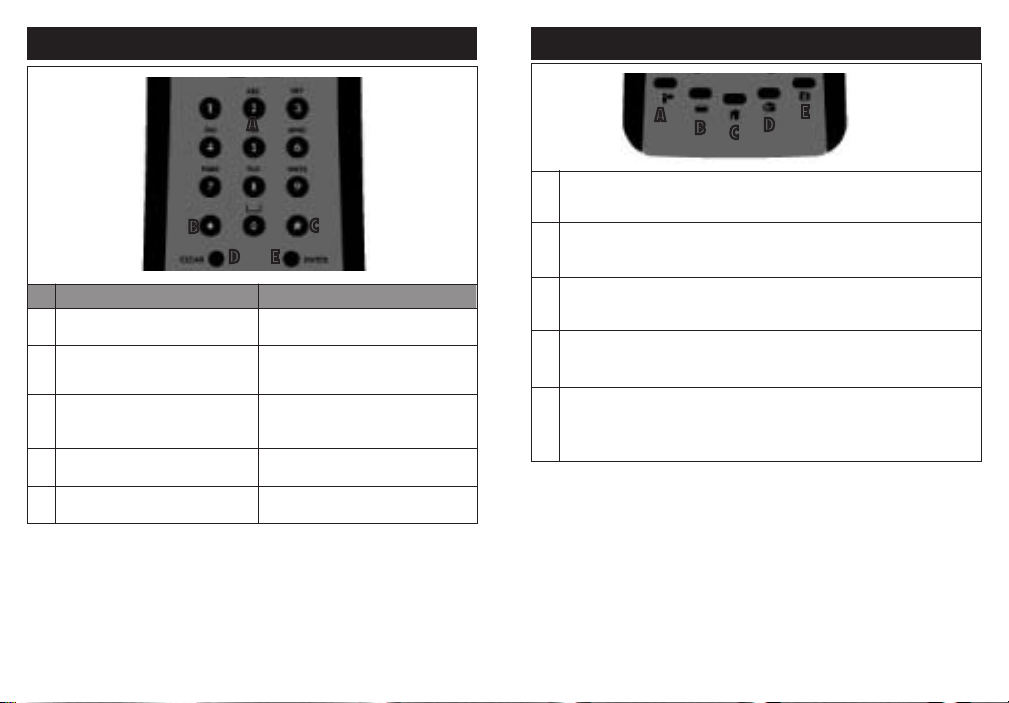
MCE Shortcut Buttons
A
C D
B
PC, TV, AUX or CAB/SAT Mode
Increment the current
B
channel by 1
Decrement the current
C
channel by 1
Mute selected device, if
D
applicable
Decrement the current
E
volume by 1 unit
Increment the current
F
volume by 1 unit
F
C
D
PC Mode
Increment the current channel by 1. If in a list view,
move up a page in the list.
Decrement the current channel by 1. If in a list view,
move back a page in the list.
Mute the entire PC volume, toggle mute state
Decrement the current volume by 1 unit. If muted,
un-mute the volume first.
Increment the current PC volume by 1 unit. If muted,
un-mute the volume first.
12
A - Recorded-TV
B - Live TV
C - My Pictures
D - Guide
PC, TV, AUX or CAB/SAT Mode
No action
No action
No action
Shows the EPG (electronic
program guide) for the
particular device selected
PC Mode
Shortcut to the Windows Media Center
“Recorded TV” page
Brings Media Center Live TV to the front
Shortcut to the Windows Media Center
“My Pictures” page
Invokes the on-screen Media Center TV
programming guide
13
Numeric Keypad
Shortcut Buttons
B
PC, TV, AUX or CAB/SAT mode
Standard 1-9, alphanumeric
A
Inserts a * symbol, if supported by the
B
selected device
Inserts a # symbol, if supported by the
C
selected device
Clear, if supported by the selected device
D
Enter, if supported by the selected device
E
A
My Videos: Microsoft defined button - Shortcut to the Windows Media
A
Center “My Videos” page
C
D E
PC Mode
Standard 1-9, alphanumeric
*
#
Clear
Enter
14 15
Mail: Launches default email program on the PC
B
Web: Launches default web browser on the PC
C
My Radio: Microsoft defined button - Shortcut to the Windows Media Center
D
“My Radio”
Favorites: Displays the Web Browser “favorites” (favorite URL addresses).
E
Only active when the Web browser is the focus.
A
B
E
D
C
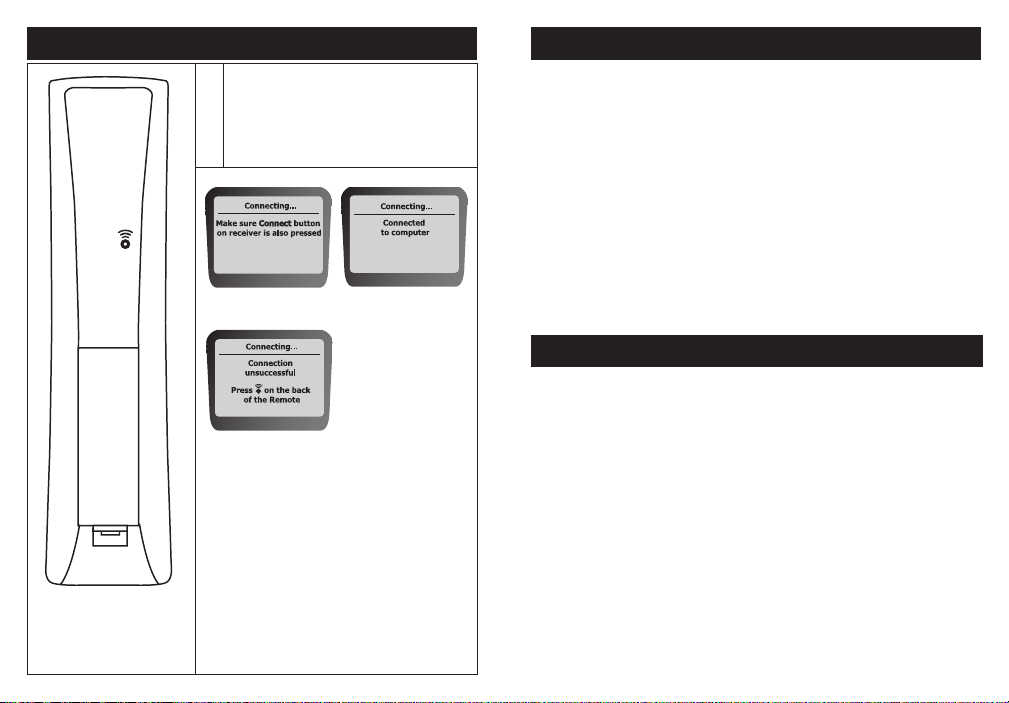
Connect
Backlighting
Connect: Located on the back side of
A
the RCU. Connects (Binds) the RCU to the
Gyration USB RF Receiver
(requires a pen-tip to activate the button
since it is below the surface)
A
Music Display While
Connecting
Music Display Upon
Successful Connection
The RCU Mode Selection buttons (TV, PC, CAB/SAT, and AUX) are lit when pressed;
these buttons light up whenever they are pressed (for 2-3 seconds) to indicate which Control
Mode the remote is in.
There is no automatic backlighting on any of the RCU buttons. The “Backlight” button
controls the backlight of the RCU buttons and the Display. Upon pressing the “Backlight”
button, the main RCU keys will be backlit. If the Display is active (by pressing the Display
button), the Display will also become backlit.
The backlight acts as a toggle and can also be used to turn off all backlighting. Additionally,
the backlighting will timeout after a short amount of time (timeout occurs after last button
pressed and the backlight turns off if no other button is pressed within 10 seconds).
If the backlighting seems dim, the batteries may need to be replaced.
Power / Standby Toggle Button
This button turns the selected device on or off or toggles its power state from standby to
active. The device is selected with the RCU Mode Switches; PC, TV, CAB/SAT, and AUX.
Music Display Upon Unsuccessful
Connection, See Troubleshooting
Section For More Information
In PC mode, this button issues a standard Windows STANDBY command. Various options
for this command can be set up in Windows. Go to Start/Control Panel/Power Options/
Advanced and then set a function for the STANDBY command. In the default configuration,
if the PC is already on, the first button press puts the PC into standby mode. If the PC is in
standby mode, another press of this button will wake up the PC.
16 17
 Loading...