

Movea AS00900, AS00764 Users Manual
COMPACT KEYBOARD
CLAVIER COMPACT
User Guide
Guide de l’utilisateur
GC1105CKM_NA_IB_REVA_K6.qxd 2/11/05 12:51 PM Page 1
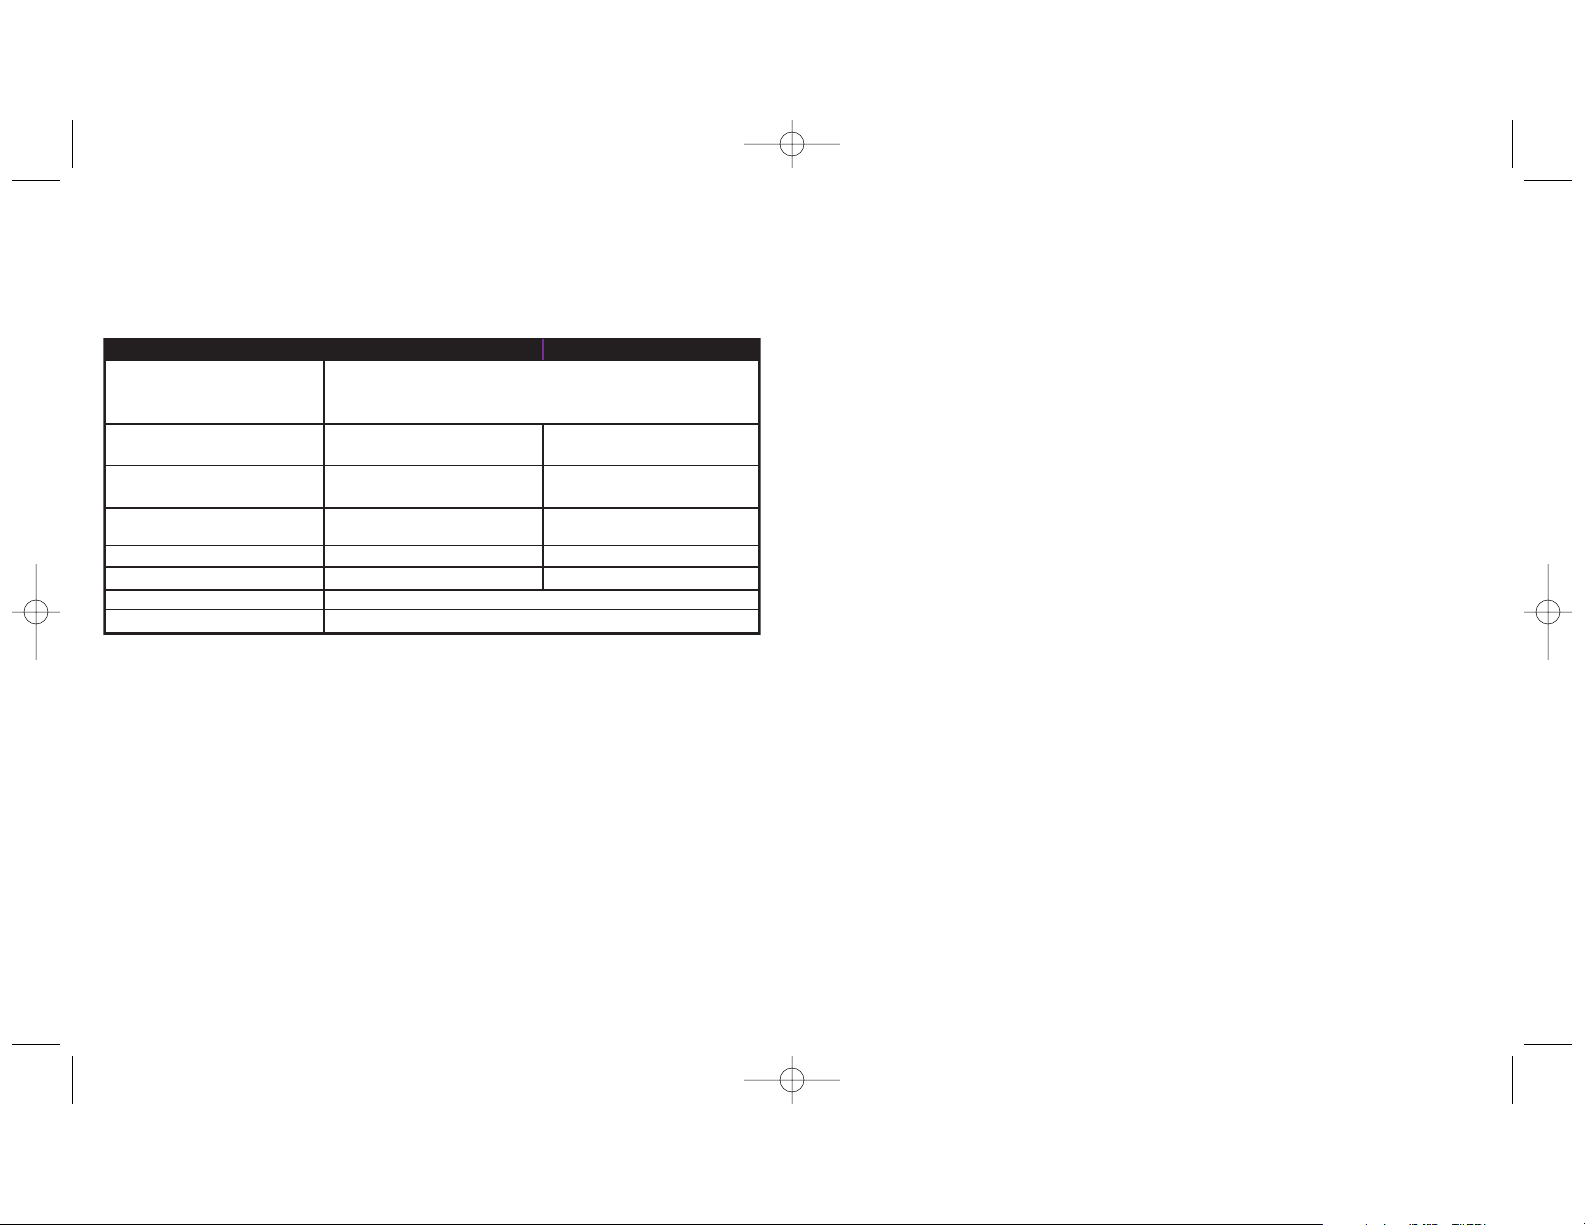
TABLE OF CONTENTS
Compact Keyboard ..........................................................1
Key Features..............................................................1
Setting Up and Synchronizing
....................................2
Powering On and Off ...............................................4
Special Keyboard Media Keys....................................5
RF Receiver
....................................................................6
Connect Button.............................................................6
Status LED...................................................................6
Troubleshooting
..............................................................7
PRODUCT SPECIFICATIONS
* Internet and Multimedia hot keys not supported by Macintosh or Windows 98 (Second Edition). Standard
keyboard keys are functional.
Note: 49 MHz mouse, keyboard and remotes are not compatible with the 2.4 GHz RF Receiver.
GC1105CKM_NA_IB_REVA_K6.qxd 2/11/05 12:51 PM Page 2
Spec Compact Keyboard RF Receiver
System Requirements
Size 12.5" L x 6" W x 1"H
Weight 21 ounces (653 g) includes batteries .53 ounces (15 g)
Radio
Batteries 4 AAA N/A
Connector N/A
Operating Temp +10 to +40 C (+50 to +104 F)
Storage Temp -30 to +70 C (-86 to +158 F)
• Full functionality on IBM compatible PCs running Windows 2000, ME, XP or higher
• Limited functionality on MAC OS 8.0 and higher and Windows 98 (Second Edition)*
• Available USB port
(32 cm x 15 cm x 2.5 cm)
2.4 GHz (U.S.) with automatic
channel selection
70'' L x 1.18'' W x .35'' H
(178 cm x 3 cm x .9 cm)
2.4 GHz (U.S.)
USB
1
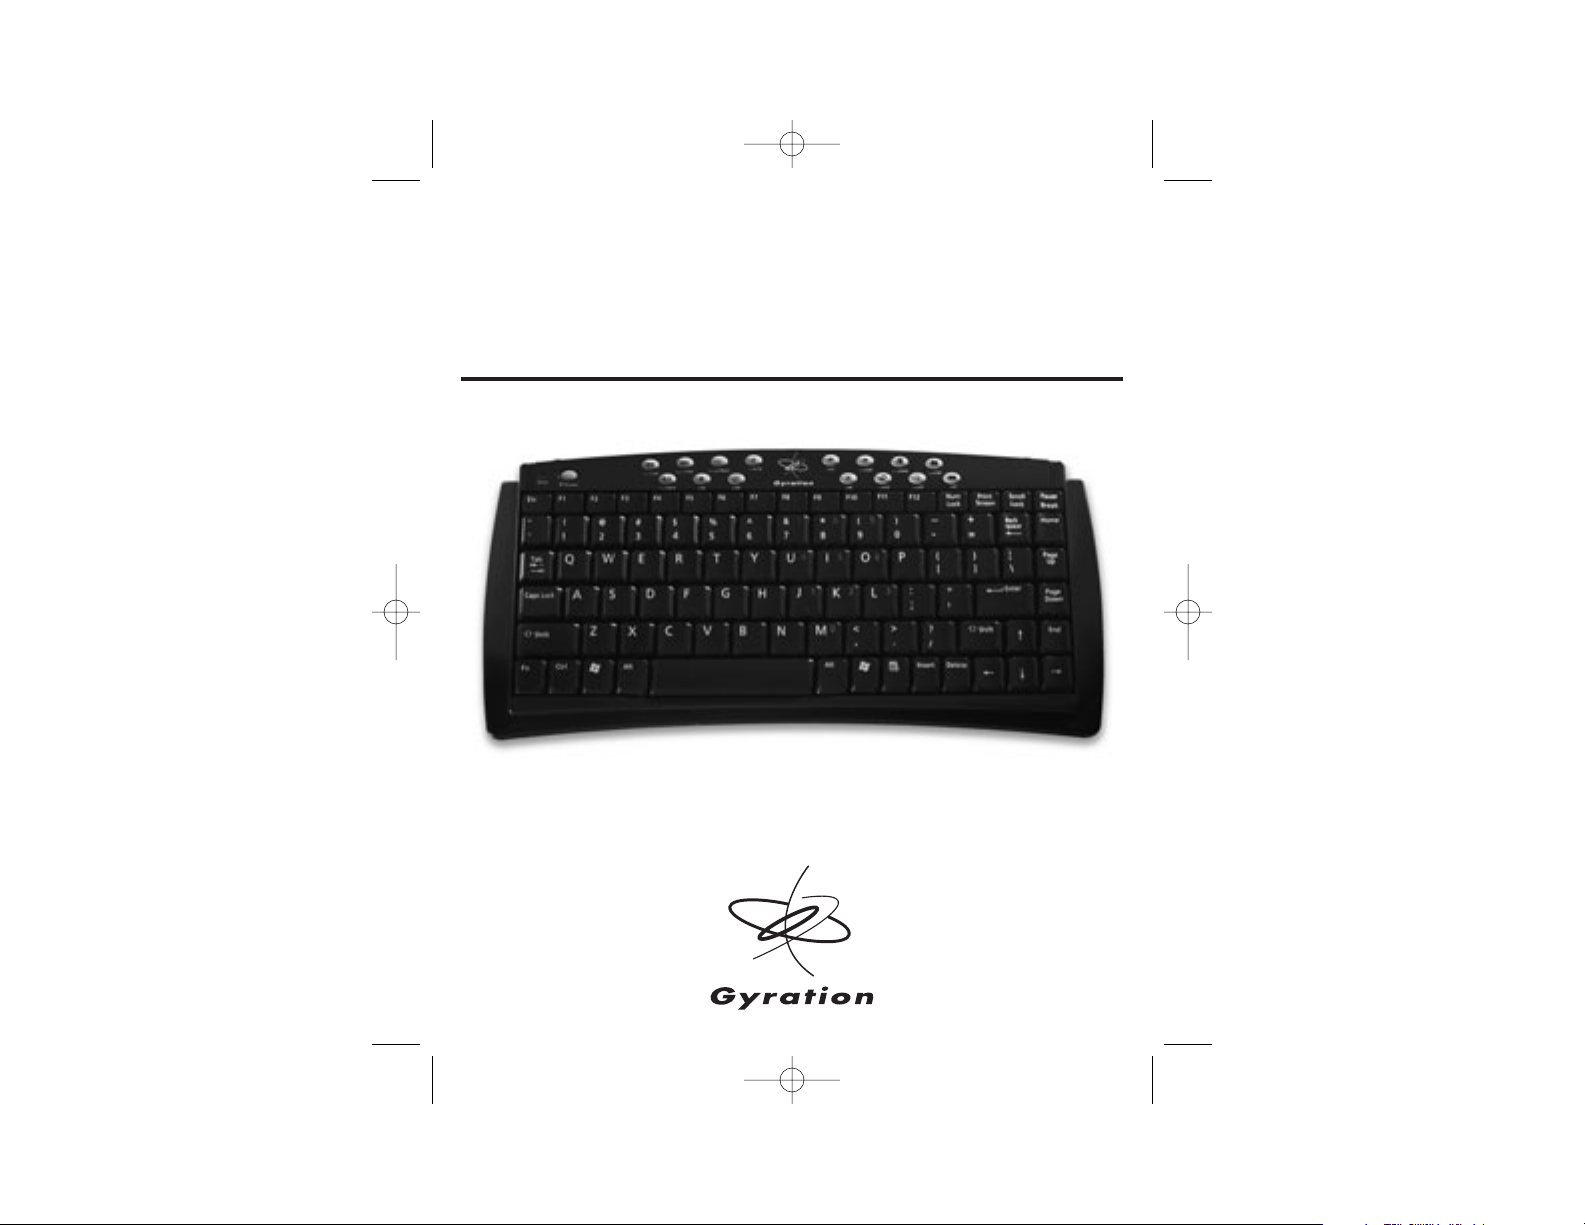
GYRATION COMPACT KEYBOARD
Gyration’s Wireless Compact Keyboard is small, ultra-light and perfect for
conference rooms, classrooms, traveling or even the living room with your
media PC. Having no line-of-sight limitations, its powerful range allows you to
control your PC from virtually anywhere in the room and when you include
the whisper quiet keys, you have the ultimate in portability and efficiency.
Setting Up and Synchronizing the Keyboard and the
Gyration RF Receiver
When installing the Compact Keyboard for the first time or when adding
additional Gyration devices to the system, it is necessary to synchronize the
devices with the receiver.
Key Features
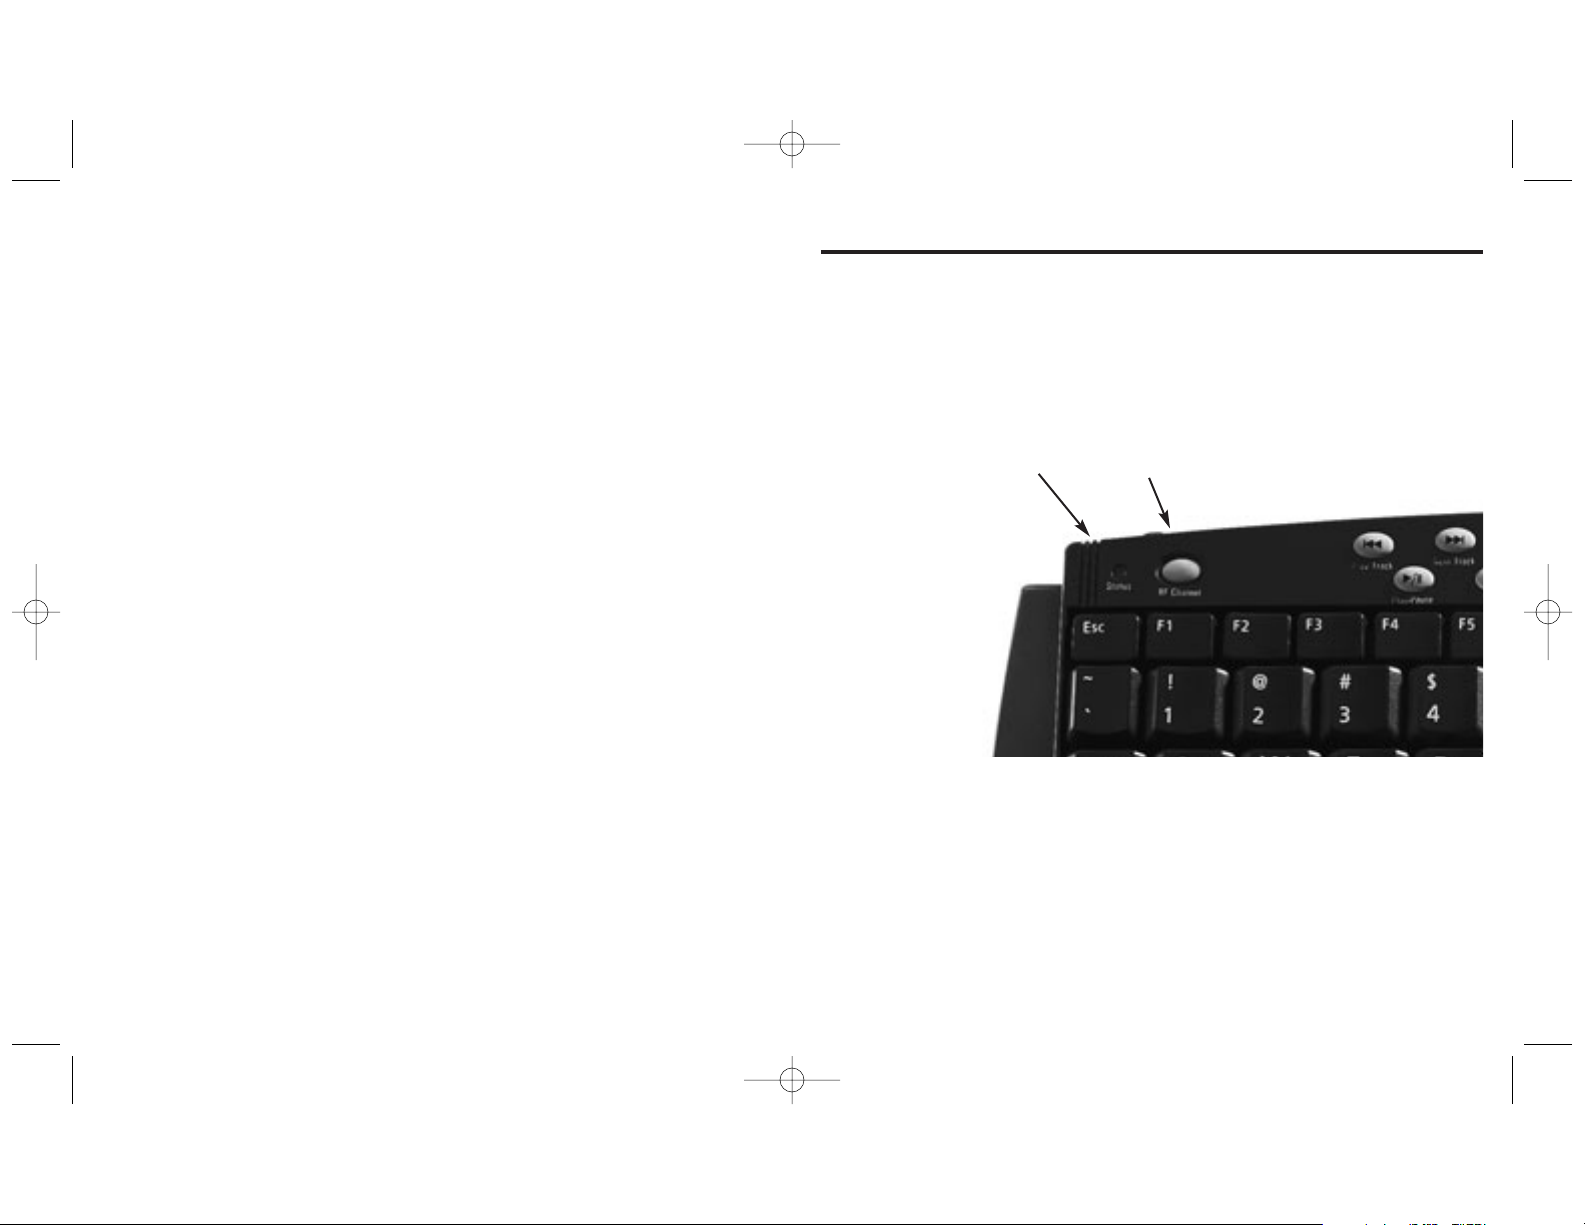
Status LED
Connect Button
GC1105CKM_NA_IB_REVA_K6.qxd 2/11/05 12:51 PM Page 4

3
Note: Repeat steps 3 and 4 for any additional Gyration®GO 2.4 GHz mice,
keyboards, and/or remotes that will be added to the system.
5. Connect Mode will automatically time out after one minute.
After the Connect/Connect sequence is performed, the receiver and device(s) will
remain synchronized after powering down. It is only necessary to perform the
Connect/Connect sequence when setting a device up for the first time or when
adding additional devices to the system.
To set up and synchronize the Compact Keyboard and the
RF Receiver:
1. Connect the RF receiver into an available USB port and power on your
computer. Your operating system should detect the new hardware device
and initiate the installation procedure. Continue to follow the standard USB
device installation screens until installation is complete.
2. Insert four AAA batteries (included) into the keyboard.
3. Press and hold the Connect button on the receiver for two seconds, and
then release it. The Connect light will blink rapidly, indicating the receiver is
in “Connect Mode.”
4. Press and release the Connect button located at the top of the keyboard.
The Connect light on the receiver will stop blinking and
remain lit.
2
Status
LED
Connect
Button
Connect Button
RF Receiver
Top of
Compact Keyboard
The above illustrates the Connect/Connect sequence discussed in this guide.
GC1105CKM_NA_IB_REVA_K6.qxd 2/11/05 12:51 PM Page 6
 Loading...