

Page 1
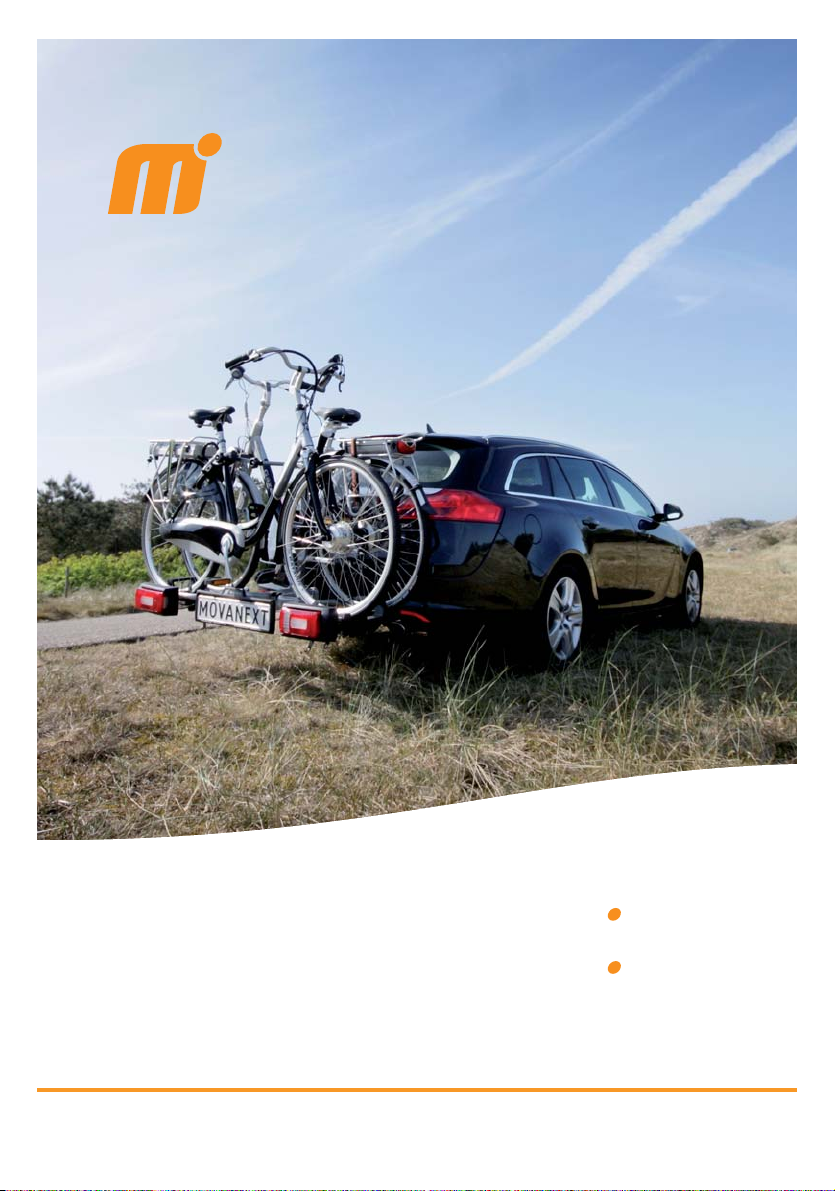
MovaNext
User manual for the
MovaNext
Lux
Vision
www.movanext.com
Page 2
Introduction
Congratulations on the purchase of your MovaNext bike carrier!
This manual contains important user information with tips and warnings
about correct and safe use of the product. So read this manual carefully
before using the product.
Your bike carrier is ready for use and set for a standard tow bar with a
throat thickness of 28 mm and a tow ball with a diameter of 50 mm.
We wish you lots of pleasure while using the MovaNext!
The MovaNext bicycle carrier has EU type approval granted by the RDW.
Symbols in this manual
Note: These are points you must bear in mind while using the
bicycle carrier. You then avoid damage and unsafe situations.
Tip: Information to use the MovaNext safer and easier.
2 3
MovaNext MovaNext
Page 3
Contents
1 Your MovaNext
1 Your MovaNext 5
2 Components 6
3 Points for attention 7
4 Tips 10
5 Fitting the bicycle carrier 11
6 Mounting the bicycle(s) 13
7 Using the ramp 16
8 Dismounting the bicycle(s) 17
9 Removing the bicycle carrier 19
10 Bicycle transport and the law 21
11 Maintenance and replacement 22
12 Fitting on a tow bar 23
13 Guarantee conditions 30
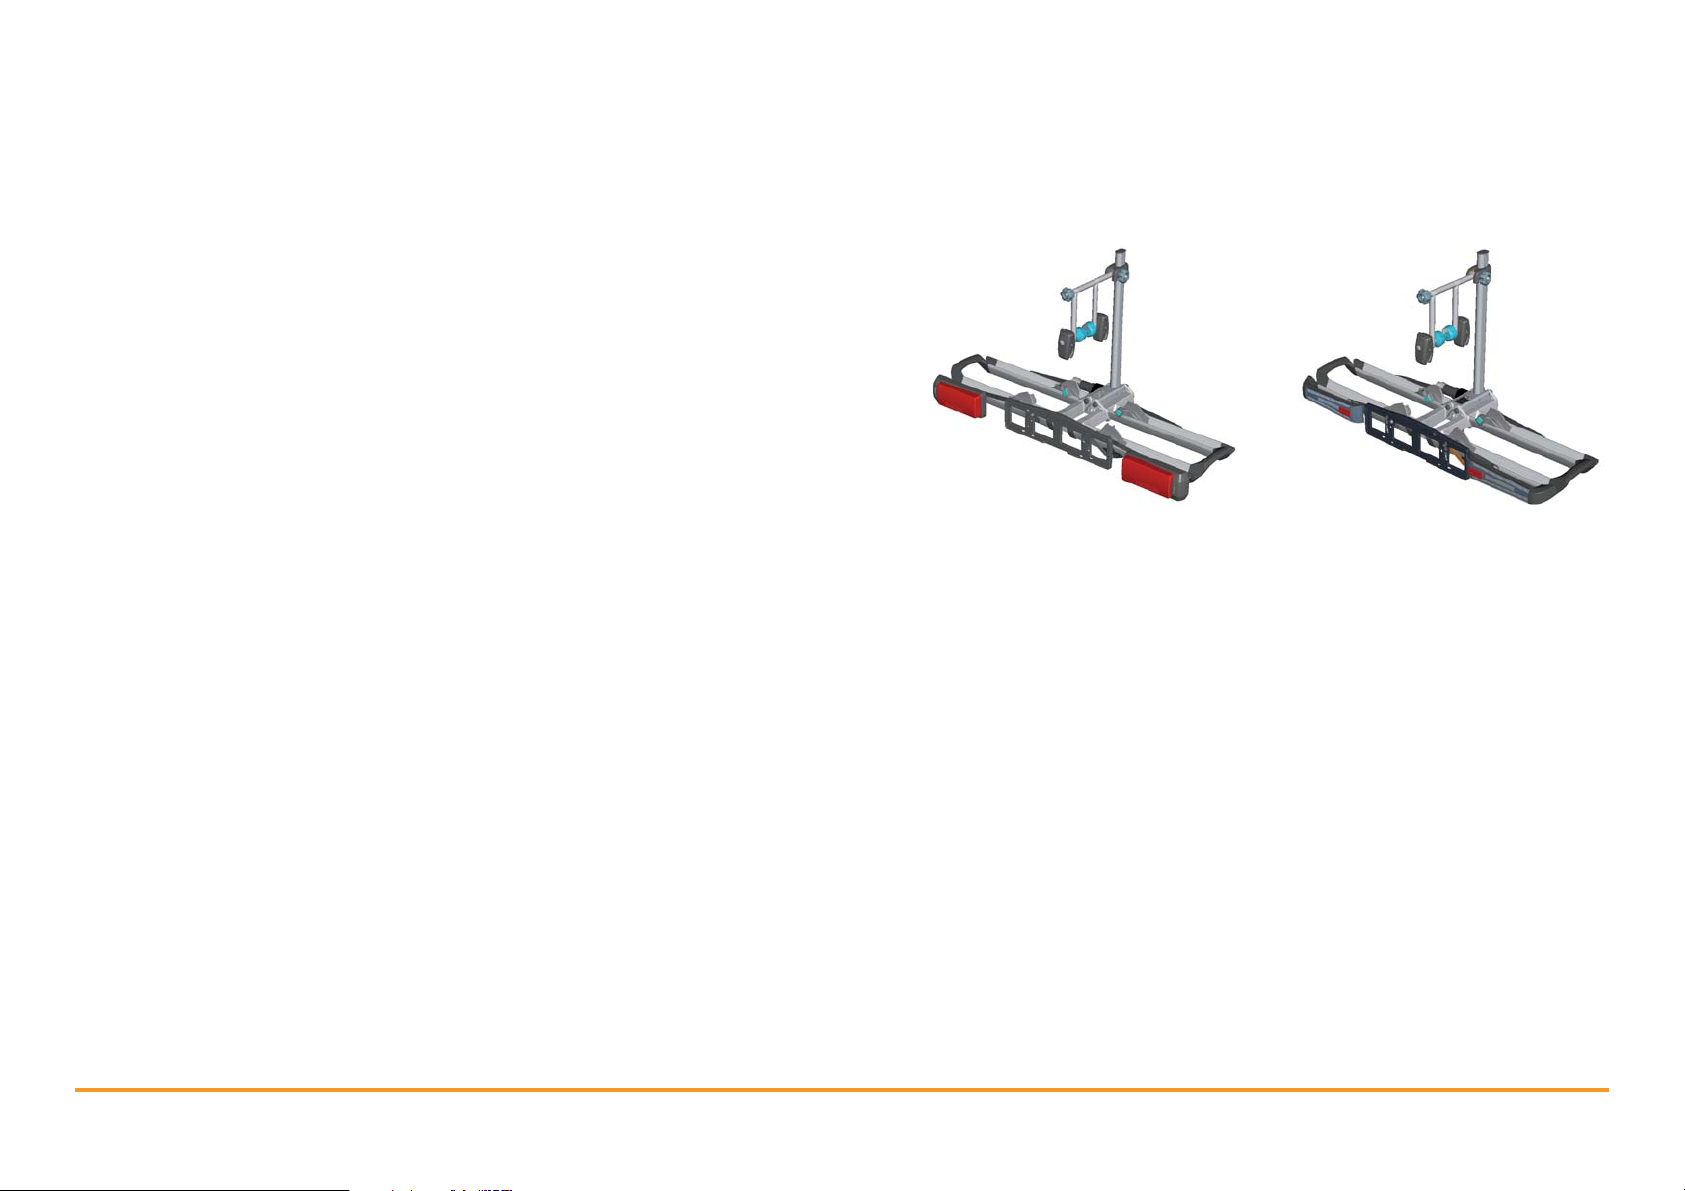
This manual explains the use of two versions of the MovaNext bicycle
carrier - the Lux and the Vision.
Lux
Lighting: filament bulbs
No tilting mechanism
Both versions are the same except for the lights. In the rest of the manual
only the Lux is pictured to explain use.
Vision
Lighting: LED
No tilting mechanism
4 5
MovaNext MovaNext
Page 4

2 Components
3 Points for consideration
This section explains the parts of the MovaNext. The pictures show the
Lux. More information and instruction films can be found at
www.movanext.com
MovaNext Lux
1. Lock knob arm with frame clamps
2. Frame clamp with lock knob
4. 7/13-pole plug socket
3. Wheel ramp (4x)
5. Left-hand blade
6. Number plate holder
7. Central tube
8. Height adjustment knob
9. Frame clamp with lock knob
10. Lock for locking
11. Automatic locking
12. Sliding wheel clamp with wheel strap (4x))
13. Right-hand blade
1.
Use the parts list in section 2 to check that all necessary parts of
the carrier have been supplied. Check that all parts are intact and in
working order.
2.
If a part is missing or not in working order it must be replaced to
ensure the safety of your bicycle carrier. In such a case contact your
supplier. For information about ordering parts see
www.movanext.com
3.
The bicycle carrier may only be used to transport a maximum of two
bicycles.
4.
The bicycle carrier can carry a maximum load of 60 kg. The weight
of the Lux and Vision is 12.5 kg. Make sure that the maximum trailer
nose weight of the tow bar is not exceeded.
The table mentions the maximum permitted weight for one or two
bicycles on the bicycle carrier in combination with a specific permitted
trailer nose weight. The difference between the permitted trailer nose
weight and the maximum weight on the bicycle carrier is 12.5 kg,
being the weight of the carrier itself.
MovaNext Lux/ Vision
Permitted
trailer nose
weight
Carrier weight Maximum
weight
2 bicycles
Maximum
weight
1 bicycle
50 kg 12.5 kg 37.5 kg 30 kg
60 kg 12.5 kg 47.5 kg 30 kg
70 kg 12.5 kg 57.5 kg 30 kg
75 kg 12.5 kg 60 kg 30 kg
80 kg or more 12.5 kg 60 kg 30 kg
6 7
MovaNext MovaNext
Page 5

Always fit the wheel clamps on the wheels of a bicycle using the wheel
5.
straps. These wheel straps fix the bicycle to the carrier and the wheels
cannot move out of the wheel rail while driving.
original replacement parts and the use of bungee cords is also not
allowed. The bicycle carrier is unsuitable for driving on unsurfaced
roads and driving at speeds higher than 130 kph.
On longer journeys or if driving over poor or unhardened surfaces
6.
regularly (every 2-3 hours) check the fastening of the bicycles and
carrier.
Before you drive off always check that the bicycle carrier lights are
7.
working. Driving with a bicycle carrier with the lights not working is an
offence. The driver of the car is responsible for this.
Child’s seats, water bottles, etc. must be removed from the bicycle.
8.
These items can come loose while driving. It is recommended to also
remove bicycle bags from the bicycle.
If the carrier is not mounted on the tow bar, always place the tow bar
9.
plug in its holder. This is to prevent damage.
10.
The bicycle carrier can be locked to prevent theft and inadvertent
unlocking. So always use these locks when you are on the way with
the MovaNext.
11.
When fitting and removing the bicycle carrier make sure that you first
unlock the lock. You then avoid damage to the carrier.
12.
To extend the life of the bicycle carrier it is important to store the
carrier in a dry place and maintain it properly (see section 11:
Maintenance and replacement).
The bicycle carrier is only suitable for standard two-wheeled bicycles.
15.
Tandems or three-wheelers may not be transported on the bicycle
carrier.
Take care when mounting a bicycle with a carbon frame. Fixing too
16.
firmly can cause damage to these bicycles. The manufacturer accepts
no liability for damage to carbon frames.
13.
If you have had an accident with your vehicle while the bicycle carrier
was assembled, you must have the carrier checked for damage by the
dealer. You must also check the carrier after swerving or after driving
on a poor surface for any length of time.
14.
No changes of any nature may be made to the carrier. Using non-
8 9
MovaNext MovaNext
Page 6
4 Tips 5 Fitting the bicycle carrier
Preferably fit the frame clamps as high as possible on the saddle or
1.
frame tube of the bicycle for maximum stability.
When storing, place the bicycle carrier upright with the grip facing
2.
upwards. You then avoid damage to the carrier.
The total length of the vehicle increases when the bicycle carrier is
3.
assembled. The height and width can also increase. Remember this
when reversing, parking, etc.
Remove the bicycle carrier from the tow bar before you drive into a car
4.
wash.
To save fuel it is advisable to not assemble the bicycle carrier on the
5.
tow bar when no bicycles are being transported.
If your vehicle has a boot lid that automatically opens it is advised to
6.
switch this function off. You then avoid damage to the bicycle carrier
and your vehicle.
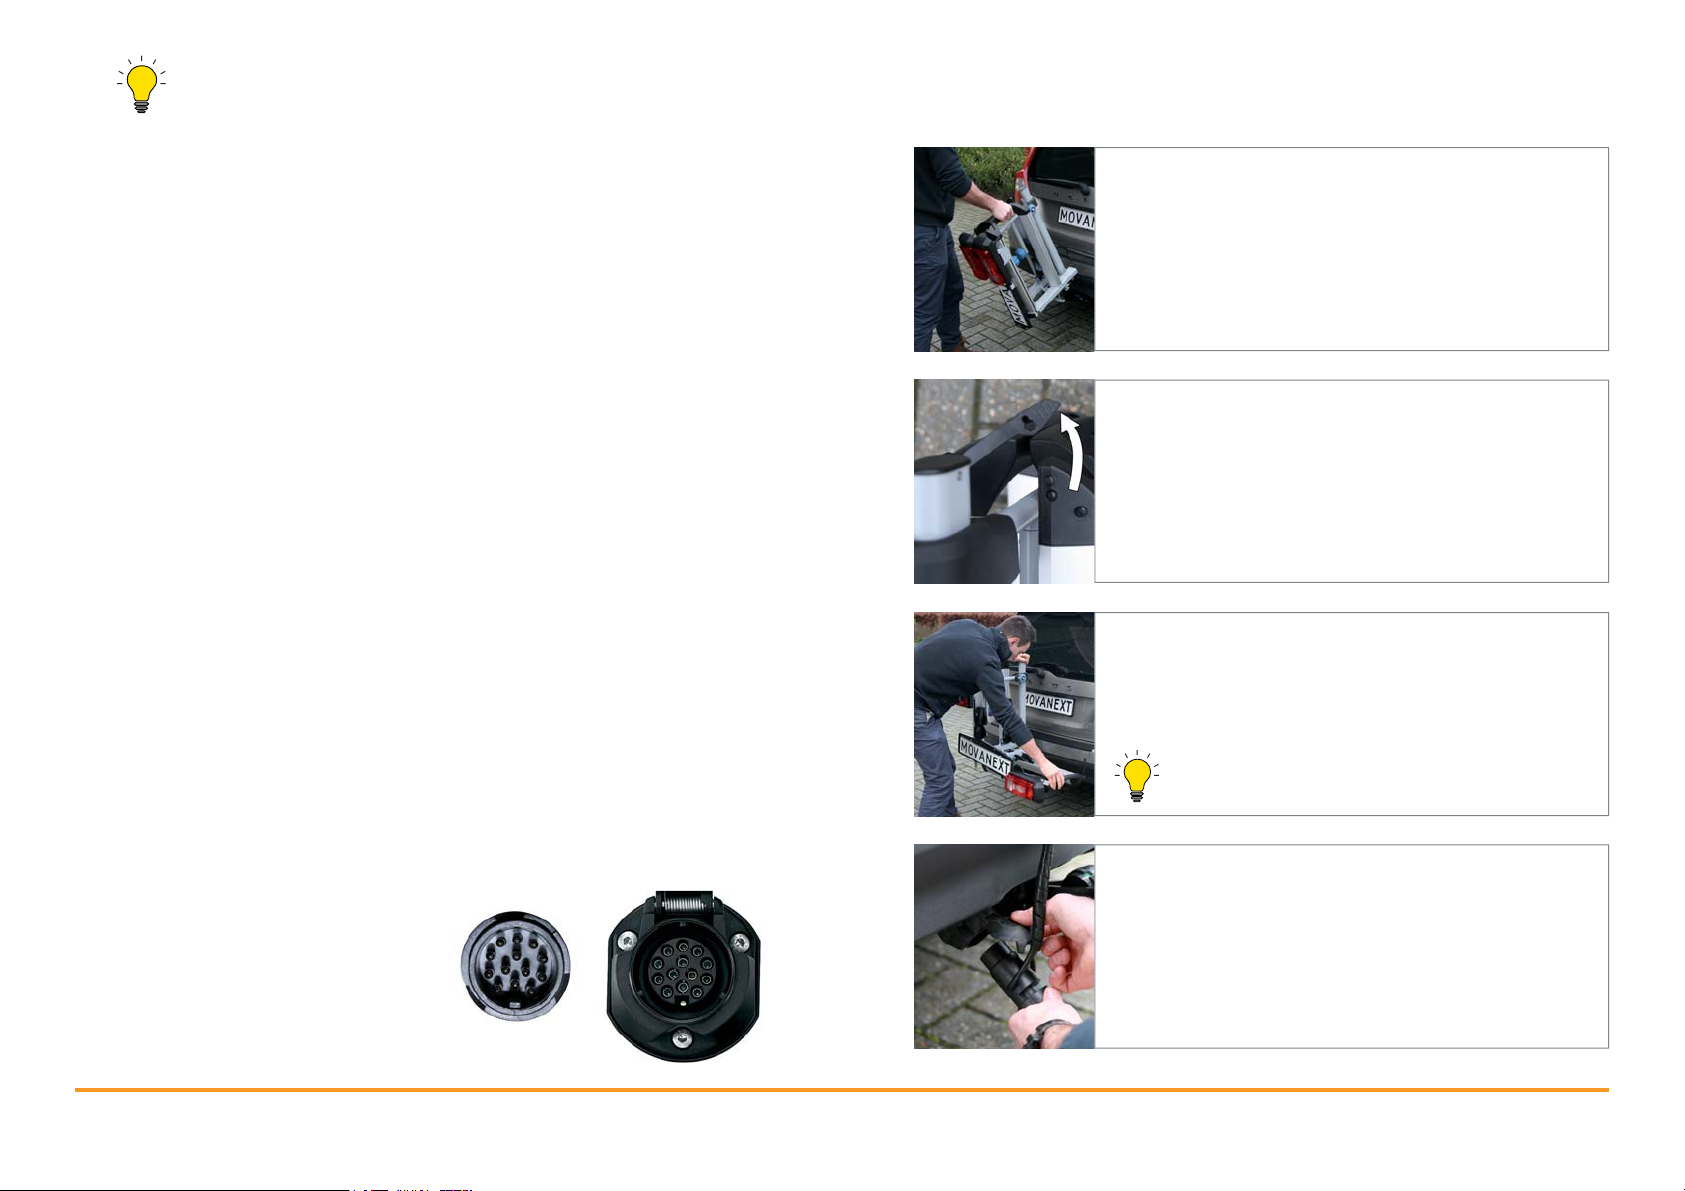
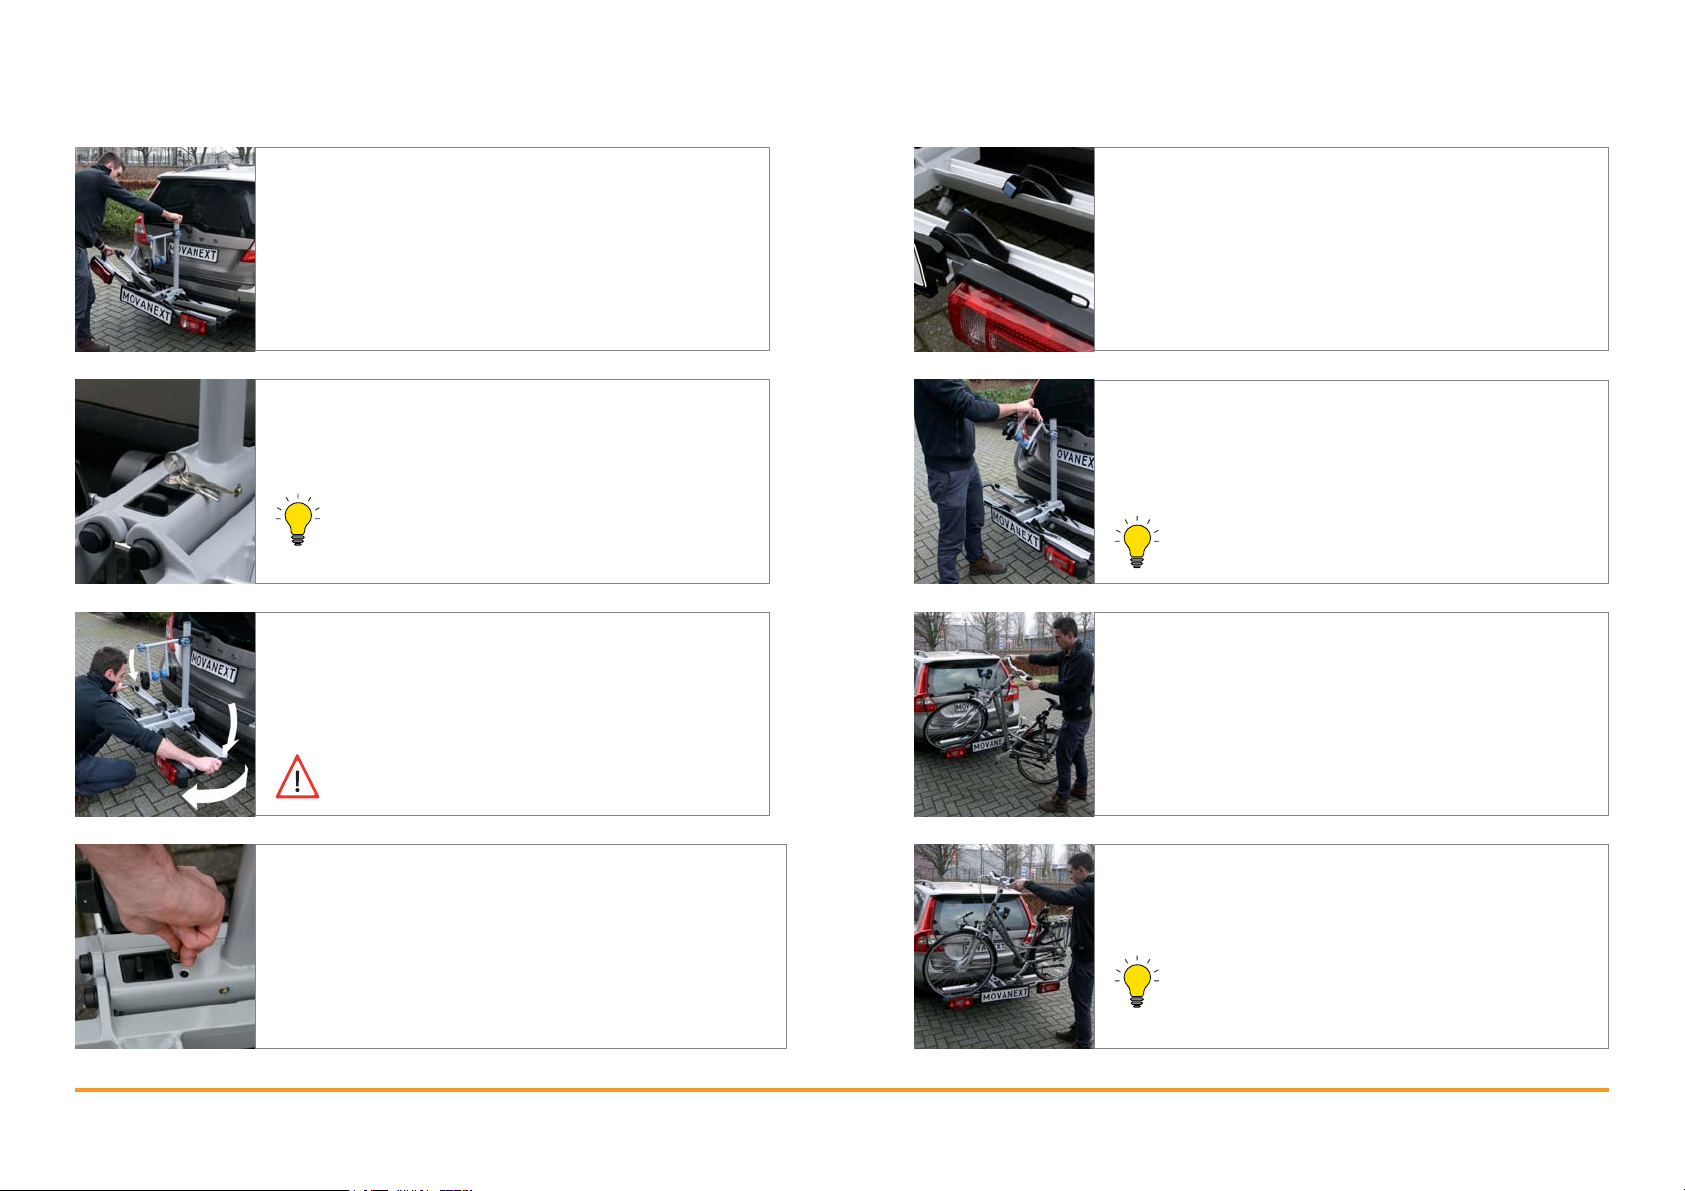
1. Assembling the bicycle carrier on the
tow bar
Make sure that the tow ball is not dirty or greasy.
Fit the bicycle carrier slightly tilted towards you on
the tow bar then bring it upright.
2. Loosen the clip
The two blades are kept together by a clip. Loosen
the clip in order to fold the blades out. The two
blades are kept together by a clip. Loosen the clip
in order to fold the blades out.
7.
8.
10 11
www.movanext.com for accessories and more information on
Go to
how to use the bicycle carrier in a more simple way.
The 13-pole plug socket works with a bayonet catch so the plug
turns a quarter turn and is firmly fixed. Should the plug not fit in the
connection on your car check if:
• the notch in the plug matches the recess in the socket on the car
(see figure).
• the 3 slots in the plug are correctly positioned for the notch in the
socket (see figure).
• the pins are correctly positioned
for the notch (see figure).
MovaNext MovaNext
3. Fold out the right-hand blade
Fold the right-hand blade downwards to make it
horizontal. Keep the central tube as vertical as
possible.
You can release the bicycle carrier; it is now
clamped on the tow bar.
4. Connect the plug
Take the plug from the holder and insert it in the
car’s plug socket. The plug has a 7- and a 13-pole
side. Cover the unused plug part with the cap
supplied.
Page 7
6 Mounting bicycles
5. Fold out the left-hand blade
Fold the left-hand blade downwards until it is flat.
Keep the central tube as vertical as possible.
When both blades are fully folded out the bicycle
carrier secures automatically.
6. Automatic locking
When the blades are in the correct position, the
blades lock automatically and you hear a click.
The slide next to the lock is then slid towards
you.
7. Check the bicycle carrier
Check that the carrier stays straight by alternately
pressing the blades. Check the clamping force by
pulling a blade towards you.
See section 12 if the carrier is not straight or
if clamping is not sufficient.
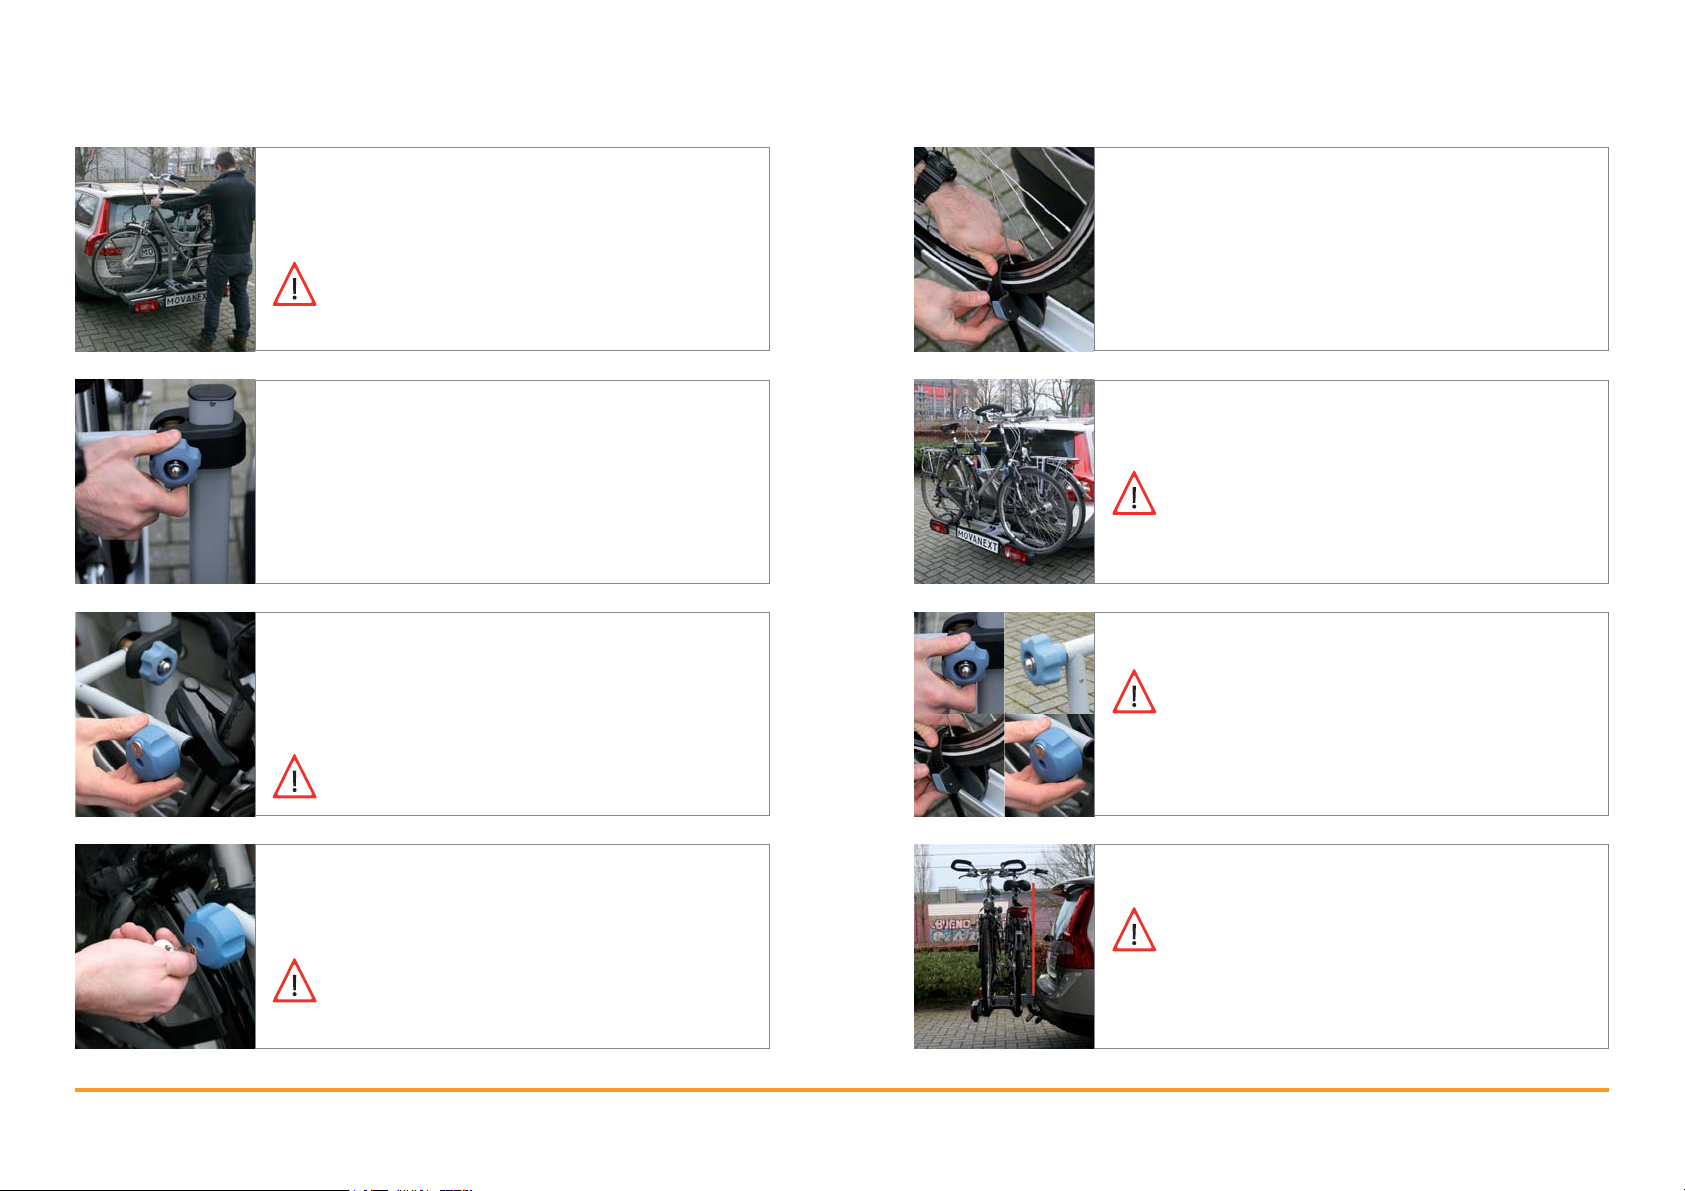
1. Wheel straps
Insert the wheel straps in their holders in order to
place them along the rails and do not impede the
placing of the bicycle.
2. Fold the frame clamps upwards
Folding the frame clamps upwards makes placing
the bicycle(s) easier. First loosen the locking
button to do this.
This can be particularly useful when using a
ramp (see section 7).
3. Place the bicycle in front of the bicycle
carrier
Place the first (lady‘s) bicycle in front of the carrier
with the chain guard facing the car. Then squeeze
both brakes and lift the front wheel into the rail. t.
8. Locking
The lock is used to secure the carrier. You then
make sure that the lock does not spring back. Turn
the key and pull the key out of the lock.
12 13
MovaNext MovaNext
4. Place the bicycle in the wheel rail
Lift the rear wheel into the wheel rail. One hand
remains on the handlebars.
You can also use a ramp to put the bicycle(s)
on the MovaNext.
y
Page 8
5. Lift into the back wheel rails
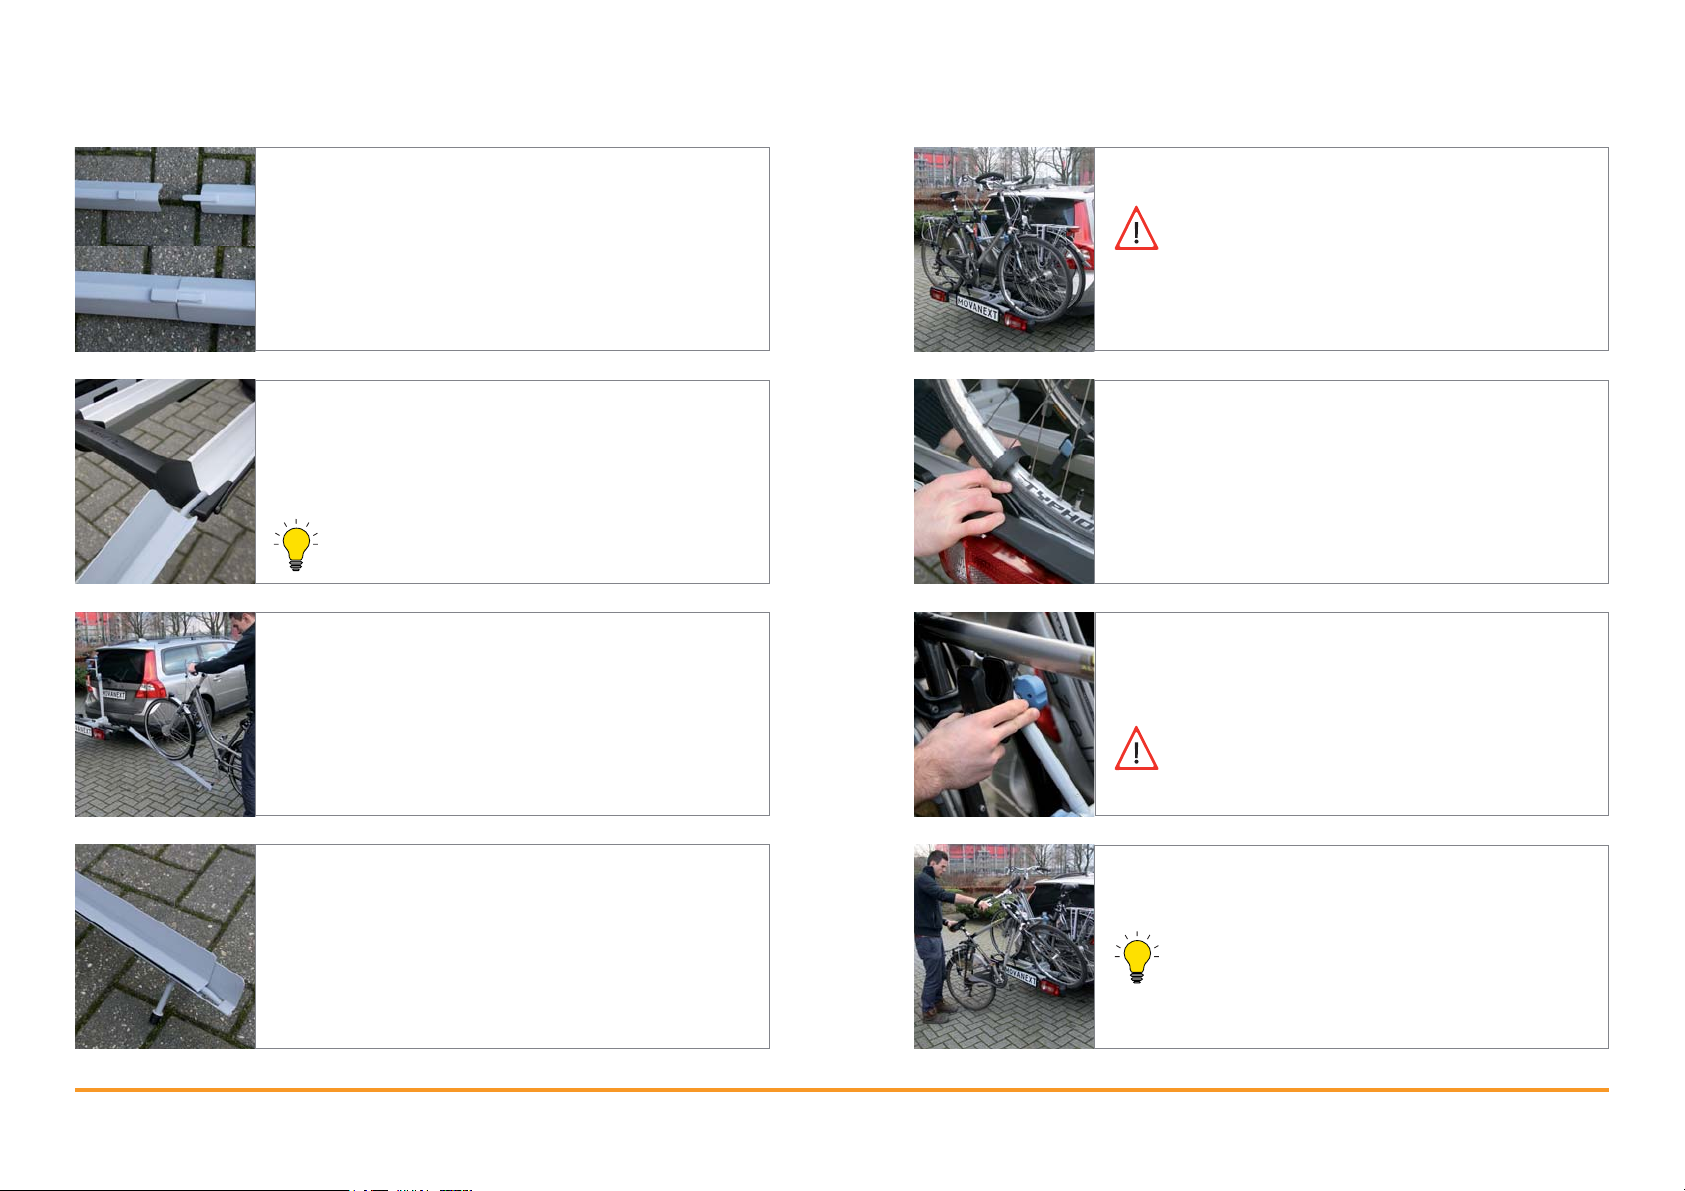
9. Move the wheel rails
Lift the bicycle from the front wheel rails into the
rear wheel rails.
Make sure that the bicycles are in the middle
of the carrier.
6. Bring the frame clamps to height
Loosen the height adjustment knob. Adjust the arm
to the correct height. Then tighten the knob again
finger-tight.
7. Fix the fame clamps
Loosen the frame clamp and preferably position
it as high as possible on the saddle tube. Turn it
finger-tight.
Never turn the lock knob fully out of the
screw thread.
Slide both wheel clamps as close as possible to
the wheels and fasten the wheel straps: insert the
wheel straps through their openings and tighten
them.
10. Place a second bicycle
Repeat steps 1 to 9 for the second bicycle.
Always place a second bicycle in the
opposite direction to the first bicycle.
11. Check fastening points
Check whether:
• the height adjustment knob, lock knob and
frame clamps are tightened finger-tight.
• the wheel straps are pulled tight.
• the keys have been removed from the lock
knobs.
8. Lock the frame clamps
Door gebruik te maken van de sloten in de
slotknoppen beschermt u de fietsen tegen diefstal.
After locking remove the key from the lock.
14 15
MovaNext MovaNext
12. Check the position of the carrier
The bicycle carrier must be fixed upright on
the tow bar. You can check this by looking
from the side to see if the central tube is
vertical.
Page 9
7 Using the ramp
8 Dismounting the bicycle(s)
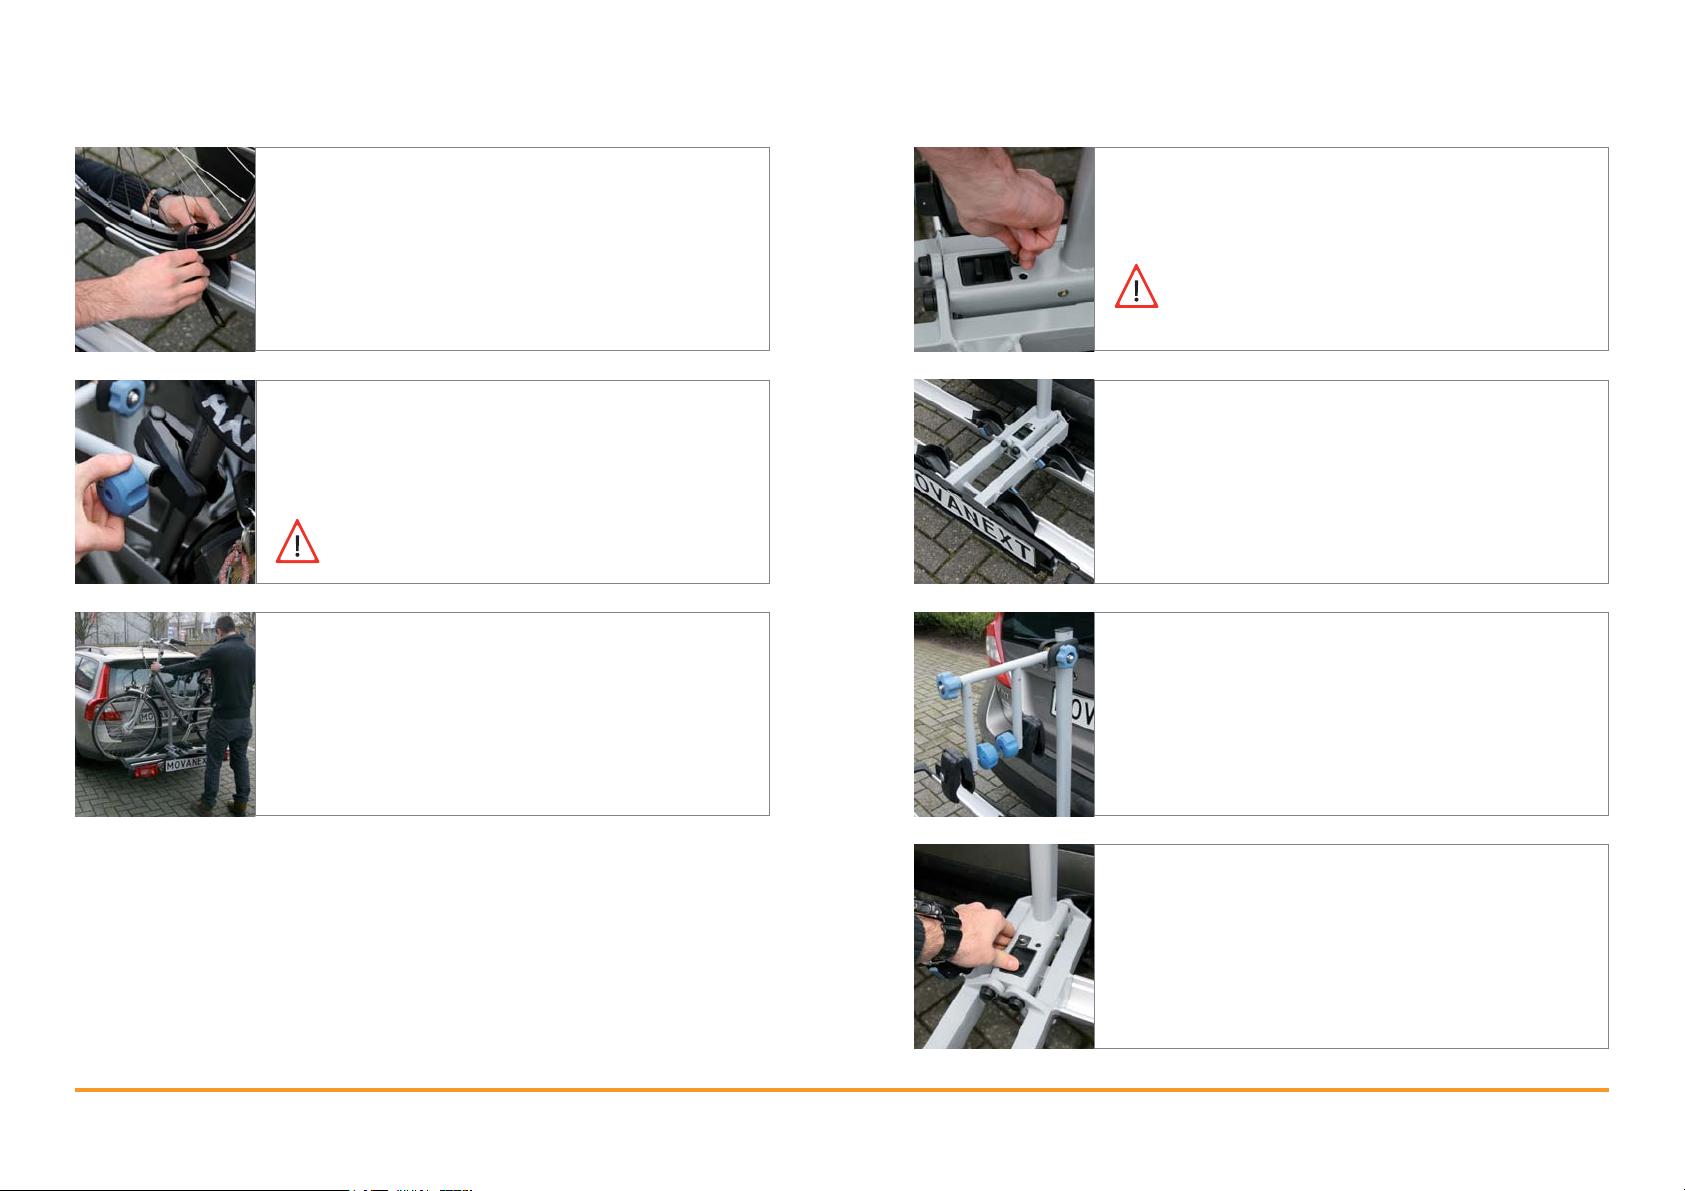
1. Assembly
The ramp consists of two parts. Connect the two
parts to each other by inserting the pin of the one
part in the hole in the other.
2. Place the ramp against the carrier
Place the ramp alongside the carrier. The hook at
the end of the ramp must fit in the wheel rail as
shown in the figure.
Fold the frame clamps upwards to ease the
placing of the bicycle.
3. Ride the bicycle onto the carrier
Now ride the bicycle onto the carrier. Always keep
at least one hand on the handlebars.
Fold the frame clamps downwards when the
bicycle is on the bicycle carrier. Before securing
the bicycles check from step 6 in section 6.
1. One bicycle at a time
Only one bicycle at a time can be lifted
from the carrier. Only loosen the belts and
frame clamp of the bicycle you are going to
remove.
2. Loosen the wheel straps
Loosen the wheel straps of the bicycle to be
removed by pressing the blue knob and pulling the
straps out.
3. Loosen the frame clamp
Loosen the frame clamp from the bicycle to be
removed and take it from the saddle tube.
Hold the bicycle while you loosen the clamp
so the bicycle cannot fall.
4. Storing the ramp
The two parts of the ramp can be placed inside
one another for easy storage. The hook on the one
part fits in an opening in the other part.
16 17
MovaNext MovaNext
4. Remove the bicycle
Lift the bicycle from the bicycle carrier.
You can also do this per wheel as described
in step 3 in section 6. “Mounting bicycle(s)”
Page 10
9 Removing the bicycle carrier
5. Loosen the second bicycle wheel
straps
Loosen the wheel straps of a second bicycle by
pressing the blue knob and pulling the straps out.
6. Loosen the second bicycle frame
clamp
Loosen the frame clamp from the bicycle to be
removed and take it from the saddle tube.
Hold the bicycle while you loosen the clamp
so the bicycle cannot fall.
7. Remove the second bicycle
Lift the bicycle from the bicycle carrier.
1. Unlock the bicycle carrier
Unlock the bicycle carrier by opening the lock with
the key.
After use remove the key from the lock.
2. Slide the wheel clamps inwards
To easily fold the bicycle carrier up, the wheel
clamps are best slid into each other with the straps
flat in their holders. (See figure).
3. Frame clamps
Hang the frame clamps straight down and tighten
the locking knob.
4. Left-hand blade upwards
Unlock the blades by sliding the slide for locking
towards the car. Now you can (at the same time)
lift the left-hand blade.
18 19
MovaNext MovaNext
Page 11
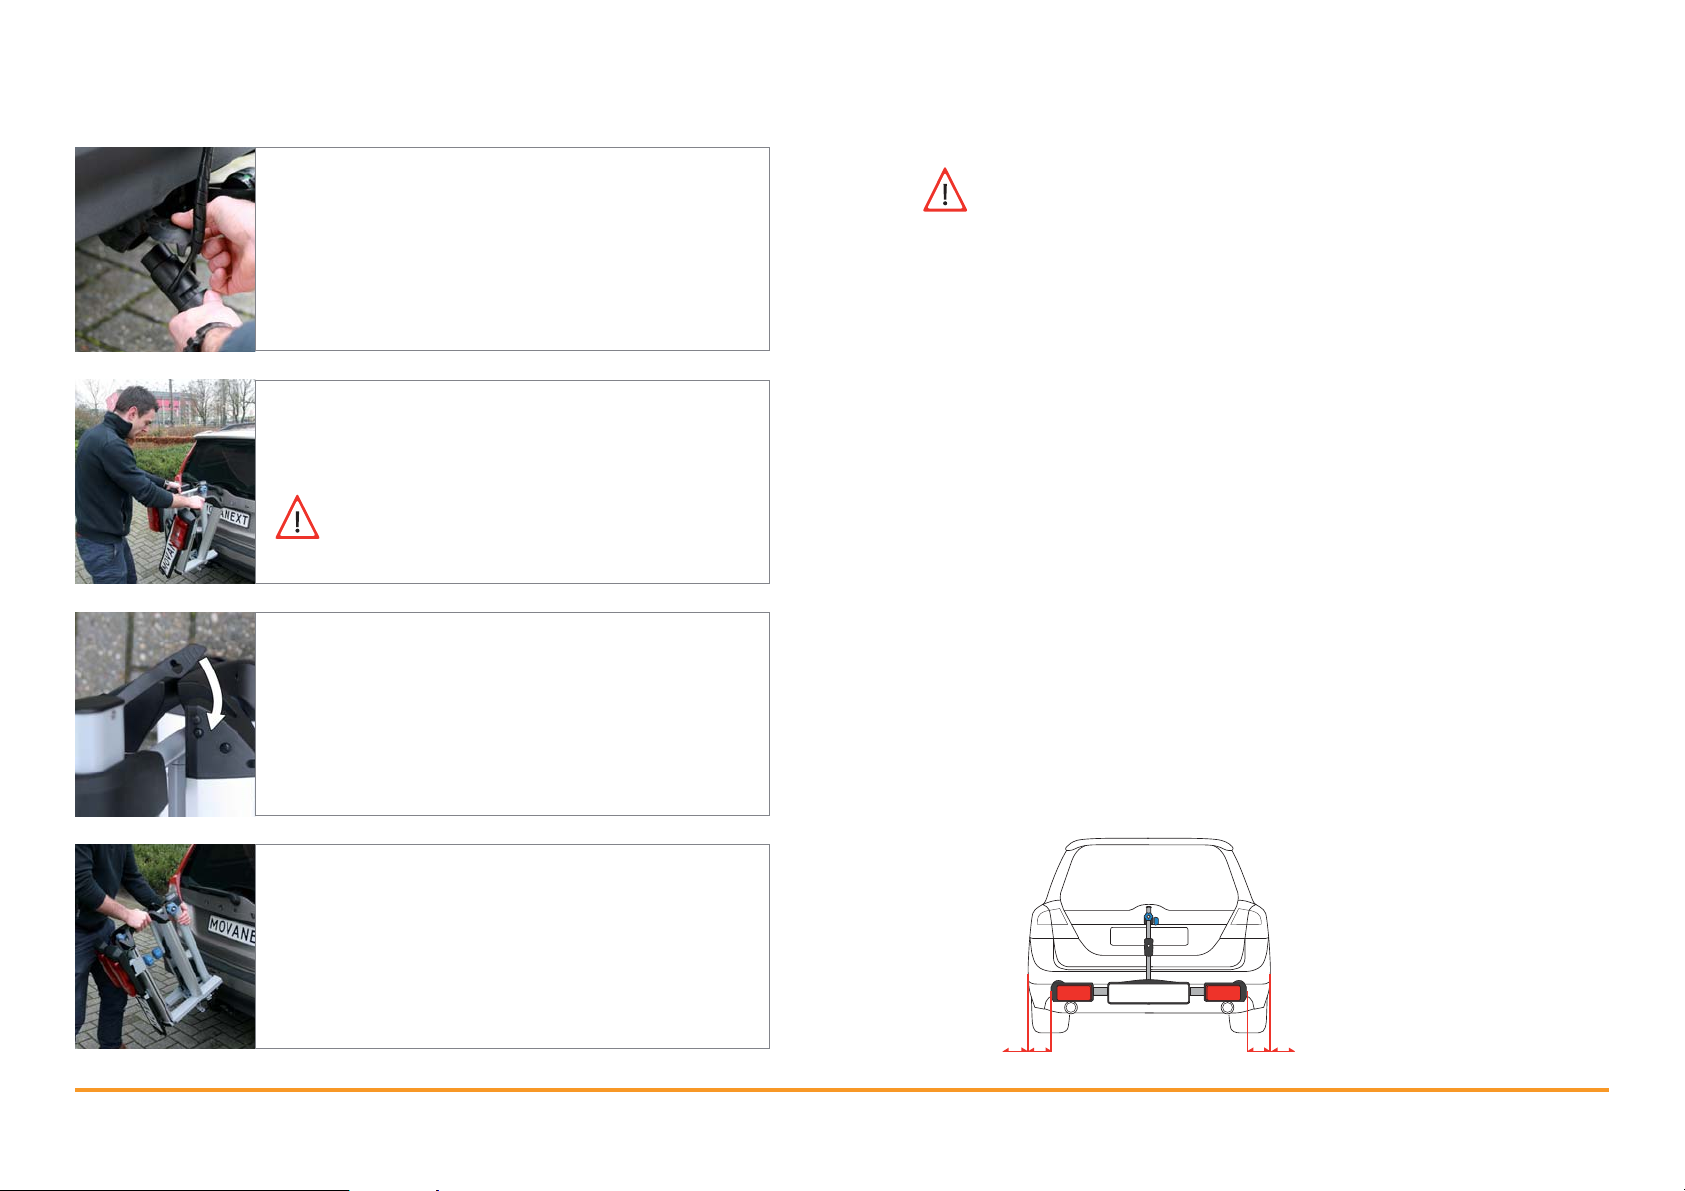
5. Remove the plug
Take the plug from the car’s plug socket and place
it in the bicycle carrier’s plug holder. Fit the cap on
the open plug part.
6. Right-hand blade upwards
Keep the left-hand blade in the vertical position
and fold the right-hand blade upwards.
The bicycle carrier is now no longer fixed to
the tow bar.
7. Fasten with the clip
Fasten the two blades using the clip.
10 Bicycle transport and the law
This section describes different regulations set by law. You
•
must comply with these regulations to avoid putting yourself
and others in danger.
The maximum trailer nose weight of the tow bar may not be
•
exceeded (see section 3). So check the maximum trailer nose
weight for your car.
Adapt your driving speed to the traffic conditions and drive with
•
common sense.
There must be a white number plate on the bicycle carrier.
•
Different regulations often apply abroad - the protrusion of
•
loads at the side is often prohibited. Make sure you know the
regulations before you depart!
•
The distance between the end of the bicycle carrier (measured
from the light) and the side of the car may be at most 50 cm in
the Netherlands. The distance between the end of the bicycle
carrier (measured from the light) and the side of the car may
be at most 40 cm in Germany. (Distance A in the figure below).
•
The bicycles on the bicycle carrier may protrude no more
than 20 cm on both sides of the car. (Distance B in the figure
below).
8. Remove from the tow bar
You can now tilt the bicycle slightly towards you
and lift it from the tow bar.
B
A
20 21
MovaNext MovaNext
B
A
Page 12
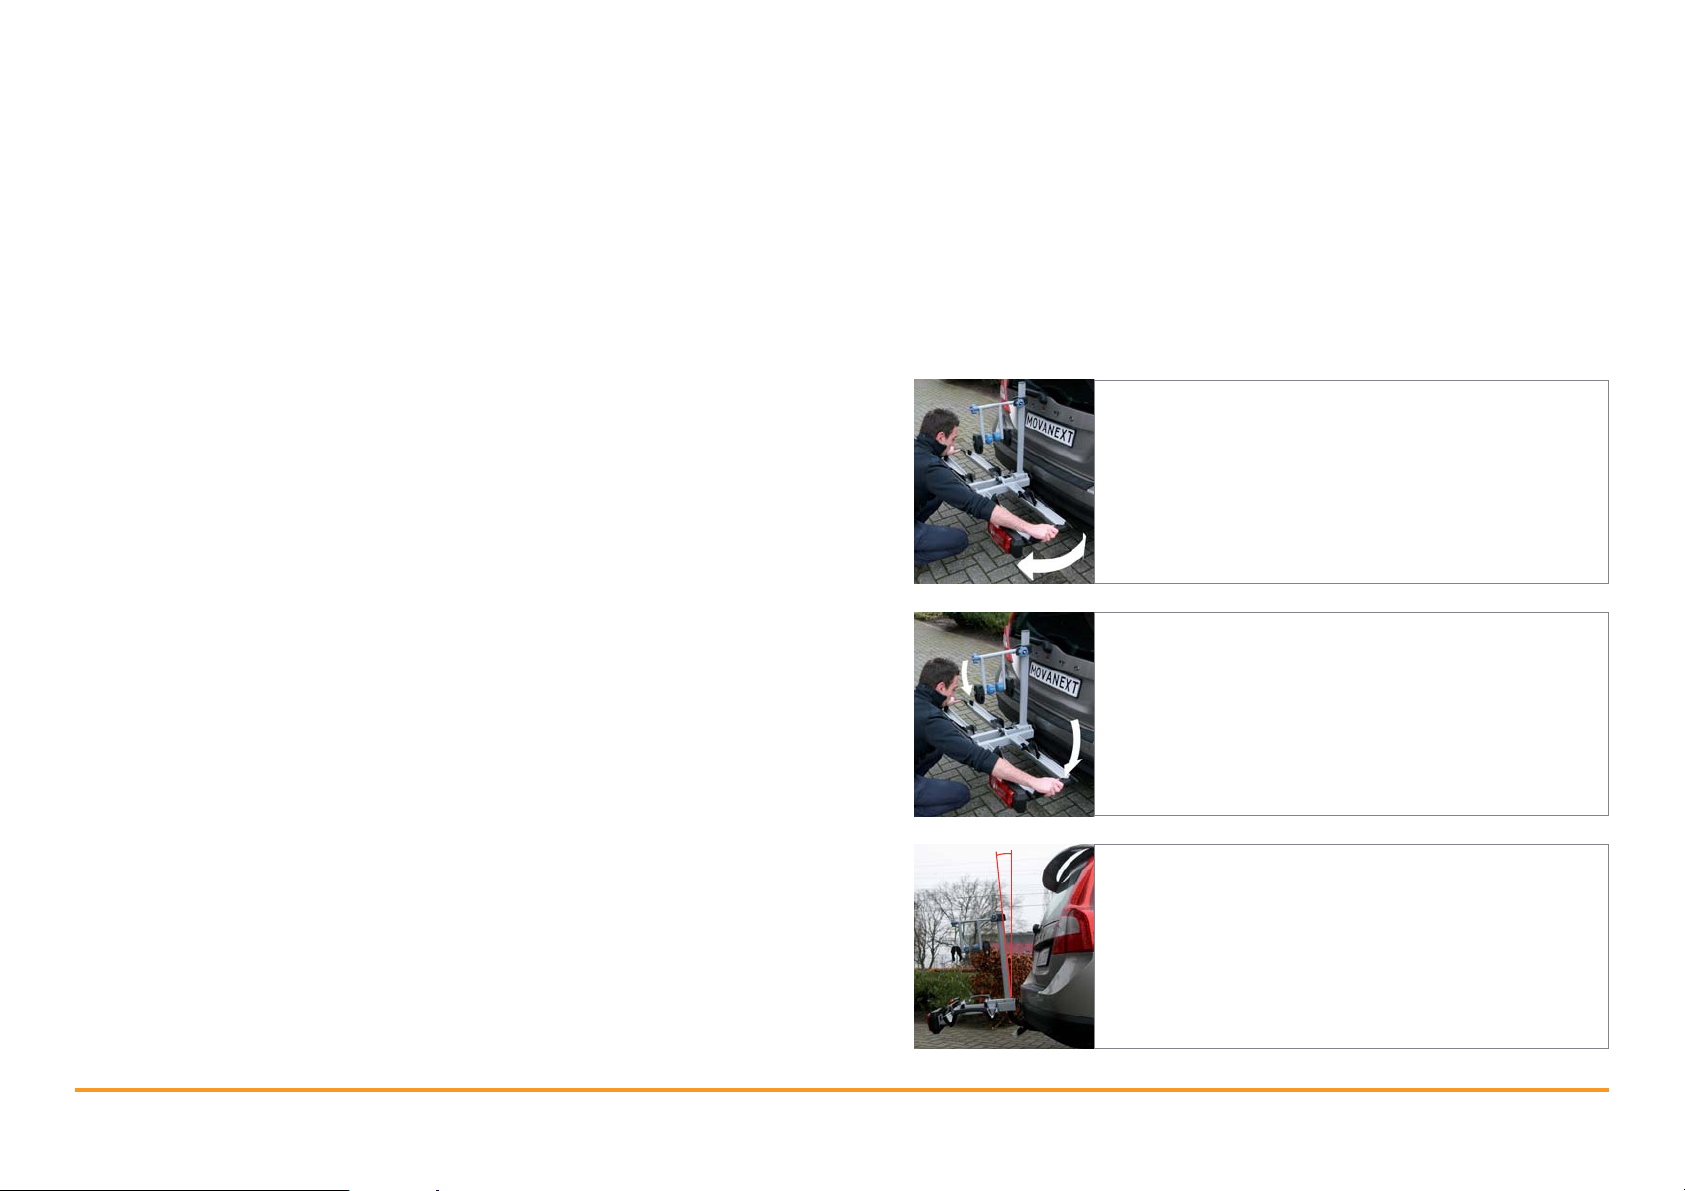
11 Maintenance and replacement
12 Adjustment on a tow bar
With normal use the bicycle carrier is in principle maintenance-free. It is
however recommended to clean the bicycle carrier and keep it in a dry
space.
Cleaning the bicycle carrier requires extra attention in the winter when grit
remains can corrode hinging parts. This can for example mean folding the
blades in and out becomes stiffer and the lock can rust up. So always rinse
the bicycle carrier after use in the winter and store the bicycle carrier dry.
Defective parts must be replaced for safety reasons.
www.movanext.com for the order numbers or ask your MovaNext
See
dealer.
It is important that the bicycle carrier is and remains upright on the tow bar.
Your bicycle carrier is set by default for a tow bar with a throat thickness
of 28 mm and a tow ball measuring 50 mm. It may be the case that the
diameter of the tow ball, the thickness of the throat or the angle of the
throat are different. This can mean the bicycle carrier is less stable or out
of square on the tow bar. The steps below allow you to check if your carrier
is correctly assembled. If in doubt contact your dealer.
Check for clamping force
Test the clamping force by trying to rotate the
bicycle carrier. Do this by pulling the blade briefly
towards you once. If you can easily rotate the
carrier, see paragraph 12.1 ‘Too large or too small
tow bar’.
Check for straightness and stability
Check if the bicycle carrier is horizontal. Then test
the stability by pushing the blades downwards one
by one. If you the carrier moves, refer to paragraph
12.2 to improve stability.
Check for horizontal position
Check that your bicycle carrier is assembled
straight by seeing if the central tube is straight. If
the carrier is askew on the tow bar, see paragraph
12.2 on how you can improve the position of the
carrier.
22 23
MovaNext MovaNext
Page 13
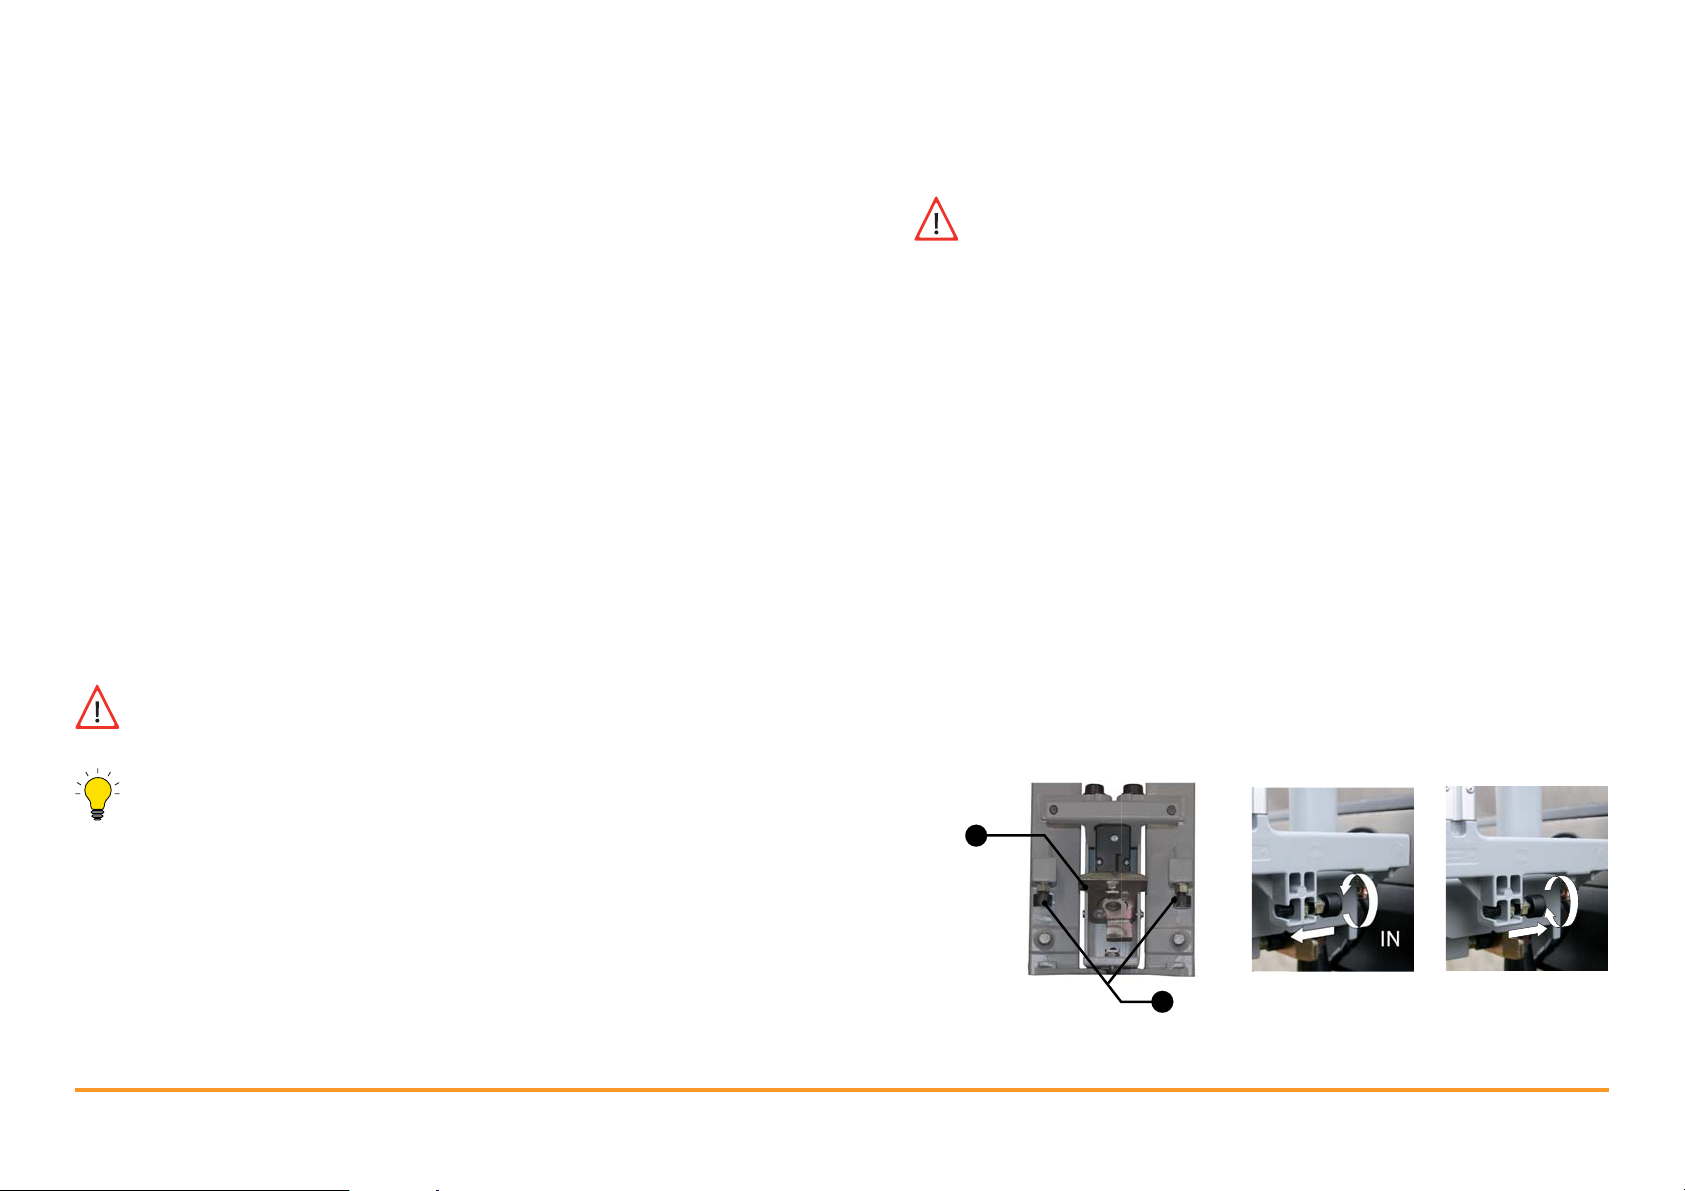
12.1 Too large or too small tow bar
The bicycle carrier clamps on the tow ball to avoid rotation. An incorrect
clamping force can have different reasons:
The carrier is adjusted for a tow ball with a larger diameter. In that
•
case you can easily rotate the bicycle carrier on the tow bar. If the ball
is smaller, the clamping force is too low.
The carrier is adjusted for a tow ball with a smaller diameter. In that
•
case folding the blades down is difficult.
If the ball is larger, the clamping force is too high.
The clamping force of the carrier is reduced due to the wearing of the
•
push bolts. The clamping force is then too low.
Changing the camping force
It is not advised to change the clamping force while the bicycle
carrier is placed on the tow bar.
The adjustment of the push bolts causes greater or lesser clamping with
the pressure plate. Make sure that both push bolts protrude equally.
Loosen the locking nuts of both push bolts (9).
1.
If the clamping force is too low: Turn the push bolts a half turn out.
2.
If the clamping force is too high: Turn the push bolts a half turn in.
Tighten the locking nuts of both push bolts (9) again.
3.
To change the clamping force you need:
Spanner 14
•
Check whether the clamping force is sufficient by fitting the carrier and
4.
folding a blade down. Test if the operating force is not too high.
Test the clamping force by trying to rotate the bicycle carrier. Do this
5.
by briefly pulling the blade towards you once.
Repeat these steps until the clamping force is sufficient.
Correct adjustment is important for safe use of your bicycle carrier. If
6.
in doubt contact your dealer.
For information: the clamping force is too high if you can no longer
manually fold the blades down.
Pressure plate
2
The clamping force is too low if the blades fold down very lightly and
the carrier moves on the tow ball.
OUT
9
Push bolts
24 25
MovaNext MovaNext
Page 14
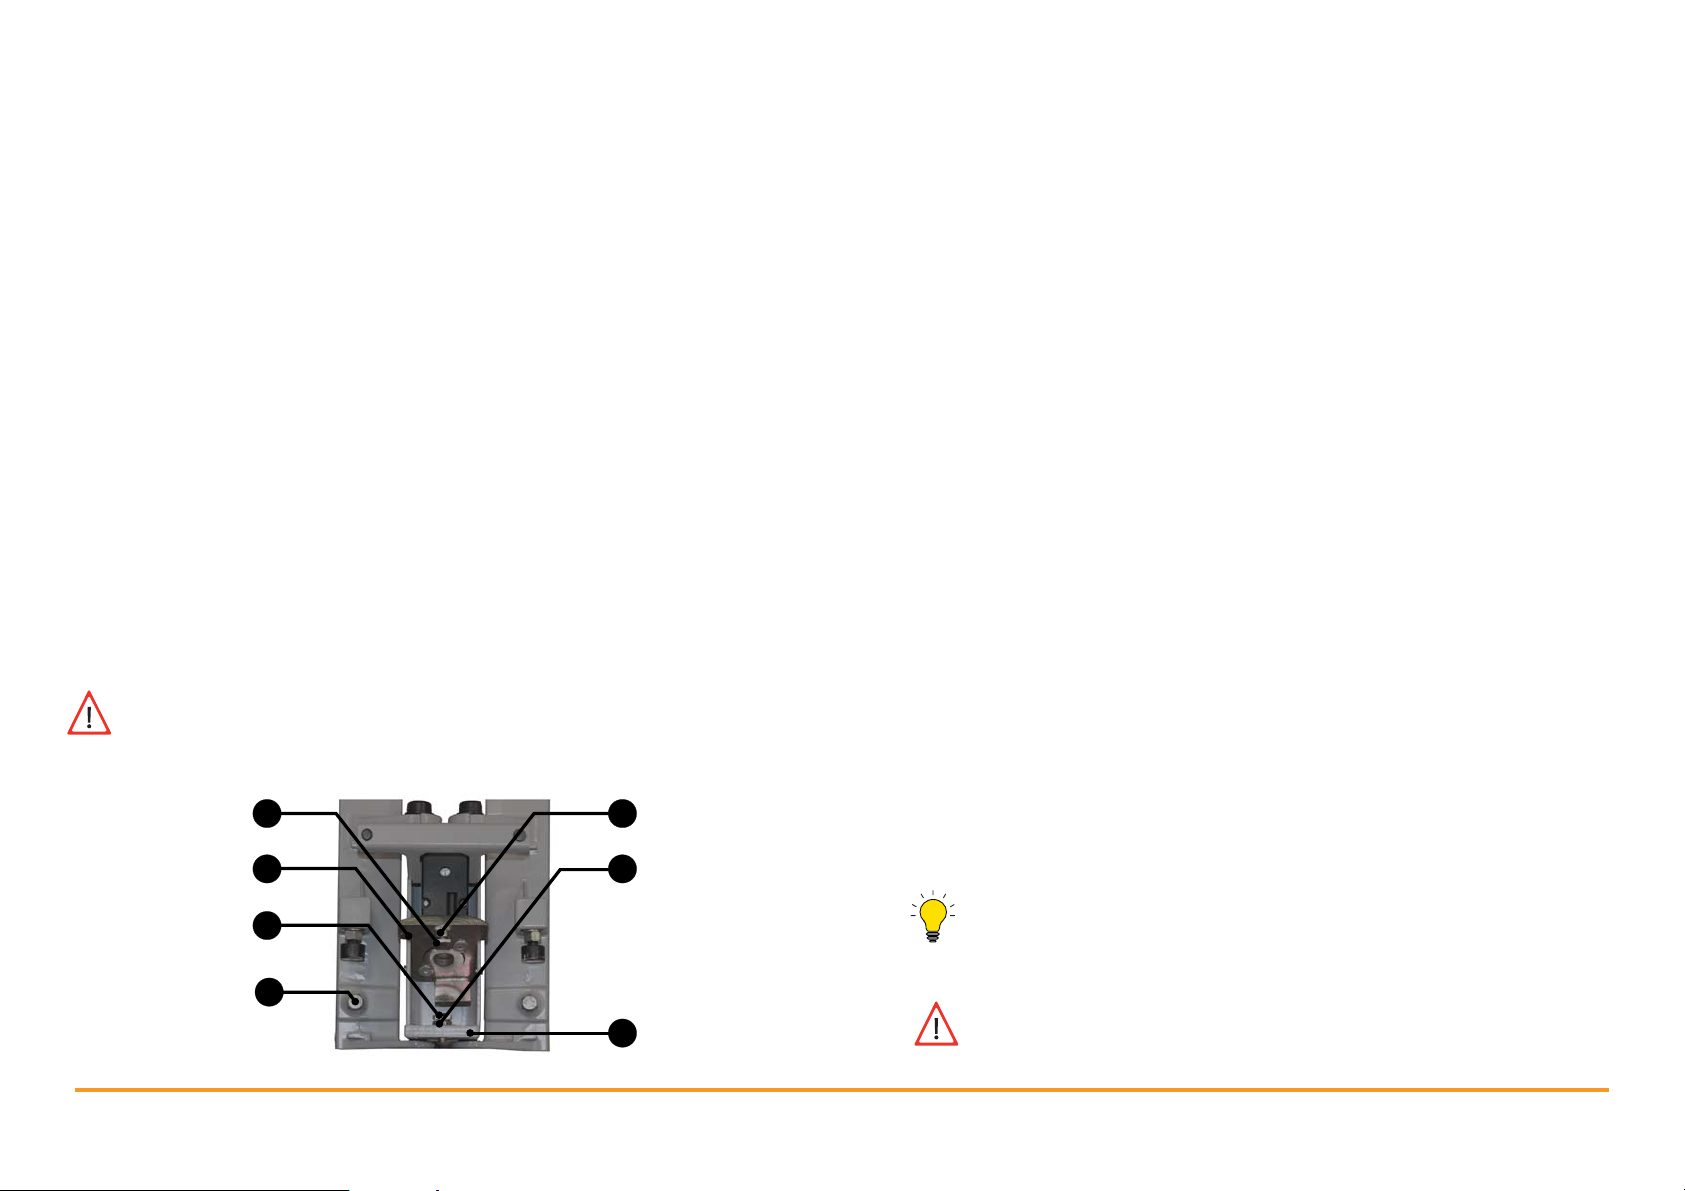
12.2 Improving the stability and position of the Lux/Vision.
The stability and straight position of the bicycle carrier are determined
by the position of the throat bolts. Insufficient stability and/or an incorrect
position can be caused by:
•
Too much clearance between the throat bolts and the tow bar throat.
You can then easily move the bicycle carrier. This can occur with tow
bars with a thin throat.
•
Throat bolts are turned out too far. Then the throat bolts press against
the throat of the tow bar. The bicycle carrier then not clamped on the
tow ball but on the throat. The bicycle carrier can then easily rotate on
the tow bar and this is unsafe.
Improving stability - front/back
Undo locking nuts (5) and (6) with spanner 13.
1.
With too much clearance between the throat bolts and the throat of the
2.
tow bar: turn throat bolts (1) and (3) a half turn out with spanner 10.
With too little clearance between the throat bolts and the throat of the
tow bar: turn throat bolts (1) and (3) a half turn in with spanner 10.
3.
Adjust the throat bolts must, so that they just do not touch the throat.
4.
Tighten the lock nuts (5) and (6). The head must be horizontal.
5.
Test the stability of the carrier on the tow bar. Check the distance
between the throat bolts and the tow bar throat.
•
A tow bar with oblique throat. With incorrect adjustment the bicycle
carrier can tip over backwards. See changing the position.
To adjust the carrier you need:
•
Spanner 10/Spanner 13
It is not advised to change the clamping force while the bicycle
carrier is on the tow bar.
Short throat bolt
Pressure plate
Long throat bolt
Blade adjusting
bolt + locking nut
1
2
5
6
3
4
8
Locking nut
Locking nut
Back plate
Improving stability - left/right
1.
Unlock the nuts of the blade adjusting bolts (4) and (7) with spanner
13.
2.
With too much clearance between the blade adjusting bolts and the throat
of the tow bar: turn the blade adjusting bolts (4) and (7) a half turn out.
With too little clearance between the blade adjusting bolts and the throat
of the tow bar: turn blade adjusting bolts (4) and (7) a half turn in.
3.
The blade adjusting bolts may just not touch the throat.
4.
Tighten the locking nuts while you hold the blade adjusting bolts in
place.
5.
Test the stability by putting the carrier on the tow bar. Also check the
distance between the blade bolts and the tow bar throat.
The bolts may not be clamped against the throat of the tow bar. The
space between the throat and the bolts must be approximately equal
to the thickness of a sheet of paper.
Correct adjustment is important for safe use of your bicycle carrier. If
in doubt contact your dealer.
26 27
MovaNext MovaNext
Page 15
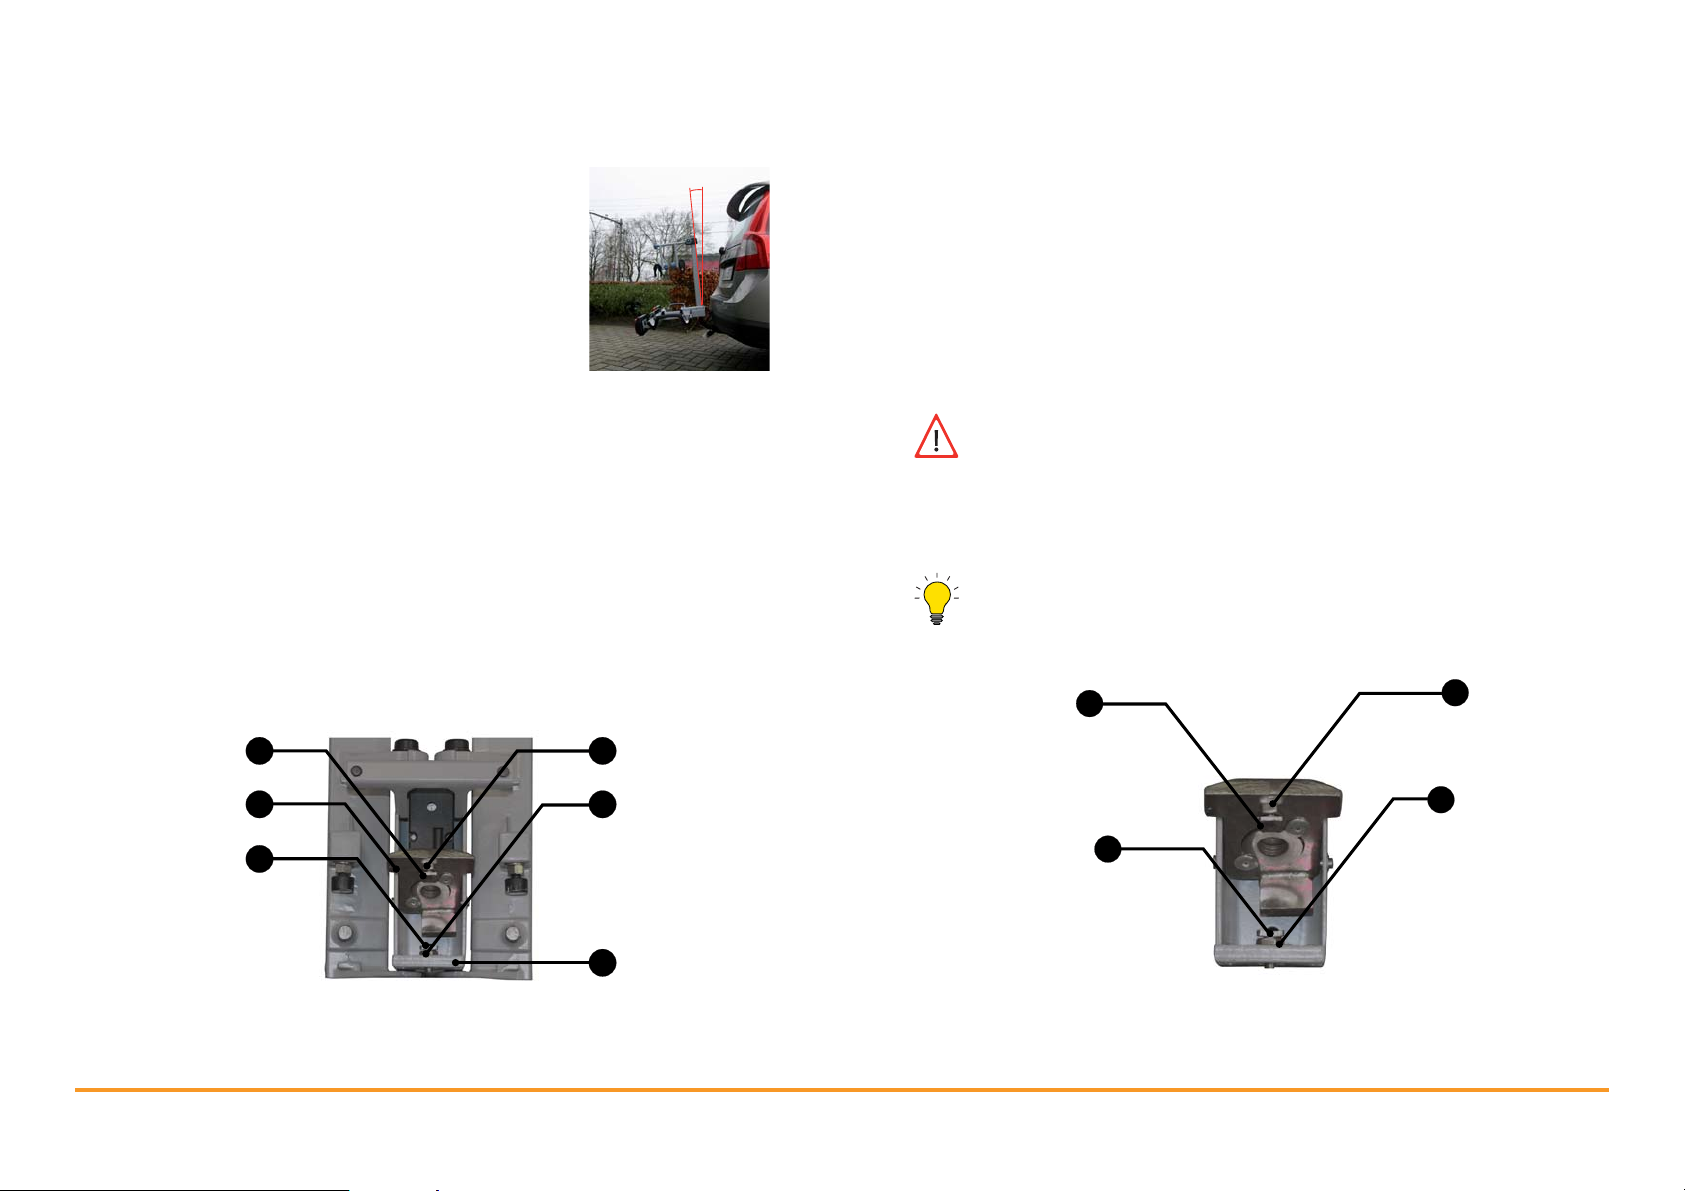
Changing the position.
If the bicycle carrier is slanting forwards the position
must be changed.
The throat bolts (1 and 3) have a different length.
With a tow bar with oblique throat the throat bolts
must be swapped to adjust the bicycle carrier.
Undo locking nuts (5) and (6) with spanner 13.
1.
Turn throat bolt (1) out of the pressure plate (2) and throat bolt (3) out
2.
of the back plate (8) with spanner 10.
3.
Remove the lock nut (5) from the short throat bolt (1).
4.
Fit the short throat bolt (1) in the back plate (8). Turn the throat bolt in
the back plate until screw thread is visible to the rear.
Fit the long throat bolt (3) with lock nut (6) in the pressure plate (2).
7.
Tighten the lock nut (6). The head (3) must be horizontal.
8.
The situation in the figure below is now achieved. Note that the throat
9.
bolts have changed place and that lock nut (5) is now against the rear
side of the back plate.
Check the position of the bicycle carrier on the tow bar.
10.
The position of the bicycle carrier can be corrected by varying the
space between the pressure plate (2) and the head of the throat bolt
(3). Take small steps during adjustment and always check the result
on the tow bar. Always set the throat bolt horizontally again and then
tighten the lock nut.
5.
Turn the loose lock nut (5) on the rear of the back plate (8) onto the
throat bolt (1).
6.
Tighten the lock nut (5) to fasten the throat bolt (1).
Short throat bolt
Pressure plate
Long throat bolt
Normal installation of throat bolts:
short throat bolt (1) in the pressure plate (2) and long throat bolt (3) in the
back plate (8).
28 29
1
2
3
MovaNext MovaNext
Locking nut
5
Locking nut
6
Back plate
8
Correct adjustment is important for safe use of your bicycle carrier. If
in doubt contact your dealer.
Locking nut
Long throat bolt
Short throat bolt
Custom installation throat bolts:
long throat bolt (3) and short throat bolt (1) are interchanged.
3
1
5
Locking nut
6
Page 16

13 Guarantee conditions
This section describes the guarantee conditions for the bicycle carrier
described.
When can you claim on the guarantee?
A two-year guarantee is provided on presentation of a purchase note with
date of sale. The guarantee is only provided for construction faults and
corrosion (rust formation).
When can you not claim on the guarantee?
The manufacturer of the bicycle carrier is not liable for unsafe situations,
accidents or damage that are the consequence of:
•
Ignoring warnings or instructions as shown on the MovaNext or
included in this documentation.
•
Use of the carrier for other purposes or in other circumstances than
mentioned in this user manual.
•
If any changes are made to the carrier in any way. This includes using
non-original replacement parts and the use of (elastic) bungee cords.
•
Insufficient maintenance (see section 11: maintenance and
replacement).
•
Accidents, illegal and incompetent use of the vehicle or failures to the
vehicle on which the bicycle carrier is assembled.
•
Driving on unsurfaced roads.
•
Driving with a bicycle carrier at speeds above 130 kph.
The manufacturer is not liable for consequential damage with a fault in the
bicycle carrier such as damage to a car or bicycle.
30 31
MovaNext MovaNext
Page 17
Your dealer:
Dealer sticker/stamp:
Producer:
Indes B.V
www.indes.eu
www.movanext.com
PP_Q1102_9011 / 2013-07.00-EN - LUX
 Loading...