

MovaNext Lux, Vision User Manual
MovaNext
User manual for the
MovaNext
Lux
Vision
www.movanext.com

Introduction
Congratulations on the purchase of your MovaNext bike carrier!
This manual contains important user information with tips and warnings
about correct and safe use of the product. So read this manual carefully
before using the product.
Your bike carrier is ready for use and set for a standard tow bar with a
throat thickness of 28 mm and a tow ball with a diameter of 50 mm.
We wish you lots of pleasure while using the MovaNext!
The MovaNext bicycle carrier has EU type approval granted by the RDW.
Symbols in this manual
Note: These are points you must bear in mind while using the
bicycle carrier. You then avoid damage and unsafe situations.
Tip: Information to use the MovaNext safer and easier.
2 3
MovaNext MovaNext
Contents
1 Your MovaNext
1 Your MovaNext 5
2 Components 6
3 Points for attention 7
4 Tips 10
5 Fitting the bicycle carrier 11
6 Mounting the bicycle(s) 13
7 Using the ramp 16
8 Dismounting the bicycle(s) 17
9 Removing the bicycle carrier 19
10 Bicycle transport and the law 21
11 Maintenance and replacement 22
12 Fitting on a tow bar 23
13 Guarantee conditions 30
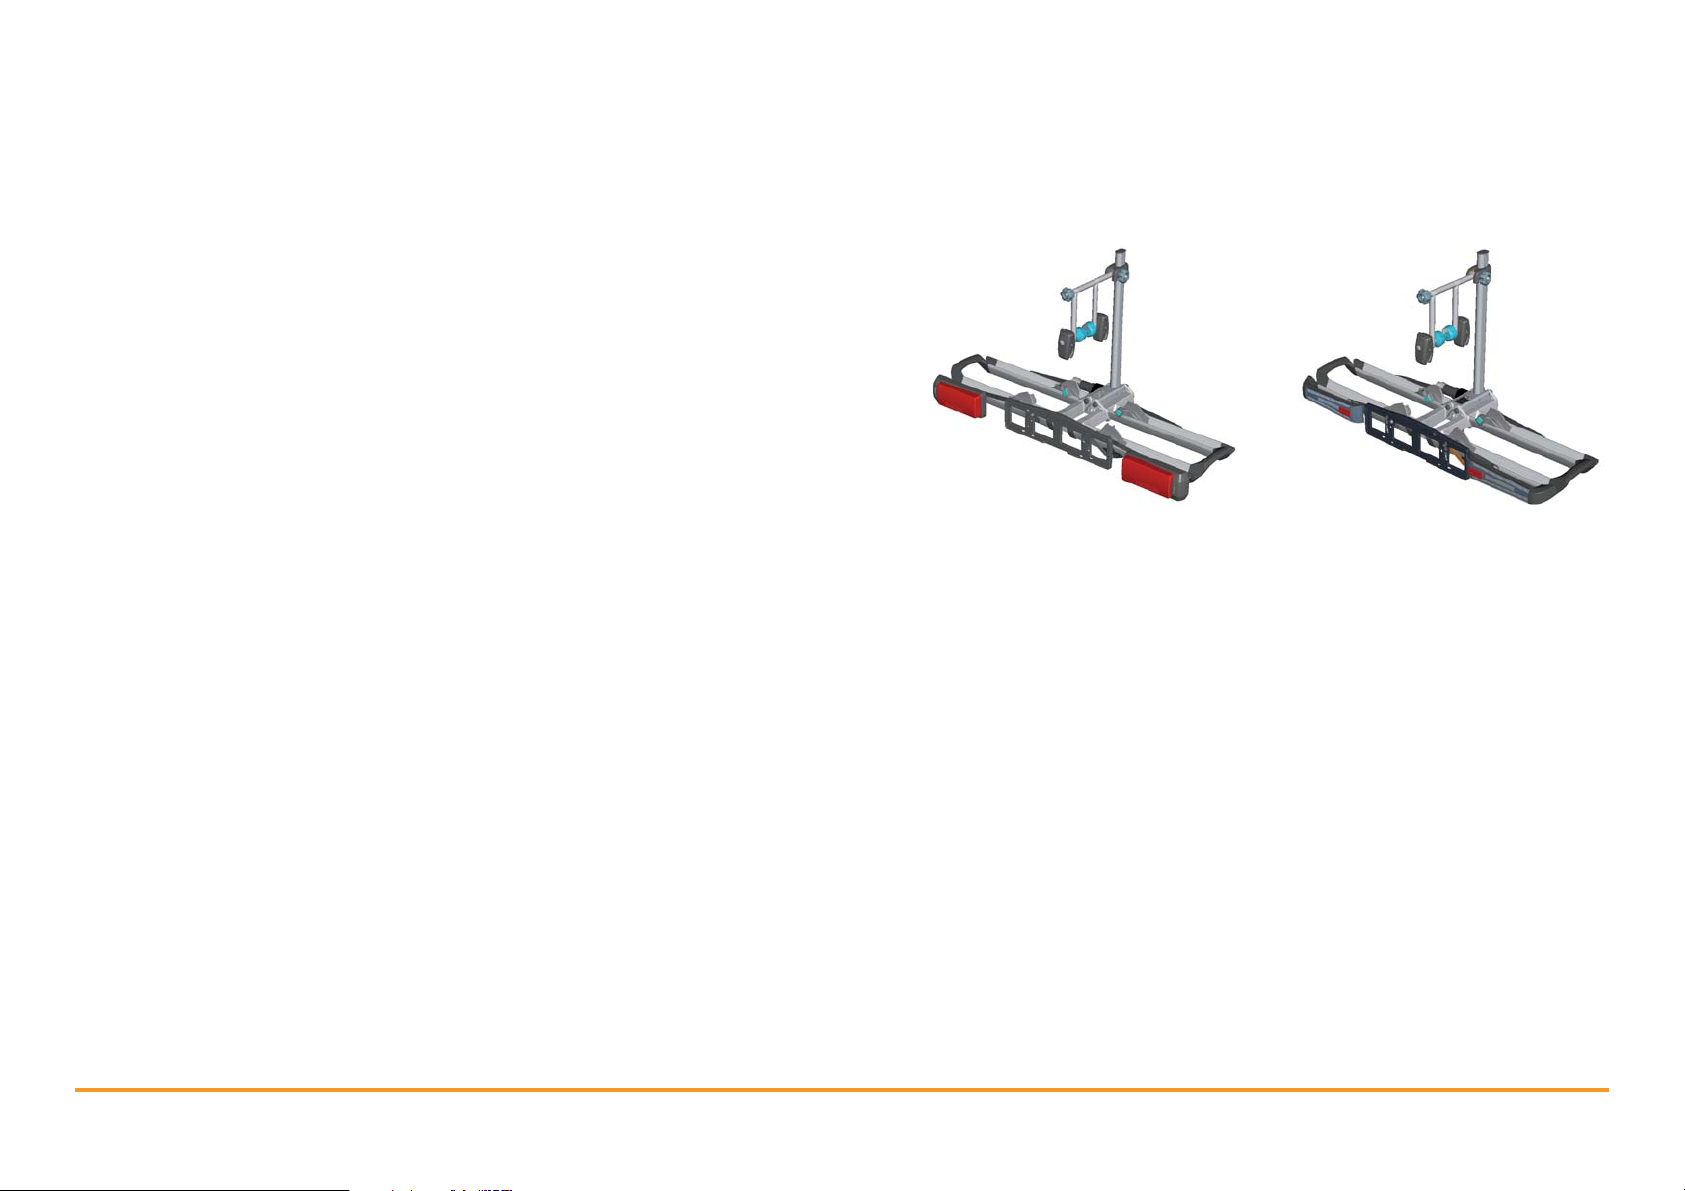
This manual explains the use of two versions of the MovaNext bicycle
carrier - the Lux and the Vision.
Lux
Lighting: filament bulbs
No tilting mechanism
Both versions are the same except for the lights. In the rest of the manual
only the Lux is pictured to explain use.
Vision
Lighting: LED
No tilting mechanism
4 5
MovaNext MovaNext

2 Components
3 Points for consideration
This section explains the parts of the MovaNext. The pictures show the
Lux. More information and instruction films can be found at
www.movanext.com
MovaNext Lux
1. Lock knob arm with frame clamps
2. Frame clamp with lock knob
4. 7/13-pole plug socket
3. Wheel ramp (4x)
5. Left-hand blade
6. Number plate holder
7. Central tube
8. Height adjustment knob
9. Frame clamp with lock knob
10. Lock for locking
11. Automatic locking
12. Sliding wheel clamp with wheel strap (4x))
13. Right-hand blade
1.
Use the parts list in section 2 to check that all necessary parts of
the carrier have been supplied. Check that all parts are intact and in
working order.
2.
If a part is missing or not in working order it must be replaced to
ensure the safety of your bicycle carrier. In such a case contact your
supplier. For information about ordering parts see
www.movanext.com
3.
The bicycle carrier may only be used to transport a maximum of two
bicycles.
4.
The bicycle carrier can carry a maximum load of 60 kg. The weight
of the Lux and Vision is 12.5 kg. Make sure that the maximum trailer
nose weight of the tow bar is not exceeded.
The table mentions the maximum permitted weight for one or two
bicycles on the bicycle carrier in combination with a specific permitted
trailer nose weight. The difference between the permitted trailer nose
weight and the maximum weight on the bicycle carrier is 12.5 kg,
being the weight of the carrier itself.
MovaNext Lux/ Vision
Permitted
trailer nose
weight
Carrier weight Maximum
weight
2 bicycles
Maximum
weight
1 bicycle
50 kg 12.5 kg 37.5 kg 30 kg
60 kg 12.5 kg 47.5 kg 30 kg
70 kg 12.5 kg 57.5 kg 30 kg
75 kg 12.5 kg 60 kg 30 kg
80 kg or more 12.5 kg 60 kg 30 kg
6 7
MovaNext MovaNext

Always fit the wheel clamps on the wheels of a bicycle using the wheel
5.
straps. These wheel straps fix the bicycle to the carrier and the wheels
cannot move out of the wheel rail while driving.
original replacement parts and the use of bungee cords is also not
allowed. The bicycle carrier is unsuitable for driving on unsurfaced
roads and driving at speeds higher than 130 kph.
On longer journeys or if driving over poor or unhardened surfaces
6.
regularly (every 2-3 hours) check the fastening of the bicycles and
carrier.
Before you drive off always check that the bicycle carrier lights are
7.
working. Driving with a bicycle carrier with the lights not working is an
offence. The driver of the car is responsible for this.
Child’s seats, water bottles, etc. must be removed from the bicycle.
8.
These items can come loose while driving. It is recommended to also
remove bicycle bags from the bicycle.
If the carrier is not mounted on the tow bar, always place the tow bar
9.
plug in its holder. This is to prevent damage.
10.
The bicycle carrier can be locked to prevent theft and inadvertent
unlocking. So always use these locks when you are on the way with
the MovaNext.
11.
When fitting and removing the bicycle carrier make sure that you first
unlock the lock. You then avoid damage to the carrier.
12.
To extend the life of the bicycle carrier it is important to store the
carrier in a dry place and maintain it properly (see section 11:
Maintenance and replacement).
The bicycle carrier is only suitable for standard two-wheeled bicycles.
15.
Tandems or three-wheelers may not be transported on the bicycle
carrier.
Take care when mounting a bicycle with a carbon frame. Fixing too
16.
firmly can cause damage to these bicycles. The manufacturer accepts
no liability for damage to carbon frames.
13.
If you have had an accident with your vehicle while the bicycle carrier
was assembled, you must have the carrier checked for damage by the
dealer. You must also check the carrier after swerving or after driving
on a poor surface for any length of time.
14.
No changes of any nature may be made to the carrier. Using non-
8 9
MovaNext MovaNext
4 Tips 5 Fitting the bicycle carrier
Preferably fit the frame clamps as high as possible on the saddle or
1.
frame tube of the bicycle for maximum stability.
When storing, place the bicycle carrier upright with the grip facing
2.
upwards. You then avoid damage to the carrier.
The total length of the vehicle increases when the bicycle carrier is
3.
assembled. The height and width can also increase. Remember this
when reversing, parking, etc.
Remove the bicycle carrier from the tow bar before you drive into a car
4.
wash.
To save fuel it is advisable to not assemble the bicycle carrier on the
5.
tow bar when no bicycles are being transported.
If your vehicle has a boot lid that automatically opens it is advised to
6.
switch this function off. You then avoid damage to the bicycle carrier
and your vehicle.
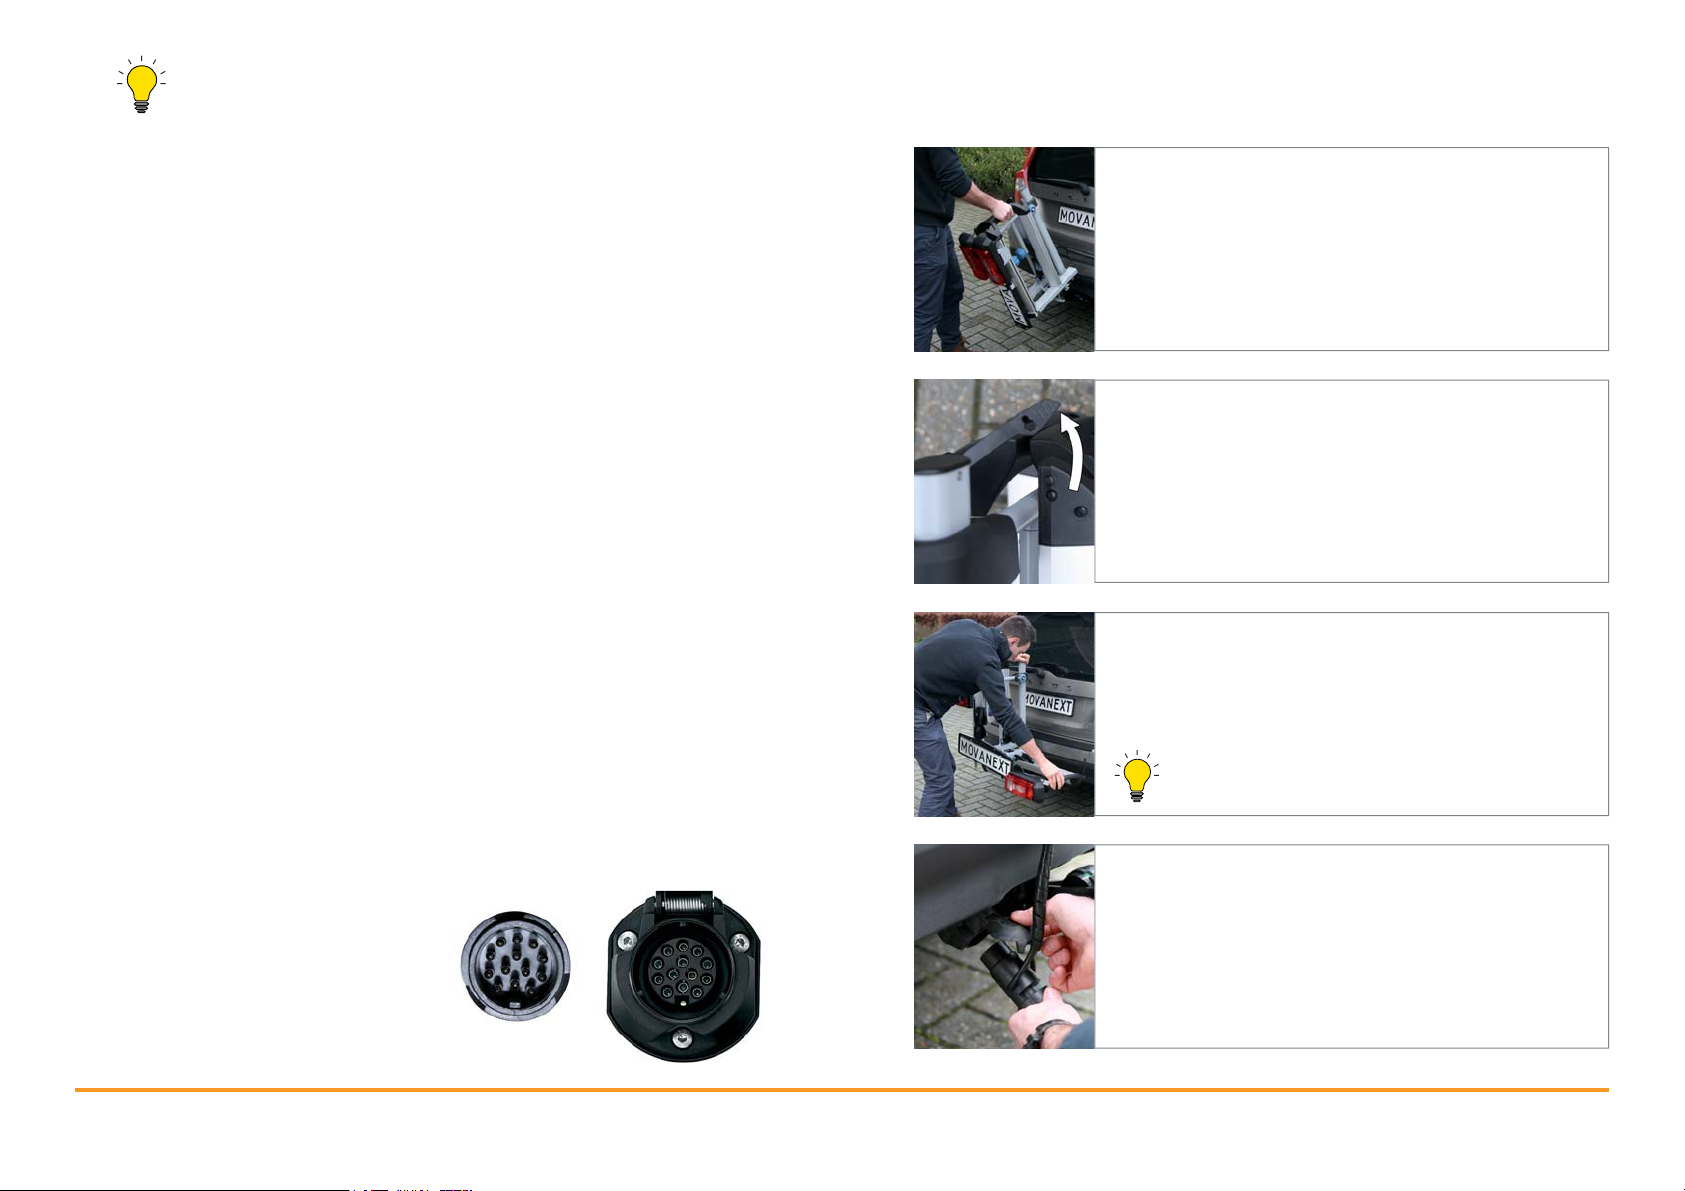
1. Assembling the bicycle carrier on the
tow bar
Make sure that the tow ball is not dirty or greasy.
Fit the bicycle carrier slightly tilted towards you on
the tow bar then bring it upright.
2. Loosen the clip
The two blades are kept together by a clip. Loosen
the clip in order to fold the blades out. The two
blades are kept together by a clip. Loosen the clip
in order to fold the blades out.
7.
8.
10 11
www.movanext.com for accessories and more information on
Go to
how to use the bicycle carrier in a more simple way.
The 13-pole plug socket works with a bayonet catch so the plug
turns a quarter turn and is firmly fixed. Should the plug not fit in the
connection on your car check if:
• the notch in the plug matches the recess in the socket on the car
(see figure).
• the 3 slots in the plug are correctly positioned for the notch in the
socket (see figure).
• the pins are correctly positioned
for the notch (see figure).
MovaNext MovaNext
3. Fold out the right-hand blade
Fold the right-hand blade downwards to make it
horizontal. Keep the central tube as vertical as
possible.
You can release the bicycle carrier; it is now
clamped on the tow bar.
4. Connect the plug
Take the plug from the holder and insert it in the
car’s plug socket. The plug has a 7- and a 13-pole
side. Cover the unused plug part with the cap
supplied.
 Loading...