

Page 1
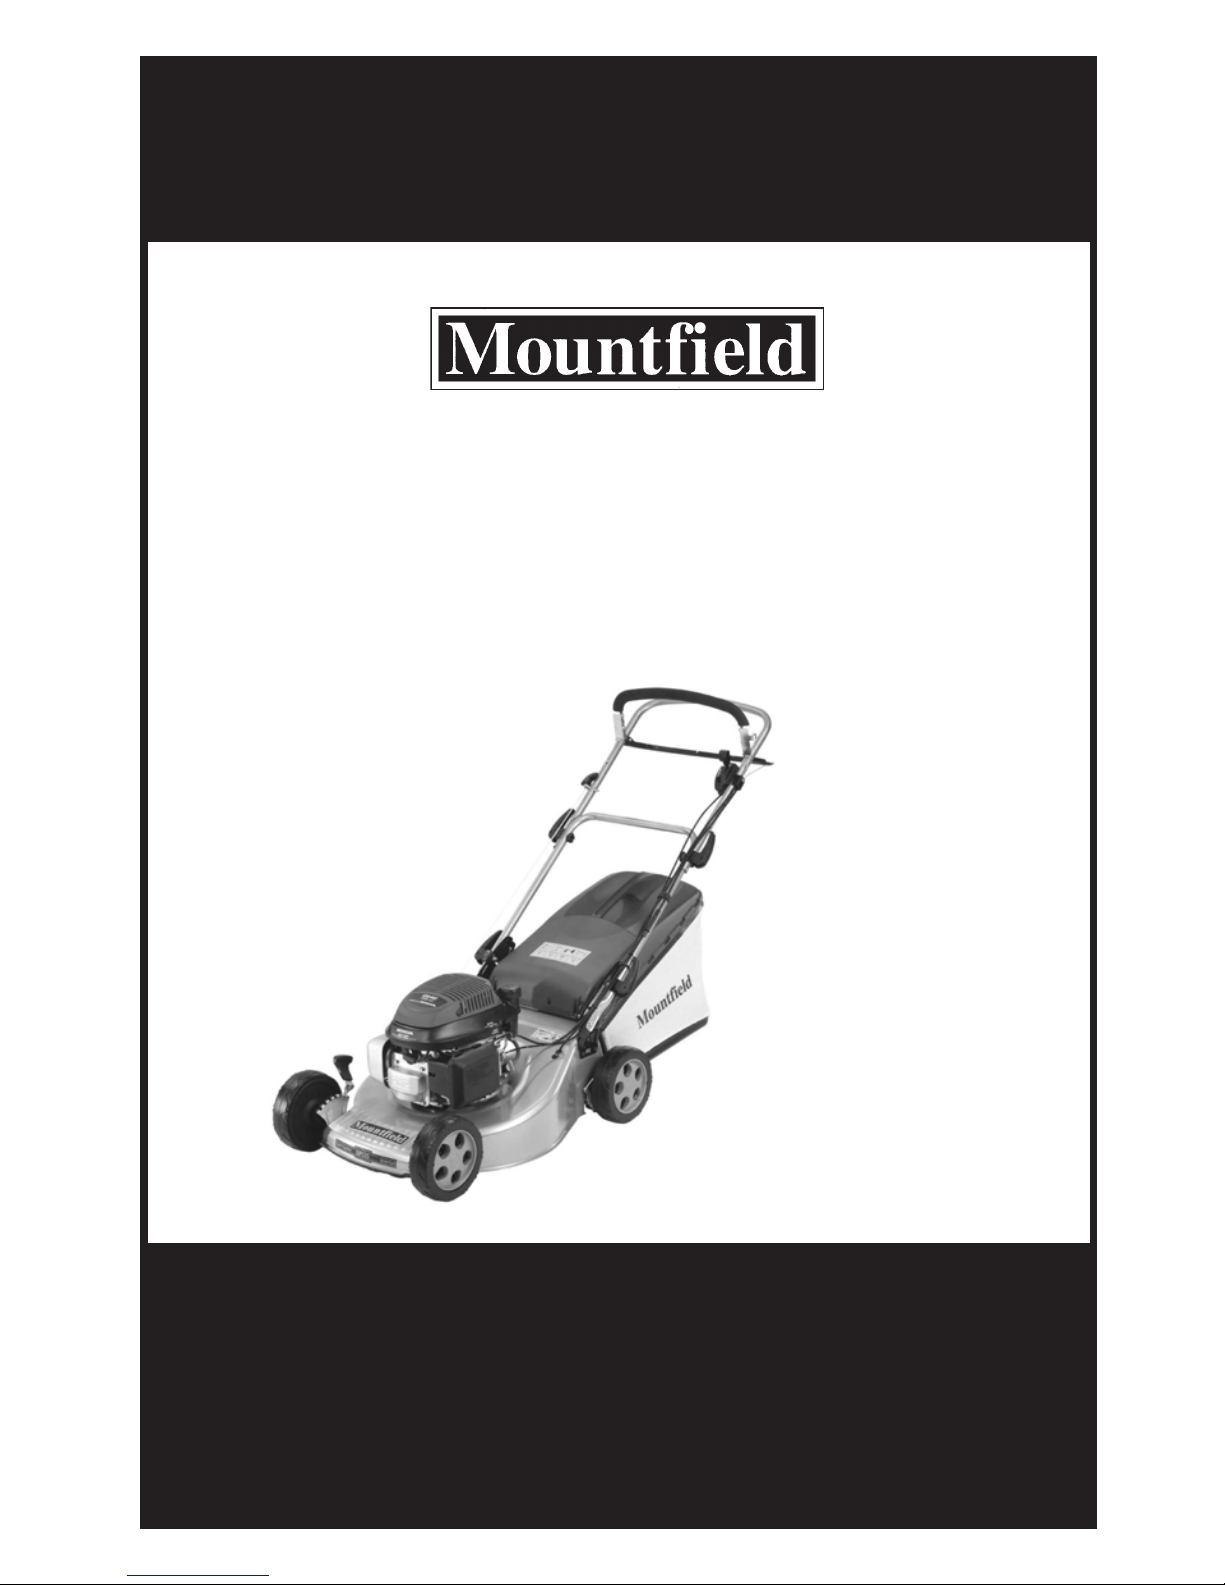
Please Read These Instructions
Before Using Your Mower
Call our Helpline if you have any problems:-
0845 600 2912
Open from 9:00am to 5:00pm Monday to Saturday
10.00am to 4.00pm on Sunday
Operating Instructions
for model
SP535 Lawnmower
with Honda GCV135 engine
Product Code:
299536838/BQ
Page 2

Page 3

IT
ITALIANO - Istruzioni Originali
- Norme di sicurezza......................................................................................4-7
- Funzionamento............................................................................................8-10
- Risoluzione problemi...................................................................................11
ENGLISH - Translation of the original instructions (Istruzioni Originali)
- Safety precautions.......................................................................................12-15
- How to get mowing.......................................................................................16-18
- Fault Finding................................................................................................19
GUARANTEE................................................................................................ 20
EN
Page 4
Grazie per aver acquistato un rasaerba Mountfield. Questa macchina garantirà molti anni di affidabile e
sicuro lavoro se utilizzata secondo le seguenti istruzioni.
Leggere e comprendere attentamente
le istruzioni di utilizzo prima di utilizzare il rasaerba. Eventuali omissioni possono causare danni
a persone e/o alla macchina.
NON INCLINARE IL RASAERBA SUL SUO FIANCO, LA FUORIUSCITA DI OLIO POTREBBE DANNEGGIARE IL FILTRO ARIA.
Per accedere alla parte inferiore, alzare le ruote anteriori nché il manico si appoggia a terrra.
NORME DI SICUREZZA
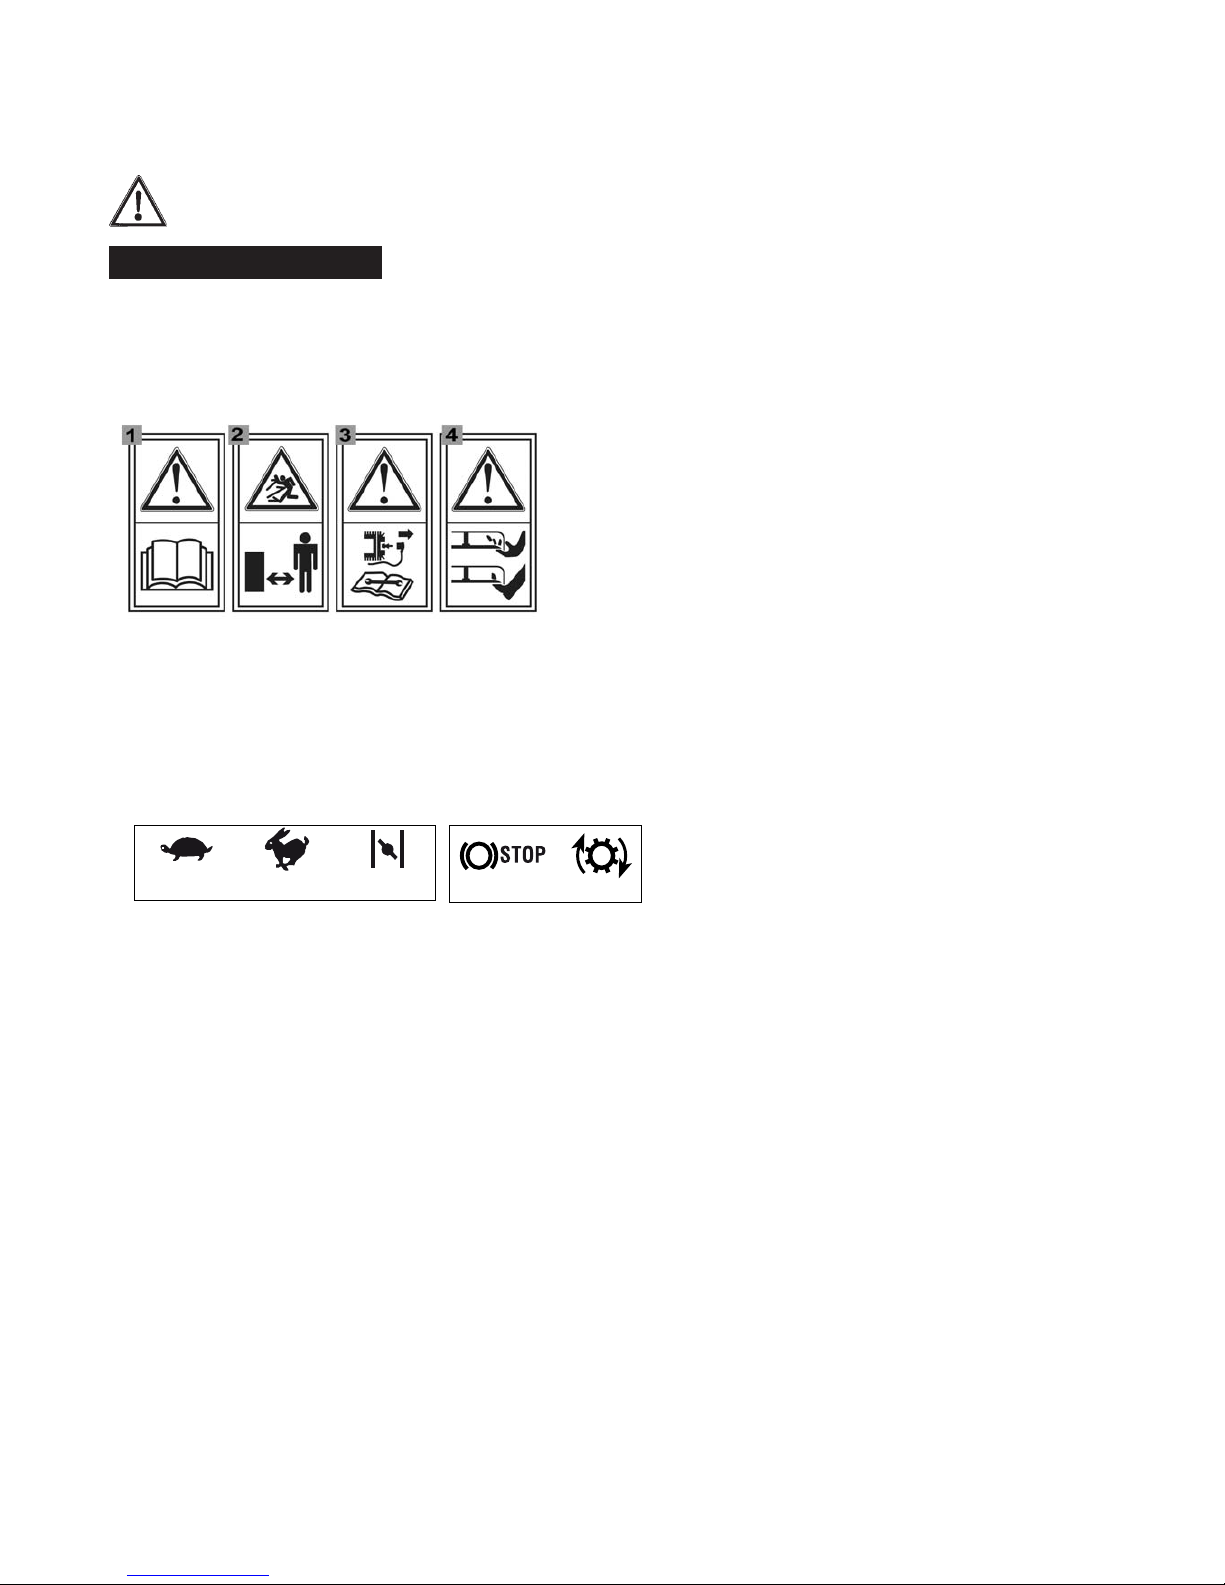
Il Vostro rasaerba deve essere utilizzato con prudenza. A tale scopo, sulla macchina sono stati posti dei pittogrammi,
destinati a ricordarvi le prinipali precauzioni d’uso. Il loro significato è spiegato qui di seguito. Vi raccomandiamo
inoltre di leggere attentamente le norme di sicurezza riportate nll’apposito capitolo dele presente libretto.
1. Attenzione: Leggere il libretto istruzioni prima di usare
la macchina.
2. Rischio di espulsione: tenere le persone al di fuori
dell’area di lavoro, durante l’uso.
3.Attenzione: scollegare il cappuccio della candela prima
di effettuare qualsiasi operazione di
manutenzione o riparazione.
4.Rischio di tagli: Lame in movimento. Non introdurre mani
DESCRIZIONE DEI SIMBOLI RIPORTATI SUI COMANDI
5.
Lento 6. Veloce 7. Starter 8. Arresto motore 9. Trazione inserita
Valori massimi di rumorosità e vibrazioni
Livello di pressione acustica orecchio operatore
(in base alla norma 81/1051/EEC)........................................ ... db(A) 82,7
- Incertezza di misura (2006/42/EC - EN 27574)........................ db(A) 0,3
____________________________________________________________
Livello di potenza acustica misurato
(in base alla direttiva 2000/14/EC, 2005/88/EC)........................ db(A) 96,6
- Incertezza di misura (2006/42/EC - EN 27574).........................db(A) 0,3
____________________________________________________________
Livello di potenza acustica garantito
(in base alla direttiva 2000/14/EC, 2005/88/EC)........................ db(A) 98
____________________________________________________________
Livello di vibrazioni (in base alla direttiva EN 1033)................... m/s
2
6,54
- Incertezza di misura (2006/42/EC - EN 12096)..........................m/s
2 0,8
4
5.
6.
7.
8.
9.
o piedi all’interno dell’alloggiamento lama
Page 5
CONOSCERE LA MACCHINA
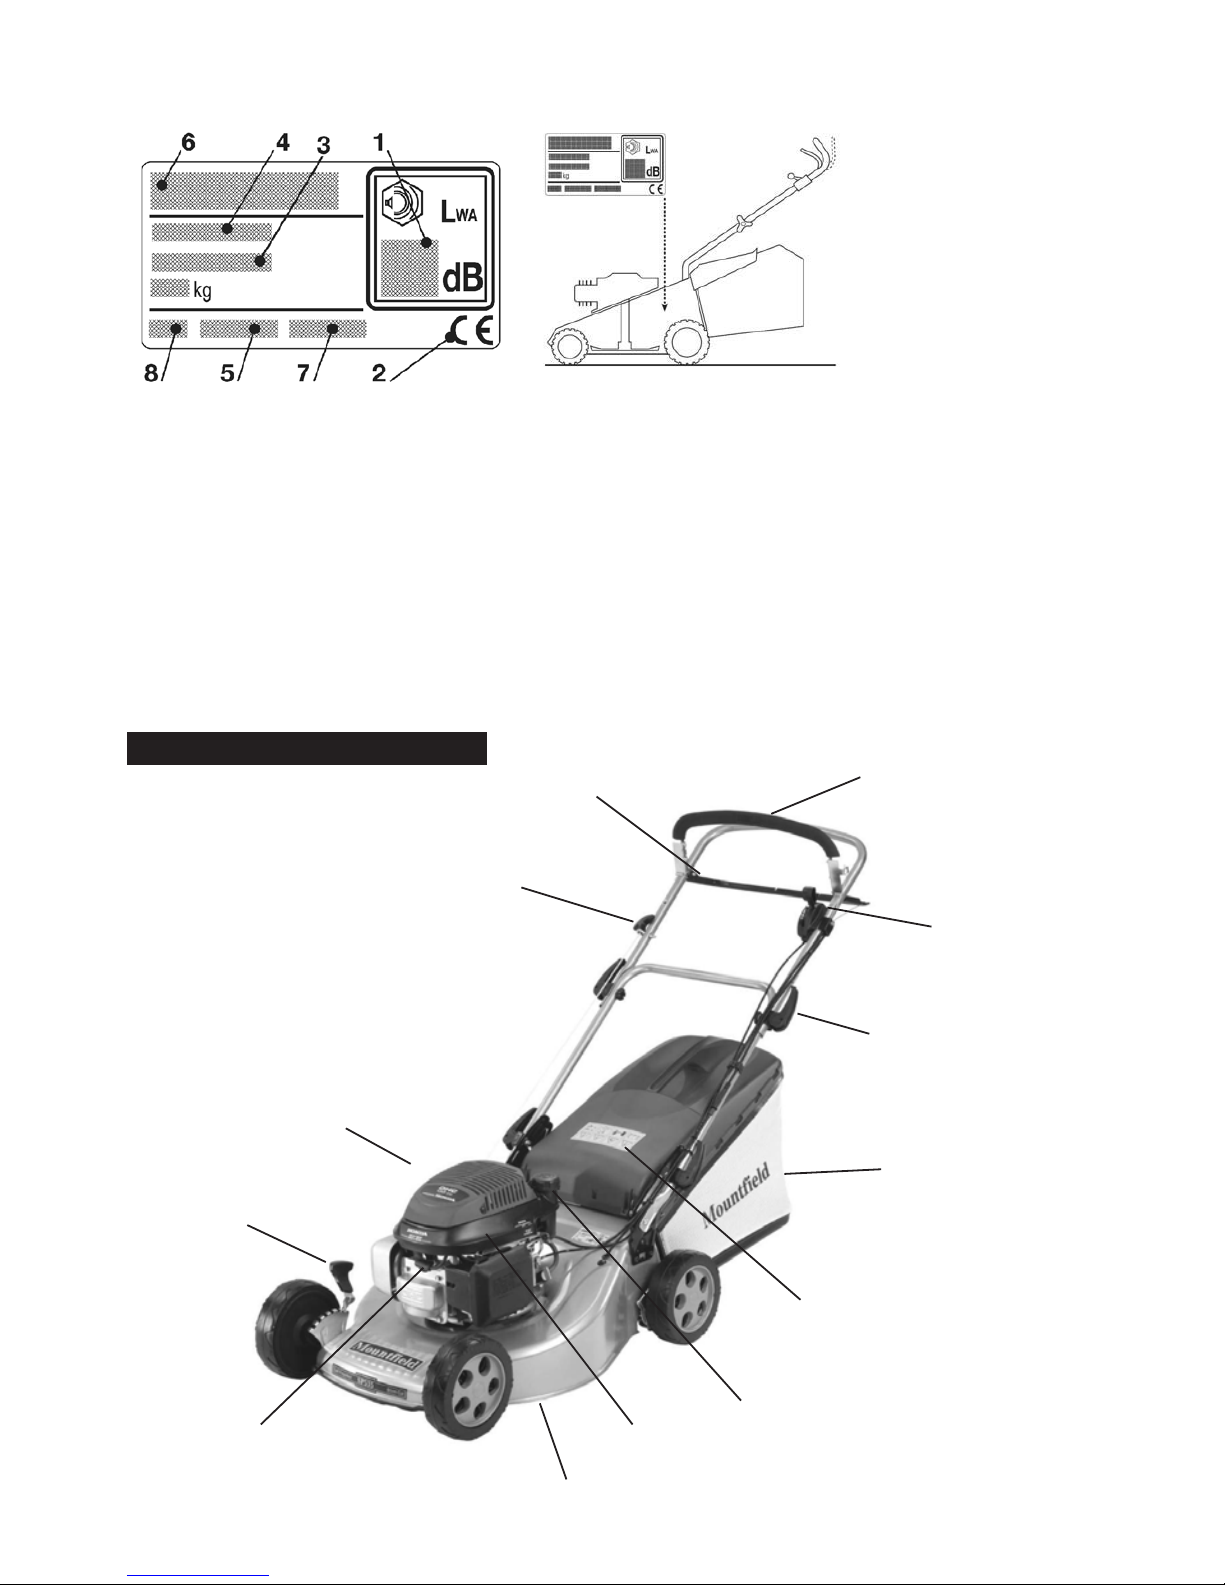
ETICHETTA DI IDENTIFICAZIONE
1.
Livello di potenza acustica secondo la direttiva 2000/14/EC.
2. Marchio di conformità secondo la direttiva 98/37/EEC (2006/42/EC dal 29/12/2009).
3. Tipo di rasaerba.
4. Modello di rasaerba.
5. Numero di matricola.
6. Nome e indirizzo del costruttore.
7. Codice articolo.
8. Anno di fabbricazione.
Immediatamente dopo l’acquisto della macchina, trascrivere i numeri di identificatione (3-5-6) negli appositi spazi
sull’ultima pagina del manuale.
5
Leva innesto trazione
(inferiore)
Leva presenza operatore
/freno motore (OPC)
(superiore)
Sacco di raccolta
Parasassi
Motore
Regolazione
altezza
di taglio
Chassis
Tappo serbatoio
carburante
Maniglie di fissaggio
Fune e guida fune
Candela
Tappo riempimento olio
con astina di livello
(posizionato sul retro del motore
Comando
acceleratore
Page 6

Le seguenti norme di sicurezza devono essere osservate ad ogni utilizzo. Preghiamo di leggerle
attentamente.
ADDESTRAMENTO
1) Leggere attentamente le istruzioni. Prendere famigliarità con i comandi e con un uso appropriato del rasaerba.
imparare ad arrestare rapidamente il motore.
2) Utilizzate il rasaerba per lo scopo al quale è destinato, cioè per il taglio e la raccolta dell’erba. Qualsiasi
altro impiego può rivelarsi pericoloso e causare il danneggiamento della macchina. Rientrano nell’uso improprio
(come esempio, ma non solo):
–trasportare sulla macchina persone, bambini o animali;
–farsi trasportare dalla macchina;
–usare la macchina per trainare o spingere carichi;
–usare la macchina per la raccolta di foglie o detriti;
–usare la macchina per regolarizzare siepi, o per il taglio di vegetazione di tipo non erboso;
–utilizzare la macchina in più di una persona;
–azionare la lama nei tratti non erbosi.
3) Non permettere mai che il rasaerba venga utilizzato da bambini o da persone che non abbiano la necessaria
dimestichezza conle istruzioni. Le leggi locali possono fissare un’età minima per l’utilizzatore.
4) Non utilizzare mai il rasaerba:
–con persone, in particolare bambini, o animali nelle vicinanze.
–se l’utilizzatore ha assunto farmaci o sostanze ritenute nocivealle sue capacità di riflessi e attenzione.
5) Ricordare che l’operatore o l’utilizzatore è responsabile di inci-denti e imprevisti che si possono verificare ad
altre persone o alleloro proprietà.
6) Mai introdurre mani o piedi all’interno dell’alloggiamento lame o all’interno dello scivolo scarico erba. La lama
continua a ruotare per un po’ di tempo anche dopo lo spegnimento della macchina.
OPERAZIONI PRELIMINARI
1) Durante il taglio, indossare sempre calzature solide e pan-taloni lunghi. Non azionare il
rasaerba a piedi scalzi o consandali aperti.
2) Ispezionare a fondo tutta l’area di lavoro e togliere tutto ciò chepotrebbe venire espulso dalla macchina o
danneggiare il gruppodi taglio e il motore (sassi, rami, fili di ferro, ossi, ecc.).
3) ATTENZIONE: PERICOLO! La benzina è altamente infiammabile:
–conservare il carburante in appositi contenitori.
–rabboccare il carburante, utilizzando un imbuto, solo all’a-perto e non fumare durante questa
l’operazione e ognivolta che si maneggia il carburante.
–rabboccare prima di avviare il motore; non aggiungere benzinao togliere il tappo del serbatoio
quando il motore è in funzioneo è caldo;
–se fuoriesce della benzina, non avviare il motore, ma allontana-re il rasaerba dall’area nella quale
il carburante è stato versato, edevitare di creare possibilità di incendio, fintanto che il carburantenon
sia evaporato ed i vapori di benzina non si siano dissolti.
–rimettere sempre e serrare bene i tappi del serbatoio e del con-tenitore della benzina.
4) Sostituire i silenziatori difettosi. Mai utilizzare la macchina senza silenziatore.
5) Prima dell’uso, procedere ad una verifica generale ed inparticolare dell’aspetto delle lame, e controllare
che le viti e ilgruppo di taglio non siano usurati o danneggiati. Sostituire inblocco le lame e le viti
danneggiate o usurate per mantenere l’equilibratura.
6) Prima di iniziare il lavoro, montare le protezioni all’uscita (saccoo parasassi).
UTILIZZO
1) Non azionare il motore in spazi chiusi, dove possono accumu-larsi pericolosi fumi di monossido di carbonio.
2) Lavorare solamente alla luce del giorno o con buona luce arti-ficiale.
3) Se possibile, evitare di lavorare nell’erba bagnata.
4) Accertarsi sempre del proprio punto d’appoggio sui terreni inpendenza.
5) Non correre mai, ma camminare; evitare di farsi tirare dalrasaerba.
6) Tagliare nel senso trasversale al pendio e mai su e giù.
7) Prestare la massima attenzione nel cambio di direzione sui pendii.
8) Non tagliare su terreni con pendenza superiore a 20°.
9) Prestare estrema attenzione quando tirate il rasaerba verso di voi.
6
Page 7

10) Fermare la lama se il rasaerba deve essere inclinato per il trasporto, nell’attraversare superfici
non erbose, e quando il rasaerba viene trasportato da o verso l’area che deve essere tagliata.
11) Non azionare mai il rasaerba se i ripari sono danneggiati, oppure senza il sacco raccoglierba o il
parasassi
12) Non modificare le regolazioni del motore, e non fare raggiungere al motore un regime di giri
eccessivo.
13) Nei modelli con trazione, disinnestare l’innesto della trasmissione alle ruote, prima di avviare il
motore.
14) Avviare il motore con cautela secondo le istruzioni e tenendoi piedi ben distanti dalla lama.
15) Non inclinare il rasaerba per l’avviamento. Effettuare l’avviamento su una superficie piana e priva
di ostacoli o erba alta.
16) Non avvicinare mani e piedi accanto o sotto le parti rotanti. State sempre lontani dall’apertura di
scarico.
17) Non sollevare o trasportare il rasaerba quando il motore è infunzione.
18) Fermare il motore e staccare il cavo della candela:
–prima di qualsiasi intervento sotto il piatto di taglio o prima didisintasare il convogliatore di scarico;
–prima di controllare, pulire o lavorare sul rasaerba;
–dopo aver colpito un corpo estraneo. Verificare eventuali dannisul rasaerba ed effettuare le
necessarie riparazioni prima diusare nuovamente la macchina;
–se il rasaerba comincia a vibrare in modo anomalo (Ricercareimmediatamente la causa delle
vibrazioni e provvedere alleverifiche necessarie presso un Centro Specializzato).
19) Fermare il motore:
–ogni qualvolta si lasci il rasaerba incustodito. Nei modelli con avviamento elettrico, togliere anche
la chiave;
–prima di fare rifornimento di carburante;
–ogni volta che si toglie o si rimonta il sacco raccoglierba;
–prima di regolare l’altezza di taglio.
20) Ridurre il gas prima di fermare il motore. Chiudere l’alimentazionedel carburante al termine del
lavoro, seguendo le istruzioni fornite sul libretto del motore.
21) Durante il lavoro, mantenere sempre la distanza di sicurezzadalla lama rotante, data dalla lunghezza
del manico.
MANUTENZIONE E MAGAZZINAGGIO
1) Mantenere serrati dadi e viti, per essere certi che la macchina sia sempre in condizioni sicure di
funzionamento. Una manutenzione regolare è essenziale per la sicurezza e per mantenere il livello
delle prestazioni.
2) Non riporre il rasaerba con della benzina nel serbatoio in un locale dove i vapori di benzina potrebbero
raggiungere una fiamma, una scintilla o una forte fonte di calore.
3) Lasciare raffreddare il motore prima di collocare il rasaerba in un qualsiasi ambiente.
4) Per ridurre il rischio d’incendio, mantenere il motore, il silenziatore di scarico, l’alloggiamento della
batteria e la zona di magazzinaggio della benzina liberi da residui d’erba, foglie o grasso eccessivo.
Non lasciare contenitori con l’erba tagliata all’interno di un locale.
5) Controllare di frequente il parassassi e il sacco raccoglierba, per verificarne l’usura o il deterioramento.
6) Se il serbatoio deve essere vuotato, effettuare questa operazione all’aperto e a motore freddo.
7) Indossare guanti da lavoro per lo smontaggio e rimontaggio della lama.
8) Curare l’equilibratura della lama, quando viene affilata. Tutte le operazioni riguardanti la lama
(smontaggio, affilatura, equilibratura, rimontaggio e/o sostituzione) sono lavori impegnativi che
richiedono una specifica competenza oltre all’impiego di apposite attrezzature; per ragioni di
sicurezza, occorre pertanto che siano sempre eseguiti presso un centro specializzato.
9) Non usare mai la macchina con parti usurate o danneggiate, per motivi di sicurezza. I pezzi devono
essere sostituiti e mai riparati. Usare ricambi originali. I pezzi di qualità non equivalente possono
danneggiare la macchina e nuocere alla vostra sicurezza.
TRASPORTO E MOVIMENTAZIONE
1) Ogni volta che è necessario movimentare, sollevare, trasportare
o inclinare la macchina occorre:
– indossare robusti guanti da lavoro;
– afferrare la macchina in punti che offrano una presa sicura tenendo conto del peso e della sua
ripartizione;
– impiegare un numero di persone adeguato al peso della macchina e alle caratteristiche del
mezzo di trasporto o del posto nel quale deve essere collocata o prelevata.
2) Durante il trasporto, assicurare adeguatamente la macchina mediante funi o catene.
7
Page 8
FUNZIONAMENTO
dell’utilizzo.
al motore e invalidare la vostra garanzia.
NON INCLINARE IL RASAERBA SUL SUO FIANCO. LA FUORIUSCITA DI OLIO POTREBBE DANNEGGIARE IL FILTRO ARIA.
Per accedere alla parte inferiore, alzare le ruote manico si appoggia a terra.
Rimuovere con attenzione il rasaerba dall’imballo e leggere le seguenti istruzioni. Leggere attentamente
anche il manuale istruzioni del motore , qui incluso, prima di avviare il motore.
ASSIEMAGGIO MANICO
correttamente i due dadi nelle aperture dei due supporti laterali dello chassis. (Figura 1-A).
Portare l’impugnatura del manico all’altezza desiderata e bloccare le maniglie inferiori. (Figura 1-B).
Montare la parte superiore e bloccare fra loro le due parti del manico tramite le maniglie superiori (precedentemente
parte superiore alla parte inferiore del manico senza richiedere uno sforzo eccessivo per bloccarle o sbloccarle.
(Figura 1-C).
SACCO DI RACCOLTA
Figura 1-A
Figura 2
Figura 1-D
Figura 1-B
Figura 1-C
8
10
1
0
Tirare la leva freno motore contro il manico per disinserire il freno. Tirare la fune di avviamento ed inserirla nella
guida fune. Fissare la guida fune alla parte superiore del manico utilizzando una chiave da 10mm (Figura 1-D).
Fissare tramite le fascette il cavo freno (ed il cavo trazione se presente) al manico.
5-7 mm
5-7mm dall’estremità (Figura2).
Page 9
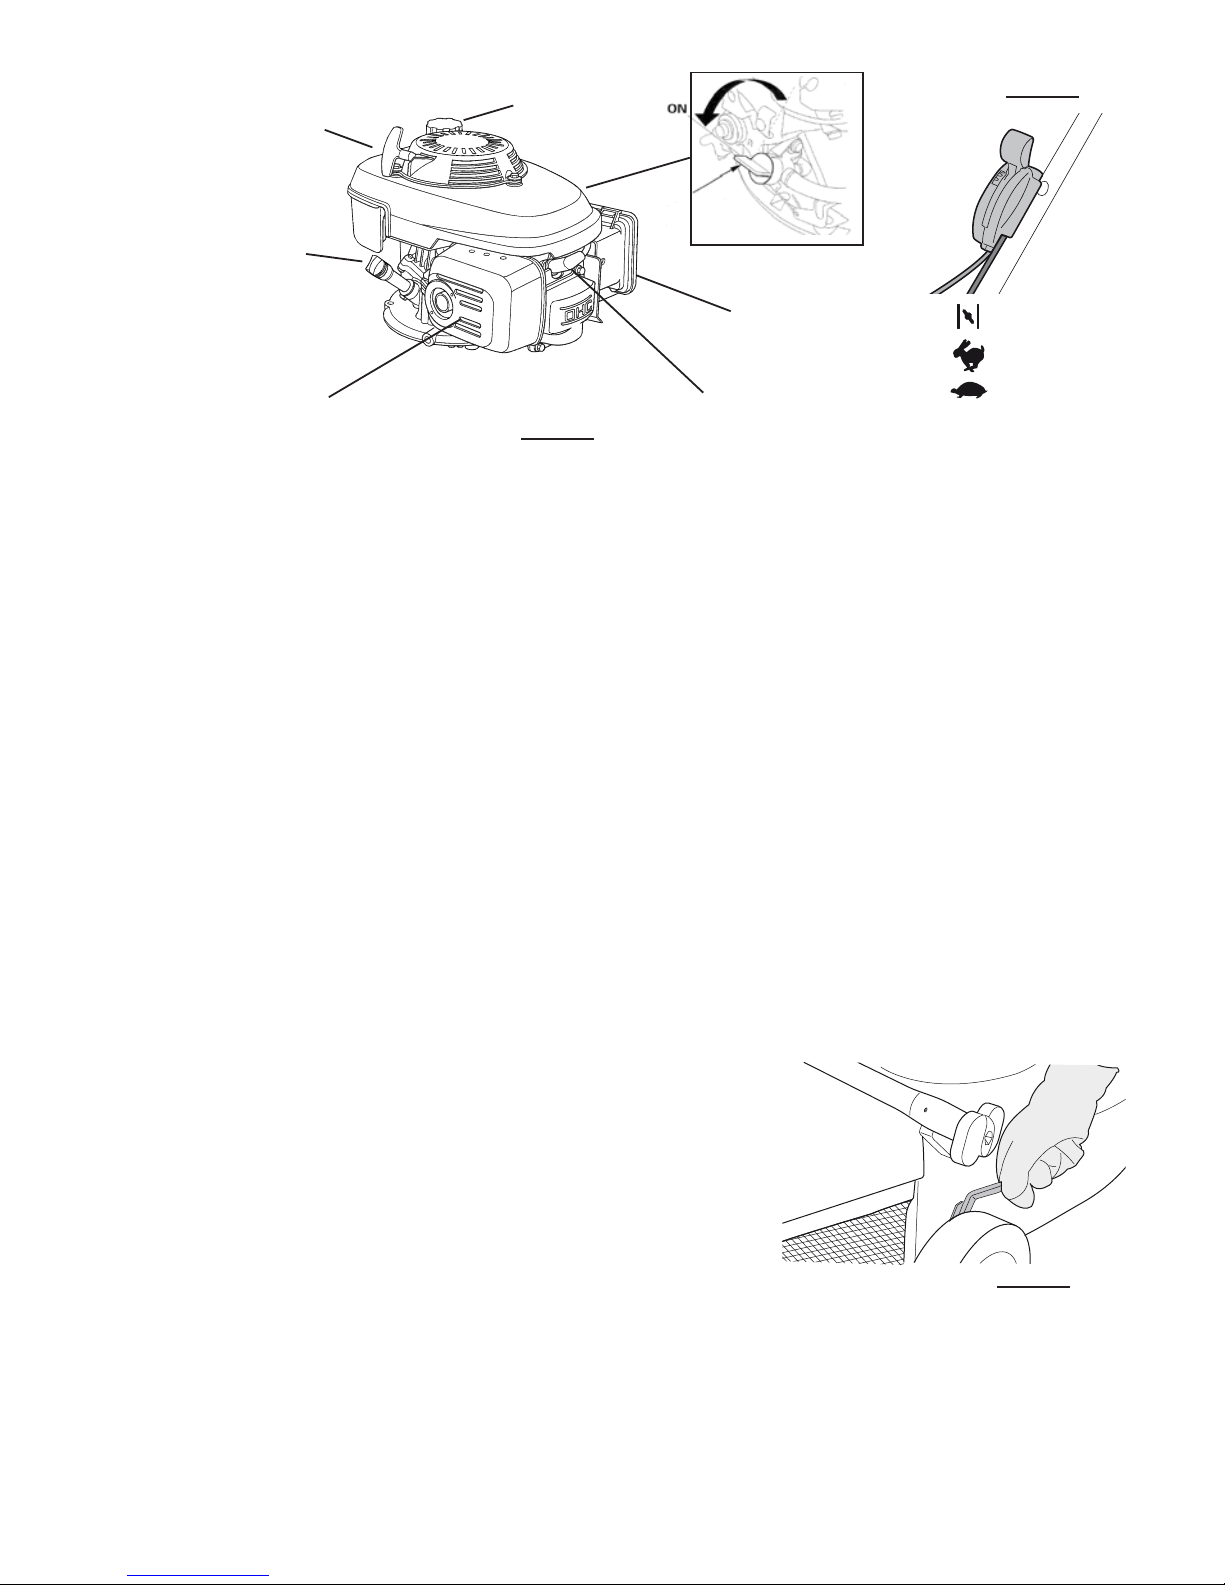
AVVIARE IL RASAERBA
Leggere e capire le norme di sicurezza prima di avviare il rasaerba.
t Riempire con olio SAE 10W-30, il serbaotio olio (Figura 3).Non riempire in eccesso, la capacità del serbatoio
olio è di 0.55 litri.
t Riempire il serbatoio con benzina verde. Utilizzare benzina fresca, benzina vecchia o lasciata depositare
potrebbe danneggiare il carburatore. Non riempire eccessivamente, il livello massimo è sotto la base del collo
dell’imboccatura del serbatoio.
t Assicurarsi che il cappuccio del cavo sia saldamente collegato alla candela.
t Aprire il rubinetto della benzina che si trova a lato del ltro d’aria. (Particolare Figura 3).
t Spostare il comando acceleratore sulla posizione “Choke” (Figura 4).
t Tirare e tenre la leva freno motore contro il manico per disinserire il freno. IL MOTORE NON SI AVVIA O SI
ARRESTA, A MENO CHE LA LEVA FRENO NON SIA TENUTA CONTRO IL MANICO.
t
Afferrare la manopola della fune di avviamento e tirare lentamente no ad avvertire una certa
resistenza, quindi dare un deciso strappo alla fune di avviamento.
Non rimuovere la fune dalla guida.
t A motore avviato rilasciare la fune, portare gradualmente la leva dell’accelleratore dalla posizione “CHOKE”
alla posizione “FAST”..
t Nei modelli con trazione, l’avanzamento del rasaerba avviene portando e premendo la leva innesto trazioneverso
il manico. Il rasaerba smette di avanzare al rilascio della leva.
NOTE: L’utilizzo della posizione “choke” è solitamente non necessaria quando si avviano motori già caldi.
In ogni caso, con clima freddo potrebbe essere necessario l’utilizzo del “choke” per avviare il motore.
FERMARE IL RASAERBA
t Rilasciare il comando freno motore, questo azionerà il freno motore bloccando l’alimentazione del motore che
si spegnerà.
REGOLAZIONE ALTEZZA DI TAGLIO
La regolazione dell’altezza di taglio si effettua per mezzo delle apposite
leve. Nel caso il tunnel scarico erba risultasse bloccato, alzare l’altezza di
taglio in modo da aumentare il usso d’aria. Per prevenire intasamenti
quando si tagliano prati con erba folta ed alta, regolare il rasaerba al livello
più alto, tagliare l’erba, in seguito tagliare nuovamente con uno settaggio
più basso.
Per sistemare l’altezza di taglio:
t fermare il motore e scollegare il cavo candela.
t posizionare il rasaerba su una supercie piana.
t regolare l’altezza di taglio spostando la leva e posizionandola al livello desiderato (Figura 5)
9
Figura 3
Tappo olio/
astina
Tappo serbatoio
carburante
Marmitta
Candela
Filtro aria
Maniglia fune
avviamento
Figura 4
CHOKE
FAST
SLOW
t Le quattro ruote devono essere regolate alla medesima altezza
Figura 5
Page 10
Spegnere il motore e scollegare il cavo candela prima di lavorare sulla macchina.
NON INCLINARE IL RASAERBA SUL SUO FIANCO, LA FUORIUSCITA DI OLIO POTREBBE DANNEGGIARE IL FILTRO ARIA.
é il manico si appoggia a terra.
LAMA
Esaminare la lama per cercare eventuali danni o usure.
Nel caso la lama fosse danneggiata deve essere sostituita. Il kit di sostituzione della lama è disponibile c/o il
. In caso di dubbi fare riferimento al vostro
rivenditore o contattare il servizio telefonico 0845 600 2912. Le
lame devono sempre essere marchiate 81004381/1.
REGOLAZIONE CAVO TRAZIONE(Solo modelli trazione)
Assicurarsi che la leva trazione sia completamente rilasciata.
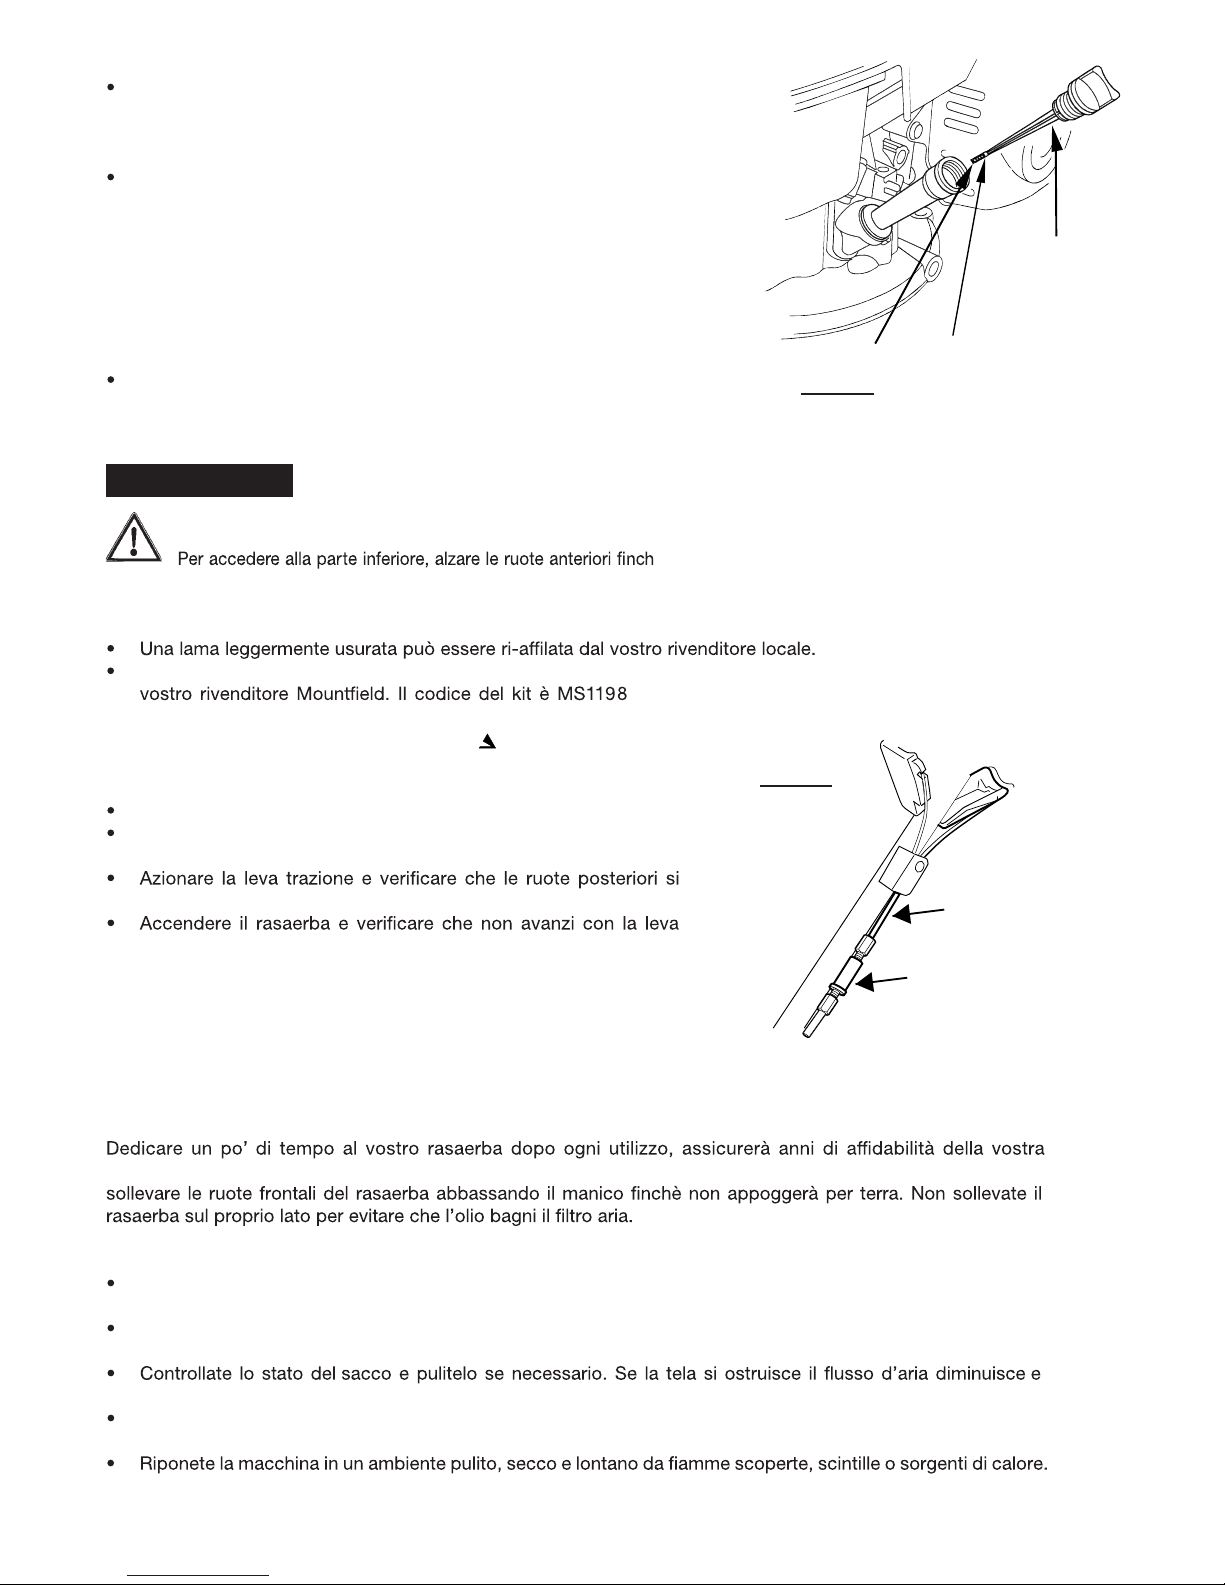
Allungare il registro del cavo svitandolo per un paio di giri. (Figura
7)
blocchino quando il rasaerba viene spinto in avanti.
trazione rilasciata.
MOTORE
Il manuale istruzioni del costruttore del motore è fornito con il rasaerba.
Leggete il manuale, fornirà informazioni dettagliate sulle funzionalità
del motore e la sua manutenzione. Interventi di riparazione diversi dalla normale manutenzione devono essere
operati da centri autorizzati dal costruttore del motore.
MAGAZZINAGGIO
macchina.Per accedere all’apparato di taglio, assicurarsi che il cappuccio della candela sia scollegato, in seguito
DOPO OGNI UTILIZZO
Rimuovere ogni residuo di erba dall’interno dello chassis servendosi di un oggetto non metallico, come un pezzo
di legno, e prestando attenzione a non danneggiare la verniciatura.
Esaminare la lama per trovare eventuali danni . Una lama danneggiata potrebbe disequilibrare il rasaerba
causando eccessive vibrazioni. Nel caso abbiate dubbi contattare un rivenditore specializzato.
penalizza la raccolta di erba.
Il manico può essere ripiegato per ridurre l’ingombro al momento dello stoccaggio. Assicuratevi di non
danneggiare od intorcigliare nessun cavo quando si distende o si piega il manico.
MANUTENZIONE
Figura 7
Cavo
Registro
10
Figura 6
PRIMA DI OGNI UTILIZZO
Assicurarsi che il rasaerba possa lavorare in condizioni di
sicurezza. Controllare che la lama non sia danneggiata; controllare gli
apparati di sicurezza e le protezioni; controllare che i dadi, i bulloni e le
viti siano serrate.
Controlla il livello olio come segue:
a) Rimuovere il tappo olio e pulire l’astina di livello (Figura 6)
b) Inserire nuovamente l’astina nell’apertura del serbatoio senza avvitarla
a fondo.
Estrarre l’astina livello olio. L’olio deve raggiungere il segno Max. La
capacità del serbatoio olio è di 0,55 litri.
c) Raboccare, se necessario, con olio SAE 10W-30. Il livello non deve
superare il segno MAX né essere al di sotto del segno MIN.
Non rabboccare oltre il livello MAX.
Riempire il serbatoio benzina con benzina senza piombo (verde).
Non rabboccare oltre la base del collo dell’apertura serbatoio.
TAPPO OLIO/
ASTINA
OLIO
LIMITE INFERIORE
LIMITE
SUPERIORE
Non provocare fuoriuscite di benzina.
Page 11
LUNGO TERMINE-Nel caso non si utilizzi il rasaerba per più di 28 giorni.
t Pulire accuratamente l’intera macchina prestando particolare attenzione alla parte interna dello chassis.
t Lubricare tutte le parti del rasaerba.
t Alla ne della stagione svuotare il serbatoio della benzina o esaurendo il carburante o inclinando la
macchina all’indietro, appoggiandola sulla ruota posteriore destra (lato operatore) e raccogliendo la benzina
in un apposito contenitore. Svuotare il carburatore svitando l’apposita vite e poi riavvitare.
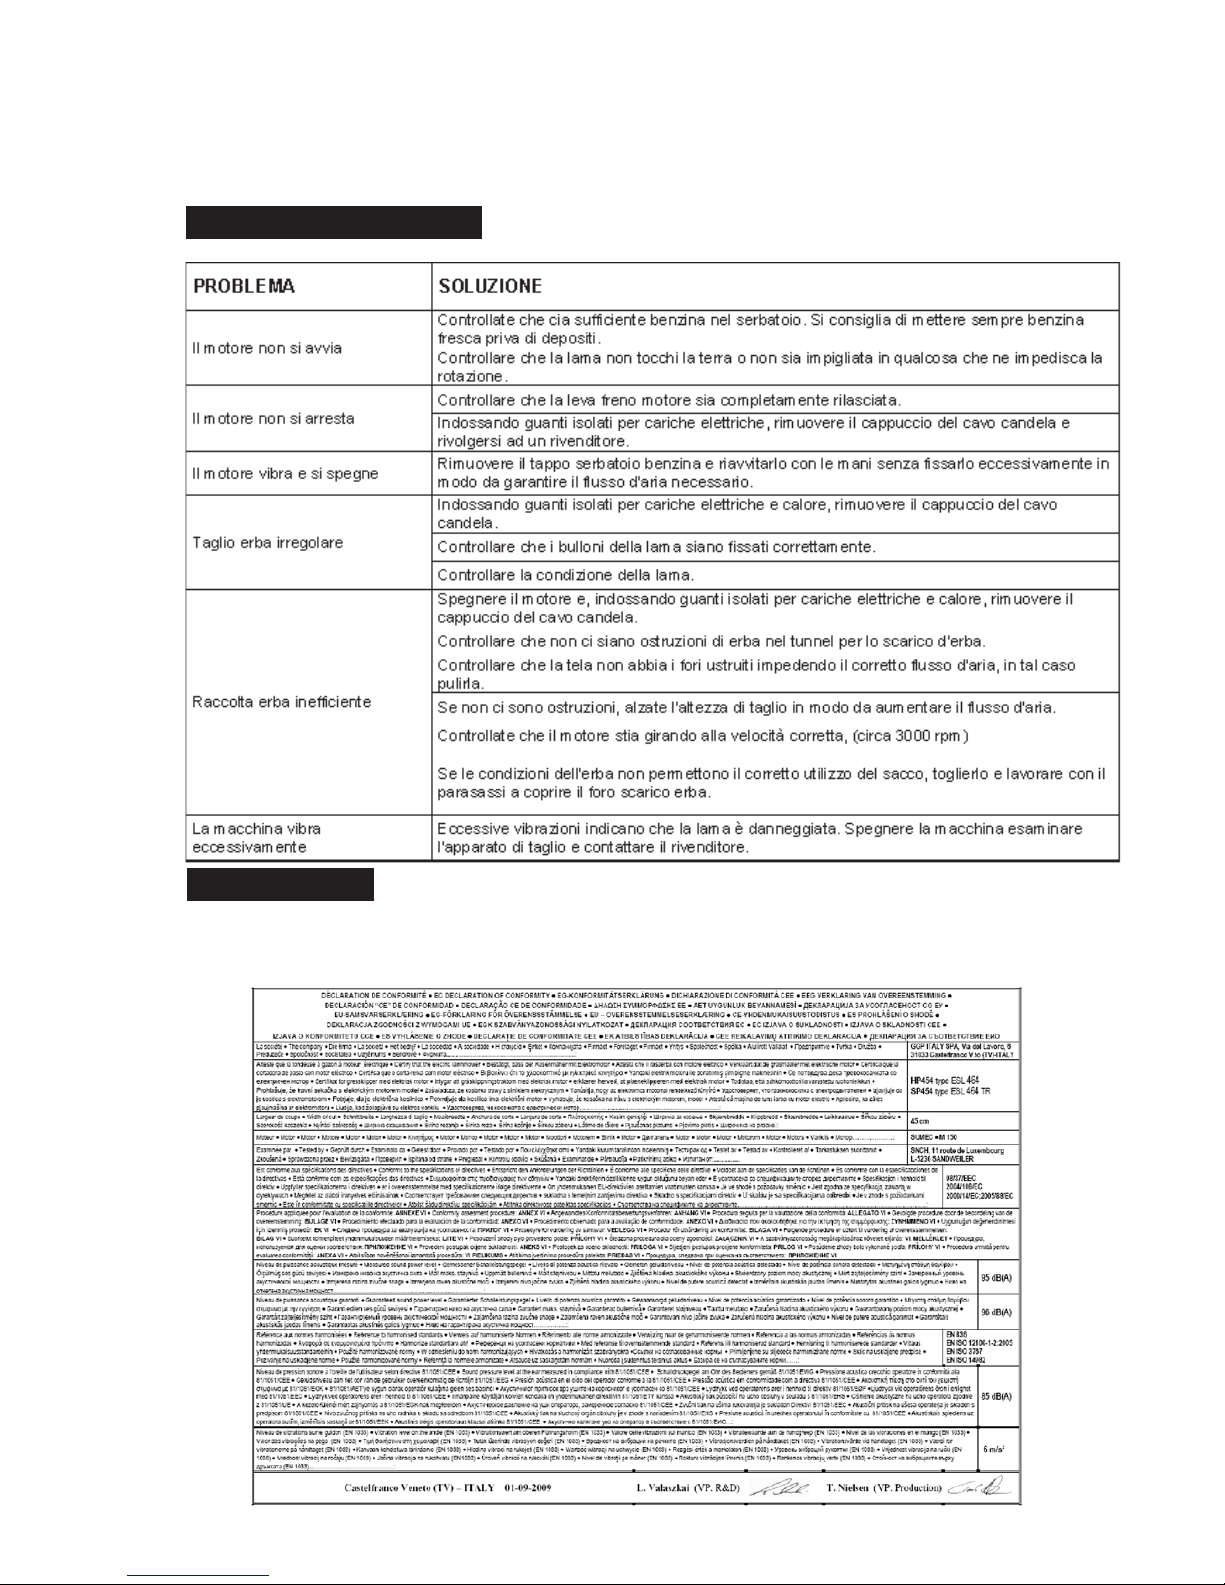
RISOLUZIONE PROBLEMI
Il certicato di conformità e allegato alla documentazione inclusa con il rasaerba, mostriamo qui un esempio.
11
ESEMPIO
MANUTENZIONE
CERTIFICATO
Page 12
reliable service if operated in accordance with these instructions.Please read and understand these
Operating Instructions before using your mower, failure to do so could result in personal injury
or damage to the equipment.
NEVER TIP THE MOWER ON ITS SIDE AS THIS WILL FLOOD THE AIR FILTER WITH OIL.
To access the underside, lift the front wheels by lowering the handle until it rests on the ground.
SAFETY PRECAUTIONS
Your lawnmower should be used with due care and attention. Symbols have therefore been placed on various
parts of the machine to remind you of the main precautions to be taken. Their meaning is explained below. You are
also asked to carefully read the safety regulations in the applicable chapter of this handbook.
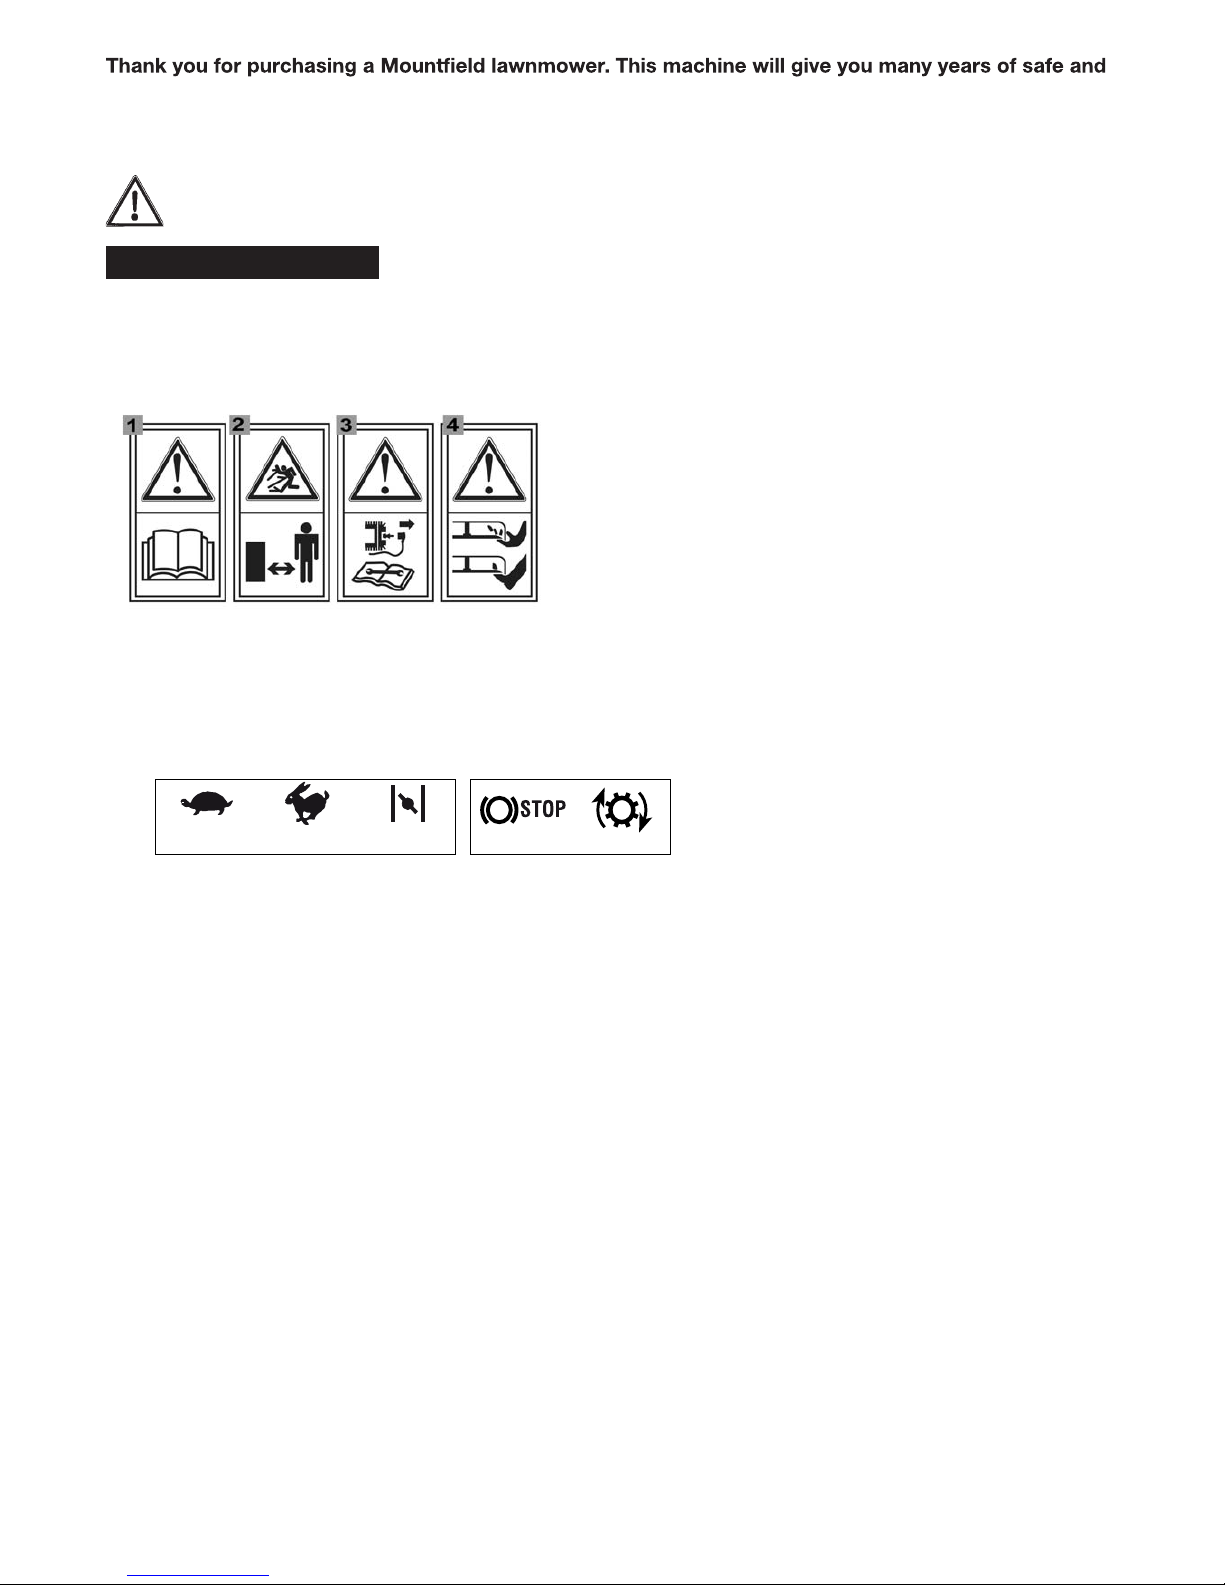
1. Warning: Read the instruction manual before using the
machine.
2. Beware of thrown objects: Keep other people at a
safe distance whilst working.
3.Warning: Disconnect the spark plug cap before carrying
out any repairs or maintenance.
4. Beware of cutting: Moving blades. Do not put hands
or feet near the blades.
DESCRIPTION OF SYMBOLS ON CONTROLS
5.
Slow 6. Fast 7. Choke 8. Engine stop 9. Drive on
Maximum noise and vibration levels
Operator ear noise pressure level
(according to regulation 81/1051/EEC)........................................ db(A) 82,7
- Measurement uncertainty (2006/42/EC - EN 27574)...................db(A) 0,3
____________________________________________________________
Measured acoustic output level
(according to directive 2000/14/EC, 2005/88/EC)........................ db(A) 96,6
- Measurement uncertainty (2006/42/EC - EN 27574)................... db(A) 0,3
____________________________________________________________
Guaranted acoustic output level
(according to directive 2000/14/EC, 2005/88/EC)........................ db(A) 98
____________________________________________________________
Vibration level (according to the standard EN 1033)................... m/s
2
6,54
- Measurement uncertainty (2006/42/EC - EN 12096)................. m/s
2
0,8
12
5.
6.
7.
8. 9.
Page 13
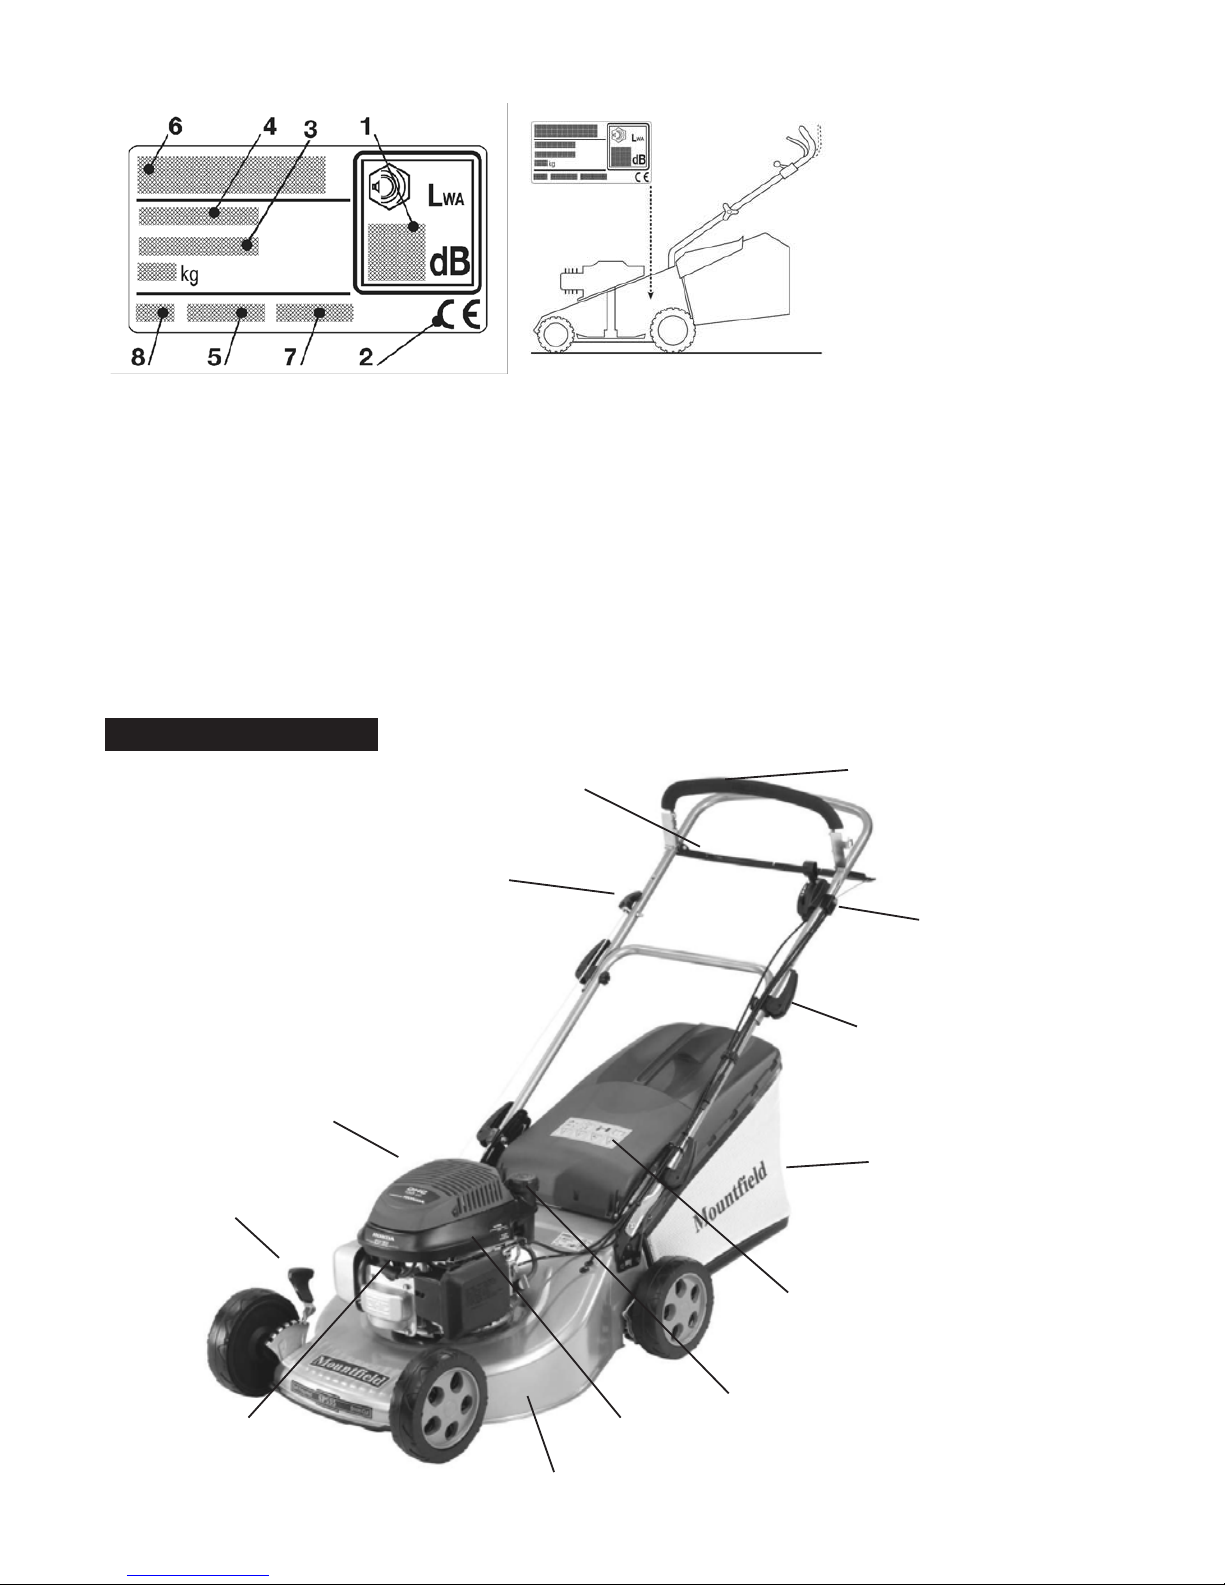
1. Acoustic power level according to directive 2000/14/EC.
2. Conformity mark according to directive 98/37/EEC (2006/42/EC from 29/12/2009).
3. Type of lawnmower..
4. Model of lawnmower.
5. Serial number.
6. Name and address of Manufacturer.
7. Article code.
8. Year of manufacture.
As soon as you have purchased the machine, do not forget to write the identification numbers (8-5-7) in the spaces
on the last page of the manual.
IDENTIFICATION LABEL
13
Clutch Lever
(Lower)
Operator Presence
Control (OPC) Lever
(Upper)
Grass Collector
Deflector Flap
Engine
Height
Adjuster
Cutter Deck
Fuel
Filler Cap
Handle Locking Lever
Pull Cord & Guide
Spark
Plug
Oil Filler Cap/Dipstick
(located at rear of engine)
Throttle Control
KNOW YOUR MOWER
Page 14

The following safety precautions must be observed at all times. Please read them very carefully.
TRAINING
1) Read the instructions carefully. Get familiar with the controls and proper use of the equipment.
Learn how to stop the engine quickly.
2) Only use the lawnmower for the purpose for which it was designed, i.e. for cutting and collecting
grass. Any other use can be hazardous, causing damage to the machine. Examples of improper use
may include, but are not limited to:
–transport of people, children or animals on the machine;
–being transported by the machine;
–using the machine to tow or push loads;
–using the machine for leaf or debris collection;
–using the machine to trim hedges, or for cutting vegetation other than grass;
–use of the machine by more than one person;
–using the blade on surfaces other than grass.
3) Never allow children or people unfamiliar with these instructions to use the lawnmower. Local
regulations may restrict the age of the operator.
4) Never use the lawnmower:
–When people, especially children, or pets are nearby.
–If the operator has taken medicine or substances that can affect his ability to react and concentrate.
5
) Remember that the operator or user is responsible for accidents or hazards occurring to other people
or their property.
6) Never put your hands, feet or any implement under the cutter deck or inside the rear discharge
chute. The cutter blade will continue to rotate for some time after the engine is switched off.
PREPARATION
1) While mowing, always wear sturdy footwear and long trousers. Do not operate the equipment
when bare foot or wearing open sandals. Avoid loose clothing that may snag on moving
parts.
2) Thoroughly inspect the area where the equipment is to be used and remove all objects which may
be thrown by the machine or damage the cutter assembly and the engine (stones,sticks, metal
wire,bones, etc.).
3) WARNING: DANGER! Engine fuel is highly flammable:
–Store fuel in containers specifically designed for this purpose.
–Refuel using a funnel and outdoors only. Do not smoke while refuelling or whenever
handling the fuel.
–Add fuel before starting the engine. Never remove the cap of the fuel tank or add fuel while the
engine is running
or when the engine is hot.
–If fuel is spilled, do not attempt to start the engine but move the machine away from the area of
spillage and avoid creating any source of ignition until the fuel has evaporated and the vapour has
dispersed.
–Replace all fuel tanks and containers caps securely.
4) Substitute faulty silencers.Never use the machine without a silencer.
5) Before use, always inspect the machine, especially the condition of the blades, and check
that the screws and cutting assembly are not worn or damaged.
Replace worn or damaged blades and screws in sets to preserve balance.
6) Before mowing, attach the discharge opening guards (grass-catcher or stone-guard).
OPERATION
1) Do not operate the engine in a confined space where dangerous carbon monoxide fumes can collect.
2) Mow only in daylight or good artificial light.
3) If possible avoid operating the equipment on wet grass.
4) Always be sure of your footing on slopes.
5) Walk, never run and do not allow yourself to be pulled along by the lawnmower.
6) Mow across the face of
slopes, never up and down.
14
Page 15

7) Exercise extreme caution when changing direction on slopes.
8) Do not mow on slopes of more than 20 degrees.
9) Exercise extreme caution when pulling the lawn mower towards you.
10) Stop the blade if the lawnmower has to be tilted for transportation when crossing surfaces other
than grass, and when transporting the lawnmower to and from the area to be mown.
11) Never operate the lawnmower with defective guards, or without safety devices, such as the stone guard and/or grass-catcher, in place.
12) Do not change the engine governor settings or over rev the engine.
13) On power-driven models, disengage the drive clutch before starting the engine.
14) Start the engine carefully, following the instructions and keeping feet well away from the blade.
15) Do not tilt the lawnmower when starting the engine. Start the engine on a flat surface that is free
of obstacles and tall grass.
16) Do not put your hands or feet near or under rotating parts.Keep clear of the discharge opening
at all times.
17) Never pick
up or carry a lawnmower while the engine is running.
18) Stop the engine and disconnect the spark plug wire:
–Before carrying out any work underneath the cutting deck or before unclogging the chute;
–Before checking, cleaning or working on the lawnmower;
–After striking a foreign object. Inspect the lawnmower for damage and make repairs before
restarting and operating the lawnmower;
–If the lawnmower begins to abnormally vibrate (Immediately look for the cause of the vibrations
and take for necessary controls at a Specialised Centre).
19) Stop the engine:
–Whenever you leave the lawnmower unattended. Remove the key from models with electric
starters.
–Before refuelling.
–Every time you remove or replace the grass-catcher.
–Before adjusting the grass cutting height.
20) Reduce the throttle before turning off the engine and turn the fuel off when you have finished
mowing, following the in-structions in the engine handbook.
21) When mowing, always keep to a safe distance from the rotating blade.
This distance is the length
of the handle.
MAINTENANCE AND STORAGE
1) Keep all nuts, bolts and screws tight to be sure the equipment is in safe working condition. Regular
maintenance is essential for safety and performance.
2) Never store the equipment with fuel in the tank inside a building where vapour may reach a flame or
a spark or a source of extreme heat.
3) Allow the engine to cool before storing in an enclosed space.
4) To reduce the fire hazard, keep the engine, exhaust silencer, battery compartment and fuel storage
area free of grass, leaves, or excessive grease. Do not leave containers with grass cuttings in rooms.
5) Check the stone-guard and the grass-catcher frequently for wear and deterioration.
6) If the fuel tank has to be drained, this should be done outdoors and when the engine is cool.
7) Wear strong work gloves when removing and reassembling the blade.
8) Keep the blade balanced during sharpening. All operations on the blade (dismantling, sharpening,
remounting balancing, and/or replacing) require a certain familiarity and special tools. For safety reasons,
these jobs are best carried out at a specialized centre.
9) For safety reasons, never use the machine when it has worn or damaged parts. Parts are to be
replaced and
not repaired. Use genuine spare parts. Parts that are not of the same quality
can damage the equipment and impair your safety.
TRANSPORTATION AND HANDLING
1) Whenever the machine is to be handled, raised, transported or tilted you must:
–wear strong working gloves;
–grasp the machine at the points that offer a safe grip, taking account of the weight and its
distribution.
–use an appropriate number of people for the weight of the machine and the characteristics of
the vehicle or the place where it has to be placed or collected.
2) During transport, fasten the machine securely with ropes or chains.
15
Page 16
HOW TO GET MOWING
Your Mounteld lawnmower does not contain petrol or oil and these must be added before use. Running
the mower with insufcient oil can cause serious damage to the engine and will invalidate your
warranty.
NEVER TIP THE MOWER ONTO ITS SIDE AS THIS WILL FLOOD THE AIR FILTER WITH OIL.
To access the underside of the machine lift the front wheels by lowering the handle to the ground.
Carefully remove the mower from the carton and read these Operating Instructions. An Owner’s Manual
for the engine is also included, please read this before starting the engine.
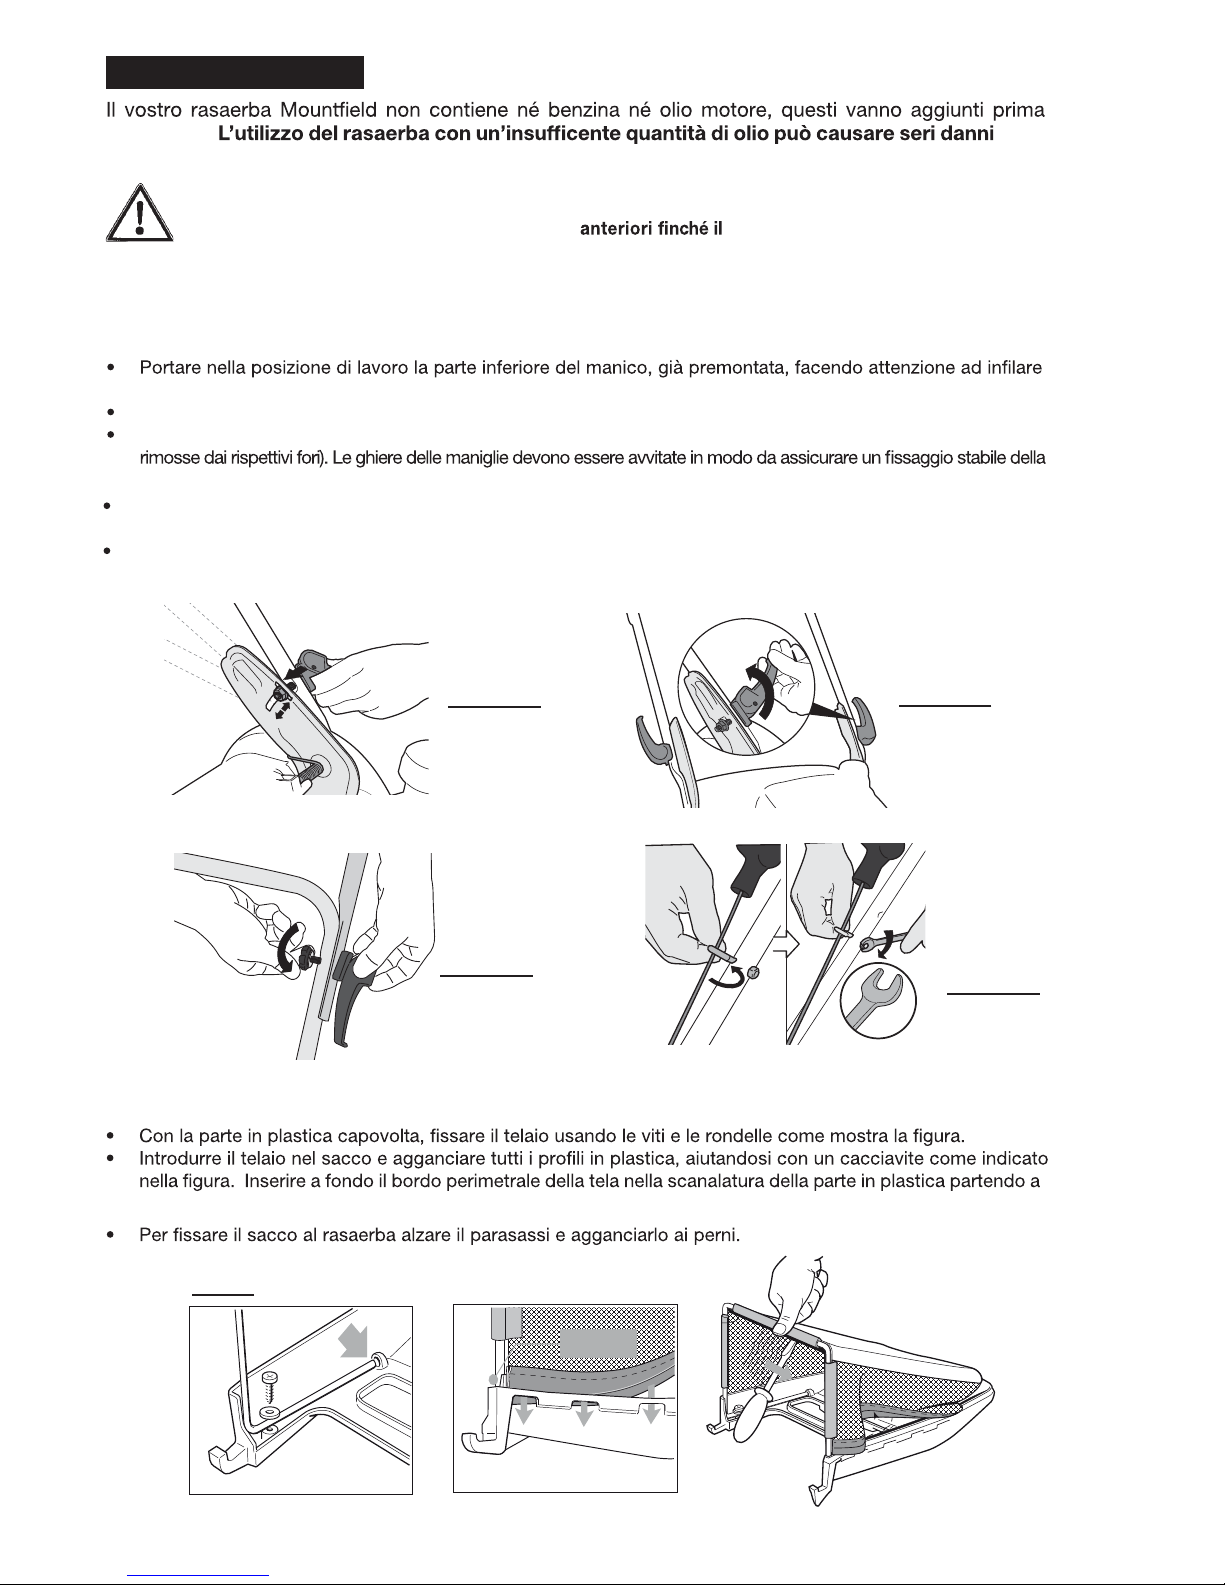
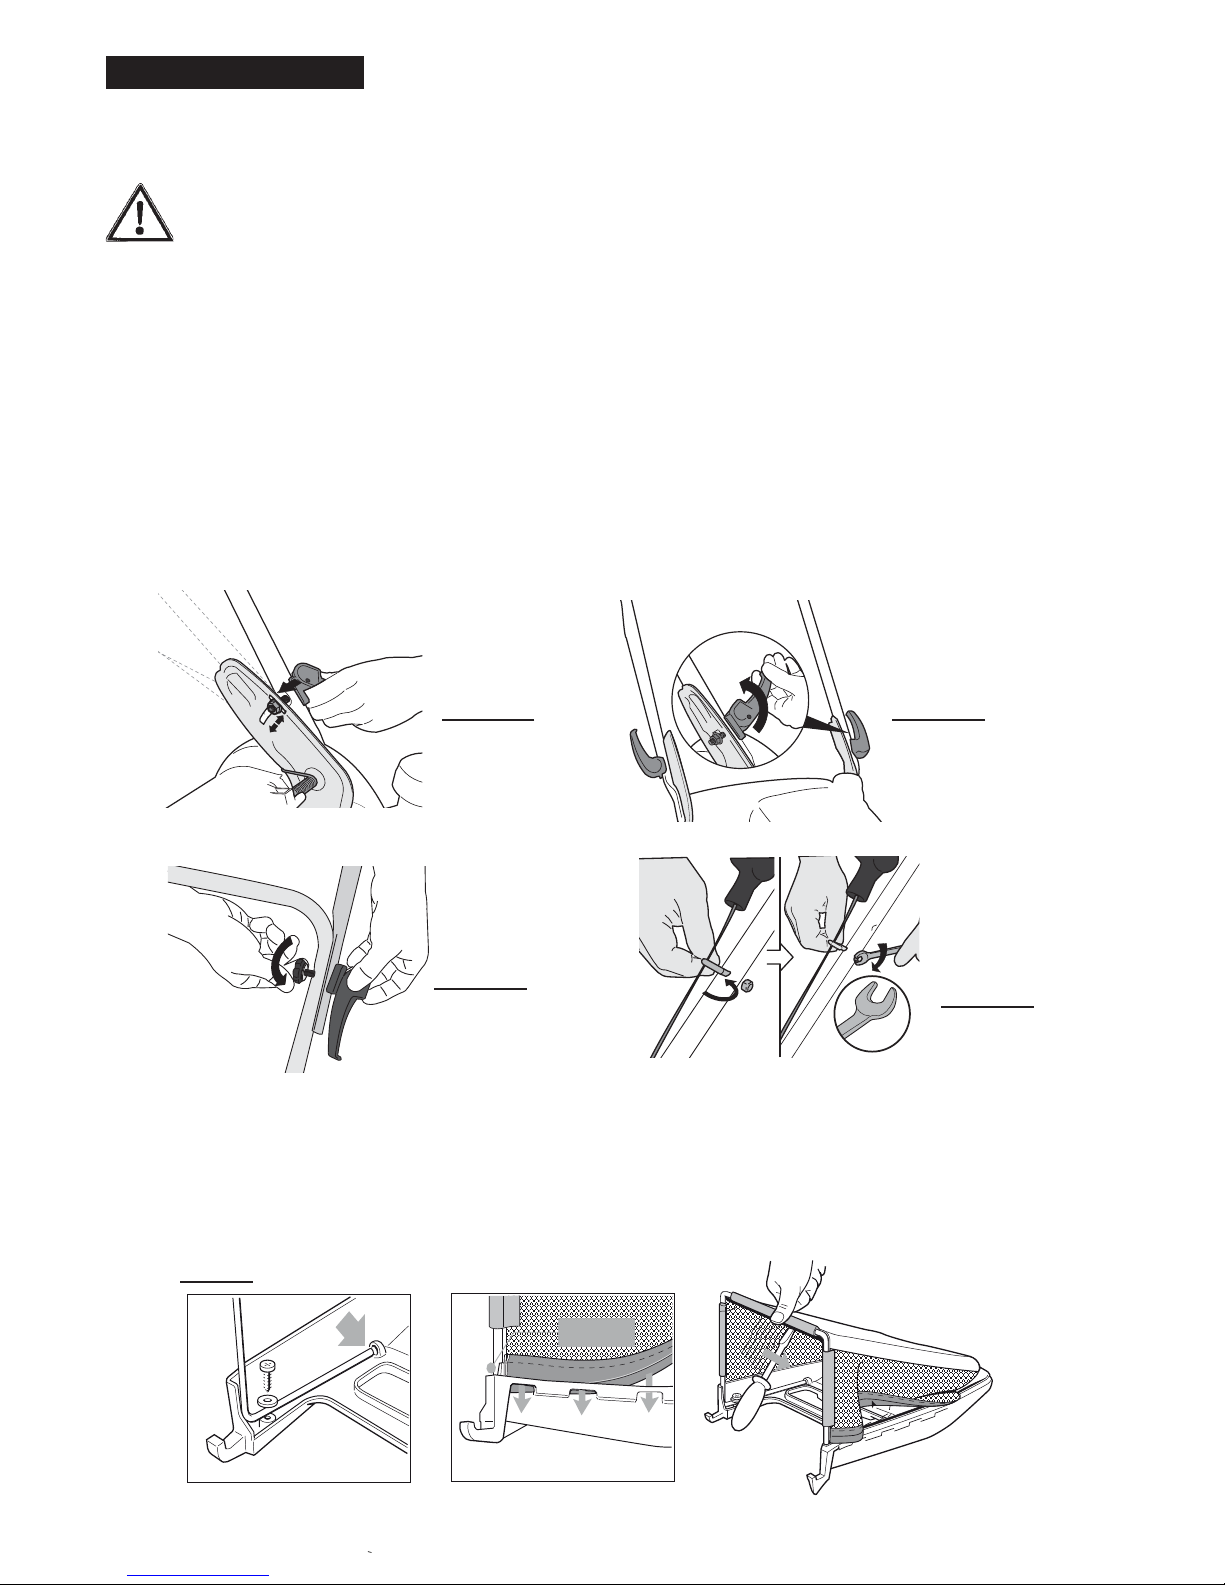
HANDLE ASSEMBLY
t Move the handle’s lower part, already preassembled, to the working position, making sure the two nuts are correctly
inserted in the openings on the two side chassis supports (Figure 1-A).
t Move the handle’s grip to the desired height and block the lower clamps (Figure 1-B).
t Attach the upper part and tighten the handle’s two parts with the upper clamps (5) (previously removed from
their holes). The washers on the handles must be mounted so they keep the top part rmly xed to the lower section
of the handle, without too much effort required to tighten or release them. (Figure 1-C).
t Engage the Operator Presence Control (OPC) lever to release the engine brake. Pull the starter cord and t
it into the cord guide. Fit the cord guide to the upper handle using a 10mm spanner (Figure 1-D).
t Use cable ties to t the OPC cable (and clutch cable if tted) to the handle assembly.
GRASS COLLECTOR
t Turn the top upside down and t the frame to it as shown using the screws and washers supplied.
t Fit the cloth base by fastening the plastic bars onto the frame, it may help to use a screwdriver as shown in the
drawing to do this. Then click the edge into the groove in the top starting 5-7mm from an end (Figure2).
t To t the grass collector onto the mower, lift the rear safety deector ap and hook the collector onto the pegs.
Figure 1-A
Figure 1-D
Figure 1-B
10
1
0
Figure 2
Figure 1-C
16
16
5-7 mm
Page 17
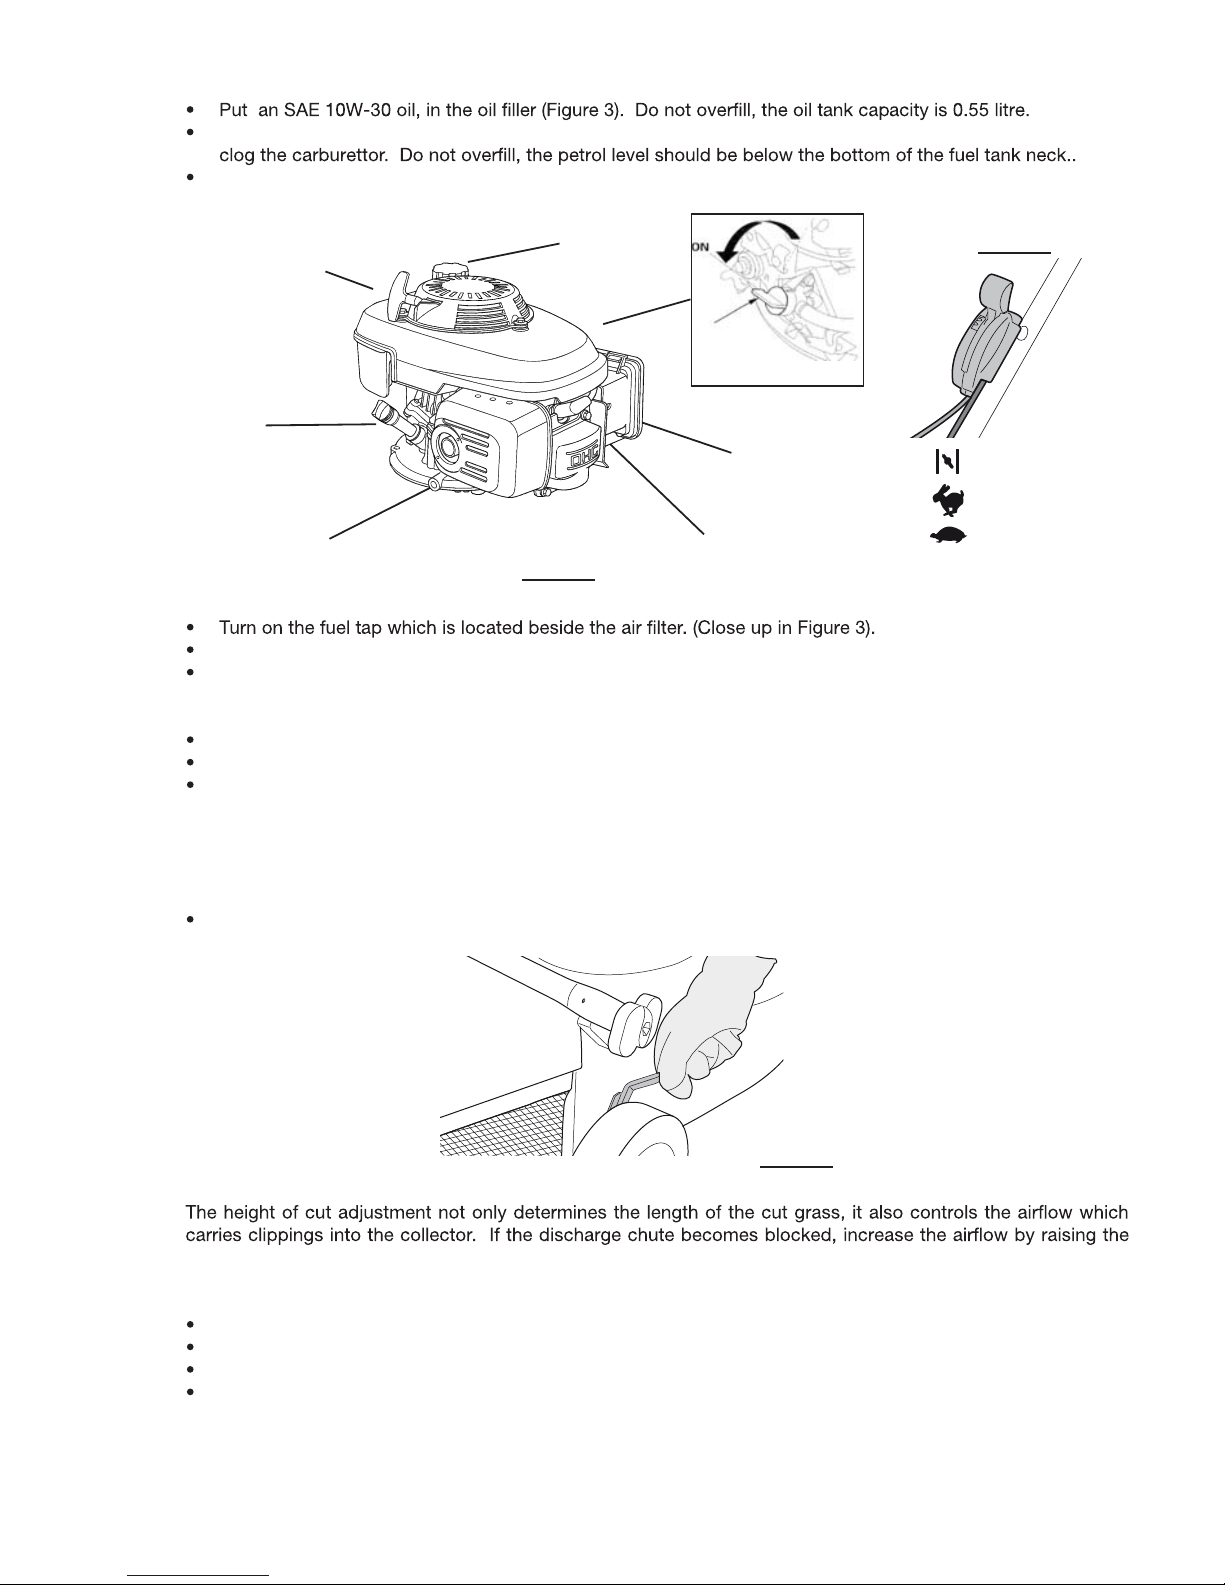
STARTING YOUR MOWER
Read and understand the Safety Precautions before using your mower.
Fill the fuel tank with UNLEADED petrol. Use only clean, fresh petrol - stale fuel may contain deposits that will
Ensure that the spark plug lead is securely connected to the spark plug.
Move the throttle control to the “Choke” positiion (Figure 4).
Pull and hold the Operators Presence Control (OPC) lever against the handle to disengage the engine brake.
THE ENGINE WILL NOT START, OR CONTINUE TO RUN, UNLESS THE OPC LEVER IS HELD AGAINST
THE HANDLE.
Pull the starter cord with a strong smooth pull. Do not remove the pull cord from the guide.
When the engine starts move the throttle control from “Choke” to the “Fast” position.
To engage the drive to the rear wheels on Power Driven models, pull and hold the clutch lever against the
handle. To stop the drive, release the clutch lever.
NOTE: Using the choke is usually unnecessary when starting a warm engine. However, in cool weather it may
still be necessary to use the choke to start the engine.
STOPPING YOUR MOWER
Release the Operators Presence Control (OPC) lever; this will engage the engine brake and operate the
ignition safety cut out device.
ADJUSTING THE HEIGHT OF CUT
height of cut. To prevent blockages when cutting long, thick grass, set the adjustment to the highest setting and cut
the grass; then cut it again on a lower setting.
To adjust the height of cut:
stop the engine and disconnect the spark plug.
put the mower on a level surface.
adjust the cutting height levers by pulling outwards and moving into the required position (Figure 5)
check the cutter deck is level after adjusting the levers, i.e. that they are all set at the same height.
Figure 5
Figure 3
Oil Filler Cap/
Dipstick
Fuel Filler Cap
Exhaust
Spark Plug
Air Filter
Pull Cord
Handle
Figure 4
17
CHOKE
FAST
SLOW
Page 18
BEFORE EACH USE
Always ensure that the mower is in a safe working condition. Inspect
the cutter blade for damage; check safety devices and guards; check
that all nuts, bolts and screws are secure.
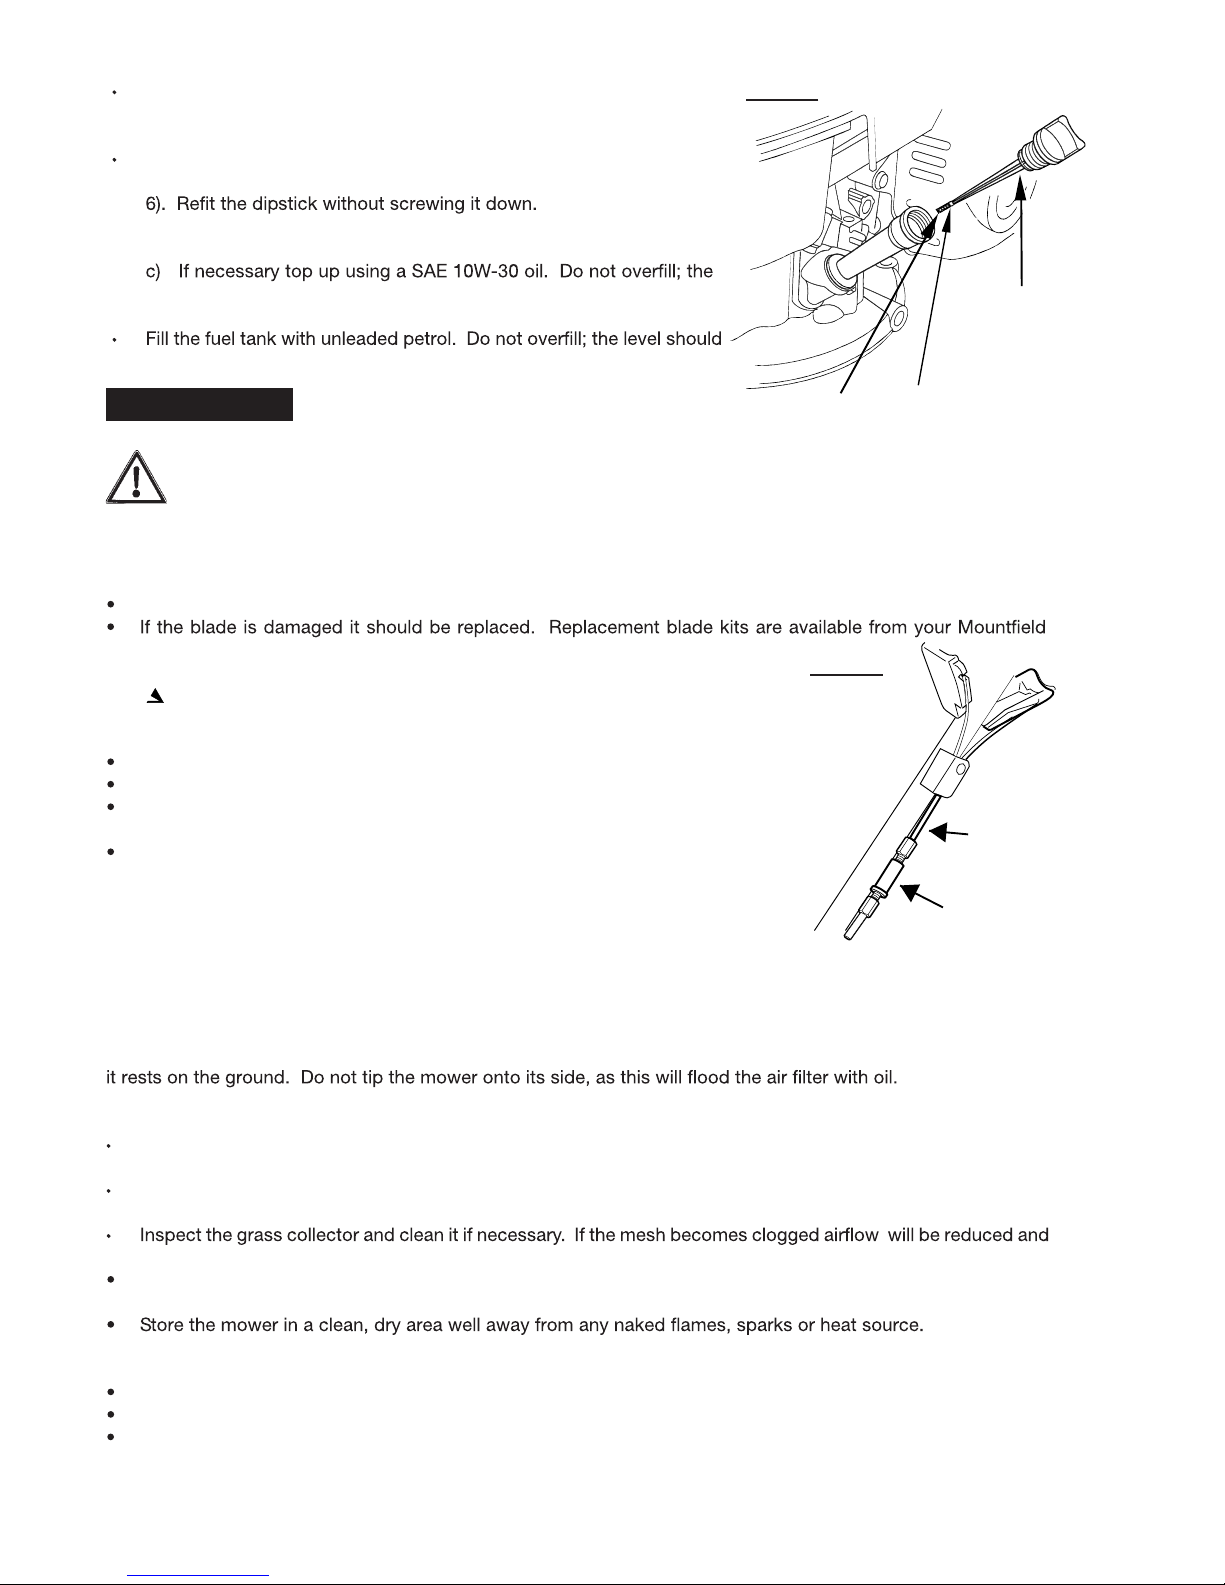
Check the oil level as follows:
a) Remove the Oil Filler/Dipstick and wipe the dipstick clean (Figure
b) Remove the dipstick again and check the oil level is at the
Maximum mark.
oil level should not be above the Maximum mark or below the Minimum
mark. The oil tank capacity is about 0.55litre.
be below the bottom of the fuel tank neck.
Stop the engine and disconnect the spark plug lead before working on the machine. DO NOT TIP
THE MOWER ONTO ITS SIDE AS THIS WILL FLOOD THE AIR FILTER WITH OIL. To access the
underside of the machine, lift the front wheels by lowering the handle until it rests on the ground.
CUTTER BLADE
Examine the cutter blade regularly for wear or damage.
A slightly worn blade can be re-sharpened by your local dealer.
stockist. The part number for the blade kit is MS1198. If in doubt refer to
your dealer, or telephone 0845 600 2912. Blades must always be marked
81004381/1.
CLUTCH CABLE ADJUSTMENT (Self Propelled model only)
Make sure that the clutch lever is fully released.
Lengthen the cable adjuster by unscrewing it a couple of turns. (Figure 7)
Engage the clutch lever and check that the rear wheels lock when the mower
is pulled backwards.
Start the mower and ensure it does not drive when the lever is disengaged.
ENGINE
An engine manufacturer’s Owner’s Manual is supplied with your mower. Please
read this, it provides detailed information on engine operation and maintenance.
Repair work other than routine maintenance, should be carried out by an authorised dealer.
STORAGE
A little time spent on your mower after use will ensure many years of reliable mowing. To access the underside of
the cutter deck, ensure the spark plug lead is disconnected, then lift the front wheels by lowering the handle until
AFTER EACH USE
Remove any grass pulp from the underside of the cutter deck using a non-metallic instrument such as a piece
of wood. Take care not to damage the paintwork.
Examine the cutter blade for any damage. A damaged blade may upset the balance of your mower and cause
excessive vibration, if in doubt refer to your dealer.
impair grass collection.
The handle can be folded down to reduce the amount of storage space required. Take care not to trap any of
the operating cables when folding or unfolding the handle.
LONG TERM - If you are not using your mower for more than 28 days.
Give the machine a thorough clean, paying particular attention to the underside.
Lubricate all moving parts.
At the end of the season, empty the fuel tank either by running the mower out of fuel or tip the machine
backwards and onto the back right wheel to drain the fuel into a suitable container. Drain the carburettor by
loosening the drain screw, retighten the drain screw.
MAINTENANCE
Cable
Adjuster
18
Figure 7
Figure 6
OIL FILLER CAP/
DIPSTICK
LOWER LIMIT
UPPER LIMIT
Page 19
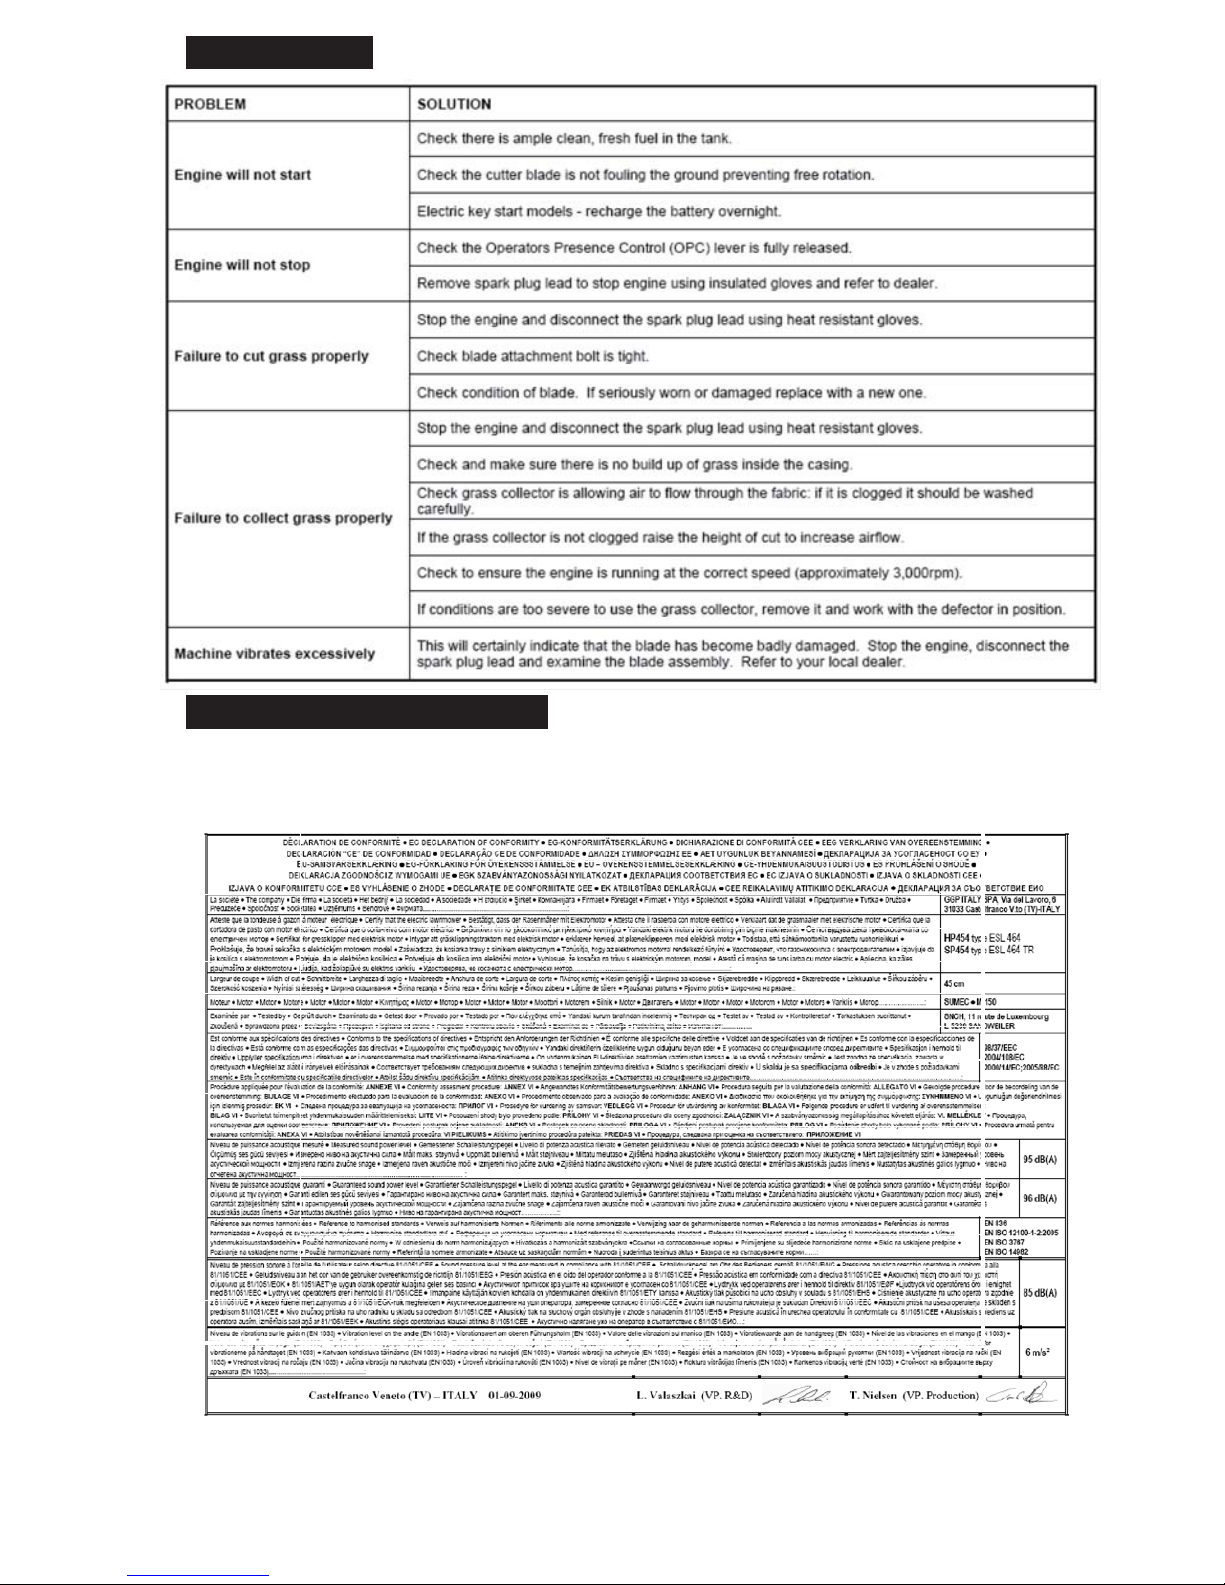
FAULT FINDING
CERTIFICATE OF CONFORMITY
PR OB LE M SO LUTI O N
En gin e w ill n ot st art
Ch e ck there is am p le cle an , fresh fue l in the tan k.
Ch e ck the c ut ter bla de is n ot fo uling the g round pre ve nting fre e ro tation.
En gin e w ill n ot st op
Ch e ck the O p era tors Presence C ontrol (O PC ) le ver i s fully rel e ased.
Re m ove spa rk plu g lead to st op engine us ing insul ated glo v es an d ref er to dealer.
En gin e h unts a nd sto ps Re m ove fu el ca p to r ele as e air lo ck and re plac e i t jus t fing er tigh t, do n ot ove r-tighten.
Fai lu re to cu t g ras s prope rly
Stop the eng ine an d dis connect the spa rk p lug le ad us ing h ea t re sis tant gl oves.
Ch e ck bla de atta chme nt bolt is tig ht.
Ch e ck cond ition of blade . If serio us ly worn or da m ag ed r eplace w ith a ne w on e.
Fai lu re to co llect g ras s pro pe rly
Stop the eng ine an d disconnect the spa rk plug le ad usin g he at re sis tant gl oves.
Ch e ck and m ak e su re the re is no bu ild up of gra ss ins ide the c asin g.
Ch e ck g ras s catcher is allowin g ai r to flo w through the fab ric ; if it is clogge d it sho uld be was he d
caref ull y.
If th e g rass ca tche r is n ot clog ged r ais e t he he igh t of c ut to i ncrea se ai rflo w.
Ch e ck to ensur e the engine is run ning at the co rrect spee d, ( ap pro xim ate ly 3 000rp m ).
If co nditi ons ar e too s ev ere to u se the grass catc he r, re move it an d work wit h t he d eflec to r in po sition.
Ma ch in e vib rat es ex ce ssiv ely
T his will cert ain ly in dic at e tha t the bla de has becom e badly dam aged. Stop the eng ine, d iscon nect the
spark plug le ad an d exam ine th e b la de assembly. Re fer to you r l ocal d e aler .
A certificate of conformity is enclosed with the documentation as separate document. An EXAMPLE is shown
below.
19
EXAMPLE
Page 20
GuaranteeGuarantee
GGP UK Limited undertakes to provide a full guarantee against defective materials or workmanship
for two years from the date of purchase subject to the mower receiving an annual service.
If the machine is used for commercial purposes; i.e. for hire; or by contractors, caravan sites or
similar users, this guarantee period shall be 90 days.
If any part or parts are found to be defective within the guarantee period, GGP UK Limited, via their
authorised dealer, will effect the repair or replacement at no charge to the owner providing that the
dealer. Delivery and collection of the machine is the owner’s responsibility and not covered
under the terms of this guarantee.
This guarantee is not transferable. Proof of purchase will be required in the event of a claim.
This guarantee does not apply to the routine replacement of parts that are subject to normal wear
and tear – or to normal service and maintenance parts. This guarantee does not cover faults caused
by neglect or misuse.
This guarantee is in addition to, and does not detract from, the contractual rights of the owner under
st
atute or common law.
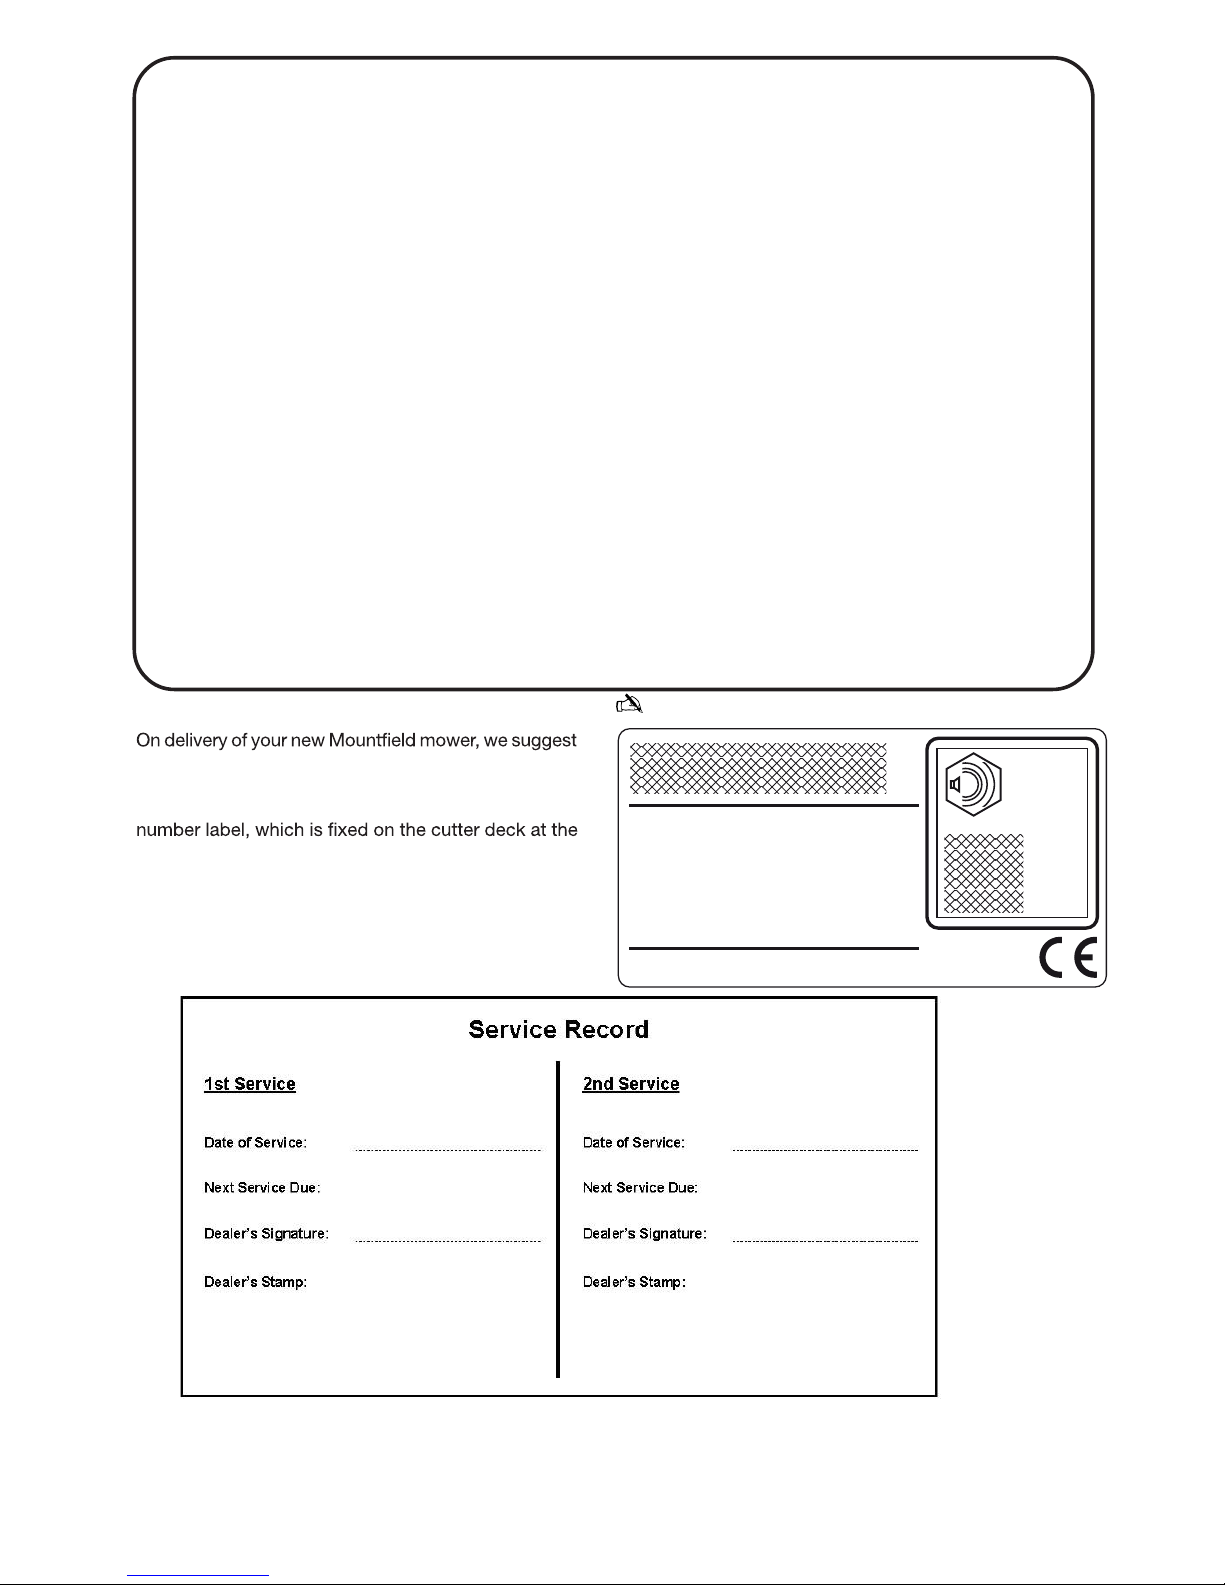
that you complete the box to the right.
The information for your machine is on the serial
base of the handles. You will be asked for these details
if you have any problems or require spare parts.
Please keep your receipt, proof of purchase will be
required in the event of a claim.
GGP UK LIMITED
Unit 8, Bluewater Estate, Bell Close, Plympton, Plymouth, Devon, PL7 4JH, England.
manufactured by GGP ITALY SpA Via del Lavoro, 6 I-31033 Castelfranco Veneto (TV) Italy
L
WA
(Year) . . . . . . . S/N ° . . . . . . . . . . . . . . . .
dB
Model: . . . . . . . . . . . . . . . .
Type: . . . . . . . . . . .
171503962/0
fault is reported direct to the dealer. All repairs must be carried out by an authorised Mounteld
The engine manufacturer guarantees the engine tted to this machine.
 Loading...