

Mountain Buggy Lite User Manual
User Guide EN Page 1
Gebrauchsanleitung D Page 10
Istruzioni per l’uso IT Page 19
Manual de montaje ES Page 28
Mode d’emploi FR Page 37
Gebruikershandleiding NL Page 46
IMPORTANT: KEEP FOR FUTURE REFERENCE
Buggypod® from Revelo Ltd
Granted European Patent No. 1747137
Granted U.S. Patent No. 7677585
Revelo Limited offers customer support
via telephone and email. Please contact us
on 0870 850 3463 (UK only, Mon-Fri) or visit
www.buggypod.com
03/14
Dear Customer,
At Revelo Ltd we pride ourselves in bringing you innovative products of
quality which have great design and production values.
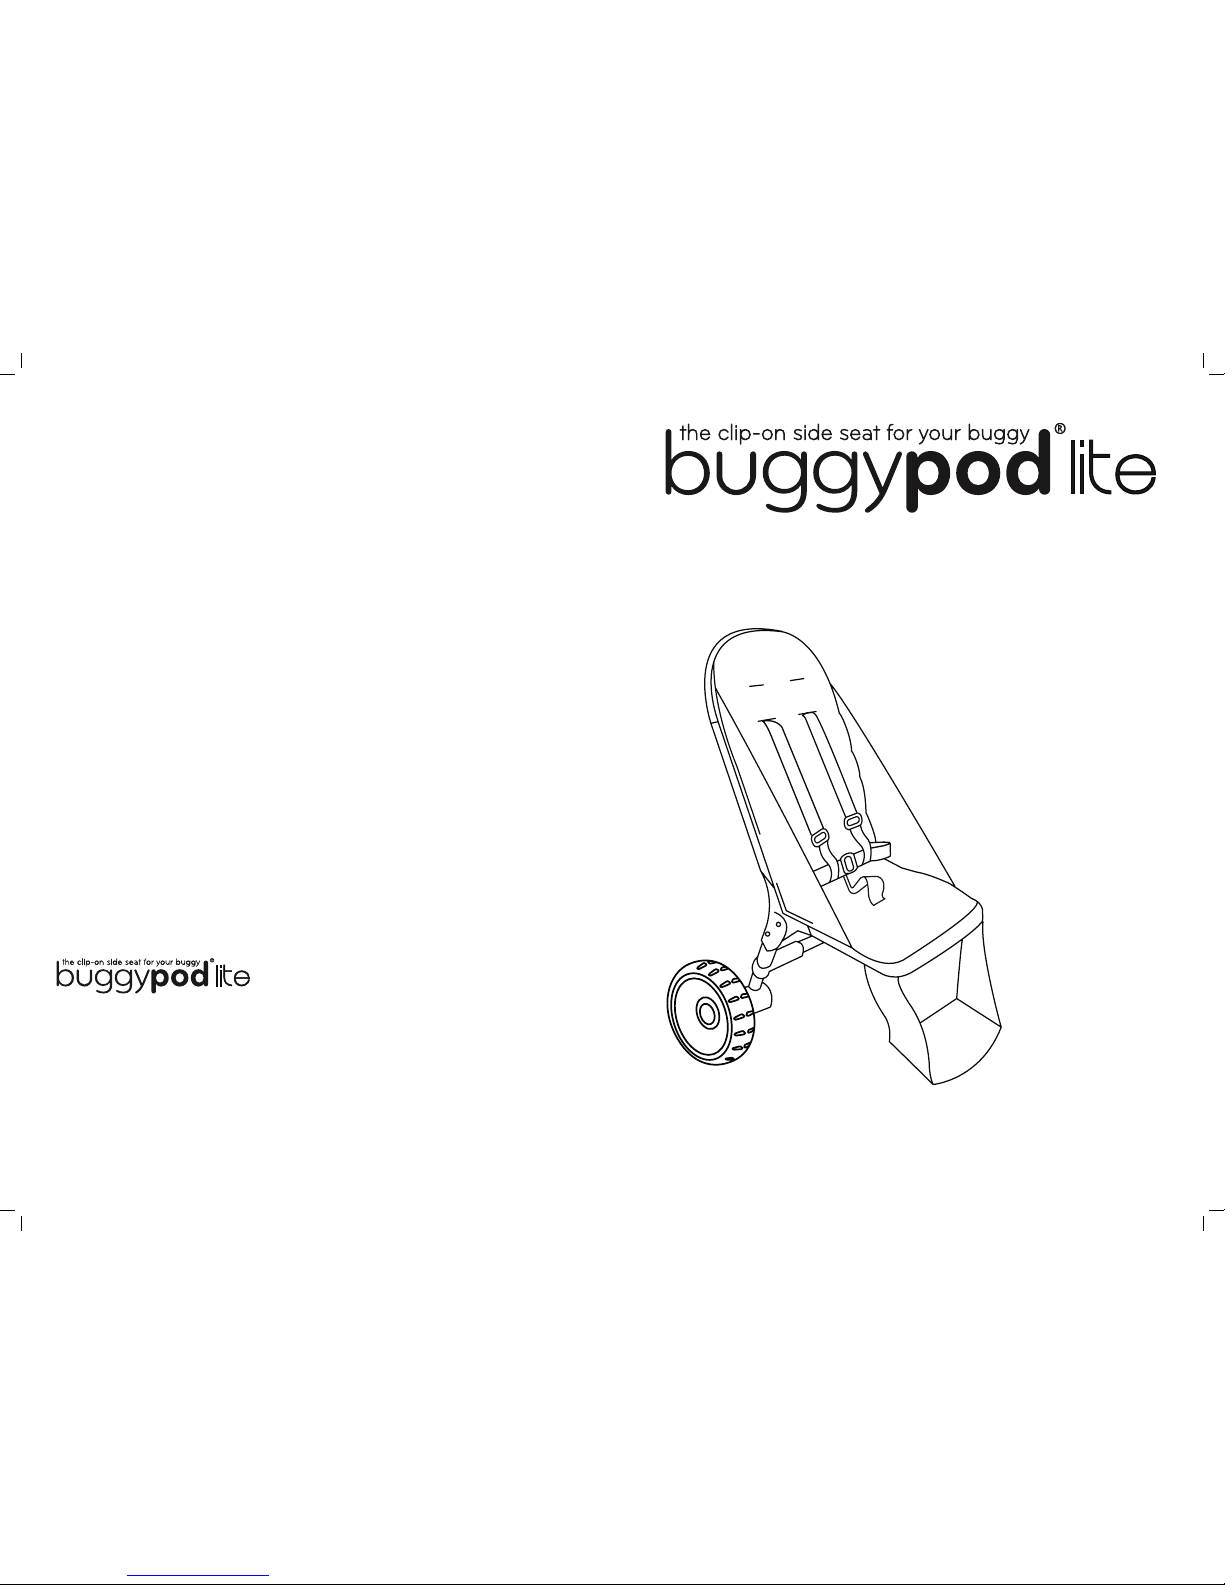
Buggypod®lite has been designed to provide a means of transporting two
children together - in the most flexible, comfortable, safe, fun - and not
forgetting stylish - way we could find.
Buggypod®lite is a clip-on seat that attaches to the side of a pushchair using
attachment brackets which fit most pushchairs. Buggypod®lite can be
folded open so that the older child can be harnessed into the seat and enjoy
a safe and comfortable ride alongside the younger child in the buggy.
When not in use, Buggypod®lite folds up flush against the side of the pushchair.
Complies with BSEN1888:2003, SOR 85/379 - Carriages and Strollers
Suitable for children from 6 months to 3+ years (max. weight 18kg/40 lb)
Not suitable for a child under 6 months
We hope you and your toddler enjoy your Buggypod®!
* available seperately
WARNING: Avoid serious injury by falling or sliding out.
Always use the safety harness.
WARNING: Placing bags, parcels and/or accessories on
the Buggypod® may cause the unit to become unstable.
WARNING: Follow the manufacturer’s instructions.
Read these instructions carefully before use and keep them for
future reference. Your child’s safety may be affected if you do not
follow these instructions.
WARNING: Put on the brakes of the host pushchair whenever parked.
WARNING: Do not leave children unattended.
It may be dangerous to leave your child unattended.
WARNING: Do not carry extra children or bags on this carriage.
WARNING: Make sure children are clear of any moving parts if
you adjust this carriage otherwise they may be injured.
WARNING: Check that the pram body or seat unit attachment
devices are correctly engaged before use.
WARNING: Ensure that all locking devices are engaged before use.
WARNING: Always use the crotch strap in combination with the waist belt.
WARNING: This product is not suitable for running or skating.
WARNING: This seat unit is not suitable for children under 6 months.

1
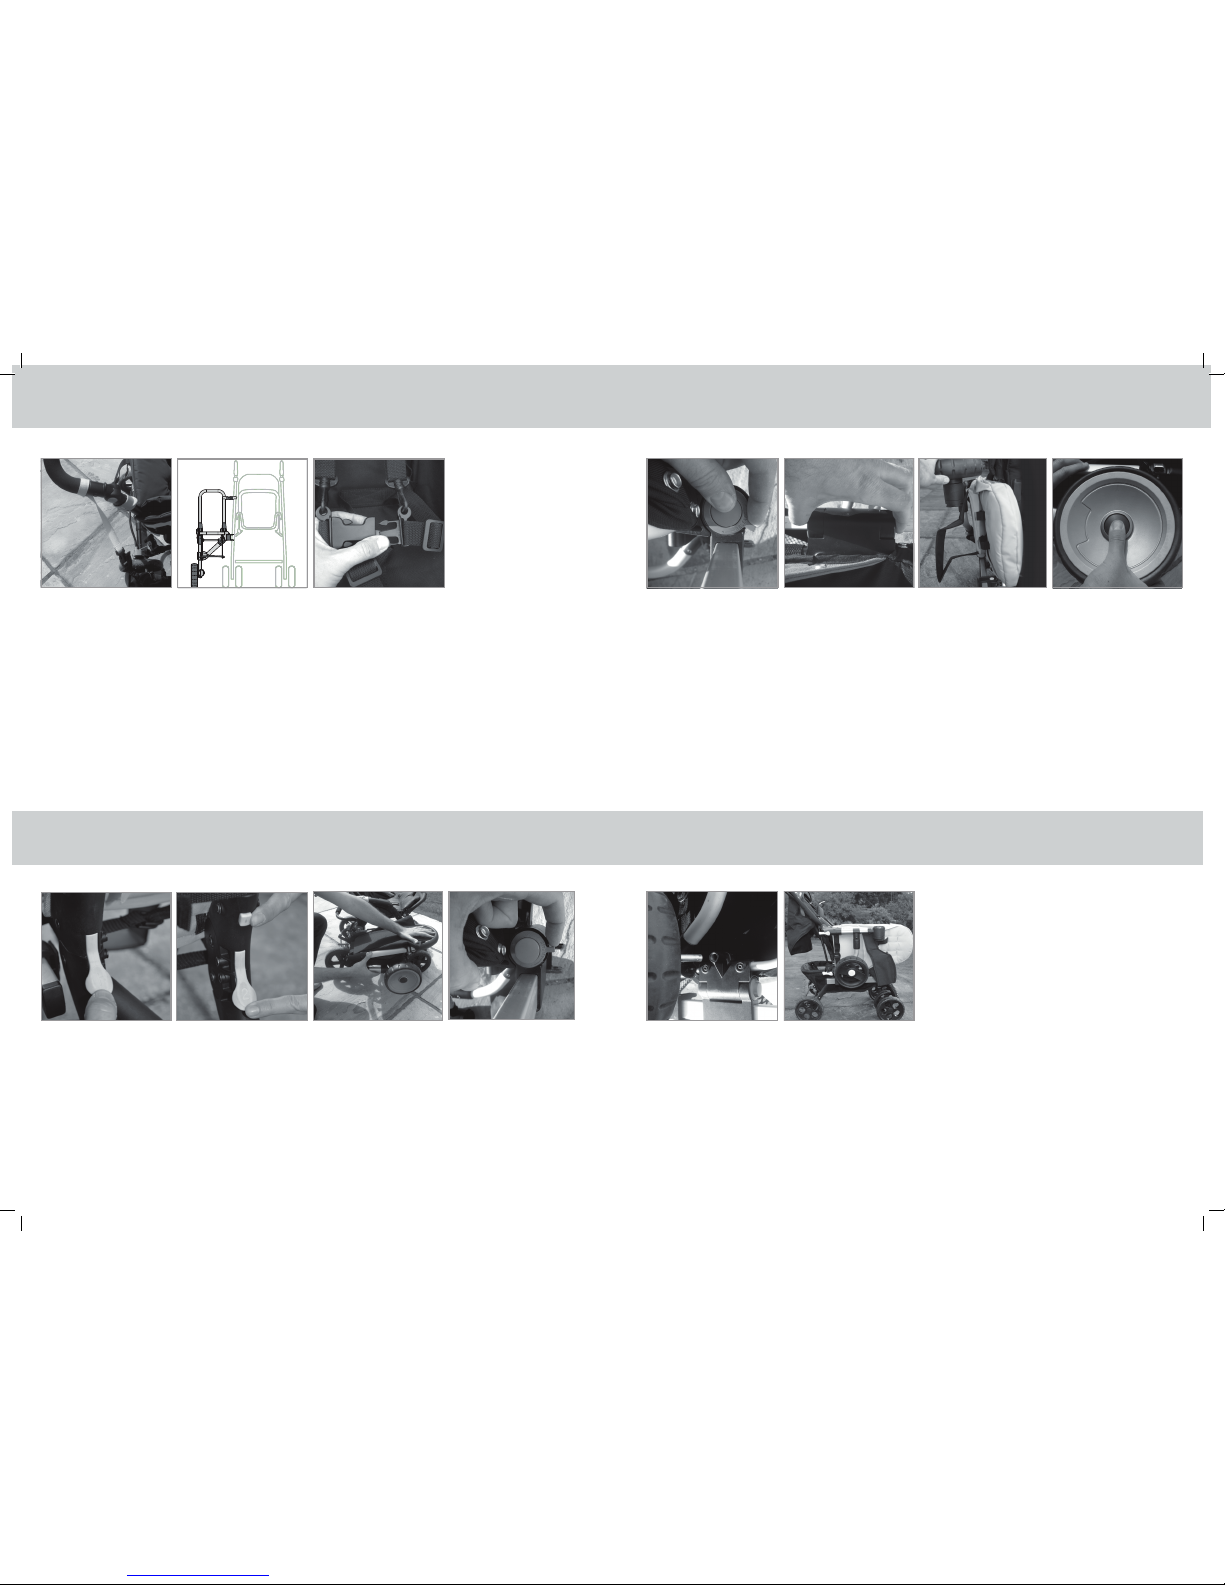
Fitting Check List
PLEASE READ BEFORE CONTINUING
• The Buggypod®lite can be attached to most buggies and pushchairs including twin pushchairs
and 3-wheelers. The mounting bracket strap can be tightened easily around most buggy
and pushchair frames. The frames can be oval, square, round, thick or thin.
• Looking at the pushchair from the rear or the front, the bars to which you intend to
attach the brackets must be vertical; otherwise the Buggypod®lite will not sit vertically.
• The mounting brackets should be attached to two major frame bars on the right hand
side of your pushchair (when viewed from the pushing position) between 29 - 41cm
from the floor and 14cm- 37.5cm apart.
• You should check that, once tted, the mounting brackets do not prevent you from
using the pushchair brakes or folding the pushchair.
For more information visit www.buggypod.com
* Available separately
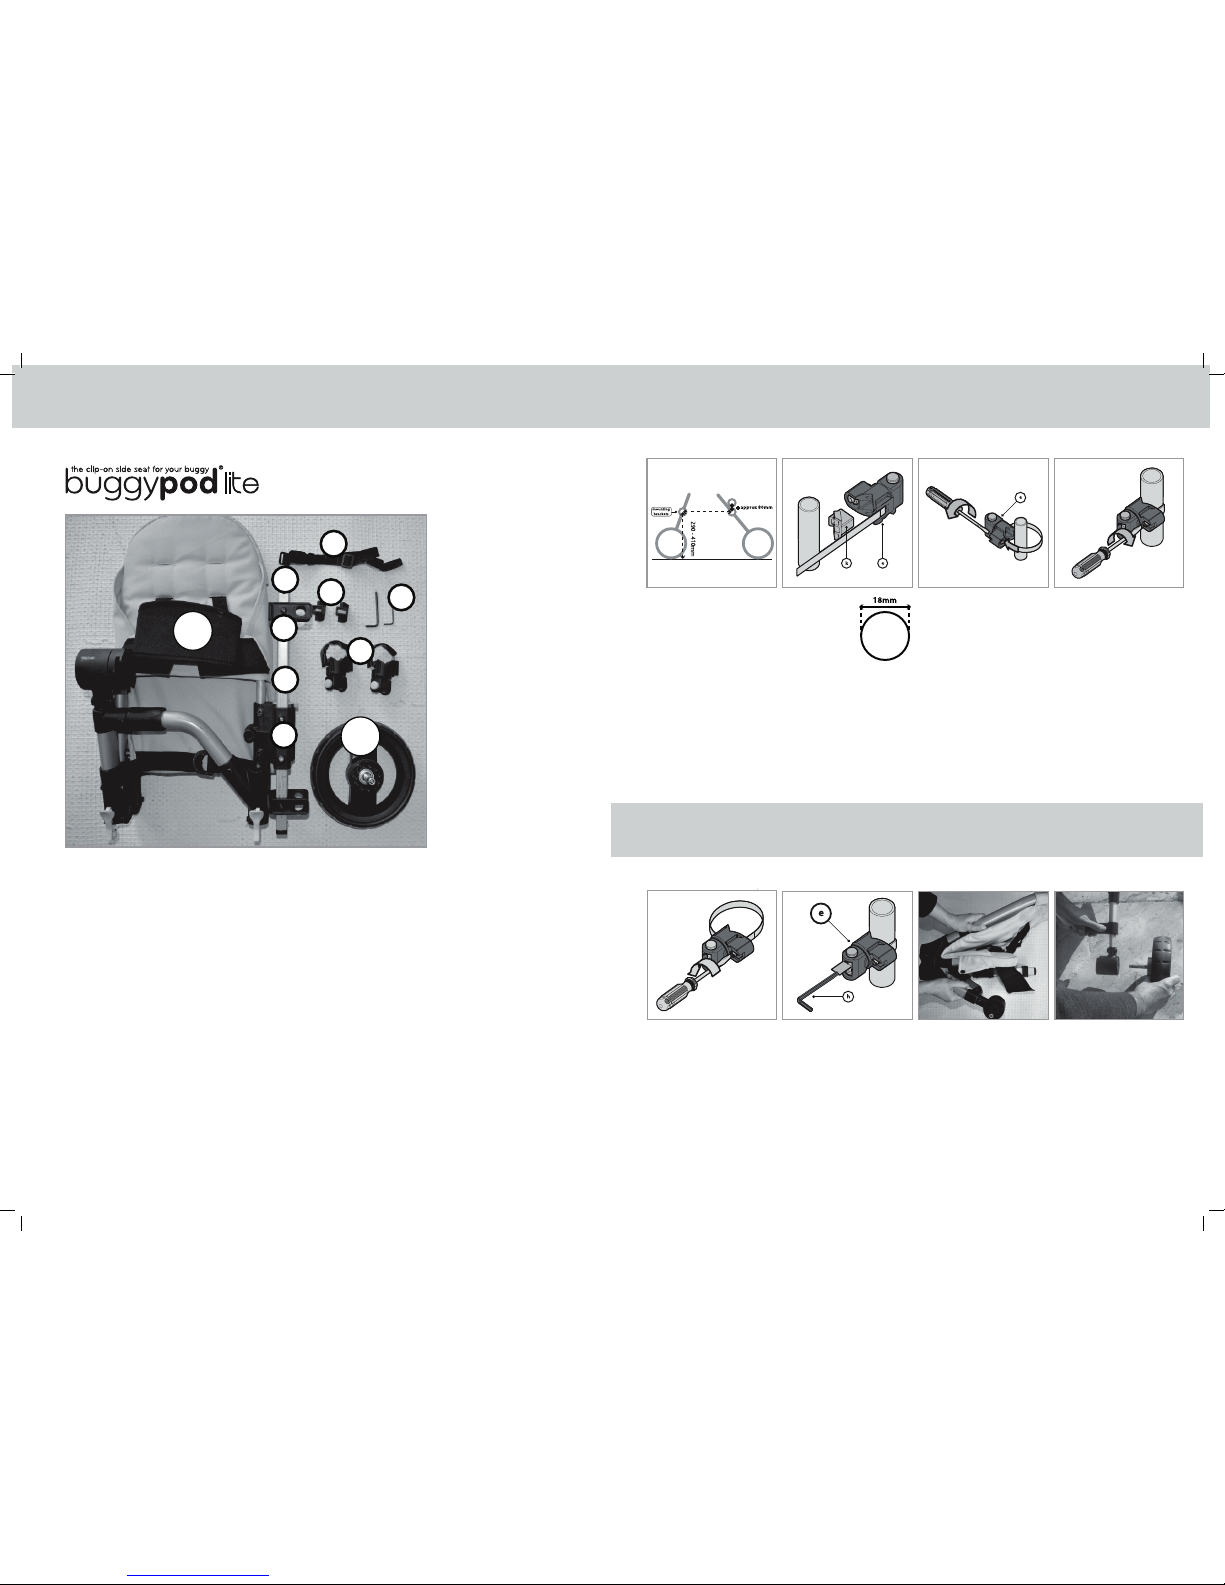
For correct installation, the mounting brackets
(Part e- see Components on page 2) need to be
positioned to allow the connector bar (c) to run
parallel to the centreline of the host pushchair.
If this is not possible, (e.g. with some 3 wheeler pushchairs),
the connector bar adaptor (d) *can be used to
ensure the connector bar is able to run parallel
to the centreline. Please see page 10 for instructions
on how to install the Buggypod®lite when using the
connector bar adaptor.
PARALLEL FITTING
1. POSITIONING THE
MOUNTING BRACKETS
2. WHEN TO USE
MOUNTING BLOCKS
3. FITTING MOUNTING
BRACKETS
4. UNFOLDING BUGGYPOD®
The mounting brackets (e) should
be fitted to two major chassis tubes
on the right hand side of the host
pushchair, between 14 to 37.5 cm apart,
and approximately 29 to 41cm from
the floor.
NOTE! The front bracket can be
fitted up to approx. 8 cm higher than
the rear bracket if it helps provide a
good connection. The Buggypod®seat
will then tilt back slightly, as with
pushchairs, and you may in any case
prefer that.
NOTE! The mounting brackets (e)
should not interfere with the braking
system or folding mechanism of your
pushchair.
If you want to make any changes to
the position of the mounting bracket,
loosen the steel band screw with a
screwdriver, re-position the mounting
bracket and re-tighten. You should try
to re-position the mounting brackets
if they interfere with the braking or
folding mechanism of the pushchair.
The mounting blocks
(k) should be used
when fitting the
mounting brackets
(e) to square-shaped
tubing or thin tubing
with a diameter less
than 18mm. They can also be used
tohelp clear folding mechanisms if
the brackets interfere with folding
the pushchair without the block fitted.
When fitting to square tubing, allow
the bracket to point diagonally to the
rear or front so that the mounting
block fits snug to the edge of
the tubing. (see www.buggypod.com/
support_fitting.php)
a. Rotate the green button head of
the mounting bracket so that it is
vertical (or perpendicular to the
connector bar (c) if front bracket is
attached higher than rear bracket).
b. Tighten the green button head with
the supplied large allen key (h)
inserted into the hole between
the buttons.
THIS MUST BE TIGHT BEFORE USE !
Once you have identified suitable
locations for the mounting brackets,
remove the green PVC cap from the
steel band tip on the mounting bracket,
turn the screw anti-clockwise to release
the bracket band from the bracket, then
wrap the steel band with the pre-fitted
black PVC friction sleeve around the
tubing at the selected height and
feed the band tip back into the
screw housing.
NOTE! Depending on the diameter
of the tubing, you should shorten the
friction sleeve with scissors so that it
does not interfere with tightening the
mounting bracket.
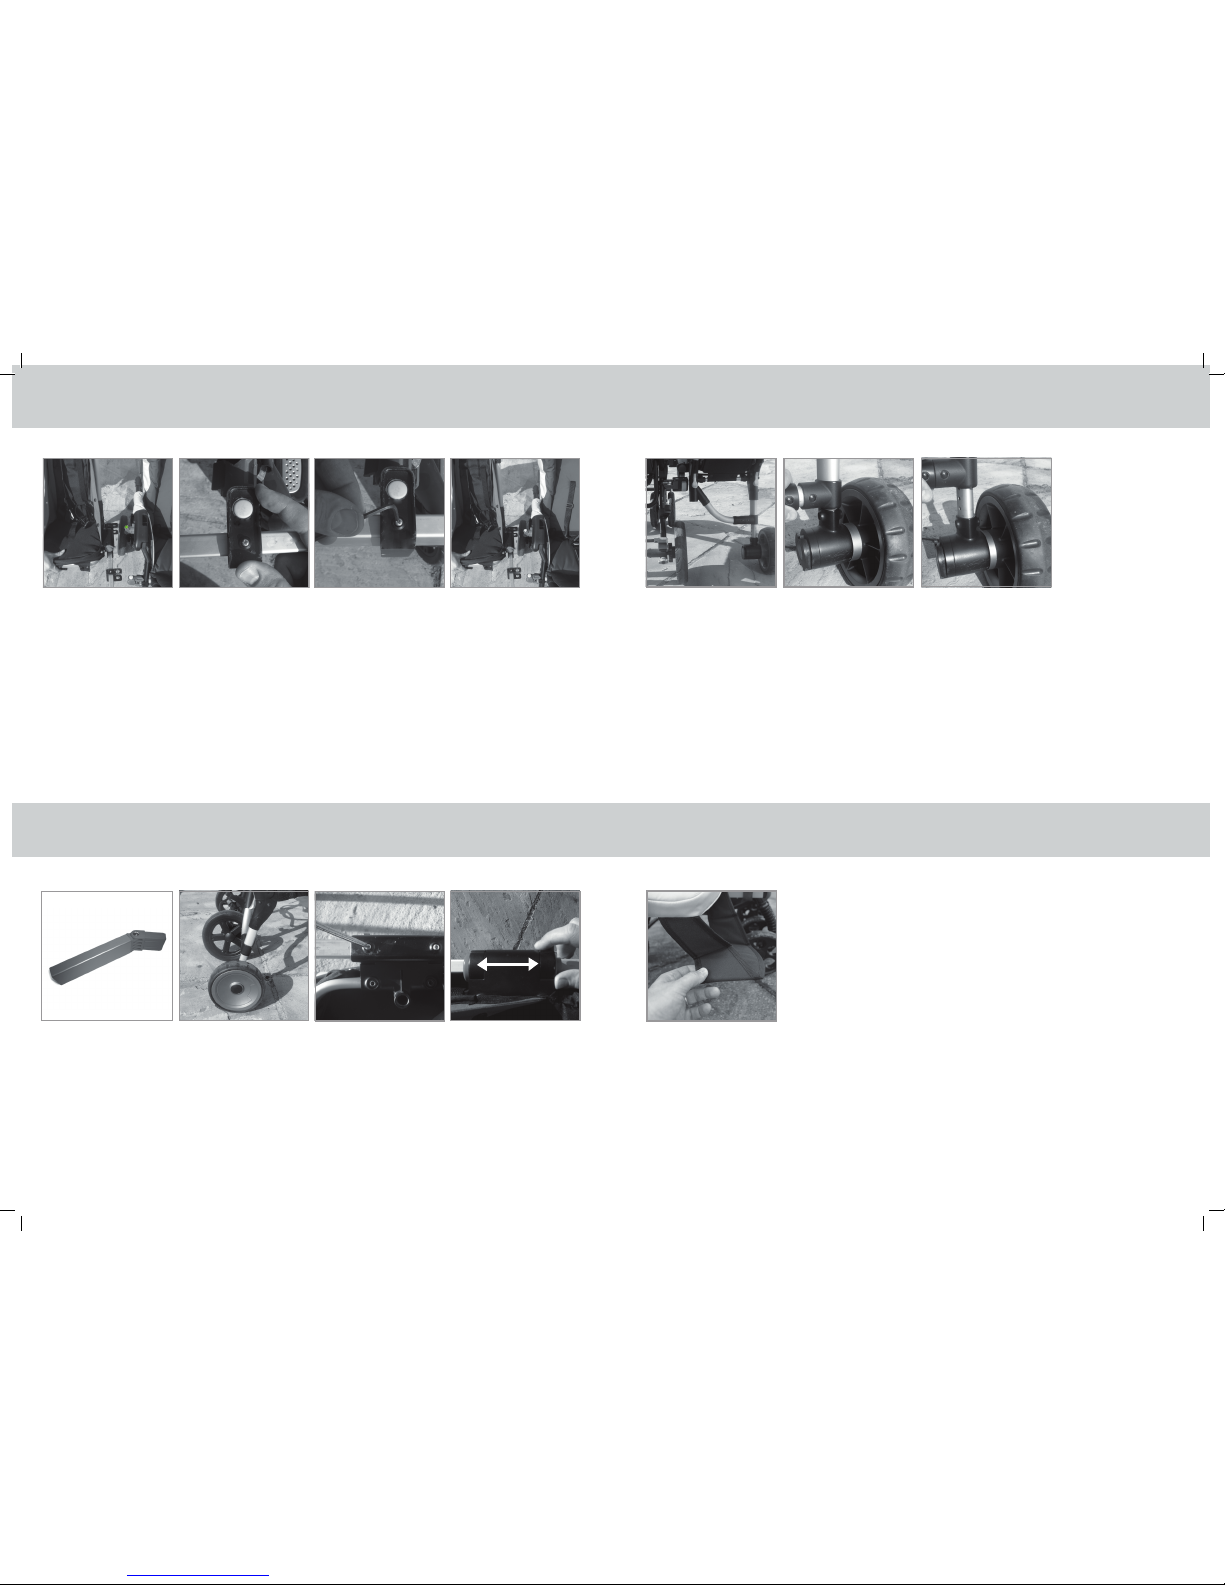
Fold open Buggypod® by simply
pulling backrest and leg apart.
The two rear locks should close
automatically
Tighten the band screw with a
flat-headed or 7mm hex-headed
screwdriver / spanner.
Slide wheel (ib) onto wheel axle until
it locks.
COMPONENTS/KOMPONENTEN/COMPONENTES
LA
IB
I
K
G
E
H
O
C
IP
Buggypod lite box contents:
1. Buggypod® lite frame and seat (part LA)
2. Wheel (IB)
3. Connector bar (C) and Mounting boss x 2 (G), prefitted to Buggypod
®
4. Mounting bracket, standard size x 2 (E)
5. Mounting block x 2 (K)
6. Allen key, small x 1 and large x 1 (H)
7. Leash (O)
8. End plug x 2 (I), pre-fitted to Buggypod
®
9. Hinge (IP)
10. User Guide
For your convenience, the Buggypod® is supplied partially assembled.
2 3
140 - 375mm
Open Footrest
5. ATTACHING BUGGYPOD®
TO PUSHCHAIR
7. SETTING HEIGHT
8. OPENING FOOTREST
Hold the Buggypod® vertically against
the mounting brackets on the host
pushchair.
NOTE ! the mounting bosses (g) are
supplied un-tightened so can slide
along the connector bar (c).
Tighten the grub screws on the
mounting bosses with the supplied
small allen key
Slide both mounting bosses, one after
the other, over the 4 green buttons on
the mounting brackets, top and
bottom.
Ensure all 4 buttons are fully in place.
Each button should produce an audible
“click” when popping through the
mounting boss holes.
Make sure the connector bar and
Buggypod are running parallel with
the centreline of the pushchair.
Make sure that, when viewed from
the rear, the Buggypod®lite seat
is level to the floor.
6. BUGGYPOD® ALIGNMENT
4 5
If the angle of your pushchair chassis
prevents this (e.g. with some 3 wheel
pushchairs or those which narrow
at the front or rear), then you should
use the connector bar adaptor (d)
available separately from stockists
(see www.buggypod.com for a
compatibility list of pushchairs
known to require the connector
bar adaptor and Appendix A for
assembly instructions).
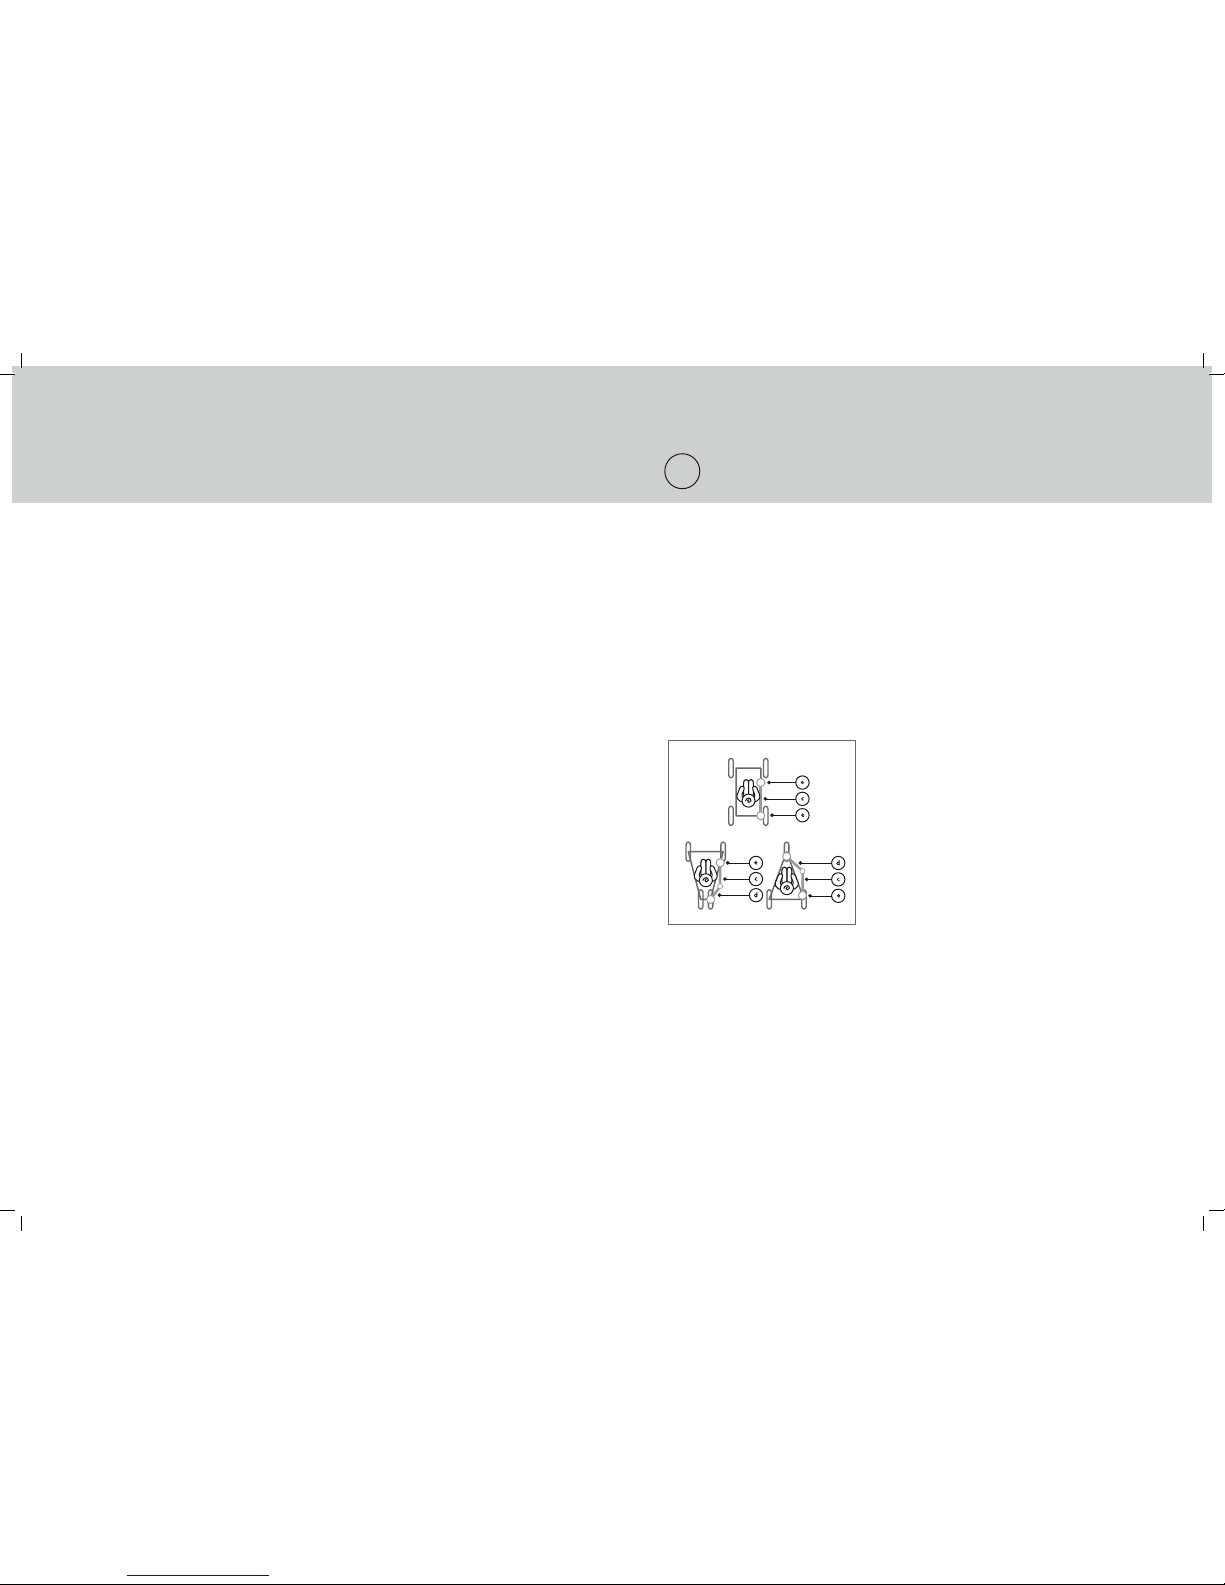
Check that Buggypod® wheel is in line
as far as possible with the pushchair
rear wheels.
If it is not, then adjust position of
mounting bosses (g) and hinge (ip)
by first loosening the grub screws,
then pushing the mounting bosses
and/or hinge as appropriate along the
connector bar until the wheel is
in line.
If it is not, adjust the leg height by
pulling back the black leg lock 5mm,
then turn down to open lock; then
shorten or lengthen the telescopi
leg as necessary. Release the leg
lock to let it snap back into place.
If it is not, adjust the leg height by
pulling back the black leg lock 5mm,
then turn down to open lock; then
shorten or lengthen the telescopic
leg as necessary. Release the leg lock
to let it snap back into place.
9. ATTACHING
LEASH
12. FOLDING UP THE BUGGYPOD®
AGAINST THE PUSHCHAIR
10. CHECKING
INSTALLATION
Optimal assembly is attained with
the Buggypod® standing level to
floor (Step 14) and the wheel in line
with the pushchair wheels (Step 13).
11. BUCKLING IN
YOUR CHILD
Ensure the brakes are applied to your
pushchair before seating your child
in the Buggypod® with the 5-point
harness. Connect the two waist buckles
with the crotch harness buckle, and
connect the shoulder straps to the waist
buckles. Adjust the length of the waist
and shoulder straps for a secure but
comfortable fit. Squeeze the tabs to
release the buckles. D-ring anchors
are located in the corners of the seat
should you wish to use an additional
safety harness (not included).
Attach the longer section of the
leash (o) to the upper tubing on
the right-hand side of the pushchair.
Loop the leash around the tubing
and thread through the buckle at least
2 x. Make sure it is anchored at a point
where it can not slip down. Attach the
shorter leash section to the upper
left side of the Buggypod® chassis,
and below the raincover/sunshade
anchor points if using those accessories.
Connect the two ends. The leash should
be taut but not pull the Buggypod® off
the ground. The leash provides upper
stability and should be connected to
the Buggypod® every time it is used
as a side-seat attached to the host
pushchair. Cut off excess leash once
fitted to avoid any entanglement
hazard. Open leash before folding
Buggypod®.
6 7
a. Press down left rear lock until it
stays down
b. Press green button above right rear
lock and then press and hold down
right rear lock.
c. Push backrest forward until
Buggypod® is fully folded into itself
d. On the hinge (p), push the green
lever down.
e. Press green button while holding
lever in position.
f. Press the other green button of hinge
while holding first green button.
g. Fold Buggypod® against side of
pushchair
h. Remove wheel from axle by
pressing button in centre
i. insert into wheel storage hole
underneath hinge.
j. Fold up footrest if required.
13. DETACHING THE
BUGGYPOD®LITE
WARNINGS
GUARANTEE
ACCESSORIES AVAILABLE FOR YOUR BUGGYPOD®
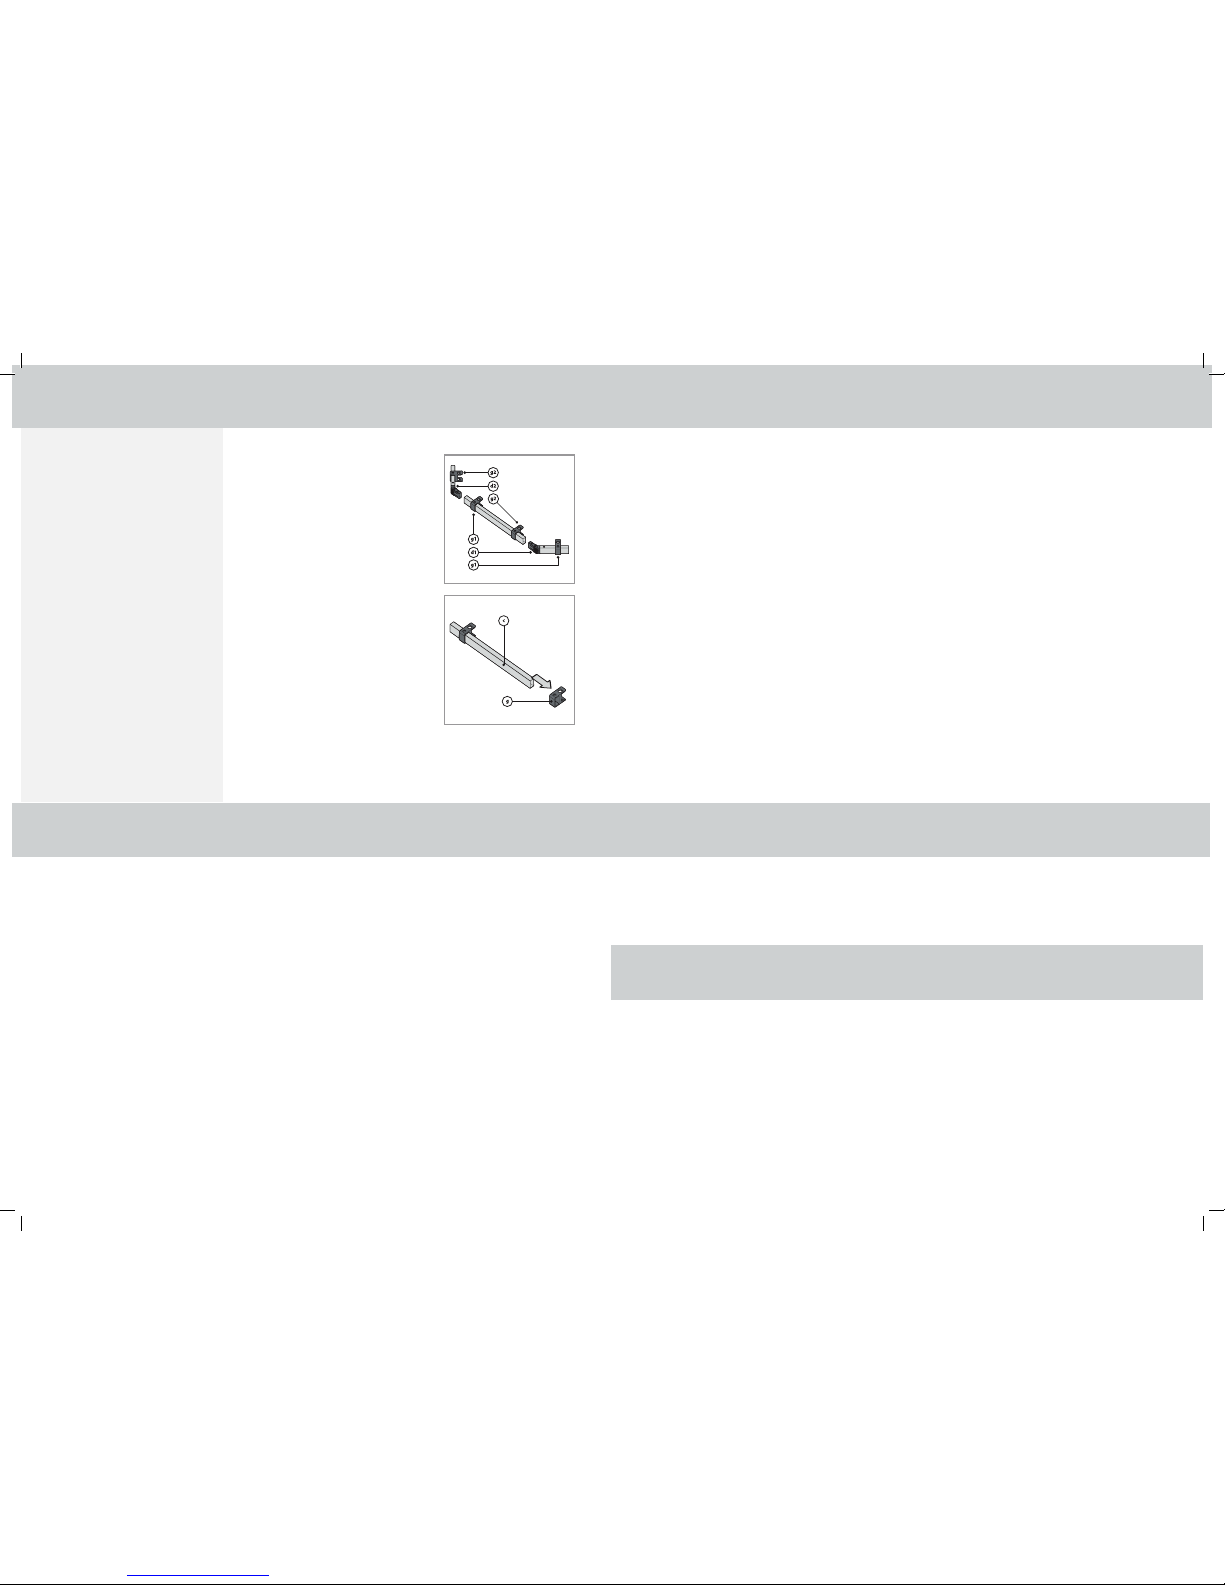
APPENDIX A: ASSEMBLY INSTRUCTIONS
USING CONNECTOR BAR ADAPTOR
The Buggypod® can be removed from
the side of the pushchair when folded or
open. It must be removed from the
mounting brackets to fold the pushchair.
a) Read FITTING CHECK LIST - PARALLEL FITTING
on p. 2 and read Step 12; then follow Steps 1
to 4.
b) Remove the end plug (i) from that end of
the connector bar (c) to which you intend
to attach the adaptor (d).
Note: the adaptor must be positioned correctly
to compensate for the lack of width at the
narrowest part of the host pushchair
(see Fitting Check List on Page 2).
Parts labelled
1. refer to a host pushchair that narrows towards
the front, parts labelled 2. refer to a pushchair
that narrows towards the rear. Make any
necessary adjustments to the location of the
mounting brackets.
c) Slide the nearest mounting boss (g) off the
connector bar (c), then attach the connector
bar to the connector bar adaptor (d)
d) Slide the mounting boss onto the adaptor
(do not tighten it) and place end plug onto
end of connector bar.
e) Follow Step 5 onwards
To maintain your Buggypod®, please follow the following procedures:
Periodically check the tightness of the mounting boss (g) screws,
the mounting bracket (e) and the main hinge (ip) screws.
After the Buggypod® has been used in the wet, remove excess water using a cloth.
Light spillages on the textile covers can be removed using a damp cloth.
Use in salty environments may cause rusting or discolouration. After use in these
conditions remove the textile covers and rinse the Buggypod® in fresh water to
remove any salt deposits. Wipe the textile covers with a damp cloth – do not rinse.
If you suspect your Buggypod® has become damaged, please contact your Revelo retailer.
Your Buggypod® may become unsafe if accessories are used from another supplier,
unless otherwise stated.
Your Buggypod® may become unsafe if replacement parts are used other than
those supplied or approved by the manufacturer.
- It may be unsafe to use replacement parts other than those supplied or approved
by the manufacturer.
- The product will become unstable if a parcel bag or rack is used.
- Take care when folding and unfolding the product to prevent finger entrapment.
- Not recommended for a child under 6 months old.
This vehicle must only be used by one child (maximum weight 18 kg/40 lb).
- A child’s safety is your responsibility. Children should be harnessed in at all times
and should never be left unattended. The child should be clear of moving parts while
making adjustments. This vehicle requires regular maintenance by the user. Overloading,
incorrect folding and the use of non-approved accessories may damage or break this vehicle.
Read the instructions.
- Each time Buggypod® is folded up against the main buggy the wheel must be clipped
off and stored on the wheel storage hole.
- Constant use may result in excessive wear and tear.
- The footrest gives your child extra comfort and leg support.
It is not meant as a step for climbing into the Buggypod®.
- Take care when using on stairs or escalators.
- Do not use near an open fire or exposed flame.
- Please ensure that the brakes of the host pushchair are applied and that the wheels
of the host pushchair are in a forward-facing locked position before putting your child
into the Buggypod®.
- No reponsibility is held for any effect on the host pushchair as
a result of incorrect installation or use.
- Buggypod® has been carefully designed, manufactured and tested. However, should it prove faulty within
12 months of purchase under normal use and in compliance with the user instructions, please return it to
the point of purchase and we shall repair it. If a repair is not possible, we shall replace it.
Proof of purchase will be required and we recommend that you retain your receipt and attach it to this User Guide.
Raincover
Sunshade
Extra set of brackets
Comfort Liners
Connector Bar Adaptor
Visit www.buggypod.com for a list of Buggypod® stockists.
LOOKING AFTER YOUR BUGGYPOD
®
8 9
10
D
Montage Checkliste
BITTE VOR DEM FORTFAHREN LESEN
• Der Buggypod® lässt sich an den meisten Buggy- und Kinderwagenrahmen befestigen.
Dies gilt auch für dreirädrige und Zwillingskinderwagen. Die Stahlbänder der Halterungen können
einfach um die Rahmen der meisten Buggys und Kinderwagen herum befestigt werden.
Der Querschnitt des Rahmens kann oval, quadratisch, rund, dick oder dünn sein.
• Wenn der Kinderwagen von vorne oder von hinten betrachtet wird, müssen
die Stangen, an denen die Halterungen befestigt werden sollen, vertikal sein;
ansonsten wird sich der Buggypod® nicht in einer vertikalen Position befinden.
• Die Halterungen müssen an zwei wesentlichen Rahmenteilen an der rechten Seite Ihres
Kinderwagens (aus Schiebeposition gesehen) 29-41cm vom Boden und mit einem Abstand
von 14-37.5cm befestigt werden.
• Nach Montage der Halterungen müssen Sie überprüfen, ob diese nicht den Betrieb
der Bremsen des Kinderwagens oder das Zusammenfalten des Kinderwagens behindern.
Weitere Informationen erhalten Sie bei Besuch unserer Webseite www.buggypod.com
* Separat erhältlich
Zur korrekten Installation müssen die Halterungen (Teil (e)
– siehe Komponenten auf Seite 1) so positioniert werden,
dass die Verbindungsstange (c) parallel zur Mittellinie
des eigentlichen Kinderwagens verläuft. Ist dies mit den
Halterungen alleine nicht möglich (z.B. bei dreirädrigen
Kinderwagen), so muss der Verbindungsstangenadapter
(d) benutzt werden, um sicherzustellen, dass die
Verbindungsstange parallel zur Mittellinie verläuft. Bitte
befolgen Sie die Anweisungen auf Seite14, wenn Sie den
Verbindungsstangenadapter zur Befestigung des
Buggypod® verwenden.
PARALLELE MONTAGE

1. POSITIONING THE
MOUNTING BRACKETS
2. WHEN TO USE
MOUNTING BLOCKS
3. FITTING MOUNTING
BRACKETS
4. AUFKLAPPEN DES BUGGYPOD®
Die Halterungen (e) müssen an zwei
wesentlichen Chassisrohren an der rechten
Seite Ihres Kinderwagens 29 bis 41cm vom
Boden und mit einem Abstand von etwa
14 bis 37,5 cm befestigt werden.
ANMERKUNG! Die vordere Halterung
kann bis zu etwa 8cm höher als die
hintere montiert werden, wenn dadurch
eine bessere Verbindung geschaffen
werden kann. Der Buggypod® Sitz ist
dann, wie beim Kinderwagen, leicht
nach hinten geneigt, was Sie sowieso
bevorzugen können.
ANMERKUNG! Die Halterungen (e)
dürfen das Bremssystem oder den
Faltmechanismus Ihres Kinderwagens
auf keinen Fall behindern.
Wenn Sie die Positionen der
Halterungen ändern möchten,
müssen die Bandschrauben mit einem
Schraubenzieher gelöst, die Halterungen
verschoben und dann die Schrauben
wieder angezogen werden. Die
Halterungen müssen neu positioniert
werden, wenn sie die Bremsen oder den
Faltmechanismus Ihres Kinderwagens
stören.
Die Halterungsblöcke
(k) müssen verwendet
werden, wenn
die Halterungen
an Rahmen mit
quadratischem
Querschnitt oder
dünnem Rohr mit einem Durchmesser
von weniger als 18mm befestigt
werden. Sie können auch benutzt
werden, Abstand zum Faltmechanismus
zu schaffen, wenn die Halterungen
ohne die Blöcke den Faltmechanismus
behindern. Bei Befestigung an
Quadratrohren müssen die Halterungen
diagonal nach vorne oder hinten weisen,
sodass der Halterungsblock sicher an
der Kante des Rohrs anliegen kann.
(siehe www.buggypod.com/support_
fitting.php).
a. Drehen Sie den roten Halbrundkopf
auf der Halterung so, dass er vertikal
steht (oder im rechten Winkel zur
Verbindungsstange (c) ist, wenn
die vordere Halterung höher als die
hintere angebracht ist).
b. Die grüne Halbrundschraube mit dem
mitgelieferten, in das Loch zwischen
den Knöpfen eingeführten, großen
Inbusschlüssel (h) anziehen.
DIES MUSS VOR NUTZUNG
ANGEZOGEN WERDEN !
Wenn Sie einen geeigneten Ort für die
Halterungen gefunden haben, die grüne
Kappe vom Ende des Stahlbandes der
Halterung entfernen, die Schraube im
Gegenuhrzeigersinn zum Lösen des
Bandes von der Halterung drehen, dann
das Stahlband mit dem vormontierten
schwarzen PVC-Reibband um das Rohr
in gewünschter Höhe wickeln und das
Stahlband in das Schraubengehäuse
einführen.
ANMERKUNG! In Abhängigkeit vom
Rohrdurchmesser muss das Reibband
mit einer Schere gekürzt werden,
sodass das Anziehen der Halterung
nicht behindert wird.
Den Buggypod® durch Auseinanderziehen
von Rückenlehne und Bein aufklappen.
Die Bandschraube mit einem
Flachschraubenziehen oder 7mm
Sechskant-Schraubenschlüssel anziehen.
Schieben Sie das Rad (ib) soweit auf die
Achse, bis es einrastet.
KOMPONENTEN
IB
IP
Inhalt der Box Ihres Buggypod®lite:
1. Buggypod® lite Rahmen und Sitz (Teil LA)
2. Rad (IB)
3. Verbindungsstange (C) und Halterungsgegenstück x 2 (G), am Buggypod® vormontiert
4. Halterung, Standardgröße x 2 (E)
5. Halterungsblock x 2 (K)
6. Inbusschlüssel, klein x 1 und groß x 1 (H)
7. Verbindungsriemen (O)
8. Verschlussstopfen x 2 (I), am Buggypod® vormontiert
9. Gelenk (IP)
10. Bedienungsanleitung
für Ihre Bequemlichkeit, wird das Produkt teilweise zusammengebaut geliefert.
11 12
1. POSITIONIEREN DER
HALTERUNGEN
3. MONTAGE DER
HALTERUNGEN
2. WENN HALTERUNGSBLÖCKE
BENUTZT WERDEN MÜSSEN
140 - 375mm
LA
IB
I
K
G
E
H
O
C
IP

5. BUGGYPOD AM
KINDERWAGEN BEFESTIGEN
7. HÖHE EINSTELLEN
8. ÖFFNEN DER
FUSSAUFLAGE
Halten Sie den Buggypod® vertikal
gegen die am Kinderwagen befestigten
Halterungen.
ANMERKUNG ! Die
Halterungsgegenstücke (g) werden
nicht-angezogen geliefert und können
auf der Verbindungsstange (c)
verschoben werden.
Die Madenschrauben auf den
Halterungsgegenstücken mit dem
mitgelieferten keinen Inbusschlüssel
anziehen.
Schieben Sie die beiden
Halterungsgegenstücke eines nach
dem anderen über die 4 grünen Knöpfe
auf den Halterungen, oben und unten.
Sicherstellen, dass alle 4 Knöpfe ganz
in ihrer Position sind.
Stellen Sie sicher, dass die
Verbindungsstange und der Buggypod
parallel zur Mittellinie des Kinderwagens
sind.
Stellen Sie sicher, dass der Sitz des
Buggypod® parallel zum Boden ist,
wenn von hinten betrachtet.
6. AUSRICHTEN DES BUGGYPOD®
13 14
Wenn der Winkel des Chassis Ihres
Kinderwagens (z.B. bei einigen
3-rädrigen Kinderwagen oder solchen,
die vorne oder hinten schmaler sind)
dies verhindert, dann müssen Sie
den Verbindungsstangenadapter (d)
verwenden, der separat von Ihrem
Fachhändler erhältlich ist (auf der
Webseite www.buggypod.com finden
Sie eine Liste der Kinderwagen, von
denen bekannt ist, dass der Adapter
benötigt wird, und im Anhang A nden
Sie die Montageanweisung).
Überprüfen Sie, dass das Rad des
Buggypod so weit möglich in einer
Linie mit den Hinterrädern des
Kinderwagens ist.
Wenn es nicht auf einer Linie ist, die
Position der Halterungsgegenstücke
(g) und des Gelenks (ip) entsprechend
ändern, indem zuerst die
Madenschrauben gelöst und dann
Halterungsgegenstücke und/oder Gelenk
soweit entlang der Verbindungsstange
verschoben werden, bis es sich auf einer
Linie befindet.
Wenn nicht, muss die schwarze
Beinverriegelung zur Einstellung der
Beinhöhe 5mm herausgezogen und
dann nach unten gedreht werden,
um die Verriegelung zu lösen; das
Teleskopbein entsprechend verlängern
oder verkürzen. Verriegelung lösen und
einrasten lassen.
 Loading...